
MD42598 - Television MEDION - Free user manual and instructions
Find the device manual for free MD42598 MEDION in PDF.
| Product type | Plasma television |
| Brand and model | Medion MD42598 |
| Screen diagonal | 106 cm (42 inches), 16:9 format |
| Resolution | 848 x 480 pixels |
| Dimensions (with stand) | 700 x 1041 x 200 mm |
| Total weight | 31.7 kg |
| Power supply | 230 V AC ±10%, 50/60 Hz, 300 W typical, 5 W standby |
| Viewing angle | 160° horizontal and vertical |
| Contrast ratio | 3000:1 typical |
| Video standards | PAL / SECAM / NTSC |
| Color support | 16.7 million colors |
| Video inputs | 2 x SCART (1 RGB), Y/C (S-Video), YUV/CVBS (3 x Cinch), DVI-I (analog and digital) |
| Audio inputs | 3 x Cinch (L/R) for YUV, YC, PC; 2 x SCART |
| Audio outputs | 1 x Cinch (LINE OUT), 1 x Subwoofer, speakers 2 x 7 W RMS |
| TV tuner | PAL (BG, I, DK, M, L/L'), SECAM, 47 - 861 MHz |
| Image formats | 4:3, 16:9, Panorama, Full screen, User zoom (40% - 160%) |
| Special functions | Teletext, PIP (Picture in picture), Freeze frame, Sleep timer, Dynamic noise control |
| Operating temperature | 5 °C to 35 °C |
| Maintenance and cleaning | Turn off and unplug before cleaning; use a soft slightly damp cloth; avoid chemical products |
| Safety | Do not open the device; do not expose to moisture; leave at least 10 cm of ventilation space on the sides and 30 cm above |
| Spare parts and repairability | Contact after-sales service; no user repair |
| Included accessories | Power cable, video cable, remote control, LR03 batteries, user manual |
Frequently Asked Questions - MD42598 MEDION
User questions about MD42598 MEDION
0 question about this device. Answer the ones you know or ask your own.
Ask a new question about this device
Download the instructions for your Television in PDF format for free! Find your manual MD42598 - MEDION and take your electronic device back in hand. On this page are published all the documents necessary for the use of your device. MD42598 by MEDION.
USER MANUAL MD42598 MEDION
[2950-4042-C217Rev.00]
Inhaltsverzeichnis
| PAL BG | PAL I | PAL DK | SECAM L | SECAM DK |
| Austria | UK | Czech | France | Bulgaria |
| Belgium | Ireland | Hungary | Luxembourg | Russia |
| Denmark | Poland | Ukraine | ||
| Finland | Slovakia | |||
| Germany | ||||
| Greece | ||||
| Italy | ||||
| Luxembourg | ||||
| Netherlands | ||||
| Norway | ||||
| Rumania | ||||
| Portugal | ||||
| Slovenia | ||||
| Spain | ||||
| Sweden | ||||
| Switzerland | ||||
| Turkey |
Grosse/diagonal:106cm(42"),16:9Format
DarstellbareBildgroBe:920mm(horizontal)x518mm(vertical)
Horizontalfrequency:
Vertikalfrequency:
Clockfrequenz:
Auflösungen:
- Standards 2
- Safety directions 2
2.1 Information for your safety 2.
2.2 General information 3
- Overview 5
3.1 Scope of supply 5
3.2 Connection sockets 6
3.3 Control buttons and functions of the remote control 7
3.4 Control buttons on the unit 7
- Initial operation 8
4.1 Unpacking and installing 8
4.2 Connecting and switching on 10
4.3 OSD menu Operator Control 11
4.4 Basic settings OSD menu 12
4.5 Settings for initial operation 13
- Everyday operator control 16
5.1 Switching on/off 16
5.2 Setting the volume 16
5.3 Setting the picture 17
5.4 Television mode 18
5.5 PC mode 19
5.6 Operation with additional devices 19
5.7 Special functions 19
- Troubleshooting 22
- Technical specifications 23
1.Standards
ThisdisplayisaninformationdeviceandcomplieswiththefollowingdirectivesandstandardsoftheEuropean Union:
89/336/ECCE of 03 May 1989 with subsequent modifications (directive 92/31/ECCE of April 1992 and directive 93/68/ECCEof22July1993)
73/23/ECCEof19February 1973withsubsequentmodifications(directive93/68/ECCEof 22July1993)
EN55013,EN55020,EN61000-3-2/-3(ElectroMagneticCompatibility)
- EN60065(SafetyRequirements).
Conformitywiththerequirementsiscertifiedbythedesignationon
theproduct.
Themanufacturer cannot beheld liable for operation outside of the operating conditions as described in these operating instructions. Your product liability and warranty claimssshallalsolapseduebythis.
2.Safetydirections
Read and take heed of the safety directionss that when used in compliance with the intended use there is no danger to your health. Installation and connection errors,scandamagethe unitor any devices connected to it. Take heed of the warnings and directions on the unit and in this operating manual. Never allow children to use electrical appliances without supervision.
2.1 Informationforyoursafety
Neveroperatedisplayenvironmentalconditionsthatdifferfromthetechnicalspecificationsinthismanual. Differingconditionscancauseanelectricalhazard,fireorfailureoftheunit.
Protect the display against moisture. This includes continuous high levels of air humidity, proximity to water, dripping water, spray water and rain. Do not put any vessels that are filled with water, e.g. vases, on the unit. If you connect an external aerial, please ensure that nowater can penetrate the cableinfeed.
Dangerofelectricshockandirreparabledamagetotheunit.
Protecttheunitagainsstheat,heataccumulationanddirectsunlight.Avoidproximitytofire,heatsourcesandovens.
Maintain sufficient space above and below the ventilation slits and on the sides away from furniture and the ceiling. Do not drapecurtainsovertheunit.
Thereisadangeroffireduetooverheating.
Mainsconnectionandoperatorcontrol
The display is completely disconnected from the electrical mainsonly when themains switchisswitchedoffandthemains cable is pulled out of the unit or the plug is pulled out of the plug receptacle. Connect the display only to a plug receptacle that has been installed in compliance with regulations with hearing contacts, themains voltage of which complies with the technical specifications of the unit. Ensure that the mainplug and plug receptacle are accessible at all times. Differing conditions can cause anelectrical hazard, fireor failure of the unit.
Useonlythemainscablesupplied.
Never remove the plug from the receptacle by pulling the actual mains cable. Avoid laying the mains cable in the vicinity of photobjects.
Dangeroffireandelectricshock.
If absent for a long period of time or if there is lightning, for safety reasons pull the mains plug out of the receptacle and the building's aerialplugoutoftheaerialsocket.
This is a precautionary measure to prevent a possible fire, avoid damage to the unit and the danger of an electric shock.
Always switch off the display and the signal source before connecting the two units.
Dangerofolectricshock.
The display is equipped with an attached glass filter plate. If the unit is exposed to an excessive load, e.g. due to shock, vibration, bending or heat shock, the glass surface can break. Do not subject the glass surface to any pressure or knocks. If the glass is cracked, pulloutthemainsplugimmediatelyanddonottouchthefragmentswithyourbarehands.
Dangerofinjuryfromsharp-edgedglassfragments.
2.2Generalinformation
The display you have purchased meets the highest quality requirements in this product segment and has been checked for pixel defects. Despite taking the greatest care during production of these units, for technological reasons it cannot be excluded absolutely that thereares some pixels with defects.
Werequestyourunderstandingforthefactthatschdefects,providedthattheyarewithinthelimitsspecifiedbythe standard,cannotbeconsideredtobeasanappliancedefectinthetermsoftthewarranty.
Onplasmadisplaysthelightemissionreduceswithincreasingusageduration.
Plasmadisplaysoperateonthebasisofphosphorus.Withthistechnologyscreenburnscanoccurundertcain conditions.Thefollowingareexamplesofsuchoperatingconditions:
- longsustaineddisplayofastillimage
- constantdisplayofthesamebackground
- use of a format that does not fill the display screen (e.g. 4:3) over a long period of time.
Asaruleoncescreenburnshaveoccurringtheycannotbereversed.
Toavoidorreducescreenburnspleasetakeheedofthefollowingdirectionsandrecommendations:
- during the first 100 operating hours mainly moving images or frequently changing still images should be displayed asafullscreen
-useyourdisplayinfullscreenformat(16:9) - whenusingaPCdisplayalwaysactivatethescreenshotaver
displaymovingimagesasfaraspossible
alwayssswitchthethisplaywhenitisnotbeingused
reduceasmuchaspossiblethecontrastandbrightness - whereverpossible displayimageswithlotsofcoloursandcolourshades.
Certain conditions can cause your display to hum. The humming generally comes from the mains voltages supply and can occur through the connection of different earth conductors. You can provide aremedy by putting gaso-called sheath current filter between the incoming aerial lead and the aerial input socket on the display. Sheath current filters are available in the retail trade in the formofasmallinlineplug.
For technical reasons the unit can generate noise inside itself. However, this must not exceed the value specified in the appliancespecification.
If your display is connected to an external aerial, the latter must be earthed as protection against electric shocks and static charging. Theearthingmustcomplywiththevalidregulations.
Faults
Ifthedisplayisdamaged,disconnectthemainsplugfromtheplugreceptacle.
Pulloutthemainsplug,iftheunitgivesoffsmoke,anunpleasantodouranyunusualnoises.Proceedinthesameway if the display is no longer able to display an image after switching on or during operation. Do not attempt to continue operatingthedisplayinthiscondition.
Undernocircumstanceshouldyouopentheunityyourself.Insiderthedisplaytherearenopartsthatcanbeservicedor replacedbyyou.Contactourservicehotlineoranothersuitabletechnicalworkshop.
Cleaningandcare
Before installation, cleaning or care, switch off the unit and pull the mains plug out of the plug receptacle. Wait for several minutes so that the capacitors in the unit can fully discharge, because the display generates a high voltage internally for the gas discharge.
Forcleaninguseonlyaslightlymoistenedsoftcloth. You should avoid chemical solvents and cleaning agents because they can damage the surfaces.
Immediately pull out the mains plug, if foreign bodies such as water, other liquids, metal parts etc. get into the display. Never attempt to reach into the unit with any object or with your hands.
Dangerofoelectricshock.
Batteries
Alwaystakeusedbatteriesoutoftheremotecontrolimmediately,becausetheywillleakandcanthereforecausedamage.
The enclosed batteries must not be charged or reactivated by any other means and must not be taken apart, thrown into fire or short-circuited.
Donotputdeadbatteriesinyourhouseholdwaste.Thebatteriesmustbedisposedofatcollectionpointsprovidedfor thispurpose.
Otherdirections
Forergonomicreasonswerecommendthatyouavoidtheuseofredorbluefontssymbolsdarkbackgrounds.On accountofthepoorcontrastsuchadisplaycausespoorlegibilityandcausesearlyeyefatigue.Thereforepleaseuse displaystatarichincontrast,e.g.blackfontonwhitebackground.
To avoid aching eyes and obtain an optimized viewing distance, the distance from the unit should be five to six times the display's diagonal dimension. In your television room it should be so light that you could also read. The contrast is lost with too much brightness. Too little light strains the eyes due to the alternation between light and dark on the display.
Whenconnectingexternalloudspeakerstakeheedthetechnicalspecificationsoftheloudspeakeroutput.lfthe loudspeakersareinsufficientlydimensioned,theloudspeakersand/orintegratedamplifierscanberuined.
Packingandauxiliarypackagingthatisnolongerequiredarerecyclableandshouldalwaysbesentforrecycling.

3.Overview
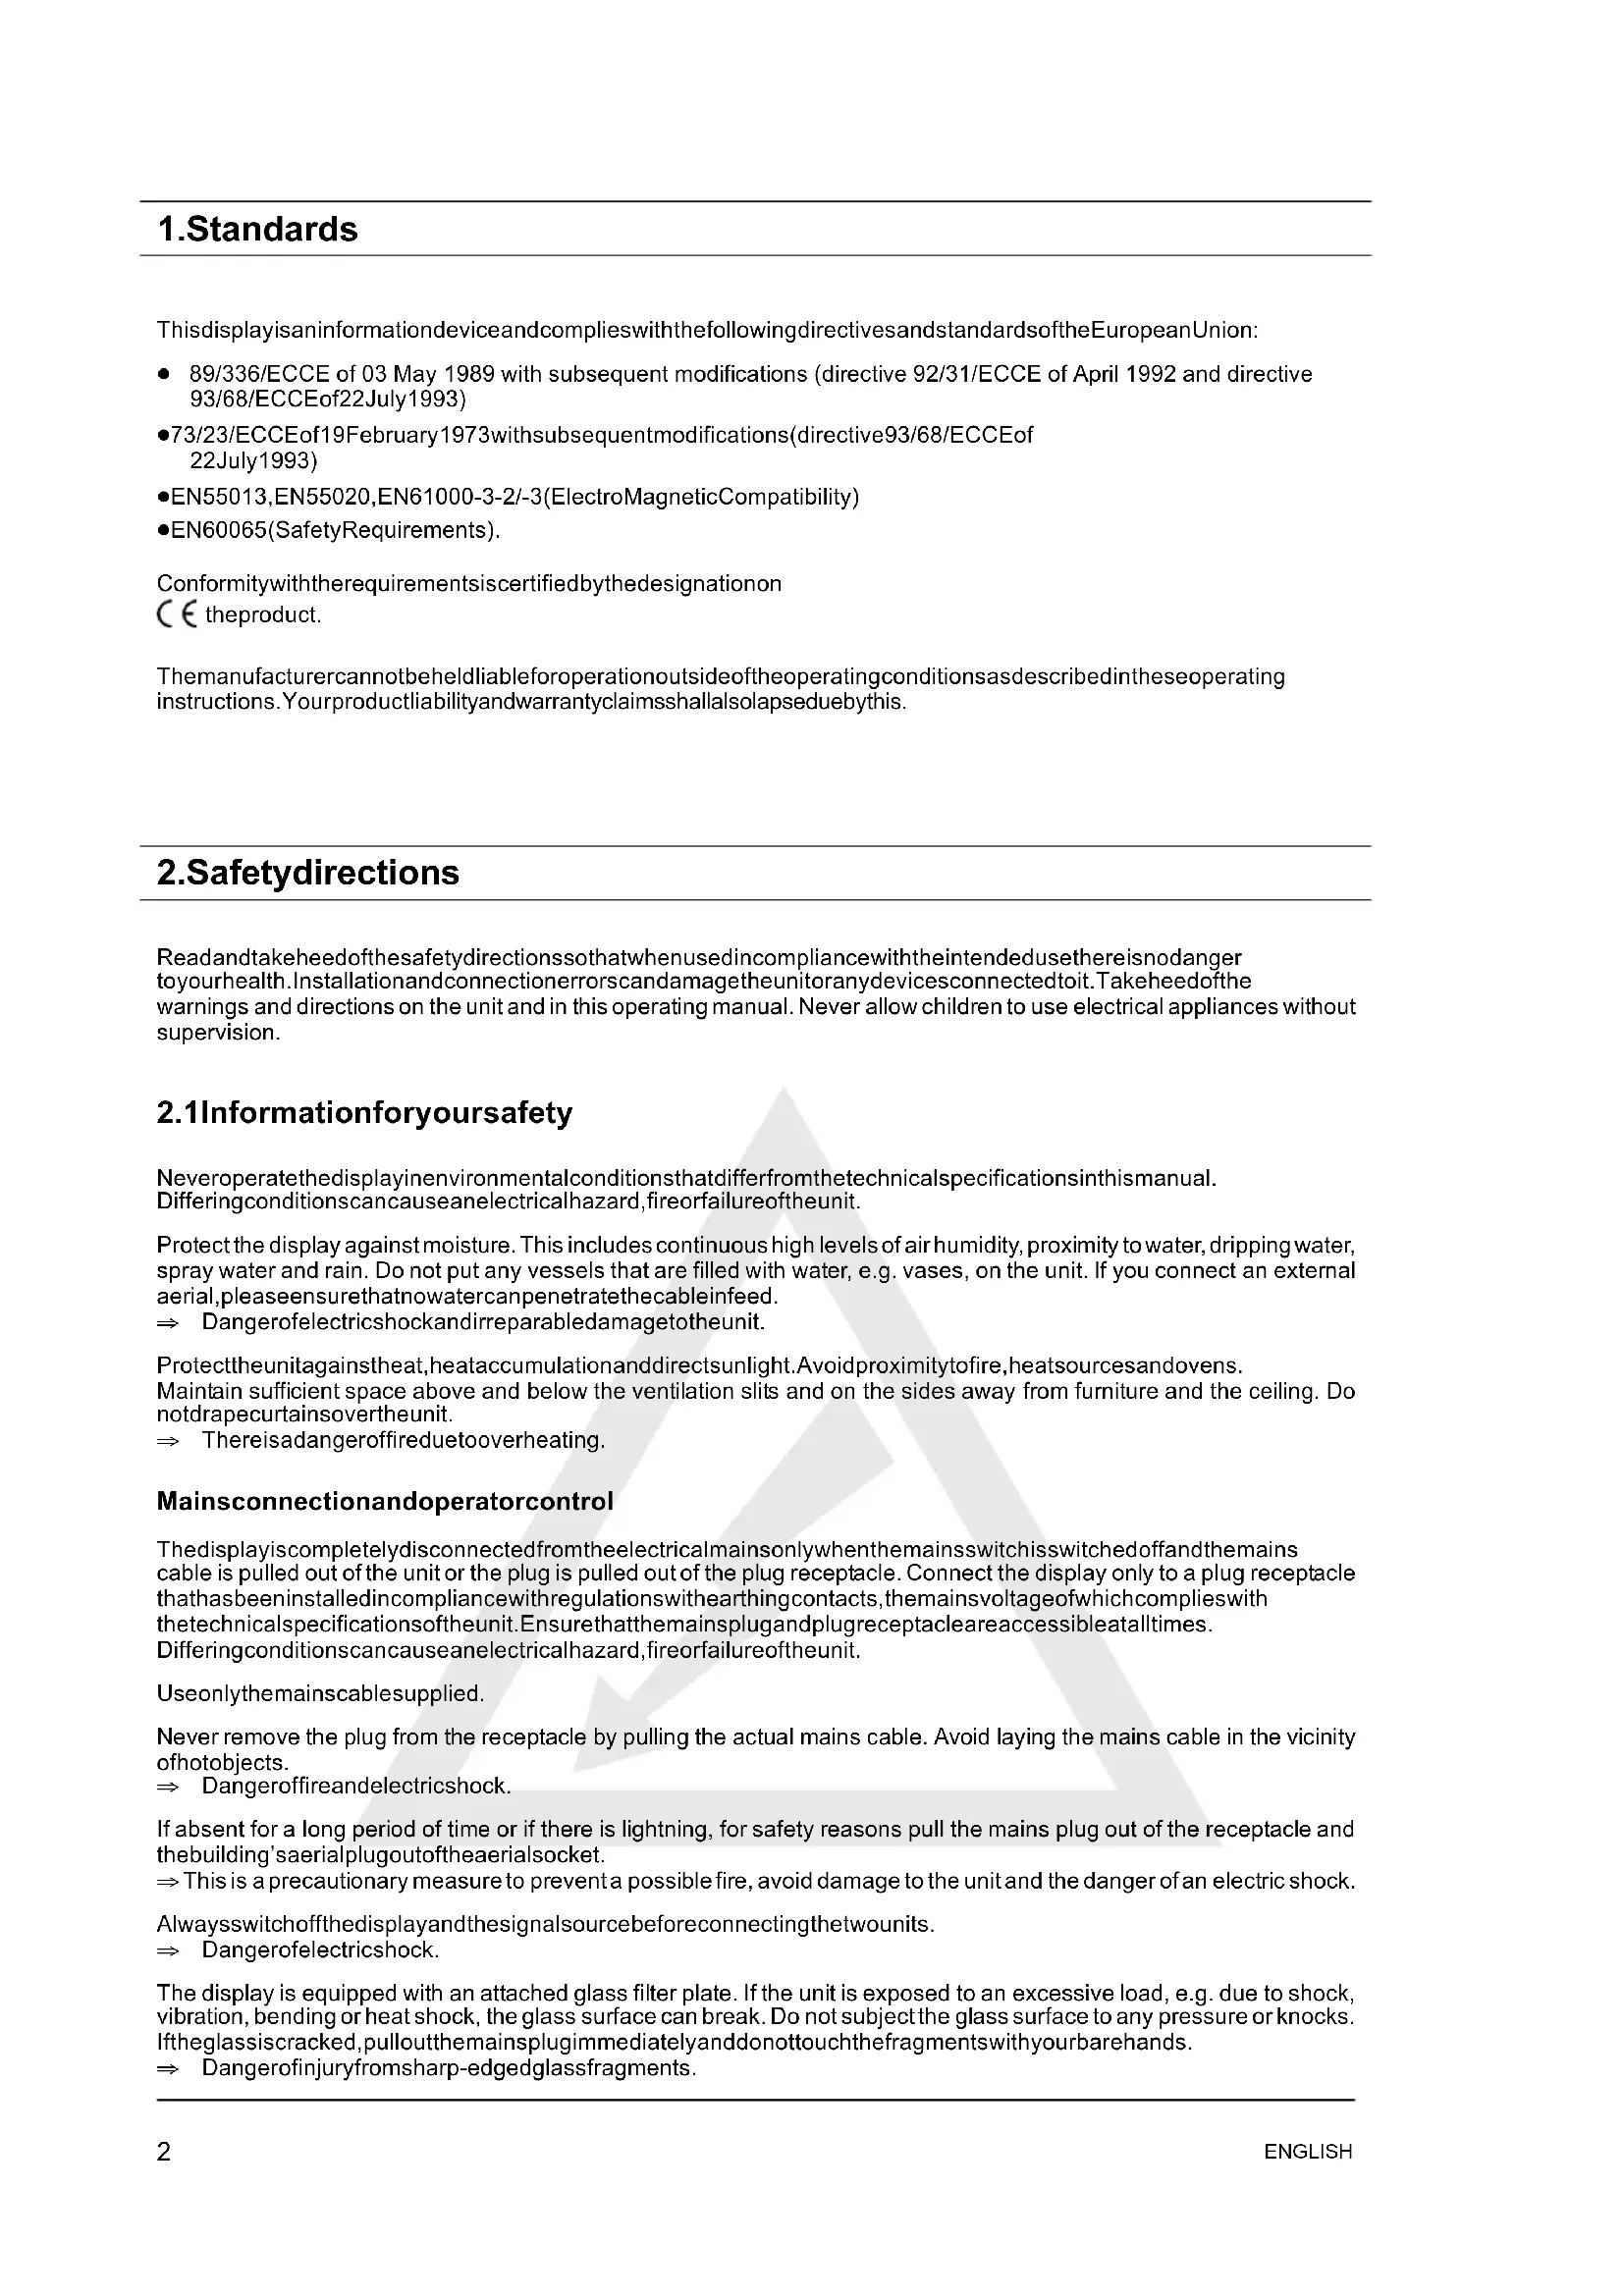
TheplasmadisplayoffersabroadrangeofconnectionfacilitiesforPCs,DVDplayers,videorecorders,videocameras, etc.
Nomatterwhetherit'saquestionoftelevision,videoorPCimages,theyalldisplayedwithaverysharpoutlineand distortion-free on an absolutely flat display surface. and the pictures have an excellent degree of brightness and unusual brilliance. Other important features are the display's large diagonal dimension with a length ratio of 16:9 and a very slim overalldepth.
For TV viewingitisnecessarytoconnecttheunittoaterrestrialaerial, SATreceiverorcableTVbox.
Operatorcontrolisinteractiveviatheremotecontrolprovidedandtheon-screenmenu(OSD).Awiderangeofpicture qualitysettingscanbeeffectedwiththese.
A new type of coolingsystem enables operation of the plasmas display without any disturbing fannoise. Beinas quiet as a conventionalelevision settheplasma display isexcellentlysuited forliving roomsand conferencerooms.
Equipment
High-quality aluminiumenclosure
Fanlessdesign
-Displaydiagonal106cm
16:9format
- Integratedcloudspeakersystem
Viewinganglehorizontal/vertical160degrees
Digitalcombfilter
- CompatiblewithPAL,SECAMandNTSC
-CompatiblewithVGA,SVGA,WXGAandXGA
- Videotext
Automaticchannelidentificationandchannelsorting
- Sleeptimer
- Screensaver
-2xEUROSCARTs(SCART1withRGB)
1xY/C
1xYUV/CVBS
1× DVI(I)(analogueanddigital)
3.1 Scopeofsupply
Afterunpackingpleasechecktheplasmadisplayforpossibletransportationdamageandcompletenessoftthedelivery. The supplier can recognize claims for transportation damage only if you advise them of this prior to initial operation of the unit. If any part of the scope of supply is missing, please contact our service hotline. Please keep the original packing for a possiblereturnconsignmentoftthedisplayunit.

mainscable
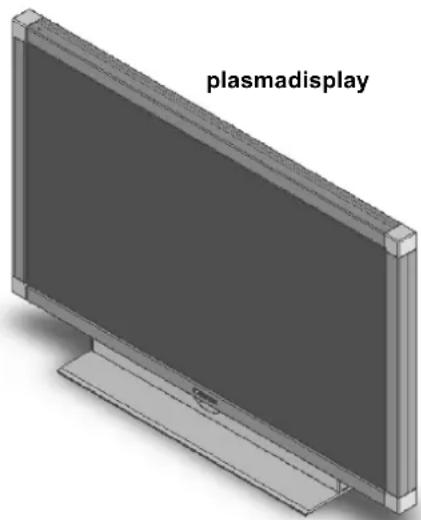
videocable
LR03batteries
remotecontrol

operatingsmanual, warrantycardand installationoverview
3.2Connectionsockets

1SCART1-e.g.satelliterceiversocket
2 S-VIDEO(Y/C)-e.g.camcordersocketwithS-videojack
3 UV/Y(CVBS)
4UVU
5UVV
RS232-serialinterfaceforservicepurposes
7PCDVI-IPCSocket(RGBforanaloguesignals,DVIfordigitalsignals) IfyourPChasananalogueVGAoutput,toconnectyourPCtothedisplayusetheDVI-Iconnectioncable providedviaa15-pinHD-Sub.
SOUT(optional)-connectionforanexternalloudspeaker Theloudspeakerportprovidesanoutputof2x7Wsinusoidal@8ohms.
9 LINEOUT-socketforanactivesubwoofer
10LINEOUTL/R-e.g.audioamplifierorDVDreceiversocket
LINEINYUV(CVBS)-audioinputforYUV(CVBSS)
LINEINPC-e.g.audioinputPCwithline-outjack
LINEINS-VIDEO-audioinputforS-video
14ANTENNA-socketforTVaerialsignal(terrestrialaerialorcableconnection)
15SCART2-e.g.videorecordorordecodersocket
3.3Controlbuttonsandfunctionsoftheremotecontrol
Tobeabletocontroltheplasmadisplaywiththeremotecontrol,themainsplugmustbepluggedinandthemainsswitch mustbeswitchedon.
The infrared remote control functions only if there are no obstructions between the control and the infrared sensor on the frontside(bottom)ofthedisplay. Therangeoftheremotecontrolisapprox.7m.
Whenthebatteriesgetweakertherangeoftheremotecontrolisreduced. Inthiscasepleasechangethebatteries. You mustuseonly2batteriesoftthetypeLR03AAA1.5V.

Donotputdeadbatteriesinyourhouseholdwaste. They must be disposed ofatacollection pointforusedbatteries(e.g.thebatterycollectingboxatyourretaildealer'spremises) oratyour centreforspecialwaste.
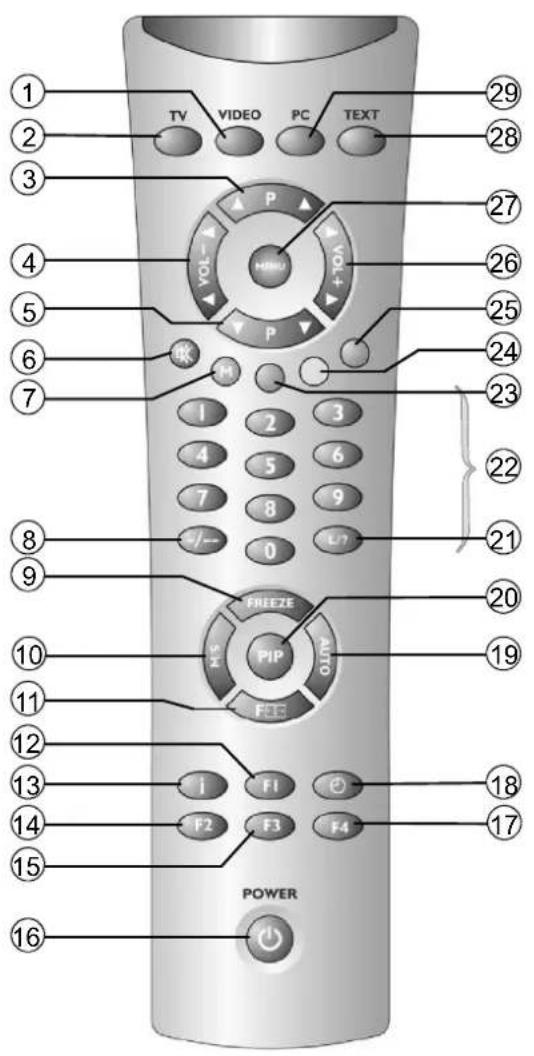
① Buttonfordirectselectionofvideomode
② ButtonfordirectselectionofTVmode
③ Buttonprogrammeselectionup
④ Buttonforreducingthevolume/directionbuttonleft
⑤ Buttonforprogramselectiondown
VolumeOff
⑦ M记忆)button,red
Buttonforallternationbetweensingingleandmulti-digitprogrammenumber
FREEZEkey,stillpicture
M/Button
11 Selectionbuttonforpictureformat
F1,Functionbuttonsforconfiguration-dependentassignment
13 Infobution
F2,Functionbuttonsforconfiguration-dependentassignment
F3,Functionbuttonsforconfiguration-dependentassignment
16 Stand-bybutton
F4,Functionbuttonsforconfiguration-dependentassignment
Buttonfortimedisplay
AUTO, callstheautoalignmentfunctionfor "PC(RBG)"sourcesordoublingofthetextheightin videotextmode
20 PILbutton(PictureInPicture)
ButtonforfunctionprogrammelistinTVmodeor functionsinteletextmode
22 Programmesebuttons1-9,0
23 Greenbutton.videotext
Yellowbutton,videotext
Bluebutton,videotext
26 Buttonforincreasingvolume/ directionbuttonright
27 Menubutton
28 Buttonfordirectselectionoftefetext
29 ButtonfordirectselectionofPCmode
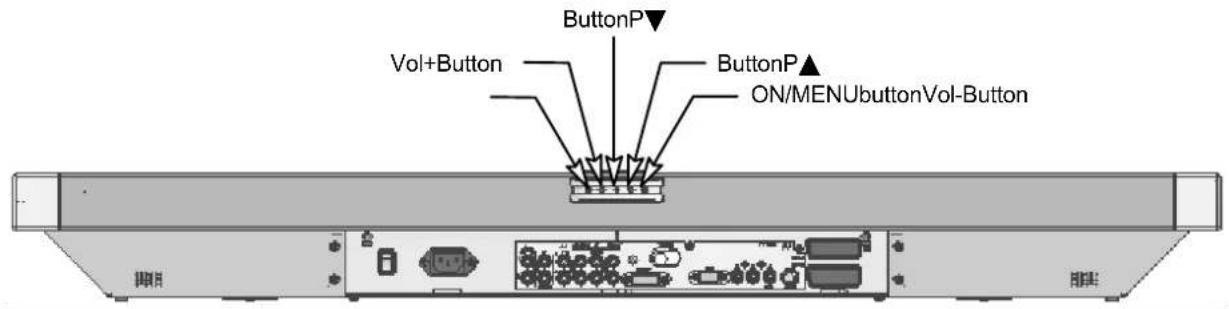
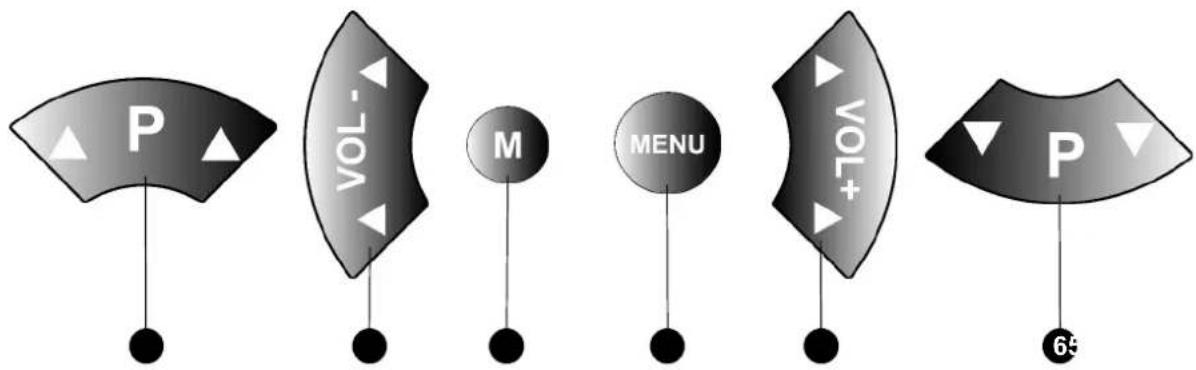
3.4Controlbuttonsontheunit
Thefunctionsofthebuttonsontheunitmatchthoseontheremotecontrol!
4. Initialoperation

Beforeyoumakeanyconnections,switchoffalltheappliancesinvolved,includingtheplasma display.
4.1 Unpackingandinstalling
SELECTTHELOCATIONFORTHETUNIT
Viewingdirection
- Despite the large viewing angle the plasma display provides its best performance is when viewed directly from a vertical direction. Alignthedisplaywiththemostfrequentviewingdirection.
Location
Lightreflection Avoidlocatingtheunitoppositewindowsorotherlightsources.
- Accesssthemainsinput
- Themainsinputandmainsswitchshouldbeeasilyaccessibleataalltimes.
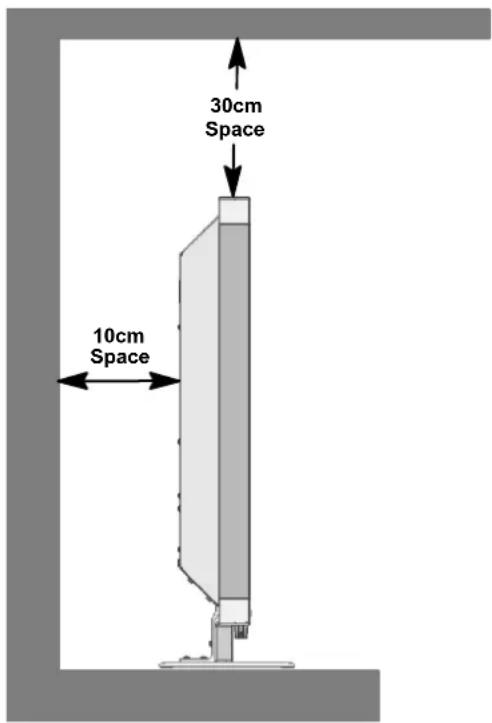
- Airsupply
Leaveaspaceofleast10cmonthesideandtotherearfromanyfurniture. Thedistanceupwardsshouldbeat least30cmfromfurnitureorfromtheceiling.
Ambienttemperature Forsafeandreliableoperationtheambienttemperaturemustbebetween5°Cand35°C.
UNPACKING
Place the carton vertically with the underside on a firm base. You will recognize the top side by the direction of the arrowtipsonthelongsideofthecarton.
Removethepackagingtapefromtheopeninggedeandopenthecartonflapoutwards.
Remove the two top polystyrene packing corners and take the accessories carton out of the packing. The latter is located on the side at therearofthedisplay.
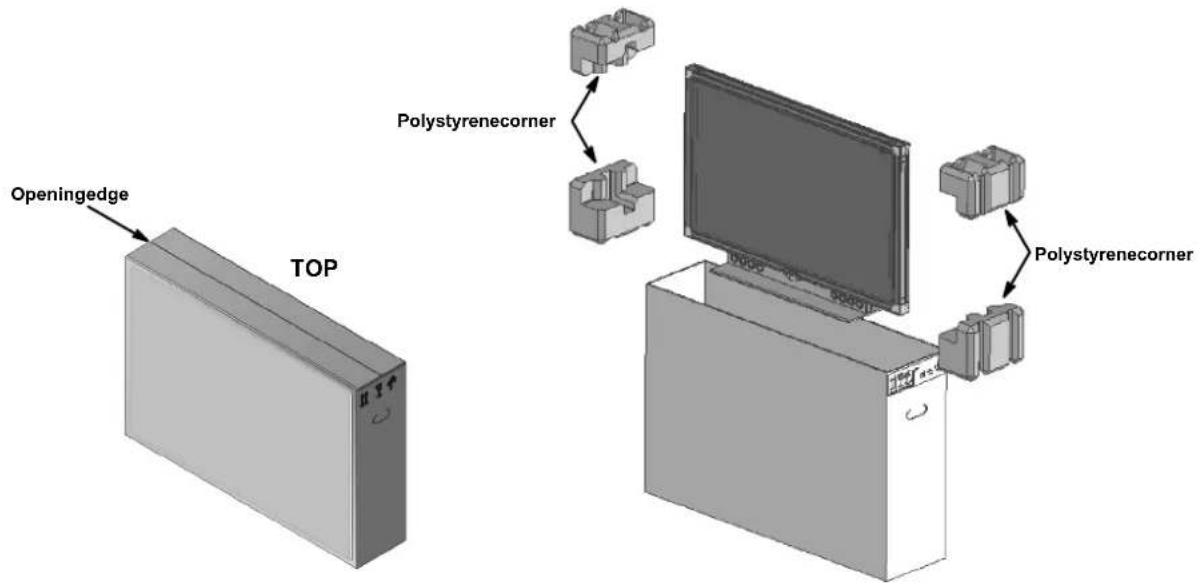
INSTALLATION

- Twopersonsarequiredtoremovetheplasmadisplayfromthepacking.Neverliftupthe displayalone.Anattempttoliftthedisplayalonewillpresentarisktoyourhealth.
- Place the table stand on a stable and horizontal base. The substrate must be firm and capable of bearing the load.
- Before installation make sure that the display is switched off and that the mains cable and signalcable are unplugged.
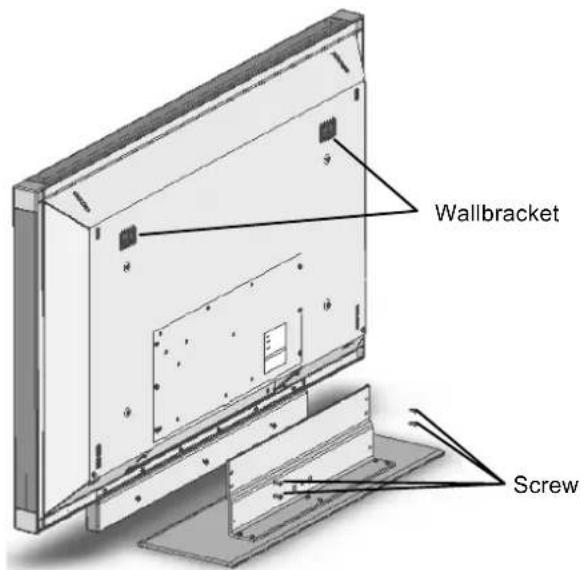
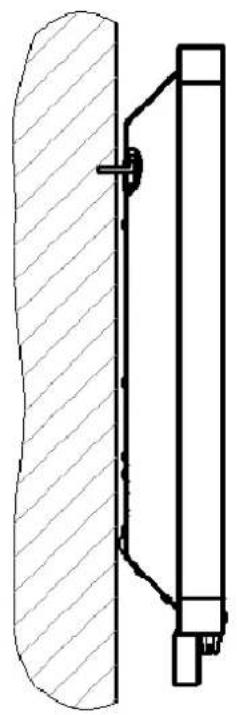
WALLMOUNTING
4.2Connectingandswitchingon
CONNECTION(foranoveriewoftheconnectionsocketssseetheillustrationonpage6)
Insert the mains cable into the mains input socket on the display and the mains plug into a plug receptacle.

Cableconnection/terrestrialaerial
Ifyouwouldliketoconnectacableorterrestrialaerial,usetheAERIAL socketforthispurpose.
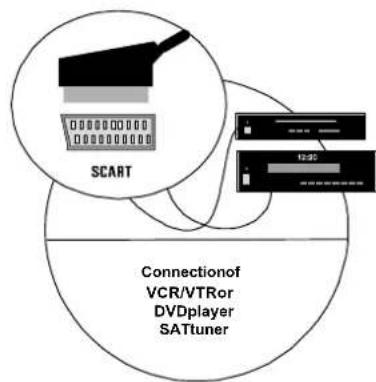
Satelliterceiver
If you receive your TV channels via satellite, connect your receiver by meansfaSCARTcabletotheSCART1orSCART2socket.
InadditionSCART1hasaconnectionssocketforRGBsources, e.g.DVDplayer.
OnlyaSCART2canbeusedforconnectionofadecoder.
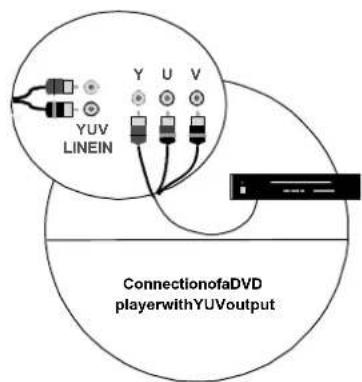
DVDplayerwithYUVoutput
ForconnectionofaDVDplayeroranothervideoosrcetoaYUV-output pleaseusethedisplay'sYUV-input.
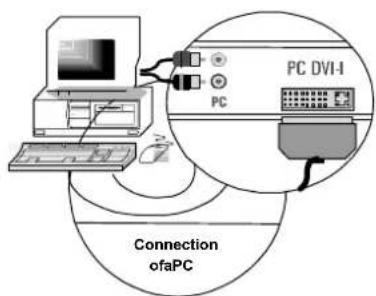
PC
UsethePCDVI-IsockettoconnectyourPCtothedisplay.IfyourPChas ananalogueVGAoutputport,usthesuppliedconnectingcableDVI-lona 15PinHD-Subforconnection.

OnolderPCgraphicboardsitcanhappenthatpin9isbarred. Shouldthisbethecase,pleasecontacttheservicehotline.
PREPARATIONS
Open the battery compartment on the rear side of the remote control and insert the two batteries provided (typeLR03microAAA). Payattentiontothepolarityasspecifiedonthebottomofthebatterycompartment. Closethebatterycompartmentagain.
TOSWITCHON
Switch the mains switch on the rear side of the display to position "l". The display is now in standby mode and can beswitchedonbymeansotheremotecontrol.
Cableconnection/terrestrial aerial

SwitchchonthedisplaybymeansoftheTVbuttononyourremote control.
-Satelliterceiver

Switchonyoursatelliterceiverandswitchthedisplayvithebutton[VIDEO]onyourremotecontrol.Pleasetakenotethatyoumay havetopressthebutton[VIDEO]severaltimesdependingonwhichSCARTsocketyourreceiverisconnectedto.
PC

Switchonthedisplaywiththebutton[PC]onyourremotecontroland selecttheappropriatesignainput(PC(RGB)orPC(DVI)).Todoso callupyourdisplay'sOSDmenuviatheremotecontrolbuttonMENU andselectyourinputsignalinthesubmenu
4.3OSDmenuOperatorControl
PERFORMING SETTINGS
YourdisplaycanbesetandoperatedwiththeaidofthesimpleOSDmenucontrol.6buttonsareatyourdisposalonthem remotecontrolforthispurpose:
P▲button
UpwardmovementintheOSDmenu. These selected menuorselected function appears against a white background.
2 button
Toquittheselectedfunction.
To quit a submenu select menu option < > and press the button [ ]
Changethesettingintheselectedmenuoption.
3 Mbutton
Savesanychangesthathavebeenperformed.
4 MENUbutton
DisplaystheOSDmainmenu.Themainmenuappearsonthetopletedgeofthedisplay.ExitOSDmenu.
5 button
Opensthenextsubmenu.
Activatestheasedmenuoptionortheselectedfunction. Theselectedmenuoptionappearsagainstalight background.
Changethesettingintheselectedmenuoption.
6 button
DownwardmovementintheOSDmenu. These selected menuorselected function appears against a lightbackground.
Inthecaseofmenuoptionsthatcannotbeselectedtheirfontiswhite.
STORECHANGES
The changes effected by you are stored by pressing button [M] on your remote control (see illustration above) or by quitting the OSDmenu.
4.4BasicsettingsOSDmenu
CHANGINGTHEOSDLANGUAGE
Yourdisplayhasa10-languageOSDmenu(German,English,French,Italian,Dutch,Spanish,Norwegian,Swedish, Danish and Finnish).
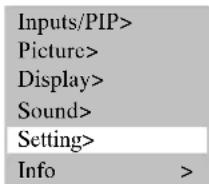
To change the preset language, select the menu option
| Infosignalsource: | ON |
| Language: | English |
| OSDsettings: | > |
| ECOMode/standby: | > |
| Calldefaultsettings | > |
| Sleeptimer: | OFF |
| ← |
CHANGINGTHEOSDMENUPROPERTIES
To change the display or the display time (time after the last actuation up to display exit) of the OSD menu, select inthemainmenuthemenuoption
Inthesubmenu
| Infosignalsource: | ON |
| Language: | English |
| OSDsettings: | > |
| ECOMode/standby: | > |
| Calldefaultsettings | > |
| Sleptimer: | OFF |
| ← |
| Waitingtime: | 5s |
| Transparent: | OFF |
| ← |
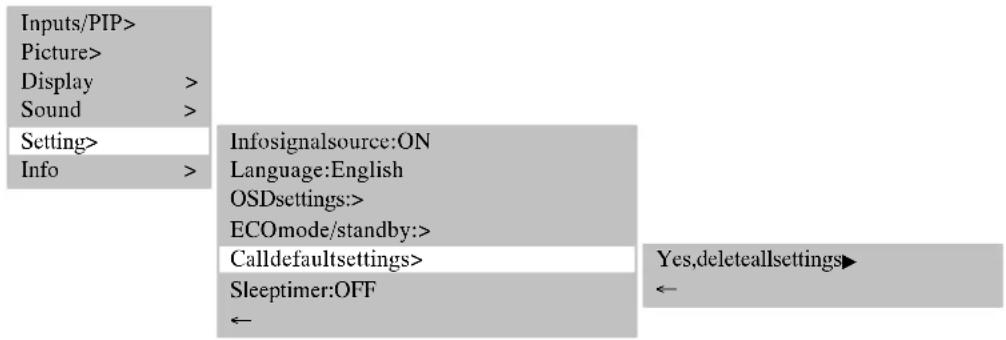
RESETTINGMODEFAULT SETTINGS
You have the option of resetting all changes made in the OSD menu back to the original default setting.
To do so select in the main menu the menu option
4.5 Settings for initial operation
IfaDVDplayerisconnected, priortoinitialoperationitmustbeensuredthatthetunerisselectedasthesource. Pressthe[TV]buttonseveraltimes.
TV MODE
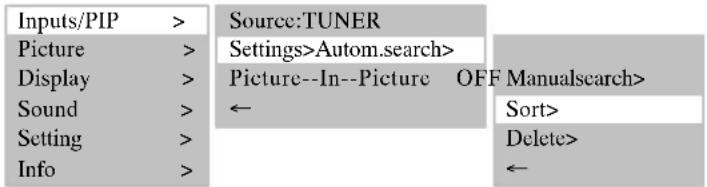
Automaticchannelsearch
If you receive your channels viasatelliteonly, you donothave to perform the automatic channel search. Tostartthe automatic channelsearch, proceed as follows:
Switchchondethesplayviathe[TV]buttononyourremotecontrol.
Call up the OSD menu via the MENU button on your remote control and select the menu option.
In the menu select the menu option. The menu is opened.
In the menu option
| PAL BG | PAL I | PAL DK | SECAM L | SECAM DK |
| Austria | UK | Czech | France | Bulgaria |
| Belgium | Ireland | Hungary | Luxembourg | Russia |
| Denmark | Poland | Ukraine | ||
| Finland | Slovakia | |||
| Germany | ||||
| Greece | ||||
| Italy | ||||
| Luxembourg | ||||
| Netherlands | ||||
| Norway | ||||
| Rumania | ||||
| Portugal | ||||
| Slovenia | ||||
| Spain | ||||
| Sweden | ||||
| Switzerland | ||||
| Turkey |
In the menu option
Now select the menu option
Theautomaticchannelsearchstarts.

YoucanabortthesearchbypressingtheMENUbutton.
- SortingTVchannels
Select the menu option
Thefollowingtableopens.
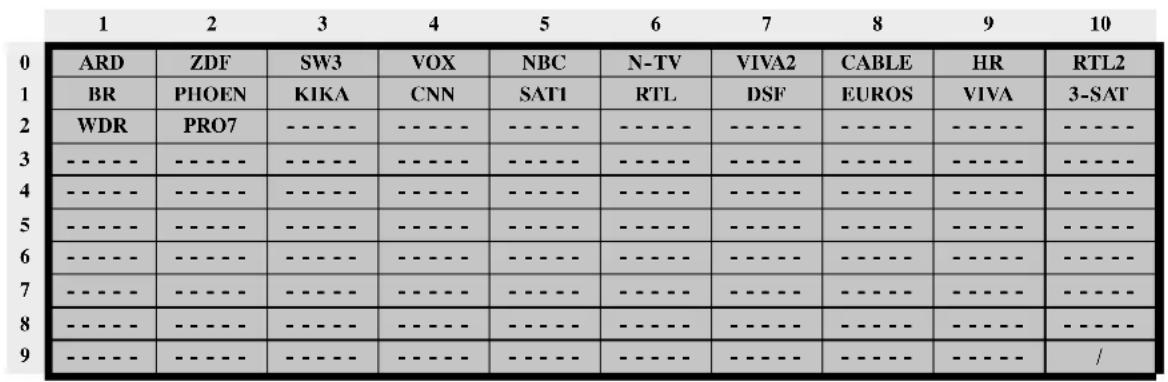
:Markprogramme..
Current = 1 - ARD
:Insertemptyprogrammelocation
:Relocatesselectedprogrammetocurrentposition
YoucannowsorttheTVchannelswiththecolouredbuttonsonyourremotecontrol.
- Changingthechannelname
If the display can detect the channel name from the TV signal, the detected name is stored under the set programme number. If the channelnameisnotdetected, theprogrammenumberappearsinthename(e.g.PR02).
Proceedasfollowstochangethechannelname:
Select the menu option
Now press the [ ] button to select the first character position.
With the buttons [▼] and [▲] you can scroll through the character set until the desired character appears in the selected character position.
Use the [ ] button to select the next character position.
- Repeat the previous 3 steps until you have entered the name. A maximum of 5 characters is possible.
SelectPCMODE
Switchonthedisplayviathe[PC]buttononyourremotecontrol.
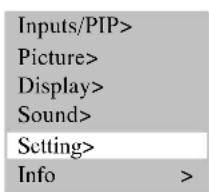
Call up the OSD menu via the MENU button on your remote control. The menu option
In the submenu < SOURCE> select the corresponding signal input (PC (RGB) or PC (DVI)).
| Inputs/PIP> | Source:PC(RGB) |
| Picture> | Settings> |
| Display> | Picture-In-Picture OFF |
| Sound> | ← |
| Setting> | |
| Info> |
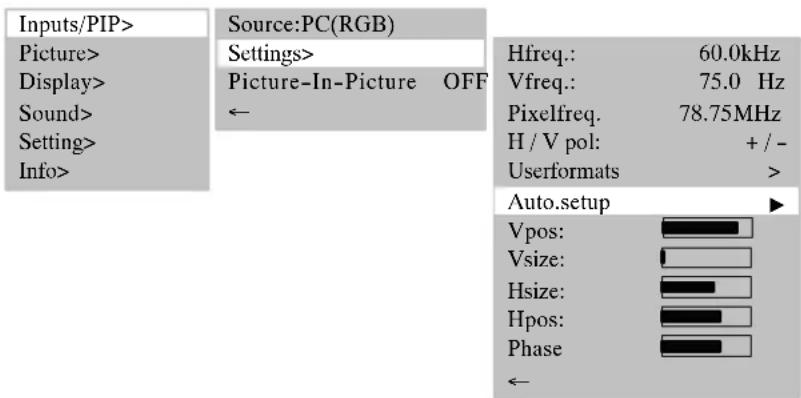
AUTO SETUPFUNCTION
The displayalwaysautomatically executes the autosetupfunctionwhenananaloguevideoformat(RGB)isusedforthe first time. During this time period the display moves slightly back and forth to reach the optimal position and reproduction.

TheH/V(horizontal/vertical)positionandthepicturesizehavetobesetmanuallyforseveral unfavourablePCsizes. Theautosetupfunctionishighlydependentonthe picturedisplay. The displayofafullscreenwhitepictureisverysuitable.
If you would like to activate auto setup manually, select the menu option <INPUTS / PIP SETTINGS AUTO.
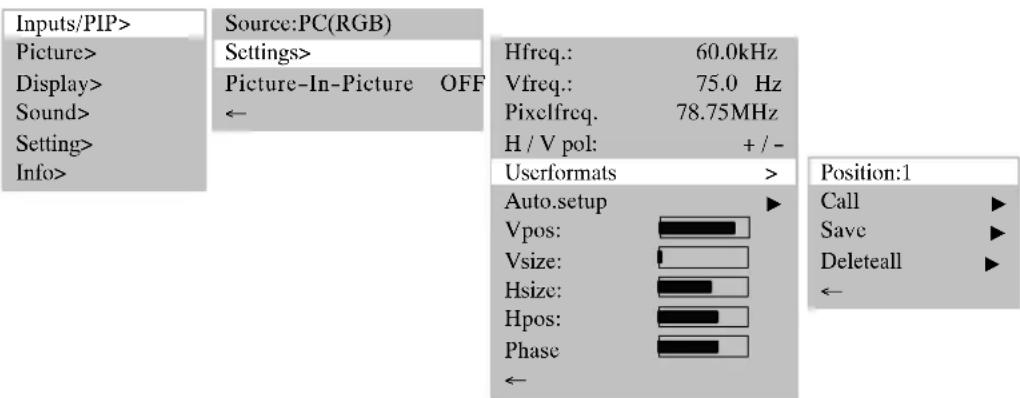
SETTINGUSERFORMATS
You have the option of storing frequently used formats as user formats. The display unit detects the stored formats and immediately displays them correctly without execution of the auto-adjustfunction.
In the main menu select the menu option
Activatethemenuoption
You can now file the user format that is set at the moment, for example, in position 1 (8 positions are possible) with themenuoption
With the menu option < CALL > you can call up a stored user format and with < DELETE ALL > delete all stored user formats.
5.Everydayoperatorcontrol
5.1 Switchingon/off
TOSWITCHON
Toswitchonthdisplayputthemainsswitchposition"I".
ThestandbyLEDontheinfraredsensorlightsupred.
Now press one of the numeric buttons or [TV] / [VIDEO] / [PC] on the remote control to set the display into operation.
TheOPERATINGDontheinfraredsensorlightsupblue.

The display must be runup. This is comparable to PCand takes several seconds.
TOSWITCHOFF
Press the stand-by button on the remote control. The display switches back to stand-by mode.
ThestandbyLEDOntheinfraredsensorlightsupred.
Toswitchoffthedisplayagaincompletely,putthemainsswitchinposition"0".

Standbybutton
Ifnosignalispendingonscreen,itissswitchedautomaticallyytostand-bymode.
Toswitchonagainpressonefthenumericbuttonsontheremotecontrol
CHANGEOVER
When you change over from one TV channel to another, first of all you see eastill picture of the 1st channel and then the moving picture of the other channel.
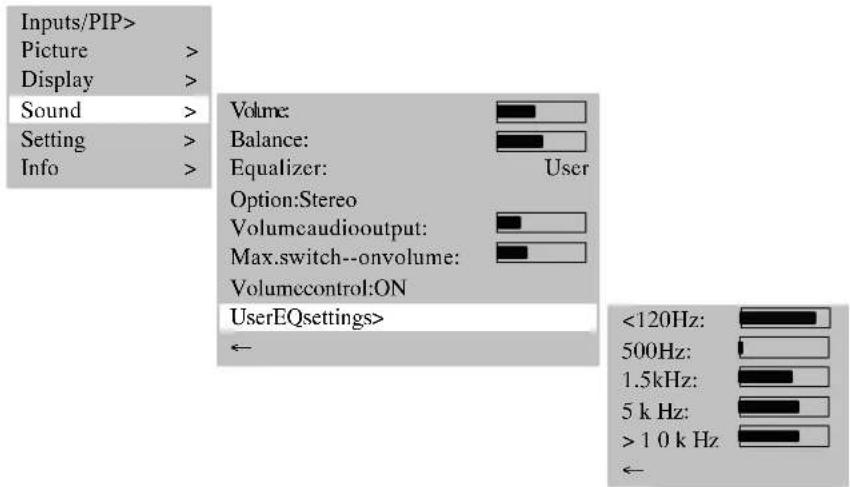
5.2 Settingthevolume
SETTINGTHEVOLUME
Press the button [ Vol -] or [ Vol +] on the remote control to set the desired volume.
Volume:

The current volume setting appears on screen.
Select the menu option
Hereyoucansethecurrentvolumeorthedisplay'scurrentswitch-onvolume.
Inputs/PIP>
Picture
Display
Sound
Setting
Info
Volume:
Balance:
Equalizer:
Option:
Volumcaudiooutput:
Max.switch-onvolume:
Volumecontrol:
UserEQsettings


Displayofthecurrenltysetvolume

Rock
Stereo


ON
Presettingforthevolumewhenthe
displayisswitchedon
SOUNDSETTING
Againstthemenuoption
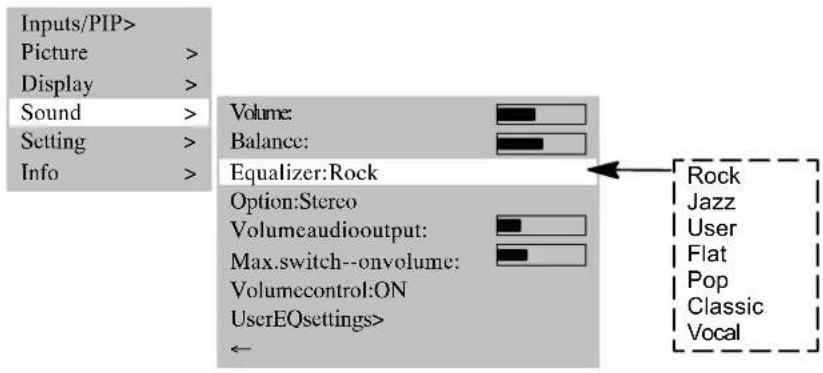
Select the menu option
VOLUMEOFF
Press the button [ ] on the remote control. The volume is turned off and the following info window appears on the displayforapprox.5seconds:
TV-2-ZDF MUTE
Thesoundisswitchedonagain,ifyoupresssthebutton[ ], [ Vol-] or [ Vol + ] on the remote control. The followinginfowwindowappearsonthedisplayforapprox.5seconds:
TV-2-ZDF STEREO
5.3 Setting the picture
When the display is switched on for the first time basic values are set for contrast, brightness, picture sharpness and colour. You can individually change these values as described below, depending on your personal taste and the location of the displayorthelightincidenceassociatedwithit.
CONTRAST
Press button [ ] and the contrast becomes greater.
Press button [ ] and the contrast becomes less.
BRIGHTNESS
Press button [ ] and the picture becomes brighter.
Press button [ ] and the picture becomes darker.
PICTURESHARPNESS
Press button [ ] and the picture becomes sharper.
Press button [ ] and the picture becomes softer.
COLOUR
Press button [ ] and the colour saturation is increased.
Press button [ ] and the colour saturation is reduced.
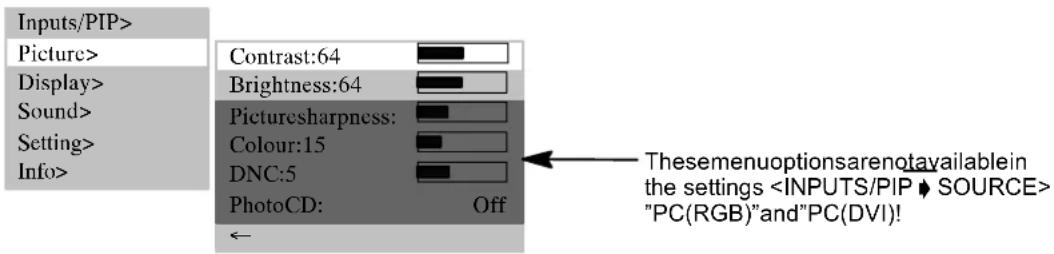
Menuoption
Weak TV signals or poor video signals can generate disturbing picture noise. DNC dynamically adapts the effect of the digitalnoisesuppressiontothepicturecontent.
The menu option is specifically for the reproduction of still pictures, e.g. photo CDs or picture CDs.
Set the menu option
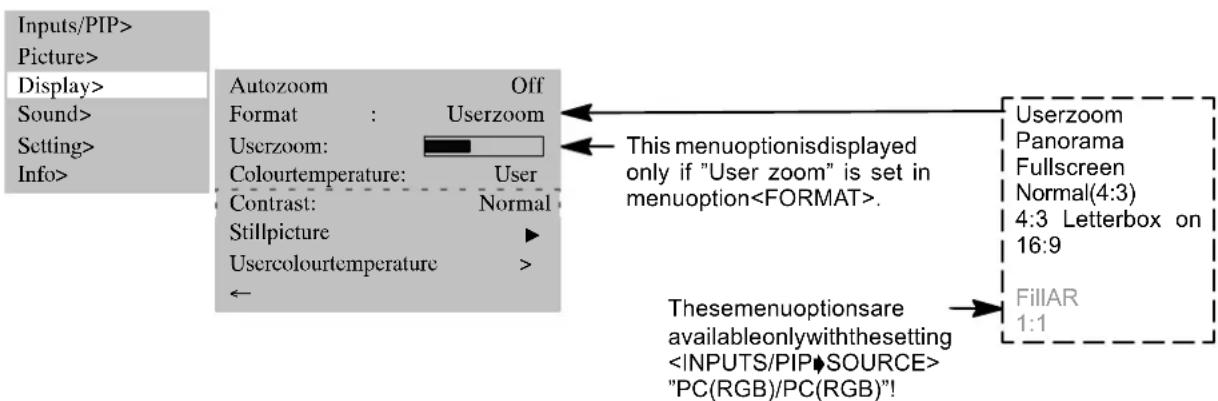
PICTURE FORMAT
- Autozoom
This function evaluates the current picture format and switches automatically between "FULLPICTURE" and "4:3LETTERBOX ON16:9".
In the menu option
- Panorama
This format setting scales the input signal automatically in horizontal and vertical directions so that it is screen-filling, but not linearly, i.e. the picture contents in the centre of the screen are displayed as the original and towards the edges moreintensescalingtakesplace.
Normal(4:3)
This format setting displays a PAL 4:3 picture with the correct side ratio. Dark stripes are visible on the left and right-handedges ofthepicture.
- Fullpicture
In this format setting the picture is adapted in horizontal and vertical directions so that a full screen display is always visible.
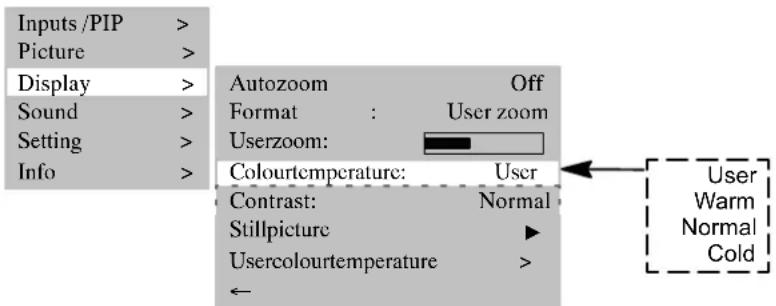
-Userzoom
Ifyou selectuserzoom,themenuoption
In this menu option you can display an individual picture format in the range 40% to 160% of the original picture size. Settingisperformedinjumpsof 6 %
4:3letterboxon 16:9
This mode displays a PAL 16:9 picture so that no dark stripes are visible along the top or bottom edges of the picture. PAL 4:3 pictures are converted to the full horizontal resolution. Due to the additional scaling in vertical direction some of the vertical picture content is not displayed symmetrically at the top and bottom edges of the screen.
Tochangeovertheformats,repeatedlypressbutton[F ]
5.4 Television mode
Thedisplayisinstandbymode.
To switch on, press one of the numeric buttons [0...9] or the [TV] button on the remote control.
Duringinitializationthecompanylogoisdisplayed.
Thenthetelevisionchannellastselected(programmenumber)appearscreen.
If the menu option
TV--2-ZDF STEREO
Press the button [P] or [PV] to increase or reduce the programme number by 1 at a time or select eachprogrammenumberdirectlywiththenumericbuttonsontheremotecontrol.
TELETEXT
YourdisplaycanreceiveanddisplayTOP/FLOFteletextinformation.
Selectatelevisionchannelwithteletext.
Pressthebutton[TEXT]ontheremotecontroltodisplayteletext or
usethe numercibuttonsfordirectselectionofteletextpages.
The red, green, yellow and blue buttons on the remote control have different functions depending on the type of teletext, thesebeingdisplayedinthelowerareaoftheteletext.
5.5PCmode
SwitchoffthedisplayandthePC.
Connect your PC and the display by means of the enclosed video cable (DVI plug on the display and HD-sub connectoronthePC).
SwitchONthedisplayandPCagain.
PC (RGB) must be set in the menu option
PC(RGB) 1024x768
5.6Operationwithadditionaldevices
VIDEORECORDER
SwitchOFFthedisplayandvideorecorder.
Thereare3possibilitiesforconnectingyourvideorecordertothedisplay:
- via the aerial lead, read the operating instructions for the video recorder on this subject
- bymeansofascartcableeithertoSCART1orSCART2
- if your video recorder has an S-video output, connect this to the Y/C input.
SwitchthedisplayandvideorecorderbackON.
Toswitchovertotheconnectedinput(e.g.SCART1)pressthe[VIDEO]buttonrepeatedly.
SCART1 Fullpicture
DVDPLAYER
SwitchOFFthedisplayandDVDplayer.
Connect your DVD player by means of SCART1, YC input or YUV input, if it has an S-video output.
SwitchthedisplayandDVDplayerbackON.
To switch over the connected input, press the [VIDEO] button repeatedly.
YC Fullpicture
5.7Specialfunctions
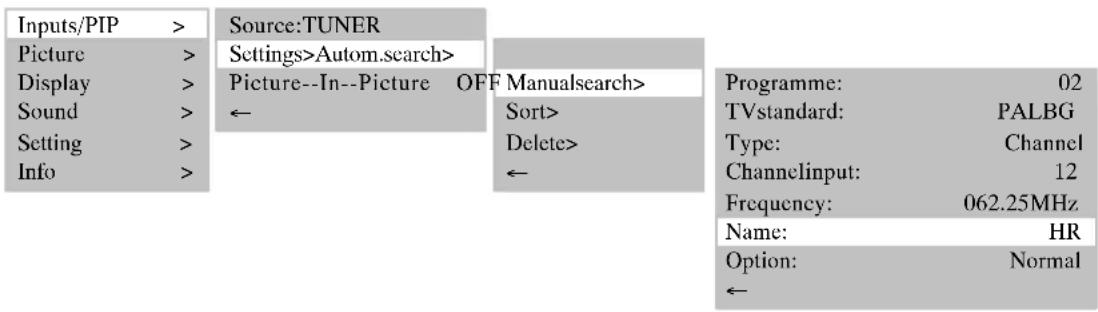
MANUALCHANNELSEARCH
Againstthemenuoption
Under the menu option
If the picture is not optimal, in small increments increase or reduce the frequency entered.
If the TV channel does not transmit a name, you can enter it under the menu option
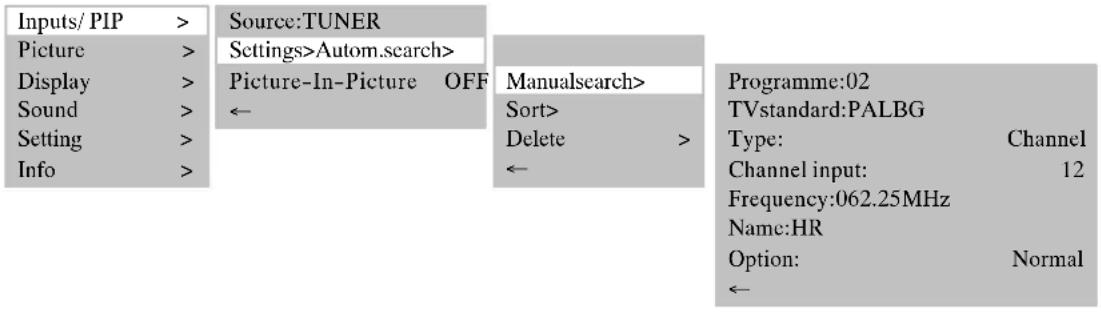
In menu option
STILL PICTURE
Youcangenerateastillpicturewiththe[FREEZE]buttonorunderthemenuoption
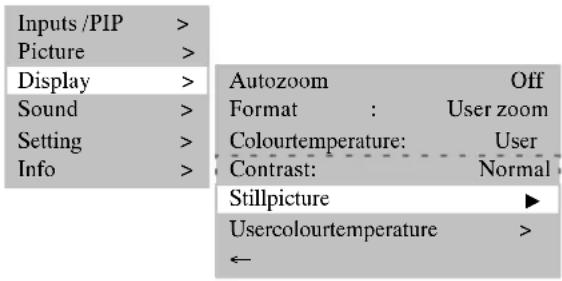
COLOUR TEMPERATURE
You can select the colour temperature from 3 predefined settings or define a value yourself via the menu option
Alowercolurtemperaturevalueincreases the proportionofredinthepictureandgivesita"warmer"appearance. The proportion of blue light increases with an increasing colour temperature, the picture has a "colder" effect.

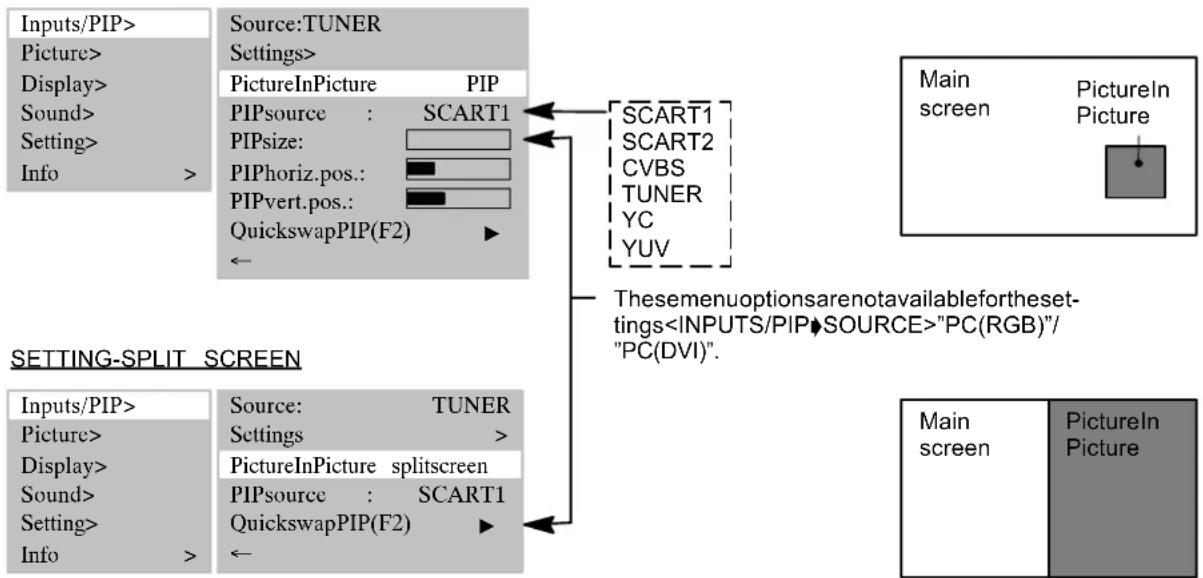
PICTURE-IN-PICTURE
ThefunctionPICTUREINPICTUREoffers the possibility of watching two images signals atthesametime.
- You can fade an external video signal, e.g. from the video recorder, into the current TV programme.
- Simultaneously to PC signals you can display a video signal, e.g. from a DVD player.
Press the [PIP] button and the picture from the input set under the menu option
Ifnosignalispendingatthisinputport,thesuperimposedwindowremainsdark.
Thepositionandsizeofthewindowcanbeset.
Under the menu option
Thechangesinsizelandpositionbecomevisibleimmediately.
You can swap between "main screen" and "Picture In Picture" with the menu option
Select the menu option
TochangePIPmodeyoucanssousethe[PIP]buttonnontheremotecontrol.
SETTING-PIP
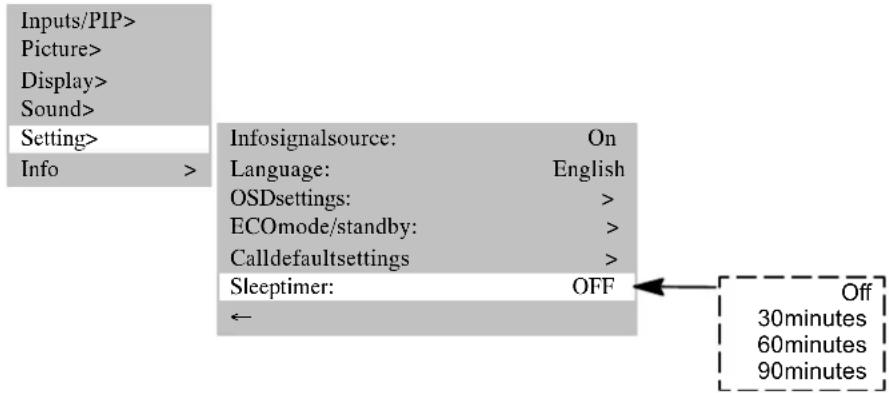
AUTOMATICS SWITCH-OFF
Youcansetthedisplaysothatitisswitchedoffautomaticallyafteracertainamountoftime.
Inthemenuoption
Uponexpiryofthisimeperiodthedisplayisswitchedoffautomatically.
SWITCHING OVER TO DUAL CHANNEL SOUND
Dual channel sound is the designation for films with which the viewer has the possibility of changing between the synchronized version and the original language.
If channels are transmitted with dual channel sound, channel "A" is active first of all.
Pressthebutton[M/S]toswitchtochannel"B".
DECODER MODE
Under the menu option
6.Troubleshooting
If a defect occurs when using your TFT display, please read through the following list of defects and remedies before you sendinyourapplianceforrepair. You may be able to remedythedefects yourself very easily. Forexample, ifthemains plug of the display is not plugged into the plug receptacle or if there are problems with the receiver system (aerial), you couldmistakenlyassumethatthescreendisplayisdefective.
If the information provided for troublesome shooting do not bring about success, switch OFF the unit viathemainsswitchandpullthemainsplugoutoftheplugreceptacle.
Neverattemptto repair the unity yourself and undernocircumstances should you remove the rearcover from the unit.
| DEFECTPOSSIBLECAUSEPOSSIBLEREMEODY | ||
| Nopictureandnosound, althoughthemainsplugins insertedandtheunitis switchedon. | •Mainsswitchinposition"0"(OFF). •Mainsplugofunitisnotinsertedinto theplugreceptacle. •Defectivemainscable. | •Shiftmainsswitchtoposition"1". •Insertthemainscableplugintothe plugreceptacle. •Calltheservicehotline. |
| Screendark. | •Contrastsettingtoolow. •Noinputsignal, wronginputselected. | •Setthebrightnessand/orcontrast correctly(semenuption <PICTURE>). •Checktheconnection cable;assign correctinputsource. |
| Weakorecessive colours. | •Colournotcorrectlyset. •Connectioncablenotcorrectly connected. | •Setthecolourundermenuption <PICTURE>. •Connectthecablecorrectly. |
| Thepictureiscutofforthe pictureisnotcentred. | •Picture position not correctly set. | •Correct the picture position. Usetheautosetupfunction. |
| Thepictureistoolargeor toosmall. | •Pictureformatsetwrongly. | •RepeatedlypressbuttonFuntilthe pictureisdisplayedasfullscreen. |
| Theremotecontrolisnot working. | •Thebatteriesareflat. •Thereisanobstructionbetweenthe remotecontrolandthesensor. •Theremotecontrolislocated outsideitsoperatingrange. | •Insertthenewbatteries. •Removetheobstructionbetweenthe remotecontrolandthesensor. •Operatetheremotecontrolwithinthe specifiedrange. |
| Thedisplayspictureis toodark. | •The picture quality is not set correctly. | •Correct the picture brightness and contrastunderthemenuption <PICTURE>. |
| Thepictureisdisplayed, butthereisnosound. | •Volumeoffisswitchedon. •Setvolumetominimum. •Loudspeakersnotcorrectlyconnected. | •Pressthebuttohontheremote control. •Increasethevolume. •Connecttheloudspeakerscorrectly. |
| Individuallettersarenot displayed(PCmode). | •Setthephasepositionundermenu option <PICTUREPHASE>. •Checkthesettingforthepicturewidth. •Perform <PICTURE AUTOSETUP>. | |
| HorizontalstripeswithTV orvideosignals. | •Signalsourceissetupbeforethe display. •Screeningofthevideocableis insufficient. | •Alwaysplacethesignalsourceson theseideofbehindthedisplay. •Useonlyhigh-grade signal cable withahighscreeningattenuation. |
| Toresetall settingstotheiroriginalstatus, usethemenuption < SETTINGS>CALLDEFAULT SETTINGS>! | ||
| Temperaturewarning | Ifthedisplayisnotoperatedwithsufficientventilation, the internaltemperature can riseexcessively. Iftheambientorinternaltemperatureincreasesoveracertain value, firstofallthewarningwindowontheleft-handsideofthedisplaysappears. Asaconsequencecdethesisplaymayautomaticallyswitchovertostand-bymode. Makeprovisionforsufficientventilation! | |
7. Technical specifications
DISPLAY
Size/diagonal:106cm(42"),16:9format
Displayablepicturesize:920mm(horizontal)x518mm(vertical)
Resolution:852x480pixels
Colourdisplay:16.7millioncolours
Viewingangle:160°typical
Contrastrio:3000:1typical
Pixelerrors: Thenumberofpixelerrorscorrespondswiththecurrentdisplayqualities.
VIDEOSTANDARDS
Video:PAL/SECAM/NTSC
TVtuner: PAL (BG,I,DK/K',M,L/L')/SECAM,47-861 MHz (VHF,UHF,Hyperband)
PALplus,Cinescope: Automaticformatdetection(fullscreen)
Formats: 4:3,16:9,panorama,fullscreen, userzoom(40%-160%)
PCFREQUENCYRANGE
Horizontalfrequency: 30-80kHz
Verticalfrequency: 50-90Hz
Clockfrequency: max.140MHz
Resolutions: DOS:640x480@60Hz,720x400@70Hz
VGA:640x480,SVGA:800x600;WVGA:848x48050Hz-90Hz
XGA:1024x76850Hz-90Hz
WXGA:1280x768@60Hz
SXGA:1280x102450Hz-75Hz
Recommendedresolution: 848x480@60Hz
Formats: 1:1,fullscreen,fullformat,zoom,userzoom(40%-160%)
INPUTS/CONNECTIONS/SYNCHRONIZATION
PC/Videoinputport: RGBanalogueandautomaticsyncdetection
Video connections TVtuner: IEC, 75 ohms input resistance
SCART1: RGB,CVBSSinput,CVBSSoutpu
SCART2: CVBSinput,CVBsOutput
SCART1/SCART2: audioinput/output
CVBS: RCAcinch
Y/C: MiniDIN(HOSIDEN)
YUV(CVBS): 3xRCAinch
PCanalogue/digitalconnection: DVI-I
Audio sockets
Loudspeaker (optional): 2 × 4 broadband @ 2 × 7 W sinusoidal
LSOUT(optional): 2x7Wsinusoidal@8Ω
OUTLINESUB: 1xactivesubwoofer
Stereoinput: 3xcinchL/R1Vrms(YUV(CVBS),YC,
PC)
2xSCART1Vrms
Stereoeoutput: 1xcinch(LINEOUT)
Synchronization: Syncgreen, compositesyncwithautomaticdetection,
SeparateHandVsync
Operator control elements: Mains switch, IR remote control (OSD menu 10 languages), local operator control
OPERATINGCONDITIONS
Temperature: 5^ + 35^ (in operation), -20^ + 60^ (storage)
Airhumidity: 20%-85%(non-condensating)@40°C
Elevation: max.2,000m(7,000ft)
DATAMAINSCONNECTION
Voltagesupply: 230VAC±10%
Mainsfrequency: 50/60Hz±6%
Power consumption: 300 W typical, 5 W in stand-by mode
DIMENSIONSANDWEIGHT
DisplayscreenwithstandHxWxD: 700mmx1041mmx200mm
Weight(total): 31,7kg
Tabledesmatieres
5.4 Modo de television
Lapantallaesteneimodostandby.
BUSQUEDADEPROGRAMAMANUAL
Resolution:848x480pixels
Visualizaciondecolor:16.7 mildecolores
Angulodevisio:160'tipico
TVTuner:PAL(BG,I,DK/K',M,L/L')/SECAM,47-861MHz(VHF,UHF,hyperband)
| PAL BG | PAL I | PAL DK | SECAM L | SECAM DK |
| Austria | UK | Czech | France | Bulgaria |
| Belgium | Ireland | Hungary | Luxembourg | Russia |
| Denmark | Poland | Ukraine | ||
| Finland | Slovakia | |||
| Germany | ||||
| Greece | ||||
| Italy | ||||
| Luxembourg | ||||
| Netherlands | ||||
| Norway | ||||
| Rumania | ||||
| Portugal | ||||
| Slovenia | ||||
| Spain | ||||
| Sweden | ||||
| Switzerland | ||||
| Turkey |
MANUEL PROGRAMSØGNING
TVtuner: PAL (BG,I,DK/K,M,L/L')/SECAM,47-861MHz(VHF,UHF,Hyperband)
TILKOBLING(oversiktovertilkoblinger,sefigurside6)
| PAL BG | PAL I | PAL DK | SECAM L | SECAM DK |
| Austria | UK | Czech | France | Bulgaria |
| Belgium | Ireland | Hungary | Luxembourg | Russia |
| Denmark | Poland | Ukraine | ||
| Finland | Slovakia | |||
| Germany | ||||
| Greece | ||||
| Italy | ||||
| Luxembourg | ||||
| Netherlands | ||||
| Norway | ||||
| Romania | ||||
| Portugal | ||||
| Slovenia | ||||
| Spain | ||||
| Sweden | ||||
| Switzerland | ||||
| Turkey |
PAL (BG, I, DK/K', M, L/L') / SECAM, 47 - 861 MHz (VHF, UHF, Hyperband)
Automatisch formatgenkjennelse (heldekkende bilde kant-til-kant)
4:3,16:9,Panorama,bildeutfyllingkant-til-kant,brukerzoom(40%-160%)
FREKVENSOMRADEPC
Horizontal frekvens:
Vertikalfrekvens:
Klokkefrekvens:
Opplosning:
Anbefaltopplønsning:
Formater:
30-80kHz
50-90Hz
Maks.140MHz
DOS:640x480@60Hz,720x400@70Hz
VGA: 640 x 480; SVGA: 800 x 600; WVGA: 848 x 480 50 Hz - 90 Hz
XGA: 1024 x 768 50 Hz - 90 Hz; WXGA: 1280 x 768 @ 60 Hz
SXGA: 1280 x 1024 50 Hz - 75 Hz
848x480@60Hz
1:1, bildeutfylling kant-til-kant, formatyllende, zoom, brukerzoom(40%- 160%)
INNGANGER/TILKOBLINGER/SYNKRONISERING
PC/video-inngang:
Video-tilkoblinger
Strømforsyning:230VAC±10%
Netfrekvens:
50/60Hz±6%
Effektforbruk:
300 W typisk, 5 W i standby-modus
MALOGVEKT
Skjermmedsokkelhxbd:
700mmx1041mmx200mm
Vekt (total):31,7kg
MANUELLPROGRAMSÖKNING
Viamenypunktten
I menypunktten
Ombildeninteärbrakanduökaellerminskafkrevensismasteg.
| PAL BG | PAL I | PAL DK | SECAM L | SECAM DK |
| Austria | UK | Czech | France | Bulgaria |
| Belgium | Ireland | Hungary | Luxembourg | Russia |
| Denmark | Poland | Ukraine | ||
| Finland | Slovakia | |||
| Germany | ||||
| Greece | ||||
| Italy | ||||
| Luxembourg | ||||
| Netherlands | ||||
| Norway | ||||
| Rumania | ||||
| Portugal | ||||
| Slovenia | ||||
| Spain | ||||
| Sweden | ||||
| Switzerland | ||||
| Turkey |
ZVOLITMISTOINSTALACE
Smerpohledu
MANUALNIVYHLEDANIPROGRAMU
Pod bodem menu
V bodu menu
Neni-li obrz optimalni, zvyujte, prip. snizujte zadanou frekvenci po mal'ych krocich.