USER MANUAL Model S DAB GENEVA
Geneva Sound System (Model S and Model S DAB)
IMPORTANT SAFETY INSTRUCTIONS
CAUTION
RISK OF ELECTRICAL SHOCK
DO NOT OPEN
AVIS
RISQUE DE CHOC ÉLECTRIQUE
NE PAS OUVRIR
1) Read, keep and follow these instructions.
2) Install in accordance with the manufacturer's instructions.
3) Keep the heat dissipator at the bottom side away from heat sensitive materials.
4) Do not install near any heat sources such as radiators, heat registers, stoves, or other apparatus (including amplifiers) that produce heat.
5) Only use attachments/accessories specified by the manufacturer.
6) Protect the power cord from being walked on or pinched, particularly at plugs, convenience receptacles, and the point where they exit from the apparatus.
7) Unplug this apparatus during lightning storms or when unused for long periods of time.
8) Do not let objects or liquids enter the product.
9) Refer all servicing to qualified service personnel. Servicing is required when the apparatus has been damaged in any way, such as power-supply cord or plug is damaged, liquid has been spilled or objects have fallen into the apparatus, the apparatus has been exposed to rain or moisture, does not operate normally, or has been dropped.
10) Opening the unit by unauthorized personnel will void the limited warranty.
CAUTION: Use of controls or adjustments or performance of procedures other than herein may result in hazardous radiation exposure or other unsafe operation.
Cleaning: Use a soft, dry cloth to avoid making scratches to the surface. Do not use cleaning alcohol, or other solvent fluids to clean the surface of the Cabinet as this can both damage the lacquer and also cause electrical failures and fire if it enters the electronics in the Geneva Sound System! Before cleaning, please unplug this Geneva Sound System from the AC power outlet.
Overloading: To prevent risk of fire or electric shock, avoid overloading wall outlets or extension cords.
Open fire: Keep this Geneva Sound System a safe distance away from any open flame such as a lit candle. No open flame sources, such as lighted candles, should be placed on the Geneva Sound System.
Operating Temperatures: The recommended operating temperature range for the Geneva Sound System is 41 to 104 degrees Fahrenheit (5 to 40 degrees Celsius).
Front grille panel: Never remove front grille panel because the panel is non detachable and will void the limited warranty.
Label location: The product labels and safety related markings are located on the bottom plate of the Geneva Sound System.
Unplugging while in operation: Do not remove the AC power cord if music is playing.
Batteries in the remote control: Keep the remote control battery away from children. It may cause a fire or chemical burn if mishandled. Do not recharge, disassemble, heat above 212°F (100°C), Replace only with a battery of the correct type and model number (CR2025 lithium coin cell battery, 3 V).
CAUTION: Risk of explosion if battery is replaced incorrectly.
Used batteries: Please dispose of used batteries properly, following the local regulations. Do not place the battery in fire.
Outside Antenna: If an outside antenna or cable system is connected to this product, be sure the antenna or cable system is grounded so as to provide some protection against voltage surges and built-up static charges. Article 810 of the National Electric Code, ANSI/NFP No. 70 information, Section 54 of the Canadian Electrical Code, with regard to proper grounding of the mast and supporting structure, grounding of the lead-in wire to an antenna discharge unit, size of grounding conductors, location of antenna/discharge unit, connection to grounding electrodes, and requirements for the grounding electrode.
Note to CATV system installer: This reminder is provided to call the CATV system installer's attention to Article 820-40 of the NEC (of USA) that provides guidelines for proper grounding. In particular, it specifies that the cable ground shall be connected to the grounding system of the building, as close to the point of cable entry as is practical.
This product can be recycled. Products bearing this symbol must NOT be thrown away with normal household waste. At the end of the product's life, take it to a collection point designated for recycling of electrical and electronic devices. Find out more about return and collection points through your local authority.
The European Waste Electrical and Electronic Equipment (WEEE) Directive was implemented to dramatically reduce the amount of waste going to landfills, thereby reducing the environmental impact on the planet and on human health. Please act responsibly by recycling used products. If this product is still usable, consider giving it away or selling it.
1. Getting Started
Step 1: Unpack all components from the shipping box. Please save the original packaging material in case you ever need to return the system since the Limited Warranty does not cover shipping damages.
The shipping box should contain the following system components:

Step 2: Remove the protection paper from the remote control battery compartment.
Step 3: Connect the enclosed external telescopic antenna. You will find the antenna connector in the Geneva Sound System back panel (see picture below).
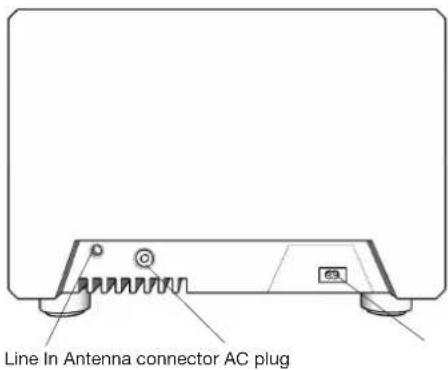
Step 4: Connect the AC power cable to the AC power plug on the back panel (see picture). Then connect the other end of the AC power cable to an AC outlet. „12:00“ will blink on the display, indicating an invalid time setting.
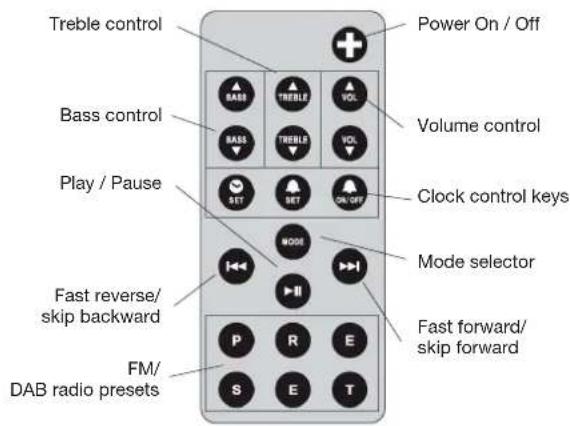
Remote Control:
Touch Panel:
Turn on the Geneva Sound System:
Press the ✕ key on the remote control or touch the ● key on the touch panel.
How to verify that the remote control works?
Every time a key is pressed on the remote control, a small red light on the display lights up quickly.
Adjust the clock:
- Press the 🔒 key on the remote control. The letter „C“ should start blinking on the display.
- Use the and keys on the remote control or the wheel to set the correct time.
- Press to complete the procedure.
Note: the clock remains valid for up to 1 hour of power loss.
How to adjust volume and sound?
- Use the VOL, VOL, BASS, BASS, TREBLE, TREBLE keys on the remote control (or the touch panel wheel for the volume only) to adjust sound and volume.
- Volume: 0 means silence, 100 means maximum output.
- Treble and Bass: -6 means very little Bass or Treble, 0 means neutral, 6 means maximum effect.
- If you turn the device off, the current values are stored.
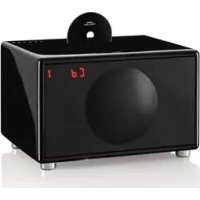
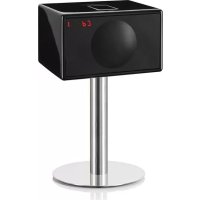
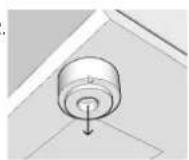
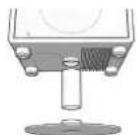
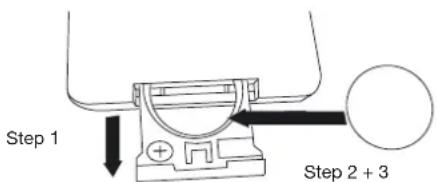
How to mount the stand?
The cabinet can be mounted on the enclosed stand. To mount the stand, proceed in two steps:
- Remove the feet from the cabinet (simply pull them off the bottom plate).
- Assemble the stand tube and plate and attach it to the cabinet bottom plate.
1.2
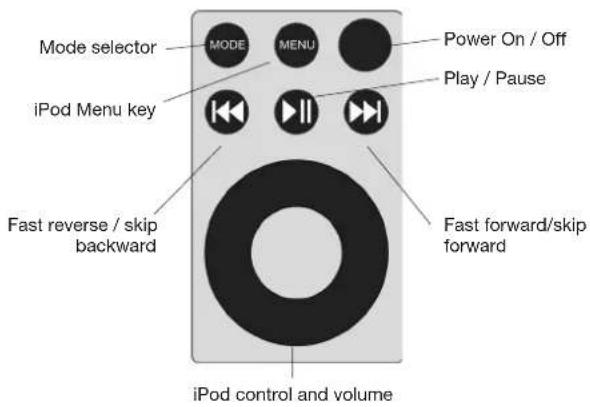
2. Listening to the iPod
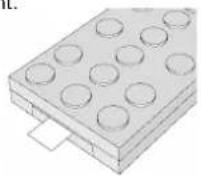
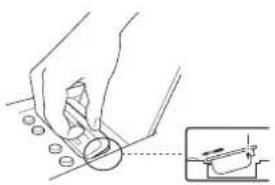
Step 1. To use the Geneva Sound System with an iPod, select iPod as the audio source using the MODE key: the iPod dock will automatically open and the display under the grille should display "no iPod".
Step 2. Insert the correct iPod adapter: Attach the Dock Adapter to the iPod Universal Dock by pressing lightly on the top of the Dock Adapter (see picture) and it will snap in:
natural_image
Illustration of a hand using a tool to cut a circular component, with an inset showing the same part (no text or symbols present)
How to select the right iPod adapter for my iPod?
Use the iPod adapter provided with your iPod. Only if an iPhone has to be docked, use the iPhone adapter provided with the Geneva Sound System.
Step 3. Insert the iPod into the iPod dock. The display should now show „iPod“.
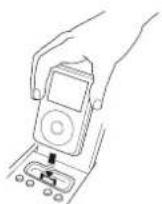
Step 4. Press the ▶ key on the remote control or on the touch panel. If you still cannot hear any sound check that the volume is turned up by adjusting the ▶ key or the wheel.
Step 5. You can control your iPod using the ▶, ▶, ▶ keys on your remote control and on the touch panel.
Step 6. Use the MENU key and the wheel on the touch panel to browse the iPod. A menu entry on the iPod is selected by tapping the wheel.
Charging: Your iPod is charging while the system is connected to an AC plug.
If the iPod is unplugged, the dock will close and the unit will switch to the radio mode.
3. Listening to the FM radio
Step 1. Select FM radio as the audio source using the MODE key on on the remote control or on the touch panel; the display under the grille should display an FM frequency, e.g. "103.2". If you cannot hear any sound, check the volume setting by pressing the MODE key.
Step 2. Select an FM station with the 🎨 and 🎨 keys: one click increases or decreases the frequency by 100 kHz. The number on the display under the grille indicates the current frequency in MHz (e.g. "88.7" on display means 88.7 MHz). Hold down the 🎨 or the 🎨 key and the FM radio will search for the next station automatically. When a station has been found, the automatic search stops. To keep scanning, repeat this action.
How to store / recall a radio station (presets)?
- Select your favorite radio station using the 📄 or ▶ keys on the remote control or on the touch panel.

- Select one of the 6 preset keys on the remote control, and keep pressing it until the corresponding letter on the display starts blinking. The station has now been stored and can be recalled by pressing the same preset key.
How to erase or overwrite a preset?
Stored presets do not need to be erased - just use the previous steps to store a new station in a preset.
4. Listening to the DAB radio (Model S DAB only)
The DAB radio is operated exactly like the FM radio, with the following differences:
-
A scanning operation has been done the first time the unit is installed or when the unit is moved to a different location: the scanning procedure is started by holding down the key for at least 3 seconds (while in DAB mode): the "SCANNING" message will pop-up on the display. The scanning procedure could take up to a minute to complete.
-
Radio station names are displayed instead of frequencies.
To browse the DAB stations list use the 🎯 and ➕ keys on the remote control or on the touch panel.
About the presets usage, please refer to the FM radio section.
- Use a cable with a 3.5mm jack to connect the Geneva Sound System to any audio device that has an audio out connector. First connect the cable to the source, then connect the cable to the Line In connector located on the back panel of the Geneva Sound System.
- Switch the Geneva Sound System to iPod mode using the MODE key and activate the connected audio source. Note that you cannot control any connected device using the Geneva Sound System remote control.
- Adjust the output volume of the connected device.
Note: If an iPod is docked and playing, the iPod sound and the external audio will be mixed.
6. Using the Alarm
How to set the Alarm?
- Push the SET key on the remote control: a blinking „A“ should appear on the display.
- Select the desired alarm time using the 🔊 and ➕ keys on the remote control or on the cabinet.
- Push again the SET key on the remote control to store the alarm time; "A" indicates alarm active.
Note: An alarm can be set only if the clock has been adjusted as described above in Chapter 1.
The alarm will use the latest mode and setting. If the audio level is too low, or the volume is set to 0, an internal beep tone is activated.
How to switch the Alarm on and off?
Use the ON/OFF key to activate / deactivate the alarm; „A“ indicates alarm active.
How to snooze and acknowledge the Alarm?
While the alarm is active, touch whatever key of the touch panel to snooze the alarm for ten minutes. To acknowledge the alarm push any key on the remote control. Without acknowledge the unit will automatically go to stand-by mode after playing for 20 minutes.
7. Troubleshooting, Service and Support
How to change the remote control battery?
- Open the battery lid of the remote control.
- Remove the used battery and replace it with a new lithium cell, 3 V battery (CR2025 type).
- Respect the polarity indication.
Troubleshooting and Support:
- If the system does not work as expected, first carefully read this manual.
- If the problem persists, you can access our troubleshooting
database available on the web at www.genevalab.com and select support page.
- If still not successful, contact our customer support.
Service and Repair:
If the product is damaged and needs repair, please contact Geneva Lab by phone or email to be referred to an authorized service center. For repair under the limited warranty period, see terms on the web at www.genevalab.com and select support page or consult your dealer.
Customer Service:
see Geneva Lab Website www.genevalab.com and select support page for your local support number.
8. Made for iPod & Technology Partners


The “Made for iPod” and „Works with iPhone“ logos indicate that this product has been designed specifically to work with iPod and the iPhone.
The manufacturer certifies that this accessory has been made in accordance with the high standards of quality and performance that you expect from iPod and Apple.
Technology Partners:
Geneva Lab Corporation uses some of the world's leading developers of audio technologies to make the Geneva Sound System a very advanced product.

EmbracingSound™
"EmbracingSound™ is the technology for consumers and professionals alike to experience sound. As EmbracingSound™ is utilizing two very closely spaced speakers you will experience what is really in the recording with better resolution and clarity than ever before. Just sit back and experience all your music and you will most probably find new favorites as well as making excursions in to music genres that you where totally unfamiliar with before. Just let the experience guide you!
More details can be found on the www.genevalab.com website.
9. Technical Specifications
For detailed technical specifications for this product, please visit our website (www.genevalab.com) and select support page, where you can download the detailed technical specifications for any of our products.
© 2009 G-Lab GmbH. All rights reserved
Under the copyright laws, this manual may not be copied, in whole or in part, without the written consent of G-Lab GmbH.
Geneva™ is a trademark of G-Lab GmbH.
iPod is a trademark of Apple Computer, Inc. registered in the U.S. and other countries.
The trademark EmbracingSound™ and the Embracing Sound Experience logo are owned by Embracing Sound Experience AB.
Geneva Sound System Model S, User Manual, Version v1.0
CAUTION
RISK OF ELECTRICAL SHOCK
DO NOT OPEN
AVIS
RISQUE DE CHOC ÉLECTRIQUE
NE PAS OUVRIR
natural_image
Illustration of a hand using a tool to cut or mark a circular feature, with an inset showing a close-up of the tool (no text or symbols present)
natural_image
Technical line drawing of a device rear panel with mounting points and a small inset showing a button (no text or symbols)
natural_image
Illustration of a hand using a tool to cut a circular component, with an inset showing the same part (no text or symbols present)
natural_image
Technical diagram showing a mechanical component with a pin and base, alongside its exploded view (no text or symbols)
natural_image
Illustration of a hand holding a small object with a magnified inset showing a small mechanical component (no text or symbols)
natural_image
Technical illustration showing a mechanical component with a pin and base, no text or symbols present
natural_image
Illustration of hands using a tool to adjust or install a component, with an inset showing a close-up of the component (no text or symbols present)
natural_image
Illustration of a hand using a tool to cut a circular component, with an inset showing a close-up of the component (no text or symbols present)
natural_image
Illustration of a hand using a tool to cut a circular component, with an inset showing the same part (no text or symbols present)
natural_image
Illustration of hands using a tool to adjust or install a mechanical component, with an inset showing a close-up of the component (no text or symbols present)
Technology Partners:
natural_image
Illustration of hands using a tool to cut a mechanical part, with an inset showing a close-up of the component (no text or symbols present)
natural_image
Technical line drawing of a flat electronic device rear panel with no visible text or symbols
natural_image
Illustration of a hand using a tool to cut a circular component, with an inset showing the same part (no text or symbols present)
Technology Partners: