NXU10 - Audio System YAMAHA - Free user manual and instructions
Find the device manual for free NXU10 YAMAHA in PDF.
User questions about NXU10 YAMAHA
0 question about this device. Answer the ones you know or ask your own.
Ask a new question about this device
Download the instructions for your Audio System in PDF format for free! Find your manual NXU10 - YAMAHA and take your electronic device back in hand. On this page are published all the documents necessary for the use of your device. NXU10 by YAMAHA.
USER MANUAL NXU10 YAMAHA
CAUTION: Read this before operating your unit.
To assure the finest performance, please read this manual carefully. Keep it in a safe place for future reference.
1 Install this unit in a well ventilated, cool, dry, clean place - away from direct sunlight, heat sources, vibration, dust, moisture, and/or cold. (Do not use/keep this unit in a car etc.)
2. Locate this unit away from other electrical appliances, motors, or transformers to avoid humming sounds.
3 Do not expose this unit to sudden temperature changes from cold to hot, and do not locate this unit in an environment with high humidity (i.e. a room with a humidifier) to prevent condensation inside this unit, which may cause an electrical shock, fire, damage to this unit, and/or personal injury.
4 Avoid installing this unit where foreign objects may fall onto this unit and/or this unit may be exposed to liquid dripping or splashing. On the top of this unit, do NOT place:
- Other components, as they may cause damage and/or discoloration on the surface of this unit.
- Burning objects (i.e. candles), as they may cause fire, damage to this unit, and/or personal injury.
- Containers with liquid in them, as they may fall and liquid may cause electrical shock to the user and/or damage to this unit.
5 Do not cover this unit with a newspaper, tablecloth, curtain, etc. in order not to obstruct heat radiation. If the temperature inside this unit rises, it may cause fire, damage to this unit, and/or personal injury.
6 Do not plug this unit into a AC wall outlet until all connections are complete.
7 Do not operate this unit upside-down. They may overheat, possibly causing damage.
8 Do not use force on switches, knobs and/or cords.
9 When disconnecting the USB/AC adaptor from the wall outlet, grasp the USB/AC adaptor; do not pull the cord.
10 Do not clean this unit with chemical solvents; this might damage the finish. Use a clean, dry cloth.
11 Only the voltage specified on this unit must be used. Using this unit with a higher voltage than specified is dangerous and may cause fire, damage to this unit, and/or personal injury. Yamaha will not be held responsible for any damage resulting from use of this unit with a voltage other than that specified.
12 Do not attempt to modify or fix this unit. Contact qualified Yamaha service personnel when any service is needed. The cabinet should never be opened for any reason.
13 When not planning to use this unit for long periods of time (i.e. when going on vacation), disconnect the USB/AC adaptor from the AC wall outlet.
14 Be sure to read the "TROUBLESHOOTING" section regarding common operating errors before concluding that the unit is faulty.
15 Before moving this unit, press POWER to set this unit to off, and disconnect the USB/AC adaptor from the wall outlet.
16 Be sure to use the USB/AC adaptor supplied with this unit. Using an USB/AC adaptor other than the one provided may cause fire or damage to this unit.
17 Install this unit near the wall outlet and where the USB/AC adaptor can be reached easily.
18 For added protection for this product during a lightning storm, or when it is left unattended and unused for long periods of time, unplug it from the wall outlet. This will prevent damage to the product due to lightning and power-line surges.
19 The batteries shall not be exposed to excessive heat such as sunshine, fire or the like.
This unit features a magnetically shielded design, but there is still a chance that placing it too close to a TV set might impair picture color. Should this happen, move this unit away from the TV set.
For U.K. customers
If the socket outlets in the home are not suitable for the plug supplied with this appliance, it should be cut off and an appropriate 3 pin plug fitted. For details, refer to the instructions described below.
Note
The plug severed from the mains lead must be destroyed, as a plug with bared flexible cord is hazardous if engaged in a live socket outlet.
Special Instructions for U.K. Model
IMPORTANT
THE WIRES IN MAINS LEAD ARE COLOURED IN ACCORDANCE WITH THE FOLLOWING CODE:
Blue: NEUTRAL
Brown: LIVE
As the colours of the wires in the mains lead of this apparatus may not correspond with the coloured markings identifying the terminals in your plug, proceed as follows:
The wire which is coloured BLUE must be connected to the terminal which is marked with the letter N or coloured BLACK. The wire which is coloured BROWN must be connected to the terminal which is marked with the letter L or coloured RED.
Making sure that neither core is connected to the earth terminal of the three pin plug.
CONTENTS
FEATURES 1
SUPPLIED ACCESSORIES 1
CONTROLS AND FUNCTIONS. 1
CONNECTIONS 2
1 When using USB bus power 2
2 When using the USB/AC adaptor. 4
3 When using batteries 5
USING THIS UNIT 6
About the status indicator (LED). 6
TROUBLESHOOTING. 7
SPECIFICATIONS. 7
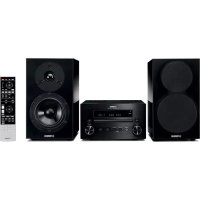
FEATURES
3 way power supply
You can choose one of three power supplies according to your usage circumstances: USB bus power, USB/AC adaptor or batteries.
Digital sound reproduction
The USB connection provides clear sound with little noise.
Real stereo sound
The high quality amplifier, titanium diaphragm and Yamaha's unique SR-BASS technology achieve high quality sound.
High 20 W power
Yamaha's original power technology enables an impressive 20 W output (Max. Instantaneous Power).
Auto loudness function
This unit is equipped with an auto loudness function that strengthens the bass sound while playing at low volumes to achieve a more solid sound.
SR-Bass
"Swing Radiator BassTM" is a trademark of YAMAHA CORPORATION.
SUPPLIED ACCESSORIES
Please check that you received all of the following parts.
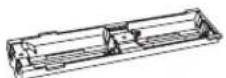
Battery holder
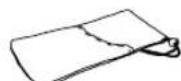
Carrying case
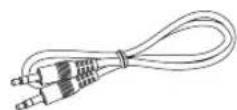
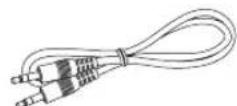
3.5 mm stereo mini plug cable (0.5 m (19-11/16"))
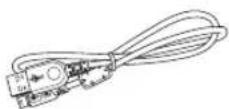
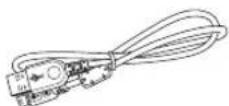
USB cable (1 m (39-3/8")
USB/AC adaptor
The shape of the adaptor may vary depending on the area where you purchased.
(U.S.A.and Canada models: WJ84090)
(Taiwan model: WJ84540)
China model: WJ84570)
(Australia model: WJ84590)
(Europe and Asia models: WJ84610)
(U.K. model: WJ84620)
(Korea model: WJ84640)

Non-skid pad x 2 (including 1 spare)
CONTROLS AND FUNCTIONS
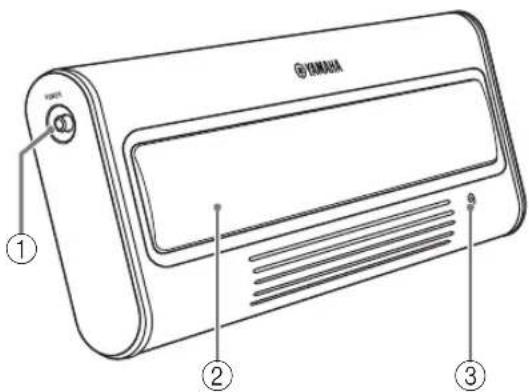

① POWER switch
Turns this unit on. Press this switch again to turn this unit off. When this unit is on, the status indicator (LED) lights up.
②Speaker
Outputs the sound of the connected device.
③ Status indicator (LED)
Indicates the current status of this unit. For details, refer to "About the status indicator (LED)" on page 6.
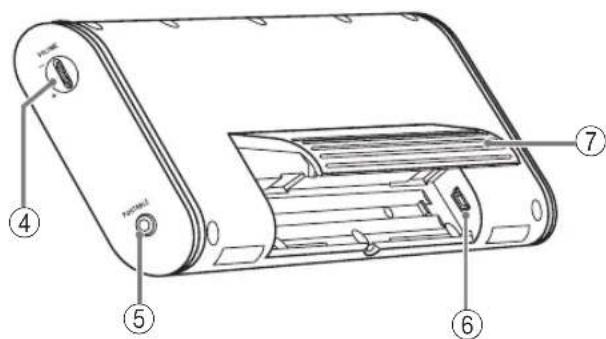
④VOLUME dial
Adjusts the volume level. Rotate the dial in the direction of the + symbol to increase the volume and in the direction of the - symbol to decrease the volume.
⑤ PORTABLE jack
Connect a portable audio player, etc. to this jack.
⑥USB jack
Connect the small plug of the USB cable to this jack.
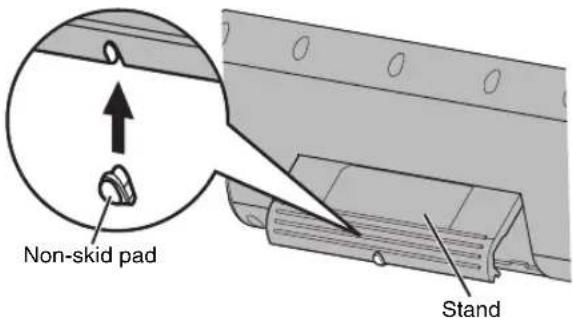
⑦Stand
Use the stand when you set up this unit.
CONNECTIONS
Use the procedure below to choose one of the three power supplies according to your usage circumstances.
When using USB bus power (this page)
When using the USB/AC adaptor (page 4)
3 When using batteries (page 5)
Notes
- Before connecting, make sure that POWER switch on this unit is turned off.
- Before connecting, make sure that VOLUME dial on this unit is set to the minimum.
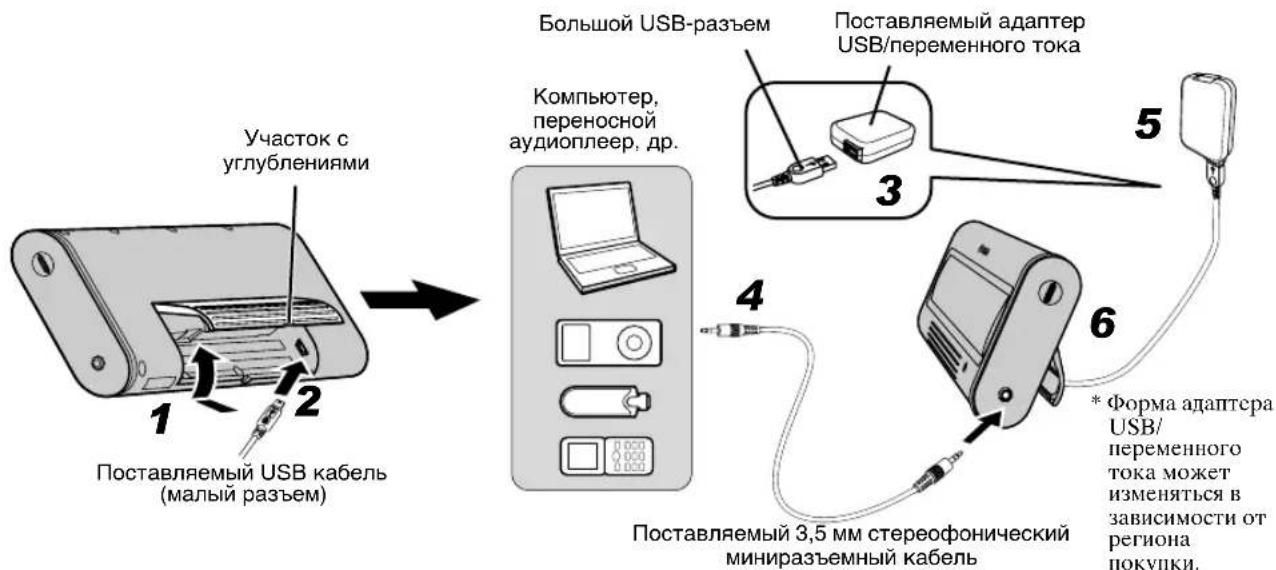
When using USB bus power
When you connect the USB port for the first time, you need to download USB drivers into your computer. For the procedure of the installing USB drivers, see "Installation of USB drivers" on page 3.
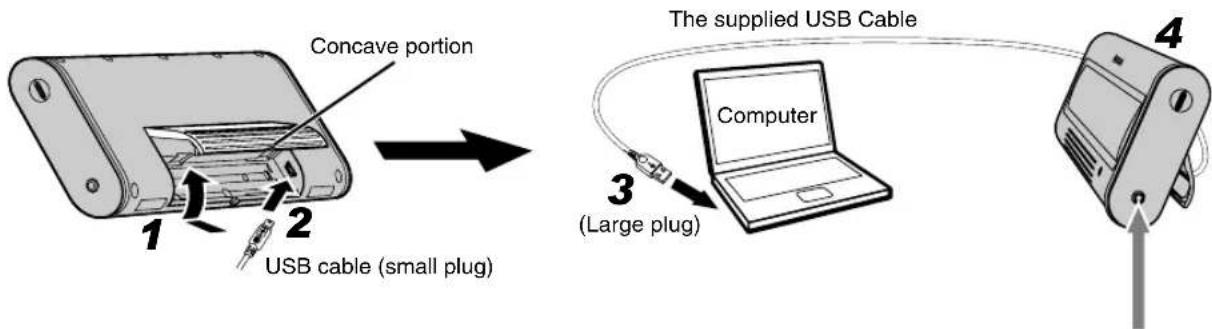
1 Press and hold the concave portion on the stand and open it upward.
2Connect the small plug of the supplied USB cable to the USB jack of this unit.
3Connect the large plug of the USB cable to the USB port of your computer.
Note
Never connect your computer via an USB hub. This unit may not work properly.
4Put this unit on a flat surface (a desk etc.) using the stand.
Note
When setting up this unit, do not apply force to the top of this unit. Doing so may cause damage or break the stand.
Enjoying sounds of a portable audio player using the USB bus power
You can also enjoy the sound of a portable audio player using a computer as power source when you connect a portable audio player to the PORTABLE jack of this unit using the supplied 3.5mm stereo mini plug cable.
Note
In this case, the sound output from this unit is mixed with the sound from your computer. Adjust the mixing level using volumes of your computer's media player or your portable audio player.
■ Installation of USB drivers
The installation procedure is variable depending on OS. After "Common operations" below, follow the installation procedure for your OS.
- You may need the CD-ROM of the OS running on your computer to install the device drivers. For details, refer to the manuals of your computer.
- The following installation procedures for the device driver installation method may not be applicable to certain PC environments. In this case, follow the instructions given in the displayed dialog boxes. Consult the PC manufacturer or your computer dealer in case of doubt.
- When you change the connecting USB port to another one, it may be required to reinstall the USB driver.
The displayed messages etc. may vary depending on your computer or OS. - When installing USB drivers into an OS other than the ones mentioned below, refer to the manuals of your computer.
Common operations
1Switch on your computer to boot the OS.
2Connect this unit to your computer.
For the connection method, see steps 1 to 4 in "1 When using USB bus power" on page 2.
Installing on Windows Vista, Windows XP, Windows 2000 or Mac OS*
Press POWER to switch on this unit.
Your computer detects this unit and installs the necessary devices automatically.
This unit gets ready for use after completion of the installation.
- (Mac OS 9.1 or later, Mac OS X 10.0 or later)
Installing on Windows Me
1Press POWER to switch on this unit.
2Install the USB-Compatible Device.
Your computer automatically detects the "USB-Compatible Device" and installs it.
3Install the USB Audio Device.
[Add New Hardware Wizard] is displayed

Window: [Windows has found the following new hardware]
Check "USB Audio Device" is displayed Window: When [Digital signature confirmation] is displayed
Check "USB Audio Device" is displayed Select [Yes]
Click [OK]
Select "Automatic search for a better driver. [Recommended]"
Click [Next]
Your computer automatically detects the "USB Audio Device" and installs it. Check "Windows has finished installing the software for the new hardware device" is displayed Click [Finish]
4Install the USB Human Interface Device.
Your computer automatically detects the "USB Human Interface Device" and installs it.
This unit gets ready for use after completion of the installation.
Installing on Windows 98SE
1Press POWER to switch on this unit. [Add New Hardware Wizard] is displayed
2Install the USB-Compatible Device.
Window: [This wizard searches for new drivers for] Check "USB-Compatible Device" is displayed
Click [Next]
Select "Search for the best driver for your device.
[Recommended]
Click [Next]
Select "CD-ROM Drive"
*At this time, leave the items checked by default.
Click [Next]
Window: When [Add New Hardware Wizard] is displayed Select "The updated driver [Recommended]"
Click [Next]
Window: [Windows driver file search for the device]
Check "USB-Compatible Device" is displayed
Click [Next]
Check "Windows has finished installing the software that your new hardware device requires." is displayed Click [Finish]
3Install the USB Human Interface Device.
Window: [This wizard searches for new drivers for]
Check "USB Human Interface Device" is displayed
Click [Next]
Select "Search for the best driver for your device. [Recommended]"
Click [Next]
Select "CD-ROM Drive"
*At this time, leave the items checked by default.
Click [Next]
Window: [Windows driver file search for the device]
Check "USB Human Interface Device" is displayed
Click [Next]
Check "Windows has finished installing the software that your new hardware device requires." is displayed Click [Finish]
4Install the USB Audio Device.
Window: [This wizard searches for new drivers for]
Check "USB Audio Device" is displayed
Click [Next]
Select "Search for the best driver for your device."
[Recommended]
Click [Next]
Select "CD-ROM Drive"
*At this time, leave the items checked by default.
Click [Next]
Window: [Windows driver file search for the device]
Check "USB Audio Device" is displayed
Click [Next]
Check "Windows has finished installing the software that your new hardware device requires." is displayed Click [Finish]
This unit gets ready for use after completion of the installation.
When the inserted Windows 98SE CD-ROM is not recognized
Even when the CD-ROM is inserted, your computer may display an error message if it cannot find the location of the CD-ROM drive. In this case, it is required to specify the location manually.
If this error occurs during installation of USB Human Interface Device:
Window: [Disc insertion] (Error message)
Click [OK]
Window: [Open]
"Drive (V):" (Pull-down menu)
Select the drive in which the CD-ROM is inserted
"Folder (F):" (Field)
Select [win98]
"Filename (N):" (Field)
Select [base6.cab]
Click [OK]
Window: [Copy File]
"File Copy Source (C):" (Field)
Check the drive name selected above.
Click [OK]
Check "Windows has finished installing the software that your new hardware device requires." is displayed Click [Finish]
If this error occurs during installation of USB Audio Device:
Window: [Disc insertion] (Error message)
Click [OK]
Window: [Open]
"Drive (V): (Pull-down menu)
Select the drive in which the CD-ROM is inserted
"Folder (F):" (Field)
Select [win98]
"Filename (N):" (Field)
Select [driver21.cab]
Click [OK]
Window: [Copy File]
"File Copy Source (C):" (Field)
Check the drive name selected above.
▼ Click [OK]
Check "Windows has finished installing the software
that your new hardware device requires." is displayed
Click [Finish]
- Windows is a registered trademark of Microsoft Corporation in the United States and/or other countries.
Macintosh is a trademark of Apple Computer, Inc., registered in the United States and other countries.
2 When using the USB/AC adaptor
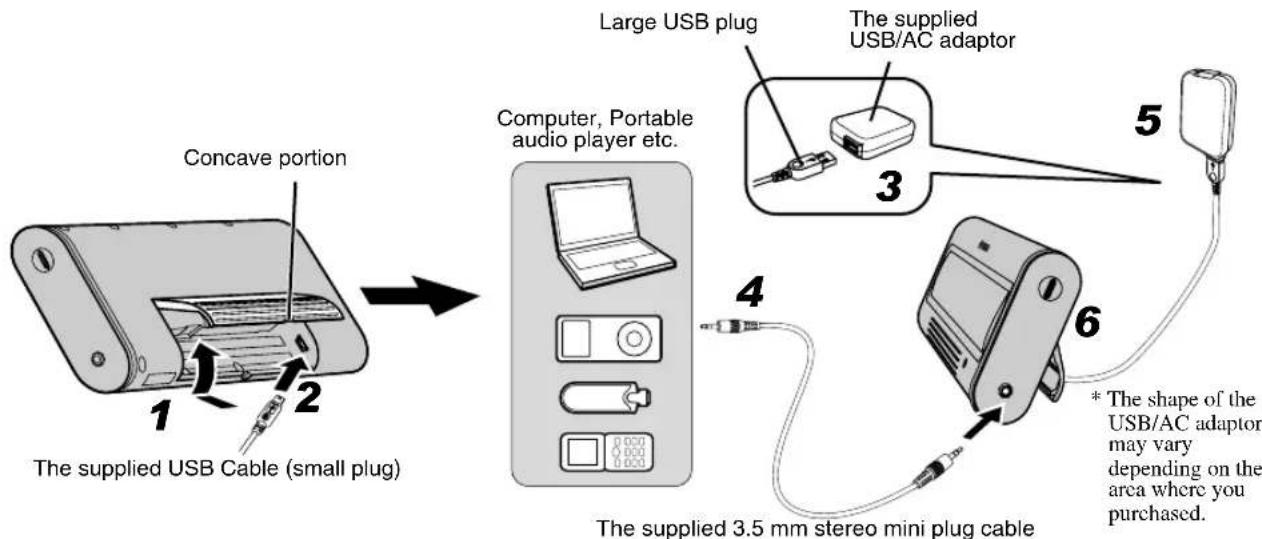
1 Press and hold the concave portion on the stand and open it upward.
2Connect the small plug of the supplied USB cable to the USB jack of this unit.
3Connect the large plug of the USB cable to the USB/AC adaptor.
4Connect an audio output jack of your portable audio player and the PORTABLE jack of this unit using the supplied 3.5 mm stereo mini plug cable.
5Plug the USB/AC adaptor to the AC wall outlet.
6Put this unit on a flat surface (a desk etc.) using the stand.
Note
When setting up this unit, do not apply force to the top of this unit. Doing so may cause damage or break the stand.
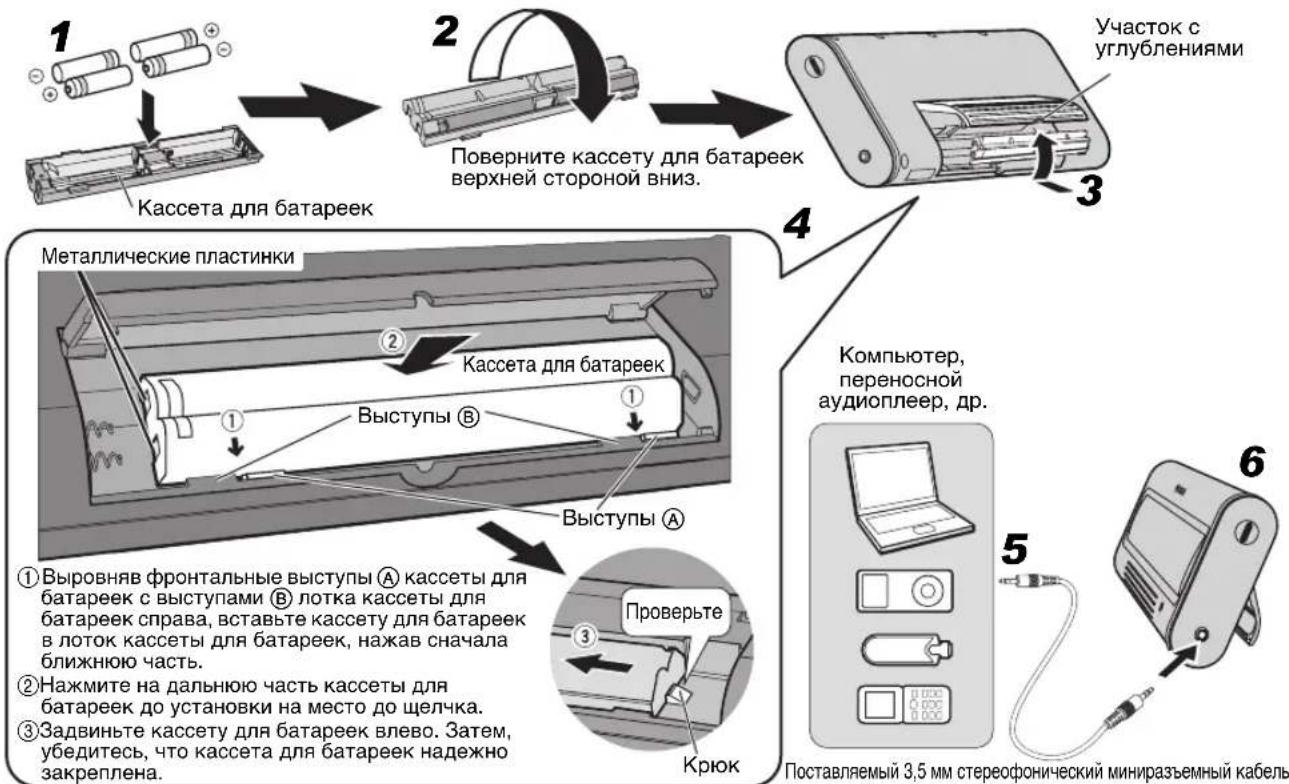
3 When using batteries
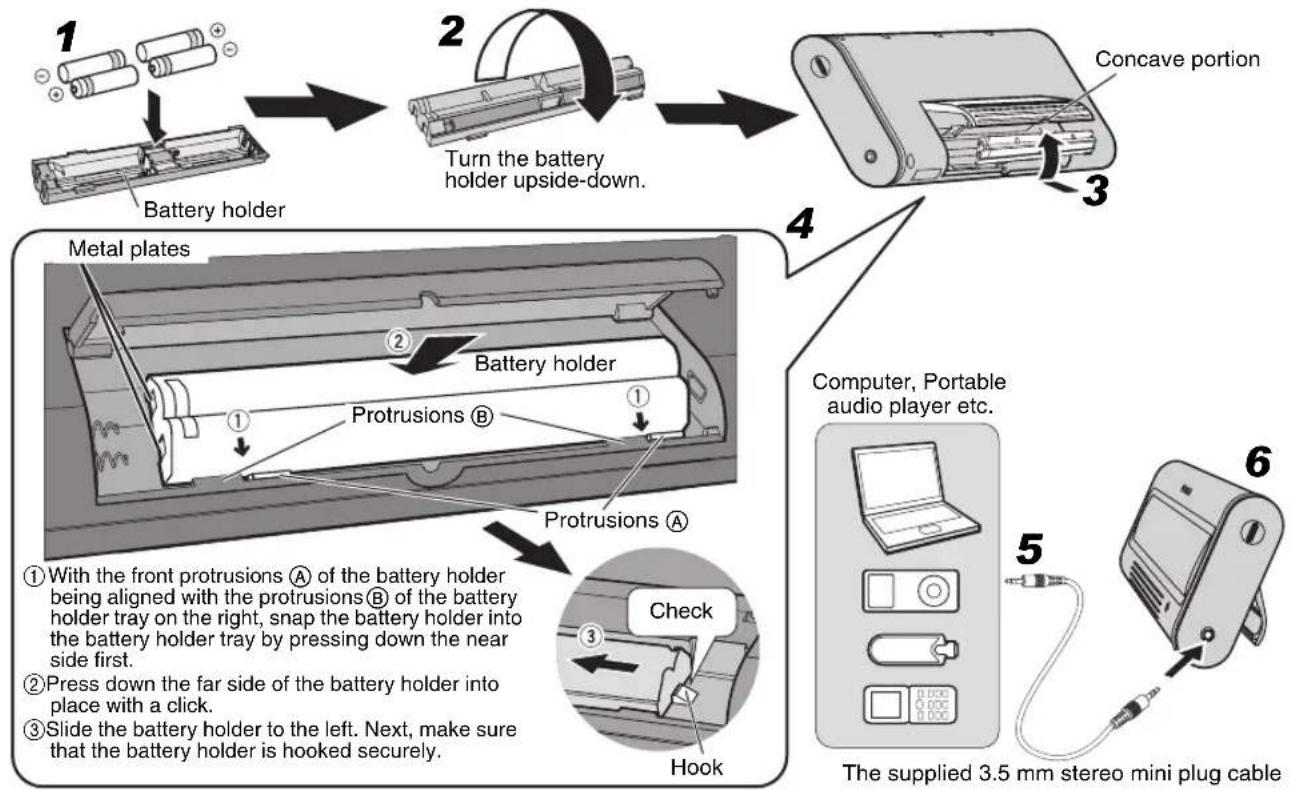
You cannot insert the battery holder into this unit when connecting the USB plug. Unplug the USB cable from this unit before inserting the battery holder.
1Insert 4 commercially available AAA, R03, UM-4 batteries (alkaline or nickel-hydride batteries) into the battery holder.
Make sure you insert the batteries according to the polarity markings (+ and -) .
2Turn the battery holder upside-down.
3Press and hold the concave portion on the stand and open it upward.
4Insert the battery holder into this unit.
5Connect an audio output jack of your portable audio player and the PORTABLE jack of this unit using the supplied 3.5 mm stereo mini plug cable.
6Put this unit on a flat surface (a desk etc.) using the stand.
Note
When setting up this unit, do not apply force to the top of this unit. Doing so may cause damage or break the stand.
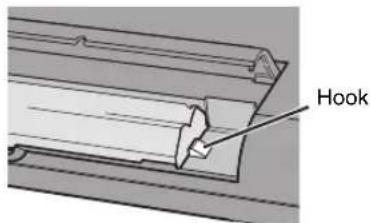
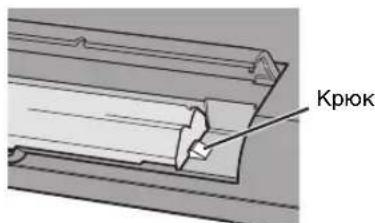
When removing the battery holder
Push down the hook, and then slide the battery holder rightward to remove the battery holder.
About batteries
Notes
We recommend using alkaline or nickel-hydride batteries. Manganese batteries provide short battery life.
- Do not use an old battery together with a new one.
- Do not use different types of batteries (such as alkaline and nickel-hydride batteries) together. Each type of battery has its own characteristics even if they are similar in shape.
- When not planning to use this unit for long periods of time (for more than 1 month), remove the batteries from the battery holder.
- If the batteries have leaked, dispose of them immediately. Avoid touching the leaked material or letting it come into contact with clothing, etc. Clean the battery compartment thoroughly before installing new batteries.
- Do not throw away batteries with general house waste; dispose of them correctly in accordance with your local regulations.
1 Press POWER to turn this unit on. (The status indicator (LED) lights up.)
2Start playback of your computer's media player or your portable audio player.
3Adjust the volume level using VOLUME on this unit.
Note
Do not unplug the USB cable from your computer during playback. Doing so may cause your computer to freeze.
- When connecting to your computer, we recommend that adjusting the volume level using VOLUME on this unit after setting the volume level of your computer and media player to the maximum.
- When not using this unit, turn its power off to save power.
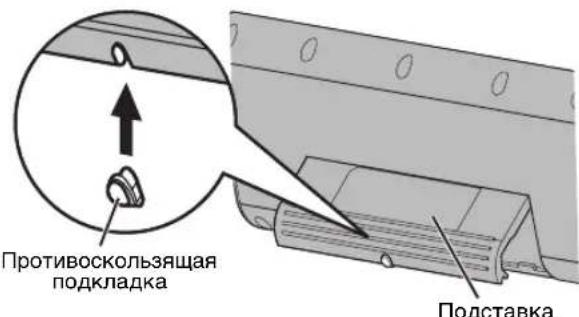
About the non-skid pad
When playing back a source with low frequency sounds, this unit may vibrate. To get rid of the vibration noise, attach the supplied non-skid pad.
After using this unit
1Rotate VOLUME to set this unit's volume level to the minimum.
2Stop playback of your computer's media player or your portable audio player.
3Press POWER to turn this unit off. (The status indicator turns off.)
Note
Do not pull forcibly on the USB cable when disconnecting it. Doing so may damage the USB cable/plug.
About the status indicator (LED)
| LED status The current status of this unit | |
| Lit This unit is on. | |
| Off This unit is off, or | power supply is not connected. |
| Turning on and off repeatedly | Limiter control has been activated due to excessive input. (Turn down the volume level until the LED stops flashing.) |
TROUBLESHOOTING
If the problem you are experiencing is not listed below, set this unit to off, disconnect the power, and contact the nearest authorized Yamaha dealer or service center.
General
| Problem Cause Remedy | ||
| No sound. The connection between this unit and the portable audio player or computer is not collect or securely. | Connect securely. | |
| The volume is set to the minimum. Increase the volume. |
When using the USB bus power
| Problem Cause Remedy | ||
| The volume level cannot be increased even if this unit's VOLUME dial is rotated in the direction of the + symbol. | The setting of audio device on your computer is wrong. | Set the audio device to Windows: "USB Audio DAC" or "USB Audio Device" Macintosh: "USB DAC" or "USB Audio DAC". |
| No sound from this unit. | Failure to install the USB driver. | Install the USB driver again. |
| The volume level cannot be increased. | The volume of your computer or the media player is not set to maximum. | Increase the volume. |
Note
The limiter is activated temporarily to decrease the volume output when there is a continuous excessive output. While the limiter is activated, the status indicator turns on and off repeatedly. Turn down the volume until the indicator flashing stops.
SPECIFICATIONS
Speaker section
Type.Yamaha SR-BASS technology
Driver 38 mm Ti-cone full-range driver x 2
Magnetic shielding type
Impedance 6Ω
Amplifier section
Input
Analog (PORTABLE). 3.5 mm Stereo mini jack Digital (USB) USB terminal
Dynamic power 6 W x 2 (1 kHz, 6 Ω)
Max. Instantaneous Power*
10 W x 2 (1 kHz, 6 Ω, 10% THD)
Input sensitivity/Impedance
PORTABLE input. 300mV / 10k
Maximum input signal
PORTABLE input. 2.0 V
Frequency response 90 Hz to 20 kHz
- Refers to the power that can be output for 100ms continuously.
USB section
Computer
...Computer equipped with a USB port on which a Windows or Macintosh operating system is installed.
OS
..Windows Vista, XP, 2000, Me, 98SE
.. Mac OS 9.1 or later, Mac OS X 10.0 or later
General
Power Supply
USB bus power. 5 V/500 mA
USB/AC adaptor . 5 V/500 mA
Battery .AAA,R03,UM-4
Battery life: 3 hours as alkaline
Output: 10mW + 10mW
Power Consumption (When the USB/AC adaptor is used)
Less than 5 W
Dimensions (WxHxD) 248 x 100 x 33 mm
(9-3/4" x 3-15/16" x 1-5/16")
Weight 500g
(1 lbs. 2 oz.)
Please note that all specifications are subject to change without notice.
ACCESSIONES FOURNIS 1
COMMANDES ET FONCTIONS 1
RACCORDEMENTS 2
Selectionnez "Search for the best driver for your device.
[Recommended]
Cliquez sur [Next]
Sélectionnez "The updated driver [Recommended]"
Cliquez sur [Next]
Fenetre: [Windows driver file search for the device]
Vérifiez si "Windows has finished installing the software that your new hardware device requires." est affché Cliquez sur [Finish]
Fenêtre: [This wizard searches for new drivers for]
Vérifiez si "USB Human Interface Device" est affché
Cliquez sur [Next]
Selectionnez "Search for the best driver for your device. [Recommended]"
Cliquez sur [Next]
Fenêtre: [Windows driver file search for the device]
Vérifiez si "USB Human Interface Device" est affché
Cliquez sur [Next]
Vérifiez si "Windows has finished installing the software that your new hardware device requires." est affché Cliquez sur [Finish]
Fenêtre: [This wizard searches for new drivers for]
Vérifiez si "USB Audio Device" est affché
Cliquez sur [Next]
Sélectionnez "Search for the best driver for your device. [Recommended]"
Cliquez sur [Next]
Fenetre: [Windows driver file search for the device]
Vérifiez si "USB Audio Device" est affché
Cliquez sur [Next]
Vérifiez si "Windows has finished installing the software that your new hardware device requires." est affché Cliquez sur [Finish]
"Folder (F):" (Champ)
"Filename (N):" (Champ)
Fenetre: [Copy File]
"File Copy Source (C):" (Champ)
Vérifiez si "Windows has finished installing the software
that your new hardware device requires." est affché
Cliquez sur [Finish]
"Folder (F):" (Champ)
"Filename (N):" (Champ)
Fenetre: [Copy File]
"File Copy Source (C):" (Champ)
Verifiez si "Windows has finished installing the software
that your new hardware device requires." est affché
Cliquez sur [Finish]
10 W x 2 (1 kHz, 6 Ω, 10% THD)
Pile. AAA, R03, UM-4
(Modell fur Taiwan: WJ84540)
(Modell fur China: WJ84570)
(Modell fur Australien: WJ84590)
(Modell fur Korea: WJ84640)

Fenster: [This wizard searches for new drivers for]
Wahlen Sie,Search for the best driver for your device.
[Recommended]
Wahlen Sie, The updated driver [Recommended]
Fenster: [Windows driver file search for the device]
Prüfen Sie, ob „Windows has finished installing the software that your new hardware device requires.” erscheint
Fenster: [This wizard searches for new drivers for]
Wahlen Sie,Search for the best driver for your device.
[Recommended]
Fenster: [Windows driver file search for the device]
software that your new hardware device requires.
erscheint
Fenster: [This wizard searches for new drivers for]
Wahlen Sie, "Search for the best driver for your device.
[Recommended]
Fenster: [Windows driver file search for the device]
Prüfen Sie, ob „Windows has finished installing the software that your new hardware device requires.” erscheint
"Drive (V):" (Pull-down-Menu)
"Filename (N):"(Feld)
Fenster: [Copy File]
"File Copy Source (C):" (Feld)
"Drive (V):" (Pull-down-Menu)
"Filename (N):" (Feld)
Fenster: [Copy File]
"File Copy Source (C):" (Feld)
Prufen Sie, ob „Windows has finished installing the software that your new hardware device requires." erscheint
Fonster: [This wizard searches for new drivers for]
Kontrollera att "USB-Compatible Device"visas
Klicka pa [Next]
Valj "Search for the best driver for your device.
[Recommended]
Klicka pa [Next]
Välj "CD-ROM Drive"
*Lat i detta skede de forvalda posterna vara markerade.
Klicka pa [Next]
Fonster: När [Add New Hardware Wizard] visas
Välj "The updated driver [Recommended]"
Klicka pa [Next]
Fönster: [Windows driver file search for the device]
Kontrollera att "USB-Compatible Device" visas
Klicka pa [Next]
Kontrollera att "Windows has finished installing the software that your new hardware device requires." visas Klicka på [Finish]
Fonster: [This wizard searches for new drivers for]
Kontrollera att "USB Human Interface Device" visas
Klicka pa [Next]
Valj "Search for the best driver for your device. [Recommended]"
Klicka pa [Next]
Valj "CD-ROM Drive"
Fönster: [Windows driver file search for the device]
Kontrollera att "USB Human Interface Device" visas
Klicka pa [Next]
Kontrollera att "Windows has finished installing the software that your new hardware device requires." visas Klicka på [Finish]
Valj "Search for the best driver for your device. [Recommended]"
Klicka pa [Next]
Valj "CD-ROM Drive"
*Lát i detta skedec forvalda posterna vara markerade.
Klicka pa [Next]
Fönster: [Windows driver file search for the device]
Kontrollera att "USB Audio Device" visas
Klicka pa [Next]
Kontrollera att "Windows has finished installing the software that your new hardware device requires." visas Klicka på [Finish]
After avsutad installation forbereds hegtalaren for anvandning.
"Folder (F):" (Falt)
Välj [win98]
"Filename (N):" (Falt)
Välj [base6.cab]
Klicka pa [OK]
Fonster: [Copy File]
"File Copy Source (C):" (Falt)
Kontrollera att "Windows has finished installing the
software that your new hardware device requires." visas
Klicka på [Finish]
"Filename (N):" (Fait)
Vaj [driver21 cab]
▼ Klicka pa [OK]
Fonster: [Copy File]
"File Copy Source (C):" (Falt)
Kontrolera att "Windows has finished installing the
software that your new hardware device requires." visas
Klicka på [Finish]
10 W x 2 (1 kHz, 6 Ω, 10 % overtonsdistorsion)
Fare cli su [OK] Scegliere "Automatic search for a better driver. [Recommended]"
Fare cli su [Next]
Scegliere "Search for the best driver for your device. [Recommended]"
Fare cli su [Next]
Fare cli su [Next]
Scegliere "The updated driver [Recommended]"
Fare cli su [Next]
Finestra: [Windows driver file search for the device]
Fare cli su [Next]
Controllare che "Windows has finished installing the software that your new hardware device requires." sia visualizzato
Fare cli su [Finish]
Scegliere "Search for the best driver for your device. [Recommended]"
Fare cli cu [Next]
Fare cli su [Next]
Fare cli su [Next]
Controllare che "Windows has finished installing the software that your new hardware device requires." sia visualizzato
Fare cli su [Finish]
Fare cli su [Next]
Scegliere "Search for the best driver for your device. [Recommended]"
Fare cli su [Next]
Fare cli su [Next]
Fare cli su [Next]
Controllare che "Windows has finished installing the software that your new hardware device requires." sai visualizzato
Fare cli su [Finish]
"Filename (N):" (Campo)
Scegliere [base6.cab]
Fare cli su [OK]
Finestra: [Copy File]
"File Copy Source (C):" (Campo)
Fare cli scu [Finish]
"Folder (F):" (Campo)
Scegliere [win98]
"Filename (N):" (Campo)
Scegliere [driver21.cab]
Fare clic su [OK]
Finestra: [Copy File]
"File Copy Source (C):" (Campo)
Controllare che "Windows has finished installing the software that your new hardware device requires." visualizzato
Fare cli scu [Finish]
Ventana: [Windows has found the following new hardware]
Compruebe que se visualice "USB Audio Device"
Ventana: Cuando se visualiza [Digital signature confirmation]
Compruebe que se visualice "USB Audio Device"
Selezione [Yes]
Haga cli en [OK]
Selezione "Automatic search for a better driver.
[Recommended]"
Haga cli en [Next]
Compruebe que se visualice "Windows has finished installing the software for the new hardware device"
Haga cli en [Finish]
Ventana: [This wizard searches for new drivers for]
Compruebe que se visualice "USB-Compatible Device"
Haga cli en [Next]
Selezione "Search for the best driver for your device. [Recommended]"
Haga cli en [Next]
Ventana: [Windows driver file search for the device]
Compruebe que se visualice "USB-Compatible Device"
Haga cli en [Next]
Compruebe que se visualice "Windows has finished installing the software that your new hardware device requires."
Haga cli en [Finish]
Ventana: [This wizard searches for new drivers for]
Compruebe que se visualse "USB Human Interface Device"
Haga cli en [Next]
Selezione "Search for the best driver for your device. [Recommended]"
Haga cli en [Next]
Ventana: [Windows driver file search for the device]
Compruebe que se visualice "USB Human Interface Device"
Haga cli en [Next]
Compruebe que se visualice "Windows has finished installing the software that your new hardware device requires."
Haga cli en [Finish]
Ventana: [This wizard searches for new drivers for]
Compruebe que se visualice "USB Audio Device"
Haga cli en [Next]
Selezione "Search for the best driver for your device. [Recommended]"
Haga cli en [Next]
Ventana: [Windows driver file search for the device]
Compruebe que se visualice "USB Audio Device"
Haga cli en [Next]
Compruebe que se visualice "Windows has finished installing the software that your new hardware device requires."
Haga cli en [Finish]
"Drive (V):" (Menu desplegable)
"Folder (F):" (Campo)
Selectione [win98]
"Filename (N):" (Campo)
Selectione [base6.cab]
Haga clic en [OK]
Ventana: [Copy File]
"File Copy Source (C):" (Campo)
Compruebe que se visualice "Windows has finished installing the software that your new hardware device requires."
Haga cli en [Finish]
"Drive (V):" (Menu desplegable)
"Folder (F):" (Campo)
Selection [win98]
"Filename (N):" (Can
念 Selectione [driver21.cab]
Haga clic en [OK]
Ventana: [Copy File]
"File Copy Source (C):"(Campo)
Compruebe que se visualice "Windows has finished installing the software that your new hardware device requires."
Haga clic en [Finish]
10 W x 2 (1 kHz, 6 Ω, 10% THD)
Sensibilitad de entrada/Impedancia
Entrada PORTABLE. 300 mV/10 kΩ
Entrada PORTABLE. 2,0 V
- (Mac OS 9.1 of later, Mac OS X 10.0 of later)
Venster: [Windows has found the following new hardware]
Controller of USB Audio Device' word getoond
Venster: Wanner [Digital signature confirmation] wordt getoond
Controller of "USB Audio Device" wordt getoond Selecteer [Yes]
Klik op [OK]
Selecteer "Automatic search for a better driver. [Recommended]"
Klik op [Next]
Controller of "Windows has finished installing the software for the new hardware device" wordt getoond Klik op [Finish]
Venster: [This wizard searches for new drivers for] Controller of "USB-Compatible Device" word getoo
Klik op [Next]
Selecteer "Search for the best driver for your device. [Recommended]"
Klik op [Next]
Selecteer "CD-ROM Drive"
*Op dit moment=kunt u alle items gewoon op de standaardinstellungen latent staan.
Klik op [Next]
Venster: Wanner [Add New Hardware Wizard] wordt getoond
Selecteer "The updated driver [Recommended]"
Klik op [Next]
Venster: [Windows driver file search for the device]
Controller of "USB-Compatible Device" word getoond
Klik op [Next]
Controller of "Windows has finished installing the software that your new hardware device requires." wordt getoond
Klik op [Finish]
Venster: [This wizard searches for new drivers for]
Controller of "USB Human Interface Device" word getoond
Klik op [Next]
Selecteer "Search for the best driver for your device. [Recommended]"
Klik op [Next]
Selecteer "CD-ROM Drive"
Venster: [Windows driver file search for the device]
Controller of "USB Human Interface Device" word getoond
Klik op [Next]
Controller of "Windows has finished installing the software that your new hardware device requires." wordt getoond
Klik op [Finish]
Venster: [This wizard searches for new drivers for] Controller of "USB Audio Device" wordt getoond
Klik op [Next]
Selecteer "Search for the best driver for your device. [Recommended]"
Klik op [Next]
Selecteer "CD-ROM Drive"
*Op dit moment=kunt u alle items gewoon op de standaardinstellungen lately staan.
Klik op [Next]
Venster: [Windows driver file search for the device]
Controller of "USB Audio Device" word getoond
Klik op [Next]
Controller of "Windows has finished installing the software that your new hardware device requires." wordt getoond
Klik op [Finish]
Venster: [Disc insertion] (Foutmelding)
Klik op [OK]
Venster: [Open]
"Drive (V):" (Afrolmenu)
"Folder (F):" (Invoerveld)
Selecteer [win98]
"Filename (N):" (Invoerveld)
Selecteer [base6.cab]
Klik op [OK]
Venster: [Copy File]
"File Copy Source (C):" (Invoerveld)
Controller of "Windows has finished installing the software that your new hardware device requires." wordt getoond
Klik op [Finish]
Venster: [Disc insertion] (Foutmelding)
Klik op [OK]
Venster:[Open]
"Drive (V):" (Afrolmenu)
"Folder (F):" (Invoerveld)
Selecteer [win98]
"Filename (N):" (Invoerveld)
Selecteer [driver21.cab]
▼ Klik op [OK]
Venster: [Copy File]
"File Copy Source (C):" (Invoerveld)
Controller of "Windows has finished installing the software that your new hardware device requires." wordt getoond
Klik op [Finish]
..Windows Vista, XP, 2000, Me, 98SE ..Mac OS 9.1 of later, Mac OS X 10.0 of later
Algemeen
Stroomvoorziening
BO3MOXHbIE HENCnPABHOCTN IN CnOCOBI INX YCTPAHEHIN
TEXHNUECKNE XAPAKTEPNUKNI 7
ОпИСАНЕ
3 Bnda 3Hepeo06ecneueHna
B 3aHcHMOCTN OT yCIOB HcIOJIb3OBAHH, MOKHO BbIpaTB OINH H3 TpeX HcTOINIKOB 3JIeKTPoIIepRHN: IHTaHHe OT USB-IIIINbI, aAaITepa USB/IEpeMeHHORToKa HIN bTaapeek.
Bocnpon3BedeHne uΦpoBOrO 3ByaHnA
USB coeHHHeHHe 06ecnueHBaet YHCToe 3ByaHHe c MeHbHMM IIIYMOM.
PeaIbHoe cTepeoHnueckoe 3ByaHne
BbICOKKaueCTBeHHoe 3ByaHHeIOCTnHaerTcC HOMOuBO BbICOKKaueCTBeHHoro yCHJInTeJI, THTaHOBoI HaepaMbl H yHKaJIbHO TeXHOJOrHH SR-BASS,pa3paOtaHHoYamaha.
Ycnilenne do 20 BaTT
OpHHHaJIbHaI TexIOJorH ycnJeHHa YamaHa IO3BOJIeT IOCTHb IIEyATJHOeR 20 BaTTHORO BOCIIPOHN3BeHeHHa (MaKc.MTHOBeHHa MOUHocTB).
ФункциаВТOMaTиСЕСКОнHAcTpOПКИrPOMKOCTN
JaHHb aHnnapaT coepKHT cyHKHIO ABTOMaTHueckOHaCTpOHKn rPOMKoCTH, KOtopa I03BOJIe T yCHINTb 6acOBoe 3ByaHHe pH BOCIIPOH3BeJeHH Ha H3KOM yPoBHe rPOMKoCTH, DIOCTHXKeHH 6OJIee y6eIHNTeJIbHO 3ByaHHe.
SRBass
"Swing Radiator BassTM" ABJIECTCRA TOpROBm MapKoYAMAHA CORPORATION.
IIOCTABJRAEMbIEAKCECCYAPbl
Y6eINTEcB HaJIyIN BCeX CJIeYIOIN XTeAJIeN.
Kacceta 6aTaapeek
Pepenocnoy yexon
3,5 MM CTepeofoHueckn MNHnpa3bEmhbl Ka6eIb (0,5M)
USB ka6eNB (1M)
AanTep USB/npeMeHHoro ToKa FOpMa aaiiTepa MoKeT H3MeHHTbC B 3aBCHMOCTN OT PerHOHa IOKyIKH.
(MoJIeIINIIA CIIIA H KaHaIbI: WJ84090)
(MonjT TaBnA: WJ84540) (MonjKHTA: WJ84570)
(MOcJIbIaB AEBpAaHIN: WJ84590) (MOcJIbIaB EBPOBnA AaHIN: WJ84610)
(MoJIbIa CoeHHeHOrO KOpJIeBCTBa BeJIHKoBPHTAHIN CBepeHoi HpAunu: WJ84620) (MoJIcIIa KOpH: WJ84640)

IpoTnBocKoNb3aUa nDknaKa x 2 BKIOuOa1 3anaChyO
CNCTEMblYnPABJIeHnI NФYHKUIN

①ПepeключateNB POWER
BkIIOyae TaHHbI aIIIapaT. IJIa OTKJIIOyeHnI DaHHOrO aIIIapaTa, cHOBa HaXMITE daHHbI HepeKJIIOYateJIb. Korda DaHHbI aIIIapaT HAXODITcR BO BKJIIOUeHHOM COCTOHHN, BbICBEuHBaCtcr HHINKaTOP COCTOHHr (CBeTOHOn).
②KoJOnHka
BocpoH3BOaHT 3ByaHHe oTIOKJIHOeHHOrO yctPoHCTBa.
2NoDKKIOUHTe daHHbI annapaT K KOMNbIoTepy.
I0 MeToyNoKJIIOHeHnA,CMOTpuTe wArn 1-4B
IcnoJIb3OBAHHe NHTaHn O T USB-ImHb"Ha cTp.2.
YcTaHOBka Ha OpeaunOHoCnCTeMe Windows Vista,Windows XP,Windows 2000 nIi Mac\*
Haxmte POWER nBkNoeHn DaHHoro annapata.
KOMIbIOTep aBTOMaTnueeCKN 6OBHApYKNaBaET daHHbI annapat n yCTaHaBnBaet Heo6XoDmble dpaiBepbl. DaHHbI annapat MOxHO nCNoB3ObaTb nocne 3aBepseHn yCTaHOBKn.
* (Mac OS 9.1 nnn no3ke, Mac OS X 10.0 nnn no3ke)
YctaHOBka Ha Windows Me
1 Haxmte POWER dna BkIOueHn daHHoro annapata.
2yCTaHOBNTe USB-COBMECTHMoe yCTpoIcTBO. KomblbTOpe aBtOMaTHueCKN 6hApYKNaBaET "USB- Compatible Device" n yCTaHabJIbAeT erO.
3yctaHOBnTe AynOyCtPoNCTBO USB.
OTo6paKaTcR [Add New Hardware Wizard]

OKHO: [Windows has found the following new hardware]
Y6eIITecb, YTO OTo6paXeHo "USB Audio Device" OkHO: Korda OTo6paXeHo [Digital signature confirmation] Y6eIITecb, YTO OTo6paXeHo "USB Audio Device" BbIbepTe [Yes]
LZeIKNHnTe [OK]
BbI6epuTe "Automatic search for a better driver. [Recommended]"
LZeKHTe [Next]
KOMNbIOTep aBtOMaTnueckn 06hApyXnBaet "USB Audio Device" n yCTaHaBnBaET erO.
Y6eIITecb, YTO OTo6paKeHo "Windows has finished installing the software for the new hardware device" UeJIKNHnTe [Finish]
4 UctahOBHTe USB-ycTpoIcTBo INHTepfSeMa nOJIb3ObaTeJIa. KomblIOTeP aBtOMaTHueCKn 06HapyXmBaET "USB Human Interface Device" uYCTaHaBJIuBaET erO.
DaHHb annapaT MOxHO NcNoJIb3OBA Tb NOcNe 3aBepueHn yCTaHOBKn.
YctaHObKa Ha Windows 98SE
1 Haxmte POWER nBkIoueHn daHHoro annapaTa. OTo6paKaetcR [Add New Hardware Wizard]
2yctaHOBNTe USB-COBmecTHMOe ycTPOncTBO.
OknHO: [This wizard searches for new drivers for] 6eHntecb, yTo oTo6paKeHo "USB-Compatible Device"
LJIKNHTe [Next]
Bb6epTe "Search for the best driver for your device. [Recommended]"
LJIeJKNHnTe [Next]
BbIbepnTe "CD-ROM Drive"
*B 3OTOT MOMCHT,OCCTABBTC HcH3McHHbIMN IyHKTB1, OTMCCHHbC NO yMOJUHaHHO.
LJIeKHe [Next]
Okho: Korga oTo6paKeHo [Add New Hardware Wizard] BbIepeTe "The updated driver [Recommended]"
LJIeKHe [Next]
OKHO: [Windows driver file search for the device]
Y6eIntecb, yTO oTo6paKeHo "USB-Compatible Device"
LJIKNHnTe [Next]
Y6eNTecb, YTO OTo6paKeHo "Windows has finished installing the software that your new hardware device requires." UenKHTe [Finish]
3 YctaHOBNTE USB-ycTPOcCTBO INHTeppeIca NOIb3OBATeIa. OKHO: [This wizard searches for new drivers for]
Y6eIITecb,HTO OTo6paKeHO "USB Human Interface Device"
LeKHe [Next]
Bb6epTe "Search for the best driver for your device. [Recommended]"
LJIKHNTe [Next]
BbIbepeTe“CD-ROM Drive"
*B 3OTOT MOMCHT,OCCTABTC HCH3MCHHBIMN IYHKTB1, OTMCCHHBCIO VMOJUAAHHIO.
山 JeknTe [Next]
OKHO: [Windows driver file search for the device]
Y6eIntecb,HTO OTo6paXKeHO "USB Human Interface Device"
LJIeKHe [Next]
Y6eIntecb, YTO OTo6paKeHo "Windows has finished installing the software that your new hardware device requires."
LJIeKNHnTe [Finish]
4yctaHOBnTe AynoycTPOuCTBO USB.
OKHO: [This wizard searches for new drivers for]
Y6eNTecb, yTO OTo6paKeHo "USB Audio Device"
LJIeIKHnTe [Next]
BbIepeHte "Search for the best driver for your device. [Recommended]" 1eKnTe [Next]
BbIbepuTe "CD-ROM Drive"
*B 3OTOT MOMeHT, OCTaBtHe HEN3MeHHbIMH IYHKTBI, OTMEeHHbIc NO VMOJUHaHHIO.
LZeKHe [Next]
OKHO: [Windows driver file search for the device]
Y6eIntec, yTO OTo6paKeHNo "USB Audio Device"
LJIeKHNTe [Next]
Y6eIntecb, YTO OTo6paKeHo "Windows has finished installing the software that your new hardware device requires."
UeKnTe [Finish]
DaHHb annapaT MoXHO NcNoIb3ObaTb NocNe 3aBepWeHnY cTaHOBKn.
Ecn He pacno3Haetc yTaHOBJIeHHbI Windows 98SE CD-ROM-
JaKe eCIny yctaHOJIeH CD-ROM-ⅡIck, KOMIIbIOTeP MoKcET OTO6paKaTb COO6IeHHeC 06 OHIN6Ke, cEIN HeBO3MOXHO 06HapKyITb paCIOJOxKeHHe CD-ROM-ⅡIckOBOJHa. B TaKOM CUYae, Tpe6yEtCBpyuHyo yka3aTb paCIOJOxKeHHe.
Ecnn daHHa OwH6Ka BO3HKnBa BO BpEm yCTAHOBKN USB-ycTpoNCTBa HHTepceEnca NOb3ObaTeHa:
Oko: [Disc insertion] (Coo6eHne 06 own6ke)
LJIeKHNTe [OK]
OkHO:[Open]
"Drive (V): (Onyckaioeecg MeHIO)
BbIbepeHTeDnCKOBOD,kydaBCTaBneH CD-ROM-
"Folder (F):" (None)
Bb6epnte [win98]
"Filename (N):" (None)
BbI6epnTe [base6.cab]
LJENKHNTE [OK]
OKHO: [Copy File]
"File Copy Source (C):" (Flone)
PpOBepbTe Ha3BaHHe DnCKOBOa, BblpaHHoe Bblwe
LJIeKHNTe [OK]
Y6eNTecb, YTO OTo6paKeHo "Windows has finished installing the software that your new hardware device requires."
UeKnTe [Finish]
Ecn daHHa Oun6Ka Bo3HKnBa BO BpeMa yCTaHOBKn AynOyCtPoIcTBA USB:
ÖkHO: [Disc insertion] (Coo6üeHne 06 oWn6ke)
LJIeIKHnTe [OK]
OKHO: [Open]
"Drive (V): (OnyckaioeecmHIO)
BbI6epnte DnckoBoD, Kyda BCTaBneH CD-ROM-ndck
"Folder (F):" (None)
BbIepeHTe [win98]
"Filename (N):" (None)
BbIepeTe [driver21 cab]
LLeKHNTE [OK]
OKHO: [Copy File]
"File Copy Source (C):" (Пол e)
Y6eNTecb,HTO OTo6paKeHo "Windows has finished installing the software that your new hardware device requires."
UeJKNHTe [Finish]
-Windows - 3apeHrncrhpOBAHHaTOpROBaMapKa Microsoft Corporation B CoeHNHeHHbIX IIITaTAX H/INn DpyTHX cTpaHax.
Macintosh - ToproBaa MapKa Apple Computer, Inc., 3aperntpnpoBaHHa B CoeHHeHHbIX IIIratax n npyHX ctpaHax.
2 NcnoJb3OBAHne aanTepa USB/npemehHoro Toka
1HaXMMTe n ydepeKnBaIte yuactOK c yrny6JIeHnAMn Ha noDCTaBKe n OTKpoTTe ero BBepx.
2ПОДКЛIOUHTe MaIbI pa3beM nOCTaBJIeMOrO USB-Ka6eJr K rHe3dY USB dAHHOro annapapa.
3Поdkлioчnte 60ьшои pa3beM USB-ka6eЯ K aДаNTepy USB/неремEHHOrTo Toka.
4 Поdkлочte aydnoBbIXoHoe rHe3do nepehoCHoro aydnonIeepa n rHe3do PORTABLE daHHoro annapataYepe3 noctabnemoro 3,5 MM cTepeoOhueckm MmHnpa3bEmhbl Ka6eb.
5NodknIOuHTe aanTep USB/npemehHoro TOka K cetn npemehHoro TOka.
6 NcnoJb3yra NOCTaBky, yCTaHOBNTe daHHbI annapaT ha poBHOH NOBepXHocTN (CTOJI, dp.).
PnmeaHne
IpycTaHOBKe IaHHoro aIIIapA, He cJeNyET IIpHMeHb ChJy KIOBepxHOCTn JaHHoro aIIapapa. 3rO MoKet IIpHBecTH KIOBpeXJEHHIO HIN IOJIOMKe IOJCTaBKn.

IcnoJb3ObaHne 6aTapeek
IIpnIOKIOHHeHH USB-pa3bema,HEBO3MOXHO BCTaBHTb KaccctyIIA6atapcckBdaHHbAHHapar.IpeiBCTaBKOI KaccetbIIA6atapeek,OTcoeHHHTe USB-Ka6eJIb.
1BCTaBBte 4 OTdJIbHO npOdaIOUmeCn 6aTapeKn AAA, R03, UM-4 (IeNoOHyBne Nn HNKJHe-rN6pNDHbIE 6aTapeKn) B Kaccety DnA 6aTapeek. Y6eINITecb, TTO 6aTapeKn BCTaBJIeHbIB COOTBeTCTBn C O6O3NaYeHnMn IIOJIpaHocTH (+N-)
2NoBepHnTe Kaccety IJIa 6aTaapeek BepxHei CTOpOH BHN3.
3 Haxmte u yepknae yactok cyry6neHnMa Ha noctabke n OTKpoTe erO BBepx.
4 BcTaBbTe kaccety dIa 6aTapeek B daHHbI annapaT.
5NoDKKIOUHTe aydNOBbIXOHOe rHe3do nepeHoCHOro aydnoJIneepa n rHe3do PORTABLE daHoro annapata yepe3 noCTaBnIeMbI 3,5 MM cTepeofoHueckn MHHpa3bemHbIKa6eIb.
6 IcnoIb3yra nOCTaBky, yCTaHOBNTe daHHbI annapat Ha poBHOJ NOBepxHocTn (cToJ, dp.).
PpMeyaHne
Ipn yctaHOBKe JaHHoro aHaapA, He cJeJeYe IpnMeHb ChIy KIOBepxHOCTn DaHHoro aHaapAta. 3To MoKcT IIpHBcTH KIOBpeXJHeHHIO HIN IOJIOMKe IOIDCTABKN.
I3BneueHne kaccetbldlaTaapeek
HaKMTe Ha KPIOK, H3aTeM BbIBBnHbTe Kaccety IIbaTaapeek Bnpabo, H3BJIeKHTe Kaccety IIbaTaapeek.
O 6aTapeiKaX
PnmeaHn
PeKOMeHJyETc HcHIOJIb3OBaTb IIeIOUHbIe HIN HnKeJIeRn6pHIIbIe 6aTapeEKn. MapraHIIeBbIe 6aTaapeEKn HcJOIOIROBcHbI.
He HIOJIb3yIte cTapeIe 6aTapeKIN BmEcTe cHOBBIMN.
He Hcno.1b3yIte pa3HnHbIe TnIIb6aTaapeek (HaipHMepe, IIeIOuHbIe HnKcJIe-Tn6pHbIbc 6aTaapeKn) OIOOBpeMeHHo KaJbI THN 6aTaapeek 06laaet yHKnAIBIMn CBOINCTBaMH, JAnKe cCIn y INx ONIHAKOBaΦopMa.
- EcIN He co6npaTebc HcnoJIb3ObaT daHHb anIcapaT B TcyeHc HPOIOJIKHTeJbHoro cpoKa (60JIec 1 Mccua), H3BJIeKHTe 6aTaPeEKN H3 Kaccetb IIN GaTaapeek.
IIpH IIpoTeKaHH 6aTapeeK, HEmCJIeHHHO H3BJIckHTe Hx. H36eHaIte KOHTaKTA c MaTePhaJOM IIpoTeKaHH HIN He IaBaHTe OJExJe H T.I. CoNPHKaCaTBcR c MaTePhaJOM IIpoTeKaHH. IIpcd yCTaHOKBoHOBbIX 6aTapeeK, TIIaTeJIbHo IIpoTpHe OTJeJIeHHe JIIa 6aTapeeK.
He BbI6paBcBAHte 6aTapeKHN BMeCTe C O6bIyHBIM MycopOM; H36abJIHrTECb OT HHX IIpaBnJIbHO, B COOTBeTCTBHH C MeCTHBIM IIpaBnJIaMH.
ИСПОЛьЗOBAHNE ДАHHО ГАПAPATA
1HaXMMTe POWER nIa BkJIIOueHn DaHHoro annapata. (BbICBeuNbaeTc HnDnKaTop COCTOHHN (CBeTOdNOd).)
2HaunTe Bocnpo3BedeHne MeHaanpeepa KOMnbIOTepa IIN NpeHoCHoro aydnoJIeepa.
3HaCTpoIte ypoBeHb rPOMKOcTn C nOMOuBIO VOLUME Ha daHHo annapaTe.
PpMeyaHne
He orcoeHHnIte USB-Ka6eJIb OT KOMIIbOTepa BO BpeMa BOcHPOH3BecHn. 3TO MOKeT IIpHBecTH K 3aBncaHHIO KOMIIbOTepa.
IINIOKIIIOUeHHNKOMIBIOTepy,peKOMHeHyTcHAcTPaHBaTByPOBeHbPOMKOCTN CIOMOIOBIOVOLUMEHaJaHHOM aIIIapAte,yCTaHOBBYPOBEHbPOMKOCTKHOMIBOTepa HMeJNAJIeepaHa MaKCHMaJIbHbI yPOBEHb.
EcH daHHb annapaT He hCIOJIb3yeTc,OTKIOHTe HHTaHHe B IeJHX KOHOMHN.
O npotnbockoJIb3aIeN IOdKnaIKe
Bo BpeMa BOCpOn3BeeHn HcToHnKa c Hn3KoUacTOThbIMN 3ByKaAMn, DaIIhBn aIIIapaT MoXeT Bn6pnpOBaTB. Bo n36eXaHne IyMa OT Bn6paun, IIpHKpeHrTe IOCTaBJIeMMyIO IpOTNBocKOJIb3aIyIO IOJKAJky.
BO3MOXHbIE HENCINPABHOCTN IN CNOCObI INX YCTPAHEHn
EcJIN Ipo6JIeMa He yKa3aHa HnKe, yCTaHOBHTe JaHHbI aIIIapat B pexKIM OxHJaHHa, OTcoEHNHTe IIITaHHe, H 3aTeM CBXHTecb C 6JIHXaIIHM aBTOpH3NPOBaHHbIM dIIlepOM HIn cepBHC-IEHTpOM Yamaha.
O67aJtB
TEXHINUeCKNEXAPAKTEPNUCTUNK
Pa3deI KOJIOHKn
Tt.. ..Yamaha SR-BASS
FIOJBKA
38 MM THTaHOBO-KOHHueCKa IOJIHOHaIIa3OHHaI ROJIOBkaX2
HmpeJahc 6Ω
Pa3delenycnnteJia
Bxoi
AHaIOROBbI (PORTABLE) 3,5 MM cTepeofoHueCKoe MHHrHe3IO IuΦpOBoi (USB). USB-TePMHaJI
Hannmueckoe HapjkeHne ... 6 BaTT x 2 (1 kT, 6 Ω)
MaKc.MrHOBeHHaMoHnOcTb*
10 BATT x 2 (1 KΓι, 6 Ω, 10% OHN)
UyBCTBHTeJIbHOCTb BXoJa/HMIIeJaHc
BxO PORTABLE 300 mB/10 kΩ
MaKcHMaJIbHbIIBXoJHOCHrHaJI
BxOπ PORTABLE 2,0 B
Yactotnha xapaKtepHctnka
*OTHOCHTcKa HAnpJxKeHHO, KOToPOe MoKet IOCToHNO BBIOJNTbCBA TeueHne 100 Mc.
Pa3dEn USB
KoMnIbITeP
... KomПьIOTep, obOpуIobaHbI USB-норTom, c yctaHOBJeHHoI OpepaIIIOHHOI cnCTeMoI Windows nJIM Macintosh.
OnepaHOnHa nCtema
Windows Vista, XP, 2000, Me, 98SE Mac OS 9.1 nii n03ke, Mac OS X 10.0 nii n03ke
067aYacTb
Hannpaxkennc
ΠιΤΑΗΝΕΟΓUSB-ⅢΙΙΝΗΒI 5B/500MA
AaTep USB/epemehHoro ToKa .5 B/500 mA
BaTaPeIka .AAA,R03,UM-4
CpOK cnjxkb6aTaapeek:3 Yaca IIJIeIOUHbIX (BbIOI:10MBaTT+10MBaTT)
3JIeKToIopTepeJHe (PiH HcIOJIb3OBAHH aHaIRepa USB/IIepeMeHHoro ToKa) MeHee 5 BaTT
a6a t b_1 (III x B x F) 248 x 100 x 33 MM
Bec. 500
IIOKaIyHCTa, IOMHHTe, YTO BCE CIIeIHΦKauHIM MOryt 6bITb H3MeHeHb1 6e3 yBeIDOMJIeHH.