IAP001X - Fan BIONAIRE - Free user manual and instructions
Find the device manual for free IAP001X BIONAIRE in PDF.
User questions about IAP001X BIONAIRE
0 question about this device. Answer the ones you know or ask your own.
Ask a new question about this device
Download the instructions for your Fan in PDF format for free! Find your manual IAP001X - BIONAIRE and take your electronic device back in hand. On this page are published all the documents necessary for the use of your device. IAP001X by BIONAIRE.
USER MANUAL IAP001X BIONAIRE
natural_image
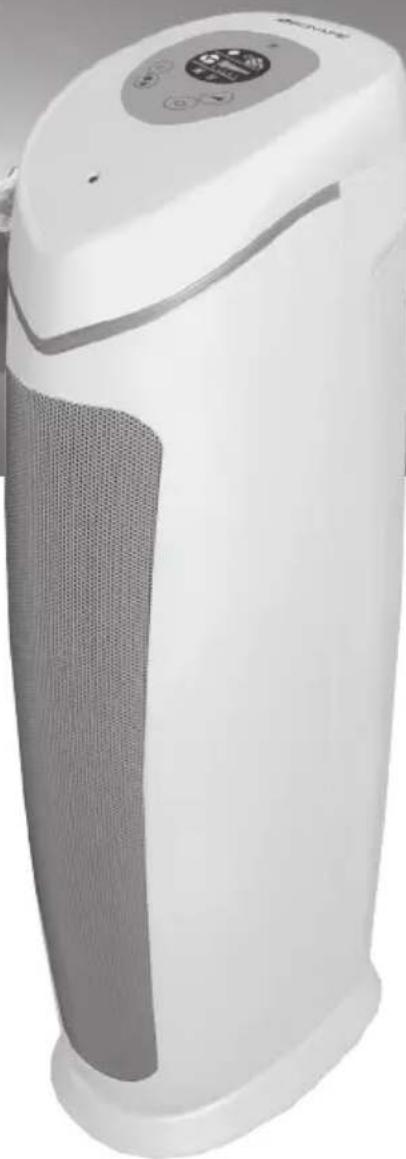
Exterior view of a modern air purifier on a mountain peak with snow-covered peaks and a lake in the background (no signage or text visible)UV AIR PURIFIER
with HEPA-Type
Long Life Filter
MODEL: BAP001X/IAP001X
natural_image
White portable air purifier with gray ventilation grille and digital display (no visible text or symbols)INSTRUCTION MANUAL
MANUEL D'UTILISATION
BENUTZERHANDBUCH
MANUAL DE INSTRUÇÕES
English 4
Français/French 8
Deutsch/German 12
Español/Spanish 17
Nederlands/Dutch 21
Svenska/Swedish 26
Suomi/Finnish 30
Norsk/Norwegian 34
Dansk/Danish 38
Polski/Polish 42
ΕΛΛΗΝΙΚΑ/Greek 46
РУССКИЙ/Russian 51
Italiano/Italian 56
Magyar/Hungarian 60
ČESKY/Czech 65
natural_image
Simple line drawing of an open book with no text or symbols visibleFIG. 1
text_image
A B C D E F
text_image
G J UV 8h H 5 4 3 2 1 I K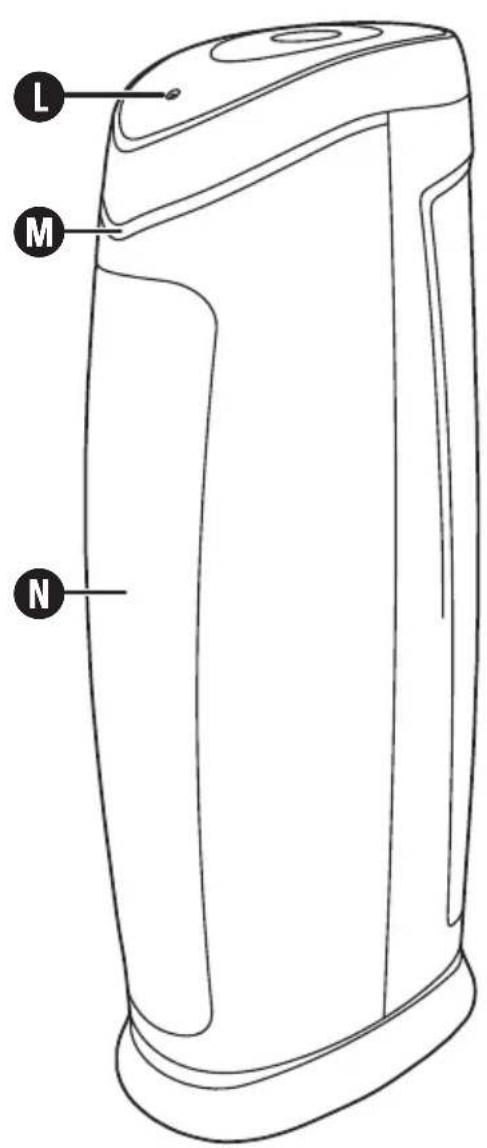
text_image
L M N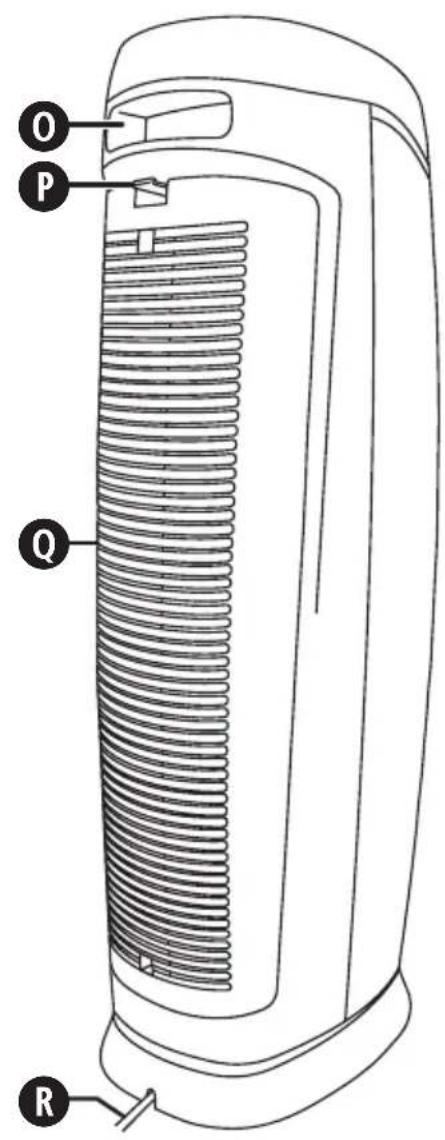
text_image
O P Q RENGLISH
PLEASE READ AND SAVE THESE IMPORTANT SAFETY INSTRUCTIONS.
This appliance can be used by children aged from 8 years and above and persons with reduced physical, sensory or mental capabilities or lack of experience and knowledge if they have been given supervision or instruction concerning use of the appliance in a safe way and understand the hazards involved. Children shall not play with the appliance. Cleaning and user maintenance shall not be made by children without supervision. If the supply cord or plug is damaged, it must be replaced by the manufacturer or its service agent or a similarly qualified person in order to avoid a hazard.
WARNING: This appliance contains a UV-C lamp. Do not stare at the lamp.
To protect against electrical shock, do not immerse the fan, plug or cord in water or spray with liquids.
Avoid contact with any moving parts.
Do not operate in the presence of explosive and/or flammable fumes.
Do not operate fan until fully assembled with all parts properly in place.
To avoid fire hazard, NEVER place the cord under rugs or any parts near an open flame, cooking or other heating appliance.
Do not use outdoors.
Do not let the cord hang over the edge of a table or counter, or come into contact with hot surfaces.
Always use on a dry, level surface.
Do not operate your fan unless the fan grilles are properly fitted.
This product is intended for household use ONLY and not for commercial or industrial applications.
Should the fan stop working, first check the fuse in the plug or fuse/circuit breaker at the distribution board is operating, before contacting the manufacturer or service agent.
Disconnect the appliance from the mains supply before cleaning or maintenance.
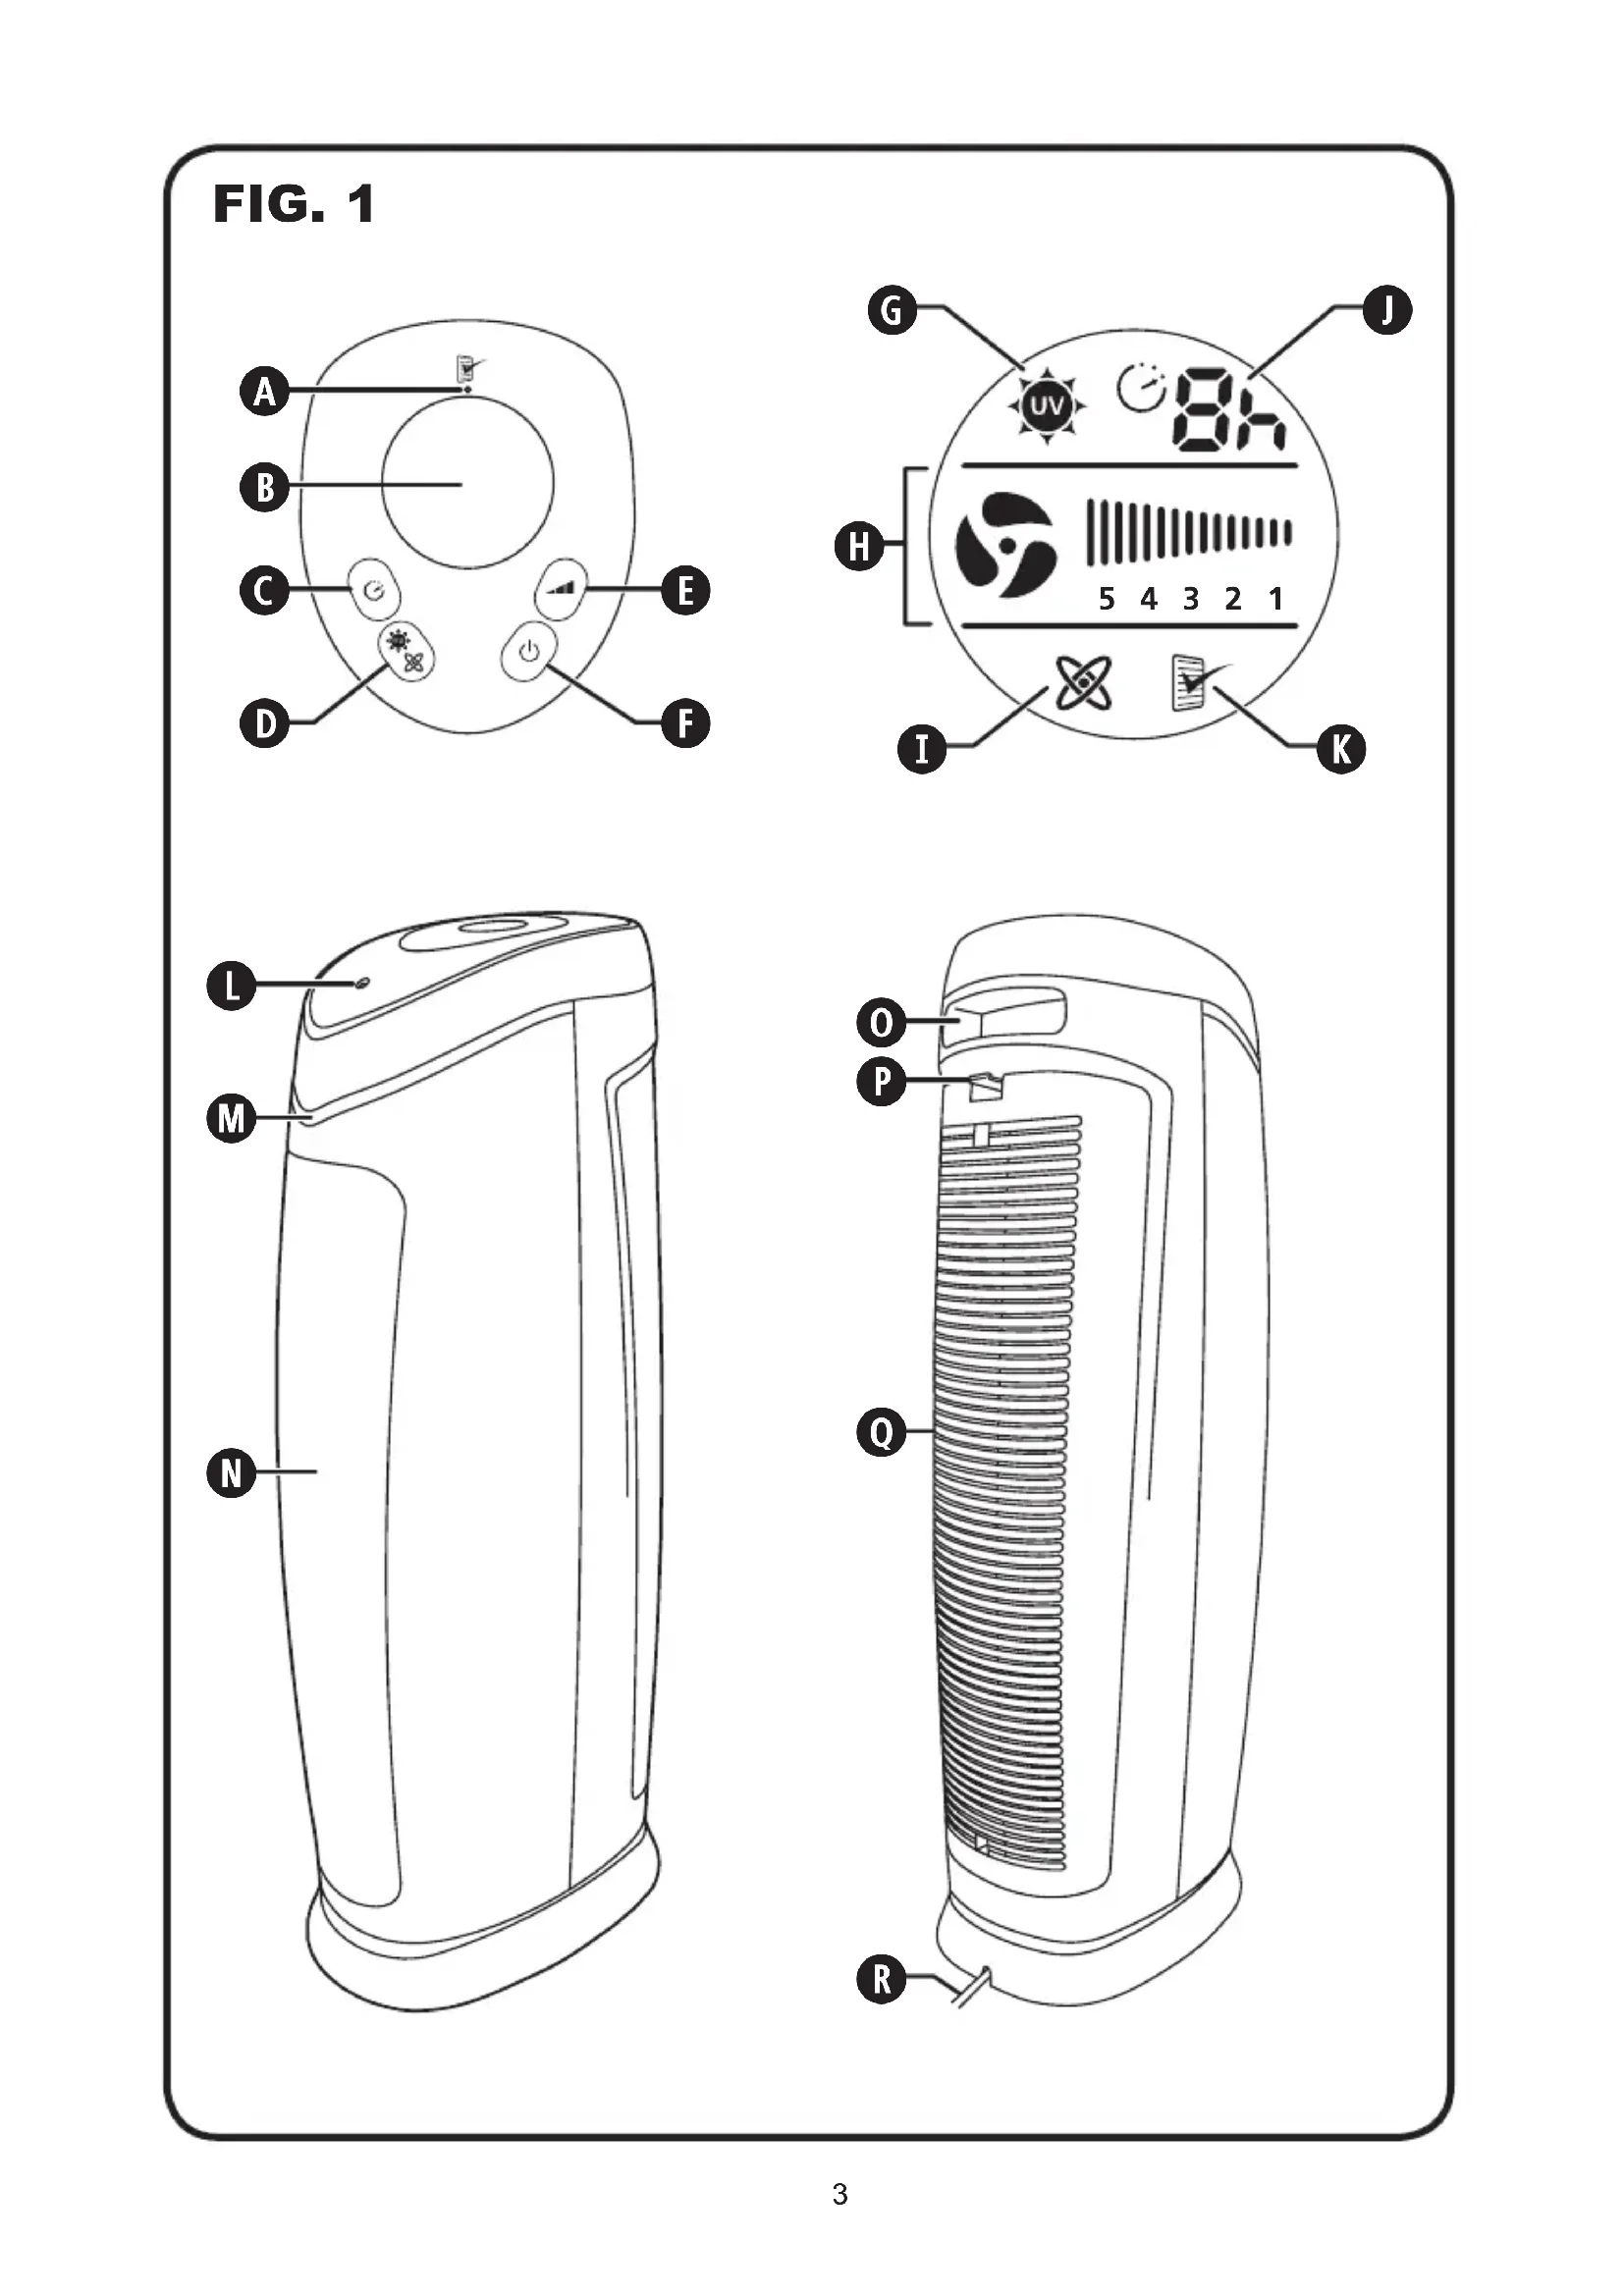
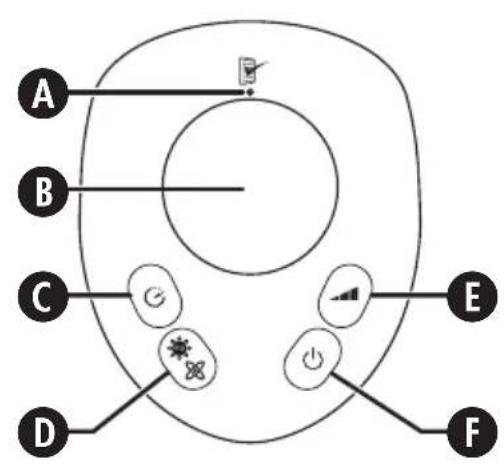
PARTS (FIG 1)
A Filter reset button
B LCD display
C Timer select button
D UV/Ioniser mode select button
E Fan speed select button
F On/off button
G UV active icon
H Fan speed display
I Ioniser active icon
J Timer active icon
K Filter service indicator icon
L On light
M Illuminated strip
N Air outlet grille
O Carrying handle
P Rear grille latch
Q Rear grille
R Power cord
FEATURES OF YOUR AIR PURIFIER
Your air purifier features a HEPA-type filter which removes up to 99% of airborne dust and pollen as small as 2 microns and helps reduce smoke, mould spores and pet dander from the air passing through the filter.
- Filters can be vacuumed every few months for easy cleaning.
- Washable pre-filter captures larger particles and extends the HEPA-type filter's cleaning cycle.
- Optional ioniser function naturally improves performance and helps freshen the air.
- Slim tower design allows placement in almost any area of the room.
IONISER
This appliance has an optional ioniser feature which, when turned on, releases negative ions into outgoing filtered air to help the air purification process.
What are lons?
Ions are tiny particles that carry a positive or negative charge. They exist naturally around us in the air, water, and ground. Both positive and negative ions are colourless, odourless, and completely harmless.
How does the ioniser work?
Negative ions help air purification by attaching themselves to very small airborne particles in the room. These particles take on a negative charge and may join with positively charged particles such as dust, pollen, smoke, and pet dander to form larger particles. The larger particles are then more easily
captured by the filter system.
IMPORTANT NOTES:
Your ioniser may produce an occasional popping or cracking sound. This is normal and occurs when a small buildup of ions is discharged.
After extended use, you may notice dust around the grilles or front panel.
- This is caused by negative ions exiting the air outlet, evidence of the ioniser's air cleaning effectiveness.
- You can remove the dust with a soft brush or clean, damp cloth. Larger particles may be attracted to positively charged surfaces throughout the home, like walls or floors.
- This may occur more frequently when the filter is nearing the end of its useful product life and unable to capture as many charged particles.
- Excessive amounts of pet dander, dust, or smoke may decrease the life expectancy of the filters and interfere with the ionisation process.
To help prevent particles from attracting to surfaces throughout your home:
- You may want to run the ioniser function less often.
- Check the condition of the filters more frequently.
- Always clean the filters at the recommended intervals (See CLEANING THE FILTERS). Using the ioniser with dirty filters may result in dirty particles exiting the air purifier and attracting to walls, carpets, furniture, or other household objects. These dirty particles may prove difficult to remove.
CAUTION: The levels of ozone produced by the ioniser in this appliance fall within the recommended safe limits. However, in high concentrations, ozone can be harmful to birds and small pets. To prevent ozone buildup when using the ioniser mode, operate the appliance in a well ventilated area.
HEPA-TYPE FILTER
HEPA-type (High Efficiency Particulate Air) filters are designed to remove up to 99% of airborne pollutants, at 2 microns or larger, from the air that passes through them. These include tobacco smoke, household dust, pet dander and pollen.
UV LIGHT
Ultraviolet light is a proven technology used to destroy various types of bacteria, viruses, fungi and mould spores and is commonly used in hospitals and commercial settings. This air purifier uses a UV-C bulb.
PHOTOCATALYTIC OXIDATION
Photocatalytic oxidation (PCO) is achieved when you combine UV light with a Titanium Dioxide (TiO2) coating. PCO removes Volatile Organic Compounds (VOCs) and odours which include harmful pollutants such as formaldehyde, ammonia, toxic fumes and chemicals such as paint and many other common contaminants released by building materials and household cleaners.
PRE-OPERATING INSTRUCTIONS
- Carefully unpack your air purifier.
- Select a firm, level surface with no obstructions to the air inlets or outlets.
OPERATING INSTRUCTIONS
DO NOT POINT FILTERED AIR OUTLET TOWARDS WALL. DO NOT USE THE IONISER FOR LONG PERIODS OF TIME AS THIS CAN CAUSE BLACKENING OF WALLS IF THE FILTERS ARE NOT CLEANED REGULARLY.
To operate your air purifier:
- Press the on/off button F. Your air purifier will turn on at the maximum fan speed (5).
- Select the desired fan speed (5, 4, 3, 2 or 1) by pressing the fan speed select button Ⓔ. The display will show the selected speed.
Ioniser/UV mode
The ioniser and UV features can be selected individually or both together. They will operate at any selected fan speed.
- Press the UV/ionic mode selector button D to select UV and ioniser, UV only, ioniser only or none. The display will show the selected mode. Note that the illuminated strip M will light up when the UV feature is selected.
Timer Mode
You can set the timer so that your air purifier automatically turns off when the desired time has elapsed:
- Press the timer select button C until you reach the desired number of hours you want the unit to operate (1, 2, 3, 4, 5, 6, 7 or 8 hours).
- The number of hours selected and the timer active icon ⚠ will be shown on the display.
- When the time has elapsed, your air purifier will turn off.
To cancel the timer, press the timer select button ⓒ
several times until the timer active icon ⏻ goes out. You may also cancel the timer by turning the unit off using the on/off button Ⓔ.
CLEANING THE FILTERS
We recommend regular filter cleaning for optimal performance.
- Every few weeks, check the condition of both filters.
- After approximately 3 months of operation, the filter service indicator icon ⚪ will appear on the LCD display to alert you to clean the filters before further use.
- Depending on use, the filters should be replaced after approximately 12 months.
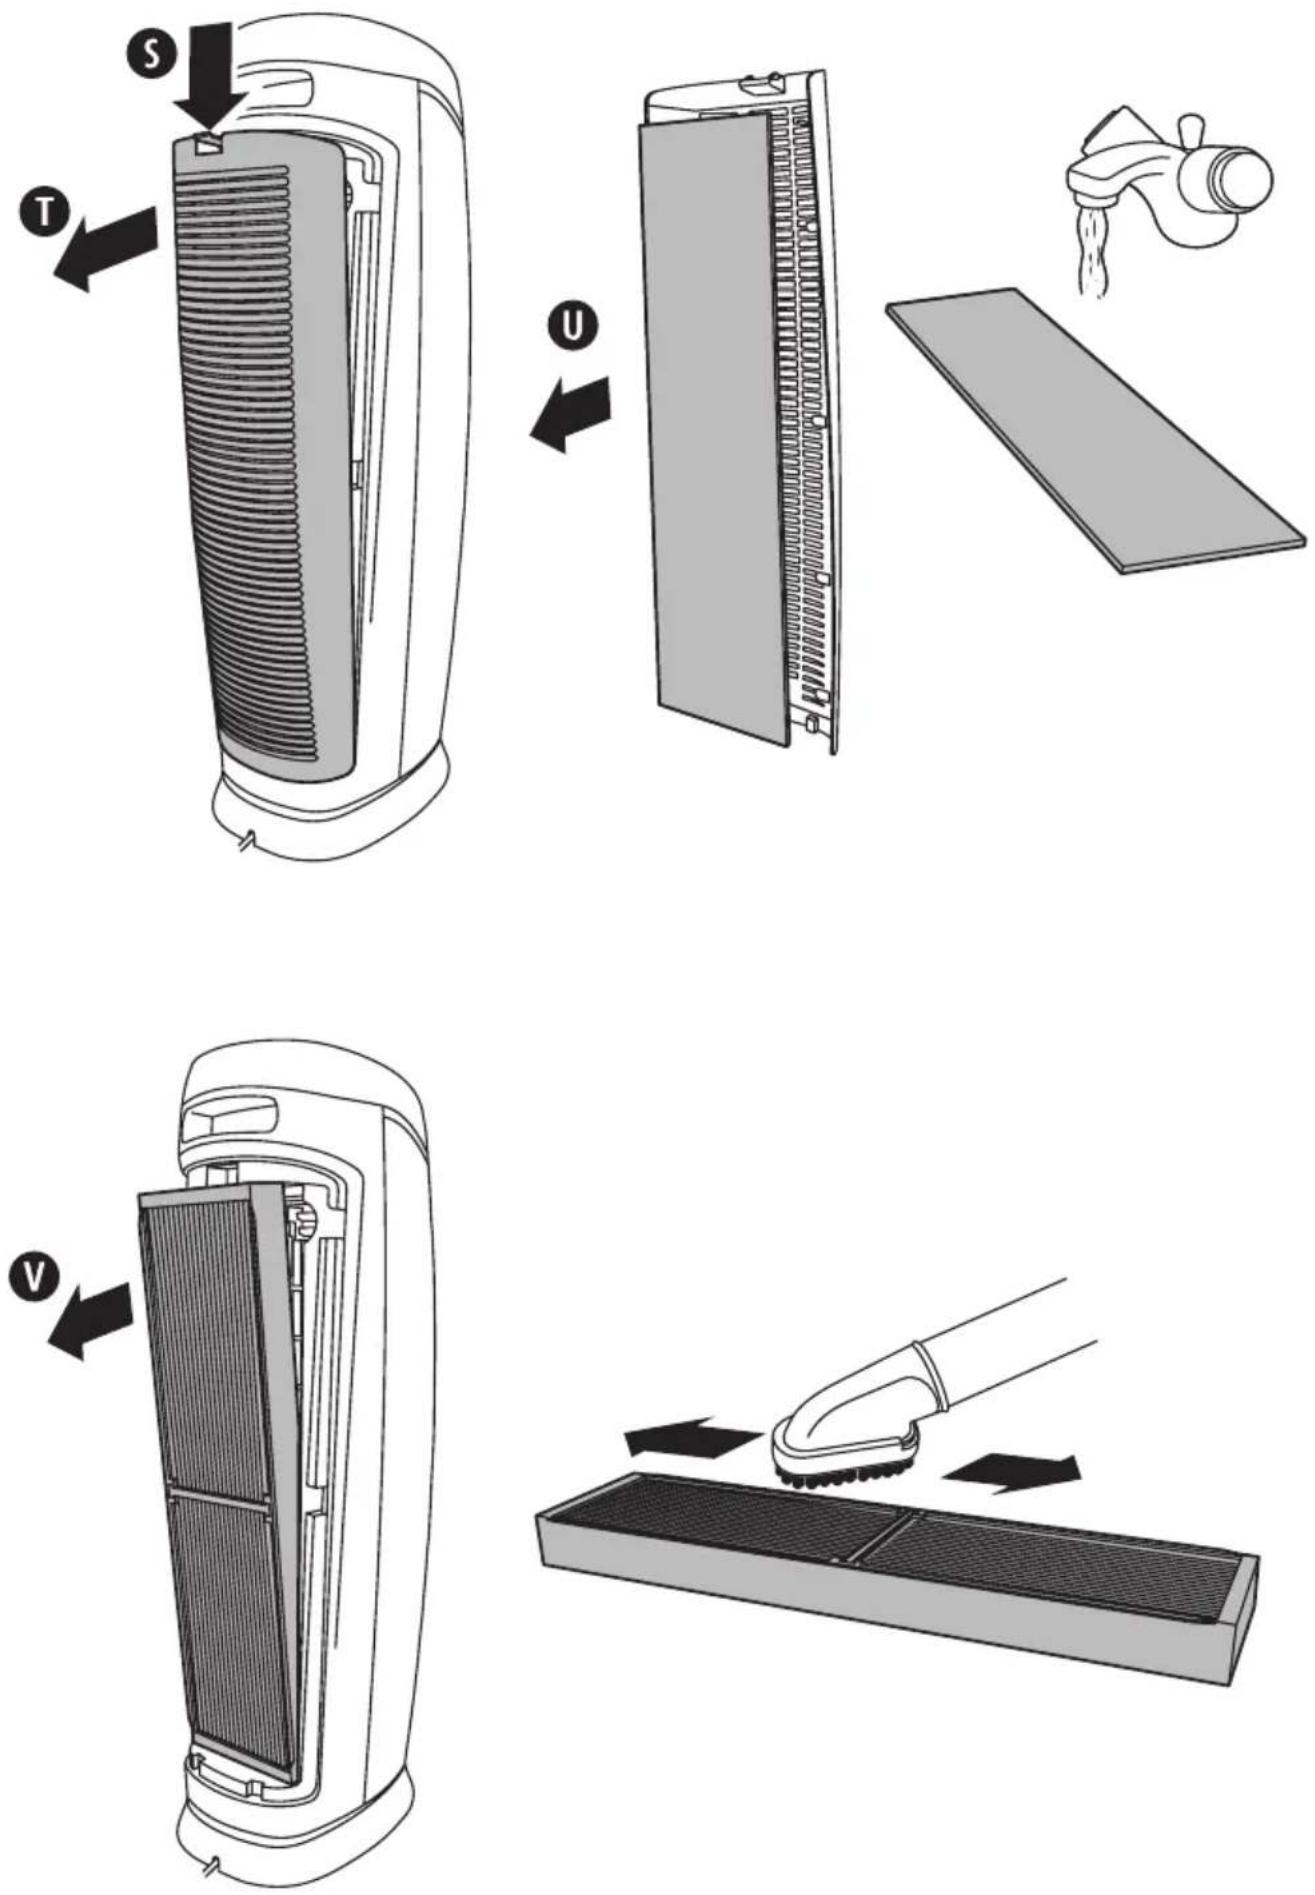
Pre-filter
If you are replacing the filter, remove any packaging from the new filter before fitting.
- Switch off and unplug your air purifier from the supply socket.
- Referring to figure 2, press the rear grille latch S down and remove the rear grille T.
- Remove the pre-filter U from the inside of the rear grille.
- Wash the pre-filter in warm soapy water.
- Allow the filter to dry naturally on a flat surface.
- Once thoroughly dry, refit the pre-filter into the rear grille then replace the rear grille onto your air purifier.
HEPA-type filter
If you are replacing the filter, remove any packaging from the new filter before fitting.
IMPORTANT: Do not use water, household purifiers or detergents to clean the filter. The filter may appear discolored, even after vacuuming. This is normal and does not affect performance in any way.
- Switch off and unplug your air purifier from the supply socket.
- Referring to figure 2, press the rear grille latch S down and remove the rear grille T.
- Remove the HEPA-type filter purifier.
- Using your vacuum cleaner, run the brush attachment along both sides of the filter and clean between the pleated layers.
- After cleaning, refit the HEPA-type filter then the rear grille.
Resetting the filter service indicator icon
- With your air purifier switched on, reset the filter service indicator icon K by inserting a small object (such as a pin or paper clip) into the hole for the filter reset button A until the filter service indicator icon goes out.
TROUBLESHOOTING
| Problem Solution | |
| The unit will not operate | Make sure that the unit is plugged in and switched on |
| Decreased air flow | Make sure that nothing is blocking the air inlet or air outlet.Check the condition of the filters and clean them if necessary.Make sure that the air intake grill is at least 30 to 90 cm from the wall. |
| Filter appears dirty, even after vacuum-ing clean | This is normal and does not affect performance in any way. A new filter is not necessary. |
| The filter service indicator icon is still on after cleaning the filters. | See the Resetting the filter service indicator icon section in these instructions. |
TECHNICAL SPECIFICATION
For all technical and regulatory information with regards to your product specifications under Eco-Design Regulation No 206/2012, please contact our consumer help line or visit www.bionaireuk.co.uk.
SPARE PARTS
HEPA-type filter 91382
Pre-filter 91383
UK - Filter Sales Order Line - 0870 759 9000
GUARANTEE
Please keep your receipt as this will be required for any claims under this guarantee.
This appliance is guaranteed for 2 years after your purchase as described in this document.
During this guaranteed period, if in the unlikely event the appliance no longer functions due to a design or manufacturing fault, please take it back to the place of purchase, with your till receipt and a copy of this guarantee.
The rights and benefits under this guarantee are additional to your statutory rights, which are not affected by this guarantee. Only Jarden Consumer Solutions (Europe) Limited (“JCS (Europe)”) has the right to change these terms.
JCS (Europe) undertakes within the guarantee period to repair or replace the appliance, or any part of appliance found to be not working properly free of charge provided that:
- you promptly notify the place of purchase or JCS (Europe) of the problem; and
- the appliance has not been altered in any way or subjected to damage, misuse, abuse, repair or alteration by a person other than a person authorised by JCS (Europe).
Faults that occur through, improper use, damage, abuse, use with incorrect voltage, acts of nature, events beyond the control of JCS (Europe), repair or alteration by a person other than a person authorised by JCS (Europe) or failure to follow instructions for use are not covered by this guarantee. Additionally, normal wear and tear, including, but not limited to, minor discoloration and scratches are not covered by this guarantee.
The rights under this guarantee shall only apply to the original purchaser and shall not extend to commercial or communal use.
If your appliance includes a country-specific guarantee or warranty insert please refer to the terms and conditions of such guarantee or warranty in place of this guarantee or contact your local authorized dealer for more information.
Waste electrical products should not be disposed of with Household waste. Please recycle where facilities exist. E-mail us at info@pulse-uk.co.uk for further recycling and WEEE information.
Jarden Consumer Solutions (Europe) Limited.
Middleton Road
Royton
Oldham
OL2 5LN
UK
INSTALLATION OF A PLUG
If the plug is not suitable for the socket outlets in your home, it can be removed and replaced by a plug of the correct type.

text_image
Do Not Connect Mains Wires Here Blue (Neutral) Fuse 3A CORD GRIP Brown (Live)NOTE: If the terminals in the plug are not marked or if you are unsure or in doubt about the installation of the plug please contact a qualified electrician.
If a 13A 3-pin plug is fitted, it must be an ASTA approved plug, conforming to BS1363 standard. Replacement fuses must be BSI or ASTA BS1362 approved.
This product is fitted with a 13A plug complying to The wires in the mains lead are coloured as such:
BROWN - LIVE
BLUE - NEUTRAL
Please note that the colour of these mains wires may not correspond with the colour markings that identify the terminals in your plug.
The BROWN coloured wire must be connected to the terminal, which is marked with the letter "L" or is coloured RED.
The BLUE coloured wire must be connected to the terminal, which is marked with the letter "N" or is coloured BLACK.
DO NOT CONNECT either of these wires to the earth terminal in the plug. The earth terminal plug is marked with the letter "E", or with the earth symbol 12 , or coloured GREEN, or GREEN and YELLOW.
FRANÇAIS
PRIERE DE LIRE CES DIRECTIVES ET DE LES CONSERVER
DIRECTIVES IMPORTANTES
Jarden Consumer Solutions (Europe) Limited Middleton Road
Royton
Oldham
OL2 5LN
UK

DEUTSCH
Jarden Consumer Solutions (Europe) Limited
Middleton Road
Royton
Oldham
OL2 5LN
Großbritannien

ESPAÑOL
POR FAVOR LEER Y GUARDAR ESTAS INSTRUCCIONES
INSTRUCCIONES IMPORTANTES
Jarden Consumer Solutions (Europe) Limited
Middleton Road
Royton
Oldham
OL2 5LN
Reino Unido
NEDERLANDS
HEPA-type filter 91382
Voorfilter 91383
GARANTIE
Jarden Consumer Solutions (Europe) Limited Middleton Road
Royton
Oldham
OL2 5LN
Groot-Brittannië
SVENSKA
LÄS OCH SPAR DESSA INSTRUKTIONER VIKTIGA INSTRUKTIONER
ALLMÄN BESKRIVNING (SE FIG. 1)
Jarden Consumer Solutions (Europe) Limited
Middleton Road
Royton
Oldham
OL2 5LN
UK
SUOMI
PYYDÄMME LUKEMAAN NÄMÄ OHJEET LÄPI JA SÄILYTTÄMÄÄN NE
TÄRKEITÄ OHJEITA
Jarden Consumer Solutions (Europe) Limited Middleton Road
Royton
Oldham
OL2 5LN
UK
NORSK
LES DISSE INSTRUKSJONENE, OG TA VARE PÅ DEM TIL SENERE BRUK VIKTIGE INSTRUKSJONER
Jarden Consumer Solutions (Europe) Limited
Middleton Road
Royton
Oldham
OL2 5LN
UK
DANSK
LÆS OG GEM DENNE VEJLEDNING
VIGTIGE ANVISNINGER
HEPA-type filter 91382
Forfilter 91383
GARANTI
Jarden Consumer Solutions (Europe) Limited Middleton Road
Royton
Oldham
OL2 5LN, UK
POLSKI
INSTRUKCJĘ NALEŻY PRZECZYTAĆ I ZACHOWAĆ WAŻNE INFORMACJE
Jarden Consumer Solutions (Europe) Limited
Middleton Road
Royton
Oldham
OL2 5LN
Wielka Brytania
ΕΛΛΗΝΙΚΑ
Jarden Consumer Solutions (Europe) Limited Middleton Road
Royton
Oldham
OL2 5LN
UK
ITALIANO
LEGGERE E CONSERVARE QUESTE ISTRUZIONI
ISTRUZIONI IMPORTANTI
Jarden Consumer Solutions (Europe) Limited
Middleton Road
Royton
Oldham
OL2 5LN
UK
MAGYAR
KÉRJÜK, OLVASSA EL ÉS ÖRIZZE MEG EZEKET AZ UTASÍTÁSOKAT.
FONTOS UTASÍTÁSOK
Jarden Consumer Solutions (Europe) Limited Middleton Road
Royton
Oldham
OL2 5LN
UK
ČESKY
PŘEČTĚTE SI TYTO POKYNY A PEČLIVĚ JE USCHOVEJTE DŮLEŽITÉ POKYNY
Jarden Consumer Solutions (Europe) Limited Middleton Road
Royton
Oldham
OL2 5LN
UK
PORTUGUÊS
LEIA E GUARDE ESTAS INSTRUÇÕES IMPORTANTES
INSTRUÇÕES IMPORTANTES
Jarden Consumer Solutions (Europe) Limited Middleton Road
Royton
Oldham
OL2 5LN
UK
FIG. 2

BIONAIRE™
Jarden Consumer Solutions (Europe) Limited
Royton, Oldham OL2 5LN
England
Fax: +44 (0)161 626 0391
Email: enquiriesEurope@jardencs.com
UK - Filter Sales Order Line - 0870 759 9000
Website address: www.bionaireeurope.com
UK - Free phone Customer Service Helpline - 0800 052 3615
Jarden Consumer Solutions (Europe) Limited
Czech Republic: +420 48 513 03 03
Finland: +358 98 70 870
Germany: +49 89 5480195-0
Hungary: +36 1 37 17 970
Latvia +371 7514081
Lithuania +370 (52) 772388
Netherlands: +31 793 41 77 71
Poland: +48 22 847 8968
Russia: +7 095 334 82 21
Slovakia: +421 41 723 47 09
Spain: +34 902 051 045

© 2013 Sunbeam Products, Inc. doing business as Jarden Consumer Solutions. All rights reserved. Distributed by Jarden Consumer Solutions (Europe) Limited, Royton, Oldham OL2 5LN, UK. Printed in PRC