INC 2602 - Speaker HECO - Free user manual and instructions
Find the device manual for free INC 2602 HECO in PDF.
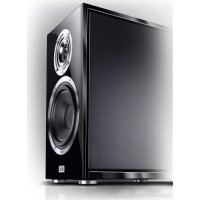
| Product Type | In-ceiling/in-wall speaker |
| Brand | Heco |
| Model | INC 2602 |
| Category | Speaker |
| Outer Dimensions (diameter) | 231 mm |
| Mounting Depth | 92 mm |
| Required Cutout (diameter) | 198 mm |
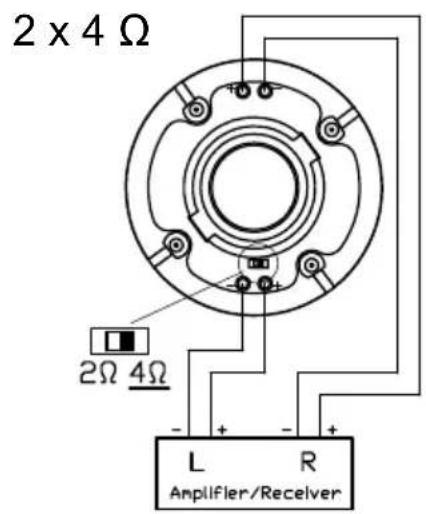
| Impedance | 2 x 4 ohms |
| Nominal / Maximum Power | 100 W / 180 W |
| Frequency Response | 35 - 30,000 Hz |
| Crossover Frequency | 3600 Hz |
| Sensitivity (1 W/1 m) | 90 dB |
| Recommended Amplifier Power | 30 - 160 W |
| Cone Material | Not specified (estimated: polypropylene or treated paper) |
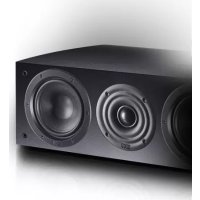
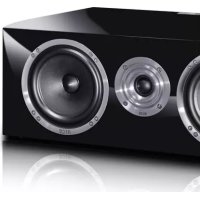
| Number of Ways | 2-way |
| Swivel Tweeter | Yes (swivel, up to 35°) |
| Acoustic Adjustments | Switching for treble and midrange: -3 dB, 0 dB, +3 dB |
| Connection Type | Spring terminals (clamping mechanism) |
| Recommended Cable Cross-section | ≥ 1 mm² up to 3 m, ≥ 1.5 mm² beyond |
| Mounting | Flush in wall or ceiling (plaster, wood) |
| Protective Grille | Removable (unscrewing) |
| Color | Not specified (generally white) |
| Warranty | 5 years (subject to conditions) |
| Care and Cleaning | Soft, dry cloth; avoid harsh products |
| Weight | Not specified (estimated: 1.5 - 2 kg) |
Frequently Asked Questions - INC 2602 HECO
User questions about INC 2602 HECO
0 question about this device. Answer the ones you know or ask your own.
Ask a new question about this device
Download the instructions for your Speaker in PDF format for free! Find your manual INC 2602 - HECO and take your electronic device back in hand. On this page are published all the documents necessary for the use of your device. INC 2602 by HECO.
USER MANUAL INC 2602 HECO
At the end of the product's useful life, please dispose of it at appropriate collection points provided in your country.
natural_image
Close-up of a car wheel rim with a glossy finish (no text or symbols visible)
natural_image
Close-up of a car wheel with a glossy finish button (no text or symbols visible)
natural_image
Close-up of a car wheel rim and hub (no text or symbols visible)Congratulations on your fine new loudspeakers and thank you very much for choosing HECO! You have made an excellent choice. The high-quality speakers produced by HECO are renowned all over the world.
Please study the instructions and information below carefully before using your new loudspeakers.
HECO INC/INW LOUDSPEAKERS - SPECIALLY DESIGNED FOR CEILING FITTING/WALL MOUNTING
Heco INC/INW speakers have an ingenious clamping mechanism that enables you to easily fit them into a hole cut into a baffle. The easiest way is to fit them in a plaster board or similar ceiling. When using an opening in a masonry wall, a plaster or timber board is also needed. For the fitting dimensions, please see the technical data given at the end of the manual.
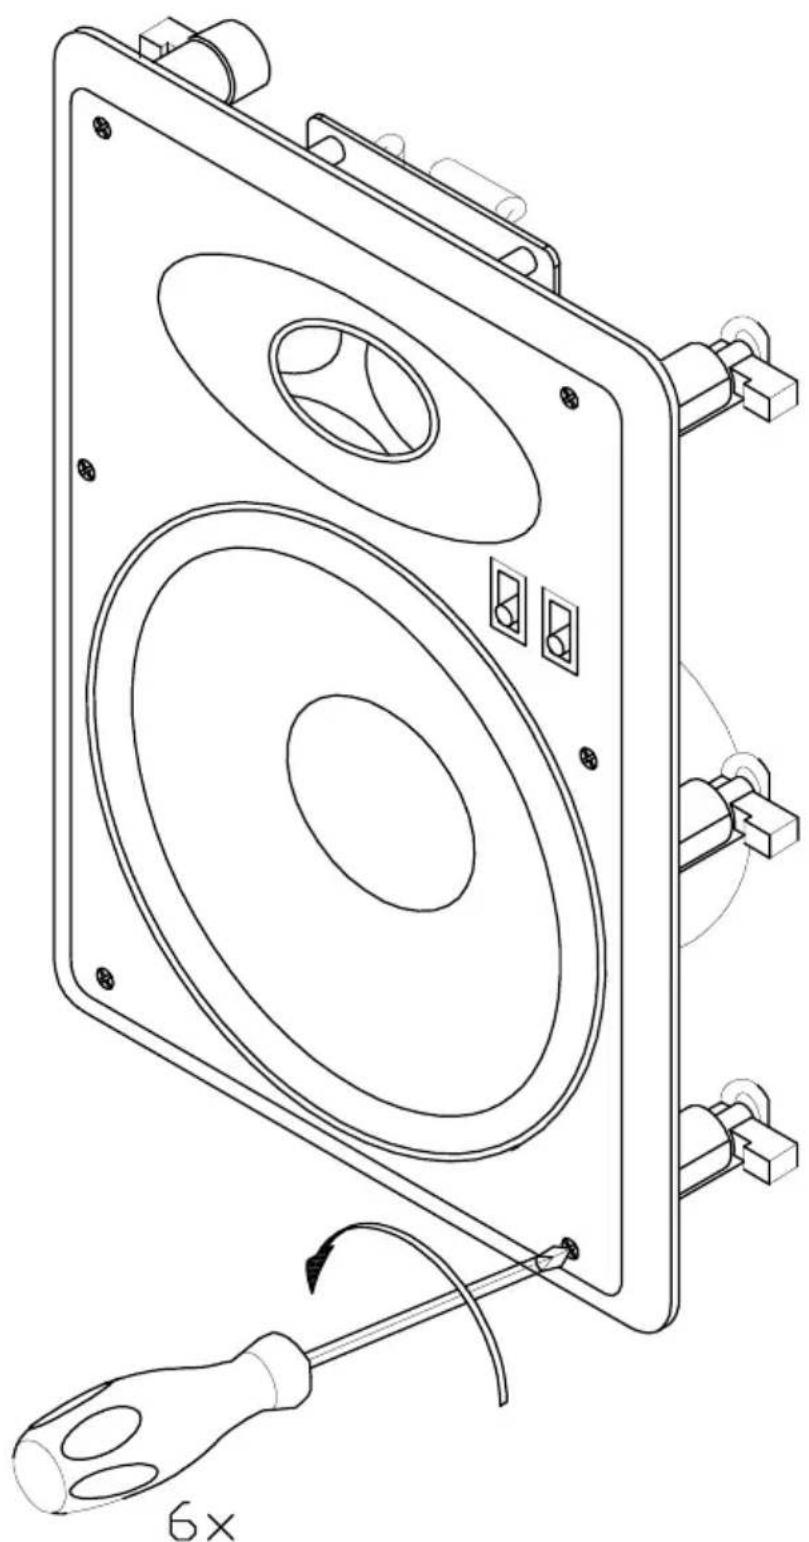
Removing the grille (fig. 1)
INC 802 / INC 602 / INC 2602 (fig. 2)
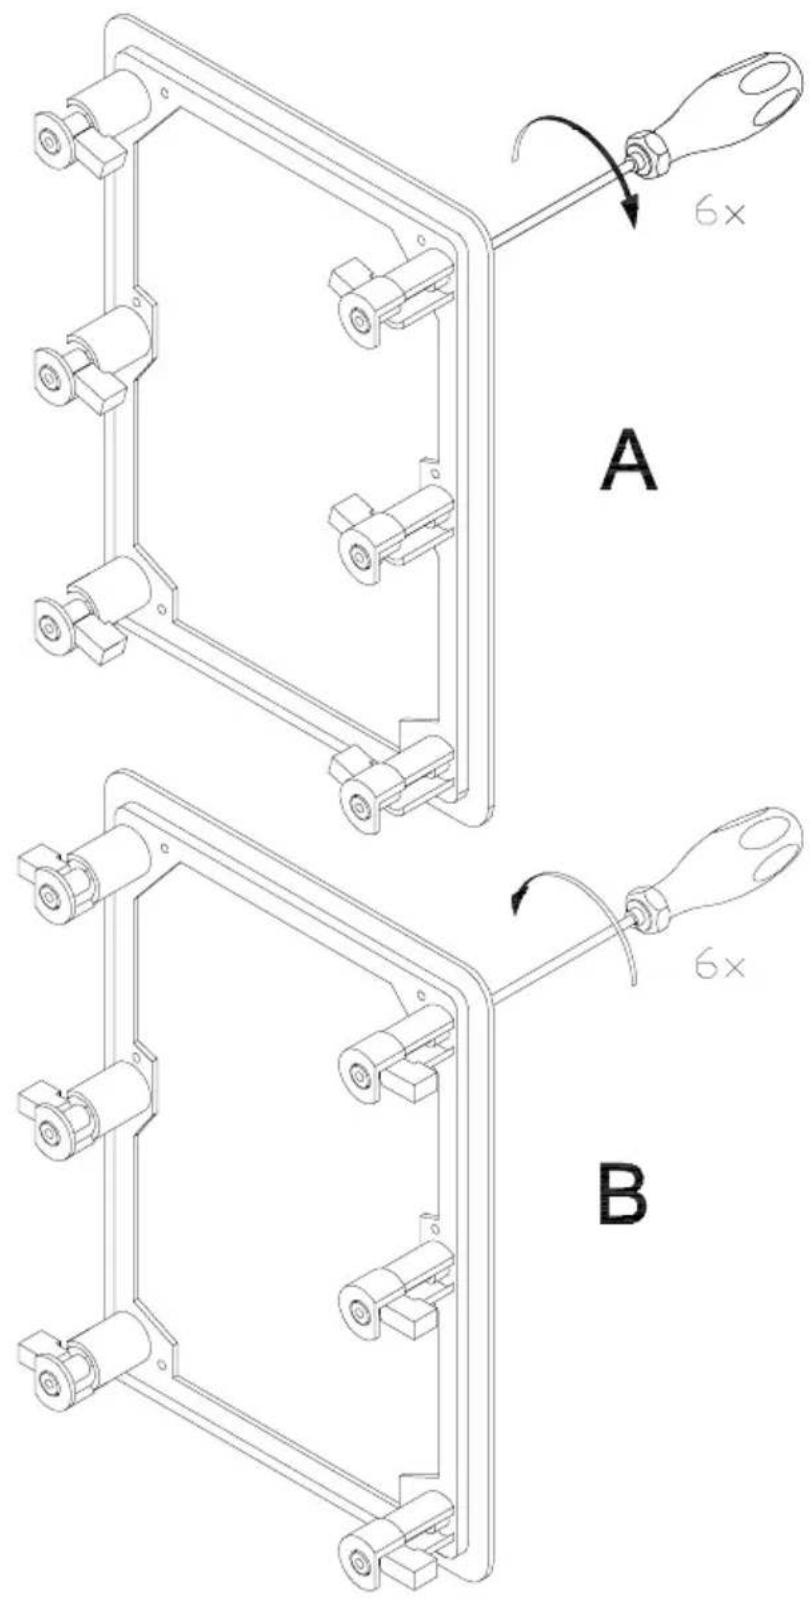
The clamping mechanism for attaching the speaker can be accessed after removing the protective grille. Loosen the screws and move the clamps to position A. After placing the appliance in the cut-out hole, tighten the screws. This automatically turns the clamps to position B and tightens them.
INW 802 / INW 602 (fig. 3)
After removing the protective grille first dismantle the baffle using the 6 visible cross-head screws (fig. 3.1). Loosen the screws and move the clamps to position A. After placing the appliance in the cut-out hole, tighten the screws (fig. 3.2). This automatically turns the clamps to position B and tightens them.
GENERAL INFORMATION ABOUT CONNECTING YOUR HECO LOUDSPEAKERS
Please always use a good quality loudspeaker connection cable from an audio dealer. To prevent impairment of sound quality, we recommend cables with cross-sections of at least 1 mm^2 for lengths up to 3 m and at least 1.5 mm^2 for lengths above 3 m.
Always turn off the amplifier or receiver before connecting or disconnecting loudspeaker cables. Place the loudspeakers in their planned positions and cut the cables to the right length. The cables for both channels should always be exactly the same length.
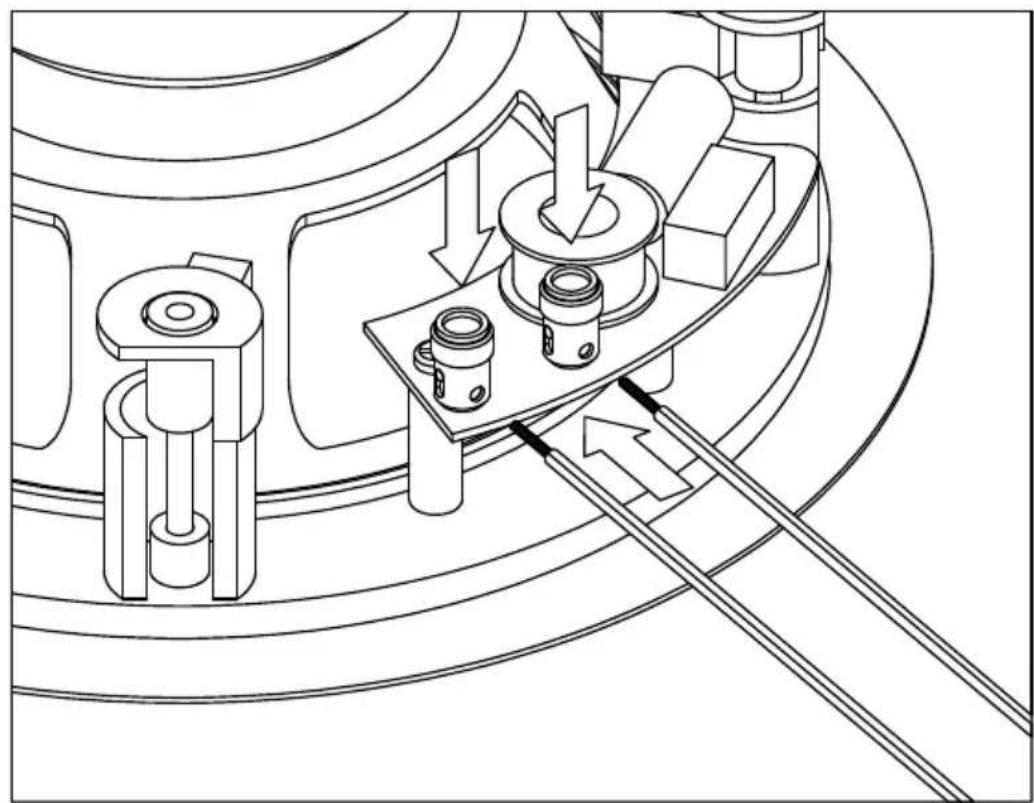
Strip 10 – 15 mm of insulation from the ends of the cables and twist the ends. The loudspeaker terminals are equipped with a clamping mechanism (fig. 4). Press the terminal head down and guide the stripped cable end into the hole on the side. On releasing the terminal head, the cable is secured, ensuring the best possible contact.
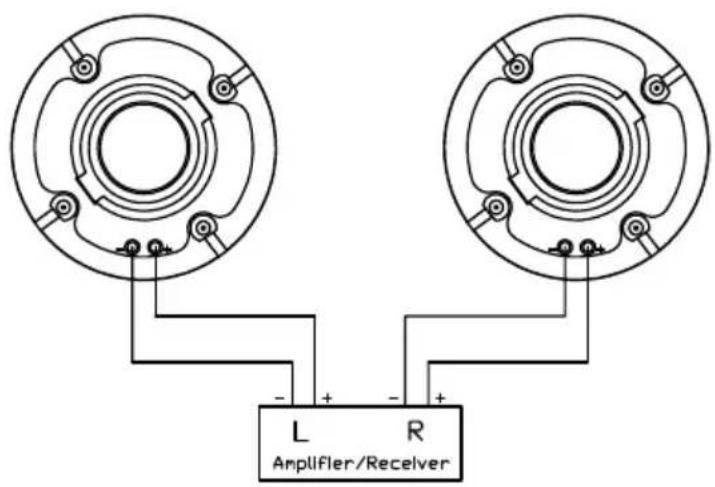
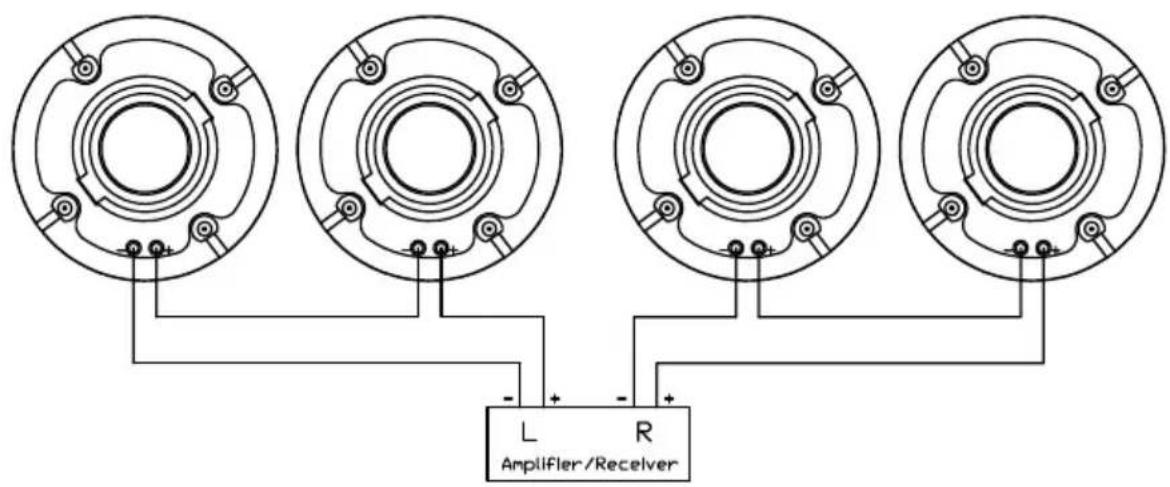
For good sound it is imperative that the cables must be connected in such a way that the speakers are “in phase”. This means that the black negative terminals on the speakers (-) must be connected to the negative (-) terminals on the amplifier, the red positive (+) speaker terminals to the positive (+) amplifier terminals. To make this easier one wire of most speaker cables is marked with a coloured strip or a ridge in the insulation.
Before switching on the system double-check all your connections and make sure that the terminal screws are tight and that there are no short circuits caused by stray wire filaments – this could cause serious damage to your amplifier!
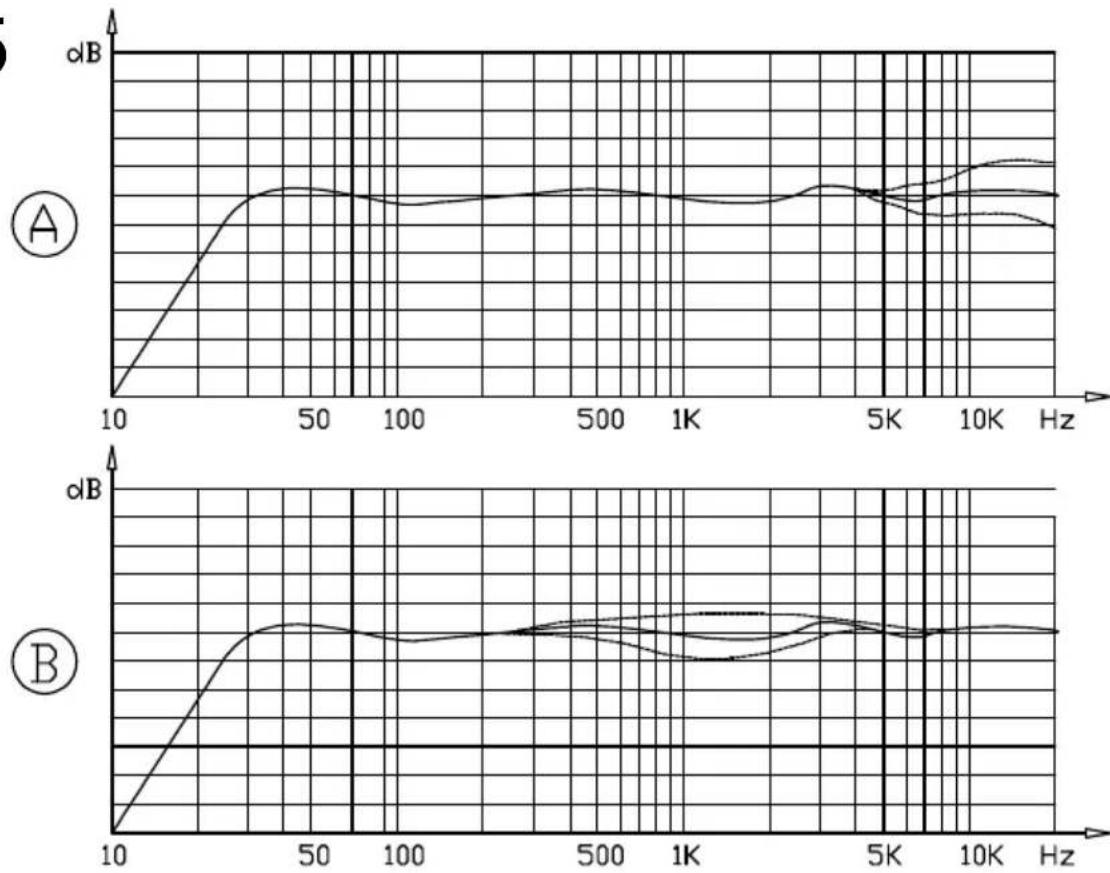
ACOUSTIC ADAPTATION
The crossover facilitates individual sound adjustment of the speaker system via high-quality jumpers:
- Tweeter level adjustment (treble) (fig. 5A)
- Mid-range adjustment (midrange) (fig. 5B)
It is advisable to conduct the optimum setting according to your own personal listening preferences. We recommend the following switch positions as a basic setting for various listening areas:
| Listening area Example | Switch position | „treble“ | Switch position „midrange“ |
| Low sound-absorbing setup | Wet rooms, hard reflective surfaces, tiles, large glass areas, rooms with minimal furniture | -3dB -3dB | |
| Normal sound-absorbing setup | Carpets, glass surfaces with curtains, leather objects, rooms with a normal amount of furniture | 0dB 0dB | |
| High sound-absorbing setup | Carpets, upholstered objects, heavy curtains, rooms with lots of furniture | +3dB 0dB |
The tweeter's „swivel“ technology allows it to be pivoted by up to 35 degrees, thereby enabling ideal sound dispersion and perfect alignment to the listening area:
natural_image
Close-up of a car wheel rim with glossy finish (no text or symbols visible)
natural_image
Close-up of a car wheel with a glossy finish and circular dial (no text or symbols visible)
natural_image
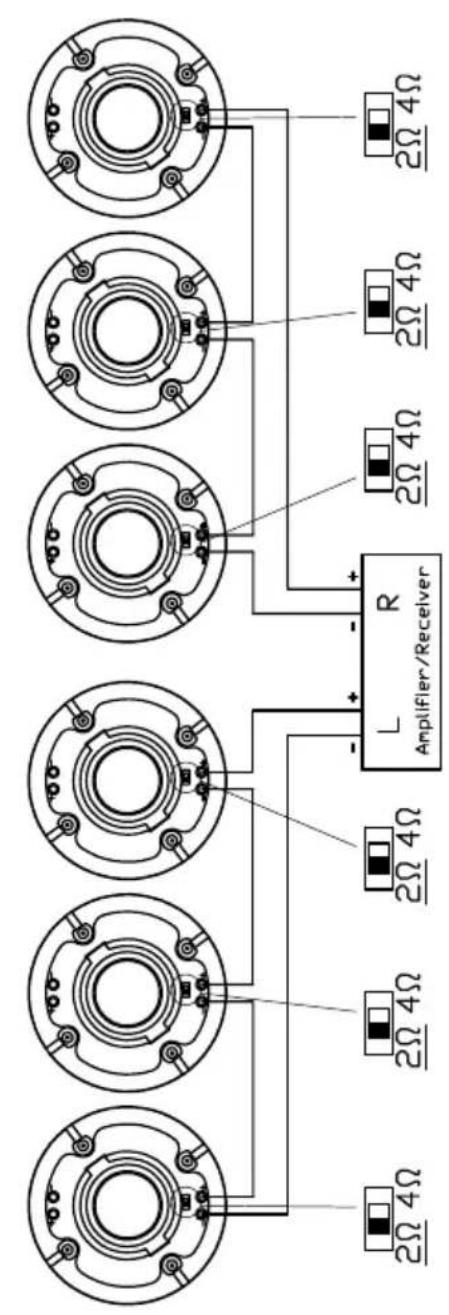
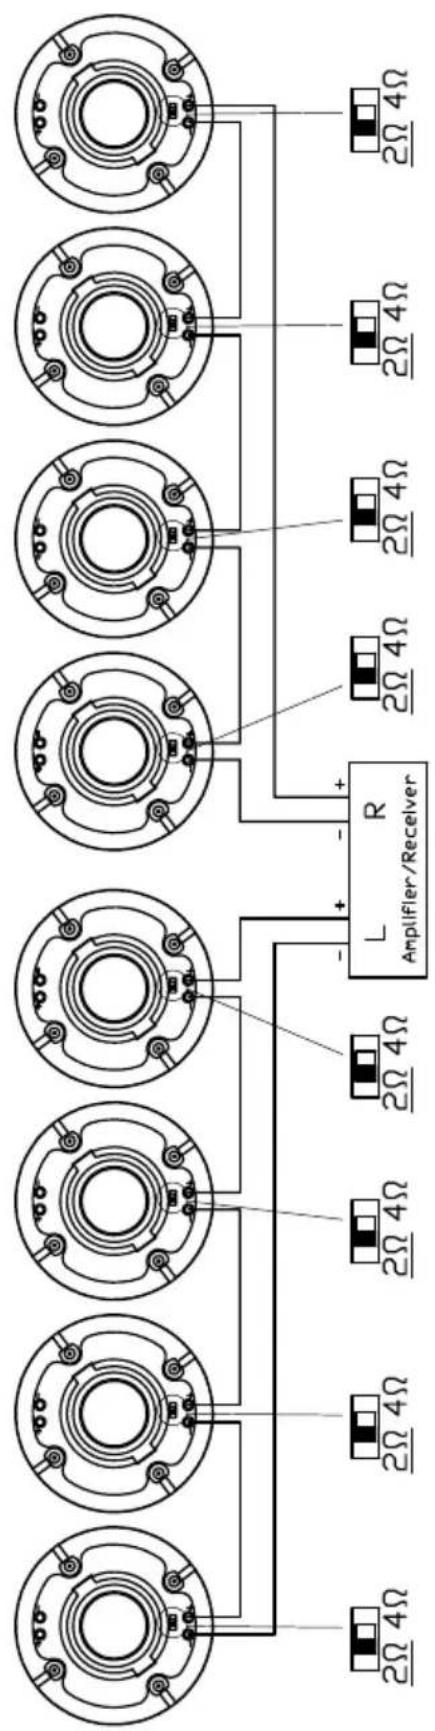
Close-up of a car wheel rim and hub (no text or symbols visible)CONNECTING A STEREO AMPLIFIER
Fig. 6 shows the loudspeakers connected to a stereo amplifier.
HOW TO AVOID DAMAGE TO YOUR VALUABLE SPEAKERS
All HECO loudspeakers are designed and built for optimum sound reproduction with the tone controls in the central position – i.e. with “linear” amplifier output. Turning up the bass and treble controls too far delivers more power to the woofers and/or tweeters, and at high volumes this can actually destroy the speaker units!
If the output of your amplifier is significantly higher than the rated power handling capacity of your speakers extremely high volumes can physically destroy your speakers. This doesn't actually happen often but you should be aware that it is possible.
Weak amplifiers with low output ratings can actually be more dangerous for your speakers at medium volumes because weak amplifiers may overload much faster than powerful ones and this causes measurable and audible distortion, which is extremely dangerous to your loudspeakers.
Always turn the volume down immediately as soon as you hear distortion! If you like listening to loud music make sure that your amplifier can deliver at least as much power as the speakers' power-handling rating.
Amplifiers, tuners and CD/DVD players can all produce inaudible high-frequency signals – and this doesn't only apply to cheap products. If your tweeters fail at low or medium volumes you should have a qualified technician check your system components for dangerous inaudible signals.
SPECIFICATIONS
INC 802 INC 602 INC 2602
Power-handling capacity: 120 / 200 W 100 / 180 W 100 / 180 W
Impedance: 4 – 8 ohms 4 – 8 ohms 2 x 4 ohms
Crossover frequency: 3,500 Hz 3,500 Hz 3,600 Hz
Frequency response: 32 – 32,000 Hz 35 – 32,000 Hz 35 – 30,000 Hz
Recommended amplifier output: 30 – 180 W 30 – 140 W 30 – 140 W
Efficiency (1W/1m): 91 dB 90 dB 90 dB
External dimensions ∅: 272 mm 231 mm 231 mm
Hole cut-out ∅: 242 mm 198 mm 198 mm
Mounting depth: 112 mm 98 mm 92 mm
INW 802
INW 602
Power-handling capacity: 120 / 200 W 100 / 180 W
Impedance: 4 ohms 4 – 8 ohms
Crossover frequency: 3,500 Hz 3,500 Hz
Frequency response: 32 – 32,000 Hz 38 – 32,000 Hz
Recommended amplifier output: 30 – 180 W 30 – 160 W
Efficiency (1W/1m): 91 dB 90 dB
External dimensions (w x h): 253 x 356 mm 219 x 306 mm
Hole cut-out (w x h): 223 x 325 mm 188 x 274 mm
Mounting depth: 90 mm 75 mm
Subject to technical change.
Très cher client,
natural_image
Close-up of a car wheel rim with glossy finish (no text or symbols visible)
natural_image
Close-up of a car wheel component with a glossy finish and central knob (no text or symbols visible)
natural_image
Close-up of a car wheel rim and hub assembly (no text or symbols visible)natural_image
Close-up of a car wheel rim with glossy finish (no text or symbols visible)
natural_image
Close-up of a car wheel with a glossy finish and central knob (no text or symbols visible)
natural_image
Close-up of a car wheel rim and hub (no text or symbols visible)AANSLUITING OP EEN STEREOVERSTERKER
natural_image
Close-up of a mechanical component with a glossy, curved surface and circular holes (no text or symbols visible)
natural_image
Close-up of a car wheel with a glossy finish button and mounting holes (no text or symbols visible)
natural_image
Close-up of a car wheel rim and hub assembly (no text or symbols visible)COLLEGAMENTO AD UN AMPLIFICATORE STEREO
natural_image
Close-up of a car wheel rim with glossy finish (no text or symbols visible)
natural_image
Close-up of a car wheel with a glossy finish button (no text or symbols visible)
natural_image
Close-up of a car wheel rim with a glossy finish (no text or symbols visible)natural_image
Close-up of a car wheel rim with glossy finish (no text or symbols visible)
natural_image
Close-up of a car wheel and dashboard component (no visible text or symbols)
natural_image
Close-up of a car wheel rim with a glossy finish (no text or symbols visible)natural_image
Close-up of a car wheel rim with glossy finish (no text or symbols visible)
natural_image
Close-up of a car wheel handle with glossy finish (no text or symbols visible)
natural_image
Close-up of a car wheel rim with a glossy finish (no text or symbols visible)ANSLUTNING TILL EN STEREOFÖRSTÄRKARE
natural_image
Close-up of a car wheel rim with glossy finish (no text or symbols visible)
natural_image
Close-up of a car wheel with a glossy finish and circular button (no text or symbols visible)
natural_image
Close-up of a car wheel rim with a circular dial and central hub (no text or symbols visible)natural_image
Close-up of a car wheel rim with glossy finish (no text or symbols visible)
natural_image
Close-up of a car wheel component with a glossy finish and central knob (no text or symbols visible)
natural_image
Close-up of a car wheel rim with a glossy finish (no text or symbols visible)接双声道立体声放大器
图6 显示音箱连接到立体声放大器。
避免需要修机的几点建议
natural_image
Close-up of a mechanical component with a glossy, curved surface and circular holes (no visible text or symbols)
natural_image
Close-up of a car wheel rim with a glossy finish button (no text or symbols visible)
natural_image
Close-up of a car wheel rim with a glossy finish (no text or symbols visible)ステレオアンプへの接続
natural_image
Technical diagram of a mechanical assembly with no visible text or symbolsnatural_image
Technical cross-sectional diagram of a mechanical assembly (no text or labels)natural_image
Technical cross-sectional diagram of a mechanical assembly with no visible text or symbolsnatural_image
Technical line drawing of a mechanical assembly with a rotating component and labeled section A (no text or symbols on the diagram itself)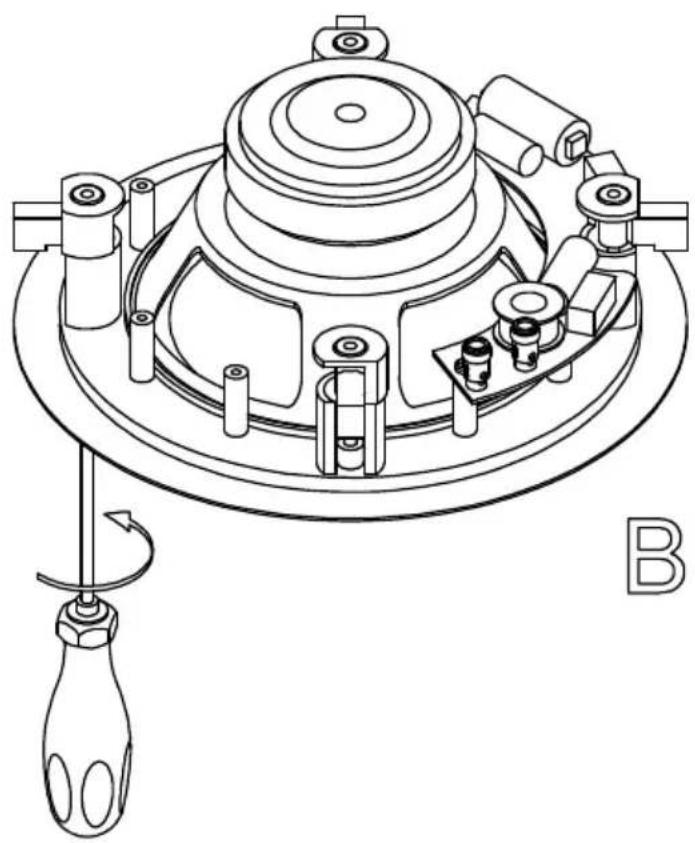
natural_image
Technical line drawing of a mechanical device with no visible text or symbols3.1
natural_image
Technical line drawing of a speaker panel with circular components and a 6x speed indicator (no text or symbols)3.2
text_image
6x A 6x B4
natural_image
Technical line drawing of a mechanical assembly with gears and shafts (no text or symbols)5
line
| Frequency (Hz) | Series A (dB) | Series B (dB) | | -------------- | ------------- | ------------- | | 10 | 0 | 0 | | 50 | ~0.8 | ~0.7 | | 100 | ~0.7 | ~0.6 | | 500 | ~0.7 | ~0.6 | | 1K | ~0.7 | ~0.6 | | 5K | ~0.7 | ~0.6 | | 10K | ~0.7 | ~0.6 | | 10K+ | ~0.7 | ~0.6 |6 INC 802 / INC 602 / INW 802 / INW 602
2 × 4
text_image
L R Amplifier/Receiver2 × 8
text_image
L R Amplifier/Receiver6 INC 2602
text_image
2 x 4 Ω 2Ω 4Ω L R Amplifier/Receiver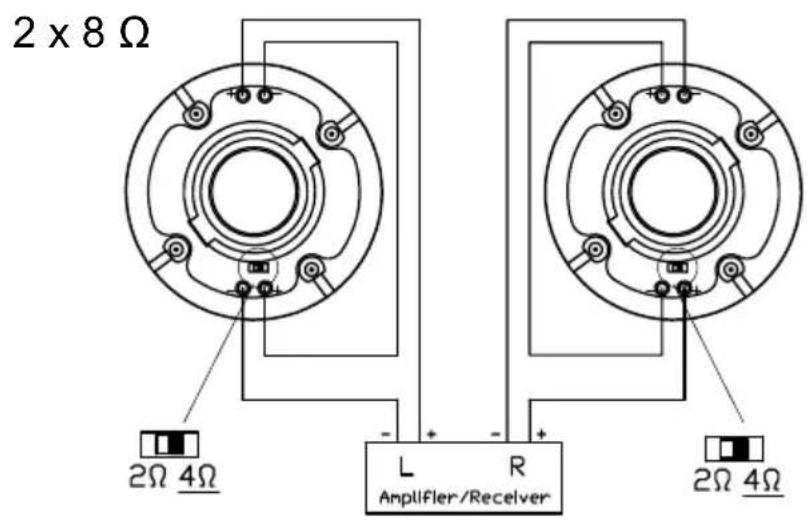
text_image
2 x 8 Ω 2Ω 4Ω L R Amplifier/Receiver 2Ω 4Ω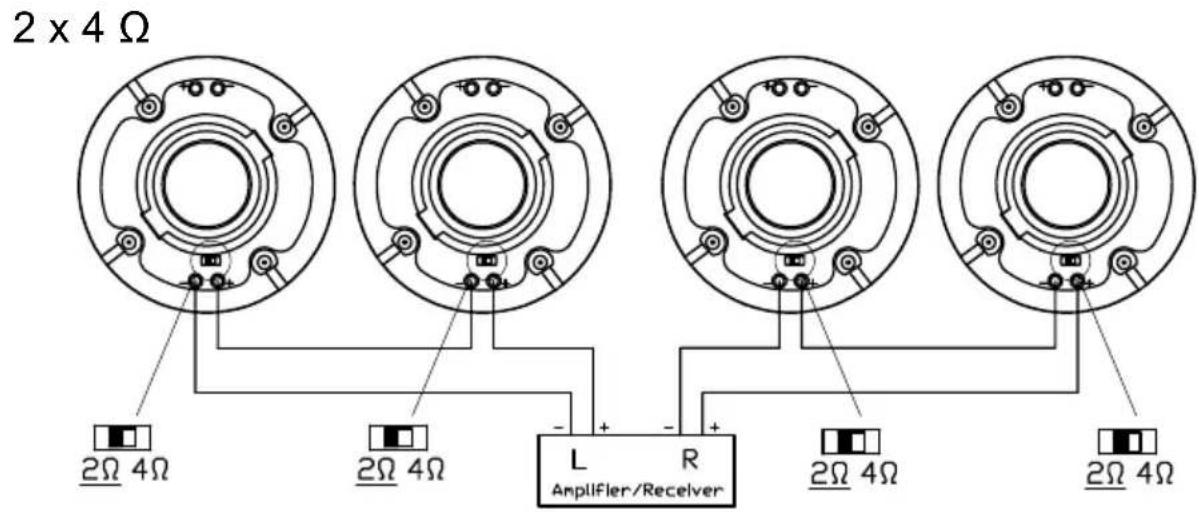
text_image
2 x 4 Ω 2Ω 4Ω 2Ω 4Ω - + - L R Amplifier/Receiver 2Ω 4Ω 2Ω 4Ω6 INC 2602
text_image
2Ω 4Ω 2Ω 4Ω 2Ω 4Ω L Amplifier/Receiver R 2Ω 4Ω 2Ω 4Ω 2Ω 4Ω2 × 6
2 × 8
text_image
2Ω 4Ω 2Ω 4Ω 2Ω 4Ω 2Ω 4Ω - + - L Amplifier/Receiver R 2Ω 4Ω 2Ω 4Ω 2Ω 4Ω 2Ω 4Ω
natural_image
Blank white image with no visible content, text, or symbols
natural_image
Completely blank white image with no visible content, text, or symbols.
natural_image
Blank white image with no visible content, text, or symbols.
natural_image
Blank white image with no visible content, text, or symbols.
natural_image
Blank white image with no visible content, text, or symbols.
natural_image
Blank white image with no visible content, text, or symbols.
natural_image
Blank white image with no visible content, text, or symbols
natural_image
Blank white image with no visible content, text, or symbols.
natural_image
Blank white image with no visible content, text, or symbols.
natural_image
Blank white image with no visible content, text, or symbols.
natural_image
Blank white image with no visible content, text, or symbols
natural_image
Blank white image with no visible content, text, or symbols.
natural_image
Blank white image with no visible content, text, or symbols.
natural_image
Blank white image with no visible content, text, or symbols.
natural_image
Blank white image with no visible content, text, or symbols.
natural_image
Blank white image with no visible content, text, or symbols.
natural_image
Blank white image with no visible content, text, or symbols.
natural_image
Blank white image with no visible content, text, or symbols
natural_image
Blank white image with no visible content, text, or symbols
natural_image
Blank white image with no visible content, text, or symbols
natural_image
Blank white image with no visible content, text, or symbols
natural_image
Blank white image with no visible content, text, or symbols.
natural_image
Blank white image with no visible content, text, or symbols.
natural_image
Blank white image with no visible content, text, or symbols.
natural_image
Blank white image with no visible content, text, or symbols.
natural_image
Blank white image with no visible content, text, or symbols.
natural_image
Blank white image with no visible content, text, or symbols.
natural_image
Blank white image with no visible content, text, or symbols
natural_image
Blank white image with no visible content, text, or symbols
natural_image
Blank white image with no visible content, text, or symbols.
natural_image
Blank white image with no visible content, text, or symbols.
natural_image
Blank white image with no visible content, text, or symbols.
natural_image
Blank white image with no visible content, text, or symbols.
natural_image
Blank white image with no visible content, text, or symbols.
natural_image
Blank white image with no visible content, text, or symbols
natural_image
Blank white image with no visible content, text, or symbols
natural_image
Blank white image with no visible content, text, or symbols
natural_image
Blank white image with no visible content, text, or symbols.
natural_image
Blank white image with no visible content, text, or symbols.
natural_image
Blank white image with no visible content, text, or symbols.
natural_image
Blank white image with no visible content, text, or symbols.
natural_image
Blank white image with no visible content, text, or symbols
natural_image
Blank white image with no visible content, text, or symbols.
natural_image
Blank white image with no visible content, text, or symbols.
natural_image
Blank white image with no visible content, text, or symbols
natural_image
Blank white image with no visible content, text, or symbols.
natural_image
Blank white image with no visible content, text, or symbols.
natural_image
Pure horizontal black line on white background (no text or symbols)
natural_image
Completely blank white image with no visible content, text, or symbols.
natural_image
Blank white image with no visible content, text, or symbols.
natural_image
Blank white image with no visible content, text, or symbols.

natural_image
Blank white image with no visible content, text, or symbols.
D
Congratulations! You have made a wise selection in becoming the owner of a HECO HiFi equipment. Due to high quality HECO HiFi products have earned an excellent reputation through the western world. And this high quality standard enables us to grant a 5-years warranty for HECO HiFi products.
The equipments are checked and tested continuously during the entire production process. In case you have problems with your HECO HiFi equipment, kindly observe the following:
- The guarantee period commences with the purchase of the component and is applicable only to the original owner.
- During the guarantee period we will rectify any defects due to faulty material or workmanship by replacing or repairing the defective part at our discretion. Further claims, and in particular those for price reduction, cancellation of sale, compensation for damages or subsequential damages, are excluded. The guarantee period is not altered by the fact that we have carried out guarantee work.
- Unauthorized tampering with the equipment will invalidate this guarantee.
- Consult your authorized dealer first, if guarantee service is needed. Should it prove necessary to return the component to the factory, please insure that • the component is packed in original factory packing in good condition • the quality control card has been filled out and enclosed with the component • your enclose your receipt as proof of purchase.
- Excluded from the guarantee are: • Illuminates • Wear parts • Shipping damages, either readily apparent or concealed (claims for such damages must be lodged immediately with forwarding agent, the railway express office or post office). • Scratches in cases, metal components, front panels, etc. (You must notify your dealer directly of such defects within three days of purchase.) • Defects caused by incorrect installation or connection, by operation errors (see operating instructions), by overloading or by external force. • Equipments which have been repaired incorrectly or modified or where the case has been opened by persons other than us. • Consequential damages to other equipments. • Reimbursement of cools, without our prior consent, when repairing damages by third parties.
F
Name and address of the dealer/stamp
Käufer/Customer
Name/Name
Straße/Street
PLZ, Ort/City
Land/Country
Kaufdatum/buying date
No warranty without receipt!
HECO®
Lise-Meitner-Str. 9 • D-50259 Pulheim • Germany
Tel. +49 (0) 2234 / 807 - 0 • Fax +49 (0) 2234 / 807 - 399
Internet: http://www.heco-audio.de