
BSS 4816 - Loudspeaker AEG - Free user manual and instructions
Find the device manual for free BSS 4816 AEG in PDF.
| Product type | Bluetooth 5.1 ambient speaker (5.1 channels) |
| Power supply | 230 V, 50 Hz |
| Standby consumption | < 1 W |
| Maximum consumption | 200 W |
| Net weight | 15.9 kg |
| Readable audio formats | MP3, WMA |
| Bluetooth | V2.1 + EDR, A2DP/AVRCP profile |
| Bluetooth range | Approximately 15 meters |
| FM radio frequency | 87.5 - 108 MHz |
| Audio inputs | 5.1CH INPUT (RCA), 2CH/AUX (RCA), USB, FM ANT |
| Speaker outputs | Front (FR/FL), center (CEN), rear (RR/RL), subwoofer (SW) |
| Functions | Remote control, equalizer (Normal/Music/Movie), 2.1 and 5.1 modes, FM radio with 20 presets, USB playback |
| Display | LCD |
| Maintenance | Clean with a dry, soft cloth. Do not use abrasive products or solvents. |
| Safety | Do not expose to moisture. Unplug before cleaning. Do not open the casing. Keep out of reach of children. |
| Remote control batteries | 2 R03/AAA 1.5 V batteries (not included) |
| Auto standby | After approximately 30 minutes without activity |
Frequently Asked Questions - BSS 4816 AEG
User questions about BSS 4816 AEG
0 question about this device. Answer the ones you know or ask your own.
Ask a new question about this device
Download the instructions for your Loudspeaker in PDF format for free! Find your manual BSS 4816 - AEG and take your electronic device back in hand. On this page are published all the documents necessary for the use of your device. BSS 4816 by AEG.
USER MANUAL BSS 4816 AEG
GB Bluetooth Surround Speaker System
natural_image
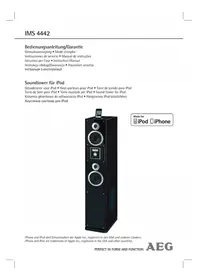
Exterior view of a multi-tiered black audio amplifier setup with speakers and a central speaker unit (no visible text or symbols)CE
AEG
3/4Overview of the Components ......Page 3/40
Instruction Manual......Page 41
Technical Data Page 45
Dposal Page 45
11
Nederlands
Inhoud
Aansluiten
△ LET OP:
Mode supports de stockage
Alcance:....aprox. 15 metros
Supporto Bluetooth: V2.1 + EDR
Gamma: ca. 15 metri
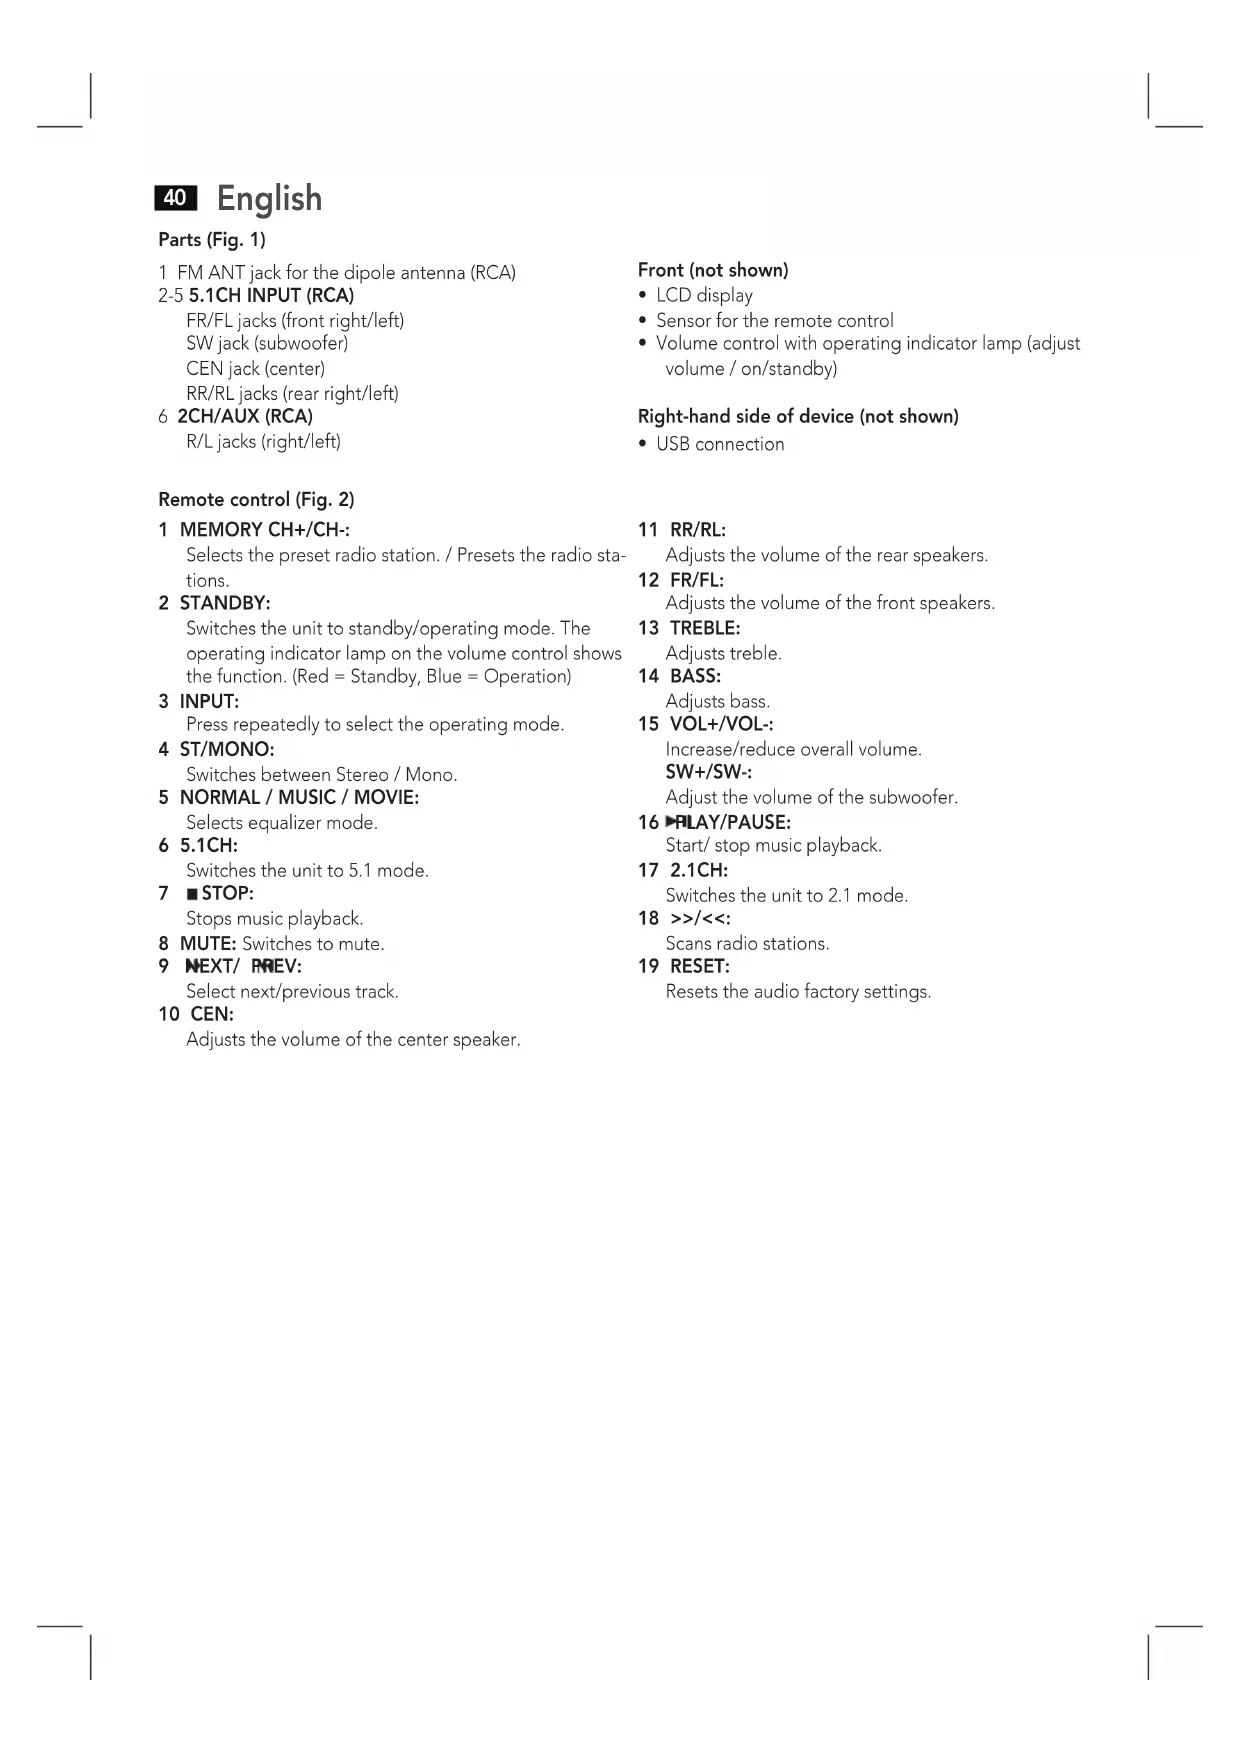
1 FM ANT jack for the dipole antenna (RCA)
2-5 5.1CH INPUT (RCA)
FR/FL jacks (front right/left) SW jack (subwoofer) CEN jack (center) RR/RL jacks (rear right/left)
6 2CH/AUX (RCA)
R/L jacks (right/left)
Front (not shown)
- LCD display
- Sensor for the remote control
• Volume control with operating indicator lamp (adjust volume / on/standby)
Right-hand side of device (not shown)
- USB connection
Remote control (Fig. 2)
1 MEMORY CH+/CH-:
Selects the preset radio station. / Presets the radio stations.
2 STANDBY:
Switches the unit to standby/operating mode. The operating indicator lamp on the volume control shows the function. (Red = Standby, Blue = Operation)
3 INPUT:
Press repeatedly to select the operating mode.
4 ST/MONO:
Switches between Stereo / Mono.
5 NORMAL / MUSIC / MOVIE:
Selects equalizer mode.
6 5.1CH:
Switches the unit to 5.1 mode.
7 ■ STOP:
Stops music playback.
8 MUTE: Switches to mute.
9 NEXT/ PREV:
Select next/previous track.
10 CEN:
Adjusts the volume of the center speaker.
11 RR/RL:
Adjusts the volume of the rear speakers.
12 FR/FL:
Adjusts the volume of the front speakers.
13 TREBLE:
Adjusts treble.
14 BASS:
Adjusts bass.
15 VOL+/VOL-:
Increase/reduce overall volume.
SW+/SW-:
Adjust the volume of the subwoofer.
16 ▶PLAY/PAUSE:
Start/ stop music playback.
17 2.1CH:
Switches the unit to 2.1 mode.
18 >>/<<:
Scans radio stations.
19 RESET:
Resets the audio factory settings.
Instruction Manual
Thank you for choosing our product. We hope you enjoy using the device.
Symbols in these Instructions for Use
Important information for your safety is specially marked. It is essential to comply with these instructions in order to avoid accidents and prevent damage to the machine:

WARNING:
This warns you of dangers to your health and indicates possible injury risks.

CAUTION:
This refers to possible hazards to the machine or other objects.

NOTE:
This highlights tips and information.
General Safety Instructions
Read the operating instructions carefully before putting the appliance into operation and keep the instructions including the warranty, the receipt and, if possible, the box with the internal packing. If you give this device to other people, please also pass on the operating instructions.
- To avoid the risk of fire or electric shock, you should not expose the device to rain or humidity. Do not use the device near water (e.g. bathroom, swimming pool, humid cellars).
- Do not use the unit in extremely hot, cold, dusty, or damp places.
- The unit is designed solely for private use and its intended purpose. This unit is not designed for commercial use.
- Make sure that the power cable is not bent, pinched, or comes into contact with heat sources.
- Make sure that the power cable is not a tripping hazard.
- Never touch the mains plug or the cord with wet hands.
- Always connect the unit to a properly installed plug socket. Be sure the device voltage corresponds to the grid voltage.
- The mains plug must always be easily accessible.
• Always install batteries in the correct direction. - Avoid covering the device's vent openings.
- Never cover the vent holes with objects, such as magazines, tablecloths, curtains etc.
- This appliance shall not be exposed to dripping or splashing water and that no object filled with liquids such as vases shall be placed on apparatus.
- Open sources of fire, such as e.g. burning candles may not be placed onto the unit.
English
41
- Never open the device's case. Improper repairs can cause severe danger to the user. If the device or particularly the power cord is damaged, don't use the device any further and have it repaired by a qualified specialist. Check the power cord regularly for damages.
- To avoid any danger, a damaged power cord must be replaced only by the producer, its customer service or a similarly qualified person with an equal cord.
- If the device won't be used over an extended period of time, disconnect the power cord and remove the batteries.
Do not insert any objects into the bass-reflex port.
These symbols may be found on the machine and are intended to indicate the following:

The lightning symbol should advise the user of parts in the inside of the device which carry dangerously high voltage levels.
The symbol with an exclamation mark should advise the user of important operation or maintenance instructions in the accompanying documentation.
Children and Frail Individuals
In order to ensure your children's safety, please keep all packaging (plastic bags, boxes, polystyrene etc.) out of their reach.

WARNING!
Caution! Do not allow small children to play with the foil as there is a danger of suffocation!
- This device is not intended to be used by individuals (including children) who have restricted physical, sensory or mental abilities and/or insufficient knowledge and/or experience, unless they are supervised by an individual who is responsible for their safety or have received instructions on how to use the device.
- Children should be supervised at all times in order to ensure that they do not play with the device.
Installation
- Remove all devices from the packing and replace the internal packaging material back in the box.
- Retain the packaging if possible during the entire guarantee period!
- Do not insert the plug of the subwoofer into the socket until all loudspeakers and connections have been correctly made!
• If applicable, remove the protective plastic from the display and the front panel.
42 English
For optimum installation of the loudspeakers, please follow the instructions below:

flowchart
graph TD
    A["L"] --> B["C"]
    B --> C["SW"]
    C --> D["R"]
    D --> E["SL"]
    E --> F["SR"]
    F --> G["Output"]
Connection
CAUTION:
- Switch off the subwoofer before connecting the speakers or modifying the connection.
- Make sure that the uninsulated speaker wires do not touch/cross. Risk of short circuiting!
- Do not operate the unit at maximum volume. This may lead to damage.
- Never connect the speakers to the mains!
- Never touch the speaker membranes with your hands or with objects. Doing so may damage the membranes
- Do not overload the speaker boxes.
i NOTE:
Please ensure
- that the plug-in connectors are firmly in place. Poor connections can result in interference.
- that exposed wires do not touch or cross each other. Danger of short-circuiting!
1 Antenna connection
Plug the supplied FM wire antenna onto the connection
2 5.1CH INPUT (5.1 connections)
Used for connecting an external sound source to a 5.1 output (e.g. DVD player).
i NOTE:
The device has an analogue 5.1 connection for an AC3 or DTS decoder.
2CH/AUX (2.1 connections)
For connection of an external sound source with normal stereo recording (e.g. hifi video recorder).
4 SPEAKER OUTPUT
- Outputs on the right and left for connection of the front loudspeakers (FR/FL).
- Outputs for connection of the surround speaker boxes right and left (RR/RL).
• Output for connection of the centre loudspeaker (CEN). - Remove around 1.5 cm of the cable insulation.
- Twist the end of the cable.
- Open the cable terminal by pressing on the latch.
- Now connect the speaker cable of the respective box to the corresponding connection on the subwoofer. Check that the polarity is correct. (Polarity " " from speaker to "+" from the subwoofer and " " to "-".)
5 POWER ON/OFF switch
With this switch the system can be switched on and off.
6 Mains lead
Power supply
When you have connected all loudspeakers and devices as described you can insert the mains plug of the subwoofer into a correctly installed 230 volt, 50 hertz power socket.
Remote Control
Inserting the battery/batteries
(battery/batteries not supplied)
- Open the lid of the battery compartment on the back of the remote control.
- Insert 2 batteries of type R03 "AAA" 1.5 V. Ensure that the polarity is correct (see the floor of the battery compartment)! If the remote control is not used for a prolonged period, remove the batteries in order to prevent battery acid leaking.
- Now close the battery compartment.
CAUTION:
- Different battery types or new and used batteries must not be used together.
- Batteries are not to be disposed of together with domestic wastes. Dispose of the used batteries at the relevant collection bin or at your dealer's.
WARNING:
Do not expose batteries to any intense heat, such as sunlight, fire, or similar. There is a danger of explosion!
When the remote control is used, care should be taken that there are no objects between the remote control and the central loudspeaker. (e.g. table, chair, etc.). These objects prevent the infrared beam of the remote control from reaching the receiver of the central loudspeaker. It is then not possible to control the television with the remote control.
Initial Operation
Insert the plug in a duly installed 230 V/50 Hz socket.
- Switch on your sound source (e.g. DVD player) and start it.
- Turn on the subwoofer with the on/off switch on the rear of the device.
- Press the STANDBY button (2). You may also turn on the device by pressing the volume control on the front of the subwoofer. The light on the volume control will change from red to blue.
- Select the desired input source. To do this, press the INPUT button (3) repeatedly.
i NOTE:
- Every time it is switched on the device starts in 2.1 operation.
-
The input source "USB" may only be selected with a connected storage device.
-
Select between the 2.1 and 5.1 operation by pressing the respective button (17/7).
-
With the VOL +/- button you can set the overall volume.
i NOTE:
After about 30 minutes, the device will switch to standby automatically.
MUTE (8)
This button is used to quickly turn off the volume. The indic Select the preset radio station with the MEMORY CH+/CH- (1) for flashes on the display. Press the button again to cancel buttons. the function.
Adjust the volume of the individual speakers
- Use the FR+/- and FL+/- buttons (12) to select the volume of the front speakers.
- Use the RR+/- and RL+/- buttons (11) to select the volume of the surround speakers.
- Use the SW+/- buttons (15) to select the volume of the subwoofers.
- Use the CEN+/- buttons (10) to select the volume of the center speaker.
i NOTE:
- Please note! The surround and centre loudspeakers can only be controlled during 5.1 operation.
- When you change the overall volume with the VOL+/VOL- buttons, the level for the center, subwoofer, surround, and front loudspeakers will change as well.
- When you press the RESET button (19), the settings will be reset to the factory defaults.
Sound setting (5)
Preset equalizer function. Different sound modes are available. (NORMAL, MUSIC, MOVIE).
i NOTE:
Change the EQ setting in your playback device, if necessary, to create an optimal sound.
Turning off
To turn off, switch the POWER button on the back of the unit to the OFF position.
Radio mode
Scan stations
- Press the INPUT button (3) repeatedly, until "FM" is shown in the display.
- Tune the desired station with the >>/<< buttons. If you keep one of the buttons pressed, the unit will scan to the next radio station. The tuned frequency is shown on the display.
Preset stations
- Search for a station as described under "Scan stations".
- Briefly keep the MEMORY CH+ button (1) pressed down. "P01" flashes on the display.
- Use the MEMORY CH+/CH- buttons to select the preset location on which the station is supposed to be stored.
- Press the MEMORY CH+ button (1) to store the station.
Select preset stations
Select the preset radio station with the MEMORY CH+/CH- (1) buttons.
Storage media mode
Storage media compatibility
There is a wide range of compression methods as well as variations in quality between storage media. These unfortunately do not allow us to guarantee full compatibility. For these reasons, there may be problems during the music playback of USB devices. This is not a malfunction of the device.
USB Port (Device side)
- Directly connect a USB storage medium.
- Press the INPUT button repeatedly (3), until the notification "USb" appears in the display. Playback then begins.
For operation, please refer to the "Explanation of the operating keys" section.
i NOTE:
• Always connect a USB storage medium directly to the USB connection to prevent possible malfunctions.
- The USB connection is not suitable for charging external devices.
CAUTION:
Before removing the USB stick, switch to another input source.
44 English
Explanation of the operating keys:
▶ II PLAY/PAUSE (16)
You can briefly pause and restart playback. Press the button again to continue playback at the same point.
NEXT PREV (9)
- Use the ▶ button to skip to the next or to the subsequent title etc.
- Use the I button to skip to the previous title.
■ STOP (7)
Stops the USB music playback.
Bluetooth Operation
Bluetooth involves a technology for wireless radio connection of devices over a short distance. Devices with Bluetooth standard are transmitting between 2.402 and 2.480 GHz in the ISM band (Industrial, Scientific and Medical). Interference can be caused for example by WLAN-networks, DAB radios, cordless phones, or microwave ovens which work on the same frequency band.
This device offers you the possibility to use a Bluetooth-enabled device. The functional radius is limited to approx. 15 metres depending on the surroundings and the unit used.
If your playing device supports the A2DP profile (Advanced Audio Distribution Profile) and has a music-player function, then you can also wirelessly transfer music to the device. The A2DP profile involves a multi-vendor Bluetooth profile. By streaming, stereo-audio signals are wirelessly transferred between the playing device (source) and the receiving device. To be able to remotely control the source, the playback device must support the AVRCP profile (Audio Video Remote Control Profile).
Due to the different device manufacturers, models, and software versions, a full functionality cannot be guaranteed.
Logging on devices (Pairing)
Before you listen to music via the unit, you must pair the devices.
- Ensure, that the Bluetooth function is activated in your player (e.g. mobile phone). For this, refer to the operation manual of your player.
- Press the INPUT button (3) repeatedly, until "bt" is shown on the display. Two short beeps can be heard. These signal that the device is in pairing mode.
- Chose the Bluetooth menu in your player and register the device in your player. For this, refer to the operation manual of your player. The device "AEG BSS 4816" will show in your player as a selection.
i NOTE:
Only one playback unit can be connected to the speaker. If the speaker is already connected to another playback unit, the speaker will not appear in the BT selection menu.
- Now enter the password "0000" in your player, depending on the device manufacturers, model, and software version.
If the registration was done successfully, a beep will sound. For the further procedure, please refer to the user manual of the playback unit. If possible, adjust the volume of the external unit to a comfortable level.
For operation, please refer to the section "Explanation of the operating keys" in the "Storage media mode" section.
NOTE:
- Depending on the device manufacturer, you need to perform the registration (PAIRING) again to connect the devices.
- In case of problems with the registration of a replay device, deactivate the WiFi-/ and mobile data function in your playback device.
- The Bluetooth compatibility cannot be ensured for devices (e.g. mobile phones) getting released in the future.
- To ensure an optimal connection, make sure that the battery of your player is completely charged.
Some of the mobile phone brands have an energy-saving mode. Deactivate the energy-saving mode as it can otherwise result in problems during the data transfer through Bluetooth. - To be able to transfer audio data, Bluetooth needs to stay activated in your player. Observe the operation manual of your player.
- If a mobile phone on which you are playing music receives a call, the music will be interrupted. The sound however is not played back via the speaker. After you have ended the call, the devices are connected to each other again and playback continues.
Troubleshooting
| Problem Possible Cause Remedy | ||
| No sound from the front loudspeakers. | No power supply. | Check the mains connection and the position of the on/off switch on the subwoofer. |
| The volume is turned off. | Check the volume setting. | |
| The loudspeaker leads are wrongly connected. | Check the loudspeaker connections. | |
| No signal at the RCA input of the cinch sockets. | Check your external sound source (e.g. DVD player) and the RCA connections. | |
| The loudspeaker connection is the wrong way round or not correct. | Check the loudspeaker connection. | |
| No sound from the center or surround loudspeakers (5.1). | The loudspeaker connection is the wrong way round or not correct. | Check the loudspeaker connection. |
| The sound source does not emit any 5.1 signal. | Switch on the 5.1 output of the sound source. | |
| The subwoofer is not set to 5.1. | Set the subwoofer to 5.1. | |
| Device cannot be operated. | be operated.Device crashes and "hangs". | Disconnect the power supply for 5 sec. Then switch the device on again. |
| No audio signal via the Bluetooth connection | Speaker is not paired to the audio source. | Check whether a connection exists. If necessary, pair the speaker again to the audio source. |
| Volume too low Inc | Increase the volume on the speaker | |
| Increase the volume on the audio source. | ||
| Speaker cannot be connected | Pairing does not work | Check whether the audio source supports the A2DP protocol. |
| Audio source is switched off | Switch on the audio source | |
| Bluetooth is switched off at the audio source. | Switch on the Bluetooth function in the audio source. | |
| Bluetooth version is not supported. | Use a different play-back unit. | |
English 45
Technical Data
Model: BSS 4816
Power supply: 230 V, 50 Hz
Power consumption
Standby: ....<1 W
Operating mode: max. 200 W
Playable file formats: ......MP3/WMA
Net weight: 15.9 kg
Radio element
Frequency range: FM 87.5 \~ 108 MHz
Bluetooth
Bluetooth support: V2.1 + EDR
Range: approx. 15 metres
Transmission frequency: 2.402-2.480 GHz
Protocols: ......A2DP/AVRCP
The right to make technical and design modifications in the course of continuous product development remains reserved.
This device has been tested according to all relevant current CE guidelines, such as electromagnetic compatibility and low voltage directives, and has been constructed in accordance with the latest safety regulations

Disposal
Meaning of the "Dustbin" Symbol
Protect our environment: do not dispose of electrical equipment in the domestic waste.
Please return any electrical equipment that you will no longer use to the collection points provided for their disposal.
This helps avoid the potential effects of incorrect disposal on the environment and human health.
This will contribute to the recycling and other forms of reutilization of electrical and electronic equipment.
Information concerning where the equipment can be disposed of can be obtained from your local authority.
46 Język polski
Części (rys. 1)
Podłączenie
△ UWAGA:
flowchart
graph TD
    L["Left"] --> C["C"]
    C --> SW["Right"]
    SW --> R["Right"]
    R --> SL["Right"]
    SL --> SR["Right"]
    C --> L
    C --> R
    C --> SW
    C --> R
    style C fill:#f9f,stroke:#333
    style SW fill:#ccf,stroke:#333
    style R fill:#cfc,stroke:#333
Під'єднання
△ YBAΓA.


- Nederlands
- Inhoud
- Aansluiten
- △ LET OP:
- Mode supports de stockage
- Front (not shown)
- Right-hand side of device (not shown)
- Remote control (Fig. 2)
- Instruction Manual
- Symbols in these Instructions for Use
- WARNING:
- CAUTION:
- NOTE:
- General Safety Instructions
- English
- Children and Frail Individuals
- WARNING!
- Installation
- English
- Connection
- i NOTE:
- Antenna connection
- 5.1CH INPUT (5.1 connections)
- 2CH/AUX (2.1 connections)
- SPEAKER OUTPUT
- POWER ON/OFF switch
- Mains lead
- Power supply
- Remote Control
- Inserting the battery/batteries
- Initial Operation
- MUTE (8)
- Adjust the volume of the individual speakers
- Sound setting (5)
- Turning off
- Radio mode
- Scan stations
- Preset stations
- Select preset stations
- Storage media mode
- Storage media compatibility
- USB Port (Device side)
- English
- Explanation of the operating keys:
- ▶ II PLAY/PAUSE (16)
- NEXT PREV (9)
- ■ STOP (7)
- Bluetooth Operation
- Logging on devices (Pairing)
- English 45
- Technical Data
- Bluetooth
- Disposal
- Meaning of the "Dustbin" Symbol
- Język polski
- Części (rys. 1)
- Podłączenie
- △ UWAGA:
- Під'єднання
- △ YBAΓA.
Brand : AEG
Model : BSS 4816
Category : Loudspeaker