
BSS 4820 - Loudspeaker AEG - Free user manual and instructions
Find the device manual for free BSS 4820 AEG in PDF.
| Product type | Bluetooth speaker |
| Brand | AEG |
| Model | BSS 4820 |
| Power supply | AC adapter 100-240 V ~ 50/60 Hz, output 5 V / 2 A; built-in battery 3.7 V / 1000 mAh |
| Power consumption | 12.5 W |
| Net weight | Approximately 0.895 kg |
| Protection class | III (device), II (adapter) |
| Bluetooth technology | Version 2.1 + EDR, range 10-15 m |
| Supported Bluetooth profiles | A2DP, AVRCP |
| Audio inputs | AUX 3.5 mm stereo; USB type A port (audio file playback) |
| Charging port | USB micro B (DC IN 5 V / 2 A) |
| USB output port | USB type A (DC OUT 5 V / 1 A for charging a smartphone) |
| Functions | Bluetooth, USB, AUX playback; hands-free function with built-in microphone |
| Built-in tray | For tablet or smartphone |
| Indicator lights | Multicolor indicator (Bluetooth, USB, AUX, charging mode) |
| Cleaning | Soft damp cloth, no detergent; do not immerse |
| Safety | Do not expose to water or moisture; do not open the housing |
| Operating conditions | Flat, dry, well-ventilated surface; room temperature |
| Battery | Charge via USB or adapter; charging time varies; discharge during prolonged non-use |
| Disposal | Do not dispose with household waste; battery removal by a professional |
Frequently Asked Questions - BSS 4820 AEG
User questions about BSS 4820 AEG
0 question about this device. Answer the ones you know or ask your own.
Ask a new question about this device
Download the instructions for your Loudspeaker in PDF format for free! Find your manual BSS 4820 - AEG and take your electronic device back in hand. On this page are published all the documents necessary for the use of your device. BSS 4820 by AEG.
USER MANUAL BSS 4820 AEG
natural_image
Exterior view of a modern AEG brand electronic device with front panel and control buttons (no readable text or symbols beyond branding)2 Inhalt
Deutsch
Inhalt
Location of Controls Page 3
Instruction Manual......Page 30
Technical Specifications Page 33
Disposal Page 34
Język polski
Spis treści
Location of Controls
Alcance:......aprox. 10-15 metros
Cordless via Bluetooth
Thank you for choosing our product. We hope you will enjoy using the appliance.
Symbols in these Instructions for Use
WARNING:
Warns of dangers for your health and indicates potential risks of injury.
CAUTION:
Indicates potential dangers for the device or other objects.
i NOTE:
Highlights tips and information for you.
General Safety Guidelines
Before using this device, carefully read this user manual and keep it together with the Warranty Certificate, cashier receipt and if possible, the original package inclusive its interior packing. If you hand on the device to any third person, include the user manual as well.
- To avoid the risk of fire or electric shock, you should not expose the device to rain or humidity. Do not use the device near water (e.g. bathroom, swimming pool, humid cellars).
- Do not use the unit in extremely hot, cold, dusty, or damp places.
- The unit is designed solely for private use and its intended purpose. This unit is not designed for commercial use.
- Make sure that the power cable is not bent, pinched, or comes into contact with heat sources.
• Make sure that the power cable is not a tripping hazard.
• The power supply is only suitable for use in dry rooms. - Only connect the power supply to a properly installed socket. Ensure that the specified voltage matches the voltage of the socket. Also check to make sure that the output current and the polarity of the power supply match the information on the connected device.
- Do not touch the power supply with wet hands!
- The mains plug must always be easily accessible.
• Always install batteries in the correct direction. - Avoid covering the device's vent openings.
- Never cover the vent holes with objects, such as magazines, tablecloths, curtains etc.
- This appliance shall not be exposed to dripping or splashing water and that no object filled with liquids such as vases shall be placed on apparatus.
-
Open sources of fire, such as e.g. burning candles may not be placed onto the unit.
-
Never open the device's case. Improper repairs can cause severe danger to the user. If the device or particularly the power cord is damaged, don't use the device any further and have it repaired by a qualified specialist. Check the power cord regularly for damages.
- To avoid any danger, a damaged power cord must be replaced only by the producer, its customer service or a similarly qualified person with an equal cord.
- If the device won't be used over an extended period of time, disconnect the power cord and remove the batteries.
- Do not expose the built-in battery to hard impacts or pressures.
These symbols may be found on the device and shall indicate the following:
The lightning symbol warns the user of dangerously high voltages inside the case.

The exclamation mark symbol points to important instruction or maintenance remarks in the accompanying guidelines.
Children and disabled persons
- For the safety of your children, keep any packing parts (plastic bags, cartilage, Styrofoam etc.) out of their reach.
WARNING!
Don't let small children play with foils for danger of suffocation!
- This device is not intended for use by persons (including children) with reduced physical, sensory or mental capabilities, or lack of experience and/or knowledge unless they have been given supervision or instructions concerning the use of the device by a person responsible for their safety.
- Supervise children to ensure they do not play with the device.
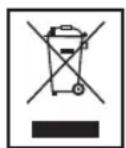
Location of Controls
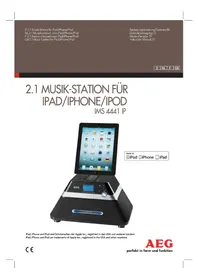
1 Tray for tablet PC or smartphone
2 ✿ Indicator lamp, multicolored
3 POWER/CHARGE indicator lamp
4 VOL-/VOL+ buttons
5 🎨/buttons
6 PAIR/▶ button
7 SOURCE button
8 MIC (microphone)
9 ⏻ button
Rear
10 AUX IN input
11 DC IN 5 V/2 A power supply connection
12 DC IN 5 V/2 A - micro-B USB charging port
13 DC OUT 5 V/1 A – charging port USB type A for charging of smartphones
14 USB port type A for music playback
Scope of delivery
1x Bluetooth sound system
1x Charging cable (type A USB to mini-B USB)
1x AC adapter
1x Operating instructions
First Use of the Device/Introduction
- Select a proper place for the device. A dry, level and slip proof surface is suitable.
• Make sure the device is vented sufficiently! - Remove the protective film from the device, if present.
Power supply (11)
- Insert the grid plug into a properly installed socket. Connect the device with the plug connector by inserting its plug into the DC IN 5 V/2 A jack of the device.
- Make sure the grid voltage corresponds to the figures on the rating plate.

CAUTION:
- The included AC adapter may only be used with this device. Do not use it for other devices.
- Use only an AC adapter with 5 V (⊕→)−⊖). A different AC adapter may damage the unit.

NOTE:
Disconnect from mains power supply during longer periods of non-use.
Charging the built-in Battery
You can also operate the device with the built-in battery. Charge the battery as follows:
- Insert the Mini USB plug from the charger cable into the socket (12) of the unit. Connect the USB plug to a powered-on computer. The indicator lamp lights up red and the battery charges.
- If the battery is completely charged, the indicator light (3) will light up green.
- Remove the charger cable from the speaker and PC.

CAUTION:
Never leave the unit unattended when it is charging.

NOTE:
• The battery is only charged while the PC is switched on.
- Do not connect the player for a long period of time to a laptop computer disconnected from mains power. Otherwise the laptop computer's battery may be discharged.

NOTE:
• The charging time varies according to battery use.
- Should you not use the device for longer than half a year, charge the battery at least every 6 to 12 months. The battery will also constantly discharge when switched off.
- You can use the included AC adapter to charge the battery. Connect the AC adapter to a correctly installed outlet and to the power supply connection (11).
General Operation
Turning the device on/ off (9)
- Switch on the unit with the ⏻ button (9). The unit starts with the last selected source.
- Press the ⏻ button again to switch the unit off.

NOTE:
After about 15 minutes without signal, the device will automatically switch to standby.
Volume
By pressing the VOL+/VOL-buttons (4) you can adjust the desired volume.
Sound Settings
If necessary, change the EQ setting in your playback unit to create the best sound.

Indicator lamp (2)
The indicator lamp changes its color according to the operating mode.
| Color of the indicator lamp Operating mode | |
| Alternate flashing red and blue | In Bluetooth pairing mode |
| Lit blue Bluetooth connection exists | |
| Flashes blue Music playback via Blue-tooth | |
| Lit green In USB mode | |
| Flashes green USB playback stopped | |
| Lit red In AUX IN mode | |
USB charging port (13)
You can charge your smartphone via this port. Use the USB cable of your smartphone for the connection.

NOTE:
- Because of the many different smartphone types being offered today and their different charging capacities, the charging time depends on the smartphone being used and it operating mode.
- Playback of audio files via this port is not possible.
- Your smartphone is being charged even during battery operation. However, please note that this discharges the built-in battery of the unit.
32 English
Playing back music files
There are three ways of playing your own music files with the unit: via cable connection, wireless via Bluetooth, or via USB port.
By cable (Cable not included)
- Connect the 3.5 mm stereo RCA cable to an external audio source. If required, use a suitable adapter (not included).
- Insert the other end of the cable into the AUX-IN jack (10) on the unit.
- Press the SOURCE button (7) until the indicator lamp (2) lights red.
- Start the playback of your audio source. Listen to the sound playback via the speaker. You can adjust the volume using the VOL+/VOL-buttons (4).
- For the further procedure, please refer to the user manual of the external audio source.
i NOTE:
If possible, adjust the volume of the external unit to a comfortable level.
Cordless via Bluetooth
Bluetooth involves a technology for wireless radio connection of devices over a short distance. Devices with Bluetooth standard are transmitting between 2.402 and 2.480 GHz in the ISM band (Industrial, Scientific and Medical). Interference can be caused for example by WLAN-networks, DAB radios, cordless phones, or microwave ovens which work on the same frequency band.
This device offers you the possibility to use a Bluetooth-enabled device. The functional radius is limited to approx. 15 metres depending on the surroundings and the unit used. If your playing device supports the A2DP profile (Advanced Audio Distribution Profile) and has a music-player function, then you can also wirelessly transfer music to the device. The A2DP profile involves a multi-vendor Bluetooth profile. By streaming, stereo-audio signals are wirelessly transferred between the playing device (source) and the receiving device. To be able to remotely control the source, the playback device must support the AVRCP profile (Audio Video Remote Control Profile).
Due to the different device manufacturers, models, and software versions, a full functionality cannot be guaranteed.
- Logging on devices (Pairing)
Before you listen to music via the unit, you must pair the devices.
-
Ensure, that the Bluetooth function is activated in your player (e.g. mobile phone). For this, refer to the operation manual of your player.
-
After switching on, beeps can be heard, and the indicator lamp (2) flashes alternately red and blue. This indicates that the unit is in pairing mode.
- Chose the Bluetooth menu in your player and register the device in your player. For this, refer to the operation manual of your player. The device "AEG BSS 4820" will show in your player as a selection.
i NOTE:
- Only one playback unit can be connected to the speaker. If the speaker is already connected to another playback unit, the speaker will not appear in the BT selection menu.
-
In case of problems with connection of the devices: Press the PAIR button (6) for about 3 seconds to switch the unit again to pairing mode. Now try again to connect the devices.
-
Now enter the password "0000" in your player, depending on the device manufacturers, model, and software version.
When the pairing was successful, a beep can be heard and the indicator lamp (2) lights blue.
For the further procedure, please refer to the user manual of the playback unit. If possible, adjust the volume of the external unit to a comfortable level.
i NOTE:
- Depending on the device manufacturer, you need to perform the registration (PAIRING) again to connect the devices.
- In the case of problems with the pairing of a playback device, deactivate the WiFi-/ and mobile data function in your playback device.
- The Bluetooth compatibility cannot be ensured for devices (e.g. mobile phones) getting released in the future.
- To ensure an optimal connection, make sure that the battery of your player is completely charged.
- Some of the mobile phone brands have an energy-saving mode. Deactivate the energy-saving mode as it can otherwise result in problems during the data transfer through Bluetooth.
- To be able to transfer audio data, Bluetooth needs to stay activated in your player. Observe the operation manual of your player.
- If a mobile phone on which you are playing music receives a call, the music will be interrupted. Press the PAIR/1 button (6) to accept the call. The sound is transmitted via the unit. Speak into the microphone (8) of the unit or transfer the call to your mobile telephone. For this, note the display contents of your mobile phone. Playback continues after you have ended your call.
USB port (14)
This device has been developed according to the current level of technology in the USB sector. However, the large variety of different USB storage media of all kinds being offered today makes it impossible for us to guarantee full compatibility with all USB storage media. Because of this, in rare cases there may be problems with playback from USB storage media. This is not a malfunction of the device.
- Press the SOURCE button (7) until the indicator lamp (2) lights green.
- Connect a USB storage medium directly. Then the play-back starts.
Refer to the section "Description of the USB / Bluetooth Operation Buttons" for operation.

NOTE:
- Always connect a USB storage medium directly to the USB port to prevent problems.
- This USB port cannot be used to charge external devices.

CAUTION:
Before you remove the USB storage medium, use the SOURCE button to switch the unit to a different mode.
Description of the USB / Bluetooth Operation Buttons
PAIR/1(9)
- Press the button briefly to interrupt the playback. Pressing the button again continues the playback from the same position.

NOTE: Bluetooth music playback
Your playback device must support this function. Depending on the device, it may be necessary to start the music app in advance on your playback device.
- Keep the button pressed to separate an existing Bluetooth connection or to activate the pairing mode manually.
- Press this button to accept or end an incoming call.
◀ (5)
Press once = (Only in Bluetooth mode) Starts the current title again from the beginning.
Press twice = Jumps to the preceding title.
Press three times = Plays a preceding title, etc.
- (Only in USB mode) Keeping the button pressed starts a music search. By doing so, the sound is muted.
▶| (5)
You can use this button to jump to the next or overnext title etc.
- (Only in USB mode) Keeping the button pressed starts a music search. By doing so, the sound is muted.
Cleaning

CAUTION:
Do not submerge the device in water.
• Before cleaning disconnect from mains power supply.
- Clean the device with a soft damp cloth without detergents.
Troubleshooting
| Fault Cause Solution | ||
| Unit cannot be operated. | Unit crashes and "hangs". | Disconnect from the mains for around 5 seconds. Then switch the unit on again. |
| No audio signal via the Bluetooth connection | Speaker is not paired to the audio source. | Check whether a connection exists. If necessary, pair the speaker again to the audio source. |
| Volume too low | Increase the volume on the speaker | |
| Increase the volume on the audio source. | ||
| Speaker cannot be connected | Pairing does not work | Check whether the audio source supports the A2DP protocol. |
| Audio source is switched off | Switch on the audio source | |
| Bluetooth is switched off at the audio source. | Switch on the Bluetooth function in the audio source. | |
| Bluetooth version is not supported. | Use a different playback unit. | |
Technical Specifications
Model: BSS 4820
Battery operation: 3.7 V, 1000 mAh
Power supply (AC adapter): .... DC 5 V, 2 A ⊖—←⊕
Power Consumption: 12,5 W
Protection class:....III
Net weight:......approx. 0.895 kg
AC adapter
Protection class:....II
Input: AC 100-240 V\~ 50/60 Hz
Output: DC 5V,2A
Polarity: -
34 English
Bluetooth
Bluetooth support:....V2.1 + EDR
Range: approx. 10-15 metres
Transmission frequency: 2.4 GHz
Protocols: ......A2DP, AVRCP
The right to make technical and design modifications in the course of continuous product development remains reserved.
This device has been tested according to all relevant current CE guidelines, such as electromagnetic compatibility and low voltage directives, and has been constructed in accordance with the latest safety regulations.
Disposal
Battery disposal

The device has a rechargeable battery. Used batteries and accumulators do not belong in the household waste.
The batteries / accumulators must be removed before the product goes into the waste disposal. Contact qualified specialists to do so.
Environmental protection
Do not dispose of the device at the end of its service life with normal household waste. Bring it to the official collection point for recycling. By doing this, you help protect the environment.


- Inhalt
- Deutsch
- Inhalt
- Język polski
- Spis treści
- Cordless via Bluetooth
- Symbols in these Instructions for Use
- WARNING:
- CAUTION:
- i NOTE:
- General Safety Guidelines
- Children and disabled persons
- WARNING!
- Location of Controls
- Rear
- Scope of delivery
- First Use of the Device/Introduction
- Power supply (11)
- NOTE:
- Charging the built-in Battery
- General Operation
- Turning the device on/ off (9)
- Volume
- Sound Settings
- Indicator lamp (2)
- USB charging port (13)
- English
- Playing back music files
- By cable (Cable not included)
- - Logging on devices (Pairing)
- USB port (14)
- Description of the USB / Bluetooth Operation Buttons
- PAIR/1(9)
- NOTE: Bluetooth music playback
- ◀ (5)
- ▶| (5)
- Cleaning
- Troubleshooting
- Technical Specifications
- AC adapter
- English
- Bluetooth
- Disposal
- Battery disposal
- Environmental protection
Brand : AEG
Model : BSS 4820
Category : Loudspeaker