
6H 50 X - Electric oven FAGOR - Free user manual and instructions
Find the device manual for free 6H 50 X FAGOR in PDF.
| Product type | Built-in electric oven |
| Brand | Fagor |
| Model | 6H 50 X |
| Dimensions (W x H x D) | 595 x 595 x 550 mm (estimate) |
| Net weight | Approximately 30 kg (estimate) |
| Power supply | 220-240 V, 50/60 Hz |
| Total power | Approximately 3000 W (estimate) |
| Capacity | 60 liters (estimate) |
| Cooking functions | Conventional cooking, Turbo Plus, Strong Grill, Gentle Grill, Intensive Bottom Heat, Pulsed Bottom Heat, Defrost, Fan-assisted |
| Clock type | Conventional or digital depending on variant |
| Timer | Yes, up to 99 minutes |
| Delayed programming | Yes, with digital clock |
| Child lock | Yes |
| Interior lighting | Yes, replaceable bulb |
| Wall type | Smooth or self-cleaning depending on model |
| Included accessories | Standard grid, standard tray, deep tray |
| Door | Glass, open with caution (hot steam) |
| Safety | Automatic shut-off after several hours, locking, mandatory grounding |
| Repairability | Replaceable bulb; for other issues, contact technical service |
| Energy class | A (estimate) |
Frequently Asked Questions - 6H 50 X FAGOR
User questions about 6H 50 X FAGOR
0 question about this device. Answer the ones you know or ask your own.
Ask a new question about this device
Download the instructions for your Electric oven in PDF format for free! Find your manual 6H 50 X - FAGOR and take your electronic device back in hand. On this page are published all the documents necessary for the use of your device. 6H 50 X by FAGOR.
USER MANUAL 6H 50 X FAGOR
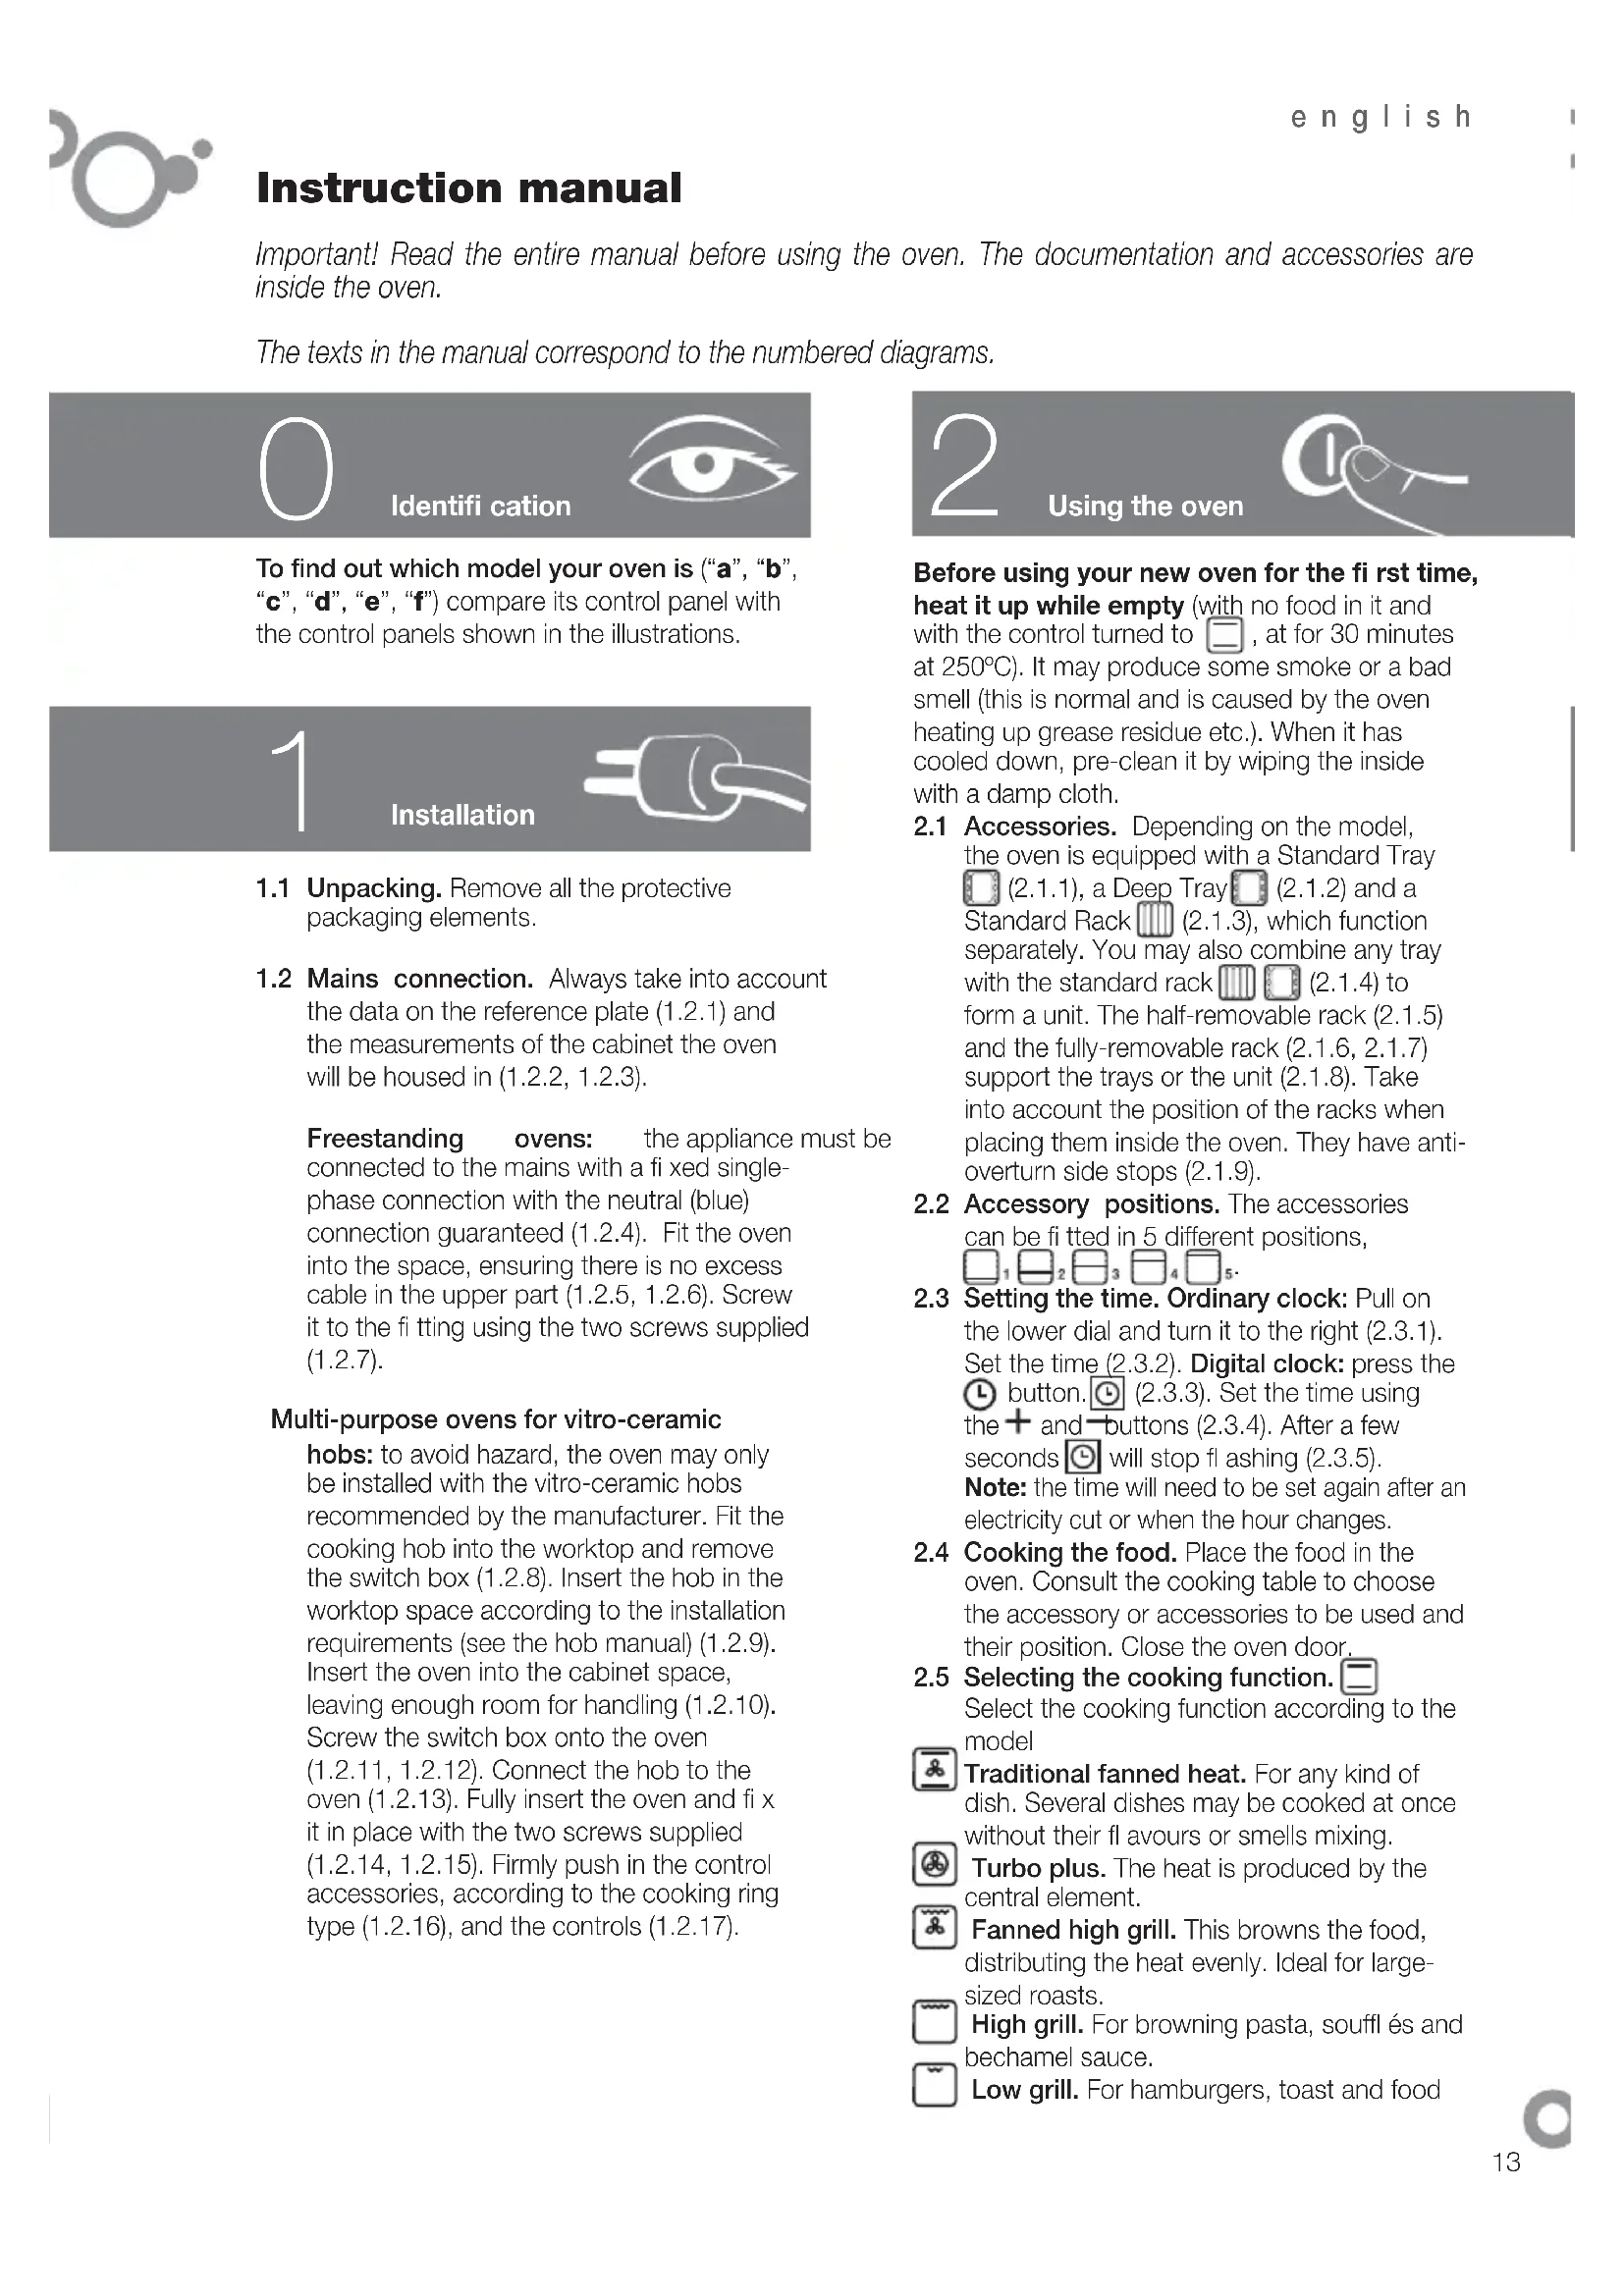
Important! Read the entire manual before using the oven. The documentation and accessories are inside the oven.
The texts in the manual correspond to the numbered diagrams.

Identification

To find out which model your oven is ("a", "b", "c", "d", "e", "f") compare its control panel with the control panels shown in the illustrations.
1
Installation

1.1 Unpacking. Remove all the protective packaging elements.
1.2 Mains connection. Always take into account the data on the reference plate (1.2.1) and the measurements of the cabinet the oven will be housed in (1.2.2, 1.2.3).
Freestanding ovens: the appliance must be connected to the mains with a fixed single-phase connection with the neutral (blue) connection guaranteed (1.2.4). Fit the oven into the space, ensuring there is no excess cable in the upper part (1.2.5, 1.2.6). Screw it to the fitting using the two screws supplied (1.2.7).
Multi-purpose ovens for vitro-ceramic
hobs: to avoid hazard, the oven may only be installed with the vitro-ceramic hobs recommended by the manufacturer. Fit the cooking hob into the worktop and remove the switch box (1.2.8). Insert the hob in the worktop space according to the installation requirements (see the hob manual) (1.2.9). Insert the oven into the cabinet space, leaving enough room for handling (1.2.10). Screw the switch box onto the oven (1.2.11, 1.2.12). Connect the hob to the oven (1.2.13). Fully insert the oven and fix it in place with the two screws supplied (1.2.14, 1.2.15). Firmly push in the control accessories, according to the cooking ring type (1.2.16), and the controls (1.2.17).
2
Using the oven

Before using your new oven for the first time, heat it up while empty (with no food in it and with the control turned to , at for 30 minutes at 250^ ). It may produce some smoke or a bad smell (this is normal and is caused by the oven heating up grease residue etc.). When it has cooled down, pre-clean it by wiping the inside with a damp cloth.
2.1 Accessories. Depending on the model, the oven is equipped with a Standard Tray (2.1.1), a Deep Tray (2.1.2) and a Standard Rack (2.1.3), which function separately. You may also combine any tray with the standard rack (2.1.4) to form a unit. The half-removable rack (2.1.5) and the fully-removable rack (2.1.6, 2.1.7) support the trays or the unit (2.1.8). Take into account the position of the racks when placing them inside the oven. They have anti-overturn side stops (2.1.9).
2.2 Accessory positions. The accessories can be fitted in 5 different positions,
2.3 Setting the time. Ordinary clock: Pull on the lower dial and turn it to the right (2.3.1). Set the time (2.3.2). Digital clock: press the button. (2.3.3). Set the time using the + and - buttons (2.3.4). After a few seconds will stop flashing (2.3.5).
Note: the time will need to be set again after an electricity cut or when the hour changes.
2.4 Cooking the food. Place the food in the oven. Consult the cooking table to choose the accessory or accessories to be used and their position. Close the oven door.
2.5 Selecting the cooking function. Select the cooking function according to the model
Traditional fanned heat. For any kind of dish. Several dishes may be cooked at once without their flavours or smells mixing.
Turbo plus. The heat is produced by the central element.
Fanned high grill. This browns the food, distributing the heat evenly. Ideal for large-sized roasts.
High grill. For browning pasta, souffles and bechamel sauce.
Low grill. For hamburgers, toast and food
with a small surface area.
High base heat. The heat from the oven base is evenly distributed. Ideal for paellas or pizzas.
Fanned base heat. The fan distributes the base heat evenly. Suitable for paellas.
Traditional heat. For bread, cakes, cakes with flling and lean meat.
Defrost. Rapidly thaws any kind of food.
Celeris. For pre-heating the oven.
2.6 Selecting the temperature ^ C . Select the temperature by turning the selector dial. The pilot light will switch off when the selected temperature is reached.
TIME FUNCTIONS
2.7 Selecting the cooking time. Timer: select the minutes by turning the selector dial.(2.7.1).If you prefer the oven to function without a time limit, turn it to hand position
Ordinary clock: Turn the upper dial to the right and select the minutes (2.7.2). If you prefer the oven to function without a time limit, turn it to hand position and line up the red arrow with the time shown by the hands of the clock. Digital clock: press the button. l will start to flash (2.7.3). Adjust the duration using the + and buttons (2.7.4). l will stop flashing after a few seconds.
2.8 Selecting the start time. Ordinary clock: When you have selected the programme and the temperature, turn the upper dial to 品 . Then pull on the upper dial and turn it until the red arrow shows the start time (2.8.1). Select the duration by turning the upper dial to the right.
2.9 Selecting the end time.
Digital clock: after selecting the programme, temperature and cooking time, press the button. will start to flash (2.9.1). Set the desired end of cooking time by pressing the + and - buttons (2.9.2). will stop flashing after a few seconds.
2.10 Beeper function.
Ordinary clock: Select the position 0 on the programme dial (2.10.1). Turn the upper dial to the right and select the minutes (2.10.2). This only works if the oven is switched off.
Digital clock: press the button several times. will start to flash (2.10.3). Adjust the duration using the + and - buttons (2.10.4). will stop flashing after a few seconds. This works with the oven switched off and switched on.
2.11 Child lock. To prevent children from playing with the oven.
Ordinary clock: Turn the upper dial to select (2.11.1)
Digital clock: press the + and buttons at the same time and hold them down for 3 seconds. will appear on the display (2.11.2). To remove the child lock, repeat the process.
Warnings: when the cooking time has elapsed, turn the function and temperature dials to 0 and the time dial to hand position. Open the oven door, taking care as hot steam may come out.
3 Maintenance and cleaning

3.1 Cleaning the accessories. The accessories are dishwasher-safe. To wash them up by hand, use normal detergent. Leave them to soak for easier cleaning.
Cleaning the inside of the oven.
3.2 Smooth-walled models. ake out the side runners. Depending on the models, the side runners are fixed in two ways, either without a support (3.2.1, 3.2.2) or with a support (3.2.4, 3.2.5). Clean the oven while it is warm, wiping the walls with a cloth soaked in hot soapy water (3.2.3, 3.2.6). When you have cleaned the oven walls, replace the runners.
3.3 Self-cleaning rough-walled models. On these models, the rear plate and side panels are covered with a self-cleaning enamel that removes the grease while the oven is functioning. The side panels are reversible, doubling the lifetime of the coating.
To remove the self-cleaning panels, fi rstly remove the side rails.
If the panels are not performing the self-cleaning process sufficiently, they will need regenerating. To do this, remove all the accessories and utensils from the inside of the oven. Thoroughly clean the oven surfaces that are not self-cleaning. Select the function.
Set the temperature to 250^ and set the time between 30 and 60 minutes, depending on how dirty the oven is.
When the cleaning programme ends and the oven has cooled down, wipe the self-cleaning elements with a damp sponge. They will then be totally functional again.
Note: Do not use specific oven cleaning products to clean the catalytic walls.
Do not scrape the surface with metal scouring pads or sharp or pointed instruments.
3.4 Cleaning the oven ceiling. If your oven has a fold-down grill, pull upwards and press to fold it down (3.4.1) and clean the top wall with a damp cloth (3.4.2).
3.5 Cleaning the outside of the oven. Use neutral cleaning products and dry the oven well with a soft cloth.
Warnings: 1. Make sure the oven is switched off.
2. Never use steam cleaning machines.

Troubleshooting

You can solve the following problems yourself:
4.1 The oven does not switch on. Check it is plugged in and that the time selector dial is not turned to 0.
4.2 Smoke comes out during cooking. Tum the temperature down and/or clean the oven (point 3.3).
4.3 The oven makes a noise after cooking. This is normal, as the fan keeps running until the temperature inside and outside the oven is reduced.
Digital display models have a diagnosis system which detects any problems and warns the user. You can see this on the display:
4.4 Oven not working. flashing. Turn the function selector dial to 0 and set the time (point 2.3).
4.5 Oven not working. is fl ashing. The oven has been working for several hours and for safety reasons it has switched off automatically. Turn the function selector dial to 0 and set the time (point 2.3).
4.6 Oven not working. l is flashing. Turn the function selector dial to 0 and remove the child lock (point 2.11).
4.7 Oven not working. is flashing. Press any button.

- Do not try to repair the oven yourself.
Call the technical assistance service.

Safety

- The oven must be installed by an authorised installer in accordance with the manufacturer's instructions and diagrams.
- The electrical installation must be dimensioned for the maximum power indicated on the reference plate and the electrical socket must have a regulatory earth connection.
- The mains circuit supplying the oven must have a single-pole cut-off switch with at least 3 mm
between contacts.
- If the power cord is damaged, it must be replaced by the after-sales technical service or by similarly qualified staff, to avoid hazard.
- Ensure the appliance is unplugged from the mains before replacing the oven lamp, to avoid electric shock.
- Do not use abrasive cleaning products or metal scouring pads to clean the oven door, as they could scratch the surface and cause the glass to shatter.
- Keep small children away from the oven. It has accessible parts that can heat up during functioning.
- Do not touch the heating elements inside the oven.
- This appliance is not intended for use by people (including children) whose physical, sensory, or mental capacities are reduced or who lack experience or knowledge, except under supervision or after receiving instruction regarding use of the appliance from a person responsible for their safety. Use by children should be supervised to prevent them playing with the appliance.

The Environment

This oven has been designed with environmental protection in mind.
Respect the environment. Only preheat the oven when necessary (see table). Use dark coloured cake tins whenever possible. For long cooking times, switch off the oven 5 or 10 minutes before the end of cooking time.
Management of waste electrical and electronic equipment.
The symbol indicates that the appliance must not be disposed of in traditional bins for domestic waste.
Take your oven to the a special collection centre. Recycling domestic appliances will prevent negative consequences for health and the environment and will allow savings on energy and resources.
For further information, contact the local authorities or the shop where you bought the oven.
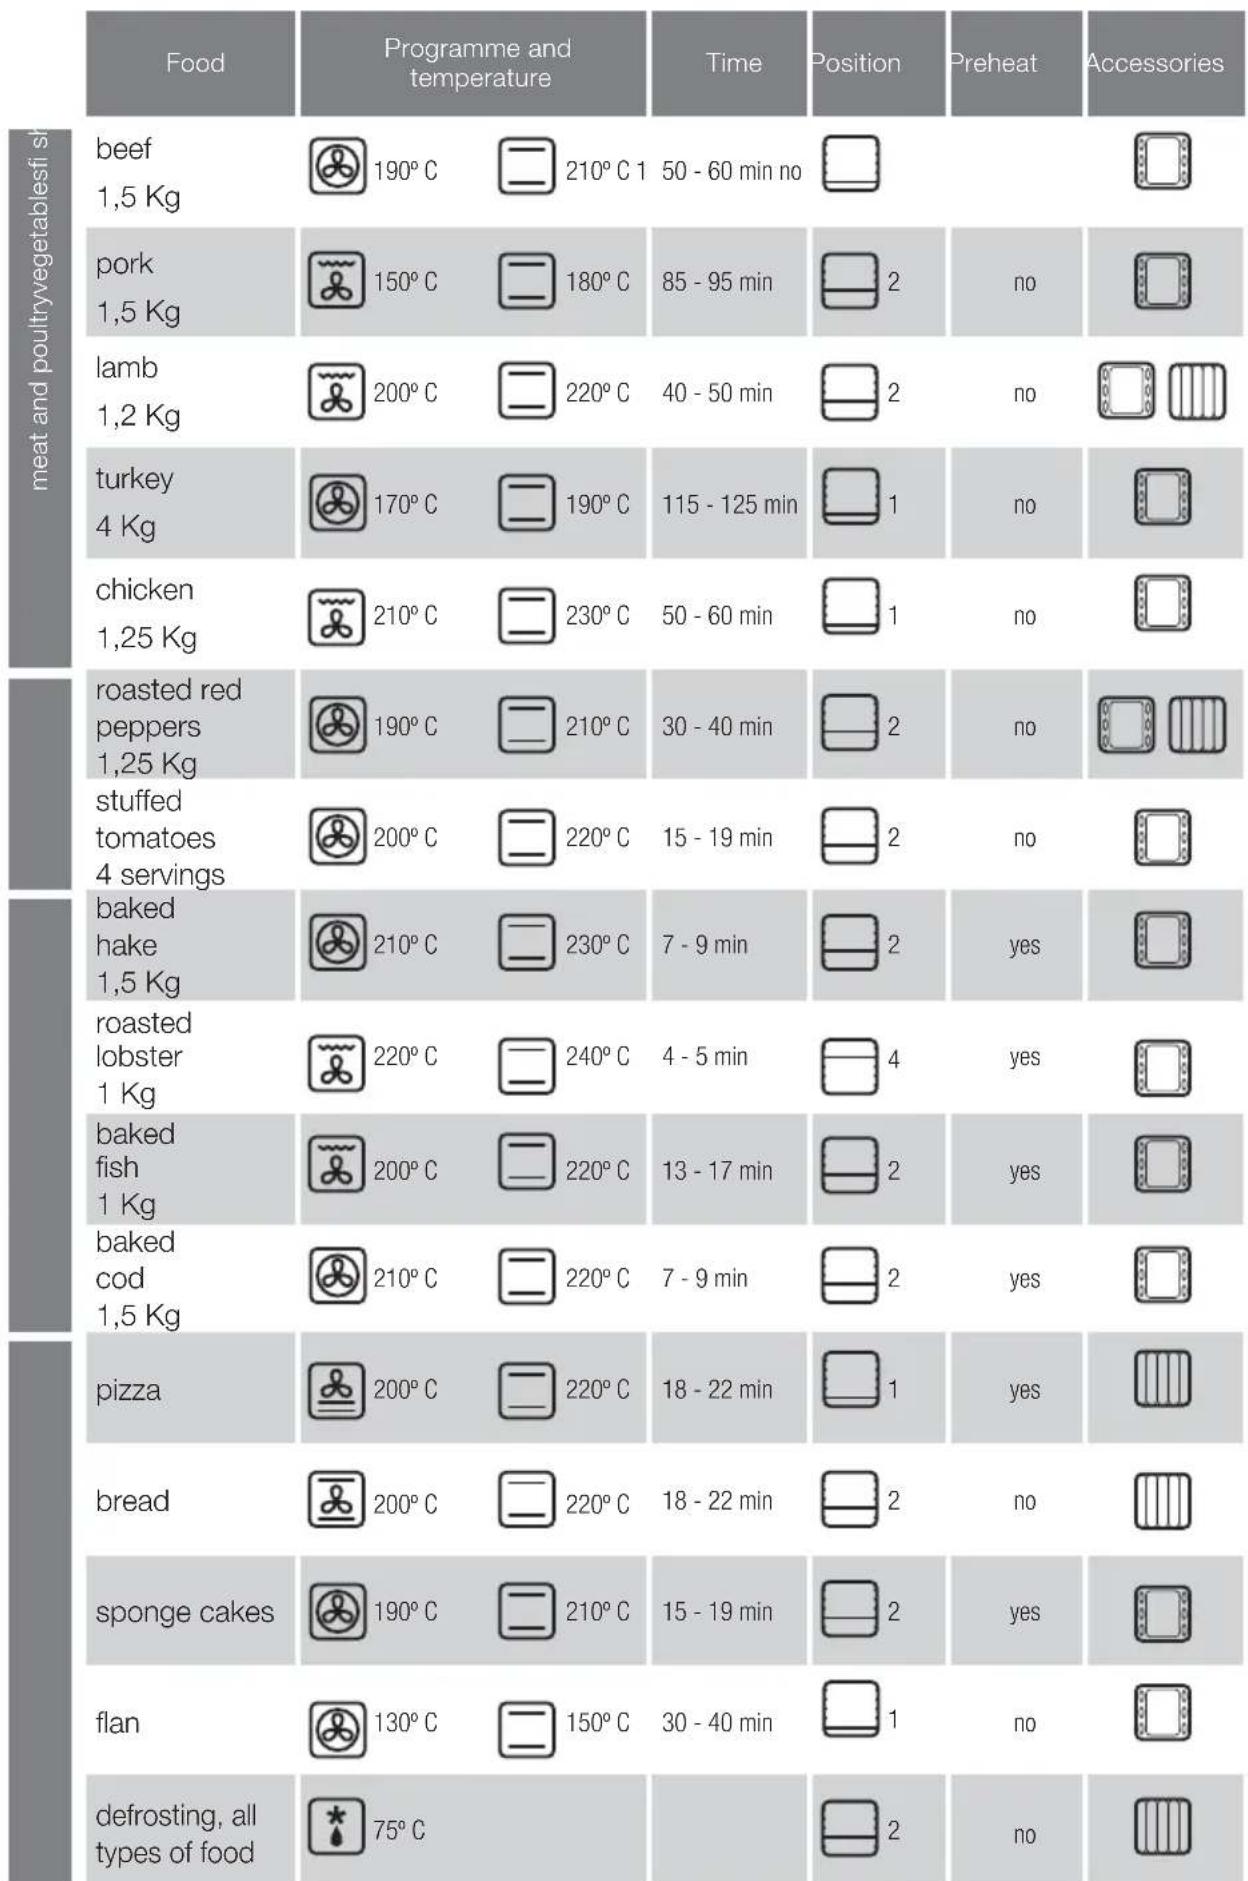
Cooking Table
Bedienungsanleitung
Pexmm HHTeHCBHOro npnroTOBNeHHa rnpIe.
3aKeaembe 6IIOJa: MyHbIe n3JeINr, cyfJIe n COyC 6ewamEnb.

Pekm MkarO npiroTOBHeHa rpeJe.
TAm6yprpebl,rrpeHKn n npOyKtbl C He6oJbIoi NOBepxHOCTbIO.

HHTeHCNBbI HNxHnI NOOrpeB. HHTeHCNBaI NaDaTa TENla Cn3y C paBHomepNbIM erO pacPeJeIeHnEM. Pexm OChEh XopoIo NOxOIT dIg PnroTOBHeHn IaJIb NJI INIuCbl.

HnKnnnoDOrpeB C npnHydntbHOn cnpkylrae B03dyxa B kamepe ukaa. 3a cet pa6oTbI BEHTnIaTopa oBeCneuNbaETcpaBHomepHoe pacnPepeneHne Tena, noDaBaemoro cnH3y. Pexim peKOMeHNyETcA IIN pRTOBNEHnna

TpaHIOHHbI TnI NODaCh TEnJa. Xne6o6yNochBie 43dJIIN, INPOrn, INPOXKIn C NaHnHKo N NOCTHOE MRCO

Pa3mopaxnBaHne. nCOnb3yra 3TOT peXMM, Bbl CMOKTe B KpaTuaIuHe cPOK pa3MOpO3NTb IIO6bIe npOdyKTbl.

Celeris. 3ToT pexnmpeHa3haueH dna npedBaPntbHoro pa3OrpeBa dYxOBKn.
2.6 BbI6Op TemnepaTypbI ^ C YcTaHOBtE TemnepaTypy, nobopauBaHnepeKIOuOaTeNb.KoHTpOJbHaJaMNoUKa norachET,Korda 6ydt YeTaHOBHeHa HyxHaTemnepaTypa.
ФУHКЛМВВЕМEH
2.7 YctaHOBka BpemeH npiroTOBHeHn. TaMep C: YcTaHOBtMe MNHyTbI, NOBopauHBa NpeKNIIOuATEnb (2.7.1). EcnB bIXoNTe, TTo6bl dYxOBKa pa6oTana 6e3 BpemeHoro orpaHnueHn, yCTaHOBtE eB No3NIO pyHoro ynpabNeHn. O6bUHbIe qacbI: POBepHyTB BepXHO puyky BnPABO n YcTaHOBtMbHyTb (2.7.2). EcnB bIXoNTe, TTo6bl dYxOBKa pa6oTana 6e3 BpemeHoro orpaHnueHn, yCTaHOBtE eNo3NIO pyHoro ynpabNeHn. H cdeNaTe Tak, YTO6bl KpaCHa CTpeKN CoBnAda n C BpemeHem, KOtOpoe NOKa3bBAOT CTpeKN qAcob.
LcnpbObIe yacbl:HaKMTe Ha KnaBnWy L, HauHET MiraTb 3HaQOK (2.7.3).YCTaHOBtE BpEm nprirotOBHeHH pN NOMOuK KnaBn+ -2.7.4).Yepe3 HeCKoNbKO CekyHd 3HaQOK | nepeCTaHET MiraTb.
2.8 UctaHOBKa BpeMeHH 3anycka.
06bHbIe YacbI: NocIe Bblbopa nporpaMMbI INBENuHHbI TEMnepaTpybl NOBepHyTB BEPXHIO pyKy B NOJoxKeHne .NocIe 3TOr OTO TReHtB BepXHIO pyKy INBpaAatb ee Do Tex nop, noka Kpachar CTpeJIka He NOKaXeT Bpem Nycka (2.8.1).
2.9 YctahOBKa BpemeHn 3aBepeHn
LcnpbIyacbl: Tocne yctaHOBKn nporpaMMbl, TEMnepaTybl N BpeMeH npiroTOBHeHnaHXMNTe Ha KlaBNIUy , H NaHET MraTb 3HaYOK (2.9.1). YcTaHOBtBe PEmr 3aBepWeHn npi NmOuN KlaBNI + - (2.9.2).Yepe3 HeckoNbKO ceKHyd 3HaYok nepeCTaHET MraTb.
2.10ФункцmaCnHann3aun
ObuHbIe cAsb:YCTaHOBnTe nepeKJIouyateIb npOrpaMM B no3mUHO 0 (2.10.1).IOBePHyTb BepXHOpyKvBy BnpaBO n UCTaHOBnTB MHyTb (2.10.2).ToJbKO eCNI dXOBKa HaxOHTCB Hepa6oTaIOUeM COCTOHHN.
UcPpOBblie cAsb:HaxMITE HeCKoJIbKO pa3 Ha KlaBnUy L HAHNET MIRaTb 3HaQOK (2.10.3).YCTaHOBnTe BpEMn pNtROBOTHeH NpN NOMOUI KJIaBnU+ ,(2.10.4). Yepe3 HeCKoJIbKO cEkyHd 3HaQOK nepeCTaHET MIRatb. DxOBKa MoXeT HAXOITbCra KaK B pa6oTaIOUeM, TAK N B Hepa6oTaIOUeM COCTOHHN.
2.11ФнкибLOKOBKn:HTO6bITeHMeMOrMaHINyIpOBaTcDyXOBKoN.
06bHbIe YacbI:BpaaTaB BepxHIOpyKy Do tex nop, noKa He bdyet ycTaHOBNeHO . (2.11.1)
UHpObIe HaJIIMaIe B TeYeHne 3 CeKHyD OHOBpeMeHHo KnaBn+ , -OTOBpa3NTc3HaOK (2.11.2).Ja pa36JIOkpOBKn NobTOptPe OepauHIO.

IpeDynpExHHe: Io OKOHaHN BpEmEH npiroTOBHeHn
yCTAHOBITE nepeKIOUaTeHn cyHKuN n TemnepaTypbI B noLoXeHne
0,a nepeKIOUaTeHb BpEmEH Bno3uHIO pyHOrO ynpabLeHn.
OTkpBaIte octopoXHO DBepu DyXOBKn, TAK KaK OTTuDa MoXeT
BbIPBaTcRrOpAHH nap.

Yxod n yncTka

3.1 Ynctka dononHHTeNbHbIx npncnocobHeh.Bce
Pnncoc6bHn PnroDnI IaN MbTb R NocydomoeyHO
MaHHe. Pn YnCTKe BpyHyIO nCnOJIb3yIte OblyHbe MOUe
cpeCTBa. YTo6bl ObnErHTb YnCTKy pnncoc6bHneH, IN
MOxHO ppeDbapntelbHO 3amOHTb.
YnCTKa BHYtpEHHeN NOBepxHOCTH KaMepbI dyXOBKn.
3.2 Moden C rnaKmN CTeHkAmn. HeoXOIMMO CHHTb 60KOBbie HapabJHOUme. B 3aBucMOnCTN OT MOeIN DxyOBoro WkaFa 60KOBbie HapabJHOUme MOrT KpeNTCBrOHNIM I3 DBYX cNoCob: 6e3 onopbl (3.2.1, 3.2.2) INI C onopoII (3.2.4, 3.2.5). DxyOBky CneNyET MbITb CnERKa HarpTeON, IpombIBar TANKY TROPey BOIOI MOUIM CpeCTBOM INI MblONM (3.2.3, 3.2.6). Pocne 3abepeHnI PPOeDpybI ONUCTKN CTeHOK HapabJHOUme CneNyET YCTAHOBITb Ha MeTO.
3.3 Moen cpebnbefnhm tchenkamn (camooohauouece).B dYXOBKax TaKnx MOeJe 3aHnR n BOKOBbI naHEN NOKpbITbl camooohuaouiec 3MaJIbO, 6laorapy eMy Knp ydaIaNETc co CTehok BO BpempaobtI npnbopa. BOKOBBe naHEN MoxHO nepebopayBaT ha DpyrTO CTOPHy, YTO npOJaebAet cPOK cnJxkbI obnIOBOOHOR cnoB Dba pa3a.
Korda naheHn nepeCTaHyT oecneuBaTb DoCTaTOHyO OHCTKY 3a CHT CBONX CBOICTB, Heo6xOJIMNO pOn3BECTN IX perEHepaHIO. IINr 3TOr N3 WkaDpa HxyHO n3BNeYb BCE npHaNDexHOCTN n EMKOCTN. IocNE 3TOr TuaTeNbHO OHCTNTb NOBepxHOCTN DyXOBKN, He ABJHOUINECA camooHnUauOUMMICA. 3aTeM 3aJaIte peKIM
YCTaHOBNTe TEMnepaTyPy Ha npOBHe 250C n BpEmn B Dnana3oHe 30-60 MNHyT B 3aBnCMOCTn OT CTeneHn 3arPn3HeHHocTn np6opa.
Tocne toro kak nporpamma OCHCTKn 3aBepuNT paOby n
DyXOBKa OCTbIeT, CaMOUHuaIOUHeeCA 3NEmeHTb Heo6xOJIMOpnoTepeTB baxHO r6ko. I0 3aBepuHm 3To npoueDpybOHNOJIHOCTbIO BOCCTaHaBImBAOT CBOIO pnpFOHOCTbK 3KcIIyatauMn.
3.4 YnCTKa notOnka.EcnIyXOBKa NmEe TcEBMhB IrpNtB,TO HxHNO npINoHNbEero,HaXaTb Ha Hero N BbHyTB BHN3 (3.4.1), nOCHNTe BEpXHOIO CTEHKByBIAxHOI TpAnKOi (3.4.2).
3.5 NCTKa HApYKbIX NOBepXHOCTe DyXOBKn. NcnoIb3yIte HeITpaJIbHbIE MOIOUme CpeIDCTBa, XOPOJO BbITpmtE DyXOBky KYCKOM MfIKoT KAHN.
Ipeynpekndnra:1.YIOCTOBepbTcB TOM,TOyXOBKa haoNTCB Hepa6oTaIOeM COCTOHN.2.HNKOrDa He NcNoJIb3yTe napOBBe OCHNTeN.

Ppo6JIembl

Hekotpbie np6bEmbl bbl moKeTe peuTb cam.
4.1 DxyOBka He pa6oTaet. YIOCTOBeBpTEcB TOM, YTO DxyOBKa NOKIIIOHeHa K CETn WInN YTO nepeKIOaTeNb BPEMeHn He HaxOINTCB NNOXKeHm 0.
4.2 Bo Bpem npiroTOBHeHn NOBJIeTc DbIM. YMeHbIInTe TempeaTypy N/INN NoCHTE yXOBky (nyHKT 3.3).
4.3 DyXOBka npOn3BOgNT Wym, KOrda npnroTOBHeHne yKe 3aBepseHo. 3To HOpMaIbHoe ABNeHMe, BEHTmIATOp npoDOnJkaeT paOtaTb, YTO6bl NOHm3NtB TemnepaTyp BHyTpNi n ChApYKn DyXOBKn.
MoDcI cIuPbBIM dCnIeem Ch6KeHb CNTEmo IaHOCTHKIN, NO3BOJIAOeI O6HApyKNaBaT bIO6Be HEnOJaK IN CnHaJIImpObaTb OHX. 3TO OTOppaKaetc Ha DcNnee.
4.4 DyXOBka He pa6oTaet. Mraet 3aHoc . YcTAHOBITE nepeKIOUOATEIb dyHKuB INOJOKeHne O u yCTaHOBITE TEkyUee BpEMr (NYHKT 2.3).
4.5 Dyxobka He pa6oTaE. Mraet 3HaOcK .DyoxbKa pa6oTajB TeueHne HECKoJIbKnx YacOB n ABTomaHTeCKN OTKJIOHnIacB dIg ObecTeueHnBE30nAChOCTN. UctAHOBITE NepeKIOHcATEnb FyHKuB B NONOKeHne O n UcTAHOBITE TEkyUee BpEMr (nyHKT 2.3).
4.6 DxyOBKa He pa6oTaet. Mraet 3HaQok .YcTaHOBnTe nepeKIOHATeIb dyHKUIN B nOKeHne O n CHMnTE 6NOKpOBky (nykT 2.11).
4.7 DxyOBKa He pa6oTaet. Muraet 3HaQok .HaKMITE IIO6yIO KnaBnJy.

He npOn3BODnte CdyXOBKo HmKaKxMaHnYIaCm, CBXkNTecb COTdEOM TexO6cJyKXBaHn.

Be30nachocTb

YCTAHOBKa DxyOBKn DOJXHa OcyuEcTBnTbCRA KBaJIINΦUICPObaHHbIM CneIuaNtOM NO MOHTaXY B COOTBETCTBm C INHCTpyKlFMM N CXeMaM N 3rTOBOTeJIH.
3NeKtpoyctaHOBKa DOJIxHa IPOUN3BOIDtbcB COOTBeTCTBmC MaKcImaJIbHOJ MOUHOCtBu, YKa3aHHoH Ha NDeHTnФpKaUHHO TaIINuKe, N C INOJIb3OBAHHeM 3NeKtpuecko Po3ETKn C 3a3EmNEHHeM, COOTBeTCTBYUHUM HOpMaM.
LEnb3neKtpnueckoro TOKa,NTaHOoero DyXOBky,D0JXHa 6bIb ChabxHea OMHNIOHpHbIM npepbBaTeJeM C MHHMaJIbHbIM paCtOHRMeMKdy KOHTaKTAMM 3 MM.
EcnI nIATAOUI KabeIb NOBpeKdH, OH dONKeH 6bIb 3aMeHnEPcoHaIOM OTDeIa NocTIpOdaXHOro 06cJyXnbAHn IIN CneuaJIntAmu TAKOI KE KBaIINpKaUIn C cIeIbIO oBeCneueHn 6e3OnaCHOCTn.
- PπeJde Yem 3aEmHtB JAmnY yOcTOBepbTeCb B TOM, yTo annapat BbIKIOueH, yTO6bI N36exKaTb yDapa TOKOM.
He nCnoJb3yIte abpa3nBhIe cHCTaIe CpeCTBa IIN XEcTKe MeTaNJIueckne MoaANKn IINcTKn DBePcbl DYXOBKN, TAK KAK 3TO MOKeT PnBecT N NOBpeXdEHNO BoBepxHOCTN IN KA p3pyeHNIO CTekna.
- He pa3pewaIte MaIeHbKIM DeTAM HaxOJITbCRA pAOM cpa6oTaIOSeI dXyOBKO.HekOTOpBle HApYxHbIe qactn N3dENr MOrYT HarpeBaTbCra.
- IV36eraIte DoTparNbTaBcA Do HArpeBaTeIbHbIX 3JIeMeHTOB BHYTPN DUYXOBKN.
JaHbI npBOp He npEHa3HaueHdIe 3KcNlyatauIMnUaMn (B TOM YNCNE DeTbMn) C OrpaHNUeHHbIMn F3N3HeCKIMM, CEHCOPbIMn UymCTBeHHbIMn BO3MOxHOCTAAM, a TaKoKe IuCaMn, He IMeHOzMMN DOCTaTOHOrO ONbTa n3HaHm. PONb3OBaHne npBOpOM TAKIM NlCaMn pa3peuaeTcT ToJbKO NO pINCMOTpOM Nua, OTBETCTBEHHORo 3a TEXHMky 6e3OnaCHOCTn, INN NocNe pNOBEdHnIM COOTBETCTByIOUe HNCTpyKTaxa No 3KcnNyataum. Pn EKnnyataum npBopAp dTeMbMn 3a HIMM He06XoDMIO npICMaTpNBaTB, He NO3BOJAR INpTaB C npBOpom.

Okpyxuaoua cnpea

KoHCTpykunnyxOBKnOCHOBaHa Ha npHHnax 3aunTbokpykaoue cpebl.
Co6IIOdaTe npHHcunbl 3aunTbOkpykaoue cpdebl.
PpOIN3BODInTe PpeBaTteNbHoe HArpeBaHne DxyOBKn, TOnbKOecn 3TO Heo6xOdmo (cm. TaBnUy). Ppn DInTEbHOpaOteDxyOBKn BbKIOaHaTe e 3a 5-10 MHyT do ycTaHOBHeHHoro BpeMeHN.
Ipo6nema OTPa6oTaHHbIX 3JIeKtpuuecknx H 3JIeKTPoHHbIX annapaTOB.
O603HaHeHne yka3bIbaeT Ha To, YTO daHHbI npi6Op HJIb3R Bbl6paCbIbA b OBblHbIE KOHTeHepbl dII bI TOBbIX OTXIOB.
IpepaTeBauyDyXOBkyBcneuaNbHbIeHTnpnEMKn. YTNIN3aun6bITOBbIX 3NEKTPoPn6OpOB NO3BOINETN36ExaTb HERATNBbIXIOCNECTBmDNIA3DOPOBb,OKpykaUeien Cpebl N NOMOraEt 3KOHOOMNTb 3NEKTPo3HEPRINO n pecypcbI.
IINONUYeHNA DNOHNHTeBHOH INHOpMaUNO6paTteCb K MECTbIM BnactAM NIN B OpraHn3aUIO, rDe BBI pNOBpeN Bawy dYXOBky.
Forns polivalents per a plaques


- Multi-purpose ovens for vitro-ceramic
- TIME FUNCTIONS
- Maintenance and cleaning
- Troubleshooting
- Safety
- The Environment
- This oven has been designed with environmental protection in mind.
- Management of waste electrical and electronic equipment.
- Bedienungsanleitung
- ФУHКЛМВВЕМEH
- UctaHOBKa BpeMeHH 3anycka.
- YctahOBKa BpemeHn 3aBepeHn
- 2.10ФункцmaCnHann3aun
- 2.11ФнкибLOKOBKn:HTO6bITeHMeMOrMaHINyIpOBaTcDyXOBKoN.
- Yxod n yncTka
- Ynctka dononHHTeNbHbIx npncnocobHeh.Bce
- YnCTKa BHYtpEHHeN NOBepxHOCTH KaMepbI dyXOBKn.
- Ppo6JIembl
- Be30nachocTb
- Okpyxuaoua cnpea
- Forns polivalents per a plaques
Brand : FAGOR
Model : 6H 50 X
Category : Electric oven