
MRC 4119 - Radio AEG - Free user manual and instructions
Find the device manual for free MRC 4119 AEG in PDF.
| Product type | Radio alarm clock with projection |
| Brand | AEG |
| Model | MRC 4119 |
| Net weight | 0.53 kg |
| Power supply | 230 V~50 Hz, 5 W |
| Backup battery | CR2032, 3V (not included) |
| Radio frequency range | FM 87.5 ~ 108.0 MHz |
| Station memory | 10 presets |
| Alarm functions | 2 independent alarms, snooze, wake modes (radio or buzzer) |
| Projection | Time and temperature on wall/ceiling, adjustable rotation and focus, 180° flip |
| Display | LCD with date, time, temperature, brightness adjustment (3 levels) |
| Temperature | Display in °C/°F |
| Auxiliary input | 3.5 mm jack LINE IN |
| Sleep timer | 15, 30, 60 or 90 minutes |
| Care and cleaning | Clean with a slightly damp cloth, no detergent. Do not immerse in water. |
| Safety | Do not expose to moisture, do not obstruct ventilation openings, use only the indicated voltage |
Frequently Asked Questions - MRC 4119 AEG
User questions about MRC 4119 AEG
0 question about this device. Answer the ones you know or ask your own.
Ask a new question about this device
Download the instructions for your Radio in PDF format for free! Find your manual MRC 4119 - AEG and take your electronic device back in hand. On this page are published all the documents necessary for the use of your device. MRC 4119 by AEG.
USER MANUAL MRC 4119 AEG
Overview of the Components......Page 3
Instruction Manual.. Page 57
Technical Data.. Page 65
Disposal.. Page 66
Język polski
Spistresci
Przegladelementow oblsugi.....Strona 3
TexhiHnI npaMeTpN cTOp. 97
Pycckn
CopepkHne
O63opIeTaleI np6opa. 3
PykoBoIcTBO NO 3KcNJIyatau..CTp. 98
TexHHueckne daHHbIe cTp. 107
Antenne extensible (FM)
Bas (sans illustration)
Cable de antenna (FM)
Cable de red
Inferior (sin ilustracion)
LINE IN conductor (Posterior (sin ilustracion))
Thank you for choosing our product. We hope you will enjoy using the appliance.
Symbols in these Instructions for Use
Important information for your safety is specially marked. It is essential to comply with these instructions in order to avoid accidents and prevent damage to the machine:

WARNING:
This warns you of dangers to your health and indicates possible injury risks.

CAUTION:
This refers to possible hazards to the machine or other objects.

NOTE: This highlights tips and information.
General Safety Instructions
Read the operating instructions carefully before putting the appliance into operation and keep the instructions including the warranty, the receipt and, if possible, the box with the internal packing. If you give this device to other people, please also pass on the operating instructions.
- To avoid the risk of fire or an electric shock, you should not expose the device to rain or moisture. Consequently, do not use the device in the immediate vicinity of water – for example near a bath tub, a swimming pool or in a damp cellar.
- The appliance is designed exclusively for private use and for the envisaged purpose. This appliance is not fit for commercial use.
- Only connect the device at a properly installed plug socket. Pay attention that the specified voltage corresponds to the voltage of the plug socket.
- When using external mains supply, pay attention to the correct polarity and voltage. Always place the batteries in the correct direction.
- Assemble the device in such a way that the available ventilation openings are not covered.
- Never open the housing of the device. Incorrect repairs can constitute a considerable risk for the user. Should the device become damaged, in particular the mains supply cable, do not operate the device any longer, but rather have it repaired by an expert. Check the mains supply cable regularly for damage.
English
- For safety reasons a broken or damaged mains lead may only be replaced by an equivalent lead from the manufacturer, our customer service department or a similar qualified person.
- If the device is not used for a longer period, remove the plug connector from the plug socket or take out the batteries.
These symbols may be found on the machine and are intended to indicate the following:

The lightning symbol should advise the user of parts in the inside of the device which carry dangerously high voltage levels.

The symbol with an exclamation mark should advise the user of important operation or maintenance instructions in the accompanying documentation.
Children and Frail Individuals
- In order to ensure your children's safety, please keep all packaging (plastic bags, boxes, polystyrene etc.) out of their reach.

WARNING!
Caution! Do not allow small children to play with the foil as there is a danger of suffocation!
- This device is not intended to be used by individuals (including children) who have restricted physical, sensory or mental abilities and/or insufficient knowledge and/or experience, unless they are supervised by an individual who is responsible for their safety or have received instructions on how to use the device.
Children should be supervised at all times in order to ensure that they do not play with the device.
Special Safety Instructions
- Do not use the device in locations that are extremely hot, cold, dusty or moist.
- Ensure that the radio recorder is sufficiently ventilated!
- Do not cover any ventilation slits with objects such as magazines, tablecloths, curtains etc.
- Never touch the mains plug or lead with wet hands.
- Keep the mains lead away from heaters.
-
Never put a heavy object on the electric lead.
-
Keep the device away from vases, baths, wash basins etc. If liquid enters the device this may cause serious damage.
Overview of the Components
1 Rotatable projector
2 FOCUS control
3 Lens
4 180° FLIP button
5 C/F /YEAR button (°Celsius/°Fahrenheit)
6 button
7 MEM/M+ button
8 button (On/Off)
9 SNOOZE/SLEEP/DIMMER button
10 LCD display
11 button (reduce volume)
12 button (increase volume)
13 button
14 BST/M/D button
15 ON/OFF PROJECTION button
Rear (without illustration)
Loudspeaker
LINE IN Jack
Temperature sensor
Throw-out aerial (FM)
Mains lead
Bottom (without illustration)
Battery compartment (clock backup)
Putting into function
- Select a proper place for the device such as a dry, and even non slip area where you can easily operate the device.
- If still in place, remove the protection foil from the display.
English
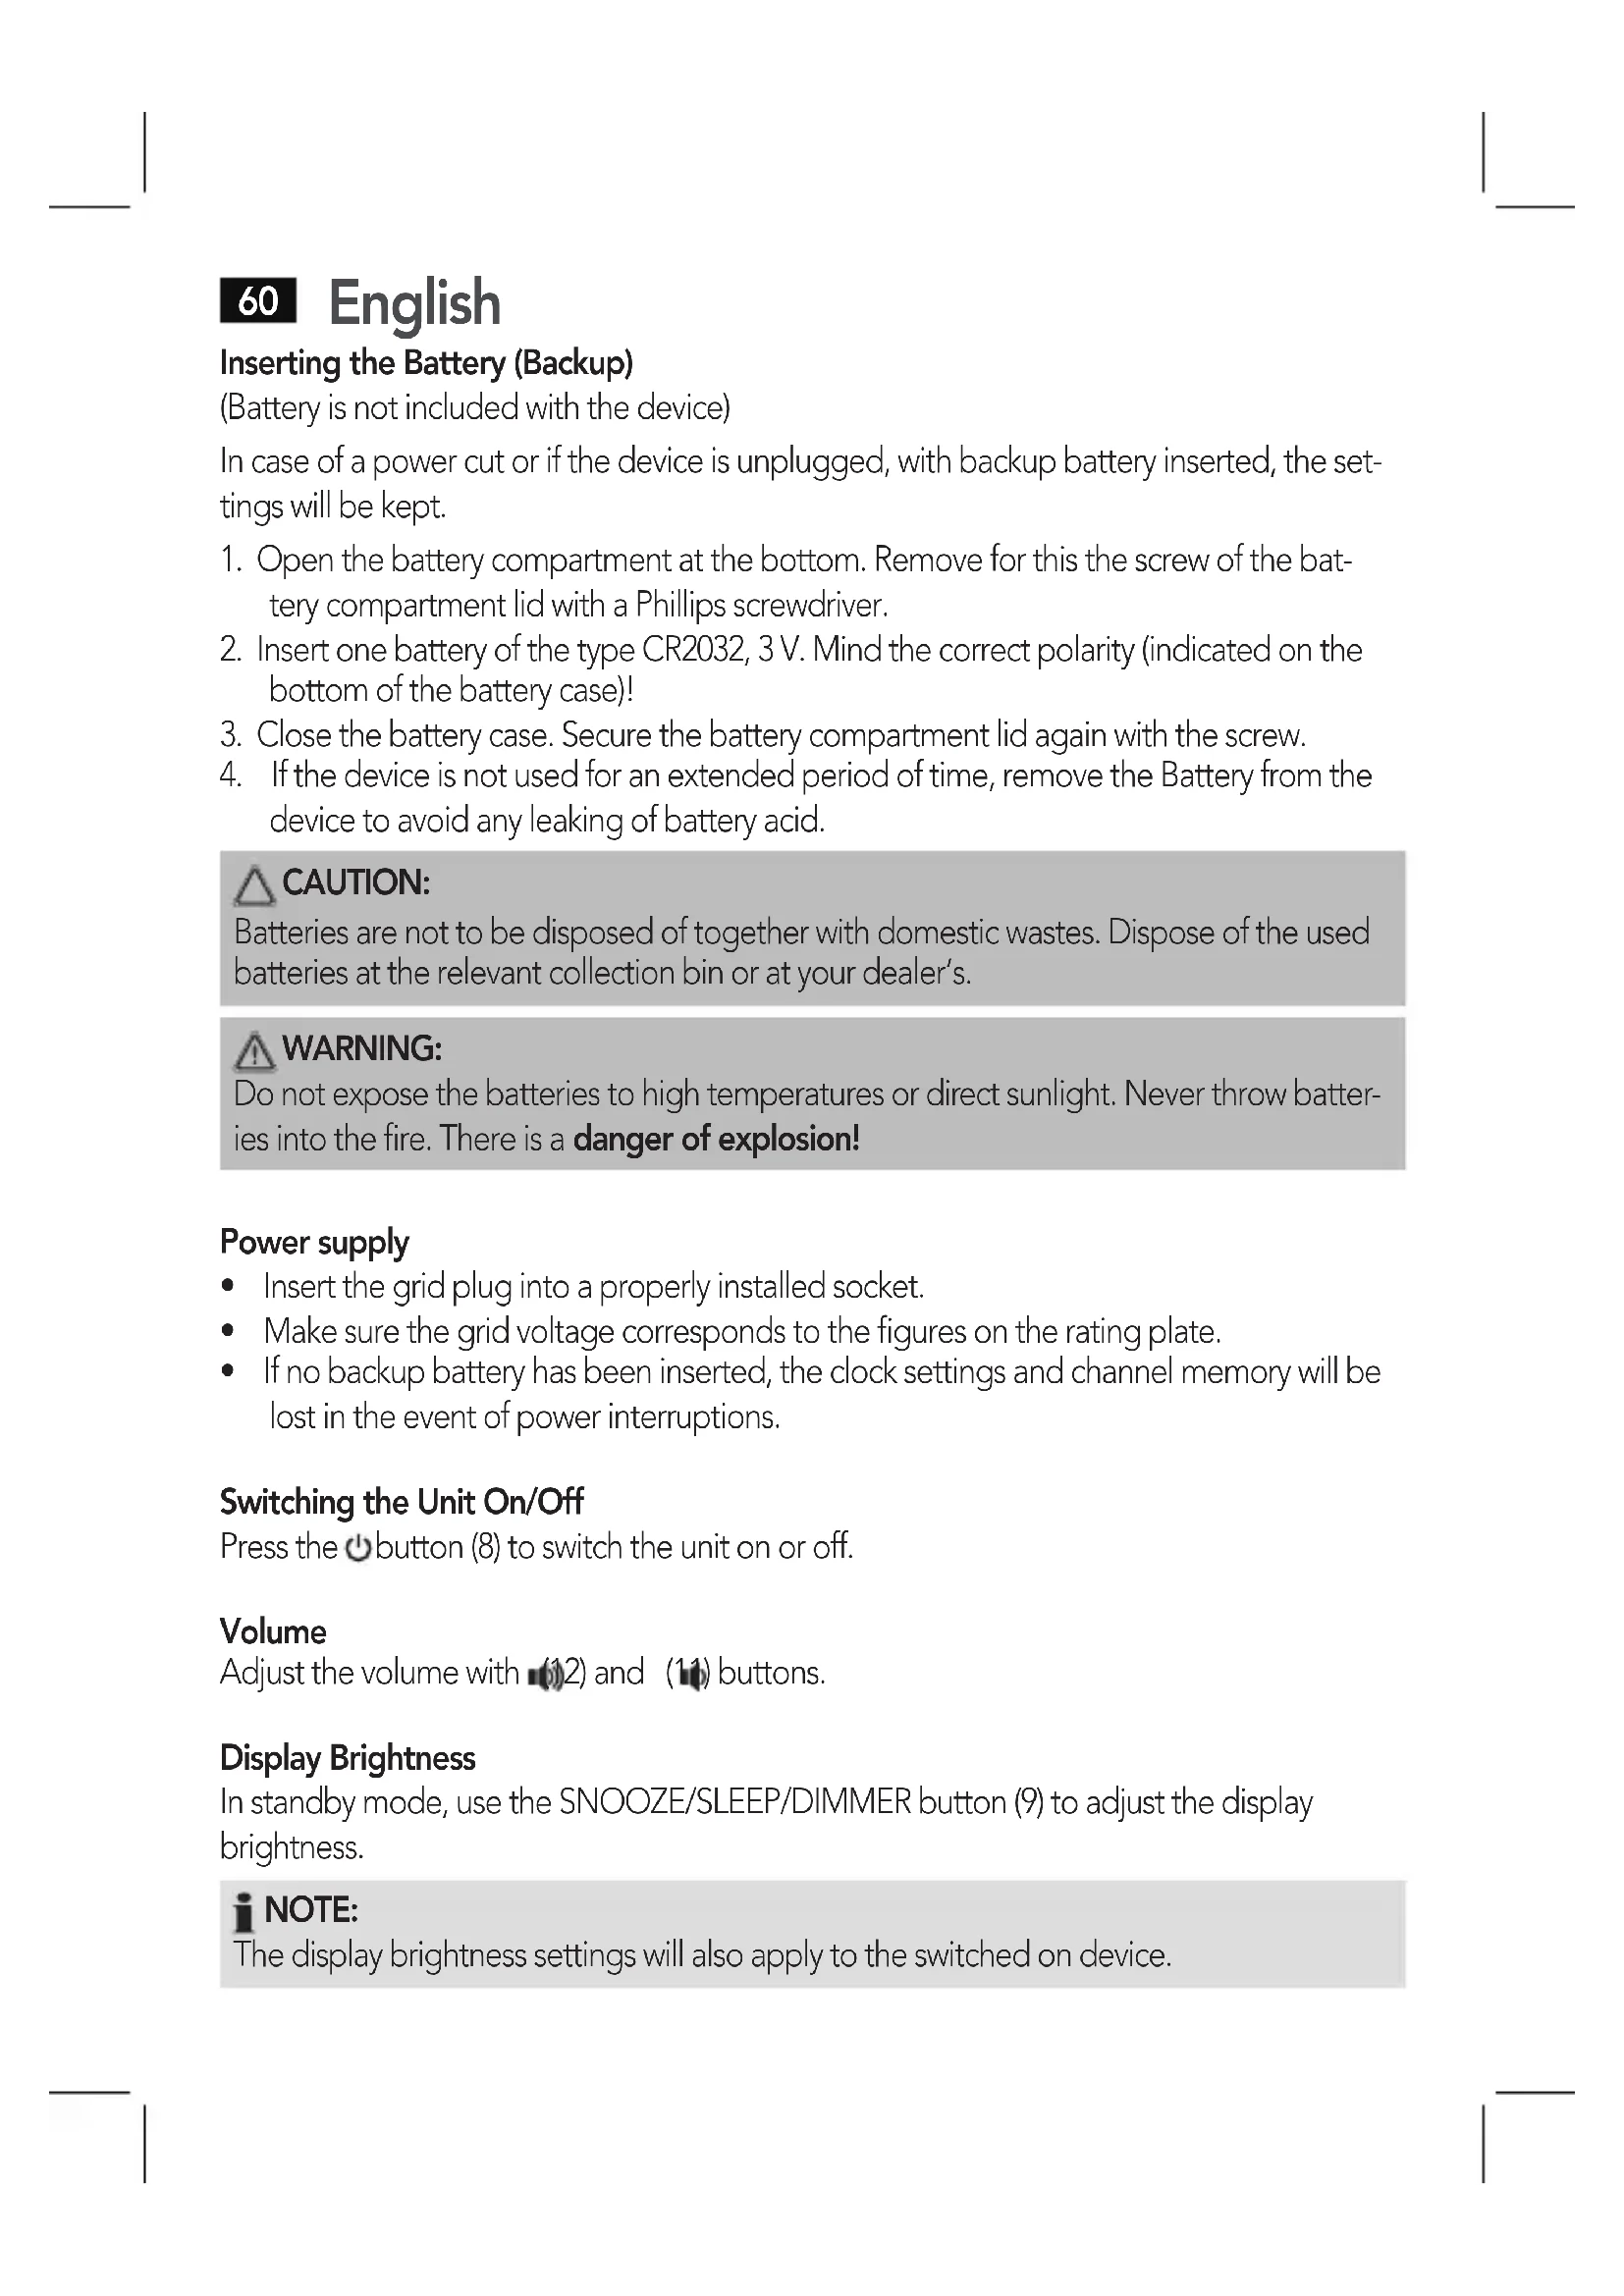
Inserting the Battery (Backup)
(Battery is not included with the device)
In case of a power cut or if the device is unplugged, with backup battery inserted, the settings will be kept.
- Open the battery compartment at the bottom. Remove for this the screw of the battery compartment lid with a Phillips screwdriver.
- Insert one battery of the type CR2032, 3 V. Mind the correct polarity (indicated on the bottom of the battery case)!
- Close the battery case. Secure the battery compartment lid again with the screw.
- If the device is not used for an extended period of time, remove the Battery from the device to avoid any leaking of battery acid.

CAUTION:
Batteries are not to be disposed of together with domestic wastes. Dispose of the used batteries at the relevant collection bin or at your dealer's.

WARNING:
Do not expose the batteries to high temperatures or direct sunlight. Never throw batteries into the fire. There is a danger of explosion!
Power supply
- Insert the grid plug into a properly installed socket.
- Make sure the grid voltage corresponds to the figures on the rating plate.
- If no backup battery has been inserted, the clock settings and channel memory will be lost in the event of power interruptions.
Switching the Unit On/Off
Press the button (8) to switch the unit on or off.
Volume
Adjust the volume with (12) and (11) buttons.
Display Brightness
In standby mode, use the SNOOZE/SLEEP/DIMMER button (9) to adjust the display brightness.

NOTE:
The display brightness settings will also apply to the switched on device.
Temperature display
The unit detects the current ambient temperature and it is shown in the display.
- In standby, the temperature indication can be switched between ^ C (degrees Celsius) and ^ F (degrees Fahrenheit) by holding the C/F >>/YEAR button depressed.
Setting the Clock (in standby)
- Hold the CMEM/M+ button (7) depressed until the year indication (YR) on the display flashes.
- Now you can set the year (YR), the month (M), the day (D), the time display format (12 H/24 H), the hours, and the minutes with the buttons C/F YEAR (5) and DST / M/D (14).
- In each case, confirm the input with the MEM/M+ button. The current indication to be set flashes on the display.
i NOTE:
- The input is stored automatically within approximately 30 seconds when no button is pressed.
- With a 12 hour display the following is displayed: PM = Afternoon
- Setting of the weekday is done automatically.
Display Date and Year (in standby)
- Press the DST / M/D button (14) to display the date for a short time.
- Press the C/F YEAR button (5) to display the year for a short time.
Switching to Summer Time (in standby)
Keep the DST / M/D button (14) depressed to switch between summer time and normal time. When summer time has been selected, the symbol "..." is shown on the display.
Radio station tuning
-
Use the C/F YEAR (5) and DGT/M/D (14) buttons to tune the desired station. If you keep one of the buttons pressed, the device searches for the next radio station. The display shows the tuned frequency.
-
If reception is too weak, change the position of the dipole antenna in order to improve the reception.
English
Preset stations
You can preset up to 10 radio stations.
- Search for a station as described under "Radio station tuning".
- Keep the MEM/M+ button (7) pressed. The preset location indicator flashes on the display (e.g. P02).
- Use the C/F YEAR (5) and DGT / M/D (14) buttons to select the desired preset station memory.
- Press the EM / M+ button to preset the station.
NOTE:
If no backup battery has been inserted, all channels saved will be lost in the event of disconnection from the mains.
Tune into the preset station
Press the MEM/M+ button (7) repeatedly in radio mode to scan through the preset station memory.
Alarm function
Setting of the Alarm
You can set two alarm times. Proceed as follows:
- Press button (13). The current alarm time and the "icons" will be displayed.
- Keep the button pressed for approx. 3 seconds when the alarm time is displayed. The hours of the currently set alarm time start to flash.
- Use the buttons C/F YEAR (5) and DRT/M/D (14) for setting.
- Press the button for confirmation. The minutes start to flash.
- Use the buttons C/F >>/YEAR and ST/M/D for setting.
-
Now select the days you want the alarm to sound. The following selections can be made:
-
1-5 = Monday to Friday
- 1-7 = Monday to Sunday
- 6-7 = Saturday and Sunday
- 1-1 = Weekday
6a. When you have selected the setting 1-1:
- Press the button to select the weekday.
- Make your selection with the buttons C/F YEAR and DST/M/D.
(MON = Monday, TUE = Tuesday, WED = Wednesday, THU = Thursday, FRI = Friday, SAT = Saturday, SUN = Sunday)
- Press the button to confirm. Then select how you want to be awakened. Select from:
"bu"(buzzer):
A buzzer sounds when the alarm time is reached. The buzzer interval increases from slow to fast. The volume cannot be adjusted.
- Radio frequency is displayed:
As soon as your set alarm time is shown, the radio switches on. The last set station is played. The volume increases slowly to the set volume. The volume cannot be adjusted.
iNOTE:
The alarm function turns off automatically after 30 minutes until the next day.
7a. If you want to be awakened by a radio station, select the maximum alarm volume using the C/F / YEAR and DST / M / D buttons.
8. Finally, press the button again. The first alarm time is now activated.
To set the second alarm time, repeat the above steps with the 2 button (6).
i NOTE:
- When the alarm function is activated, the "1" or "icons or 2" icons will be displayed respectively.
- Press or button to display the set alarm time briefly.
- The projection will start automatically at the set alarm time.
Turning off the Alarm
Press the button (8) to stop the alarm.
Automatic Alarm Interval
The automatically set alarm function can be shut off for approximately 9 minutes with the SNOOZE/SLEEP/DIMMER button (9). The alarm icon flashes on the display.
Deactivate the Alarm Function
Press and hold 13) or button respectively to deactivate the alarm function. The respective alarm icon will disappear.
64 English Delayed Shut-Off
You can use the function for delayed power-off with radio operation. The unit is switched off automatically when the selected time is reached.
- Select the time after which the unit is switched off by repeatedly pressing the SNOOZE/SLEEP/DIMMER button (9). The following selections can be made: 90, 60, 30, and 15 minutes. "SLEEP" will be displayed.
- This function can be cancelled with the button (8).
Projection
With this unit, you can project the time onto a wall or the ceiling.
- You can switch this function on and off with the ON/OFF / PROJECTION button (15).
- Rotate the projector (1) to the desired position.
- The rear of the projector has a setting wheel (2) with which you can adjust the sharpness of the projection.
- You can use the 180^ FLIP button (4) to flip the projection by 180 degrees.
- Press and hold the 1 / 0 / 180^ FLIP button for approx. 3 seconds. By doing so you can switch between clock time and temperature display.

NOTE:
At the set alarm time and after a power interruption the projection will start automatically.
LINE IN socket (Rear (without illustration))
To connect analogue replay devices. Via this socket you can also hear the sound of other playback devices such as MP3 players, CD players etc. through the loudspeaker.
- Please connect the external device with a 3.5 mm stereo jack plug to the LINE IN socket.
- The device switches automatically to LINE IN operation. The radio sound is switched off.
- The speaker will output the audio of the external device. Use and buttons to adjust the volume.
- For the remaining procedure please see the operating instructions of the external sound source.
iNOTE:
- Adjust the volume of the external device to a comfortable level.
- The alarm cannot be heard if a cable is connected to the LINE IN socket!
Cleaning
CAUTION:
Do not dip the appliance in water.
- Remove the plug before cleaning.
- Clean the appliance with a slightly humid cloth without any additives.
Troubleshooting
| Problem Cause Solution | ||
| The unit cannot be operated | The unit is blocked and “hangs” | Pull the mains plug for approximately 5 seconds. Then connect the unit again |
Technical Data
Model: MRC 4119 P N
Power supply: 230 V~50 Hz
Power consumption: 5 W
Battery power reserve: 3 V, CR2032
Protection class:
Net weight: 0.53 kg
Radio section:
Frequency ranges: FM 87.5 ~ 108.0 MHz
The right to make technical and design modifications in the course of continuous product development remains reserved.
This device has been tested according to all relevant current CE guidelines, such as electromagnetic compatibility and low voltage directives, and has been constructed in accordance with the latest safety regulations
Meaning of the "Dustbin" Symbol
Protect our environment: do not dispose of electrical equipment in the domestic waste.
Please return any electrical equipment that you will no longer use to the collection points provided for their disposal.
This helps avoid the potential effects of incorrect disposal on the environment and human health.
This will contribute to the recycling and other forms of reutilisation of electrical and electronic equipment.
Information concerning where the equipment can be disposed of can be obtained from your local authority.
Instrukcja obslugi
CTC Clatronic Sp. z o.o
(BaTapeH He BxOuNTb y KOMnIeKT nocTaBKn)
Y pa3i npinHHeHH JxNBHeHH npicTpoIO hanaHTyBaHH 6ye 36epexeHO, kUO BCTaHOBJIeHO 6bTaapeIO pe3epBHorO XNBHeHH
- BiKpnTe BiCik DnIa 6aTapei y HnXhH yactnHi. Iy cboRo 3a donomoro xpectoBoi BnKpyTKn BnKpyITb rBnHT Ha KpUuBiDcKi y dna 6aTapei.
- BCTaBTe OndHy 6bTapeIoo TnIy CR2032, 3 B. IpeBipTe npabInbHicTb noJrpHoCti (noka-3aHa Ha dHi BiDcIKy dIra 6bTape)!.
- 3akpytib rBnHT KpnKbicky dny 6aTaapei.
4.Якшо Вириб He BnKOpNCTOByBaTmEbCЯ npOTaROM TpNBaIoro Yacy, BnIMiTb 6aTapeIo DЯЗanobirAHHЯ II BNTiKaHHIO.

YBARA.
BaTapeiKHe MoJHa BnKuIaTn B 3BnuAaHHe DomaUHe CmITra. IpocMo NOBepHyTu 6BaTepeiKy B MaRa3In, De Bu II npu6aJIa, a6o BiDauTn Ha cneuaJIbHi NyHKT 36OpY.

PONEPEIXEHH.
3a6opohetaeTbca nidaBataN bataeKn BnCOKm TemnepaTypam aO npMIM COHcHIM npomeHm. 3a6opohetaeTbca KndaTn bataeKn B OOrh. lChye He6e3neka Bn6yxy!
XMBJeHHA
-Пдкючышт ekрdoHaTeXHoBCTaHOBJeHoi p03eTKN.
- YneBHitbcra, ⅢO Hanpyra Mepexi BiINOBiJaE 3HaueHHaM Ha TaBnUci 3 TexHcHIMN daHIMN.
-Якuto pezeервнабатaper He BCTaHOBJIeHa,у pa3i 36oIB y noDAci JKNBJIeHHa HalaHTyBaHHraToHHnka i Nam'ay KaHany Byde BTPaueHo.
YBIMKHeHHBIMKHeHHBnpo6y
ДяуВIMKHeHHa6O BIMKHeHHBnpo6yHaTNCiTb KnaBiWy (8).
Cnla 3Byky
HaIaHTOByInTe ryuHicTb 3a donomoroKhoNok (2) Ta (11).
RckpaBicTb dncnne
HanaHTyBaTn RCKpaBicTB DnCpIeY pexmIo OUYBaHHa MOxHa 3a DOIpOMOrOIO KHOpKN SNOOZE/SLEEP/DimMER (9).
92 YkpaIHcbka

PIMITKA.
HanaTsyBaHHЯRcKpaBOCTi DnCpJIe 6yIe TaKoX 3aCTOCOBaHO Do yBIMKHeHOrO npNCTPOIO.
Bido6paXeHHa TempepaTpyn
Bupi6 Bn3Naac nToChy Tempeatpy HABKOnuHbOrO cepeobua i BiOppaac ii Ha dincnnei.
B peximi ouikybaHH no3haeHHa tempeatpno moxHa nepeMKaTn mix peXIMAMN ^ C (rpaucn 3a LcIbciem) i ^ (rpaucn 3a FapeHreITOM), kUo haTncHTn i yTpmyBaTN KJIaBiuy C/F YEAR.
BcTaHOBJIeHHra rOuHHnka (ypeXmIo ouiKyBaHHa)
- Hatnchitb i ytpmmyte knaibiy cMEM/M+ (7),doNOKn no3NaueHn poky (YR) ha dncnnei He noUHe 6nmatn.
Tepe moxha BCTaHOBtpi (YR), mca (M), deh (D), fopmat BiobpaxeHny acy (12 H/24 H), rOHH Ta XbIHH 3a donomoroIO KJIaBiC/F YEAR (5) i RST/M/D (14).
KoJHoro pa3y niTBepeBte BBeJeHe 3a DonomoroKnaBiWi MEM/M+. 3NaueHnA,Ke CII BCTaHOBTN, MNGOTNTb.

ПРИMITKA.
BVeIe He 6yJe aBTOMaTHUHO 36epExeH O npOTaROM npn6JIu3Ho 30 cekyHd nicHaTuscheHHa KJIaBi.
Bpexmi 12 roDn6yde BiO6paXaTncb Take:PM nicJnnoJyndn.
- Byndhi DiHi BCTaHOBNeHO aBTOMaTnHIO.
Bido6paXeHHaTn i pOKy (ypeXmIoOikyBaHHa)
ПоданьжИВлени.. 230B,50T
CnoxmbHHn noTyXHocTi: .5 B
3anac xody 6atapei: .3V, CR2032
Ipryna eJektpo6e3neuHocti:
Bara HeTTo: 0,53 K
Papio6JIOK:
Дiana30нчacToT:ФM875\~108,0MΓu
IpaBO Ha TexHicHi 3MiHN Ta 3MiHN y Dn3aHHi 36epiraetbca npoobK npoccy po3pO6Kn npOdykTy.
Ley npiaad 6yno nepeBipeno 3rIHO BCix BiINOBiHNx, aKtyaJIbHnx DnpeKTNB CE, HapriKlaad 10oO eJekTpomarHITHOcymichocTI Ta Hn3bKOBoTHOi DnpeKTNB, Ta 36ydoBaHO 3 a HOiTHIMN NOLOXeHHaMm TexhIKn 6e3neKn.
PykoBoDCTBO no 3KcPnyaTcuN
Ecn nCnHaI cnNkOM cnaBbI, n3MeHInTe pNOXeHne aHTehhbl dny yJyUeHn npnema.
CnMBOJI npIMeHReMbIe B daHHOM pyKOBoDCTBe nOJIb3OBaTeJI
Baxhble pekomehdaun Inay oecneueHnae Bauen 6e3onacHOCTN 0o3NaeHbI NOOCohHOMy.ObaTeJIbHo cJeDyIte 3TNM pekomehdaunm, YTObI ppeOTbpaTITb HecactHbI cnuyaHnn PONOMKU n3deJnA:

PPEyPEXKDEHNE:
IpeDynpexJaet o6 onacHocTn dIra 3dopOBbI N BO3MOXHOM pIcKe IOnyuHeHr TpaBMbl.

BHIMAHHE:
Yka3bIbaeHa BO3MOXHyO ONaCHOCTb IIN3dJIINu INpyrNX OkpyKaIOUINNpeiMeTOB.

ПРИМЕЧАНЯ: Даet coBETы Информалю.
(BaTapeiKa He BxOДNT B KOMNJIeK T NOCTaBKn)
B clyuae nponaanna 3neKtpo3Hepn, nIe eCNI yCTpoNCTBO OTcoEINHTb OT pO3eTKN, BCE HacTPOkN6yDyT COxpaHebl, eCNI B yCTpOJCTBO BCTaBJeHa 6aTapeKeKa.
- OTKpoIte 6aTapeHbI OTceK, HaxOJIuINcB HnJxHeN YaCTn yCTpOiCTBa. OTBnHTITe BnHT KpbIuKN 6aTapeHOrO OTceKa C NOMUcIbIO KpeCToo6pa3HOJ OTBeptTKN.
- BcTaBbTe Ondy 6aTapeiKu Tnna CR2032, 3 B. BcTaBnra 6aTapeiKn, co6IouaTe noJIapHocTb (yKa3aHa Ha dHe 6aTapeiHoro OTceKa)!
- 3aKpOte 6bapeHbI OTeK. BcTaBbTe KpbIshky 6bapeHoro OTceKa o6paTHo I 3a-ΦHKCnpyTe ee C NOMOUsbIO BVHTa.
- Ecnn yctpoiCTBO He nCnOJIb3yETcA DnIteJIbHOe BpeMa, N3BLeKnte n3 Hero 6aTapeN Ky, TAK KAK OHa MOXET NaHaTb PnOTeKaTb IN NOBpeDnTb yCTpOiCTBO.

BHIMAHHE:
HacrtpoiKa yacOB (BpeKIMe OxNdaHna)
- Haxmte KhoNky MEM/M+ (7), n ydepXnBaIte ee, noka ha dinCnnee He 3amiraeT nHnkaunr rOa (YR).
Tepeb moxho yctahOBtB rOi (YR), Mea (M) n DeHb (D), fopmat oToobpaxeHH BpeMeHN (12 H/24 H), Yac n MInHyTu c NOMoubIO KHOJOK C/F YEAR (5) n DST/M/D (14).
B kajdom cnyae noTBepxdaTe cBoi BbIbOp hXkaTneM KhoNKn MEM/M+. YcTaHaBnBaemoe 3NaueHne 6yJeT MIRaTb Ha DnCnnee.

ПРИМЕЧАНЯ:
- I3meHeHHoe 3HaueHne 6ydt aBtOMaTnueCKn COxpaHEn B nAmrTn, eCIn Hn Onda N3 KHOJOK He 6ydt HaKaTa B TeueHne, npImepHo, 30 cekyHd.
- Ecni yctaHOBJIeH 12-YacOBoi FOpMaT OTo6paXeHnBpeMeHn, bYdET TaKxE OTo6paXaTc: PM =noCne noLyDn.
- YctaHOBka dHr HeJeI npOxCoJNT aBTOMaTnueckn.
OTo6paXeHne daTbI n rOda (BpeXmme OxuHaHna)
- Haxmnte KhoNky DST/M/D(14),YTO6blKpaTKOBpeMeHHO BbICBETnTb DaTy.
Haxmte KhoNky C/F Year (5), yTo6bI KpaTkoBpeMeHHo BbICBeNTb rO.
IepexoHa IeTHee BpeMa (BpeKIme OxuaHna)
HaximaiTe cydepkaHem KhoNky DST/M/D (14), TTo6bI nepeKIOUaTbcra MeXdy IeTHIM N 3IMHM BpeMeHem. EcIn BbIpaHO JeTHee BpeM, Ha dncJIee 6yDet BBICBeHNBaTbCRA CmBOJ
HactpoKaHa paNocTaHcNIO
- Khoikamn C/F 1YEAR (5) n DST/M/D (14) hactpoiTecb Ha HyxHyIO CTaHcIIO. Ecni depkaTb oNDHy n3 KhoNOK hXkatoN, To yCTPOICTBO BblOJIHT NOnCK CJeDyUoIe paiaocTaHcII. Ha dinCnIee bYdET OTo6paKaTbCS TeKuIaJ YAcTota.
- Ecnn cnHnCnIeKOM cIa6bI, n3MeHnTe NOLOXKeHne aHTehNbI dIyUyUeHn npIema.
CoxpaHeHne cTaHcN
Mожно coхpaHTbdo10paTnoCTaHcH.
- Понь санци опись в раздени "Hac troйka на радиocанцю".
- Haxmnte i depknte KhoNky MEM/M+ (7). NndkaTop coxpaHemoi no3n 3amiraet Ha dinCnnee (Haepimep, P02).
- Khoŋkamn C/F YEAR (5) n DST/M/D (14) BbIbepeTe HxKHyO ryeKeKy naMaTn dJa coXpaHeHn cTaHcN.
- Haxmte KhoNky MEM/M+ dans coxpaHnA cTahn.
I I P N M E Y A H N A:
EcnB yCTpOcTBO He ycTaHOBNeHa pe3epBnA 6aTapeNka, B cIyae npepbBaHnna 3JIeKTPoNTaHnO rT CeTN nAmrB BceX KaHAnOB bUdET YTpauHeHa.
Hacpoika Ha coxpaehHyIO cTaHcNIO
He norpykaite yctpoicTBO B Body.
- BыдернITE вилку Шнupa щелковпатаня n3 розтк поед Tem, кak чicitитусторостBO.
- YnCTnTe yCTpOiCTBO C NOMOuCJIeTka BnaXHOI TkaHn 6e3 KaKnx JInoMOUix DoabOK.
YcTpaHHe HeNCnPaBHOCTeI


- Język polski
- Spistresci
- Pycckn
- CopepkHne
- Bas (sans illustration)
- Inferior (sin ilustracion)
- LINE IN conductor (Posterior (sin ilustracion))
- Symbols in these Instructions for Use
- WARNING:
- CAUTION:
- General Safety Instructions
- English
- Children and Frail Individuals
- WARNING!
- Special Safety Instructions
- Overview of the Components
- Rear (without illustration)
- Bottom (without illustration)
- Putting into function
- Inserting the Battery (Backup)
- Power supply
- Switching the Unit On/Off
- Volume
- Display Brightness
- NOTE:
- Temperature display
- Setting the Clock (in standby)
- i NOTE:
- Display Date and Year (in standby)
- Switching to Summer Time (in standby)
- Radio station tuning
- Preset stations
- Tune into the preset station
- Alarm function
- Setting of the Alarm
- iNOTE:
- Turning off the Alarm
- Automatic Alarm Interval
- Deactivate the Alarm Function
- English Delayed Shut-Off
- Projection
- LINE IN socket (Rear (without illustration))
- Cleaning
- Troubleshooting
- Technical Data
- Meaning of the "Dustbin" Symbol
- Instrukcja obslugi
- YBARA.
- PONEPEIXEHH.
- XMBJeHHA
- YBIMKHeHHBIMKHeHHBnpo6y
- Cnla 3Byky
- RckpaBicTb dncnne
- YkpaIHcbka
- PIMITKA.
- Bido6paXeHHa TempepaTpyn
- BcTaHOBJIeHHra rOuHHnka (ypeXmIo ouiKyBaHHa)
- ПРИMITKA.
- Bido6paXeHHaTn i pOKy (ypeXmIoOikyBaHHa)
- PykoBoDCTBO no 3KcPnyaTcuN
- CnMBOJI npIMeHReMbIe B daHHOM pyKOBoDCTBe nOJIb3OBaTeJI
- PPEyPEXKDEHNE:
- BHIMAHHE:
- HacrtpoiKa yacOB (BpeKIMe OxNdaHna)
- ПРИМЕЧАНЯ:
- OTo6paXeHne daTbI n rOda (BpeXmme OxuHaHna)
- IepexoHa IeTHee BpeMa (BpeKIme OxuaHna)
- HactpoKaHa paNocTaHcNIO
- CoxpaHeHne cTaHcN
- I I P N M E Y A H N A:
- Hacpoika Ha coxpaehHyIO cTaHcNIO
- YcTpaHHe HeNCnPaBHOCTeI
Brand : AEG
Model : MRC 4119
Category : Radio