USER MANUAL PA530 Audio Plus GIGASET
Operating Elements. 20
Baby unit (Transmitter) 20
Parent unit (Receiver). 21
Display Parent Unit. 22
Starting Up 23
Safety notes. 23
Checking the package contents. 23
Parent unit 23
Baby unit 23
Operation 24
- Powering on/off the baby monitor 24
Volume 25
Battery charge indicator and battery low warning 26
Baby unit to parent unit paging. 26
Display of the temperature and humidity in the baby's room 26
Settings 27
Date and time. 27
Language 27
Feed timer 27
Temperature 28
Vibrating alert. 28
Voice control (VOX function). 28
Lullaby Mode 29
Alarm Priority 29
Appendix. 30
Troubleshooting 30
Disposal. 30
Feature Highlight 31
Technical data 31
Customer Service & Help 32
Warranty Certificate. 33
Authorisation. 33
Warning
This baby monitoring device complies with all the relevant standards with regard to electromagnetic fields and is safe to use if it is used as described in the operating instructions. Therefore, please read these operating instructions carefully before you use the device.
Explain the contents to your children and tell them about the dangers of using the device.
The Babyphone was developed to provide extra security during the times when you can not be in the same room as your baby. This system does not replace responsible supervision of the baby by an adult. During use, an adult must always remain within the range of the Babyphone. The Babyphone is neither a medical device nor a device to prevent cot death. It is important that you check that your baby is well at regular intervals.
| Take care that the baby unit and the cable are always out of reach of your child (at least 1 metre distance). Never place the baby unit in the cot or playpen. |
| Only use the mains unit supplied. Do not use any other plug-in mains units, as this could damage the device or the rechargeable batteries.Ensure that the voltage of the plug socket corresponds to that of the mains unit. A damaged mains unit must only be replaced with an original spare part. |
| Do not use non-rechargeable alkaline batteries in the parent unit. Only use rechargeable batteries which comply with the specification (see „Technical Data").Batteries and rechargeable batteries may explode if they are exposed to direct sunlight, fire or other sources of high temperature.Parent unit: Only use rechargeable batteries which comply with the specification (2x 750mAh AAA NiMH) as otherwise serious damage to health or injuries cannot be ruled out.Baby unit: Only use the specified batteries in the baby unit (AAA 1.5 V alkali or type AAA rechargeable batteries), as otherwise serious damage to health or personal injury cannot be ruled out.Please remember to replace the batteries from time to time (at least once per year), to ensure that the baby unit will continue to function in case of mains failure. The baby unit does not have a charging function.Batteries which are obviously damaged must be replaced immediately.This prevents damage due to leaking batteries or rechargeable batteries.1. Remove the batteries/rechargeable batteries if you intend not to use the Babyphone for one month or longer.2. Do not leave discharged batteries in the Babyphone. |
| The function of medical devices can be impaired. Note the technical conditions of the relevant environment, e.g. doctor's surgery.Please obtain information from the manufacturer of the device of you use medical devices (e.g. a pacemaker). The manufacturer can provide information with regard to the extent to which the device is immune to high frequency energies (See "Technical Data" for information about your Gigaset product). |
| The devices are not protected against splashed water. Therefore do not use them in wet areas such as bathrooms or showers.Do not immerse any part of the Babyphone in water or other liquids. |
| With the exception of the battery compartment cover, the device and the mains unit must not be opened, as this may cause electric shocks. If the device does not function correctly, please do NOT try to remedy the problem yourself. In this case, please contact the Gigaset hotline.Do not use defective devices, as these may interfere with other radio services. |
| Do not immerse the parent or the baby unit in water and do not clean them under running water. Do not use cleaning spray or cleaning agents.1. Pull the charging adapter of the parent or baby unit out of the socket if it plugged in.2. Clean the parent and baby unit with a damp cloth.3. Only clean the charging adapter with a dry cloth.Take care that both units are dry before reconnecting them to the mains. |
| Only pass your Gigaset Babyphone on to other people together with the operating instructions. |
en
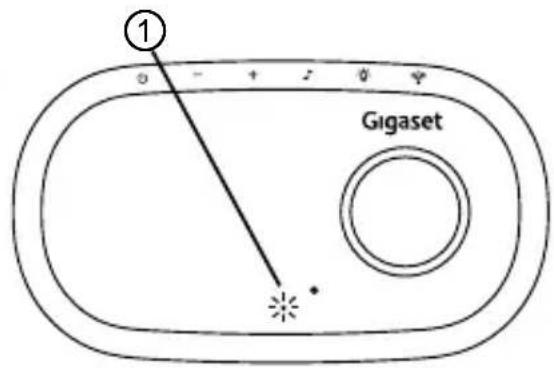
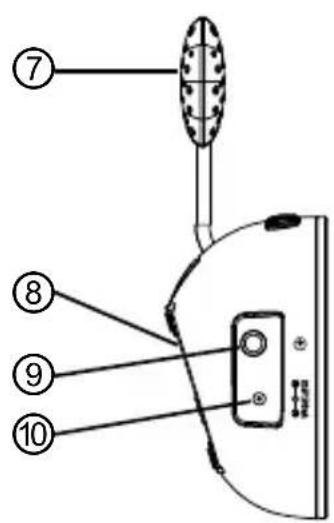
Baby unit (Transmitter)
1 PowerLED
Steady green during normal operation (parent unit and baby unit linked); flashes green during establishing the connection to the receiver or when the connection is lost; lights red when the batteries are running low.
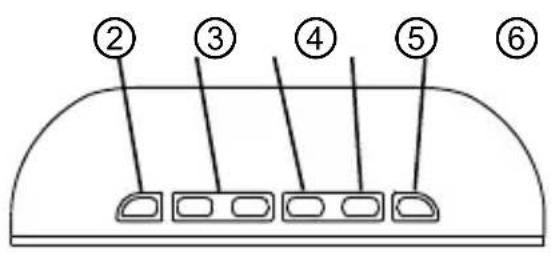
2 On/Off key
Press and hold down for approx. 2 seconds to switch on/off the unit.
3 Volume keys Vol.
For setting the volume of lullabies and for the voice transmitted from the parent unit.
4 Lullaby key (only when baby unit is switched off)
Press and hold down for approx. 2 seconds to switch on/off the lullaby function.
5 Night light key
Press and hold down for approx. 2 seconds to switch on/off the nightlight function.
When the backlight is switched on, you can reduce the brightness by one level by pressing the key briefly (3 levels of brightness). The backlight can also be used when the baby unit is switched off. When operating on batteries the backlight switches off automatically after 5 min, to save energy.
6 Paging key
Press briefly to "page" the parent unit with an audible alert. Useful to call for assistance or to locate a missing parent unit.
7 Temperature Sensor
8 Battery compartment (rear)
Compartment for 2 AAA batteries (not provided) for backing up the baby unit during a power failure.
9 External MP3 player jack (3.5mm)
10 Power supply jack (^ + ^ in center)
Parent unit (Receiver)
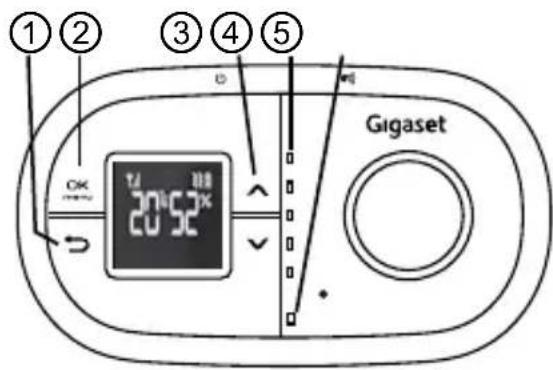
1 Back/ESC key
To leave the menu resp. to leave the current menu level.
Press briefly to open the menu / confirm a setting. Press and hold for approx. 2 seconds to display temperature and humidity in the baby's room. Press and hold for 2 seconds again to return to time display.
3▼/▲ keys
- Setting the volume
- Selecting a menu item
4 Noise indicator
Lights up when noise is detected.
5 Power LED
Steady green during normal operation (parent unit and baby unit linked); flashes green during establishing the connection to the sender or when the connection is lost; lights red when the batteries are running low; flashes red when batteries are charging.
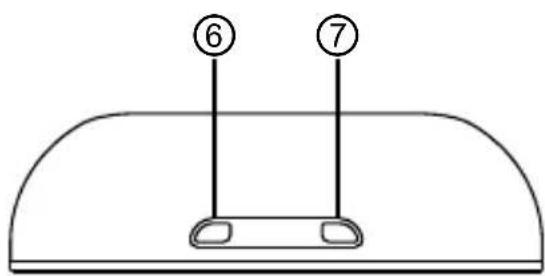
6 On/Off key
Press and hold down for approx. 2 seconds to switch on the unit.
Press and hold down for approx. 2 seconds to switch off the unit.
7 Talk key
Press and hold to talk to your baby or partner in the baby's room via the baby unit.
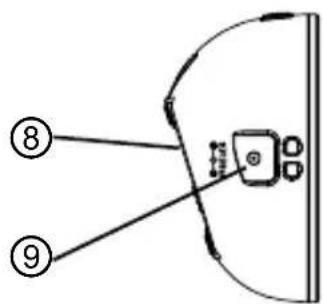
8 Battery compartment cover (rear)
Compartment for 2 rechargeable batteries AAA, 1.2 V, NiMH.
9 Power supply jack
Display Parent Unit
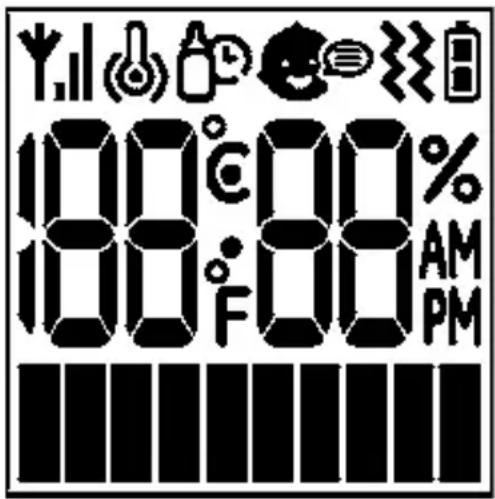
Display icons

Connection
Depending on the connection quality 1 . . . 3 bars are displayed.
In case of no connection the symbol is switched off.

Temperature monitoring activated
Temperature alert with vibrate
Temperature alert without vibrate

Feeding alarm activated

VOX function activated

Vibration activated

Battery capacity
Full battery
Mid battery
Low battery
Safety notes
Note
It is essential to read the "Safety notes" at the beginning of this manual before starting up.
Checking the package contents
The package contains:
1 Parent unit (receiver)
1 Baby unit (sender)
2 mains adaptor with power cord
2 rechargeable batteries AAA, 750 mAh, NiMH
1 audio cable
1 user manual
Parent unit
- Remove the battery cover on the back of the parent unit by applying pressure and sliding it down. Insert the rechargeable batteries as marked on the unit and close the cover again.
- Plug the power cord into the power jack and plug the adaptor plug into a mains power socket.
- Press and hold down the On/Off key turn the parent unit on if necessary. The display shows the charging of the batteries.
Note
Before first use, or if it has been out of use for a long time, the parent unit will need to be charged for 13 hours. During this time, the parent unit will operate from the power adaptor when switched on.
Baby unit
- In event of a power failure, your baby monitor can switch to battery power. It is therefore recommended that you insert non-rechargeable batteries in the baby unit.
- Remove the battery cover on the back of the baby unit by applying pressure and sliding it down. Insert 2 alkaline batteries or rechargeable batteries of the type AAA (not provided) as marked onthe unit and close the cover again. Please note, that the baby unit has no charging functionality, even when the mains adaptor is connected.
- Plug the power cord into the power input of the baby unit and plug the adaptor plug into a mainspower socket.
- Press and hold down the On/Off key to turn the baby unit on if necessary.
Note
The baby unit should be placed about 1 m away from the baby's cot on a flat surface. Never place the baby unit inside the cot, bed or playpen. Make sure the unit, cords and mains adaptor are out of reach of the baby and other young children. Never place either unit on antique or polished surfaces to avoid damage from the rubber feet.
Once you have set up your baby monitor, you will be able to hear the sounds in your baby's room through the parent unit. You will also be able to see those sounds as the sound sensor lights on the parent unit, which rise and fall with the volume level.
Note
If the connection between the parent unit and baby unit is broken at any time the green "Link" light on the parent unit will flash and you will hear short beeps. To re-establish the "Link", follow the directions in the "Troubleshooting" chapter.
Powering on/off the baby monitor
After having connected the baby monitor you will have to switch on both units.
Press and hold down the On/Off key on each unit.
To switch off the unit press and hold down the On/Off key again.
Parent Unit
- Long press On/Off key 2 sec to turn on unit. Power LED will turn On in Green and then flashing in 0.5s on and 0.5s off during linking. Antenna icon is turned off.
It becomes steady Green when linked. Antenna Icon is turned on.
- It becomes flashing Green Flashing if linking failed. Antenna Icon is turned off.
Baby Unit
- Long press On/Off key 2 sec to turn on unit. Power LED will turn On in Green and then flashing in 0.5s on and 0.5s off during linking.
It becomes steady Green when linked.
It becomes flashing Green Flashing if linking failed.
Volume
Parent Unit
You can adjust the volume at which you hear your baby by using the keys and on the parent unit.
Press Volume keys _off^V_^V_ or + will increase or decrease the speaker output. Totally
10 Levels (VOL 01 to VOL 10, VOL 01 = MUTE). User could adjust the received baby voice.
- 1 beep tone for each volume key pressing
- 3 beep tone as warning of volume limit (max / min). The LCD will display [VOL MAX] or [VOL MIN] for 3sec and then exit to Top Level Display Mode
- Beep tone is constant and not volume control
- Every time user press Volume keys = / _off^Vol or +, the LCD displays the volume setting for example "VOL 05". If user no any key command for 3sec, the LCD will clear the volume setting display and exit to Top Level Display Mode
Volume keys or + can only be working as volume control in Top Level Display. Volume adjustment can only be allowed in Top Level Display Mode. Because these 2 keys will use as up/down in menu level
- It has last memory function after power off
Baby Unit
Using the Volume keys f_OH^Vac or on the baby unit you can adjust the volume for your voice (when speaking from the parent unit) and the lullabies (only for the internal source). If a MP3 player is connected to the baby unit, the volume is adjusted by the MP3 player volume keys.
Press Volume keys -_01off or + will increase or decrease the speaker output. Totally 10 Levels (VOL 01 to VOL 10, VOL01=very small volume for lullaby play, VOL 01=MUTE for when baby receive voice from parent). User could adjust the lullaby output or received talk back from parent voice level.
- No tone for each volume key pressing
- 1 beep tone as warning of volume limit (max / min)
- Beep tone is constant and not volume control
- Internal Lullaby is with volume control
- External MP3 Player Audio In is constant and no volume control
- It has last memory function after power off
ECO MODE
When the Parent comes close to the baby unit, the transmission power will be dynamically reduced to save the power
Battery charge indicator and battery low warning
The parent unit will work up to 8 hours without charging, but this depends on the amount of activity and the level of the charge in the batteries. On the display you can see the charging status:
Battery icon full = full capacity
Battery icon 1/2 full = approx.half capacity
Battery icon empty / battery symbol flashes = batteries must be charged
Parent Unit
- When battery is low, the power LED becomes Red. Low Battery Icon is turned on. Battery low beep tone alarm will be generated.
- The parent unit switches off after at least 15 minutes from alarm starts
- During battery charging, the power LED is flashing Red. Low Battery – Mid Battery – Full Battery Icons are continuous flashing one by one to indicate the charging is in progress.

- When battery is high or charging is completed. Full Battery Icon will be turned on without flashing.
- When battery is not installed, battery icon will NOT turn on and the power LED will NOT turn Red.
Baby Unit
- When battery is low, the power LED becomes Red
- When battery is not installed, the power LED will NOT turn Red
Baby unit to parent unit paging
Useful if one parent is in the baby's room and needs to contact the other. Also helps to find a mislaid parent unit.
At the baby unit
Press and hold the Paging key briefly. The parent unit will emit a tone. The tone can be switched off by pressing any key on the parent unit or by pressing the Paging key on the baby unit once again.
Paging function have the Time-out after 2 minutes.
Display of the temperature and humidity in the baby's room
Press and hold down the OK/Menu key for approx. 2 seconds.
The temperature and humidity in the baby's room will be displayed. The information will be updated once in a minute.
Press and hold down the OK/Menu key for approx. 2 seconds to return to the date/time display.
You can make several settings using the menu.
Press the OK/Menu key 46 open the menu.
Use the and keys to scroll through the menu.
Press OK/Menu key OK briefly to open a submenu or to confirm a setting. Press the Back/ESC key several times if necessary, to leave the menu.
If there is no key input for approx. 10 sec, the unit will exit to the top level display mode without saving.
Date and time
Press the OK/Menu key OK
Select CLOCK SET and press the OK/Menu key OK
Use and to adjust the year and press the OK/Menu key OK menu.
Use and to adjust the month and press the OK/Menu key OK
Use and to adjust the day and press the OK/Menu key OK.
Use and to adjust the hour and press the OK/Menu key OK
Use and to adjust the minute and press the OK/Menu key OK menu.
Language
Press the OK/Menu key OK
Select LANG SET and press the OK/Menu key OK
Select a language and press the OK/Menu key OK
Feed timer
You have the choice to set an alert just for your baby's next feed time. The alarm will be given by "BEEP", "VIBE" (vibration) or "BEEP&VIBE". When the function is set to ON, will be displayed.
Note
Make sure you have set the correct date and time.
Press the OK/Menu key OK menu.
Select FEED SET and press the OK/Menu key OK
Select BEEP, VIBE or BEEP&VIBE and press the OK/Menu key OK menu.
Use and to adjust the year and press the OK/Menu key OK menu.
Use and to adjust the month and press the OK/Menu key OK
Use and to adjust the day and press the OK/Menu key OK
Use and to adjust the hour and press the OK/Menu key OK
Use and to adjust the minute and press the OK/Menu key OK menu.
Once the feeding alert is triggered:
- The feeding alert icon will flash at a rate of 1sec on and 1sec off.
- Vibration (if set on) will start on for 4sec and then stop for 8sec. After that, it will on again 4sec and off again 8sec.
- Once the feeding is triggered, turn off alarm by press Menu key OK and feeding alert set to OFF.
Temperature
You can monitor the temperature in the baby's room. Healthcare professionals advise that the ideal temperature for your baby's room is between 16^ and 20^ . When the temperature is ≥ 25^ or ≤ 15^ in the system, the temperature alert (BEEP, VIBE or BEEP&VIBE) is activated. When the function is set to ON, will be displayed.
Press the OK/Menu key OK menu.
Select TEMP SET and press the OK/Menu key OK
Select BEEP, VIBE or BEEP&VIBE and press the OK/Menu key OK
To confirm a given alarm (is flashing) press the OK/Menu key the conditions do not change within the next 2 minutes, the alarm will be given again.
Vibrating alert
You can set your parent unit to vibrate should the noise levels in your baby's room reach the sensitivity of the sound sensor.
You can use this function, if the volume on the parent unit is set to "VOL MIN" (= OFF).
When the function is set to ON, will be displayed.
Press the OK/Menu key OK
Select VIBE SET and press the OK/Menu key OK
Select ON or OFF and press the OK/Menu key OK
Voice control (VOX function)
(Background noise suppression)
When the voice control (VOX function) is activated, background noise will be suppressed. That means, that the parent unit's loudspeaker will be switched on, when the volume from the baby's room is above a defined level.
When the function is set to ON, will be displayed.
Press the OK/Menu key OK menu.
Select VOX SET and press the OK/Menu key OK mntu.
Select ON or OFF and press the OK/Menu key OK
Lullaby Mode
In the Lullaby Mode, the baby unit will start playback the internal lullaby or external MP3 player (or any external audio source). In order not to false trigger the baby unit by VOX or baby voice masked out by lullaby, lullaby mode will only be allowed to be activated when baby unit is not function as monitor, i.e. transmission off.
It will only be activated when baby unit is turn OFF state. Then long press the Lullaby key 2 sec to enter the lullaby mode.
Short press or long press Lullaby key when baby unit is in on state will not enter lullaby mode, the key request will be ignored.
Long press the Lullaby key again for 2sec will quit the lullaby mode. The baby unit will resume back to OFF state.
When entering the lullaby mode, the baby unit will check whether the external AUX in jack has plug detected or not. If external AUX plug in (no matter external audio presence or not), the baby unit speaker out will be switch to the external audio in. As long as the AUX plug is detected, the audio path will keep route from external irrespective to whether audio presence or not. If user connected with MP3 player, user should press the MP3 player volume and control keys.
To listen the internal lullaby, user must unplug the audio cable out from the AUX in jack during lullaby mode. Then the audio path will be resumed back to internal lullaby. The baby unit will start playback the lullaby from #1 to #9 in repeat cycle. To advance to next lullaby, short press the Lullaby key. The playback is still kept on from that lullaby in repeat cycle.
If user wants to switch to external audio, just plug in the audio source to the AUX in. The audio path will switch to external and internal lullaby will be stopped. During switch from internal to external or vice versa, beep tone is NO needed.
Internal lullaby can have baby unit volume control.
External audio in will not have baby unit volume control
Alarm Priority
There are various alarm alerts in the parent unit. In case of conflict and happen at the same time, the priority is assigned as below.
- Highest Priority: Key Tone or Error Tone
1st Priority: Out of Range
2nd Priority: Low Battery
3rd Priority: Feeding Alert Alarm
4th Priority: Temperature Alert Alarm
Troubleshooting
Should problems arise with the babyphone, please refer to the following information first. In the case of technical problems, contact our Gigaset Hotline. In the case of claims under the terms of guarantee, contact your sales outlet.
| Problem Solution | |
| The Power LED does not light up when connecting the unit to the mains. | ·Check whether there is a power failure. Check whether all connections are ok and both units are switched on (on/off key). |
| The light on the parent unit is flashing and you cannot hear the sounds from your baby's room. | ·You may have moved out of range - move closer to the baby unit and wait 5 seconds for the “Link” to establish.
·You may need to re-establish the “Link” between the two units. Turn both units off and then:
On the baby unit: Press the On/Off key.
On the parent unit: Press and hold down the On/Off key for approx.
2 seconds. The green “Link” light comes on (this may take a few seconds). |
| Can’t hear your baby on the parent unit, but the light is still glowing steadily. | ·Check the volume is turned up on the parent unit. |
| The Power LED on the parent unit is flashing. | ·The rechargeable batteries are nearly exhausted. Connect the parent unit to the charger. |
| Your baby monitor is emitting an high pitched ear-piercing noise. | ·This may happen if your parent and baby units are too close together. Move them further apart. |
Disposal
Batteries should not be disposed of in general household waste. Observe the local waste disposal regulations, details of which can be obtained from your local authority. All electrical and electronic products should be disposed of separately from the municipal waste stream via designated collection facilities appointed by the government or the local authorities.

This crossed-out wheeled bin symbol on the product means the product is covered by the European Directive 2002/96/EC. The correct disposal and separate collection of your old appliance will help prevent potential negative consequences for the environment and human health. It is a precondition for reuse and
recycling of used electrical and electronic equipment. For more detailed information about disposal of your old appliance, please contact your local council refuse centre or the original supplier of the product.
- DECT Audio Monitoring Platform
Language: DE · PL · NO · SV · EN · FR · ES · NL · IT · PT
Over 300m Effective Coverage Range
Parent Unit
- VOX Control On-Off
Talk
- 5 LEDs for 3 Sound Levels Indication
- ECO Mode
- LCD Display (Negative Type. White, 1 Character Line with Graphic Icons)
- Temperature and Humidity Monitoring
Volume Control
- Out of Range Alert
- Low Battery Alert
Vibration Alert
Real Time Clock
- Feeding Alarm
- DC Adaptor and / or 2pcs AAA Size NiMH Rechargeable Batteries Operation with Charging
Baby Unit
Night Light (white)
Page Function
Built-in Lullaby
External Lullaby In
Volume Control
Out of Range Alert
- Low Battery Alert
- DC Adaptor and / or 2pcs AAA Size Batteries Operation Without Charging
Technical data
Operating frequency 1,8 GHz
Range Up to 300m under optimum conditions.
It is possible to reach up to 50m in buildings (due to walls, doors etc.)
Power supply, baby unit / parent unit S003IV0600050
Input: 100 240VAC,50 / 60Hz,150mA
Output: 6 V DC, 500 mA, Center = +
Transmitting power Average: 10mW Maximum: 250mW
Rechargeable batteries Typ AAA 1.2 V 750 mAh NiMH
for the parent unit (receiver)
Operating time with charged battery Approx. 8 hours
Permissible ambient temperature 10^ to 30^
Permissible relative humidity 20% to 75%
Step by step to your solution with Gigaset Customer Service www.gigaset.com/service

Register your Gigaset device under
www.gigaset.com/register
immediately after purchase - in this way we can help you even quicker in case of any queries or warranty claims.
Your personal customer account enables:
Management of your personal details,
Registration of your Gigaset products,
Online registration of repairs and
Subscription to our Newsletter.

Visit our customer service website:
www.gigaset.com/service
Here you can find:
Questions and answer
Free downloads of software and operating instructions
The Gigaset customer forum

Were you unable to find a solution under "Questions & Answers"?
We will be glad to help you ...
...by telephone during opening hours Sun. 11 pm - Fri. 11 pm continuously under 084503 18190 (local call cost charge)
...or 24/7 by email under www.gigaset.com/contact
Please have your proof of purchase at hand.
On the outer packaging (box) of the product, next to the CE mark, it is clearly stated for which country or countries the particular device and its accessories was developed.
If the device or its accessories are not used according to this information, the information in the operating instructions or on the product itself, this may invalidate any warranty claims (repair or replacement).
Before making a warranty claim, the purchaser is requested to provide the proof of purchase, which states the date of purchase and the product which has been purchased.
Regardless of his/her claims for faults against the vendor, the consumer (customer) is granted a warranty for this device according to the following conditions:
- At the discretion of Gigaset Communications, production and/or material defects which occur within 24 months of the date of purchase of this device will be repaired free of charge, or the device will be replaced by a corresponding device which complies with the state-of-the-art. For wearing parts (e.g. batteries, housing, holder, buttons), this warranty applies for six months from the date of purchase.
- This warranty does not apply if the device is damaged, has not been correctly used or serviced or unauthorised repairs have been made.
- The warranty is conditional on the presentation of the dated proof of purchase. Warranty claims must be made within the warranty period within two months of the defect covered by the warranty becoming evident.
- Replaced devices or their components, which are returned to Gigaset Communications in the context of replacement become the property of Gigaset Communications.
- This warranty applies to new devices which are purchased in the European Union. The warrantor for devices purchased in United Kingdom is Gigaset Communications UK Limited, 2 White Friars, Chester, CH1 1NZ.
- Further, or other claims under this warranty are excluded, unless they are mandatory according to legal regulations.
- If no warranty claim pertains, Gigaset Communications reserves the right to invoice the customer for the replacement or repair. Gigaset Communications will inform the customer of this in advance.
- The provisions above do not constitute a change to the burden of proof to the detriment of the customer.
Please contact Gigaset Communications to redeem this warranty.
Authorisation
This device is intended for use worldwide. Use outside the European Economic Area (with the exception of Switzerland) is subject to national approval. Country-specific requirements have been taken into consideration.
We, Gigaset Communications GmbH, declare that this device meets the essential requirements and other relevant regulations laid down in Directive 1999/5/EC.
A copy of the Declaration of Conformity is available at this Internet address:
www.gigaset.com/docs
Service client et assistance 48
Certificat de garantie. 49
Homologation 49
Attention
Klantenservice & Help. 82
Garantie-oorkonde 83
Goedkeuring 83
Let op
Baby-unit (transmitter)
8 Deksel batterijcompartment (achterkant)
Gigaset Communications GmbH declares that this equipment is the most suitable for all applications. This equipment has been developed by a number of leading researchers and engineers, including Dr. Dr. Dr. Dr. Dr. Dr. Dr. Dr. Dr. Dr. Dr. Dr. Dr. Dr. Dr. Dr. Dr. Dr. Dr. Dr. Dr. Dr. Dr. Dr. Dr. Dr. Dr. Dr. Dr. Dr. Dr. Dr. Dr. Dr. Dr. Dr. Dr. Dr. Dr. Dr. Dr. Dr. Dr. Dr. Dr. Dr. Dr. Dr. Dr. Dr. Dr.
- The GIGAS project was funded by the European Union under Grant No. 2014/63758
- The GIGAS project was funded by the European Union under Grant No. 2014/63758
- The GIGAS project was funded by the European Union under Grant No. 2014/63758
- The GIGAS project was funded by the European Union under Grant No. 2014/63758
- The GIGAS project was funded by the European Union under Grant No 2014/63758
- The GIGAS project was funded by the European Union under Grant No. 2014/63758
- The GIGAS project was funded by the European Union under Grant No. 2014/63758
- The GIGAS project was funded by the European Union under Grant No. 2014/63758
- The GIC project was funded by the European Union under Grant No. 2014/63758
- The GIC project was funded by the European Union under Grant No. 2014/63758
- The GIC project was funded by the European Union under Grant No. 2014/63758
- The GIC project was funded by the European Union under Grant No. 2014/6
© Gigaset Communications GmbH 2013
Subject to availability.
All rights reserved. Rights of modification reserved.
www.gigaset.com

A31008-N1159-R101-1-X119
UG PA530 BABYPHONE (GS2)
A31008-N1159-R101-1-X119