HZ510E - Electric heater HONEYWELL - Free user manual and instructions
Find the device manual for free HZ510E HONEYWELL in PDF.
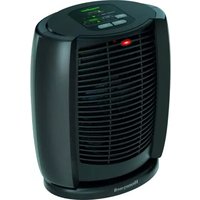
| Product Type | Electric Fan Heater |
| Brand | Honeywell |
| Model | HZ510E |
| Power | 1100 W / 1800 W (2 levels) |
| Power Supply | Single phase, mains voltage (see rating plate), double insulation (class II) |
| Temperature Setting | Rotary thermostat with MIN and MAX positions |
| Heat Indicator | Safeguard system: black indicator (cold) / red (hot) |
| Overheat Protection | Automatic shut-off in case of excessive internal temperature |
| Safety Fuses | Safety fuse and motor fuse |
| Usage | Indoor only, flat and stable surface |
| Safety Distance | Minimum 100 cm from flammable materials |
| Maintenance | Clean air openings with a vacuum cleaner; exterior with a dry cloth |
| Repairability | Do not open or repair yourself (warranty void) |
| Warranty | See provided warranty conditions |
Frequently Asked Questions - HZ510E HONEYWELL
User questions about HZ510E HONEYWELL
0 question about this device. Answer the ones you know or ask your own.
Ask a new question about this device
Download the instructions for your Electric heater in PDF format for free! Find your manual HZ510E - HONEYWELL and take your electronic device back in hand. On this page are published all the documents necessary for the use of your device. HZ510E by HONEYWELL.
USER MANUAL HZ510E HONEYWELL
INNEHALLSFÖRTECKNING SVENISKA
INNHOldSFOrTEGNELSE NO
INDHOLDSFORTEGNELSE DANSK
SISALLYSLUETTELO SUAYI
SPISTRESCIPOL3K
TARTALOMJEGYZEK MAGYAR
OBSAH CESKY
SADRZAJ HRWATSKI
VSEBINA SLOWENSKO
SISUKORD EES
TURINYS
56
LIETUVIU
SATURA RADITAJS LABJEESU
FiHRIST TUBKCE
CODEPKAHVE
64
PYCCKN
NEPIEXOMENA
67
EAAHNIKA

75


IMPORTANT SAFETY INFORMATION
Before starting to use the heater, read through all the instructions and keep this user manual in a safe place for future reference.
- Extreme care is essential when the heater is used in the vicinity of children or frail persons and when the heater is running without supervision.
- Do not use the heater outdoors.
- Only operate the fan heater when it is in an upright position.
- Unwind the power cord completely. An incompletely unwound power cord can lead to overheating and cause a fire. Do not touch the power cord with wet hands. Make sure that no objects are resting on the power cord or can come in contact with hot parts. Position the power cord so that nobody can trip over it and the power plug is easily accessible. Do not locate the power cord under carpets, rugs or similar fittings.
- Do not use an extension cord, a multi-way connector or a continuously variable speed controller. This can cause overheating, fire or electric shock.
- Connect the heater only to a single-phase power socket with the current as stated on the type plate of the appliance. The heater has double electric insulation (Class II) and does not therefore need to be earthed.
- Always switch the fan heater off with the thermostat switch and disconnect the power plug from the socket when the fan heater is not in use, or before you move, handle or clean it. Do not tug at the power cord to pull the plug out. Only handle the fan heater with dry hands.
- Do not use the heater anywhere near easily inflammable gases or substances such as solvents, lacqueurs, glues, etc. Some of the parts inside the heater are hot and could melt or throw sparks.
- Do not position the fan heater immediately below a power socket.
- Do not use the heater in the bathroom, laundry room or similar damp indoor rooms. Do not locate the heater where it could fall into a bathtub or other water container.
- Do not use the heater in any kind of vehicle (e.g. portacabins, lifts, caravans, cars, sheds) or similar enclosed spaces.
- The use of a heater in small, enclosed spaces requires particular caution, especially if the heater does not have a thermostat. We recommend you to control the room temperature frequently.
-
Caution: The heater gets very hot when it is running. Keep burnable materials such as cushions, pillows, duvets, furniture, paper, curtains and clothing at least 100cm away from the heater. To prevent burns, do not allow bare skin to come in contact with hot surfaces. Use the transport handle to transport the appliance.
-
Keep the heater clean. Make sure that the air intake and outlet vents are open before starting to use the heater. Do not allow any objects to get into the air intake and outlet vents.
- Do not cover the heater (Symbol the heater). This can lead to overheating, fire or electric shock. Do not use the heater on soft elastic surfaces such as beds, as the air intake and outlet vents could become blocked.
- Do not plunge the heater into water or any other liquids and do not pour water or any other liquids over the appliance or into the air intake and outlet vents.
- Clean the heater regularly by following the cleaning instructions.
- The heater may only be used according to the instructions in this user manual. Non-observation of these instructions could result in injuries, a fire, an electric shock or faults in the appliance.
- The appliance is intended only for private use indoors and not designed for commercial use.
- If the power cord of the heater is damaged, it must be replaced by a manufacturer-approved service centre or by similarly qualified persons, so as to avoid damage.
- Do not use this heater if it is damaged or shows signs of damage, if it has fallen over, or does not function properly. Pull the plug out of the power socket.
- This heater uses 12.5 Ampere short-term when in operation. To avoid the electric circuit becoming overloaded, do not connect the heater with a circuit to which other appliances are already connected.
- Although it is normal for the power plug to feel warm to the touch, a loose connection between power socket and power plug can cause overheating and faults in the socket. Contact a qualified electrician to get a loose or worn out socket replaced.
- The power output of this heater can vary and the temperature can get hot enough to burn unprotected skin. Use of this heater is not recommended for persons with reduced sensitivity to heat or capacity of reaction, so that burns may be avoided.
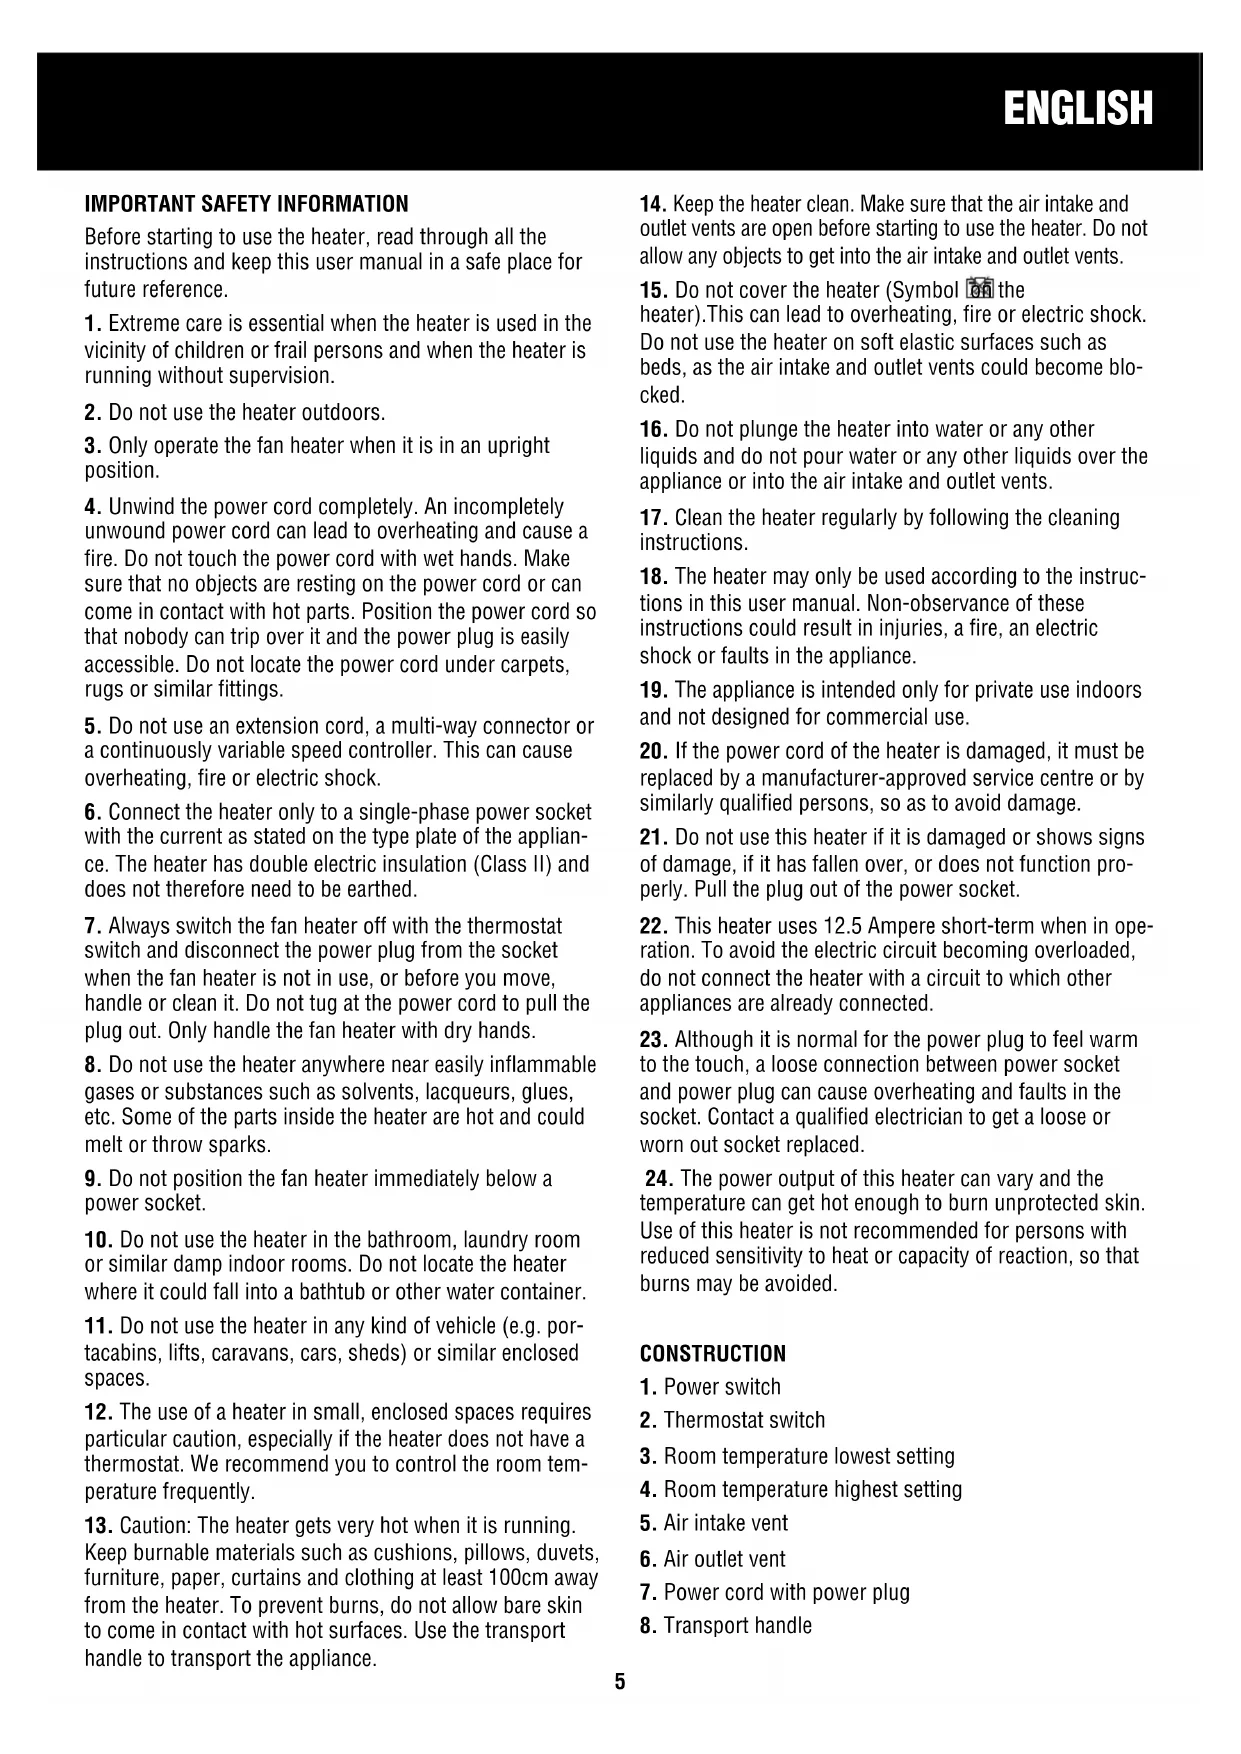
CONSTRUCTION
- Power switch
- Thermostat switch
- Room temperature lowest setting
- Room temperature highest setting
- Air intake vent
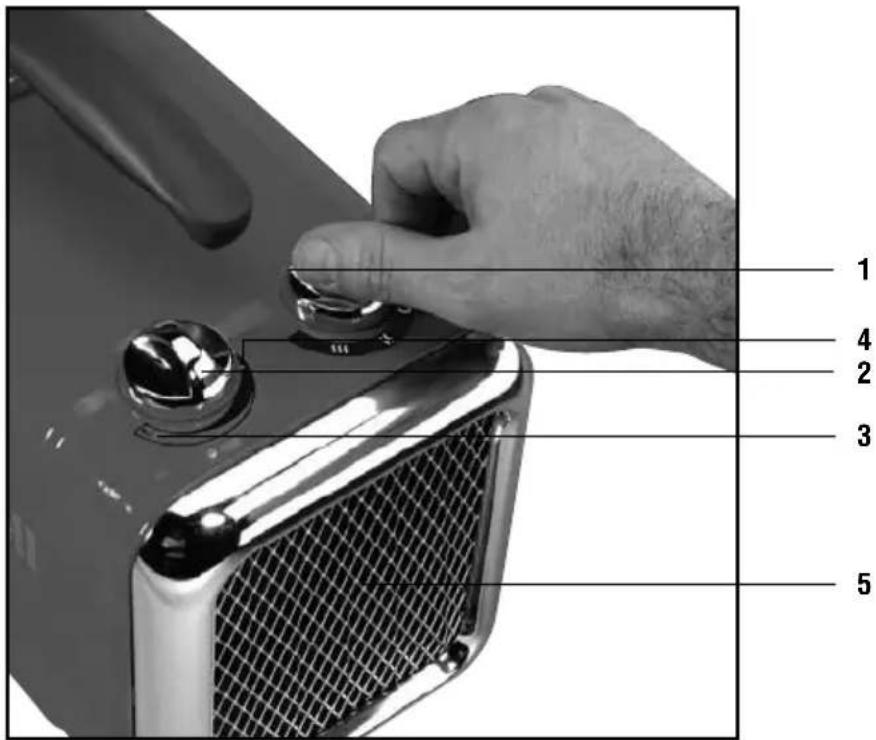
- Air outlet vent
- Power cord with power plug
- Transport handle
ENGLISH
- Lever for height adjustment
- Feet
- Power lamp
- Safeguard System marker
FIRST TIME OF USE
- Before starting to use the heater, read through all the instructions.
- Unpack the heater and the power cord. Remove all the packaging materials and dispose of them for recycling.
INSTRUCTIONS FOR USE
- Place the heater only on a firm, even surface where the heater cannot fall over, fall down or be knocked over.
- Make sure that the heater is switched off and that the thermostat switch is in the lowest position (3). Insert the power plug into the socket. Do not touch the power cord with wet hands.
- Make sure that the air intake vent (5) and outlet vent (6) are not covered up and that no objects have got inside. The air intake and outlet vents must always be free.
- The height of the front foot is adjustable. Turn the lever for height adjustment (9) anti-clockwise to increase the height. Turn the lever clockwise to lower the height.
- Turn the power switch (1) to the position of the desired heat setting:
\~1100 Watts
~~~1800 Watts
- Turn the thermostat switch (2) clockwise to the highest position (4). The power lamp lights up.
- When the desired room temperature has been reached, turn the thermostat switch (2) anti-clockwise until you hear it ,click". Now the heater is switched off.
- Now turn the thermostat switch (2) back clockwise a bit. The heater will now automatically switch on and off to maintain the desired room temperature.
- The further clockwise you turn the thermostat switch, the higher the room temperature will be.
- Before handling, moving or cleaning the heater, switch it off at the power switch (1) and turn the thermostat switch (2) to the lowest position (3). Pull the power plug out of the socket and allow the heater to cool for at least 20 minutes. Always use the transport handle when moving the heater (8).
SafeguardTM System
This heater is equipped with a SafeguardTM System (12) which is located at the front on the air outlet vent (6).
When the appliance is heating, the Safeguard marker changes colour from black to red. This signalizes that the heater is hot and must not be touched until it has been switched off and the marker has turned completely black again.
Overheating shut-off for the heater
- The heater is equipped with overheating shut-off which switches the heater off automatically when the temperature inside the appliance exceeds the normal running temperature. This protective device applies only to the appliance and has no influence on room temperature regulation.
- The appliance will not function if the overheating shut-off is activated.
- Turn the power switch to 0 and the thermostat switch (2) to the lowest position (3). Pull the power plug out of the socket.
- Now allow the heater to cool at least until the Safeguard marker is completely black.
- Remove any objects from inside or in front of the air intake (5) or outlet (6) vents, or use a vacuum cleaner to clean the openings which caused the faulty running or overheating. If heavy dust deposits are also visible inside the heater, please get the appliance cleaned at a service centre.
- Resume using the heater as described under „User instructions".
Further safety features
- The heater has a back-up safety fuse.
- This heater has a motor cut-out which switches the motor off if it is operating at an above normal temperature.
CLEANING, MAINTENANCE, DISPOSAL
We recommend you to clean the heater regularly. Follow the instructions for cleaning and maintenance, so as not to impair the functioning of the heater.
Cleaning
- Before you start with the cleaning, turn the thermostat switch (2) to the lowest position (3) and pull the power plug out of the socket. Allow the heater to cool at least until the Safeguard marker is completely black again.
- Clean the air intake (5) and outlet (6) vents with a vacuum cleaner to remove dust from the motor and heating element.
-
Clean the outside of the heater with a soft, dry cloth. Do not use water, wax, polish, or other chemical cleaners.
-
Resume using the heater as described under „User instructions".
Disposal
This symbol on the product or its packaging indicates that the appliance cannot be treated as normal domestic trash, but must be handed in
at a collection point for recycling electric and electronic appliances.
Your contribution to the correct disposal of this product protects the environment and the health of your fellow men. Health and the environment are endangered by incorrect disposal.
Further information about the recycling of this product can be obtained from your local town hall, your refuse collection service, or in the store at which you bought the product.
This regulation is valid only in EU member states.
CONDITION OF PURCHASE
As condition of purchase the purchaser assumes responsibility for the correct use and care of this KAZ product according to these user instructions. The purchaser or user must himself or herself decide when and for how long this KAZ product is in use.
WARNING: IF PROBLEMS ARE WITH THIS KAZ PRODUCT, PLEASE OBSERVE THE INSTRUCTIONS IN THE GUARANTEE CONDITIONS. DO NOT ATTEMPT TO OPEN OR REPAIR THE KAZ PRODUCT YOURSELF, AS THIS COULD LEAD TO TERMINATION OF THE GUARANTEE AND CAUSE DAMAGE TO PERSONS AND PROPERTY.
Technical modifications reserved
DEUTSCH
PUHDISTUS, HUOLTO, JATEHUOLTO
OLULISED OHUTUSJUHISED
jlls jlll lal jlll y aill ll alle 1e g jlll all jolll lal jll
i. j. i. 13 13 13 13 13 13 13 13 13 13 13 13 13 13 13 13
a 1 a 1 1 1 1 1 1 1 1 1 1 1 1 1 1 1 1 1 1 1 1 1 1 1 1 1 1 1 1
a
KAZ
KAZ 15 KAZ 15
aaii i jiaii Jai
5
"Jll J" g uagg g Ls. aill 6
xuill sji ci bdo
jaiy iia aalil jaii 1
a 2
clll l 1
y 1
aill jll. 1 (3) 2 (2) 1 aL5 s gssgss
J 2
3
"Jlll 15" g oagg 8L s aill j 4
Jyill Cay
1
L 2
a 1
(6)g(5)g(5)
a 1
acllll jiee i jil (9) eaiy biai e jil yj.4
eaijy jaiiaj acwll yjie oljy eji jil
(1)
11,1100\~
1,1800~~~
.(6) (4)
"ab" 2 (2)
Jzill aizill jge j11 p
8
a
a 9
j 3 (3) a 1 (2) c 1 (1) j 10
aill 20 2y aill jg j g
(8)
TM 2j1jxuiaxl ubi
aill aalaiil jll lalie. gell gaaia aagaa TM Jauu aaii jie 4e! pss Aaswbyn y nss aiit jg jy Iq y
alol ojguy 2y jgl lloxl ggi
yill 5j j
jia jia jia jia jia jia jia jia jia jia jia jia jia jia jia jia jia jia jia jia jia jia jia jia jia jia jia jia jia jia jia jia jia jia jia jia jia jia jia jia jia jia jia jia jia jia jia jia jia jia jia
aill jy a y bui y i l o k y 12 aiaill jz glaiai jzll
2
(3) 2 (2)
AalS 8gJyI JyI yXll Cx IyI yI yI yI yI yI yI yI .4
J 12,50
5j0j0j0j0j0j0j0j0j0j0j0j0j0j0j0j0j0j0j0j0j0j0
J 23
ailll Jg aall jy 5 y
24
aie aiaiaiaiaiaiaiaiaiaiaiaiaiaiaiaiaiaiaiaiaiaiaiaiaiaiaiaiaiaiaiaiaiaiaiaiaiaiaiaiaiaiaiaiaiaiaiaiaiaiaiaiaiaiaiaiaiaiaiaiaiaiaiaiaiaiaiaiaiaiaia
jia 1
Jieeill 1
Cilwgojll 2
3
4
1y 5
0181 C.6
7
8
1.9
10
Jusssal.11
jiaowaoxlwolbiolae.12
1
2
iill lleil
aill s jai iie jai 12
13 13
J 13
J 13
J 13
J 13
J 13
J 13
J 13
J 13
J 13
J 13
J 13
14 2. aixill jz jia y gai jia gao elg jiz 15
. gj z 15
. 15
16 1
17
18 18
ai jiall cllsuiu buea aieill jg 19
a 20
a a a a a a a a a a a a a a a a a a a a a a a a a a a
21
iulil 100
L 1
Jalalj n jy aaiil jge gao y jall 1.1
aagn lglgaae dllk, jll k jlae aladzaii 2
gall oqll giaill jgs piau y.2
y
J 4
J 4
J 4
J 4
J 4
J 4
J 4
J 4
J 4
J 5
. 2
. 5
aaiy 6
ii j 1. j 1j 1i 1i 1i 1i 1i 1i 1i 1i 1i
y 7
154
154
154
154
154
154
154
154
154
154
154
154
28 1 gai j 1 1 1 1 1 1 1 1 1 1 1 1
9
10
11
KAZ Hausgeräte GmbH
Westerhaar 54
D-58739 Wickede
Phone: +49 2377 9289-0
www.kaz.com
The Honeywell trademark is used by
Kaz, Inc. under licence from Honeywell
Intellectual Properties, Inc.
HZ-510E-OM//0//2006-06-07