Multi Grill 112350 - Barbecue PRINCESS - Free user manual and instructions
Find the device manual for free Multi Grill 112350 PRINCESS in PDF.
User questions about Multi Grill 112350 PRINCESS
0 question about this device. Answer the ones you know or ask your own.
Ask a new question about this device
Download the instructions for your Barbecue in PDF format for free! Find your manual Multi Grill 112350 - PRINCESS and take your electronic device back in hand. On this page are published all the documents necessary for the use of your device. Multi Grill 112350 by PRINCESS.
USER MANUAL Multi Grill 112350 PRINCESS
Tosti's make (fig. A-C)
You have purchased a Princess appliance. Our aim is to provide quality products with a tasteful design and at an affordable price. We hope that you will enjoy this appliance for many years.
Safety instructions
The appliance can be used by children from 8 years and above and by persons with a physical, sensory, mental or motorial disability, or lack of experience and knowledge if they are supervised or instructed on how to use the appliance in a safe way and understand the hazards involved. Children shall not play with the appliance. Cleaning and maintenance shall not be made by children unless they are older than 8 years and supervised. Keep the appliance and the mains cable out of the reach of children younger than 8 years.
General safety
Read the manual carefully before use. Keep the manual for future reference.
Only use the appliance and the accessories - for their intended purposes. Do not use the appliance and the accessories for other purposes than described in the manual.
Do not use the appliance if any part or any accessory is damaged or defective. If a part or an accessory is damaged or defective, it must be replaced by the manufacturer or an authorised repair agent.
Do not use the appliance near bathtubs, showers, basins or other vessels containing water.
Do not immerse the appliance in water or other liquids. If the appliance is immersed in water or other liquids, do not remove the appliance with your hands.
Immediately remove the mains plug from the wall socket. If the appliance is immersed in water or other liquids, do not use the appliance again.
This appliance is intended to be used in indoor only and similar applications such as staff kitchen areas in shops, offices and other working environments; farm houses; by clients in hotels, motels and other residential type environments; bed-and-breakfast type environments.
Electrical safety
Before use, always check that the mains - voltage is the same as the voltage on the rating plate of the appliance.
Connect the appliance to an earthed wall - socket. If necessary, use an earthed extension cable of a suitable diameter (at least 3 × 1.5 ~mm^2 ).
For additional protection, install a residual - current device (RCD) with a rated residual operating current that does not exceed 30mA .
The appliance is not intended to be operated by means of an external timer or separate remote-control system.
Make sure that water cannot enter the contact plugs of the mains cable and the extension cable.
Always fully unwind the mains cable and the extension cable.
Make sure that the mains cable does not hang over the edge of a worktop and cannot be caught accidentally or tripped over.
Keep the mains cable away from heat, oil and sharp edges.
Regularly check the mains cable and the mains plug for signs of damage. Do not use the appliance if the mains cable or the mains plug is damaged or defective. If the mains cable or the mains plug is damaged or defective, it must be replaced by the manufacturer or an authorised repair agent.
Do not pull the mains cable to disconnect the mains plug from the mains.
Disconnect the mains plug from the mains when the appliance is not in use, before assembly or disassembly and before cleaning and maintenance.
Safety instructions for multi grills
Place the appliance on a stable and flat surface.
- Place the appliance on a heat-resistant and - splash-proof surface.
Do not place the appliance on a hob.
Do not cover the appliance.
Make sure that there is sufficient space around the appliance to allow heat to escape and provide sufficient ventilation.
Make sure that the appliance does not come into contact with flammable material.
Keep the appliance away from heat sources. Do not place the appliance on hot surfaces or near open flames.
Beware of steam and splashes when - putting food on the hot baking plates.
Caution: Hot grease can splash from the baking plates.
Do not pour cold water onto the hot baking plates. The water will splash and damage the baking plates.
Always be careful when touching the appliance. Use oven gloves if you need to touch the appliance during or shortly after use.
Beware of hot parts. The surfaces marked with a caution symbol for hot surfaces are liable to become hot during use. The accessible surfaces can become hot when the appliance is operating. The outer surface can become hot when the appliance is operating. The baking plates become very hot during use. Do not touch the hot baking plates.
Make sure that your hands are dry before touching the appliance.
Do not leave the appliance unattended. during use.
Do not move the appliance while it is switched on or is still hot. Remove the mains plug from the wall socket and wait until the appliance has cooled down.
Do not use the appliance near birds (e.g. tropical birds such as parrots). The baking plates are finished with a non-stick coating based on PTFE. Upon heating, the coating may release small amounts of gases which are fully harmless for people. However, the nervous systems of birds are extremely sensitive to these gases.
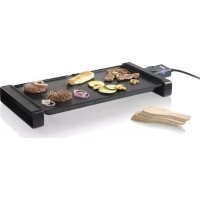
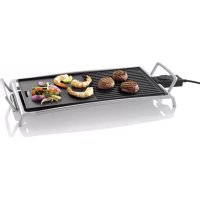
Description (fig. A)
Your 112350 Princess multi grill has been designed for making sandwiches and grilling food without using fat. The appliance is equipped with removable baking plates with a non-stick coating. The appliance is suitable for indoor use only. The appliance is suitable for domestic use only.
- Thermostat dial
- Temperature indicator
- Handgrip
- Handgrip lock
- Baking plate
- Drainage point
- Drip tray
Initial use
Before you proceed, we need you to pay attention to the following notes:
-
Make sure that there is sufficient space around the appliance to allow heat to escape and provide sufficient ventilation.
-
Clean the appliance. Refer to the section "Cleaning and maintenance".
Place the appliance on a stable and flat surface.
Insert the mains plug into the wall socket. - Turn the thermostat dial to the '4' position. The temperature indicator comes on.
The appliance starts heating.
- Allow the appliance to cool down completely.
Note: If you switch on the appliance for the first time, the appliance may emit a little smoke and a characteristic smell for a short period. This is normal operation.
Assembly
Before you proceed, we need you to pay attention to the following notes:
Before assembly, always switch off the appliance and remove the mains plug from the wall socket.
Mounting and removing the baking plates (fig. B)
Before you proceed, we would like you to focus your attention on the following notes:
- Before mounting or removing the baking plates, make sure that the appliance is in the 180^ mode.
To mount the baking plates:
- Slide the baking plate (5) with the side with two recesses (8) into the clamps (10).
- Slightly pull the clamp (11).
- Lower the baking plate (5) with the side with one recess (9) into the clamp (11).
- Release the clamp (11).
- Repeat the above steps to mount the other baking plate.
To remove the baking plates:
- Slightly pull the clamp (11).
- Raise the baking plate (5) with the side with one recess (9) from the clamp (11).
- Release the clamp (11).
- Pull the baking plate (5) with the side with two recesses (8) from the clamps (10).
- Repeat the above steps to remove the other baking plate.
Use
Switching on and off (fig. A)
The appliance is equipped with a thermostat that keeps the baking plates at the required temperature.
To switch on the appliance, insert the mains plug into the wall socket.
Turn the thermostat dial (1) to set the required temperature. The temperature indicator (2) remains on while the thermostat heats the heating elements.
The temperature indicator (2) goes off when the heating elements have reached the required temperature.
While the appliance is switched on, the temperature indicator (2) will illuminate and extinguish as the thermostat switches the heating elements on and off to maintain the required temperature.
To switch off the appliance, remove the mains plug from the wall socket.
Setting the temperature (fig. A)
Turn the thermostat dial (1) clockwise to increase the temperature of the baking plates (5).
Turn the thermostat dial (1) · counterclockwise to decrease the temperature of the baking plates (5).
Food Temp. (^) Time (min)
| Frozen food | 100 | - | |
| Sandwiches | 140 | - | |
| Hamburgers | 190 | 3-5 | |
| Vegetables | 190 | 5-8 | |
| Prawns | 230 | 5-9 | |
| Fish | 230 | 5-10 | |
| Sliced meat | 230 | 4-7 | |
| Shish kebab | 230 | 6-10 | |
| Hot dogs | 230 | 6-10 | |
| Steak | 230 | 6-10 | |
| Chicken legs | 230 | 5-10 |
Making sandwiches (fig. A - C)
Before you proceed, we would like you to focus your attention on the following notes:
- Do not let metal cutlery touch the baking plates to prevent damage to the non-stick coating.
Prepare the sandwich.
- Place the appliance on a stable and flat surface.
Make sure that the baking plates (5) are properly mounted. If necessary, clean the baking plates (5) with a damp cloth.
- Close the appliance (fig. C3).
- Insert the mains plug into the wall socket. Turn the thermostat dial (1) to set the temperature. The temperature indicator (2) comes on. The appliance starts heating.
- Wait until the baking plates (5) have reached the required temperature. The temperature indicator (2) goes off. The appliance is ready for use.
- Open the appliance for use in the 90^ mode (fig. C1).
- Place the sandwich onto the lower baking plate (5).
- Close the appliance (fig. C3).
Place an empty drip tray (7) under the drainage point (6) of the baking plate (5) (fig. C1).
Bake the sandwich until it has a golden - brown colour. The required baking time depends on your wishes. Stay close to the appliance in order to check from time to time whether the sandwich is ready and to make sure that the sandwich does not burn. Open the appliance when the sandwich is ready.
Remove the sandwich from the baking plate (5) using a flat wooden or plastic spatula. Close the appliance to retain the heat for further use.
After use, remove the mains plug from the wall socket and wait until the appliance has cooled down.
Grilling food (fig. A-C)
Before you proceed, we would like you to focus your attention on the following notes:
- Do not let metal cutlery touch the baking plates to prevent damage to the non-stick coating.
Prepare the food.
Place the appliance on a stable and flat surface.
Make sure that the baking plates (5) are properly mounted. If necessary, clean the baking plates (5) with a damp cloth.
Close the appliance (fig. C3).
Insert the mains plug into the wall socket.
Turn the thermostat dial (1) to set the temperature. The temperature indicator (2) comes on. The appliance starts heating.
Wait until the baking plates (5) have reached the required temperature.
The temperature indicator (2) goes off. The appliance is ready for use.
Take one of the following actions:
-
Open the appliance for use in the 90^ mode (fig. C1). Place the food onto the lower baking plate (5). Place an empty drip tray (7) under the drainage point (6) of the baking plate (5) (fig. C1).
-
Open the appliance for use in the 180^ mode (fig. C2). Place the food onto both baking plates (5). Place an empty drip tray (7) under the drainage point (6) of each baking plate (5) (fig. C2).
Note: If you want to grill food when the appliance is closed, place the food onto the lower baking plate before closing the appliance.
- Small pieces will grill or fry better and more quickly than large pieces.
- Experiment with the required cooking time and the required temperature to achieve the best results.
- Turn meat and fish using a flat wooden or plastic spatula only once in order to prevent them from drying out.
- Remove the food from the baking plate using a flat wooden or plastic spatula. After use, remove the mains plug from the wall socket and wait until the appliance has cooled down.
Cleaning and maintenance
The appliance must be cleaned after each use.
Before you proceed, we need you to pay attention to the following notes:
- Before cleaning or maintenance, always switch off the appliance, remove the mains plug from the wall socket and wait until the appliance has cooled down.
- Do not immerse the appliance in water or other liquids.
Before you proceed, we would like you to focus your attention on the following notes:
- Before cleaning or maintenance, remove the baking plates.
- Do not use aggressive or abrasive cleaning agents to clean the appliance.
-
Do not use sharp objects to clean the appliance.
-
Regularly check the appliance for possible damage.
Clean the outside of the appliance with a damp cloth.
Clean the baking plates after each use:
- Remove the baking plates.
-
Remove any residues with a paper towel.
-
Clean the baking plates with a soft, damp cloth and a few drops of washing-up liquid.
- Thoroughly dry the baking plates.
- Mount the baking plates.
After cleaning, put the appliance in the original packaging.
Store the appliance in a dry and frost-free place, out of the reach of children.
U.K. Wiring instructions
The wires in the mains lead are coloured in accordance with the following code:
BLUE NEUTRAL
BROWN LIVE
GREEN/YELLOW EARTH
As the colours of the wire in the mains lead of this appliance may not correspond with the colour markings identifying the terminals on your plug, proceed as follows:
The wire which is coloured BLUE must be connected to the terminal which is marked with the letter N or coloured black.
The wire which is coloured BROWN must be connected to the terminal which is marked with the letter L or coloured red.
The wire which is coloured GREEN/YELLOW must be connected to the terminal which is marked with the letter E or ( ) and is coloured GREEN or GREEN/YELLOW.
If a 13Amp (BS1363) plug is used, a 13Amp (BS1362) fuse must be fitted, or if any other type of plug is used, a 13Amp fuse must be fitted, either in the plug or adaptor, or on the distribution board.
Warning! This appliance must be earthed.
Disclaimer
Subject to change; specifications can be changed without further notice.
Felicitations!
Lave toasts (fig. A - C)
Para retiring as placas de cozedura:
Piv PPOxwpnoeTE, PPETTEI VA OuyKEVTPwoeTE TnV PPOOoxn oac otic Tnapakw onmuiewoeic:
MnV aΦnvETa μελλικα μaxaiopoTIPouva va akouμπiσoov TIG πλakeç Ψηοιμatoγ iα va αΠOTpeψeTE Tg ζημίσ Θηv avTi-Koλntikn επιφάνεια.
olal alusily jolal cgl no plebll
iX
j 1
j1s2j j1j1j1j1
a. all g a. bitall
pdisu Js 2j jgjj
1jol jgi jaiil 0s lao jgl j
(·5)jzclnnaaiai
ii 1
pliswul jol jol jolly bial u jieil giei
.
jgl21 2 jgl jilil jilil
(A-C)
j5i jji jia jgi jia jia jia jia
ai = bi
PQ = 2
juaa guaa cbaa ie jiaai
(5)
(5)
a
C3
Jilal
(1)
(2)のりdlal 0jdo.のりdlal
j_c = 1
Jll Jlal jll Jaiy Jilall
(A) (5)
A 1
i j 1
j 1
j 1
j 1
j 1
j 1
j 1
j 1
j 1
j 1
j 1
j 1
j 1
j 1
j 1
j 1
j 1
j 1
j 1
j 1
j 1
j 1
j 1
j 1
j 1
j 1
J 1
J 1
J 1
J 1
J 1
J 1
J 1
J 1
J 1
J 1
J 1
J 1
J 1
J 1
J 1
J 1
J 1
J 1
J 1
(A)
Princess 112350
plisilol jgs palebll g sgg cnilg sinll 12
154
jiaol plisuiuui jieall aaiy
baa jiaol plaiwU wlia jgall.
C. a = 1
.2
动量 3
Jaaal Jaa 4
j · s = c_1 · 5^j
aai 6
7
1
olil 1sio jj cIgbiI alolso
ai = bi
jgl jg jgsa aaluaa 1 j j
aaiiei i j 1
"
aill
.
pa. 1ilal jia 5g yjy
4"
jglll jzss 12y.0jrls a ydo gao
alai jie 1
a
o jial o jao aai jy Jia 1jia jia
a1 = 2,an + 1 = n1 + n2
#
alililililililililililililililililililililililililililililililililil
ai = bi
10
jie 1
billy
#
juaa juaa cba aie jiaai
pIgao gaii liua zha jia 1
.
j全球
jglal jg ails alus alis jgo sli
a
aegyol golly jellll wdi pae o a 5ti
Jiey
- 0jral juaa jie 1 jy jia bai
jaiy jiaiaw
S OBC = S COD + S_ BOC
plebl gao zic jililai all jbalg jali
iiisall jsiil 95il
jgl jg aiaa gl gaaai jilii 4
aill jll gie 2ll lll
jssllalilgolll
jll jlll lll
0jg jbjg 2
yalee gaoaill cbwii aiwl lll aill
j 1
chwJzai jSoy. pssu 1iit iis
j kay. jkaai jiai iic aiil o jali
aall aalll
Jbaii Jia jia jia jia jia jia jia jia jia jia jia jia jia jia jia jia jia jia jia jia jia jia jia jia jia jia jia jia jia jia jia jia jia jia jia jia jia jia jia jia jia jia jia jia jia jia jia jia jia jia jia