
CFV80AX - Range hood FAGOR - Free user manual and instructions
Find the device manual for free CFV80AX FAGOR in PDF.
| Product type | Kitchen hood |
| Brand | Fagor |
| Model | CFV80AX |
| Operating mode | Extracting (external evacuation) or filtering (internal recirculation) |
| Power supply | 230 V, 50 Hz (check the rating plate) |
| Lighting | Halogen lamp 12 V – 20 W max, type G4 |
| Controls | Push buttons: lighting ON/OFF, extraction OFF/ON and power selection (min, med, max) |
| Grease filter | Metallic, dishwasher safe (short cycle, low temperature) |
| Activated charcoal filter (optional) | For recirculation version; cleanable with hot water or dishwasher (65°C), oven drying (10 min at 100°C) |
| Minimum safety distance | 40 cm above an electric hob, 65 cm above a gas or mixed hob |
| Air outlet diameter | Top outlet B (duct not supplied) |
| Grease filter maintenance | Clean at least once a month |
| Charcoal filter maintenance | Clean every 2 months; replace the pad every 3 years |
| Hood material | Stainless steel (probably) |
| Chimney height | Telescopic, adjustable |
Frequently Asked Questions - CFV80AX FAGOR
Follow the assembly instructions in the manual.
User questions about CFV80AX FAGOR
0 question about this device. Answer the ones you know or ask your own.
Ask a new question about this device
Download the instructions for your Range hood in PDF format for free! Find your manual CFV80AX - FAGOR and take your electronic device back in hand. On this page are published all the documents necessary for the use of your device. CFV80AX by FAGOR.
USER MANUAL CFV80AX FAGOR
EN - Instruction on mounting and use
Closely follow the instructions set out in this manual. All responsibility, for any eventual inconveniences, damages or fires caused by not complying with the instructions in this manual, is declined.
Note: the elements marked with the symbol () are optional accessories supplied only with some models or elements to purchase, not supplied.

Caution
WARNING! Do not connect the appliance to the mains until the installation is fully complete.
Before any cleaning or maintenance operation, disconnect hood from the mains by removing the plug or disconnecting the mains electrical supply.
Always wear work gloves for all installation and maintenance operations.
The appliance is not intended for use by children or persons with impaired physical, sensorial or mental faculties, or if lacking in experience or knowledge, unless they are under supervision or have been trained in the use of the appliance by a person responsible for their safety.
This appliance is designed to be operated by adults, children should be monitored to ensure that they do not play with the appliance.
This appliance is designed to be operated by adults. Children should not be allowed to tamper with the controls or play with the appliance.
Never use the hood without effectively mounted grating!
The hood must NEVER be used as a support surface unless specifically indicated.
The premises where the appliance is installed must be sufficiently ventilated, when the kitchen hood is used together with other gas combustion devices or other fuels.
The ducting system for this appliance must not be connected to any existing ventilation system which is being used for any other purpose such as discharging exhaust fumes from appliances burning gas or other fuels.
The flaming of foods beneath the hood itself is severely prohibited.
The use of exposed flames is detrimental to the filters and may cause a fire risk, and must therefore be avoided in all circumstances.
Any frying must be done with care in order to make sure that the oil does not overheat and ignite.
Accessible parts may become hot when used with cooking appliances.
With regards to the technical and safety measures to be adopted for fume discharging it is important to closely follow the regulations provided by the authorised authorities.
The hood must be regularly cleaned on both the inside and outside (AT LEAST ONCE A MONTH).
This must be completed in accordance with the maintenance instructions provided in this manual). Failure to follow the instructions provided in this user guide regarding the cleaning of the hood and filters will lead to the risk of fires.
Do not use or leave the hood without the lamp correctly
mounted due to the possible risk of electric shocks.
We will not accept any responsibility for any faults, damage or fires caused to the appliance as a result of the non-observation of the instructions included in this manual.
This appliance is marked according to the European directive 2002/96/EC on Waste Electrical and Electronic Equipment (WEEE). By ensuring this product is disposed of correctly, you will help prevent potential negative consequences for the environment and human health, which could otherwise be caused by inappropriate waste handling of this product.

The symbol on the product, or on the documents accompanying the product, indicates that this appliance may not be treated as household waste. Instead it should be taken to the appropriate collection point for the recycling of electrical and electronic equipment. Disposal must be carried out in accordance with local environmental regulations for waste disposal.
Use
The hood is designed to be used either for exhausting or filter version.
Ducting version
The hood is equipped with a top air outlet B for discharge of fumes to the outside (exhaust pipe and pipe fixing clamps not provided). Fig. 5-6
Attention! If the hood is supplied with carbon filter, then it must be removed.
Filter version
Should it not be possible to discharge cooking fumes and vapour to the outside, the hood can be used in the filter version, fitting an activated carbon filter and the deflector F on the support (bracket) G, fumes and vapours are recycled through the top grille H by means of an exhaust pipe connected to the top air outlet B and the connection ring mounted on the deflector F (exhaust pipe and pipe fixing clamps not provided). Fig. 5-6
Attention! If the hood is not supplied with carbon filter, then it must be ordered and mounted.
The models with no suction motor only operate in ducting mode, and must be connected to an external suction device (not supplied).
The connecting instructions are supplied with the peripheral suction unit.
Installation
The minimum distance between the supporting surface for the cooking equipment on the hob and the lowest part of the range hood must be not less than 40cm from electric cookers and 65cm from gas or mixed cookers.
If the instructions for installation for the gas hob specify a greater distance, this must be adhered to.

Electrical connection
The mains power supply must correspond to the rating indicated on the plate situated inside the hood. If provided with a plug connect the hood to a socket in compliance with current regulations and positioned in an accessible area. If it not fitted with a plug (direct mains connection) or if the plug is not located in an accessible area apply a double poled switch in accordance with standards which assures the complete disconnection of the mains under conditions relating to overcurrent category III, in accordance with installation instructions.
Warning! Before re-connecting the hood circuit to the mains supply and checking the efficient function, always check that the mains cable is correctly assembled.
Mounting
Before beginning installation:
- Check that the product purchased is of a suitable size for the chosen installation area.
- To facilitate installation, remove the fat filters and the other parts allowed and described here, dismantle and mount it.
To remove see also the relative paragraphs.
- Remove the active carbon (*) filter/s if supplied (see also relative paragraph). This/these is/are to be mounted only if you want to use the hood in the filtering version.
- Check (for transport reasons) that there is no other supplied material inside the hood (e.g. packets with screws (^) , guarantees (^) , etc.), eventually removing them and keeping them.
- If possible, disconnect and move freestanding or slide-in range from cabinet opening to provide easier access to rear wall/ceiling. Otherwise put a thick, protective covering over countertop, cooktop or range to protect from damage and debris. Select a flat surface for assembling the unit. Cover that surface with a protective covering and place all canopy hood parts and hardware in it.
- In addition check whether near the installation area of the hood (in the area accessible also with the hood mounted) an electric socket is available and it is possible to connect a fumes discharge device to the outside (only suction version).
- Carry out all the masonry work necessary (e.g. installation of an electric socket and/or a hole for the passage of the discharge tube).
Expansion wall plugs are provided to secure the hood to most types of walls/ceilings. However, a qualified technician must verify suitability of the materials in accordance with the type of wall/ceiling. The wall/ceiling must be strong enough to take the weight of the hood. Do not tile, grout or silicone this appliance to the wall. Surface mounting only.
Only for some models
An aesthetic flue can be purchased as an optional accessory. Check with the authorized dealer whether the model in your possession envisages this possibility.
We advise installing the hood after having purchased the flue to check with certainty the most suitable installation.
Note: The hood may be installed both with and without a chimney.
Fig. 5-6
Apply three adhesive strips C to the back of the hood.
- Trace a centre line on the wall to facilitate the montage (1), position the hole template so that the middle line printed on it corresponds to the centre line previously drawn and that the lower side of the grill corresponds to the lower part of the hood once mounted (2).
- Make two holes with the 8mm drill and fix the support bracket with two dowels and wall screws (3).
- Open the steam screen and remove the grease filter (see relative paragraph).
Fix the chimney bracket with two dowels and wall screws (4).
- Hang up the hood (5), adjusting its position (6-7) and from the inner part of the hood mark one point for the definitive fixing. Remove the hood and make one 8mm holes (9), insert one wall dowel, hang the hood up again and fix it definitively with one screw (10).
- Connect the electricity (11), but leave the hood disconnected from the general electric panel of the house.
- If the hood is to be used in the suction version, install the flange supplied in the kit on the exit hole of the hood (12A - suction version - also install a fumes discharge tube of suitable dimensions) instead of the deflector (12F1 or 12F2 - filtering version).
- Mount the grease filter and close the steam screen.
Attention! If the hood is to be used in the suction version, remove, if supplied with the kit, the carbon filter and the fixing rods (on the back of the grease filter - see relative paragraph).
If the hood is to be used in the filtering version, check that the carbon filter is already mounted on the back of the grease filter or, in its absence, purchase it and install it.
Install the upper cover with 3 screws (13).
- Installa the chimney (14a) to the bracket (14b) with two screws.
- Slide bottom section of the chimney inside the proper housing on top of the hood.
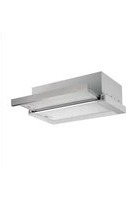
Description of the hood
Fig. 1
- Control panel
- Grease filter
- Grease filter release handle
- Halogen lamp
- Vapour catcher
- Telescopic chimney
- Air outlet (used for filter version only)
Operation
Use the high suction speed in cases of concentrated kitchen vapours. It is recommended that the cooker hood suction is switched on for 5 minutes prior to cooking and to leave in operation during cooking and for another 15 minutes approximately after terminating cooking.
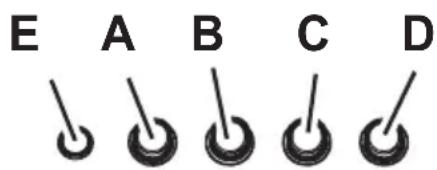
Model with button panel
DCBAE
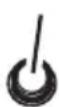

A. on/off light switch
B. on/off aspiration switch and minimum power selection
B+C. medium power selection aspiration switch
B+D. maximum power selection aspiration switch
E. operating gauge (foreseen in the model with round buttons)
Maintenance
ATTENTION! Before performing any maintenance operation, isolate the hood from the electrical supply by switching off at the connector and removing the connector fuse.
Or if the appliance has been connected through a plug and socket, then the plug must be removed from the socket.
Cleaning
The cooker hood should be cleaned regularly (at least with the same frequency with which you carry out maintenance of the fat filters) internally and externally. Clean using the cloth dampened with neutral liquid detergent. Do not use abrasive products. DO NOT USE ALCOHOL!
WARNING: Failure to carry out the basic cleaning recommendations of the cooker hood and replacement of the filters may cause fire risks.
Therefore, we recommend oserving these instructions.
The manufacturer declines all responsibility for any damage to the motor or any fire damage linked to inappropriate maintenance or failure to observe the above safety recommendations.
Steam screen
The steam screen must always be left closed and opened only for maintenance (e.g. cleaning or changing filters).
Opening the steam screen:
Press the lower part of the steam screen firmly. After coupling, accompany it upward.
Closing the steam screen:
Accompany the steam screen downwards, press firmly and check the resulting coupling.
Grease filter
Traps cooking grease particles.
This must be cleaned once a month using non aggressive detergents, either by hand or in the dishwasher, which must be set to a low temperature and a short cycle. When washed in a dishwasher, the grease filter may discolour slightly, but
this does not affect its filtering capacity.
To remove the grease filter, pull the spring release handle.
Fig. 2
Charcoal filter (filter version only)
Fig. 3
It absorbs unpleasant odours caused by cooking.
The charcoal filter can be washed once every two months using hot water and a suitable detergent, or in a dishwasher at 65^ (if the dishwasher is used, select the full cycle function and leave dishes out).
Eliminate excess water without damaging the filter, then remove the mattress located inside the plastic frame and put it in the oven for 10 minutes at 100^ to dry completely. Replace the mattress every 3 years and when the cloth is damaged.
Montage
Open the steam screen and remove the grease filter.
Install the carbon filter on the back of the grease filter and fix with two rods.
Attention! The rods are included in the carbon filter packing and not on the hood.
- To dismantle the filter act in the reverse manner.
Replacing lamps
Fig. 4
Disconnect the hood from the electricity.
Warning! Prior to touching the light bulbs ensure they are cooled down.
- Using a flat head screwdriver or equivalent tool, carefully pry loose the light cover.
- Remove the damaged light and replace with a new 12 Volt, 20 Watt (Maximum) halogen light made for a G-4 base SUITABLE FOR USE IN OPEN LUMINAIREs. Follow package directions and do not touch new light with bare hands.
- Reinstall the light cover. (it will snap shut).
If the lights do not work, make sure that the lamps are fitted properly into their housings before you call for technical assistance.
Pn6bOp He nOxOHT IIN HcONb3OBaHnI DeTBMn INI
NtAmn, HEnoJIHOeHHbIM NIO CBOIM yMCTBeHHbIM INI
ceHCOPHBIM cNoCOb6HOCTaMn, INI He ObnAaHOUcMM
DOCTaTOHbIM ONbITOM INI 3HaHnAMy, ecNI He NOd
npncmOTpOM, INI ecNI OHN He 6blnn Obyehbl NOnb3OBaHnIO
annapatypoi co cToPOhbl INIa, OTBeauOJero 3a INX
6e3onacHOctb.
He octabte TeTee 6e3 npncmoTpa, yTo6bI OHn He irpaJIn C np6opom.
He nCnoJb3yIe BblTgKky, ecn peWetka HnpaBnIbHo cMOHTnpoBaHa!
Kateropueckn 3anpeuaeTcN cnoIb3oBaTb BbITkky B KaueCTBe ONOPHO NIOCKOCTN, eCIN 3TO CneuaNbHo He orOBopeHo.
ObecneBte Hndnexkaun Bo3dyxoo6MeH nomeeHna, KOrda BblncnIb3ynte BbITXkky B kyxhe OndHOpeMeHHo C npu6opamn C ra3OBblm CxNraHem NnC nNTaHEm DpyHMn ropouHMn.
BbITraBaEmBIO3dyx He DoJnxH BbI6pRcBiBaTbcH HApxyUepe3 BO3dyXOBOD,NCnOJIb3yEmBIM DnA BbI6pOCA DbIMOB OT npI6opOB C ra30BBIM CXnRaHnEM NnC PnTaHnEM DpyrMM roPouHM.
Kateropueeckn 3anpeuaetcra roTOBNTb 6IIOda "noI IaMeHem", NockoJIbky CBO6OJHOe INaMMy MOKeT NOBpeDHTbΦIbTpbl n CTaTb npuHHoN IOXapa; N03ToMy, BO3depKINBaIteCb OT 3TOrO B IIObOM cIyae.
KapeHbe B 06nIbHom Macne IOnJxHO npOn3BODntbCn NOd NOCTOARHHbIM KOHTpONEM, IMeB BVNDy, YTO neperpeToe MACNO MOKET BOCNJaMaHErTbcR.
Pn nCnoIb3OBAHm BMeCTe C npOuHMn annapaTAMn DnBapKn, DoCTyHbIe YAcTn npi6opa MOryt CnIbHO HArpeBaTbCra.
YTO kacaetcayTexnuecknx Mep u yCNOBn NO TexNKe 6e3oNaCHOCTn npn OTBODe DbIMOB, TO npnDEpXnBAiTecb CTporo npaBn, npedyCMOTpeHHbIX pePnaMeHTOM MeCThBX KOMNETeHTbIX BnactEi.
Ipon3BOJnTe nepnoDnueeCKyO OuNCTKy BbITJxKn KaK BHyTpN, TaK n Chapyn (IO KPAHEn MEPE PA3 B MECaL, Bo BCaKOM cnyae c coBnOdeHnem ycNoBn, KOtOpblc
CneuaJIbHO npdymcMTpeHbI B IHCTpyKUHX IO 06cnykmbaHIO daHHoro pykoBODCTBa).
HecobJeHHe HNCTpyKuIN NO ONUCTKe BbITJAKN INo 3aMeHe N OUYCTKe FInbTPOB MOXET CtaTB npUHNHOJXapa. He nCnOJIb3OBaTB JIN OCTaBnTb BbITJKKy 6e3 npaBnBHO yCTAHOBHeHHbIX IAMNoYek B CB83N C BO3MOXHBIM PNCKOM yDapa 3JIeKTpUYeCKM TOKOM.
Mbl CHnMaem C ce6yBCaKyIO OTBeTCTBHeHOctb 3a HEnOJaKn, yuep6 nnn cropanne npnbopa BCpeDCTBne HecobnoeHHNCHtpkui, npNBedeHHbIX B daHHOM pyKOBOdCTBE.
JaHHe n3dJIeNIE npomapKnpoBaHO B COOTBETCTBnC EbponeckoI DnpeKTbBOI 2002/96/EC no ytni3aunn 3Jektpueckoro I
3JektpoHHoro o6OpydoBaHnA (WEEE).
Obecneivn npabHnyu yTuN3aHIO daHHoro n3deJnB, BbI NOMOKeTe npedotBpaTb NOteHuaNbHbIe HeratNBbIe NocJeCTBnI DnKpXauOSeI Cpebl N 3doOpBBy eNoBeka, KOtOpBe MOrIN6bl IMetb MeCTo B IpOTNBOM Cnyae.

CnMBOI Ha cAMOM N3deJINHIN COpOBODTeHBHO DOKyMeHTaUYNka3bIBaeT, YTO PnYyTNIN3aUN DaHHORO N3deJINc HMM HeNB3O ObpaTaBcR KaK C O6bYhbIMN 6bITOBbIMN OTXoDAMn. BMeCTO 3TOrO, erO cNeJyET cDaBaTb BCOTBETCTByIOUm NyHK T pNEmKn 3NEKTPnueCKoro N 3JIeKTPoHnHO OBOpyDoBaHNdIg NocJeDuOuSeYTNIN3aUIN.
CdaHa Ha cIOM DOJXHa npOIN3BOIDTbcB CCOBTbCTBn C MeCTHbIMN ppaBnAMN NO yTUN3aUIN OTXoIOB.
3a 6oJIe noIop6HOn IHΦOpMaUne O npaBnax oBaupEnHc TaKIMN N3DeJINAMN, IN YTNIN3aUN IN nepepa6OTKNOBpaauTeCB MeCTHbE OprAHbIBn, B Cnyx6y IOn yTIN3aUN OTXODOB INB MArA3NH, B KOTOpOM BblnpO6pei DaHHoe N3dJIe.
Повьзоване
BbITXka cKoHCTpynpObaHa dIpa60TbIBpeXmEOTBOda BO3dyxa HApKy IIN peuPKyIaN IN BO3dyxa.
IcnoJIHeHne cOTbOdom Bo3dyXa
BbIraKc ChabxHea BepxHIM BbIOHbIM OTBepCTnEM B IINBbIbPOca DbIMOB HApxy (VcnoJIHeHne C OTBOOM BO3dyXaHApxy-BbIOHAR Tpy6a IN XOMyTbIKpeJIeHnHE BXOJATB KOMNKeT).Pnc.5-6
BHHMaHHe! Ecnn BbITaXKa Cha6KeHa yroJIbHbIM cnIbTpOM, to y6epnte ero.
IcnoJIHeHne COTBOJOM BO3dyxa
EcnIO TBOD bIMOB n napOB HApyKHe BO3MOKeH Bbl MoKeTe NOIb3OBA TcB BITAKKO B pexnme C peuPKyrauei npn NOMOu yroNbHbIX QINbTPOB uYCTAHOBKn DePfKeKTopa F ha KPOHtEH G. TaKIM O6pa3OM OUYUeHHbI OT DbIMOBbIX napOB BO3dYX BO3BpaaetcB NOMEueHne Upe3 BePxHIO PeWETKY H N BBIOHO TY6y, NOCDcoEINHReMyo K BepxHemy BBIOHOMy OTBepCTnIO B, npi NOMOu COeHNHTeJIbHOrO KOJIbCa, CMOHTPOBaHHORo Ha DePfKeTope F (BBIOHOHa
Tpy6a HXOMyTbI KpePJIeHnHE BXOJaT B KOMNJIeKT NocTaBKn).
Pnc. 5-6
BHHMaHHe! EcIn BbITaXka He Cha6XeHa yroIbHbIM ΦnIbTpom, To 3akaxnte n yctahOBnte ero nepei NCNoJIb3OBAHneM.
MoJIeN BbITJKeK 6e3 MOTOPHOrO 6Ioka MoryT pa6oTaB B ODHOM pexIMe OTBOJa BO3dUxa HApyKy, N03TOMy OH NdoJXHbI 6bITb NOcOeINHeHbI K BHeUHei BbITJxHOY yCTaHOBKe (HE BXoINT B NoCTaBky).
HCTpyKmno COeINHeHnM NOCTABJYOTc C nepuepnHbIM BbITXHbIM y3IOM.
YctaHOBka
PacctoHne HxHHe IpaHb BbTJXKn HnO npHO nIOCKoCTbIO NOcCocyDbI Ha xyKOHHO pINTe DOJXHO 6bITb He Mehee 40cm -nIa3NeKtpnuecknx PINT, n He Mehee 65cm dIra3OBbIX NIN KOM6uHnpOBaHHbIX PINT.
EcIn B INHCTpyKUxN NO yCTaHOBKe ra3OBoI pINrBi OROBOE 6oJIbwee pacctOraHne,To yUTnTe 3TO.

3neKtpnueckoe coeHHeHne
HapjxHe cTe DoJxHo COOTBeTCTBOBaTb HnnpjxHeHIO, yka3aHHOMy Ha TabnUKe Texnuecknx DaHHbIX, KOtopa pa3MeJeHa BHyTp npi6opa. EcnB BbIgKca ChabkeHa BnIKo, NODKnOChte ee K StTencelbHOMy pa3beMy, OTBeaHoueMy DeNCTByIOuM npaBnAm, KOTOpBn DOJXeH 6bItb pacNoLoXeH B JERKO DoCTynHom MceTe. EcnJ Xe BbITAAKa He CbA6KeHa BnIKo (DJIa PnMOro NOkNIOUeHnK ceTn), INN STencelbHbI pa3bEm He pacNOLOXeH B DoCTynHom MceTe, TO NCNoJIb3yIte HaNEXKaun DBvXNoIOCHbI BbIKLIOuAteJIb, ObecneuBaIOuIN NoNHOe pa3MbikAHne cTe N pni BO3HNKHOBeHIn YcNOBn NepeHApJxKeHn 3-ei KaTeOpn, B COOTBeTCTBnC nHCTpyKzmaMn no yCTaHOBKe.
BHIMAHHE: npexde yem IODKIOHTb K cETn NITAHN 3JIeKtpueckyIO CNCTemy BblTJKKI NPOBepNTb NCpabHoe HKNIOHUPOBAHne ee yBeINTEcb B TOM, YTO Ka6JIb NITAHN IpaBnIbHO CMOHTnpOBaH.
YctaHOBka
Ipeed Haayajom Mohtaxa:
IpoBepbTe, yTo6bI pa3Mepbl npNo6peTeHHoro Bamn 13eINr IOnxOduN K BbI6paHOMy MeCTy erO MONTaxa.
ДяоблгченmaontaxapekomehdyeBpeMeHHO ChTbФnIbTpbl-kinpoynobnteIN ndpyme KOMJIeKTKUoIne,CbemNIOBTOphaYCTaHOBkaKOTOpbIX dOnyckaETcN ONCbIBaetcB DaHHOM Tex. pyKOBOIDCTBe.
3TN KOMNNEKTKUOUINE BOCCTaHaBJIbAIOTC Ha CBOI MecTa IIO 3aBepWeHm MOHTaKa BbITRAKKn.
OncanHe npaKnx Cbema CMOTpTe B COOTBeTCTByUxnx pa3dEax.
- CHIMITE yroBbHbI ΦnIbTp/bI, eCIN OH N IMeHTcR (CMOTPe TAKKe COOTBeTCTByUOuN pa3deN). ΦnIbP/bI yCTaHaBJIbBAOTcR O6paTHo, TOJIbKO eCIN Bbl XOTNe IcNoB3OBaTB BbITKky B pexIme peUpKyJLmN.
IpoBepbTe,HTO6bl BHyTpN BbITaKKNe He OCTaBaJIocb npedMetOB,NOMeUeHHbIX Tyda Ha Bpemr ee
TpaHCnOpTnPoBKn)(HaNPmEp,NaKeTnKOB C WypynAmN, JnCTKOB rapaHTn N T.D.),ecJIN OHN NMEOTcR,BbInbTe IN N COxpaHNTe.
IIO BO3MOXHOCTN OTCOEHNHtE N OTOBUNHBTe KxOHHbIE 3JIeMeHTbI, paCNOLOXeHHbIe NOD BbITJXKOIN PRAOM C 30HO ee MOHTaKa, DnI oBeCneueHn EoJIe cBO6OHorO DoCTyna K NOTOnKy/CTeHAM, K KOToPbIM 6yDet KpeNTbcra BbITJXKa. EcIn 3TO HeBO3MOxHn, KaK MoXHo TuaTeJIbHee IpeOxpaHnTE Me6JIb IN IpOuHne IpeDMtBI Ha Bpem MOHTaKa. Bb6epnte poBHyO NOBepxHOCTb, IOKPOITE ee 3aUHTNbIM NOKpbITnEM n pa3INOKHTe Ha He BbITJXKY IN KpeNXHbIe DeTaII.
- Поберп te takke, чobу рядом C 30но мотраь Bыгжkn (B 3OHe, дocTyнои takke посе мотраь Bыгжkn) Имелacь сетевая poTeKa n OTberpctne Дяд bIMoxOda, OTbOraJee Dblm Ha yNtCy (ToIbKO B peKIme OTbOda).
BbINOHNHe BCE Heo6XoIMMbIe pa6oTbI (HaNPmEp: yCTaHOBka ceTeBOI PO3eTKN I/INI PPOeJIbIBaHne OTBepTnI DJIy DbIMOXOHDIO Tpy6bl).
BbIgKa cHa6KeHa IIO6eMaN Mn KpeHneHn ee B 6OJIbUHNCTBe CTeH/NOTOKOB. Ondako, Heo6XoDMo 60paTntbcra K KBaINOpuHOBAHHOMy TexHnky N y6eINTbcra B TOM, YTO MaTePnaJIbI npiroDhl DnA DAHHOR TIna CTeHb/ nOTOnka. CTeHa/nOTJOK DoJxHbI oBnadaTb DOCTaTOHOr npoOHoc bC yueTOM MacCbI pnp6opa.
ToIbKO dIra HeKOTOpbIX MoIeIeN
No cne3anpocy, Bbl MoKTe 3akynntb DeKopatNBhBkAMH; npOBepbTe B yNOJHOMOeHHORo npOaBca, PpeDyCMOTpeHa nn TaKaB O3MOxHOCTb DnA BaWe MDoJI.
Mbl pekomehnyem yctaHOBTb Bbitkky nocne 3akynKn KamHa n npobepntb npedBapntelbHo cambl HaedeKhbI cnoc06 yctaHOBN.
PnmeuHne: BbITXKa MoKet 6bITb yCTaHOBHeHa KaC DblMOxOdom, TaK n 6e3 Hero.
Pnc. 5-6
HaKJIeNTb 3 KJIeIeKIX JIeHTb C Ha 3aJHei CTeHKe BbITJxKKN.
Haheptntb ceHTpaIbHyU JINHIO Ha cTeHe IJI
6bnpeHEny yCTaHOBKn (1), npInOxNtB 7a6Noh TaK,
YTO6bl erO ceHTpaIbHnJnnHn COBnaDana C
npedBaPnteNbHO HaupeyehHo JINHnHa CTHe,
YTO6bl 3aHnJa YAcTb peWetKn COOTBeTcTBoBaJa 3aHnei
yactn BbITaKKn, KOrda NocJeHra 6yDet yCTaHOBNeHa
(2).
- Порсеверпь дрени 2 OTbercentя 8 MM И закpenntb onopнь кронштейн Дымг StnФтами IN BnHTamN K CTeHe (3).
- OTKpbITb OTKINHOI KpAH n CHrTb XnPOBOI qnIbTp (CMOTpeTB COOTBETCTBYOUHn pa3dE).
3akpenntb kpoHHTeHH KAMHa DByMa 7TnΦTaMn N BnHTaMn K CTeHe (4).
HaBeCNTb BbITaKky (5), OTpeyIupoBaTb ee noIOxKeHne (6/7) n OTMeNTb C BHyTpEHHe CTOpOHb BbITaKKn TOcKy dIra OKOHaTeJIbHOro KpeJIeHn. ChrTb BbITaKky n npocBepNTb OTBepCTne DnaMeTpOM 8 MM (9), BCTaBtB bHTb BCTeHy, HabeCNTb CHOba BbITaKky n OKOHaTeJIbHO 3akpeNtB ee BNHTOM (10).
- PódknHouHTb TOK (11), HO BbITaKKy OCTaBHTb OTKIIHOeHHoT OT 3JIeKTPuYeCKOTo Μιnta Doma.
Ecnn BbITJkKa DOJIKHa pa6OtaB B peXnme OTBOda BO3dyxa, yCTaHOBnTb fnaHeu, NOCTaBnEmbB Habope KOMIIeKTyIOxN DeTaIeN, Ha BbIXoDHOM OTBepCTmN BbITJKKn (12A - nCNoIHeHne C OTBODM BO3dyxa - yCTaHOBnTb TaK Xe Tpy6y BbIBOda DbIMa COOTBETCTByIOUeRo pa3Mepa) nIN HA DeΦJIeKTope (12F1 nIN 12F2 - nCNoIHeHne C peUnpKyIyIeNe BO3dyxa). - YCTaHOBtB CHOBA XnpoBOJ ΦnIbTp n 3akpbTb OTKnIHOH 3kpaH.
BhImaHne! Ecn BbITgKka 6yDet nCNoIb3ObaTbC B pexime OTbOda BO3dyxa, ChrTb, ecn noCTabJIeH B Ha6ope 3anachbIX qacteN, yOrIbHbI KpIbTp N 3JemeHTbl Dn er OKePnEHHa (Ha 3aDHeN CTOpOHe JInpoBoro FmIbTp a - CMOtpn COOTBeTCTByIOUpiu pa3dEn).
Ecnn BbITaKka 6yJeT NcNoIb3ObaTbC8 B peXnmepeunpkyanB03dyxa, npOBepntb, yTo6bl yroIbHbIyfnbTp 6bl yke yctaHOBneH Ha 3aHeN cTeHKeJxnpOBoro fNbtpa nn, B npOTNBOM Cnyae, npno6pectn ero n yCTaHOBNTb. - YcTaHOBnTb N 3aKpeNITb BepXHIOI KpbIiKy 3 BuHTaMn (13).
- PpNkpEnTb KaMH (14a) K KpoHHTeHy (14b) DByMa BnHTaM.
- PpOyCTnTb HxKHe cKeuN KAMHa BOHyTpB IN MecTopaCNOJIOKeHn CBepXy BbITaKKn.
OnncahHe BbITJKKN
Pnc.1
- NaheJIb ynpaBneHnA
2.Фильтрзадерхкнжupa - Puyka Otuene Hnfa 3aepKn Knpa
- TanaoreHHaJaMaHa
- OtknDHOH 3KpaH
- KamNH TeJIeCKOnIuYeCKn
- BbIOB Bo3dyxa (ToIbKO B pexKmpeu npkyiaun)
Функцонюванe
IOnb3yntecb INTEHcNBHBMpeXIMOMpa60TbBbITAXKIN B cnlyae OOCO BblCOKOJ KOHcHTpaqm KxOHhbIX nCnapeHn. Mbl peKomeHdyem BKIOUHTb BblrKkY 3a 5 MNHyT do Hauana npocecca pnpiroTOBJIeHn IuN OCTaBtB ee BKIOUeHHoB TeueHne 15 MNHyT np6bn3NTeJbHO no OKOHaHN npoceca.
Modelb c KlaBnHoi nHaHeIbIO
A-Knabuwa BKN/BbIKI npcbetkn
B-Knabuwa BbIKJI/BIKJI BbITJxKn I nepeKlnOyeHna HAMHIMaNbHyIO MOUHOCtB
B+C-KnaBnua nepeKlnHueHnHa cpeHIO MoUHOCtB
B+D - KnaBnua nepeKIOUeHnHa MaKcMaJIbHyI0
MOUHOCtB
HE IIPIMEHJTE CnHPT!
BHHMaHHe: He co6JIIODeHne npaBnI qIcTKn npIbopa n 3aMeHbI pINbTPOB MOKeT npIBeCTN K pNCKy BO3HNKHOBeHnnoXapa. IooTOMy peKoMeHdyem CO6JIIOdaTb npNBedeHHbIe HHCTpyKUIM.
CHIMaeTcJIIO6aOTBETCTBeHHOCbB CBy3nCBO3MOXHbIMN NOBpeXDeHNrMM DBrIaTeJN C NoKapAMN, BO3HNIUMM BCJeDCTBHe HEnpaBnIbHO r peMOHTa NIN HeCO6IIODeHNr BblSeONiCaHHbIX npeDynpExdHm.
OTKnDHOJ 3kpan
OTKnHoi 3KpaH Bcerda ocTcra 3aKpbItbIM N OTKpbIbAeTcra TOJIbKO B cnyae npoBeHnO6CnykBaHn (HaNP. OCHCTKN INN 3AmHeBf CnIbTpOB).
OTKpbIteNe OTKnDHorO 3kpaHa:
PeinteIbHO haxaTb Ha HxKHO uacTb OTKnHOrO 3KpaHa, nocJe OTuEKN pOBecTn erO BBepx.
3aKpbItne OTKnDHorO 3kpaHa:
PpOBecTn OTKNDHO 3KpaH BHN3, CNbHO HaxaTb N npOKoHTpOIpnoPoBaTb CcEJIeHHe.
ΦnIbTpbl 3aIepKKn Knpa
YdepKnBaet YactuBj Xnpa, NcXoJyne OTnnTbI.
ФильтслдуET3aHnTaBExeMeCyaHHeHearpeccnBbIMM MOUIMN CpeIcTBAMN, BpyHyO IINB NocydomoeyHO MaUNHe Pn Hn3KoTEmPepaTyE N3KOHOMuHOM ZIKNe MbITb.
PmMbITbe B NocydomoeyHOMaWHe MoXeT IMeTb MeCTO HeKOTOpoe oBeCuBcUHnE PnIbTp a3aepKKn Knpa, Ho erO pNbTPuyuza XapakTepructnka ocTaETcA abCoJIOTHo HEN3MeHHo.
IJIa CHrTna 0nMbTp a 3aepKKn Jnpa TReHbTe K ce6e IIOdnpyKHeHHyO pyKy OTcENJIeHHa 0nMbTp.a
Pnc.2
YrOJIbHbI ΦnIbTp (TOnbKO BpeKImpeunpkyJauu)
Pnc.3
YdAnrEHTHePnTbIe 3anaxKyxHn.
YroIbHbI ΦIbTp MOxHO MbITb KaJdbIe DBa Mecaa B TeNIOB BoDe C HAdIeXaUIMM MOUIMM CpeDCTBaMn IIN B NocydomoeyHOn MaUNHe npT TemnepaType 65^ (B NocneHem Cnyae, BbINOHNte NOHbI cIKMbITb8e3 NocyDbI BHyTpN NocydomoeyHOn MaUNHbI).
YdaIInTe N3nnIeK BObI OCTOPOXHO, YTO6bI He NOBpeIITb ΦINbTp, 3aTeM CHIMnTE IOnyUkY I3 INaCTMaCCOB PaMbI N BblepXnBaIte ee B Neyn B TeueHne 10 MmHT npN Temnepatype 100^ C dIra oecneueHn nIOHn BlyCuyKn.
3aMeHnTe NoDyKy KaJdbIe 3 rOda n KAK TOnbKO NnOTHO OKaXETcNOBpeXdEHHbIM.
MOHTAX
OTKpbITb OTKNIDHOJ KpaH N BbHyTb 0nNbTp 3aepKKN KINPOB.
BctaBt yroIbHbI ΦnIbTp no3aIgΦnIbTp a3aepKKn KInpO b 3akpeINb c nOMoIb2 cTepkHei.
BHMMaHHe!CTepKHN BKNIOueHb B KOMNJIeKT yROJbHOFO pNbTpa,a He BBITRAKKN.
Дя demoHTaxa Фиltpa DeiCTBOBaTb B o6paTHOM HappaBHeHn.
3aMeHa JAmn
Pnc.4
OTKIIIOHTe npIb6Op OT 3JIeKTpOcETn.
BHMaHHe!IpeXeJeem npKacatbca K JAmnam y6eInTeCb B TOM, YTO OHN OCTblIN.
- BbHbTe 3aUHTbI 3IeMeHT npn NOMOuN He6oNbOu OTBepTK C HOKeBOI rONOBKn NIN NOo6HOr OHCTpyMeHTa.
- 3aMeHnTe npeperopeBsuIyI naMny.
IcnoJIb3yIe dIgI 3TOrO IINb rAnoreHHbIe daMnbl Ha 12V -20W mAcC-G4,He npKacacb K Hm pyKaMn.
- 3akpoTe pnaΦoH (KpeIeHne 3aueIeKoI).
Ecni CnCTema NODCBETKHe pa6oTaET, npOBepbTe KOppekTHyO yCTaHOBky lamn B rHe3dax, npExJe Yem o6paTntbcraB CEHTp TEXHueckoi NOMOUI.
TR - Montaj ve kullanim talimatlari


- EN - Instruction on mounting and use
- Caution
- Use
- Ducting version
- Filter version
- Installation
- Electrical connection
- Mounting
- Before beginning installation:
- Only for some models
- Fig. 5-6
- Description of the hood
- Fig. 1
- Operation
- Model with button panel
- DCBAE
- Maintenance
- Cleaning
- Steam screen
- Opening the steam screen:
- Closing the steam screen:
- Grease filter
- Traps cooking grease particles.
- Charcoal filter (filter version only)
- Fig. 3
- It absorbs unpleasant odours caused by cooking.
- Montage
- Replacing lamps
- Fig. 4
- Повьзоване
- IcnoJIHeHne cOTbOdom Bo3dyXa
- IcnoJIHeHne COTBOJOM BO3dyxa
- Pnc. 5-6
- YctaHOBka
- 3neKtpnueckoe coeHHeHne
- Ipeed Haayajom Mohtaxa:
- ToIbKO dIra HeKOTOpbIX MoIeIeN
- OnncahHe BbITJKKN
- Pnc.1
- Функцонюванe
- Modelb c KlaBnHoi nHaHeIbIO
- HE IIPIMEHJTE CnHPT!
- OTKnDHOJ 3kpan
- OTKpbIteNe OTKnDHorO 3kpaHa:
- 3aKpbItne OTKnDHorO 3kpaHa:
- ΦnIbTpbl 3aIepKKn Knpa
- YrOJIbHbI ΦnIbTp (TOnbKO BpeKImpeunpkyJauu)
- Pnc.3
- YdAnrEHTHePnTbIe 3anaxKyxHn.
- MOHTAX
- 3aMeHa JAmn
- Pnc.4
- TR - Montaj ve kullanim talimatlari
Brand : FAGOR
Model : CFV80AX
Category : Range hood