DigiFrame 1560 - Digital photo frame BRAUN - Free user manual and instructions
Find the device manual for free DigiFrame 1560 BRAUN in PDF.
| Product type | Digital photo frame |
| Brand | Braun |
| Model | DigiFrame 1560 |
| Screen size | 15.6 inches (estimated) |
| Dimensions (approx.) | 40 x 30 x 5 cm |
| Weight (approx.) | 1.5 kg |
| Power supply | AC adapter 100-240 V, 50-60 Hz; output DC 12 V, 2.0 A |
| Photo formats | JPEG up to 16 megapixels |
| Video formats | MPEG1/2/4, Motion JPEG (depending on model) |
| Audio formats | MP3 (depending on model) |
| Compatible memory cards | SD, SDHC, MMC, MS, MS Pro, MS Duo, MS Pro Duo, CF |
| Connectivity | USB 2.0 (host and device) |
| Internal memory | Built-in (capacity not specified) |
| Main functions | Slideshow with background music, rotate/zoom photos, brightness/contrast/saturation settings, calendar and alarm (depending on model), display modes (original/crop/expand), mixed file playback |
| Safety | Do not expose to water or humidity; operating temperature 0-40 °C; do not open the device |
| Maintenance and cleaning | Clean with a soft, dry cloth; unplug if not in use for an extended period |
| Spare parts and repairability | Remote control included; AC adapter; repair by qualified service only |
| Included accessories | USB cable, AC adapter, remote control, user manual |
| General information | Versatile digital photo frame for displaying photos, videos, and music; user-friendly; multiple versions available |
Frequently Asked Questions - DigiFrame 1560 BRAUN
User questions about DigiFrame 1560 BRAUN
0 question about this device. Answer the ones you know or ask your own.
Ask a new question about this device
Download the instructions for your Digital photo frame in PDF format for free! Find your manual DigiFrame 1560 - BRAUN and take your electronic device back in hand. On this page are published all the documents necessary for the use of your device. DigiFrame 1560 by BRAUN.
USER MANUAL DigiFrame 1560 BRAUN
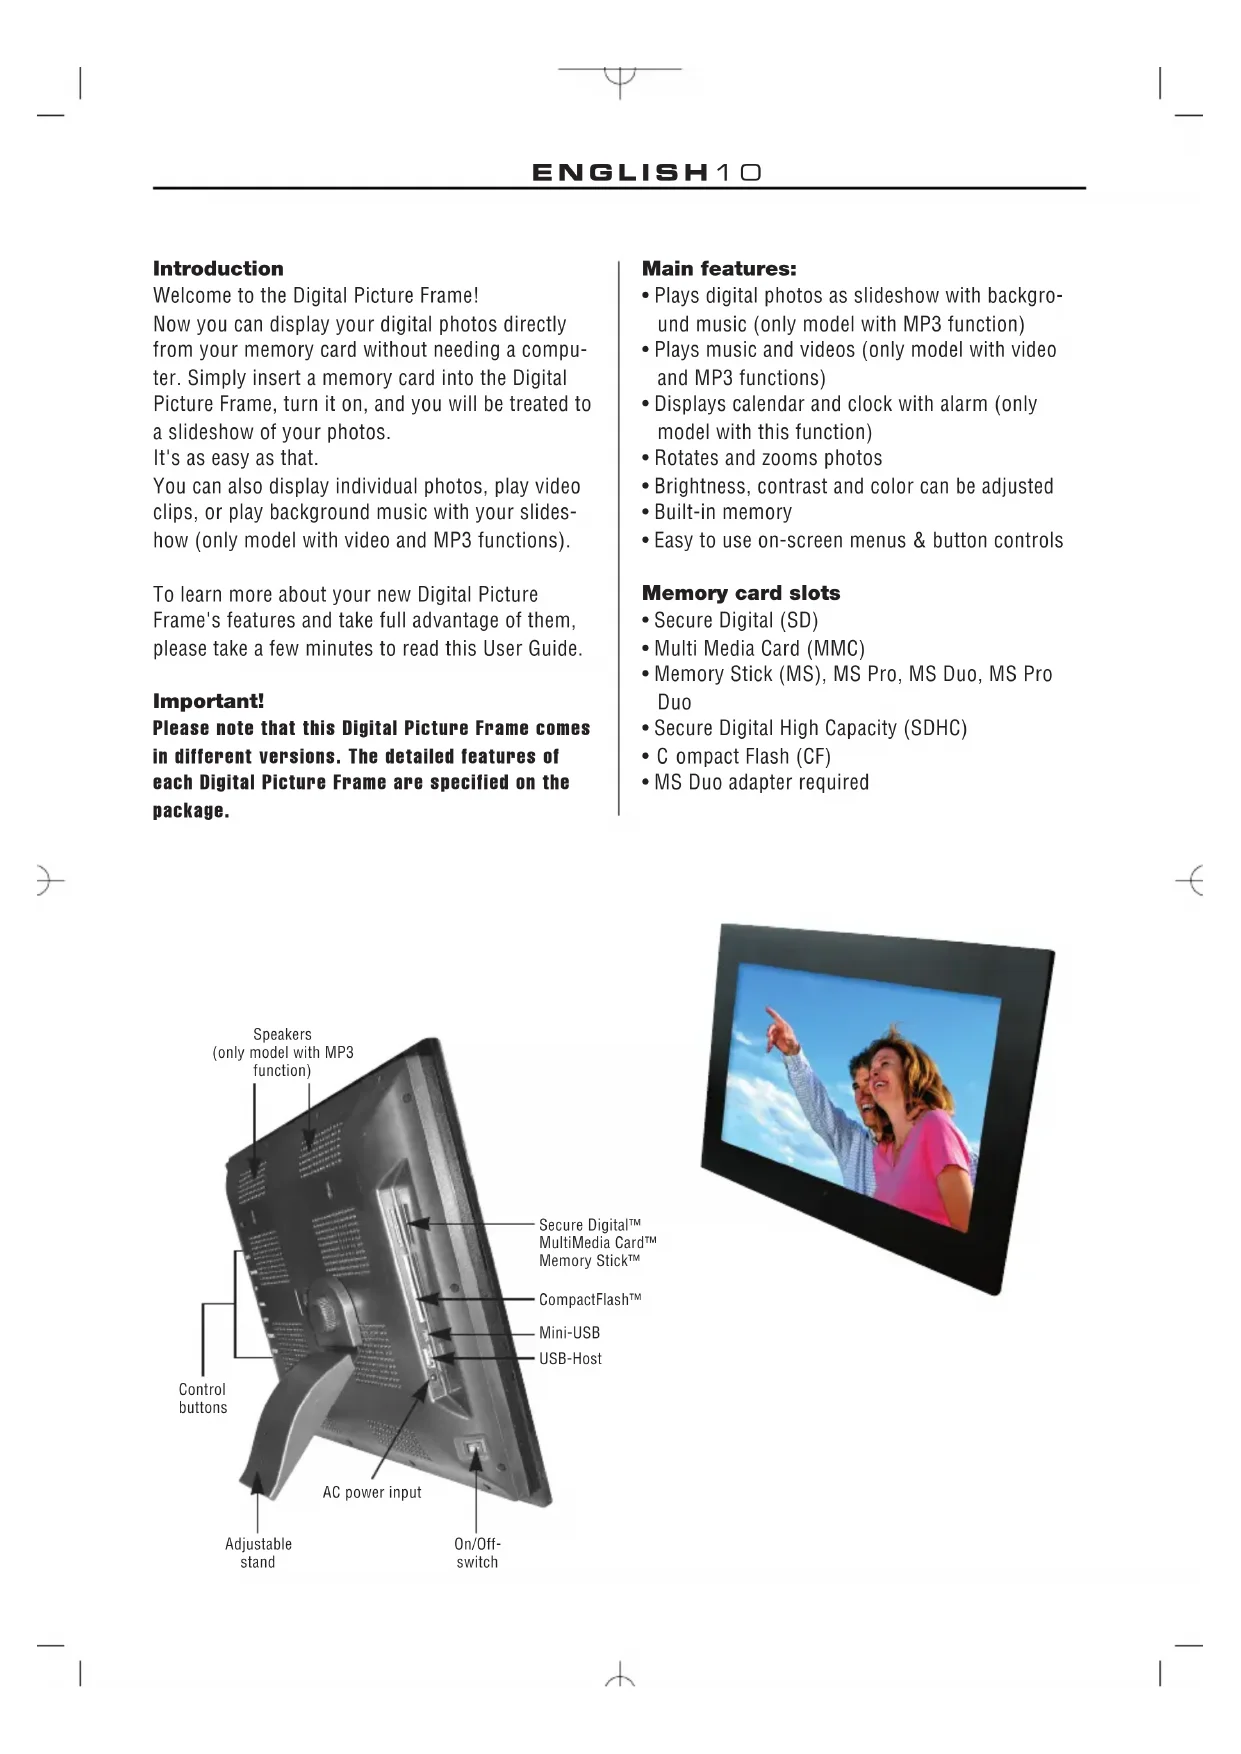
- Secure Digital (SD)
Multi Media Card (MMC) - Memory Stick (MS), MS Pro, MS Duo, MS Pro Duo
- Secure Digital High Capacity (SDHC)
- C compact Flash (CF)
- MS Duo-Adapter erforderlich

Important Safety Precautions. 9
Box Content 9
Introduction 10
Main features 10
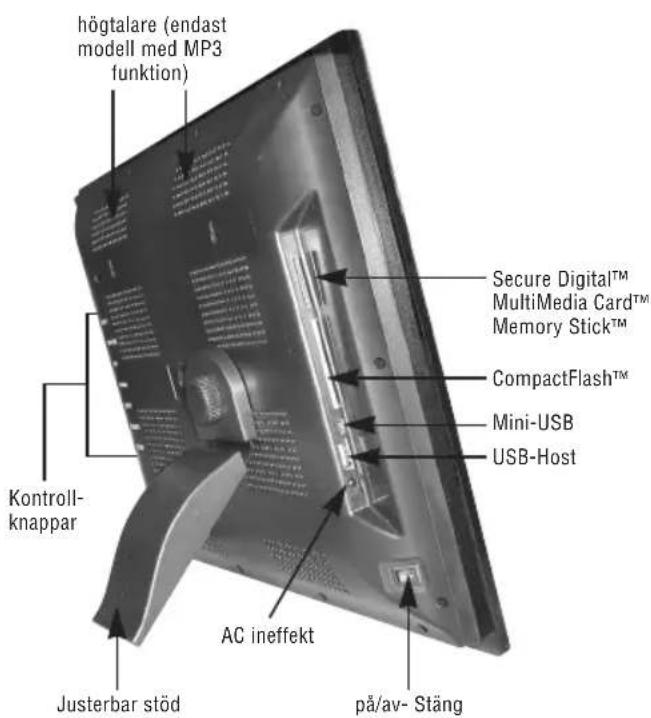
Memory card slots. 10
Setting up the Digital Photo Frame. 11
Operating the Digital Foto Frame. 11
Menu selection screen. 11
Mode selection screen. 11
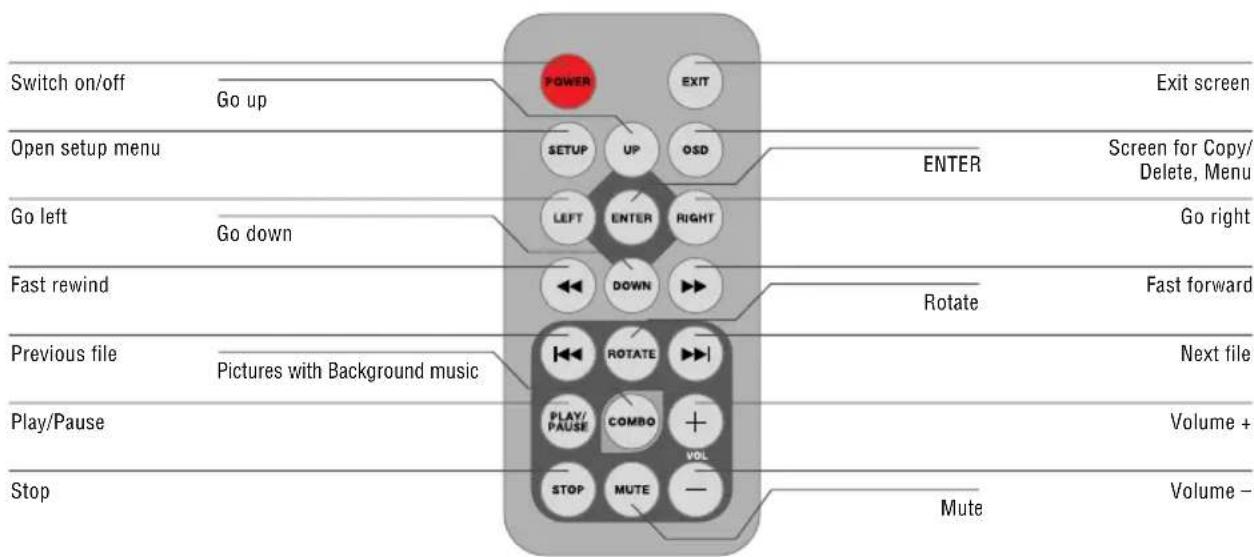
Remote Control 11
Displaying movies
(only model with video function). 12
Playing music (only model with MP3 function)...12
Displaying pictures 12
Using mixed files
(only model with video and MP3 functions)13
File editing. 13
Copying files 13
Deleting files 14
Connecting to a Computer 14
Setting the Frame Options. 14
Setting the Calendar/Clock/Alarm
(only model with this function) 14
List of Menus and Functions. 15
FAQs 16
Technical specifications. 16
Important Safety Precautions
- Keep away from water, moisture and dusty areas.
- Operating temperature is 0 - 40^ . Keep the photo frame away from very hot or cold places.
- Be careful not to drop or knock the photo frame.
- Do not open the case yourself, always seek technical support.
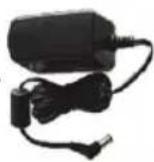
- Connect the AC power adapter to the Digital Photo Frame and a wall outlet.
- Only use accessories approved by the manufacturer.
- Unplug the power cord from the outlet when the Digital Photo Frame will be left unused for a longer period of time.
Warning: To reduce the risk of fire or shock hazard, do not expose this product to rain or moisture.
Box Content
Digital Photo Frame
Remote control
- Adapter
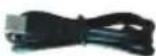
- USB cable (optional)
Important!
Please note that this Digital Photo Frame comes in different versions. The detailed features of the specific model are specified on the package.
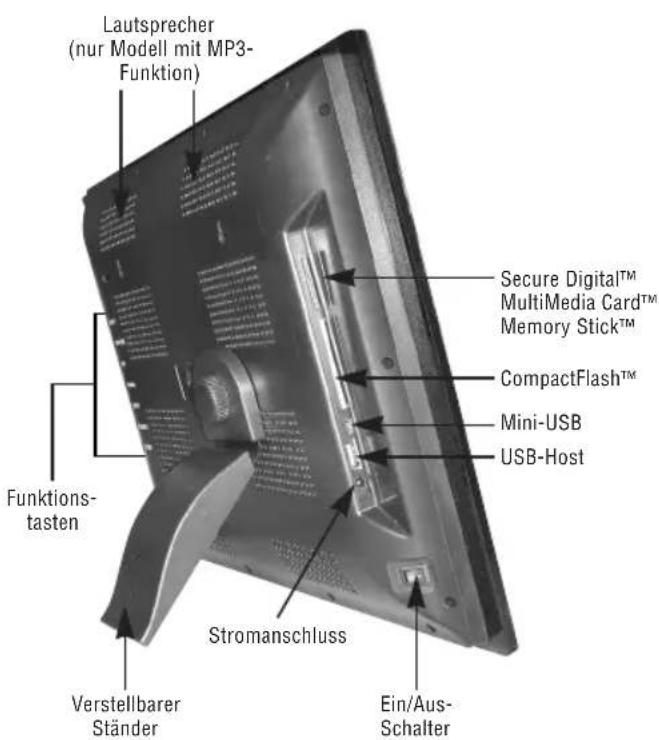
Introduction
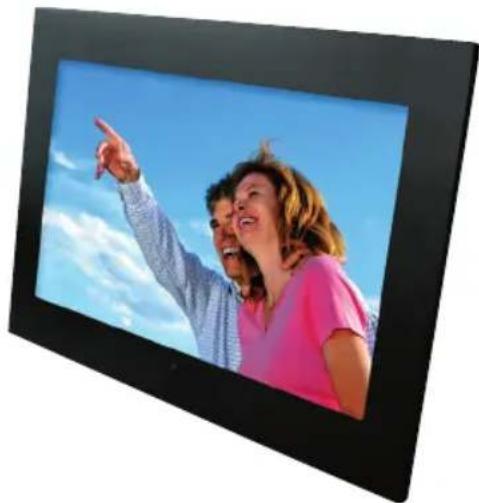
Welcome to the Digital Picture Frame!
Now you can display your digital photos directly from your memory card without needing a computer. Simply insert a memory card into the Digital
Picture Frame, turn it on, and you will be treated to a slideshow of your photos.
It's as easy as that.
You can also display individual photos, play video clips, or play background music with your slideshow (only model with video and MP3 functions).
To learn more about your new Digital Picture Frame's features and take full advantage of them, please take a few minutes to read this User Guide.
Important!
Please note that this Digital Picture Frame comes in different versions. The detailed features of each Digital Picture Frame are specified on the package.
Main features:
- Plays digital photos as slideshow with background music (only model with MP3 function)
- Plays music and videos (only model with video and MP3 functions)
- Displays calendar and clock with alarm (only model with this function)
Rotates and zooms photos - Brightness, contrast and color can be adjusted
Built-in memory - Easy to use on-screen menus & button controls
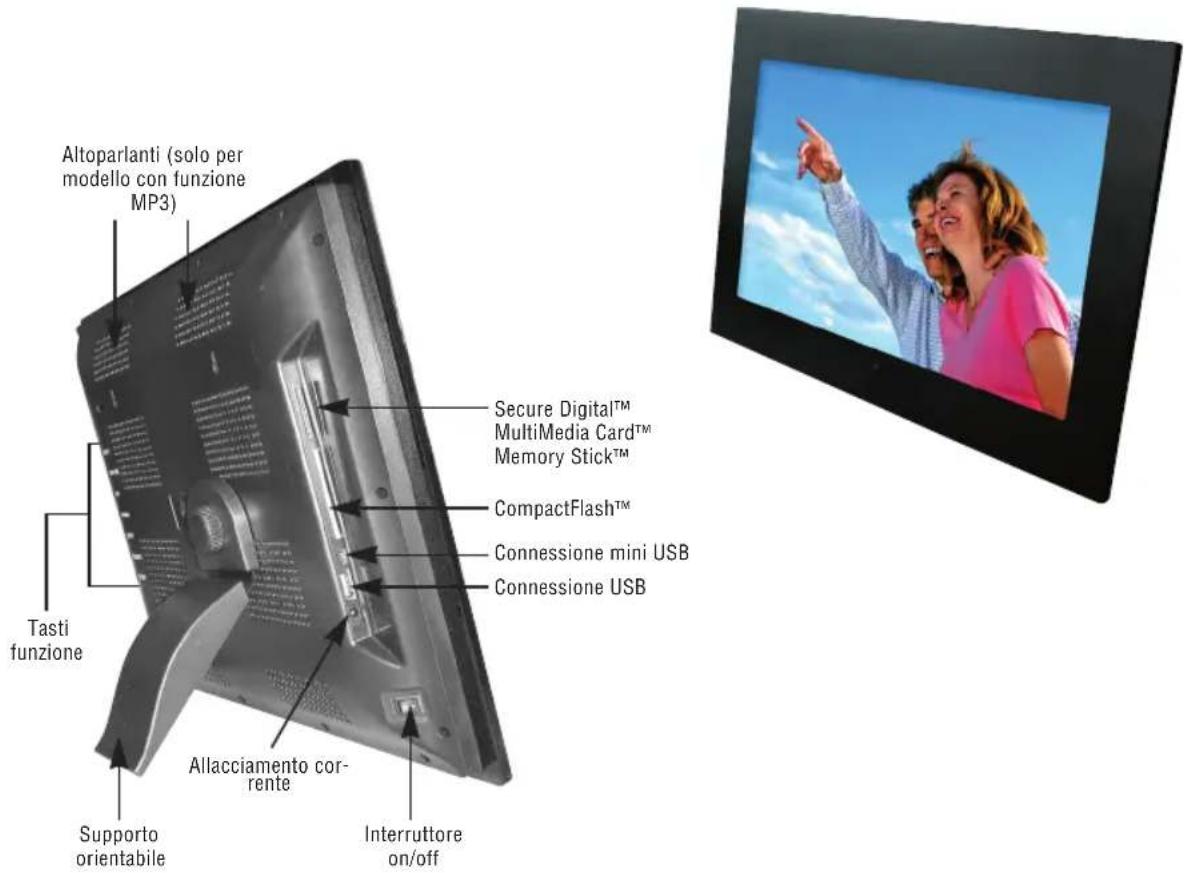
Memory card slots
- Secure Digital (SD)
Multi Media Card (MMC)
Memory Stick (MS), MS Pro, MS Duo, MS Pro Duo - Secure Digital High Capacity (SDHC)
- C compact Flash (CF)
MS Duo adapter required
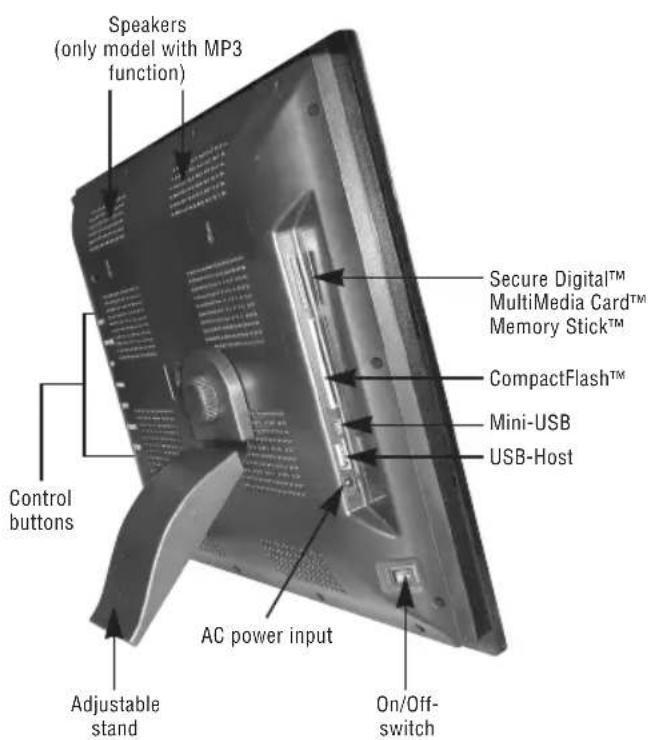
Setting up the Digital Photo Frame
- Connect the AC power adapter to the Digital Photo Frame and a wall outlet.
- If your digital photo frame has an On/Off switch, move this switch to the On position.
- Insert a memory card into the appropriate slot. The cards will only fit in one direction. Do not force a card. The card should fit snugly when properly inserted.
Operating the Digital Photo Frame Menu selection screen
Use the menu selection screen to choose the appropriate menu.
- NAND, SD/MMC, CF, ... Select the type of memory card to be used
- Setup Adjust frame settings
- Calendar Display a calendar with time and alarm settings

Menu selection

Memory card selection
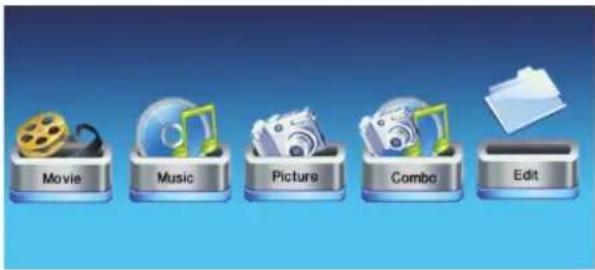
Mode selection screen
The mode selection screen appears after selecting the memory source to choose the type of files you wish to play or display.
- Movie: Play movie files (only model with video function)
- Music: Play music files (only model with MP3 function)
- Picture: Play photos as a slideshow
- Combo: Play slideshow pictures with background music (only model with MP3 function)
- File/Edit: Copy or delete files
Menu selection
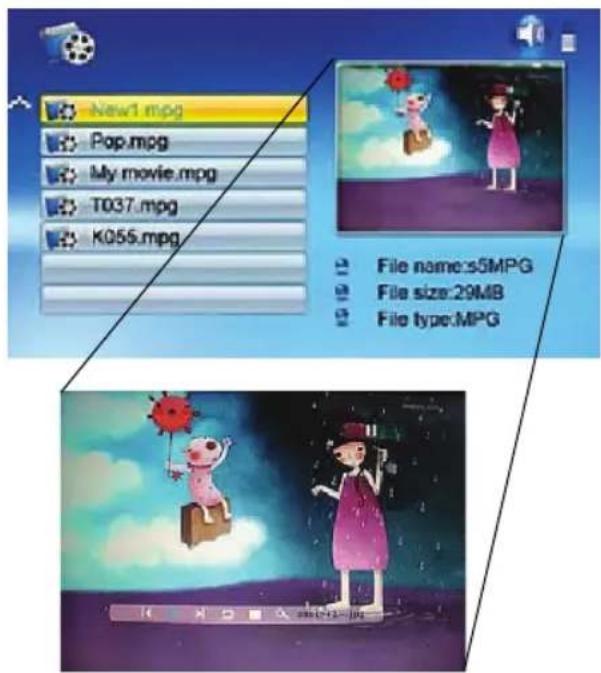
Displaying movies
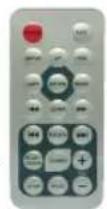
(only model with video function) In the mode selection screen, use the arrow buttons to select Movie and press ENTER. A list with all available movie files will be displayed.
- Use the arrow buttons [] / [] to choose the desired file and press ENTER. The Digital Photo Frame will play the movie.
- To display the info bar during movie playback on the screen, press OSD.
- Press [+]/[▶] to select the appropriate function in the info bar and execute it with ENTER.
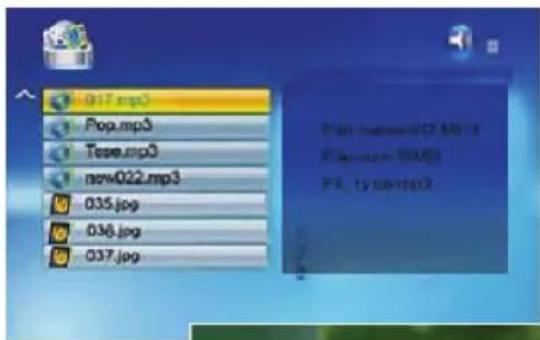
Playing music
(only model with MP3 function) In the mode selection screen, use the arrow buttons to select Music and press ENTER. A list with all available music files will be displayed.
- Use the arrow buttons [] / [] to choose the desired file and press ENTER. The Digital Photo Frame will play the file.
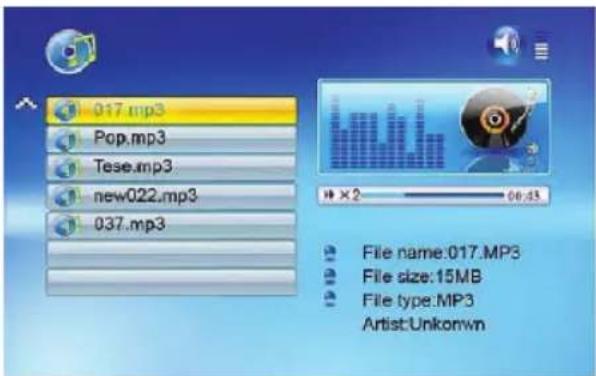
Note: To change the volume, press the VOL / on the remote control.
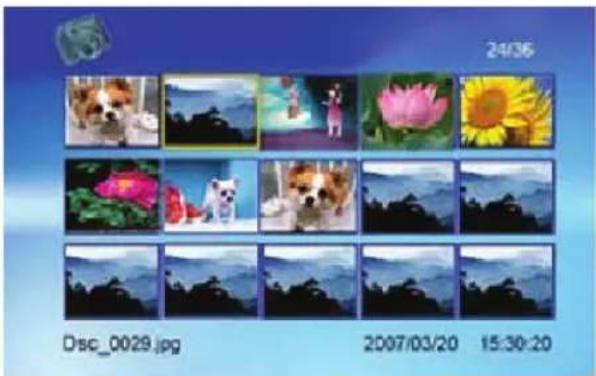
Displaying pictures
- In the mode selection screen, use the arrow buttons to select Photo and press ENTER. A list with all available picture files will be displayed.
- Use the arrow buttons [ ] / [ ] to choose the desired file and press ENTER. The Digital Photo Frame will display the photo.
- To display the info bar, press OSD.
- Press []/[] to select the appropriate function in the info bar and execute it with ENTER.
Using mixed files
(only model with video and MP3 functions) In the mode selection screen, use the arrow buttons to select Combo and press ENTER. A list with all available files will be displayed.
- Use the arrow buttons [] / [] to choose the desired photo and music files and press ENTER to start a slideshow with background music.

Note: To change the volume, press VOL / on the remote control.
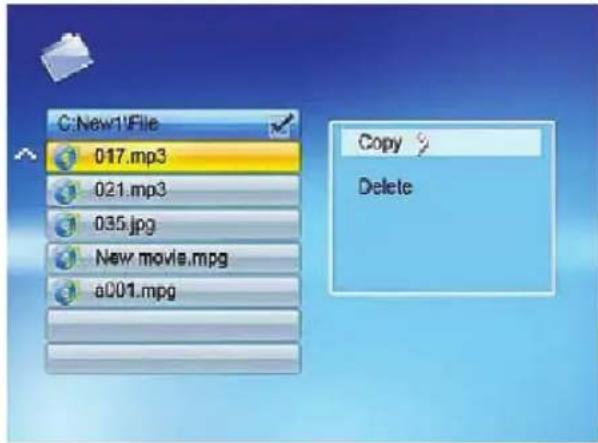
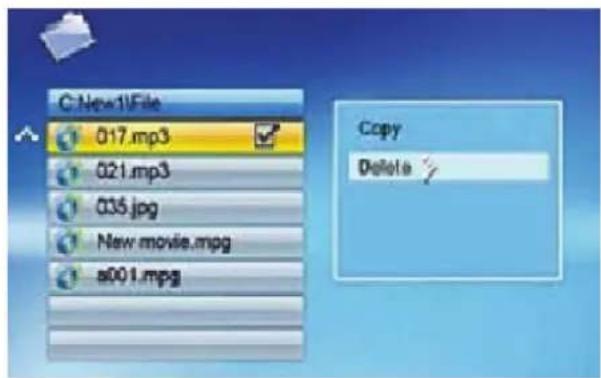
File editing
- In the mode selection screen, use the arrow buttons to select Edit and press ENTER. A list with all files and folders will be displayed.
- Use the arrow buttons [ ] / [ ] to choose the desired file.
- Press [▶] to mark a file. A checkmark will be displayed after the file name.
- To unmark a file, press [▶] again.
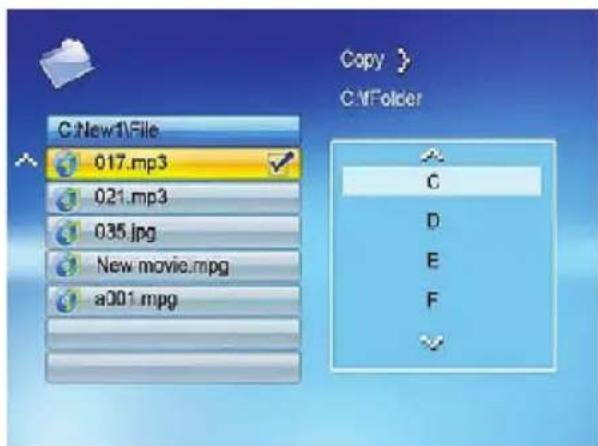
Copying files
- When the file is marked, press OSD, select COPY and confirm with ENTER.
- Use the arrow buttons [] / [] to select the copy destination and confirm with the right arrow button [] . When you press ENTER, the file will be copied to the respective location.
Deleting files
- When the file is marked, press OSD, select DELETE and confirm with ENTER.
- Use the left arrow button [ ] to select the checkmark button
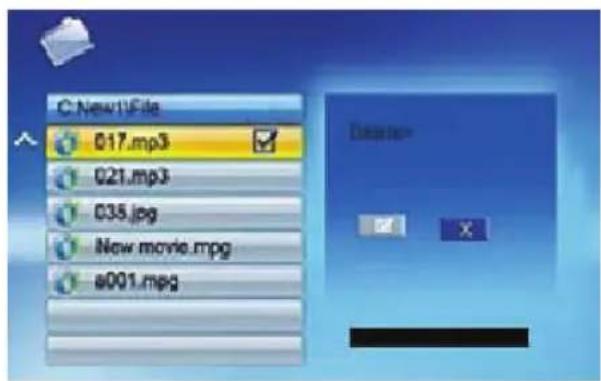
- When you press ENTER, the file will be deleted.
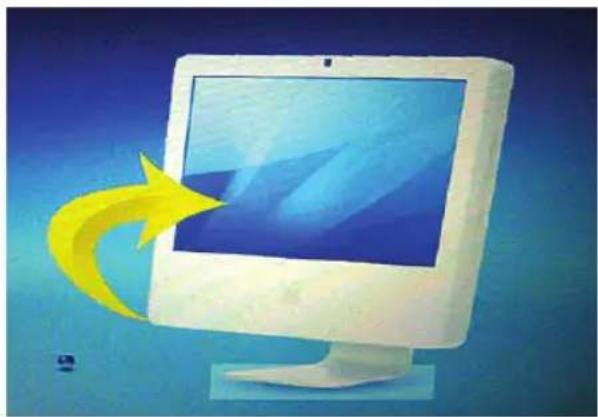
Connecting to a Computer
You can connect your Digital Photo Frame to a computer by using a USB cable to edit the files on your Frame's memory card on the computer.
Setting the Frame Options
In the menu selection screen, use the arrow buttons to select Setup and press ENTER. A list with the available options will be displayed.
The settings and parameters are selected as follows:
[▲]/[▼]: Shift items or choose parameter
[ ]/ [ ]: Change parameter value
ENTER: Confirm the defined setting
EXIT: Return to list of settings
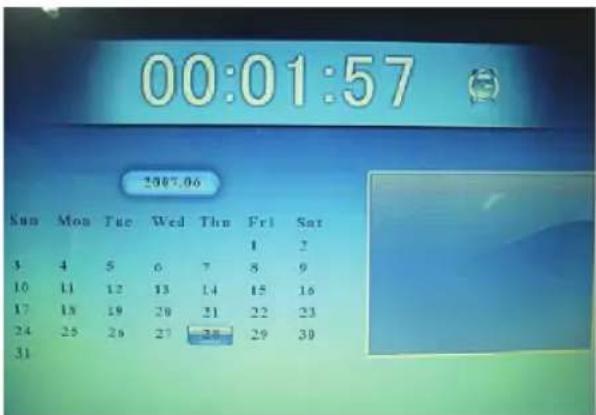
Setting the Calendar / Clock / Alarm
(only model with this function)
In the menu selection screen, use the arrow buttons to select Calendar and press ENTER. A screen will be displayed where you can define the settings.
[▲]/[▼]: Move to previous or next year
[ ]/ [ ]: Move to previous or next month
ENTER: Confirm the defined setting
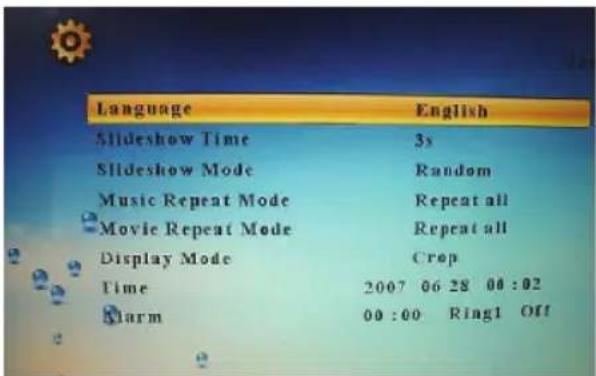
List of Menu and Functions
Display option Settings Description
| Selecting menu NAND Internal memory |
| Setup Define frame settings |
| Calendar Define calendar, clock and alarm settings |
| USB-C |
| SD/MMC Available memory cards and storage locations |
| MS |
| CF |
| Selecting mode Movie Play movie |
| Music Play MP3 file |
| Picture Display slideshow |
| Combo Display slideshow with background music |
| File/Edit Copy/delete files |
| Setup menu Language Select the desired language | |
| Slideshow Show Time Define the speed of the slideshow (display interval of photos): 3s, 5s, 15s, 1min, 15mins, 1hour | |
| Slideshow Mode 14 special effects used for the transition from one photo to the next in a slideshow | |
| Music Repeat Mode Choose to repeat a single audio file, all audio files, or play the available files only once: Repeat one, Repeat all, Repeat off | |
| Movie Repeat Mode Choose to repeat a single movie file, all movie files, or play the available files only once: Repeat one, Repeat all, Repeat off | |
| Display Mode | Original: Preserves dimension ratios of original picture Crop: Full screen picture (preserves dimension ratios, but crops picture for full screen) Stretch: Stretches picture to fit screen (dimension ratio is distorted) |
| Time | Set time (year/month/day/hour/minute) |
| Alarm Set alarm | |
| Brightness | Adjust brightness |
| Contrast | Adjust contrast |
| Saturation | Adjust saturation |
| Auto Power On | Set time when frame shall power on automatically, ON/OFF |
| Auto Power Off | Set time when frame shall power off automatically, ON/OFF |
| Splitscreen Function | Display several photos at the same time; On/Off |
| Auto Play | Select type of file to be played when frame is turned on: Movie, Picture, Music |
| Default Pressing ENTER immediately resets the frame to factory defaults. There will be no warning message. | |
Frequently Asked Questions
Question: Why can't the Digital Photo Frame play all images or movie files?
Answer: The Digital Photo Frame supports JPEG, MP3 and some video formats depending on the product specifications. It may not read some files downloaded from the internet.
Question: I have a memory card in the Digital Photo Frame. Why can't it read the card?
Answer: First, make sure that you are using a memory card that is supported by the Digital Photo Frame. Second, ensure that the memory card is inserted all the way into the correct card slot. Third, choose the correct card icon which you want to play.
Question: Why is the picture display slower with some pictures and faster with others?
Answer: Higher resolution pictures usually load slower.

This symbol on the product or in the instructions means that your electrical and electronic equipment should be disposed at the end of its life separately from your household waste. There are separate collection systems for recycling in the EU. For more information, please contact the local authority or your retailer where you purchased the product.
Technical specifications
Pictures: JPEG up to 16 mega pixel resolution
Video: MPEG 1/2/4, Motion JPEG (only model with video function)
Audio: MP3 (only model with MP3 function)
USB ports: USB 2.0 device
USB 2.0 host
AC adapter:
Input: AC 100 V-240 V, 50-60 Hz
Output: DC 12 V, 2.0 A
NOTE: Right to technical and design modifications reserved.
- NAND, SD/MMC, CF, ...
- Secure Digital (SD)
Multi Media Card (MMC)
Memory Stick (MS), MS Pro, MS Duo, MS Pro Duo - Secure Digital High Capacity (SDHC)
- C compact Flash (CF)
- Adattatore MS Duo richiesto
Come montare la cornice digitale
- Secure Digital (SD)
Multi Media Card (MMC)
Memory Stick (MS), MS Pro, MS Duo, MS Pro Duo - Secure Digital High Capacity (SDHC)
- C compact Flash (CF)
- Necessario adaptor MS Duo

- NAND, SD/MMC, CF, ...
- Secure Digital (SD)
Multi Media Card (MMC)
Memory Stick (MS), MS Pro, MS Duo, MS Pro Duo - Secure Digital High Capacity (SDHC)
- C compact Flash (CF)
- Requere-se adaptor de MS Duo

- Secure Digital (SD)
Multi Media Card (MMC)
Memory Stick (MS), MS Pro, MS Duo, MS Pro Duo - Secure Digital High Capacity (SDHC)
- C compact Flash (CF)
MS Duo-Adapter kravs