TSX120 - Docking station YAMAHA - Free user manual and instructions
Find the device manual for free TSX120 YAMAHA in PDF.
| Product Type | Docking station with built-in speakers |
| Brand and Model | YAMAHA TSX120 |
| Dimensions (W × H × D) | 350 × 120 × 240 mm |
| Weight | 3.7 kg |
| Power Supply | AC 220–240 V, 50 Hz (European model); AC 120 V, 60 Hz (US model) |
| Power Consumption | 20 W in operation; less than 1.0 W in standby |
| Output Power | 15 W + 15 W (6 Ω, 1 kHz, 10 % THD) |
| Speakers | 2 x 8 cm full-range speakers |
| FM Tuning Range | 87.50 to 108.00 MHz |
| iPod Compatibility | iPod touch, iPod (Click Wheel, including iPod classic), iPod nano, iPod mini |
| Auxiliary Input (AUX) | 3.5 mm stereo mini-jack |
| Alarm Functions | Dual alarm with choice of beep, music (iPod/FM), or both; snooze function (5 min) |
| Sleep Mode | Adjustable sleep timer (SLEEP) |
| DSP Modes | Normal, MILD, HEAVY, LIVE |
| Clock Setting | Manual or automatic via RDS; 12h/24h format |
| Display | Bright display with automatic dimming |
| Remote Control | Infrared, range ≤6 m; CR2025 battery included |
| Supplied Accessories | Remote control, indoor FM antenna (1.4 m), instruction manual |
| Maintenance and Cleaning | Use a clean, dry cloth; do not use chemical solvents |
| Safety | Do not expose to rain or moisture; do not open the cabinet; unplug during thunderstorms |
| Environmental Protection | Do not dispose with household waste; follow recycling guidelines (WEEE and batteries) |
| Warranty | 2 years (EEA and Switzerland); contact your Yamaha dealer |
Frequently Asked Questions - TSX120 YAMAHA
User questions about TSX120 YAMAHA
0 question about this device. Answer the ones you know or ask your own.
Ask a new question about this device
Download the instructions for your Docking station in PDF format for free! Find your manual TSX120 - YAMAHA and take your electronic device back in hand. On this page are published all the documents necessary for the use of your device. TSX120 by YAMAHA.
USER MANUAL TSX120 YAMAHA
If the socket outlets in the home are not suitable for the plug supplied with this appliance, it should be cut off and an appropriate 3 pin plug fitted. For details, refer to the instructions described below.
Note
The plug severed from the mains lead must be destroyed, as a plug with bared flexible cord is hazardous if engaged in a live socket outlet.
■Special Instructions for U.K. Model
IMPORTANT
THE WIRES IN MAINS LEAD ARE COLOURED IN ACCORDANCE WITH THE FOLLOWING CODE:
Blue: NEUTRAL
Brown: LIVE
As the colours of the wires in the mains lead of this apparatus may not correspond with the coloured markings identifying the terminals in your plug, proceed as follows: The wire which is coloured BLUE must be connected to the terminal which is marked with the letter N or coloured BLACK. The wire which is coloured BROWN must be connected to the terminal which is marked with the letter L or coloured RED. Make sure that neither core is connected to the earth terminal of the three pin plug.
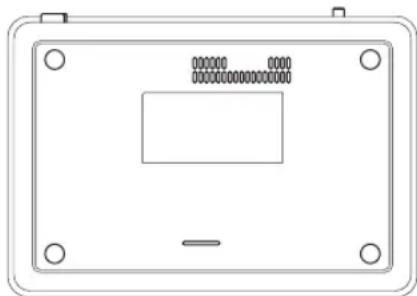
The name plate is located on the bottom of the unit.
Caution: Read this before operating your unit.
1 To assure the finest performance, please read this manual carefully. Keep it in a safe place for future reference.
2 Install this unit in a well ventilated, cool, dry, clean place with at least 15cm on the top, 10cm on the left and right, and 10cm at the back of this unit — away from direct sunlight, heat sources, vibration, dust, moisture, and/or cold.
3 Locate this unit away from other electrical appliances, motors, or transformers to avoid humming sounds.
4 Do not expose this unit to sudden temperature changes from cold to hot (or vice versa), and do not locate this unit in an environment with high humidity (i.e., a room with a humidifier) to prevent condensation inside this unit, which may cause an electrical shock, fire, damage to this unit, and/or personal injury.
5 Avoid installing this unit where foreign object may fall onto this unit and/or this unit may be exposed to liquid dripping or splashing. On the top of this unit, do not place:
- Other components, as they may cause damage and/or discoloration on the surface of this unit.
- Burning objects (i.e., candles), as they may cause fire, damage to this unit, and/or personal injury.
- Containers with liquid in them, as they may fall and liquid may cause electrical shock to the user and/or damage to this unit.
6 Do not cover this unit with a newspaper, tablecloth, curtain, etc. in order not to obstruct heat radiation. If the temperature inside this unit rises, it may cause fire, damage to this unit, and/or personal injury.
7 Do not plug in this unit to a wall outlet until all connections are complete.
8 Do not operate this unit upside-down. It may overheat, possibly causing damage.
9 Do not use force on switches, knobs and/or cords.
10 When disconnecting the power cable from the wall outlet, grasp the plug; do not pull the cable.
11 Do not clean this unit with chemical solvents; this might damage the finish.
12 Only voltage specified on this unit must be used. Using this unit with a higher voltage than specified is dangerous and may cause fire, damage to this unit, and/or personal injury. Yamaha will not be held responsible for any damage resulting from use of this unit with a voltage other than specified.
13 To prevent damage by lightning, keep the power cable and outdoor antennas disconnected from a wall outlet or this unit during a lightning storm.
14 Do not attempt to modify or fix this unit. Contact qualified Yamaha service personnel when any service is needed. The cabinet should never be opened for any reasons.
15 When not planning to use this unit for long periods of time (i.e., vacation), disconnect the AC power plug from the wall outlet.
16 Be sure to read the "TROUBLESHOOTING" section on common operating errors before concluding that this unit is faulty.
17 Before moving this unit, press ON/OFF to set the system to off, and disconnect the AC power plug from the wall outlet.
18 Condensation will form when the surrounding temperature changes suddenly. Disconnect the power cable from the outlet, then leave this unit alone.
19 When using this unit for a long time, this unit may become warm. Turn the system off, then leave this unit alone for cooling.
20 Install this unit near the wall outlet and where the AC power plug can be reached easily.
21 The batteries shall not be exposed to excessive heat such as sunshine, fire or the like.
This unit is not disconnected from the AC power source as long as it is connected to the wall outlet, even if this unit itself is turned off by ON/OFF. In this state, this unit is designed to consume a very small quantity of power.
WARNING
TO REDUCE THE RISK OF FIRE OR ELECTRIC SHOCK, DO NOT EXPOSE THIS UNIT TO RAIN OR MOISTURE.
CAUTION
Use of controls or adjustments or performance of procedures other than those specified herein may result in hazardous radiation exposure.
CAUTION
Danger of explosion if battery is incorrectly replaced. Replace only with the same or equivalent type.
Taking care of the unit
When you wipe this unit, use a clean dry cloth.
CONTENTS
PREPARATION
PREPARATIONS BEFORE USING THIS UNIT
Turning on/off the system. 4
Adjusting the clock. 4
OPERATION
USING USEFUL FUNCTIONS 5
Using the alarm functions. 5
Setting sleeping mode.. 8
Setting Dimmer mode. 8
Switching DSP mode. 8
BASIC OPERATION. 9
LISTENING TO iPod™ AND EXTERNAL
SOURCES 10
Listening to your iPodTM 10
Playing back external sources. 12
LISTENING TO FM RADIO STATIONS 13
Connecting antennas. 13
Tuning radio stations 13
Preseting radio stations. 13
Selecting preset radio stations (Preset tuning). 14
Receiving Radio Data System stations. 14
ADDITIONAL INFORMATION
TROUBLESHOOTING 16
General. 16
iPodTM 16
Radio reception. 17
Remote control 17
SPECIFICATIONS. 18
■About this manual
- In this manual, operations that can be performed with either this unit or its remote control are explained using the unit.
- The symbol “ 串 ” with page number(s) indicates the corresponding reference page(s).
Notes contain important information about safety and operating instructions. indicates a tip for your operation. - This manual is printed prior to production. Design and specifications are subject to change in part as a result of improvements, etc. In case of differences between the manual and the product, the product has priority.
Supplied accessories
This product includes the following accessories. Make sure you have all of the following parts.

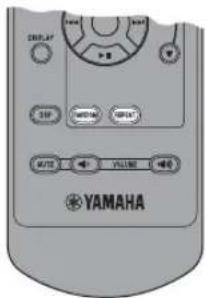
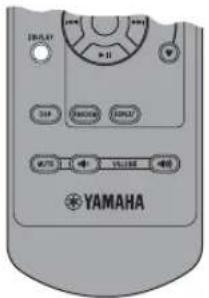
Remote control Owner's manual

Indoor FM antenna (1.4 m (55-1/8"))
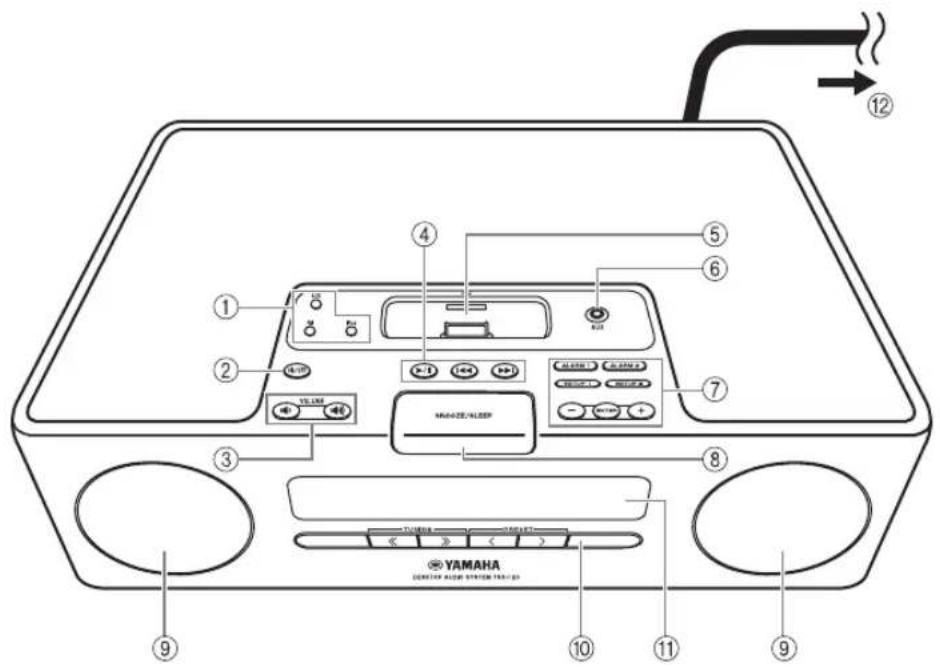
PREPARATIONS BEFORE USING THIS UNIT
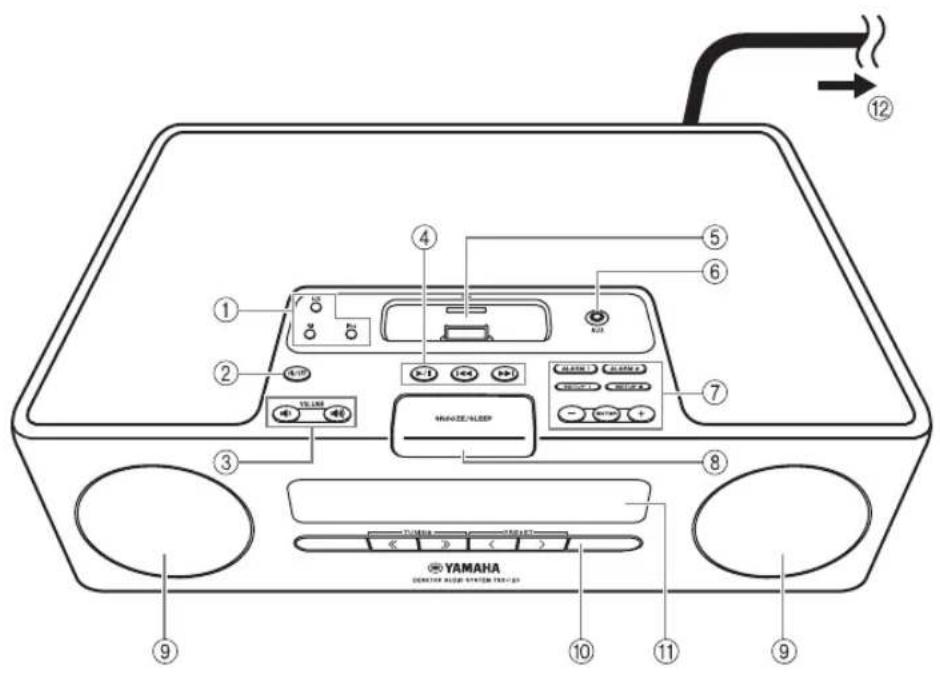
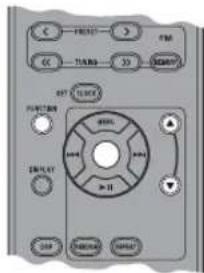
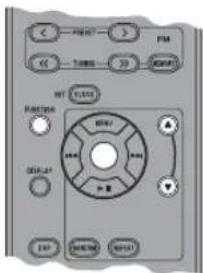
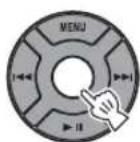
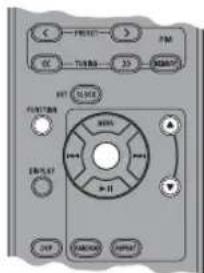
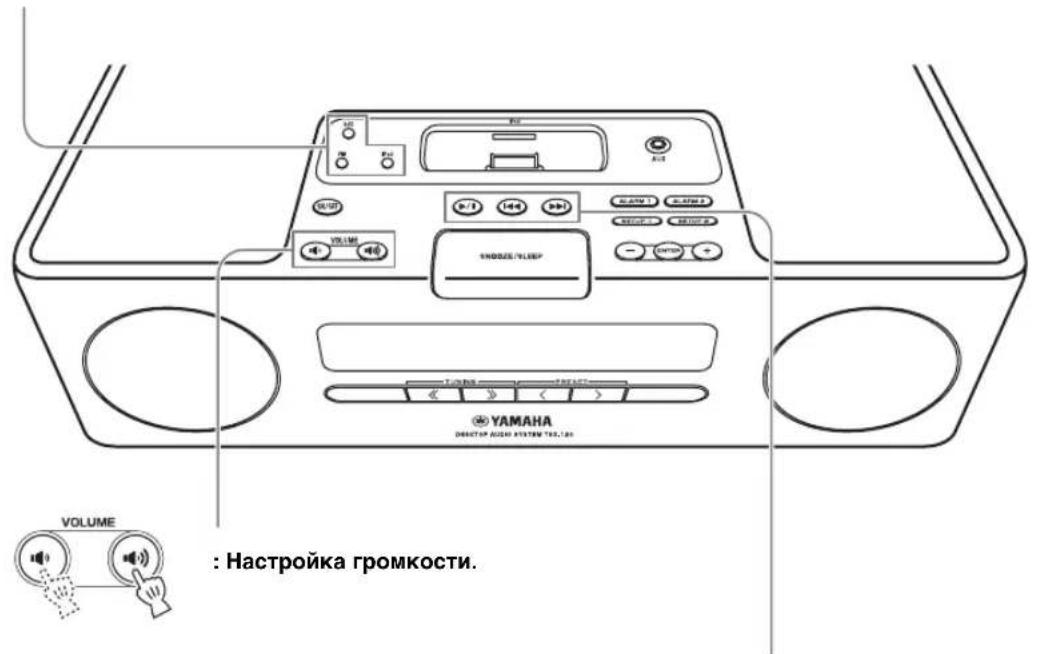
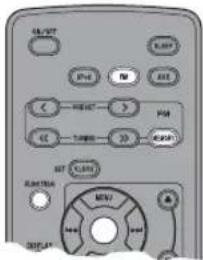
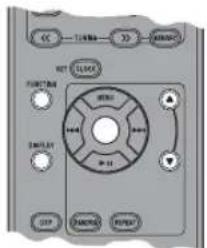
① Source buttons: AUX, FM, iPod (P. 9)
② ON/OFF: System on/off (P.4)
③ VOLUME: Volume control buttons (P.9)
④ Audio control buttons (P.9)
⑤Pod dock (P.10)
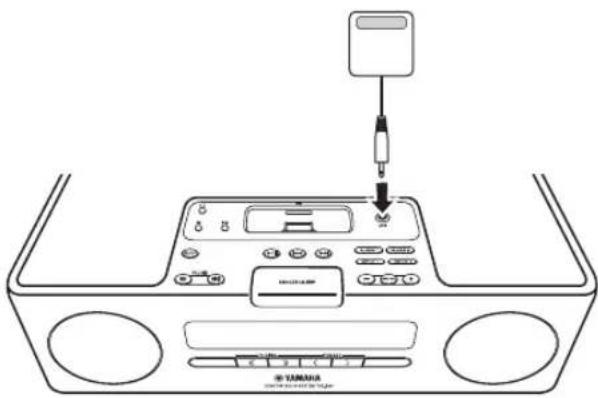
⑥ AUX in (P.12)
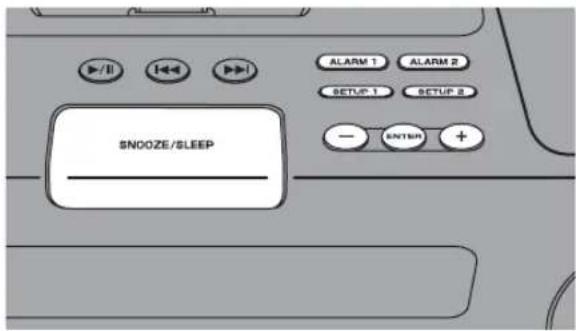
⑦ Alarm control buttons (P.5)
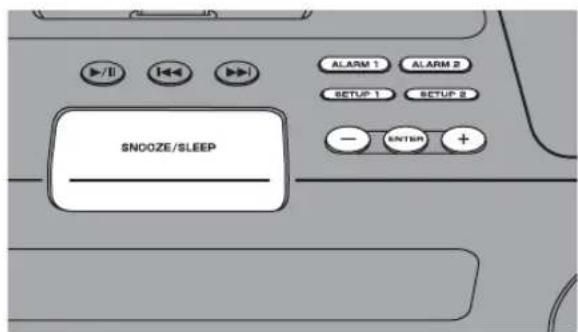
⑧SNOOZE/SLEEP (P.7,8)
⑨Speakers
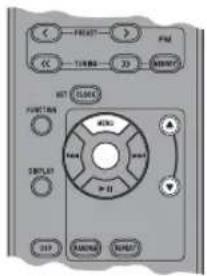
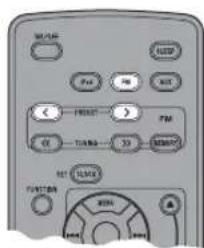
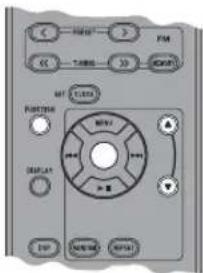
FM control buttons (P.13)
① Front panel display (P.4)
To the wall outlet
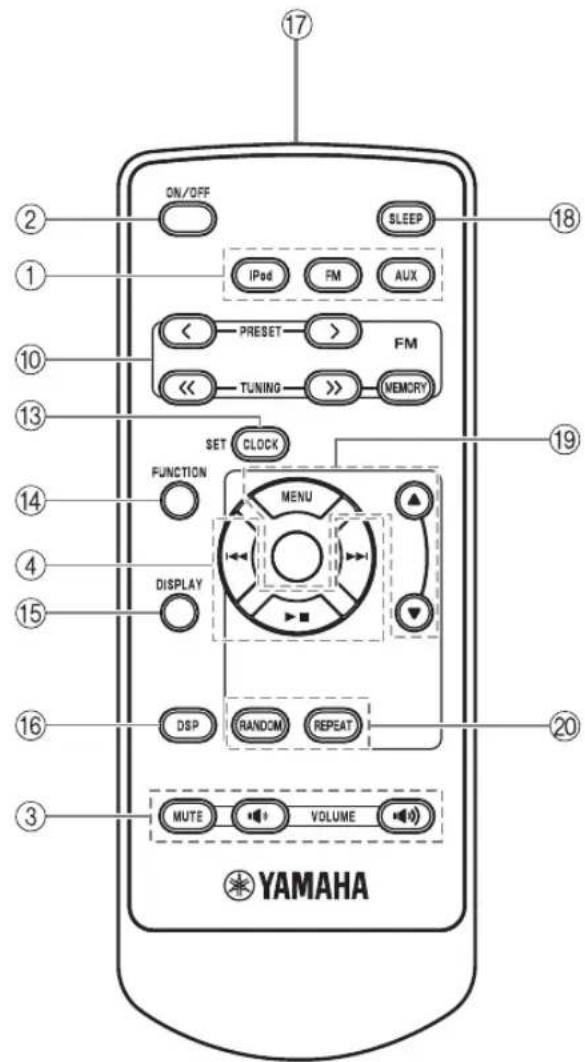
13CLOCK SET (P.4)
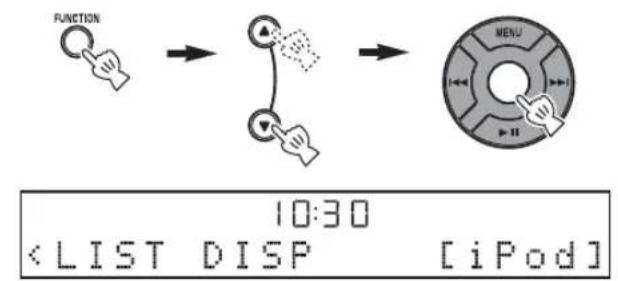
⑭FUNCTION
15DISPLAY(P.11)
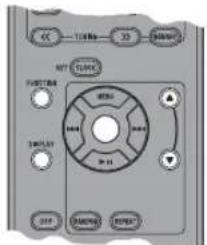
DSP: DSP mode switching (P.8)
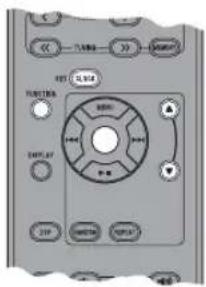
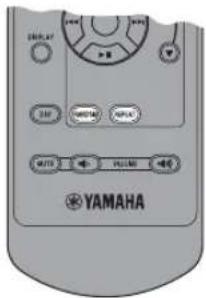
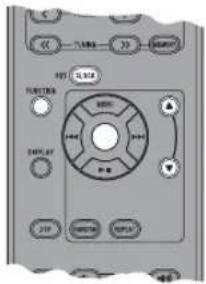
Infrared signal transmitter P.3
SLEEP: Sleep time setting (P.8)
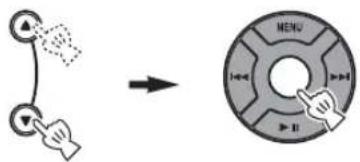
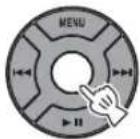
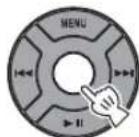
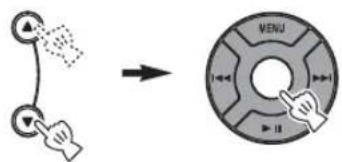
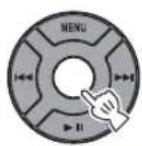
19 MENU ▲/Center buttons (P. 10)
20RANDOM/REPEAT: Changing the playback mode for iPod (P. 10)
The round shaped button on the center is called Center in this manual.
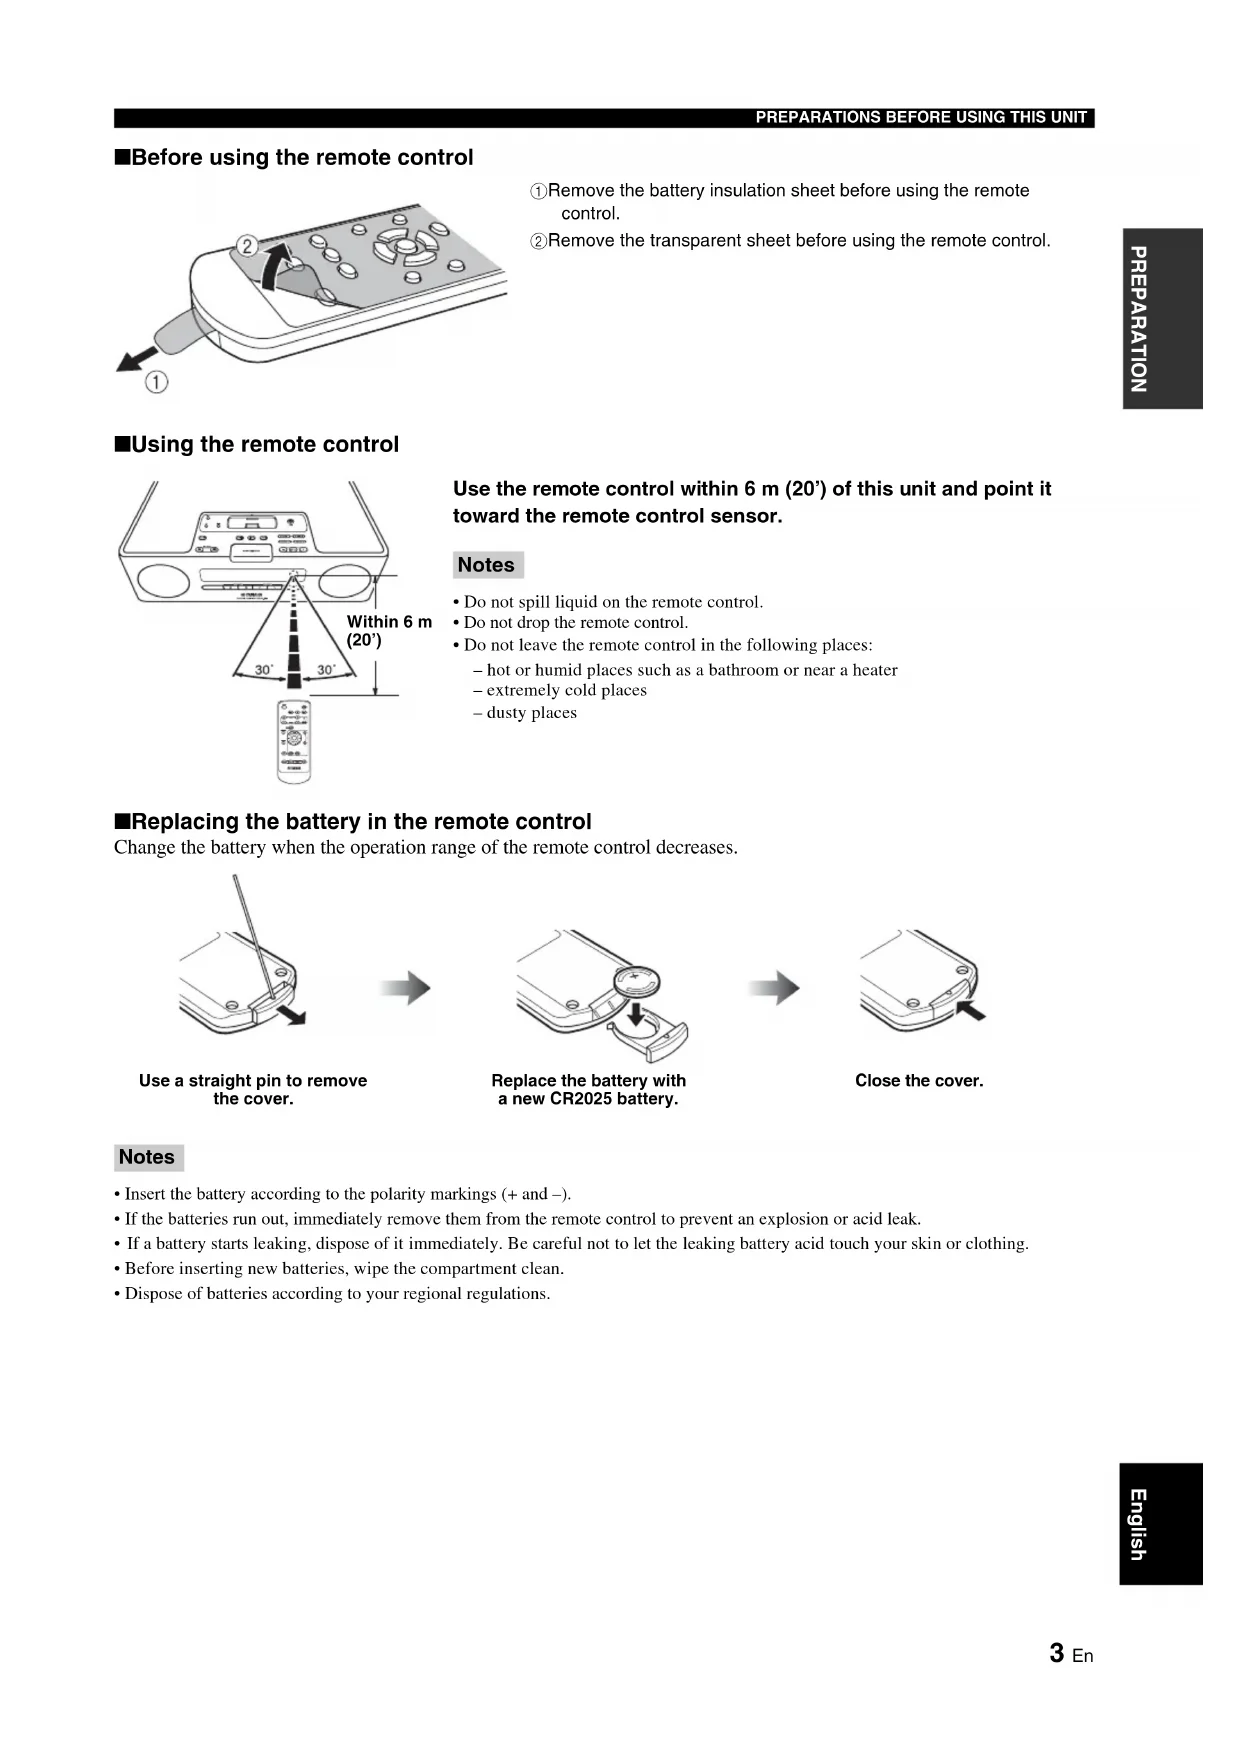
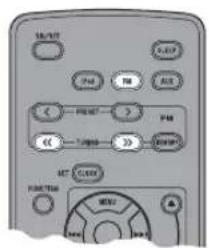
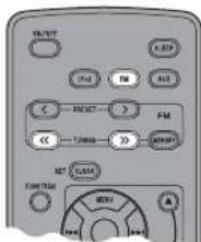
Before using the remote control

① Remove the battery insulation sheet before using the remote control.
② Remove the transparent sheet before using the remote control.
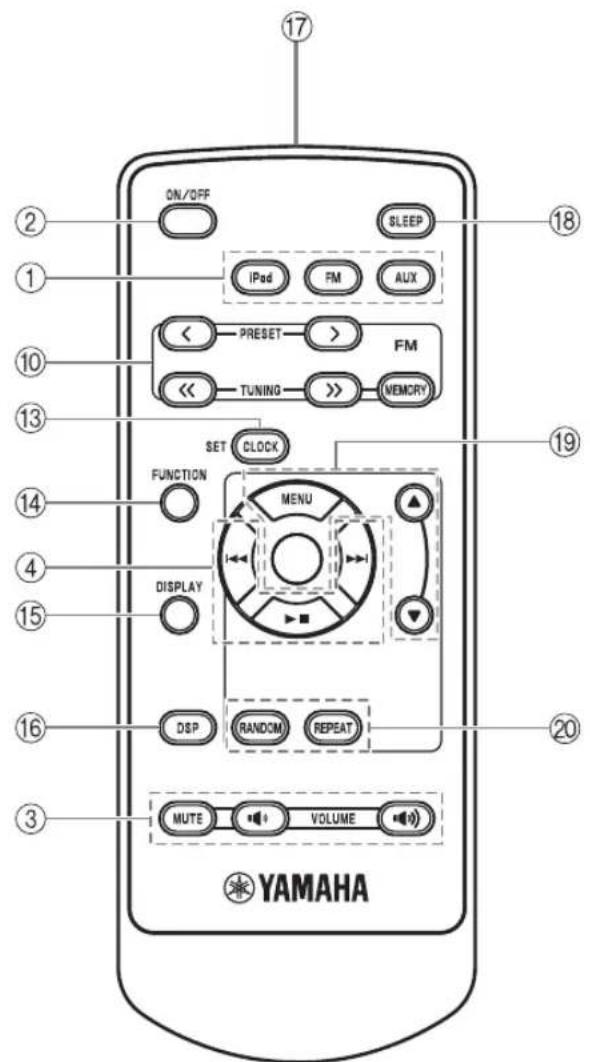
Using the remote control
Use the remote control within 6m (20') of this unit and point it toward the remote control sensor.
Notes
- Do not spill liquid on the remote control.
- Do not drop the remote control.
- Do not leave the remote control in the following places:
hot or humid places such as a bathroom or near a heater
extremely cold places
-dustyplaces
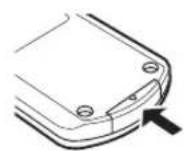
Replacing the battery in the remote control
Change the battery when the operation range of the remote control decreases.
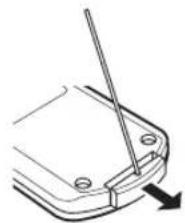
Use a straight pin to remove the cover.

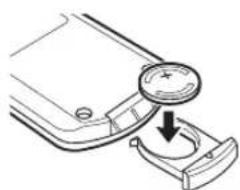
Replace the battery with a new CR2025 battery.

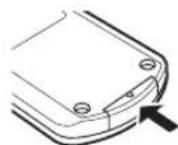
Close the cover.
Notes
- Insert the battery according to the polarity markings (+ and -).
- If the batteries run out, immediately remove them from the remote control to prevent an explosion or acid leak.
- If a battery starts leaking, dispose of it immediately. Be careful not to let the leaking battery acid touch your skin or clothing.
- Before inserting new batteries, wipe the compartment clean.
- Dispose of batteries according to your regional regulations.
Turning on/off the system
1 Connect the power cable to the wall outlet.
2 Press ON/OFF to turn on the system.
When the system is on: "Hello" appears, then clock and other information are displayed.

Example: iPod playback mode display
When the system is off: "Good-bye" appears, then only date and time are displayed.

#
- This unit has an auto off function, which will automatically switch the system to off if the system is left turned on for 1 hour without playback or any other operation being performed. This function is only available when the source is set to iPod.
- Press and hold ON/OFF on the top of the unit for more than 3 seconds to set the system to standby mode. All the information on the front panel display is not displayed in standby mode. This can reduce the power consumption. To cancel standby mode, press ON/OFF.
Even in system off/standby mode, the alarm function is available. - The memory back-up circuit prevents stored data such as the time setting from being lost even in system off/standby mode.
Adjusting the clock
The clock is not set at the factory.
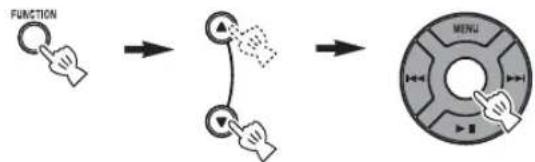
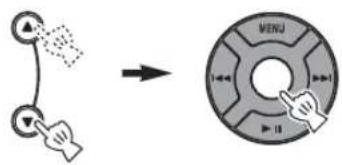
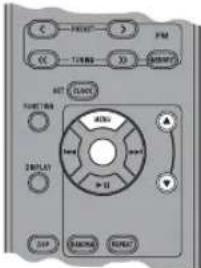
1 Press CLOCK SET.

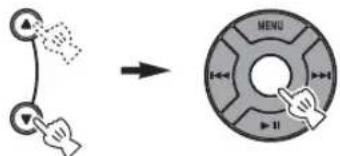
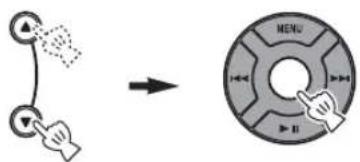
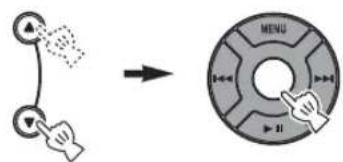
2 Select each setting with MENU ▲/▼ and confirm with Center.
You can set YEAR MONTH DAY TIME.
Notes
- This operation can be performed only with the remote control.
Time appears in 12-hour notation (AM/PM), depending on the model. For example, "4:00PM". - You can switch 12-hour/24-hour notation by pressing FUNCTION MENU / Center to select TIME FORMAT, then pressing MENU / Center to select 12H/24H.
The time settings are lost after one week when the power cable is disconnected from the wall outlet.
USING USEFUL FUNCTIONS
Using the alarm functions
The unit has the dual alarm function. Each alarm time always appears on the right/left sides of the clock on the front panel display. When the alarm is set to on, the alarm indicator and time light up.
You can set the different music to the alarm from what you listen to during the setting.
Note
This operation can be performed only with the buttons on the top of the unit.
Setting the alarm time and sound
Note
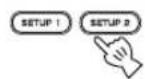
To cancel the alarm function setting during the operations, press SETUP1/SETUP2. The alarm is not set.
1 Start setting ALARM1/ALARM2.
When you want to set the alarm to ALARM1, set on SETUP1, and SETUP2 is for ALARM2.
2 Set the alarm time.

① While setting the alarm function, the alarm indicator blinks.
② The item you are setting also blinks.
③ The > mark on the right side means that you have other menu items on the following screens. You can go to the next menu item setting by pressing ENTER.
3 Select and set TYPE BEEP SOURCE VOLUME.

① After setting the alarm time, select the alarm type from BEEP/BEEP+MUSIC/MUSIC.
- BEEP: beep sound only
- BEEP+MUSIC: beep sound and music selected in an input source, iPod/FM
- MUSIC: music only
If you set TYPE to BEEP+MUSIC, you can play back the desired music in an input source, iPod/ FM and beep sound together at the time you set. The music volume gradually increases to wake you up comfortably, and then the beep sound plays back at the time you set.
10:30 5:45 TYPE [BEEP+MUSIC]
②Select the beep sound.
5 kinds of beep sounds are stored on the unit.
The BEEP screen is skipped automatically if you select MUSIC/BEEP+MUSIC in step ①.
中
You can preview the currently displayed beep sound by pressing SNOOZE/SLEEP when you select the beep sound. To stop the beep sound, press SNOOZE/SLEEP again.

③Select the music source from iPod/FM or LAST SET.

The SOURCE screen is skipped automatically if you select BEEP in step ①.
iPod
You can select PLAYLIST or RESUME PLAY.
The music starts from the beginning of the playlist. Before this operation, make a playlist on your iPod (P.7).
Select and set PLAYLIST.


Select and set the desired playlist.

Select and set RESUME PLAY when you want to resume the music, which you listen to last time, as the alarm sound.

FM
Set preset number/frequency.
LAST SET
Keep the setting you set last time.
Note
If the SOURCE is not set completely or the music device is not set, the unit plays back the beep sound instead. For example, if the unit cannot read your iPod, the beep sound plays back.
④ Set the alarm volume.
The volume is set with ENTER in step ④, then the alarm setting is complete. The alarm is set to on automatically.

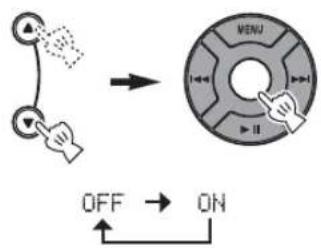
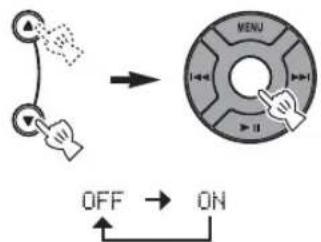
Switching on/off the alarm
You can switch on/off the alarm with ALARM1/
ALARM2, but the alarm settings are not deleted with this operation.
Switch on/off the alarm function.
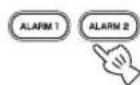
When the alarm is on, the alarm indicator and time light up.
Using the snooze function
When the beep sound, music, or both are played back, you can set the snooze function.
Set the snooze function.

The function differs depending on the alarm type you set in TYPE (P.5).
BEEP: The beep sound stops by pressing SNOOZE/ SLEEP, and resumes after 5 minutes.
MUSIC: The music stops by pressing SNOOZE/SLEEP, and resumes after 5 minutes.
BEEP+MUSIC: With one click of SNOOZE/SLEEP, you can stop the beep sound and keep playing back the music. The beep sound resumes after 5 minutes.
#
You can also set the snooze function by pressing SLEEP on the remote control instead of SNOOZE/SLEEP on the unit.
Stopping the alarm sound
You can stop the alarm sound in the 3 ways as follows. When you stop alarm sound, the system is set to off.
Press ALARM1/ALARM2.

Press ON/OFF.

Press and hold SNOOZE/SLEEP for 2 seconds.

#
- If you do not stop the alarm, the alarm stops after 60 minutes automatically.
- When you stop the alarm, the alarm indicator disappears. To activate the alarm function again, press ALARM1/ALARM2 to set the alarm to on.
- When you stop the alarm, the time setting, etc., is saved for convenient use next time.
Note
Any operations other than setting the snooze function, stopping the alarm sound, or adjusting the volume control are not available while playing back the alarm sound.
About Playlist
You can collect your favorite songs in the library on your iPod and make a list. This is a playlist. If you select a playlist for playback, the songs in the playlist will be played back. Even if you delete a song in a playlist, it is not deleted from the library.
#
For more details on playlists, refer to the instruction manual of your iPod.
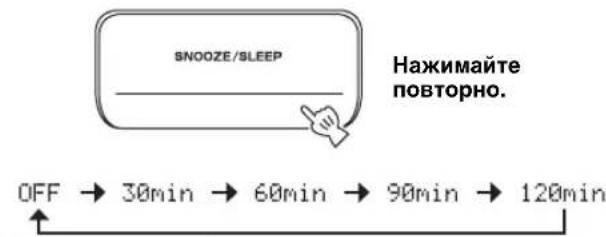
Setting sleeping mode
You can set the time to turn off the system automatically.
Select the sleep time.


When the sleep function is on, the SLEEP indicator lights up.
中
You can also operate this function with SLEEP on the remote control.
Setting Dimmer mode
You can change the brightness of the front panel. If you set DIMMER to AUTO, the dimmer level is adjusted automatically, depending on the brightness of the room. If your room is dark, the front panel becomes darker.
中
The default setting is AUTO.
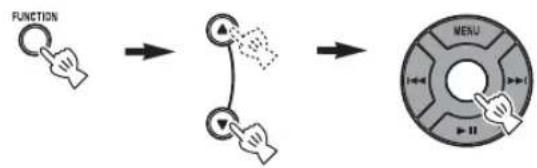
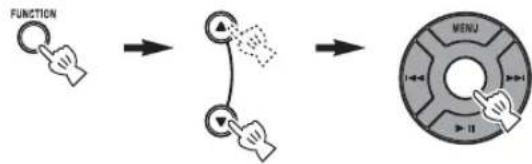
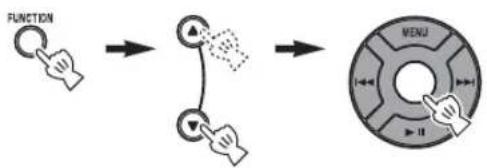
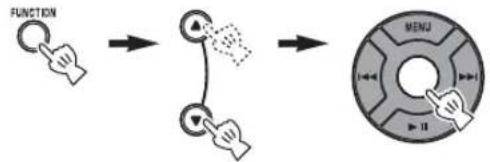
1 Select DIMMER from the FUNCTION menu.
中
After you select DIMMER with Center, < appears on the left side of the front panel display. You can go back to the FUNCTION menu by pressing MENU on the remote control.
2 Select the desired dimmer level.

Switching DSP mode
You can switch the sound mode according to the environment or your preference.

Switch DSP mode.

Press repeatedly.
Each time you press DSP the setting switches as follows:
NORMAL: For normal sound
↓
MILD: For natural and mild sound
↓
HEAVY: For more powerful sound (default setting)
↓
LIVE: For wide realistic sound
↓
Back to NORMAL
BASIC OPERATION


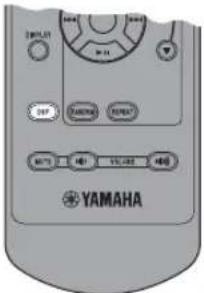
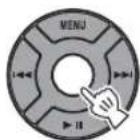
:Press one of the Source buttons to select the desired source.*
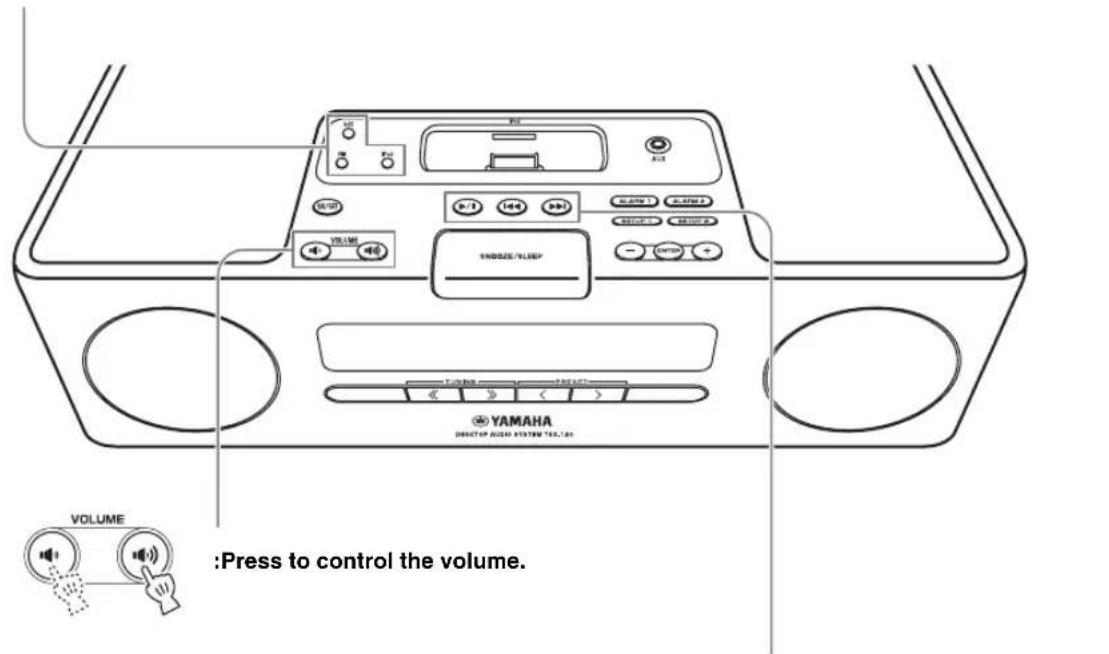

:Press to control the volume.

:Press to play/pause.
: Press to skip backward/forward.
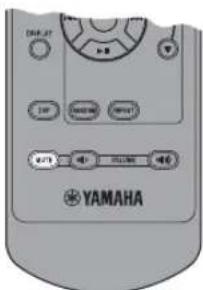

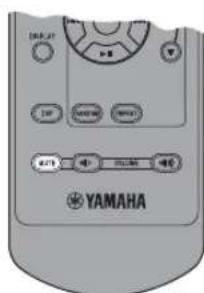
:Press to turn off the sound. Press again to resume the volume.
- Even when the system is off, you can start playback of the desired source by pressing one of the Source buttons, without pressing ON/OFF.
LISTENING TO iPod™ AND EXTERNAL SOURCES
Listening to your iPod™
Notes
- The unit is compatible with iPod touch, iPod (Click Wheel including iPod classic), iPod nano and iPod mini.
- You can remove your iPod whenever you want.
- Some features may not be available depending on the model or the software version of your iPod.
■Playing back normally
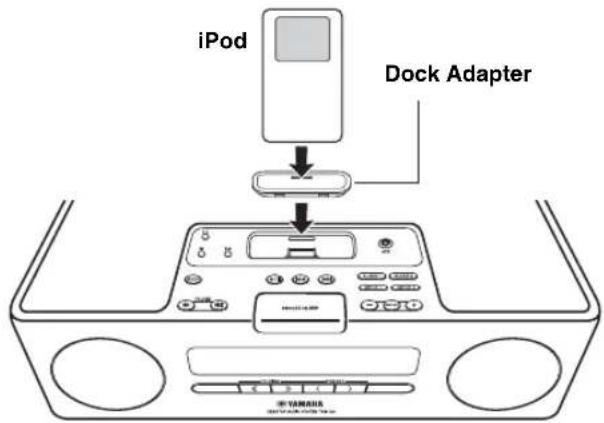
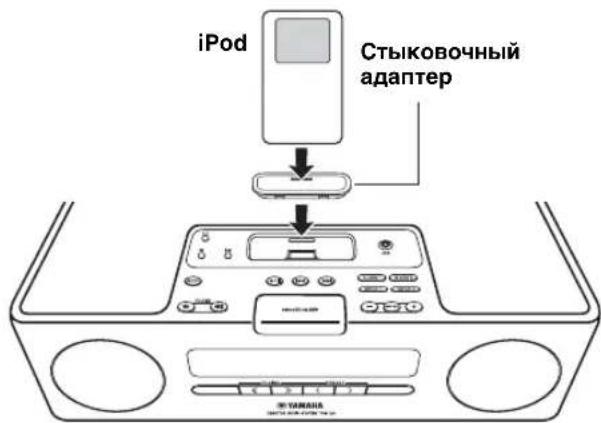
1 Set your iPod into the iPod dock.
Notes
- A compatible Dock Adapter (not supplied) is required to attach to the unit.
- The iPod may not be set in the iPod dock securely if it is in its protective case.
2 Select iPod.
Playback starts.

#
For operations of your iPod, refer to the instruction manual of your iPod.
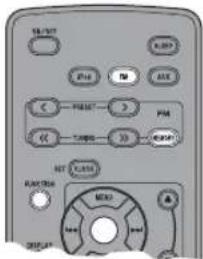
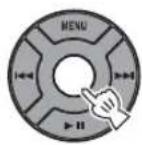
■Selecting music on iPod with the remote control
You can also operate with your iPod only when LIST DISP is set to iPod (P. 11).
MENU: Go back to the previous menu.
Center: Confirm.
/ : Select menu or items.
Using shuffle/repeat mode
After the above steps 1 and 2, you can enjoy shuffle and repeat mode.
Press RANDOM to switch shuffle mode for iPod.

Press repeatedly.
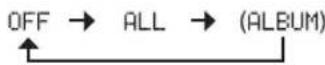
Note
You cannot set ALBUM when you use an iPod touch.
Switch repeat mode.

Press repeatedly.

Switching the playback information display

Switch the display in iPod playback mode.

Press repeatedly.
You can change the information display as follows.
Song number and elapsed time (default setting)
Song number and remaining time
Song name
Artist name
Album name
Back to the default setting
Notes
- This function is available for iPod touch, iPod classic, iPod 5 th generation or later, and iPod nano. However, even with these models, this function may not be available depending on the software version of your iPod.
- If you intend to disconnect the power cable of the unit for a long time, remove the iPod from the unit.
Switching the playback list display
LIST DISP allows you to select iPod or the front panel display of the unit to display the list.

Example: When LIST DISP is set to F.PANEL
If you set LIST DISP to iPod, you can also control playback operations and display the menu list on the iPod.
#
The default setting is iPod.
Note
When LIST DISP is set to F.PANEL, the menu list appears only on the front panel display of the unit, and all playback operations except stop are available only on the unit. These operations are not available with your iPod.
1 Select LIST DISP from the FUNCTION menu.

2 Select iPod/F.PANEL.
Playing back external sources
■Playing back normally
1 Connect your portable audio device to the AUX terminal using a commercially available 3.5 mm mini plug cable.
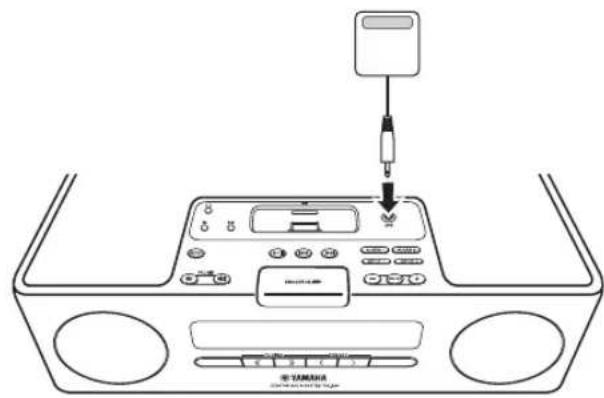
Note
Turn down the volume of this unit and your portable audio device before connection.
2 Select AUX.

3 Start playback on the connected portable audio device.
For operations of the portable audio device, refer to the instruction manual of the device.
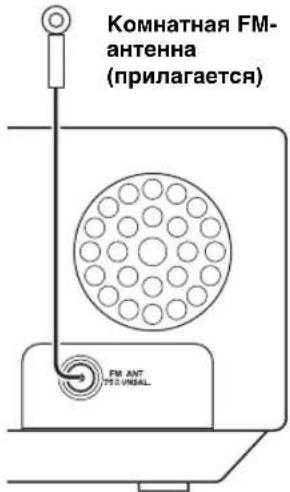
LISTENING TO FM RADIO STATIONS
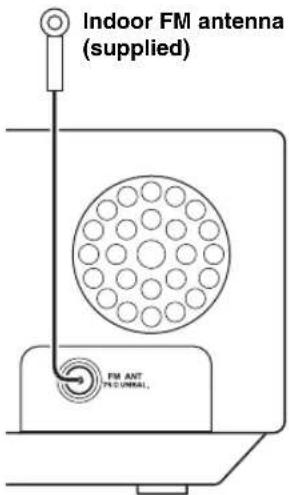
Connecting antennas
Notes
The antenna should be stretched out.
If radio reception is poor, change the height, direction, or placement of the antenna.
- If you use an outdoor antenna instead of the supplied FM antenna, reception will be better.
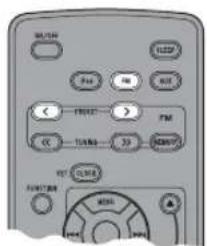
Tuning radio stations
1 Turn on FM.

2 Start automatic tuning.

Press and hold.
#
- If the signal received from the station you want to select is weak, you can also tune into radio stations manually by pressing TUNING repeatedly.
- You can also use TUNING < 12 >> on the front of the unit.
Note
If you tune to a station manually, the sound is monaural.
Presetting radio stations
You can store your favorite FM stations with the preset function.
Auto preset
1 Press and hold MEMORY for more than 2 seconds in FM mode.

10:30 AUTO PRESET START?
2 Start the auto preset.
■Manual preset
1 Tune into a favorite radio station.
2 Press MEMORY.

3 Select the preset number you want to store to.

Note
To cancel the manual preset, press MEMORY again.
4 Complete the manual preset.

- You can preset up to 30 FM stations.
- You can delete a preset station by pressing FUNCTION MENU / Center to select PRESET DELETE.
Note
When you perform the auto preset, all stored stations are cleared and the new stations are stored.
Selecting preset radio stations (Preset tuning)
Select the preset radio station in FM mode.


You can also use PRESET</> on the front of the unit.
Receiving Radio Data System stations
■Selecting stations by program type
1 While receiving FM, select PTY SEEK from the FUNCTION menu.
2 Select a program type.

3 Initiate scan.
Available program types
| Program type Descriptions | |
| News | News |
| Current Affairs | Current Affairs |
| Information | Information |
| Sport | Sport |
| Education | Education |
| Drama | Drama |
| Cultures | Culture |
| Science | Science |
| Varied Speech | Varied |
| Pop Music | Pop Music |
| Rock Music | Rock Music |
| Easy Listening | Easy Listening Music |
| Light Classics M | Light Classical Music |
| Serious Classics | Serious Classical Music |
| Other Music | Other Music |
Switching the information display of Radio Data System
While receiving Radio Data System, switch the information display.

Press repeatedly.
Station name
↓
Program type
↓
Text information related to the station
↓
Current time
↓
Original display
↓
Status display
Note
If the signal transmission of the Radio Data System station is too weak, this unit may not be able to receive Radio Data System information completely. In particular, RT (Radio Text) information uses a lot of bandwidth, so it may be less available compared to other types of information.
Adjusting the time automatically
This function sets the clock automatically based on RDS information.
1 While receiving FM, select AUTO CLOCK from the FUNCTION menu.
2 Select and set the desired setting.
Note
The clock information may differ depending on the received station.
TROUBLESHOOTING
In case of a problem with the unit, check the following list first. If you cannot solve your problem with the suggested solutions or if your problem is not listed below, turn off and unplug the unit, and consult the nearest authorized Yamaha dealer or service center.
General
| Problem Cause Solution | |
| The system turns on but immediately shuts off. | The power cable may be connected improperly. |
| The unit may have received a strong electrical shock such as lightning or excessive static electricity. | |
| The speakers make no sound. | The volume may be set to the minimum level. |
| The mute function may be on. | |
| The source may be incorrect. | |
| Sound suddenly turns off. | The sleep timer (P.8) may be set. |
| The unit does not operate properly. | The unit may have received a strong electrical shock such as lightning or excessive static electricity, or power supply may have dropped. |
| A digital or high-frequency equipment produces noises. | The unit may be placed too close to the digital or high-frequency equipment. |
| The clock setting has been cleared. | The unit is left more than one week after you disconnect the power cable from the wall outlet. |
iPodTM
| Problem Cause Solution | ||
| “iPod Connect Error” appears on the front panel display. | There is a problem with communication between the unit and your iPod. | Turn off the system and reconnect your iPod to the unit. |
| The iPod does not charge up. | The iPod is set in the iPod dock improperly. | Remove the iPod from the unit, then set it in the iPod dock again. |
| “iPod Not Connected” appears on the front panel display after you set the iPod. | ||
| The iPod makes no sound. | ||
| The iPod sounds, but you cannot operate it with the unit or the remote control. | ||
| You cannot operate from the iPod. | LIST DISP is set to F.PANEL. Set LIS | T DISP to iPod from the FUNCTION menu (P. 11). |
| The playback information is not displayed on the front panel display. | The iPod you set is not compatible with the playback information display. | Only iPod touch, iPod classic, iPod 5th generation or later, and iPod nano are compatible with the function. |
| “Unknown iPod” appears on the front panel display after you set the iPod. | The iPod being used is not supported by the unit. | Only iPod touch, iPod (Click Wheel, including iPod classic), iPod nano and iPod mini are supported. |
Radio reception
| Problem Cause Solution | ||
| The preset selecting function does not work. | The preset (memory) may have been erased. | Preset radio stations again (P.13). |
| Too much noise during stereo broadcast. | The FM antenna may be connected improperly. | Make sure the FM antenna is connected properly (P.13). |
| The radio station you selected may be far from your area, or the radio wave reception is weak in your area. | Try manual tuning to improve the signal quality (P.13) or use a multi-channel outdoor antenna. | |
| Even with an outdoor antenna, radio wave reception is weak. (Sound is distorted.) | Multipath reflection or other radio interferences may have occurred. | Change the height, direction, or placement of the antenna. |
Remote control
| Problem Cause Solution | ||
| The remote control does not work properly. | The remote control may be operated outside its operation range. | For information on the remote control operation range, refer to “Using the remote control” (P. 3). |
| The remote control sensor on the unit may be exposed to direct sunlight or lighting (inverted fluorescent lamps). | Change the lighting or orientation of the unit. | |
| The battery may be worn out. Replace the battery with a new one (P. 3). | ||
| There are obstacles between the sensor of the unit and the remote control. | Remove the obstacles. | |
SPECIFICATIONS
■PLAYER SECTION
iPod
- Supported iPod .........iPod touch, iPod (Click Wheel including iPod classic), iPod nano, iPod mini
AUX IN
- Input connector. STEREOL/R: 3.5 Φ STEREOMiniJack
■AMPLIFIER SECTION
Minimum RMS output power per channel. 15 W + 15 W (6 Ω 1 kHz, 10% THD)
- Driver unit. 8 cm (3") full-range driver × 2
TUNER SECTION
Tuning range U.S.A. model 87.50 to 107.90MHz Other models 87.50 to 108.00MHz
GENERAL
Power Supply U.S.A. model AC 120 V,60 Hz Other models AC 220 to 240V 50Hz
Power consumption 20 W
- Standby Power consumption 1.0 W or less
- Dimensions (W × H × D) 350 × 120 × 240 mm (13-3/4 × 4-3/4 × 9-7/16 in)
Weight 3.7 kg (8 lbs. 3 oz)
Specifications are subject to change without notice.
iPodTM
"iPod" is a trademark of Apple, Inc., registered in the U.S. and other countries.
"Made for iPod" means that an electronic accessory has been designed to connect specifically to iPod and has been certified by the developer to meet Apple performance standards.
Apple is not responsible for the operation of this device or its compliance with safety and regulatory standards.
Limited Guarantee for European Economic Area (EEA) and Switzerland
Thank you for having chosen a Yamaha product. In the unlikely event that your Yamaha product needs guarantee service, please contact the dealer from whom it was purchased. If you experience any difficulty, please contact Yamaha representative office in your country. You can find full details on our website (http://www.yamaha-hifi.com/ or http://www.yamaha-uk.com/ for U.K. resident).
The product is guaranteed to be free from defects in workmanship or materials for a period of two years from the date of the original purchase. Yamaha undertakes, subject to the conditions listed below, to have the faulty product or any part(s) repaired, or replaced at Yamaha's discretion, without any charge for parts or labour. Yamaha reserves the right to replace a product with that of a similar kind and/or value and condition, where a model has been discontinued or is considered uneconomic to repair.
Conditions
- The original invoice or sales receipt (showing date of purchase, product code and dealer's name) MUST accompany the defective product, along with a statement detailing the fault. In the absence of this clear proof of purchase, Yamaha reserves the right to refuse to provide free of charge service and the product may be returned at the customer's expense.
- The product MUST have been purchased from an AUTHORISED Yamaha dealer within the European Economic Area (EEA) or Switzerland.
- The product must not have been the subject of any modifications or alterations, unless authorised in writing by Yamaha.
- The following are excluded from this guarantee:
a. Periodic maintenance and repair or replacement of parts due to normal wear and tear.
b. Damage resulting from:
(1) Repairs performed by the customer himself or by an unauthorised third party.
(2) Inadequate packaging or mishandling, when the product is in transit from the customer. Please note that it is the customer's responsibility to ensure the product is adequately packaged when returning the product for repair.
(3) Misuse, including but not limited to (a) failure to use the product for its normal purpose or in accordance with Yamaha's instructions on the proper use, maintenance and storage, and (b) installation or use of the product in a manner inconsistent with the technical or safety standards in force in the country where it is used.
(4) Accidents, lightning, water, fire, improper ventilation, battery leakage or any cause beyond Yamaha's control.
(5) Defects of the system into which this product is incorporated and/or incompatibility with third party products.
(6) Use of a product imported into the EEA and/or Switzerland, not by Yamaha, where that product does not conform to the technical or safety standards of the country of use and/or to the standard specification of a product sold by Yamaha in the EEA and/or Switzerland.
(7) Non AV (Audio Visual) related products. (Products subject to "Yamaha AV Guarantee Statement" are defined in our website at http://www.yamaha-hifi.com/ or http://www.yamaha-uk.com/ for U.K. resident.)
- Where the guarantee differs between the country of purchase and the country of use of the product, the guarantee of the country of use shall apply.
- Yamaha may not be held responsible for any losses or damages, whether direct, consequential or otherwise, save for the repair or replacement of the product.
- Please backup any custom settings or data, as Yamaha may not be held responsible for any alteration or loss to such settings or data.
- This guarantee does not affect the consumer's statutory rights under applicable national laws in force or the consumer's rights against the dealer arising from their sales/purchase contract.
Information for Users on Collection and Disposal of Old Equipment and Used Batteries

13/14
These symbols on the products, packaging, and/or accompanying documents mean that used electrical and electronic products and batteries should not be mixed with general household waste.
For proper treatment, recovery and recycling of old products and used batteries, please take them to applicable collection points, in accordance with your national legislation and the Directives 2002/96/EC and 2006/66/EC.

By disposing of these products and batteries correctly, you will help to save valuable resources and prevent any potential negative effects on human health and the environment which could otherwise arise from inappropriate waste handling.
For more information about collection and recycling of old products and batteries, please contact your local municipality, your waste disposal service or the point of sale where you purchased the items.

Pb
[Information on Disposal in other Countries outside the European Union]
These symbols are only valid in the European Union. If you wish to discard these items, please contact your local authorities or dealer and ask for the correct method of disposal.
Note for the battery symbol (bottom two symbol examples):
This symbol might be used in combination with a chemical symbol. In this case it complies with the requirement set by the Directive for the chemical involved.
Miscous/hors tension. 4
La lecture commence.

#
Centre: Confirmation.

m = 311
LYSSNA PÅ iPod™ OCH EXTERNA
KALLOR. 10
Lyssna pà din iPodTM 10
Spela upp externa kallor 12
LYSSNA PAFM RADIOSTATIONER. 13
LYSSNA PÅ iPod™ OCH EXTERNA KÄLLOR
Lyssna pà din iPod™
Anmärkninger
De standardinstelling is iPod.
Opmerking
BocpoH3BeJeHHe 3ByKa H3 BHeIHHX HcTOyHHKOB. 12
IIPOCJIYIINBAHNE PAJIOCTAHIHN FM. 13
IIOKIOUeHne aHTeHH 13
HacrpoKa paJnoctaHn 13
IpeBapHTeJIbHaHa HAcTpoHKa paHIOCTaHcH.. 13
Bb6op IpeBapHTeJIbHO HAcTpoEHHbIX paHIOCTaHIu (HaCTPOIka Ha IIpeJBaPHTeJIbHO HAcTPOCHHyIO paHIOCTaHIuIO) 14
PpHem paJIOCTaHcN C cHHaJIOM CHCTeMbI paJIOJaHHbIX. 14
DONOHHTEJIbHAR MHΦOPMALI
BO3MOXHbIe HENCIIPABHOCTH IN CIOCObI Ix YCTPAHEHn 16
O6nne 16
iPodTM 16
PaHnoHnem. 17
IyIbT IY 17
TEXHUNUECKHEXAPAKTEPHCTIKN18
06 3Tom pyKOBOdCTBe
B 3TOM pyKOBOCTBe OIEpaHIN, KOTOpbIe BbINOJIHIO Tc C IIMOIOK 3TOrO aIIHpTa HIN IIyJIbTa DY o6bAcHIOCTc Ha IIpIMepe KHOIOK aIIHpTa.
CIMBOJ“"pIOM c HOMepom (HomepaM) cTpaHHIO6O3Haayet COOTBeTCTBYIOIIne cTpaHHJIJIcIpaBKn.
IppmehaHncoepKxat BaXHyIO HhOpMaHIO O 6e3oHaChOCTN HnHcTpyKuHn IO 9KcHlyatauH. 0603Haayet COBET NO NOBOy ONepaHn.
- 3TO pyKOBOCTBO OTHeaTaHO Do IPOH3BOJCTBa aHaIapata. KOHcTpyKnH IN TexHHueckne XapaKTepHCTKN MOryT 6bITb YAcTHNHO H3MeHbI B pe3yJIbTaTe yCOBepHECTBOBaHN H T.I. B cJIyae pa3JIHm MeKJy pyKOBOCTBOM H aIIIapAToM IIpHOpHTET HMeet aIIIapAe.
Ppnilaraemble akceccyapbl
CneIyIOUHne AKECECyApbI BXOJIT B KOMIIJIeKT IOCTaBKn aIIapapa. Y6eHTecb TOM, YTOK aIIIapaty IIpHJIarAOTcR Bce IpeCTaBJIeHHbIe HIXe KOMIOHOHTbl.
IyIbT Dv Hctpykunrno 3KcHryamaaFM-aHTehHa (1,4M)

ПОДГOTOBКИСПОЛьЗОВАнIO DAHHORO ANIAPATA
① KhoNkn noncka: AUX, FM, iPod (t- ctp. 9)
②ON/OFF:BkJIOueHHe/BbIKIOueHHe CnCTEmbl (cTp.4)
③VOLUME: KhoNKn ynpaBneHn rpoMkoCTbO (cTp.9)
④ KhoNk ynpaBneHn BocnpOn3BeDeHnEM (cTp.9)
⑤ DOK-CTAHUNI iPod (cTp.10)
⑥ AUXB(ctp.12)
⑦ KhoNkynpaBneHHnCnHAnOM (CTp.5)
SNOOZE/SLEEP (c7 7,8)
⑨KoNoHKn
10 KhoNKn ynpaBneHn FM (tCtp. 13)
⑪ DmCnnei nepeDnei naHenn (cTp.4)
12Kpo3eTke
13CLOCK SET (s; ctp.4)
14FUNCTION
DISPLAY (ctp. 11)
16DSP: PpeeknioueHne B pexm DSP (ctp.8)
17 IpepaTnK INHpaKpaChbIX CnHaNoB (CtP.3)
SLEEP: YcTaHOBKa BpeMeHN Do nepeXoJa B peXm OxuHaHn (15 cTp.8)
19 MENU ▲/▼ /LentpaJIbHbI KaHaI* (cTp. 10)
20 RANDOM/REPEAT: Перхов Ворини ржимов Bocpon3be demma iPod (Ft. 10)
*KHOIIKa OKpyTIOIΦOpMbI B IeHTpe B JaHHOM pyKOBOIcTBc Ha3bIbAcTcA LcHTpaJIbHbIKaHaJI.
■Ipeed nCNoB3OBAHnem nylbTa D
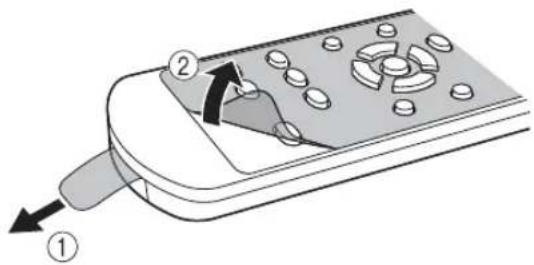
①IpeepnncnoB3oBAHHeMnybTaDy ydaNITe N3OJNUOHHyIO BKnaAky.
②IpeepnObn3oBaHneMnylbTa DY ydaJIte npo3paHyIO nIeHky.
IcnoJb3ObaHne npJbTa Dv
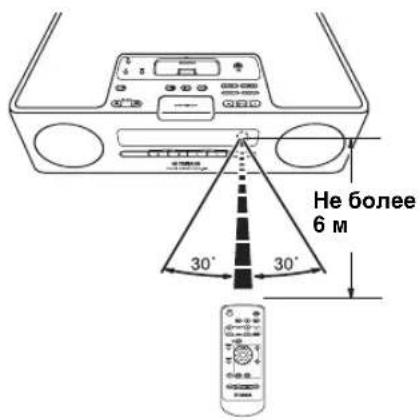
IcnoJb3yIte nyIbT yHa paacctOaHm 6 M ot annapata n HnpaBJIaTe ero Ha daTynK y.
PpMMeaHn
He npJINBaHTe KnKoCTb Ha IIyIbT N
He poHnIe npJIbT Nv.
HeocTAbIHTyBcJeIyIOHxMecTaX: -KapKHX HIN BJaXHBIX,HaIIpHMeP,B BaHHoH HIN BO3Jc O6orpeBaTeJI -OeHb XOJIIOHbIX MecTaX -B 3aIIbIJIcHHbIX MccTaX
3aMeHa 6aTapeB nylbTe Dy
Pn yMeHbIeHH pa6oOerno hnaa30Ha npJbTa Y 3aMeHHTe 6aTapeKy.
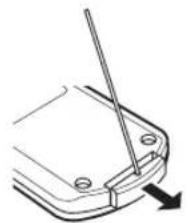
YTO6bI CHATb KpbIbKy, nCNoB3yInTe npAMyIO WnNlbKy.
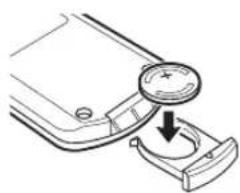
3aMeHnTe 6aTapeKky Ha HOByIO 6aTapeKky CR2025.
3aKpOTe KpbIkwKy.
PnmuMeaHn
BCTABLTBe 6aTapeKy,co6IOJAAIIOJIAPHOCtB(+n-).
- EcIN 6aTapeKapaaacb, HeMeJIeHHO H3BJIeKHTe ee H3 IIyIbTa IY IpeIOBpaIIeHHB3pIBa HIN yTeYKNKHCJOTbl.
- EcIN 6aTapeKa HauJIH IPOTEKaTb, HEmcIeHHO yTHJIN3HpyHTe ee. Co6JIIOaIIte octopoKHOCTb, YTO6bIKNcIOTA, BITREKAIOIH N3 6aTapeKn, He IIHJIa HA KOKy IIN OJExJy.
- Ipej yctraHOBko HOBO 6aTaapeKu TuaTeJIbHO npotpnte OrJeIHeHne JIA 6aTaapeKn.
BaTapeKcJeIyETYTHIN3HPOBAbTB COOTBeCTBHN C MeCTHBIMN HOPMaMH.
BkIIOueHne/ByIKIOueHne CnCTembl
1BcTaBbTe Ka6eIb NHTaHnB p03eTKy.
2HaXMMTe KhoNky ON/OFF, YTo6bl BKNIOHTb CnCTemy.
PnB BKIOHcNCTeMbI OTo6paXaETcH "Hello", a 3aTEM qacbl n npyra HOpmaun.

PnHmep: oTo6paXHHpeXKHa BOeNpOH3BcEHHa iPod
PnOtKIOUeHmN CNTeMbI OTo6paXaETcA "Good-bye", nocJe Yero 6yDenOTo6paXaTbcra TOnbko HOpMaunr O DaTe N BpeMeHn.

#
- 3TOT aHHPaT HMeET cyHKHIIO ABTOMATuecKOTo OTKJIIOeHH, KOtOpA IO3BOJAE T ABTOMATuecKN BbIKIOyATb ChCTemy, ecIIN OHa OCTaeTcB KIIIOyeHHoB TeueHHe 1 Yaca 6e3 BOCHIPON3BeDEHHN IIN BbIHIOJIHeHH KaKH-X-JIHO dpyTHX OIIepaII. DaHHa cyHKIIH IOCTyHHA, TOJIbKO eCIN B KauecTBE HcTOHHKa 3aJah iPod.
ⅡIJIpeBOda cHCTeMBI B pexHM OXHaHHaHXMHTe H yIepKHBaHTe KHOIKy ON/OFF B BcpxHe qacTH yCtpoHCTBa He MeHee 3 cekyH. B pexHMe OXHaHHa HINCHIE CPeHHe HAnCJH OTo6paKaactc Hc BCn HHOpMaHH. Ipn Eton MIOTpE6JrMa MOIHocTB CHHXaETc. YTO6bI BBHTN H3 peXHMA OXHaHHa HAXMHTe KHOIKY ON/OFF.
JaKe ecHn cHcTeMa BbIKIOHeHa/HaXOHTcBpeXHMe OxHuaHH,dyHKIIH CNHJIOB OCTAcTcIIOCTyHHO.
PeepBHaIeHbIaMHTNpeDtBpaIaEITnoTePcoXpAHCHbIX DaHHbIX, TaKHX KaK HAcTPOKa BpeMeHH,JaKe ecJIN cHCTeMa BbIKJIIOyeHa/HaXOJTcR BpeKHMoeKIIaHn.
HacrtpoiKa yacOB
YacbI He HacrpanBaIOrca Ha 3aBOJe.
1HaXMMTe KHonky CLOCK SET.

2BbI6epnte KaKdIbnnapaMeTp c NOMOuKHOHONK MENU A/Vn IOdTBePnte BbI6Op,HaKaB KHonky LcHTpaJIbHbI KaHaJ.
YcTaHOBHTc 3HaueHnIa YEAR MONTH DAY TIME.
PpMeeaHnA
-3Ty OIepaHIO MOKHO BbIOJHTB TOJIbKO C IOMOIIbIO IIyJBta INCTaHIOHIOHO yIpaBJIcHH.
3HaueHHe BpeMeHH OTo6paXaTeBΦOpMaTe 12-ACOB (AM/PM) B 3aBHCnMoCTN OT MoJeJH. HaIIpHMcp: "4:00PM".
YTO6bI IepeKJIIOuATb fOpMaTbI BpEmEH 12 hAcOB/ 24 yaca, HAXMNTc KHOIHKN FUNCTION MENU △/V→ LcHTpaNBbHk KaHaN IIaBB6opa TIME FORMAT, 3aTeM HAXMNTc KHOIIKN MENU △/V→ LcHTpaNBbHk KaHaN IIaBB6opa 12H/24H.
IapametpbBpeMeHHbuyyTyepe3 HeeJIIO IOcJIe OTKIOUoyHnKa6JIINITaHHNOTPO3eTKN.
ИСПОЛьЗOBAHNE ПОЛЕЗHBIXФУHKЦИ
IcnoJb3OBaHne yHKnCnHaJa
TOT aHnapat HmeeT bOHyIO fYHKuHO cHrHaJa. KaKIOc BpEMa CnHaJa BceIa OTOppaKaTeC c npaBOJJIeBOI CTOPoHbI YacOB Ha IINCIJIe cpeJHei NaHcJI. PnB KJIIOUcHN NfYHKIIIN CNHaJa 3aRopA Tc HNIIKAtOp CnHaJa N BpEMa. Ha CnHaJI MOXHO yCTaHOBHT pa3JIHUYIO My3bIKy, KOtopa IIPOCSUYINBAETc BO BpEMa HAcTPOKH.
PnmuMeaHne
3Ty ONEpaHIO MOKHO BbIIOJIHNITb TOJIbKO C IIMOIIIBKO KHOIOK Ha BcpxHeuactn aIIIapata.
Hactpoika BpeMeHH 3Byka cnHaJa
PnmeaHne
ДЯ OTMeHbI HAcTpoKnФуHKINCHrHaJIa BO BpeMa BBIOJIHeHHOIEpaHn HaKMHTe KHOIIky SETUP1/ SETUP2.CrHaJI He ycTaHOBJeH.
1HaçaJo hacrpoiKn ALARM1/ ALARM2.
IIpn Heo6xOJHMOCTn yCTaHOBKn cHrHaJa ALARM1 BbI6epHTe SETUP1,aJIa ALARM2 BbI6epHTe SETUP2.

2yctaHOBNTe BpeMa CnHaJa.

①Πρη γγταHOBKΦγHκινιν ΣιΓHαλι δγδειτ MιΓaMbιHιNΚaTOp CιΓHαλι.
②Kpome TOrO,6yTeT MnraTb BbIbHpaEmbI 9JIeMeHT.
③MeTka>c npaBOcTOPOHBIO3HaHaeT,TOHaIpyTHX 3KpaHAX IMeOTcN I pyTHe 3JIeMeHTbIMEHIO.IIpaIepExoJa K HAcTpOINKeCJIeNyIOUeTo 3JIeMeHTa MeHIO HaKMITEKNOHKy ENTER.
3BbI6epNTe n yCTaHOBNTe 3HaueHnA dIa TYPE BEEP SOURCE VOLUME.

① IocJIe ycTaHOBKn BpeMeHn CnHaJa BB6epNTe TnI CnHaJa: BEEP/ BEEP+MUSIC/MUSIC.
-BEEP:TOJbKO3ByKOBOcHnHaI
-BEEP+MUSIC:3ByKOBoN cHHaJI N My3bIka H3 BbI6paHHOrO HcTOUHNKa BXoJHO rHaJa, iPod/FM
-MUSIC:ToJbKOmy3bIka
Ipn yctaHOBKe IJI npaMeTpa TYPE 3NaueHnBEEP+MUSIC MoKHO BOCIIPOH3BeCTn Heo6XODmYIO My3bIKy C nCTOuHNKa BXoJHOrO cHHaJIa (iPod/FM) H 3BYKOBOI cHTHaJI OINHOBpeMcHNO B ycTaHOBJIeHHOE Bpem. YpOBcHb rPOMKOCTH My3bIKN BO3paCTaET IOCTeJIeHHO, o6ecneHBAJ KOMΦOpTHoe IIpo6yKdHeHne,a 3aTEM B 3aJaAHHOE BpeM IIPO3ByHT 3ByKOBOI cHHaJI.

② BbI6epHTe TnI 3ByKOBOrO cHrHaJa. B anIIapate xpaHntc8 5 pa3JIuHbIX TnIOB 3ByKObIX CnIHaIOB. Ipn BbI6ope MUSIC/BEEP+MUSIC B IIare ① ekpaH BEEP aBTOMaTHueckn IpoIyckaTcR.
EeBb6paH 3ByKOBo CHHaJI, eTO MoXHO
IpeBaPteJIbHO IpocJyMaTb, HxKAB KHOIKY
SNOOZE/SLEEP. YTo6bIO OCTaHOBTb
BOcIpOn3BeJeHHe 3ByKOBOrO ChHaJa, CHOBa HaKMHTe
KHOIKY SNOOZE/SLEEP.

③Bb6epHTe OINH H3 HCTOuHNKOB My3bIKN: iPod/FM HJN LAST SET.

PnBbIbOpc BEEP Bmare ①KpaH SOURCE nponyckaetraBOMaTHueKn.
iPod
MOxHO BbIpaTb PLAYLIST HIN RESUME PLAY.
Bocpon3BcJcHc My3bIKn HaHcTc cHaJaIa cnHcKa Bocpon3BeJeHHa. Ipei BblIOJIHeHHem 3ToI ONepaHH co3JaIte CnHCOK Bocpon3BcJeHHa HcIOJIb3YeMOM iPod (r crp.7).
Bb6epnte HacptpoTe PLAYLIST.


Bb6epntu HactpoIte Heo6xOumbI CNUCOK Bocpon3BeHnA.

Bb6epHTe HacptpoTe RESUME PLAY, cJH Heo6xOJIMO IPOJOJIJKNTb BOCIIPOH3BcIeHHe My3bIKN, KOTOPa INppaJa IocJIeINPa3B KaueCTBe 3ByKa cnHaJa.

FM
YcTaHOBHTe HOMep IpeBapHTeJIbHOH NaCTPOKN/NaCTOTbl.
LAST SET
CoxpaHHTe NocJIeHNIO BbI6paHHyHOHaCTpOHy.
PnmeaHne
EcH Iapametp SOURCE He HactpoeH IOJIHOCTbO Hn Hc yctaHOBJeHO yctpoHCTBO BOCIPOHNBcEHnMy3bIKH, 6yET 3ByaTb 3BYKOBo cHHaJ. Haipmep, ecH anIIapaT He MoKet IIPOHTaTB JaHHbIe Ha iPod, 6yET 3ByaTb 3BYKOBo cHHaJ.
④YCTAHOBHTe rPOMKOCtB CHTHaJa.
YCTAHOBHTe rPOMKoCTb BIIaTe ④ C HOMOIIbIO KHOIIKN ENTER, IocJIe Ycero yCTAHOBKa CNHJaIa 6yET 3aBepHeHa. JIA CNHJaIa yCTAHOBJIeHO ABTOMaTHueCKoe cpaBaTbIBaHHe.

BkJIOueHHe/BbIKJIIOueHHe yHKcNn CnHaJa
BKKIOHTb/BbIKJIIOHTb ΦyHKIIIO CHHaJa MOKHO C HOMOIIbIO KHOIIOK ALARM1/ALARM2, OJHaKO IIpN BbIIOJIHeHHN 3THX OIIepaHn HaCTpoiKn CHHaJa He 6yUyt ydaJIeHbl.
BkIIOueHne/BbIKJIIOueHne yHKcnn cnHaJa.

Pn BkIOueHH FyHKINH CnHJa 3aropTc HnHKaTOP CnHJaI N BpeM.
IcnoJb3OBAHne yHKuIN NOBTOpeHnCnRHaJa
Pn BocpOn3BeHenn 3ByKOBOrO CHHaJa, My3bIKn HIN NX OJHOBpeMeHHOM BOCpON3BeJeHHN MOKHO HCIOJIb3OBaTb QYHKUHO NOBTOpeHNAJ.
BkIIOUeHne cyHKcIM NOBTOpeHn cNrHaJa.

IapametpbI cyHKiH MoryT pa3JHuaTbcB 3aBnCHMOCTN OT THHaJa, yCTaHOBJeHHORO B TYPE (cTp.5).
BEEP:Пи НжаTNK HONIK SNOOZE/SLEEP 3ByK cnHaJa IIpeKpaIaETCn BO3O6HOBJAeTcN Yepe3 5 MInHyT.
MUSIC:Пин haжаTNKHOIIKN SNOOZE/SLEEP BOCIIPOH3BeIeHHe My3bIKN IIpeKpaIaETCa H BO3O6HOBJIaTeTcA Yepe3 5 MHHyT.
BEEP+MUSIC:Прнхаатн КНОК SNOOZE/ SLEEP 3ByK cnHajIи BOCIIpon3BeJeHne My3bIKn IIpeKpaIaIOTc. 3ByK cnHajIa BO3O6HOBJeTcR uepe3 MmHyT.
KpOme KHOIIKN SNOOZE/SLEEP Ha yctpoIcTBe, cyHKINIO Ipo6yJKeHHN OTO cHa MOXHO TaKKe YcTaHOBHTb, HaxKaB KHOIIKY SLEEP Ha IIyJIte INCTaHIOHHOY npabJeHHN.
IpekpaeseHne 3ByaHnCnHaJa
Moxho IpekpaTb 3ByaHne cHHaJa
3 cJeIyIOIMN cNoocO6amn.
Pi np IpeKpaueHH 3ByaHna cHHaJa cHCTema
OTKJIHOaETcra.
Haxmnte Khonky ALARM1/ALARM2.

HaXmTe KhONKy ON/OFF.

Haxmnte u ydepknaite KhONky SNOOZE/SLEEP B TeueHne 2 ceKyhd.

EcHHeIpeKpaHTb3ByaHaHHe cHHaJa, OH ABROMaTHueCKn IepctraHc3ByaTaHpe360MHyT.
- Ecln OTKJIOHTb cHrHaJI, HNHKaTOp cHrHaJa HcYe3HeT. TTo6bl CHOBA BKJIOHTb cyHKIIO cpaBaTBaBHn CHrHaJa, HaxMITE KHOIIky ALARM1/ALARM2.
EeHH BbIKIOHTb CnHAI,TOIIN yIO6CTBa HcHOBaHnaCTpoKa BpemHn Ipyrnc yctAHOBKn 6yNT coXpaHeHbI.
PnmeaHne
Bce npyrne OIepaHn, KpOme ycTaHOBKn cyHKnn Hpo6yKHeHH OTO cHa, BbIKIOUChHc 3ByKOBOrO CHHaJa HIN pCryJInpOBKn ypOBn rPOMKoCTn, Hc 6yDyT IOCTYHHb IIpn BOCnPOn3BeDeHH 3ByKOBOrO CHTHaJa.
O cnnckax Bocnpn3BepeHna
MoKHo co6paTb IIO6HMbIe KOMIO3HmN B 6n6JInOTcky Ha iPod n cJeJaTb Hx CINcOK. 3TO Ha3bIbAeTcCnCKOM BOCIpOu3BeJeHHa. Pn BbIbOpce CnCKa BOCIpOu3BeJeHHa 6yIeT BbIOJIHeHO BOCIpOu3BeJeHHe KOMIO3HmN 3TOrO CnCKa. JdKe IIpy UdaJIeHHN KOMIO3HmN H3 CnCKa BOCIpOu3BeJeHHa OHa He 6yIeT yJaJIeHa H3 6n6JInOTcKn.
IJIIOJUyHeHHIIOJINHTeJIbHOH HΦOpMaIIH O CIIHCkAX BOCIIPOHN3BcDEHHa CM. pyKOBOJCTBO IIOJIb3OBaTeI iPod.
Hac troponka pexnma OxndaHna
MOxH0 3aIaTb aBROMaTHueCKoe OTKIOUeHHe cHCTeMbI B Ha3HaueHHoe BpeM.
Bb6op BpeMeHn nepexoJa cnCTeMbI B peKIM OXndaHna.
EeHN BKJIIOUeHa FyHKIINI IEPEXOa CnCTeMbIB peXIM OxHdAHN, 3arOpHTcSLEEP.
MOxHO TaKHe HcHIOJIb3OBaTb 3Ty fYHKUH, HaXaB KHOIIKy SLEEP HA IIyIbTe JY.
Hac troponka pexnma peryntopa npKoctn
I3MeHeHHe npKocTH nHcIIe IpeepHe IIaHeJI.
Ipn ycTaHOBKe IJn Iapametpa DIMMER 3HaueHHAUTO peryJIrTop npKocTH HactpanBaCTcABTOMaTHUcCKN B3aBHCIMOCTN OT npKocTH IomeIIeHH. EJIb II OMEIIeHH TeMIO, IpeepHJIaHEJIb cTAHeT TeMHee.
中
HactpoikKa IIO yMOJIaHaHHo: AUTO.
1BbI6epnTe DIMMER B MeHIO FUNCTION.

Bb6epHTe DIMMER c HOMOIIbIO KHOIIKN LcHtpaIbHbI KaHa, cJeBOH cTOpOBH IINCIJIe IpeJHeI NaHEII OTo6pa3HTcR. <. TRObI BcPHyTBcR B McHO FUNCTION, HaxMHTe KHOIIKY MUNHa IIy.IbTe DY.
2BbI6epnTe Heo6xOaMbI ypoBeHb npKocTn.

PepexoBpexmDSP
MOxHOBbIbpaTb3ByuHaHHB COOTBcTCTBHN C OKpykaIOeI cpeoHIN NO cBOemy ycMoTpeHHIO.
PepexoBpexIMDSP.

Haxmamte noBtOpHo.
Pn KaKJOM HkaTNN KHOIIKN DSP HacTpOIKIIEpeKJIIOUaOTcCJIeIyIOuIM O6pa3OM:
NORMAL: HopmaJIbHoe 3ByaHne
MILD: EctectBeHHoe mMarKoe 3ByaHne
HEAVY: MoiHoe 3ByaHne (HaCTpoiKa no yMOnuHaHIO)
LIVE:ЖиboaеpeaJIncTnHoe3ByuHne↓
Bo3BpaT K pexmy NORMAL
OCHOBHOE YNPABJIEHNE


:BbIbOp HxKHOro nCTOuHnKa (HaxMMTe OdHy I3 KHOJOK nCTOuHnKa).*


:OTKJIOUHeHne 3Byka.ДЯ BKJIOUeHn 3Byka HaXMMTe KHOKNy eue pa3.
* IaKe ecJn cHcTeMa BbIKIOHeHa, MoKHO HaayrB BoCipOn3BeJeHHe HyKHO IOToCHNKa, HaaKAB OHy H3 KHOIOK HCTOHTHKa H He HaKIMar KHOIIky ON/OFF.
BOCПОН3BEДЕHNE 3BYKA C iPod™ И N3 BHESHNX ICTOCHNKOB
Bocnpo3BeDeHne c iPodTM
PpmeaHn
-Дань anapat coBmectHm c iPod touch, iPod (Click Wheel BkIoUyA iPod classic), iPod nano H iPod mini.
- MoXHO OTOCQHHHTb iPod B JIOBOc Bpemr.
-HeKoTObIX MoJeIe HIN BepCHN IPOrpaMMHOrO 06ecnueHHia Pod MorYt 6bITb HcIOCTyHHbI ONpeJIeHHbIe cyHKHIIH.
06bHoe BocnpOn3BedeHne
1yctaHOBNTe iPod Ha DOK-CTaHcNIO iPod.
PnmuMeaHna
KycpoBCTBy Hc06XoHMO IprHKpeINbctbIKOBOuHbI aHaTep (He npJIaraeTc)
iPod, BO3MOXHO, He yIacTcH HaeJxHO yCTaHOHTb HaIOK-CTaIHIO iPod, cCIN OH HaxOHTcB 3aIHTHOM cyTJIpe.
2BbI6epnte iPod.
HaHHeTcBOCIIpon3BeIeHne.

#
HΦopMaHIO o paOte iPod cm. B HcTpkyKIIH NO 3KCHyataaHn iPod.
Bb6op My3bIKn Ha iPod c nomoucbio nyIbTa Dv
YIpaBIAITb IPoD MoKHO TaKKe B TOM cIyue, KOrJa IIa IPOD yCTaHOBJIe HapamcTp LIST DISP (cTp.11).
MENU:Bo3BpaT K IIpcIbIyIeMy McHIO.
UeHTpaBbHbKaHaJ: IIOITBepXdHeHne.
A / V :Bb6OpMeHIO HIN 3JIeMeHTOB.
IcnoJb3ObaHne pexnMa cMeaHHoro/ NOBTOPHORBOBCPON3BeDeHNA
IocJIe BbIIIOJIHeHHOINcAHHbIX BbIIIE IaROB 1 H2 MOxHO HcIOJIb3OBaTb peXHM CMeIIaHHORIO IOBOTOPHOBOCIIPOH3BeJeHHA.
HaXmnte KhoNky RANDOM, YTo6bl BkIouHTb dIy iPod pexim BocnpOn3BeDeHnB IpnOn3BOJbHOI NOcJIeOBAteJIbHOCTn.

Haxmante NOBTOPOHO.

Pnmeyane
PnHIOJIb3OBAHHiPod touchpexHM ALBUM HeIOCTyIeH.
IpeekIIOUeHne peXnMa NOBTOPHOROBocnpOn3BeDeHn.

Haxmamte noBtOPO.

IpeekJIoueHne IucnIe HnΦopMaun O BocnpOn3BeDeHN
Ipeeknouhte dincnpen B pexm Bocnpon3BedeHn iPod.

Haxmatae noBtOpHo.
MoxHo H3MeHnTb OTo6paKaMyo Ha IInCIIeep HhOpMaHIO CJeIyIOHM O6pa3OM.
Homek Komno3n m npowee BpeMa BocnpOn3BeDeHna (HaCtpoNka no yMOnuHaHNO)
Homek Komno3nui n octaBueeec BpeMa BocnpOn3BeDeHn
Ha3BaHne KOMno3nMn
IMRA NcnoHnTeJIa
Ha3BaHne anb6Oma
Bo3BpaT K HacTpOKe no yMoJuaHnIO
Приимеань.
-Данная Функшия дocупma ДЯ iPod touch, iPod classic, iPod 5ro IOKOJIeHn HIN 6OJIe CCIO3HrO, a TAKKe DIA iPod nano. OJHaKO JIaKe IIpr INIOJIb3OBaHHN IpeCHeHbIX MoIcJIe N E Ta fYHKIIH MaKcET 6bITb HeIOCTyIHn B 3aBnCHMoCtH OT BepChn IIpoPpAMMHoro o6ecIeueHn iPod.
Ecln IJIaHpyetcOToeDHHHTb Ka6JIb HHTaHna anIapata Ha IIInTeJbHbI NepHO, H3BJIeKHTe iPod ot anIapata.
■IpeeknoueHne dncnpe, oTo6paKaUoJero cncocK BocnpOn3BeDeHnA
C NOMOIIbIO LIST DISP MOxHO BbI6paTb iPod HIN IINcIIe IIpeIHeN IaHcJIaI aIIapTa IJIA OTO6paKeHH cIIncKa.

PnHmep:ecHHIINapametpa LIST DISP yctAHOBHeHO 3HaueHne F.PANEL
EclnI IaIapametpa LIST DISP yctaHOBHTb 3HaueHHe iPod, MoXHO TaKKe yIpaBJIrTb OIIepaINM BOCIPON3BeJeHn H OTO6paKaTb cNcOK MeHIO Ha iPod.

Hacrpoika no ymoJuaHHIO: iPod.
PpmeaHne
EcH IIIpaMaTePa LIST DISP yctaHOJEHO 3HaueHHe F.PANEL, yipapBtB OIIepaINM BOCIPON3BeJeHHn H OTOp6paKaTb CINcOK MeHO MOxHO TOJIbKO Ha aIHapate. IIaHHbe OIIepaINN 6yJET HeIOCTyINHbHa iPod.
1BbI6epnte LIST DISP B MeHIO FUNCTION.
2BbI6epnTe iPod/F.PANEL.
Bocnpo3BeDeHne 3ByKa n3 BHeuHnx nCTOuHnKOB
06bHoe Bocnpn3BedeHne
1NoDKIIOUHTe NOpTaTnBHOe ayDNOUCrpoiCTBO K TepMHaJy AUX c nOMOuIbIO DocTyHoro B npoJaKe Ka6eJIc MmH-pa3beMOM 3,5 MM.
PpimueaHne
PepaIOJIKNIOHHeEM BbIKIOHHTe 3ByKaaHHoro yctpoCTBa HIOPTaTHBHO rayHOyCtPOcTBA.
2BbIbepnTe AUX.

3BkIIOHTe BOCpOIN3BeDeHne 3ByKa Ha NOdKJIIOUeHHOM NOpTaTnBHom ayDnOyCtpoiCTBe.
中
3a HhΦopMaIIHe O pa3JIHbIX ΦyHKIIHX HnAcTpOKnKax ayHNOyCTpoIcTBA cm. B pyKOBoIcTBe K HeMy.
ПОСЛУSHINBAHNE PAДNOCTAHLCИ FM
Подклioченье aHTeHH
PnmuMeaHn
- AHTeHHy CJJeIyET paTbHytB.
- IIpn IipheMe cIa6o Ro paHIOcHrHaJa H3MeHHTe opHeHTaIIHO aHTeHHbI IO BBICOTE, HaIIpaBJIeHHIO JIN MeCToIOJIOKeHHIO.
IIpHem cHrHaJa yIyIHHITcI pH hCIOJIb3OBAHH HApYKHOaHTeHHbBMeCTo IIpNJIarAeMOFM-aHTeHHbI.
Hacrtpoika paadnoctaun
1HaXMMTe KHonky FM.

2 3aynctnte aBtOMaTHueckyIO hAcTpoiKy.

Haxmte u ydepKbaine HaxaToi.
#
- ECIN CHHaI CTAHIN, KOToPyIO Tpe6yeTcBbI6paTB, CJINHKOM CJa6bM, MOXHO TaKKe HAcTpOHTbcr Ha paAnocTaHINIO BpyHyIO, IOBTOPO HAxHMaR KHOIIKN TUNING<.</>>.
- MoXHO TaKKe HcHIOJIb3OBArTB KHOIIKN TUNING<->, paioJOKeHHBe Ha IepeHHaHcHn aHapara.
PnmuMeaHne
EcHn HacTpoKny paHocTaHmBbHIOHHITb BpyHyIO, TO 6yIeT BOCpOHN3BOIDHTbc MOHOoHNEcKn 3ByK.
IpeBapnteJbHa NaCTpOJa paNocTaHcN
H36paHHbIe FM-paHIOCTaHIIMMOXHO coXpAHHTb c IOMOIIbIO yHKIN IIpeBapNTcJIbHOH NaTPOIKN.
■ ABTomatUchecka npeBapuTeIbHa HacTpoKa
1 Haxmnte KhoNky MEMORY u ydepXnBaIte ee 6oJee 2 cekyHd B pexnme FM.

10:30 AUTO PRESET START?
23anyctnte aBTOMaTnueckyIO npedBapnteIbHyIO HactpoiKy.
PyuHa npeBapnteIbHa HaCTpOka
1BbINOJIHnTe HAcTpoIky Ha HyxHyIO paIIOCTaHcIIO.
2HaXMMTe KHonKy MEMORY.

3 BbIbePHTe HOMep npeBapNTbHOn NaCTpOuKN,Ha KOTOpbTpe6yeTcB bInoJIHNtbcoxpaHeHne.

PnmuMeaHne
TTO6bI OTMeHHrB pyHHyIO IIpeBaHPTeJIbHyIO HAcTPOHy IOBTOpHO HAKMHTe KHOHNy MEMORY.
43aBepuTe pyHyIO npedBaPntbHyIO HaCTpoiKy.

- MoKHO BbHIOJIHHb IIpeBapHTeJIbHyIO NaCTPOky JIO 30 cTaHnFM.
- TTOI TO6bI yJaJIHTb IpeynycTaHOBJIeHHyO paJIOHocraIHIO, HAXMHTe FUNCTION MENU △/▼→ UENTpaJIbHbIK KaHAN II BbI6epHTe PRESET DELETE.
PnmeaHne
Pn BbIOJIHeHHaBtOMaTHueckKHOHacTPOHKnBce yctAHOBIEHHbc paHIOCTaHH 6yIyt c6pOIIeHbI, a BMeCTO Hx 6yIyt coXpaHEHbI HOBbI paHIOCTaHH.
BbI6Op npedBapnteIbHo NaCTpoEHhbIX paIIOCTaHcN (HaCTPOIka Ha npedBapNTeIbHO NaCTpoEHHyO paIIOCTaHcNIO)
Bpexime FM BbI6epnte npedeBapnteJbHo HAcTpoEHHyIO paNocTaHcHIO.


Kpome TOrO,MOxHO BOCIOJIb3OBaTbcra KHOIIKOI PRESET</>Ha IepeIHeI IaHeJIn ycTpOcTBA.
PpneMaIOCTaHcN C cnHaJOM CNCTeMbI paNoDaHHbIX
Bb6op cTahn no Tnny nporpaMMbl
1Bo BpeMa npema FM BbIbePnte PTY SEEK B MeHIO FUNCTION.

2BbI6epnte Tn nporpaMMbl.

33anycntte cKaHnpOBaHne.
DocTyNbI Tnbl nporpaMM
| Ти п порамьо Onисанne | |
| News | Новости |
| Current Affairs | Актуалы соб扭曲и |
| Information | Информанные и рогамьо |
| Sport | Спортыбibles и рогамьо |
| Education | Овочаюше рогамьо |
| Drama | Драма |
| Cultures | Куль.typa |
| Science | Hayka |
| Varied Speech | Раздунчыс рогамьо |
| Pop Music | Пос-музika |
| Rock Music | Рок-музika |
| Easy Listening | Легская музika |
| Light Classics M | Легская клASSЧЕСКая музika |
| Serious Classics | Сер bjESHA KIASSCHECKA музika |
| Other Music | Прочая музika |
IpeeknoueHne OTo6paXaemOn Ha dncnlee HOpMaun npnpneMe paNoctaun C cnHaJOM cNCTEmbl paNoDaHHbIX
Pn npnepe paHocTaHc n CnHanom cnCTeMbI paNDoHaHbIX MeHnTe OTO6paXaemyu Ha DnCnnee HOpMaun.

HaxmMaTe NOBTOPO.
Ha3BaHne cTaHcnn
Tn nporpaMMbl
TeKCTOBa HOpMaun, OTHoCAaC K CTaHcnn
TeKyuee Bpem
HaaybHbI dncnle
Dncnle coToHHA
PnmeaHne
EcH crHaJI paHocTaAHHH c CHrHaIOM cHCTeMBI
paHIOaHHbIX cHIIKOM cIa6bi, aHHbI aIIapAT,
BO3MOxHO, He cMOXcT IIpHHMaTb HOpMaIHIO cHCTeMBI
paHIOaHHbIX B IOJIHOm Mepe. B YacTHOCTH, JIJA
HHOpMaIHn RT (paHOTekr) Tpe6yetc 6oJIbIIa IIOLOca
IIPOYCKaHH, IO3OTomy OHa MOXeT 6bITb MEHee IOCTyHa B
MeHbIIeI CTeEHN IIO cpABHeHHO C dpyHM NTHAMH
HHOpMaIHn.
■ABytomatnuecka HacTpoNka BpeMeHn
C IOMOJIbIO JaHHoI cyHKuIN BbIIIOJIHReTcABTOMaTHuecka HAcTpOJa HaCoOB Ha OCHOBaHHHΦOpMaunRDS.
1Bo BpeMa npema FM BbI6epnte AUTO CLOCK B MeHIO FUNCTION.
2BbI6epnte n 3aadte HxKHyu NaCTpOy.
PnmuMeaHne
HfopMaunnoOBpMcHHMOKCTpaHuaTbcB 3aBHCMOCTNOTIHHMaEMOHTaHHIN.
BO3MOXHbIE HENCINPABHOCTN IN CNOCObI INX YCTPAHEHnA
B cIyuae BO3HKNHOBeHHa IIpo6JIem IIpH IcIOJIb3OBAHH aIIapAta, cHaayaIa ObaHTTeCB K cJIeIyIOHeMy CINCKy. EcIIN ycTpaHHTb IIpo6JIemY cIIMOUIbIO IIpeIIOKeHHbIX cIOco6OB He ydaetC, IIN ecIIN IIpo6JIema He Yka3aHa B CINhKcE, BbIKJIOUHTe aIIIapAT N OTCOeIHnHTe OT cETN JIeKTPoIIHTAHNA, 3aTeM ObaTHTecB K 6JIHXaIIeMy aBTOPI3OBAHHOMy IIJIepy Yamaha IIN cepBHCbI ΒeHTP.
067ne
TEXHNUECKNEXAPAKTEPNUCTUKN
PA3ENIPOINrPbIBATEJRA
iPod
- Пдемеркнвадетсй iPod............ iPod touch, iPod (Click Wheel BKIOIOTa iPod classic), iPod nano, iPod mini.
AUX IN
- BxOHH pa3bem..... CTEPEO JI/II: 3,5Φ CTEPEO mini-jack
PA3dEN YCINJNTEN
-МИИМаЛьная БыхОДнай мошноctь RMSHa KaHаJI 15BT+15BT (6Ω1KΓI,10%OHN)
-ⅡHHAMHK 8cmHnHAMK OKpykaIOIeO 3ByaHnX2
PA3DEJI TIOHEPA
-ⅡHnHa30HnactpoiKn MoJIbIJIa CIIIA 87,50-107,90 MgU IpyTHe MoJeI. 87,50-108,00 M
OBsPRA3DEJ
- NcToHHK IIHTaHnMoJIbIJI CIIIA 120B IpeMeHHOro ToKa,60TJpyrHe MoJeI..220-240B IpeMeHHOro ToKa,50T
-3HepeIIOIop6JIeHHe 20Bt
-3HeprnoIOTpe6JIeHHe BpeXHMe OxHJaHHa 1,0BT HJIM MeHee - ΓαδαριNTbI (ΠΙ × B × Γ)……… 350 × 120 × 240 MM
Bec. 3,7 k
TexHHueckHe xapaKTepeHCTHKM OryT 6bITb H3MeHeHbI 6e3 yBeOMJIeHHJ.
iPodTM
"IPod" ABJIECTC TOBAPHbIM 3HaKOM Apple, Inc., 3aperHcTpnpoAHHO B CIIIA HpyHX cTpaHax. 3HaK "Made for iPod" yka3bIbAet, YTO 3JIeKTPoHHbIe INHnHaJIeXHOCTH, HA KOTOpBX HMeETc 3TOT 3HaK, IIpeHn3HaueHbI IINI IOCoEINHeHHa K yCTpOHTby iPod, a TAKKe YTO OHN CeTHΦHnHPoABHbI pa3pa6OTHKOM B COOTBeTCTBHn C OKCIyAtaIHNOHHbIM CTaHApTaMn Apple. KopHopaHr Apple He HecET OTBcTBEHHOCTH 3a pa60ty DAHHoro yCTpOHTBA HIN ETO COOTBeTCTBHe CTAHApTaM 6e3IOACHOCTH H peRyJITHBHbIM HopMaM.
HΦopMaçnI dI IOnb3OBaTeJIeI NO c6OpY n yTnJIIn3aÇnI cTapOI annapaTypbl n IcNoJIb3OBaHHbIX 6aTapeek

3TH 3HaKn Ha aHa npaType, yHaKOBkax H B COIPOBOHTeJbHbIX JOKyMeHTax YKa3bIBaOT Ha TO, TTOIOEpcKaHHbc EJIckTpHuEcKHe N 3JIckTPOHHbc IIpu6Opbl H BaTapeKn He JOJIKHbIBBbIpaCbIBaTBcR BMeTe C O6bIYHbIM IOMaIIHHM Mycopom.
IpaBbHOB 06pa6OTKn, xpaHcHn H yTHIN3aHn CTapO aHAPAtpbH HcHIOJIb3OBAHHbIX 6aTapeek NOKaJyInCTa CdaBaHTe IN B COOTBeTCTByIOHne c6OpHbIe NYKtBJ, corJaacHO BaIIMeMy HAIOHOHaHOMy 3aKOHOaTcJIbCTBy HdpeKTNB 2002/96/EC n 2006/66/EC.

Pn npabHbHOM OTcJIeHHN 3THX TOBapOB H 6aTapeck, Bbl IOMorAcTe COxpaHrTB cEHhbc pecypbI H IIpeIOITbPaIIaTb BpeIHoe BJIINHHe Ha 3IOpOBbe JIOJe H OKpykaIOIyIO cpeHy, KOtOpoe MOKeT BO3HNKHyTB N3-3a HecooTBeTCTByIOIeRO o6paIeHHc COTXOJaMH.
3a 60JIe e IOIPO6HON HNΦOpMaIIHe O cOpe H yTHIN3aIIHN CTapbIX TOBAPOB H 6aTapeek IOKaJIyIcTa o6paIaIaHTecb B BAIIy JIOKaJIbHyIO aIMHHNCTpaIHIO, B BAIII pHiEMHbI IyHKT HJH B MaIa3HN Ie DE BBI IIpHNo6peJIH 3TH TOBApBI.

[InHΦopMaunno yTnun3aunB dpynx cTpaHax 3a npedeJamN Ebponeckoro Co103a]
3Hn 3HaKn IeCTBnTeJIbHbI TOJIbKO Ha TeppHTOpHN EbpOIIeCKORo CoIO3a. EcIN Bbl XOTHe H36aBnTbcra OT 3THX IIpeIMMeTOB, IOXaJIyHcTa o6paTHTeCb B BaIIy JIOKaJIbHyIO aIMMHnCTpaIIHIO HIN IIpoaBny H cIpocHTe O IIpaBNIbHOM ChOCObe yTHIN3aIIHH.
06paTnte BHIMaHHe Ha 3HaK dJa 6aTaapeek (Dba 3HaKa Ha 3aAdHe CTOpOHe):
3TOT 3HaK MoKET HcIOJIb3OBAbTcB KOM6HHaIIN CO 3HaKOM yKa3bIAHOIM M O coJepXaHHN XMHKAJIH. B 3TOM cIyac 3TO yIOBJCTBOPrCT Tpc6OBaHHM yCTaHOJIeHHbIMN IInpckTKBOH IO HcIOJIb3OBAHHIo XMHKAJIH.

YAMAHA