TSX132B - Docking station YAMAHA - Free user manual and instructions
Find the device manual for free TSX132B YAMAHA in PDF.
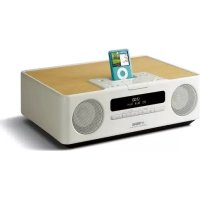
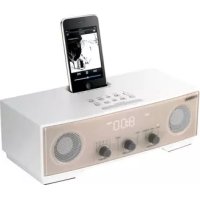
| Product type | Docking station with CD player, FM radio, compatible with iPod/iPhone/iPad |
| Dimensions (W × H × D) | 370 × 110 × 230 mm |
| Weight | 3.8 kg |
| Power supply | AC 230 V, 50 Hz |
| Power consumption | 30 W (operating), ≤ 3 W (standby), ≤ 0.5 W (energy-saving) |
| Maximum output power | 15 W + 15 W (6 Ω, 1 kHz, 10% THD) |
| Supported audio formats | Audio CD, CD-R/RW, MP3, WMA (data CD and USB) |
| iPod/iPhone/iPad compatibility | iPod touch (1st to 4th generation), iPod nano (2nd to 6th generation), iPhone 4S/4/3GS/3G, iPad (3rd generation/iPad 2/iPad) |
| USB port | 1 x USB (for mass storage devices and iPod/iPhone/iPad) |
| AUX auxiliary input | 1 x 3.5 mm mini-jack stereo socket |
| FM radio | Range 87.50 – 108.00 MHz, 30 presets, RDS |
| Alarm function | IntelliAlarm: 3 types (SOURCE+BEEP, SOURCE, BEEP) with gradual volume, snooze |
| Sleep timer | 30/60/90/120 minutes |
| Remote control | Yes, CR2032 battery included |
| Display | LCD screen with automatic or manual brightness adjustment |
| Equalizer | Bass, midrange, treble adjustable (remote control) |
| Care and cleaning | Use a dry and clean cloth. Do not use chemical solvents. |
| Safety | Class 1 laser, do not open the casing. Disconnect during thunderstorms. |
| Spare parts and repairability | Contact authorized Yamaha after-sales service. Do not attempt to repair yourself. |
| General information | Manufactured by Yamaha. Instruction manual available in PDF format. |
Frequently Asked Questions - TSX132B YAMAHA
User questions about TSX132B YAMAHA
0 question about this device. Answer the ones you know or ask your own.
Ask a new question about this device
Download the instructions for your Docking station in PDF format for free! Find your manual TSX132B - YAMAHA and take your electronic device back in hand. On this page are published all the documents necessary for the use of your device. TSX132B by YAMAHA.
USER MANUAL TSX132B YAMAHA
1 To assure the finest performance, please read this manual carefully. Keep it in a safe place for future reference.
2 Install this unit in a well ventilated, cool, dry, clean place away from direct sunlight, heat sources, vibration, dust, moisture and cold. For proper ventilation, allow the following minimum clearances. Top: 15cm (6 in) Rear: 10cm (4 in) Sides: 10cm (4 in)
3 Locate this unit away from other electrical appliances, motors, or transformers to avoid humming sounds.
4 Do not expose this unit to sudden temperature changes from cold to hot, and do not locate this unit in an environment with high humidity (i.e. a room with a humidifier) to prevent condensation inside this unit, which may cause an electrical shock, fire, damage to this unit, and/or personal injury.
5 Avoid installing this unit where foreign object may fall onto this unit and/or this unit may be exposed to liquid dripping or splashing. On the top of this unit, do not place: - Other components, as they may cause damage and/or discoloration on the surface of this unit. - Burning objects (i.e. candles), as they may cause fire, damage to this unit, and/or personal injury. - Containers with liquid in them, as they may fall and liquid may cause electrical shock to the user and/or damage to this unit.
6 Do not cover this unit with a newspaper, tablecloth, curtain, etc. in order not to obstruct heat radiation. If the temperature inside this unit rises, it may cause fire, damage to this unit, and/or personal injury.
7 Do not plug in this unit to a wall outlet until all connections are complete.
8 Do not operate this unit upside-down. It may overheat, possibly causing damage.
9 Do not use force on switches, knobs and/or cords.
10 When disconnecting the power cable from the wall outlet, grasp the plug; do not pull the cable.
11 Do not clean this unit with chemical solvents; this might damage the finish. Use a clean, dry cloth.
12 Only voltage specified on this unit must be used. Using this unit with a higher voltage than specified is dangerous and may cause fire, damage to this unit, and/or personal injury. Yamaha will not be held responsible for any damage resulting from use of this unit with a voltage other than specified.
13 To prevent damage by lightning, keep the power cable disconnected from a wall outlet or this unit during a lightning storm.
14 Do not attempt to modify or fix this unit. Contact qualified Yamaha service personnel when any service is needed. The cabinet should never be opened for any reasons.
15 When not planning to use this unit for long periods of time (i.e. vacation), disconnect the AC power plug from the wall outlet.
16 Be sure to read the "TROUBLESHOOTING" section on common operating errors before concluding that this unit is faulty.
17 Before moving this unit, press set the system to off, and disconnect the AC power plug from the wall outlet.
18 Condensation will form when the surrounding temperature changes suddenly. Disconnect the power cable from the outlet, then leave this unit alone.
19 When using this unit for a long time, this unit may become warm. Turn the system off, then leave this unit alone for cooling.
20 Install this unit near the wall outlet and where the AC power plug can be reached easily.
21 The batteries shall not be exposed to excessive heat such as sunshine, fire or the like. When you dispose of batteries, follow your regional regulations.
- Keep the batteries in a location out of reach of children. Batteries can be dangerous if a child were to put in his or her mouth.
- If the batteries grow old, the effective operation range of the remote control decreases considerably. If this happens, replace the batteries with new one as soon as possible.
- Do not use old batteries together with new ones.
- Do not use different types of batteries (such as alkaline and manganese batteries) together. Read the packaging carefully as these different types of batteries may have the same shape and color.
- Exhausted batteries may leak. If the batteries have leaked, dispose of them immediately. Avoid touching the leaked material or letting it come into contact with clothing, etc. Clean the battery compartment thoroughly before installing new batteries.
- If you plan not to use the unit for a long period of time, remove the batteries from the unit. Otherwise, the batteries will wear out, possibly resulting in a leakage of battery liquid that may damage the unit.
- Do not throw away batteries with general house waste. Dispose of them correctly in accordance with your local regulations.
22 Excessive sound pressure from earphones and headphones can cause hearing loss.
This unit is not disconnected from the AC power source as long as it is connected to the wall outlet, even if this unit itself is turned off by in this state, this unit is designed to consume a very small quantity of power.
WARNING TO REDUCE THE RISK OF FIRE OR ELECTRIC SHOCK,DO NOT EXPOSE THIS UNIT TO RAIN OR MOISTURE.
CAUTION
Danger of explosion if battery is incorrectly replaced. Replace only with the same or equivalent type.
There is a chance that placing this unit too close to a CRT-based (Braun tube) TV set might impair picture color. Should this happen, move this unit away from the TV set.
CONTENTS
NAMES OF PARTS AND THEIR FUNCTIONS 2
Top panel / Front panel. 2
Front panel display. 3
Rear panel. 3
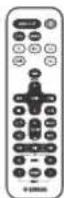
Remote control. 4
TURING THE SYSTEM ON 5
Playing music from your iPod. 6
Using repeat/shuffle playback (remote control only)....6
LISTENING TO CD AND USB DEVICES 7
Listening to a CD. 7
Listening to a USB device. 8
Using repeat/shuffle playback (remote control only)....8
LISTENING TO FM STATIONS 9
Selecting an FM station. 9
Presetting FM stations (remote control only) 10
Selecting preset FM stations. 11
LISTENING TO EXTERNAL SOURCES 11
USING THE ALARM FUNCTION. 12
Using "DTA Controller" to set the alarm 12
Setting the alarm 13
Operations while the alarm sound is playing. 14
USING THE SLEEP TIMER 15
ADJUSTING THE TONE (remote control only)....15
ADJUSTING THE BRIGHTNESS OF THE FRONT PANEL DISPLAY (remote control only) 15
TROUBLESHOOTING 16
NOTES ON DISCS AND USB DEVICES. 18
SPECIFICATIONS. 19
Features
- Play back music from external devices such as your iPod/iPhone/iPad, audio/data CDs, USB devices, or external devices via the AUX, and listen to the FM.
- Use your favorite music or a beep tone as an alarm. When the set time arrives, the music you select is played at the volume that you specify, giving you the ideal start to your day (IntelliAlarm function).
- You can take advantage of more sophisticated alarm functionality by using the free "DTA Controller" application for the iPod touch/iPhone/iPad (P. 12).
- You can easily store and recall 30 of your favorite FM stations.
- Bass, middle, and treble can be adjusted to your taste.
About this manual
- References to the iPod appearing in this manual also include the iPhone.
- If an operation can be performed using either the buttons on the unit itself or from the remote control, the explanation will focus on operation using the main unit.
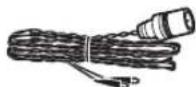
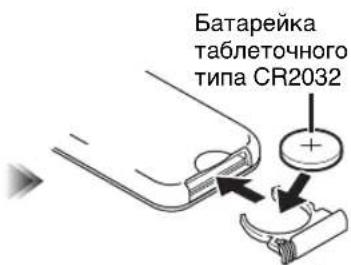
Supplied accessories
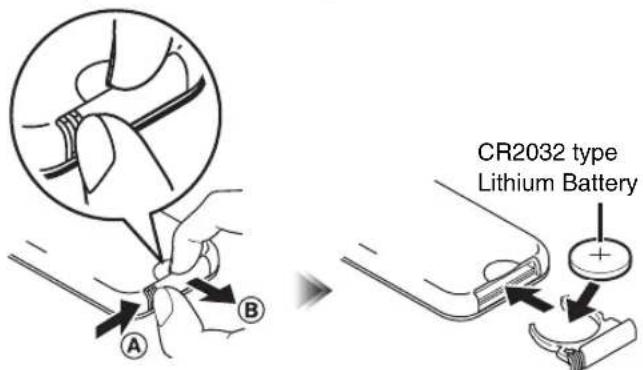
Remote control USB cap
(uses a CR2032 type Lithium Battery)
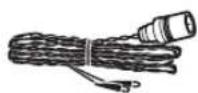
Dock coverFM antenna


Keep the USB cap out of reach of children so as to ensure that it is not mistakenly swallowed.
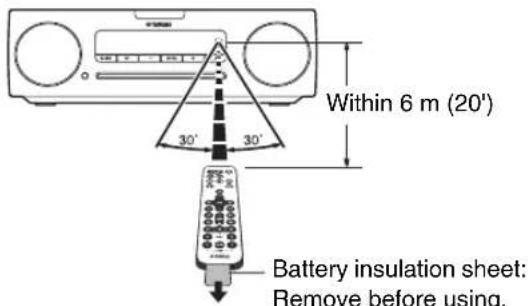
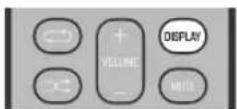
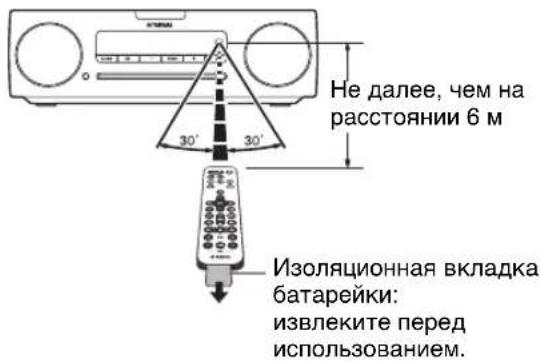
How to use the remote control
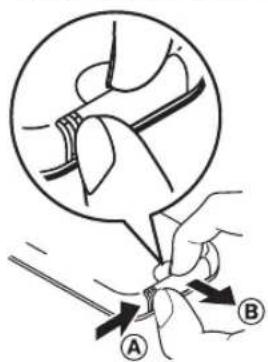
Replacing the battery in the remote control
While pushing the release tab in direction A slide out the battery holder in direction B
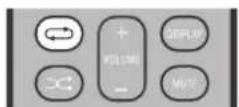
Top panel / Front panel
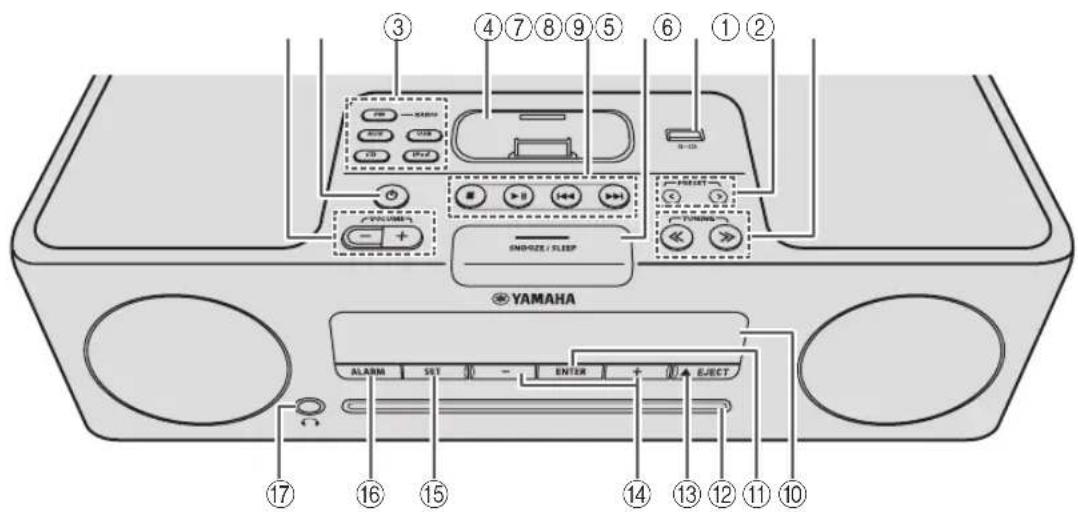
①VOLUME-1+
Adjust the volume.
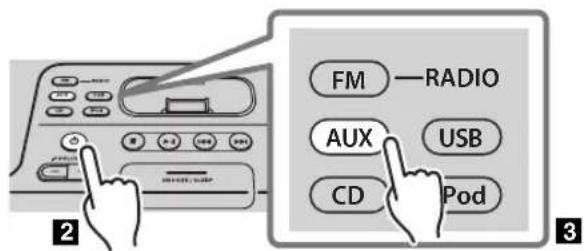
② (Power)
Press to turn the system on/off (P. 5).
③Source buttons
Switch the audio source to be played.
If you press one of these while the system is off, the system will turn on and then switch the audio source.
④ iPod dock
Connect your iPod here (refer to "Placing your iPod in the iPod dock" below).
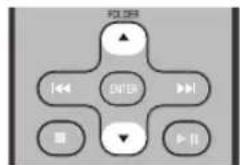
⑤Audio control buttons
Use these to operate the iPod/CD/USB device.
: Stop
▶II: Play/Pause
:Skip,Search backward/forward (press and hold down)
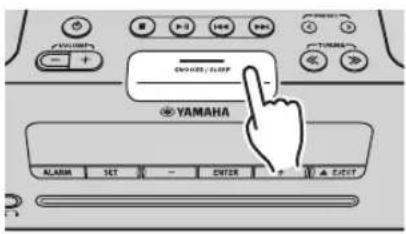
(6)SNOOZE/SLEEP
Set the sleep timer or switch the alarm to snooze mode (P. 14, 15).
⑦USB port
Connect your USB device / iPod / iPhone / iPad here (P. 8).

When the USB device is not in use, put the USB cover in place to protect the connector.
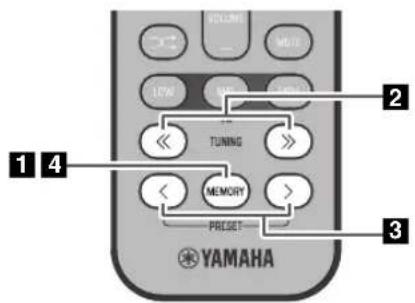
⑧PRESET<Y
Use these buttons to select a FM station (preset) that you've stored (P. 11).
⑨TUNING <<
Tune the FM (P.9).
Front panel display
The clock and other information is displayed here (P.3).
①ENTER
Confirm a selected item or value.
12Disc slot
Insert a CD here (P. 7).
13 JECT
Eject the CD.
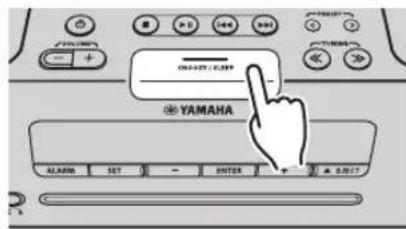
⑭-1+
Select an item or value when setting the clock or the alarm.
15SET
Set the alarm (P. 13).
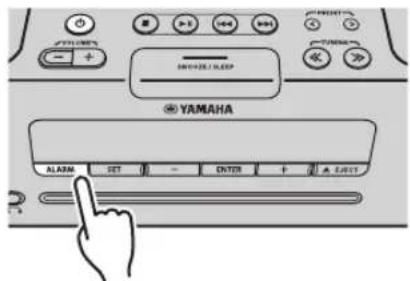
16ALARM
Switch the alarm on/off (P. 14).
17 (Headphone jack)
Connect headphones here.
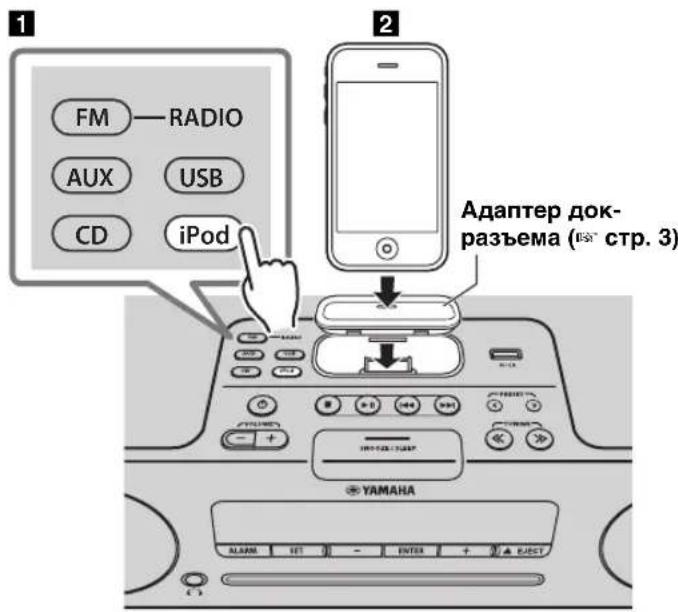
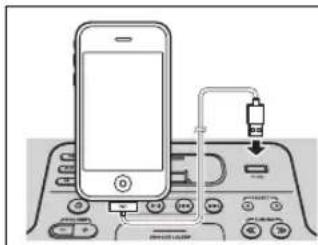
Placing your iPod in the iPod dock
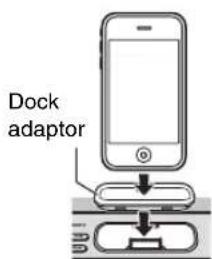
Your iPod will be recharged while it is connected to the dock. However if USB is selected as the source, the iPod will not be recharged.

- Be sure to use a dock adaptor that is compatible with your iPod. If you do not use the adaptor or the adaptor is not compatible, the connection could be loose or poor, which could cause damage to the connector. For details on dock adaptor information, please visit Apple's official website.
- If an iPod in a protective case is forcibly connected, the connector may be damaged. Remove the protective case before connection.
- When the iPod is not in use, put the iPod dock cover in place to protect the connector.
Front panel display
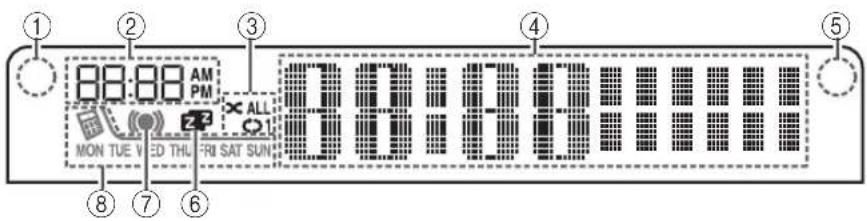
①Illumination sensor
Detect ambient lighting. Do not cover this sensor.
② Alarm time
This indicates the alarm time.
③Repeat/shuffle indicator
Display the playback mode (P. 6, 8).
④ Multi-function indicator
Display various information, including the clock time, information about the currently-playing track, and the frequency of the FM station.
⑤Remote control signal receiver
Make sure that this sensor is not obstructed (P. 1).
⑥ Sleep indicator
Turn on if the sleep timer has been set (P. 15).
⑦ Alarm indicator
Turn on if the alarm has been set (P. 14).
⑧ Weekly alarm indicator
Shows alarm information specified using the free "DTA Controller" application for the iPod touch/iPhone/iPad (P. 12)
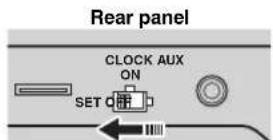
Rear panel
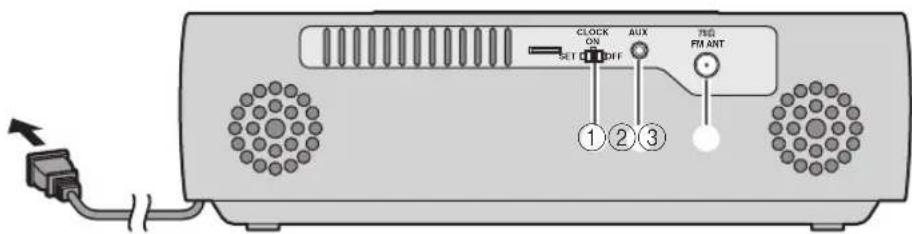
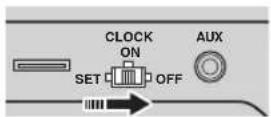
① CLOCK switch
Sets the clock and specifies whether the clock will be displayed (P. 5).
SET: Set the clock.
ON: Even when the system is off, the clock will be displayed and the alarm function will be available.
OFF: When the system is off, the clock will not be displayed and the alarm function will not be available.
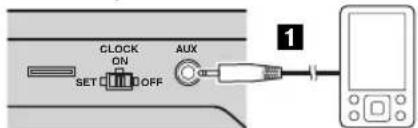
② AUX
Use a commercially available 3.5mm mini-plug cable to connect your external device here (P. 11).
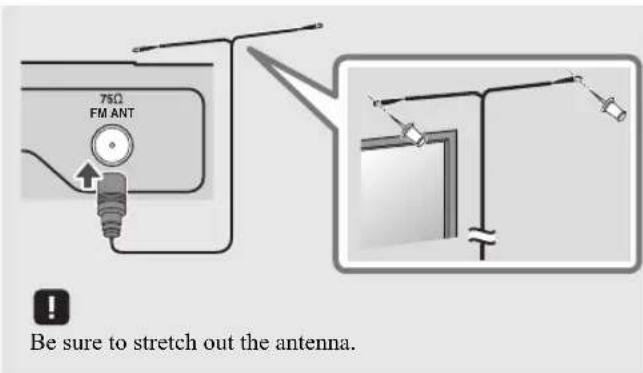
③ FM antenna connector
Connect the FM antenna here.

-
If reception is poor, try changing the height or direction of the antenna, or move the unit to find a location that has better reception.
-
If you use a commercially available outdoor antenna instead of the supplied antenna, reception may be better.
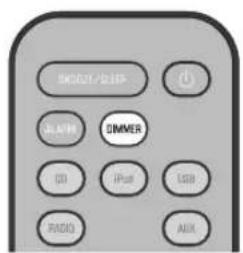
Remote control
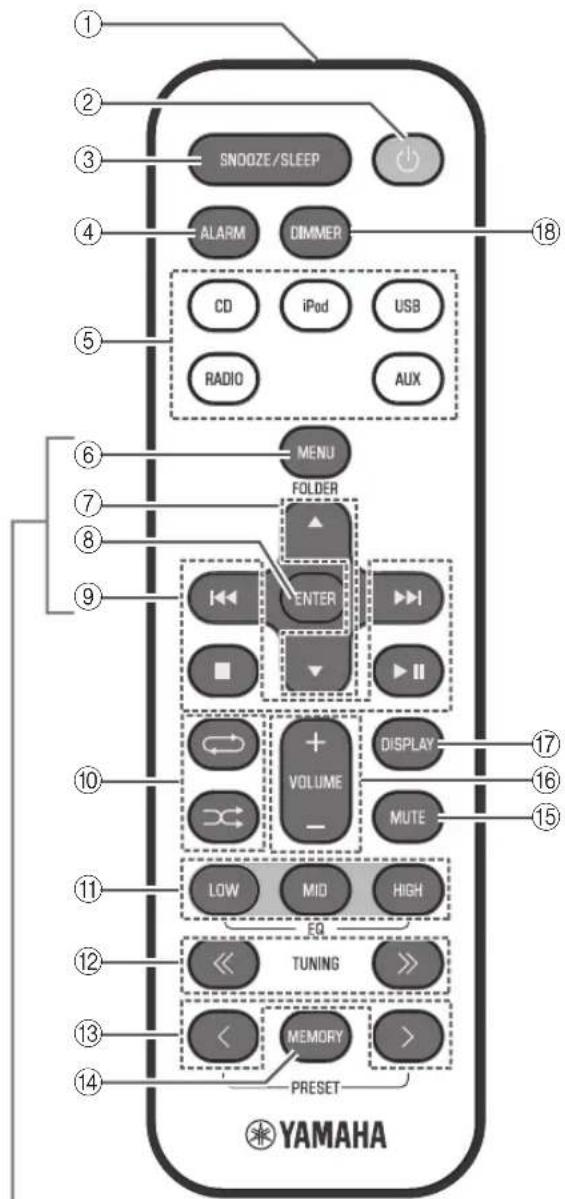
iPod control buttons
① Remote control signal transmitter
② (Power)
Press to turn the system on/off (P. 5).
(3)SNOOZE/SLEEP
Set the sleep timer or switch the alarm to snooze mode (P. 14, 15).
④ALARM
Switch the alarm on/off (P. 14).
⑤Source buttons
Switch the audio source to be played.
If you press one of these while the system is off, the system will turn on and then switch the audio source.
(6) MENU
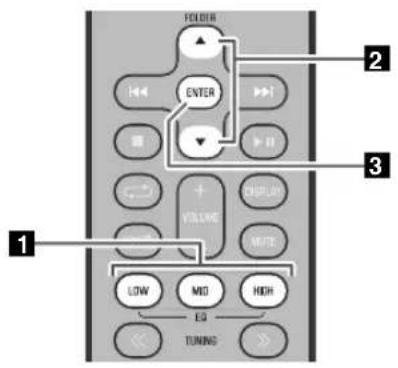
Switch the iPod menu item / Return to the previous menu (P. 6).
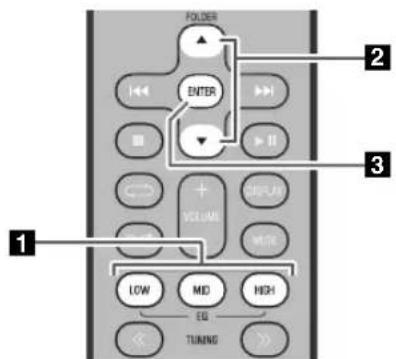
⑦ FOLDER ▲/▼
Switch the playback folder when playing music on data CDs or USB devices (P. 7, 8).
Select items or edit numerical values (P. 6, 15).
(8)ENTER
Confirm a selected item or value.
⑨ Audio control buttons
Use these to operate the iPod/CD/USB device.
S t 0 p
▶II: Play/Pause
Skip, Search backward/forward (press and hold down)
10 (Repeat)/ (Shuffle)
Play music on an iPod, CD or USB device in repeat/shuffle mode (P. 6, 8).
⑪EQ: LOW/MID/HIGH
Adjust the bass, middle or treble sound quality (P. 15).
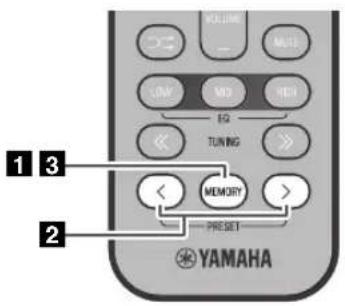
TUNING
Tune the FM (P.9).
13 PRESET < Y
Select a FM station (preset) that you've stored P.11).
⑭MEMORY
Store a FM station (P. 10).
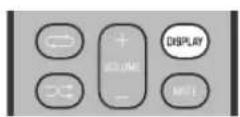
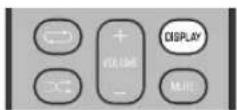
(15)MUTE
Mute or unmute the sound.
16VOLUME+/-
Adjust the volume.
⑦DISPLAY
Switch the information shown in the front panel display (P. 6, 7, 8, 9).
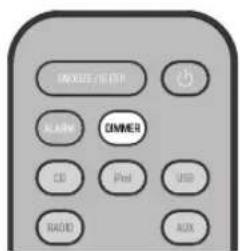
DIMMER
Adjusts the brightness of the front panel display (P. 15).

Display (24-hour) when the system is on
Display (24-hour) when the system is off (CLOCK switch: ON)

Connect the power cable to an AC outlet, and press
The system will turn on, and will be ready to play audio sources.
To turn the system off, press once again.

If you set the rear panel CLOCK switch to the OFF position (P. 3), the clock will not be displayed when the system is off, reducing the power consumption.
| Clock display when the system is off | Alarm | Recharging your iPod in the iPod dock | |
| CLOCK switch: ON | Yes Enabled Yes | ||
| CLOCK switch: OFF (power-saving) | No Disabled Yes | ||
ADJUSTING THE CLOCK
2
Front panel
Rear panel
3


(24-hour)
Jan Feb Mar Apr May Jun
| January | February | March | April | May | June |
| Jul Aug | Sep Oct | Nov | Dec | ||
| July | August | September | October | November | December |
1 Set the rear panel CLOCK switch to the SET position.
The display will indicate "CLOCK YEAR," and the numerical value to be set will blink.
2 Set the date and time.
Press the front panel - / + buttons to edit the values, and press ENTER to confirm the settings.
Set the items in the order of y hour minute.


month
When clock setting has finished, the display will indicate "Completed!"

-
On step 2 can copy the time of iPod instead of setting time manually by setting the iPod to the iPod dock. The time will not be copied if the iPod is already connected.
-
On step 2 pressing SNOOZE/SLEEP you can select the time format (12-hour / 24-hour).
3 When you've finished making settings, set the CLOCK switch to the ON position.
The moment you set the switch to the ON position, the clock will start from 0 second.

The time settings will be reset if the unit remains unpowered for more than one week.
LISTENING TO YOUR iPod
Playing music from your iPod
- For details on compatible iPod models, refer to "SPECIFICATIONS" (P. 19).
- Your iPod can also play back music and recharge while connected to the USB port (P. 8).
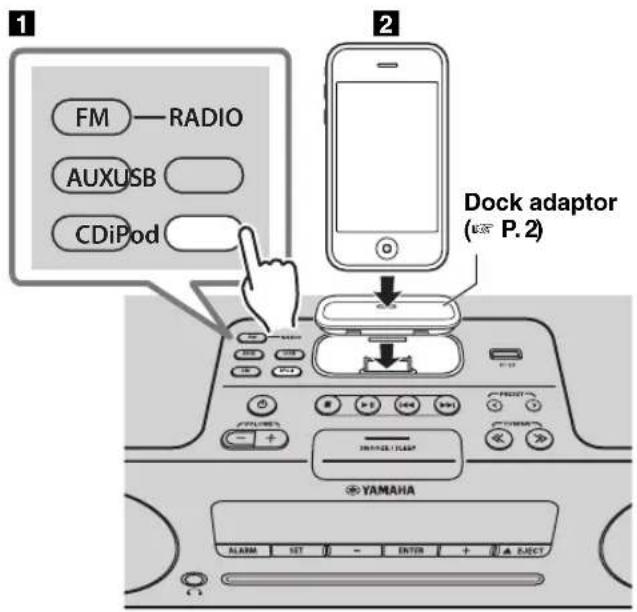
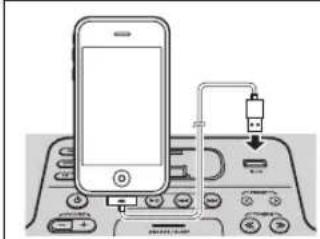
Press the iPod source button to switch the audio source to iPod.
2 Set your iPod in the iPod dock (P. 2).
3 Play the iPod.
Playback can be controlled with either the remote control, iPod or the unit (P. 2, 4).

-
If you've selected an audio source other than USB, performing the following operations will automatically switch the audio source to iPod and start playback even if this system is turned off.
-
Connect your iPod in the playback state to the iPod dock.
-
Play back the connected iPod.
-
If USB is selected as the audio source, the iPod will not be charged.
- You can remove the iPod during playback.
- If iPod is selected as the audio source, the system will automatically turn off when 60 minutes have elapsed without a device being connected to the iPod dock nor any operation performed.
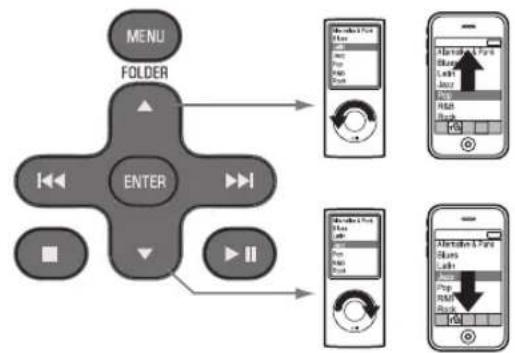
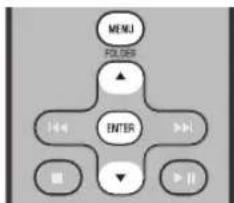
iPod menu operations (remote control only)
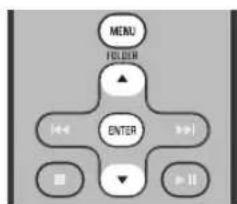
You can use the remote control to operate your iPod.
MENU: Switch menu items / Return to the previous menu
/ Move between items in the menu
ENTER: Confirm
Display information (remote control only)
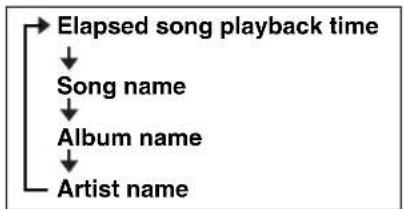
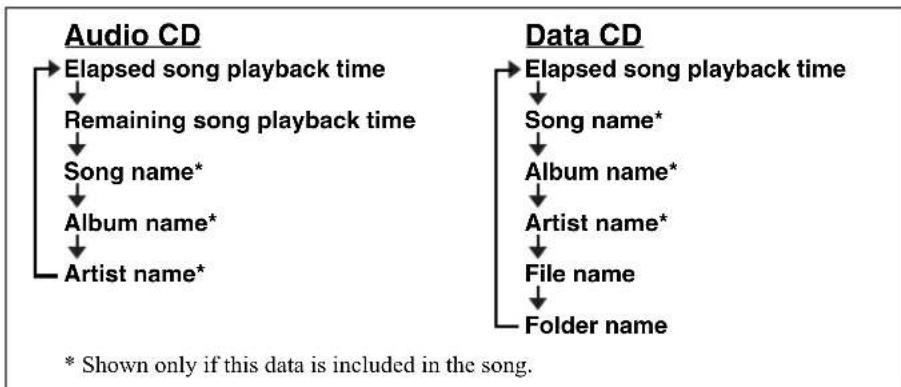
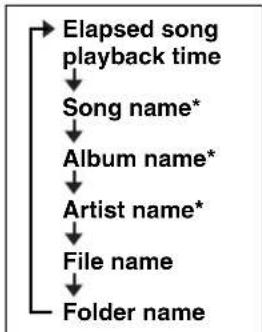
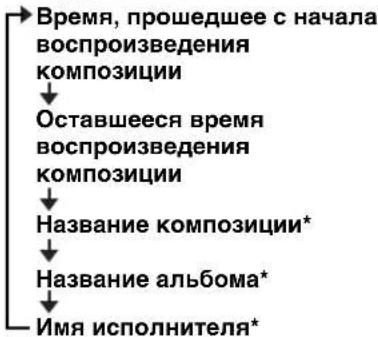
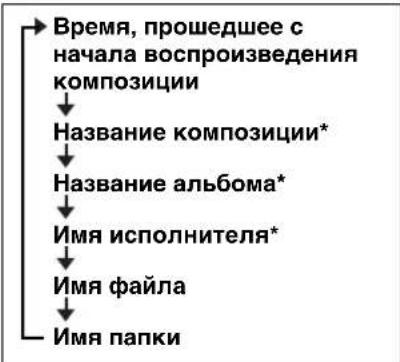
If you press DISPLAY on the remote control while a song is playing or paused, the information shown on the front panel display will be switched in the order shown at right.
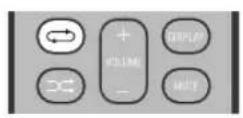
Using repeat/shuffle playback (remote control only)
The playback status is shown by the repeat/shuffle indicator (P. 3) in the front panel display.
Repeat playback
Press (repeat) on the remote control repeatedly to select one of the following playback modes.
No display: Off
1: One
ALL: All
Shuffle playback
Press (shuffle) on the remote control repeatedly to select one of the following playback modes.
No display: Off
: Albums
: Songs

Repeat/shuffle may not operate or be displayed correctly as shown above depending on the type of iPod used.
LISTENING TO CD AND USB DEVICES
The unit will operate as follows when playing back tracks/files on CD/USB devices.
- If the CD/USB device being played back is stopped, the track that was being played back will start playing from the beginning of the track the next time playback begins.
- If you press while playback is stopped, tracks will play as follows the next time playback begins:
-Audio CD: Play from the first track of the CD.
- Data CD (a CD containing MP3/WMA files) or USB: Play from the first track in the folder containing the song that you last stopped.
This unit automatically turns off the system if no operation has been performed for 60 minutes after CD/USB device playback is stopped.

For details on playable discs and files, refer to "NOTES ON DISCS AND USB DEVICES" (P. 18).
Listening to a CD
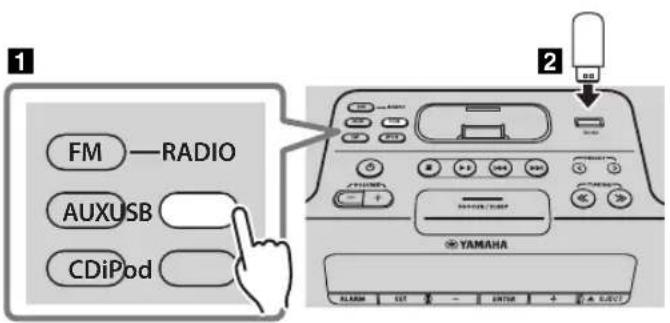
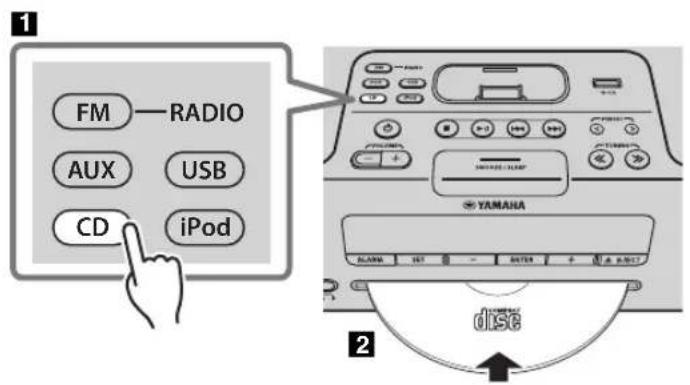
Press the CD source button to switch the audio source to CD.
If a CD is already inserted, playback will start.
2 Insert a CD into the disc slot.
Playback starts automatically.
Playback can be controlled with either the remote control or the unit (P.2,4).

Insert the CD with the label side facing upward.

Folders and files on a data CD are played in alphabetical order.
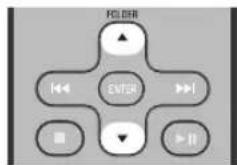
Skipping folders (remote control only)

While a data CD is playing, you can use the remote control's FOLDER / buttons to select the folder.
Display information (remote control only)
The folder number (only for a data CD) or the song/file number is shown for several seconds when starting playback or skipping tracks.
If you press DISPLAY on the remote control while a song is playing or paused, the information shown on the front panel display will be switched in the following order.
Listening to a USB device
Your iPod/iPhone/iPad can also play back music and recharge while connected to the USB port (P.6).
Press the USB source button to switch the audio source to USB. If a USB device is already connected, playback will start.
2 Connect a USB device to the USB port. Playback starts automatically. Playback can be controlled using either the remote control, the unit, or the USB device (P. 2, 4).
Folders and files will play in the order in which they were written.
Stop playback before disconnecting the USB device.
Skipping folders (remote control only)
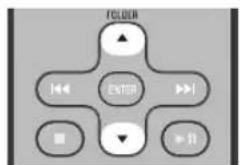
While a USB device is playing, you can use the remote control's FOLDER / buttons to select the folder.
Display information (remote control only)
The folder/file number is shown for several seconds when starting playback or skipping tracks.
If you press DISPLAY on the remote control while a song is playing or paused, the information shown on the front panel display will be switched in the order shown at right.
- Shown only if this data is included in the song.
Using repeat/shuffle playback (remote control only)
The playback status is shown by the repeat/shuffle indicator (P. 3) in the front panel display.
Repeat playback
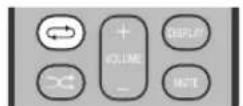
Press (topcat) on the remote control repeatedly to select one of the following playback modes.
No display: Repeat mode off
1 :1:track
: All tracks within the folder (data CD/ USB device only)
ALL: All tracks
Shuffle playback
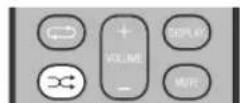
Press shuffle) on the remote control repeatedly to select one of the following playback modes.
No display: Shuffle mode off
: All tracks within the folder (data CD/ USB device only)
ALL: All tracks
LISTENING TO FM STATIONS
Selecting an FM station
Connect the antenna if you want to listen to the FM (P.3).
1
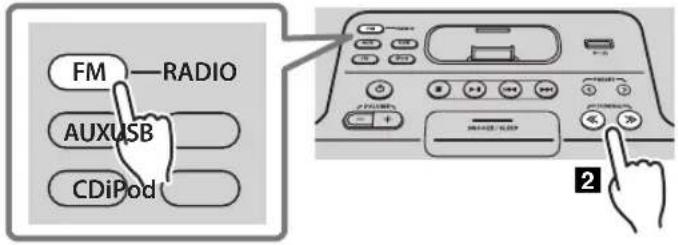
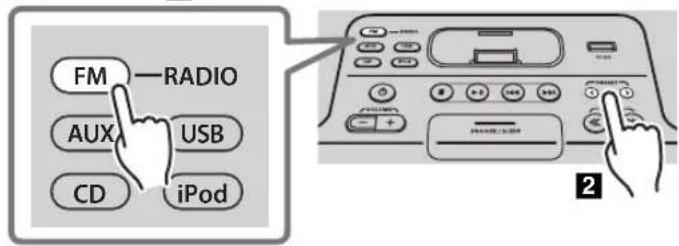
Press the FM source button to switch the audio source to FM.
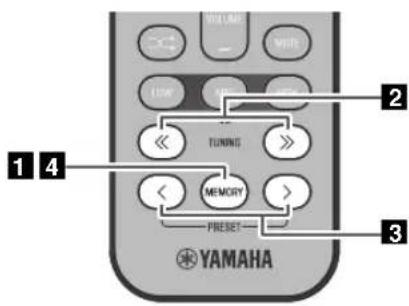
Tuning FM stations.
Automatic tuning: Press and hold TUNING Manual tuning: Press TUNING repeatedly.
If you tune to a station manually while receiving FM, the sound will be monaural.
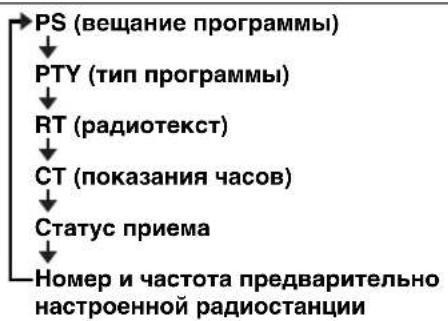
Display information
If you press DISPLAY on the remote control, the information shown on the front panel display will be switched in the following order.
Preset number and frequency Reception status\*
- Examples of reception status indication.
TUNED/STEREO: A strong FM stereo broadcast is being received.
TUNED/MONO: Receiving an FM broadcast in monaural (even if the FM broadcast is stereo, reception will be monaural if the signal is weak).
Not TUNED: No broadcast is being received.
Displaying Radio Data System information
If you press DISPLAY on the remote control while Radio Data System information is being received, the information shown on the front panel display will be switched in the order shown at right.
If the signal transmission of the Radio Data System station is too weak, this unit may not be able to receive Radio Data System information completely. In particular, RT (Radio Text) information uses a lot of bandwidth, so it may be less available compared to other types of information.

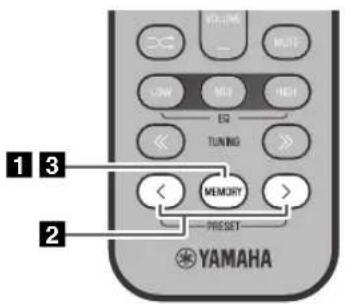
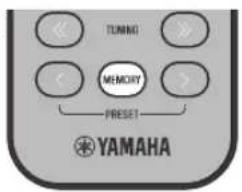
Presetting FM stations (remote control only)
Use the preset function to store your favorite 30 stations.
Auto preset
This method tunes automatically, and automatically preset only the stations that have good reception.
12
Manual preset
Deleting a stored preset
Press and hold down MEMORY on the remote control.
"AUTO PRESET" will appear and "Press MEMORY" will blink.
2 Press MEMORY.
Auto preset will begin.
When presetting has finished, the display will indicate "Completed!"

When you perform auto preset, all stored stations are cleared and the new stations are stored.

If you want to stop auto preset before it is completed, press
1 Select the station that you want to preset, and press MEMORY.
The display will indicate "PRESET MEMORY."
Press PRESET / to select the preset number that you want to store.

- The lowest preset number that has not been stored will be selected first.
- If you want to cancel the presetting, press
- If you select a preset number in which a station has already been stored, it will be overwritten by the new station.
3 Press MEMORY to complete the operation.
The preset will be stored, and the display will indicate "Completed!".
Press MEMORY on the remote control.
The display will indicate "PRESET MEMORY," and the preset number will blink.
Press TUNING / to select the preset delete operation.
The display will indicate "PRESET DELETE."
Press PRESET / to select the preset number that you want to delete.

If you want to cancel the deleting, press
4 Press MEMORY to complete the operation.
The preset will be deleted, and the display will indicate "Deleted!"
Selecting preset FM stations
Press the FM source button to switch the audio source to FM.

You can also switch the audio source by pressing RADIO on the remote control.
Press PRESET / to select the FM station that you want to listen.

You can only select the presets that have been stored.
LISTENING TO EXTERNAL SOURCES
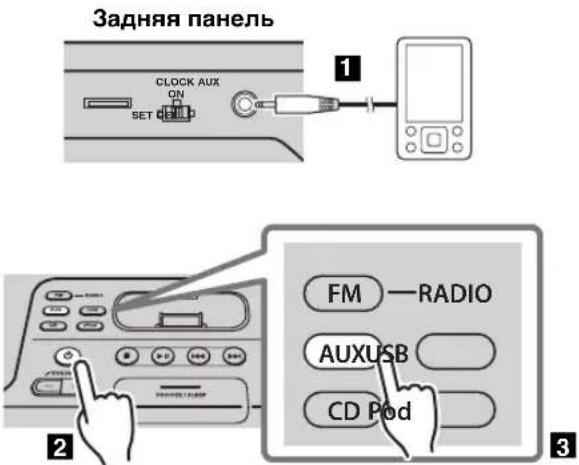
Rear panel
Using a commercially available 3.5mm miniplug cable, connect your external device to the AUX on the rear panel of this unit.

-
Turn off the system before connecting the mini-plug cable.
-
Turn down the volume of the unit and your external audio device before connection.
Press to turn the system on.
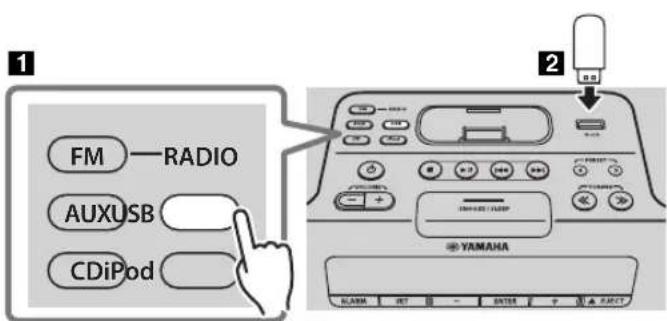
Press the AUX source button to switch the audio source to AUX.
4 Start playback on the connected external audio device.
USING THE ALARM FUNCTION
The unit includes an alarm function (IntelliAlarm) that plays back audio sources or a set of beep (internal alarm sound) at the set time using a variety of different methods. The alarm function has the following features.
3 types of alarms
Select from 3 alarm types, combining music and beep sounds.
| SOURCE+BEEP | The selected audio source and beep sound are played at the set time. This mode is recommended for the best possible start to the day. 3 minutes before the set time: the source music begins to fade in and the volume gradually increases as the alarm time approaches. Alarm time: a beeping sound also begins playing. |
| SOURCE | The selected audio source is played at the set time. The volume fades in gradually and increases to the set volume. |
| BEEP The beep sound | is played at the set time. |
Various audio sources
The iPod, audio CD, data CD, USB device and radio can be selected. The following playback methods can also be selected depending on the audio source:
| Source Playback | method Function | |
| iPod | Playlist* | A specific playlist stored on the iPod is played back repeatedly. To play a playlist, create a playlist with the name “ALARM Yamaha DTA” in advance.When entering the playlist name, use single-byte spaces to separate words, and enter single-byte characters, taking care that uppercase/lowercase letters are used correctly. |
| Resume | If the “ALARM Yamaha DTA” playlist cannot be found within the iPod, the unit resumes play from the last track you played. | |
| Audio CD | Selected track The selected track is played repeatedly. | |
| Resume The track you listened to last time is played back. | ||
| Data CD/USB device | Folder The selected folder is played repeatedly. | |
| Resume The track you listened to last time is played back. | ||
| FM | Preset station The selected preset station is played. | |
| Resume The FM station you listened to last time is played back. | ||
- For information on creating a playlist, refer to the instructions for your iPod or iTunes.
Snooze
The snooze function can be enabled to replay the alarm after 5 minutes (P. 14).
Using "DTA Controller" to set the alarm
By using the free "DTA Controller" application for the iPod touch/iPhone/iPad, you can make detailed alarm settings that cannot be made using this unit by itself. For each day of the week, you can specify the alarm time (Weekly Alarm) and adjust the IntelliAlarm as desired.

The front panel display shows information for the Weekly Alarm you've set.

For details of "DTA Controller", refer to the product information in the Yamaha website.
Setting the alarm
Set the alarm time and alarm type

Alarm settings cannot be made when the unit is in power saving. If you want to use the alarm function, set the rear panel CLOCK switch to the ON position.

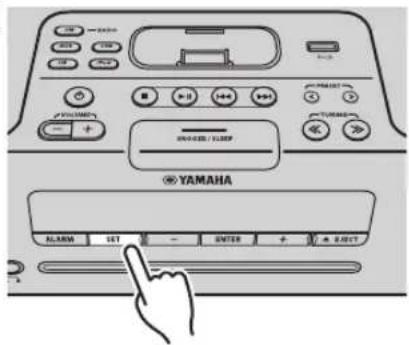


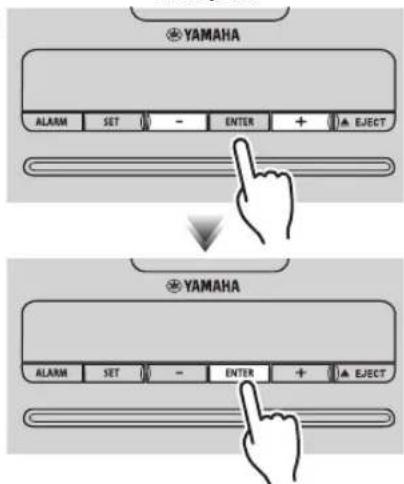
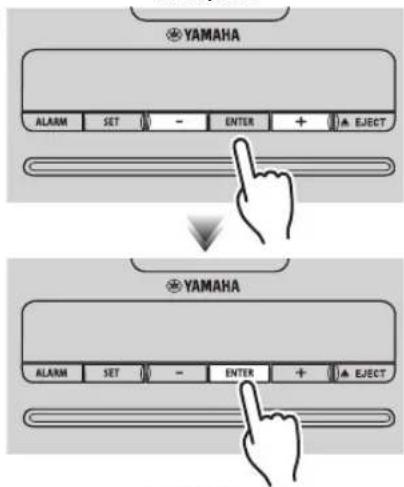
1 Press SET.
The alarm indicator ([i]l) blink.
2 Set the alarm.
Set items ①-⑤ described below.
ss - / + to select a numerical value, and press ENTER to confirm it.
| Items | Setting or range |
| ① ALARM SELECT | * This can be selected after you've used "DTA Controller" to set the alarm (P. 12). If you're not using "DTA Controller," proceed to item ②.ONE DAY: An alarm that sounds only once at the specified time.WEEKLY: An alarm whose time can be specified for each day of the week (settable only using "DTA Controller")If you've chosen WEEKLY, this completes the alarm setting. |
| ② ALARM TIME | Make settings in the order of hours → minutes. |
| ③ ALARM TYPE | Select from SOURCE+BEEP, SOURCE or BEEP.For details, refer to "3 types of alarms" (P. 12).If you selected BEEP, proceed to item ⑤. |
| ④ ALARM SOURCE(If you selectedSOURCE+BEEP orSOURCE as theALARM TYPE) | iPod: Play back music from your iPod (Refer to "Various audio sources" (P. 12).)CD: Play back music from a CD.Specify the track number (data CD: folder number) (RESUME, 1-99).USB: Play back music from a USB device.Specify the folder number (RESUME, 1-999).FM: Play a radio station.Specify the preset number (RESUME, 1-30).If the selected source cannot be played back at the time set for the alarm (e.g., the iPod is not connected), the beep sound is played back.If you choose RESUME when specifying the track/folder/preset number, the last-played track/folder/station will be played (resumc playback). |
| ⑤ ALARM VOLUME | Specifies the volume (5-60) of the alarm. |
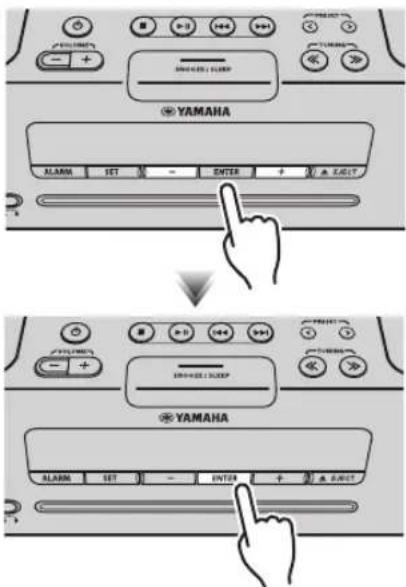
3 Complete the settings.
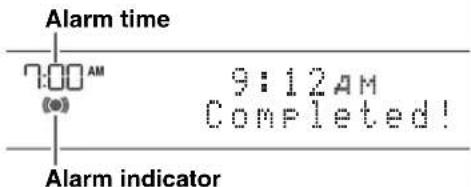
When you set the VOLUME for item 5, the display will indicate "Completed!" and your settings will be confirmed. This completes the alarm setting. The alarm will be turned on and the alarm indicator (I light.

- By pressing SET during this procedure, you can confirm the alarm settings with the currently-specified values and complete the procedure.
- If you decide to cancel alarm settings mid-way through the procedure, turn the system off.
Switching the alarm on/off
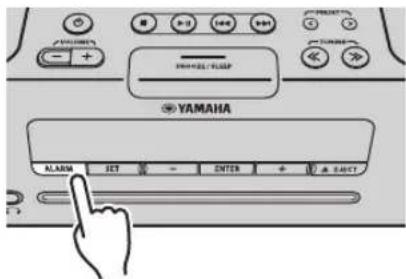
Press ALARM to turn the alarm on/off.
When the alarm is on, the alarm indicator (light, and the alarm time will be shown.
If you press ALARM again, the alarm indicator ( ) and the alarm will turn off.

When the unit is in power saving, the alarm will not function (P.5).
Operations while the alarm sound is playing
When the set time arrives, the selected alarm sound will play. During playback, the following operations are available.
To pause the alarm (Snoopze)
Press SNOOZE/SLEEP.
Snoopze will stop the alarm and play it again 5 minutes later.

If SOURCE + BEEP is set as the alarm type, you can press SNOOZE/SLEEP once to stop the beep sound, and twice to stop the audio source.
Five minutes after the audio source is stopped, it will start fading in again and the beep sound will resume.
To turn the alarm off
Press ALARM or


- You can also stop the alarm by holding down SNOOZE/SLEEP.
- If you don't stop the alarm, it will stop automatically after 60 minutes and the system will turn off.
- The alarm setting will be saved even if the alarm is turned off. If the alarm is turned on again by pressing ALARM, the alarm will sound with the previous alarm settings.
USING THE SLEEP TIMER
When the specified time has elapsed, the system will turn off automatically.
Press repeatedly
Press SNOOZE/SLEEP repeatedly to specify the time after which the system will turn off.
You can specify 30, 60, 90 or 120 minutes.
When you select a time, the sleep timer is turned on, and the sleep indicator (2) shown in the front panel display.

If you press SNOOZE/SLEEP while the sleep timer is activated, the sleep timer setting will be canceled.
ADJUSTING THE TONE (remote control only)
During playback, press the LOW, MID, or HIGH EQ button on the remote control.
Select the tone to be adjusted (LOW, MID, HIGH).
Press / to adjust the tone.
3 Press ENTER on the remote control to complete the operation.
You can also press the EQ button that you pressed in Step 1 complete the settings.
If you want to adjust another frequency band, return to step 1d press the EQ button for the frequency band that you want to adjust.
ADJUSTING THE BRIGHTNESS OF THE FRONT PANEL DISPLAY (remote control only)
Press repeatedly
Press DIMMER repeatedly on the remote control.
The brightness of the front panel display will change in the order shown below.
AUTO 1 (bright) 2 (medium) 3 (dim)
back to AUTO

When AUTO is set, the brightness of the front panel display is adjusted automatically with the Illumination sensor (15 P. 3). Ensure that the sensor is not covered.
TROUBLESHOOTING
If there is a problem with the unit, check the following list first. If you cannot resolve the problem with the suggested solutions or if the problem is not listed below, turn off and unplug the system, and consult the nearest authorized Yamaha dealer or service center.
General
| Problem Cause Solution | ||
| The speakers make no sound. The | volume might be set to the minimum level, or muted. | Adjust the volume level. |
| The source may be incorrect. Select the correct source. | ||
| The headphones are connected. Remove the headphones. | ||
| The volume of a connected external device is not loud enough. | Raise the volume of the external device. | |
| Sound suddenly turns off. | The sleep timer (P. 15) may be set. | Turn the system on and play the source again. |
| Sound is cracked/distorted or there is abnormal noise. | Input source volume is excessive, or volume of this unit is excessive (especially Bass). | Adjust volume with VOLUME, or adjust Bass with EQ (P. 15). If an external device is playing back, lower the volume of the external device. |
| The unit does not operate properly. | The unit may have received a strong electrical shock such as lightning or excessive static electricity, or power supply may have dropped. | Turn the system off, and disconnect the power cable. Wait about 30 seconds, reconnect the power cable, and turn on the system. |
| The system turns on but immediately shuts off. | ||
| A digital or high-frequency equipment produces noises. | The unit may be placed too close to the digital or high-frequency equipment. | Place the unit farther away from the equipment. |
| The clock setting has been cleared. | The unit remained unpowered for more than one week. | If the power supply is interrupted for about one week, the time setting may be reset. If this occurs, please reset the clock (P. 5). |
| The iPod does not play back at the alarm time even if the alarm source is set to iPod. | The iPod is not set in the iPod dock. | Set the iPod in the iPod dock (P. 2). |
| Clock flashes and the unit cannot be operated. | The CLOCK switch is in the SET position, and the clock settings are in progress. | Set the CLOCK switch to the ON or OFF position. |
| Alarm does not sound. | The CLOCK switch is in the OFF or SET position. | Set the CLOCK switch to the ON position. |
| The front panel display indicates “ALARM not work” and can’t set the alarm. | ||
| The unit turns the system off unexpectedly. | The automatic system-off function may have operated. | This unit will turn the system off when 60 minutes have elapsed without any operation being performed after stopping playback of the USB device or the CD, or if the system has been on for 12 hours or more without any operation being performed. |
| Front panel display becomes dim. | The front panel display’s brightness setting is set to AUTO. | Change the brightness setting to something other than AUTO (P. 15). Alternatively, ensure that the illumination sensor (P. 3) is not obscured. |
iPod
| Problem Cause Solution | ||
| No sound. | The iPod is not set in the iPod dock firmly. | Remove the iPod from the unit, and then set it in the iPod dock again (® P. 2). |
| The headphones of the iPod are connected. | Remove the headphones. | |
| The iPod software version has not been updated. | Download the latest iTunes software to update the iPod software version to the latest. | |
| The iPod does not charge up. | The iPod is not set in the iPod dock firmly. | Remove the iPod from the unit, and then set it in the iPod dock again (® P. 2). |
| USB is selected as the audio source. | Select something other than USB as the audio source. | |
| The front panel display indicates “iPod Unknown” when you connect the iPod. | The iPod being used is not supported by the unit. | Use a supported iPod (® P. 19). |
CD playback
| Problem Cause Solution | ||
| CD cannot be inserted. | Another disc is already inserted. | Unload the disc with▲ EJECT. |
| You are attempting to insert a disc that cannot be used by this unit. | Use a disc supported by the unit (ccP.18). | |
| Some button operations do not work. | The disc loaded into the unit may not be compatible. | Use a disc supported by the unit (ccP.18). |
| Playback does not start immediately after pressing ▷(playback stops immediately.). | The disc may be dirty. Wipe the disc clean. | |
| The disc loaded into the unit may not be compatible. | Use a disc supported by the unit (ccP.18). | |
| If the unit was moved from a cold to warm place, condensation may have formed on the disc reading lens. | Wait for an hour or two until the unit adjusts to the room temperature, and try again. | |
| When you insert a disc, the front panel display indicates “No Disc” or “CD Unknown.” | The disc loaded into the unit may not be compatible. | Use a disc supported by the unit (ccP.18). |
| The disc may be dirty, or a foreign object may have adhered to it. | Wipe the disc clean. Alternatively, remove any foreign object that has adhered to the disc. | |
| The disc does not contain playable files. | Use a disc containing playable files (ccP.18). | |
| The disc was inserted upside down. Insert the disc | with the label facing upward. | |
| The front panel display indicates “no operation”, and a disc cannot be inserted or unloaded. | The clock/alarm/tone settings are in progress. Alternatively, the alarm is playing. | Complete the clock/alarm/tone settings. Alternatively, stop the alarm. |
USB device playback
| Problem Cause Solution | ||
| MP3/WMA file on the USB device does not play. | The USB device is not recognized. Turn the system off and disconnect the USB device. Then turn the system on and reconnect the USB device to the unit. If the solutions above do not resolve the problem, the USB device is not playable on the unit (P. 18). | |
| The USB device does not contain playable files. | Use a USB device contains playable files (P. 18). | |
| When you connect a USB device, the front panel display indicates "USB OverCurrent," and then the front panel display goes blank. | An incompatible USB device is connected to the unit. Alternatively, the USB device is not connect firmly to the unit. | Turn the system off and disconnect the USB device. Then turn the system on and reconnect the USB device to the unit. If the solutions above do not resolve the problem, the USB device is not playable on the unit (P. 18). |
FM reception
| Problem Cause Solution | ||
| Too much noise. | The antenna may be connected improperly. | Make sure the antenna is connected properly (P. 3) or use a commercially available outdoor antenna. |
| The antenna is too close to the unit or to an electronic device. | Position the antenna as far away as possible from the unit or the electronic device. | |
| Too much noise during stereo broadcast. | The radio station you selected may be far from your area, or the radio wave reception is weak in your area. | Try manual tuning to improve the signal quality (P. 9) or use a commercially available outdoor antenna. |
| Even with an outdoor antenna, radio wave reception is weak. (Sound is distorted.) | Multipath reflection or other radio interferences may have occurred. | Change the height, direction, or placement of the antenna. |
Remote control
| Problem Cause Solution | ||
| The remote control does not work properly. | The remote control may be operated outside its operation range. | For information on the remote control operation range, refer to “How to use the remote control” (P. 1). |
| The remote control signal receiver on the unit (P. 3) may be exposed to direct sunlight or lighting (inverted fluorescent lamps). | Change the lighting or orientation of the unit. | |
| The battery may be worn out. | Replace the battery with new one (P. 1). | |
| There are obstacles between the remote control signal receiver on the unit (P. 3) and the remote control. | Remove the obstacles. | |
NOTES ON DISCS AND USB DEVICES
CD information
This unit is designed for use with audio CD, CD-R, and CD-RW with the logos followings.


- ISO 9660 format CD-R/RW

This unit can play back discs bearing any of the logo marks above. A disc logo mark is printed on the disc and the disc jacket.

- Do not load any other type of disc into this unit. Doing so may damage this unit.
- CD-R/RW cannot be played back unless finalized.
- Some discs cannot be played back depending on the disc characteristics or recording conditions.
- Do not use any non-standard shaped discs such as a heart-shaped disc.
- Do not use discs with many scratches on their surface.
- Do not load a cracked, warped, or glued disc.
- Do not use 8-cm discs.
Handling a disc
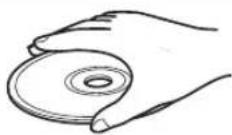
- Do not touch the surface of the disc. Hold a disc by its edge (and the center hole).
- Do not use a pencil or pointed marker to write on the disc.
- Do not put a tape, seal, glue, etc., on a disc.
- Do not use a protective cover to prevent scratches.
- Do not load more than one disc into this unit at one time. This can cause damage to both this unit and the discs.
- Do not insert any foreign objects into the disc slot.
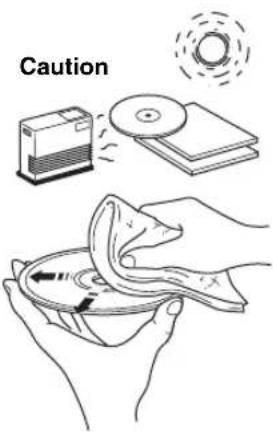
- Do not expose a disc to direct sunlight, high temperature, high humidity, or a lot of dust.
- If a disc becomes dirty, wipe it with a clean, dry cloth from the center out to the edge. Do not use record cleaner or paint thinner.
- To avoid malfunction, do not use a commercially available lens cleaner.
USB device information
This unit supports USB mass storage class devices (e.g., flash memories or portable audio players) using FAT16 or FAT32 format.

- Some devices may not work properly even if they meet the requirements.
- Do not connect devices other than USB mass storage class devices (such as USB chargers or USB hubs), PCs, card readers, an external HDD, etc.
- Yamaha will not be held responsible for any damage to or data loss on the USB device occurring while the device is connected to this unit.
- Playability of and power supply to all kind of USB devices are not guaranteed.
- USB devices with encryption cannot be used.
About MP3 or WMA files

The unit can play back:
| File Bitrate (kbps) | Sampling frequency (kHz) |
| MP3 8-320** | 16-48 |
| WMA 16-320** | 22.05-48 |
** Both constant and variable bitrates are supported.
- The maximum numbers of files/folders that can be played on the unit are as follows.
| Data CD USB | ||
| Maximum total number of file 512 9999 | ||
| Maximum folder number 255 | 999 | |
| Maximum file number per folder | 511 | 255 |
Copyright-protected files cannot be played back.
SPECIFICATIONS
PLAYER SECTION
iPod (Digital connection) [As of July, 2012]
- Compatible iPod models
iPod touch (1st, 2nd, 3rd and 4th generations) iPod nano (2nd, 3rd, 4th, 5th and 6th generations) - Compatible iPhone models
iPhone 4S, iPhone 4, iPhone 3GS, iPhone 3G, iPhone - Compatible iPad models ......... iPad (3rd generation), iPad 2, iPad An iPod may not be detected by the unit or some features may not be compatible, depending on the model or software version of the iPod.
CD
Media CD,CD-R/RW
Audio format Audio CD, MP3, WMA
LASER
- Type. Semiconductor laser GaAS/GaAlAs
·Wave length. 790 nm
Output Power 7mW
USB
Audio format MP3, WMA
AUX
- Input connector. 3.5 mm (1/8 in) STEREO mini jack
AMPLIFIER SECTION
Maximum output power ....15 W + 15 W (6 Ω 1 kHz, 10 % THD)
- Headphones ...... 3.5 mm STEREO mini jack (Impedance 16 to 32 Ω)
TUNER SECTION
Tuning range
FM 87.50 to 108.00 MHz
GENERAL
- Power supply. AC 230 V, 50 Hz
Power consumption 30 W - System off consumption 3.0 W or less/0.5 W or less (Power saving)
- Dimensions (W × H × D) 370 (14-5/8 in) × 110 (4-3/8 in) × 230 (9 in) mm
Weight 3.8 kg (8.4 lbs.)
Specifications are subject to change without notice.
iPod, iPhone, iPad
"Made for iPod", "Made for iPhone" and "Made for iPad" mean that an electronic accessory has been designed to connect specifically to iPod, iPhone or iPad, respectively, and has been certified by the developer to meet Apple performance standards.
Apple is not responsible for the operation of this device or its compliance with safety and regulatory standards. Please note that the use of this accessory with iPod, iPhone or iPad may affect wireless performance.
iPad, iPhone, iPod, iPod nano, iPod touch and iTunes are trademarks of Apple Inc., registered in the U.S. and other countries.
LASER SAFETY
This unit employs a laser. Due to possible eye injury, only a qualified service person should remove the cover or attempt to service this device.
DANGER
This unit emits visible laser radiation when open. Avoid direct eye exposure to beam. When this unit is plugged into the wall outlet, do not place your eyes close to the opening of the disc tray and other openings to look into inside.
Information for Users on Collection and Disposal of Old Equipment and Used Batteries

These symbols on the products, packaging, and/or accompanying documents mean that used electrical and electronic products and batteries should not be mixed with general household waste.

For proper treatment, recovery and recycling of old products and used batteries, please take them to applicable collection points, in accordance with your national legislation and the Directives 2002/96/EC and 2006/66/EC.

Pb
By disposing of these products and batteries correctly, you will help to save valuable resources and prevent any potential negative effects on human health and the environment which could otherwise arise from inappropriate waste handling.
For more information about collection and recycling of old products and batteries, please contact your local municipality, your waste disposal service or the point of sale where you purchased the items.
[Information on Disposal in other Countries outside the European Union]
These symbols are only valid in the European Union. If you wish to discard these items, please contact your local authorities or dealer and ask for the correct method of disposal.
Note for the battery symbol (bottom two symbol examples):
This symbol might be used in combination with a chemical symbol. In this case it complies with the requirement set by the Directive for the chemical involved.
ATTENTION: VEUILLEZ LIRE CE QUI SUIT AVANT D'UTILISER L'APPAREIL.
| Jan | Feb | Mar Apr May | Jun | |
| Janvier | Février | Mars | Avril Mai Juin | |
| Jul | Aug Sep | Oct Nov | Dec | |
| Juillet | Aout | Septembre | Octobre | Novembre |
Diverses sources audio
Supports CD, CD-R/RW
- Format audio CD audio, MP3, WMA
LASER
DELARNAS NAMN OCH FUNKTIONER. 2
Toppanel/frontpanel 2
Frontpanelens teckenfonster. 3
Bakpanel 3
Fjarrkontroll 4
STARTA SYSTEMET. 5
JUSTERA KLOCKAN 5
LYSSNA PÅ iPod. 6
LYSSNA PÄ EXTERNA KÄLLOR. 11
ANVANDALARMFUNKTIONEN 12
2
Frontpanel
Bakpanel
3

(24 timmar)
| Jan | Feb | Mar | Apr | May | Jun |
| januari | februari | mars | april | maj | juni |
| Jul | Aug | Sep | Oct | Nov | Dec |
| juli | augusti | september | oktober | november | december |
LYSSNA PÅ EXTERNA KÄLLOR
Bakpanel
1 Anslut din externa enchet med en 3,5 mm minikontakt till AUX-uttaget påenna enchets bakpanel.

ACCENSIONEL SISTEMA. 5
aIIIapata He IIOJIKeH OTKpbBaTbc H N B KOEM cIyue.
15 EcINH Bb Hc co6HpacTecb HcNOJb3ObaTb JaHHbI aIIpaT B TeueHHe IIPOIOJKHTeJIbHOro IIPOMEKytKa BpeMeHH (HaIIpHmep, BO BpEMa OTHyck), OTKIOOHrte ChIOBOI Ka6JIb IIpeMeEHOrTOkAOTpo3ETK.
16 PcK TcM KAKIINK 3aKIOCHHIO O NOJOMKe aHHOR aIIapata, 063areJIbHO H3yHTe pa3deI "VCTPAHEHNE HEICIPABHOCTE", OHcBIAOuH qacto BCTpeHaIOUHeCn OIH6KN BO Bpem HCIOJb3OBAHN.
17 PcpepeMeHem anapapa HAKMTe KNONky 0, TTO6bblIKIOHTB cHCTeMy, HCHIOBO Ka6cJIb pepeMeHHoro TOKa or PO3ETK.
18 PnB HIE3aHIOH N3MeIeHIOH OKpyKaIOIIe TcMIIepaTybO6pa3OBbIBaecTc KOJIeNCAH.OTcoEJIHHTe cHIOBOKa6JIb IIHTaIHNA OT ceTH H IIE IOJIb3yIteCb anIaparom.
19 AnnapaT MoKET HArpeBaTbCg INH erO npOIOJIKeTIbIOM HCIOJIb3OBaHH. OTKIOUHTe CnCTEmy, 3aTe mJaITe aIInapaTy ocTbTb.
20 IaHbI anIIapar cIeIyET yCTaHaBJIIBaTb BO3IE PO3ETKN IIpeMeHHIO TOKa, KJla MoKJIO CBO6O,IIO IIPOTAAHTb CNIOBoI Ka6eJIb.
21 BaatapeiKHe IdoJHKbI NODBePraTbC HArpeBy OToCInHeHbIX JyueH,OrTH HIN HOXOXHX HcTOHHKOB.BaatapeiKCHJeIyET yTHIN3HPoBaTb CootBcETBHH C MeCTbIMH HopMaMH.
XpaHHTe 6aTapeKn B HeIOCTyINOM JIJI AeTe MceTe. BaTapeKMOrY T 6bITb OAnChbl, cJIN pe6eHOK IOIOKHT Hx B pot.
Ecln 6aTapeKKn KOHyaOTcN, OpeaIIOHOHe pacCToHne DeCTBnI PybTa IV 3NaHTeIbIO IOINKaTeC. Ecln 0TO npOH3OIIIO, 3aMeIHTe 6aTapeKKn Ia DBe IOBbE KaK MoKIO cKopee.
He HcnoIb3yIte cTaphe 6aTapeKBNMCTe CHOBBM
He HcIOJIb3yIte 6aTapeeHK pa3HbIX THIOB (HaNPHEp, IIeIOJHbIe I MapraIHIEBIE 6aTapeiK) OINHOpeMeHHO. BHIMATEJIbHO O3HAKOmbTEcB c IHΦopMaIIHe Ha yIaKOBKe, NCKOJIbKY pa3HbIe THIIb 6aTapeek MOrYt HMeTb OINHAKOByFO φOpMy I IBer.
PaapkeHHbc 6aapeKHN MOYr IPOTech. ECH 6aateeKn HIOPEKIN, HCMcHUNHO yTHIN3HPYtnc Hx. He npHKacaiTcCb K BbTEKHEMY BCIECTBy Hc HOIyckaiTe CTO KOHTAKTa c OJcKIOH T.I.D. Pecpe yctAHOBKOHOBbX 6aapeck TuaTeJIbHO OHCHITcOTcck Dua 6aataeck.
EChyctBOHcIIaHpyeTcHcHIOb3OBaBtB TceHHc IITTEJbHOrO NepHOA BpeMeHN, BInIbTe 6atapeIKN H3 ycTPOIHCTBA. B IpTOHBMcClyaae 6atapeIKN BInIyT H3 cTPO, YTO MOKCTIPNBcCTN KYTEKc JNKIOcTn H3 6atapeck H IOBpeINHTb yCTPOIHCTBO.
He BbIbpaBbAaTe 6aTapeHh BmEcTe C bItOBbIMn OTXoJAMn. YTHIN3pyHrE Hx B COOTBeTcTBHn C NOCTaIOBJIeHHMn MeCTIIIX opraIOB yipabJIeHHa.
22 H3JIHIIHCC 3BYKOBOC JABJIeHNC OT BHYtPHYIHHbIX TCJIcfoHOB H hayIHHKOB MOKCT PnHBcTH K NIOTepe cIyxa.
HnHb anHapat cHTaTcH He OTKJIOueHHbIM OT HCTOHHKa
IpcmchHoro TOKA BCC To Bpemr, IOKa OH IIOJKHOCh K PO3cTKC,
JaKe ccHn daHbH anHapat HAXODHTcB B BYKIOUCHHom
IOIOKEHHH Upe3 B.OTOM pcKHMc 5JIckTPOITpe6.THeHc
daHHOro anHapata CHHKaETc DO MHHMyMa.
PNEyPPEKDEHNE
BO H36EKAHHE IIOKAPA HJIN YIAPA 3JIeKTPHueCKHM TOKOM HE IIOJBEPTAITE DAIIHBII AIIAPAT BO3JEHCTBHNM JOXJN BJIAGH.
PNEyynPEKDEHNE
OnacHocTb pa3pbIbA IIpH HeIpaBHIbHO 3aMeHe 6aTapeIIKn. 3aMeHnTe TOJIbKO Ha 6aTaapeIIKn OINHaKOBOrO HIn aIIaTOIRHIO TIIa.
CINIKOM 6H3Koe paIOIOKeHHe daHIOrO aHApata K TeJIeBn3Opy cIeKtPOIIHO- lyueBOH TPy6KO MoKET IINBecTH K yXuIHEHIO Ubeta H3O6paKeHHa. B TaKOM ClyUae, OTOdBHNbTe daHHb annapat OT TEJIeBn3Opa.
COДЕРЖAHNE
HA3BAHNAYACTENIXXΦYHKUIN 2
Bepxnahe /Ipeednahe 2
Ducnnei nepedne nahei 3
3aHnnaHeIb 4
IyIbT Dv. 5
BKJIOUeHNE CNTEMbl. 6
HACTPOIKA YACOB. 6
IPOCJIYUWBAHNE iPod 7
Bocnpoun3BeHHe My3bIKc iPod. 7
IcnoJIb3OBAHHe NOBtOPHO BOCnPOUN3BeDEHN/
BocnpOn3BeDeHnB CnyuHOMnopAKe
(Tonbko c npnbTa Dv) 8
IPOCJIUYUHBAHNE CD-IMCKOB N USB-YCTPOICTB ...8
Bocnpoun3BeDHeNc CD-1nCka 8
Bocnpoun3BeDene c USB-ycTpoiCTBa 9
IcnoB3OBAHHe NOBTOPOHO BOCnpon3BeDHeH/
BocnpOn3BedeHnB CnyaHOM npAKe
(Tonbko c npnbTa Dv) 10
IPOCJIYUWBAHNE FM-PAIDOCTAHCUI 11
Bb6op FM-paioocTaHcnn 11
PpeBapnteNbHnactpoKa FM-paioctaHcui
(Tonbko c npnbTa Dv) 12
Bb6op npedBaupTeJbHo HacTpoEHbIX
FM-paioocTaHcui 13
NPOCJUYUBAHNE BHEUHNX ICTOHHKOB 14
NCIOJIb3OBAHHe ΦYHKUIN ByuINbHNKA 15
IcnoB3ObaHne npnIOxKeHn "DTA Controller"
IyctaHOBc CnHana 6yDnblbHaKa 15
UcTaHOBKa CnHana 6yDnIbHnka. 16
Oepaunn BO Bpem BAocnpn3BeDneHn
CnHana 6yDnIbHnKa. 17
NCHOJIb3OBAHNE TAIIMEPA NEPEXODA
B PEXKIM OXINDAHNA 18
PERYIIMPOBKA TEM6PA (ToIbko c npIbTa y) 18
HACTPOIKA APKOCTN DUCJIIE NEPEDHEI
NAHEJI (ToIbKO c npIbTa DY) 18
YCTPAHEHNE HENCPABHOCTE 19
IPIMEAHNA O DnCKAX N YCTPOINCTBAX USB ....22
TEXHUNECKNE XAPAKTEPNUKU 23
ФункциN
Bocipoh3BeHHe My3bIKc BHeHHx yctpoiCTB, HainpHMeP, iPod/iPhone/iPad, CD-ncOB c My3bKOHN aHHbIMN, USB-yctpoiCTB HnB HeHHnx ycTpoiCTB Yepe3 rHe3o AUX, n npocnyHbaHne FM-paHocTaHH.
IcnoB0aHHe JIO6HMOe MeIOHN HIN 3ByKOBOrO CHTHaJa B KaueCTBe 3BOHKa 6yHbHnKa. B 3aHaHOe BpeMa CTHHaTa Bb6paHaa MCIOHN BOcIIPOH3BOIDTCa yKa3aHHo IpOMKocTbIO, O6ecIeHHBa Bam HcAJIbHOe HaHaJIO (fYHKnHa IntelliAlarm).
- Bb moxete BocnoB3oBaTcBc6 60lee pacnHpeHHbIX 6yHKnH 6yHnHnKa, HcnoJb3y 6ecnTaHoe npHtokeHne "DTA Controller" iPod touch/iPhone/iPad (15).
- BbIMoKTe JERKO coXpaHbT b H bB3bBaTb 30 IIO6MbIX FM-paHnOCTAHII.
Hn3KHe, cpeINHne IN BbICOKHe YAcTOTb MoXHO HAcTPOHTB B COOTBeTCTBHN C HnINBHyaJIbHBIMn IpeINOTeHHMn.
O6 3TOM pyKOBoIDCTBe
CcbIHK Ha iPod B daHHOM pyKOBoIDCTBe taKc oTHocTc K iPhone.
- Ecln OIepaHIO MOKHO BbIIIOJIHHb C IIMOIoBIO KHOIOH KaOM yCTpoHCTBC HIN C IIyIbTa DY, B HcTpyKHH 6ydet OIHcSbIbTaBc BbIIIOJIHeHHe OIEpaHIn C IIMOIIbO yCTpoHCTBa.
Прилары ecceccyapbl
Nyblr
(ncnojbl3yETc
6aTapeiKa
TabJeToUHOrO
Tuna CR2032)
FM-aHTehHa

Kpbioka dok-pa3bema

Kpbioka nopTa USB

XpaHHTc KpbHnKy npTa
USB BHe IOCTyHOM D
JeTeMecTe,TObOHH
HC MORTIN C.IYUaHNO
HPOJIOHTb ee.
Uncnojb3ObaHne npJbTa Ny
3aMeHa 6atapeKn B nyIbTe dy
HaabHB Ha hKcHpyoHH 3bYOK B HapBaJIeHH A, BblBnIbTe DecpKaTeJb 6aTapeKn B HauPaBICIHH B.
BepxHnPaHeIb /IpeDnHaPaHeIb
①VOLUME-/+
PeryinpoBka rpoMkoctH.
② (NTaHne)
HaKMHTe 3Ty KHOIIKy, TTO6bI BKJIOHTb HIN BbIKIOHTb cHCTcMy (Ctp.6).
③KhoNKn BbIbopa nCTOuHnKa
Bb6op ayHONCTOHHKA IIIB BOCINPOH3BCEDHH. B BIKIOHcHOM COCTOHN HAKATNE OHOH 3OTNX KIOIOK BbIOBCT BKIOCHNC CHCTCMbl, a 3ATCM BKIOHcHne ayHONCTOHHKa.
④Дok-pa3bem iPod
IIOKJIIOHHTe cBOH iPod K OTOMy pa3bemy (cm. pa3JeT "YcTaHOBka iPod B IOK-CTAHIIIO iPod" Ha cTp. 3).
⑤KhONKn ynpaBneHn BOCpOn3BeDeHnEm
HcnoJb3yIte Hx IyIpaBHeHHa iPod/CD-DCKOM/ USB-yCTPOIcTBOM.
OctaHOBka
Bocpon3BcdeHnc/laya
Ipoynck, obaTbH/IIpMaMoI IOHc (HaKMHTe H yIepKHBaHTc KIOJIky)
(6)SNOOZE/SLEEP
YcTaHOBKa TaHMepa IIepeXoJa B peKHM OKnIaHHa HII INepeKJIIOHeHne 6yINIIbHNka B peKHM IOBTOpeHHa cHHaJa (cTp.17,18).
⑦Nopt USB
HcnoB3ynte IIOKIOOCHINHA USB-yctpoictBa / iPod/iPhone/iPad(15 ctp.9).

Ecnn yctpoictBO USB He hcnnoj3yetc, yctaHOBHTe 3aunHnIy0 KpbNkY npTa USB.
(8) PRESET < Y
HcnoB3yHTe 3TH KHOHNK, TTO6bI BbIbpaTb coxpaHeHHyIO (IpeIbapHTeJIbHO HAcTpOeHHyIO) FMpaIIOCTaHIIO (E cTp.13).
⑨TUNING <<
HactpoiKa FM-paTno (cTp.11).
10Dncnne nepeHne naheJn
HaHcHlIe oTo6paKaCTcBpEm H npyra HhOpMaIIH (cTp.3).
⑪ENTER
IIOITBepKJHeHNE BbIbpaHHORO 3JIeMeHTa HIN 3HaueHHN.
12CnotdIaDncka
BcTaBbTe CD-1nck (cTp.8).
13 EJECT
H3BJIeueHHe CD-1nca.
14-1+
Bb6epHTe ⅡIeMeHT HIN 3HaueHHe IPh HAcTpOKe YacOB HIN CnIHHaJIa 6yINJbHHKa.
15SET
3aJnte cHnHaia 6yHnIbHHka (cTp.16).
16ALARM
HcIOJB3yETcBIAI BKIOOeHHN H BBKIOOeHHN 6yINIBHnKa (Ctpr.17).
17 He3doIaI NOdkJIOUeHnHaHayuHNKOB)
HcnoIb3yIte IIOIIOKIOUeHHaHayIHINKOB.
YctaHObKa iPod B DOK-CTaHcHIO iPod
iPod 6yET 3apKaTbC, IOK OH IIOKIIIOHcH K IOK-pa3bemy. Ho, cJIN B KaecTBe HCTOHHKA BB6paHO USB-ycToPoiCTBO, iPod He 6yET 3apKaTbC.
#
- HcnoIb3yIte aIaIITep IOK-cTAHHIN, COBMeCTHMbI c HMEIOUHMCs iPod. Ecln aIaIIETep He HcNOIb3yERc HnI aIaIITep Hc IBIECTcO BcMeCTHMbIM, COeHHHeHc MOKeT 6bITb OCtABeHbIM HIN HCHaDCKbHM, TTO MOKeT IIpHBecTH K IOBpeKdHIO pa3bema. BoTee NOpDpObHAR HHΦopMaHr O6 aIaIIITepc IOK-pa3bema IpcIcTaBcHa Ha ophiHaaJbHom caIte KOHAAHH Apple.
Pa3bEM MoKET 6bITb TaKKe IIOBpeKJHe H INI IOIKIIHOeHHH iPod B 3aIHTHOM fytJIpe c ycHJIHE. CHHMHTe 3aIHTHbIyfYIep IIpeIIOKIIHOeHHem. - EcIIi iPod He nCIOJIb3yETc, yCTaHOBHTe 3aIITHyIO KpbIuKy IOK-pa3BeMa.
Iinpnei nepedne nahei
CoxpaHHe FM-paIIOCTaHIINN (cTp. 12).
15MUTE
BbIKIOeHHc N BKIOOeHHc 3Byka.
16 VOLUME + / -
Pcrgy.lnpOBka rpoMKoctH.
⑦DISPLAY
IepckJIOUOCHNE HhOpMaUNH, OTo6paKaCMoH NaCIIJIe IpeJeHHeI NaHeJI (cTp.7,9,10,11).
18 DIMMER
HacpoKa npKocTH HcHHepepeHnHaHeH (cTp.18).
BKJIIOUeyEHNcCTEMbl
Bud nucnner (24-acaobpekm),Korda cnctema BklnoueHa

Bud nucnner (24-acobon peKm), KOrda cnCTema BbIKNoueHa (nepeknouatelb CLOCK B noLoXeHm ON)

IopKnIOUHTe Ka6eNb NITaHnK p03eTKe nepemehHOro TOKa HaxMITE
CnCTeMa BkHouHTcH 6yIET rTOBa K BOCpON3BeHeHIO ayHNOCTOHHKOB.
IJIy BbIKIOHHeHH CHTeMbHaKMMTe eIe pa3.

EcHn NepcknoateB CLOCK Ha 3aHcH nHaehn yctaHOBn B noIOxckHe OFF (cTp.4),TO hAcb He 6yDyT oObpaKaTbc, KOrda ChTeMa BbKJIIOHeHa, HTO cOKpaAaer 3HepeIOnIop6JIeHHe.
IocJe OKOHuaHnHaCTpOHN HAcOB Ha IINcIIe e NoBHTcH aHaHncb "Completed!"

BIIARE 2 Bmecto pyHIO yCTAOBKN BpemeHH MOKHOCKONHPoBaTb Bpem iPod,ycTAHOBH iPod BIOK-CTAHIOB.PeMa He 6yTe KOHNPOBaTbcra,ecn iPod yKe HIOKIOOHe.
BIIARE 2 C HOMOIOIIO KHOIOK SNOOZE/SLEEP MOJHO Bb6pAIB foPMA BpeMeHH (12-ycobOH/ 24-ycobOH).
3 Nocne 3aBepWeHnHaCTpoEKe npeBeDInTe nepeKlnuOaTeNb CLOCK B noLoXeHne ON.
B MOMENTIpeKIOUeHIN BIOIOKeHHe ON Yacbl HAUYTOTCHCT BpemCIN C0cckyIIbI.

EcJIN ycTpoiCTBO He BKIOHOaIOb 6OJIee HeJeH, IpON3oIeT c6poc npapameTOB BpeMeHH.
ПРОСЛУШИВАНЕ iPod
Bocnpon3BeDeHne My3bIKn c iPod
-ДяпolyченялробнйинфорmaциоCoBMecTmocTmoJeleni iPod cm. pa3JeT "TEXHNUECKHE XAPAKTEPHCTNKN" (ctp. 23).
iPod taKke MoKeT BocPOnH3BOdHTb My3bky H 3apKaTbcra npn NOKIOueHHepe3 USB-nopr (cTp.9).
HaXMMTe KHOKNy NCTOCHNka iPod, YTO6bI Bb6paTb iPod B KaueCTBe ayDNONCTOCHNka.
YCTaHOBnte CBOI iPod B DOK-pa3bEm iPod (CTp.2).
HaunTe Bocnpo3BeHeHne c iPod. Bocpo3BeHHeM MoXHO yIpaBJIaTb C IOMOIIbIO nyIbTa DY, iPod Hn DaHHoro ycToPcTBa (cTp.2,5).

EcHb6paH ayHOHCTOHHK,OTHHHbIOT USByctpoHCTBa,TO npn BbIOJIHeHH CJIeYIOIHx ONEpaHINpOH30iET ABOMATHueCKoe NepeKIOUHeHne ayHOHCTOHHKaHaIPD H HAHTcBocPOn3BeJeHHe,JaKe ecHN cHCTemaBbIKIOyeHa.
-ПОДКИСИЧТЕ iPod B COCTOЯнн BOCПpoH3BcIeHn K JOKpa3bemy iPod.
- Haunre Bocipon3BeHne c noKnoeHHoro iPod.
Ho cnn B KaueCTB acyHOnctOuyHnKa Bb6paHO USBycTpoiictBO,iPod He 6yder3apKaIbcra.
iPod MoKHO OTOcoeHHHTb BO BpMa BocPOn3BeJeHnA.
EcIN B KaeeCTBe ayHONCTOHNKa BB6paH iPod, cHCTcMa ABOTOMAHueckn BbIKIOHTTCR, eIN B TeeHHe 60 MHHyT ycPTPOIECTBO He 6bLIO IOKIOHOeHO KIOK-pa3bemy iPod H He BbIOJIINCb HNKaKHe OIepaHH.
OnpaunBMeHIOiPod(TonbKOcnybTaY)
BbMOKeTe HcIOJIb3OBaTb IyIbT IY IyIyIpaBJIeHH iPod.
MENU: Bb6op nyHKta MeHIO / Bo3BpaT K IIpeIbIyIeMy MeHIO
A/V: IpepeMeHHeH MeKdy nyHKTaM MeHIO
ENTER: IIOITBcRKeHnC Bb6opa
OTo6paXeHHe HhOpMaun Ha dncnnee (Tolbko c nyIbTa Dv)

PnHaKaTHN KHOIIKN DISPLAY Ha IIyJIbe IV BO BpEmB OBCIPOH3BcIEHH NIN HAY3H HOpMaIHn HA INCIIe IpeEHei NaHeH 6yET OTO6paKaTbCByka3aHIOm CIIpaBA npRJaKe.

IcnoJb3OBAHne NOBTOPHOro BOCnpOn3BeDeHnA/BocnpOn3BeDeHnB CnyaHOM nopAKe (ToJIbKO c npJIbTa Dy)
Ctatyc Bocippon3BeHnna 06o3Haaetc HnHKaTOpom IOBTOPOBO CIOPOHBOOIOHOBOOIOHOBOOIOHOBOOIOHO HOPOKKe (cTp. 3) Ha DCIIepepeHne naHei.
NOBTOPHoe BOCnpOu3BeDeHne
HaKMHTc KIOIky (IOBTO) Ha nyIbTe DY HeCKOJIbKO pa3, qTO6bl BbIbpaTb OINH H3 CJIcDyIOUHX peKHMOB BOCIIPOH3BeJeHH.
He oTo6paKaetc: BbIKJ
1:OINH
ALL:Bce
Bocnpo3BeDeHne B cIyauHOM nopAKe
HaKMHTe KIOIky (B ClyuHOM NopRKe) Ha NylbTe IV HcckOJIbKO pa3, YTO6bl BbIpaTB OINH H3 CJeIyIOIIHX pcKHMOB BOCIIPOH3BCdCHN.
He oTo6paKaetc: BbIKI
:AJIb6OMB1
:I1ecm

ΦyHKIIH NOBTOPHORO BOCnPOH3BEeHH/HoBCnPOH3BeEHH B CtyaHOM IopRAKe MOKET He pa6OTaTH HTH OTOppaKaTcH HIN pABHJIbHO corIacHO yka3aHHbIM BBIe 0603aueHHM B 3aBCHMOCTH ONCNOJb3yeMOrTo TnHa iPod.
ПОСЛУSHINBAHIME CD-ДИСКOB И USB-UCTPOИCTB
YcTpoIcTBo 6yIeT pa6OaTb cJeIyIOHm o6pa3OM Iprn BocIpOn3BeHeHH IopOKeK/phiIIOB Ha CD-ⅡNCKax/ycTpoIcTBax USB.
- EcINBocIpOn3BcIcHc CD-dncka/yctpoiCTBa USB ocTaHOJIcHo, BocIpOn3BcIeHHc HaHCTc c HauJa IopOJKn npn BO306HOBJeHHn OepaHn.
- EcHn KHOIIKa HauKHaCTcBO Bpemr OCTaHOBKn BOCIPOH3BCdIHn,TO IIN BO3O6HOBJeHHN BOCIPOH3BCdIHn IopoxkNbYt POnHTpbBaTbc CJIeIyIOHM 06pa3OM:
-Дяayno CD:c npBoN IOpOKn Ha CD-DnKc.
-CDcdaHbIMn(CD-dhck,coepkaunnphiJbMP3/WMA)INUSByctpOchTBO:
BOcHPOH3BcEHNHe C nepBoH KOMIO3HINH B pAnke, coIepKaIIeKOMIO3HINHO, H a KOTOpOH BOcHPOH3BcEHNHe 6bIto ocTaHOHIO HOJIeHH pa3.
- YcIpoJIcTBO ABtOMaTHueckn BbIKIOHHT ChTeMy, ecIN B TeueHHe 60 MHyT IOcJIe OCTaHOBKn BocIIPOH3BeJEnH CDHcKa/USB-ycIpoJIcTBA He BBIOJIHHJIHcB HKAKeOIEpaIH.

IINIOJIyueHn HIOJPO6HOH HhOOPMaUNH O BOCIIPOH3BOHMbIX INCKAX H faJIax cm. pa3JeI "IPIMEuaHHIO JNCKAX N YCTPOHCTBAX USB" (cTp. 22).
Bocnpon3BeDeHne CD-ДиСka
HaXMMTe KHOKNy NCTOCHNka CD, YTO6bI Bb6paTb CD-DAck B KaueCTBe ayDIOONCTOCHNka. EcIIIN CD-DnCK yKe BCtABJIeH, Nauchetc BocIpOn3BedeHne.
2 BcTaBbTe CD-dnCK B cNOT dJa dncka.
Bocpon3BcDcHnC nauHCTcra bTOMaTHUcckn.
BocipoH3BCdHcHcMoXIO yIpaBJIbTc HOMOu bIO nyIbTa DY HIN daHHoro ycToPiCTBa (cTp.2,5).

BcTaBtCe Hnck, HnPpABHB CTOpOHy COTHKETKOB BBepx.

PAnKnHΦaJIbI HcCDcIaIIbIMNBOcIpOu3BOJrTcB aJIΦaBHTHom IopRKe.
Iponyck nanok (ToIbko c nyIbTa dY)
PnB BOCIIPOIN3BeIeHHN CD c IaHHbIMM MOKHO HcIOJIb3OBaTb KHOIIKN FOLDER △/▼ Ha IIyIbTe IY, YTO6bI bIb6paTb IaIKy.
OTo6paXeHne HhOpMaun Ha dncnnee (ToIbKO c npyIbTa Dv)
HOMcp HAIKN (TOJIbKO DIA CD c dIHHbIMH) HIN HOMcP KOMIO3HNN/phiJIA OTO6paKaetcHa IINCIJIe B TeueHHe HeCKOJIbKHX CeKYH, KOJa HAUNHaeTcR BOCIIPOHN3BcENHC HIN IDOPOKKa IIponyckaetc.
IIpn HauKaTHN KIOIKN DISPLAY Ha IIyJIbTe IY BO BpEm BAocIpOn3BcIChn HIN Hay3bl HIIΦopMaunHa IINcIIeC IepcIHei PAncH 6yIcT OTO6paKaTbcB CJIeJyIOIeM NOpAJIke.
Aydno CD
CDc daHHbIMN

* OTo6paKaTaTc TaIbKO B cIyHae, ecJIN KOMIO3HuaI coIepKHT 3TH daHHble.
Bocnpo3BeDeHne c USB-ycTroPcTba

iPod/iPhone/iPad TaKKe MoKet BOCINPOH3BOADHT My3bIKY II 3apKaTbCp PH NODKNIOCHHH Hepe3 USB-NOPT (cTp.7).
HaXMMTe KHOHky nCTOuHNka USB, yTO6bI Bbl6paTb USB-ycTroPoiCTBO B kaueCTBe ayDIONcTOUHNka. Ecln USB-ycTroPoiCTBO yKc IIOJKNIOUHO, HauHcTcB BOCIIPOH3BeJeHHe.
2NoKIOHnTe USB-ycTpoNCTBO K USBnOpy. BocpOn3BeHeHHe NaHHeTcABTomAtnHeckn. BocpOn3BeHeHem MOKHO yIpaBtbc HOMOII nyIbTa DY, ycTpoNCTBa HIN USB-ycTpoNCTBa (cTp.2,5).

PAnKn H faJIb6yIyT BOCpOHN3BOJHTbcrB TOM IopRJaKc, B KOTOPOM OHN 3aIHCAHbI.

OcTaHOBHTe BOCIIpOH3BEeHHe IepeI OTKIOHEm USByCTpoHCTBa.
Pponyck nanok (Tolbko c nynbTa dY)
IIpnBocnpon3BeHenncUSB-ycToIcTBaMOKHOHCIOJIb3OBaTb KHOIIKN FOLDER / Ha npIbte IV, T06bI BbIbpaTb IaIKy.
OTo6paKeHHe HhOpMaun Ha dncnnee (TolbKo c npyIbTa Dv)

Home piaikn/phiIa OTO6paKactcna HINCHIIe B TeueHHe HeCKOIBKnx CekyH, KOrJa HAHHAcTcB OBCIpOn3BcDChHe HIN IOpokka IIponyckaetc.
PiH HaaKaTHN KIOIKN DISPLAY Ha nyIbTe DY BO BcPmB BocpOnHcEHH HIN IIay3b HfOpMaIHn HA IInCIJIe HepeIHei NaHeJH 6yET OTo6paKaTbcB yka3aHHOM cnpaba NopdKc.
*OTobpaKaTcT TaIbKO B cIyae,ecnn KOMIO3HnH COJIepKHT OTn daHHbe.
IcnoJb3OBAHne NOBTOPHOROBOPON3BeDeHNA/BOCnpon3BeDeHNA B cnyaHOM nopAKe (ToJIbKO c nylbTa Dy)
Ctaryc Bocnpn3BeHn HOb3HaAeTcH NIKaTOpOM IOBTOpHO BOCpOH3BeHn/BOCPoH3BeHn B cyuHOM IopAJIke (cTp. 3) Ha nciiee Hepdien Hnclnn.
NOBTOPHOE BOCPON3BedeHne
HaKMHTe KIOIky (IOBTOP) Ha NITBE IV HeCKOJIbKO pa3, TTO6b Bb6paTb OINH H3 CJEJYIOIIIX peKHMOB BOCIIPOH3BCdCHNIA.
He oTo6paKaaeTc:
PcKHMIOBTOPHORO BOCIIPOH3BCDEHHN OTKJHOCH
1:1npokka
:
BceIopOKN BIIHKe (TOJIbKO CD c DaHHbIMN/YcTpoINCTBO USB)
ALL:BceIopOJKN
Bocnpo3BeDHe B cIyauHOM npAKe
HaKMHTc KIOIky (B CnyaHOM NopRKe) Ha nyIbTe IV HecKoJIbKO pa3, YTO6bl BbIpaTb OINH H3 CJeYIOIHx pcKMOB BOCnPOH3BcDEHH.
He oTo6paKaetc: PckHM BocIPOH3BcIeHHN B cIyauHOM IopraKc OTKIOUCH
X:
BceIopOxKN BIIaIKe (TOJIbKO CD c IaHHbIMN/ycTpOoiCTBO USB)
ALL:BccIopoknn
ПОСЛУSHINBAHNE FM-РадиоctAHцИ
BbI6op FM-paIocTaHcnn
JnpocnyHHBaHH FM-paHocTaHnH NoKIOHTe aHTeHHy (cTp.4).
1

!
HaXmTe KONky nCTOuHnKa FM, yTO6bI Bbl6paTb FM-paIOcTaHcuB KaueCTBe aydnoNCToHnKa.
HacTrojka FM-paDnocTaHcN.
ABTomathcckaHaCTpoKa:
HaKMHTe HyepKbAHTe KHOIky TUNING / PyHaa HaCTpoKa:
HaKMHTe KHOIky TUNING / HeckoJIbko pa3.
EcHn HacptpoKy paHIOCTaHHN BbHIOJIHTb BpyHUYIO BO BpEmI IIpHema FM-cHHaII, 6yET BOCINPOH3BOUHTbc MoHOOHNueckn 3ByK.
OTo6paXeHne HhOpMaun
Pn HauKaTHN KHOIN DISPLAY Ha IyIbTe Y NHΦopMaIIHa IINcIIeepEIN He IIaHeJN 6yET OTo6paKaTbcB CJIeIyIOUeM IOpAke.
Homep uactota npedbapntelbHO HactpoeHHo paHocTAHm @ytc pneMa*
*IpnHMepeBIOKoKa3aHHcTaryCa IpnHema.
TUNED/STEREO: CHIJIHBI FM-CHTHA CTREPOOHUeCKOTo BEIIAHIA.
TUNED/MONO: Ipnem MOHOHueckoro FM-cnHaJIa (JaKe ee FM-paHocTaHnra TpaHcHpyetcB cTepeo- oopMaTe, npn cJia6om cnHaJIe Ipnem 6ydet MOHOHueckHM).
Not TUNED: CnHaJa paHOBeuaaHr OTCyTCTBye.
OTo6paKeHHe HnOpMaqnn O paNocTaHqnx C cnHaJOM CNCTeMbI paNODaHHbIX
Ipn HauKaTHN KHOINKHN DISPLAY Ha NylbTe DY BO BpeMa IpnHema paAnocTaHn C cHTHaTOM cHCTeMb paAnoHaHHbIX HHOpMaIIHA JHCIIee IpcdHc HnCn 6ydt OTO6paKaTaBc B yKa3aHOM cPiBa IopAJIKe.
EcHn ChHaI paHIOCTAHHH C CHHAIOM CHTeMb paHIOHAHHbIX CJIHHKOM CJIa6bII, JAnHbI aHapat, BO3MOXHO, IIcMOKET IIHNHMATb HINΦOPMaIHIO CHTeMb paHNOaHHbIX B NOHOH Mepe. B YacTHOCHT, IINHΦOpMaIH RT (paHOTekT) Tpeyetc6oJIbWIIa HOJIOCA IIPOYCKAHII, IO3OTMY OHA MOKET 6bITb IOCTUHa B MEHIIIE CTENHIIO CpABIIeHHIO CpyrHM THIaMH INΦOpMaIH.
!

IpeBapntbHaHa HacTpoKa FM-paHocTaHcN (ToIbKO c npIbTa Dy)
HcnoIb3yIte 3aHaHHyo yHKnIO IJIa coXpaHeHra 30 JIO6MbIX paAnocTaHII.
ABTomatnueckaI npedBaPntbHaHaHacTpOka
JaHbI MeTOI IO3BOJIaET aBOMaTHueeCKn HAcTpaHBaTB n aBTOMaTHueeCKN IpeBaHTeJIbHO 3aJABaTB TOJIbKO paINocTaIHIN C XOPOUHM KauCCTBOM IIpHcMa.
12
Puchna IpeDbapnteIbnaH NaCtpoKa
HaKmTe uYdepXnBaIte KHONKy MEMORY Ha npIbTe Dv.
IIOBHTc coo6HHe "AUTO PRESET" HnHaJIINCb "Press MEMORY" 6yJCT MHRaTb.
HaxmTe KhoNkY MEMORY.
HaHTcA BToMaTHuecka IpeBapHTeJIbHa HaCTpoKa. IocIe OKOHaHHa IpeBapHTeJIbHO HaCTpoKn Ha HnCIIIE IOBHTc HaIINCb "Completed!"

Pn BbIOHHeHH ABToMaTHuecko IpeBapHTeJIbHOI NaCTPOH KBE coXpAHIIHbIe paJIOCTaHH yJaJIHOITcN COxpaHIOITc HOBbIe paJIOHcTAHH.

EcHH Heo6xHMO OCTaHOBHb AROMATHueckyHO IpEaBapHTeHBHyHO HAcTPOHky Ioo ee 3aBePHeHH, HAKMHTe KHOHNy
1BbIbepnte paAnocTaHcNIO, KOtOpyIO Bbl XOTnTe HaCTpOnTb, n HaxMnTe MEMORY. Ha dncnccnnoBnTcnaHnnncb "PRESET MEMORY".
2HaXmTe KONky PRESET / ,yTo6bI BbIpaTb HOMep IpeBapnteJbHO 3aDaHHo paAnocTaHcN, KOtOpYIO Heo6xoDIMO COxpaHnTb.

CamaH MaJIeHbKHI HOMep IpeIbapHTeJIbHO 3aJauHHo paHocTaHnH, KOtOpBII eH He 6bl coXpaHEn, 6yTe Bb6paII B nepHyIO OpeIb.
- EcII BbXOTHTe OTMeHHTb IIpeIiBaHPTeJIbHyIO HAcTpOoiKy, HAKMITE KIOIky
EeIN BbBb6HpaeTe HOpem PpeBaPteTbHo 3aDaHIO paHIOCTaHH, IOI KOTOpbIM yKe 6bHa coXpaHeHa paHIOCTaHH, OHa 6yTe 3aMeHeHa Ha HOByo paHIOCTaHHIO.
3ДлЯЗавершениосяпинхмnte KhoNKy MEMORY.
HacptpoeHHa paHnOCTAHnHa 6yTe coXpaHeHa Ha HnCIIIEe IIOBHTcnaIINCb "Completed!".
YdaJIeHne coXpaHeHHoI npEdbapntelbHo HacTpoEHHO paNocTaHcN
HaXMMTe KHOKNy MEMORY Ha nyIbTe Nv. Ha nHcIIe cIOABHTc coo6ueHHe "PRESET MEMORY", a HOMep IpeBapHTeJbHo 3aJaHHo paHnOCTaHnn 6yIcT MHRatb.
HaXMMTe KHOKNy TUNING / ,YTO6bl BbIbpaTb Oepaunu ydaJeHnna PpeBapnteJbHo HAcTpoEHnO paIOCTaHcN. Ha IINIIIE CnoBHTc HAnIHcB "PRESET DELETE".
HaXMMTe KHOKNy PRESET</>,YTO6bI BbIbpaTb HOMep npeDbapnteJbHo 3aDaHHo paNIOCTaHcHn, KOtOpyIO Heo6xOdmo ydaNTb.

EcINBbXOTHTeOTMeHHTb yJaJIeHHe,HaKMTe KIOIIKy
4ДЯЗаверш�онonepaunnaHaxmTe KhoNKy MEMORY.
HacpoeHHa paHIOCTaHnHa 6yJeT yJaHe H Ha nHcJIe neoBntc HAnncb "Deleted!".
Bb6op npedBaPnteIbHo hAcTpoEHHbIX FM-paNoctaHcN
UcTpoIcTBo

Nyblny
HaxmTe KhONky nCTOuHnKa FM, yTo6bI BblpaTb FM-paIOcTaHnB KaueCTBe aydnoNCTOuHnKa.

IpeKIOHTb ayHOHCTOHTIK MOKIO C NOMOHTIO KHOITKIRADIO Ha nyIbTe IV.
Haxmte KhoNky PRESET</>,yTo6bI Bbl6paTb FM-paNoctaHcHIO dJI npocnyuBaHnA.

Bb moke T b6paT ToJIbKO Te npBaPHTeIbHn HactpoehHHie paHocraHH, KOtOpHe 6bHH coXpAenHb.

ПОНДУШВАНЕ BHEшнх NGTOЧИКOB
C NOMOsbIO IMeHOUcROB INpOdaKe Ka6eJIa C MHN-UTeKepOM 3,5 MM NOdkIouHTe BHeuHHee yCTPOINCTBO K rHe3dy AUX Ha 3aJHei NaHei DaHHoro yCTPOINCTBa.
!
BbIKIOHHTe cHcTeMy IpeE IIOKIIIOHeHHem Ka6JIa C MIIHN-ITKePOM.
IpeINIOIKIOHHeEM BbIKIOHTe 3BYK DAHHORO yctpoictBa H BHeuHero ayHouycptpOCTBa.
HaXMMTe KHOKNy OTO6bI BKIOUHTb CNTEmy.
3HaxmTe KHOKNy NCTOCHNkA AUX, YTO6bI Bb6paTb BHeuHHee yCTPOINCTBO B KaueCTBe ayDnONCTOCHNka.
4HaunTe BocpOn3BeJeHne Ha NOKIOUeHHOM BHeuHem ayuOyCTPOIcTBe.
MCPOJIb3OBAHNEФYHKcINБyДиЛьнKA
YcTPOIcTB OHeeT yHKHIO 6yHINbHNka (IntelliAlarm), KOTopA BOCPON3BOJNT MEJOIO C ayHOHCTOHNKOB Hn Ha6Op 3ByKOBbIX cHNAIOB (BcTPOeHHbN 3ByK 6yHINbHNka) B yCtAHOBJIeHHoe BPempa3JINHbIMN cHOCo6aMH. FyHKIIH 6yHINbHNka HMeet cJeTyIOIIHe xapaKTepehCTKN.
3 Tnna 6yDnIbHnKOB
YcTpoIcTBnMeET 3 TnIIa 6yINJIbHnKOB, CoeTaHOIIHe My3bIKy H 3ByKOBBie CHTHaJIbI.
| SOURCE+BEEP | Быбранный aydnoctochyнк H 3bykoBoi сngHnaI BocpoH3BOJATcB yctaHOBJIeHHoe BpeM. Даинь peжHM peKOMeHdyetcRДЯ NaHJIyUHrero NaHajla Дн. 3 МИNTbdo yctaHOBJIeHHOro BpeMeH: My3bika ИЗ hCtOuHnka ПОCTeПeHIO усHJIHBAeTcA, a ГомКоCTb ПОCTeПeHNO yBeJIuHbAeTcRДЯМе РпбЛжЕнь BpeMeH bdyHJIbHnka. ВpeM 6byHJIbHnka: NaHINHaETcR BOCpoH3BeDEHne 3ByKOBOrO cHrHajla. |
| SOURCE | Быбранный aydnoctochyнк BocpoH3BOJATcR yctaHOBJIeHHOC BpeM. ГомКоCTb ПОCTeПeHNo yBeJIuHbAeTcRДЯуctaHOBJIeHHOrO upOBHra. |
| BEEP | В установлійhoe BpeM BOCpoH3BOJATcR TOLbKO 3BykoBoi сngHajl. |
Pa3JIuHbIe aydnoNcTOUHnKu
iPod, ayINo CD, CD c dAHbIMN, USB-ycTpoHCTBO n paIINO ABJIOrTC JOcTyIHbIMN IJI BA6Opa HcTOHHKAMN. CJIeIyIOIIHe CIOOC6bI BOCIIPOH3BeJeHHa TaKKe MOKHO Bb6pA b 3aBNCMOCTn O ayINOHCTOHHKA:
Haxmte KhoNky SNOOZE/SLEEP.
Pn3TOM BOCIIPOH3BcEHe Hne CHTHaJIa IIpeKpaHTnc H BO306HOBHTc CHOBA Yepe3 5 MHHyT.

EcJIN B KaueCTBe Tnna CnHaJa Bb6paHO 3HaueHHe SOURCE + BEEP, HAKMHTe KNOIKy SNOOZE/SLEEP OJINII pa3, TTO6bl BIKJIOOHHTB 3BYKOBOI CNTnAI, INBa pa3a, TTO6bl OCTaHOBBtB BOCIIPOHN3BeDEHHe ayDHOHCTOHHKa.
Yepe3 5MHHTIOCNEOCTAHOBKH BOCINPOH3BcEHHA yHOHOCTOCHHKaOHCHOBA HauHETIOCTeEHHO YCHJIHBaTbCn 3ByKOBOON CHHAI BO306HOHHTC.
Haxmte KhoNky SNOOZE/SLEEP
HeckoBko pa3, YTo6bI 3aDaTb BpeM, NO ICTeueHn KOTOpO rCtEma OTKJIHOuHTcR.
MoXHO yCTaHOBHTb 3HaueHHe 30,60,90 Hn120 MHHyT.
IocJIe TORo, KaK BpeM BA6paHo, BKIOUOaETcra TaIIMeP
IEpcXODa B pckHM OxHNdaHn I COOTBCTeCTByIOuHn
HINHKaTOP (F) IOBHTcRa Ha INCIIeE IIpeDHei
IIaHCJIn.

EcHn KhoIka SNOOZE/SLEEP HaKaTa, KorHa TaIImepe IepexoJa B peKHM OxHaHHaKTHBHpOBaH, To HAcTpoiKn TaIIMepe IepexoJa B peKHM OxHaHHaHH6bYt OTMeHHeJI.
PEYJINPOBKA TEMBPA (ToIbko c npIbTa dV)
1Bo BpemBocnpoN3BeDeHnHaXmnte KHOJky LOW, MID nHn HIGH EQ Ha npJIbTe Dv.
Bb6epTe Tem6p Ia HacrpoKN (LOW, MID, HIGH).
HaXMMTE KHOKNy △/▼, YTO6bI HAcTpONTb TEM6p.
3ДЯЗавершениonepaин haXmTe KhoNky ENTERHa nyIbTe D.
Takke MoKHO HaxKaTH KHOIIky EQ, KOtopyIO BbI HaxHMAJIIN B IaRc 1, YTO6b3aBepiHTb HaCTpoNky.
HacptpoknDpytor Dnana3oHa hactot BepHTecb K IIIary 1 HauKMHTe KhoNkEy EQ nlaHnna3oHa hactOT, KOtOpBn Bb XOTHe HAcTPOHTb.
HACTPOIKA JPKOCTN DnCJIe IEPEDH NAHEN
(TOJIbKO C nIyIbTa dV)
HaKMHTe IeckoIbko pa3
HaXMMTe KhoNky DIMMER Ha npIbTe IV HeCKoJIbKO pa3.
JPKoCTbHcHIEIpeHHeH HHeH6yET H3MeHrTbcB CJIeNyIOIIEM NOpRJaKe.
AUO 1() (20 2 (cpennn)
TEXHnueCKNEXAPAKTEPNUCTMKN

m = 311 ;
3TH3HAKHHa aHHapatypc, yHakOBkax H B COIPOBOHTCILbHIX DOKYMCTAX YKA3bBAIOH HA TO, YTO IOpeJXAHHHbe 3EeKTPnueckHe H 3TeKTPoHHBe IpH6OpB H 6aTapeHN He 10JIHKHb BB6paCbBAETCB MBeCTe C 06bYHbIM DOMAHHM MycOpM. JII PAABHbHOI 6pa6OTKH, XpaHEHH H yTHIN3aHH CTapOH anHAPATpyH N HCHOJIb3OBaHHbX 6BatapeK, HOKaJIyHcTa CdaBaHTe H X B COOTBCTCYIOHNC 6OpHbc IIyHKTB, COJIACHO BAHCMy HAHONAHbHOMy 3aKHOJATEJIbCTBy H IIpeKTHB 2002/96/ EC n 2006/66/ EC.

PnHaJIeKaIIHeyyTHIN3aIHIN 3THX TOBAPOB H6atapeek, BbI IOMOraete COxpaHrT IIeHHBe pecypcbI IN IpeIOBpaIIATb BpeIIIOE BIINIIIE Ha 3IOPOBLe IIOeH N OKpykaIOIIYIO cpeIy, KOtOPE MOKET BO3IHKNITb I3-3a HECOOTBETCTBYIOIero O6paIIeHHcCOTXoDMH.
3a 6oJIee IOIIOIOH HIIΦOpMaIIeH O c6ope H yTHIN3aIHN CTApBIX TOBAPOB H 6aTapeck, IOKaJIyIcTa 6bpaIaIHTEcB B aHIy JOKaJIbHyO aIMMHCTpaIIHO, B BAHI IIpHHeMHbI IyHKT HIN B MaIa3HH TRe B bI pHObpeH 3TN TOBapbl.
[Infopmaun no ytnn3aunn Bdpynx ctpanax 3a npedamn Ebponeckoro Co103a]
3TH 3HAK DeCTBHTeJIbIbTOJIbKO Ha TeppHTOPHN EbpONIEKOrO CoIO3a.EcIN Bx XOTHTC H36aBHITcER OT 3HX IpcIMCTOB,IOKAJHyIeTa O6paTHTCCB B BAUY IOKAJIbHYIO aMHHHCpaIHIO HIN IpOdaBHy H cIpocHTC O IIpaBHbHOM CnOc06e yTHIN3aIIHH.
06paTHe BHMMaHHe Ha 3HaK dIa 6aTaapeek (DbA 3HaKa Ha 3aDHe CTopoHE):
3TOT 3HAK MOKET HCIOJIb3OBAtBc8 B KOM6HnHaIHn CO 3HAKOM YKa3bIbAIOIHm O coJePkaIHIN XMHInaIHn. B 3TOM cIJyAc 3TO yIOBJCTBOPrCT Tpc6OBaHHM yCTaHOBJICHHBM INpckTHBOI NO HCIOJIb3OBAHHO XMHKAJIHH.
| CAUTION Use of controls or adjustments or performance of procedures other than those specified herein may result in hazardous radiation exposure. |
| AVERTISSEMENT L'utilisation de commandes et l'emploi de régles ou de méthodes autres que ceux décrits ci-dessous, peuvent entraîner une exposition à un rayonnement dangereux. |
| VORSICHT Die Verwendung von Bedienelementen oder die Einstellung bzw. die Ausführung von anderen als in dieser Anleitung beschriebenen Vorgängen kann zu Gefährung durch gefährliche Strahlung führen. |
| OBSERVERA Användning av reglage aller justeringar aller utförande av Åtgärder på annat sättän säll som beskrivs här kan resultera i farlig strälning. |
| ATTENZIONE L'uso di controli, regulazioni, operazioni o procedure non specificati in quello manuale posso sono risultare in esposizione a radiazioni pericolose. |
| PRECAUCión El uso de los controles, los ajustes o los procedimientos que no se especfican enste manual=Puede causar una exposión peligrosa a la radiación. |
| LET OP Gebruik van bedieningsorganen, installingen of procedures anders dan beschreiben in dit document kan leiden tot blootstelling aan gevaarlijke stralen. |
| ΠΡΕΝΟCTEPEXEGHE Исpenьзованные оретаю упавлия пони виимлеленце пождур, не указааньх в ладиони иструkinи, может отразимлься на виимлелени onасно радашии. |
VAROITUS
If the socket outlets in the home are not suitable for the plug supplied with this appliance, it should be cut off and an appropriate 3 pin plug fitted. For details, refer to the instructions described below.
!
The plug severed from the mains lead must be destroyed, as a plug with bared flexible cord is hazardous if engaged in a live socket outlet.
Special Instructions for U.K. Model
IMPORTANT
THE WIRES IN MAINS LEAD ARE COLOURED IN ACCORDANCE WITH THE FOLLOWING CODE:
Blue: NEUTRAL
Brown: LIVE
As the colours of the wires in the mains lead of this apparatus may not correspond with the coloured markings identifying the terminals in your plug, proceed as follows:
The wire which is coloured BLUE must be connected to the terminal which is marked with the letter N or coloured BLACK. The wire which is coloured BROWN must be connected to the terminal which is marked with the letter L or coloured RED.
Make sure that neither core is connected to the earth terminal of the three pin plug.
- The name plate is located on the bottom of the unit.
- La plaque signaletique se trouve sur le dessous de l'appareil.
- Das Typenschild ist an der Geräteunterseite angebracht.
- Namplaten sitter på enhetens undersida.
- La targhetto con il nome è disposa sul lato inferiore dell'unità.
- La etiqueta con el nombre se encuesta en la parte inferior de la unidad.
- Het naamplaatje bevindt zich aan de onderzijde van het toestel.
3aOIOckA Ta6JIHcKa HAXOHTcHa HIXKHeI NOBcpxHocTH annapara.
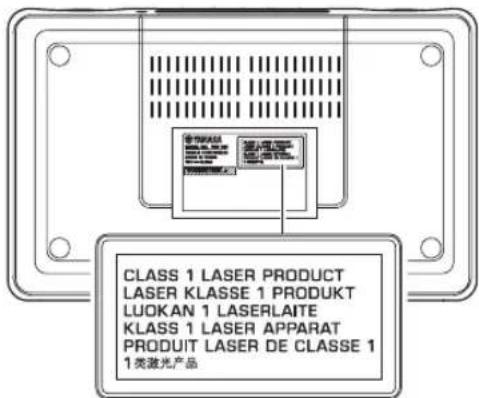
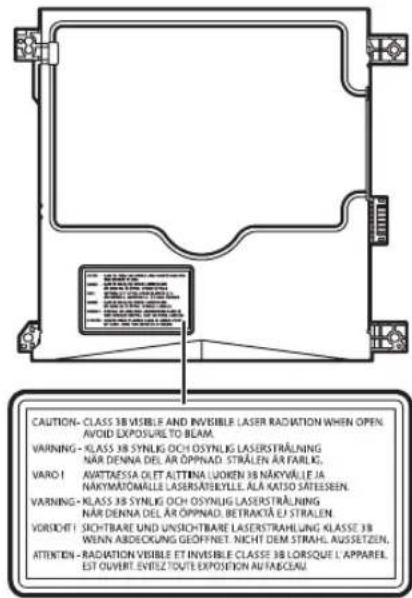
| Important Notice: Guarantee Information for customers in EEA* and Switzerland | English |
| For detailed guarantee information about this Yamaha product, and Pan-EEA* and Switzerland warranty service, please either visit the website address below (Printable file is available at our website) or contact the Yamaha representative office for your country. * EEA: European Economic Area | |
| Remarque importante: informations de garantie pour les clients de l'EEE et la Suisse | Français |
| Pour des informations plus détaillées sur la garantie de ce produit Yamaha et sur le service de garantie applicable dans l'ensemble de l'EEE ainsi qu'en Suisse, consultez notre site Web à l'adresse ci-dessous (le fichier imprimable est disponible sur notre site Web) ou contactez directement Yamaha dans vos pays de résidence. * EEE: Espace Economique Européen | |
| Wichtiger Hinweis: Garantie-Information für Kunden in der EWR* und der Schweiz | Deutsch |
| Für{nahere Garantie-Information über ceses Produkt von Yamaha, sowie über den Pan-EWR*- und Schweizer Garantieservice, besuchen Sieitte entweder die folgend angegebene Internetadressee (eine druckfähige Version befindet sich auch auf unserer Website), oder wenden Sie sich an den fur Ihr Land zuständigen Yamaha-Vertrieb. *EWR: Europäischer Wirtschaftsrämun | |
| Viktigt: Garantiinformation für kunder i EES-området* och Schweiz | Svenska |
| Für detailjerad information omenna Yamahaproduktsamt garantiservice i hela EES-området* och Schweiz kan du antingen besöka nedanstäende webbaddress (en utskriftsvänlig fil finns på webbplatsen) erler kontakta Yamaha officiella representant i ditt land. * EES: Europeiska Ekonomiska Samarbetsområdet | |
| Avviso importante: informazioni sulla garanzia per i clienti residenti nell'EEA* e in Svizzera | Italiano |
| Per informazioni dettagliate sulla garanzia relativa a Anythingo prodotto Yamaha e l'assistenza in garanzia nei paesi EEA* e in Svizzera, potete consulquire il site Web all'indirizzo riportato di seguito (è disponibile il file in formato stampabile) oppure contattare l'ufficio di rappresentanza locale della Yamaha. * EEA: Area Economica Europea | |
| Avviso importante: informacion sobre la garantia para los clientei del EEE* y Suiza | Espanol |
| Para una informacion detallada sobre este producto Yamaha y sobre el soporte de garantia en la zona EEE* y Suiza, visite la direction web que se incluye más bajo (la version del archivo para imprintir esta disponible en nuestro situ web) o póngase en contacto con el representante de Yamaha en su pais. * EEE: Espacio Economico Europeo | |
| Belangrijke meededeling: Garantie-informatie voor klanten in de EER* en Zwitserland | Nederland |
| Voor gedetailleerde garantie-informatie over dit Yamaha-product en de garantieservice in heel de EER* en Zwitserland, gaat u maar de onderstaande website (u vind een afdrukbaar bestand op unsere website) of neemt u contact op met de vertegenwoordiginc van Yamaha in uw land. * EER: Europese Economische Ruihte | |
http://europe.yamaha.com/warranty/

YAMAHA