NVR0208 - Voice recorder LEVELONE - Free user manual and instructions
Find the device manual for free NVR0208 LEVELONE in PDF.
User questions about NVR0208 LEVELONE
0 question about this device. Answer the ones you know or ask your own.
Ask a new question about this device
Download the instructions for your Voice recorder in PDF format for free! Find your manual NVR0208 - LEVELONE and take your electronic device back in hand. On this page are published all the documents necessary for the use of your device. NVR0208 by LEVELONE.
USER MANUAL NVR0208 LEVELONE
natural_image
Abstract geometric pattern composed of blue squares forming a stylized 'H' shape (no text or symbols)one
NVR-0204/0208/0216
4/8/16-CH Network Video Recorder
Quick Installation Guide v1.0
English
Português
Deutsch
Svenska
Français
Slovenščina
Español
繁體中文
Nederlands
한국어
Dansk
Русский
Italiano
Polski
Ελληνικά
Table of Contents
English....3
Deutsch.... 11
Français 19
Español 27
Nederlands.... 35
Dansk 43
Italiano 51
Ελληνικά 59
Português 67
Svenska 75
Slovenščina 83
繁體中文....91
한국어 99
Русский 107
Polski 115
Package Contents
▶ Network Video Recorder
▶ RJ-45 Ethernet LAN cable
Power cord
Quick Installation Guide
▶ CD Manual/Utility
Default Settings
| IP Address | DHCP address |
| Username | root |
| Password | root |
If the NVR detects no DHCP server on the LAN environment, then the NVR's IP will be static IP [192.168.101.50]
This guide covers only the most common situations. All detailed information is described in the user manual.
English
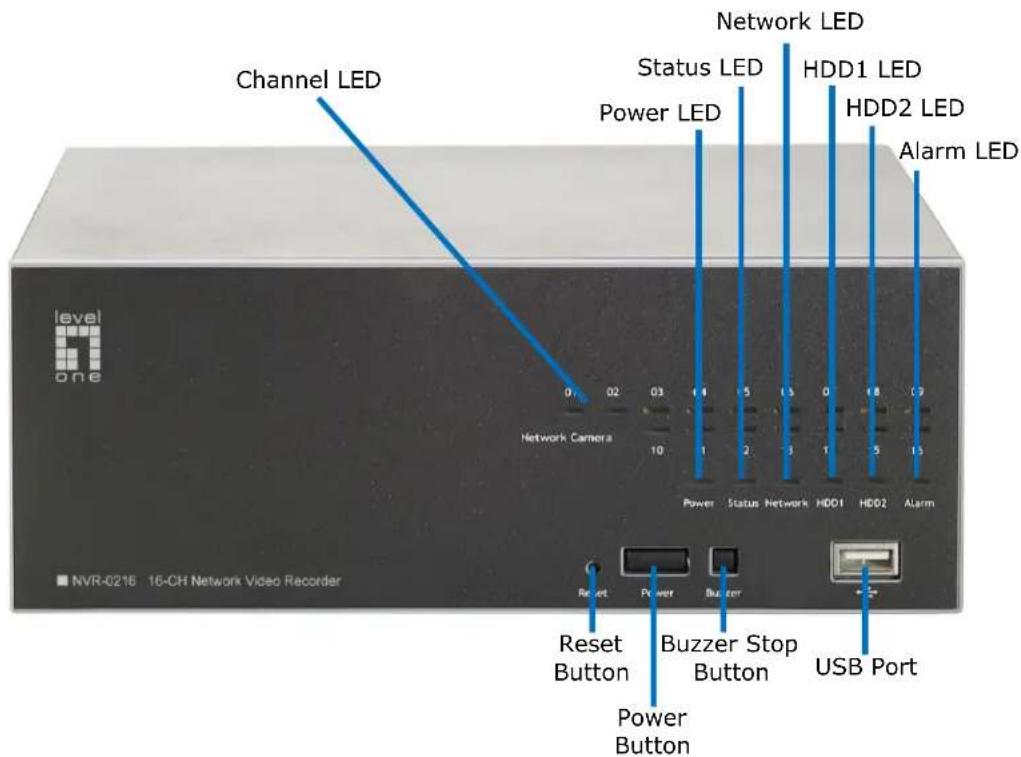
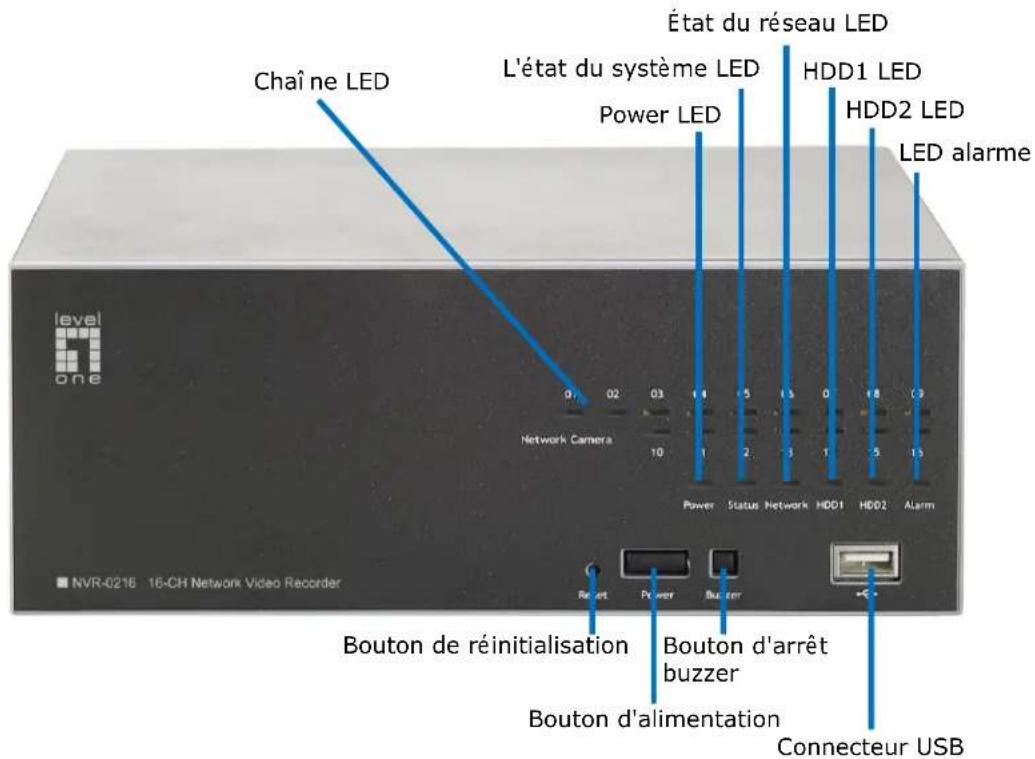
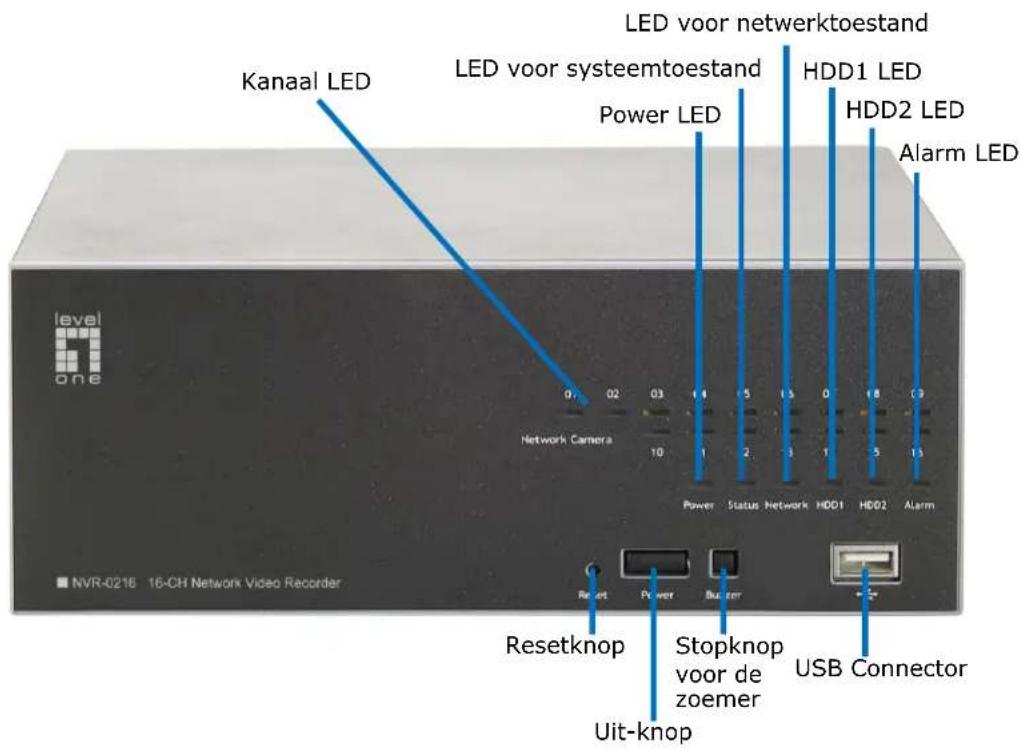
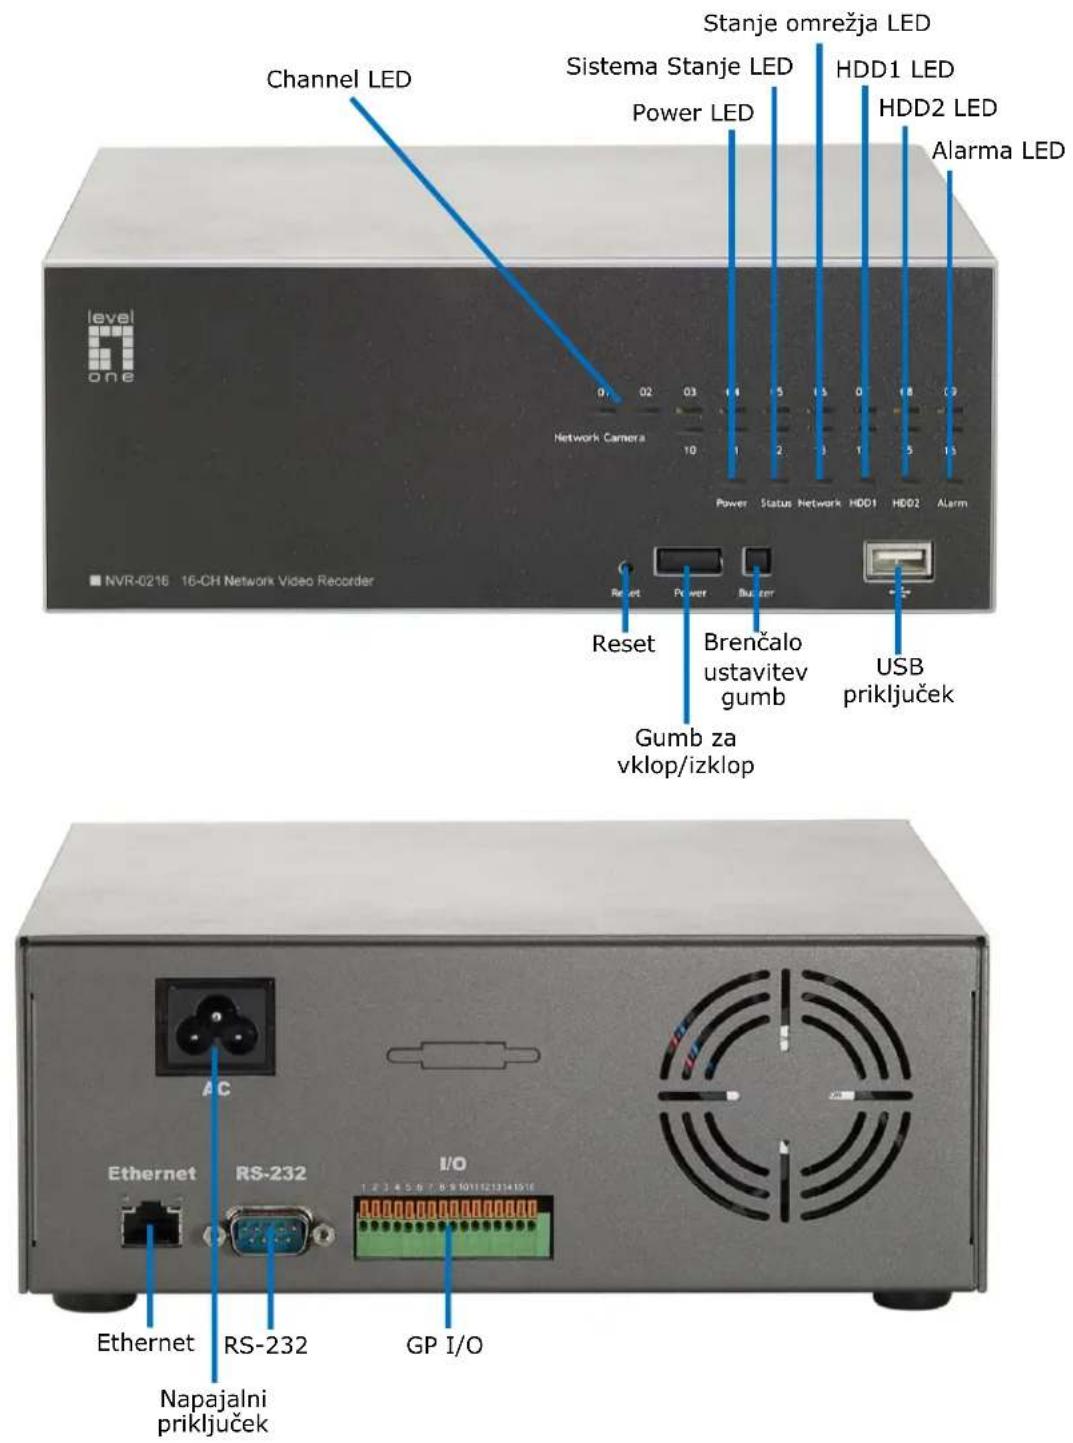
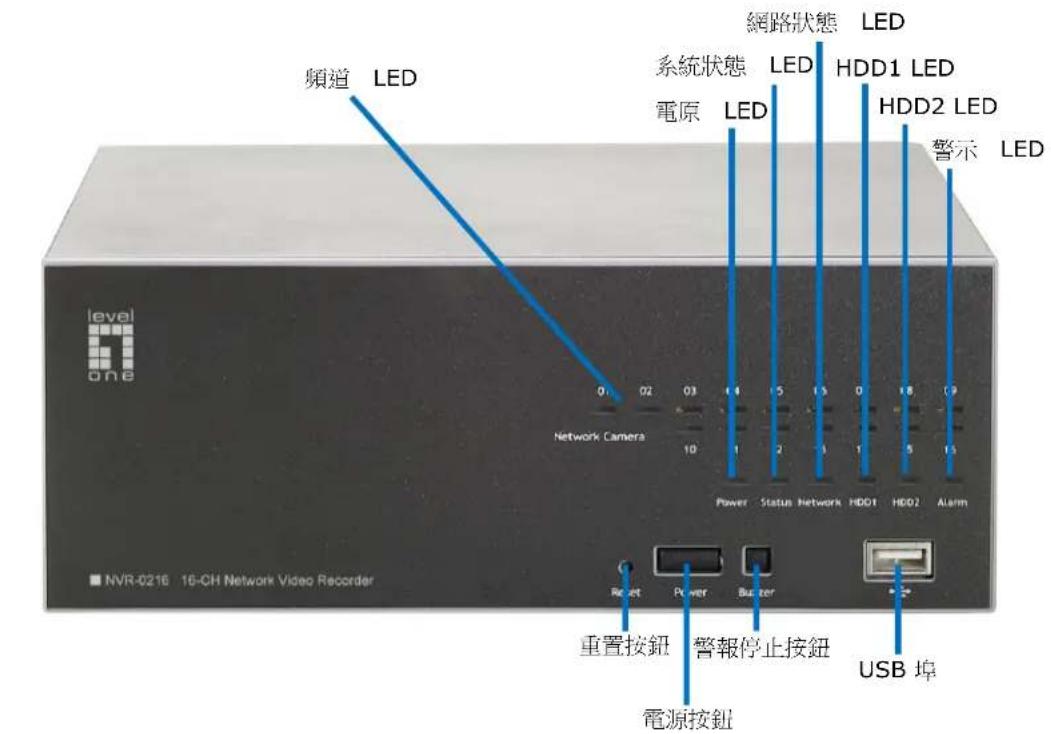
System Overview
text_image
Channel LED Status LED Power LED Network LED HDD1 LED HDD2 LED Alarm LED Network Camera 0 02 03 1 4 5 13 0 18 3 10 Power Status Network HDD1 HDD2 Alarm NVR-0216 16-CH Network Video Recorder Reset Button Buzzer Stop Button USB Port Power Button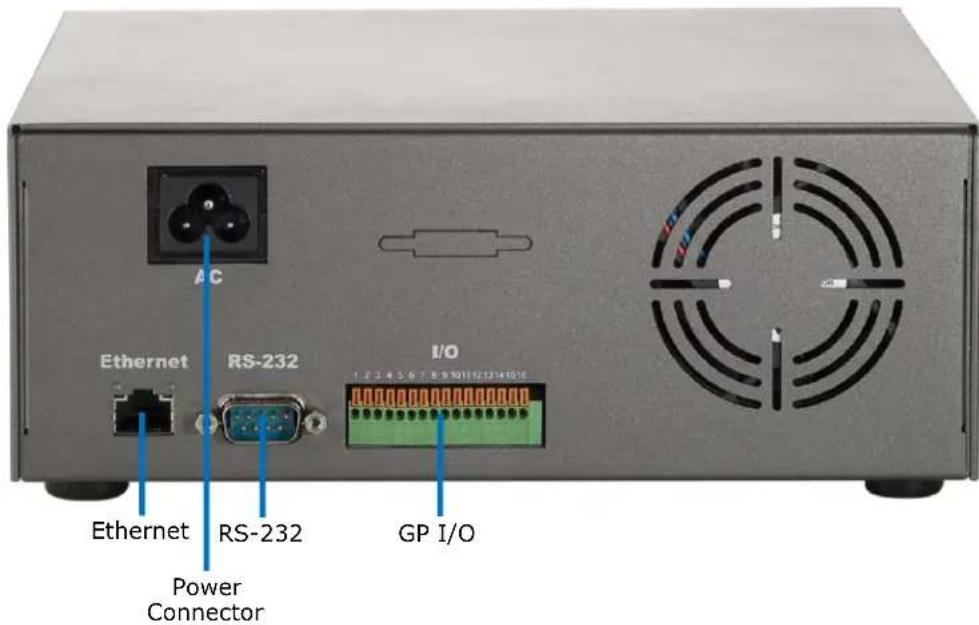
text_image
Ethernet RS-232 I/O 1 2 2 4 5 6 7 8 9 10 11 12 13 14 15 Power Connector GP I/OHDD Installation
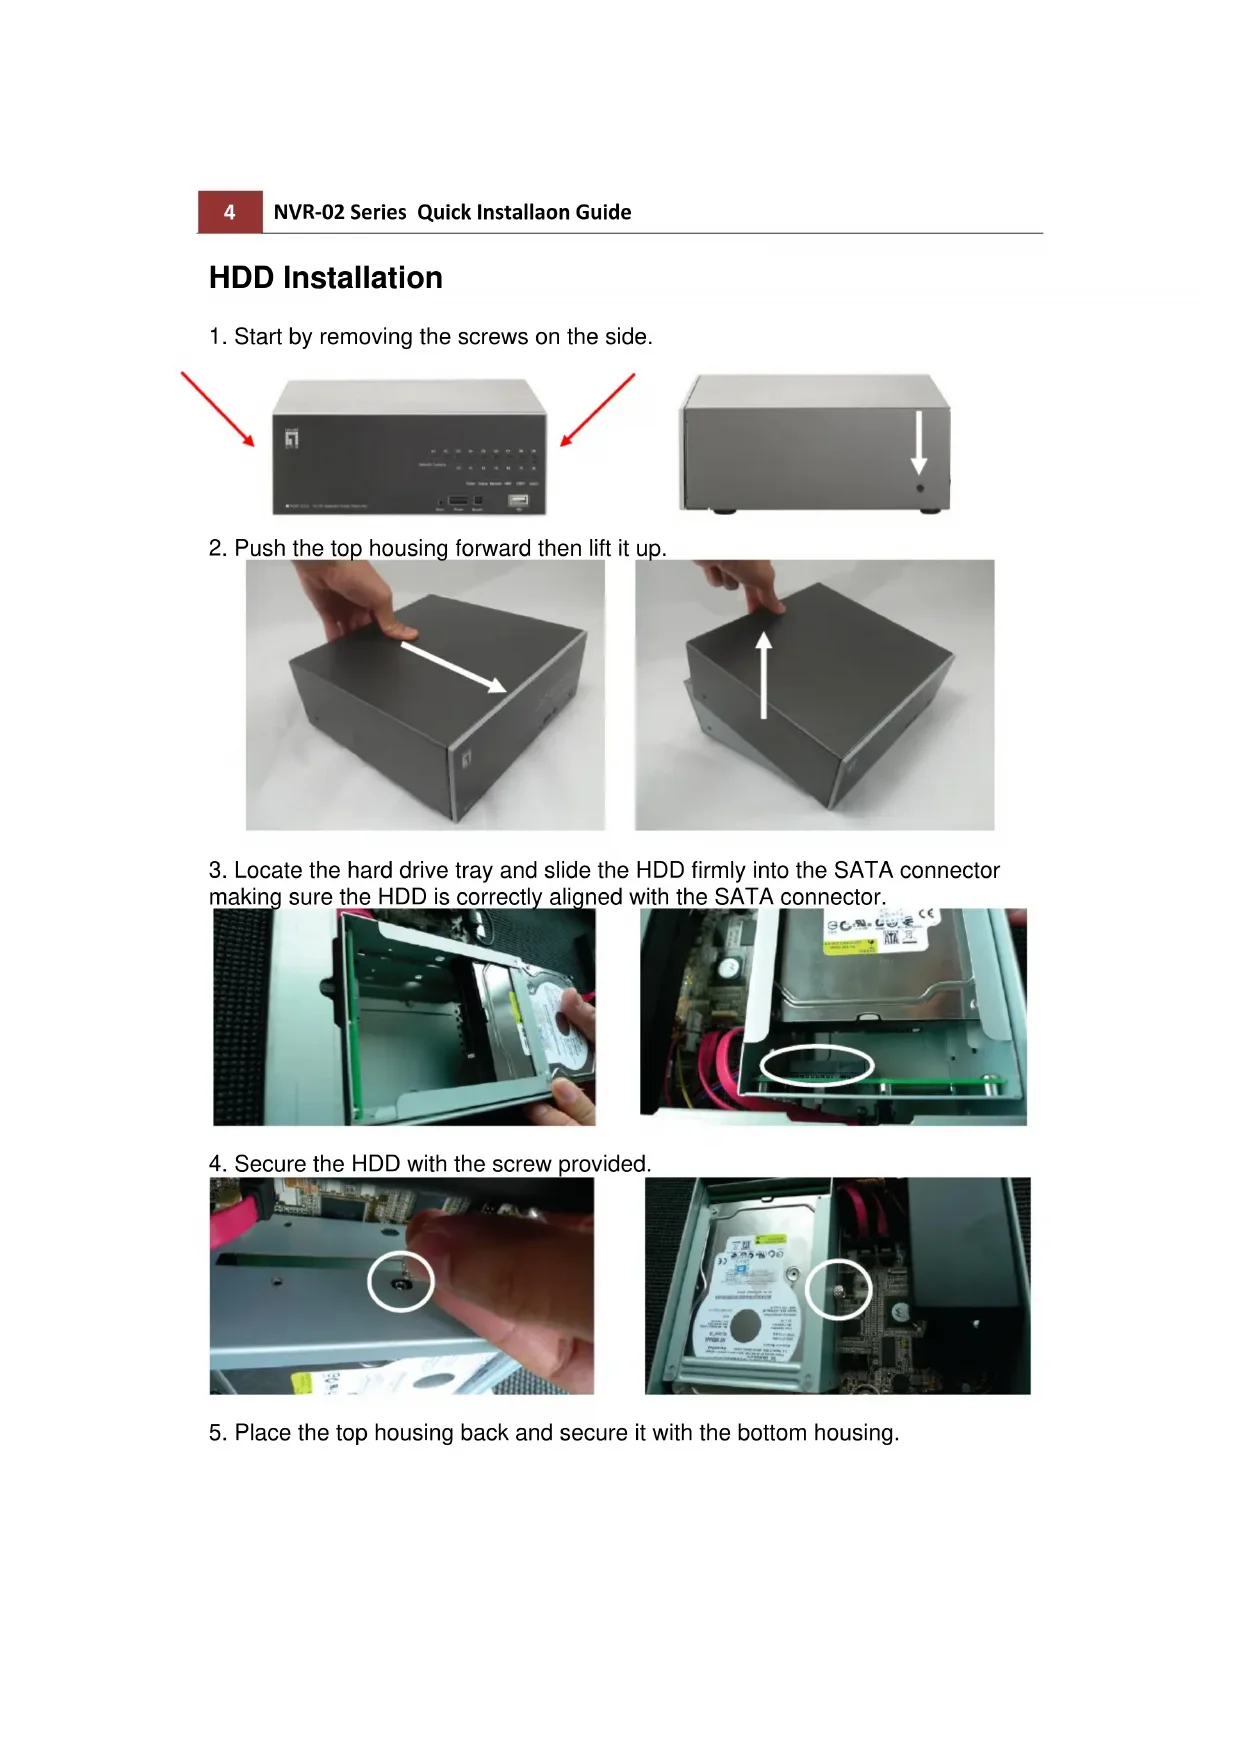
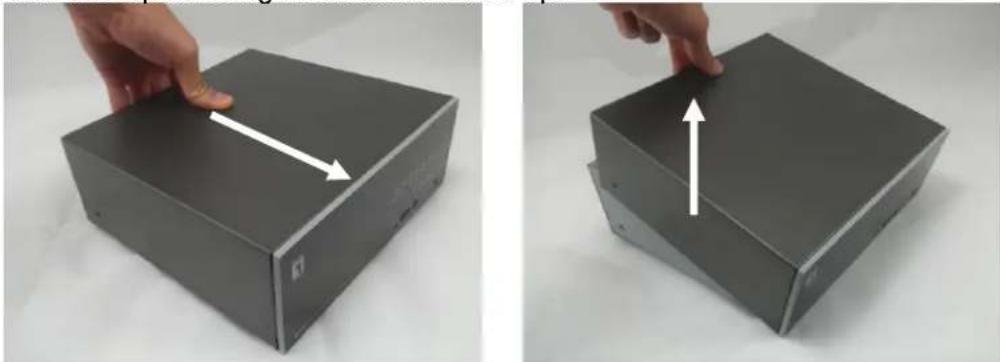
- Start by removing the screws on the side.

natural_image
Two electronic devices shown from front and side views, one with red arrows pointing to the left panel (no visible text or symbols on the device surfaces)- Push the top housing forward then lift it up.
natural_image
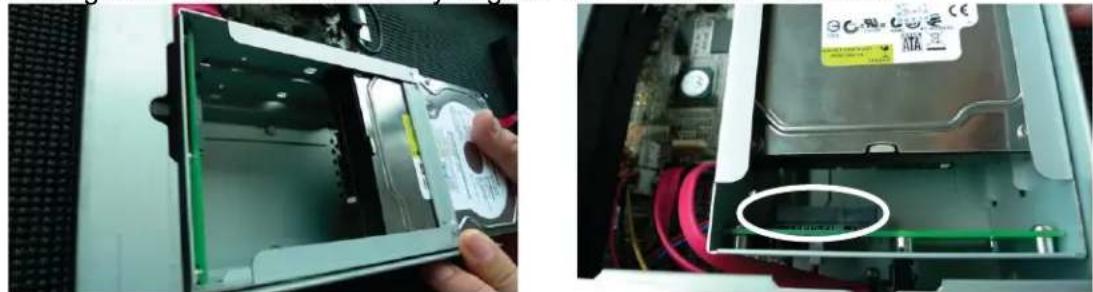
Two views of a black rectangular electronic device with a finger pressing the top panel, showing a double-headed arrow indicating compression (no text or symbols present)- Locate the hard drive tray and slide the HDD firmly into the SATA connector making sure the HDD is correctly aligned with the SATA connector.
natural_image
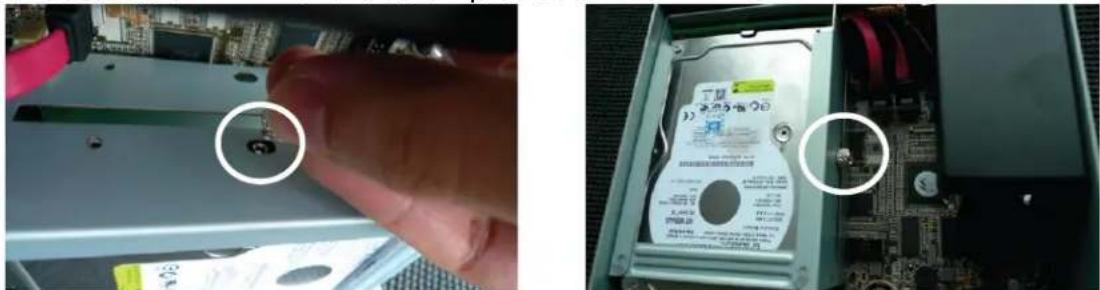
Two views of a computer case showing internal components and a hand inserting a CD into the case (no visible text or symbols)- Secure the HDD with the screw provided.
natural_image
Close-up of a hand inserting a CD into a computer motherboard, showing internal components and wiring (no readable text or symbols)- Place the top housing back and secure it with the bottom housing.
Connect to the NVR
There are various ways you can connect to the NVR and below are the suggested methods for different network setup:
Use LevelOne Device Search Utility
If the NVR is placed in a corporate network or a local area network where a DHCP server is already presented, run the “LevelOne Device Search” utility from a computer that is on the same network and locate the NVR with its IP address that is assigned by the top-level DHCP server.
To begin, launch the "Device Search" utility from the CD and proceed with the installation:

text_image
Search NVR - InstallShield Wizard Welcome to the InstallShield Wizard for Search NVR The InstallShield(R) Wizard will install Search NVR on your computer. To continue, click Next. WARNING: The program is protected by copyright law and international treaties.Once the installation is complete, check the "Launch the program" option and click "Finish".

text_image
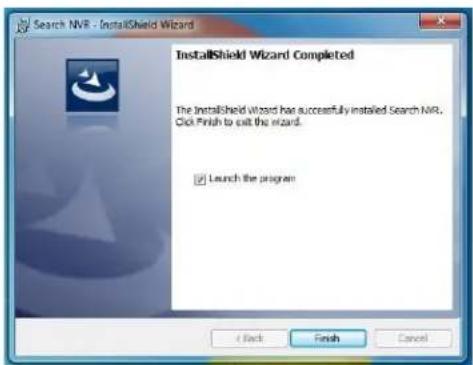
Search NVR - InstallShield Wizard InstallShield Wizard Completed The InstallShield Wizard has successfully installed Search NIR. Click Finish to exit the wizard. ✓ Launch the program ✓ Back Finish CancelThe search should start automatically and its status should be displayed.

text_image
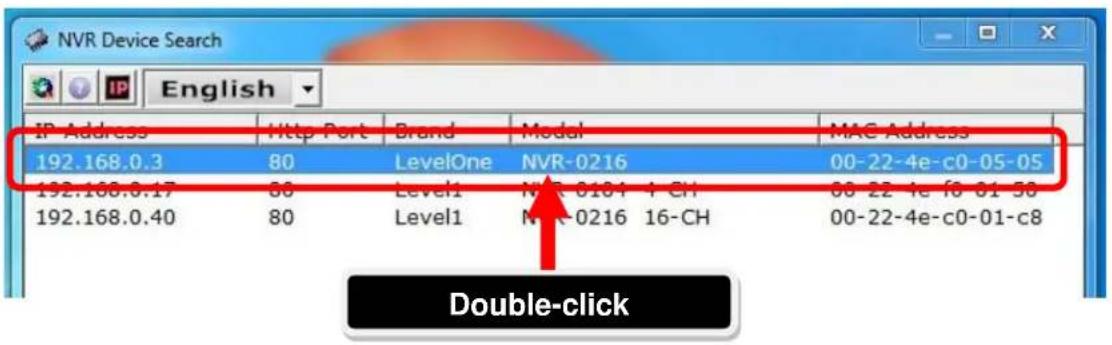
Search...The NVR should be located and its IP address should be displayed.
| IP Address | Http Port | Brand | Modal | MAC Address | ||
| 192.168.0.3 | 80 | LevelOne | NVR-0216 | 00-22-4e-c0-05-05 | ||
| 192.168.0.17 | 80 | Level1 | NVR-0104 | 4-CH | 00-22-4e-f0-01-50 | |
| 192.168.0.40 | 80 | Level1 | NVR-0216 | 16-CH | 00-22-4e-c0-01-c8 | |
Double-click on an NVR and the search program should automatically access the NVR's web administration page from your default browser.
text_image
NVR Device Search IP Address Http Port Brand Modal MAC Address 192.168.0.3 80 LevelOne NVR-0216 00-22-4e-c0-05-05 192.168.0.17 80 Level1 NVR-0181 + CH 00-22 4e f8 01 50 192.168.0.40 80 Level1 NVR-0216 16-CH 00-22-4e-c0-01-c8 Double-clickYou should be prompted for the NVR's username and password. Enter its default username "root" and password "root" and then click "OK" to enter the system.

text_image
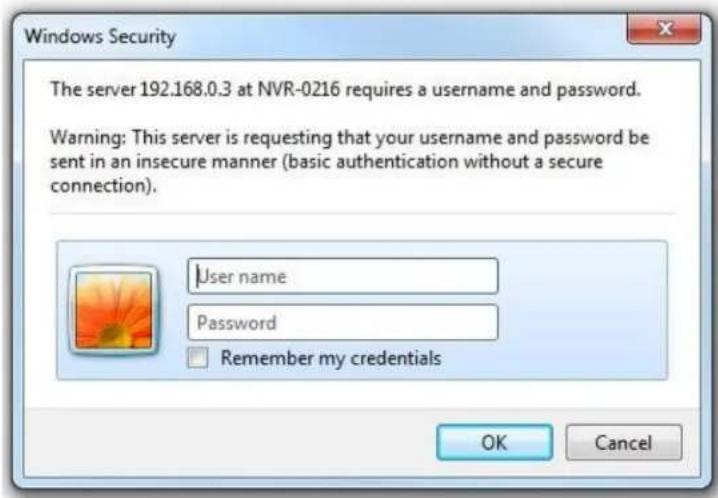
Windows Security The server 192.168.0.3 at NVR-0216 requires a username and password. Warning: This server is requesting that your username and password be sent in an insecure manner (basic authentication without a secure connection). User name Password Remember my credentials OK CancelAccess the NVR with its default IP address
The NVR comes with a pre-configured static IP "192.168.101.50". However, it is only used when there is no DHCP server presented in the network. The NVR will turn on its DHCP server function and act as the DHCP server in the network.
To connect to the NVR, connect the PC directly to the NVR using a crossover CAT5 Ethernet cable. Simply access the NVR from your web browser with its IP address.
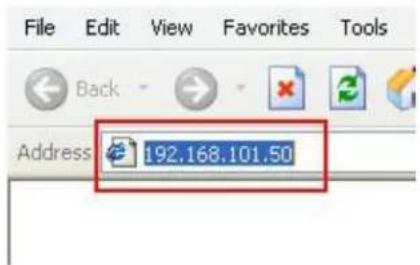
text_image
File Edit View Favorites Tools Back Address 192,168,101.50Again, you should be prompted for the username and password. Enter its default username "root" and password "root" and then click "OK" to enter the system.
text_image
Windows Security The server 192.168.0.3 at NVR-0216 requires a username and password. Warning: This server is requesting that your username and password be sent in an insecure manner (basic authentication without a secure connection). User name Password Remember my credentials OK CancelAdd a Camera
Automatic Search
- Click the "Search" button to perform the camera search.

text_image
Click here to search camera: * You may skip this step and add a new camera manually by entering camera's setting in the "Camera Information" section
text_image
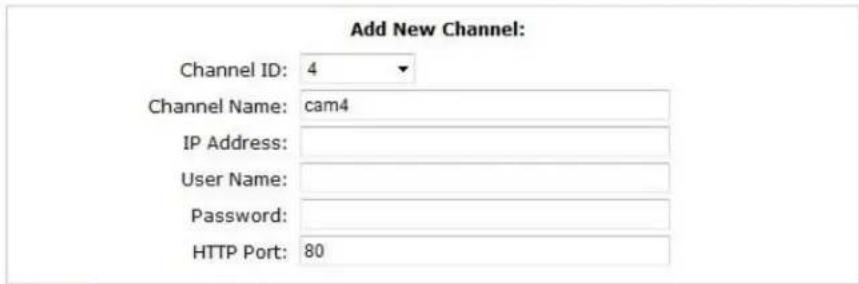
Add New Channel: Channel ID: 4 Channel Name: cam4 IP Address: User Name: Password: HTTP Port: 80Detect
Once you fill out above information, click "Detect" to retrieve camera setting
Add
Cancel
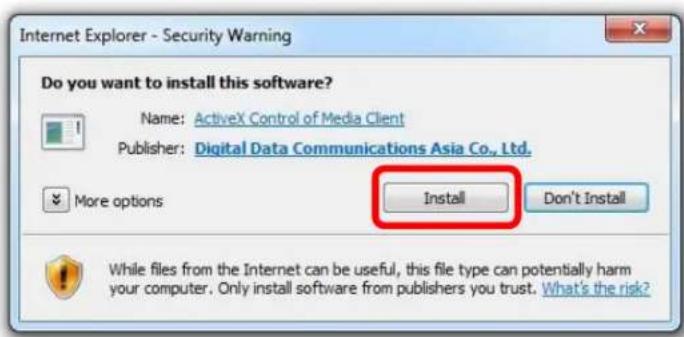
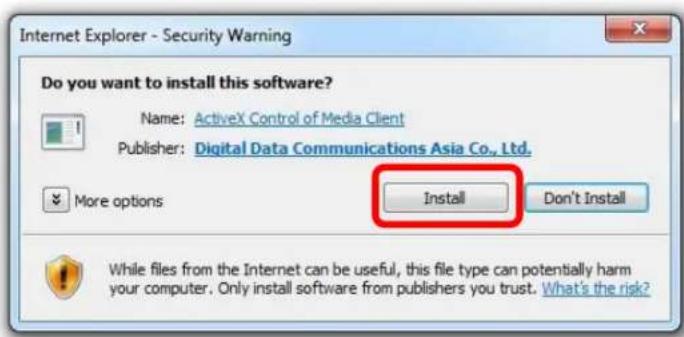
- You should be prompted to install Active Control component in order for the search to function properly. Go ahead and click "Install".
text_image
Internet Explorer - Security Warning Do you want to install this software? Name: ActiveX Control of Media Client Publisher: Digital Data Communications Asia Co., Ltd. More options Install Don't Install While files from the Internet can be useful, this file type can potentially harm your computer. Only install software from publishers you trust. What's the risk?- After that, the search should begin and its status should be displayed:

text_image
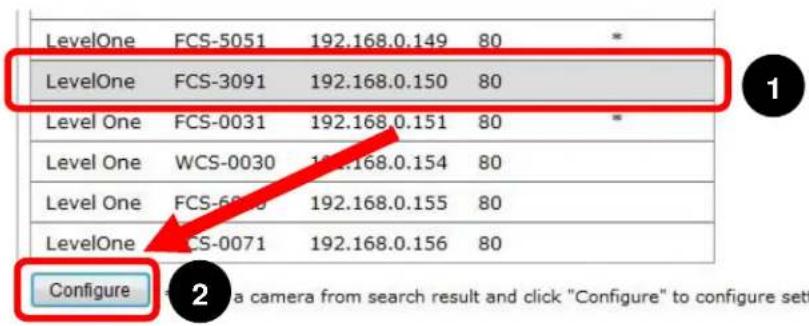
Searching...- Found cameras should be listed and simply select a camera from the list and press "Configure".
text_image
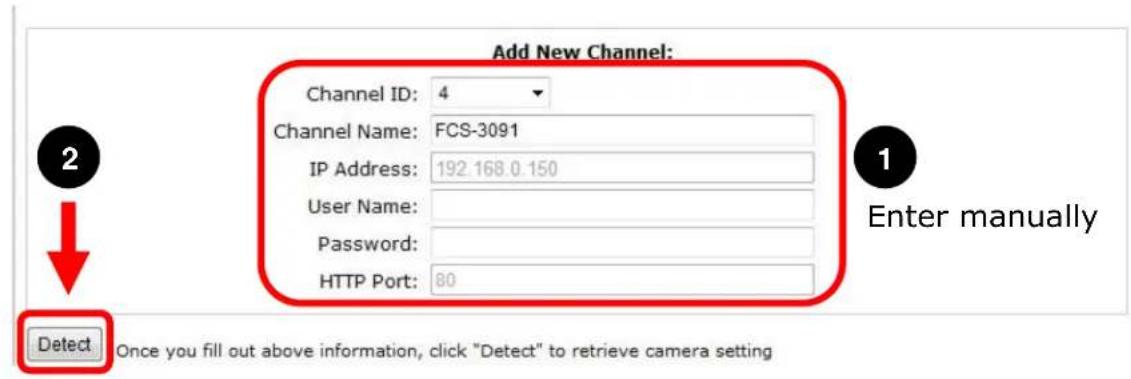
LevelOne FCS-5051 192.168.0.149 80 * LevelOne FCS-3091 192.168.0.150 80 Level One FCS-0031 192.168.0.151 80 * Level One WCS-0030 192.168.0.154 80 Level One FCS-6070 192.168.0.155 80 LevelOne FCS-0071 192.168.0.156 80 Configure 2- The camera's information should be displayed in the "Camera Information" section. Enter its username and password and select the channel ID and name the camera.

text_image
Add New Channel: Channel ID: 4 Channel Name: FCS-3091 IP Address: 192.168.0.150 User Name: Password: HTTP Port: 80Detect
Once you fill out above information, click "Detect" to retrieve camera setting
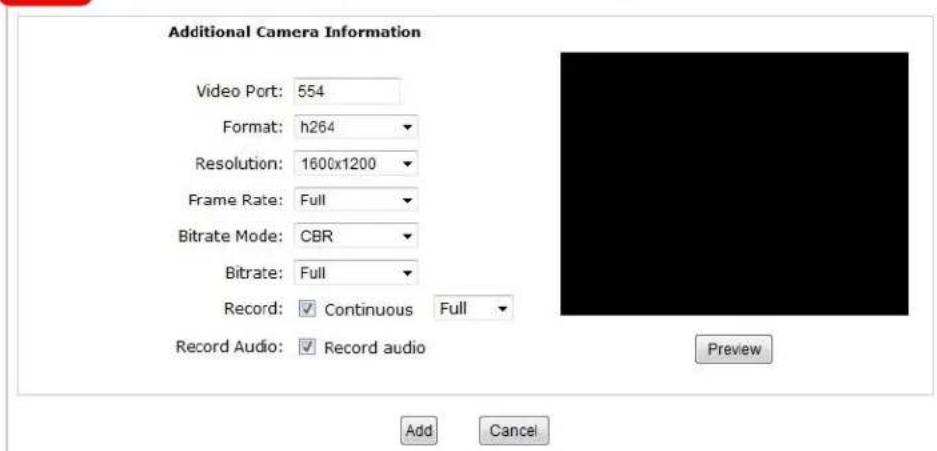
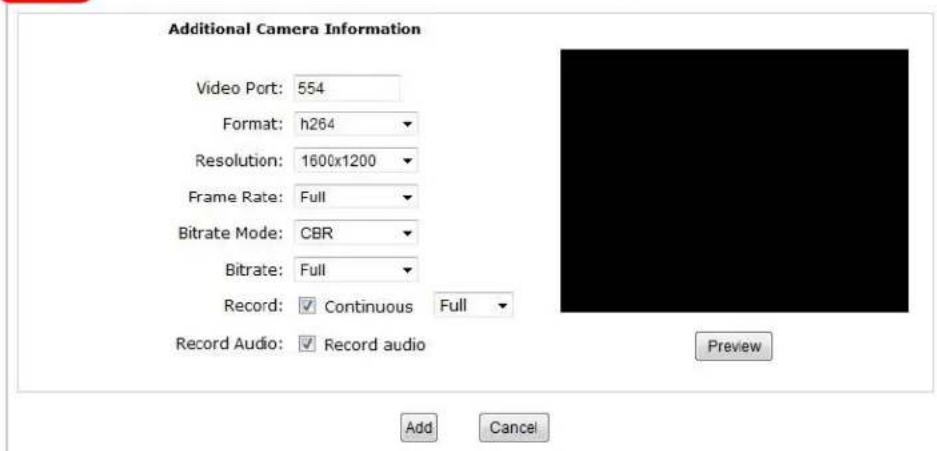
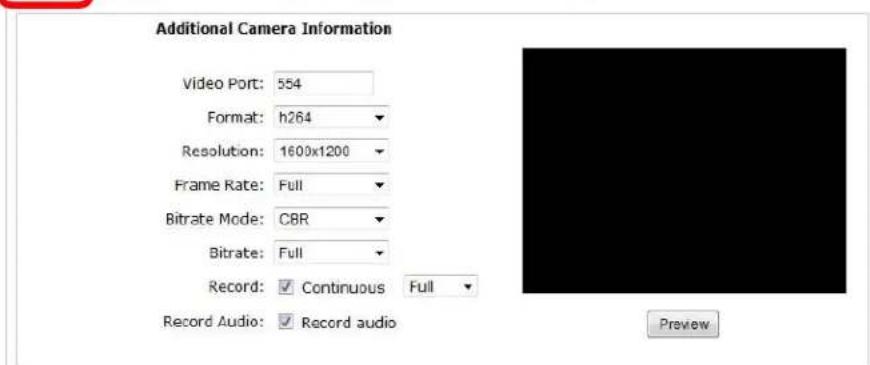
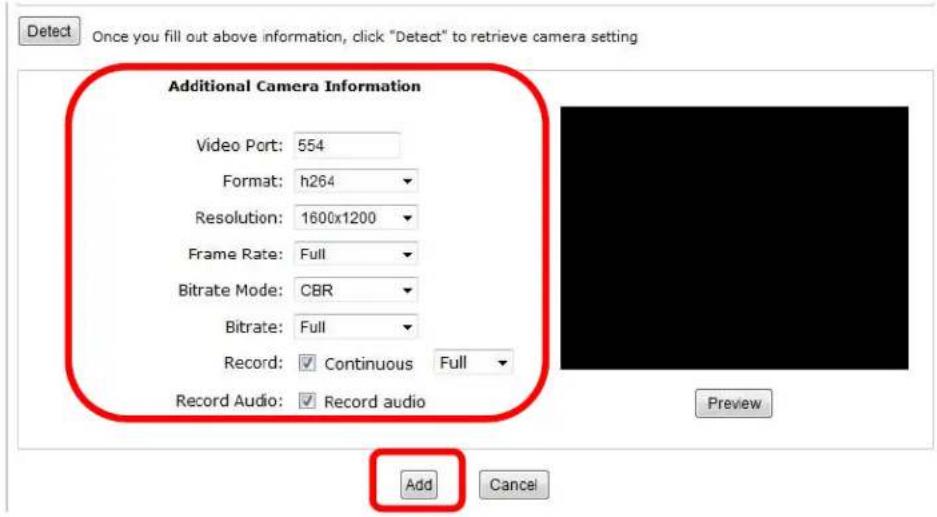
- Click on "Detect" to establish connection between the recorder and the camera. If connection establishes successfully, camera's detailed information should be polled and displayed as below.
Detect
Once you fill out above information, click "Detect" to retrieve camera setting

text_image
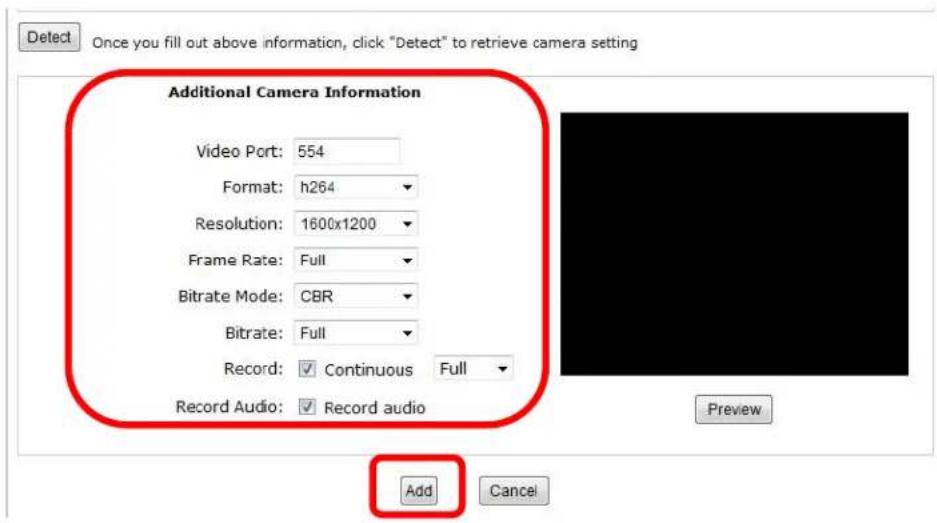
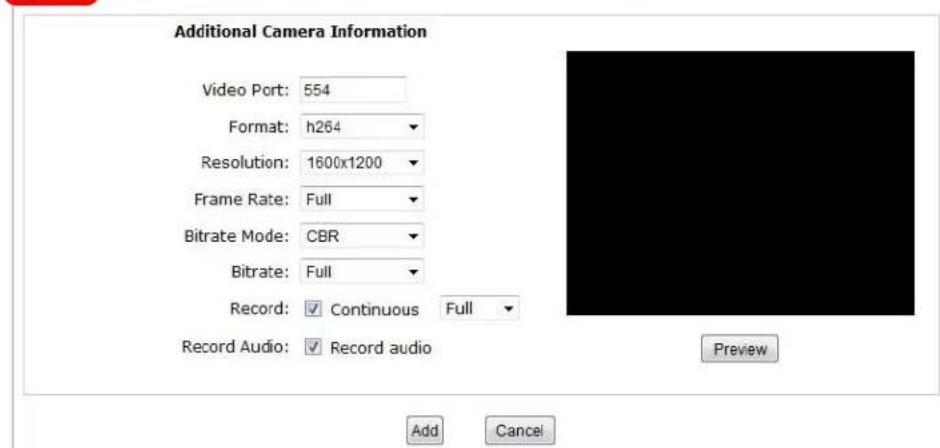
Additional Camera Information Video Port: 554 Format: h264 Resolution: 1600x1200 Frame Rate: Full Bitrate Mode: CBR Bitrate: Full Record: ✓ Continuous Full Record Audio: ✓ Record audio Add Cancel Preview- Adjust its video format, frame rate, resolution or bitrate...etc if you wish and then click "Add" to finish adding the camera.

text_image
Detect Once you fill out above information, click "Detect" to retrieve camera setting Additional Camera Information Video Port: 554 Format: h264 Resolution: 1600x1200 Frame Rate: Full Bitrate Mode: CBR Bitrate: Full Record: ✓ Continuous Full Record Audio: ✓ Record audio Add CancelAdd a camera manually
Simply follow the instruction described above but instead of using the "Search" function, enter the camera's IP address and credential in the "Camera Information" manually, then follow steps 6 \~ 7 described above.
text_image
Add New Channel: Channel ID: 4 Channel Name: FCS-3091 IP Address: 192.168.0.150 User Name: Password: HTTP Port: 80 Enter manually Detect Once you fill out above information, click "Detect" to retrieve camera settingDeutsch
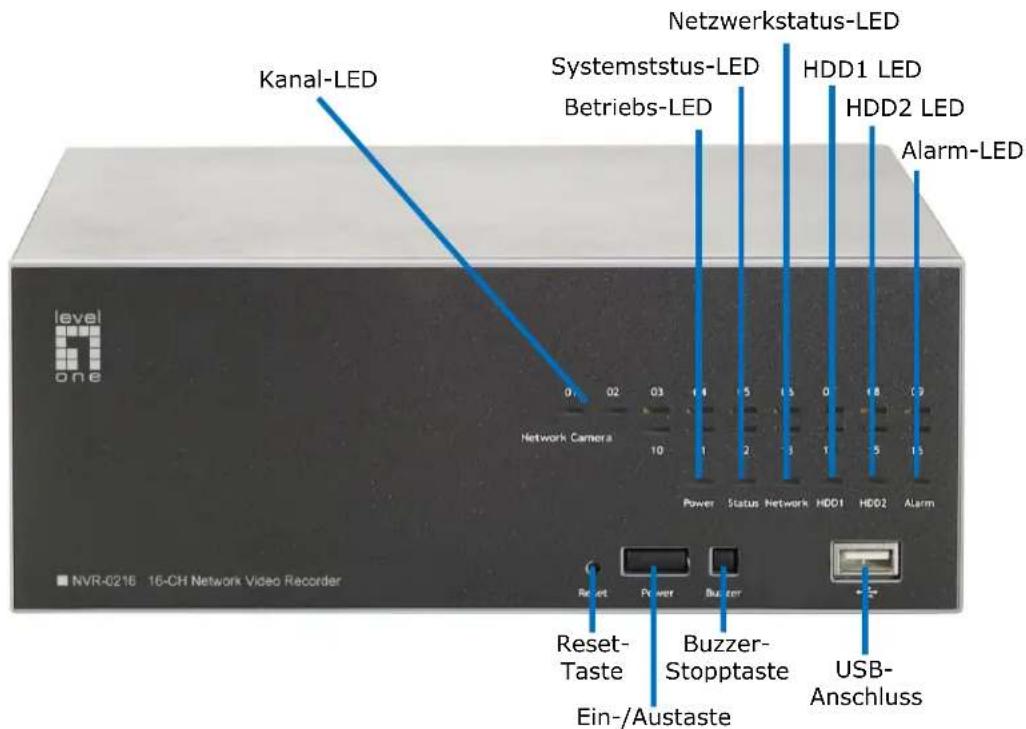
Systemübersicht
text_image
Kanal-LED Systemstus-LED Betriebs-LED Netzwerkstatus-LED HDD1 LED HDD2 LED Alarm-LED Network Camera 0 02 03 1 1 5 1.5 0 1.8 0.9 Power Status Network HDD1 HDD2 Alarm NVR-0216 16-CH Network Video Recorder Reset Power Buzzer Reset-Taste Ein-/Austaste Buzzer-Stopptaste USB-Anschluss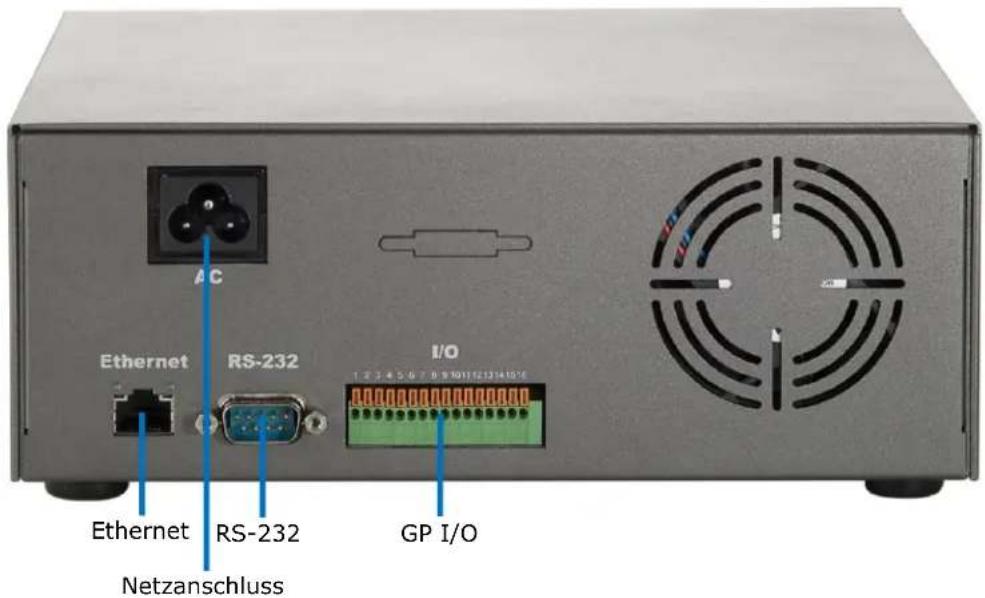
text_image
Ethernet RS-232 I/O 1 2 3 4 5 6 7 8 9 10 11 12 13 14 15 Ethern RS-232 GP I/O NetzanschlussFestplatteninstallation
natural_image
Two electronic devices shown from front and side views, one with red arrows pointing to the left panel (no visible text or symbols on the device surfaces)natural_image
Two views of a black rectangular electronic device with a hand adjusting its top panel (no text or symbols visible)natural_image
Two views of a computer case showing internal components and a magnified view of the internal casing (no visible text or symbols)natural_image
Close-up of a hand inserting a small electronic component into a computer hard drive (no visible text or symbols)text_image
Search NVR - InstallShield Wizard Welcome to the InstallShield Wizard for Search NVR The InstallShield(R) Wizard will install Search NVR on your computer. To continue, click Next. WARNING: The program is protected by copyright law and international treaties.text_image
InstallShield Wizard Completed The InstallShield Wizard has successfully installed Search NIR. Click Finish to exit the wizard. OK Launch the programtext_image
Search...text_image
Windows Security The server 192.168.0.3 at NVR-0216 requires a username and password. Warning: This server is requesting that your username and password be sent in an insecure manner (basic authentication without a secure connection). User name Password Remember my credentials OK Canceltext_image
File Edit View Favorites Tools Back Address 192.168.101.50text_image
Windows Security The server 192.168.0.3 at NVR-0216 requires a username and password. Warning: This server is requesting that your username and password be sent in an insecure manner (basic authentication without a secure connection). User name Password Remember my credentials OK Canceltext_image
Click here to search camera: * You may skip this step and add a new camera manually by entering camera's setting in the "Camera Information" section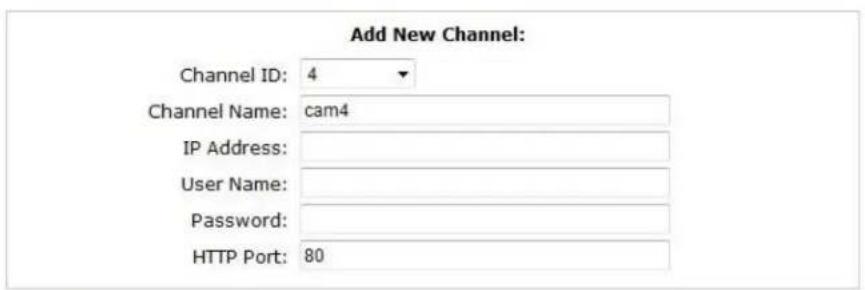
text_image
Add New Channel: Channel ID: 4 Channel Name: cam4 IP Address: User Name: Password: HTTP Port: 80Detect
Once you fill out above information, click "Detect" to retrieve camera setting
Add
Cancel
text_image
Internet Explorer - Security Warning Do you want to install this software? Name: ActiveX Control of Media Client Publisher: Digital Data Communications Asia Co., Ltd. More options Install Don't Install While files from the Internet can be useful, this file type can potentially harm your computer. Only install software from publishers you trust. What's the risk?text_image
Searching...text_image
Add New Channel: Channel ID: 4 Channel Name: FCS-3091 IP Address: 192.168.0.150 User Name: Password: HTTP Port: 80Detect
Once you fill out above information, click "Detect" to retrieve camera setting
Once you fill out above information, click "Detect" to retrieve camera setting
text_image
Additional Camera Information Video Port: 554 Format: h264 Resolution: 1600x1200 Frame Rate: Full Bitrate Mode: CBR Bitrate: Full Record: ✓ Continuous Full Record Audio: ✓ Record audio Add Cancel Preview- Adjust its video format, frame rate, resolution or bitrate...etc if you wish and then click "Add" to finish adding the camera
text_image
Detect Once you fill out above information, click "Detect" to retrieve camera setting Additional Camera Information Video Port: 554 Format: h264 Resolution: 1600x1200 Frame Rate: Full Bitrate Mode: CBR Bitrate: Full Record: ✓ Continuous Full Record Audio: ✓ Record audio Add Canceltext_image
Add New Channel: Channel ID: 4 Channel Name: FCS-3091 IP Address: 192.168.0.150 User Name: Password: HTTP Port: 80 Enter manually Detect Once you fill out above information, click "Detect" to retrieve camera settingFrançais
Vue d'ensemble
natural_image
Two electronic devices shown from front and side views, one with red arrows pointing to the left panel (no visible text or symbols on the device surfaces)natural_image
Two views of a gray electronic device with a hand adjusting its top panel, showing a double-headed arrow indicating compression (no text or symbols present)natural_image
Two views of a computer case showing internal components: one with a hand holding a CD drive, the other showing a close-up of a hard drive (no visible text or symbols)natural_image
Close-up of a hand inserting a CD into a computer case, showing internal components and wiring (no readable text or symbols)text_image
Search NVR - InstallShield Wizard Welcome to the InstallShield Wizard for Search NVR The InstallShield(R) Wizard will install Search NVR on your computer. To continue, click Next. WARNING: The program is protected by copyright law and international treaties.text_image
InstallShield Wizard Completed The InstallShield Wizard has successfully installed Search NIR. Click Finish to exit the wizard. OK Launch the programtext_image
Search...text_image
Windows Security The server 192.168.0.3 at NVR-0216 requires a username and password. Warning: This server is requesting that your username and password be sent in an insecure manner (basic authentication without a secure connection). User name Password Remember my credentials OK Canceltext_image
File Edit View Favorites Tools Back Address 192.168.101.50text_image
Windows Security The server 192.168.0.3 at NVR-0216 requires a username and password. Warning: This server is requesting that your username and password be sent in an insecure manner (basic authentication without a secure connection). User name Password Remember my credentials OK CancelAjouter une caméra
text_image
Click here to search camera: * You may skip this step and add how camera manually by entering camera's setting in the "Camera Information" section
text_image
Add New Channel: Channel ID: 4 Channel Name: cam4 IP Address: User Name: Password: HTTP Port: 80Detect
Once you fill out above information, click "Detect" to retrieve camera setting
Add
Cancel
text_image
Internet Explorer - Security Warning Do you want to install this software? Name: ActiveX Control of Media Client Publisher: Digital Data Communications Asia Co., Ltd. Install Don't Install More options While files from the Internet can be useful, this file type can potentially harm your computer. Only install software from publishers you trust. What's the risk?text_image
Searching...a camera from search result and click "Configure" to configure setting below.
text_image
Add New Channel: Channel ID: 4 Channel Name: FCS-3091 IP Address: 192.168 0.150 User Name: Password: HTTP Port: 80Detect
Once you fill out above information, click "Detect" to retrieve camera setting
Since you fill out above information, click "Detect" to retrieve camera setting.
text_image
Additional Camera Information Video Port: 554 Format: h264 Resolution: 1600x1200 Frame Rate: Full Bitrate Mode: CBR Bitrate: Full Record: ✓ Continuous Full Record Audio: ✓ Record audio PreviewAdd
Cancel
text_image
Detect Once you fill out above information, click "Detect" to retrieve camera setting Additional Camera Information Video Port: 554 Format: h264 Resolution: 1600x1200 Frame Rate: Full Bitrate Mode: CBR Bitrate: Full Record: ✓ Continuous Full Record Audio: ✓ Record audio Add Canceltext_image
Add New Channel: Channel ID: 4 Channel Name: FCS-3091 IP Address: 192.168.0.150 User Name: Password: HTTP Port: 80 Enter manually Detect Once you fill out above information, click "Detect" to retrieve camera settingEspañol
natural_image
Two electronic devices shown from front and side views, one with red arrows pointing to the left panel (no visible text or symbols on the device surfaces)natural_image
Two views of a black electronic device with a hand adjusting its top panel, showing a double-headed arrow indicating compression (no text or symbols present)natural_image
Two views of a computer case showing internal components and a magnified view of the internal casing (no visible text or symbols)natural_image
Close-up of a hand inserting a small electronic component into a computer hard drive (no visible text or symbols)text_image
Search NVR - InstallShield Wizard Welcome to the InstallShield Wizard for Search NVR The InstallShield(R) Wizard will install Search NVR on your computer. To continue, do next. WARNING: The program is protected by copyright law and international treaties.text_image
Search NVR - InstallShield Wizard InstallShield Wizard Completed The InstallShield Wizard has successfully installed Search NVR. Click Finish to exit the wizard. Launch the program √ Back Finish Canceltext_image
Search...text_image
Windows Security The server 192.168.0.3 at NVR-0216 requires a username and password. Warning: This server is requesting that your username and password be sent in an insecure manner (basic authentication without a secure connection). User name Password Remember my credentials OK Canceltext_image
File Edit View Favorites Tools Back Address 192,168,101,50text_image
Windows Security The server 192.168.0.3 at NVR-0216 requires a username and password. Warning: This server is requesting that your username and password be sent in an insecure manner (basic authentication without a secure connection). User name Password Remember my credentials OK CancelAgregar una cámara
Búsqueda automática
text_image
Click here to search camera: * You may skip this step and add a new camera manually by entering camera's setting in the "Camera Information" section
text_image
Add New Channel: Channel ID: 4 Channel Name: cam4 IP Address: User Name: Password: HTTP Port: 80Detect
Once you fill out above information, click "Detect" to retrieve camera setting
Add
Cancel
text_image
Internet Explorer - Security Warning Do you want to install this software? Name: ActiveX Control of Media Client Publisher: Digital Data Communications Asia Co., Ltd. More options Install Don't Install While files from the Internet can be useful, this file type can potentially harm your computer. Only install software from publishers you trust. What's the risk?text_image
Searching...text_image
Add New Channel: Channel ID: 4 Channel Name: FCS-3091 IP Address: 192 168.0 150 User Name: Password: HTTP Port: 80Detect
Once you fill out above information, click "Detect" to retrieve camera setting
text_image
Detect Once you fill out above information, click "Detect" to retrieve camera setting Additional Camera Information Video Port: 554 Format: h264 Resolution: 1600x1200 Frame Rate: Full Bitrate Mode: CBR Bibrate: Full Record: Continuous Full Record Audio: Record audio Add Cancel Previewtext_image
Detect Once you fill out above information, click "Detect" to retrieve camera setting Additional Camera Information Video Port: 554 Format: h264 Resolution: 1600x1200 Frame Rate: Full Bitrate Mode: CBR Bitrate: Full Record: ✓ Continuous Full Record Audio: ✓ Record audio Add Canceltext_image
Add New Channel: Channel ID: 4 Channel Name: FCS-3091 IP Address: 192.168.0.150 User Name: Password: HTTP Port: 80 Enter manually Detect Once you fill out above information, click "Detect" to retrieve camera settingNederlands
Systeemoverzicht
natural_image
Two electronic devices shown from front and side views, one with red arrows pointing to the left panel (no visible text or symbols on the device surfaces)natural_image
Two views of a black rectangular electronic device with a finger pressing the top panel, showing a double-headed arrow indicating compression (no text or symbols present)natural_image
Two views of an open hard disk drive showing internal components and a magnified view (no text or symbols visible)natural_image
Close-up of a hand inserting a CD drive into an internal circuit board (no visible text or symbols)text_image
Search NVR - InstallShield Wizard Welcome to the InstallShield Wizard for Search NVR The InstallShield(R) Wizard will install Search NVR on your computer. To continue, click Next. WARNING: The program is protected by copyright law and international treaties.text_image
Search NVR - InstallShield Wizard InstallShield Wizard Completed The InstallShield Wizard has successfully installed Search NIR. Click Finish to exit the wizard. ✓ Launch the program 4 Back Finish Canceltext_image
Search...text_image
Windows Security The server 192.168.0.3 at NVR-0216 requires a username and password. Warning: This server is requesting that your username and password be sent in an insecure manner (basic authentication without a secure connection). User name Password Remember my credentials OK Canceltext_image
File Edit View Favorites Tools Back Address 192,168,101.50text_image
Windows Security The server 192.168.0.3 at NVR-0216 requires a username and password. Warning: This server is requesting that your username and password be sent in an insecure manner (basic authentication without a secure connection). User name Password Remember my credentials OK Canceltext_image
Click here to search camera: * You may skip this step and add a new camera manually by entering camera's setting in the "Camera Information" section
text_image
Add New Channel: Channel ID: 4 Channel Name: cam4 IP Address: User Name: Password: HTTP Port: 80Detect
Once you fill out above information, click "Detect" to retrieve camera setting
Add
Cancel
text_image
Internet Explorer - Security Warning Do you want to install this software? Name: ActiveX Control of Media Client Publisher: Digital Data Communications Asia Co., Ltd. More options Install Don't Install While files from the Internet can be useful, this file type can potentially harm your computer. Only install software from publishers you trust. What's the risk?text_image
Searching...text_image
Add New Channel: Channel ID: 4 Channel Name: FCS-3091 IP Address: 192.168.0.150 User Name: Password: HTTP Port: 80Detect
Once you fill out above information, click "Detect" to retrieve camera setting
Once you fill out above information, click "Detect" to retrieve camera setting

text_image
Additional Camera Information Video Port: 554 Format: h264 Resolution: 1600x1200 Frame Rate: Full Bitrate Mode: CBR Bitrate: Full Record: ✓ Continuous Full Record Audio: ✓ Record audio Add Cancel Previewtext_image
Detect Once you fill out above information, click "Detect" to retrieve camera setting Additional Camera Information Video Port: 554 Format: h264 Resolution: 1600x1200 Frame Rate: Full Bitrate Mode: CBR Bitrate: Full Record: ✓ Continuous Full Record Audio: ✓ Record audio Add Canceltext_image
Add New Channel: Channel ID: 4 Channel Name: FCS-3091 IP Address: 192.168.0.150 User Name: Password: HTTP Port: 80 Enter manually Detect Once you fill out above information, click "Detect" to retrieve camera settingDansk
System oversigt

text_image
Kanal LED Systemstatus LED Strøm LED Netværks status LED HDD1 LED HDD2 LED Alarm LED Network Camera 0 02 03 1 1 5 1.5 0 1.8 3 10 Power Status Network HDD1 HDD2 Alarm Nulstillingsknap Knap til stop af summer Strømknap USB Slot NVR-0216 16-CH Network Video Recorder
text_image
Ethernet RS-232 Strøm Stik I/O 1 2 3 4 5 6 7 8 9 10 11 12 13 14 15 16 ACnatural_image
Two electronic devices shown from front and side views, one with red arrows pointing to the left panel (no visible text or symbols on the device surfaces)natural_image
Two views of a gray electronic device casing with a finger pressing the lid, showing white directional arrows indicating movement (no text or symbols)natural_image
Two views of an open hard disk drive showing internal components and a hand inserting a card into the case (no visible text or symbols)natural_image
Close-up of a hand inserting a CD into a computer motherboard, showing internal components and a magnified view (no readable text or symbols)text_image
Search NVR - InstallShield Wizard Welcome to the InstallShield Wizard for Search NVR The InstallShield(R) Wizard will install Search NVR on your computer. To continue, click Next. WARNING: The program is protected by copyright law and international treaties.text_image
Search NVR - InstallShield Wizard InstallShield Wizard Completed The InstallShield Wizard has successfully installed Search NIR. Click Finish to exit the wizard. Launch the program < Back Finish Canceltext_image
Search...text_image
Windows Security The server 192.168.0.3 at NVR-0216 requires a username and password. Warning: This server is requesting that your username and password be sent in an insecure manner (basic authentication without a secure connection). User name Password Remember my credentials OK Canceltext_image
File Edit View Favorites Tools Back Address 192.168.101.50text_image
Windows Security The server 192.168.0.3 at NVR-0216 requires a username and password. Warning: This server is requesting that your username and password be sent in an insecure manner (basic authentication without a secure connection). User name Password Remember my credentials OK CancelTilføj et kamera
Automatisk søgning
text_image
Click here to search camera: * You may skip this step and add a new camera manually by entering camera's setting in the "Camera Information" section
text_image
Add New Channel: Channel ID: 4 Channel Name: cam4 IP Address: User Name: Password: HTTP Port: 80Detect
Once you fill out above information, click "Detect" to retrieve camera setting
Add
Cancel
text_image
Internet Explorer - Security Warning Do you want to install this software? Name: ActiveX Control of Media Client Publisher: Digital Data Communications Asia Co., Ltd. More options Install Don't Install While files from the Internet can be useful, this file type can potentially harm your computer. Only install software from publishers you trust. What's the risk?text_image
Searching...text_image
Add New Channel: Channel ID: 4 Channel Name: FCS-3091 IP Address: 192.168.0.150 User Name: Password: HTTP Port: 80Detect
Once you fill out above information, click "Detect" to retrieve camera setting
- Klik på "Detect" (Genkend) for at oprette forbindelse mellem optageren og kameraet. Når forbindelsen er oprettet, tjekkes kameraets detaljerede oplysninger og vises som nedenfor:
Detect
Once you fill out above information, click "Detect" to retrieve camera setting

text_image
Additional Camera Information Video Port: 554 Format: h264 Resolution: 1600x1200 Frame Rate: Full Bitrate Mode: CBR Bitrate: Full Record: ✓ Continuous Full Record Audio: ✓ Record audio Add Cancel Previewtext_image
Detect Once you fill out above information, click "Detect" to retrieve camera setting Additional Camera Information Video Port: 554 Format: h264 Resolution: 1600x1200 Frame Rate: Full Bitrate Mode: CBR Bitrate: Full Record: ✓ Continuous Full Record Audio: ✓ Record audio Add Canceltext_image
Add New Channel: Channel ID: 4 Channel Name: FCS-3091 IP Address: 192.168.0.150 User Name: Password: HTTP Port: 80 Enter manually Detect Once you fill out above information, click "Detect" to retrieve camera settingItaliano
Panoramica del sistema
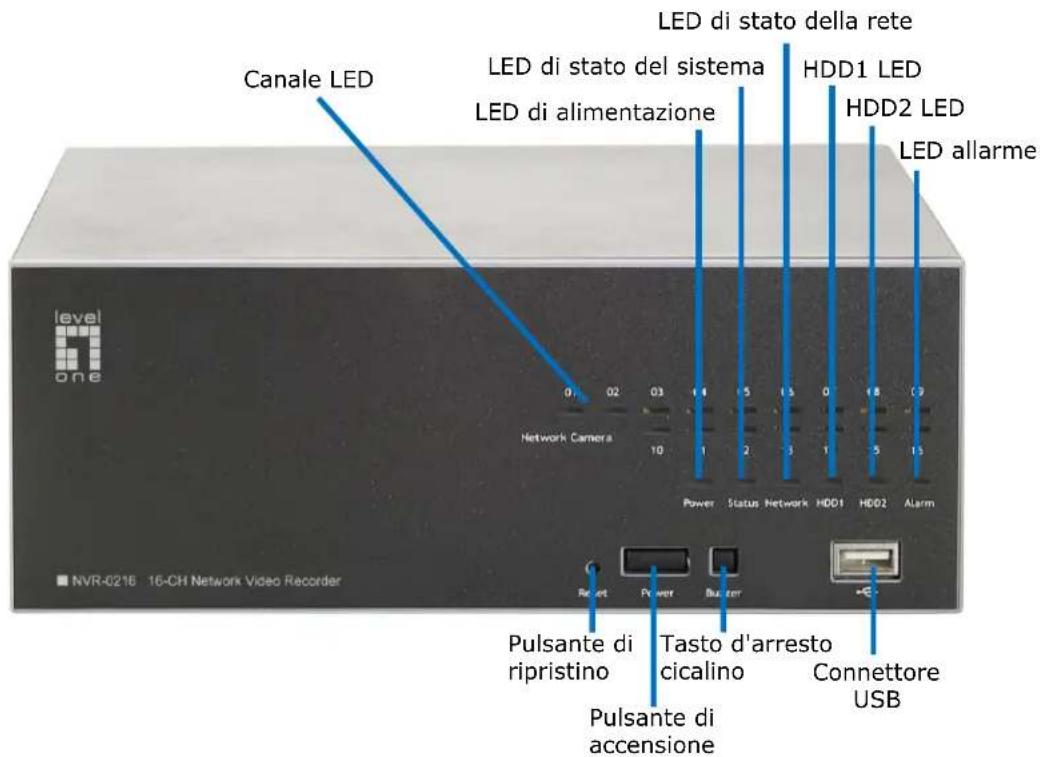
natural_image
Two electronic devices shown from front and side views, one with red arrows pointing to the front panel (no visible text or symbols)natural_image
Two views of a black rectangular electronic device with a hand adjusting its top panel (no text or symbols visible)natural_image
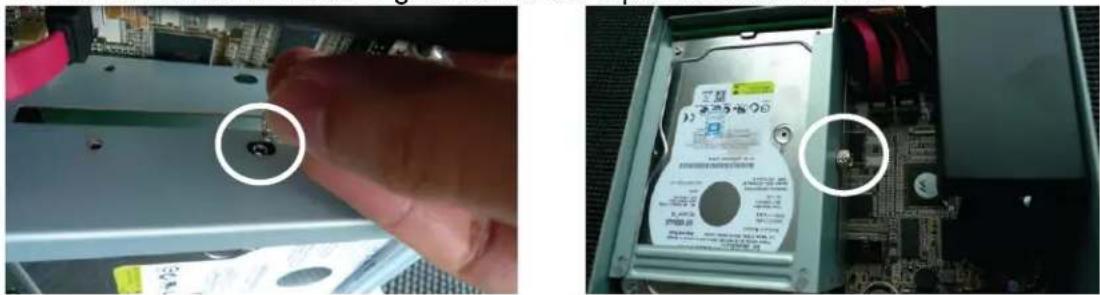
Two views of an open hard disk drive showing internal components and a close-up view of the internal casing (no visible text or symbols)natural_image
Close-up of a hand inserting a CD into a computer motherboard, showing internal components and a magnified view (no readable text or symbols)text_image
Search NVR - InstallShield Wizard Welcome to the InstallShield Wizard for Search NVR The InstallShield(R) Wizard will install Search NVR on your computer. To continue, click Next. WARNING: The program is protected by copyright law and international treaties.text_image
InstallShield Wizard Completed The InstallShield Wizard has successfully installed Search NIR. Click Finish to exit the wizard. [√] Launch the program < Back Finish Canceltext_image
Search...text_image
Windows Security The server 192.168.0.3 at NVR-0216 requires a username and password. Warning: This server is requesting that your username and password be sent in an insecure manner (basic authentication without a secure connection). User name Password Remember my credentials OK Canceltext_image
File Edit View Favorites Tools Back Address 192.168.101.50text_image
Windows Security The server 192.168.0.3 at NVR-0216 requires a username and password. Warning: This server is requesting that your username and password be sent in an insecure manner (basic authentication without a secure connection). User name Password Remember my credentials OK Cancela manually by entering camera's setting in the "Camera Information" section

text_image
Add New Channel: Channel ID: 4 Channel Name: cam4 IP Address: User Name: Password: HTTP Port: 80Detect
Once you fill out above information, click "Detect" to retrieve camera setting
Add
Cancel
text_image
Internet Explorer - Security Warning Do you want to install this software? Name: ActiveX Control of Media Client Publisher: Digital Data Communications Asia Co., Ltd. Install More options Don't Install While files from the Internet can be useful, this file type can potentially harm your computer. Only install software from publishers you trust. What's the risk?text_image
Searching...text_image
Add New Channel: Channel ID: 4 Channel Name: FCS-3091 IP Address: 192.168 0.150 User Name: Password: HTTP Port: 80Detect
Once you fill out above information, click "Detect" to retrieve camera setting
text_image
Detect Once you fill out above information, click "Detect" to retrieve camera setting Additional Camera Information Video Port: 554 Format: h264 Resolution: 1600x1200 Frame Rate: Full Bitrate Mode: CBR Bitrate: Full Record: ✓ Continuous Full Record Audio: ✓ Record audio Preview Add Canceltext_image
Detect Once you fill out above information, click "Detect" to retrieve camera setting Additional Camera Information Video Port: 554 Format: h264 Resolution: 1600x1200 Frame Rate: Full Bitrate Mode: CBR Bitrate: Full Record: ✓ Continuous Full Record Audio: ✓ Record audio Add Canceltext_image
Add New Channel: Channel ID: 4 Channel Name: FCS-3091 IP Address: 192.168.0.150 User Name: Password: HTTP Port: 80 Enter manually Detect Once you fill out above information, click "Detect" to retrieve camera settingΕλληνικά
natural_image
Two electronic devices shown from front and side views, one with red arrows pointing to the left panel (no visible text or symbols on the device surfaces)natural_image
Two views of a gray rectangular electronic device with a hand adjusting its top panel, showing a double-headed arrow indicating the process (no text or symbols present)natural_image
Two views of a computer case showing a hand inserting a CD into an open drive, with a magnified inset showing the internal components (no visible text or symbols)natural_image
Close-up of a hand inserting a CD into an electronic circuit board (no visible text or symbols)text_image
Search NVR - InstallShield Wizard Welcome to the InstallShield Wizard for Search NVR The InstallShield(R) Wizard will install Search NVR on your computer. To continue, click Next. WARNING: The program is protected by copyright law and international treaties.text_image
Search NVR - InstallShield Wizard InstallShield Wizard Completed The InstallShield Wizard has successfully installed Search NVR. Click Finish to exit the wizard. [√] Launch the program < Back Finish Canceltext_image
Search...text_image
Windows Security The server 192.168.0.3 at NVR-0216 requires a username and password. Warning: This server is requesting that your username and password be sent in an insecure manner (basic authentication without a secure connection). User name Password Remember my credentials OK Canceltext_image
File Edit View Favorites Tools Back Address 192.168.101.50text_image
Windows Security The server 192.168.0.3 at NVR-0216 requires a username and password. Warning: This server is requesting that your username and password be sent in an insecure manner (basic authentication without a secure connection). User name Password Remember my credentials OK CancelΠροσθήκη κάμερας
Αυτόματη αναζήτηση
text_image
Click here to search camera: * You may skip this step and add how camera manually by entering camera's setting in the "Camera Information" section
text_image
Add New Channel: Channel ID: 4 Channel Name: cam4 IP Address: User Name: Password: HTTP Port: 80Detect
Once you fill out above information, click "Detect" to retrieve camera setting
Add
Cancel
text_image
Internet Explorer - Security Warning Do you want to install this software? Name: ActiveX Control of Media Client Publisher: Digital Data Communications Asia Co., Ltd. More options Install Don't Install While files from the Internet can be useful, this file type can potentially harm your computer. Only install software from publishers you trust. What's the risk?text_image
Searching...text_image
Add New Channel: Channel ID: 4 Channel Name: FCS-3091 IP Address: 192.168.0.150 User Name: Password: HTTP Port: 80Detect Once you fill out above information, click "Detect" to retrieve camera setting
text_image
Detect Once you fill out above information, click "Detect" to retrieve camera setting Additional Camera Information Video Port: 554 Format: h264 Resolution: 1600x1200 Frame Rate: Full Bitrate Mode: CBR Bitrate: Full Record: □ Continuous Full ▼ Record Audio: □ Record audio Preview Add Canceltext_image
Detect Once you fill out above information, click "Detect" to retrieve camera setting Additional Camera Information Video Port: 554 Format: h264 Resolution: 1600x1200 Frame Rate: Full Bitrate Mode: CBR Bitrate: Full Record: ✓ Continuous Full Record Audio: ✓ Record audio Add Canceltext_image
Add New Channel: Channel ID: 4 Channel Name: FCS-3091 IP Address: 192.168.0 150 User Name: Password: HTTP Port: 80 Enter manually Detect Once you fill out above information, click "Detect" to retrieve camera settingPortuguês
natural_image
Two electronic devices shown from front and side views, one with red arrows pointing to the front panel (no visible text or symbols)natural_image
Two views of a black rectangular electronic device with a finger pressing the top panel, showing white arrows indicating motion direction (no text or symbols)natural_image
Two views of an open hard disk drive showing internal components and a close-up view of the internal casing (no visible text or symbols)- Fixe a unidade de disco rígido utilizando o parafuso fornecido.
natural_image
Close-up of a hand inserting a CD into a computer motherboard, showing internal components and wiring (no readable text or symbols)text_image
Search NVR - InstallShield Wizard Welcome to the InstallShield Wizard for Search NVR The InstallShield(R) Wizard will install Search NVR on your computer. To continue, click Next. WARNING: The program is protected by copyright law and international treaties.text_image
Search NVR - InstallShield Wizard InstallShield Wizard Completed The InstallShield Wizard has successfully installed Search NIR. Click Finish to exit the wizard. ✓ Launch the program 4 Back Finish Canceltext_image
Search...text_image
Windows Security The server 192.168.0.3 at NVR-0216 requires a username and password. Warning: This server is requesting that your username and password be sent in an insecure manner (basic authentication without a secure connection). User name Password Remember my credentials OK Canceltext_image
File Edit View Favorites Tools Back Address 192.168.101.50text_image
Windows Security The server 192.168.0.3 at NVR-0216 requires a username and password. Warning: This server is requesting that your username and password be sent in an insecure manner (basic authentication without a secure connection). User name Password Remember my credentials OK Cancela manually by entering camera's setting in the "Camera Information" section

text_image
Add New Channel: Channel ID: 4 Channel Name: cam4 IP Address: User Name: Password: HTTP Port: 80Detect
Once you fill out above information, click "Detect" to retrieve camera setting
Add
Cancel
text_image
Internet Explorer - Security Warning Do you want to install this software? Name: ActiveX Control of Media Client Publisher: Digital Data Communications Asia Co., Ltd. More options Install Don't Install While files from the Internet can be useful, this file type can potentially harm your computer. Only install software from publishers you trust. What's the risk?text_image
Searching...text_image
Add New Channel: Channel ID: 4 Channel Name: FCS-3091 IP Address: 192.168.0.150 User Name: Password: HTTP Port: 80Detect
Once you fill out above information, click "Detect" to retrieve camera setting
Once you fill out above information, click "Detect" to retrieve camera setting

text_image
Additional Camera Information Video Port: 554 Format: h264 Resolution: 1600x1200 Frame Rate: Full Bitrate Mode: CBR Bitrate: Full Record: ✓ Continuous Full Record Audio: ✓ Record audio Add Cancel Previewtext_image
Detect Once you fill out above information, click "Detect" to retrieve camera setting Additional Camera Information Video Port: 554 Format: h264 Resolution: 1600x1200 Frame Rate: Full Bitrate Mode: CBR Bitrate: Full Record: ✓ Continuous Full Record Audio: ✓ Record audio Add Canceltext_image
Add New Channel: Channel ID: 4 Channel Name: FCS-3091 IP Address: 192.168.0.150 User Name: Password: HTTP Port: 80 Enter manually Detect Once you fill out above information, click "Detect" to retrieve camera settingSvenska
Systemöversikt
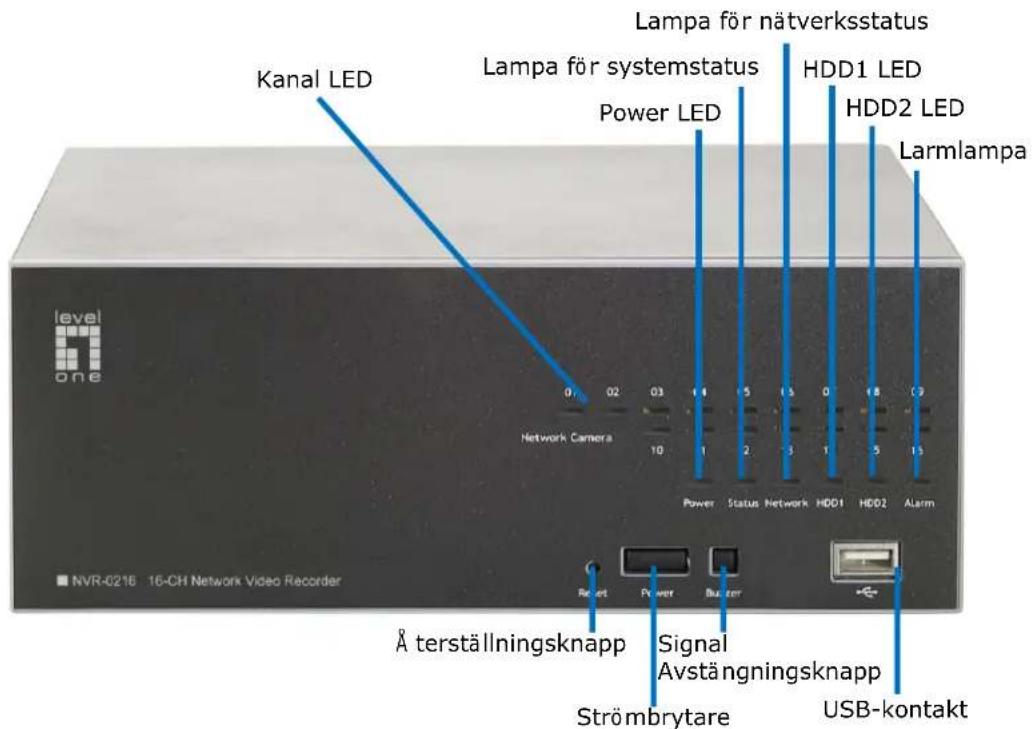
text_image
Kanal LED Lampa för nätverksstatus Lampa för systemstatus Power LED HDD1 LED HDD2 LED Larmlampa Network Camera 0 02 03 1 1 5 3 0 8 3 10 Power Status Network HDD1 HDD2 Alarm NVR-0216 16-CH Network Video Recorder Å terställningsknapp Signal Avständningsknapp Strömbrytare USB-kontakt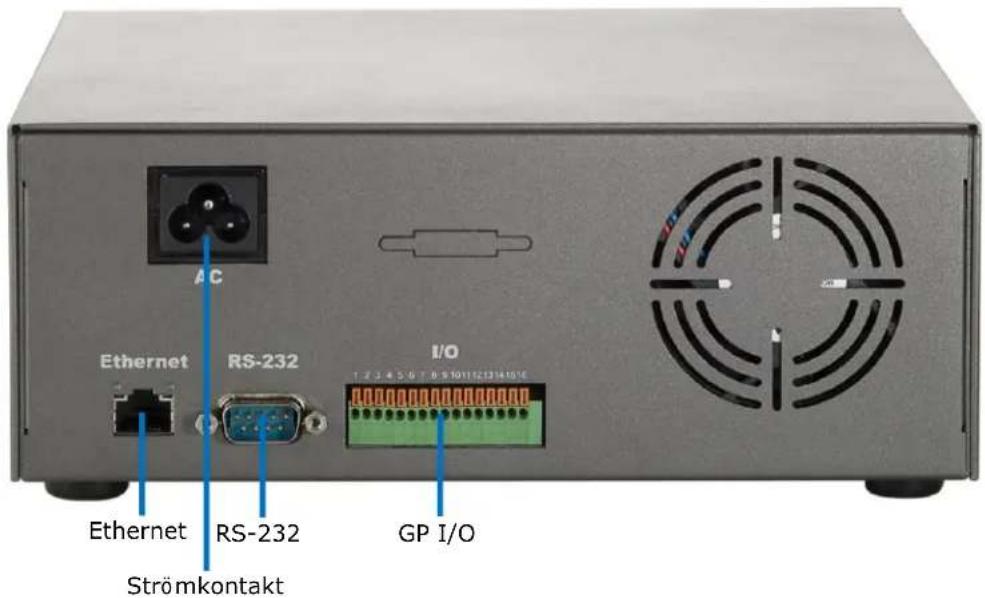
text_image
Ethernet RS-232 I/O Strömkontakt 1 2 3 4 5 6 7 8 9 10 11 12 13 14 15 16Hårddiskinstallation
natural_image
Two electronic devices shown from front and side views, one with red arrows pointing to the left panel (no visible text or symbols on the device surfaces)natural_image
Two views of a black rectangular electronic device with a finger pressing the top panel, showing white arrows indicating direction (no text or symbols)natural_image
Two views of a computer case showing a card slot being inserted into a drive, with a magnified inset highlighting the internal components (no visible text or symbols)natural_image
Close-up of a hand inserting a CD drive into an electronic circuit board (no visible text or symbols)text_image
Search NVR - InstallShield Wizard Welcome to the InstallShield Wizard for Search NVR The InstallShield(R) Wizard will install Search NVR on your computer. To continue, click Next. WARNING: The program is protected by copyright law and international treaties.text_image
InstallShield Wizard Completed The InstallShield Wizard has successfully installed Search NIR. Click Finish to exit the wizard. [√] Launch the program < Back Finish Canceltext_image
Search...text_image
Windows Security The server 192.168.0.3 at NVR-0216 requires a username and password. Warning: This server is requesting that your username and password be sent in an insecure manner (basic authentication without a secure connection). User name Password Remember my credentials OK Canceltext_image
File Edit View Favorites Tools Back Address 192.168.101.50text_image
Windows Security The server 192.168.0.3 at NVR-0216 requires a username and password. Warning: This server is requesting that your username and password be sent in an insecure manner (basic authentication without a secure connection). User name Password Remember my credentials OK Canceltext_image
Click here to search camera: * You may skip this step and add a new camera manually by entering camera's setting in the "Camera Information" section
text_image
Add New Channel: Channel ID: 4 Channel Name: cam4 IP Address: User Name: Password: HTTP Port: 80Detect
Once you fill out above information, click "Detect" to retrieve camera setting
Add
Cancel
text_image
Internet Explorer - Security Warning Do you want to install this software? Name: ActiveX Control of Media Client Publisher: Digital Data Communications Asia Co., Ltd. More options Install Don't Install While files from the Internet can be useful, this file type can potentially harm your computer. Only install software from publishers you trust. What's the risk?text_image
Searching...text_image
Add New Channel: Channel ID: 4 Channel Name: FCS-3091 IP Address: 192.168.0.150 User Name: Password: HTTP Port: 80Detect
Once you fill out above information, click "Detect" to retrieve camera setting
Once you fill out above information, click "Detect" to retrieve camera setting

text_image
Additional Camera Information Video Port: 554 Format: h264 Resolution: 1600x1200 Frame Rate: Full Bitrate Mode: CBR Bitrate: Full Record: ✓ Continuous Full Record Audio: ✓ Record audio Add Cancel Previewtext_image
Detect Once you fill out above information, click "Detect" to retrieve camera setting Additional Camera Information Video Port: 554 Format: h264 Resolution: 1600x1200 Frame Rate: Full Bitrate Mode: CBR Bitrate: Full Record: ✓ Continuous Full Record Audio: ✓ Record audio Add Canceltext_image
Add New Channel: Channel ID: 4 Channel Name: FCS-3091 IP Address: 192.168.0.150 User Name: Password: HTTP Port: 80 Enter manually Detect Once you fill out above information, click "Detect" to retrieve camera settingSlovenščina
Pregled sistema
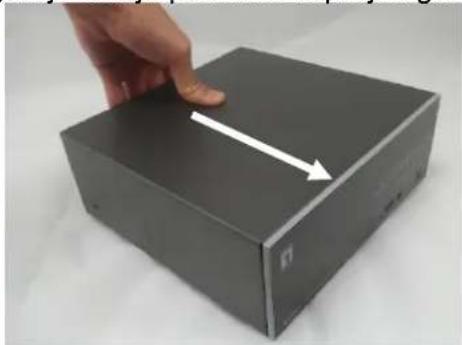
Vstaviteva trdega diska (HDD)
natural_image
Two electronic devices shown from front and side views, one with red arrows pointing to the left panel (no visible text or symbols on the device surfaces)- Zgornje ohišje potisnite naprej in ga nato dvignite.
natural_image
Hand pressing a button on a black rectangular electronic device with an arrow indicating direction (no text or symbols visible)
natural_image
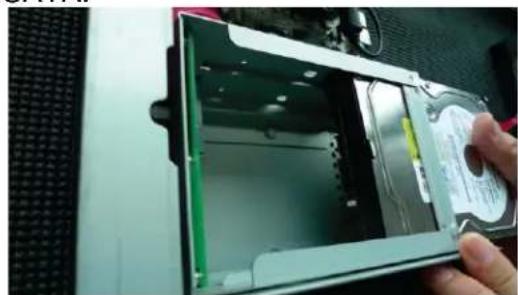
Hand pressing a square metal block with an upward arrow, no text or symbols visible- Poiščite pladenj s trdim diskom in nato čvrsto potisnite trdi disk v priključek SATA, pri tem pa se prepričajte, da je trdi disk pravilno poravnan s priključkom SATA.
natural_image
Close-up of a computer hard drive showing internal components and a hand holding the drive (no visible text or symbols)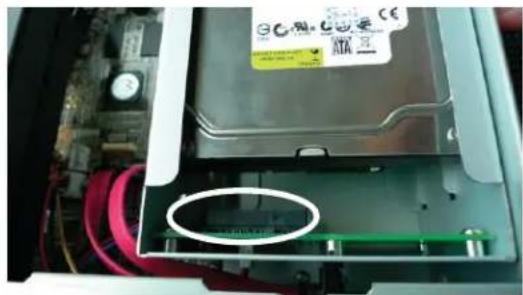
natural_image
Close-up of an open electronic device showing internal components and a circular annotation (no readable text or symbols)- Pritrdite trdi disk s priloženim vijakom.

natural_image
Close-up of a finger pressing a small metallic component with a white circle highlighting the tip (no text or symbols visible)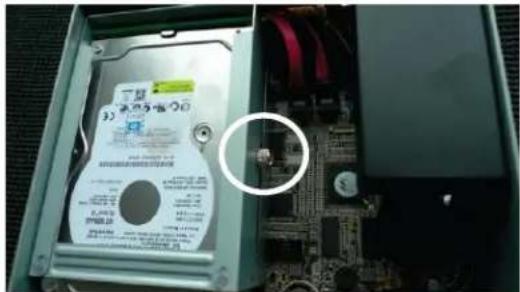
text_image
3) 电容保护柜 PWB12 2.000 GB 400 GB 500 GB 600 GB 700 GB 800 GB 900 GB 1000 GB 1100 GB 1200 GB 1300 GB 1400 GB 1500 GB 1600 GB 1700 GB 1800 GB 1900 GB 2000 GB 2100 GB 2200 GB 2300 GB 2400 GB 2500 GB 2600 GB 2700 GB 2800 GB 2900 GB 3000 GB 3100 GB 3200 GB 3300 GB 3400 GB 3500 GB 3600 GB 3700 GB 3800 GB 3900 GB 4000 GB 4100 GB 4200 GB 4300 GB 4400 GB 4500 GB 4600 GB 4700 GB 4800 GB 4900 GB 5000 GB 5100 GB 5200 GB 5300 GB 5400 GB 5500 GB 5600 GB 5700 GB 5800 GB 5900 GB 6000 GB 6100 GB 6200 GB 6300 GB 6400 GB 6500 GB 6600 GB 6700 GB 6800 GB 6900 GB 7000 GB 7100 GB 7200 GB 7300 GB 7400 GB 7500 GB 7600 GB 7700 GB 7800 GB 7900 GB 8000 GB 8100 GB 8200 GB 8300 GB 8400 GB 8500 GB 8600 GB 8700 GB 8800 GB 8900 GB 9000 GB 9100 GB 9200 GB 9300 GB 9400 GB 9500 GB 9600 GB 9700 GB 9800 GB 9900 GBtext_image
Search NVR - InstallShield Wizard Welcome to the InstallShield Wizard for Search NVR The InstallShield(R) Wizard will install Search NVR on your computer. To continue, click Next. WARNING: The program is protected by copyright law and international treaties.Ko je namestitev končana, preverite možnost "Launch the program" in kliknite "Finish" (Dokončaj):
text_image
Search NVR - InstallShield Wizard InstallShield Wizard Completed The InstallShield Wizard has successfully installed Search NVR. Click Finish to exit the wizard. Launch the program 4 Back Finish CancelIskanje se bi moralo zagnati samodejno, prikazano pa bi moralo biti stanje iskanja:

text_image
Search...Najden bi moral biti NVR prikazan pa bi moral biti njegov naslov IP:
| IP Address | Http Port | Brand | Modal | MAC Address | ||
| 192.168.0.3 | 80 | LevelOne | NVR-0216 | 00-22-4e-c0-05-05 | ||
| 192.168.0.17 | 80 | Level1 | NVR-0104 | 4-CH | 00-22-4e-f0-01-50 | |
| 192.168.0.40 | 80 | Level1 | NVR-0216 | 16-CH | 00-22-4e-c0-01-c8 | |
text_image
Windows Security The server 192.168.0.3 at NVR-0216 requires a username and password. Warning: This server is requesting that your username and password be sent in an insecure manner (basic authentication without a secure connection). User name Password Remember my credentials OK CancelDostopajte do NVR s privzetim naslovom IP
text_image
File Edit View Favorites Tools Back Address 192.168.101.50text_image
Windows Security The server 192.168.0.3 at NVR-0216 requires a username and password. Warning: This server is requesting that your username and password be sent in an insecure manner (basic authentication without a secure connection). User name Password Remember my credentials OK CancelDodaj kamera
Samodejno iskanje
- Kliknite gumb "Search" (Iskanje) za izvedbo iskanja kamere.

text_image
Click here to search camera: * You may skip this step and add a new camera manually by entering camera's setting in the "Camera Information" section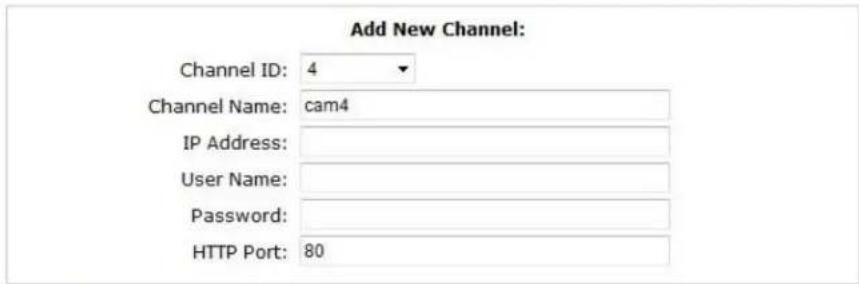
text_image
Add New Channel: Channel ID: 4 Channel Name: cam4 IP Address: User Name: Password: HTTP Port: 80Detect
Once you fill out above information, click "Detect" to retrieve camera setting
Add
Cancel
- Računalnik vas bo pozval, da namestite komponento Active Control, da bo funkcija iskanja delovala pravilno. Nadaljujte in kliknite "Install" (Namesti).
text_image
Internet Explorer - Security Warning Do you want to install this software? Name: ActiveX Control of Media Client Publisher: Digital Data Communications Asia Co., Ltd. More options Install Don't Install While files from the Internet can be useful, this file type can potentially harm your computer. Only install software from publishers you trust. What's the risk?text_image
Searching...text_image
Add New Channel: Channel ID: 4 Channel Name: FCS-3091 IP Address: 192.168.0.150 User Name: Password: HTTP Port: 80Detect
Once you fill out above information, click "Detect" to retrieve camera setting
Once you fill out above information, click "Detect" to retrieve camera setting

text_image
Additional Camera Information Video Port: 554 Format: h264 Resolution: 1600x1200 Frame Rate: Full Bitrate Mode: CBR Bitrate: Full Record: ✓ Continuous Full Record Audio: ✓ Record audio Add Cancel Preview- Če želite prilagodite video format kamere, hitrost sličic, ločljivost ali bitno hitrost itd. in nato kliknite "Add" (Dodaj) za dokončanje dodajanja kamere.
text_image
Detect Once you fill out above information, click "Detect" to retrieve camera setting Additional Camera Information Video Port: 554 Format: h264 Resolution: 1600x1200 Frame Rate: Full Bitrate Mode: CBR Bitrate: Full Record: ✓ Continuous Full Record Audio: ✓ Record audio Add Canceltext_image
Add New Channel: Channel ID: 4 Channel Name: FCS-3091 IP Address: 192.168.0.150 User Name: Password: HTTP Port: 80 Enter manually Detect Once you fill out above information, click "Detect" to retrieve camera setting繁體中文
系統概述
natural_image
Hand pressing a button on a black rectangular box with an arrow indicating direction (no text or symbols visible)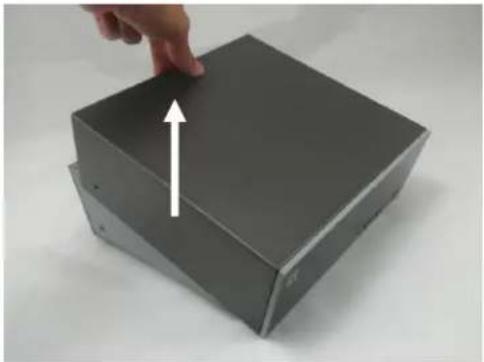
natural_image
Hand pressing a button on a gray metal box with an upward arrow (no text or symbols visible)natural_image
Close-up of a hand inserting a CD into a memory drive into a drive (no visible text or symbols)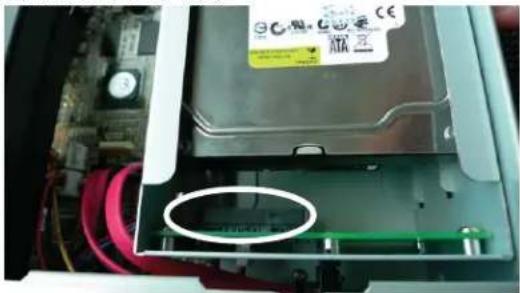
natural_image
Interior view of an electronic device showing a green internal component with red wiring and a circular annotation on the inner casing (no readable text or symbols)- 使用螺絲把硬碟鎖上硬碟槽。

natural_image
Close-up of a hand pressing a small metallic component on a computer motherboard (no visible text or symbols)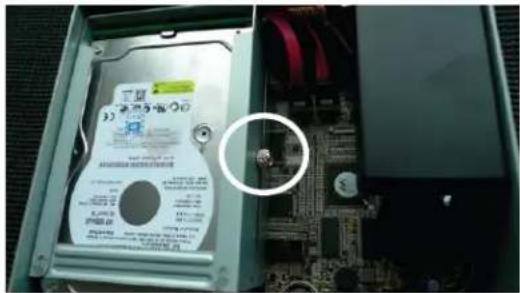
text_image
Close-up of an internal hard disk drive with visible label and circuit board, circled for emphasis.- 最後蓋回機器上蓋並把螺絲鎖上。
連接網路影像錄影機
text_image
Search NVR - InstallShield Wizard Welcome to the InstallShield Wizard for Search NVR The InstallShield(R) Wizard will install Search NVR on your computer. To continue, click Next. WARNINGS: The program is protected by copyright law and international treaties.text_image
Search NVR - InstallShield Wizard InstallShield Wizard Completed The InstallShield Wizard has successfully installed Search NVR, Click Finish to exit the wizard. Launch the program < Back Finish Canceltext_image
Search...text_image
Windows Security The server 192.168.0.3 at NVR-0216 requires a username and password. Warning: This server is requesting that your username and password be sent in an insecure manner (basic authentication without a secure connection). User name Password Remember my credentials OK Cancel利用預設 IP 位址連接網路影像錄影機
text_image
File Edit View Favorites Tools Back Address 192.168.101.50text_image
Windows Security The server 192.168.0.3 at NVR-0216 requires a username and password. Warning: This server is requesting that your username and password be sent in an insecure manner (basic authentication without a secure connection). User name Password Remember my credentials OK Cancel新增攝影機
自動搜尋
text_image
Click here to search camera: * You may skip this step and add new camera manually by entering camera's setting in the "Camera Information" section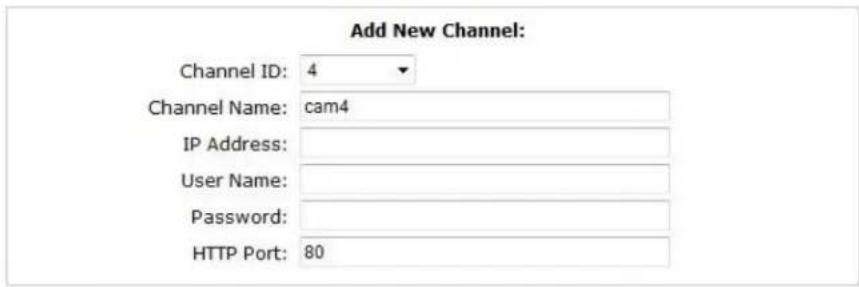
text_image
Add New Channel: Channel ID: 4 Channel Name: cam4 IP Address: User Name: Password: HTTP Port: 80
text_image
Detect Once you fill out above information, click "Detect" to retrieve camera setting Add Canceltext_image
Internet Explorer - Security Warning Do you want to install this software? Name: ActiveX Control of Media Client Publisher: Digital Data Communications Asia Co., Ltd. More options Install Don't Install While files from the Internet can be useful, this file type can potentially harm your computer. Only install software from publishers you trust. What's the risk?text_image
Searching...a camera from search result and click "Configure" to configure setting below.
text_image
Add New Channel: Channel ID: 4 Channel Name: FCS-3091 IP Address: 192.168.0.150 User Name: Password: HTTP Port: 80Detect
Once you fill out above information, click "Detect" to retrieve camera setting
Once you fill out above information, click "Detect" to retrieve camera setting
text_image
Additional Camera Information Video Port: 554 Format: h264 Resolution: 1600x1200 Frame Rate: Full Bitrate Mode: CBR Bitrate: Full Record: ✓ Continuous Full ✓ Record Audio: ✓ Record audio Preview Add Canceltext_image
Detect Once you fill out above information, click "Detect" to retrieve camera setting Additional Camera Information Video Port: 554 Format: h264 Resolution: 1600x1200 Frame Rate: Full Bitrate Mode: CBR Bitrate: Full Record: ✓ Continuous Full Record Audio: ✓ Record audio Add Cancel手動新增攝影機
text_image
Add New Channel: Channel ID: 4 Channel Name: FCS-3091 IP Address: 192.168.0.150 User Name: Password: HTTP Port: 80 Enter manually Detect Once you fill out above information, click "Detect" to retrieve camera setting한국어
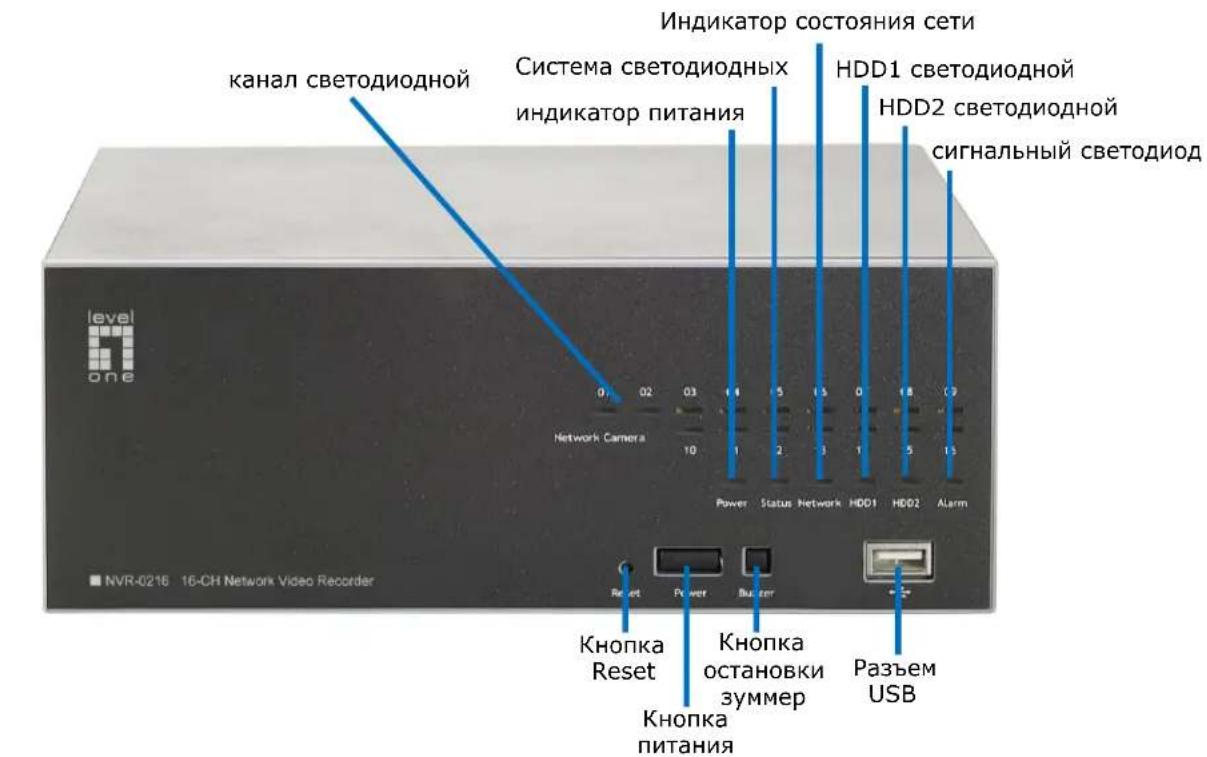
시스템 개요
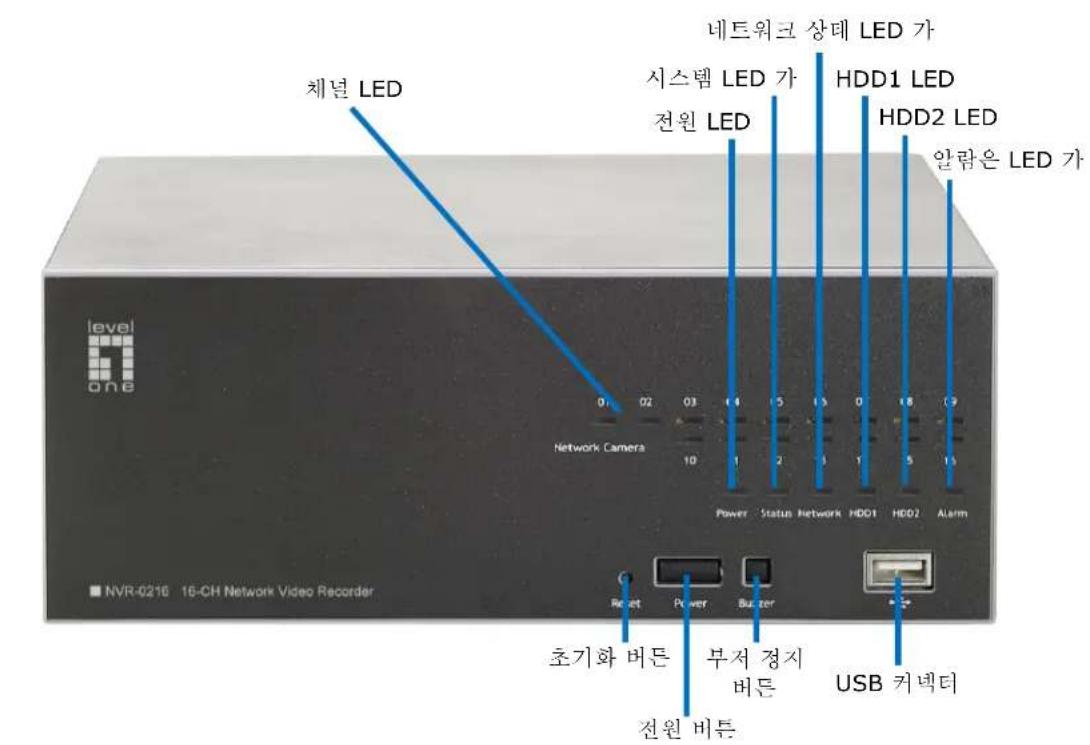
natural_image
Two electronic devices shown from front and side views, one with red arrows pointing to the left panel (no visible text or symbols)natural_image
Two views of a black rectangular electronic device with a hand adjusting its top panel, showing a 2x increase in size (no text or symbols visible)natural_image
Two views of a computer case showing internal components: one open showing a CD drive, the other closed with a labeled inset showing a battery (no readable text or symbols)natural_image
Close-up of a hand inserting a small electronic component into a computer motherboard, showing internal circuitry and part labels (no readable text or symbols)text_image
Search NVR - InstallShield Wizard Welcome to the InstallShield Wizard for Search NVR The InstallShield(R) Wizard will install Search NVR on your computer. To continue, click next. WARNING: This program is protected by copyright law and international treaties.text_image
Search NVR - InstallShield Wizard InstallShield Wizard Completed The InstallShield Wizard has successfully installed Search NIR. Click Finish to exit the wizard. ✓ Launch the program + Back Finish Canceltext_image
Search...text_image
Windows Security The server 192.168.0.3 at NVR-0216 requires a username and password. Warning: This server is requesting that your username and password be sent in an insecure manner (basic authentication without a secure connection). User name Password Remember my credentials OK Canceltext_image
File Edit View Favorites Tools Back Address 192,168,101.50text_image
Windows Security The server 192.168.0.3 at NVR-0216 requires a username and password. Warning: This server is requesting that your username and password be sent in an insecure manner (basic authentication without a secure connection). User name Password Remember my credentials OK Cancel카메라 추가하기
자동 검색
text_image
Click here to search camera: * You may skip this step and add a new camera manually by entering camera's setting in the "Camera Information" section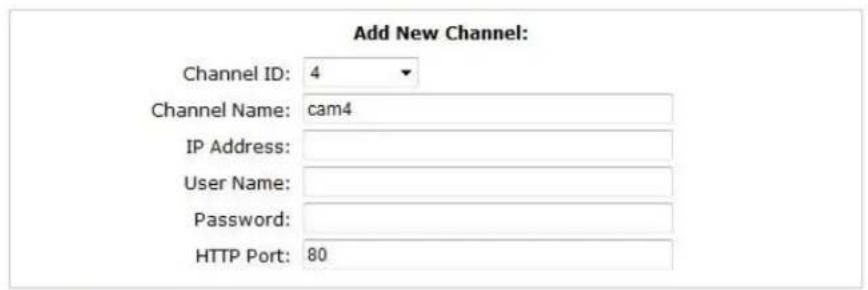
text_image
Add New Channel: Channel ID: 4 Channel Name: cam4 IP Address: User Name: Password: HTTP Port: 80Detect Once you fill out above information, click "Detect" to retrieve camera setting

text_image
Internet Explorer - Security Warning Do you want to install this software? Name: ActiveX Control of Media Client Publisher: Digital Data Communications Asia Co., Ltd. More options Install Don't Install While files from the Internet can be useful, this file type can potentially harm your computer. Only install software from publishers you trust. What's the risk?text_image
Searching...a camera from search result and click "Configure" to configure setting below.
text_image
Add New Channel: Channel ID: 4 Channel Name: FCS-3091 IP Address: 192.168.0.150 User Name: Password: HTTP Port: 80Detect
Once you fill out above information, click "Detect" to retrieve camera setting
Once you fill out above information, click "Detect" to retrieve camera setting
text_image
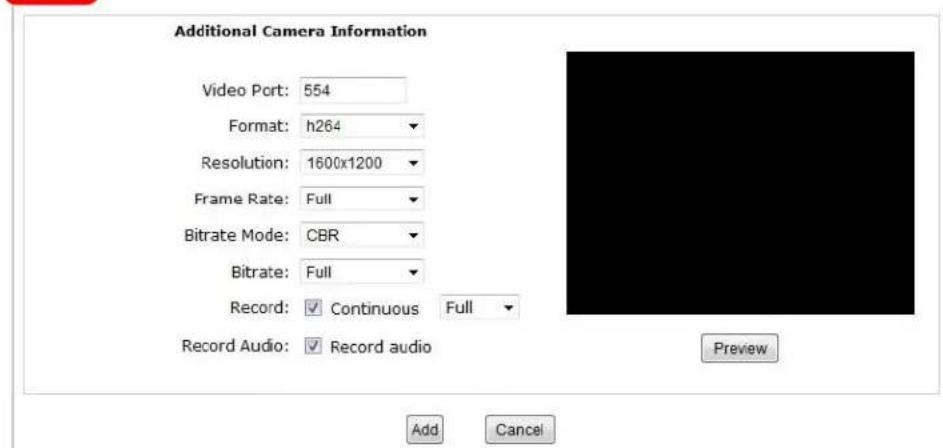
Additional Camera Information Video Port: 554 Format: h264 Resolution: 1600x1200 Frame Rate: Full Bitrate Mode: CBR Bitrate: Full Record: ✓ Continuous Full Record Audio: ✓ Record audio Add Cancel Previewtext_image
Detect Once you fill out above information, click "Detect" to retrieve camera setting Additional Camera Information Video Port: 554 Format: h264 Resolution: 1600x1200 Frame Rate: Full Bitrate Mode: CBR Bitrate: Full Record: ✓ Continuous Full Record Audio: ✓ Record audio Add Cancel수동으로 카메라 추가하기
text_image
Add New Channel: Channel ID: 4 Channel Name: FCS-3091 IP Address: 192.168.0.150 User Name: Password: HTTP Port: 80 Enter manually Detect Once you fill out above information, click "Detect" to retrieve camera settingРусский
Обзор устройства
natural_image
Two electronic devices shown from front and side views, one with red arrows pointing to the front panel (no visible text or symbols on the device body)natural_image
Hand pointing at a black rectangular electronic device with an arrow indicating direction (no text or symbols visible)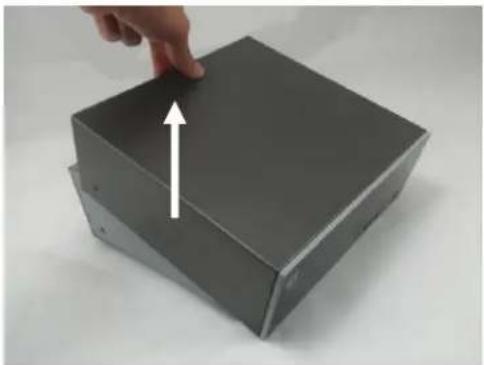
natural_image
Hand pressing a button on a dark metal box with an upward arrow (no text or symbols visible)natural_image
Close-up of a hand inserting a CD into a plastic case, showing internal components and casing (no text or symbols visible)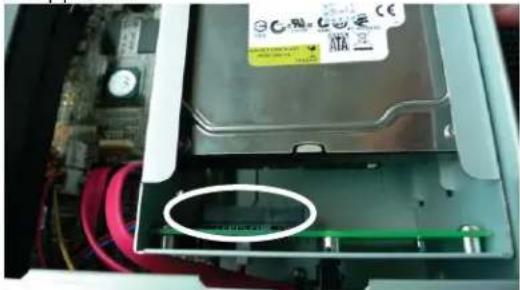
natural_image
Interior view of an electronic device showing a drive casing with a circular component and surrounding circuitry (no visible text or symbols)natural_image
Close-up of a finger pressing a small circular component on a metal electronic device (no visible text or symbols)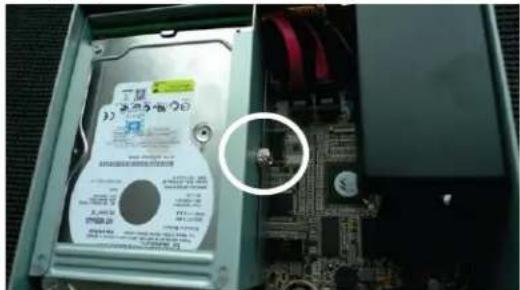
text_image
3) 高速硬盘 20 1.45V 1.6V 2.45V 2.6V 3.45V 3.6V 4.45V 4.6V 5.45V 5.6V 6.45V 6.6V 7.45V 7.6V 8.45V 8.6V 9.45V 9.6V 10.45V 10.6V 11.45V 11.6V 12.45V 12.6V 13.45V 13.6V 14.45V 14.6V 15.45V 15.6V 16.45V 16.6V 17.45V 17.6V 18.45V 18.6V 19.45V 19.6V 20.45V 20.6V 21.45V 21.6V 22.45V 22.6V 23.45V 23.6V 24.45V 24.6V 25.45V 25.6V 26.45V 26.6V 27.45V 27.6V 28.45V 28.6V 29.45V 29.6V 30.45V 30.6V 31.45V 31.6V 32.45V 32.6V 33.45V 33.6V 34.45V 34.6V 35.45V 35.6V 36.45V 36.6V 37.45V 37.6V 38.45V 38.6V 39.45V 39.6V 40.45V 40.6V 41.45V 41.6V 42.45V 42.6V 43.45V 43.6V 44.45V 44.6V 45.45V 45.6V 46.45V 46.6V 47.45V 47.6V 48.45V 48.6V 49.45V 49.6V 50.45V 50.6V 51.45V 51.6V 52.45V 52.6V 53.45V 53.6V 54.45V 54.6V 55.45V 55.6V 56.45V 56.6V 57.45V 57.6V 58.45V 58.6V 59.45V 59.6V 60.45V 60.6V 61.45V 61.6V 62.45V 62.6V 63.45V 63.6V 64.45V 64.6V 65.45V 65.6V 66.45V 66.6V 67.45V 67.6V 68.45V 68.6V 69.45V 69.6V 70.45V 70.6V 71.45V 71.6V 72.45V 72.6V 73.45V 73.6V 74.45V 74.6V 75.45V 75.6V 76.45V 76.6V 77.45V 77.6V 78.45V 78.6V 79.45V 79.6V 80.45V 80.6V 81.45V 81.6V 82.45V 82.6V 83.45V 83.6V 84.45V 84.6V 85.45V 84.9999999999999999999999999999999999999999999999999999999999999999999999999999999999999999999999999999text_image
Search NVR - InstallShield Wizard Welcome to the InstallShield Wizard for Search NVR The InstallShield(R) Wizard will install Search NVR on your computer. To continue, click Next. WARNING: The program is protected by copyright law and international treaties.text_image
InstallShield Wizard Completed The InstallShield Wizard has successfully installed Search NIR. Click Finish to exit the wizard. OK Launch the programtext_image
Search...text_image
Windows Security The server 192.168.0.3 at NVR-0216 requires a username and password. Warning: This server is requesting that your username and password be sent in an insecure manner (basic authentication without a secure connection). User name Password Remember my credentials OK Canceltext_image
File Edit View Favorites Tools Back Address 192,168.101.50text_image
Windows Security The server 192.168.0.3 at NVR-0216 requires a username and password. Warning: This server is requesting that your username and password be sent in an insecure manner (basic authentication without a secure connection). User name Password Remember my credentials OK CancelДобавление камеры
a manually by entering camera's setting in the "Camera Information" section
text_image
Add New Channel: Channel ID: 4 Channel Name: cam4 IP Address: User Name: Password: HTTP Port: 80Detect
Once you fill out above information, click "Detect" to retrieve camera setting
Add
Cancel
text_image
Internet Explorer - Security Warning Do you want to install this software? Name: ActiveX Control of Media Client Publisher: Digital Data Communications Asia Co., Ltd. More options Install Don't Install While files from the Internet can be useful, this file type can potentially harm your computer. Only install software from publishers you trust. What's the risk?text_image
Searching...text_image
Add New Channel: Channel ID: 4 Channel Name: FCS-3091 IP Address: 192.168.0.150 User Name: Password: HTTP Port: 80Detect
Once you fill out above information, click "Detect" to retrieve camera setting
text_image
Detect Once you fill out above information, click "Detect" to retrieve camera setting Additional Camera Information Video Port: 554 Format: h264 Resolution: 1600x1200 Frame Rate: Full Bitrate Mode: CBR Bitrate: Full Record: ✓ Continuous Full Record Audio: ✓ Record audio Preview Add Canceltext_image
Detect Once you fill out above information, click "Detect" to retrieve camera setting Additional Camera Information Video Port: 554 Format: h264 Resolution: 1600x1200 Frame Rate: Full Bitrate Mode: CBR Bitrate: Full Record: ✓ Continuous Full Record Audio: ✓ Record audio Add Canceltext_image
Add New Channel: Channel ID: 4 Channel Name: FCS-3091 IP Address: 192.168.0 150 User Name: Password: HTTP Port: 80 Enter manually Detect Once you fill out above information, click "Detect" to retrieve camera settingPolski
Przegląd systemu
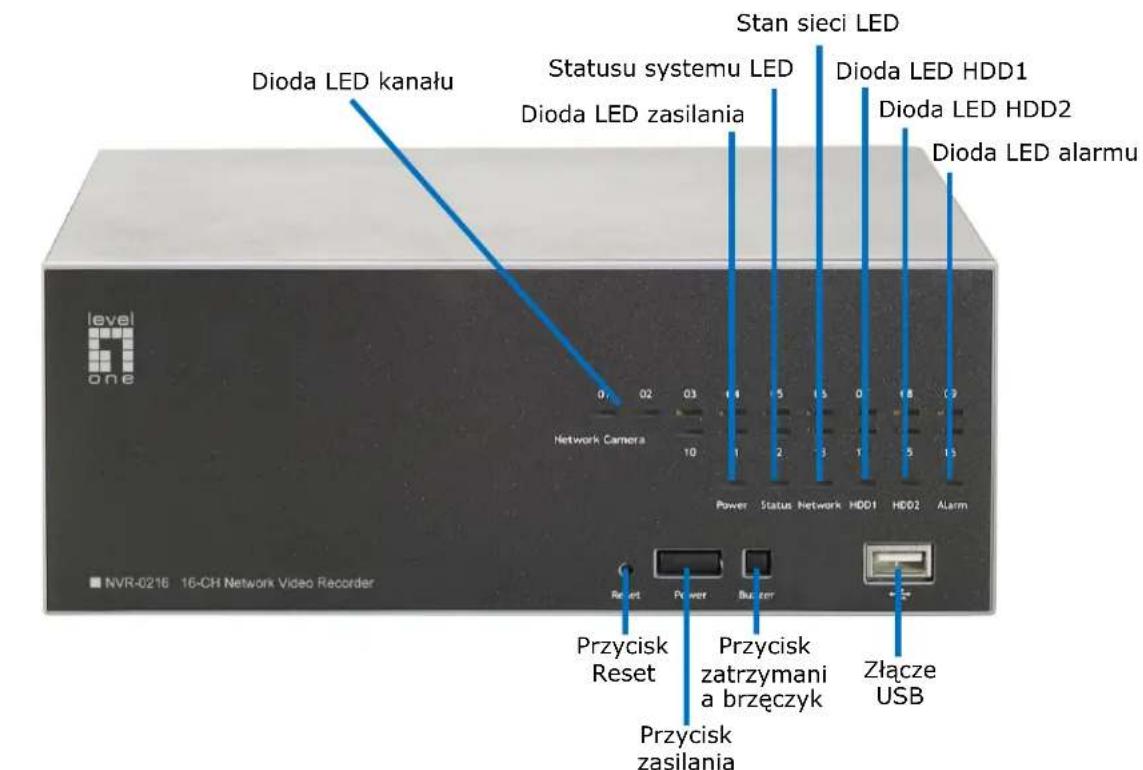
text_image
Dioda LED kanału Statusu systemu LED Dioda LED zasilania Stan sieci LED Dioda LED HDD1 Dioda LED HDD2 Dioda LED alarmu Network Camera 0 02 03 1 1 5 15 0 18 2 Power Status Network HDD1 HDD2 Alarm NVR-0216 16-CH Network Video Recorder Przycisk Reset Przycisk zatrzymani a brzęczyk Złącze USB Przycisk zasilania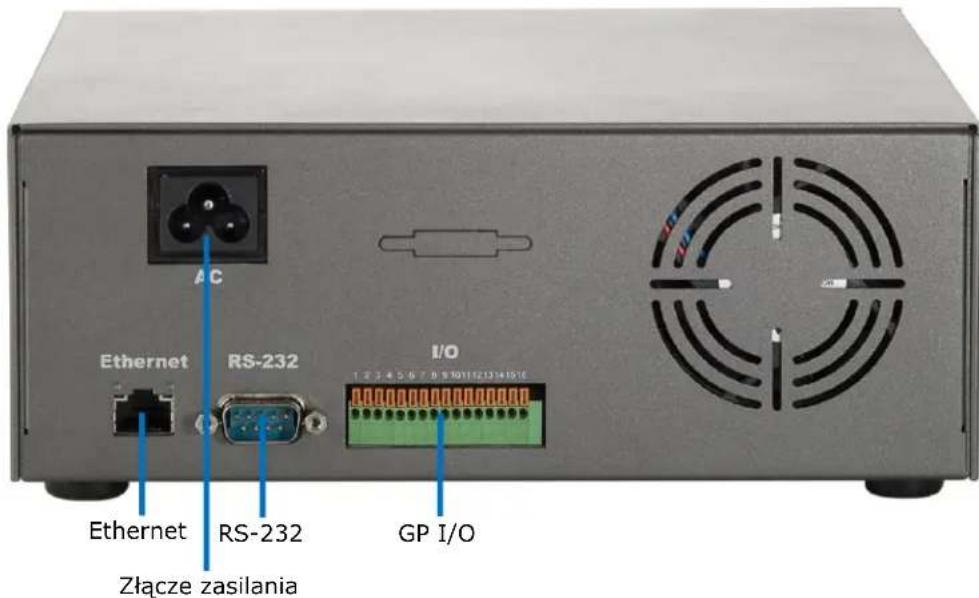
text_image
Ethernet RS-232 I/O 1 2 3 4 5 6 7 8 9 10 11 12 13 14 15 16 Złącze zasilanianatural_image
Two electronic devices shown from front and side views, one with red arrows pointing to the left panel (no visible text or symbols on the device surfaces)natural_image
Two views of a black rectangular electronic device with a hand adjusting its top panel, showing a double-headed arrow indicating rotation (no text or symbols present)natural_image
Two-panel photo showing a computer case with a CD drive being inserted, and the interior view of an open hard disk drive (no visible text or symbols)natural_image
Close-up of a hand inserting a CD into an electronic device casing (no visible text or symbols)text_image
Search NVR - InstallShield Wizard Welcome to the InstallShield Wizard for Search NVR The InstallShield(K) Wizard will install Search NVR on your computer. To continue, click Next. WARNINGS: The program is protected by copyright law and international treaties.text_image
Search NVR - InstallShield Wizard InstallShield Wizard Completed The InstallShield Wizard has successfully installed Search NIR. Click Finish to exit the wizard. Launch the program < Back Finish Canceltext_image
Search...text_image
Windows Security The server 192.168.0.3 at NVR-0216 requires a username and password. Warning: This server is requesting that your username and password be sent in an insecure manner (basic authentication without a secure connection). User name Password Remember my credentials OK CancelNVR-02 Series Quick Installaon Guide
text_image
Click here to search camera: * You may skip this step and add a new camera manually by entering camera's setting in the "Camera Information" section
text_image
Add New Channel: Channel ID: 4 Channel Name: cam4 IP Address: User Name: Password: HTTP Port: 80Detect
Once you fill out above information, click "Detect" to retrieve camera setting
Add
Cancel
text_image
Internet Explorer - Security Warning Do you want to install this software? Name: ActiveX Control of Media Client Publisher: Digital Data Communications Asia Co., Ltd. More options Install Don't Install While files from the Internet can be useful, this file type can potentially harm your computer. Only install software from publishers you trust. What's the risk?text_image
Searching...text_image
Add New Channel: Channel ID: 4 Channel Name: FCS-3091 IP Address: 192.168.0.150 User Name: Password: HTTP Port: 80Detect
Once you fill out above information, click "Detect" to retrieve camera setting
Once you fill out above information, click "Detect" to retrieve camera setting