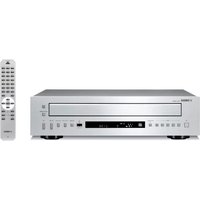
TSX130 - Audio System YAMAHA - Free user manual and instructions
Find the device manual for free TSX130 YAMAHA in PDF.
| Brand | YAMAHA |
| Model | TSX130 |
| Product type | Audio system with CD player, FM radio, iPod dock, USB port |
| Dimensions (W × H × D) | 350 × 120 × 240 mm |
| Weight | 4.0 kg |
| Power supply | AC 110-120 V / 220-240 V, 50/60 Hz |
| Power consumption | 20 W (standby ≤ 1.0 W) |
| Output power | 15 W + 15 W (6 Ω, 1 kHz, 10% THD) |
| Speakers | 2 × 8 cm full-range speaker |
| Supported audio formats | Audio CD, CD-R/RW, MP3, WMA |
| iPod compatibility | iPod touch, iPod classic, iPod nano, iPod mini |
| Tuner type | FM with RDS (Radio Data System) |
| FM presets | 30 stations |
| Alarm functions | Dual alarm with type setting (beep, music, both) and 5 min snooze |
| Sleep timer | Adjustable (SLEEP function) |
| Sound modes (DSP) | Normal, Mild, Heavy, Live |
| Display | Display with brightness adjustment (manual or automatic) |
| Clock | 12/24 h display, manual or automatic setting via RDS |
| Playback functions | Random, repeat (track, folder, all), resume playback |
| Inputs | iPod dock (front), USB port (front), CD player (front) |
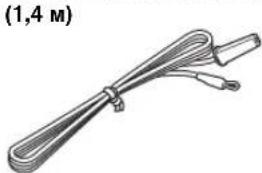
| Included accessories | Remote control (CR2025 battery included), FM antenna (1.4 m), instruction manual |
| Cleaning | Clean cloth and dry; do not use chemical solvents |
| Safety | Do not open the device, class 1 laser protection, do not expose to moisture |
| Repairability | Entrust any repairs to an authorized Yamaha technician |
Frequently Asked Questions - TSX130 YAMAHA
User questions about TSX130 YAMAHA
0 question about this device. Answer the ones you know or ask your own.
Ask a new question about this device
Download the instructions for your Audio System in PDF format for free! Find your manual TSX130 - YAMAHA and take your electronic device back in hand. On this page are published all the documents necessary for the use of your device. TSX130 by YAMAHA.
USER MANUAL TSX130 YAMAHA
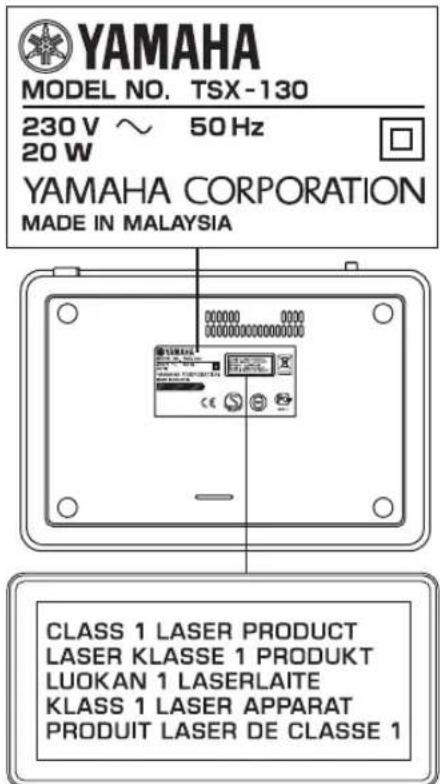
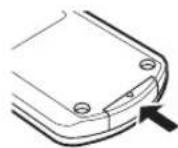
The name plate is located on the bottom of the unit.
VAROITUS
If the socket outlets in the home are not suitable for the plug supplied with this appliance, it should be cut off and an appropriate 3 pin plug fitted. For details, refer to the instructions described below.
Note
The plug severed from the mains lead must be destroyed, as a plug with barcd flexible cord is hazardous if engaged in a live socket outlet.
■Special Instructions for U.K. Model
IMPORTANT
THE WIRES IN MAINS LEAD ARE COLOURED IN ACCORDANCE WITH THE FOLLOWING CODE:
Blue: NEUTRAL
Brown: LIVE
As the colours of the wires in the mains lead of this apparatus may not correspond with the coloured markings identifying the terminals in your plug, proceed as follows: The wire which is coloured BLUE must be connected to the terminal which is marked with the letter N or coloured BLACK. The wire which is coloured BROWN must be connected to the terminal which is marked with the letter L or coloured RED.
Make sure that neither core is connected to the earth terminal of the three pin plug.
Caution: Read this before operating your unit.
1 To assure the finest performance, please read this manual carefully. Keep it in a safe place for future reference.
2 Install this unit in a well ventilated, cool, dry, clean place with at least 15cm on the top, 10cm on the left and right, and 10cm at the back of this unit away from direct sunlight, heat sources, vibration, dust, moisture, and/or cold.
3 Locate this unit away from other electrical appliances, motors, or transformers to avoid humming sounds.
4 Do not expose this unit to sudden temperature changes from cold to hot (or vice versa), and do not locate this unit in an environment with high humidity (i.e., a room with a humidifier) to prevent condensation inside this unit, which may cause an electrical shock, fire, damage to this unit, and/or personal injury.
5 Avoid installing this unit where foreign object may fall onto this unit and/or this unit may be exposed to liquid dripping or splashing. On the top of this unit, do not place:
- Other components, as they may cause damage and/or discoloration on the surface of this unit.
- Burning objects (i.e., candles), as they may cause fire, damage to this unit, and/or personal injury.
- Containers with liquid in them, as they may fall and liquid may cause electrical shock to the user and/or damage to this unit.
6 Do not cover this unit with a newspaper, tablecloth, curtain, etc. in order not to obstruct heat radiation. If the temperature inside this unit rises, it may cause fire, damage to this unit, and/or personal injury.
7 Do not plug in this unit to a wall outlet until all connections are complete.
8 Do not operate this unit upside-down. It may overheat, possibly causing damage.
9 Do not use force on switches, knobs and/or cords.
10 When disconnecting the power cable from the wall outlet, grasp the plug; do not pull the cable.
11 Do not clean this unit with chemical solvents; this might damage the finish.
12 Only voltage specified on this unit must be used. Using this unit with a higher voltage than specified is dangerous and may cause fire, damage to this unit, and/or personal injury. Yamaha will not be held responsible for any damage resulting from use of this unit with a voltage other than specified.
13 To prevent damage by lightning, keep the power cable and outdoor antennas disconnected from a wall outlet or this unit during a lightning storm.
14 Do not attempt to modify or fix this unit. Contact qualified Yamaha service personnel when any service is needed. The cabinet should never be opened for any reasons.
15 When not planning to use this unit for long periods of time (i.e., vacation), disconnect the AC power plug from the wall outlet.
16 Be sure to read the "TROUBLESHOOTING" section on common operating errors before concluding that this unit is faulty.
17 Before moving this unit, press ON/OFF to set the system to off, and disconnect the AC power plug from the wall outlet.
18 Condensation will form when the surrounding temperature changes suddenly. Disconnect the power cable from the outlet, then leave this unit alone.
19 When using this unit for a long time, this unit may become warm. Turn the system off, then leave this unit alone for cooling.
20 Install this unit near the wall outlet and where the AC power plug can be reached easily.
21 The batteries shall not be exposed to excessive heat such as sunshine, fire or the like.
This unit is not disconnected from the AC power source as long as it is connected to the wall outlet, even if this unit itself is turned off by ON/OFF. In this state, this unit is designed to consume a very small quantity of power.
WARNING
TO REDUCE THE RISK OF FIRE OR ELECTRIC SHOCK, DO NOT EXPOSE THIS UNIT TO RAIN OR MOISTURE.
LASER SAFETY
This unit employs a laser. Due to possible eye injury, only a qualified service person should remove the cover or attempt to service this device.
DANGER
This unit emits visible laser radiation when open. Avoid direct eye exposure to beam. When this unit is plugged into the wall outlet, do not place your eyes close to the opening of the disc tray and other openings to look into inside.
The laser component in this product is capable of emitting radiation exceeding the limit for Class 1.
LASER
Type Semiconductor laser GaAS/GaAlAs
Wave length 780nm
Output Power 10mW
Beam divergence 60 degrees
CAUTION
Danger of explosion if battery is incorrectly replaced.
Replace only with the same or equivalent type.
Taking care of the unit
When you wipe this unit, use a clean dry cloth.
CONTENTS
PREPARATION
PREPARATIONS BEFORE USING THIS UNIT
Turning on/off the system. 4
Adjusting the clock. 4
OPERATION
USING USEFUL FUNCTIONS 5
Using the alarm functions. 5
Setting sleeping mode. 8
Setting Dimmer mode. 8
Switching DSP mode. 8
BASIC OPERATION. 9
LISTENING TO MUSIC. 10
Listening to your iPodTM 10
Listening to a CD. 12
Listening to a USB device 13
LISTENING TO FM RADIO STATIONS 14
Connecting antennas. 14
Tuning radio stations 14
Presetting radio stations. 14
Selecting preset radio stations (Preset tuning). 15
Receiving Radio Data System stations. 15
ADDITIONAL INFORMATION
TROUBLESHOOTING 17
General. 17
iPodTM 18
Disc playback 18
USB playback 19
Radio reception. 19
Remote control 19
NOTES ON DISCS AND USB DEVICES 20
Disc information. 20
Handling a disc 20
About MP3 or WMA files. 20
GLOSSARY 21
SPECIFICATIONS. 21
■About this manual
- In this manual, operations that can be performed with either this unit or its remote control are explained using the unit.
- The symbol “ 串 ” with page number(s) indicates the corresponding reference page(s).
Notes contain important information about safety and operating instructions. indicates a tip for your operation. - This manual is printed prior to production. Design and specifications are subject to change in part as a result of improvements, etc. In case of differences between the manual and the product, the product has priority.
Supplied accessories
This product includes the following accessories. Make sure you have all of the following parts.
Remote control

Indoor FM antenna
(1.4 m (55-1/8"))
Owner's manual
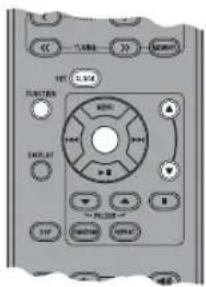
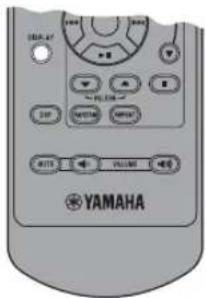
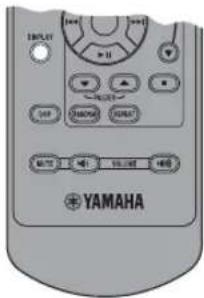
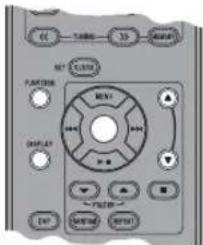
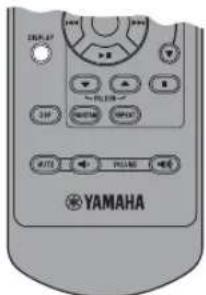
PREPARATIONS BEFORE USING THIS UNIT

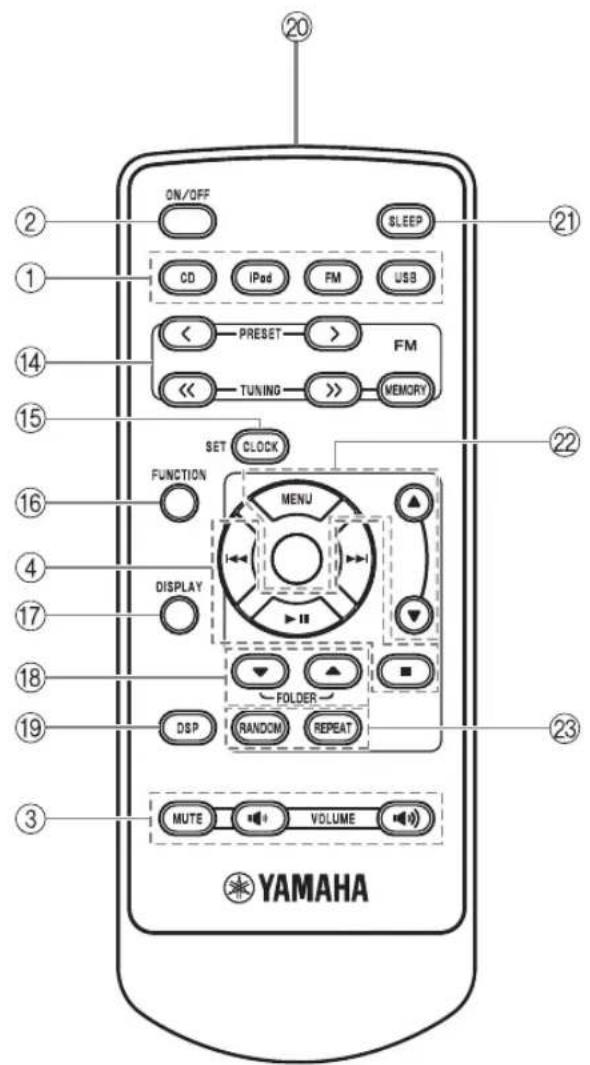
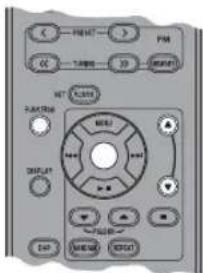
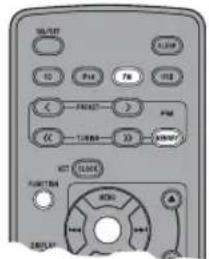
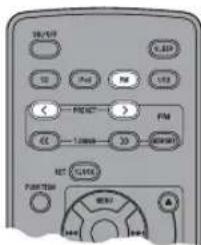
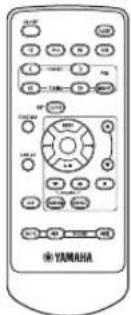
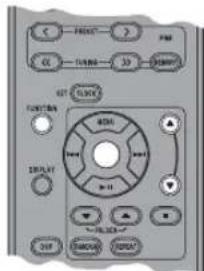
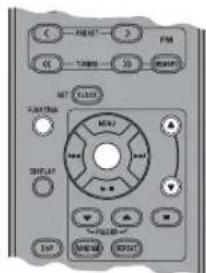
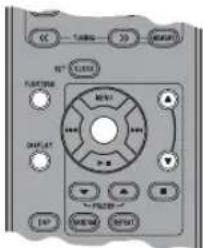
① Source buttons: USB, CD, FM, iPod (P.9)
② ON/OFF: System on/off (P.4)
③ VOLUME: Volume control buttons (P. 9)
④ Audio control buttons (P.9)
⑤ Pod dock (P. 10)
⑥USB port (P. 13)
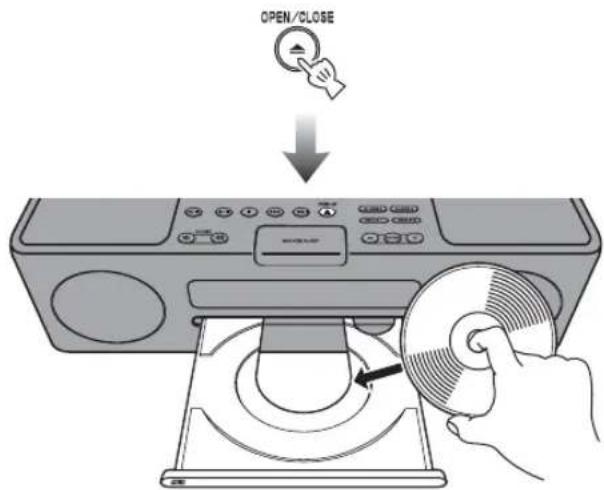
⑦ OPEN/CLOSE: Disc tray open/close (P. 12)
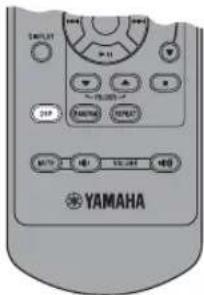
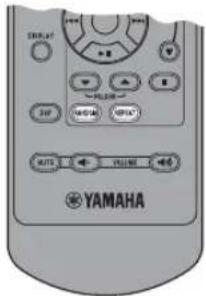
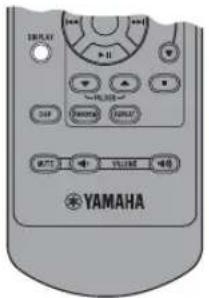
Alarm control buttons P.5
⑨SNOOZE/SLEEP (P.7,8)
10Speakers
⑪Disc tray (P. 12)
12Front panel display (P.4)
To the wall outlet
FM control buttons (P. 14)
15CLOCK SET (P.4)
FUNCTION
17 DISPLAY (P. 11, 12, 13)
18 FOLDER ▲/▼ (P.9)
DSP: DSP mode switching (P.8)
Infrared signal transmitter (P. 3)
② SLEEP: Sleep time setting (P.8)
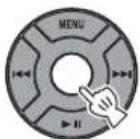
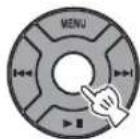
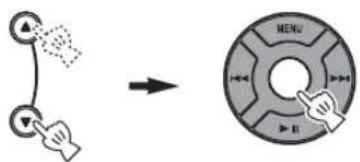
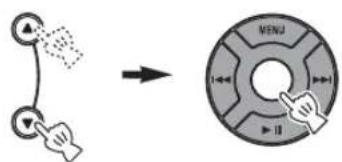
22 MENU / /Center buttons (P. 10)
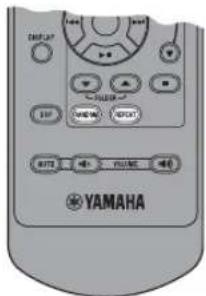
23RANDOM/REPEAT: Changing the playback mode for iPod/CD/USB (P. 10, 12)
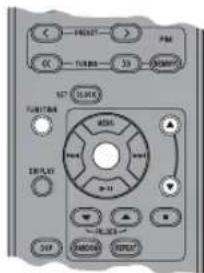
The round shaped button on the center is called Center in this manual.
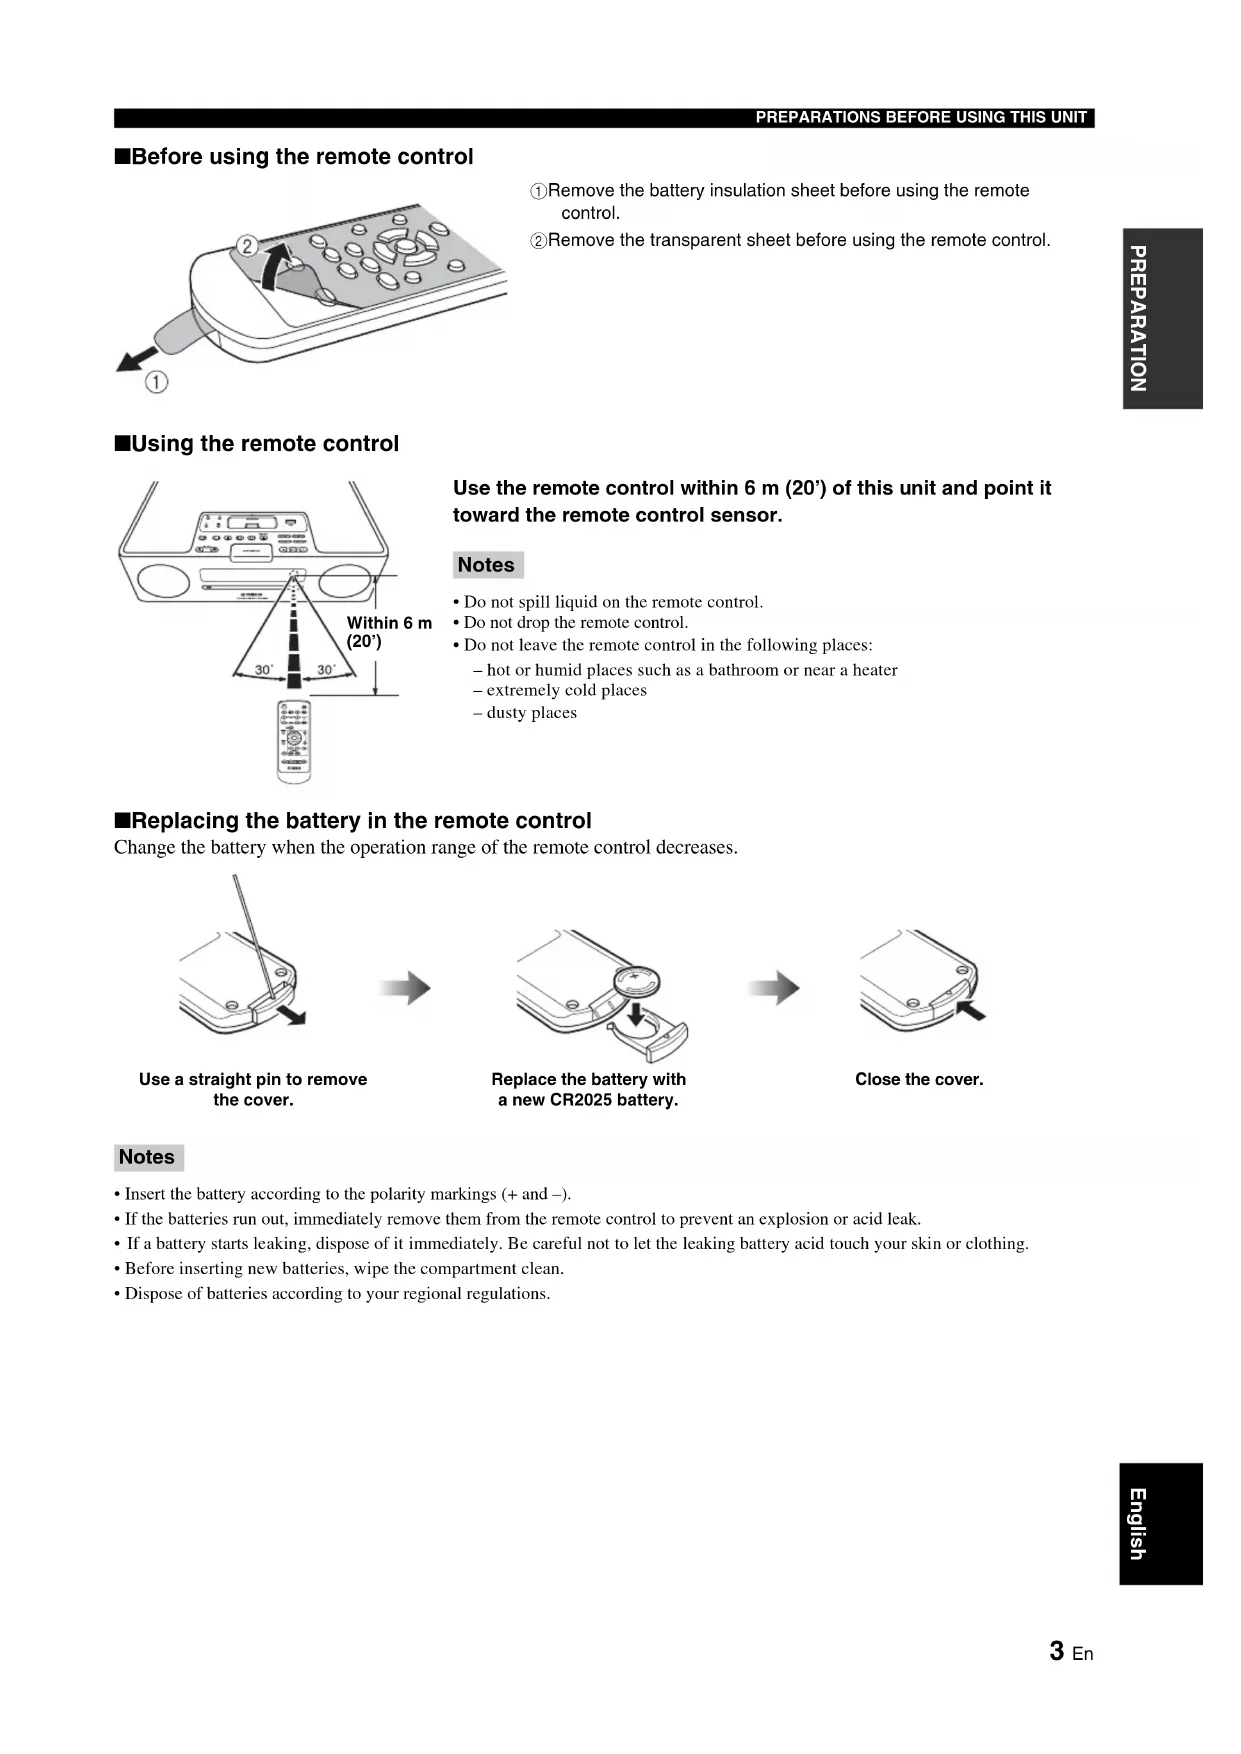
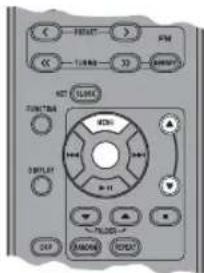
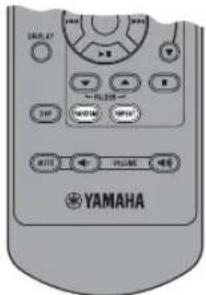
Before using the remote control

① Remove the battery insulation sheet before using the remote control.
② Remove the transparent sheet before using the remote control.
Using the remote control
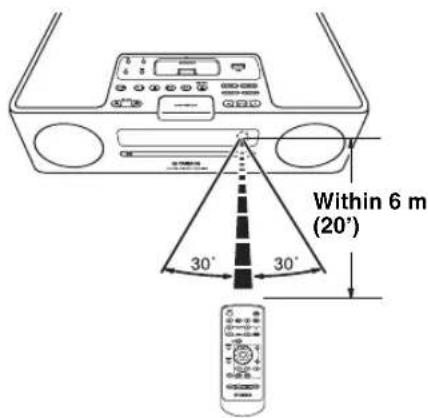
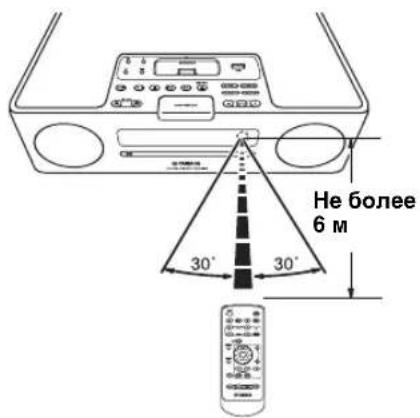
Use the remote control within 6m (20') of this unit and point it toward the remote control sensor.
Notes
- Do not spill liquid on the remote control.
- Do not drop the remote control.
- Do not leave the remote control in the following places:
hot or humid places such as a bathroom or near a heater
extremely cold places
-dusty places
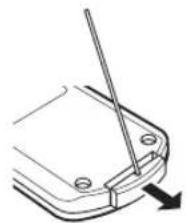
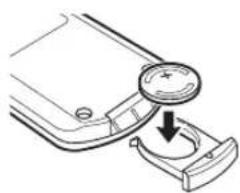
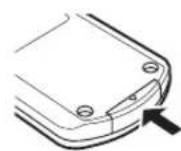
Replacing the battery in the remote control
Change the battery when the operation range of the remote control decreases.
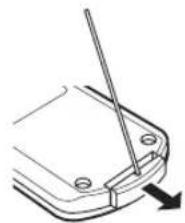
Use a straight pin to remove the cover.

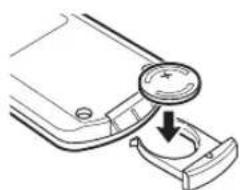
Replace the battery with a new CR2025 battery.

Close the cover.
Notes
- Insert the battery according to the polarity markings (+ and -).
- If the batteries run out, immediately remove them from the remote control to prevent an explosion or acid leak.
- If a battery starts leaking, dispose of it immediately. Be careful not to let the leaking battery acid touch your skin or clothing.
- Before inserting new batteries, wipe the compartment clean.
- Dispose of batteries according to your regional regulations.
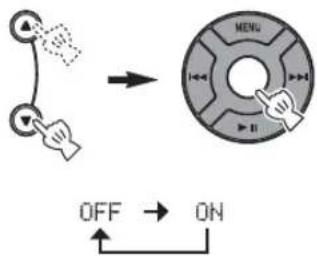
Turning on/off the system
1 Connect the power cable to the wall outlet.
2 Press ON/OFF to turn on the system.
When the system is on: "Hello" appears, then clock and other information are displayed.

Example: iPod playback mode display
When the system is off: "Good-bye" appears, then only date and time are displayed.

#
- This unit has an auto off function, which will automatically switch the system to off if the system is left turned on for 1 hour without playback or any other operation being performed. This function is not available when the source is set to FM.
- Press and hold ON/OFF on the top of the unit for more than 3 seconds to set the system to standby mode. All the information on the front panel display is not displayed in standby mode. This can reduce the power consumption. To cancel standby mode, press ON/OFF.
Even in system off/standby mode, the alarm function is available. - The memory back-up circuit prevents stored data such as the time setting from being lost even in system off/standby mode.
Adjusting the clock
The clock is not set at the factory.
1 Press CLOCK SET.

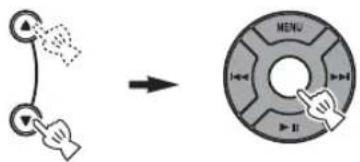
2 Select each setting with MENU ▲/▼ and confirm with Center.
You can set YEAR MONTH DAY TIME.
Notes
- This operation can be performed only with the remote control.
Time appears in 12-hour notation (AM/PM), depending on the model. For example, "4:00PM". - You can switch 12-hour/24-hour notation by pressing FUNCTION MENU / Center to select TIME FORMAT, then pressing MENU / Center to select 12H/24H.
The time settings are lost after one week when the power cable is disconnected from the wall outlet.
USING USEFUL FUNCTIONS
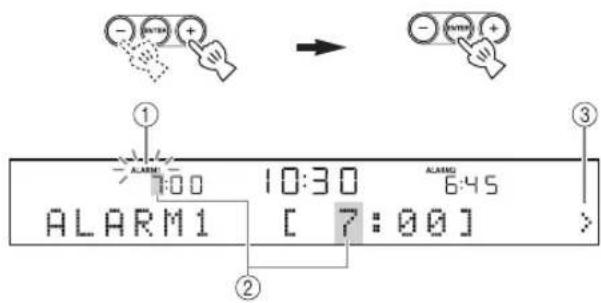
Using the alarm functions
The unit has the dual alarm function. Each alarm time always appears on the right/left sides of the clock on the front panel display. When the alarm is set to on, the alarm indicator and time light up.
You can set the different music to the alarm from what you listen to during the setting.
Note
This operation can be performed only with the buttons on the top of the unit.

Setting the alarm time and sound
Note
To cancel the alarm function setting during the operations, press SETUP1/SETUP2. The alarm is not set.
1 Start setting ALARM1/ALARM2.
When you want to set the alarm to ALARM1, set on SETUP1, and SETUP2 is for ALARM2.

2 Set the alarm time.
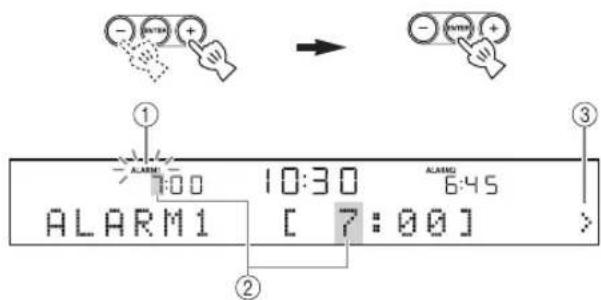
① While setting the alarm function, the alarm indicator blinks.
② The item you are setting also blinks.
③ The > mark on the right side means that you have other menu items on the following screens. You can go to the next menu item setting by pressing ENTER.
3 Select and set TYPE BEEP SOURCE VOLUME.

① After setting the alarm time, select the alarm type from BEEP/BEEP+MUSIC/MUSIC.
- BEEP: beep sound only
- BEEP+MUSIC: beep sound and music selected in an input source, iPod/FM/CD/USB
- MUSIC: music only
If you set TYPE to BEEP+MUSIC, you can play back the desired music in an input source, iPod/ FM/CD/USB and beep sound together at the time you set. The music volume gradually increases to wake you up comfortably, and then the beep sound plays back at the time you set.
10:30 6:45 TYPE [BEEP+MUSIC]
USING USEFUL FUNCTIONS
②Select the beep sound.
5 kinds of beep sounds are stored on the unit.
The BEEP screen is skipped automatically if you select MUSIC/BEEP+MUSIC in step ①.
中
You can preview the currently displayed beep sound by pressing SNOOZE/SLEEP when you select the beep sound. To stop the beep sound, press SNOOZE/SLEEP again.

③Select the music source from iPod/FM/CD/USB or LAST SET.

The SOURCE screen is skipped automatically if you select BEEP in step ①.
iPod
You can select PLAYLIST or RESUME PLAY.
The music starts from the beginning of the playlist. Before this operation, make a playlist on your iPod (P. 7).
Select and set PLAYLIST.


Select and set the desired playlist.

Select and set RESUME PLAY when you want to resume the music, which you listen to last time, as the alarm sound.

CD
Audio CD: Set a track number.
MP3/WMA CD: Set a folder number. Music starts from the beginning of the selected folder (P. 20).
USB (MP3/WMA files)
Set a folder number. Music starts from the beginning of the selected folder (P. 20).
FM
Set preset number/frequency.
LAST SET
Keep the setting you set last time.
Note
If the SOURCE is not set completely or the music device is not set, the unit plays back the beep sound instead. For example, if the unit cannot read your iPod, the beep sound plays back.
④ Set the alarm volume.
The volume is set with ENTER in step ④, then the alarm setting is complete. The alarm is set to on automatically.

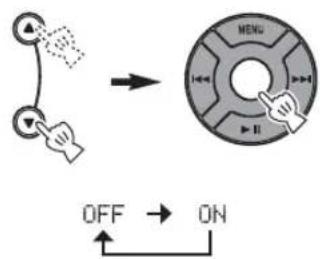
Switching on/off the alarm
You can switch on/off the alarm with ALARM1/ ALARM2, but the alarm settings are not deleted with this operation.
Switch on/off the alarm function.

When the alarm is on, the alarm indicator and time light up.
Using the snooze function
When the beep sound, music, or both are played back, you can set the snooze function.
Set the snooze function.

The function differs depending on the alarm type you set in TYPE (P.5).
BEEP: The beep sound stops by pressing SNOOZE/ SLEEP, and resumes after 5 minutes.
MUSIC: The music stops by pressing SNOOZE/SLEEP, and resumes after 5 minutes.
BEEP+MUSIC: With one click of SNOOZE/SLEEP, you can stop the beep sound and keep playing back the music. The beep sound resumes after 5 minutes.
#
You can also set the snooze function by pressing SLEEP on the remote control instead of SNOOZE/SLEEP on the unit.
■Stopping the alarm sound
You can stop the alarm sound in the 3 ways as follows. When you stop alarm sound, the system is set to off.
Press ALARM1/ALARM2.

Press ON/OFF.

Press and hold SNOOZE/SLEEP for 2 seconds.

#
- If you do not stop the alarm, the alarm stops after 60 minutes automatically.
- When you stop the alarm, the alarm indicator disappears. To activate the alarm function again, press ALARM1/ALARM2 to set the alarm to on.
- When you stop the alarm, the time setting, etc., is saved for convenient use next time.
Note
Any operations other than setting the snooze function, stopping the alarm sound, or adjusting the volume control are not available while playing back the alarm sound.
About Playlist
You can collect your favorite songs in the library on your iPod and make a list. This is a playlist. If you select a playlist for playback, the songs in the playlist will be played back. Even if you delete a song in a playlist, it is not deleted from the library.
#
For more details on playlists, refer to the instruction manual of your iPod.
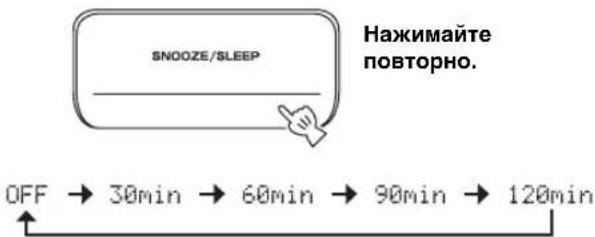
Setting sleeping mode
You can set the time to turn off the system automatically.
Select the sleep time.

Press repeatedly.

When the sleep function is on, the SLEEP indicator lights up.

You can also operate this function with SLEEP on the remote control.
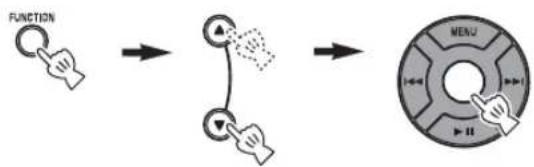
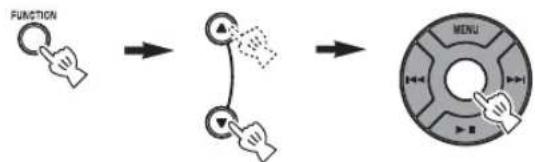
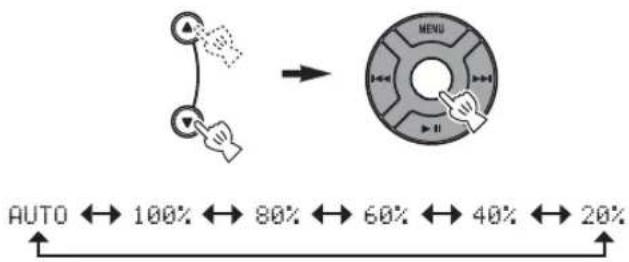
Setting Dimmer mode
You can change the brightness of the front panel. If you set DIMMER to AUTO, the dimmer level is adjusted automatically, depending on the brightness of the room. If your room is dark, the front panel becomes darker.

The default setting is AUTO.
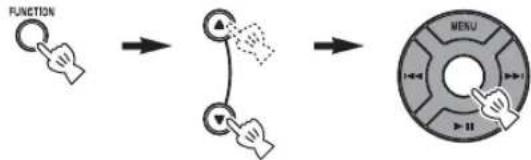
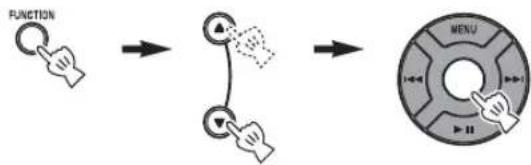
1 Select DIMMER from the FUNCTION menu.
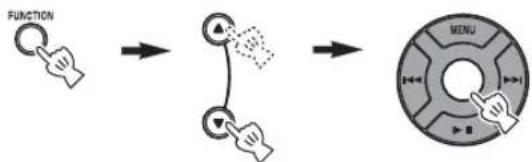

After you select DIMMER with Center, < appears on the left side of the front panel display. You can go back to the FUNCTION menu by pressing MENU on the remote control.
2 Select the desired dimmer level.

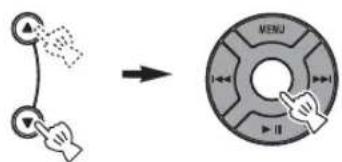
Switching DSP mode
You can switch the sound mode according to the environment or your preference.
Switch DSP mode.

Press repeatedly.
Each time you press DSP the setting switches as follows:
NORMAL: For normal sound

MILD: For natural and mild sound

HEAVY: For more powerful sound (default setting)

LIVE: For wide realistic sound

Back to NORMAL
BASIC OPERATION


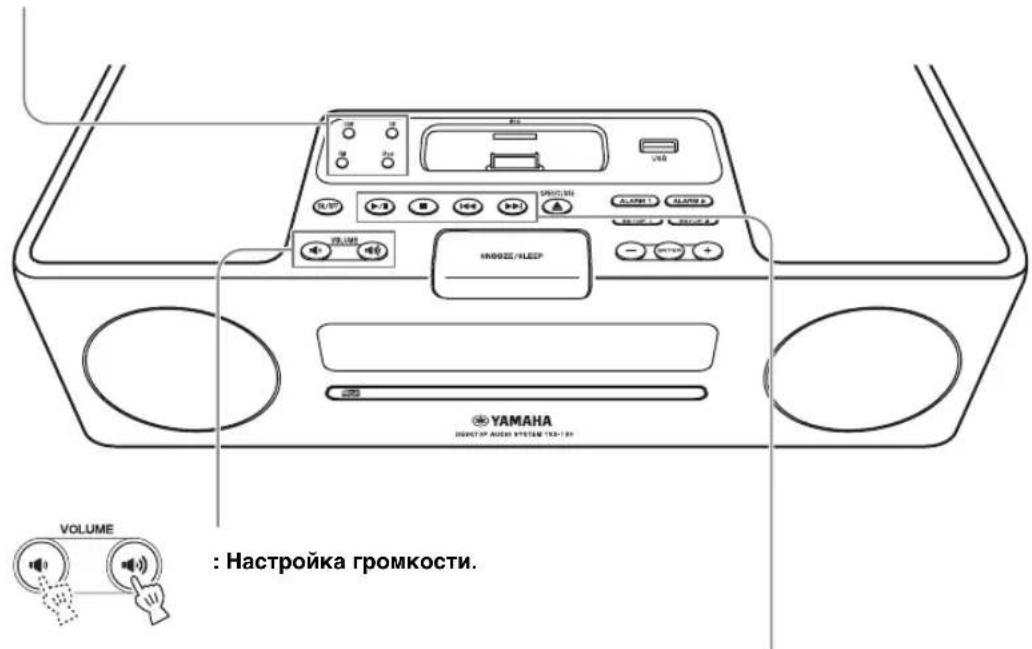
:Press one of the Source buttons to select the desired source.*1*2

:Press to control the volume.
:Press to play/pause.*

:Press to stop playback.*2

: Press to skip backward/forward.

:Press to turn off the sound. Press again to resume the volume.

:Press to choose a folder.*3
1 Even when the system is off, you can start playback of the desired source by pressing one of the Source buttons, without pressing ON/OFF.
2 Playback is resumed from it was last stopped.
(Except for CD/USB which are played back from the beginning of the track you listened to last time.)
Only for CD/USB:
If you press while the music is stopped, the resume information is cleared and the music starts from the beginning of the first
track/file next time.
*3 Only for MP3/WMA of CD and USB
LISTENING TO MUSIC
Listening to your iPod™
Notes
- The unit is compatible with iPod touch, iPod (Click Wheel including iPod classic), iPod nano and iPod mini.
- You can remove your iPod whenever you want.
- Some features may not be available depending on the model or the software version of your iPod.
■Playing back normally
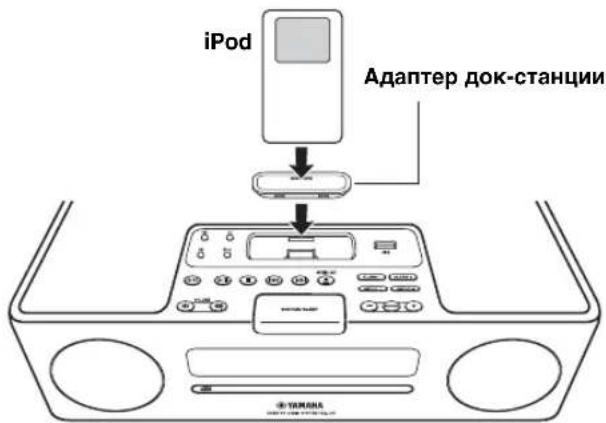
1 Set your iPod into the iPod dock.
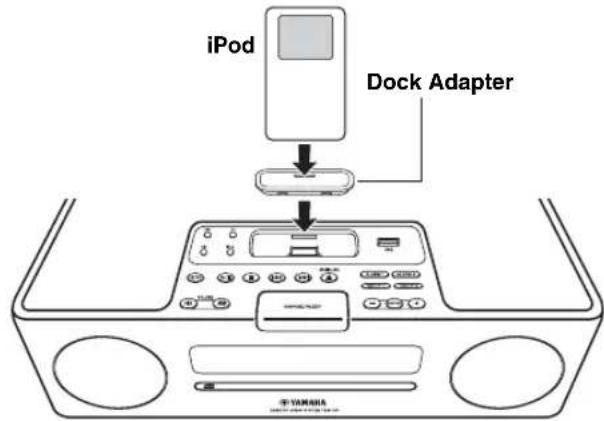
Notes
- A compatible Dock Adapter (not supplied) is required to attach to the unit.
- The iPod may not be set in the iPod dock securely if it is in its protective case.
2 Select iPod.
Playback starts.


For operations of your iPod, refer to the instruction manual of your iPod.
■Selecting music on iPod with the remote control
You can also operate with your iPod only when LIST DISP is set to iPod (P. 11).
MENU: Go back to the previous menu.
Center: Confirm.
/ : Select menu or items.
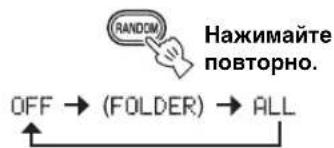
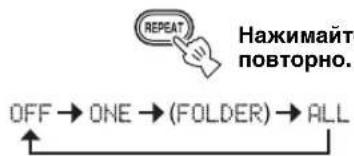
Using shuffle/repeat mode
After the above steps 1 and 2, you can enjoy shuffle and repeat mode.
Press RANDOM to switch shuffle mode for iPod.

Press repeatedly.

Note
You cannot set ALBUM when you use an iPod touch.
Switch repeat mode.

Press repeatedly.

Switching the playback information display
Switch the display in iPod playback mode.

Press repeatedly.
You can change the information display as follows.
Song number and elapsed time (default setting)
Song number and remaining time
Song name
Artist name
Album name
Back to the default setting
Notes
- This function is available for iPod touch, iPod classic, iPod 5 th generation or later, and iPod nano. However, even with these models, this function may not be available depending on the software version of your iPod.
- If you intend to disconnect the power cable of the unit for a long time, remove the iPod from the unit.
Switching the playback list display
LIST DISP allows you to select iPod or the front panel display of the unit to display the list.

Example: When LIST DISP is set to F.PANEL
If you set LIST DISP to iPod, you can also control playback operations and display the menu list on the iPod.

The default setting is iPod.
Note
When LIST DISP is set to F.PANEL, playback operation and menu list displaying are available only on the unit. These operations are not available with your iPod.
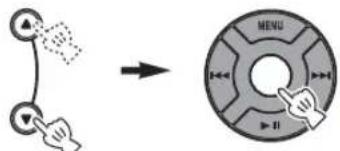
1 Select LIST DISP from the FUNCTION menu.

2 Select iPod/F.PANEL.
Listening to a CD
■Playing back normally
1 Open the disc tray and insert your disc.
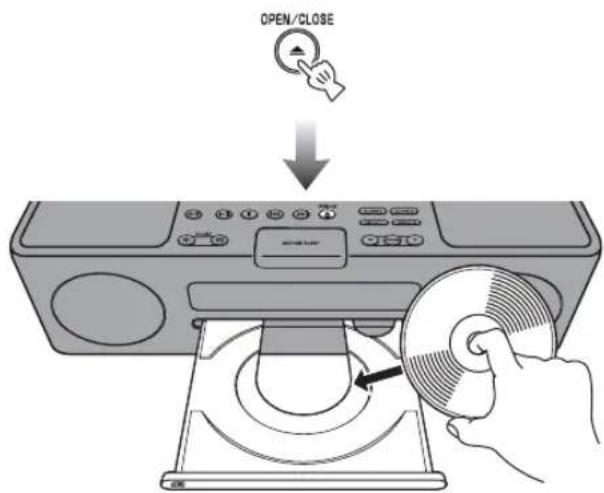
2 Close the disc tray.

3 Select CD.
Playback starts.

■Playing back in random sequence/ repeatedly
After the above steps 1 to 3, you can enjoy random and repeat mode.

Switch random mode.

Switch repeat mode.
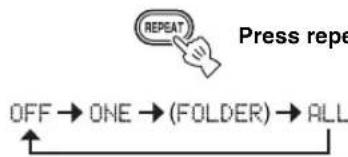
If the selected music source contains folders, you can also select FOLDER.
Switching the playback information display
Switch the display in CD playback mode.

Press repeatedly.
You can change the information display as follows.
Elapsed time of the current track (default setting)
Remaining time of the current track
Total time of the disc
Remaining time of the disc*
Track name*2
Artist name*2
Album name*2
File name*3
Back to the default setting
*1 Only for Audio CDs
2 Only when the selected track has information
3 Only for MP3/WMA CDs
Listening to a USB device
Note
You can remove your USB device whenever you want.
Playing back normally
1 Set your USB device into the USB port.
This unit supports USB mass storage class devices (c.g., flash memories or portable audio players) using FAT16 or FAT32 format.

Notes
- Some devices may not work properly even if they meet the requirements.
- Do not connect devices other than USB mass storage class devices (such as USB chargers or USB hubs), PCs, card readers, an external HDD, etc.
- Yamaha will not be held responsible for any damage to or data loss on the USB device occurring while the device is connected to this unit.
- Playability of and power supply to all kind of USB devices are not guaranteed.
2 Select USB.
Playback starts.

Note
The reading time may exceed 30 seconds, depending on the number of files/folders.
■Playing back in random sequence/ repeatedly
After the above steps 1 and 2, you can enjoy random and repeat mode.
Set in the same way as for CDs (P. 12).
Switching the playback information display
Switch the display in USB playback mode.

Press repeatedly.
You can change the information display as follows.
Elapsed time of the current track (default setting)
Track name*
Artist name*
Album name*
File name
Back to the default setting
- Only when the selected file has information
中
On MP3/WMA files, refer to "NOTES ON DISCS AND USB DEVICES" (P. 20).
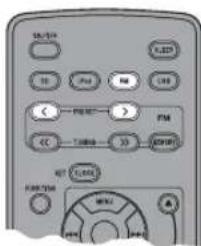
LISTENING TO FM RADIO STATIONS
Connecting antennas

Notes
- The antenna should be stretched out.
- If radio reception is poor, change the height, direction, or placement of the antenna.
If you use an outdoor antenna instead of the supplied FM antenna, reception will be better.
Tuning radio stations
1 Turn on FM.

2 Start automatic tuning.

Press and hold.
中
If the signal received from the station you want to select is weak, you can also tune into radio stations manually by pressing TUNING / > repeatedly.
Note
If you tune to a station manually, the sound is monaural.
Presetting radio stations
You can store your favorite FM stations with the preset function.
Auto preset
1 Press and hold MEMORY for more than 2 seconds in FM mode.

10:30 AUTO PRESET START?
2 Start the auto preset.
■Manual preset
1 Tune into a favorite radio station.
2 Press MEMORY.

3 Select the preset number you want to store to.

Note
To cancel the manual preset, press MEMORY again.
4 Complete the manual preset.
#
- You can preset up to 30 FM stations.
- You can delete a preset station by pressing FUNCTION MENU / Center to select PRESET DELETE.
Note
When you perform the auto preset, all stored stations are cleared and the new stations are stored.
Selecting preset radio stations (Preset tuning)
Select the preset radio station in FM mode.

中
You can also use on the top of the unit.
Receiving Radio Data System stations
■Selecting stations by program type
1 While receiving FM, select PTY SEEK from the FUNCTION menu.
2 Select a program type.

3 Initiate scan.
Available program types
| Program type Descriptions | |
| News | News |
| Current Affairs | Current Affairs |
| Information | Information |
| Sport | Sport |
| Education | Education |
| Drama | Drama |
| Cultures | Culture |
| Science | Science |
| Varied Speech | Varied |
| Pop Music | Pop Music |
| Rock Music | Rock Music |
| Easy Listening | Easy Listening Music |
| Light Classics M | Light Classical Music |
| Serious Classics | Serious Classical Music |
| Other Music | Other Music |
Switching the information display of Radio Data System
While receiving Radio Data System, switch the information display.

Press repeatedly.
Station name
↓
Program type
↓
Text information related to the station
↓
Current time
↓
Original display
↓
Status display
Note
If the signal transmission of the Radio Data System station is too weak, this unit may not be able to receive Radio Data System information completely. In particular, RT (Radio Text) information uses a lot of bandwidth, so it may be less available compared to other types of information.
Adjusting the time automatically
This function sets the clock automatically based on RDS information.
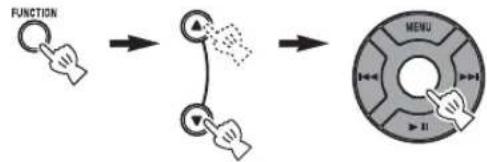
1 While receiving FM, select AUTO CLOCK from the FUNCTION menu.

2 Select and set the desired setting.
Note
The clock information may differ depending on the received station.
TROUBLESHOOTING
In case of a problem with the unit, check the following list first. If you cannot solve your problem with the suggested solutions or if your problem is not listed below, turn off and unplug the unit, and consult the nearest authorized Yamaha dealer or service center.
General
| Problem Cause Solution | |
| The system turns on but immediately shuts off. | The power cable may be connected improperly. Make sure the power cable is plugged into the wall outlet firmly. |
| The unit may have received a strong electrical shock such as lightning or excessive static electricity. Set the system to off, and disconnect the power cable. Wait about 30 seconds,reconnect the power cable,and turn on the system. | |
| The speakers make no sound. | The volume may be set to the minimum level. Adjust the volume level (P.9). |
| The mute function may be on. Cancel the mute function (P.9). | |
| The source may be incorrect. Select the correct source (P.9). | |
| The disc loaded into the unit may not be compatible. Use a disc supported by the unit (P.20). | |
| Sound suddenly turns off. | The sleep timer (P.8) may be set. Turn on the system and play the source again. |
| The unit does not operate properly. | The unit may have received a strong electrical shock such as lightning or excessive static electricity, or power supply may have dropped. Set the system to off, and disconnect the power cable. Wait about 30 seconds,reconnect the power cable,and turn on the system. |
| A digital or high-frequency equipment produces noises. | The unit may be placed too close to the digital or high-frequency equipment. Place the unit farther away from the equipment. |
| The clock setting has been cleared. | The unit is left more than one week after you disconnect the power cable from the wall outlet. Plug the power cable into the wall outlet firmly, and set the clock again (P.4). |
iPodTM
| Problem Cause Solution | |
| “iPod Connect Error” appears on the front panel display. | There is a problem with communication between the unit and your iPod. |
| The iPod does not charge up. | The iPod is set in the iPod dock improperly. |
| “iPod Not Connected” appears on the front panel display after you set the iPod. | Remove the iPod from the unit, then set it in the iPod dock again. |
| The iPod makes no sound. | |
| The iPod sounds, but you cannot operate it with the unit or the remote control. | |
| You cannot operate from the iPod. | LIST DISP is set to F.PANEL. Set LIST DISP to iPod from the FUNCTION menu (P.11). |
| The playback information is not displayed on the front panel display. | Only iPod touch, iPod classic, iPod 5 th generation or later, and iPod nano are compatible with the function. |
| “Unknown iPod” appears on the front panel display after you set the iPod. | Only iPod touch, iPod (Click Wheel, including iPod classic), iPod nano and iPod mini are supported. |
Disc playback
| Problem Cause Solution | ||
| Some button operations do not work. | The disc loaded into the unit may not be compatible. | Remove the disc and then check whether the unit supports the disc or not (P. 20). |
| Playback does not start immediately after pressing on the unit or on the remote control. | The disc may be dirty. Wipe the disc clean. | |
| The disc loaded into the unit may not be compatible. | Use a disc supported by the unit (P. 20). | |
| If the unit was moved from a cold to warm place, condensation may have formed on the disc reading lens. | Wait for an hour or two until the unit adjusts to the room temperature, and try again. | |
| “No Disc” appears in the display even though a disc is in the disc tray. | The disc loaded into the unit may not be compatible. | Use a disc supported by the unit (P. 20). |
| The disc may be dirty. Remove the disc and then wipe the disc clean. | ||
| Disc is loaded upside-down. Remove the disc and then load the disc with the labeled side facing up. | ||
USB playback
| Problem Cause Solution | ||
| MP3/WMA file in the USB device does not play. | The USB device is not recognized. Set | the system to off, and turn it on again (P. 4). |
| Disconnect the device while the system is off. Then connect the device again and turn on the system (P. 4). | ||
| Connect an AC adapter if supplied with the device. | ||
| If the solutions above do not resolve the problem, the USB device is not playable on the unit. | Try another USB device. | |
| “USB Over Current” appears on the front panel display. | An incompatible USB device is connected to the unit. | Turn off the system and reconnect the USB device to the unit. If the message appears again, the USB device is not compatible with the unit. |
Radio reception
| Problem Cause Solution | ||
| The preset selecting function does not work. | The preset (memory) may have been erased. | Preset radio stations again (P.14). |
| Too much noise during stereo broadcast. | The FM antenna may be connected improperly. | Make sure the FM antenna is connected properly (P.14). |
| The radio station you selected may be far from your area, or the radio wave reception is weak in your area. | Try manual tuning to improve the signal quality (P.14) or use a multi-channel outdoor antenna. | |
| Even with an outdoor antenna, radio wave reception is weak. (Sound is distorted.) | Multipath reflection or other radio interferences may have occurred. | Change the height, direction, or placement of the antenna. |
Remote control
| Problem Cause Solution | ||
| The remote control does not work properly. | The remote control may be operated outside its operation range. | For information on the remote control operation range, refer to “Using the remote control” (P. 3). |
| The remote control sensor on the unit may be exposed to direct sunlight or lighting (inverted fluorescent lamps). | Change the lighting or orientation of the unit. | |
| The battery may be worn out. Replace the battery with a new one (P. 3). | ||
| There are obstacles between the sensor of the unit and the remote control. | Remove the obstacles. | |
NOTES ON DISCS AND USB DEVICES
Disc information
This unit is designed for use with audio CD, CD-R, and CD-RW. Also, this unit can play back 8 cm (3 inch) compact discs.


*ISO 9660
中
This unit can play back discs bearing any of the logo marks above. A disc logo mark is printed on the disc and the disc jacket.
Notes
- Do not load any other type of disc into this unit. Doing so may damage this unit.
CD-R/RW cannot be played back unless finalized. - Some discs cannot be played back depending on the disc characteristics or recording conditions.
- Do not use any non-standard shaped discs such as a heart-shaped disc.
- Do not use discs with many scratches on their surface.
Handling a disc
- Do not touch the surface of the disc. Hold a disc by its edge (and the center hole).
- Do not leave a disc in the disc tray when not playing.
- Do not use a pencil or pointed marker to write on the disc.
- Do not put a tape, seal, glue, etc., on a disc.
- Do not use a protective cover to prevent scratches.
- Do not use a disc that has a printable surface using a commercially available label printer.
- Do not insert more than one disc into the disc slot at one time. This can cause damage to both this unit and the discs.
- When you listen to an 8 cm disc, insert the disc without using an 8-cm adapter.
- Do not insert any foreign objects into the disc slot.
- Do not insert a cracked, warped, or glued disc.

- Do not expose a disc to direct sunlight, high temperature, high humidity, or a lot of dust.
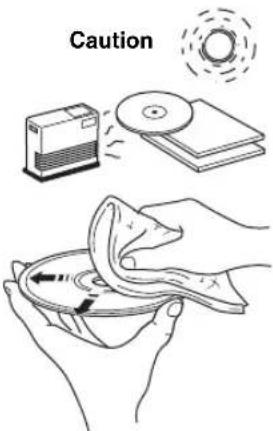
- If a disc becomes dirty, wipe it with a clean, dry cloth from the center out to the edge. Do not use record cleaner or paint thinner.
- To avoid malfunction, do not use a commercially available lens cleaner.
About MP3 or WMA files
You can play back MP3 or WMA files recorded on your CD-R, CD-RW, or USB device.Folders are regarded as albums and files are regarded as tracks. Folder hierarchy is disregarded.
Notes
The unit can play back:
- MP3 files (fs 8-48 kHz, 8-320 kbps and variable bit encoded)
MP3 files (CBR and VBR))
WMA files (fs 22.5-48 kHz, 16-320 kbps and variable bit encoded WMA files (CBR and VBR))
The maximum numbers of files/folders that can be displayed on the unit are as follows.
The maximum file number:
-511 (For data discs)
-9,959 (For USB devices)
The maximum folder number:
255 (For data discs/USB devices)
The maximum file number in a folder:
-511 (For data discs)
-255 (For USB devices)
- If the USB device is partitioned, only the first partition is displayed.
- Some files may not work properly depending on the USB device specification.
Copyright-protected files cannot be played back. - Folder numbers are allocated automatically.
GLOSSARY
MP3 (MPEG Audio Layer-3)
One of the audio compression methods used by MPEG. It employs an irreversible compression method, which achieves a high compression rate by thinning out the data of hardly audible part to human ears. It is said to be capable of compressing the data quantity by about 1/11 (128 kbps) while maintaining a similar audio quality to a music CD.
■WMA (Windows Media Audio)
An audio compression method developed by Microsoft Corporation. It employs an irreversible compression method, which achieves a high compression rate by thinning out the data of hardly audible part to human ears. It is said to be capable of compressing the data quantity by about 1/22 (64 kbps) while maintaining a similar audio quality to a music CD.
■PCM (Pulse Code Modulation)
A signal that is changed to digital format without compression. A CD is recorded with 16-bit sound at 44.1kHz
Track
A CD can be divided into a number of segments (tracks). Each division is called a track number.
SPECIFICATIONS
■PLAYER SECTION
iPod
- Supported iPod...... iPod touch, iPod (Click Wheel including iPod classic), iPod nano, iPod mini
CD
Media CD, CD-R/RW
Audio format.. Audio CD, MP3, WMA
USB
Audio format.. MP3, WMA
■AMPLIFIER SECTION
Minimum RMS output power per channel. 15 W + 15 W (6 Ω 1 kHz, 10% THD)
- Driver unit. 8 cm (3") full-range driver × 2
TUNER SECTION
Tuning range U.S.A.model. 87.50 to 107.90 MHz Other models.. 87.50 to 108.00 MHz
GENERAL
Power Supply U.S.A.model.. AC 120 V,60 Hz Other models..AC 110 to 120/220 to 240V 50 / 60Hz
Power consumption 20 W
- Standby Power consumption. 1.0 W or less
- Dimensions (W × H × D) 350 × 120 × 240 mm (13 3/4 × 4 3/4 × 9 7/16 in)
Weight. 4.0 kg (8 lbs 13 oz)
Specifications are subject to change without notice.
iPodTM
"iPod" is a trademark of Apple, Inc., registered in the U.S. and other countries.
"Made for iPod" means that an electronic accessory has been designed to connect specifically to iPod and has been certified by the developer to meet Apple performance standards.
Apple is not responsible for the operation of this device or its compliance with safety and regulatory standards.
Limited Guarantee for European Economic Area (EEA) and Switzerland
Thank you for having chosen a Yamaha product. In the unlikely event that your Yamaha product needs guarantee service, please contact the dealer from whom it was purchased. If you experience any difficulty, please contact Yamaha representative office in your country. You can find full details on our website (http://www.yamaha-hifi.com/ or http://www.yamaha-uk.com/ for U.K. resident).
The product is guaranteed to be free from defects in workmanship or materials for a period of two years from the date of the original purchase. Yamaha undertakes, subject to the conditions listed below, to have the faulty product or any part(s) repaired, or replaced at Yamaha's discretion, without any charge for parts or labour. Yamaha reserves the right to replace a product with that of a similar kind and/or value and condition, where a model has been discontinued or is considered uneconomic to repair.
Conditions
- The original invoice or sales receipt (showing date of purchase, product code and dealer's name) MUST accompany the defective product, along with a statement detailing the fault. In the absence of this clear proof of purchase, Yamaha reserves the right to refuse to provide free of charge service and the product may be returned at the customer's expense.
- The product MUST have been purchased from an AUTHORISED Yamaha dealer within the European Economic Area (EEA) or Switzerland.
- The product must not have been the subject of any modifications or alterations, unless authorised in writing by Yamaha.
- The following are excluded from this guarantee:
a. Periodic maintenance and repair or replacement of parts due to normal wear and tear.
b. Damage resulting from:
(1) Repairs performed by the customer himself or by an unauthorised third party.
(2) Inadequate packaging or mishandling, when the product is in transit from the customer. Please note that it is the customer's responsibility to ensure the product is adequately packaged when returning the product for repair.
(3) Misuse, including but not limited to (a) failure to use the product for its normal purpose or in accordance with Yamaha's instructions on the proper use, maintenance and storage, and (b) installation or use of the product in a manner inconsistent with the technical or safety standards in force in the country where it is used.
(4) Accidents, lightning, water, fire, improper ventilation, battery leakage or any cause beyond Yamaha's control.
(5) Defects of the system into which this product is incorporated and/or incompatibility with third party products.
(6) Use of a product imported into the EEA and/or Switzerland, not by Yamaha, where that product does not conform to the technical or safety standards of the country of use and/or to the standard specification of a product sold by Yamaha in the EEA and/or Switzerland.
(7) Non AV (Audio Visual) related products.
(Products subject to "Yamaha AV Guarantee Statement" are defined in our website at http://www.yamaha-hifi.com/ or http://www.yamaha-uk.com/ for U.K. resident.)
- Where the guarantee differs between the country of purchase and the country of use of the product, the guarantee of the country of use shall apply.
- Yamaha may not be held responsible for any losses or damages, whether direct, consequential or otherwise, save for the repair or replacement of the product.
- Please backup any custom settings or data, as Yamaha may not be held responsible for any alteration or loss to such settings or data.
- This guarantee does not affect the consumer's statutory rights under applicable national laws in force or the consumer's rights against the dealer arising from their sales/purchase contract.
Information for Users on Collection and Disposal of Old Equipment and Used Batteries

13/14
These symbols on the products, packaging, and/or accompanying documents mean that used electrical and electronic products and batteries should not be mixed with general household waste.
For proper treatment, recovery and recycling of old products and used batteries, please take them to applicable collection points, in accordance with your national legislation and the Directives 2002/96/EC and 2006/66/EC.

By disposing of these products and batteries correctly, you will help to save valuable resources and prevent any potential negative effects on human health and the environment which could otherwise arise from inappropriate waste handling.

Pb
For more information about collection and recycling of old products and batteries, please contact your local municipality, your waste disposal service or the point of sale where you purchased the items.
[Information on Disposal in other Countries outside the European Union]
These symbols are only valid in the European Union. If you wish to discard these items, please contact your local authorities or dealer and ask for the correct method of disposal.
Note for the battery symbol (bottom two symbol examples):
This symbol might be used in combination with a chemical symbol. In this case it complies with the requirement set by the Directive for the chemical involved.
Miscous/hors tension. 4
La lecture commence.


Centre: Confirmation.
La lecture commence.

La lecture commence.

Remarque
Supports. CD, CD-R/RW
- Format audio. CD audio, MP3, WMA
USB
- Format audio. MP3, WMA
■SECTION AMPLIFICATEUR
-511 (for datakivor)
-9959 (for USB-enheter)
Maximalt mappnummer:
-255 (for dataskivor/USB-enheter)
Maximal filnummer i en mapp:
-511 (for datakivor)
-255 (for USB-enheter)
JaHHOC yCTPOHCTBO COIEcKHT JIA3cp. H3-3a OIIaHOCTH TpaMBI FJIa3, CHMaTb KpbIHKy HIN OBcJyXHBaTb JaHHOC yCTPOHCTBO JOIKeH ToJIbKO cEPTHHHPoBaHHIO6cJyXHBaIOHN HePCoHaJI.
ONACHOCTb
JaHHoe yctpoCTBO BOTKpIbTOM COCTOHH H3JIyAeT BHINMbIe Ja3epHbIe JyH. He JOnyckaIte HeIOcpeJCTBEHORO Bo3JeCTBnHaJ3epHbIX JyueH Ha Tla3a. KOrJa DaHHoe YcTPOCTBO IIOJIKJIOUeHO K PO3eTE, He INp6JIHKaIe Tla3a K OTBePCTHO JOTKa JIDCKa HpyTMOTBepCTHM, H He CMOTPHTE BHYTp bAIIIapaTa.
Ja3epHbI KOMIOHeHT JaHHOrO H3JeJIH MoKcT BbIeJIaTb paHaIIO, IIpeBbIIaIOuIyO OrpaHHYeHHbI ypOBeHb paJNaIuI JIa KJaCCa 1.
JI3EP
TINI PIIJYHPOBOIDIKOBBIJI Na3ep GaAS/GaAlAs
JIINHABOJIHBI780HM
BbIXOHaMAOHHocTb10MBT
PacxoxKHeHnE npUka 60 rpaIycob
PNEyPPEKDEHNE
EcHbTaapeKa HeIpaBnIbHO 3aMeHeHa,ecb OIaHocTb B3pbBa. 3aMCHTE cToJIbKO HA TakyIO Kc HIN EKBBBAJIeHTHyIO bTapeKy.
YxOa 3a annapaTOM
PpHcM paJIOCTaHnC cnHaJOM cHCTeMbpaJHOaHHbIX. 15
DONOHHTJEHAR MHOPMALNA
BO3MOXKHbIE HENCIPABHOCTN
CIOCOBbI INYCTPAHEHn17
06nne 17
iPodTM 18
Bocippon3BeJeHHe Hncka 18
Bocpon3BcHHe yctpoIcTBA USB. 19
PaHnoHpHem. 19
Iy 19
IIIPIMEUAHNAO DnCKAXN
YCTPOICTBAX USB 20
Hckobaa HhOpMaunna 20
O6paIeIHc c IINCKOM 20
O faiaax MP3 n WMA. 20
TJIOCCAPNI 21
TEXHINUeCKHEXAPAKTEPHCTHKU...21
06 3tOM pyKOBoDCTBe
B 3TOM pyKOBOCTBE OIepaHH, KOToPbIE BbIOJIHHOTc c HOMOIIIO KHOIOK 3TOrO aHIIapata HIN HUY, o6bIcHIOITc Ha IIpHMepe KHOIOK aHIIapata.
CHMBOJI "prrom c HOMepom (HomepaH) ctpaHHIO6O3HaayeT COOTBeTCTBYIOIne ctpaHHIIJI CHPaBKn.
- IpiHMeaHn coIepKaat BaXHyO IHΦOpMaunIO 6e3OnaChocTH H NHCtpyKunn IO 9KcIIyatauHN. 06o3Haayet COBET NO NOBOy ONEpaunn.
-TO pyKOBOCTBO OTHeaTaHO Do IPOH3BOJCTBa aHaapaTa. KOHcTpkyuHa N TeXnueckne XapaKTePncTHKn MOryT 6bITb YactHNO H3MeHeHb B pe3yJIbTaTe yCOBepIeHCTBOBaHH N T.I. B Clyuae pa3JInm MeKJpyKOBOCTBOM n aHaapaTOM IIpHOpHTET HMeet aHaapat.
Ppnilaraemble akceccyapbl
CJeIyIOIIe aKccccyapb I BXoJrT B KOMJIeKT IOCTaBKn aIIIapata. Y6eIHTecb TOM, YTO K aIIIapaty IIpHJaIarOITcBce IIpeIcTAbJIeHHbIe HIXe KOMIOHOHTbl.
Nybld
KomhaHa FM-aHTeHHa

HCTpyKU no 3Knnyatau
ПОДГOTOBКИСПОЛБ3OBAHMIO DAHHORO ANIAPATA


① Khonkn nonka: USB, CD, FM, iPod (ctp. 9)
②ON/OFF:BkIIOueHHe/BbIKIOueHHe CnCTEmbl (cTp.4)
③VOLUME: KhoNk ynpaBnHn rpoMkoCTbO (cTp.9)
④ KhoNKn ynpaBneHn BocnpOn3BeDeHnem (cTp.9)
⑤ДOK-CTAHUNI iPod(cTp.10)
⑥ NopT USB (wCtp. 13)
⑦OPEN/CLOSE :kpblte/3akpbltne IOTka ncka (ctp.12)
⑧ KhoNKn ynpaBneHn CnHaNoM (Uc Tp. 5)
SNOOZE/SLEEP (c7 7,8)
10KoNoHKn
⑪ItoK DnCKa (CTp.12)
12 DnCnnei nepednei nane (cTp.4)
③Kpo3eTke
14 KhoNKn ynpaBneHn FM (cTp. 14)
15CLOCK SET (u3ctp.4)
FUNCTION
17 DISPLAY (tp. 11, 12, 13)
FOLDER ▲/▼ (c#r ctp.9)
DSP: nepeknoeHne B pexMM DSP (cTp.8)
10 PepeaTnK nHpaKaPaChbIX CnHaNoB (CtP.3)
SLEEP: yctaHOBKa BpeMeHH Do nepexOda B peXMM OxuaHn (cTp.8)
22 MENU ▲/▼ /LeHTpaIbHbI KaHaI * (cTp.10)
23 RANDOM/REPEAT: nepexoB oOINn 3 peKIMOB Bocpon3BeHnA: iPod/CD/USB (10, 12)
*KHOIIKA OKpyrJIOI QOpMbI B IeHTpe B JaHIOm pyKOBOJICTBE Ha3bIABaETcIeHTpaJIbHbIKaHaJI.
■Ipeed nCNoB3OBAHnem nylbTa D

①IpeepnncnoB3oBAHHeMnybTaDy ydaNITe N3OJNUOHHyIO BKnaAky.
②IpeepnObn3oBaHnemnybTaYydaJIte npo3paHyIO nneKky.
IcnoJb3ObaHne npJbTa Dv
IcnoJb3yIte nyIbT yHa paacctOHHn 6 M ot annapata n HapabJIaIte ero Ha daTynK y.
PnmuMeaHn
He npoIbBaIte KnIkoCTb Ha IyIbT IY.
-He poHnIte npJIbT IV.
He octabJIaIe IIyIbT IY BCJeIyIOIIHX MeCTax:
- KapKHX HIN BJaXHbIX, HAIpHMep, B BaHHoH HIN BO3Ic 06OrpeBaTeJIa
-0YEHbXOJIOJIHHIX MecTaX
-B3aIIbJIeHHbIX MecTaX
3aMeHa 6aTapeB nylbTe Dy
Pn yMeHbIeHH pa6oOerno hnaa30Ha npJbTa Y 3aMeHHTe 6aTapeKy.
Yto6bI CHaTb KpbIuKy, HcnoJb3yTe npamyio uHnIbky.

3aMeHnTe 6aTapeKky Ha HOByIO 6aTapeKky CR2025.
3aKpOTe KpbIkwKy.
PnmeuHn
BCTaBBTe 6aTapeKy,co6IOJAAIIOJIAPHocTb(+N-).
EcHb6aTapeKa pa3pRnJIacb, HeMeJHeHNO H3BJeKHTe ee H3 IIy JpyIpeOTBpaIeHHN B3pbBa HIN yTeQKN KHCIOBTbl.
- EcIIb 6aTaapeKa HauJIH IIpoTeKaTb, HEmeJIeHHO yTHJIN3HpyHTe ee. Co6JIIOaIte octopoKHOCTb, YTO6bIKNCIOta, BITREKAIOIHg I3 6aTaapeKn, He IIHJIaHa KOKy IIN OJeKJy.
-NepeyctahOBKoHOBOB6aTapeKNuTaTeJbHoIpoTpHrTeOTJeHeHneJaBaTapeKn.
BaTapeHKn CJIeIyET yTHJIN3HPOBaTB B COOTBeTcTBHH C MeCtHBIMH HopMaMH.
BkHIOyehne/BbIKHIOyehne CnCTeMbI
1BcTaBbTe Ka6eIb NHTaHnB po3eTKy.
2HaXmTe KhoNky ON/OFF, YTo6bl BKNIOHTb CnCTemy.
PnB BKIOHcNCTeMbI OTo6paXaETcH "Hello", a 3aTEM Yacbl Npyra HOpMaun.

Ppimep: oTo6paKeHHe peKHMa BOcIPoH3BcEHH iPod
Pn OTKIOUeHnn CNTembl OTO6paxaETCA "Good-bye", nocne yero 6ydt OTo6paxaTbcra TOnbko HOpmaun o DaTe N BpeMeHH.

#
3TOT aHapar HmeeT cyHKnIO aBROMaTHueCKORO OTKIOHeHIA, KOTOPa IIO3BOJAE T aBOMaTHueCKI BbIKIOHaTB ChCTeMy, ecIN OHA ocTaETcBA KIIIOyeHHoB TeueHne 1 yaca 6e3 BOcIPON3BeJeHHra HIN BBIOJIHeHHa KaHX-JIHO npyTHx oepaH. DaHHa cyHKnIH HeIOCTyHHa, ecIN B KaueCTBE hCTOHHka yctAHOBJIeHO FM.
JIIEPCBOJa CnCTeMb IB pexHM OxHJAAHH HAXMITE H yIepKHBaHTe KHOIKy ON/OFF B BepXHei YacTH ycTPOIcTBa Ic MeHec 3 cckyH. IB pcXHMc OxHJAAHH HaHCIIJIe IcpeHcH IIaHcHIOTo6paKaCTc H BCn HHΦopMaHr. IIpH OTOM IOTpE6JIaEMa MOIHOCb CHJKAeTc. YTO6bI BBHTN H3 pcXHMA OxHJAAHH, HAKMITE KHOIKY ON/OFF.
JaKe cCIn ChCTeMa BbIKIOUCha/HaxOHTcB PceJHMc OXHaHH,dyHKIN CHHaJIOB OCtAEcTcIocTyHoi.
-Pe3epBnA IeIb IaMHTIpeDtBpaaaet IIOTePio coXpHaHeHHbIX JaHHbIX, TaKHX KaK HAcTPOHKa BpeMeHH, IaKe ecJIN ChCTema BBIKJIIOyeHa/HaxOHTcR B peKHMe OKNIIaHH.
Hactpoika yacob
YacbI He HactpaHbaIOTcHa 3aBOJe.

1HaXMMTe KHonky CLOCK SET.

2BbI6epnte KaKdIbnnapaMeTp c NOMOuKHOHONK MENU △/N I NOdTBePnTe BbI6Op,HaXaB KHonky LcHTpaJIbHbI KaHaJ.
YcraHOBHTc 3HaueHnna JYear MONTH DAY TIME.
PnmuMeaHn
3Ty OIepaHIO MOXHO BbHIOJIHTb TOJIbKO C IOMOIIbKO IIyJbTa JnCTAHIOHIOIoro yIpaBICHH.
3HaueHHe BpeMeHH OTO6paXkaeTcBΦopMaTe 12-1acOB (AM/PM) B 3aBHCMOCTH OT MOJIeHN. HAnpHmep: "4:00PM".
TTo6bI IcpeKJIIOuATb fOpMaTbI BpcMeHH 12 YacOB/ 24 Yaca, HaxMMTe KHOIIKN FUNCTION MENU ▲/→ UeHTpaIbHbI KaHaJ IIaBbOpa TIIME FORMAT, 3aTeM HaXMMTe KHOIIKN MENU ▲/→ UeHTpaIbHbI KaHaJ IIaBbOpa 12H/24H.
IapametpbBpeMeHH 6yUyt yTepeHbI Hepe3 HeeJIIO IOcJIe OTKIOUeyHn Ka6JIa IIHTAHn OTOPETKN.
MCNOJIb3OBAHME NOJIe3HbIX ΦYHKUIM
HcnoJb30BaHne yHKnCURHaJa
3TOT aHapat HMeet IBOHyIO fHyHKIIO cHHaJa. KaKIOc BpemCnHaja BceIa OTObpaXaETcN C npABoJIcBOB CTOpOHbI YacOB Ha INCHIIeC NpeJHei HAnHeJI. Ppi BKIOUChHH fHyHKIN CNHaja 3aropTc HnIKaTOP cHHaJa H Bpem. Ha cHHaJI MOxHO yCTaHOBHTb pa3HNHyIO My3bIKy, KOTOPa IIPOCSlyHBAeTcB BO Bpem HAcTPOHKn.
PnmuMeaHne
3Ty OIepaHIO MOXHO BbIIOJIHTb TOJIbKO C IIMOIIbIO KHOIOK Ha BcpxHeuactn aIIapata.

Hactpoika BpeMeHn 3Byka cnHaJa
PnmeaHne
JIgOTMeHbI HAcTPOKNKfYHKINCNrHaJl BO BpeMa BbIOJIHeHHN OIEpaNN HaKMHTe KHOIKy SETUP1/ SETUP2.CnHaJI He 6yJeT yCraHOBJieH.
1HaçaJo hacrpoiKn ALARM1/ ALARM2.
Ipn Heo6xOJHMOCTn yCTaHOBKn cnHaJa ALARM1 BbI6epHTe SETUP1,aJIa ALARM2 BbI6epHTe SETUP2.

2yctaHOBNTe BpeMa CnHaJa.
① Pn ycTaHOBKe FyHKuH CNHaJa 6yIeT Mrratb HHHKaTOP CnHaJa.
②Kpome TOrO,6yTeT MmraTb BbIbHpaEmbI 9JIeMeHT.
③MeTka>c npaBOcTOPOHBIO3HaHaeT,TOHaIpyTHX 3KpaHAX IMeOTcN I pyTHe 3JIeMeHTbIMEHIO.IIpaepxoJa K HAcTpoiKeCJIeNyIOSeIgO 3JIeMeHTa MeHIO HaKMITEKNOHKy ENTER.
3BbI6epnte n yctaHOBNTe 3HaueHnA IYr TYPE BEEP SOURCE VOLUME.
① IIOcJIe yCTaHOBKn BpeMeHn CnHaJaBBI6epHTe TnCnHaJa: BEEP/ BEEP+MUSIC/MUSIC.
-BEEP:TOJbKO3ByKOBOcHnHaI
-BEEP+MUSIC:3BykoBoi cHHaJI mMy3bIka H3 Bbl6paHHOro HcTOuHNKa BXoJHO rCnHaJa,iPod/FM/CD/USB
-MUSIC:ToJbKOmy3bIka
Ipy yctaHOBKe IJI npaMeTp a TYPE 3NaueHnBEEP+MUSIC MoXHo BOCIIPOIN3BeCTn Heo6xOJIMyIO My3bIKy C HcTOUHNKa BXoJHOrO cHrHaJIa (iPod/FM/CD/ USB) n 3ByKOBoI cHrHaJI OJHOBpEmcHNO B ycTaHOBJeHHoc BpeM. YpoBcHb rPOMKoCTn IOBbIIaETcNIOCTeJIeHIO IJIa oEcecJeHn KOMΦOpTHoro IIpo6yJdeHn, IocJIeYeRO B ycTaHOBJeHHoe BpeMa pa3Jaetc 3ByKOBOI cHrHaJI.

②BbI6epHTe TIN 3ByKOBOrO CnHaJa.
B aIIIapaTe xpaHHTc7 5 pa3JIHbIX TINOB 3BYKOBbIX CHHaJIIOB.
Пи Вьборе MUSIC/BEEP+MUSIC Bшare
① ekpanBEEPaBTOMaTHueckn nponyckaactc.
中
EcnBb6paH 3BykoBo CHrHaI, eO MOKHO IpeBaPHTeJIbHO IIPOcIyIHaTb, HaxkAB KHOIIKy
SNOOZE/SLEEP. TTo6bIOCTaHOBHTb
BOcIIPOH3BeJeHHe 3ByKOBOrO cHrHaJa,CHOBa HaKMHTe KHOIky SNOOZE/SLEEP.

③Bb6epHTe OINH N3 HCTOHNKOB My3bIKN: iPod/FM/CD/USB nIN LAST SET.

PnBbIbOpc BEEP B mare ①KpaH SOURCE nponyckaetraTOMaTHueKn.
iPod
MOxHO BbIbpaTb PLAYLIST HIN RESUME PLAY.
Bocpon3BeHHe My3bIKn HauHHeTc c HauJa CnHcKa Bocpon3BeHHe. Ipei BbIOJIHeHem 3ToI ONepaHn CO3JaHTe CINCOK BOCpon3BeHHeHa HCIOJIb3YeMOM iPod (r. crp.7).
Bb6epntuHaCTpOHTe PLAYLIST.


Bb6epntu Hacptpoite Heo6xOumbI CNcOK Bocppon3BeDeHn.

Bb6epHte H hactpoHTe RESUME PLAY, ecHN Heo6XoHMO IPOJIOJIKHTb BOCIIPOH3BEJeHHe My3bIKN, KOTOPa HrpaJa IIocJIeHN pa3 B KaueCTBe 3ByKa cnHaJa.

CD
Ayno CD: BbI6epHte Hmep OHOrpaMMbl.
MP3/WMA CD: BbI6epHTe HOMep IaIKn. BocIpOn3BBeJeHHe My3bIKn HaUHeTc a BbI6paHHoN IaIKn (cTp.20).
USB(paJIbI MP3/WMA)
BbI6epHrE HOMeP IaIKn. BocIpOn3BeJeHHe My3bIKn HaHHeTc C BbI6paHHoI IaIKN (cTp.20).
FM
YcTaHOBHTe HOMep IIpeIbapHTeJIbHOHaCTPOK/HaCTOTbl.
LAST SET
CoxpaHHTe IIOcJIeIHIOU BbI6paHHyIO HacTpOyK.
PnmeaHne
EcH Iapametp SOURCE He HactpoeH IOJIHOCTbIO Hn He yctAHOBJIeHO yCTPOHCTBO BOCIIPOH3BEJHH My3bIK, 6yET 3ByaTb 3BYKOBO CHHaJI. HaIPmep, ecH anHaIapat He MoKet IIPOHTaTB JaHHBe Ha iPod, 6yET 3ByaTb 3BYKOBO CHHaJI.
④YCTAHOBHTC rPOMKOCtB cHTHaJa.
YCTAHOBHTe rPOMKoCTb B IIIare ④ C IIMOIOIbIO KHOIIKN ENTER, NocJIe Yero yCTAHOBKa cHrHaJa 6yJeT 3aBepHeHa. JIA cHrHaJa yCTaHOBJEHO ABTOMATNIECKOE cpaTaIBaHHe.

■BkJIIOueHne/BBIKJIIOueHneФyHKUcN CnHaJa
BkIOHTb/BbIKIOHTb cyHKIOHO cHHaJa MOxHO c HOMOIO KHOIOK ALARM1/ALARM2, OHaKO IIpn BbIOJIHeHHN 3THX OIIepaHn HaCTpOKn CHHaJa He 6yUyt ydaJIeHbI.
BkIIOueHne/BbIKJIIOueHne yHKcnn cnHaJa.

Pn BkIOueHnn fynKuIN CNHaJa 3aropTcN HIKaTOP CnHaJa N BpeM.
IcnoJb3OBAHne yHKuIN NOBTOpeHnCnHaJa
IIpnBocnpOn3BeJeHH 3ByKOBOrO cHrHaJa,My3bIKI HINHX OJHOBPemEHOM BOCpON3BeJeHH MOKHO HCIOJIb3OBaTb FyHKnIO IOBTOpeHH cHrHaJa.
BkIIOUeHne cyHKcNn NOBTOpeHn cRHaHa.

IapamctpbI cyHKiH MOryT pa3JInuatbC B 3aBnHMOCTH OT TIIa CnHaJa, yCTaHOBJeHHORO B TYPE (cTp.5).
BEEP: IIpi HaKaTHN KHOIIKN SNOOZE/SLEEP 3ByK cnHaJII IpeKpaIaEeT 3ByuAtb N BO3O6HOBJIeTCype3 5 MNHyT.
MUSIC: IIpH HauKaTHN KHOIIKN SNOOZE/SLEEP BOCIIPOH3BeIeHHe My3bIKH IIpeKpaIaETcH I BO306HOBJIaTeTcA Hepe3 5 MHHyT.
BEEP+MUSIC: npn haKaTHN KHOIIKN SNOOZE/ SLEEP 3ByK cnHaJa H BOCIIPOH3BeJeHHe My3bIKn IIpeKpaIaIOTcA. 3ByK cnHaJa BO3O6HOBJAE TcA Hepe3 5 MHHyT.
Kpome KhoiKn SNOOZE/SLEEP Ha ycTpoIcTbc, cyHKHIO np6yKJeHHN OTO CHa MOXHO TaKKe YcTaHOBHTb, HxKaB KhoiKy SLEEP Ha IIyJIbTe INCTaHIOHHO ynpabJeHHN.
IpekpaueHne 3ByaHnCnHaJa
Moxho IpeKpaTHTb 3ByaHHe cHrHaJa
3cJeIyIOIMN cNoCobAmn.
PiH IpeKpaIeHHN 3ByaHna CnHaJa cHCTema
OTKJIIOuAeTcra.
Haxmnte Khonky ALARM1/ALARM2.

HaxmTe KhoNky ON/OFF.

Haxmnte u ydepknbaiTe KhONky SNOOZE/SLEEP B TeueHne 2 ceKyhd.

EeHHe IpeKpaHTb 3ByaHaHne cHrHaJa, OH ABTomatnueckn HepectaHcT 3ByaTaHpe360MHyT.
-ECIN OTKJIOHTB CHHAAJI, HHHKAToP CHHJa Hcye3HeT. TTO6bI CHOBA BKJIOHTB cyHKnIO cpa6aTBaHHa CHHaJa, HAXMITE KHOIKY ALARM1/ALARM2.
-ECIN BbIKIOHTB cHHaJI,TO IJIy yIO6CTBa HcIOJIb3OBAHH HaCTpoKa BpEmHH nIpyrnc yCTAHOBKN 6yUYT coXpaHeHbI.
PpmeaHne
Bce npyrhe onepaHn, Kpome yctaHOBN 0yHKnn IIO6yKJENH N OTO CHA, BBIKIOUcHHe 3ByKOBOrO cHHaJa HIN pcrYJINPOBKN yPONBn rPOMKoCTn, He 6yUT IOCTYINbI IIpn BOCIPON3BeJEHN 3BYKOBOrO cHHaJa.
O cnckax Bocnpn3BedeHna
MoKHO CO6paTb IIO6HMbIe KOMIO3HcHnB 6N6JInOTeKy Ha iPod n CneJIaTb Hx CINcOK. 3To HA3bIBaEcTcCnCKOM BOCIpON3BeJeHn. IIpn BBIOpe CnCKa BOCIpON3BeJeHn 6yIeT BbIOJIHeHo BOCIpON3BeJeHn KOMIO3HcHn 3TOrO CnHcKa. JdXe IIpn YdaJIeHn KOMIO3HcHn H3 CINcKa BOCIpON3BeJeHn OHa Hc 6yIeT yJaJIeHa H3 6N6JInOTeKn.
IJIIOJYueHHNIOJOHNHTeJIbHOH HΦopMaHHO CINCKAX BOCIHPOHN3BcEDHHN CM. pyKOBOIDCTBO IOJIb3OBaTcIa iPod.
Hactpoika pexima oxndaHna
MOxH0 3aJaTb aBROMaTHueCKoe OTKIOUeHHe cnCTeMbI B Ha3HaueHHoe BpeM.
Bb6op BpeMeHn nepexoJa cncTeMbI BpeKIM OXnDaHn.
EeHN BKJIIOyeHa cyHKnna IepexoJa cncTeMbIB peKIM OKnlaHn, 3aIopntc SLEEP.
中
MOxHO TaKHe HcHIOJIb3OBaTb 3Ty fYHKINIO, HaXaB KHOIIKy SLEEP Ha IIyJIbTe IY.
Hactpoika pexima peryjatopa apkoctn
I3meHHe npKocTn nncIIe IpeDHe IIaHeJIn.
Pn yctahOBKe IJI npapmctpa DIMMER 3haueHHAUTO peryJITOP npKocTH HAcTpanBaCTcABTOMaTHUeCKN B 3aBHCIMOCTH OT npKocTHIOMeHIIH. EJIIN B IOMeHIIH N TeMHO, IIpeJIHIAHeJIb cTaHET TeMHee.
中
HactpoikKa IIO yMOJIaHaHHo: AUTO.
1BbI6epnTe DIMMER B MeHIO FUNCTION.
Bb6epHTe DIMMER cHOMOIIbIO KHOIIKN
UeHTpaIbHbIKaHa, CJIeBOI CTOpOHbI INcIIIEe
IpeIeHcII HcHIn OTo6pa3HTc<. TTo6bl BcpHyTbcB
MEHIO FUNCTION, HaxMMTe KHOIIky MENu Ha
IIyIbTe IY.
2BbI6epnTe Heo6xOaMbI ypoBeHb npKocTn.
IepeXoB pexM DSP
MOxHO BbI6paTb 3ByuHaHHe B COOTBcTCTBHH C OKpykaIOJIeI cpeIoN HIN NO CBOEmYycMOrTeHHIO.
PepexoBpexIMDSP.

Haxmamte noBtOpHo.
Pn KaKJOM HkaTNN KHOIIKN DSP HaCTpoIKN HepeKJIIOVAOTc CJeIyIOUIM O6pa3OM:
NORMAL: HopmaJIbHoe 3ByaHne
MILD: eCTeCTBeHHoe m MmKoe 3ByaHne
HEAVY: MoUHoe 3ByaHne (HaCTpoiKa no yMoJIuaHnIO)
LIVE: XINGBOE peaJIncTnUHoe 3ByuHne
Bo3BpaT K pexmy NORMAL
OCHOBHOE YINPABJIEHNE


:BbIbOp HxKHOro nCTOHHKa (HaxMMTe Ody N3 KHOJOK nCTOHHKa).*1*2

:HacTpoNka rpoMkoCTn.

:Bocnpoun3BedeHne/nay3a.*2

:OctaHOBKa Bocnpon3BeDHeNr.*2


:PponyckHa3aB/BepeE.

:OTKJIIOUeHne 3Byka.
IINRA BKNIOUeHn3ByKa
HaXMMTe KHONKy eue pa3.

:BbIbOp nankn.*3
*1 JaKe ecIn cHcTeMa BbIKIOHeHa, MOxHO HaaTaB BOCIIPOIN3BeIeHHe HyXHO HO CTOHTHKa, HAZAB OINHY KHOIOK HCTOUIHKa Hc HAxHMaj KHOIKY ON/OFF.
^*2 BocpoOn3BeHeHHe HaHTeTcMaecTa, rIe OHO 6bIO OCTaHOBHeHO IOcJIHN pa3. (KpOe CD/USB, KOTOpBIE BOCipOn3BOJITcC HauJa foHOrpaMMb1, BOCipOn3BOJIMoHIOcJIHN pa3.)
ToIbKOJIA CD/USB:
EcHn HaxaB KHOIky ,KOrHa BocIpOn3BeJeHHe ocTaHO.BeHo, HOpMaIIH JIN BO3O6HOBJEHH 6yTeYJAAJIeHa H B cJeYIOH pa3 BocIpOn3BeJeHHe NaHcTc C HaJa IepBOI pOHpAMMb/paHla.
^*3 ToIbko IINI paIIIOB MP3/WMA, coIepkaIINxca Ha CD n USB.
ПОСЛУШВАНЕ MY3bIKN
Bocnpom3BedeHne C iPodTM
PpmeaHn
-Данньий симатICAL iPod touch, iPod (Click Wheel Bкюяй iPod classic), iPod nano и iPod mini.
-MoKHOOTCOeHHHTbIPodBJIIO6oeBpem.
JIH HeKOTopbIX MoJeIe HIN BepChn IporpaMMHO 06cncueHHiaPd moYr 6bITb HcNOCTyHHbI ONpeJeHHbIe FyHKHII.
06bI4Hoe BOCpOu3BedeHne
1yctaHOBnte iPod Ha DOK-CTaHcHIO iPod.
PnmuMeaHn
IIIAIOKJIIOUeHHN KJAAHOMy aHnnapaty Tpe6yeTcB COBMecTHMbI aJantep JOK-CTaHINH (He IOCTABJYCTc)
iPod, BO3MOXHO, He yIaCTcH aJeXHO yCTaHOHTb Ha JOK-CTaIHIO iPod, ecIN OH HaxOHTcB 3aIHTHOM fYTJIpe.
2BbI6epnte iPod.
HaHTHeTcBOCIPON3BeJeHne

#
HΦopMaHIO o paOte iPod cm. B HcTpkyKIIH NO 3KCHyataaHn iPod.
Bb6op My3bIKn Ha iPod c nomoucbio nyIbTa Dy
YnpabnIb iPod MoKHO TaKKe B TOM cIyue, KOrJa IiPi iPod yTaHOBJIeH npaMeTp LIST DISP (cTp.11).
MENU: BO3BpaT K IIpeIbIyIeMy MeHIO. UHTpaIbHbI KaHaJ: IOITBepXJdeHne
BBIOOP MeHIO HIN 3JIeMeHTOB.
IcnoJb3ObaHne pexnma cmeaHHoro/ NOBTOPHORBOCnppon3BeDeHNA
IocJIe BbIOJIHeHHOINcAHHbIX BbIIIE IaROB 1 H2 MOxHO HCIOJIb3OBaTbpekHM CMeIHaHHORIO IOBTOPHOBOCIPoH3BeJeHHJ.
HaXmnte KhONky RANDOM, YTo6bl BKNIOHTb dIy iPod pexnM BOCpOu3BeDeHnB IpnO3BOJbHOI NocJeDoBaTeJbHOCTN.

Haxmaite noBtOpHo.

PnmeuHne
Pn HIOJIbOBAHH iPod touch BbIbpaTb 3HaueHne ALBUM He ydaCTc.
IpeekIIOUeHne pexnma NOBTOpHOrO BocnpOn3BeDeHn.

■IpeekJIoueHne Iucnpei HΦopMaun O BocnpoN3BeDeHN
IpeeknOuHTe ducnJeB peKm BocnpOn3BeDeHn iPod.

Haxmatae noBtOpHo.
MOxHNO H3MeHnTb OTo6paKaMyIO Ha IInCIIeee HHOpMaIHHo CJeIyIOHM O6pa3OM.
Homek Komno3nH n npoWeJee BpeMa BocnpOn3BeDeHn (HaCTpoNka no yMOnuHaHNO)
Homek Komno3nui n octaBueeec BpeMa BocnpOn3BeDeHn
↓ Ha3BaHne KOMnO3nUu
Mma nCnoHnTeJI
Ha3BaHne anb6Oma
Bo3BpaT K HacTpOKe no yMOnJuHaHnIO
PpMueaHn
JaHHa yHKnna IocTyHnHa IiP iPod touch, iPod classic, iPod 5ro IIOKOJIeHHn HIN 6oJIec IIIO3IHeRo, a TaKKe IiHa iPod nano. OJHaKO JAnke Iprn HcNOJIb3OBaHHN IpeCnCJIeHHbIX MoJeIe N eTa yHKIIH MaXcT 6bITb HeIOCTyHnA B 3aBnCHMoCTn OT BepHH IporpaMMHO o6ecneHnHa iPod.
-Ecnn nHaHpyetc rOcoeHHHT Ka6eHn HnraHn aHa npaTa Ha nnTeBbHn IepHO, H3BJeKHT e iPod ot anapata.
■IpeeknoueHne dncnpe, oTo6paKaUoJero cncocK BocnpOn3BeDeHnA
C NOMOIIbIO LIST DISP MOxHO BbI6paTb iPod HIN IINcIIe IIpeIHeN IaHcJIaI aIIapTa IJIA OTO6paKeHH cIIncKa.

Pnmep: Ecm nIa Iapametpa LIST DISP yctaHOBJeHO 3HaueHHe F.PANEL
EclnI IJIaIapametpa LIST DISP yctaHOBHTb 3HaueHHe iPod, MoKHO TaKKe yIpaBJIaTb OIIepaINM BOCIIPOUN3BeJeHN H OTO6paKaTb cNcOK MeHIO Ha iPod.
HaCtpoIka IIO yMOJIaHIIIO: iPod.
PpmeaHne
EcnI IpaMaTePa LIST DISP yctaHOBJeHO 3HaueHHe F.PANEL, ynpabTb OIeepaunm BOCINPOHN3cENn H OTo6paKaTb CIncoK MeHIO MoKHO ToJIbKO Ha aIIapate. NaHHbc OIeepaunn 6yJET HeIOCTyHHbHa iPod.
1BbI6epnte LIST DISP B MeHIO FUNCTION.


2BbI6epnte iPod/F.PANEL.
Bocnpo3BeHeHne c CD
06bHoe Bocnpn3BedeHne
1OTKpoIte IOTOK DNCKa N BCTaBbTe DNCK.
23akpoTe IOTOK dNcKa.

3BbI6epnte CD.
HaHHeTcB OBCPOn3BeJeIeIe.

Bocnpoun3BeDeHne B cnUaHOM npAek/NOBTOphoe BOCpoun3BeDeHne
IOcJIe BbIIOJIHeHnOIIncAHHbIX BbIiE IIaROB c 1 IIO 3 MOxHO HcIOJIb3OBaTb peXHM ClyuAHIHO IN IOBTOPHOrBOCIIpON3BeJeHn.
IpeekIIOUeHne pexnMa cnyaHoro BocnpOn3BeDeHn.
IpeekIIOUeHne pexnma NOBTOPHORO BocnpOn3BeDeHnA.
EcIN BB6paHHbMy3bKaJIbHbI HCTOHNK COJepKHT NaIKN, MoXHO TaKKe Bb6paTB FOLDER.
IpeekJIOueHne dncnpe HOpMaun O BocnpOn3BedeHN
IpekeIIOUHTe IucnJIeB peXm BocnpOn3BeDeHnA CD.

Haxmaite noBtOpHo.
MOxH0 H3McHHTb OTo6paKaemyo Ha JInCJIeE HINΦopMaIIIO CJEyIouIM 06pa3OM.
Ipoweewe BpemBocnpo3BeDeHnTeKyupei FOHOrpaMMbI (HaCTpoNka No yMOJuaHnIO)
OCTaBWeecBpeMBAocIpOn3BeDeHnTeKyuSei
FOHOHorpaMMbl
06ueBpeMa BocnpOn3BeDeHnA ncka
OcTaBWeecn BpeMa BocnpOn3BeDeHnA DnCKa
Ha3BaHneΦoHOrpaMMbI
MRAHNCNOHNHTeTnA
Ha3BaHne aIb6Oma*2
MmaФaJa*3↓
Bo3BpaT K HacTpOKe no yMoJuaHnIO
*1 ToIbko IJIa IINcKOB Audio CD
^2 ToJIbKO ccJH Ha BbIbpaHHoH FOHOrpAMMe coIEpcKHTcH HΦOpMaIIH
^3 Tôllko JIЯ phaIIOB MP3/WMA, copejkaIIHcxra Ha CD
Bocnpon3BedeHne c yctpoNCTBa USB
PpmeaHne
OTcoeHHHTbycrpoHCTBOUSBMOKHOBJIIO6oeBpeM.
HaHTHeTaBocPOn3BeHHeNc.

PpmeaHne
BpeMaYTeHHMOKeT IpeBbICHTb 30ceKHyB 3aBHCIMOCTH OT KOJIHcCTBa paJIOB/HaIOK.
Bocnpo3BeDeHne B clyaHOM nopAKe/NOBTOphOE BOCpO3BeDeHne
IocJIe BbIOJIHeHHaONcaHHbIX BbIIe IIIarOB 1 H 2 MOKIIIO HCIOJIb3OBAbTppeKM cIyuaHOrO IN IOBTOPHOBOCIIPOUN3BeJeHHA.
BbIOJIHHTe HAcTpOky KaK JIA CD (cE cTp. 12).
IpeeknoueHne nucnpe HnΦopMaun O BocnpOn3BeDeHN

IpeekIIOUHTe IucnJIeB B peKm BocnpOn3BeDeHn USB.

Haxmaite NOBTOPOHO.
MOxHO H3MeHHTb OTo6paKaMyo Ha IuCIIe e HOpMaIHIO CJeIyIOIM O6pa3OM.
PpoeweBpeM BocnpOn3BeDeHnTekyuSei foHOrpaMMbl (HaCtpoNka no yMOJuaHnIO)
Ha3BaHne pOHOrpaMMbI
MRAUCNOHNHTEN
Ha3BaHne aIb6Oma
Mmaa
Bo3BpaT K HacTpOKe no yMoJuaHnIO
*ToIbko ecIN BbIbpaHHbI paHIT coJIepKHT INHΦopMaIIHO
中
При ВOCIPON3BdeHnHnФaIIIOB MP3/WMA cm. pa3JIeJI "ПРIMEYAHN OДИCKAX И YCTPOICTBAX USB" (cTp.20).
A B T O M A T N U C E C K A I p e D a b P u t e J b H a R h a c T p o i k a
1 Haxmnte KhoNky MEMORY u ydepxnBaIte ee 6oJee 2 cekyHd B pexnme FM.

10:30 AUTO PRESET START?
23anyctnte aBTOMaTHueckyIO npedBapntelbHyIO HaCTpOiKy.
PyuHa npeBapnteIbHa HaCTpOJa
1BbINOJIHnTe HAcTpoIky Ha HyxHyIO paIIOCTaHcIIO.
2HaxmTe Khonky MEMORY.

3Bb6op Homep npedBapntelbHon HacTpoKn,Ha KOTOpbl Tpe6yETcB bIIOJHHTb COxpaHeHne.

PnmeaHne
YTo6bI OTMcHHTb pyHyyIO IpeBbApHTcJIbHyIO HAcTPOkny IOBTOpHO HAXMITE KHOIIky MEMORY.
43aBepuTe pyHyIO npedBaPntbHyIO HacTpoiKy.

-MoJHO BbHIOJIHTb IIpeIbAPITeJIbHyIO HAcTpOHy IO 30 cTaHIN FM.
-MoJHO yJaIHTb IpeBapHTeJIbHo HAcTpoEHHyO cTaHnIO,HaXaB FUNCTION MENU ▲/→ UeHTpaJIbHbI KaHaI JIy BbIbopa PRESET DELETE.
PpmeaHne
Pn BbIOJIHeHHaBtOMaTHueckoH HAcTPOKn BCE yCTaHOBJEHHbI paHIOCTaHHH 6yIyt c6poIIeHbI, a BMcTo HIX 6yIYT coXpaHEHbI HOBBie paJINOCtAHHH.
BbI6Op npedBaPnteHbHO NaCTpoEHhbIX padnoctaHcH (NaCTpOJaHa npedBaPnteHbHO NaCTpoEHHyo padnoctaHcHIO)
Bpexime FM BbI6epnte npedbapntelbHo Hactpoehnyipo radnoctaHcIO.


MoxHO TaKKe HcIOJIb3ObaT b KHOIIKn paioIOXeHHbe Ha BepxHe HaneHn anHapara.
PpneM padnoctaHcN C CHrHaIOM CnCTeMbI padnoaHHbIX
Bb6op ctaHn no Tnny nporpaMMbl
1Bo BpeMa npema FM BbIbepuTe PTY SEEK B MeHIO FUNCTION.
2BbI6epnte Tn nporpaMMbl.

33anycntte cKaHnpOBaHne.
DocTyHbIe Tnbl nporpaMM
| Ти пэр代表大会 Onисанne | |
| News | Новости |
| Current Affairs | Tekуше собlitners |
| Information | Информанны |
| Sport | Спорт |
| Education | Овразование |
| Drama | Рад奋试аювки |
| Cultures | Культура |
| Science | Hayka |
| Varied Speech | Разлочны пэр代表大会 |
| Pop Music | Пос-мэыka |
| Rock Music | Рок-мэыka |
| Easy Listening | Летегая мэыka |
| Light Classics M | Летегая кл accrочewska мэыka |
| Serious Classics | Сер bjесни Кл accrочewska мэыka |
| Other Music | Дугные на网络传播人在 мэыки |
IpeeknoueHne OTo6paXaemoHa nucnlee HnΦopMaun npn pnpeme paNocTaun C cnHaIOM CNCTEmb paNODaHHbIX
Pn npneMaopctaHcN CnHaIOM cnCTeMbI paNoDaHHbIX MeHnTe OTo6paKaemyo Ha dncnnee HHOpMaunio.

HaxmMaTe NOBtOHO.
Ha3BaHne cTaHm
↓
Tun nporpammbl
↓
TeKCTOBaHnΦOpMaζη,OTHOCAaAe K CTaHcN
↓
Tekyuee Bpema
↓
HauajbHyi dncnnei
↓
DncnnecoctoHHA
PnmeuHne
EcHn CHHaJI paHIOCTaHIHH C cHrHaTOM cHCTeMBI paHIOaHHbIX cHIIHKOM cIa6bI, JaHHbI aIInapaT, BO3MOxHO, He cMOXeT IIpHHMaTHb HhΦopMaIHIO cHCTeMBI paHIOaHHbIX B IIOJIHO Mepe. B qactHOCTH, J1I HhΦopMaIHIN RT (paHIOTeKcT) Tpe6yEtca 6OJIbIIa IIOJocA IIPOHcyKaHH, HO3OTMY OHA MOXeT 6bITb MEHee IOCTYHaB MeHbIIeI CTeEHN IIO cpaBHeHHo C dpyHMn THIaMn HHΦopMaIHIN.
■Abtomatnuecka HacTpoiKa BpeMeH
C NOMOJIbIO DaHHoI ΦyHKUH BbIIOJIHaeTcA bTOMaTHuecka HAcTpOuKa YacOB Ha OCHOBaHHn HHΦopMaUH RDS.
1BbBpeMa npema FM BbIbepnte AUTO CLOCK B MeHIO FUNCTION.
2BbI6epnTe n 3aJaTe HxKHyu NaCTpOyKy.
PnmeuHne
HΦopMaunO BpcmnH MoKcPa3HuaTbcB 3aBHCMOCTH OT IIpuHHMaemO CTAHIN.
BO3MOXHbIE HENCnPABHOCTM N CnOCO6bl NX YCTPAHEHNA
B cIyuae BO3HKNHOBEHN Ipo6JIem npn HcIOJIb3OBAHH aIIIapaTa cHaJa o6paHTecb K cJIeIyIOUeMy cINCKy. EcJIn ycTpaHHTb Ipo6JIeMy C IOMOUIIOpeIIOKeHHbIX cIOco6OB He ydaetc, IIIN ecJIn Ipo6JIeMa He yKa3aHa B cINCKe, BBIKIOuHTe aIIIapAT H OTCoEIMHHTe OT ceTH 3JIeKToIHtAHN, 3aTeM O6paHTecb K 6JIHXaIIeMy ABTOPIN3OBAHHOMy dJIepy Yamaha nIe cepBHCbI ueHtp.
Obuhe