
SCD469 - Baby monitors PHILIPS - Free user manual and instructions
Find the device manual for free SCD469 PHILIPS in PDF.
| Product Type | Baby Monitor |
| Brand | Philips |
| Model | SCD469 |
| Units | Baby unit and parent unit |
| Baby unit power supply | Mains 220-240 V or 4 AA 1.5 V batteries (not included) |
| Parent unit power supply | Rechargeable battery 4.8 V 800 mAh (SBC EB4880) via mains charger |
| Parent unit battery life | Approximately 12 hours (after full charge) |
| Outdoor range | Up to 200 meters |
| Indoor range | Up to 50 meters (depending on obstacles) |
| Available channels | 4 selectable channels |
| Microphone sensitivity | 3 levels (low, medium, high) |
| Operating modes | Classic baby monitor and telephone call mode |
| Night light | Yes, integrated into the baby unit |
| System control alarm | Optional (disabled by default) |
| Safety | Minimum distance of 1 meter between the baby unit and the child |
| Cleaning | Damp cloth, do not immerse |
| Replaceable parent battery | Yes, model SBC EB4880 |
| Replaceable baby batteries | Yes, 4 AA 1.5 V batteries |
| Display languages | English, French, German, Spanish, Dutch (programmable) |
| PIN code | Yes, for telephone call mode (4 digits) |
| Telephone compatibility | Requires telephone line and tone dialing phone |
Frequently Asked Questions - SCD469 PHILIPS
User questions about SCD469 PHILIPS
0 question about this device. Answer the ones you know or ask your own.
Ask a new question about this device
Download the instructions for your Baby monitors in PDF format for free! Find your manual SCD469 - PHILIPS and take your electronic device back in hand. On this page are published all the documents necessary for the use of your device. SCD469 by PHILIPS.
USER MANUAL SCD469 PHILIPS
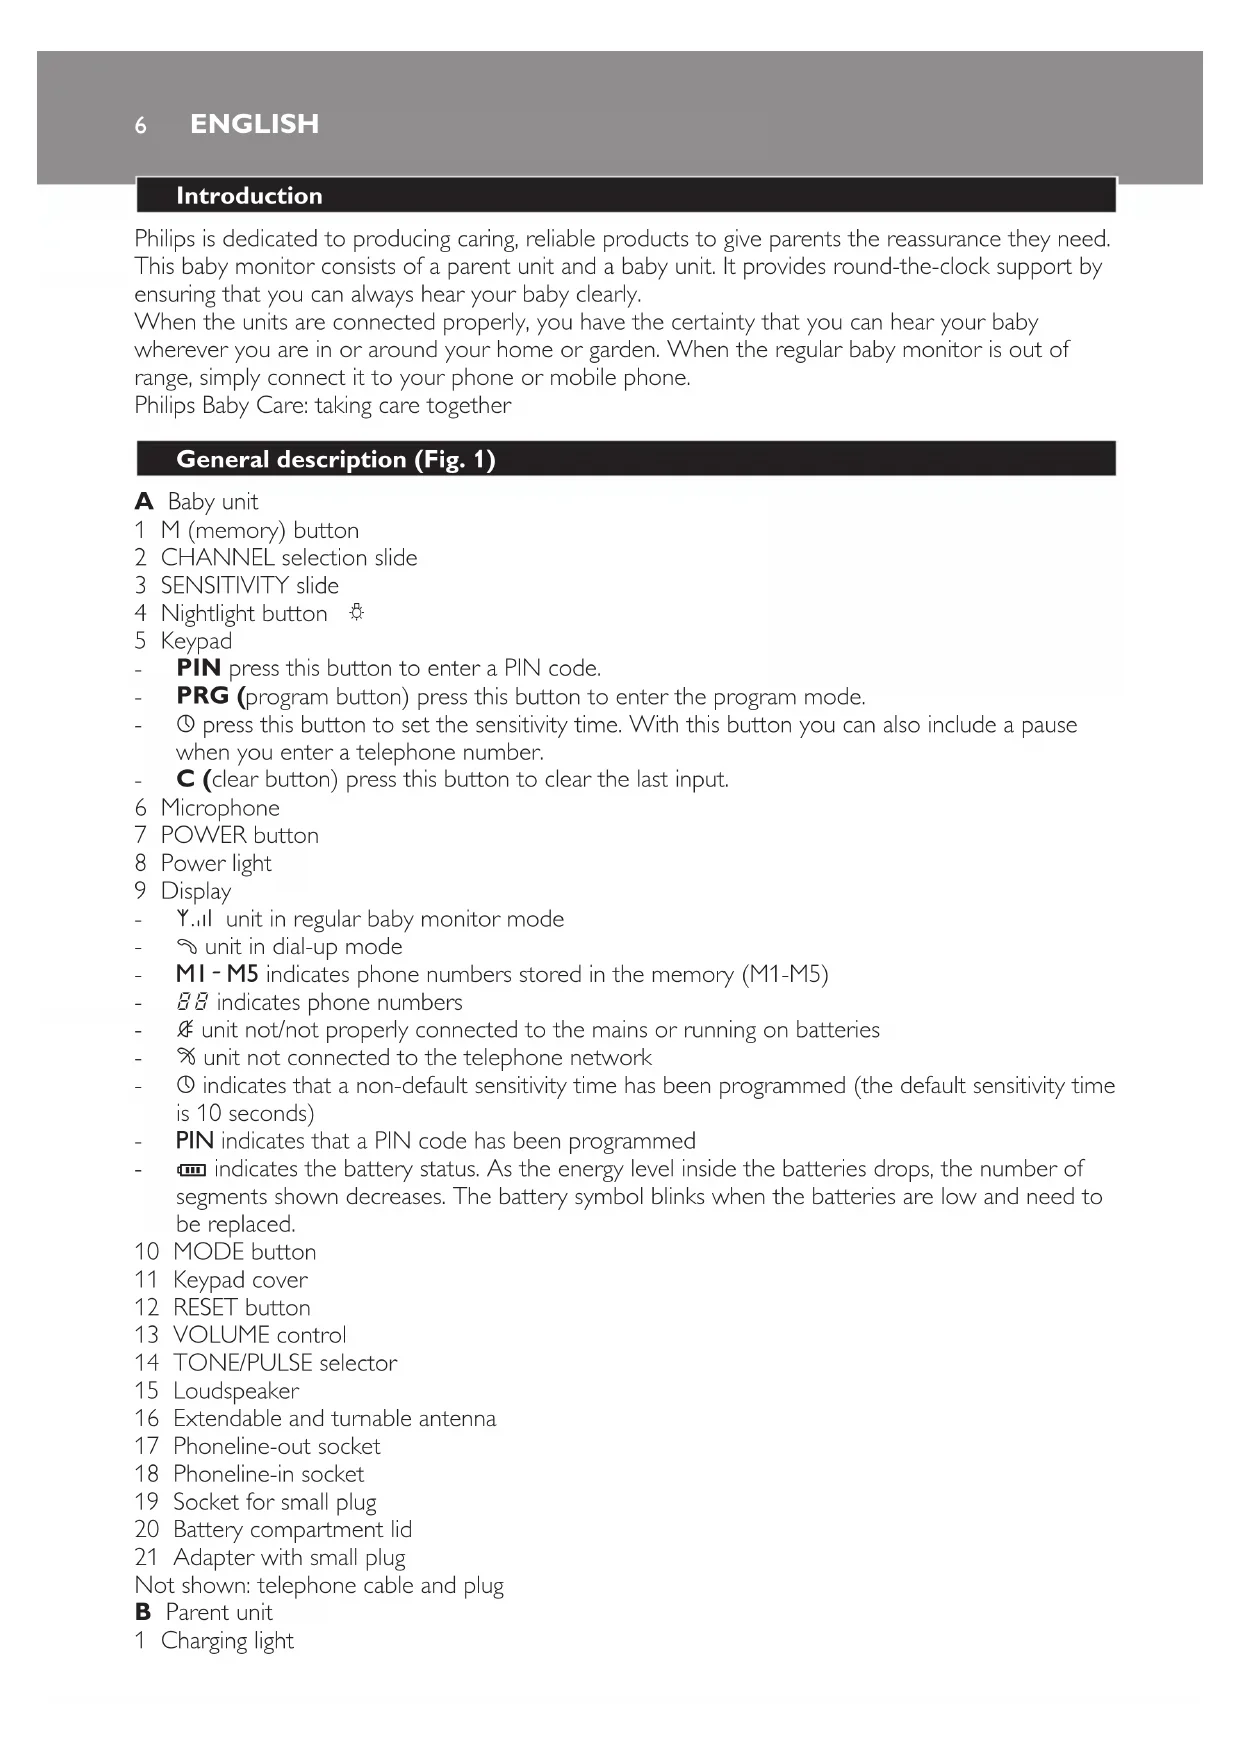
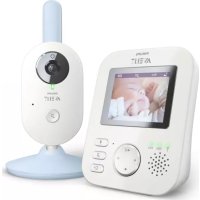
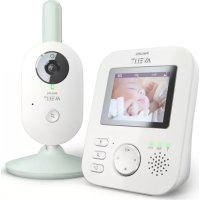
Philips is dedicated to producing caring, reliable products to give parents the reassurance they need. This baby monitor consists of a parent unit and a baby unit. It provides round-the-clock support by ensuring that you can always hear your baby clearly.
When the units are connected properly, you have the certainty that you can hear your baby wherever you are in or around your home or garden. When the regular baby monitor is out of range, simply connect it to your phone or mobile phone.
Philips Baby Care: taking care together
General description (Fig. 1)
A Baby unit
1 M (memory) button
2 CHANNEL selection slide
3 SENSITIVITY slide
4 Nightlight button
5 Keypad
PIN press this button to enter a PIN code.
- PRG (program button) press this button to enter the program mode.
- ① press this button to set the sensitivity time. With this button you can also include a pause when you enter a telephone number.
- C (clear button) press this button to clear the last input.
6 Microphone
7 POWER button
8 Power light
9 Display
- Y..il unit in regular baby monitor mode
- ~ unit in dial-up mode
- MI-M5 indicates phone numbers stored in the memory (M1-M5)
- indicates phone numbers
- unit not/not properly connected to the mains or running on batteries
- % unit not connected to the telephone network
- ① indicates that a non-default sensitivity time has been programmed (the default sensitivity time is 10 seconds)
PIN indicates that a PIN code has been programmed - indicates the battery status. As the energy level inside the batteries drops, the number of segments shown decreases. The battery symbol blinks when the batteries are low and need to be replaced.
10 MODE button
11 Keypad cover
12 RESET button
13 VOLUME control
14 TONE/PULSE selector
15 Loudspeaker
16 Extendable and turnable antenna
17 Phoneline-out socket
18 Phoneline-in socket
19 Socket for small plug
20 Battery compartment lid
21 Adapter with small plug
Not shown: telephone cable and plug
B Parent unit
1 Charging light
2 Charger
3 SYSTEM CHECK light
4 Loudspeaker
5 Sound level lights
6 Antenna
7 POWER light
8 VOLUME control with off position
9 CHANNEL selection slide
10 Socket for small plug
11 SYSTEM CHECK ALARM switch
12 Battery compartment
13 Battery compartment lid
14 Adapter with small plug
Important
Read these instructions for use carefully before you use the appliance and save them for future reference.
This baby monitor is intended as an aid. It is not a substitute for responsible and proper adult supervision and should not be used as such.
- Check if the voltage indicated on the adapter corresponds to the local mains voltage before you connect the appliance.
The appliance is suitable for mains voltages from 220 to 240V
Except for the battery compartments, do not open the housing of the baby unit and parent unit to prevent electric shock.
If the adapter of the baby unit or the parent unit is damaged, always have it replaced by one of the original type to avoid a hazard.
If the charger of the parent unit is damaged, always have it replaced by one of the original type to avoid a hazard.
Use and store the appliance at a temperature between 10^ and 40^ .
Do not expose the baby monitor to extreme cold or heat or to direct sunlight. (Fig. 2)
Make sure the baby unit and the cord are always out of reach of the baby (at least 1 metre/3 feet away).
Do not place the baby unit inside the baby's bed or playpen.
Do not use the baby monitor in moist places or close to water.
Do not cover the baby monitor with a towel or blanket.
Do not immerse any part of the baby monitor in water or any other liquid.
Always place batteries of the correct type in the baby unit to avoid the risk of explosion.
Always replace the rechargeable battery pack of the parent unit with one of the correct type.
Only use the adapter supplied to connect the baby unit to the mains.
Only use the charger supplied to charge the parent unit.
The adapters contain a transformer. Do not cut off the adapters to replace them with other plugs, as this will cause a hazardous situation.
Since continuous transmission is prohibited, you only hear your baby when it makes sounds.
The antenna of the parent unit is fixed. Do not pull at the antenna or bend it.
The antenna of the baby unit can be pulled out and turned upwards.
Preparing for use
Baby unit
You can use the baby unit from the mains or on batteries. Even if you intend to use the unit from the mains, we advise you to insert batteries. This guarantees automatic back-up in case of mains failure.
ENGLISH8
Mains operation
1 Put the small plug in the socket on the baby unit and insert the adapter in a wall socket. (Fig. 3)
Battery operation
The baby unit runs on four 1.5-volt R6 AA batteries (not included). We strongly advise you to use Philips LR6 PowerLife batteries.
Make sure your hands and the unit are dry when you insert the batteries.
1 Undo the screw of the battery compartment lid with a screwdriver and remove the lid. (Fig. 4)
2 Insert four 1.5V AA batteries.
Make sure the + and - poles of the batteries point in the right direction.
3 Put the battery compartment lid back on the appliance and fasten the screw with a screwdriver. (Fig. 5)
Note:Do not mix old and new batteries.
Note:Remove the batteries if you do not intend to use the baby unit for a month or more.
Note: If the batteries are in the unit when you operate it on mains power, check them for leakage every six months.
Note: When the batteries are low, the battery symbol on the display and the power light blink. When the batteries are empty, the power light and the display do not go on at all.
Parent unit
The parent unit has a rechargeable battery pack and can be recharged in the charger. When the battery pack is fully charged, you can use the parent unit cordlessly for up to 12 hours.
Put the small plug into the socket of the charger and put the adapter in a wall socket. (Fig. 6)
2 Place the parent unit in the charger. (Fig. 7)
The charging light starts to burn red.
3 Leave the parent unit in the charging base until the battery pack is fully charged.
- It takes at least 14 hours to charge the battery pack fully.
- The charging light burns red as long as the parent unit is in the charger, even when the battery pack is fully charged.
Note: When the battery pack is low, the power light and SYSTEM CHECK light blink. When the power light and SYSTEM CHECK light do not go on at all, the battery pack is empty.
Note:You can also leave the parent unit in the charger to run it from the mains.
Preparing for dial-up mode
Baby unit
1 Follow the instructions above to prepare the baby unit for mains operation.
2 Insert one connector of the telephone cable supplied in the appropriate plug. Insert the plug in the wall telephone socket.
3 Insert the other connector of the telephone cable into the phonenumber-in socket of the baby unit. (Fig. 8)
If you want your telephone to work while the baby unit is in dial-up mode, insert the cable of the telephone in the phonenumber-out socket of the baby unit.
4 Press the TONE/PULSE selector to select tone dialling or pulse dialling. (Fig. 9)
Note: Always select tone dialling unless your telephone works with pulse dialling or if your telephone company only supports pulse dialling.
Tip: Most older dial telephones use pulse dialling, while most modern keypad telephones use tone dialling.
Programming for dial-up mode with Quick Install
When you switch on the baby unit, M1 starts to blink on the display. This shows that the baby unit is in Quick Install mode. This mode enables you to set up the baby unit for dial-up use quickly without any preprogramming.
1 Enter a telephone number and press the OK button to confirm. (Fig. 10)
Note:Press the ① button to include a pause in the telephone number. The display shows the pause as P.
The telephone number entered is stored in M1.
PIN and --- start to blink on the display.
2 Enter a 4-digit pin code and press the OK button to confirm.
1 and 10 (default sensitivity time) start to blink on the display.
3 Set the sensitivity time and press the OK button to confirm.
- The sensitivity time is the time after which the baby unit calls the selected telephone number when it detects a sound.
- You can set a sensitivity time between 10 and 360 seconds. The default sensitivity time is 10 seconds.
Note: If you do not press another button for 5 seconds, the baby unit enters the regular baby monitor mode.
Note: To cancel all settings and leave the Quick Install mode, press the RESET button for more than 5 seconds.
Programming for dial-up mode with the PRG button
1 Press the PRG (program) button on the keypad to enter the programming mode. (Fig. 11)
- Use the keypad buttons to enter or change settings.
- Press the OK button on the keypad to confirm settings.
- Use the C (clear) button on the keypad to clear the last entered digit.
Note: When you do not press a key for 5 seconds, the baby unit leaves the programming mode.
Press the M (memory) button once or several times to find an empty memory location. (Fig. 12)
The memory icon (M1-M5) blinks when a memory location is free.
- Use the numeric keypad to enter the desired telephone number. The number may consist of a maximum of 40 digits.
The memory icon stops blinking.
The display briefly shows the telephone number (11 digits only).
- Then the number disappears from the display while the memory icon remains highlighted. The number is stored in the memory of the baby unit.
- Repeat the above steps to store other telephone numbers.
Note:Press the ① button to include a pause in the telephone number.The display shows the pause as P.
3 Select the language on the display.
- Press the OK button and the number of the language you want the baby unit to use.
Note:The languages available are English (1), French (2), German (3), Spanish (3) or Dutch (5). English is the default language.
- Press the OK button to confirm your choice.
ENGLISH10
When you phone the baby unit to listen to your baby, the baby unit asks you to enter the PIN code in the language you have selected.
4 Press the PIN button on the keypad.
PIN and --- start to blink on the display.
- Use the numeric keypad to enter a 4-digit PIN code.
- Press the OK button on the keypad to confirm the setting.
5 Press the ① button to set the sensitivity time.
and 10 start to blink on the display.
- Sensitivity time is the time after which the baby unit calls the selected telephone number when it detects a sound.
- Use the numeric keypad to enter a time between 10 and 360 seconds. The default setting is 10 seconds.
- Press the OK button to confirm the setting.
The baby unit is now ready for dial-up use.
Using the appliance
Regular baby monitor mode
1 Place the parent unit and the baby unit in the same room to test the connection. (Fig. 13)
Make sure the baby unit is at least 1 metre/3 feet away from the parent unit.
2 Press the POWER button to switch on the baby unit. (Fig. 14)
The display lights up and the power light starts to burn green
After a few seconds, M1 starts to blink on the display. The baby unit is now in Quick Install mode.
If you want to set up the baby unit for dial-up mode without programming, follow steps 1 to 4 in 'Programming for dial-up mode with Quick Install'.
If you want to set up the baby unit for use as a regular baby monitor, skip the Quick Install mode (see step 3 below).
3 Wait 5 seconds or press the OK button a few times to skip the Quick Install mode. (Fig. 10)
4 Use the MODE button to select regular baby monitor mode Y..il. (Fig. 15)
5 Pull out the antenna and turn it upwards for proper reception.
6 Turn the VOLUME control of the parent to a volume position to switch on the parent unit. (Fig. 16)
The SYSTEM CHECK light starts to burn green when connection has been established between the units.
Note:It takes about 30 seconds before a connection is established.
Place the baby unit at least 1 metre/3 feet away from your baby. (Fig. 17)
8 Position the parent unit within the operating range of the baby unit. Make sure it is at least 1 metre/3 feet away from the baby unit. (Fig. 18)
For more information on the operating range, see section 'Operating range' below.
Operating range
The operating range of the baby monitor is 200 metres/600 feet in open air. Depending on the surroundings and other disturbing factors, this range may be smaller. Indoors the operating range is up to 50 metres/150 feet.
Dry materials Material thickness Loss of range
Wood, plaster, cardboard, glass < 30cm / 12 in 0 - 10% (without metal, wires or lead)
Brick, plywood < 30 cm/12 in 5-35%
Reinforced concrete < 30 cm/12 in 30-100%
Metal grilles or bars < 1 cm/0.4 in 90 - 100%
Metal or aluminium sheets < 1 cm/0.4 in 100%
For wet and moist materials, the range loss may be up to 100% .
Features in regular baby monitor mode
Channel selection
Always make sure that the CHANNEL selection slides on both units are set to the same position. You can select four different channels. If you experience interference from other baby monitors, radio devices etc., select a different channel.
Push the CHANNEL selection slide on the baby unit to the desired channel (1, 2, 3 or 4). (Fig. 19)
2 Push the CHANNEL selection slide on the parent unit to the same channel. (Fig. 20)
Microphone sensitivity
With the microphone SENSITIVITY slide on the baby unit you can set the sound that is picked up by the baby unit to the desired level: low, mid or high. When the microphone sensitivity is set to 'high', the baby unit picks up all sounds. You can only change the microphone sensitivity when the connection between the baby unit and parent unit has been established. This is the case when the SYSTEM CHECK light on the parent unit burns green continuously.
Push the microphone SENSITIVITY slide to set the microphone sensitivity of the baby unit to the desired level. (Fig. 21)
You can use your own voice as a sound reference.
Silent baby monitoring
1 Turn the VOLUME control of the parent unit to the lowest volume level -. (Fig. 22)
Do not switch off the parent unit completely by turning theVOLUME control to off position.
The sound level lights on the parent unit visually alert you to any sound the baby makes. The louder the sounds, the more lights go on.
When no sound is detected, all sound level lights are off.
SYSTEM CHECK alarm
The default setting of the system check alarm is 'off'. If the SYSTEM CHECK alarm has been set to 'on', the parent unit beeps and the SYSTEM CHECK light blinks red when the connection with the baby unit is lost.
1 Turn the locking knob in the bottom of the parent unit a quarter turn (1) with a screwdriver. Then slide the battery compartment lid downwards to remove it (2). (Fig. 23)
2 Set the SYSTEM CHECK alarm switch inside the compartment to 'on'. (Fig. 24)
3 Slide the battery compartment lid back onto the parent unit (1). Then turn the locking knob a quarter turn with a screwdriver to fasten the lid (2). (Fig. 25)
Note:In default setting, only the SYSTEM CHECK light blinks red when the connection is lost.
ENGLISH12
Nightlight
1 Press the nightlight button to switch the nightlight on or off. (Fig. 26)
When you run the baby unit on batteries, switch off the nightlight to save power.
Dial-up mode
In this mode, the baby unit calls a preprogrammed phone number if a sound is detected. You can also phone the phone number to which the baby unit is connected to check on your baby.
Setting the baby monitor up for dial-up mode
1 Switch on the baby unit and the parent unit.
2 Make sure that:
- the telephone cable supplied is connected to the phoneline-in socket of the baby unit.
- at least one telephone number is stored in the memory of the baby unit.
Press the MODE button on the baby unit to set the unit to dial-up mode. (Fig. 15)
Note: If lights up on the display, there is no connection to the telephone network. Follow the steps in 'Preparing the baby monitor for dial-up mode' to establish a connection with the telephone network.
4 Press the M (memory) button to select the telephone number. (Fig. 12)
If you have used Quick Install to enter a telephone number in the memory, press M1.
- If you have programmed the baby unit with the PRG button, choose one of the telephone numbers stored in the memory (M1-M5).
5 Push the SENSITIVITY slide to the desired microphone sensitivity level. (Fig. 21)
See 'Microphone sensitivity' for instructions on how to set the microphone sensitivity of the baby unit.
Tip: We advise you to test the dial-up function before you leave by making a sound close to the baby unit. Of course, this is easiest when you have programmed your mobile phone number.
Answering a call of the baby monitor
When the baby unit picks up a sound, it calls the preprogrammed telephone number after the preset sensitivity time. If the call is not answered, the baby unit calls again after 1 minute.
1 Answer the phone to listen to your baby.
2 Press the # button on the telephone to talk to your baby.
- After 3 minutes, the baby unit disconnects.
3 Press the * button on the telephone or hang up to disconnect.
If the baby unit detects a sound again, it calls the preprogrammed telephone number again.
Calling the baby monitor to check on your baby
Note: To call the baby unit, use a tone-dial telephone with a keypad. This function does not work on pulse-dial telephones and on telephones with a dial.
1 Dial the number of the telephone line the baby unit is connected to.
After 3 rings, the baby unit is activated and asks you to enter your PIN code.
2 Enter your PIN code with the numeric keys on the telephone.
You can now hear your baby.
Note:If you enter the wrong PIN code three times, the baby unit disconnects.
3 Press the # button on the telephone to talk to your baby.
- After 3 minutes, the baby unit disconnects.
4 Press the * button on the telephone or hang up to disconnect.
Clearing telephone numbers from the memory
When the memory is full or when a telephone number stored in the memory is no longer correct or required, follow the procedure below to clear telephone numbers from the memory of the baby unit.
1 Press the M (memory) button. (Fig. 12)
M1 blinks on the display and the corresponding telephone number appears.
Press the M (memory) button until the telephone number you want to clear appears on the display.
3 Press the 0 button.
4 Briefly press the C (clear) button on the keypad. (Fig. 11)
The memory icon (M1-M5) starts to blink and 0 disappears from the display. The telephone number has been cleared and the memory location is free again.
5 Repeat the above steps to clear other telephone numbers.
Note: To clear all telephone numbers at once, press the RESET button. All other settings are cleared as well. See 'Resetting the baby unit'.
Changing the sensitivity time
Press the PRG button to enter the program mode.
Press the ① button.
1 and 10 start to blink on the display.
3 Use the numeric keypad to enter a new sensitivity time between 10 and 360 seconds.
4 Press the OK button to confirm the setting.
Resetting the baby unit
Note: If you press the RESET button, all settings are cleared from the memory of the baby unit.
1 Press the RESET button for about 5 seconds.
The baby unit gives a short beep to confirm.
When you hear a double beep, the baby unit has been reset to its default settings.
After a few seconds, M1 starts to blink on the display. The baby unit is now in Quick Install mode.
2 Enter new settings, if desired.
Cleaning and maintenance
1 Clean the baby monitor with a damp cloth.
Do not immerse the parent unit and the baby unit in water and do not clean them under the tap.
Replacement
Parent unit
If the battery pack of the parent unit needs to be recharged more often than usual, replace it with a new one. You can obtain a new battery pack at the shop where you bought the baby monitor.
Note: Always replace the battery pack with one of the same type: SBC EB4880, 4.8V, 800 mAh.
1 Turn the locking knob in the bottom a quarter turn (1) and slide the battery compartment lid downwards to remove it (2). (Fig. 22)
ENGLISH14
2 Remove the old battery pack from the battery compartment and pull the connector of the old battery pack out of the socket.
3 Insert the connector of the new battery pack into the socket and place the new battery pack in the battery compartment.
4 Slide the battery compartment lid back onto the parent unit (1) and turn the locking knob a quarter turn to fasten the lid (2).
Tip: To extend the life of the battery pack, remove it from the battery compartment when you do not intend to use the baby monitor for a longer period of time.
Baby unit
When the power light blinks and the battery empty symbol appears on the display, replace the batteries.
1 Undo the screw of the battery compartment lid with a screwdriver and remove the lid.
2 Remove the old batteries from the battery compartment.
3 Insert four new 1.5V AA batteries.
Note:Make sure the + and - poles of the batteries point in the right direction.
4 Put the battery compartment lid back onto the baby unit and tighten the screw with a screwdriver.
Environment
Do not throw away the appliance with the normal household waste at the end of its life, but hand it in at an official collection point for recycling. By doing this, you help to preserve the environment. (Fig. 27)
Batteries contain substances that may pollute the environment. Do not throw away empty batteries with the normal household waste, but hand them in at an official collection point. Always remove the batteries before you discard or hand in the appliance at an official collection point.
Guarantee and service
If you need information or if you have a problem, please visit the Philips website at www.philips.com or contact the Philips Customer Care Centre in your country (you find its phone number in the worldwide guarantee leaflet). If there is no Customer Care Centre in your country, turn to your local Philips dealer or contact the Service Department of Philips Domestic appliances and Personal Care BV.
Frequently asked questions
Question Answer
| Why does the baby monitor have a smaller operating range than the 200 meters/600 feet mentioned under 'Operating range'? | The specified range is only valid outdoors in open air. Inside your home, the workable range is limited by the number and type of walls and/or ceilings between the baby unit and the parent unit. The maximum operating range inside your home is 50 meters/150 feet. |
| Why is the connection lost every now and then? | The parent unit is probably close to the boundaries of the operating range. Put the parent unit closer to the baby unit in a place where it has a better reception. Please note that it takes about 30 seconds before connection is re-established when you move one or both units. |
| What happens if there is a power supply failure? | If you have placed batteries in the baby unit, the baby unit switches to battery operation. If the battery pack of the parent unit is sufficiently charged, the parent unit starts to run on battery power. |
| Why does the parent unit not work even though it is placed in the charger? | When the battery pack of the parent unit is low, you have to charge it for up to 20 minutes before you can operate the parent unit on mains power. |
| Why can I not use the parent unit cordlessly for 12 hours on a fully charged new battery pack? | You have to charge and discharge a new battery pack three times before it reaches its full capacity. |
| Why does the parent unit run less than 12 hours on a full charge? | Perhaps the volume is set too high. When the volume is set to a high level, the parent unit consumes more power. Set the volume to a lower level. |
| A battery pack that has been in use for quite some time gradually loses its capacity. When this happens, you get fewer running hours on a full charge. | |
| If you start to use the parent unit again after some time, the battery pack may have lost some of its charge. Place the parent unit in the charger to recharge the battery pack. | |
| Why do the power light and the display of the baby unit not go on when I press the POWER button? | The batteries are empty. Replace the batteries. |
| You have not plugged in the baby unit. Insert the small plug in the socket on the baby unit and insert the adapter in the wall socket. | |
| Why does the battery empty symbol on the display of the baby unit light up and why does the power light blink? | The batteries are low. Replace the batteries. |
| Why do the batteries of the baby unit run out so quickly? | Perhaps you have set the microphone sensitivity level too high. Set the microphone sensitivity to a lower level. |
Question Answer
| The volume has been set too high. Set the volume to a lower level. | |
| Why do the power light and the SYSTEM CHECK light of the parent unit not go on when I turn the VOLUME control to switch on the parent unit? | The battery pack is low. Recharge the battery pack. |
| The battery pack has reached the end of its life. Replace the battery pack. | |
| I try to use the parent unit on mains power, but the power light and SYSTEM CHECK light do not go on when I place the parent unit in the charger. Why? | Perhaps you forgot to plug in the charger. In that case, plug in the charger. If the battery pack is entirely empty, you have to charge it for 20 minutes before you can run the parent unit from the mains. |
| Why does the parent unit beep? | This signifies that the units are out of range from each other. Place the parent unit closer to the baby unit. |
| The batteries of the baby unit may be low. Replace the batteries. | |
| The battery pack of the parent unit is low. Recharge the battery pack. | |
| The parent unit cannot establish connection with the baby unit even though it is close to the baby unit. Reset the baby unit. | |
| The baby unit is not switched on. Press the POWER button on the baby unit to switch it on. | |
| Why does the SYSTEM CHECK light on the parent unit blink red? | This signifies that the units are out of range from each other. Place the parent unit closer to the baby unit. |
| The batteries of the baby unit are low. Replace the batteries. | |
| The battery pack of the parent unit is low. Recharge the battery pack. If recharging does not help, replace the battery pack. | |
| The parent unit cannot establish connection with the baby unit even though it is close to the baby unit. Reset the baby unit. | |
| The baby unit is not switched on. Press the POWER button on the baby unit to switch it on. | |
| Why does the battery pack of the parent unit not charge? | Perhaps the charger is not plugged in properly. Insert the small plug in the charger and insert the adapter in the wall socket. |
| If the battery pack fails to charge when the charger is plugged in properly, the battery pack has reached the end of its life. Replace the battery pack. | |
| Question Answer | |
| Why does charging the battery pack of the parent unit take much longer than 14 hours? | The parent unit was switched on for mains operation during charging. Switch off the parent unit during charging to prevent a longer-than-usual charging time. |
| Why does the operating time of the rechargeable battery pack decrease after each new charging cycle? | The battery pack approaches the end of its life and soon has to be replaced. The life of the battery pack decreases if you leave the parent unit continuously connected to the mains by placing it in a plugged-in charger. |
| Why does the parent unit react too slowly to the baby's sounds? | The microphone sensitivity level on the baby unit is too low. Set the microphone sensitivity to a higher level. |
| Move the baby unit closer to the baby. Make sure the baby unit is at least 1 metre/3 feet away from your baby. | |
| Why does the parent unit react too quickly to ambient sounds? | The microphone sensitivity level on the baby unit is too low. Set the microphone sensitivity to a higher level. |
| Move the baby unit closer to the baby. Make sure the baby unit is at least 1 metre/3 feet away from your baby. | |
| Why do I get no sound out of the parent unit? | The parent unit is set to a different channel than the baby unit. Set both units to the same channel. |
| The baby unit is not switched on. Press the POWER button on the baby unit to switch it on. | |
| The microphone sensitivity level on the baby unit is too low. Set the microphone sensitivity to a higher level. | |
| The volume of the parent unit is set too low. Turn the VOLUME control to a higher level. | |
| Why does the parent unit squeal/produce a high-pitched noise? | The parent unit is too close to the baby unit. Move the parent unit at least 1 metre/3 feet away from the baby unit. |
| If this does not help, the volume is too high. Turn the VOLUME control to select a lower volume. | |
| Why do I get interference on the parent unit? | Perhaps the parent unit is out of range of the baby unit. Place the parent unit closer to the baby unit. |
| Perhaps the baby unit or parent unit is too close to a mobile or cordless phone, a radio or a TV. Move the unit away from this source of interference. | |
| Why does the parent unit pick up signals from another baby monitor? | The baby monitor operates on the same channel as another baby monitor in the neighbourhood. Set both units to a different channel. Make sure they are both set to the same channel. |
| Why does the baby unit not switch to dial-up mode? | If the display shows ✘, you probably forgot to insert the telephone cable in the appropriate socket or did not insert the cable properly. Insert the cable properly. If the baby unit is connected properly to the telephone line, the display shows Ⓞ. |
| Why does the baby unit fail to dial a telephone number? | You did not select the dial-up mode. Use the MODE button to select dial-up mode. |
| Perhaps you did not insert the telephone cable properly into the phone-line-in socket of the baby unit. Insert the telephone cable. If the baby unit is connected properly to the telephone line, the display shows Ⓞ. | |
| The sensitivity time is too long. Set a shorter sensitivity time. See 'Preparing the baby monitor for dial-up mode' in chapter 'Preparing for use'. We advise you to test the dial-up mode before you leave. | |
| You did not store a telephone number in the memory of the baby unit. Enter a telephone number and store it in one of the memory locations. See 'Preparing for dial-up mode' in chapter 'Preparing for use'. We advise you to test the dial-up mode before you leave. | |
| Perhaps you forgot to select a telephone number. Press the M (memory) button to select the appropriate memory location (M1-M5). | |
| Why does the baby unit not answer my call? | You probably try to phone the baby unit with a pulse dial telephone. Use a tone dial telephone or a mobile phone. |
| Why does the baby unit not dial the correct number? | You did not enter the correct number or you selected the wrong memory location (M1-M5). |
| Your telephone network does not recognise dialling pulses. Set the TONE/PULSE selector to tone dialling or use a mobile phone. | |
| Your telephone network uses pulse dialling, but the TONE/PULSE selector is set to tone dialling. Set the TONE/PULSE selector to pulse dialling or leave the TONE/PULSE selector in tone setting and use a mobile phone. | |
| Why does the baby unit not recognise the PIN code? | You entered the wrong PIN code. Redial and enter the correct code. |
| You did not store a PIN code in the memory of the baby unit. Enter a PIN code. See 'Preparing for dial-up mode' in chapter 'Preparing for use'. | |
| You use a pulse dial telephone. Use a mobile phone to phone the baby unit. | |
| The telephone is in pulse dial mode. Set the telephone to tone dialling. Follow the instructions in the user manual of the telephone. | |
Introduktion
Philips Baby Care: taking care together
Mny anevpyoioite Tn movada yovéa yupiovtac to diakottn pUthetaonc evtaonc nou stn
Oeon anevpyooinons (off).
Oi luxviec eintiebou nyou otn movada yovea aac iobtoiouv oTTIKA yia otioiovotne xo kavei to uwpocac. Ooo TIO duvatoi eival oI nxoi, tooo TEPIOOTepcLuxviec avabouv.
Otauav dev avixveuetai kavevac nxc, oec oi luxviEc eTtEou nxou evai aeepyoioevc.
PpOeIodOnoiOn System CHECK (EeYxoc ouoTnmuToC)
H pioeTIIEyEvn puOiOn TnC pioeIbToInong eEyxou ouotmuatoc exi puOIOTei oE aTVEpyoToInon'. Eav n pioeIbToInon SYTEM CHECK (eEyXoc ouotmuatoc) exi puOIOTei oE 'evpyoToInon', akouyEtai eva nxTko ano tn movada yovea kai n luxvia SYTEM CHECK (eEyXoc ouotmuatoc) avaboosnviekKivn, epiTTwn nou diakotei n ouvdoen me Tn movada uwpou.
1 TupioTe Tnv aoaaleia oTo kaTw mepoc Tns movadac yovea kata eva Tetapto (1) me eva katoaibi. 2tn ouvexieia, oupeTe To kataki Tng thnKncs mtatapiwv Tpoc Ta katw ia va to aphipeoetE (2). (Eik. 23)
2 PuθμioTe to δiakóTTπpoεiδoToinosystem CHECK (ελεγxoc ouotnμaTOS) μεσa σtn Θκη σε ενεργοToinon. (Euk. 24)
Nota:Alternatively, you can use the following two methods to find the maximum possible load on the bus.


- General description (Fig. 1)
- Important
- Preparing for use
- Baby unit
- ENGLISH8
- Mains operation
- Battery operation
- Parent unit
- Preparing for dial-up mode
- Programming for dial-up mode with Quick Install
- Programming for dial-up mode with the PRG button
- ENGLISH10
- Using the appliance
- Regular baby monitor mode
- Operating range
- Dry materials Material thickness Loss of range
- Features in regular baby monitor mode
- Channel selection
- Microphone sensitivity
- Silent baby monitoring
- SYSTEM CHECK alarm
- ENGLISH12
- Nightlight
- Dial-up mode
- Setting the baby monitor up for dial-up mode
- Answering a call of the baby monitor
- Calling the baby monitor to check on your baby
- Clearing telephone numbers from the memory
- Changing the sensitivity time
- Resetting the baby unit
- Cleaning and maintenance
- Replacement
- ENGLISH14
- Environment
- Guarantee and service
- Frequently asked questions
- Question Answer
- Introduktion
- PpOeIodOnoiOn System CHECK (EeYxoc ouoTnmuToC)
Brand : PHILIPS
Model : SCD469
Category : Baby monitors