
IHF 6.5 A M IX - Basket INDESIT - Free user manual and instructions
Find the device manual for free IHF 6.5 A M IX INDESIT in PDF.
| Product type | Range hood |
| Brand | Indesit |
| Model | IHF 6.5 A M IX |
| Height (cm) | 61 |
| Width (cm) | 60 |
| Depth (cm) | 50 |
| Exhaust pipe diameter (cm) | 15 (or 12 with reducer) |
| Power supply | 230 V ~ 50 Hz |
| Total absorbed power (W) | 150 |
| Lighting | 2 halogen bulbs G9, 40 W each |
| Number of speeds | 3 |
| Control type | Mechanical keypad (GLASS) |
| Grease filter | Metallic, dishwasher safe or hand washable (monthly) |
| Charcoal filter (optional) | Replace every 20 months (non-washable) |
| Installation version | External evacuation (default) or recirculation with activated charcoal kit |
| Minimum safety distance | 65 cm above a gas hob, 55 cm above an electric hob |
| Energy consumption (estimated annual) | Not specified |
| Weight (kg) | Not specified |
| Included accessories | Fixing plugs, connection flange |
| Repairability | Available parts: filters, bulbs; for motor or electronics, contact customer service |
| Standards | EC directives: Low Voltage 2006/95/EC, Electromagnetic Compatibility 2004/108/EC |
Frequently Asked Questions - IHF 6.5 A M IX INDESIT
User questions about IHF 6.5 A M IX INDESIT
0 question about this device. Answer the ones you know or ask your own.
Ask a new question about this device
Download the instructions for your Basket in PDF format for free! Find your manual IHF 6.5 A M IX - INDESIT and take your electronic device back in hand. On this page are published all the documents necessary for the use of your device. IHF 6.5 A M IX by INDESIT.
USER MANUAL IHF 6.5 A M IX INDESIT
Operating Instructions
COOKER HOOD
Contents
Operating Instructions,1
Warnings,10
Assistance,31
Installation,37
GLASS controls,38
Maintenance and care,38
Troubleshooting,39
PT
Portuges
! Keep this manual for reference. If you sell, transfer or move the unit to another location, make sure to keep the manual with the product.
! Read the instructions carefully - they contain important installation, user and safety information.
! Do not tamper with the electrical or mechanical equipment of the product or its exhaust ducts.
General safety information
- The distance between the cookware support surface on top of the cooking appliance and the lowest part of the cooker hood must be at least:
65 cm if the hood is installed over a gas cooktop
55 cm if the hood is installed over an electric cooktop.
If the installation instruction manual for the gas cooking appliance specifies a greater distance, this measurement should be taken into account.
- The cooker hood comes with anchor plugs which are suitable for use with most walls/ceilings.
However, you must contact a qualified technician to check the suitability of the materials in relation to the type of wall/ceiling, which must be strong enough to support the weight of the unit.
-
Caution! Do not hook the unit up to its electrical power supply until the installation has been completed.
-
Before cleaning or servicing the unit, disconnect it from the mains by pulling the power plug or disconnecting the main circuit breaker.
- Always wear work gloves when installing and servicing the unit.
- It is not intended for use by children or persons with sensory or mental disability and lack of experience or familiarity, except under the supervision or instruction of a person responsible for their safety.
- Make sure children do not play with the unit.
- Never operate the unit without its grease filter installed!
- NEVER use the hood as a support, unless expressly instructed to do so.
- The room must be adequately ventilated if the hood is used at the same time with other equipment burning gas or other fuels.
- Extracted air must not be conveyed into a duct used for exhausting combustion fumes from gas or other fuel-fired equipment.
- Observe all regulations in relation to air extraction.
-
NEVER cook food with an open flame under the hood; open flames will damage the filters and may cause fires. Never do this.
Always supervise frying to make sure the heated oil does not catch fire. -
Strictly observe all local regulations in relation to the technical and safety measures to be employed in fumes extraction.
- Clean the product frequently, inside and out (AT LEAST ONCE A MONTH, and in observance of the maintenance instruction given in this manual).
- Failure to observe the hood cleaning and filter cleaning/replacement instructions can result in fires.
- Never use the hood without its bulbs properly installed - electrocution hazard.
- The manufacturer is not liable for any inconvenience, damage or fire caused by the unit as a result of failure to observe the instructions given in this manual.
- Caution! The unit's accessible parts can get very hot when used with cooking equipment.
FR
Avertissements
!He n3MeHnTe 3NeKTPoNpOBoDky nIn MexaHnueckyU qactb N3DeJnry nIn Tpy6oPBOoD dblMOydaJeHn.
Oe npaBnla
MHHMaJIbHOe pacCTOJHHe OT ONOpHBIX peWetOK Ha BapOCHo NaHeJn Do CamOHNxHHeJyACTN KxOHHO BbITXKKIN OJXHO 6bITb He MeHee:
65 cm, ecn BbITJkKa yCTaHOBJeHa Hnd r3OBoB BapOH NpHeJIbIO
55 cm, ecn BbITkka yCTaHOBneHa HaJ 3JIeKTPnuecko BapOuHoi NaHeIbI.
EcnB INHCTpyKcunx NO MOHTaxy K Ra3OBoN PnTe yKa3bIBaETc8 BoJIbUeep pacCTOarHne, npu MOHTaxe BbITJXKN Heo6xOdIMO yueCTb 3TN yKa3aHnI.
B KOMnIeK T BbITJxK N BXOJAT KpeNExHbI e Wypynbl, paCCHTaHHbIe Ha 60JIbShINHCTBO TINOB CTeH I NOTOLKOB.
Tem He Mehee Heo6xOIMO 6paTntbck K KBaHnФuIupOBaHHOMy TexHnky dIЯ npOBepKn pnproHocTN MaTePnaIOB B COOTBETCTBnC TINOM CTeHbI/NOTOLKa, KOtOpBle DOJXHbI 6bITb DOCTaTOUHO npOuHbIMn DnA BeCa KXYOHNo BbITAAKKN.
BHHMaHHe! He noKJIouaTe npIbOp K 3JIeKTPocetN Do nOJHOro 3aBepWeHn MOHTaxKa.
- Ipeed hauanom kaKx-ln6o pa60 no qncTke nIIN Tex. 06cnyJXBaHIO OTcoEHHTE BbITkky OT 3JeKTPocETN, BbIHyB wTeNCeJIbHyIO BNKy N3 CeTeBOI PO3eTKI IN BbIKJIIOUChvOB O6uN BbIKNUOaTeNb B DOME.
- Дя Вынонец BCex pa6ot no MOHTaKy n Tex. 06cnyKbAHnIO HadeBaTb pa6oue nepuATkn.
- I3dJIe He npedHa3NaueHo dIy nCNoJb3OBaHnJeTbMn nn JNuCaMn C OrpaHnueHHbIMn 0n3NueCKmN, CeHCOPHbIMn nn yMCTBeHHbIMn CNOCO6HOCTMa, 6e3 ONbIta N 3HaHnR, 6e3 KOHTpOJa nn OByeHnR npabNJam nCNoJb3OBaHnR nnJUeHn RnCuAMn, OTBeuaOuImn 3a nx 6e3OnaCHOCTb.
CneIte, YTObI Detn He nIrpann c n3dennem.
HnKOrda He nCNoIb3yIe n3dJIne 6e3 npaBnIbHO yCTaHOBJIeHHoro XnPOBOrO cnIbTpa!
HnKoIa He nCnoJIb3yIte KxOHHyo BbITJkky B KaueCTBe OOnOpHOI NOBepXHOCTN, ecnn 3TO YeTko Hepa3peSeHo.
-Помшени должнохоршо npobetpnbatbca, korda kyxohna BbyTka nCNoIb3yETcra OndHOBpeMeHHOCdpyrIMn np6opamnHa ra3y nINHOM rOpOyem TOnnBE. - YdaJIaEmbI B03dUx He DoJXeH NOnaDaTb B DbIMOXOД, NcNoJIb3yEmbI Jnra YdaJIeHnA DbIMa OT n3DeJIIn C rA3OBbIM TOnJIINBOM INn INhBIM TOpIOuHm TOpNIINBOM.
- Co6IIOdaIte Bce HopMaTINBbl NO DbIMOydaJIeHnIO.
Kateropnueckn 3anpeaetcra TOTOBHTb Ha OTKpbITOM PnAmEH NOD KXYOHNO BbITJXKO; OTKpbIToe PnAmr MoKeT NOBpeDntb QnJIbTpbl N pINBeCTN K BO3rOpAHIO, No3Tomy erO nCNoJIb3OBaHne Kateropnueckn 3anpeaetcra.
- PekomeHdyetc HnpepbBHO KOHTpOIpOBaTb npiroTOBJeHne 6IIOD BO pHTOpE Bo n36eKaHne BO3ropaHn ropayero Macna.
- ПравидаTeXнки n 6e3oNaChOCTn,приMuHeЯMbIe K CnCTEmdeBIMoydαJIeHnДОЛЖHbI CTporOCOTBETCTBOBaTb HOpMaTnBaM MecTHbIX KOMNTeHTHbIX OprAhOB.
- PekomeHdyetcay peryIapHO uNCTnTb n3deJIne KaK n3HyTpN, TaK n ChapyKn (HEPEKE OJHOPOA3ABMECAU, B JIO6OM clyuae co6JIoDaTb INHCTpyKcUN ITOx. 06CnykBaHnIO, pINBeJeHHbIE B HAcToaEM Tex. pyKOBoDCTBe).
HecobJIOHeNpe npaBnI NO yXoY 3a KxOHHO BbITKoN 3aMeH N UcTKe FInbTPOB PnIBOAnT K BO3ROPaHNO.
He nCnoJb3yIte nIIN He octaBnIte BblTjKy 6e3 npabNlboHocYCTaHOBJIeHHbIX JAmNoyeK, TaK KaK 3TO MOKeT npNBecTu K ydApy TOKOM.
- Ppon3BODNTeNb CHNMaet C c6b BcKaYIO OTBETCTBeHHOCTb 3a BO3MOXHbIe NOBpeKdEHNy, yUep6 nIN NOXApbl, KOTOpbIE MOrYT CnUHTbcrC N3DeJIInEM IO pPnHHe HecO6IHODeHNr INHCTypKcN, PpNBEdEHbIX B HaCToJsem Tex. pyKOBOIDCTBe.
BHHMaHHe! OTKpbItbIe qactn MoryT cnIbHO HarpeTbCra OT BapOCHo NaHeJI.
UA
3actepekhi 3ac06n
!Baxnbo 36epeTn ue kepiBnTBo, oob matn harOdy 3BepTaTncr do HbOrO y 6yDb- kmy MomeH. B pa3i npoDaxy, nepeaui a6o nepeizdy cnid nepekoHaTncr, zo ue kepiBnTBO cynpoBODxye Bnpi6.
!Увадно ознайомтеся 3 iHCTpyкцiam BOHN MICTЯТь ВаЖлИВу iHФopmaцiHO 万多о мOLTажу, ВИКОпСТання i 6e3пеки BИробу.
! He BnociTb 3miHn B eIeKtpuHi a6o MexaHiHi KOMnoHeHTn BnpOby, a TakoJy Tpy6n dny BiDBeDeHHraBipnaPbOBaHOro NobiTpr.
3aŋbHa 6e3neKa
MihimabHa BiDcTaHb MIX BapnIbHOIO NOBepxHeO I HNXHbOIO qACTnHOIO BNTJKKI He NOBINHO 6yTN MeHNIM 3a: 65cm,IKUo BNTJXKA BCTAHOBJIHOCTbcra HaIra3OBOIO NNTOHO 55cm,IKUo BNTJXKA BCTAHOBJIHOCTbcra HaIeKTPNCHOO NNTOIO. RaKIO BInCTpyKci3 MOHTaxy Ra3OBOI BapnlbHOI NOBepxHi Bka3yETbcra 6IbSha BiDcTaNb,CiID 3BaXaTI Na Hei.
- BnTjKka ochaueHa IIO6eJMaH, kI iDiIyTb Do 6IbwoCTi CTIN/CTeJIb. Y BCaKOMy pa3i, Heo6XiIDHO 3BepHyTnCra Do faxIBzra, 0o6 ToN NiITBepDnB BiINOBiHicTB MaTepiAnIB BiINOBiDHO Do TIny CTIN/CTeJI, rKi MaOTb 6yTN DOCTaTHbo MlIHMM, 0o6 BnTpIMyBaTn BAry BnTJKKN.
- Ybara! He πίд'επΗγήτe πριηλάν ὅ Επεκτρυύμι Μερεχί, ὃκην ᶂ Ε δύθενην ΝΟΒΗICTHΩ 3aΒερψεHo MONTαχ.
- Persh hix po6ntu 6ydb-ky onepaici0 3 ouuueHH a6o texhiuHoro 6cnyroBaHH, Bi'd'edHaHTe BnTjKkY BiD Mepeksi eJektpnHOrO XNBneHH, BnTARHyBUn BNkY a6o BnMKHyBUn FOIOBHNI BUMKau.
Bci onepaui 3 MOHTaxy i TexHIOHO6cnyroByBaHHn Heo6xIDHO BIKOHyBaTN y 3axnCHnx pykabuKax.
-Пиладом He MaOTb KOpNCTyBaTnCЯДITn a6o OcO6n 3 O6mExeHIMNФi3nUHMn, nCxixHIMn a6oCeHCoPnMn BnactNbOCTaMn, a6o6e3 HaneXHOro DocBiyu 3HaHb,3a BnHrTkOM BnpaKIB, KOJI TakeBnKOpNCTaHHa He BiD6yBaetbcraNiI HarJydom YN 3a Bka3iBkAmnBiDnOBiJaNbHOi 3a IXHIO 6e3neKy OcO6n.
He Do3B0JTe DITaTc3 npuaDom.
Hi B ykomy pa3i He BnKOpNCToByuTe Bnpi6 6e3 npabNtBHO BCTaHOBJeHOro @IbTppy-KnpoynobnOBAva!
HIKOJIH He BxNBaITe BNTJKBy BAKOCTi ONipHOIOBepXHi, 3a BNHTKOM BnnaKIB, KOJIHa ue HeDBo3HaUHO Bka3yE TbCBa.
-Примишнmae 6byTn DoCTaTHbO BeHTnIbOBAHm,ЯKUo BNTJxKa npaucpe pa30m 3 iHsIMn npuJaamn Ha ra3i a6o Ha iHsOMy naIbHOMy. - BcmoKtUbaHe nobITpy He ma cnprMoBvBaTnCry Tpy6OpOBiD, kIn 3actocOByEcTBcRdIaBBeDeHnB BiIpaCbOBAHnx Ra3iB Bd npuHaB, kI npauHbToB Ha ra3i nn iHwOMy naIbHOMy.
-ДotpmyTeB BCIX npaBnI BiHOCHO BIVeDEHHA DmY.
Cybopo 3a6oponeTbcra roTybaTu iKyu Ha BiDkPntomy nolym"PiBnTAAKOIO; BiDkPnte nolym' yUkoJxye φiNbTpni I MoKe BnKnKaTu nOKeJy. Tomy Norocnild yHnkatu y 6yd-akomy pa3i.
- Pekomehdyetbcra Tpimatn iD noctiHm KOHTpoJe M npoec roTyBaHHaXOM CmaKeHHa, 3anobirtn HeepneMHm BnPadkam, KOnn 3aMaetbcr OII.
- ΚΟДΟ TexHicHnx Ta 3aNo6iXhNx pO3Mipib,Яki MaHTb 3aCTOCOByBaTnCЯ ДЯ Tpy6 BiDBeHnHЯДИМу,ЖOPCTKO DoTPmYntecb pO3NopRdJKeHb MicceBx KOMNeTeHTHnx OprAhIB.
Bntjka Maecyacto OuyBaTncraK BCEpeDeHi, taK i 3OBHI (UOHAIMMEHII PA3HAMICARb, dOTpmyuocnb icTKX Bka3iBOK 3TexHicHoro 06cnyroByBaHHa, kHaDaHTbcraB cbyomy KepiBnucTbi).
- Heidotpumahnna npabnil 3 ouhiueHHa BNTJKK Ta 3 3amHn Ta OunueHHa fIbtpiB MOKe npN3BecTN DO NOKExi.
He KopnctyntecBNTJxkoHO 6e3 HaneXHO BCTaHOBJIeHIX NaMNOOOK, TOMy 0o ue He6e3neuHo uepe3 MOxNIBICTb ypaXeHHra eJeKTPnHIM CTPYMOM.
Bixnetae bcyb-ka BiinobiaaIbHicb y 3B'3ky 3 MoKINBIMN npUweHHaMn Bpo60ti npnay, 3bNTkamn a6o noKexaMn BHacNiIDOK HeDOpTpMaHn iHCTpyKci, HabeDeHNx BcBomy KepiBnucTbi.
- YBara!Частини 3 Вдкрптум Достуном можуть HarpiBaTися Do BИССКИХ TemпepаТур, якso BOHn BИКОРИСТОВИТьСЯ рa3OM 3 KУХОНМИ ППИТами.
CZ
Upozorněni
.0gall lall lalll lalal
1s gii jgai jil 1jll jj j!
piai wall lalgeog jill jc ala cloge
. jglai dLw Jgclg
aLl 1 aI yIySll lly bIy I
. 1
1
aalee aee eae 1
65
55 5
jL jS J 1J L 1J 1J 1J 1J 1J 1J 1J 1J 1J 1J 1J 1J 1J 1J 1J 1J 1J 1J 1J 1J 1J 1J 1J 1J 1J 1J 1J 1J 1J 1J 1J 1J 1J 1J
1111 1111 1111 1111 1111 1111 1111 1111 1111 1111 1111 1111 1111 1111 1111 11
J 1
j 1
g 155 jie JaoJIi jia 155jikai
1 1ablyabwgljzjg jzlal 2
Jn g aI gAaI Iy I y
1s 1s 1s 1s 1s 1s 1s 1s 1s 1s 1s 1s
.
j 1
slaalbi p la cale Stalba e bll p duiy
! Never use the services of an unauthorised technician.
Please have the following information to hand:
- The type of problem encountered.
The appliance model (Mod.).
The serial number (S/N).
The latter two pieces of information can be found on the data plate located on the appliance.
FR
Assistance
IHF 6.5 AM IX - IHF 9.5 AM IX
IHF 6.5F AM IX - IHC 9.5F AM IX
IHC 9.5 AM IX - IHC 6.5F AM IX


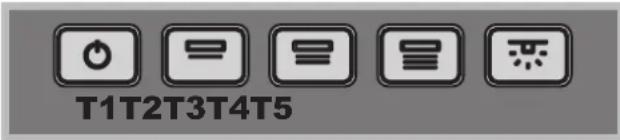
T1T2T3T4T5
T1 Reset motore
The installation procedure is illustrated in the first pages of this manual.
The installation must be done by a qualified technician.
Electrical hook up
The mains voltage must match that given on the ratings label inside the hood itself. If the hood has a power plug, connect the hood to an easily accessible regulatory power socket. If it does not (direct connection to the mains), or the socket is not easily accessible, install a two-pole regulatory switch to enable total disconnection from the mains in case of category III overvoltage, as required by the installation regulations.
Caution! Always check that the mains cable is hooked up properly and check that it operates correctly before reconnecting the hood to the mains.
Air exhaust (for ducted units)
Connect the hood to a duct and wall exhaust hole of a diameter equal to that of the air outlet flange. Using a smaller diameter tube and exhaust hole reduces the extraction capacity of the hood and also increases its running noise. The manufacturer is not liable for any consequences of doing so.
I Use the shortest duct required to achieve the purpose.
! Use a duct with as few bends as possible
I Avoid suddenly changing the diameter of the duct.
The duct must have as smooth an inner surface as possible.
! The duct must be made of regulatory material.
! Do not connect the hood to flues carrying combustion fumes from other equipment (boilers, GLASSs, stoves, etc.).
! Observe the instructions of the competent authorities in relation to the air exhaust. The air being exhausted may not be exhausted into a wall cavity unless the cavity in question is specifically intended for this purpose.
! Equip the room with air intakes to prevent the hood creating suction pressure in the interior (this must not exceed 0.04 mbar).
! The manufacturer is not liable for any consequences of failure to observe these instructions.
Filter or ducted?

Ducted version
GB
The hood purifies the air and expels it outdoors via an exhaust duct (dia. 150mm ) connected to its outlet flange. The diameter of the exhaust tube must be equal to that of the outlet flange. Caution! The exhaust duct is not supplied and must be purchased separately.
When routed horizontally, the tube must be angled slightly upwards (around 10^ ) to enable the air to be conveyed outdoors more easily. If the hood is fitted with charcoal filters, they must first be removed.

Filter version
The hood purifies the air and returns it to the room. This version of the hood requires installation of an accessory active charcoal filter unit.
This version requires an air deflector, a reduction adapter and the charcoal filter/s. The top tube must have its air outlet slots uppermost.
Technical data
| Model | Height (cm) | Width (cm) | Depth (cm) | dia. of exhaust tube (cm) |
| GLASS 60cm 61-82 59.8 50 15/1 | 2 | |||
| GLASS 90cm 61-82 89.9 50 15/1 | 2 |
| Model code Bulb (V) Bulb draw (W) Total draw (W) | ||
| IHF 6.5 A M IXIHF 9.5 A M IXIHF 6.5F A M IXIHC 9.5F A M IXIHC 9.5 A M IXIHC 6.5F A M IX | Halogen 2 | x 40 |
| 150 | ||
| Power | Voltage | Cap | Dimensions | |
| Halogen 25 W | 2 x 25 W | 230 V | G9 | L40xØ14 |
| Halogen 20 W | 2 x 20 W | 12 V | G4 | L30xØ10 |
| LED* | Risk Group 1 according to Standard EN 62471 |
| CE | The hoods are conforming to the following EC Directives: ·“Low voltage” Directive 2006/95/EC (12-12-2006) ·“EMC” Directive 2004/108/EC (15-12-2004) |
! Your hood is supplied as a ducted unit.
If you wish to use it as a filter unit, you must install the proper ACCESSORY KIT.
Note: If supplied with the hood, the accessory active charcoal filter unit may already be installed.
Instructions for transforming the hood from the ducted to the filter version are given in this manual (see "Filter version").
- Only available in certain models
Models with mechanical keypad
IHF 6.5AMIX-IHF9.5AMIX IHF6.5FAMIX-IHC9.5FAMIX IHC9.5AMIX-IHC6.5FAMIX

T1T2T3T4T5


T1 Motor reset
Pressing the button while the hood is in operation turns it OFF.
T2 Speed 1
Pressing the button sets the hood to speed 1.
T3 Speed 2
Pressing the button sets the hood to speed 2.
T4 Speed 3
Pressing the button sets the hood to speed 3.
T5 Lights ON/OFF
Maintenance and care
Caution! Before cleaning or servicing the unit, disconnect it from the mains by pulling the power plug or disconnecting the main circuit breaker.
First cleaning
- Remove the protective film
- Clean with a damp sponge and a little neutral soap
- Rinse off with a damp cloth
- Dry with a soft cloth; if the hood is stainless steel, dry along the metal's grain
Periodic cleaning
The hood must be cleaned frequently (at least as often as you service the grease filter), inside and out. Use a damp cloth and a neutral liquid detergent with lukewarm water. Do not use abrasive or corrosive products.
Warning: Failure to observe the hood cleaning and filter cleaning/replacement instructions can result in fires. Follow the instructions carefully. The manufacturer is not liable for any damage to the motor or fires caused by incorrect care or failure to follow the above instructions.
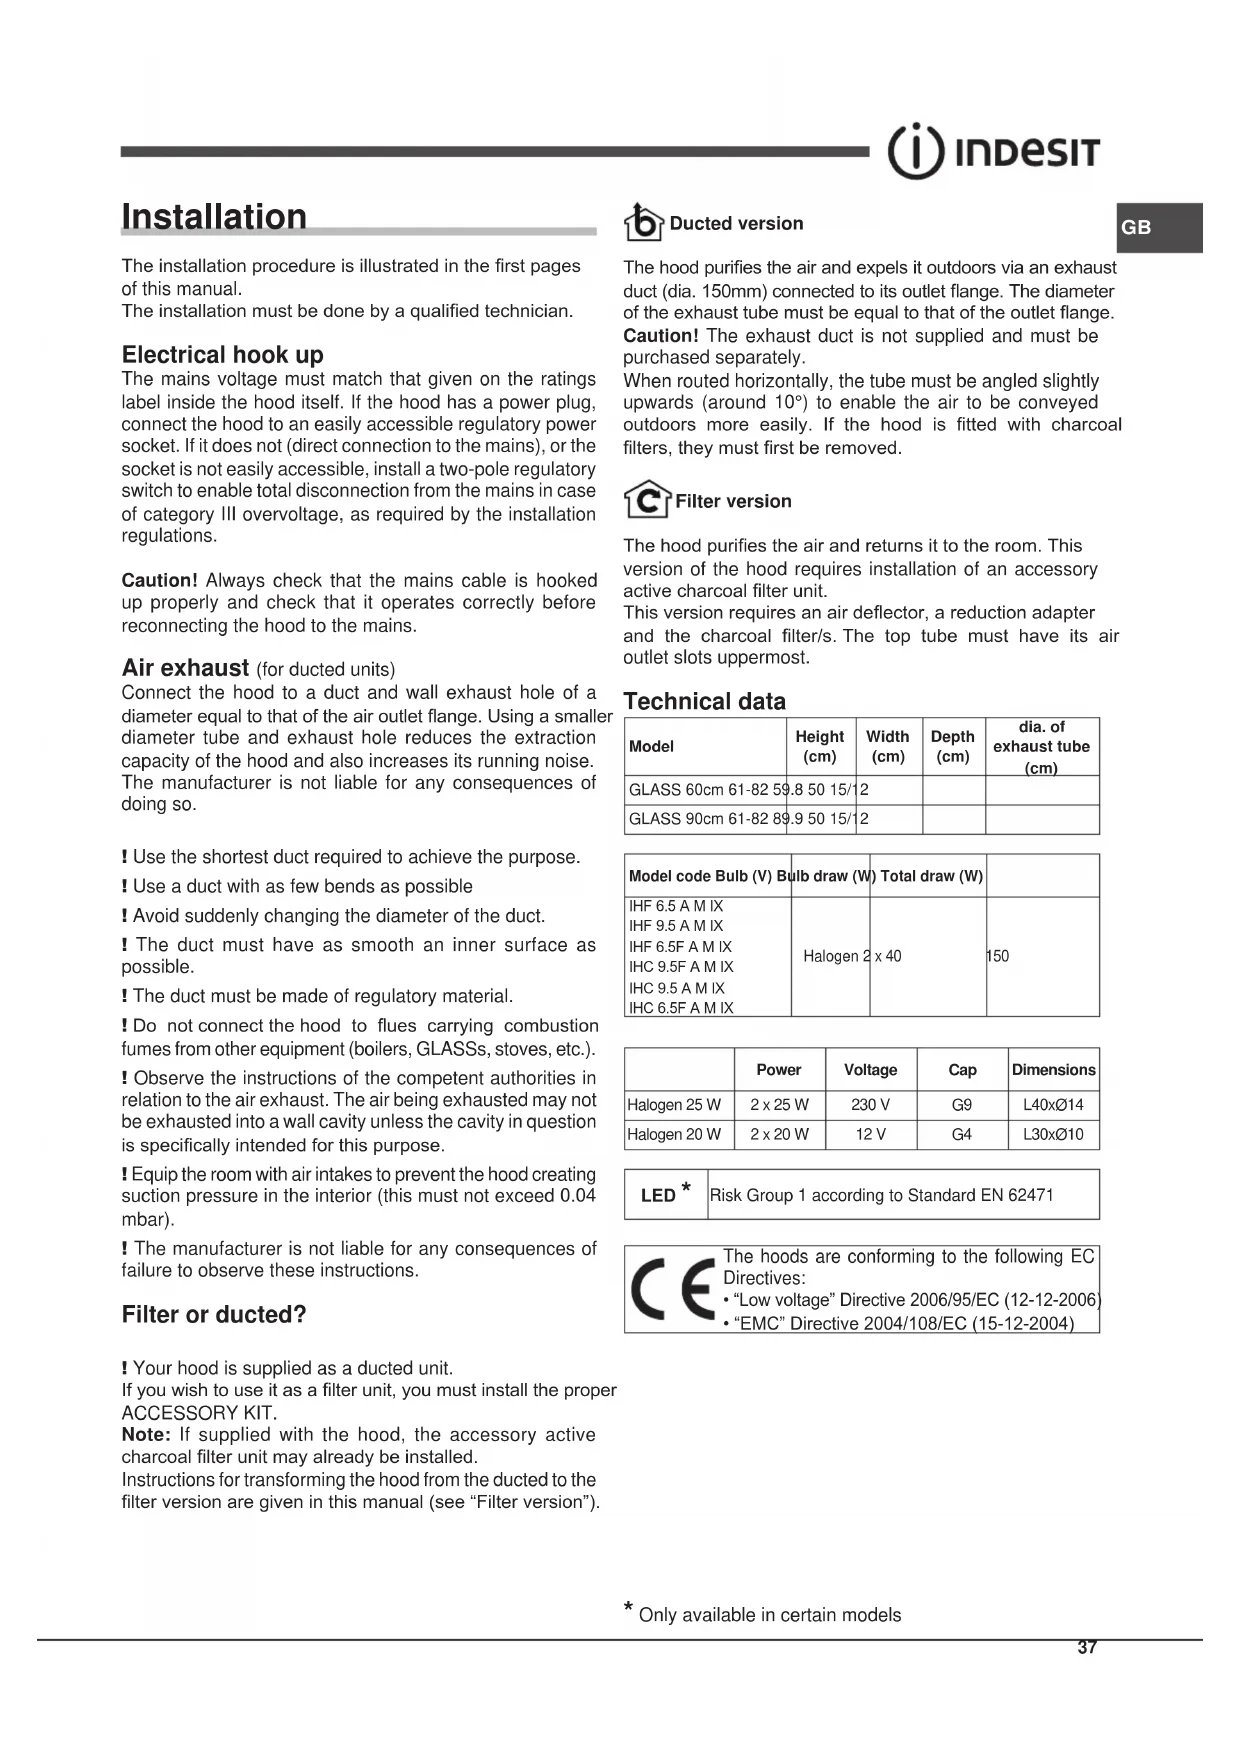
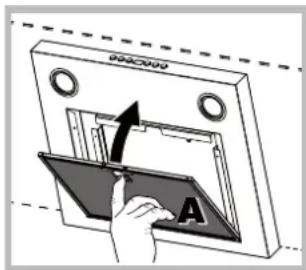
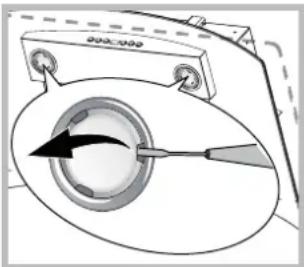
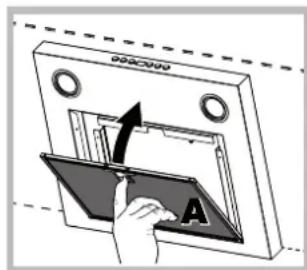
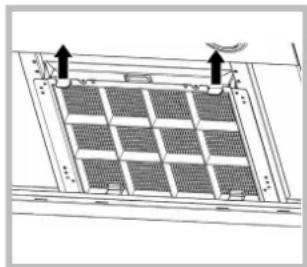
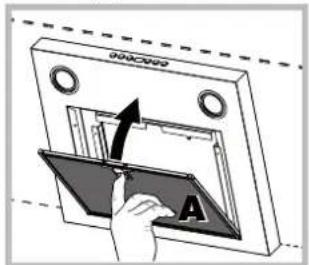
Servicing the grease filter (A)
The grease filter retains the particles of grease produced during cooking; it must be cleaned at least once a month with a non-aggressive detergent, either by hand or with a low temperature, short dishwasher cycle.
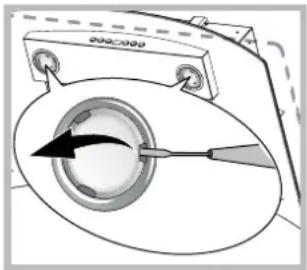
To extract the grease filter, pull the spring loaded handle.
If washed in a dishwasher, the metal filter may change colour, but this does not affect its performance.
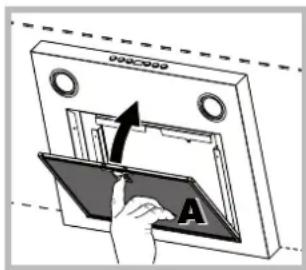
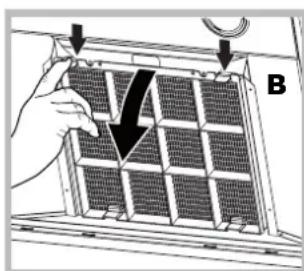
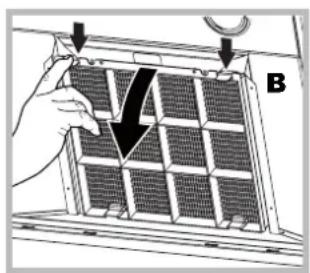
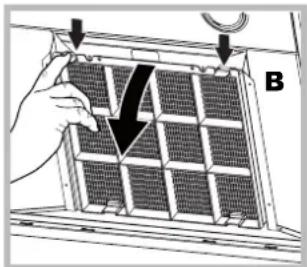
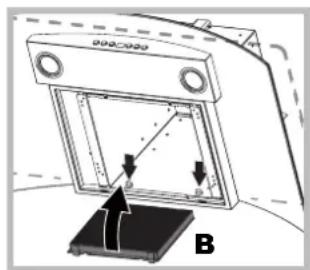
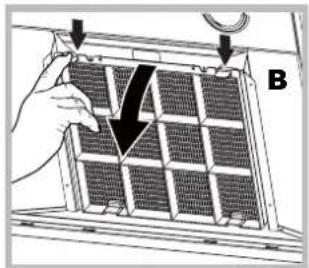
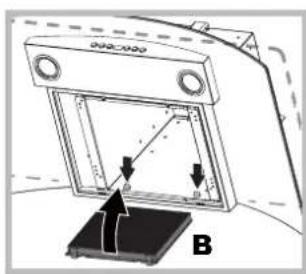
Servicing the charcoal filter (B)
The charcoal filter retains unpleasant cooking odours. The filter saturates after a variable time, depending on the type of cooking and how often the grease filter is cleaned. The cartridge must be replaced at least once every twenty months.
This filter can NOT be washed or regenerated
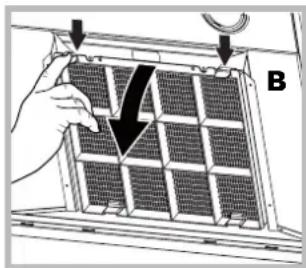
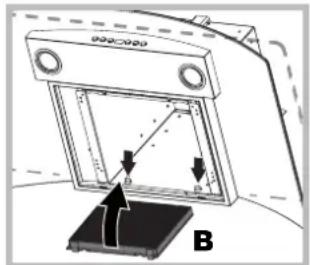
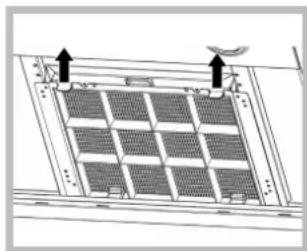
Disassembly: Remove the activated-carbon filter by pressing the two front levers which secure it to the hood.
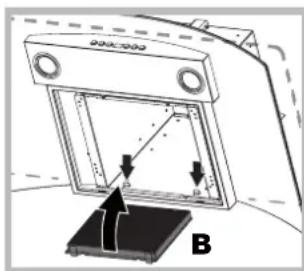
Assembly: Secure the activated-carbon filter first in the back using the hood's metal tabs and then in the front by pressing the two levers.

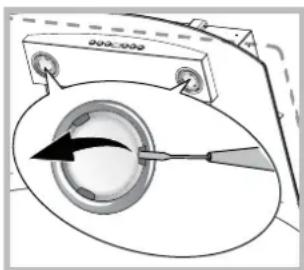
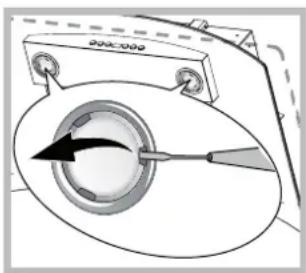
Replacing the bulbs
Disconnect the unit from the mains and remove the grease filter.
Caution! Make sure the bulbs are cool before touching them.
- Extract the guard by prising it out with a small flat head screwdriver or something similar.
- Replace the faulty bulb. Use only bulbs of the same type (for details, see the technical data in the following manual).
- Refit the guard (push it in).
Replacing the lights LED
The hood is fitted with a lighting system based on LED technology. The LEDs ensure optimal lighting, longer life and lower consumption compared with traditional lights. To replace them please contact the assistance service.
Electrical cable
If the power cable is damaged, it can be replaced by the manufacturer or his technical service, to prevent any attendant risks.
SCRAPPING
The unit is marked for conformity with European Directive 2012/19/EC, Waste Electrical and Electronic Equipment (WEEE). By ensuring that the unit is scrapped properly, the user contributes to safeguarding the environment and public health.

The symbol on the product or on its accompanying documents indicates that the product may not be treated as domestic waste but must be handed over to a sorting centre for electrical and electronic waste. Dispos of it in accordance with local waste disposal regulations. For further information on the handling, recovery and recycling of this product, contact the local authority, domestic waste disposal service or the reseller from whom you purchased it
Troubleshooting
If something does not work, make the following simple checks before contacting Technical Service:
If the hood does not operate:
Check that:
the unit is powered up.
- a speed has been set.
If the hood is not working effectively:
Check that:
- the selected motor speed is sufficient to handle the amount of smoke and steam being produced.
- the kitchen is adequately ventilated for the unit to take air in.
- the charcoal filter is not exhausted (filter version).
If the hood turns off during normal operation:
Check that:
the unit is powered up.
- the circuit breaker has not tripped.
In case of faulty operation, before contacting Technical service, first disconnect the machine from the mains for at least 5 seconds by pulling its plug, then reconnect it. If the fault persist, contact Technical Service.
FR
Installation
IHF 6.5 AM IX - IHF 9.5 AM IX
IHF 6.5F AM IX - IHC 9.5F AM IX
IHC 9.5 AM IX - IHC 6.5F AM IX

T1T2T3T4T5


IHF 6.5 AM IX - IHF 9.5 AM IX
IHF 6.5F AM IX - IHC 9.5F AM IX
IHC 9.5 AM IX - IHC 6.5F AM IX


T1T2T3T4T5


T1 Reset motor
IHF 6.5 AM IX - IHF 9.5 AM IX
IHF 6.5F AM IX - IHC 9.5F AM IX
IHC 9.5 AM IX - IHC 6.5F AM IX


T1T2T3T4T5


T1 Reset-Modus
IHF 6.5 AM IX - IHF 9.5 AM IX
IHF 6.5F AM IX - IHC 9.5F AM IX
IHC 9.5 AM IX - IHC 6.5F AM IX


T1T2T3T4T5


T1 Reset motor
IHF 6.5 AM IX - IHF 9.5 AM IX
IHF 6.5FA MIX-IHC 9.5FA MIX
IHC 9.5 AM IX - IHC 6.5F AM IX


T1T2T3T4T5
T1 Reset silnika
MoJeNc MexaHnuecko KOHCoJIbIO
IHF 6.5 AM IX - IHF 9.5 AM IX
IHF 6.5F AM IX - IHC 9.5F AM IX
IHC 9.5 AM IX - IHC 6.5F AM IX


T1T2T3T4T5


T1OctaHOBka DBnraTeNa
Pn HaxkataH KONK B npocece pa60tBbITXKa nepeknOHaetcB pexM BblKJ.
T2 Ckopoctb 1
Pn Haxkntn KhoNKn BbITaKKa nepeKIOHaetcH a 1-yoCKopoCTb.
T2 CkopoocTb 2
Pn Haxkntn KhoNKn BbITaKKa nepeKIOaEcTcHa 2-yIOCKOPOCTb.
T2CKopocTb3
Pn Haxkntn KHONKn BbITaKKa nepeKIOaetcHa 3-bOCKOPoCTb.
T5 BKN./BbIKN.ocBeueHn
TexHnueckoe obcIyXnBaHne n yXoJ
BHHMaHHe! Npeed Hauanom KaKnx-Jn6o pa60 no 7uCTKe nnTex. O6cnyKbAHNIO OTcoeHNHTe BbITJkKy OT 3NeKTPOCeTn, BbIHyB WTeNCelbHyO BNky N3 CTeBOI PO3ETKn nn BBIKNIOvNB O6uN BbIKNIOaTeNb B DOME.
PepBa YnctKa
CHINMITEaunTHyIO nJeHky
- Pioptne 3aqr3HeHnB BnaKHOI r6KOc C HeITpaJIbHbIM MOUcIM cpeDCTBOM.
TzaTeJIbHO npoTpne BnaJHoN TpIKNoI.
- BbtpnTe Hacyxo MmKoTpAnKo, ecnn BbIgKa n3 HepKaBeIOSe CTaNN, npOTnpaTe BDoNb NOOC metaJIJa.
PerynpHaH qntKa
BbITKky HxKypeyIapHO qNCTnTb (He pExe YNCTKn JINPOBbIX QINbTpOB) KAK BHyTpN, TAK N ChapyK. IJRA YNCTKN NCIOJIb3OBAbT TpIaNK HeITpaNBHbIM MOIOUIM CpeIcTBOM IN TENlyo BOy. He CneIyET NCIOJIb3OBAbT MOIOUne CpeIcTBa, COePkaune a6pa3INBhIe BEIeCTBa.
BHHMaHHe: Heco6nIOeHne npaBnI no yxOy 3a KxOHHoB BbITJAKKOn 3aMeHe pNtPOB nPbOaN T BO3ropaHIO.
PekomeHnyetc CneIOBaTb npNBeDEHHbIM INHCTpyKUyM.
Pon3BODNTeNb CHMaet C Ce6B BCaKyO OTBetCTBeHHOCtB 3a BO3MOXHoe NOBpeKdEHe NDBrAteN, BO3ropaHne No npuHHe HnPaBnBHorO yxOda nn Heco6IooHeHn Bblweyka3aHHbIX npedynpeKdEHN.
06cnykBaHne knpoBbX pntpO B(A)
KInpOBoHΦnIbTp ydePknBaet Kn pHbI e qactnCbI, coDepeKaunecB nCnpaepenX BapOCHo Nanei npri rotOBke. Heo6xOnmo QnCTNb 3OT ΦnIbTp He pexe Ondoro pa3a B Meca HearpeccNBbIMM MOUcIMN CpeCDTBAMN BpyHyu NIN B NocydomoeHNo MaUNHe npn
Hn3kO TeMnepaType No KopoTko nporpamme.ДЯ cbeMa JNPOBOrO fNbTp a NotaHnte 3a pyKy npyKHHoro OTcenHeHn. Ppi MoKe XnpoBOrO fNbTp a B NocydomooeHOn MaunHe erO cBeT MoKet NOTyCKHeTb, Ho 3TO He BInraTe Ha erO pa6OHy eXapAKTePncTkn.
06cnykBaHne yrolbHoro cHnbTpa (B)
YroIbHbIy IINbTp 3aepKINBaet HnnpraTHbIe 3anaxn OT BapOuHOBaHEnPi npri roTOBKe. CatypaunyroIbHoro IINbTpAp npocxOINT Nocne DOBOJbHO npoDOnKInTeNbHO 3KcNpyataunB 3aBNCIMOCtN OT TUNa KUxHN OOT perynpHocTN uCTKN JnpoBOrO fNbTpA.BIObOM cnyae dAnke 6e3 CnHaHn3aUnm catypaunn CneJeT 3aMeHrTb NaPONfNbTpA He pexe 1 pa3a B 20 Mecaua. 3TOT fNbTp HEJIb3MaITb NnnpeReHeepnpoBaTb.
CbeM: CHIMnTe yroJbHbI HnIbTp, HaxKaB Ha Dba IepeDnX pbUaKKa, Kpenaune erO K BbITaKke.
MOnTaK:Bnayana npncoeHnHTe yroIbHbIy fNtBtp K MetaJIInueckm WnOHkAM B3aHHe YactN BbITAKKN,3aTe M B npeJHeY actN,HaKaB Ha DBa pbIHaKka.

Iopraok 3aMeHbI lamnoueK
OTKJIOHTe BbITXkky OT 3JIeKTPocETn IN CHIMNTe XINPOBOI ΦnIbTp.
BhImaHHe!PexKdyeemDoTpoHyTbCra Do IamNoeK, y6eIntecb,yTO OHN XOIOHbIe.
1.CHrTb NpaoOH, NOaDeB ero MaJeHbKO nnOcKoI OTBePTKO HnN NOo6HbIM HHTpyMeHTOM.
2.3aMeHnte nepeperopeBsyuI naMnoUky. IcNoIb3yIte TOnbKO NaMnOuyKn C OdNHaKOBblm XapakTePncTikamn (6oJee npDpo6HbIe daHHbIe
CMOTPNTBTEXHNUeCKNX DaHHbIX,INPBBeDEHHbIE BCNEyUoIeM pyKOBOIDCTBE).
- 3akpoTe piafoh (KpeIJIeHne c uJyKom).
Iopraok 3aMeHbI JAmnouek LED
BbITJXkka yKOMNJIeKTOBaHa cIcTeMoI ocBeUeHnco CBETOINODHBIMn lamOChAMn. CBeTOnIOHNbIe lamNOChu oBeCneuHbAIOT ONTMaJIbHOe OCBeUeHne, 6oJIbWn Cpok cIyKbI n MeHbUee 3HePronOTpe6JeHne NO cpABHeHIO C TpaIzIOHaJIbHbIMn lamNoCHAMn. IJIa INx 3aMeHbI oBaPaauNTecb B CepBVC.
CTeBOI npoBOI
EcnncseBo npOBoNOBpeKdEn,BO n36eKaHne KaKOrO- nIbO pncKa erO 3aMeHy DoJXeH BblIOJIHNITb IPOUN3BOIDNTeB nn yONJHOMOeHHbI cepBVC.
YTNIN3AUIN
DaHHoe n3dennne IMeet MapKnupOBky COOTBETCTBna Ebponecko DnpekTnBe 2012/19/EC, Ytunnaaue aNeKtpnuecknx n 3neKtpoHbIx n3deNn (WEEE). PpOBepbTe, yTO6bl no OKOHuaHm erO cPoka Cnyk6bl DaHHoe n3dennne 6blIO cdaHO BytNB. 3TNMBbl NOMOKeTe coXpaHNTb OKpykaIoUyco CpeHy.

CnMBOJ Ha n3dennn nn B npnanaioeien K Hemy DOKyMeHNTaun O3Haayet, yTO daHHoe n3dennne He DOJXHO paccMaTPnbTbcra KaK 6bITobBie OTxOdbI, a DOJXHO 6bITb cdaHO B CNEuaNbHbI ueHTp yTNIN3aun, 3aHmAmUoNcR yNHUToxKeHnem 3JeKTPnuuecknx N 3JeKTPoHHbIX np6opOB. N3dennne DoJXHO 6bITb CdaHO B yTNJB B COOTBETCTBnC MeCTHBIMn HopMaTHBaMn NO yTNIN3aun OTxODOB. 3a DOnONHInTeNbHbIMn CBeDeHNrMM KacaTeNbHO o6pa6OTKn, yTNIN3aun N yNHUToxEHHaDaHORO n3dennna 06paauiaTeCb MecTHyo OprAHn3aunHO, 3aHmAmIOuYocR c6OpOM DomAunHX 6bITOBbIX np6opOB INN B Mara3HN, B KOtOpOM 6blIO KyPiNeHO n3dennne.
* IMeETcra ToJIbKO B HeKoTOpbIX MoJeIaX
HencnpaBHOCTN MeToDbInx yctpaHeHna
RS
PnObHApyKeHHN HeNCpNaBHOCTn NpeeTcK KaObpaNTbcra B CepBnC, BbINOHNHTe CneDyUe NPOCTbIe NPOBepKn:
Ecnn BbITJkKa He pa6oTaE:
PpOBepuTb:
HaJIINUe 3JIeKTpOPINTAHIA
- 6bIaJIIaI3aIaHa cKOpocTb.
Pn Hn3Ko 3ΦΦeKToBHOCTN BbITaKKn:
PpOBepntb:
- TTo6bl 3aHaHHa cKOpocb DnBraTeIa 6bIa DoCTaTOHOn dIy o6bema nCnpaHm nDbima.
- UTo6bI NOMeUeHne KxHn NmEno DoCTaTOUYo BENTUNRAuNIO DnA BO3dyX03abopa.
He n3HOweHn yroIbHbIyIbTp (yIbtpyIOuaBepcna BbITAAKKN).
Ecnn BbITXkKa BbIKIouaETcB npoecce pa6oTbI:
PpOBepuTb:
- HAIJUHNE 3JIeKTPoNITaHIN
He cpa6oTaJ nn MHORONIOJIOCHbIX pa3beENHHTeJIb.
B cnyuae BO3MOXHbIX HenCnpaBHOCTe nepeTe, KaK o6paTntbcB CepBnC,OTCOEINHTe BbITAAK Ky npIMepHo Ha 5 cek. OT cTeBOrO nITAHN, BBIHyB uTEnCeJIbHyIO BNkY n3 ceTEBoI po3ETKn, 3aTEM BHOb NOcEOHNITE. Ecnn HEnCnpaBHOCTb He yCTpahReTcA, O6paTntecB CepBnC.
IHF 6.5 AM IX - IHF 9.5 AM IX
IHF 6.5F AM IX - IHC 9.5F AM IX
IHC 9.5 AM IX - IHC 6.5F AM IX


T1T2T3T4T5
T1 Npe3anyck DnryHa
HaTnckaHnHa zu KhoNky niD yac po6oTu np3BeDe do BmKHeHHBnAAKKn.
T2 WbndKicTB 1
Pn HatackanHi ciE KhoNKn BntaKKa nepeJe y cTaH, nonepdni Wbndkocti 1.
T3 WbndKicTB 2
Pn HatackHaHie KhoKn BntKa nepeJe y cTaH, nonepdiuokcti 2.
T4 WbNdkic3
Pn HatackanHi iiei KhoNKn BntaKka nepeJe y cTaH, nonepdHi Wbdkocti 3.
T5YbIMKHeHHBIMKHeHHOBCITNeHH
Cen pInbTp He nepeD6auee MNTT a 60 BIDHOBNEHn.
Demontax: BnMItb pfIbtp aKtNbBOBaHOro ByrInnna, HATNCyBwH Na Dba nepeHi BaKeJI, kI φikcyIb NOro Do BITRAKKN.
MOnTaK:ПиeДнaHTeФiNbTp aKTHBOBaHOrO ByrIINn cNouATky N03aNy Ha Metanebi r3NcKN BntAxxN,NOTIM nonepedy,HaTnCHyBUn Ha dBa BaKeJI.
3amHa lamnoyok
Bid'edhaIe npnad BiD mepekei eekpHoro KINBneHHa i BnIMt binbtpn-KnpoyOBIOBaqi.
YBara! Nepu HIX TopkaTnCn lamn, BneBHiTbcn, 00 BOHn XOJIoNDHI.
1.Bnmiitb3axnche npntocyBaHH. BnKOpNCTOBHyOnuBraKoCTi BaKeJNeBeNnuKy BnKpyTkya6oNoDiHn IHcTpymeHT.
2.3amHb ykoJxehny a m no qy. BnKopncTOByte TInbKn amNoQKn 3 TmN J
XapakTepcntkamn,00uWkoJxHe(3aDeTaIbHiOHO IHopMaicIO 3BepHtbcra Do TexHiHnx DaHnx,HaBeJeHnx ycbomy KepiBHuTBI).
- 3akpniTe 3axnche npncTocyBaHHa (pikcaia Jxom 3auninaHH).
3aimaHaJaMNooyoKLED
Bntkka ochaueHa cBITIOIOHO CNTeMO OCBtneHn. CbitIOIOI rapaHTyIOb ONTmAlbHe OCBITNeHH, TpBaJIiWiN TepMIn cny6n n 3aouaJxHn eHepriy npIBHHI 3 TpauiuHmN lamnoovkAmn. Jna 3amHn cBITNOIOID 3BepHITbcr y CepbiCy cnX6y.
EneKtpnHn Hhpy
B pa3i yukdojHn Hhpy JnBnHn, noro moHa 3amHnTn, 3BepHyBunncd o Do Bnpo6nka a6o do noro cepbcHOI cnx6n. Lc nonpeDntb 6yDb-ky He6e3neKy
YTNJI3AUJIA
Ley npnaMaB iDmitky (WEEE) y BiDnOBiHocTi do CbponeNcKOI NapeKtNBu 2012/19/EC: BiDxoOneNEktpnuHoro Ta eNeKtpoHHoro o6NaHaHHa (WEEE). BdoCKoHaNBwncra, 0o ceB Bnpo6 6yB yTuJIIOBaHHn HaneXHM 3acobom, KopNCTyBaay poBntb CBI BHeCOK 3 MeTOIO nonepdKeHH nOteHuiHHx HeraTUBHx HacNIIDKOB IINI DOBkiIIra Ta 3DopOB'JIIOHN, kI MOKyTB HAcTaTN Upe3 HenpaBnblHy yTuJIi3auio zuBO rBOpo6y.

CnmboHa Bnp6i a60 y cynpObiHni DOKyMeHTaii
Bka3ye, 10 ue npnaI He Mae po3rJdaTncra JK no6yTOBI
BiXODn Ta Ioro cnid 3daBatn y cneiaian3OBaHI ceHTpn
3b6py, kI 3aMaIOb8cpepeo6ko eNEKTPnHORo Ta
eNEKTPoHHORo 6bnadHnn. Ytni3yIte npnaI 3riIDHO do
MICueBNx HOpM 5oDo nepeop6Kn Ta ytni3aui BiXODIB. 3a
NodabloIOHOPMaIeIO 5oDo nepeop6Kn, BiHOBJIENH
Ta NOBTOPOI nepeop6Kn 5boro Bnp6y 3B'JIKITbc3
BIDNOIBHMIM MicceBmM CNyK6amn, i3 CnyK6oIO 3i
3bnpAHnno6yTOBnX BiXODIB a60 3 Mara3HOM, De BN
PnpDbaN CE Bnip6.
HecnpaBhocti i 3ac06n ix ycyHeHHa
JaIOBpo6oTI npnady BHHKnI deaKi np6nemn, nepH HIX 3Beptatncr do CepbicHOi cnjXb no donomory, BIKOHaTe taki npocri nepeBipkn
KIO BNTXKA He npaioe:
Ipebeipte, 10:
He BiDynoCnepepuBaHHny noCTaHaHH enEeKtpuHOrO CTpyM.
- 6yna obpaHa WbNdkicTb.
YKIO BNTXKa npaioe noraHo:
Ipebeipte, 10:
- 06pHaIbIKcTB DnryHa E DocTaTHbOIO dna KJIbKocTi BIDnpaCbOBaHOro nobITpr i napi.
Kyxhi e doCTaTHbO BeHTnIbOBaHO 3a6e3neueHH 3a60py NOBITpr.
ByrilbHn HJbTp He 3HOWeHN (DnBnTjXOK y JIbTpuyOuHm MoNpikaui).
Akuo BntaKKn BmNkaTbcn iud yac HopMaJIbHOi po6Ot:
Ipebeipre, 10:
- He BiD6yIocnpepePbAHn y noCTaHaHn eNeKtpuHOrO cTpyM.
- He cnpaioBab DBOIOJIIOCHN BIMNKaU.
B pa3i HecnpabHoi p6oTn, nepu Hix 3BepTaTnc DO CepbicHOI cnyk6n no donomory, BiEaHaNte kHaamHeu Ha 5 cek. npuaD BiMpeXeJektpnuHOrO KINBHeHHa BnHBWn BuKy 3 po3eTKn, i NOTIM BCTaBTe II 3HOY. RaIO HececnpabHicTB He Bdaetbcra yCyHyTu, 3BepHiTbcr DO CepbicHOI cnyk6n no donomory.
Instalace
Modely s mechanickym tlacitkovym panelem
IHF 6.5AMIX-IHF9.5AMIX IHF6.5FAMIX-IHC9.5FAMIX IHC9.5AMIX-IHC6.5FAMIX


T1T2T3T4T5
T1 Vynulovani motoru
Modely s mechanickym tlaclidlovym panelom
IHF 6.5 AM IX - IHF 9.5 AM IX
IHF 6.5F AM IX - IHC 9.5F AM IX
IHC 9.5 AM IX - IHC 6.5F AM IX


T1T2T3T4T5
T1 Vynulovanie motora
Po stlaceni tohto tlacidla poças cinnosti sa odsavac VYPNE.
T2 Rychlost'1
IHF 6.5 AM IX - IHF 9.5 AM IX
IHF 6.5F AM IX - IHC 9.5F AM IX
IHC 9.5 AM IX - IHC 6.5F AM IX
T1 MoToPbI ToKrTaY
Copfblx Kymbcic tcn TypfaHa 6acbInca, on EWEJI
T2Kbɪnʌmʌbɪk 1
TyIme 6acblnfaHda copfbliu 1-xblnlaamdbikka opHaTbIaIbI.
T3KbIJaamdbk2
TyIme 6acblraHaDa copfbiu 2-xbiJaamdbikKa opHaTbIaIbI.
T4KbIaamabik3
TyIme 6acblfahda copfbli 3-xbIJaamdbiKa opHaTbIaIbI.
T5IaMdapdbIKOCY/ΘUIPY
TexHnKaJIbIK KbI3MeT KOpCeTy XaHe KytIM KOpCeTy
A6aB 60JIbHbI! KypblfHbI Ta3aJ lamac Hemece OAFn Kbl3MeT KepcetNec 6ypbH, KyaT aibpbln AbyrY r Herizr anbipin KockblwTbI axkbipaty apkbln OHBI TOKtAH aftity KepeK.
Anfawkbl Ta3anay
KoprafbuW ynpdi wewin anbHb3
A3fHa6eIapan ca6bIH Kocbln,dbIMKblr6kameH Ta3anaHbI3
-DbIMKbIN Wy6epeKeHn WaiBbHb3
KymcaK y6epeKeH cyptin, KypTaBbHb3; copbIOT 6acnauTbIH 6onattan Xacanfah 6oNca, TeKctypa6oibmEH KypTaBbHb3
Kyueni Ta3anay
Copfbltih ihi MeH cbptbH Kni Ta3an Tpy KaKet (KeM DereHne, MaCy3rici h aybcIbTbpFah Ke3depJe).BIMKbln Wy6epeK neh 6eHapan cyNbIK Kytfls 3aT KOcblnFAH Xblbl cy KondaHbIHbI3.
KbipfblHemeceT0TbIKtbIpfbIi3aTTapdbi naIdanaHa6aHbI3.
EckepTy: Copfblt Ta3aJay XHe cy3rinepi Ta3anay/ aybIcTbipy HcyckaynapbI opbIHdaIMaca, ept WbIFybl MymKiH. HcKaynapdb6jXkbITnaiOpbIHdaHB3. OHdipywi MOTopra KeIreh 3aKbIMdapfa HeMece dypbc Kytim Jkacamay JxOFapbladfHcyckaynapdbOpbIHdaMay caJInapbIHah ShbIKKaH eptKe Xayantb6OJMaIdbI.
MaCy3ricHe KbI3MeT Kepcety (A)
MaCy3rici TaFAM nicipren Ke3e WbifatbH Ma 6eIweKTepeHHCTaHb; OHb KEM DereHne aBbHa 6ip pet, eNci3 Kyfblw 3aTne H KOImEHemeCE TEmEH TemnepaTypaBlkICKa bIDbc KYfblW UKNbIMeH Ta3anay Kepek.
yuih cepinneni tykahn tapbih3. bldic kyyfbiWta Kyybnca, metann cyriHn Tyci e3repyi MymkiH, ipak OHbH KymbcHa HkycaH KeMnei.
Kemip cy3ire Kb13met Kepcety (B)
Kemip cy3rici KaFBIMcbI TaFAM Nicipy NICTepiH YCTaIbI Cy3ri nicipineTIN TARAM TyPiHE XeHe MaCy3ricIH Ta3anay XnJinirIe 6aIIaHaBcTbI eP TyPiXnNInikne KaHbIFbIOTbIpaDbI. KaptpnIXKEM DereHde XnbIPMa aJa bip pet ayblcTbIPbIybl Tnic.
Byn cy3riHjyyfA Hemece kajnbHa KeNtipyre 60ImaIdbI
Bennektey: Copfbilka
6eKITIN TpyaTBH anDbIHbI eKi
iINTipeKti 6acbl,
6eNceHdpinre H KEMIP cy3ricH
wein aIbHbI3.
Kypactbipy:BeIceHdpinre H KEMIP cy3rici H andbimc H COPfbIHTbIH apTkbXaFBHdaFb I MetaJIIN TINdepH, OaH KeHH aNDbHfXaFBHDAfEki NInHTipeKTTH KemerimeH 6ekitih3.
WamapdbaybCTbipy
KypbIfBihbTOKTaH aBtBIn, MaCy3ricH WeWIn aBbHbI3.
A6aB 60JbIHbI3! YCTamac 6ypbH, WAMdap caJIkbHdaFaHbHaKe3 XeTki3iH3.
1.CaKaTahDbipfblWbI WbIfapbn anHb3: KiKKeHe Teric 6actb 6ypafblwnen Hemece ofAH Kcac Kypalmeh WbIfapblb3.
2.AkaynbwaMdb aybcIpbHb3. Typi 6ipdeWamdapdbraHa KaondaHbHb3 (MaImet anyywiH,TeMeHderiHyckayn depeKti kapaHb3).
- CaKaThDbipfblwTbI opHbHa opHaTbIHbI3 (ntepin, opHaTbIHbI3).
UamapdbaybictbypLED\*
Copfblt Ta IIOI TexHONorncbHa Heri3dJeTRe HkapbIKTaHdbipy Kyeicipap. IIOITap eTeTteri WAMapfa KapaFaHda OHTaJIbI KapbIKTaHdbipyDb, y3aftpaK XyMbIC icTeydi XeHE a3bpak Kyat naDanaHydbI KaMTaMaCbI3 etedi. OnapdbI aybICTbipy ywiH KeMek Kepcety KbImTeHe xa6apnacblb3.
3neKtpKa6eJI
Kyat ka6eni 3aBIMdaIcA, TeyeKeJIeepDIn aIbH anIy yuH OHbl eHdipywire Hemece OHbIH TEXHKaNbIK KbI3MeTIHe aybIcTbIPtyfa 60nAbI.
KOKbICKA TACTAY
Eyn KypbInfbl Kokbic 3neKtp JxHe 3neKtpOndbik Ka6dbikka (WEEE) Katbictbl EC/2012/19 Eyponaanbik DnpeKtmbacbHa caikec kee i den beJrineHre. Kypblfbl Kokbicka dypbc TactaIybiH KamTamaCb3 ety apkblnb naJaAnaHybI KopwaahopTa MeH KofamHbIH DeHcaylbfbH Kopfayra at caIbicabl.

Himderi Hemece OHbIK KxKaTAMacbIHdaft TaHbAcbl EHMdi TYPMbICTbIK KOKbcTacTaJImaybl, OHbIH opHbHa 3JekTp XHe 3neKTPOHdbIK KOkbICTbICpblNTay OptaIbIFbHa Ta5bictanyb Tnic eKeHH BinDipei. JKeprinKiKObkTactay 3aHdapbHa cEneKcpeket etiri3. Ehimdi KonDaHy, KaNbHa KeNTipy XHe KaHTa eHdey TypaBkocbMua MaImet any yuH JKeprinKiTy3bIPnbl OprAhapFa, KOkbic KInHay KbI3MeTIHe Hemece EHIMdi catbIN anfah OpbIHfa xa6apNaCblHbI3.
AkaayIbIKTapdbI KOIO
KZ
Kymbc icTemen KaIca,TexHkaJIbIK Kbl3MeT Kepcety optaIbIFbHa xa6apnacnac 6ypbIH TeMeHderi KapanaBIM KaJdainapdbI Tekcepij3:
Copfbw kymbic ictemec:
Keneci kafdaanapdbteekcepin3:
KypblfblKocblbnTyp.
KbIJaAMdbIK OPhaTbIJFaH.
Copfbw Tmimdi Xymbic icTeMece:
KeNeci KaFdaaHapDbI TeKcepiH3:
-TaHdAnFaH MOTOP KbIJaMdbIbI WbIKKaH TYTH MeH 6y KeJIemIH eHdeyre keTkiJIKTI.
KpyblfbyayaanybyuwiinacyndeTnicBeHTnlaqna6ap.
Kemip cy3ri KaHbiknaFaH (Cy3y Hcckacbl).
Xymbic icten typran Ke3de, copfbw ewn kanaTbH 6onca:
KeNeci KaFdaHapDbI TeKcepin3:
Kypblfbl Kcbbltn Typ.
- anbipin Kockblu KocblmaHaH.
Akaybl kymbic ictereh kafdaeta, texhkaIbIK kb3Met KepcTeOpTaIbIFbHa xa6apnacnac 6ypbIH, aibipih aftity apKblnb KpybIfBbHb TOKTah Kem dereHde 5 cekyHka aftbTIN, kaTt KaCbHbI. Akayblk weiImce, texhkaJIbIK KbIMET KepeTeOpTaIbIFbHa xa6apnacbHbI3.

gJgJSLslll
Culagill pail jao gai cial kally Jauy el bail ay 12
aill 2015
11
:
.
:olidjaoyolbll
:
jll jlll lss co Jaleill ails jol jilil all jall ae
.
.
(j)gall
Jiaaiy jiaiui liu liu liu liu
:
.
Jill 1
aalall cllll alg jagall jol l aagall jao 10000000000000000000000000000000000000000000000000000000000000000000000000000
logio
jgall jy jgall jla lal y
jgy gall cll i xuall
Iy jy Ie 20 g y aeg
el gll y ciaio pliy
pliy gll y glll y bwl uy
o r y o y d y
glbln all
(A)
j 1 j 1 1 1 1 1 1 1 1 1 1 1
GLASS
(B)
jilal jaiy jaii jai jai jai jai jai jai jai jai jai jai jai jai jai jai jai jai jai jai jai jai jai jai jai jai jai jai jai jai jai jai jai jai jai jai jai jai jai jai jai jai jai jai jai jai jai jai jai jai jai jai jali jali jali jali jali jali jali jali jali jali jali jali
aai jy jil jla jly jia: jai jiyolai jui jil jlc bai jll aal
j 1 j 1 1 1 1 1 1 1 1 1 1 1 1 1 1 1 1 1 1 1 1 1 1 1 1 1 1 1 1 1 1 1 1 1

aaiiee
IHF 6.5 AM IX - IHF 9.5 AM IX
IHF 6.5F AM IX - IHC 9.5F AM IX
IHC 9.5 AM IX - IHC 6.5F AM IX

T1
Aeaiy piie aie clll luea eui jill iiae laiai pi 12!
1 a e T2
J 120000000000000000000000000000000000000000000
gii
aill lalb ylll jll lgl yllg kll jn jy 12 yll ldl aai eall jldydy gall cllll al g ll lal lal lal lal g s i gil g k g k g k g k g k g k g k g k g k g k g k g k g k g k g k g k g k g k g k g k g k g k g k g k g k g k g k g k g k g k g k g k g k g k g k g k g k g k g k g k g k g k g k g k g k g k g k g k g k g k g
J 1
(y)
JbIygluaa la jao g aia I ayilaaiaia g yaiy cIbll Jauy p
jaiy jaiy jaiy baii aiaiaiaia g yaiy iaiiaiaia i. gaiy iaiaia
gaiy gaiy gaiy aiaiaiaia jaiy les caiy ie caiy oia
gaiy gaiy gaiy aiaiaiaia jaiy aliy gaiy aiaiaiaia gaiy Jao 8259.85015/12
1-8289.95015/12
1 1
ylll jn jssu Jai y bji j

- Operating Instructions
- COOKER HOOD
- FR
- Avertissements
- UA
- 3actepekhi 3ac06n
- 3aŋbHa 6e3neKa
- CZ
- Upozorněni
- Assistance
- T1 Reset motore
- Electrical hook up
- Air exhaust (for ducted units)
- Filter or ducted?
- Ducted version
- Filter version
- Models with mechanical keypad
- T1 Motor reset
- T2 Speed 1
- T3 Speed 2
- T4 Speed 3
- T5 Lights ON/OFF
- Maintenance and care
- First cleaning
- Periodic cleaning
- Servicing the grease filter (A)
- Servicing the charcoal filter (B)
- Replacing the bulbs
- Replacing the lights LED
- Electrical cable
- SCRAPPING
- Troubleshooting
- If the hood does not operate:
- Check that:
- If the hood is not working effectively:
- If the hood turns off during normal operation:
- Installation
- T1 Reset motor
- T1 Reset-Modus
- T1T2T3T4T5
- T1 Reset silnika
- MoJeNc MexaHnuecko KOHCoJIbIO
- T1OctaHOBka DBnraTeNa
- T2 Ckopoctb 1
- T2 CkopoocTb 2
- T2CKopocTb3
- TexHnueckoe obcIyXnBaHne n yXoJ
- PepBa YnctKa
- PerynpHaH qntKa
- 06cnykBaHne knpoBbX pntpO B(A)
- 06cnykBaHne yrolbHoro cHnbTpa (B)
- Iopraok 3aMeHbI lamnoueK
- Iopraok 3aMeHbI JAmnouek LED
- CTeBOI npoBOI
- YTNIN3AUIN
- HencnpaBHOCTN MeToDbInx yctpaHeHna
- Ecnn BbITJkKa He pa6oTaE:
- PpOBepuTb:
- Pn Hn3Ko 3ΦΦeKToBHOCTN BbITaKKn:
- PpOBepntb:
- Ecnn BbITXkKa BbIKIouaETcB npoecce pa6oTbI:
- T1 Npe3anyck DnryHa
- T2 WbndKicTB 1
- T3 WbndKicTB 2
- T4 WbNdkic3
- T5YbIMKHeHHBIMKHeHHOBCITNeHH
- 3amHa lamnoyok
- 3aimaHaJaMNooyoKLED
- EneKtpnHn Hhpy
- YTNJI3AUJIA
- HecnpaBhocti i 3ac06n ix ycyHeHHa
- KIO BNTXKA He npaioe:
- YKIO BNTXKa npaioe noraHo:
- Akuo BntaKKn BmNkaTbcn iud yac HopMaJIbHOi po6Ot:
- Instalace
- Modely s mechanickym tlacitkovym panelem
- T1 Vynulovani motoru
- Modely s mechanickym tlaclidlovym panelom
- T1 Vynulovanie motora
- T2 Rychlost'1
- T1 MoToPbI ToKrTaY
- T2Kbɪnʌmʌbɪk 1
- T3KbIJaamdbk2
- T4KbIaamabik3
- T5IaMdapdbIKOCY/ΘUIPY
- TexHnKaJIbIK KbI3MeT KOpCeTy XaHe KytIM KOpCeTy
- Anfawkbl Ta3anay
- Kyueni Ta3anay
- MaCy3ricHe KbI3MeT Kepcety (A)
- Kemip cy3ire Kb13met Kepcety (B)
- WamapdbaybCTbipy
- UamapdbaybictbypLED\*
- 3neKtpKa6eJI
- KOKbICKA TACTAY
- AkaayIbIKTapdbI KOIO
- Copfbw kymbic ictemec:
- Copfbw Tmimdi Xymbic icTeMece:
- Xymbic icten typran Ke3de, copfbw ewn kanaTbH 6onca:
- gJgJSLslll
- GLASS
- (B)
- aaiiee
- T1
- a e T2
- gii
Brand : INDESIT
Model : IHF 6.5 A M IX
Category : Basket