1171250102 - Lighting BRENNENSTUHL - Free user manual and instructions
Find the device manual for free 1171250102 BRENNENSTUHL in PDF.
| Product type | Indoor and outdoor LED projector |
| Brand | Brennenstuhl |
| Model | 1171250102 (L CN series) |
| Power | 10 W, 30 W, 50 W or 80 W depending on version |
| Rated voltage | 220-240 V ~ 50 Hz |
| Protection class | I (earthing mandatory) |
| Protection rating | IP65 (versions without detector) or IP44 (versions with detector) |
| Detector type (PIR versions) | Passive infrared sensor |
| Detection range (PIR versions) | Up to 12 m, 180° horizontal angle |
| Duration adjustment (PIR versions) | 10 seconds to 4 minutes |
| Sensitivity adjustment (PIR versions) | Yes, via potentiometer |
| Brightness adjustment (PIR versions) | Yes, adjustable day/night threshold |
| Dimensions (e.g., 10 W version) | 110.5 x 83 x 4 mm |
| Cover material | Tempered protective glass |
| Light source | Integrated non-replaceable LED |
| Mounting | On wall bracket, mounting kit included |
| Safety instructions | Installation by a qualified electrician, cut power before intervening, do not look directly at the beam |
| Maintenance | Clean with a dry or slightly damp cloth, without solvent |
| Parts replacement | Only original protective cover, no internal components are repairable |
| Disposal | Do not dispose of with household waste, follow WEEE directive 2012/19/EU |
Frequently Asked Questions - 1171250102 BRENNENSTUHL
User questions about 1171250102 BRENNENSTUHL
0 question about this device. Answer the ones you know or ask your own.
Ask a new question about this device
Download the instructions for your Lighting in PDF format for free! Find your manual 1171250102 - BRENNENSTUHL and take your electronic device back in hand. On this page are published all the documents necessary for the use of your device. 1171250102 by BRENNENSTUHL.
USER MANUAL 1171250102 BRENNENSTUHL
LCN130PIRIP44 30W(1x30W) IP44Ja220,5x180,5x4mm
LCN150IP6550W(1x50W) IP65Nein 281,5× 231× 4mm
LCN150PIRIP44 50W(1x50W) IP44Ja281,5x231x4mm
LCN 180 IP65 80 W (1 x 80 W) IP65 Nein 303,5 x 225,5 x 5 mm
Please note: Please read these instructions carefully prior to mounting the light and store them in a safe location afterwards!
SPECIFICATIONS
Protection class: I
Nominal voltage: 220 - 240V 50Hz
Model: Output: Type of Motion Protective cover protec-detector dimensions: tion:
| L CN 110 IP65 | 10 W (1 x 10 W) | IP65 | no | 110.5 x 83 x 4 mm |
| L CN 110 PIR IP44 | 10 W (1 x 10 W) | IP44 | yes | 110.5 x 83 x 4 mm |
| L CN 130 IP65 | 30 W (1 x 30 W) | IP65 | no | 220.5 x 180.5 x 4 mm |
| L CN 130 PIR IP44 | 30 W (1 x 30 W) | IP44 | yes | 220.5 x 180.5 x 4 mm |
| L CN 150 IP65 | 50 W (1 x 50 W) | IP65 | no | 281.5 x 231 x 4 mm |
| L CN 150 PIR IP44 | 50 W (1 x 50 W) | IP44 | yes | 281.5 x 231 x 4 mm |
| L CN 180 IP65 | 80 W (1 x 80 W) | IP65 | no | 303.5 x 225.5 x 5 mm |
The heavy-duty LED light is suitable for indoor and outdoor lighting applications and is designed for permanent installation. Do not use this light for any other purposes.
SAFETY NOTES
- The light must be installed and serviced by a qualified technician.
- Always turn off the power supply before installing or servicing the light.
- The light must be properly earthed.
- Do not use this light without properly attached gaskets!
- LED lights are extremely bright! Avoid looking straight into an LED light beam, as doing so could result in irreversible eye damage.
- Damaged protective covers must be replaced with an original Brennenstuhl protective cover before the light can be used again.
- If the mains supply cable of the light is damaged it must be replaced by a qualified technician in order to avoid risks.
MOUNTING AND CONNECTION TO THE POWER SUPPLY
- Do not attach the light to a surface that is subject to vibrations.
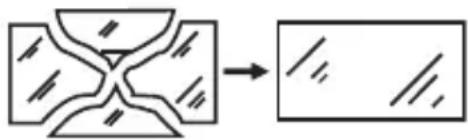
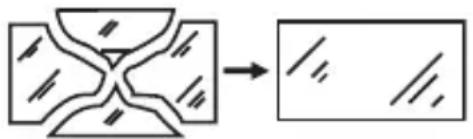
- Mounting position: If possible the light should be mounted using the wall bracket. Lights with a motion detector must be mounted as shown in Fig. 1.
- Mark the position of the bore-holes that are needed to attach the wall bracket and drill the required holes in the wall. Attach the bracket to the wall using suitable screws.
- Open the light's terminal box.
GB Operating Instructions Chip LED Light
- Guide the connecting cable through the cable gland and connect it to the light's lustre terminal as shown in Fig. 2 (left image shows 10W version, right image shows 30W version and higher. N = blue cable, earthing symbol = green / yellow cable, L = brown cable).
- Make sure the cable is securely fastened in the cable gland.
- Replace the cover of the terminal box. Make sure the gasket is seated correctly.
- Fasten the light to the wall bracket using the screws and nuts included with the package. Set the light to the desired position and tighten the screws.
DESCRIPTION OF OPERATION
(For Versions with a Motion Detector)
The light is equipped with an infrared sensor. It turns on automatically whenever the sensor detects movement in its vicinity
Try not to aim the motion detector in the direction of swimming pools, heater vents, air conditioners or objects which are subject to large variations in temperature. Avoid pointing the motion detector at trees or shrubs and at areas where pets like to move about.
Make sure when mounting the light that the motion detector is most sensitive to things that move through its detection range from side to side and least sensitive to things that move straight at the device.
ADJUSTING THE MOTION DETECTOR
There are three knobs on the underside of the light (see Fig. 3).
Setting the time (TIME):
Use the TIME knob to set how long the light remains on after the last movement (between 10 seconds and 4 minutes). Turn the TIME knob clockwise to increase the time span.
Sensitivity (SENS):
This knob can be used to adjust the sensitivity of the sensor. Turn the SENS knob clockwise to increase sensitivity.
Light Setting (LUX):
The LUX setting determines how dark it must be before the sensor turns on the light. The sun symbol (丰) shows that the sensor is active during the day and at night. If the knob is set to moon () , the sensor only works at night. To adjust the sensor, wait until the desired level of ambient light has been reached. Turn the knob all the way to the moon symbol () , then turn the knob slowly towards the sun symbol (丰) until the light turns on if movement is detected.
The light will thereafter turn on automatically at the preset level of darkness whenever a movement is detected.
Motion detector: passive infrared sensor
Detection range: up to 12m /up to 180^ (horizontal)
Time setting: approx. 10 sec-4 min
MAINTENANCE AND CLEANING
All maintenance work must be carried out by a qualified electrician.
PLEASE NOTE: The LED light does not contain parts that need servicing. The LED light source cannot be replaced. If necessary, replace the entire light.
Do not use solvents, corrosive cleaners or the like. Use a dry or slightly moist cloth for cleaning ONLY.

Operating Instructions Chip LED Light
Dispose of electrical devices in an environmentally responsible manner!
Do not dispose of electrical devices with household rubbish!
In accordance with Directive 2012/19/EU on waste electrical and electronic equipment, used electrical equipment must be collected separately and reused or recycled in an environmentally responsible manner.
Please contact your local authorities for available disposal options for your worn-out device.
Addresses
BESCHRIJVING VAN DE WERKING
LCN130PIRIP44 30W(1x30W) IP44Ja220,5x180,5x4mm
LCN150IP6550W(1x50W) IP65Nej281,5x231x4mm
LCN150PIRIP44 50W(1x50W) IP44Ja281,5x231x4mm
LCN180IP6580W(1x80W) IP65Nej303,5x225,5x5mm
YKA3AHNIO TEXHnke 6E3OpACHOCTN
-
YctaHOBka n 06cnyKuBaHne JAMnbI DOJKeH npOBoNTb KBaINΦnCnpOBaHHbI CneuaJIInCT.
-
Перед установкови Тхостмотром BCERda OTКлочаite Hanpopжени.
Chip CnД-лanma RykoBoDCTBO NO 3KcnpyaTaun
RU
3.лamnyселуетзаemлгьпо поядку.
4. Данна Лампа He может 6ыТь IncNoь3ОваHa 6e3 Cпeциаьньх npokладочнык кoleц!
5. CIVД-лamma CBeTIT OueHЯрко. Hn npu KaKnx 6OCToRteJbCTBax He cMOTpIte B IyU CBeTa OT CIVД-лamnbI, TaK KaK 3TO MoXeT npINBeCTN K NOBpeXdEHNIO rla3.
6. ClomahHoe 3auntHoe NOKpbITne cIeDyET 3aMeHnTb Ha opuHaJIbHoe 3aunTHoe NOKpbITne ot Brennenstuhl nepei CLeDyUOIM IcNoJIb3OBaHHeM IaMnbl.
- Ecnn liHHnnoKJIIOUeHnK CeTn IaMnbI NOBpeXKeHa, KBaIIuΦNcIPoBAHHbI CneuaJIInCT DoJKeH 3aMeHHTb ee BO n36exKaHHe OnaCHOCTn.
MOHTAXI NOIDCOEINHEHNE K 3JEKTPOCHABXEHNIO
- UcTaHOBnTe IaMny Ha IOBePxHocTb, KOtOpa He 6yJeT Bn6pnpoBaTb.
- Положения по мontаж: Вideале Ламна дожна 6ытб зakpenлега рп помоши настеного креленя. Лamny сдачимдвожени Следует зakpenиТь, Кс уka3aHo на рис.1.
- OtmetbTe noloxeHne npocBepnHbIX no3nui dIy 3aKpeJIeHnHaCTeHHOrO KpeJIeHnI N npocBepnIte COOTBeTCTByIOuIeOTBepCTnB CTeHe. 3aKpeIte Duyry npi NOMoU NODxOJaux BnHTOB K CTeHe.
- OtkpoTe Kopo6ky Ira nOcEINHeHnI npoBOIOB IaMnbl.
69
RU RykoBoDCTBO no 3KcPnyatauim Chip CnД-lanma
- Пювец coeHHTeHbI npOBOD uepe3 Ka6eHbI BBOID n IOcOeHNHe erO, KaK yKa3aHO Ha pnc. 2 (KapTnHka cIeBa dIy BepuN 10 W, KapTHKa cnpaba IJy BepcuN 30 W n daJIbwe), K KJIeMMoBOI KOLOKe JAmPbI (N = CnHn Ka6eB, ycIOBHOe rpaΦnueckoe 6o3HaueHne 3a3eMHeHnY = 3eJeHbI / JeNTbI Ka6eB, L = KopNUHeBbI Ka6eB).
- y6eIntecb, yTO Ka6eIb HAdEJHo 3aΦnKcnpOBaH npn NOMOuN Ka6eIbHOrO BBOda.
- CoeHnTe nokpbItne c kopo6kOJ dJa nOcOeINHeHn npOBODOB.
ObpaaTe BnMaHne Ha npaBnIbHoe nOIoXeHne yPnOTHeHn. - YCTaHOBtTe IaMny C COBMeCTHO NOCTaBHeHHbIMN 6OJTAMN I raIKaMn Ha HAcTeHHOe KpeJIeHne. YCTaHOBtTe JKeJaEMoe NIOJXeHne IaMnbl N 3aTAHnte 6OJTbl.

ONICAHNE PUNHUNPA PABOTbl
CyBCTBNTeIbHOCtB (SENS):
Припомоши данногореуларopa можно HabТрNTь ChВCTBHTeHOCt b nII BOCnprnMmHBOcTb dATUnka. ПocpeДСТВOM NOBOPota peryIaTopa SENS no yacoboi CTpeNke chvBCTBHTeHOCt b BO3paCTaet.
Hactpoika cbeta (LUX):
HactpoJa CBeTa onpeJeIeT, c KaKo OCBeUeHNocTn CeHcOp BkIouaet Iamny. P03uZra () yBEdOMJreT O TOM, UTO daTUnK pa6Otae THeM n HooBy, B P03uZnn (C) DaTUnK pa6Otae TOnbKO HooBy. DnpeRyInpOBKn Bbl DoJXhbl NDoJXdaTb, Do Tex nop, Noka He 6yDeT DOCTnHyTa JKeJaemar OKpyKaIOUaJr OCBeUeHNocTb. POBepHnte peryJrTop HAcTpOoi K CmBOJy (C). MedJeHHo NOBepHnte peryJrTop B HaNPaBLeHnN CmBOJa (),do Tex nop, Noka lamna He 3arOpNTcI NocpeiCTBOM DBNXeHn.
Tenepb lamna 3arOpntc c yCTaHOBHeHHo OCBeueHHOCTbIO npn pacno3HaBaHHn DBHXeHHra.
ДаТУнК ДВИЖЕНЯ: пасCBий ИнфраКрасьй ДaТУнК Диапазон зхвata: до 12 M / до 180° (ROPиЗОТаЛьно)
HactpoikKa BpeMeHn: npimepno ot 10 cekynd do 4 MNHyT
TEXHNUECKN OCMOTP N OUNCTKA
Texnueckni OCMOTp DOJKeH npOBODtB TOlbKO KBaINΦNUPOBaHHbI ΘJIeKTPNK.

PykoBoDCTBO NO 3KcnpyaTaumn Chip CnД-lanma
BHIMAHHE: CnД Лamпа He copejNT KOMNoHEnTbI, KOToPbIe HJxJaIOrTa B TexHnueCKOM OcMOTpe. CnД nCTOuHNK CBeTa He MoXeT 6bITb 3aMeHeH. B cIyuae Heo6xOДmOCTn, cIeDyET 3aMeHHTb BCIO JAMny.
He nCnoIb3yIte paCTBOpHTeI, eKne YnCTaIe CpeIcTba nn noXoJNc BeIecTb. IJI OuNCTKn nCnoIb3yIte TOnbKO cyXyIO nn cIeRka BnaJxHyIO caIΦeTKy.
3JIeKTPnueckne np6Opbl noJleKaT yTNn3aun C yuETOM 3aunTbI OKpykaIoUeN cpebl! BbI6paCbIBaT bJIeKTPnueckne np6Opbl B 6bITOBbIe OTXoDbI 3anpeuaetc!
B COOTBETCTBnC DnpeKtNBOE NC No 2012/19/EU no OTPa6oTaHHbIM 3JIeKTPoPnp6Opam N 3JIeKTPoHNo annapatype OTPa6oTaHHbIe 3JIeKTPoPnp6Opbl DOJXHbI Co6npaTbcra B OTdJIbHbIe KOHTeINHepbI N OTpAbTbcra Ha IpeDnprnTne dJa BVTopuHOrO nCIOJb3OBaHnA OTXODOB C CO6JIouDeHnEm HOpM 3aunTbI OKpykaIoSei CpeDbI.
BO3MOxHOCCTaX yTnIIN3aunn npnbopa, Otpa6oTaBwero CBOI pecypc, MOxHO y3HaTb B MeCTHom IIN rOpOdCKOM camOynpaBHeHH.
Ampes
LCN130IP65 30W(1x30W) IP65Ei220,5x180,5x4mm
LCN130PIRIP4430W(1x30W) IP44Jah220,5x180,5x4mm
LCN150IP65 50W(1x50W) IP65Ei281,5x231x4mm
LCN150PIRIP4450W(1x50W) IP44Jah281,5x231x4mm
LCN180IP65 80W(1x80W) IP65Ei303,5x225,5x5mm
LCN130PIRIP4430W(1x30W) IP44Ja 220,5x180,5x4mm
LCN150IP65 50W(1x50W) IP65Ne281,5x231x4mm
LCN150PIRIP4450W(1x50W) IP44Ja 281,5x231x4mm
LCN180IP65 80W(1x80W) IP65Ne303,5x225,5x5mm