
TS12XTRM - Iron SIEMENS - Free user manual and instructions
Find the device manual for free TS12XTRM SIEMENS in PDF.
| Brand | Siemens |
| Model | TS12XTRM |
| Product type | Steam iron / Compact steam station |
| Power supply | 220-240 V ~ 50-60 Hz, earthed plug |
| Power | Not specified (estimated ~2000-2400 W) |
| Water tank capacity | Not specified (estimated ~300 ml) |
| Soleplate | Smooth soleplate (material not specified) |
| Main functions | Continuous steam, steam boost*, spray, steam shot, vertical steam |
| Safety system | SensorSteam (auto shut-off if handle not held), anti-drip, auto shut-off after inactivity |
| Steam setting | eco (green) and max (red), steam stop |
| Temperature indicator | activeControl Advanced (light on handle) |
| Anti-calc | AntiCalc (self-cleaning filter), anti-calc cartridge*, calc'n clean (manual descaling) |
| Included accessories | Textile soleplate protector* (depending on model), anti-calc liquid* (code TZ11001) |
| Maintenance and cleaning | Clean soleplate with a damp cloth, regular descaling (calc'n clean every 2 weeks if water is hard) |
| Storage | Vertical position, cord winding around the heel |
| Weight | Not specified (estimated ~1.5 kg) |
| Dimensions | Not specified |
| Repairability | Repair by an approved service only, spare parts available (e.g., anti-calc liquid TZ11001) |
Frequently Asked Questions - TS12XTRM SIEMENS
User questions about TS12XTRM SIEMENS
0 question about this device. Answer the ones you know or ask your own.
Ask a new question about this device
Download the instructions for your Iron in PDF format for free! Find your manual TS12XTRM - SIEMENS and take your electronic device back in hand. On this page are published all the documents necessary for the use of your device. TS12XTRM by SIEMENS.
USER MANUAL TS12XTRM SIEMENS
Register your product online


Index
| DEUTSCH6 | |
| ENGLISH4 | |
| FRANÇAISE21 | |
| ITALIANO29 | |
| NEDERLANDS36 | |
| DANSK44 | |
| NORSK51 | |
| SVENSKA58 | |
| SUOMI | 65 |
| ESPÁÑOL | 72 |
| PORTUGUES | 80 |
| ЕАнHIKA | 88 |
| TÜRKÇE | 96 |
| POLSKI | 103 |
| MAGYAR111 | |
| ΥΚΑΙΝΥΚΑ | 118 |
| ΡΥСΚΗ | 126 |
| ROMÁN134 | |
| العربية | 149 |
Thank you for buying the TS12 steam iron from Siemens.
This iron is a compact steam generator. The water is pumped into the steam chamber with pressure by a special pump. The steam amount when ironing is higher than in conventional irons. The steaming performance is therefore far more effective. In general it is advised to use the iron with the "eco" setting.
This appliance has been designed exclusively for domestic use and must not be used for industrial purposes.
Carefully read through the operating instructions for the appliance and safeguard them for future reference.
General safety instructions
-
The iron must not be left unattended while it is connected to the supply mains.
-
Remove the plug from the socket before filling the appliance with water or before pouring out the remaining water after use.
-
The appliance must be used and placed on a stable surface.
-
When placed on its stand, make sure that the surface on which the stand is placed is stable.
-
The iron should not be used if it has been dropped, if there are visible signs of damage or if it is leaking water. It must be checked by an authorized Technical Service Centre before it can be used again.
-
With the aim of avoiding dangerous situations, any work or repair that the appliance may need, e.g. replacing a faulty mains cable, must only be carried out by qualified personnel from an Authorised Technical Service Centre.
-
This appliance can be used by children aged from 8 years and above and persons with reduced physical, sensory or mental capabilities or lack of experience and knowledge if they have been given supervision or instruction concerning use of the appliance in a safe way and understand the hazards involved. Children shall not play with the appliance. Cleaning and user maintenance shall not be made by children without supervision.
-
Keep the iron and its cord out of reach of children less than 8 years of age when it is energized or cooling down.
CAUTION. Hot surface. Surface is liable to get hot during use.
- This appliance is to be connected and used in accordance with the information stated on its characteristics plate.
- This appliance must be connected to an earthed socket. If it is absolutely necessary to use an extension cable, make sure that it is suitable for 16A and has a socket with an earth connection.
- If the safety fuse fitted in the appliance blows, the appliance will be rendered inoperative. To restore normal operation the appliance will have to be taken to an authorised Technical Service Centre.
- In order to avoid that, under unfavourable mains conditions, phenomena like transient voltage drops or lighting fluctuations can happen, it is recommended that the iron is connected to a power supply system with a maximum impedance of 0.47 . If necessary, the user can ask the public power supply company for the system impedance at the interface point.
- The appliance must never be placed directly under the tap to fill the water tank.
- Unplug the appliance from the mains supply after each use, or if a fault is suspected.
- The electrical plug must not be removed from the socket by pulling the cable.
- Never immerse the iron in water or any other fluid.
- Do not leave the appliance exposed to weather conditions (rain, sun, frost, etc.)
While the steam is being released, the iron produces a pumping sound. This is normal, indicating that water is being pumped to the steam chamber.
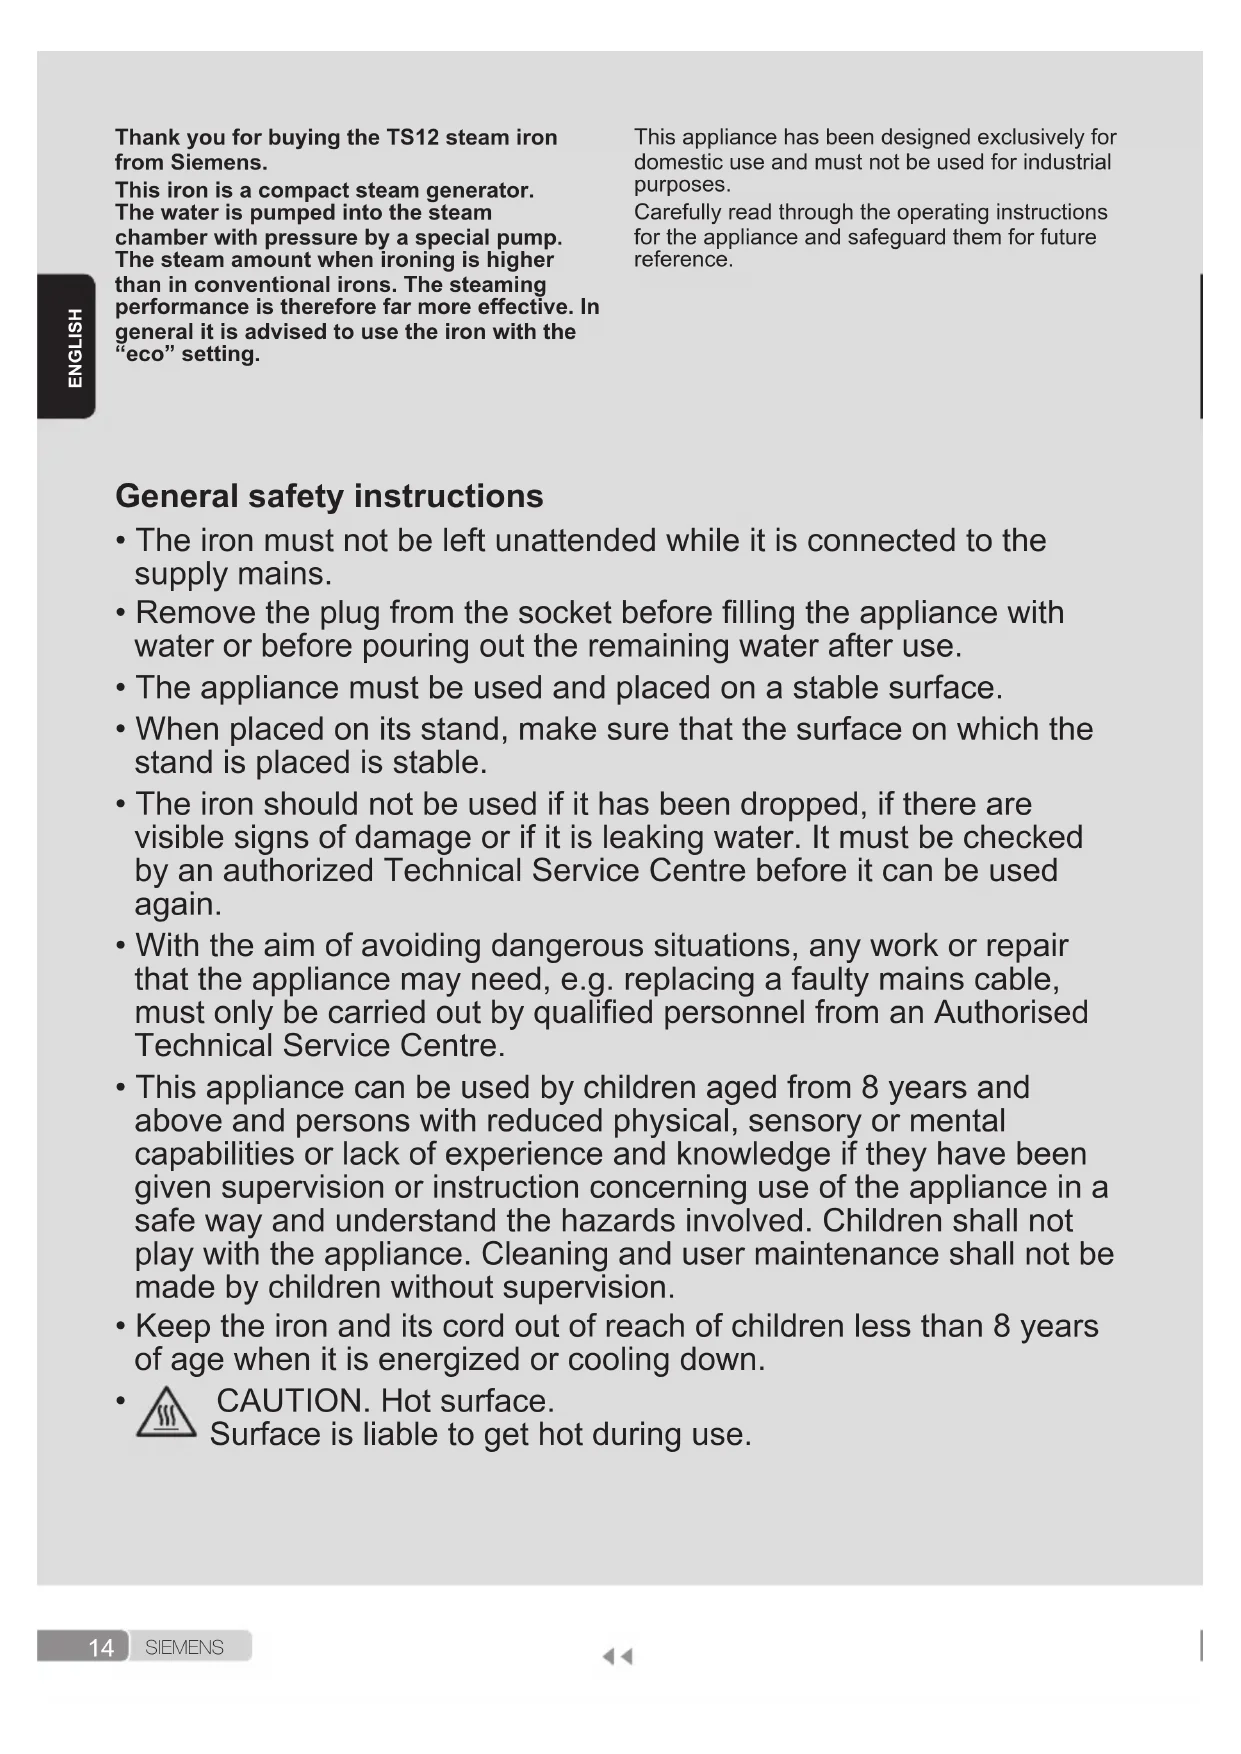
Description
- Handle with contact sensor
- Steam activation button*
- activeControl Advanced indicator lamp (clear light)
- Steam setting selection button
- Steam setting indicator lamps green = eco red = max
- Shot of steam button
- Spray button
- Water inlet
- Water inlet lid
- Spray nozzle
- Water tank
- Level mark for maximum filling
- Soleplate
- Temperature index
- Temperature control
- Power cable
- Descaling fluid*
-
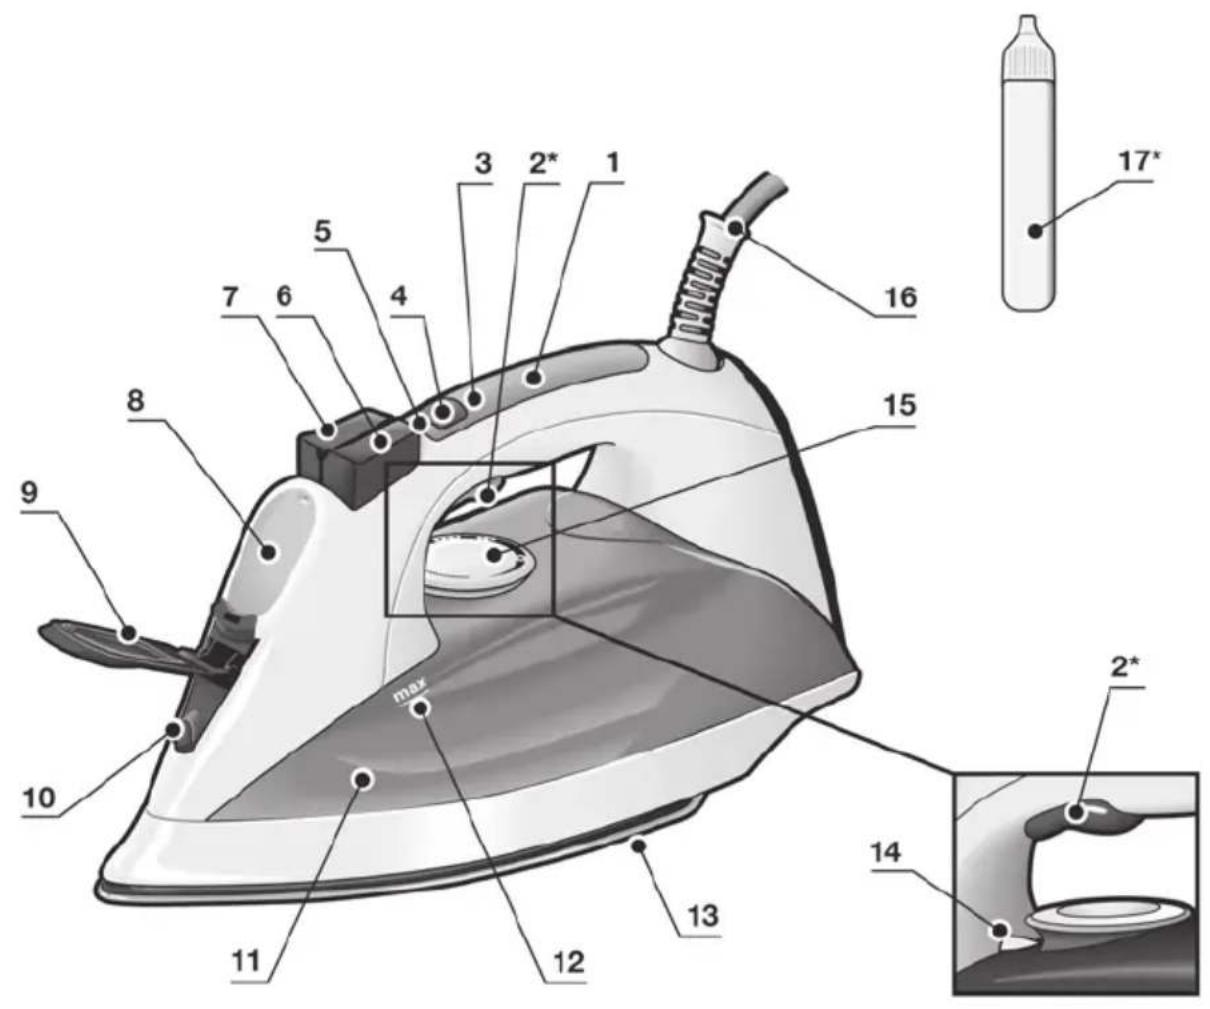
Fabric-protection soleplate cover*
-
Model dependent
Preparations

i Remove any labels or protective covering from the soleplate (13).
For further details on the following actions, please refer to the related chapters in this user manual.
- With the iron unplugged, fill the tank (11) of the iron with tap water and set the temperature control (15) to "max".
- Plug in the appliance to the mains.
- When the iron has reached the desired temperature, the green light (5) stops flashing and the clear light (3) starts flashing. Grip the handle (1) and set the steam control to the maximum position "max".
- Hold the iron horizontally and repeatedly press the shot of steam button (6). Some residue may come out of the soleplate (13).
- If necessary, carefully clean the soleplate (13) down with a dry, folded cotton cloth.
- When using the steam function for the first time, do not use it on your laundry, as there may still be dirt in the steam dispenser.
- When turned on for the first time, your new iron may smell and emit a little smoke and a few particles; this will stop after a few minutes.
1 Filling the water tank
3
Setting the steam amount
※
Unplug the iron from the mains!
- Open the water inlet lid (9).
- Never fill beyond the level mark for maximum filling (12).
- Use only clean water from the tap without mixing anything with it. The addition of other liquids, (unless recommended by Siemens) such as perfume, will damage the appliance.
Any damage caused by the use of the aforementioned products will make the guarantee void.
- Do not use condensation water from tumble dryers, air conditioning systems or similar. This appliance has been designed to use normal tap water.
- To prolong the optimum steam function, you may mix tap water with distilled water 1:1. If the tap water in your district is very hard, mix tap water with distilled water 1:2.
You can inquire about the water hardness with your local water supplier.
2 Setting the temperature

The temperature control (15) adjusts the temperature of the soleplate (13).
- Check the temperature instructions shown on the care label of the garment you are ironing.
- Set the temperature control (15) to the corresponding position by lining it up with the temperature index (14) on the iron.
| ● | Synthetics |
| ●● | Silk – Wool |
| ●●● | Cotton – Linen |
- Sort your garments based on their care labels, always starting with clothes that have to be ironed at the lowest temperature.
- If you are unsure what type of material the garment is made from, start ironing on the lowest temperature setting and increase accordingly. If the garment is made from mixed fabrics, set the temperature for the most delicate material.
- For silk, woollen or synthetic materials iron the reverse side of the fabric to prevent shiny patches. Avoid using the spray function to prevent stains.
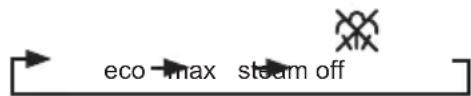
Your iron is equipped with a steam setting selection button (4) and with indicator lamps (5) showing the steam setting, according to the table below:
| Steam setting | eco | max | steam off |
| Indicator lamps | SET | SET | SET |
| Green | Red | Off |
Steam can be generated by gripping the handle (1), or by pressing the steam activation button (2^*)
If the "eco" steam mode is selected, the energy consumption of the appliance will be reduced by means of reduction of electricity and water consumption. A good ironing result can be obtained on this setting for most garments.
The steam setting can be changed by pressing the steam setting selection button (4). The iron runs through the following cycle:
SensorSteam
The "SensorSteam" function automatically switches off the iron when the handle is no longer gripped, thus increasing safety and energy saving.
When plugging the iron in, during the first minute:
- The soleplate (13) heats up to the temperature corresponding to the selected setting.
The steam generation is blocked.
The green lamp (5) flashes.
After the initial 1 minute period:
- "eco" setting is automatically selected.
The green lamp (5) stops flashing.
The "activeControl Advanced" indicator lamp (3) (clear light) goes on and starts flashing.
From this moment on, when the handle (1) of the iron is gripped or if the steam activation button (2^) is pressed at steam setting.
-
The "activeControl Advanced" indicator lamp (3) stops flashing.
-
The pump starts working and steam is generated automatically.
If the handle (1) is released:
- Steam generation will stop.
The "activeControl Advanced" indicator lamp (3) will flash - The iron shuts off automatically. If the handle is gripped again, the iron turns on.
If the iron remains plugged in and is not used for several minutes:
After the handle (1) is touched or the steam activation button (2^*) is pushed again, the green light starts flashing.
- Steam generation will not be possible for several seconds, until the appropriate working temperature has been reached.
4 | Ironing with steam

The steam control is used to adjust the amount of steam produced when ironing (see "setting the steam amount" section).
Steam can be generated in two ways :
-
Continuous steam generation :
-
Set the steam control to "eco" or "max" position.
-
Grip the handle (1).
-
Steam on demand*:
(only on models equipped with steam activation button).
- Set the steam control to the position, to cancel continuous steam generation while gripping the handle (1). On this setting, steam can only be produced when manually pressing the steam activation button (2^*) under the handle.
- Press the steam activation button (2^*) .
Important :
- Steam is only available if the temperature control (15) is set at the steam symbols - between "..." and "max".
- Adjust the temperature setting and then set the steam control according to the table below. Steam will automatically be produced:
Temperature control (15) setting
eco
to "max" max
Note: Once a steam ironing setting has been chosen using the temperature control (15), steam generation may be delayed for several seconds until the appropriate working temperature has been reached.
Tip: for better ironing results, iron the last strokes without steam to dry the garment.
5 Ironing without steam

This enables the iron to be used for dry ironing.
- Grip the handle (1) and set the steam control to the setting.
- The temperature control (15) adjusts the temperature of the soleplate (13). Set it to the corresponding position by lining it up with the temperature index (14) on the iron.
Select an appropriate temperature for the type of material being ironed (see "setting the temperature" section).
While ironing, do not press the steam activation button (2^*)
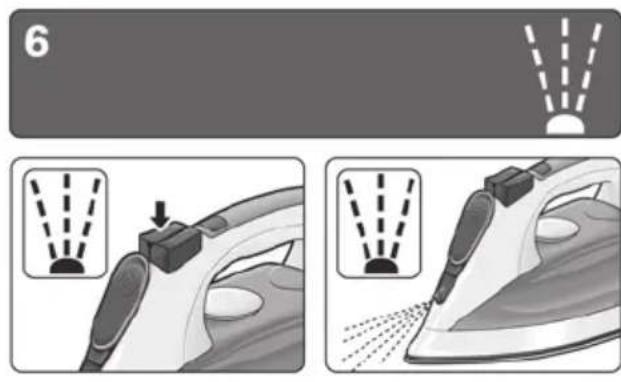
6 Spray

This can be used to remove stubborn wrinkles.
- Do not use the spray function with silk as staining may occur.
- When ironing, press the spray button (7) and water will spray out of the spray nozzle (10) onto the garment.
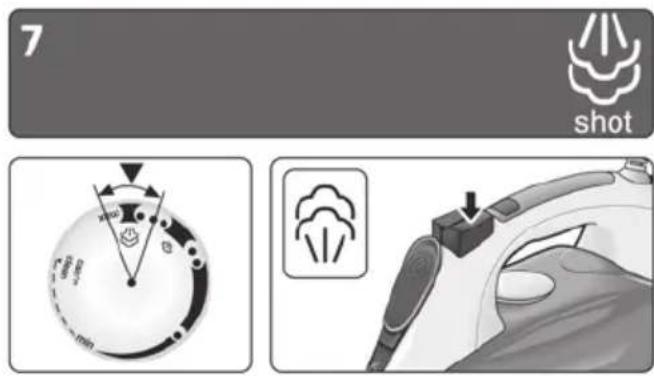
7 Shot of steam

This can be used to remove stubborn wrinkles or to press in a sharp crease or pleat.
- Set the temperature control (15) to the “…” or “max” position.
- Press the shot of steam button (6) on the handle repeatedly at intervals of 5 seconds.
8 Vertical steam


This can be used to remove creases from hanging clothes, curtains etc.
Warning.
Do not iron clothing while it is being worn! Never spray or aim the steam at persons or animals!
- Set the temperature control (15) to the "... or "max" position.
-
Models with steam activation button (2^*)
-
Grip the handle (1) and set the steam setting to the "max" position.
- Or set the steam setting to the position and press the steam activation button (2^*) .
Models without steam activation button (2^*)
-
Grip the handle (1) and set the steam control to the "max" position.
-
Hold the iron in an upright position about 15 cm away from the garment being steamed.
The shot of steam button (6) on the handle may be additionally pressed at intervals of 5 seconds. However, after 4 shots of steam, wait for 10 seconds to allow for continued steam production.
9
Multiple descending system

AntiCalc
Depending on the model, this range of irons is equipped with the following de-scaling features "AntiCalc".
1.self-clean
The self-clean filter between the water tank and the pump prevents scale impairing the steam generation system and ensures the optimum production of steam.
2. anti-calc
The "anti-calc" cartridge has been designed to reduce the build-up of scale produced during steam ironing, helping to extend the useful life of your iron. Nevertheless the "anti-calc" cartridge cannot prevent all of the scale that is produced naturally over time.
3. calc'n clean
The "calc'n clean" function helps to remove scale particles out of the steam chamber. Use this function approximately every 2 weeks, if the water in your area is very hard.
Follow the procedure described below:
a) Remove the plug from the socket, ensure that the iron has cooled down and that the water tank (11) is empty.
b) Set the temperature control (15) to the "calc'n clean" setting.
c) Fill the water tank (11) to the maximum level with clean tap water.
d) Plug in the iron and select the maximum steam setting "max" by pressing the steam selection button (4).
e) Hold the iron over a sink or a container to collect the water.
f) Grip the handle (1) until the water tank (11) is empty. This could take several minutes.
g) Repeat the procedure until particles no longer come out of the soleplate (13) of the iron.
h) Turn the temperature control (15) to the maximum setting. The iron will begin to emit steam. Wait until the water inside the iron has evaporated.
i) Clean the soleplate (13) of the iron.
4. calc'n clean with descending fluid (model dependent)
For deep descending, use the descending fluid (17^*) supplied.
This should be carried out every 3 months.
The descending fluid (17^*) can be obtained from our After-sales service or from our website.
Accessory code (After-sales)
Name of accessory (Online shop)
00311144 TZ11001
Follow the procedure described below:
a) Remove the plug from the socket, ensure that the iron has cooled down and that the water tank (11) is empty.
b) Set the temperature control (15) to the "calc'n clean" setting.
c) Fill the water tank (11) with tap water mixed with a measure (25ml) of the descending fluid (17^)
d) Plug in the iron and select the maximum steam setting "max" by pressing the steam selection button (4).
e) Hold the iron over a sink or a container to collect the water.
f) Grip the handle (1) until the water tank (11) is empty. This could take several minutes.
g) Then follow the procedure described above in section "3. calc'n clean" until particles no longer come out of the soleplate (13) of the iron.
Anti-drip system
If the temperature control (15) is set too low below ),the steam is automatically switched off to prevent water from dripping out of the soleplate (13).
The "activeControl Advanced" indicator lamp (3) on the handle flashes and the pump will not work.
10
Fabric protection soleplate cover

Tips to help you save energy

(model dependent)
The fabric-protection is used for steam-ironing delicate garments at maximum temperature without damaging them.
Use of the protector also does away with the need for a cloth to prevent shine on dark materials.
It is advisable to first iron a small section on the inside of the garment to see if it is suitable.
To attach the fabric protector to the iron, place the tip of the iron into the end of the fabric protector and press the rear of the protector upward until you hear a click. To release the fabric protector, pull down on the clip at the rear and remove the iron.
11
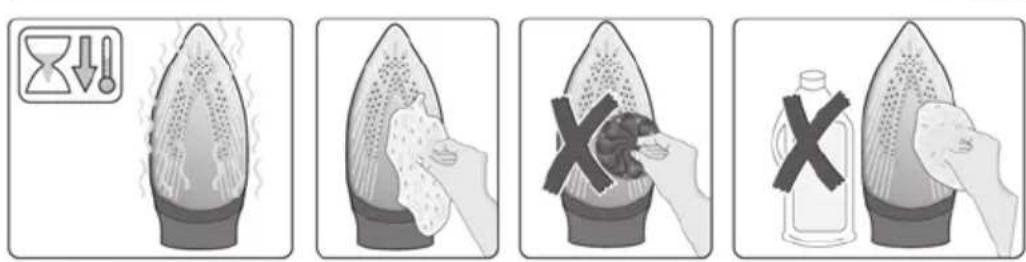
Cleaning & Maintenance


Attention! Risk of burns!
Always unplug the appliance from the mains supply before carrying out any cleaning or maintenance operation on it.
- If the iron is only slightly soiled, pull out the plug and allow the soleplate (13) to cool down. Wipe the housing and the soleplate with a damp cotton cloth only.
- If the cloth is synthetic, it may melt due to the high temperature on the soleplate (13), switch off the steam and rub off any residue immediately with a thickly folded, dry cotton cloth.
- To keep the soleplate (13) smooth, you should avoid hard contact with metal objects. Never use a scouring pad, or chemicals to clean the soleplate.
- Never decalcify the tank (11) or treat it with detergents or solvents, otherwise the iron will drip water whilst steaming.
12 Storing the appliance
- Open the water inlet lid (9).
- Hold the iron with the front facing down and shake it gently until the water tank (11) is empty.
- Set the iron aside in a vertical position to cool down.
- Coil the power cable (16) loosely around the heel of the iron, before storing.
- Store the iron in an upright position.
Steam production consumes the most energy. To help minimise the energy used, follow the advice below:
- Start by ironing the fabrics that require the lowest ironing temperature. Check the recommended ironing temperature in the label on the garment.
Regulate the steam according to the selected ironing temperature, following the instructions in this manual. Iron at "eco" steam setting (see "setting the steam level" section). - Try to iron the fabrics while they are still damp and reduce the steam setting. Steam will be generated from the fabrics rather than the iron. If you tumble dry your fabrics before ironing them, set the tumble drier on the 'iron dry' programme.
- If the fabrics are damp enough, set the steam to the × x position (see "ironing without steam" section).
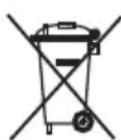
Advice on disposal
Our goods come in optimised packaging. This basically consists in using non-contaminating materials which should be handed over to the local waste disposal service as secondary raw materials. Your local town council can give you information about how to dispose of obsolete appliances.
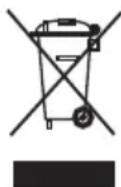
This appliance is labelled in accordance with European Directive 2012/19/EU concerning used electrical and electronic appliances (waste electrical and electronic equipment -WEEE).
The guideline determines the framework for the return and recycling of used appliances as applicable throughout the EU.
Trouble shooting
Problem Probable cause Solution
The iron does not heat up.
- Temperature control (15) set to minimum.
No mains supply. -
The "SensorSteam" system has been activated. The iron is set to stand-by.
-
Turn to a higher position.
- Check with another appliance or plug the iron into a different socket.
- Grip the handle (1) of the iron to re-start it.
"activeControl Advanced"indicator lamp (3) flashes.
-
The "SensorSteam" system has been activated. The iron is set to stand-by.
-
Grip the handle (1) of the iron to re-start it.
Iron difficult to slide on the clothing.
- Clothing is too wet. - Reduce the steam amount by
or" settings.
The clothes tend to stick.
- The temperature is too high. - Turn the temperature control (15)
down and wait until the iron has cooled down.
Water drips out of the soleplate together with steam.
-
Temperature control (15) setting is too low.
-
Turn the temperature control (15) to a higher setting (between “ ” and “max”) and wait until the green steam setting indicator lamp stops flashing.
-
Steam control is set too high in conjunction with a low temperature.
-
Set the steam control to a lower setting.
-
You have pressed the shot of steam button (6) repeatedly without waiting for 5 seconds between each press.
-
Wait 5 seconds between each press of the jet of steam button.
Pure distilled water has been used (see "Filling the water tank" section) or other products such as fragrant water have been added to the tank.
- Mix distilled water with tap water as directed in the "Filling the water tank" section and never add any other products to the water tank (unless recommended by Siemens).
Steam does not come out.
-
Steam control is set to "X" position.
-
Set the steam control to "eco" or "max" position.
-
No water in the tank (11).
-
Fill the tank (11).
-
The temperature is too low. Anti-drip system is activated.
-
Set to a higher temperature if compatible with the fabric.
Spray does not work.
No water in the tank (11).
-
Fill the water tank (11).
-
Obstructed mechanism.
-
Contact the Technical Service.
Smoke comes out when connecting the iron for the first time.
-
This may be caused by the lubrication of some of the internal parts.
-
This is normal and will stop after a few minutes.
Deposits come out through the holes in the soleplate
-
Traces of lime scale are coming out of the steam chamber.
-
Carry out a cleaning cycle (see "calc'n clean" section).
The appliance makes a pumping sound
Water is being pumped into the steam chamber
This is normal.
If none of the above solves the problem, get in touch with an authorised technical service.
You can download this manual from the local homepages of Siemens.
Levoyant activeControl Advanced (3) clignote.
- Abra a tampa com a abertura para enchimento (9).
- Nunca encha o reservatorio acima da marca de nível de enchimento máximo (12).
- Utilize开放的 drainage systems, such as a drinking container, to prevent the spread of bacteria and viruses.
- Utilize open drainage systems for cleaning purposes, such as for cleaning of personal surfaces, for cleaning of public places, or for cleaning of food sources.
- Utilize open drainage systems for cleaning purposes, such as for cleaning of public places, for cleaning of food sources, or for cleaning of public places.
| Buhar ayari | eco | max | buhar kapali |
| Gösterge lambALARI | SET | SET | SET |
| Yeşil | Kırkızo | Kapali |
He npacyuTe haJrHyTuOJa! HikOnn He po3nnIouTe Body n He cnPraMoByuTe napy Ha IIOdei TBapuH!
- YctahOBiTb peryIaTOp Tempeatypn (15) Ha no3HaKy a6o max.
- MoJI 3 KONKOIO noaui napu (2^*)
Bizbmitbc3a pyky (1) Ta BCTaHObitb perynatop nap (4) Ha no3HaKy max.
A6o yctahOBiB peryIaTOp napn Ha no3HaKy Ta HATNCHTb Ha KHONky noDaqi napn (2^*)
Modeni 6e3 KhoNkn noaui napn (2^*)
Bizbmitbc3a pyky (1) Ta BcTaHOBiTppeyIaTOp nap (4) Ha no3HaCy max.
- TpmaTe npacky y BepTKaIbHomy noIOxehHi Ha BiCTaHI 15 cm BiD oJary, kNBI o6po6JIeTe napoi.
Moxha DoaTkoBO HaTnCKaTN Ha KHOkny napoBoro ydapy (6)Ha pyuci 3 iHTepBaIOM
y5cekyH. Ondak nicra 4 napobnx yapib3auekaite 10 cekyH, uo6 3a6e3neuHTn6e3nepepbhe rehepyBaHHa napi.
9
Cnctema BuaJeHHaKny

AntiCalc
3aIeJHO BID MoJeJI, npackn UIeI cepII MaOTb Taki yHKUII BuaJIeHHa HAKIny AntiCalc.
1.Функцira self-clean
ΦiNbTp cAmoouHcHnMIXpe3epByapom dIy BODN Ta NOMIO 3anO6irae NOWkoJKeHHIO CNTeMM reHepyBaHHn napn HAKINOM N 3a6e3neUc ONTUMaJIbHe reHepyBaHHn napn.
2.Функця anti-calc
Kaptpndk anti-calc npn3haeHn dny 3MeHneHHaYbOpEHHaKnNy npOTyROM npacyBaHH 3 napo, 0do3BOJrE npOBoXHTN TepMin ekCnnyataui npcTpo. Ane Kaptpnck anti-calc He MoKe BnDaJIHTN BeCb HaKn, 00 yTBOPoETbcra nd Yac BnKOpNCtAHn npcTpo.
3.Функцicac'n clean
Функця calc'n clean donomarae BndaHNTu 3 napoBoi kamepn pewTKn Hakiny.Якso Boda y BaWOMy perioHi dyke JopcTka, BnKOpncToByTe zuФункцio npni6IIN3Ho pa3 Ha 2 TnxHi.
ДиTe 3a onncaHO HnxHpe npOeDpyoH:
a) BnIMtB wTeNCeJIb 3 po3eTKn, doyeKaIteCra oxoIOJxEHHN npackN n CnpOxHITb pe3epByap dIy BOIN (11).
b) YctaHObitb peryIaTOp Tempepatypn (15) Ha no3HaKy calc'n clean.
c). 3anobnItb pe3epByap Inn BODn (11)do BiIMITKn MaKcImaJIbHOro piBn YNCTOIO BOIOO 3 KpaHa.
d)Пдкючп npackуdo eNeKtpomepeksi noepitb pexIM MaKcMaJIbHoI nOaui napn max 3a donOMorO KHOKN Bn6Opy pexmy noaui napn (4).
e)ПиДИМITb npackу NaK KyXOHHOpaKOBHIO a6o MICTKOIO NocyDnHOIO nIa 36Opy BOiN.
f). TpmaTe npacky 3a pyky (1), nokn pe3epByap dna BODn (11) He cnopoxHNtbcra. Lc moKe TpnbAtn dekiNbka XBnInH.
g) Nobtopitb zu npoceDpy kInbka pa3iB, DOKN 3 NiOswn (13) He nepeCTaHe BxOOnTu HaKUn.
h) YcTaHOBiTb peryIaTOp TemnepaTyprn (15) Ha MaKcMaJIbHy nO3HaUKy. IpaCKa noUHe BInyckaTn npay. DooekaItecra, nOKn Bci peuTKn BOiH He nepeTBopraTbcra Ha npay i He BIn dyTb 3 npackn.
i) OuicTIb nioowBy (13) npackn.
4.Функцicac'n clean 3 piinHOIOДЯ BuaJIeHHaKIny
(y DeKnx MoJenx)
ДябьшякHorOBuDanenHaKny BnKOpNCTOByTe pINHy DЯ BUnDaNeHnHaKny (17^) ,IO BXODNTb DO KOMNNEkTу nocTaUHn. LIO npOeDpy Tpe6a BUNOHyBaTu KOKHi 3 MicaI. PInHy DЯ BUnDanEHHaKny (17^) MOxHa npNDaTu y BiDINI nicJnpoDaXHoro 06cnyroBvBaHHaBO CneuaJIi3OBaHnx Mara3NHax.
ApTnKyn DoaTaKOBoro
obnaHaHHy (y BiDini nicJnpoJaXHoro
obcnyroByaHHa)
Ha3Ba IdoaTkoBoro 6IpaIHaHHa (y cneiaJIi3ObaHnx MaRa3nHax)
00311144 TZ11001
ДиTe 3a onncaHIO HIXue npOeIpyoIO:
a) BnMItb wTeNceIb 3 po3eTKn, doyeKaITeCay oxoJoxeHH npackn n cnpoxHITb pe3epByap dna BOIN (11).
b) YcTaHOBiTb peryIaTOp TempePaTypn (15) Ha no3HaCy calc'n clean.
c) HanobHitb pe3epByap nIy BODn (11) BOIOU 3 KpaHa, 3MiHaHO 3 Heo6xIDHO KJIbKICTHO (25 mI) pIDHH dNRA BuaJeHHa HAKIny (17^*)
d)ПдкшчыпpackуdoeNeKtpomepeksi noberiptb pekIM MaKcMaJIbHOI noaHi napn max 3a donomoroH KhoNKn Bn6Opy peKmMy noaChi napi (4).
e)Пдимить пackу Над Кхонню рakOBиHO a6o MICTKOIO NOCyDNHOДЯ 36Opy BODI.
f). TpmaTe npacky 3a pyky (1), noKn pe3epByap dnia BODn (11) He cnopoxHNbCra. Lc me moKe TpNBATn deKINbKa XBUNH.
g) IOTIM DToTpMmYTeCn npOeDypn, onNcaHOI Bnue B po3diPi «3. FyHKciA calc'n clean», DOKN 3 NiDoWBn (13) He nepeCTaHytb BNXODHTN YAcTOUKN HaKIny.
ANTUKpanelbHa cnCTema
JaKIO peryIaTOP TemnepaTyPi (15) BCTaHOBJIeHn Ha Hn3bKn TEMnpaTpHi peXIM (MeHwe )noJaHa napn aBTOMaTHNO BmNKKaTbcra, 06 3anobirtn npocoyBaHHo BOIN 3 NiDoWBn (13).
Ha puzyi 6IIMaE iHnIkaTOp activeControl Advanced (3), nomna He npaioe.
10
TkaHHN

(y DeKnx MoDnax)
HacaKa YN NiKNaJa Ka DnA DeIkaTHnx TkaHH BnKOpNCTOByOTbCn DnA 6e3NeuHO npacyBaHHa DeIkaTHnx TkaHH Ha MaKcMaJIbHi TemnepaTypi 3 BnKOpNCtAHHm napn.
BnKOpncTaHnHa cAdKn YPiNknaKn DnA DeIiKaTHnx TkaHH TaKoX 3HIMae Ntpe6y KOpNCTyBaTnCraHcipKOIO INaY HnKHeHH JaNCKy Ha TeMHNX TkaHHax.
PekomeHdyeTbcra po3noaTu npacyBaHHHa HeBeInki DInrHci BHyTpihBoi NobepxHi OJary Ta nepeBipTu pe3yIbTaT.
Hn Hn Hn Hn Hn Hn Hn Hn Hn Hn Hn Hn Hn Hn Hn Hn Hn Hn Hn Hn Hn Hn Hn Hn Hn Hn Hn Hn Hn Hn Hn Hn Hn Hn Hn Hn Hn Hn Hn Hn Hn Hn Hn Hn Hn Hn Hn Hn Hn Hn Hn HH n n n n n n n n n n n n n n n n n n n n n n n n n n n n n n n n n n n n n n n n n n n n n n n n n n n n n n n n n n n n n n n n n n n n n n n.
11
OuHnueHHN

ΔYbara! Ichye He6e3neka onikib!
Ipeed 6ydb-jaKMM 3axoJaMn 3 OunuJeHHra Ta DOrJMy 3a npNCtpoeM 3aBXdN BmNKaTe Ioro 3 pO3eTKn.
JaKuo npacka 3nerka 3abpydHnIacra, BntarHITb WTeNCeB 3 po3eTKn nn DaTne niOswBi (13) OxonoHyTu. IpotpiB Kopnyc i niOswBy BOJoroTO TKAHHOIO.
- AkiCnHTeTuHa TkaHIna po3nlaBnIacn iD BnINbOM 3aHaTTo BnCOkoi TeMnepaTyPi nIOuBn (13), BiKlOChIb NODaHy napi BIDpa3y J 3cNCTITb HAnIInn MaTepiA3a DOnOMOrIO cyXOI 6abOBHraHO TkaHHnCKnaDeHOJ DEkInbKa pa3IB.
- Ⅲo6 niɪtpmymbATn nobepxHIO niooBn (13) rnaedeHbKOIO, cniD yHnKaTn pi3KOrO KOHTaKTy 3 MeTaneBnMn npEeMetam. Y JoDHomy pa3i He BnKOpNCTOByTe dIra OUnSeHHra NiDoWBn JopCTKi rY6Kn dIra MNTTЯ nocdyu ximiuHi peoyBHN.
HikonHe BndaJnTe Hakn3 pe3epByapa Inra Boi (11) 3a Donomoro Mmoux 3ac06iB a6o po3uHHKIB, iHaKwe i3 npackn Ni d ac npacyBaHHa 3 napoi 6yde npocoyBaTncra Boia.
12 36epirannn
- BiДкриTe Кршky 3аинвHorO OTbOpy (9).
- NObepHiB npacky TaK, 0o6 Hocn6 byCnpraMoBaHn DoJIInuB, i3nerka NotprciB ii, nokn pe3epByap dIa BOn (11) He cnopoxHNtbcr.
- IocTaBTe npacky y BepTnKaJIbHe noLoXeHHa DnA OXoJOnxKeHH.
- Pered 36epirAHnM HeuiJbHo HaMoTaIte UHyp XINBHeHHa HnXKnU qAcTHy npackn.
36epiraTe npacky y BepTnKaIbHomy noJoxeHHi.
IIndikaTop activeControl Advanced (3) 6JIMae.
- AKTINBOBaHa CnCTema SensorSteam. Ipacka nepeuwna B peKIM OUYiYBaHHJ.
Bizbmitbcra 3a pyky (1) npackn dna yBIMKHeHH.
IpaKa noraHo KOb3aNo Ondary.
OJaT 3aHaTo Mokpn. 3MeHwiTb KJIbKicTb napn, Bn6paBwn peXIM eco a6o
He rnaIbTe HaIeTyIO oJekdy!
Hnkorda He pacnbIJIyTe Body n He HanpaBnIe nap Ha IIOde N KINBOTbIX!
- YcTaHOBInTe TepMOperyJrTOp (15) Ha OTMeTKy ... nJn max.
-
MoDéJIc KhoNko nOaU napa (2^*)
-
Bo3bMntecb 3a pyky (1) n yctaHOBnTe napoperynTOp (4) Ha oTMeTKy max.
- Πибо установпге napорулгтог На оtmетку
- И нахмпге Кногк подачни па (2*).
Moden6e3 KhoNKn noaun npap (2^*)
- Bo3bMntecb 3a pyky (1) n yctaHOBnTe napoperynTOp (4) Ha oTMeTky max.
3.Дерхи te yTOB B BEPTnKaJIbHOM NOIoxeHnHa paCCTOHH 15 cm OT OJExKdbl, KOTopar6pa6aTbIBaETcnapom.
Moxho donoJHnTeJIbHO HaXIMaTb Ha KHONky napOBoro ydapa (6)Ha pyUke c nHTepBaIOM B 5ceyn. Pocne 4 napOBbIX ydapOB cdeJaIte 10-ceKHyIO npay3y, YTObI oBecNeuTb HnpepbIBHOe reHepnpOBaHne npa.
9
MhorofoyHKnOHaJIbHa cnCTema ydaJeHna HaKIN

AntiCalc
B 3aBnCmOCTn OT MoDen, yTOrn 3ToN cepnn NMeOT CneDyUoUne FyHKuNN ydaJeHnRA HAKUNN AntiCalc.
1.Функцna self-clean
ФильТсамоочТКМжду EMKOCью ДЯ ВОДы И НACOCOMпpeДOTВрааet сКОПLEнe НakINNВСNTeMe reHepuOBaHЯ napaи Ов ecneuBaET ONTIMaJIbHoe reHepuOBaHЯ napa.
2.Функця anti-calc
Kaptpnck anti-calc npedHa3HaueH dna CHNXeHNAOBaHNA HAKINN pni rIaXeHN Cnapom,HTO NOMORAETnpoDInTb cPOK cnjx6bl yTHora.Tem He MeHee Kaptpnck anti-calc He MOXeYCTpaHtB BCIO HAKNB,ecTeCTBeHHO 0bpa3yUOyOcR co BpeMeHem.
3.Функца calc'n clean
Функца calc'n clean nomoraet ydaNTb MeJIKe YacTnCbl HAKIN N3 KaMepbl napoo6pa3OBaHЯ. Ecln Boda B BaWeM perNoHe JecTkaj, 3Ty FyHKUHO CNeDyeT NCNOJb3OBaTb np6Ibn3ntelbHo pa3B2 HeJeN.
CneyuTe onncanHnHex npoceType:
a) BbInbTe WTeNcBHyU BnIky n3 po3eTK, DOxDNTECb OXJaXeHna yTIOra n ONopoXHNTe EMKOCTB DnBA BoDbl (11).
6) YctaHOBnte TepMoperyTOp (15) Ha OTMeTKy calc'n clean.
B) 3aONHnTe emKoCTb IJRA BOdBi (11) IO OTMeTNI MAKCImaJIbHO rpoBHa YIcTOI BOIOJ N3 KpaHa.
r)ПОДКЛIOUHTe yTOr K cetn n BbI6epnte pexIM MaKcMaJIbHOH NOaHu npa max, Haxab Ha KhoNkY BblOpa peXIMa NOaHu npa (4).
I) POnHnMnte yTIOr HAp paKOBnHOJ INm EMKOCTbO DnA C6Opa BOdbl.
e)ДерхиTe yTIOr 3a pyuKy (1), NOKa emKoCTb Дпя BOДы (11) He onopoXHITc. 3TO MOxET 3aHЯТь HeCKOJIbKO MInHyT.
K) NOBTOPRnTe 3Ty npOeDpy Do Tex nop, noka n3 nooBbI yTOra (13) He nepeCTaHET BbIXODNTb HAKINb.
3) YctaHOBnTe TepMoperyJrTOp (15) Ha MaKcImaJIbHyIO OTMeTKy. N3 yTOra HauHet BbIXoDnTb nap. DoxNITecb, noka BcR BOda BbIeT N3 yTOra B BVNe npa.
n) OunCTnte noDoowBy yTiora (13).
4.Функця calc'n clean c XnДКocTbIO ДЯудаленя Habknn
(B HeKOTOpbIX MoJeIax)
Дяболee ochobateJIbHOrO ydaIeHnHaKINNcNoJIb3yITe KIDKOCTbДЯ ydaIeHnHaKINN(17*),BXoJRAUBOKOMJIeKT NOCTaBKn.
3 Meça.
Kndkocb dny ydaJeHna HAKIN (17*) MOxHO npno6pctn B OTdene NoclenpoaHoro 06cnykBaHna IIN B CpeuaN3npoBaHHbIX Mara3nHax.
Aptnkyn npnnaeKHOCTN
(BOTe)
noclenpoedaxhoro
06cnyxmbaHnA
HaHMeHoBaHne
PnHaDnEeKHOCTN (B CnEuaIaI3uPoBaHbIX MaRa3NuHax)
00311144 TZ11001
CneyuTe onncanHnKe npoceDype:
a) BbInbTe WTeNcBHyU BNkU n3 po3eTkn, DOxDNTecb OxJaXdEHNy YTHOr a NOnOpoxHnTe EMKOCtB DnBA BoDbI (11).
6) YctaHOBNTe TepMOperyJrTOp (15) Ha OTMeTKy calc'n clean.
B) 3aNoJHnTe eMKOCTbДЯ BOdBi (11) BODoI3 KpaHa, CMeUaHHoN C HeO6XoDmMbIMKOLnueCTBOM (25 MЛ) XnIDKOCTnДЯ ydaJIeHnHaKaIIu (17*).
r) NIOKJIHOUHTe YTTOK K CETN IN BbIbepuTe peXIM MaKcImaJIbHOJ NOaUn napa max, HaxkAB Ha KHOIp Ky BbIbopapeXIMaNoaUnnapa (4).
I)NoHnMnte yTHr HaPpaKOBuHOJnn EMKOCTbO dJa c6opa BOdbl.
e)Деркпгутга pyky (1), noka emkoctb Дяь BOды (11) He onopoxhntc. 3To moKet 3aHЯТь HeCKOJIbKO MInHyT.
X) 3aTeM cIeNyIte npOeIype, ONHcHNoB bIe B pa3JeIe «3. FyHKuIra calc'n clean», Do Tex nop, noka n3 nooWbI yTOra (13) He nepeCTaHET BbIXoDITb HAKINb.
IpoTnBokaneJIbHa
CHCTema
Ecnn TepmopernyTop (15) yctaHOBnEn Ha Hn3kyo OTMeTKy (Mehee ),noJaaya npapa ABtOMaTnueCKN OTKJIIOUaETcR, YTO6bl npedOTbpaNTb npocauNbAHne BObI N3 noDoWBbl yTOrA (13).
Ha pyuKe MnraeT CBeTOBOn NnDnKaTop activeControl Advanced (3), hacoc He pa6oTaeT.
10
3auntna TeKCTnIbHa
POnOwBa

protect
(B HeKOTOpbIX MoJeIaX)
HacaKa I NOkKaIgA DnA DeJIkaTHbIX TkaHe NcNoJb3yOToC TaIg 6e3OnaChoro rnaKeHn ADeJIkaTHbIX TkaHe Ha MaKcImaJIbHOI TemNepaType C NcNoJb3ObaHnem napa.
PpimHeHne HacaKn nn noKnaKn
Длд ДелИкаTHых TkaHeи TaKke ChIMMaet
Heo6xOIMOCbBNCIOB3OBAHIN
TpaunHnHn TpnoKn JnpeoTbaeHH
BO3HnKHOBeHn Jocka Ha TEMhIX TKaHx.
PekomeHdyeTcchayana nporlaIb
HeboIbwoyUyactOKTKaHNCN3HaHKN,TO6bl npOBepntbpe3yJbTaT.
YTo6bHaHeTb Ha yTHor HacaKy dIra InaKeHnA DeJIkaTHbIX TKAHeN, NOMEcTne HOC yTHOra B KOHeU HacaKn I NOtOJKNHTe 3aDHIOU YaCTb HacaKn BBepx Do UeJyKa. YTo6bCHaTb
HacaKy DnIgTnaKeHnJeJInKaTHbIX TkaHei,
NOTAHNTe KpenneHne B 3aDHe YacTn HacaKIN
BHN3 N BbITaUHTe yTIOr.
11
Ounstka

A BnHMaHHe! CyuEcTByeT onaChOcTB OXorOB!
Ipepe npoBeHem IIO6bIX pa60 Tno OunchTe nII TeXnueckomy o6cnyKuBaHIO BCerda BbIHMaIte wTeNceJIbHyIO BNJKy npnbopa n3 po3eTKn.
- Ecnn yTnCnEgKa 3aRpa3HnncB, BbITnHTe BnIKy n3 po3ETKn n daIte noOoWBe yTOra (13) OCTbITb. Ipotpnte Kopnyc n noDooBy yTHora BNaXHO TKAHbHO.
- EcIn CInTeTnuecka TkaHb paCnJIaBnIacb NOd BO3DeIeCTBnEM CInuKOM BbICOKo TMnepaTypbI NOOuBbl yTtora (13), OTKnUChIte NOnaCy npa n cpa3y Je CnCTNte HAnINuM MaTePnaI C NOMOuCyXoX XNoPHTo6ymaxHoT KtAHN, CNOKeHHoB HeCKoJbKO CNoEB.
-Дя coхраненя Гадкости NOOWBbl yTHra (13)cneayet n3beraTb ee pe3koro KOHTa cMetaJIINueCKIMn PpeMTeAMn. Hn B Koem Cnyae He NcNoIb3yIte IЯ OChCTKN NOOWBbl yTHra JecTkne ry6Kn IЯ MblTbЯ NOcyDbI IN XIMNUeCKNe BeIeCTBa.
Hikorda He ydaJnTe HAKINb N3 EMKoCTN (11)c nOMOsbIO MOUxxCpeDCTB INI npactbOpnteNe.B npOTNBOM cnyae n3 yTOra BO Bpemr rnaXeHnC npom 6ydet npocayBaTcB Oda.
12 XpaHeHne

- OtkpoTe KpbIshky 3aJIbHOrO OTBepCTn (9).
- NObePHTe yTIOH HOCIKOM BHN3 N CJIeRka NOTpIcHTe eO, NOKa EMKoCTb IINB OIDbl (11) He ONOpOXHNTc.
- IocTaBbTe yTIOB B BepTnKaJIbHOe NOJoxHeHne DnI OXJaXKeHnI.
-ПередхраненемНнnotHoHamotaTe shyp nHTaHn(16)Ha HxKHHo Yactb yTiora.
XpaHnTe yTIOB B BepTnKaJIbHOM NNoJoxeHN.
CObeTbI IIO 3KOHOMN3Heprn N BODbl

Bolbue Bcero 3Heprn pacxOyEeTcHa
Bbipabotky npa. YTo6bl cokpatntb nOTpe6IeHne
3Heprn, pnpdepxBaNTecb cJeDyUoXN
peKOMeHdaun:
- Haunhaite rlaxeHne c 6eJIb, KOtOpoe Tpe6yeT MInHmAlbHoro TemnepaTypHoro pexima rlaxeHn. PekomeHdyEmyTo TemnepaTypy rlaxeHn MOxHO NOCMOTpeTb HaApIbIke n3dJIINr.
-
Perynipyte noauy napa B COOTBcTbN C Bbl6paHHbIM TemnepaTyphblm peXNMOM rnaKeHn, cIeDy INCTpyKcHm DaHHoro pyKOBOcTbA. IaNbTe B pexHme noaHn npaeco (cm. pa3dEi «PerynpoBaHne KOnuecTba napa').
-
CtapaItecI rnaHtB cnerka BnaXhble n3denn, noCTaBnB peryIaTOp npa Ha MehbUIO OTMeTKy. Pn 3Tom nap 6yTe 6pa3OBbIBaTbCBA CAMO TKAHN, a He B yTHore. EcNI Bbl cyuHTE 6eJIbe B cyuINbHOm MaUNHe, INcNoJIb3yIne nporpamMy «NOd yTHOr»
- Ecnn TkaHb DoCTaTOUHO BnaxHna, OTKnIOuHTe noDAUY npa (cM. pa3dEe «IpaXeHne 6e3 npa)
ytnnn3aunr OTXOIOB
YnakOBKa Haunx TOBapOB ONTmAbHo
npOyMaHa. OHa B OCHOBHOM COCTOHT N3
MaTePnaIOB, NOIeXaUnx NOBTOPOHNIpepa6OTKe, KOToPbIE MOxHO CdaTb B MeCTHyIO cny6y c6op aOTxoIDOB. INHOpMauHIO O TOM, KaNocTyuNTb C OTPa6oTabuM 3JeKTPoPn6Opom, Bbl MoKeTe IOnyUHTb B MeCTHbIX opraHax
aDMNHcTpaUN.
DaHbI np6Op HMeet OTMeKv B COOTBeTCTBnN eBPoneeCKM HopMaM 2012/19/EC yTuIn3aunn 3JKeKtpnuecknx n 3JeKtpoHHbIX np6opOB.

Ta3n DnpeKtnBa perIamEnTnpa BaJIuHnTe B paMknte Ha EC
npaBnla 3a npneMaHe n 3nOJ3BaHe Ha cTapu ypei.
Hnctpykunno yctpaheHIO meJKNx HncnpabHOCTeN
PpO6Iema Bo3MxHnA npuHa CnOco6 ycTaHeHHa
YTIOr He HarpeBaetcra.
- TepmoperyJrTop (15) yctaHOBJIeH Ha MHHMaJIbHyIO OTMeTKy.
-
OtcyTCTByeT nHTaHHe.
-
AktiBupoBaHa cnCTema SensorSteam. YIor nepeKJIouHnCBy peXIM OxNuaHnA.
-
YcTaHOBnTe TepMOperyJrTop Ha 6OJee BBICOKyIO OTMeTKy.
- PpOBepbTe HAnuNe NtTaHnI npn NOMOUs dpyrOro np6Opa nnN NOKJIIOUHTe yTOr K dpyro n po3eTke.
Bo3bMntecb 3a pyky (1) yTOra dIra erO BKNIOUeHn.
Muraet CBeTOBoi INDnKaTOp activeControl Advanced (3).
- AktiBupoBaHa cncTeMa SensorSteam. YIor nepeuen BpeXIM OxNJaHnA.
Bo3bMntecb 3a pyky (1) yTiora dner ero BKNIOUeHn.
PpO6JIeMa Bo3MoxHna npuHnA Cnoc6 ycTaHeHHa
.(and electronic equipment - WEEE
Jall jll plll jll
j 1
LgDleio 100] gaiy
12
(9) cJall aia iIbC
a
(11)
10 16)
1
.

cIaIg aIbI g
aalll aal l 1 jll alg iil jll gai lae
:
1
e 1
aannnne nnnnne annnnnne
"
(“
a
= ( x1,y1) , = ( x2,y2)
(15)
1
a1 = 23,a2 = - 43,b_1 < 2 b = 43
- jolololololololololololololololololololololololololololololololololololololololololol
scly 1 (1) jao stwol .3
lg2^n2^n + 2 > lg32
a.sgdglgblguo
b1 = 2 - 12 + 1 = 13, b2 = 10 - 12 + 10 = 1110
"SensorSteam" 3
e 10
即为
1
“SensorSteam”
- | x - 2| = 1 , 34x + 1 > 0
active-
Control Advan
(3) “ced
buall g j "eco" slaaiy buial
ailllll lallll aabg gagagaae
1

y
10
()
jlll lll lglal 51 gial alg aal cbe piss
.
J 1
iiSll lgsuial jlaal
a 1
auiolio 1i j 5ill
jol joll aaoe ool joll 1g waii
1 1
gall gail gail gail gail gail gail
a

11
!
j 1
E 2 gllg jilfa aol
ollooll 13)olll
a a
aiei iill jae gaa aia 1
(13)ol all oclal aolall aol all ool
yall aaiilal yaii bix g jllgbl ally
A
13) 15
45
01 g all 2513 a b i j k l m n o p q r s t
4j(11) j j j j j j j j j j j j j j j j
aalil blaaii gaaag yg:cluaa gl aeg algo
.
calc'n clean 4
()
Jill jll jilw plssal aill aill jll all jy
2^.1( ^ * 17) = 2^.1( 171)
3 5
jso jo (^*17) ailll jil jll
aaiiaai jaii g iie eiee ie 1
alol 25
( z + 1) ( z - 1) = 0 奇及
golol
(aaiial jaiial)
00311144 TZ11001
olid aagoll gblg
1
.(11) all jzjg
(15)(20
"cal'clean" buill
25) 11 (11) 11
(^*17) ailll jilj
j 1
j 1 j 1 j 1 j 1 j 1 j “max”
(4)
.
(11)(1)
.
calc'n 3-1 一 _ 一
J 1
(13) ! ≤ all abc = 13
fll jblg iio
(15)
(“”)
.(13) 0l all ocl al jol all jblg iial jll
(3) "activeControl Advanced"
a. a. all Jaiji 29
oal (7) 11 1c bcl c11 cl .lll aia (10) aai
ailll 100000000000000000000000000000000000000000000000000000000000000
self-clean 1.1
jlll jlll llll llll llll llll llll
anti-calc 2.2
ailll llll 1111"anti-calc" aagaae aaii aai i aai i aai i aai i aai i aai i aai i aai i aai i aai i aai i aai i aai i aai i aai i aai i aai i aai i aai i aai i aai i aai i aai i aai i aai i aai i aai i aai i aai i aai i aai i aai i aai i aai i
calc'n clean 3
a ccln clal 15 15 15 15 15 15 15 15 15 15 15 15 15 15 15 15 15 15 15 15 15 15 15 15 15 15 15 15 15
allll 1 5 5 5 5 5 5 5 5 5 5 5 5 5 5 5 5 5 5 5 5 5 5 5 5 5 5 5 5
(15)aJ 2000 2000 2000 .“calc'n clean" bai all
i1i 111 111 111 11
j 1 j 1 j 1 j 1 j 1 j 1 j 1 j 1 j 1 j 1 j 1 j 1 j 1 j 1 j 1 j 1 j 1 j 1 j 1 j 1 j 1 j 1 j 1 j 1 j 1 j 1 j 1 j 1 j 1 j 1 j 1 j 1 j 1 j 1 j
.(1)(1)()
j 11 j 11 j 11 j 11 j 11 j 11 j 11 j 11 j 11 j 11 j 11 j 11 j 11 j 11 j 11 j 11 j 11 j 11 j 11 j 11 j 11 j 11 j 11 j 11 j 11 j 11
15 15
.01 soll jol cloll
aallll lalll lalll lalll lalll lalll lalll
1
1
1
(15)
max"j"
(^*2) 1
1 1 (1) .
()
(^*2)
(^*2)
(4)
. "max" 2020高考 2020 高联竞赛班
15 15
1.
(6)
4 5 jie jie jie jie jie jie jie jie jie jie
(3) "activeControl Advanced"
.
(1) 4
(*2)jll jjjie baiy liae
S ACD = S COD + S_ BDO
(3) "activeControl Advanced"
.
J 1
(1)
.
(3) "activeControl Advanced"
a1 ≤ a0 < a_2
: 1
(2)j j (1)j
a
Jgss
aaiia aiee
4
y
(“j)
:Jyj Jy jy jy
1
ec0" 1
max
(1)
2.
()
aill clilnlllglle lllg
2g.1(1)
(4)activeControl Advanced 3
j.4
j.5
ec0slaaiee
max 1
1.6
7
Cull Jiao 8
aJall aie 1bc .9
10
all jj .11
GaiJcJall ssinae 12
ol ol olol .13
aJzai 14
15
Lys
*ailllll jilil 17
*gaii gai -aia iia 18
Jgall
#
i
.(13)
aaii jlll l 1
120 1
j j 1
a 11 (11)
max"
y
aaiia aiee eae aeae
(3) aiaaii iaiii 12y jn yj (5) cuii
(1)
max
C. = , =
J 1
Jlglgao jao sia aalb alaogp dss
16.
jglal jolal jolal jolal
yololall aylll lal y. 1be j
1.2020 4.4.4 5.2.2 6.3.1
i
gss saa aal g dusall jss Lioic aygiell
0.47 43 y 1y 5y 12y 1y 5y 5y
aJill Jn jin nn nnnn nn nnnn nn nnnn nn
ailll lglao joc gall all ygllg nojgall
J 1
J 1
jgl 1 jg 15 2y 1 y
2x + 5x - 12 = 0
s jai jil gai jgclll jj jai jai jai jai
121
()
( a + b) a = ( a + b) 2
Jg.
J 1
aaiyIg aayi yiy iayo 51 algb paaai pi
.aylll jyU galil u jy Ujiall
aaiyIg kSll algb Jiauui Ujic Ujie Ujai
.ay Iaill eg jujn jla
T512 55
Siemens
eall 12000000000000000000000000000000000000000000000000000000000000000000000
"eco"
aXllc
.
a0 = 12,b0 = - 14,c_0 = - 18
.
f( x) 定义域为 x x k t2t2 , k z
a
Aalaaaiol ole! Juaaiaia
J 1
( 1 + u) = 1 + ( 1 - u) u + ( 1 - u) u + ·s + ( 1 - u) u + ( 1 - u) u + ·s + ( 1 - u) u + ·s + ( 1 - u) u + ·s + ( 1 - u) u + ·s + ( 1 - u) u
j 2. jge all aaiy bai yall abai ll gic gil gill jge
J 1 J 1
a
8 jnnn nn nnnn nnnn nnnn nnnn nnnn nnnn nnnn nnnn nnnn nnnn nnnn nnnn nnnn nnnn nnnn nnnn nnnn nnnn nnnn nnnn nnnn nnnn nnnn nnnn nnnn nnnn nnnn nnnn nnnn nnnn nnnn nnnn nnnn nnnn nn
15
J 1
1
. 1
BSH Hausgeräte GmbH
Carl-Wery-Straβe 34
81739 Munchen, GERMANY
www.siemens-home.com

- Index
- General safety instructions
- Description
- Preparations
- i Remove any labels or protective covering from the soleplate (13).
- Filling the water tank
- Setting the steam amount
- Setting the temperature
- The temperature control (15) adjusts the temperature of the soleplate (13).
- SensorSteam
- When plugging the iron in, during the first minute:
- After the initial 1 minute period:
- If the handle (1) is released:
- If the iron remains plugged in and is not used for several minutes:
- | Ironing with steam
- The steam control is used to adjust the amount of steam produced when ironing (see "setting the steam amount" section).
- (only on models equipped with steam activation button).
- Important :
- Ironing without steam
- This enables the iron to be used for dry ironing.
- Spray
- This can be used to remove stubborn wrinkles.
- Shot of steam
- This can be used to remove stubborn wrinkles or to press in a sharp crease or pleat.
- Vertical steam
- Multiple descending system
- 1.self-clean
- anti-calc
- calc'n clean
- calc'n clean with descending fluid (model dependent)
- Anti-drip system
- 10
- Fabric protection soleplate cover
- Tips to help you save energy
- (model dependent)
- 11
- Cleaning & Maintenance
- Attention! Risk of burns!
- Always unplug the appliance from the mains supply before carrying out any cleaning or maintenance operation on it.
- Storing the appliance
- Advice on disposal
- Trouble shooting
- Problem Probable cause Solution
- He npacyuTe haJrHyTuOJa! HikOnn He po3nnIouTe Body n He cnPraMoByuTe napy Ha IIOdei TBapuH!
- Modeni 6e3 KhoNkn noaui napn (2*)
- Cnctema BuaJeHHaKny
- 1.Функцira self-clean
- 2.Функця anti-calc
- 3.Функцicac'n clean
- 4.Функцicac'n clean 3 piinHOIOДЯ BuaJIeHHaKIny
- ANTUKpanelbHa cnCTema
- ΔYbara! Ichye He6e3neka onikib!
- 36epirannn
- He rnaIbTe HaIeTyIO oJekdy!
- Hnkorda He pacnbIJIyTe Body n He HanpaBnIe nap Ha IIOde N KINBOTbIX!
- Moden6e3 KhoNKn noaun npap (2*)
- 9
- MhorofoyHKnOHaJIbHa cnCTema ydaJeHna HaKIN
- 1.Функцna self-clean
- 3.Функца calc'n clean
- 4.Функця calc'n clean c XnДКocTbIO ДЯудаленя Habknn
- IpoTnBokaneJIbHa
- CHCTema
- 3auntna TeKCTnIbHa
- POnOwBa
- Ounstka
- XpaHeHne
- CObeTbI IIO 3KOHOMN3Heprn N BODbl
- ytnnn3aunr OTXOIOB
- Hnctpykunno yctpaheHIO meJKNx HncnpabHOCTeN
- PpO6Iema Bo3MxHnA npuHa CnOco6 ycTaHeHHa
- y
- ()
- !
- fll jblg iio
- self-clean 1.1
- anti-calc 2.2
- calc'n clean 3
- #
- aXllc
Brand : SIEMENS
Model : TS12XTRM
Category : Iron