
WF1702NHW - Washing machine SAMSUNG - Free user manual and instructions
Find the device manual for free WF1702NHW SAMSUNG in PDF.
| Product Type | Front-loading washing machine |
| Brand | Samsung |
| Model | WF1702NHW |
| Washing capacity | 7.0 kg |
| Dimensions (W x D x H) | 600 x 550 x 850 mm |
| Net weight | 56 kg |
| Power supply | 220-240 V, 50 Hz, 2000-2400 W |
| Water pressure | 50 - 800 kPa |
| Maximum spin speed | 1200 rpm |
| Energy class | A+ |
| Annual energy consumption | 220 kWh/year |
| Annual water consumption | 10010 L/year |
| Noise level (wash / spin) | 59 / 78 dB(A) |
| Wash programs | Cotton, Synthetics, Hand wash wool, Baby cotton, Daily, Quick 15 min, Spin, Rinse+Spin |
| Options | Pre-wash, Extra Rinse, Intensive, Delay End (3-19 h), Child Lock |
| Cleaning and maintenance | Impurities filter, water inlet hose mesh filter, detergent drawer, emergency drain |
| Safety | Child lock, door lock, anti-foam protection, imbalance detection |
| Calibration | Automatic calibration mode for precise laundry weight detection |
Frequently Asked Questions - WF1702NHW SAMSUNG
User questions about WF1702NHW SAMSUNG
0 question about this device. Answer the ones you know or ask your own.
Ask a new question about this device
Download the instructions for your Washing machine in PDF format for free! Find your manual WF1702NHW - SAMSUNG and take your electronic device back in hand. On this page are published all the documents necessary for the use of your device. WF1702NHW by SAMSUNG.
USER MANUAL WF1702NHW SAMSUNG
WF1702AH(A/C/D/F/G/H/R/S/T/V/W/Z)(G) WF1702NH(A/C/D/F/G/H/R/S/T/V/W/Z)(G)
WF1700AH(A/C/D/F/G/H/R/S/T/V/W/Z)(G) WF1700NH(A/C/D/F/G/H/R/S/T/V/W/Z)(G)
WF1602AH(A/C/D/F/G/H/R/S/T/V/W/Z)(G) WF1602NH(A/C/D/F/G/H/R/S/T/V/W/Z)(G)
WF1600AH(A/C/D/F/G/H/R/S/T/V/W/Z)(G) WF1600NH(A/C/D/F/G/H/R/S/T/V/W/Z)(G)
WF1702AM(A/C/D/F/G/H/R/S/T/V/W/Z)(G) WF1702NM(A/C/D/F/G/H/R/S/T/V/W/Z)(G)
WF1700AM(A/C/D/F/G/H/R/S/T/V/W/Z)(G) WF1700NM(A/C/D/F/G/H/R/S/T/V/W/Z)(G)
WF1602AM(A/C/D/F/G/H/R/S/T/V/W/Z)(G) WF1602NM(A/C/D/F/G/H/R/S/T/V/W/Z)(G)
WF1600AM(A/C/D/F/G/H/R/S/T/V/W/Z)(G) WF1600NM(A/C/D/F/G/H/R/S/T/V/W/Z)(G)
Washing Machine
user manual
Planet
First
100%
Recycled Paper
This manual is made with 100% recycled paper.
imagine the possibilities
Thank you for purchasing this Samsung product.
C E
SAMSUNG
contents
SETTING UP YOUR WASHING MACHINE
13
13 Checking the parts
14 Meeting installation requirements
14 Electrical supply and grounding
14. Water Supply
15 Drain
15
15 Surrounding temperature
15 Above or closet installation
15 Installing your washing machine
WASHING A LOAD OF LAUNDRY
21
21 Washing for the first time
21Basicinstructions
22 Using the control panel
24 Child look
24 Delay end
25 Washing clothes using the cycle selector
26 Washing clothes manually
26Laundryguidelines
28 Detergent and additives information
28 Which detergent to use
28 Detergent drawer
CLEANING AND MAINTAINING YOUR WASHING MACHINE
29
29 Draining the washing machine in an emergency
29 Cleaning the exterior
30 Cleaning the detergent drawer and drawer recess
31 Cleaning the debris filter
32 Cleaning the water hose mesh filter
32 Repairing a frozen washing machine
32 Storing your washing machine
33 Check these points if your washing machine...
34Informationcodes
TROUBLESHOOTING AND INFORMATION CODES
33
34Calibrationmode
CALIBRATING YOUR WASHING MACHINE
34
CYCLE CHART
35
APPENDIX
36
35Cyclechart
36 Fabric care chart
36 Protecting the environment
37Specifications
39 Sheet of household washing machines (eu only)
43 INformation of main washing programmes
safety information
Congratulations on your new Samsung ActivFresh™ washer. This manual contains important information on the installation, use and care of your appliance. Please take time to read this manual to take full advantage of your washer's many benefits and features.
WHAT YOU NEED TO KNOW ABOUT SAFETY INSTRUCTIONS
Please read this manual thoroughly to ensure that you know how to safely and efficiently operate the extensive features and functions of your new appliance and retain it at a safe place near the appliance for your future reference. Use this appliance only for its intended purpose as described in this instruction manual.
Warnings and Important Safety Instructions in this manual do not cover all possible conditions and situations that may occur. It is your responsibility to use common sense, caution, and care when installing, maintaining, and operating your washer.
Because these following operating instructions cover various models, the characteristics of your washer may differ slightly from those described in this manual and not all warning signs may be applicable. If you have any questions or concerns, contact your nearest service center or find help and information online at www.samsung.com.
IMPORTANT SAFETY SYMBOLS AND PRECAUTIONS
What the icons and signs in this user manual mean:
| WARNING | Hazards or unsafe practices that may result in severe personal injury, death and/or property damage. |
| CAUTION | Hazards or unsafe practices that may result in personal injury and/or property damage. |
| CAUTION | To reduce the risk of fire, explosion, electric shock, or personal injury when using your washer, follow these basic safety precautions: |
| Do NOT attempt. | |
| Do NOT disassemble. | |
| Do NOT touch. | |
| Follow directions explicitly. | |
| Unplug the power plug from the wall socket. | |
| Make sure the machine is grounded to prevent electric shock. | |
| Call the service centre for help. | |
| Note | |
These warning signs are here to prevent injury to you and others.
Please follow them explicitly.
After reading this section, keep it in a safe place for future reference.

Read all instructions before using the appliance.
As with any equipment using electricity and moving parts, potential hazards exist. To safely operate this appliance, become familiar with its operation and exercise care when using it.
safety information

WARNING: To reduce the risk of fire, electric shock, or injury to persons when using your appliance, follow basic precautions, including the following:
Do not let children (or pets) play in or on your washing machine. The washing machine door does not open easily from the inside and children may be seriously injured if trapped inside.
This appliance is not to be used by persons (including children) with reduced physical, sensory or mental capabilities, or lack of experience and knowledge, unless they have been given supervision or instruction concerning use of the appliance by a person responsible for their safety.
Children should be supervised to ensure that they do not play with the appliance.
For use in Europe: This appliance can be used by children aged from 8 years and above and persons with reduced physical, sensory or mental capabilities or lack of experience and knowledge if they have been given supervision or instruction concerning use of the appliance in a safe way and understand the hazards involved. Children shall not play with the appliance. Cleaning and user maintenance shall not be made by children without supervision.
If the supply cord is damaged, it must be replaced by the manufacturer, its service agent or similarly qualified persons in order to avoid a hazard.
This appliance should be positioned so that the power plug, the water supply taps, and the drain pipes are accessible.
For appliances with ventilation openings in the base, that a carpet must not obstruct the openings.
The new hose-sets supplied with the appliance are to be used and that old hose-sets should not be reused.
CAUTION: In order to avoid a hazard due to inadvertent resetting of the thermal cut-out, this appliance must not be supplied through an external switching device, such as a timer, or connected to a circuit that is regularly switched on and off by the utility.
safety information

SeVeRe WARNING SiGNS FoR iSTALLIATION

The installation of this appliance must be performed by a qualified technician or service company.
- Failure to do so may result in electric shock, fire, an explosion, problems with the product, or injury.
The appliance is heavy, take care upon lifting it
Plug the power cord into an AC 220-240V/50Hz/15A wall socket or higher and use the socket for this appliance only. In addition, do not use an extension cord.
- Sharing a wall socket with other appliances using a power strip or extending the power cord may result in electric shock or fire.
- Ensure that the power voltage, frequency and current are the same as those of the product specifications. Failure to do so may result in electric shock or fire. Failure Plug the power plug into the wall socket firmly.
Remove all foreign substances such as dust or water from the power plug terminals and contact points using a dry cloth on a regular basis.
- Unplug the power plug and clean it with a dry cloth.
- Failure to do so may result in electric shock or fire.
Plug the power plug into the wall socket in the right direction so that the cord runs towards the floor.
- If you plug the power plug into the socket in the opposite direction, the electric wires within the cable may be damaged and this may result in electric shock or fire.
Keep all packaging materials well out of the reach of children, as packaging materials can be dangerous to children.
- If a child places a bag over its head, it may result in suffocation.
When the appliance or power plug or power cord is damaged, contact your nearest service centre.

This appliance must be properly grounded.
Do not ground the appliance to a gas pipe, plastic water pipe, or telephone line.
- This may result in electric shock, fire, an explosion, or problems with the product
- Never plug the power cord into a socket that is not grounded correctly and make sure that it is in accordance with local and national codes.

Do not install this appliance near a heater, inflammable material.
Do not install this appliance in a humid, oily or dusty location, in a location exposed to direct sunlight and water (rain drops).
Do not install this appliance in a location of low temperature
- Frost may cause tubes to burst
Do not install this appliance in a location where gas may leak. - This may result in electric shock or fire.
Do not use an electric transformer.
- It may result in electric shock or fire.
Do not use a damaged power plug, damaged power cord or loose wall socket.
- This may result in electric shock or fire.
Do not pull or excessively bend the power cord.
Do not twist or tie the power cord.
Do not hook the power cord over a metal object, place a heavy object on the power cord, insert the power cord between objects, or push the power cord into the space behind the appliance.
- This may result in electric shock or fire.
Do not pull the power cord, when unplugging the power plug. - Unplug the power plug by holding the plug.
- Failure to do so may result in electric shock or fire.
Do not lay the power cord and tubes where you may fall over them.

CAuTioN SiGNS FoR iSTALLIATION

This appliance should be positioned in such a way that it is accessible to the power plug.
- Failure to do so may result in electric shock or fire due to electric leakage.
Install your appliance on a level and hard floor that can support its weight.
- Failure to do so may result in abnormal vibrations, moves, noise, or problems with the product.

SeVeRe WARNINGSiGNS FoR uSiNG

If the appliance is flooded, cut the water supply and power immediately and contact your nearest service centre.
- Do not tough the power plug with wet hands
- Failure to do so may cause electric shock
If the appliance generates a strange noise, a burning smell or smoke, unplug the power plug immediately and contact your nearest service centre.
- Failure to do so may result in electric shock or fire.
In the event of a gas leak (such as propane gas, LP gas, etc.), ventilate immediately without touching the power plug. Do not touch the appliance or power cord.
- Do not use a ventilating fan.
- A spark may result in an explosion or fire.
Do not let children play in or on the washer. In addition, when disposing of the appliance, remove the washer door lever.
- If trapped inside, the child may become trapped and suffocate to death.
Make sure to remove the packaging (sponge, styrofoam) attached to the bottom of the washer before using it.
safety information
Do not wash items contaminated with gasoline, kerosene, benzene, paint thinner, alcohol or other flammable or explosive substances.
- This may result in electric shock, fire or an explosion.
Do not open the washer door by force while it is operating (high-temperature washing/ drying/spinning).
Water flowing out of the washer may result in burns or cause the floor to be slippery.
This may result in injury.
- Opening the door by force may result in damage to the product or injury.
Do not insert your hand under the washer.
- This may result in injury.
Do not touch the power plug with wet hands. - This may result in electric shock.
Do not turn the appliance off by unplugging the power plug while an operation is in progress.
- Plugging the power plug into the wall socket again may cause a spark and result in electric shock or fire.
Do not let children or infirm persons use this washer unsupervised. Do not let children climb in the appliance
- Failure to do so may result in electric shock, burns or injury.
Do not insert your hand or a metal object under the washer while it is operating.
- This may result in injury.
Do not unplug the appliance by pulling at the power cord, always grip plug firmly and pull straight out from the outlet.
- Damage to the cord may cause short-circuit, fire and/or electric shock
Do not attempt to repair, disassemble, or modify the appliance yourself.
- Do not use any fuse(such as cooper, steel wire, etc.) other than the standard fuse.
- When repairing or reinstalling the appliance is required, contact your nearest service centre.
- Failure to do so may result in electric shock, fire, problems with the product, or injury.
If any foreign substance such as water has entered the appliance, unplug the power plug and contact your nearest service centre.
- Failure to do so may result in electric shock or fire.
When the water supply hose comes loose from the faucet and floods the appliance, unplug the power plug.
- Failure to do so may result in electric shock or fire.
Unplug the power plug when the appliance is not being used for long periods of time or during a thunder/lightning storm.
- Failure to do so may result in electric shock or fire.

When the washer is contaminated by a foreign substance such as detergent, dirt, food waste, etc., unplug the power plug and clean the washer using a damp and soft cloth.
- Failure to do so may result in discoloration, deformation, damage or rust.
The front glass may be broken by a strong impact. Take care when using the washer.
- When the glass is broken, it may result in injury.
After a water supply failure or when reconnecting the water supply hose, open the faucet slowly.
Open the faucet slowly after a long period of non-use.
- The air pressure in the water supply hose or the water pipe may result in damage to a part or in water leakage.
If a drain error occurs during an operation, check if there is a draining problem. - If the washer is used when it is flooded because of a draining problem, it may result in electric shock or fire due to electric leakage.
Insert the laundry into the washer completely so that laundry does not get caught in the door.
- If laundry gets caught in the door, it may result in damage to the laundry or the washer, or result in water leakage.
Ensure that the faucet is turned off when the washer is not being used.
- Ensure that the screw on the water supply hose connector is properly tightened.
- Failure to do so may result in property damage or injury.
Check if the rubber seal is not contaminated by foreign substances (waste, thread, etc).
- If the door is not closed completely, it may result in water leakage.
Open the faucet and check if the water supply hose connector is firmly tightened and that there is no water leaking before using the product.
- If the screws or the water supply hose connector are loose, it may result in water leakage.
To reduce the risk of fire or explosion: - Under certain conditions, hydrogen gas may be produced in a hot water system such as your hot water heater that has not been used for two weeks or more. HYDROGEN GAS IS EXPLOSIVE. If your hot water system has not been used for two weeks or more, turn on all hot water taps in your home, and let the water flow for several minutes before using your washing machine. This will release any hydrogen gas build-up. Since hydrogen gas is flammable, do not smoke or light an open flame during this time. Ventilate immediately without touching the power plug if there is a gas leak.
The product you have purchased is designed for domestic use only.
The use for business purposes qualifies as product misuse.
In this case, the product will not be covered by the standard warranty provided by
Samsung and no responsibility can be attributed to Samsung for malfunctions or damages resulting from such misuse.
safety information

Do not stand on top of the appliance or place objects (such as laundry, lighted candles, lighted cigarettes, dishes, chemicals, metal objects, etc.) on the appliance.
- This may result in electric shock, fire, problems with the product, or injury.
Do not spray volatile material such as insecticide onto the surface of the appliance.
- As well as being harmful to humans, it may also result in electric shock, fire or problems with the product.
Do not place an object that generates a electromagnetic field near the washer.
- This may result in injury due to a malfunction.
Since the water drained during a high-temperature wash or drying cycle is hot, do not touch the water.
- This may result in burns or injury.
Do not wash, spin or dry water-proof seats, mats or clothing (^*) unless your appliance has a special program for washing these items.
- Do not wash thick, hard mats even if the washer mark is on the care label.
- This may result in injury or damage to the washer, walls, floor or clothing due to abnormal vibrations.
- Woollen bedding, rain covers, fishing vests, ski pants, sleeping bags, diaper covers, sweat suits, and bicycle, motor cycle, car covers, etc.
Do not operate the washer when the detergent box is removed.
- This may result in electric shock or injury due to water leakage.
Do not touch the inside of the tub during or just after drying as it is hot.
- This may result in burns.
Do not insert your hand into the detergent box after opening it.
-
This may result in injury as your hand may be caught by the detergent input device. Do not place any objects (such as shoes, food waste, animals) other than laundry into the washer.
-
This may result in damage to the washer, or injury and death in the case of pets due to the abnormal vibrations.
Do not press the buttons using sharp objects such as pins, knives, fingernails, etc.
- This may result in electric shock or injury.
Do not wash laundry contaminated by oils, creams or lotions usually found in skincare shops or massage clinics.
- This may result in the rubber seal becoming deformed and water leakage.
Do not leave metal objects such as a safety pin or hair pin, or bleach in the tub for long periods of time.
- This may cause the tub to rust.
- If rust starts appearing on the surface of the tub, apply a cleansing agent (neutral) to the surface and use a sponge to clean it. Never use a metal brush.
Do not use dry cleaning detergent directly and do not wash, rinse, or spin laundry contaminated by dry cleaning detergent.
- This may result in spontaneous combustion or ignition due to the heat of the oxidation of the oil.
Do not use hot water from water cooling/heating devices.
- This may result in problems with the washer.
Do not use natural hand-washing soap for the washer.
- If it hardens and accumulates inside the washer, it may result in problems with the product, discoloration, rust or bad odors.
Do not wash large laundry items such as bedding in the washing net.
-
Place socks and brassieres into the washing net and wash them with the other laundry.
-
Failure to do so may result in injury due to abnormal vibrations.
Do not use hardened detergent.
- If it accumulates inside the washer, it may result in water leakage.
For washing machines with ventilation openings in the base, ensure that the opening is not obstructed by carpet or any other obstacles.
Make sure that the pockets of all clothing to be washed are empty.
- Hard, sharp objects, such as coins, safety pins, nails, screws, or stones can cause extensive damage to the appliance.
Do not wash clothing with large buckles, buttons, or other heavy metal.

SeVeRe WARNING SiGNS FoR CleANiNG

Do not clean the appliance by spraying water directly onto it.
Do not use the strong acid cleaning agent.
Do not use benzene, thinner or alcohol to clean the appliance.
- This may result in discoloration, deformation, damage, electric shock or fire.
Before cleaning or performing maintenance, unplug the appliance from the wall socket.
- Failure to do so may result in electric shock or fire.
safety information
iNSTRuCTioN AbouT The Wee MARK
Correct Disposal of This Product (Waste Electrical & Electronic Equipment)
(Applicable in countries with separate collection systems)
This marking on the product, accessories or literature indicates that the product and its electronic accessories (e.g. charger, headset, USB cable) should not be disposed of with other household waste at the end of their working life. To prevent possible harm to the environment or human health from uncontrolled waste disposal, please separate these items from other types of waste and recycle them responsibly to promote the sustainable reuse of material resources.
Household users should contact either the retailer where they purchased this product, or their local government office, for details of where and how they can take these items for environmentally safe recycling.
Business users should contact their supplier and check the terms and conditions of the purchase contract. This product and its electronic accessories should not be mixed with other commercial wastes for disposal.
setting up your washing machine
Be sure to have your installer follow these instructions closely so that your new washing machine works properly and so that you're not at risk of injury when doing laundry.
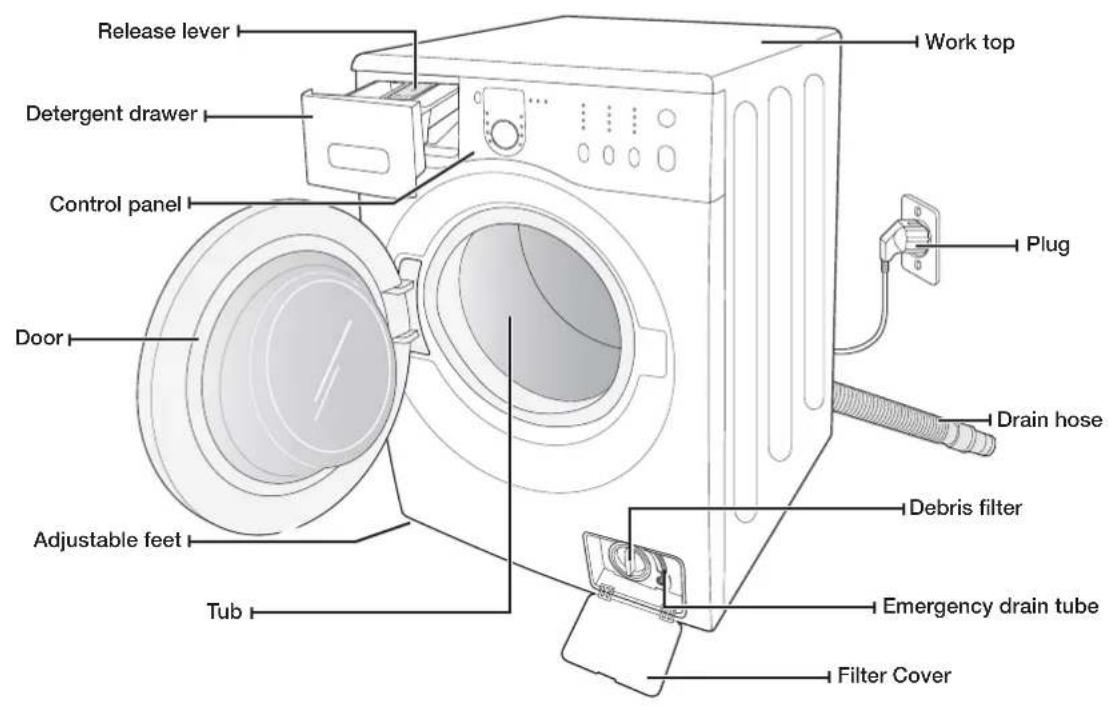
CHECKING THE PARTS
Carefully unpack your washing machine, and make sure you've received all of the parts shown below. If your washing machine was damaged during shipping, or if you do not have all of the parts, contact Samsung Customer Service or your Samsung dealer.
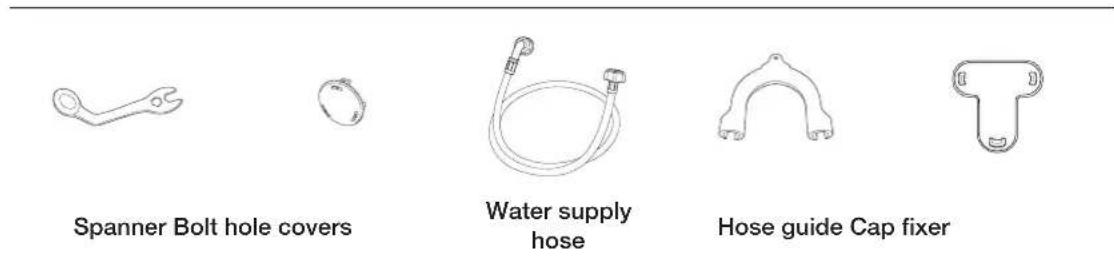

- Bolt hole covers : The number of bolt hole covers depends on the model (3~5 covers).
setting up your washingmachine
MEETING INSTALLATION REQUIREMENTS
Electrical supply and grounding
To prevent unnecessary risk of fire, electrical shock, or personal injury, all wiring and grounding must be done in accordance with the National Electrical Code ANSI/FNPA, No. 70 Latest Revision and local codes and ordinances. It is the personal responsibility of the appliance owner to provide adequate electrical service for this appliance.

Never use an extension cord.
Use only the power cord that comes with your washing machine.
When preparing for installation, ensure that your power supply offers:
220V~240V 50Hz 15 AMP fuse or circuit breaker
- Individual branch circuit serving only your washing machine
- Your washing machine must be grounded. If your washing machine malfunctions or breaks down, grounding will reduce the risk of electric shock by providing a path of least resistance for the electric current.
- Your washing machine comes with a power cord having a three-prong grounding plug for use in a properly installed and grounded outlet.

Never connect the ground wire to plastic plumbing lines, gas lines, or hot water pipes.
Improperly connecting the equipment-grounding conductor can result electrical shock.
Check with a qualified electrician or serviceman if you are unsure if the washing machine is properly grounded. Do not modify the plug provided with the washing machine. If it does not fit the outlet, have a proper outlet installed by a qualified electrician.
Water Supply
Your washing machine will fill properly when your water pressure is 50kPa 800kPa . Water pressure less than 50kPa may cause water valve failure, not allowing the water valve to shut off completely. Or, it may take the washing machine longer to fill than what the controls allow, resulting in your washing machine turning off. (A fill-time limit, designed to prevent overflows/ flooding if an internal hose becomes loose, is built into the controls.)
The water taps must be within 4 feet (122cm) of the back of your washing machine for the provided inlet hoses provided to reach your washing machine.

Most plumbing supply stores sell inlet hoses of various lengths up to 10 feet (305cm) long.
I can reduce the risk of leaks and water damage by:
- Making water taps easily accessible.
- Turning off taps when the washing machine is not in use.
Periodically checking for leaks at water inlet hose fittings.

Before using your washing machine for the first time, check all connections at the water valve and taps for leaks.
Drain
Samsung recommends a standpipe height of 65~cm . The drain hose must be routed through the drain hose clip to the standpipe. The standpipe must be large enough to accept the outside diameter of the drain hose. The drain hose is attached at the factory.
Flooring
For best performance, your washing machine must be installed on a solidly constructed floor. Wood floors may need to be reinforced to minimize vibration and/or unbalanced loads. Carpeting and soft tile surfaces are contributing factors to vibrations and the tendency for your washing machine to move slightly during the spin cycle.
Never install your washing machine on a platform or poorly supported structure.
Surrounding temperature
Do not install your washing machine in areas where water may freeze, since your washing machine always retains some water in its water valve, pump, and hose areas. Frozen water in the lines can cause damage to belts, the pump, and other components.
Alcove or closet installation
To operate safely and properly, your new washing machine requires minimum clearances of:
Sides - 25 mm Rear - 51 mm
Top-25 mm Front-465 mm
If both the washing machine and a dryer are installed together, the front of the alcove or closet must have at least 465mm unobstructed air opening. Your washing machine alone does not require a specific air opening.
INSTALLING YOUR WASHING MACHINE
STEP1
Selecting a location

Before you install the washing machine, make sure the location:
- Has a hard, level surface without carpeting or flooring that may obstruct ventilation
Is away from direct sunlight - Has adequate ventilation
Will not be freezing (below 32^ or 0^ )
Is away from heat sources such as oil or gas - Has enough space so that the washing machine doesn't stand on its power cord
setting up your washing machine
STEP 2
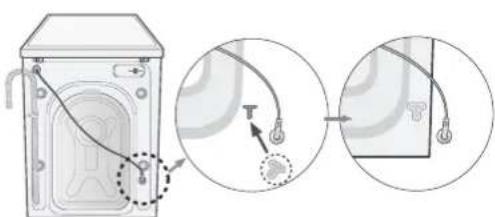
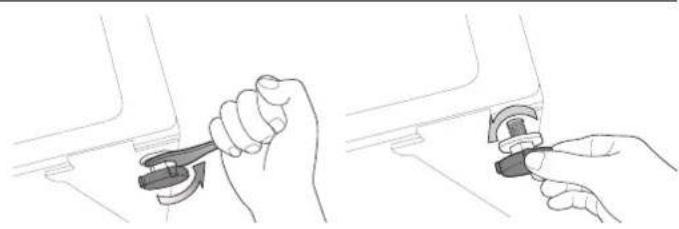
Removing the shipping bolts
Before installing the washing machine, you must remove the five shipping bolts from the back of the unit.
- Loosen all the bolts with the supplied wrench.
- Hold the bolt with the spanner and pull it through the wide section of the hole. Repeat for each bolt.
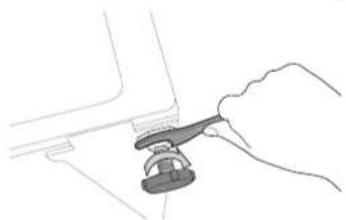
- Fill the holes with the supplied plastic covers.
- Store the shipping bolts away safely in case you have to move the washing machine in the future.

Packaging materials can be dangerous to children; keep all packaging material (plastic bags, polystyrene, etc.) well out of the reach of children.

Insert the cap fixer, (one of the accessories in the vinyl pack), into the hole from which you removed the power cord at the back of the product.
STEP 3
Adjusting the levelling feet

When installing your washing machine, ensure that the power plug, the water supply and the drain are easily accessible.
-
Slide the washing machine into position.
-
Level your washing machine by turning the leveling feet in and out as necessary by hand.
- When your washing machine is level, tighten the nuts using the wrench supplied with your washing machine.
STEP4
Connecting the water and drain
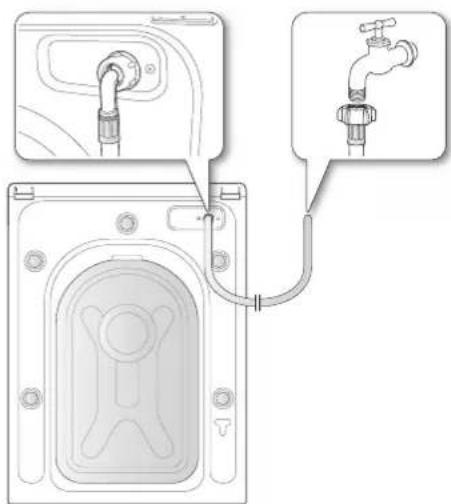
Connecting the water supply hose
- Take the L-shaped arm fitting for the cold water supply hose and connect it to the cold water supply intake on the back of the machine. Tighten by hand.
The water supply hose must be connected to the washing machine at one end and to the water tap at the other. Do not stretch the water supply hose. If the hose is too short, replace the hose with a longer, high pressure hose.
- Connect the other end of the cold water supply hose to your sink's cold water tap and tighten it by hand. If necessary, you can reposition the water supply hose at the washing machine end by loosening the fitting, rotating the hose, and retightening the fitting.
For selected models with an additional hot water intake:
- Take the red L-shaped arm fitting for the hot water supply hose and connect it to the hot water supply intake on the back of the machine. Tighten by hand.
- Connect the other end of the hot water supply hose to your sink's hot water tap and tighten it by hand.
- Use a Y-piece if you only want to use cold water.
setting up your washing machine
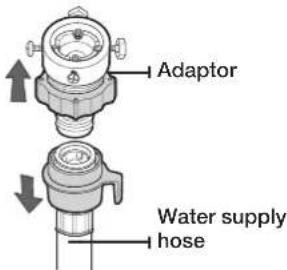
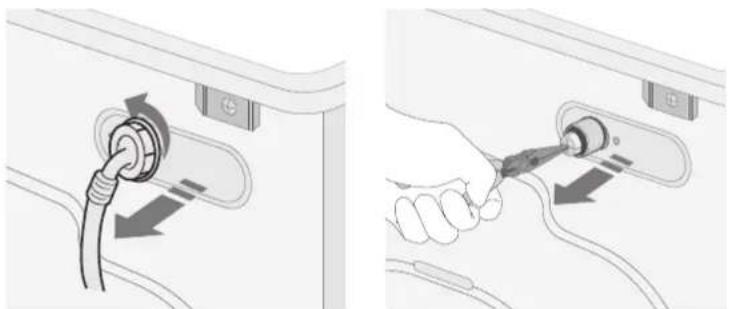
Connecting the water supply hose (selected models)
- Remove the adaptor from the water supply hose.
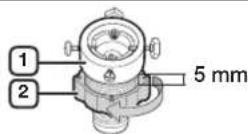
- First, using a +^ type screwdriver, loosen the four screws on the adaptor. Next, take the adaptor and turn part (2) following the arrow until there is a 5 mm gap.
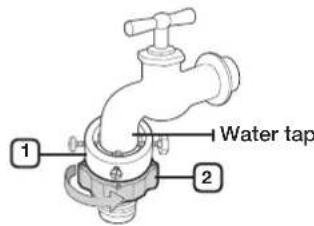
- Connect the adaptor to the water tap by tightening the screws firmly while lifting the adaptor upwards. Turn part (2) following the arrow and connect (1) and (2).
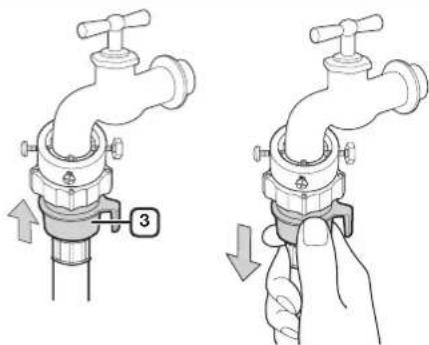
- Connect the water supply hose to the adaptor. When you release part (3), the hose automatically connects to the adaptor making a 'click' sound.
After you have connected the water supply hose to the adaptor, ensure that it is connected correctly by pulling the water supply hose downwards.
- Connect the other end of the water supply hose to the inlet water valve at the rear of the washing machine. Screw the hose clockwise all the way in.
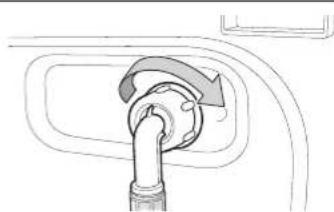
- Turn on the water supply and ensure that no water leaks from the water valve, tap or adaptor. If there is a water leaks, repeat the previous steps.
Do not use your washing machine if there is a water leak. Warning This may cause electric shock or injury.
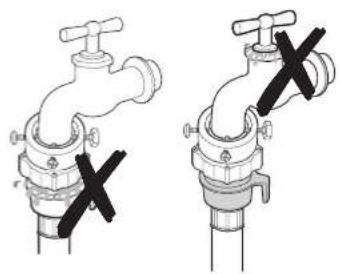
If the water tap has a screw type tap, connect the water supply hose to the tap as shown.
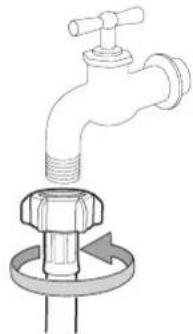
Use the most conventional type of tap for the water supply. In case the tap is square or too big, remove the spacing ring before inserting the tap into the adaptor.
setting up your washing machine
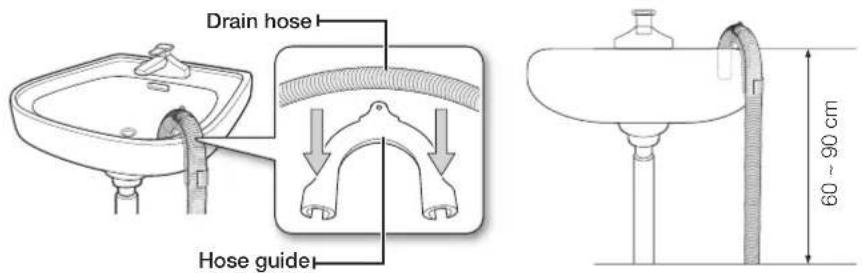
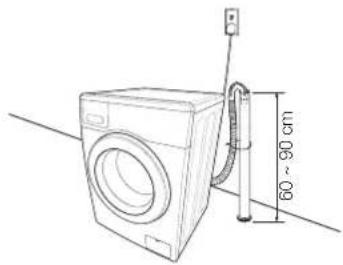
Connecting the drain hose
The end of the drain hose can be positioned in three ways:
- Over the edge of a wash basin: The drain hose must be placed at a height of between 60 and 90~cm . To keep the drain hose spout bent, use the supplied plastic hose guide. Secure the guide to the wall with a hook or to the tap with a piece of string to prevent the drain hose from moving.
- In a sink drain pipe branch: The drain pipe branch must be above the sink siphon so that the end of the hose is at least 60~cm above the ground.
- In a drain pipe: We recommend using a 65 cm high vertical pipe; it must be no shorter than 60 cm and no longer than 90 cm.
The standpipe drain requires;
- minimum diameter 5 cm.
- minimum carry-away capacity 60 liter per minute.
STEP5
powering your washing machine
Plug the power cord into a wall sockets, an AC 220-240V / 50Hz approved electrical outlet protected by a fuse or circuit breaker. (For more information on electrical and grounding requirements, see page 14.)
Test run
Make sure that you install your washing machine correctly by running the Rinse+Spin cycle after the installation is complete.
washing a load of laundry
With your new Samsung washing machine, the hardest part of doing laundry will be deciding which load to wash first.
WASHING FOR THE FIRST TIME

Before washing laundry for the first time, you must run a complete empty cycle (i.e. no laundry).
- Press the Power button.
- Add a little detergent to the detergent compartment in the detergent drawer.
- Turn on the water supply to the washing machine.
- Press the Start/Pause button.

This will remove any water that might be left over in the machine from the manufacturer's test run.
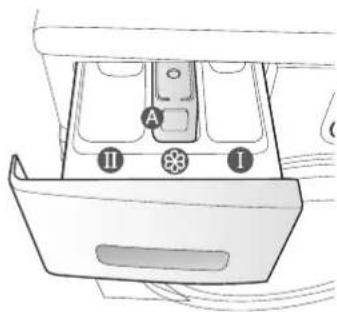
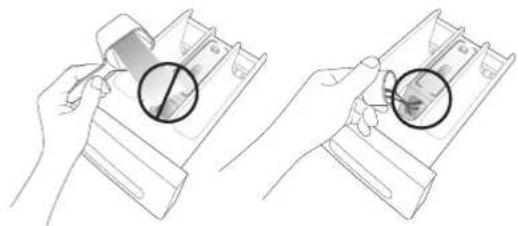
Compartment ① Detergent for prewash, or starch.
Compartment Detergent for the main wash, water softener, pre-soaking agent, bleach and stain removal product.
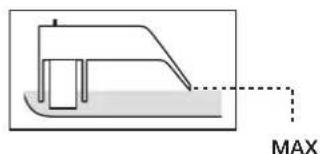
Compartment Additives, e.g. fabric softener or former (fill no higher than lower edge (MAX) of "A")
BASIC INSTRUCTIONS
- Load your laundry into the washing machine.

Do not overload the washing machine. To determine the load capacity for each type of
WARNING laundry, refer to the chart on page 27.

Make sure that laundry is not caught in the door, as this may cause a water leak.
- Washing detergent may remain in the front rubber part of the washer after a wash cycle. Remove any remaining detergent, as they may cause a water leak.
- Do not wash water-proofed items.
- Close the door until it latches.
- Turn the power on.
- Add detergent and additives to the dispenser drawer.
- Select the appropriate cycle and options for the load. The Wash Indicator light will illuminate and the estimated cycle time will appear in the display.
- Press the Start/Pause button.
washing a load of laundry
USING THE CONTROL PANEL


DIGITAL GRAPHIC DISPLAY
Displays the remaining wash cycle time, all cycle information, and error messages.

CYCLE SELECTOR
Select the tumble pattern and spin speed for the cycle.
For detailed information, refer to "Washing clothes using the cycle selector" (see page 25).
Cotton(2) - For averagely or lightly soiled cotton, bed linen, table linen, underwear, towels, shirts, etc.
Synthetics(√) - For averagely or lightly soiled blouses, shirts, etc., made of polyester (diolen, trevira), polyamide (perlon, nylon) or other similar blends.
Hand Wash For Wool (w) - Only for machine-washable wool. A load should be less than 2.0 kg.
- The wool course washes the laundry using gentle cradling actions. During the wash, the gentle cradling and soaking actions are continued to protect the wool fibers from shrinkage / distortion and for a super gentle clean. This stop operation is not a problem.
Neutral detergent is recommended for wool course, for improved washing results and for improved care of the wool fibers.
Baby Care High temperature wash and extra rinses ensure that no washing powder remains to mark your thin clothes.
Daily Wash( ) - Use for everyday items such as underwear and shirts. Short programme for test institutes.
15' Quick Wash(1) - For lightly soiled garments that you require quickly.

The values(15' minutes) can vary from the indicated values depending on water pressure, water hardness, water inlet temperature, room temperature, type and amount of washing and degree of soiling, utilized detergent, fluctuation in the electricity supply and extra options selected.
- Add only a small amount of detergent for a small amount of laundry (less than 2kg) for the 15' Quick Wash course, because if you add too much detergent, detergent may remain after the wash.
Spin(Performs an additional spin cycle to remove more water.
Rinse + Spin(+) - Use for a load that needs rinsing only or to add rinse-added fabric softener to a load.
| 3 DELAY END SELECTATION BUTTON | Press this button repeatedly to cycle through the available Delay End options (from 3 hours to 19 hours in one hour increments). The hour displayed indicates the time when the wash cycle will be finished. | |
| 4 TEMPERATURE SELECTATION BUTTON | Press this button repeatedly to cycle through the available water temperature options: (20 °C(All Lamps Turn Off), 30 °C, 40 °C, 60 °C and 95 °C). | |
| 5 SPIN SELECTION BUTTON | Press the button repeatedly to cycle through the available speeds for the spin cycle. | |
| WF1702 / WF1602 | All Lamps Turn Off, 400, 800, 1200 rpm | |
| WF1700 / WF1600 | All Lamps Turn Off, 400, 800, 1000 rpm | |
| “No spin” - The laundry remains in the drum and no spin cycle is performed after the final drain. “Rinse Hold (All Lamps Turn Off)” -The laundry remains soaking in the final rinse water. Before the laundry can be unloaded, either a Drain or Spin cycle must be performed. | ||
| 6 OPTION SELECTION BUTTON | Press this button repeatedly to cycle through the wash options: U (Pre-Wash) → U (Rinse+) → U (Intensive) → U (Pre-Wash) + U (Rinse+) → U (Pre-Wash) + U (Rinse+) → (Intensive) → (off) U (Pre-Wash): Press this button to select Pre-Wash. Pre-wash is only available with: Cotton(Synthetics(), Baby Care(), Daily Wash(), (Rinse+): Press this button to add additional rinse cycles. U (Intensive): Press this button when the laundry is heavily soiled and needs to be washed intensively. The cycle time is increased for each cycle. | |
| 7 START/PAUSE SELECTION BUTTON | Press to pause and restart a cycle. | |
| 8 POWER BUTTON | Press it once to turn your washing machine on, press it again to turn your washing machine off. If the washing machine is left on for more than 10 minutes without any buttons being touched, the power automatically turns off. | |
washing a load of laundry
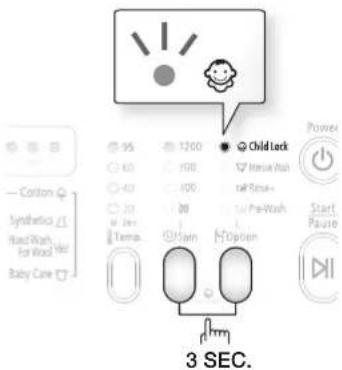
Child lock
The Child Lock function allows you to lock the buttons so that the wash cycle you've chosen can't be changed.
Activating/Deactivating
If you want to activate or deactivate the Child Lock function, press the Spin() and Option() buttons at the same time for 3 seconds. The "Child Lock" will be lit when this feature is activated.
When the Child Lock function is activated, only the Power (D) button works. The Child Lock function remains on even after the power is turned on and off or after the disconnecting and reconnecting the power cord.
Delay end
You can set the washing machine to finish your wash automatically at a later time, choosing a delay of between 3 to 19 hours (in 1 hour increments). The hour displayed indicates the time at which the wash will be finished.
- Manually or automatically set your washing machine according to the type of laundry you are washing.
- Press the Delay End() button repeatedly until the delay time is set.
- Press the Start/Pause() button. The "Delay End indicator will be lit, and the clock will begin counting down until it reaches the set time.
- To cancel a Delay End function, press the Power() button and then turn the washing machine on again.
Washing clothes using the cycle selector
Your new washing machine makes washing clothes easy, using Samsung's "Fuzzy Control" automatic control system. When you select a wash program, the machine will set the correct temperature, washing time, and washing speed.
- Turn on your sink's water tap.
- Press the Power() button.
- Open the door.
- Load the articles one at a time loosely into the drum, without overfilling it.
- Close the door.
- Add detergent, softener, and pre-wash detergent (if necessary) into the appropriate compartments.

Pre-wash is only available when selecting the Cotton(), Synthetics Baby Care and Daily Wash() cycles. It is only necessary if your clothing is heavily soiled.
- Use the Cycle Selector to select the appropriate cycle according to the type of material: Cotton(), Synthetics(Hand Wash For Wool(), Baby Care(), Dryly Wash(), 15'Quick Wash). The relevant indicators will illuminate on the control panel.
- At this time, you can control the wash temperature, the amount of rinses, the spinning speed, and the delay time by pressing the appropriate option button.
- Press the Start/Pause button and the wash will begin. The process indicator will light up and the remaining time for the cycle will appear in the display.
Pause Option
Within 5 minutes of starting a wash, it is possible to add/remove laundry items.
- Press the Start/Pause( ) button to unlock the door.
The door cannot be opened when the water is too HOT or the water level is too HIGH. - After closing the door, press the Start/Pause() button to restart the wash.
When the cycle is finished:
After the total cycle has finished, the power will turn off automatically.
- Open the door.
- Remove laundry.
washing a load of laundry
Washing clothes manually
You can wash clothes manually without using the Cycle Selector.
1. Turn the water supply on.
2. Press the Power() button on the washing machine.
3. Open the door.
4. Load the articles loosely into the drum one at a time, without overfilling it.
5. Close the door.
6. Add detergent and, if necessary, softener or prewash detergent, into the appropriate compartments.
7. Press the Temp.( ) button to select the temperature. (20 °C(All Lamps Turn Off), 30 °C, 40 °C, 60 °C, 95 °C)
8. Press the Option (山) button to select the Rinse+ to add a rinse time. The wash duration is increased accordingly.
9. Press the Spin() button to select the spin speed. The rinse hold function allows you to remove items that are still wet from the washing machine. (No Spin (All Lamps Turn Off): Rinse Hold)
10. Press the Delay End button repeatedly to cycle through the available Delay End options (from 3 hour to 19 hours in one hour increments). The hour displayed indicates the time at which the wash will be finished.
11. Press the Start/Pause() button and the machine will begin the cycle.
LAUNDRY GUIDELINES
Follow these simple guidelines for the cleanest laundry and the most efficient wash.

Always check the Care label on clothing before washing.
Sort and wash your laundry according to the following criteria:
Care Label: Sort laundry into cottons, mixed fibres, synthetics, silks, wools and rayons.
Colour: Divide whites and colours. Wash new colour items separately.
Size: Placing items of different sizes in the same load will improve the wash action.
- Sensitivity: Wash delicate items separately, using the Delicate wash cycle for pure, new woolen items, curtains and silk articles. Check the labels on the items you are washing or refer to the fabric care chart in the appendix.
Emptying pockets
Before each wash, empty all the pockets of your laundry. Small, irregularly shaped hard objects, such as coins, knives, pins, and paperclips could damage your washing machine. Do not wash clothing with large buckles, buttons, or other heavy metal objects.
Metal on clothing may damage your clothing as well as the tub. Turn clothing with buttons and embroidered clothes inside out before washing them. If zips of pants and jackets are open while washing, the spin basket may be damaged. Zips should be closed and fixed with a string before washing.
Clothing with long strings may become entangled with other clothes damaging them. Be sure to fix the strings before starting the wash.
Prewashing cotton
Your new washing machine, combined with modern detergents, will give perfect washing results, thus saving energy, time, water and detergent. However, if your cotton is particularly dirty, prewash with a protein-based detergent.
Determining the load capacity
Do not overload the washing machine or your laundry may not wash properly. Use the chart below to determine the load capacity for the type of laundry you are washing.
| Fabric Type Load Capacity | ||
| Model | WF1702 WF1700 | WF1602 WF1600 |
| Cotton - average/lightly soiled - heavily soiled | 7.0 kg 6.0 kg | |
| Synthetics 3.0 kg 2.5 kg | ||
| Hand Wash For Wool 2.0 kg 2.0 kg | ||

- When the laundry is unbalanced ("UE" lights up on the display), redistribute the load. If the laundry is unbalanced, the spin efficiency may be degraded.
- When washing Bedding or Duvets, the wash time may be lengthened or the spin efficiency may be degraded.
For Bedding or Duvets, the recommended load capacity is 1.8(kg) or less.

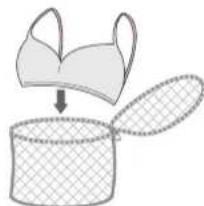
Make sure to insert brassieres (water washable) into a laundry net (to be purchased additionally).
- The metal parts of the brassieres may break through the material and damage the laundry. Therefore make sure to place them inside a fine laundry net.
- Small, light clothing such as socks, gloves, stockings and handkerchiefs may become caught around the door. Place them inside a fine laundry net.

Do not wash the laundry net by itself without other laundry. This may cause abnormal vibrations that could move the washing machine and cause an accident resulting in injury.
washing a load of laundry
DETERGENT AND ADDITIVES INFORMATION
Which detergent to use
The type of detergent you should use is based on the type of fabric (cotton, synthetics, items, Hand Wash For Wool), colour, wash temperature, and degree of soiling. Always use "low suds" laundry detergent, which is designed for automatic washing machines. Follow the detergent manufacturer's recommendations based on the weight of the laundry, the degree of soiling, and the hardness of the water in your area. If you do not know how hard your water is, enquire at your local water authority.

Do not use detergent that has hardened or solidified as the detergent may remain in the rinse cycle. It may cause your washing machine to not rinse properly or result in the overflow becoming blocked.

Please note the following when using the Wool course.
Use a neutral liquid detergent for wool only.
- When using a powder detergent, it may remain on the laundry and cause damage to the material (wool).
Detergent drawer
Your washing machine has separate compartments for dispensing detergent and fabric softener. Add all laundry additives to the correct compartment before starting your washing machine.

Do NOT open the detergent drawer when your washing machine is running.
- Pull out the detergent drawer on the left side of the control panel.
- Add the recommended amount of laundry detergent directly into the detergent compartment ① before starting your washing machine.
- Add the recommended amount of fabric softener into the softener compartment if required.

Do NOT add any powder/liquid detergent to the softener compartment (8).

- When using the Prewash option, add the recommended amount of laundry detergent into the prewash compartment ①.

When washing large items do NOT use the following detergent types.
- Tablet and capsule type detergents
Detergents using a ball and net

Concentrated or thick fabric softener and conditioner must be diluted with a little water before being poured into the dispenser (prevents the overflow from becoming

Be careful that the fabric softener does not overflow, when you close the detergent drawer after adding fabric softener into the rinse detergent compartment.
cleaning and maintaining your washing machine
Keeping your washing machine clean improves its performance, wards off unnecessary repairs, and lengthens its life.
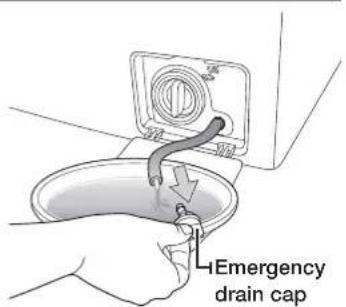
DRAINING THE WASHING MACHINE IN AN EMERGENCY
- Unplug the washing machine from the power supply.
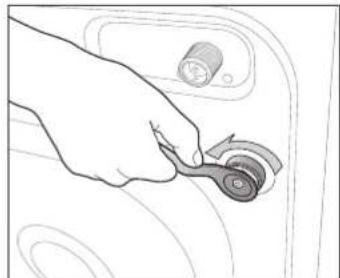
- Open the filter cover using a coin or a key.
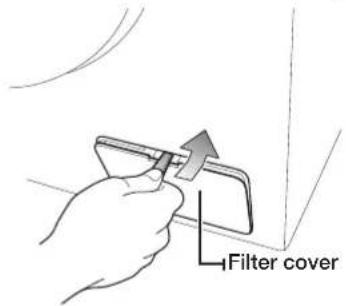
- Pull forward the emergency drain tube to separate it from the guide hook.
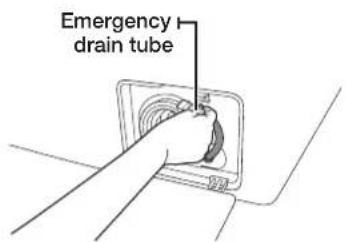
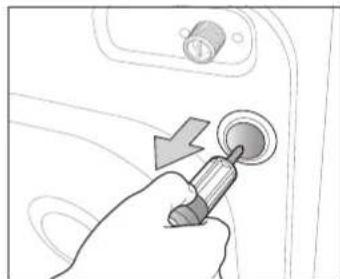
- Take off the emergency drain cap closing the emergency drain tube.
- Allow all the water to flow into a bowl.

Remain water maybe more than you expected. Prepare larger bowl.
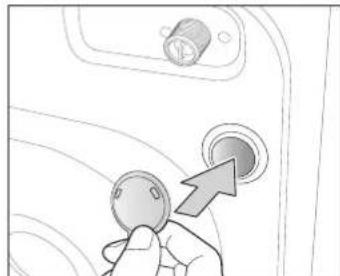
6. Re-attach the cap to the emergency drain tube and then fix the emergency drain tube to the guide hook.
7. Replace the filter-cover.
CLEANING THE EXTERIOR
- Wipe the washing machine surfaces, including the control panel, with a soft cloth using a nonabrasive household detergent.
- Use a soft cloth to dry the surfaces.
- Do not pour water onto the washing machine.
cleaning and maintaining your washing machine
CLEANING THE DETERGENT DRAWER AND DRAWER RECESS
- Press the release lever on the inside of the detergent drawer and pull the drawer out.
- Remove the liquid detergent divider from the detergent drawer
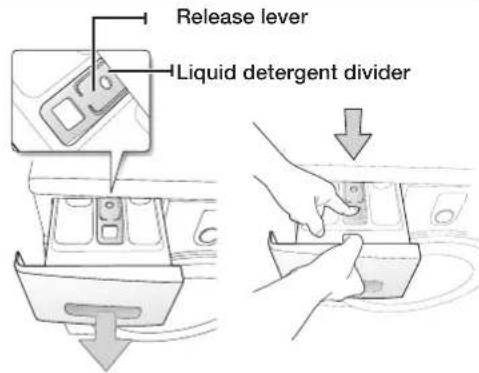
- Wash all parts under running water.
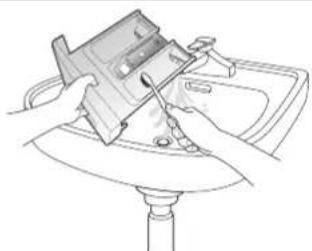
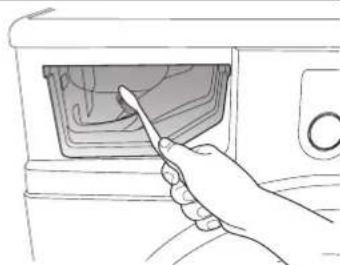
- Clean the drawer recess with an old toothbrush.
- Replace the liquid detergent divider by pushing it firmly into the drawer.
- Push the drawer back into place.
- To remove any remaining detergent, perform a rinse cycle without any laundry in the drum.
CLEANING THE DEBRIS FILTER
We recommend cleaning the debris filter 5 or 6 times a year, or when the error message of "5E" is displayed. (Refer to "Draining the washing machine in an emergency" in the previous page.)

Before cleaning the debris filter, make sure to unplug the power cord.
- Remove the remaining water first (refer to "Draining the washing machine in an emergency" on page 29.)
If you separate the filter without draining the remaining water, the remaining water may trickle out. - Open the filter cover by using a key or coin.
- Unscrew the emergency drain cap by turning it to the left and drain off all the water.
- Unscrew the debris filter cap.
- Wash any dirt or other material from the debris filter. Make sure the drain pump propeller behind the debris filter is not blocked.
- Replace the debris filter cap.
- Replace the filter cover.
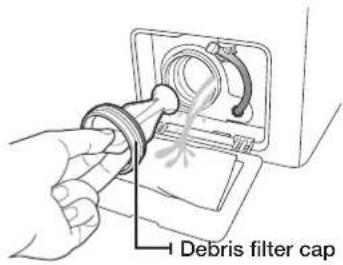

Do not open the debris filter cap while the machine is running or hot water may flow out.

- Make sure to replace the filter cap after the filter cleaning. If the filter is out of the machine, your washing machine may malfunction or leak water.
The filter should be fully assembled after the filter cleaning.
cleaning and maintaining your washing machine
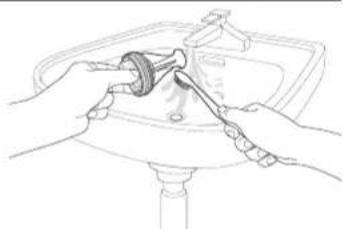
CleANiNG The WATeR HoSe MeSH FilTeR
You should clean the water hose mesh filter at least once a year, or when the error message of "4E" is displayed:
- Turn off the water supply to the washing machine.
- Unscrew the hose from the back of the washing machine. To prevent water from gushing out due to the air pressure in the hose, cover the hose with a cloth.
- Gently pull out the mesh filter from the end of the hose using a pair of pliers and rinse it under water until clean. Also clean inside and outside the threaded connector.
- Push the filter back into place.
- Screw the hose back onto the washing machine.
- Make sure the connections are watertight and turn on the tap.
RepAiRiNG A FRoZeN WASHiNG MACHiNe
If the temperature drops below freezing and your washing machine is frozen:
- Unplug the washing machine.
- Pour warm water over the tap to loosen the water supply hose.
- Remove the water supply hose and soak it in warm water.
- Pour warm water into the washing machine drum and let it sit for 10 minutes.
- Reconnect the water supply hose to the water tap and check if the water supply and drain are operating normal.
SToRiNG youR WASHiNG MACHiNe
If you need to store your washing machine for an extended time, it's better to drain and disconnect it. Washing machines can be damaged if water is left in the hoses and internal components before storage.
- Select the Quick Wash cycle and add bleach to the bleach compartment. Run your washing machine through the cycle without a load.
- Turn the water taps off and disconnect the inlet hoses.
- Unplug your washing machine from the electrical outlet, and leave your washing machine door open to allow air to circulate inside the tumbler.
If your washing machine has been stored in below-freezing temperatures, allow time for any leftover water in your washing machine to thaw out before using it.
troubleshooting and information codes
CHECK THESE POINTS IF YOUR WASHING MACHINE...
| PROBLEM SOLUTION | |
| Will not start • Make sure your washing machine is plugged in. • Make sure the door is firmly closed. • Make sure the water source tap(s) are turned on. • Make sure to press the Start/Pause button. | |
| Has no water or not enough water | • Turn the water tap on fully. • Make sure the water source hose is not frozen. • Straighten the water intake hoses. • Clean the filter on the water intake hose. |
| Has detergent remains in the detergent drawer after the wash cycle is complete | • Make sure your washing machine is running with sufficient water pressure. • Make sure the detergent is added to the center of the detergent drawer. |
| Vibrates or is too noisy | • Make sure your washing machine is on a level surface. If the surface is not level, adjust the washing machine feet to level the appliance. • Make sure that the shipping bolts are removed. • Make sure your washing machine is not touching any other object. • Make sure the laundry load is balanced. |
| The washing machine does not drain and/or spin | • Straighten the drain hose. Eliminate kinked hoses. • Make sure the debris filter is not clogged. |
| Door is locked shut or will not open. | • Make sure all the water in your drum is drained out. • Make sure the door lock light is off. Door lock light will off after drained. |
If the problem persists, contact your local Samsung Customer Service.
troubleshooting and information codes
iNFORMATioN CoDeS
When your washing machine malfunctions, you may see an information code on the display. If that happens, check this table and try the suggested solution before calling Customer Service.
| CODE SYMBOL SOLUTION | |
| dE | Make sure the door is firmly closed. Make sure that laundry is not caught in the door. |
| 4E | Make sure the source water tap is turned on. Check the water pressure. Clean the mesh filters of water hose. When the washer displays the "4E" code, the washer do draining for 3 minutes. During this time, the Power button is inoperative. |
| 5E | Clean the debris filter. Make sure the drainage hose is installed correctly. |
| UE | The laundry load is unbalanced. Redistribute the load. If only one item of clothing needs washing, such as a bathrobe or pair of jeans, the final spin result might be unsatisfactory and an "UE" error message will be shown in the display window. |
| cE/3E | Call the after-sales service. |
| Sd | This occurs when too much foaming is detected. It is also displayed while foaming is removed. When the removal is finished, the normal cycle proceeds.(This is one of the normal operations. It is an error for preventing non-sensing faults.) |
| Uc | If the voltage of the supplied power is instable, the washing machine will be paused to protect its electric devices. If the correct voltage is supplied, the cycle will resume automatically. |
For any codes not listed above, or if the suggested solution doesn't fix the problem, call your Samsung Service Centre or local Samsung dealer.
calibrating your washing machine
CALibRATioN MoDe
Samsung washing machine detects the laundry weight automatically. For more accurate weight detection, please run Calibration Mode after the installation. Calibration mode is done by following the steps below.
- Remove laundry or any contents in the machine and turn off the machine.
- Press the Temp button and Delay End button simultaneously, and press the Power button in addition. Then the machine turns on.
- Press the Start button to activate "Calibration Mode".
- The drum rotates clockwise and counterclockwise approximately for 3 minutes.
- When "Calibration Mode" is finished, "End(En)" appears on the display, and the machine automatically turns off. The washing machine is now ready for use.
cycle chart
CYCLE CHART
( user option)
| PROGRAM | Max load(kg) DETERGENT | Max Temp (℃) | Spin Speed(MAX) rpm | Delay end | |||||
| WF1702 WF1700 | WF1602 WF1600 | Pre-wash | wash | Softener | WF1702 WF1602 | WF1700 WF1600 | |||
| Cotton(♀) | 7.0 6.0 | ● | yes | ● | 95 1200 1000 | ● | |||
| Synthetics(♂) | 2.5 2.5 | ● | yes | ● | 60 1200 1000 | ● | |||
| Hand Wash For Wool(♂) | 2.0 1.5 | - yes | ● | 40 800 800 | ● | ||||
| Baby Care(♀) | 3.0 2.5 | ● | yes | ● | 95 1200 1000 | ● | |||
| Daily Wash(♂) | 2.0 2.0 | ● | yes | ● | 60 1200 1000 | ● | |||
| 15' Quick Wash(♂) | 2.0 2.0 | - yes | ● | 40 800 800 | ● | ||||
- A cycle with a prewash takes approx. 15 minutes longer.
- The cycle duration data has been measured under the conditions specified in Standard IEC 60456 / EN 60456.
Please run Calibration Mode after the installation(see page 34). - Course time in individual homes may differ from the values given in the table due to variations in the pressure and temperature of the water supply, the load and the type of laundry.
- When the Intensive Wash function is selected, the cycle time is increased for each cycle.
appendix
FAbRiC CARe CHART
The following symbols provide garment care directions. The care labels include four symbols in this order: washing, bleaching, drying and ironing, and dry cleaning when necessary.
The use of symbols ensures consistency among garment manufacturers of domestic and imported items. Follow the care label directions to maximize garment life and reduce laundering problems.
| Resistant material Can be ironed at 100 °C max. | |
| Delicate fabric Do not iron | |
| Item may be washed at 95 °C | A Can be dry cleaned using any solvent |
| Item may be washed at 60 °C | Dry clean with perchloride, lighter fuel, pure alcohol or R113 only |
| Item may be washed at 40 °C | Dry clean with aviation fuel, pure alcohol or R113 only |
| Item may be washed at 30 °C | Do not dry clean |
| Item may be hand washed | Dry flat |
| Dry clean only Can be hung to dry | III |
| Can be bleached in cold water Dry on clothes hanger | |
| Do not bleach Tumble dry, normal heat | |
| Can be ironed at 200 °C max Tumble dry, reduced heat | |
| Can be ironed at 150 °C max Do not tumble dry | |
pRoTeCTiNG THE eNViRoNMeNT
- This appliance is manufactured from recyclable materials. If you decide to dispose of this appliance, please observe local waste disposal regulations. Cut off the power cord so that the appliance cannot be connected to a power source. Remove the door so that animals and small children cannot get trapped inside the appliance.
- Do not exceed the detergent quantities recommended in the detergent manu-facturers' instructions.
- Use stain removal products and bleaches before the wash cycle only when strictly necessary.
- Save water and electricity by only washing full loads (the exact amount depends upon the program used).
SpeCiFiCATioNS
| TYPE FRONT LOADING WASHER | |||
| DIMENSION | WF1702 / WF1700 | ||
| W600mm X D550mm X H850mm | |||
| WATER PRESSURE 50 kPa ~ 800 kPa | |||
| WATER VCLUME | 56l | ||
| NET WEIGHT | WF1702 / WF1700 | ||
| 56 kg | |||
| WASH AND SPIN CAPACITY 7.0 kg | |||
| POWER CONSUMPTION | MODEL WF1702 / WF1700 | ||
| WASHING | 220 V 150 W | ||
| 240 V 150 W | |||
| WASH AND HEATING | 220 V 2000 W | ||
| 240 V 2400 W | |||
| SPIN | MODEL WF1702 WF1700 | ||
| 230V 530 W 500 W | |||
| PUMPING 34 W | |||
| SpiN ReVoluTioNS | MODEL WF1702 | WF1700 | |
| rpm 1200 1000 | |||
The appearance and specifications of the product are subject to change without prior notice for purposes of product enhancement.
appendix
SpeCiFiCATioNS
| TYPE FRONT LOADING WASHER | ||||
| DIMENSION | WF1602 / WF1600 | |||
| W600mm X D450mm X H850mm | ||||
| WATER PRESSURE 50 kPa ~ 800 kPa | ||||
| WATER VCLUME | 48l | |||
| NET WEIGHT | WF1602 WF1600 | |||
| 54 kg | ||||
| WASH AND SPIN CAPACITY 6.0 kg | ||||
| POWER CONSUMPTION | MODEL WF1602 | / WF1600 | ||
| WASHING | 220 V 150 W | |||
| 240 V 150 W | ||||
| WASH AND HEATING | 220 V 2000 W | |||
| 240 V 2400 W | ||||
| SPIN | MODEL WF1602 WF1600 | |||
| 230V 530 W 500 W | ||||
| PUMPING 34 W | ||||
| SpiN ReVoluTioNS | MODEL WF1602 | WF1600 | ||
| rpm 1200 1000 | ||||
The appearance and specifications of the product are subject to change without prior notice for purposes of product enhancement.
SHEET OF HOUSEHOLD WASHING MACHINES (EU ONLY)
According to Regulation (EU) No. 1061/2010
Asterisk(s) means variant model and can be varied (0-9) or (A-Z).
| Samsung | ||||
| Model Name | WF1702NHW WF1702NHWG | WF1700*** | ||
| Capacity kg 7 7 | ||||
| Energy Efficiency | ||||
| A+++ (highest efficiency) to D (least efficient) A+ A+ | ||||
| Energy Consumption | ||||
| Annual Energy Consumption (AE_C)1) | kWh/yr 220 220 | |||
| Energy Consumption (E_t60) Cotton 60 °C at full load kWh 1.23 1.23 | ||||
| Energy Consumption (E_t60.1/2) Cotton 60 °C with partial load kWh | 0.89 0.89 | |||
| Energy Consumption (E_t40.1/2) Cotton 40 °C with partial load kWh | 0.69 0.69 | |||
| Weighted power off-mode (P_o) W 0.45 0.45 | ||||
| Weighted power in left-on mode (P_l) W 5.5 | ||||
| Annual water consumption (AW_c)2) | L/yr | 10010 | 10010 | |
| Spin efficiency class3) | ||||
| A (most efficient) to G (least efficient) | B | C | ||
| Maximum Spin Speed | rpm 1200 | 1000 | ||
| Residual moisture | % | 53 | 62 | |
| Programs to which the information on the label and the Sheet relate | Cotton 60 °C and 40 °C + Intensive4) | |||
| Program duration of the standard program | ||||
| Cotton 60 °C at full load | min | 205 205 | ||
| Cotton 60 °C for partial load | min | 162 162 | ||
| Cotton 40 °C with partial load | min | 157 | 157 | |
| Weighted time in left-on mode | min | 2 2 | ||
| Airborne noise emissions | ||||
| Wash | dB (A) re 1 pW | 59 | 59 | |
| Spin | dB (A) re 1 pW | 78 | 74 | |
| Dimensions | ||||
| Unit dimensions | Height | mm | 850 | |
| Width | mm | 600 | ||
| Depth 5) | mm | 550 | ||
| Net weight | kg | 56 | ||
| Gross weight | kg | 58 | ||
| Package weight | kg | 2 | ||
| Water Pressure | kPa | 50-800 | ||
| Electrical connection | ||||
| Voltage | V | 220-240 | ||
| Power consumption | W | 2000-2400 | ||
| Frequency | Hz | 50 | ||
| Name of company | Samsung Electronics Co., Ltd. | |||
appendix
- Annual energy consumption is based on 220 standard washing cycles for cotton programs at 60^ and 40^ at full and partial load, and the consumption of off and left-on modes. Actual energy consumption will depend on how the appliance is used.
- Annual water consumption is based on 220 standard washing cycles for cotton programs at 60^ and 40^ at full and partial load. Actual water consumption will depend on how the appliance is used.
- Spin extraction is very important when you use a clothes dryer to dry your clothes. The energy for drying costs much higher than the energy for washing. Wasing with the high spin saves more energy in drying your clothes in a clothes dryer.
- The 'standard cotton 60^ program' and 'standard cotton 40^ program', which can be selected by adding the Intensive option to the cotton 60^ and cotton 40^ program, are suitable to clean normally soiled cotton laundry and they are the most efficient (concerning water and energy consumption) for this type of laundry. Please run Calibration Mode after the installation(see page 34). In these programs the actual water temperature may differ from the declared temperature.
- Distance to the wall from the unit is not included in the depth dimension.
SHEET OF HOUSEHOLD WASHING MACHINES (EU ONLY)
According to Regulation (EU) No. 1061/2010
Asterisk(s) means variant model and can be varied (0-9) or (A-Z).
| Samsung | ||||
| Model Name | WF1602NHW WF1602NHWG | WF1600*** | ||
| Capacity kg 6.6 | ||||
| Energy Efficiency | ||||
| A+++ (highest efficiency) to D (least efficient) A+ A+ | ||||
| Energy Consumption | ||||
| Annual Energy Consumption (AE_C)1) | kWh/yr 195 195 | |||
| Energy Consumption (E_t60) Cotton 60 °C at full load kWh 1.06 1.06 | ||||
| Energy Consumption (E_t60.1/2) Cotton 60 °C with partial load kWh | 0.79 0.79 | |||
| Energy Consumption (E_t40.1/2) Cotton 40 °C with partial load kWh | 0.65 0.65 | |||
| Weighted power off-mode (P_o) W 0.45 0.45 | ||||
| Weighted power in left-on mode (P_l) W 5.5 | ||||
| Annual water consumption (AW_c)2) | Lyr 8580 | 9580 | ||
| Spin efficiency class3) | ||||
| A (most efficient) to G (least efficient) | B | C | ||
| Maximum Spin Speed | rpm 1200 | 1000 | ||
| Residual moisture | % | 53 | 62 | |
| Programs to which the information on the label and the Sheet relate | Cotton 60 °C and 40 °C + Intensive4) | |||
| Program duration of the standard program | ||||
| Cotton 60 °C at full load | min | 225 225 | ||
| Cotton 60 °C for partial load | min | 162 162 | ||
| Cotton 40 °C with partial load | min | 157 | 157 | |
| Weighted time in left-on mode | min | 2 2 | ||
| Airborne noise emissions | ||||
| Wash | dB (A) re 1 pW | 57 | 57 | |
| Spin | dB (A) re 1 pW | 77 | 74 | |
| Dimensions | ||||
| Unit dimensions | Height | mm | 850 | |
| Width | mm | 600 | ||
| Depth 5) | mm | 450 | ||
| Net weight | kg | 54 | ||
| Gross weight | kg | 56 | ||
| Package weight | kg | 2 | ||
| Water Pressure | kPa | 50-800 | ||
| Electrical connection | ||||
| Voltage | V | 220-240 | ||
| Power consumption | W | 2000-2400 | ||
| Frequency | Hz | 50 | ||
| Name of company | Samsung Electronics Co., Ltd. | |||
appendix
- Annual energy consumption is based on 220 standard washing cycles for cotton programs at 60^ and 40^ at full and partial load, and the consumption of off and left-on modes. Actual energy consumption will depend on how the appliance is used.
- Annual water consumption is based on 220 standard washing cycles for cotton programs at 60^ and 40^ at full and partial load. Actual water consumption will depend on how the appliance is used.
- Spin extraction is very important when you use a clothes dryer to dry your clothes. The energy for drying costs much higher than the energy for washing. Wasing with the high spin saves more energy in drying your clothes in a clothes dryer.
- The 'standard cotton 60^ program' and 'standard cotton 40^ program', which can be selected by adding the Intensive option to the cotton 60^ and cotton 40^ program, are suitable to clean normally soiled cotton laundry and they are the most efficient (concerning water and energy consumption) for this type of laundry. Please run Calibration Mode after the installation(see page 34). In these programs the actual water temperature may differ from the declared temperature.
- Distance to the wall from the unit is not included in the depth dimension.
INFORMATION OF MAIN WASHING PROGRAMMES
| Model Course Temp (°C) | Capacity (kg) | Program Time (min) | Residual Moisture Content (%) | Water Consumption (L/cycle) | Energy Consumption (kWh/Cycle) | ||
| WF1702**** | Cotton 20 3.5 131 5 | 38 0.30 | |||||
| Cotton + intensive | 40 3.5 | 57 53 38 0.67 | |||||
| 60 | 7.0 205 53 | 3 49 1.19 | |||||
| 3.5 162 53 | 38 0.86 | ||||||
| Synthetics | 40 2.5 9 | 1 37 36 0.51 | |||||
SAMSUNG
QUESTIONS OR COMMENTS?
| countTry call or | VisiT us onlinE aT | |
| BULGARIA | 800 111 31, Бразлataн телегонna Линя | www.samsung.com/bg/support |
| CROATIA 072 726 786 www.samsung.com/hr/support | ||
| CZECH 800 - SAMSUNG (800-726786) www.samsung.com/cz/support | ||
| GREECE | 80111-SAMSUNG (80111 726 7864) only from land line (+30) 210 6897691 from mobile and land line | www.samsung.com/gr/support |
| HUNGARY | 0680SAMSUNG (0680-726-786) 0680PREMIUM (0680-773-648) | www.samsung.com/hu/support |
| ROMANIA | 08008 726 78 64 (08008 SAMSUNG) Apel Gratisuit | www.samsung.com/ro/support |
| RUSSIA 8-800 | -555-55-55 www.samsung.com/ru/support | |
| SERBIA 011 321 6899 www.samsung.com/rs/support | ||
| SLOVAKIA 0800 - SAMSUNG(0800-726 786) www.samsung.com/sk/support | ||
| LITHUANIA 8-800 | -77777 www.samsung.com/lt/support | |
| LATvia | 8000-7267 | www.samsung.com/lv/support |
| ESTONIA | 800-7267 | www.samsung.com/ee/support |
| SLOVENIA | 080 697 267 090 726 786 | www.samsung.com/sl/support |
Code No. DC68-02796Q-03_EN


WF1702AH(A/C/D/F/G/H/R/S/T/V/W/Z)(G) WF1702NH(A/C/D/F/G/H/R/S/T/V/W/Z)(G)
WF1700AH(A/C/D/F/G/H/R/S/T/V/W/Z)(G) WF1700NH(A/C/D/F/G/H/R/S/T/V/W/Z)(G)
WF1602AH(A/C/D/F/G/H/R/S/T/V/W/Z)(G) WF1602NH(A/C/D/F/G/H/R/S/T/V/W/Z)(G)
WF1600AH(A/C/D/F/G/H/R/S/T/V/W/Z)(G) WF1600NH(A/C/D/F/G/H/R/S/T/V/W/Z)(G)
WF1702AM(A/C/D/F/G/H/R/S/T/V/W/Z)(G) WF1702NM(A/C/D/F/G/H/R/S/T/V/W/Z)(G)
WF1700AM(A/C/D/F/G/H/R/S/T/V/W/Z)(G) WF1700NM(A/C/D/F/G/H/R/S/T/V/W/Z)(G)
WF1602AM(A/C/D/F/G/H/R/S/T/V/W/Z)(G) WF1602NM(A/C/D/F/G/H/R/S/T/V/W/Z)(G)
WF1600AM(A/C/D/F/G/H/R/S/T/V/W/Z)(G) WF1600NM(A/C/D/F/G/H/R/S/T/V/W/Z)(G)
Перална машина
PpoheTe BCnKn HnCTpyknn npdeN n3NoJ3BaHeTo Ha ypea.
KakTO npn BcRAO CbOpBXeHne n3NOJ3BaUo eNEKTPuYecTBO nIOBnXnHaCTN n Tyk CbueCTByBAT noteHuaJIHn pncKoe. 3a da paobOTte 6e3OnacHO tO3n ypeI, 3a103HaTe ce C HauHa Ha ynpaBHeHne n npocdnpaTe BHMAtenHO npn I3NoJ3BaHe.
нформача 3a 6e3ОпаСНСТТа

PNEyPNEKDEHNE: 3a da HamaIte pncKa ot noxap, eKeTpueckn ydap nHapaHbAHe Ha Iuca npu n3noI3BaHeTo Ha Bauny ypeD, cna3BaTe OCHOBn PpeDna3Hm MepKn, BKIOHTeHNo:
He no3B0JBAIte Deca (n nn Domaunn IIO6muc) da nrgaT Bbpxu nn BvB Baaata nepalna Maunna. Bpaata Ha nepaHata Maunha He ce OTBapra leCHO OTBbTppe, n decaT Moat da Ce HapaHr T cepno3HO, aKO nonaHaT BbTppe.
To3n ypei He Tp86Ba Da ce n3noJ3Ba OT nIuca (BkIIOUHTeHNO deua) C HamaJIeHN fIn3NueCKN, CeTINBHN IINI YMCTBEHN Bb3MOXHOCTN, C HeIOCTaTbUeH ONIT N IO3HaHNA, OCBEN aKO He CE Ha6JIoDaBaT IINI Ca IIM DaJeHN INHCTpyKcUN 3a yNoTpe6aTa Ha ypea OT IINIe, OTROBOPHO 3a TExHaTa 6e3OpNaCHOCT.
Ieata Tp6Ba Da 6bDaT Ha6IoDaBaHn 3a Da ce rapaHTnpa,Ye He cn IrpaT cypeHa.
3a n3non3BaHe B Ebpona: To3n ypeM MoKe Da ce n3noJ3Ba OT Deca Ha Bb3pact 8 rOdHH N NO-ROlemN IINuCa C HamaJeHn OIN3NuCeKn, CEtNBn IIN YMCCTBeHN Bb3MOXHOCTN IIN C HeIOCTaTBueH ONIT IN PO3HaHnA, aKO Ce Na6IIODaBAt IIN Ca NM DaJIeHN IHCTpyKcN INOTHOCHO 6e3OpacHTo n3non3BaHe Ha ypea n pa36npat CbOTBeTHnte pncOBe. DeaTa He 6nBa Da cn irpaT C ypea. POnCtBaHeTo n NOdpbXkata OT Notpe6ntela He Tpr6Ba Da ce npabT OT Deca 6e3 Na6IIODeHne.
Ako 3axpaHbauT Ka6e e nobpeDeH, Toi Tp8Ba Da 6bJe 3aMeHeoT npOn3BOuTeJI, HerOB cepBn3eH ppeCTaBHTeI IIN IInCe Cbc CXoHa KBaIINphiKauJia, 3a da ce n36erHe eBeHTyaJIeH pNCK.
To3n ypei Tp86Ba Da ce pa3noJoxn B TaKOBa nOJoxKeHne, Ye da NMa DoCTbI Do ⅡeIcEJa Ha 3axpaHBAHeTo, KpaHOBeTe Ha BOdaTa I Tpb6nte 3a OTTuHaHe.
3a ypeNi C BeHTnlaauHnn OTBOpN B OCHOBaTa Ce NOrpNxKeTe Da HЯMa KInlM, KoITo Da npeu Ha OTBOpNTe.
Ja ce n3noJ3BaT DOCTaBeHnte C ypeDa HOBn MapKyu; CTapNTe He Tp6Ba Da ce n3noJ3BaT NOBTOpHo.
BHMAHNE: C ceI da ce n36erHe onaChocTTa OT He npedHaMepeHo HynpaHc Ha TOnnHHnI ppeNa3nte, To3n ypeI He Tp8Ba Da 6bIe 3axpaHbAH Ype3 BbHsHO IpeBKnUoyBaIo yCTpoIcTBO, KaTO HApimep TaMep, IIN Da 6bIe CBbp3aH KbM Bepura, KOrTO Ce BKIOuBa IN 3KIIOuBA peoBHO OT eJeKTPOCSa6DInTeHNHaTAKOMnaHn.
информача 3a 6e3ОпаСНСТТа

3AdbJXNTELHIN PEPDYPNEITEJIHN 3HAUN 3AMOHTAX

MOHTaXbT Ha To3n ype, Tp86Ba Da 6bJe N3BbpweH OT KbaJIuФuIpaH TexHk nnn cepBn3Ha dnpMa.
- HecnaBaHeTo Ha ToBA n3nCKBaHe MoKe Da DoBee Do eNeKtpueckn yap, noXkap, eknNo3n, npo6JIemC ypea nn HapaHraBaHe.
YpeBtTeKbK, BHIMaBte npn NOBmraHeTo My.
BkIIOHETe 3axpaHbauyka6eB CTeHeN KOHTAKT AC 220-240V/50Hz/15A nIi no- roJIMn I3NoI3BaIte KOHTaKTA eINHCTBeHO 3a ypeJa. B donbInHeHne He n3noI3BaIte ydbJIkabaau Ka6eJ.
- CnojnelnHeTo Ha einn KOhtaKT c npytn ypeDn, n3noJ3BaHTo Ha pa3KnIOHTen nn yIbJIkaBaHe Ha 3axpaHbAunna Ka6e MoKe da doBepe Do eNeKtpnueckn yap an noXkap.
- YBepete Ce He HappeXeHHeTo, YecToTaHa CTOnHOCTT Ha ToKa Ca CbUInTe, KaTO Te3N ONICAHN B IPOyKTOBaTa CneuФnKaUa. HeCna3BaHeTo Ha TOBa N3NCKBaHe MoKe Da DOBeE Do eNeKtpnueckn Yuap nIN Noxap. N36raBaiTe HeCTaBnIO HO BKIIIOVAbe Ha UeIeCeJa Ha 3axpaHbAHeTo B KOHTaTa.
PeIOBHO npEmaxBaIte BCnKn YyKdN BeIeCTBa, KaTO BOna IIN Ipax, OT KJIeMITE Ha 1IeCEJa IN TOHKeT He Na DOniP C KOHTaKTA CbC CyXa KbPna.
- I3BaTe eIeIeHa eIeKtpo3aXpaHbAHeTo n rO noHCTe CbC cyx napuaJ.
- Hecna3BaHeTo Ha ToBa N3NCKBaHe MoKe Da DoBede Do eEeKtpueckn yap nnn noXkap.
BkIIOUeTe 1eNcenaHa eNEKTo3axpaHbAHeTO B KOHTa CbO6pa3BaIK Ce npabunHata nocoka, Taka Ye Ka6enbT da e HAcOeH KbM noJa.
-Ako BkIIOHnTe UeenceBaOBpaTHaTnOcOKa, eJekTpUneCKnTe npoBOHNuB KaBeMaMOrat Da Ce NOpeRr T TOBa MoKe Da IOBeE Do eJekTpUneCKn Ydap NIN NoXap.
ДрбжTe BCINKи ONAKOBbHn MaTePnAIn N3BbN O6ceRa Ha Deua, TbN KaTO Te3N MaTePnAIn MOrat Da 6bDaT OnaChn 3a T8X.
-AkoTeNoCTaBnTop6aBbpxyIraBaTaCnTOBaMOKeJaIOBeEDo3aNyUbaHe.
Korato ypeBt, uenCeBnT nn Ka6eBbT Ha 3axpaHbAHeTo Ca noBpeHn, CBpXKeTe ce Cn Hain-6nn3kn cepBn3eH ueTbp.

To3n ypei Tp86Ba da 6bJe noDxOJaIO 3a3eMeH.
He 3a3eMaBai Te ypeia KbM Tpb6a 3a ra3, IJIaCTMaCOba Tpb6a 3a BOda NIN TElefoHnA JINHIA.
- Toba MoKe Da IdoBeDe Do eNeKtpuYeCKn yDap, EKcPiNo3nI nn npO6JIeM C npOdykTa.
- HNKORA He BKNIOHbAaTe 3axpaHbAaJa KaBeJI KbM KOHTaKT, KOITo He e 3a3eMeH npabuHIO n Ce yBepeTe, Ye KOHTaKTbT e 3a3eMeH B CbOTBeTCTBnE C MeCTHnTE HaOHOHaHn IpaBnla.

He MOHTIpaIte To3n ypeB B 6bn3OCT Do HArpeBaTeN IIN Do Jiecho 3anaIIM MaTePnaI. He MOHTIpaIte To3n ypeD Ha BnAxAH0, Ma3HO IIN 3anPaSeHo MRCTo, Ha MRCTo NOIOJKeHO HA INpeKTHa CbHHeBa CBeTInHa N BOda (IbXKnOBHN KaKN).
He MOHTnpaIte To3n ypeI Ha MЯCTO C HNCKa TemnepaTpa.
- 3ampb3BaHe MOKe Da npuHHn CnyKBaHe Ha Tpb6nte.
He moHTnpaIte To3n ypeI Ha mrcTo, KbTeTo MoKe Da Ima H3TmHaHe Ha ra3.
- Toba moKe da doBeDe do eNeKtpnueckn yap nnn noXkap.
He n3no3BaIte eJektpnueckn TpaHcfoPmAtop.
- Toba може да довеadingо щар улл пожар.
BbIrapckn-6
He n3noJ3BaIte noBpeDeH uenceI, noBpeDeH 3axpaHbaI kAbI nn pa3xla6eH KOHTaKT.
- Toba MoXe Da DoBede Do eNeKtpnueckn yDap nn noXkap.
He dbpnaTe nJn cBbaTe npekaleHo 3axpaHbauJa KaBeJ.
He ycykbaIte nII Bp3BaIte 3axpaHbauJnKa6eJI.
He okaaTe 3axpaHbauu KaBn Ha MeTaNpEeMeT, He NoctaBnTe TeKn npEeMeTn Ha Hero, He rnoocTabraTe MeKny PpeMeTn Hr Ro TbxAaTe B MRCTO TO 3aD ypeDa.
- Toba moke da do Boede do eNeKtpnuecky yapu noxap.
He Ibpnaite 3axpaHbauJnKa6en, KORato n3BaXkDate uenceJa.
-ⅠЗвадешениетакагоудрхит.
- Hecnza3BaHeTo Ha ToBa n3NcKBaHe MoKe Da DoBeGe Do eNeKTpUeCKn yap nn noXkap.
He nocTabaIte 3axpaHbauNka6en I Tpb6nte Ha MrcTo, KbdeTo MoKeTe da naHete BbpxyTAX.

3HAUN 3A BHIMAHNE PNI MOHTAX

To3n ypei, Tp86Ba na 6bJe pa3noIoxKeH no HauH, KOITo ocNpyraBdoCTbn do IeNcenaHa 3axpaHbaHeto.
- HecnataBaHeTo Ha ToBa n3nckBaHe MoKe Da IobEe Do eNeKtpueeKn yIap nn noxap npaDi TOKOBu yTeuKn.
MOHTIpaIte ypeHa ha paBeH n TBbpN pO,I, KOITo MoKHe Ja n3IbpxKIn TerITo My.
- HecnanaBaHeTo Ha ToBa n3NCKBaHe MoKe Da DoBede Do HeoBuHaHn Bn6paUm, DBnKHeHne, Uym nn npOBeMn C npOdykTa.

3AaJIbJIIXTEJIHN IPEyIIPeINTeJIHN 3HAUIN 3AYIOTPEBA

Ako ypeBbTe hAbOHeH, npeKbChTe He3a6aBHO 3axpaHbAHeTo C B0da N eJIeKtpnEchTBoTo N Ce CbPKeTe C HAI-6m3KnCepBn3eH cHTbp.
-HeDOKOBAIteUeIcenaCMOKpnpbue
- Hecna3BaHeTo Ha ToBa I3NCKBaHe MoKe Ia DoBoeIe Do EJIeKtpnueckn yIap
Ako ypeDbT n3daBa CtpaHeH uym, MmPnC Ha n3ropaIO nn dMn, n3BaTe He3a6abHO 1eceJa n ce CBpbKeTe c Hai-6JIm3KJN cepBn3EH cHTbp.
- Hecnza3BaHeTo Ha ToBa N3NcKBaHe MoKe Ia DoBede Do eNeKTpueeKn yap nnn noXkap.
B cnuyaHa Ha n3TnuaHe Ha ra3 (KaTo nponaH-6yTaH, MeTaH n T.H), npoBeTpTe He3a6abHo, 6e3 da nnate uencena Ha 3axpaHbAheTo. He nnaiTe ypeDa nn 3axpaHbauu Ka6en.
- He n3no3BaIe BeHTnlaTop 3a npoBetpraBaHe.
- NOBaTa Ha nckpa MoKe Da DoBede Do EKcnno3n uJIn noXap.
He no3BolraaTe Ha deua da irpaT BbTpne nn Bbpy npaHnra. B donbJIHeHne, koraTo n3xBpIte ypeA, demoHTnpaTe dpbKkata Ha bpaTaHa nepaHnra.
-AkONaHHeBbTppe,JeTeToMOKeJaOCTaHe3aTBoPeHoNJaCe3aNyUHDoCMbPT.
YBepeTe Ce,Ye CTe npEmaxHann OnakOBbHnTe MaTePnAJI (DyHApEnH,CTIpOnOp) pIpIKpeHn KbM DbHOTo Ha nepaHnTa npei N3No3BaHeTo.
BbIrapckn-7
информача 3a 6e30napCHOCTTa
He n3npaIte npdmEtN 3ambpceHn C 6eH3nH, KepocnH, 6eH3oJ, pa3peHnten Ha 6on, ankoXoJ nn DpyTN Bb3nJaMeHHm HJN EKcPi03NBH BeUecTBA.
- Toba MoKe Da IIOBeDe IO eJIeKTpIueckn yIap, noXaK npI IN EKcNIO3n.
He OTBapayTe cbc cnla BpaTata Ha nepaHnra Tn No BpeMe Ha paBoTa (n3npaHe npBnCoka TemnepaTypa, cyuHe, cHTpOpyra).
- Bɔdata n3JIraT a OT nepaHnRA T M OKe Da IOBede Do n3rapAne NIN Da HappaBn Ioda XJIb3raB.
ToBa MoKe Da npuHnHa paHaBaHe.
- OTBapraHrTo Ha BpaTaTcBc Cnla MoKe Da DoBeJe Do NobpeJa Ha npOduyKt a HapaHrBaHe.
He noctabraIte pIbkaTc cn nO nepaJIHrTa.
-TOBa MoKe Da npuHnH HapaHbAHe.
He doKocBaIte ueniceJa c Mokpn pue.
- Toba MoKe Da DoBeDe Do eNeKtpuYeCKn yIap.
He n3KnIIOHbAIte ypea qe3 n3BaXkaHa He Ha 1eNcena, DOKaTO e B IpoUec Ha pa6ota.
- IocTabrahe OTHOBo Ha UeNcena B KOHTaKTa MOKe Da npuHn NCKpa N da DoBepe Do eJekTpueckn ydap nnn noxkap.
He no3B0JBAIte Dea nIIN Xopa C HeoCTaTbun da Ia IaIIOJI3BaT 6e3 HaI3Op npalHraTa. He no3B0JBAIte Ha dea da ce KaTepr T Bpxyypea.
- HecnbaHeTo Ha ToBa n3nCKBaHe MoKe Da IOBeNe Do eJIeKtpnueckn yIap, n3rapHe nnHapaHbAHe.
He noctabrayTe pbkata cn nn MeTanen npedmet nod nepaHraTa dokaTo pa6oTn.
-ToBaMOKe Da npuHHn HapaHraBaHe.
HeBaTe TcncenaHa ypea Ype3 DbpaNaHe Ha 3axpaHbaunKa6e, BnHarxBauaTe 3npaBO Uencela N3dbpnaBaiTe HanpaBO OT KOHTaTa.
Korato nepaHaTa MaunHa e 3ambpcHa OT yxkDn BcIecTBA, KaTO NOCTBaUINpepapaT, MPbCOTN, XpaHITeHNOTnAdbuN T.H., IN3BaTe UeNCeJa N NOHCTETepaHHTa C BlaxKa H MeKa Kbpna.
- HecnaBaHeTo Ha ToBa N3NCKBaHe MoKe Ia DoBeIe Io oBe3UBeTBAHe, DeOpMnPaHe, NobpeJa nn pBxka.
IpeHnOTo CTbKJIO MOKe Da Ce Chyn OTo CIneH HATnCK. BHIMaBaIte npn n3noJ3BaHeTo Ha nepaJIHaTa.
-Korato cTBKJIoTo e ChyneHo, MoXe da DoBede do HapaHraBaHe.
OToBopete KpaHa 6aBaHo CneI cnpaHe Ha 3axpaHbAHeTO C Boga, IIN KOrato NOBTopHO CBbp3BaTe MapkyHa 3a BODonoDaBaHe.
Otbopete KpaHa 6aBHO nCJIe DbIbI nepNoHa HeynoTpe6a.
Bb3duHOTo Hnrahe B Mapkya 3a nodaBaHe Ha BOda NIN BB BOHNTE Tpb6N MoKe da IOBeDe Do nobpeDa Ha Yact NIN DO BOeH TeU.
Ako Bb3nKHe rpeWka npn n3ToBaHe (drain error) no Bpeme Ha pa6ota, npoBepete daHnHa np6Jem C n3ToBaHeto.
- Ako nepaHaTa MaunHa ce n3noJ3Ba, KOraTo e HaBoDHeHa npaI npo6JIem C n3TOuBaHTo, TOBa MoKe Da IOBeE Do eJeKTpueckn ydap IIN IOxAp npaI TOKOBn yTeKn.
IocTaBeTe I3zJIo npaHTo B nepaJIhraT, Taka Ye da He ce 3auuNbA O T BpaTaTa.
-Ako npaHTo ce 3auuIne OT BpaTaTa, TOBa MoKe Ia DOBeIe Do NOBpeHa npaHeTo UINI nepaJIHrTa, INI INe TH Ha BOJa.
YbepTe Ce, Ye KpaHbT e 3aTBopeH, KORATo NepaJIHaTa MaUHnHa He Ce n3NoJ3Ba.
- YBepTeCe, Ye BNTbT Ha CbeINHeHneTo Ha MapkyHa 3a NpaBaHe Ha BOba e NOxOJaIO 3aTeHAT.
- HecnaBaHTo Ha ToBA n3nCKBaHe MoKe Da IOBeDe Do NOBpeNi Ha NMyUeCTBO NnHapaHaBaHe.
PpOBepTe,daIyMeHOTO yNtBTHHe He e 3AmbpceHO OT BbHnBeLecCTBa (OTnabuKOHnT.H).
- PpOBepTe, daJIr rMyeHOTo yIbTHHe Hne He e 3aMbpeHO OT BbHn BeueCTBa (OTNaBtu, KOHn n T.H).
Ipei n3non3BaHTo Ha npOdykTa OTBopete KpaHa n npOBepeTe, daJI cBeiHNITeJIr HA Mapkyua 3a IoDaBaHe Ha BOJa e 3IpaBO 3aTeHAT N daJI HMa TeH Ha BOJa.
-AKO BINTOBeTe Ha Mapkya 3a IoIaBaHe Ha BOJa ca pa3Xla6eHn, TOBa MoKe da IOBede Do TeH Ha BOJa.
3a da Hama nte pncka ot noxap nn EKcnnoia
- Pn onpeJeHn ycIOBn MOKe Ja ce npOn3BeNe BOOpO B CnCTEmn C ropea Boa, noo6Hn Ha BaIHa HarpBaTeN 3a ropeua Boa, aKo He e n3NoI3BaH NOBEe O T Dbe cEIMu. BOOPONHT RA3 E EKCPIIO3INBEH. Ako BaIaTa CnCTema 3a ropeua Boa He e 6Ibna I3noJI3BaHa 3a nobHe OT Dbe ceMUNI, NycHE Te BCNUKN KpaHOBe C ropeua Boa B Doma Bn U ocTabeTe BOata Ta Da Te He 3a HAKOIKO MNHyTN, IpEi Da I3noJI3BaTe BaIaTa nepaIIHa MaIIHa. ToBa ige OCBOODn BCNUKN HAtpyINBaHn Ha BOOpOJEN Ra3. Tb' KaTO BOOpOHNrT Ra3 e 3anaIIM, He NyWeTe N He NaIeTe OTKPIT I lamBk Ipe3 TOBa Bpeme.AKO Ima I3TNHaHe Ha ra3, npOBETpeTe He3a6abHb6e3 da IINNaTe 5eNCeJa Ha 3axpaHbAHeTo.
YpeBbT, KOITcTe 3aKynnIn, e npEHa3HaueH cAmo 3a DomuHa ynoTppe6a.
I3no3BaHeTo My 3a 6n3Hec cen Ce CHTa 3a HnpaBnHO n3no3BaHe Ha npOyKta. B To3n cnuyan npOyKTbT He ce NOKpBa OT cTaHApTHa rapaHcna, npedocTabeHa OT Samsung, n Samsung He Hocn OTROBOPHO 3a Hn3npABHO t nn Nobpei, pnyHeHn OT TAKOBnepaBnHO n3no3BaHe.
нформача 3a 6e30napCHOCTTa
He cToIe Bbpxy ypeJa n He NoctabYte npEmdTe (KaTo npaHe, 3anaJIeHN CBeUH, 3aJalEnuRapn, YHHN, XUMKALIN, MeTAlH NpeMeTN np.)Bbpyx Hero.
He n3no13BaIte nouicTbaI npenapaTu cbcnHn KNCeHHN.
He n3noJI3BaIte 6eH3oJ, pa3peIaTeI nn anKoxon 3a da noHcTne ypeJa.
- Toba moke da doBepe do obe3ueBaHe, deopmaue, noBpea, eektpueckn yap nn nojkap.
Ipei nouchBaHe iJn DeHocTn no nOdpbXka, pa3KaYeTe ypea OTOHTa.
- Hecnza3BaHeTo Ha ToBa n3NcKBaHe MoKe Da DoBeGe Do eNeKTpueeKn yap nn noXkap.
нформача 3a 6e3ОпаСНСТТа
HCTPYKUN OTHOCHO CUMBOJA IEEO (WEEE)
PpabnHtpeTnpaHe Ha n3dneIeTO cneKpaHa eKcnIoatauOHnMy XNBOT
(HaIInuHO B CtpaHn CbC CNTeMn 3a pa3JeJIHO CMeTOcB6npaHe)
To3n 3nak, noctaben Bbpyu n3dennno, Herobn npinnaJnxHocTn nn neaTHMaTePnannn, O3Haaba, Ye npdykTBn npinnaJnxHocHTne (HaNPmep 3apndHO yCTpoiCTBO, CnyuaKIN, USB kaBn) He bnu da ce n3xBpIaT 3aeHNO c dpynte 6tTOBn OTnAdbu, KORAto n3Tehe ekCnloaatauohnnr My xNBoT. OTdEJaTE Te3n yCTpoiCTBa OT dpynte BNDOBn OTnAdbu, n TnpedabaiTe 3a peuklnpahe. Cn3BaKn TOBn pabuNo He n3NaIarate Ha onaCHOCT 3dpabeTo H npyn Xopn npedna3BaTe OKoHnata CpeDa ot 3ambpcBaHe, PpeDn3BnKaHO OT 6e3KoHTPOJHO n3XbplnHe Ha OTnAbu. OCBen TOBA, NOO6HO OTROBOPn NOBeHHe cb3daBb3MOxHOC 3a NobTOpho (ekONOrnHO Cbo6pa3HO) n3NO3BaHe Ha MaTePnaJIHNTpecypcn.
DomaHnTe IOTpe6ntJ Tp86Ba da ce CbpxKaT C TbproEca Ha Dpe6HO, OT KOROTO ca 3aKyniN N3deJIneTO, INIc Bc CbOTBeTHaT MeCTHa DpbXaBHa aReHua, 3a Da NOJyUaT NOIpO6H NHCtpyKuM KJeI KORA MORAT Da 3aHeCat Te3N yCTpoINCTBa 3a peunKInpaHe, 6e3onacHo 3a OKoJIHaTa cpeA.
KopnpaunBHTne nontpeBnte ann cneBa da ce CbbpkaT cdoctabuNka cn n npOBepr TycIOBnraTa Ha IOROBopa 3a NOKyNka. ToBa n3dJeIne HEROBITE eJIeKTPoHHn PpHaundexHOCTHn He bna da ce CmecTBaT c dpynTe OTnabuN Ha TbproBCKOTn ppeDnptnTne.
Mokete da HamaJIte pIcKa OT TeHObe I UeTn PInuHHeH N OT BOJa KaTo:
Hapabite KpaHOBeTe 3a BOda JIECHO IOCTbHn.
3aTbaprTe KpaHOBeTe KOrTo nepaHata MaunHa He Ce n3NON3Ba.
-Пюоверразе поюдунноаоу TeOBE OTeMHnHITe Ha Mapkya 3a NOdaBaHe Na BDA.

Ipei Da n3noBte nepaHaTa MaunHa 3a npbB TbT, npOBepTe BCnKn Bpb3Kn PpN BOHn Klanah N KpaHOBeTe 3a TeOBe.
I3eJkaHe
Samsung npenopbhyba upaHc BncoHna 65 cm. MapkybT 3a n3TOBaHe Tp6Ba da 6bDe npokapan pne3 uinkata 3a 3axBaUaHe KbM UpaHra. LpaHbT Tpr6Ba da 6bJe DocTaBHO roJAM, 3a da NoEme BbHUnHa dAmEtbp Ha Mapkya 3a n3ToBaHe. MapkybT 3a n3TOBaHe e fa6pnHNo npikpeneH.
IOnOBaHaCTnJIka
3a Hn-do6pa pa0ta, BaWata nepaHa MaunHa Tpr6Ba da 6bJe MOHTnpaHa Bbpxy MOHJTHO n3rpaDen pO. DbpBeHIne IIOBte Tpr6Ba da 6bDaT NOCDJIeHN, 3a da 6bDaT CBeEHn DO MINIMMUM BV6paCmTE N/INN He6aIaNHCpAHO To HATOBAPBaHe. KINIMNTe IN PLOCHKTe C MEKN IOBbPxHocTN DOpPnHacrt 3a BV6paCmTE N CbIeCTByBa TEHJeHcNBA WaaTa nepaHa MaunHa JekO da Ce MeCTn No BpeMe Ha CEHTPODpyrnapaHe.
Hikora He MOHTpauTe nepaHaTa MaunHa Ha IlaTΦopMa IIN HeOp6pe yKpeneHa KOHCTpyKUJ.
OkoHa TemnepaTypa
He MoHTnpaIte BaIaTa nepaHa MaIHa Ha MeCTa, KbTeTo BoDaTa MoKe Ja 3ampb3He, Tb KaTO B nepaHaTa MaIHa BnHaTc Ce 3aIbPka MaIKO BoJa B KlaHaHa, B NOMTa I B MapKyuHt. 3ampb3HaIaTa BOJa B Tpb6oPiPoBOJTe MoKe Ja npuHn NOBpeHa ha peMbUIne, NOMNaTa I npyTu KOMNoHEHTN.
MOnTnpaHe B HnHa nJn shKaΦ
3a da pa6oTn 6u30NaCHO n npabuHNO, BaUaTa HOBa nepaJIHa MaUNHa N3NCKBa MHHMaJIHN OTCTOHHN O:
OTCTpaHn - 25 MM OT3aD - 51 MM OTrope - 25 MM OTnped - 465 MM
Ako nepaHaTa MaunHa N cyuHnHa Ta moHTnpaHn 3aeDHO, B npedHaTa YacT Ha HnHaTa IIN uKaFa Tp86Ba Da Ima NoHe 465 MM CBO6oDnO IpocTpAnCTBO 3a Bb3dyx. Ako nepaHaTa MaunHa e MOHTnpaHa cama, He e Heo6xoDm CneUmaIe OTBOp 3a Bb3dyx.
MOHTIPAHE HA BALJATA INEPAJIHA MALUNHA
CTbIIKA1 N36opHaMra

Ipei Da MOHTnPate nepaHata MaunHa, Tpa6Ba da ce yBepnTe, He MCTOTO:
- IMa TBbpda, paBHa NOBbpxHocT, 6e3 KINIM INI NIOBa HAcTNlKa, KOrTo MoKe Da, nonpeuHa BeHTnlaucraTa.
E daJeO t npKa cIbHYeBa CBeTInHa
-IMaNoDxOJaBaBHTnlaUa - Hama da 3ampb3Ba (noi 32^ nii 0^)
E danene ot n3toHnHa hTo tonnHa KaTo HapToBa nnra3oBa neKa - Ima doctaTbHNO npoctpaHCTBO, 3a da He ce onbBa Ka6ena Ha eNeKTPo3axpaHbaHeTo HnepaJIHaTa MaunHa
Инстапе на ваша.Tерална машина
CTbIKA2
CbaIHe Ha TpaHcnpTHnte 6oJTOBe
IpeHd a HCTaIpaTe nepaHaTa MaunHa, Tp6Ba IIpBO da CbJIte NETTE TpaHCnOpTHI 6oTt oT bPbHa Ha ypeA.
- PaaxlaabeTe BCnKb 6oTToBe C npInIOxHeHraeH eN KJIou.
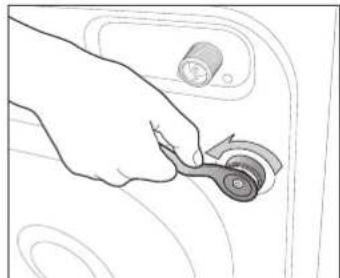
- XbaHETe 6oTt a C BnHToBn KIIOu I IO n3TeIe npes IIpOKaTa HaCT Ha OTbopa. NObTopeTe 3a BCEKu 6oIT.

- 3aTBOPeTe OTBOpTE C PIPJIOKeHnTe TlaCTMaCOBn TaII.

- Pnpbepe TpaHcnpTHTE 6oTTOBE Ha CnrypHO MRCTo, B CnyaH, He BN Ce HAnoxn da MeCTIte NepaHaTa MaUNHa B 6bdeUe.

ONaKOBbHnTe MaTePnAnMOrat Da 6bDaT ONaChn 3a Deua - Na3eTe BCNUO NaKOBbHN MaTePnAn (NOnneTnHeOBn PnIKoBE, NOJIcTIpEn H T. H.) daJeu n3BbN o6cerHa Deua.

IocTaBeTeФKCaTOpHaKaNaHcKaTa, (eINHOTaakcecoapnteBbHaiNoHOBaTa onaKOBka),BbOTbopa,OT KOITOnCTe N3BaDnN3axpaHbAunKa6eNOT3aNHa npOdykTa.
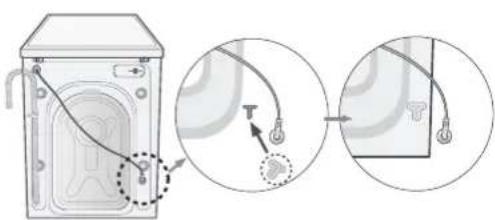
CTbIIKA3
PerynnpaHe Ha KpaetaTa 3a HnBeInpaHe

Korato MOHTnpate BaHata nepaHa MaUNHa, yBepTe Ce, Ye IMa Iecen DoCTbI Do 1eceIa 3a 3axpaHbaHe, BDOcHabBaHTo N OTTOHaTa Tpb6a.
1.ПьзHETe nepaHHTa MaUNHa Ha MRCTOTo N
2.Подрав overhe nepalnHaMaшинha KaTO BbPTHTeKpaHETa 3a HmBEnIpaHeCpbKa cnopei Heo6xOIMOCCTTa.
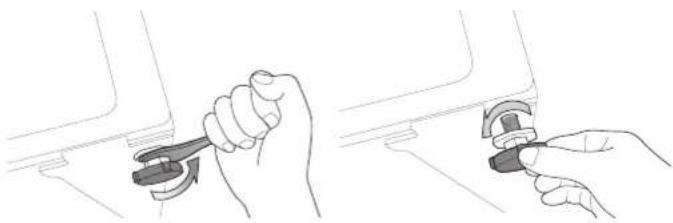
- Korato nepaHaTamaHnHa e HnBEnIpaHa, 3aterHeTe raKITE C raeHHN KIOU, npINIOKeH KbM nepaHaTa MaHnHa.
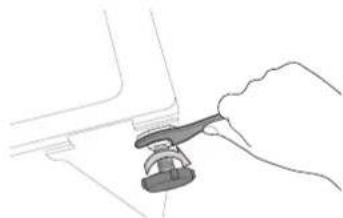
CTbNKA4
Cbbp3BaHe Ha noDaaBaHTo nN3TOUbaHTo Ha BOdaTa
Cbbp3BaHe Ha Mapkya 3a noDaBaHe Ha Boda
1.BaemTeI-6paHnHaKpAHnKaHa MapkyHa 3a NOpBaHe Ha CTydeHa B0da HcBbpxKeT KbM BXOHNOTBOP 3a NOpBaHa Ha CTydeHaTa BOHa TbPbHa MaunHata. 3aterheHa pbka.

MapkybT 3a noDaBaHe Ha B0da Tp86Ba Da ce Cbpxe KbM nepaHaTa MaunHa OT eHHnKpaN KbM BOOpBODeH KpaOH Dpyrata. He onBaIte Mapkya 3a noDaBaHe Ha B0da.AKO mapkybTe TBbpDe Kbc, 3aMeHEToC NO-DbJbTg Mapkyu 3a BnCOKo HauRaHe.
2.CbpxTe DpynHa KpaHa MapkyHa 3a NOdaBaHe Ha CtydeHa BOda KbM BOIOnpoBOHnHa KpaH 3a CtydeHa BOda Ha MNBkata NTo 3aTeHHe Ha pka.Ako e Heo6xOIMo,MOxTe Da IpemeCTHTe MapkyHa 3a NOdaBaHe Ha BOda OT Kpaar KbM nepaHnTa MaUNHa,KaTO pa3XNaBte HakpAHnKa, 3aBbPTNTe MapkyHa NOTHOBO 3aTeHHe HAKpa
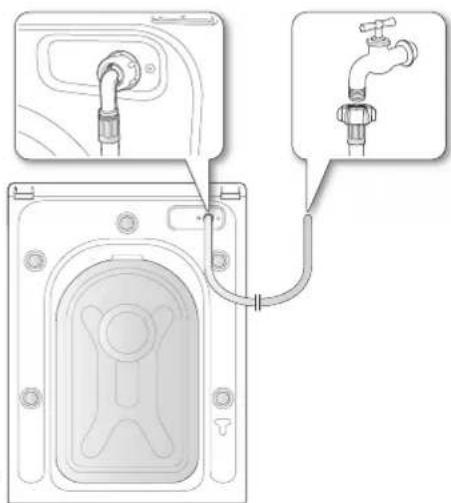
Pn onpeeneH moen c donbHLHTeH BXo3 ropea B0da:
- B3emTe YepBHeHr-6pa3eH HkpaHnK 3a Mapkya 3a noDaBaHe Ha ropeua BoJa nro CbpxKe TBm BXoHnO TBoP 3a noDaBaHe Ha ropeuata BoJa Ha rboHa MaunHata. 3aterheHa pbka.
- CbpxkTe Dpytna KpaH Ma Mapkya 3a NpdaBaHe Ha ropeu Boga KbM BOOnpoBnna KpaH 3a ropeua Boga H MNBkata N rO 3aTeHrte Ha pKa.
3.ИЗПОЛЗВаITE Y-образен раЗКLOHITEN,akO INСКАТЯ ИЗПОЛЗВaTe CaMO CTyDEHa BOJa.
Инстапе на ваша.Tерална машина
Cbbp3BaHe Ha Mapkya 3a noDaBaHe Ha Boda (npn n36paHmOdeJI)
1.Cbane TaanTepa OT Mapkya 3a noBaHe Ha B0da.
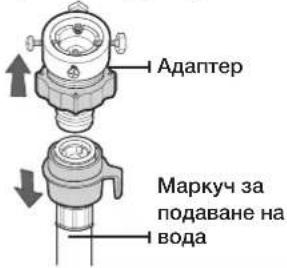
2.ПьрBO,КATOИЗПОЛБATEКРБСТАТОВЕРТКa, pa3xIa6eTeЧETINTE BnHTaHa aДaNTepa.CneTToBa B3eMeTe aДaNTepaи 3aBnHTeTe YacTTa(2)ПО NOCOKaHa CTpeNKATA,ДOKATO MEXdHATA CTAHe 5 MM.
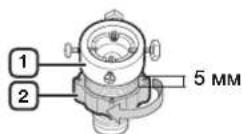
- Cbpxte aanTepa KbM KpaHa, KaTO 3aTeHETe BHTOBTe 3npABO, DOKATO NOBnIraTe aanTepa. 3abptete qact (2), KAto cJeBATE CTpeKnTE n CBpxte (1) u (2).
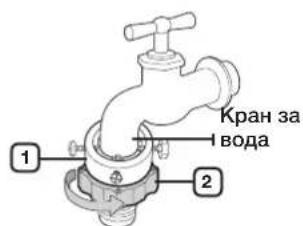
4.CbpxkTe MapkyHa 3a noDaBaHe Ha Boda KbMa aantepa. Korato OCBO6Onde YactTa (3),MapKyHbAOT ABtOMaTHHO Ce CBp3Ba KbMa aantepa, KaTO CE YuBa UpaKaBaHe.
Cne KaTo Cte Cbbp3aHm MapKya 3a noDaBaHe Ha BOJa KbMa aHaTepa, npOBepTe daH e CBbp3aH npabnHO KaTo DpbHHe Tc MapKya 3a NoDaBaHe Ha BOJa HADony.

- CbpxkTe Dpyrna Kpa H Ma Mapkya 3a NoDaBaHe Ha BOda KbM BeHTnla 3a NpdaBaHe Ha BOda Ha Tpb6a Ha nepaHnTa. 3aBnHTeMe Mapkya DOKpaN NOnocKa Ha YacOBHNKOBaTa CTpeIka.
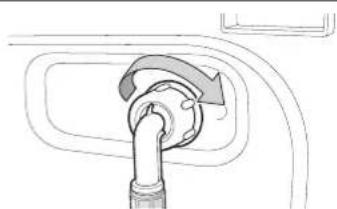
- OTbOpTe KpaHa 3a NpdaBaHe Ha B0Ja n npOBepTe dAnn HMa TeOBe OT BeHTnla, KpaHa nn aanTepa. Ako Ima TeOBe, NOBTopeTe ppeHnHTe CTbKn.

Ako mma Teohoe, He n3noJIbBaIte nepaHaTa MaunHa. ToBa moKe da doBeJe Do TOKOB yap nn HapaHbaHe.
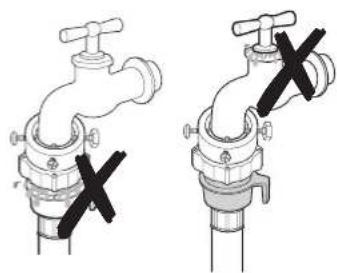
Ako KpaHbT Ha BODaTa e BNHTOB TIN, CbBpXeTe KpaHa C MapkyuHa 3a NoDaBaHe Ha BOJa, KaKTo e NOKa3aHo.
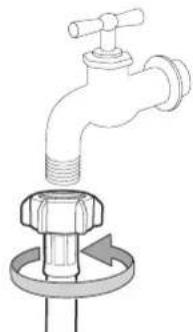

3a noIaBaHe Ha BOda nI3noJI3BaIte Hau-OBIKHOBeH Bn KpaH. B cnUa, ye KpaHbTe KbaIpaTeH IIN TBbPde rOJAM, CBAIe pa3dAneHHTeJIHHr IpbcTeH, PpeN da IIbxHete KpaHa B aIaITepa.
инсталпане на вашатупегална машина
Cbbp3BaHe Ha Mapkyua 3a OTnUaHe
KpaT Ha MapkyHa 3a OTTHaHe MoKe Ja ce pa3noLoXn No TpH NaHHa:
- Ппз рба на мька: Маркут 3a OTTNHahe Tpr6Ba Да ce NOCTaBN Ha BnCOHnMaMeJy 60 n 90 cm.3a Да 3ana3nte Края Ha Маркуta 3a OTTNHahe OrbHAT, ИЗПОЛЗВaTe npINIOKHeNBAODa 3a Маркуta. 3akpenete BODaHa KBm CteHaT c KyKa IIN KpbM KpaHa CBp3ka, 3a Да п徝OTbPaTInTe ПпeМeCTBaHeto Ha Маркуta 3a OTTNHahe.
Mapky3a n3ToBaHe
W0 06~09
Boday3a Mapkya
- B pa3knloheHne Ha Tpb6aTa Ha KaHana Ha MNBka: Pa3knOHeHneTo Ha Tpb6bTa Ha KaHana Tp8Ba Da Ce HAMpa HAd CnfoHa Ha MNBkata, Taka Ye KpaT Ha MapkyHa da e noHe Ha 60 CM HAd IODa.
- B KaHaHa Tpb6a: IpeOpBvBaMe Da n3nO3BaTe BepTikAnHa Tpb6a, BnCoka 65 cm; Ta He Tp8Ba Da e no-Kbca OT 60 cm n no-dnIra OT 90 cm.
LpaHbT 3a OTnHaHe n3nCKBa;
MNHMnHeH DnAmTeBp 5cm.
MINHIMaJIeH KaIaIHT Ha OTTnHaHe 60 mTpa B MInHyTa.
06 09
CTbIKA5
EleKtpo3axpaHbAHe Ha BaWaTa nepaHa MaunHa
BknHcTe Ka6eJa 3a eNeKtpo3axpaHbaHe B cTeHeH KOHTaKT, OOn6peH TIN KOHTaKT 3a AC 220-240V / 50Hz, 3auNTeh C npEtna3nte IIN NIOO6eH npeKbcBaHa H eNeKtpueeckTa Bepira. (3a noBeue IHOpMaunr OTHocHO mNCKBaHnra Ta 3a OKa6eJbAHe n 3a3emBaHe, Bx. cTp. 14.)
TectOBo nyckaHe
YBepTe Ce, Ye CTe MOHTnpaJI NepaIIHaTa MaIINHa IpaBUNHO, KATO CTapTnpaTe LKKBJ N3nJaKaBaHe+eHTpOpyra, CJIe KaTO 3aBbPm MOHTnpaHETO.
пране на дрени
C BaшаТа Нова перална машина Samsung на-Тудната чст OT npaHETo ьдпдрашITE КОЕ палпдд ЗapeДNTE ПьрBO.
PPAHE 3A PbB Tb
Ipei Da nepeTe dpexn 3a npbB nT, Tp6Ba Da n3nHnTe eINH nJIeH npa3eH cIKbl (T.e. 6e3 noCTabeHn dpexn).
- HatncheTe 6yToHa Power (BKnIOHbAHe).
2.CnoXeTe MaIko NepuInen npenapat B OTdeneHneTO ①B YekMeDKeTo 3a NepuInen npenapat. - OTbOpTe KpaHa 3a IOnaBaHe Ha BOba KbM NepaHata MaunHa.
- Hatnche 6yToHa Start/Pause (CTapT/lay3a).
Taka ue OTCTpaHITe BOdaTa, OCTaHaIe EBeHTyaJIHO B MaUNHaTa OT TECTOBnIcKbJ, N3NbJIHeH pRn npON3BONDTeJI.
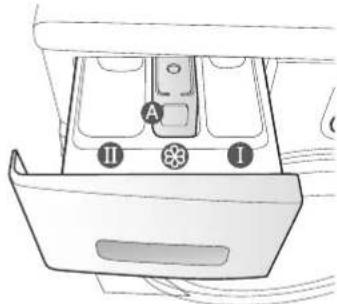
OTeJeHHe ①IepnIeH npenapat 3a npednpahe nn KOIOBaHe.
OTeJenHe IIpeHn npenapat 3a oCHOBHO npaHe, OMEKOTnHa BOJaTa, npenapaT 3a HAKNCBaHe, N36eNTeN nIu npenapaT 3a OTCTpaHraBaHe Ha neTHa.
OTdeneHne 106aBKn, Hapnimep OMEKOTTeHa TbKaHN (He HantbIbaTte NO-BNCOKO OTdoHHra p6 (MAX) Ha "A")
OCHOBH NHCHTPYKLIIN
- NocTabete npaHTo B nepaHaTa MaunHa.

He npetobapbaite nepaHata Maunha. 3a da onpeJeIte KaauTeTa 3a BCEKn Bn npahe, Bk. TaBnuata Ha ctp. 27.

-
YBepete Ce, Ye HMa 3aUInaHO npaHe BbB BpaTaT, TbN KATO TOBa MOKe Da DOBepe Do TcH Ha Boda.
CJIeIzKbIHa IpaHe B IIpeHHaTa rMyHa YacT Ha IepaHHaTa MOKe Ja OCTaHe MaIKO nepuJen npenapat. OCTpaHete OCTaHaJIra IepuJen npenapat, Tb KaTO MOKe da npuHHn TeH Ha BOJa.
He nepete BoOyctOnuHBn dpexn. -
3aTbOpTe BpaTaTa,doKaTo ce 3aKIOUH.
3.BKIOUeTe eNEKtpo3axpaHbaHeTo.
4.Добавerteпруне npenapatи ДобавкВ BOTделенeto.
5.Изберете похаясьи onци 3а пануTo.Индкаторьл 3a пане CBETBA n Ha Диспяе ce noka3Ba pa3HTHOTO BpeMe 3a LnkblnHa npaHe. - HatncheTe 6yToHa Start/Pause (CTapT/Play3a).
пране на дрени
N3NOJ3BAHE HA KOHTPOJHNAHEJI

1
UΦPOBΓPAΦNUEH DNCJIEN
Ioka3Ba OCTabaOTo BpeMe OT LKbJa Ha IpaHe, LJIaTa HnHcpMaJyra 3a LKbJa N CbOSeHn 3a rpeJka.
2
CEJIeKTOPAU
I36peTe pexHM Ha BbTpHe Ha 6apabHa n ckopocT Ha CEHTPOpOytnpaHe 3a LKbJa.
3a noDpo6Ha INΦopMaζη, Bx. "PpaHe Ha dpexn c n3bOp Ha LKb" (Bx. Ctp. 25).
Cotton (PamyK)(2) - 3a cpeHNO nI IN JeKO 3ambpceH pamyK, cnaHObelbo, NOKpNBKn, DonHO 6eJbO, XABJIeH NkbpN, pn3n np.
Synthetics (CnHTeTnka)(3) - 3a cpeHNO nI IN JeKO 3ambpcEH 6ny3n, pN3n I dp., HappaBHeH OT NOnIECTep (DIOJEn, TpeBnPa), NOINAMnI (nePLOH, HAIHO) INI NIOObHcMecn.
Hand Wash for Wool (PbHn npahe 3a BbHa)() - Camo 3a BblHeH NtBkaH, KOITMO MRAT Da ce nepaT B nepaHa MaunHa. ENo 3apeKdane Tp6Ba da e no-MaIKO OT 2 Kf.
IpoecbHa npaHe Ha BblHeHn TbkHn 3n0J3Ba DeiCTBne C JIeKO IIOJIeHe. No BpeMe Ha npaHTo JeKOTO IIOJIeHe N KICHE He npoDbJkaba, 3a Da npedNa3n BblHeHnTE BnaKHa OT CBNAHe / DeopmnpaHe, n 3a Hau-BHIMaTeJHO NOHCTBaHe. Toba cnpaHe Ha pa6oTaTHe e np6JIem.
- 3a npahe Ha BbHa ce npenopbYBa HeyTpaneH npenapat 3a npaHe, 3a no-dobpn peyntaH no-dobpa rnpka 3a BbHeneHte Bnakha.
Baby Care (Ppka 3a Deteto) Ppahe npn Bucoka Tempeatype n C DOnbHInTeJIHO INIJaKBAHe, KOeTO OcNHyprBa NbHnOTo IpemaxBaHe Ha npax 3a npahe O T bHKInTe DpeWK.
Daily Wash (ExeHneBno npahe)(-M3noJ3Ba ce 3a npexn, KOnTo ce nepaT BcEKN DeH, HApPmep, BeJbO n p3N. KpaTK nporpama 3a npOBepka.
15'Quick Wash(15-MnHyTHo 6bp30 npahe) (15) - 3a cna6o 3ambpcEH npyH, KOINTO BV Tp8BaT 6bp30.

CTOINHOCTTA(15 MNHTN)MOKeJaBapnpaCnprMo NOCOHeHATA B3aBNCIMOCTOT HAJIraHaTeHO BAODaT,TBbpDOCTTa Ha BOdATo,BXoIHATATEMepaTypaHABOdATo,TEMpePaTypaHa IOMeUeHMeTO,TtNAI KOJInHeCTBOTO HAIpaHETO INCTeNEHTA Ha 3aMbpcBaHe,INIOJ3BaHnIPTepnIeHINpEnapAT,KoneBaHnTA B ENEKTPO3axpaHbAbeHo IN36paHITeONLHN
BbIrapckn-22
| • ДобовETSамо малко колочьпорулейпор�а в пеленяпор�а в пеленяпор�а в пеленяпор�а в пеленяпор�а в пеленяпор�а в пеленяпор�а в пeltenяпор�а в пeltenяпор�а в пeltenяпор�а в пeltenяпор�а в пeltenяпор�а в пeltenяпор�а в пeltenяпор�а в пeltenяпор�а в пeltenяпор�а в пeltenяпор�а в пeltenяпор�а в пeltenyx. | |
| 3 | HATNCHETe tosny HeKOLKOKPATHO, 3a da npemHHete zuKlnHNO npes3 npednagHte B3MOXHOCTN 3a 3ababeHno N3KIOUHBAe (OT 3do 19 caca Na CTbKn ot edinh uac). ПоказангT acn O3NaHabaВрето, kORATO ue b6dne 3abprshen цкьla Ha npahe. |
| 4 | HATNCHETe byToHa HeKOLKOKPATHO, 3a da npemHHete zuKlnHNO npes3 npednagHte B3MOXHOCTN 3a TEmpepAtpya H a BoDAt: (20 °C(BcHkn lamn n3kn), 30 °C, 40 °C, 60 °C n 95 °C). BcHKn lamn n3kn; CtydeHaBoDA |
| 5 | HATNCHETe byToHa HeKOLKOKPATHO, 3a da npemHHete zuKlnHNO npes3 npednagHte B3MOXHOCTN 3a CkOPOCT Na CEHTPOФуmpaHe. |
| WF1702 / WF1602 BcHKn lamn n3Kn, 400, 800, 1200 rpm | |
| WF1700 / WF1600 BcHKn lamn n3Kn, 400, 800, 1000 rpm | |
| "No spin (Бe3 ceHTPOФуmpaHe) " - Пранeto octaba в барбанa и след okonчateJIHTO nI3eJxJaHne He se nIbBpSHA bceHTPOФуmpaHe. "Rinse Hold(ЗдьрkaHne Na I3PakBaHTo) (BcHKn lamn n3kn) " - Пранeto octaba наkuChato BbB BoDA tna H a KIIOHTEJIHTo nI3PakBaHne. Пранeto npaHTo Da moKE da se nIbBDAu, TrpaBa da se nI3bHn nporpama Drain (I3eJxJaHne) nII SpIn (LcHTPOФуmpaHe). | |
| 6 | HATNCHETe byToHa HeKOLKOKPATHO, 3a da npemHHete zuKlnHNO npes3 npednagHte B3MOXHOCTN 3a npaHne: W (ПрED-ранe) → (ИЗПлakВанe+) → (ИТНЕЗИВи) → (ПрED- пранe) + (ИЗПлakВанe+) → (ИРED-ранe) + (ИТНЕЗИВи) → (ИЗПлakВанe+) + (ИТНЕЗИВи) → (ПрED-ранe) + (ИЗПлakВанe+) + (ИТНЕЗИВи) → (ИЗПлakВанe) + (ИТНЕЗИВи) → (ИЗКЛ). W (ПрED-ранe): Hatnchete TozH, 3a da nIb6epeTe npednpaHne. Пране се npednara camo npri: Cotton (Пamyk)(Ф), Synthetics (CINTEKIA)(Ф), Baby Care (Грижca 3a deteto) (Daily Wash (ExeIDNEBNo pRaH) (Ф). (WIPLAKBAHn): Hatnchete ByToHa 3a nI3PakBaHne, 3a da doobavite цклн Ha nI3PakBaHne. Intensive (ИтEH3MIBHn): Hatnchete TozH, KORATO npaHTo e сilINO 3aMbrcHo i e HeobxodIMO INTEH3MIBHn npaHne. YBeJIuHaba ce ВретeTo 3a BceKlZbl. |
| 7 | HATNCHETe 3a cnipaHne i OTHOBO PUSKaHne Ha npogpamite. |
| 8 | Прп nbвото HatnckaHne nepalnata Maшина ce BKIOUHBA, a priq HOBO HATNCKaHne ce nI3KIOUHBA. Ако=npalnata Maшина OCTaHе BKIOUHha 3a no-dIbIro ot 10 mHyTN, 6e3 da sbdatt DOKOCHATN HIKAKBn 6byToHn, 3axpaHBAHTo ABTOMATHINO ce nI3KIOUHBA. |
пране на дрени
Child Lock (3aklouvahe 3a deca)
Функцята 3a 3akiohye 3a deca Bn no3BOJRA da 6IOKpate 6yTOHITe, taKaYe n36paHnT OT BaC uKbHa npaHe He MoKe da 6bIpe npOMeHnH.
AKTNBnpaHe/JeakTNBnpaHe
Ako nckate da akTbupate nn deakTbupate cyHKnraTa Child Lock, hATNCHTe 6yToH Spin (LcHrpoDpyuPana)(Option (Onun)(+ eNHOpeMeHHo B npOdbJKeHne Ha 3 cekyn. "Child Lock (3aKnOcbaHe 3a deua) CBeTN npn akTbnpaHa dyHKnra.
KoratoФункцЯТаChildLockeakTNBnpaHa,ДeINCTBa camo6yTOHPower(BkIIOUbahe)()。ФункцЯТa ChildLock(3akNIOUbaHe3adeua)OCTabaBKIOUyeHa dopnCleNtKJIIOUBAHeHa eNEKTPo3axpAHBaHETo INn CJIeNtBaxJaHeN NOBTOPOC BbP3BaHeHa Ka6ena 3a eNEKTPo3axpAHBaHETo.
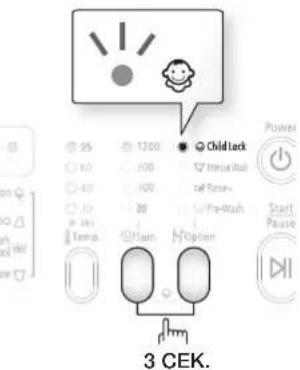
Delay end (OTJIOKeHO 3aBbPwBaHe)
Moxete da 3aandeTe MaunHaTa da 3abpIn npaHTo BN aBTOMaTHO B NO-KbceH MOMHT, KaTO n36peTe 3abAHe oT 3 do 19 yaca (Ha CTbNk OT 1 lac). Poka3AHnT Yac O3Haaba BPemTo, KORATO Ue 6bIe 3abpWeH LKbna Ha npaHe.
- PbHNO HIN ABOTOMaTHHO HAcTPOIe NepaJIHaTa MaUHa 3a BnDa IpeXn, KOnTO npeTe.
- Hatnche 6yToHa Delay End (OTnoKeHo 3aBpBaHe)(1) HeKoNkoPaTHO, DOKaTO Ce 3aJaTe BpeMeTo Ha 3a6aBHe.
- Hatnche 6ytoHa Start/Pause (Ctapt/Play3a)(N).HnDkaTOpbT "Delay End (OTnoKeHo 3abpbuBaHe) ③ue CBETHE u HacOBnKbT 3anOHa o6paTHo 6poEHe, DOKATO DOCTURHe BpemTo 3a 3abpbuBaHe.
- 3a da OTMeHnTe fynKmTa Delay End (OTJIOKeHO 3aBbPbBaHe),HaTNCHe 6yToHa Power (BKnIOuBaHe)(I) n CJIeT TOBa BKNIOHeTe OTHOBO nepaHaTa MaunHa.
IpaHe Ha dpexn C n3noJ3BaHe Ha ceJeKTopa 3a cNkbl
BaHaTa HOBa nepaHa MaunHa yneChraBa npaHTo Ha dpexn, KaTo n3No3Ba aBtOMaTHHaTcncTeMa 3a ynpaBHeHne "PpomehnB KOHTpol" Ha Samsung. Korato n36epete nporpama 3a npaHe, MaunHaTa 3e 3aJaDe npaBnHaTa TempepaTypa, BpeMe 3a npaHe n CKOpocT Ha npaHe.
- OTbOpete KpaHa Ha BodaTa Ha MNBkata.
- HatncheTe 6yToHa Power (BknUoyBaHe)(b).
- OTBOpTe BpaTnKata.
- 3apepepepepeepeepeepaepaepaepaepaepaepaepaepaepaepaepaepaepaepaepaepaepaepaepaepaepaepaepaepaepaepaepaepaepaepaepaepaepaepaepaepaepaepaepaepaepaepaepaepaepaepaepaepaepaep
- 3aTbOpTe BpaTuHkaTa.
- 6abete npnHn npenapat, oekottei npenapat 3a npednpahe (ako e Heo6xOIMO) B cbotbETHOOTdJeHne.

PpeIpaHe MoKe da ce n3noJI3Ba cmo aKO n36epTe LKbI Cotton (NamyK)(), Synthetics (CnHTeTnka) Baby Care (Pnka 3a deTeTo)(). Daily Wash (ExeJeHHeBHO npaHe)(To e Heo6xOIMo cmo aKO BaUeTO ppaHe e CInJHO 3ambpceHo.
- Ⅲποιλθαντe Cycle Selector (CeilekTOp 3a Μικβλ), 3a da n36pepe Te noDxOμι Μικβλ B 3aBucmocT OT Tnla MaTePnai: Cotton (Πamyк)(),Syntheticcs (CHTeTnka)(Hand Wash for Wool (PbUHO npahe 3a BbIHa)(), Baby Care (ΓpIka 3a deTeTo) Daily Wash (ExeIHeBHO npahe)(15'Quick Wash (15-MHHTHO 6bp3o npahe)(). Ha KOHTpOJIHnna NaHEL CBETBAT CbOTBeTHnTE INIHKaTOPn.
- B To3N MOMENT MOXeTe Da peryInpaTe TemnepaTypaHa Ha npaHe, BpeMeHaTa Ha 3nPaKaBaHe, CKOpocTtHa LcHTpOoPyrnpaHe, BpeMeTo Ha 3a6abAHe, KaTO HaTuChTe 6yToHa HcBoTBeTHaTAtyHKUIn.
- Hatnche 6yToHa Start/Pause (CTapr/Play3a) mMaunHata 3anOuBa uKbna Ha npaHe. HnIkaTOpBt Ha npoeca 1e CBETHe n Ha dncnner 1e ce nOBn OCTabaTO BpeMe OT Lkbla.
Onu3a nay3a
B pamknte Ha 5 MNHyTn cIed 3aNoOHa He npaHTo e Bb3MOxHO KbM 3apeJeHOTo npaHe da ce doabrt nn N3BaKdTa dpexn.
- Hatnche 6ytoHa Start/Pause (Ctap/ny3a)(II), 3a da OTKIOHHTe BpaTaTa.

BpaTnKata HE moke da ce OTbOp, KOrato BODATA e TBbpde FOPELA nn HIBOTO Ha BOATAe TBbpde BNICOKO.
2. CnE, KaTo 3aTbOpInTe BpaTaTa, HATncHete 6yToHa Start/Pause (CTapr/Play3a)(II), 3a Da BB3o6HOBInTe IpaHeTO.
CneI KaTo LKbBbT 3aBbPwH:
CneI nblHOTo 3aBbPbBaHe Ha zIKbla 3axpaHbAHeto Ce I3KJIIOUyBa aBTOMaTHNO.
- OTbOpTe BpaTnKkata.
2.ИЗБаДTe npaHTo.
пране на дрени
PbUHO npaHe Ha dpexn
Ako npaHeTo He e 6aHaHcnpaHo, epeKTHBHOCTTa Ha LcHTPOCDpymnpaHETo HamaJIraBa.
Korato nepete cnaHIO beIbO IIN IOPraHn, BpeMeTO 3a INIpaHe MoKe Da Ce yIbJnxnn eEeKTHBHOCTT Ha CEHTPODpyIpaHe da Ce BNOW.
3a cnaHNo 6eIbO uIu IopraHn npenopbBaMe HaTobapBaHe ot 1,8 Kr uN no-Manko.

TocTaBnTe cytneHnTe (KoTo ce nepaT) Bmpexa 3a npaHe (KnyBa ce OTdEInHo).
- MetaHata HaCytnHeHte MoKe npOBe TbKaHIne n da yBpei npaHTo. 3aTOba BnHaRn NoCTaBnTn BB PhHa MpeKa 3a npaHe.
Maikn I neknpexn KaTo HopanpKaBnC, HopanoraN KbpnnKMOrTaCa ce 3axBaHb B6JIN3OCTdo BXoJa. NocTabrTe rBbPhiHaMpexka 3a npaHe.

He nepete Mpekata 3a npahe camoctoTEnho 6e3 npyro npahe. Toba MoKe Da npuHn HHeOpMaHn Bn6paU, KOTo Da npemecTt NepaHHTa N da npuHnHt 3IIOJyKa KATO HapaHBAhe.
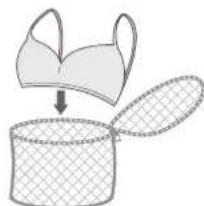
пране на дрени
INHOPMAU3A INEPNIJEN INPENAPAT N IOBABKN
KaKbB nepiJen npenapat da n3noJ3BaTe
TnBt nepuHepapat, KOITp6BaJa u3no3BaTe, ce 6a3npa Ha BnDa Ha TbKaHTa (namyK,CHTETnHa,ФnHa,BbHa),Ubeta,Tempepatypata Ha npaHe,CTeNEHTa Ha 3aMbpCBAhe. BuHAru n3no3BaIte nepuHIn npenapatn C HnCKa NeHnBOcT, KOITo Ca npedHa3HaueHn 3a ABTomAtuHn nepaHn MaunHn.
CneBaIte npenopbKInTe Ha npOn3BODnTEJI B3 OCHOBA Ha TERNoTo Ha npaHTo, CTeneHTa Ha 3AmbpcBaHe n TBpOocTtHa Ho BDoTa BbB BaWata 30Ha. Ako He 3Haete KaKBa e TBbpOCTTa Ha BOdaT, DonNTaTe Ce Do BOoCHa6nTeJIHATA KOMNaHn.

He n3non3BaIte nepiIne npenapat, KOITc ce e BTBbpIN, TbKATO qACT OT Hero MoKe da ocTaHe cJe IN3nlaKbaHTo. ToBa MoKe Da npedn3BnKa HnpaBnHO IN3nlaKBaHe OT nepaHaT MaunHa Nn 6JokpAne Ha npelNBnKa.

Mol, oBpHeTe BnMaHne Ha CJIeHNOTo, KOraTo I3NoJ3BaTe UKbJa 3a BbJHa.
- 3nnon3BaIte HeytpaIe TceH nepIe npenapat cmo 3a BbJIHa.
- Ako n3nol3BaTe npaxoo6pa3eH nepiIne npenapat, ToJ MOKe Ja octaHe B npaHTo N da npuHHIOBpeHa Ha MaTePnana (BbJIHata).
YeKMeJxKe 3a nepnJIeH npenapat
Baata nepaHa MaunHa mHa OTeJHn OTeJeHna 3a Do3npaHe Ha nepuJen npepapat n OMEKOTte Ha TbKaHN. NocTabeTe BCuKN DoabKn 3a npaHe B npaBnHOTo OTeJeHne npedn Da BKIOHTe nepaHaTa MaunHa.

HE OTbaprTe YekMeJKeTo 3a nepnneH npenapat no BpeMe Ha pa6oTa Ha nepaHaT aMaUNHa.
- ⅢterlneTe Yekmedketo 3a nepiJeH npenapat OT JraBaTa CtpaHa Ha KOHTpOJIHH naHeJ.
2.Добавete npenopbUbaHOTOKoJIHecTBo nepiJIeH npenapat HanpaboB OTeJeHHeTo 3a nepiJIeH npenapaT II npeni Da BKIOHTe nepaHaTa MaIIHa.
3.ДобаBetepenopbuaHOTOKoJIuHcTBoOMeKOTHTe 3aTbKaHnBOTdJeHHeT03aOMeKOTHTeBAKOe Heo6xOdmo.

HEIO6abTHe HnKaBn npaxoo6pa3H/TeuHn nepuHn 1npenapTu BOTJeHNEtO 3a OMEKOTNTeI (


- Korato n3noJ3BaTe onuIra 3a npednpahe, doabete npenopbYbaHOTo KOJIueCTBO nepiJeH npenapat B OTdeneHeNoTo 3a npednpahe ①.

Korato nepete rolemn aptnkyu, HE n3no3baTe cIeHNTE TINOBe nepuHn npenapaTn.
- PepinHn npenapatn Ha Ta6letk n KaCynl
- PepuHn npenapatn, n3noL3Baun tonka mpeka
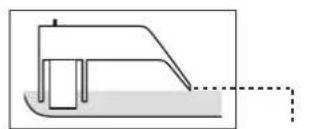

KoHcHTpnpaHn nn TbCTn OMeKOTteHn apomATn3aTOpn Ha TbKaHn TpR6Ba PpeDn IOCTabReB B OTJeHHeTO da ce pa3peXdA t BbB BOda (PpeOToBpaTaRa 3anyuBaHe Ha npaMNBnka).
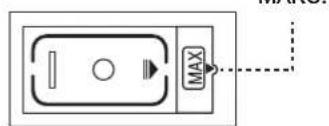

BHHMaaIte da He npelnee OMEKOTNTeIaH TaTbKaH, KOraTo 3aTbOpTe OTdJeHHeTO 3a nepuH npenapat, cne KaTo CTe rO doabn B OTdJeHHeTO 3a n3PnakBaHe Ha nepuH npenapat.
почистваши и подьржаны Ваша Терална Мшина
PonbpxaHTo Ha BaWata nepalHa MaunHa NcTa Ndoobpa pabotata N, PpeDOTBpTaBa H3JIuHINPeMOHTn UyblKaba POJe3Hn JxIBOT.
ИЗTOЧВАЕ HA ПЕРДHATA MAШИHA B СЛУЧАй HA 3ЛОПOLУKA
- N3baTe TcIeHa HepaJIHATA MaUHa OT KOHTaKaTa.
- OTbOpTe KaIaKa Ha 0JIbpa, KATO IN3IOJ3BaTe MoHeTa JNJ KJIHOH.
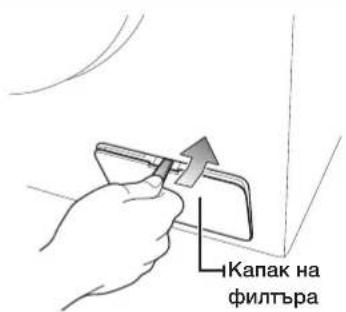
3.ИЗльрайе HanpeДТьбаТа 3a abapин Ho ИЗTOчBaHe,3a daЯ OCBOБODITE OT HACOVBauTa KYka.

4.CbaneKanaeToHaabapuHOTOn3TOBaHe,KaTO 3ATBOPTE Tp6ata3aabapuHO3TOBaHe.
5.OCTaBETe BOIaTa Ia Ce H3TeHcBcBd.

OCTaBaUaTbOdaMOKeJaeIOBHe,OTKoJIkOTO OaKaBATE. IOnrTOBtEne-ROJAMcD.
- IocTabeTe o6paTHo kanaueTo n fikcupaTe Tpb6aTa KbM HacoBaUata KYka.
- NocTabeTe Ha MrcTo KaNaka Ha qnItbpa.
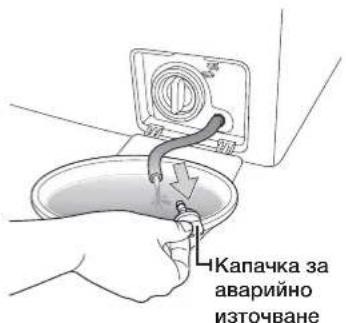
NOCNTBAHEOTBbH
- N36bpseTe NOBbpxHocHTe Ha nepaHATA MaunHa, BKJIOHTeHIO KOHTpOJIHH NaHeI, C MeKa Kbpna HHea6pa3NbHN DomAKINHCKMnJIHN IpepapATn.
- C MEKA Kbprna IIOcCyWTe IOBbpxHOCTNTE.
3.He n3nBaTe Boga Bbpyx nepaHaTa MaunHa.
BbIrapckn-29
почистваши и подьржаны Ваша Терална Мшина
ПОИСТBAHE HA YEKMEДЖETO 3A ПЕРИЛЕH ПЕПAPAT I THe3ДOTO MY
- HatncheJeIOCTeTo 3aOCBO6OxJaBaHe OTBbTpe Ha YekMeJKeTo 3a nepuJeH npenapat Iro n3BaTe.
2.ИЗБАДЕТЕ разделпгеля 3a тeуннелпурпалпенapаTOTУЕКМДжкeto
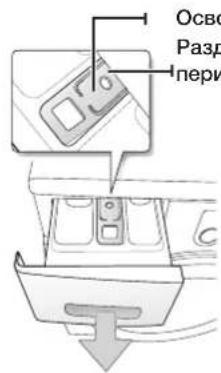
Ocbo6oxdabau JIOCT Pa3dienTe 3a TeueH nepnne npenapat
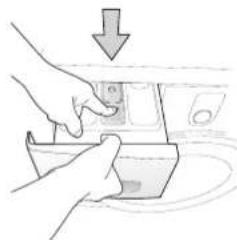
- N3MNITe BCNUHcNHaCTn NOI TeaUa BOJa.
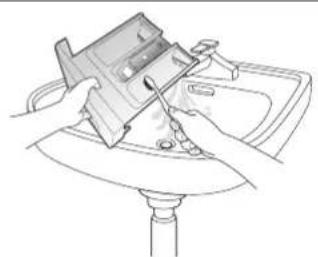
4.ПОИСТЕгнБДОТHa YeKMeJxKeTO cBc CTapa YeTka 3a 3b6n.
5. NocTaBete OTHOBo pa3eJInteIa 3a TeueH IepnIeH npenapat KaTO rO HATNCHETe 3npaBO B YeKMeJxETo.
6. HatncheTe YekMeJKeTo 0bpaTHo Ha MrcTO.
7. 3a da otctpaHITe eBHTyaJIHO octaHaJI nepnJIeH npenapat, n3TbJIHeTe uKbJI Ha nlaKHeHe 6e3 npaHe B 6apa6aHa.
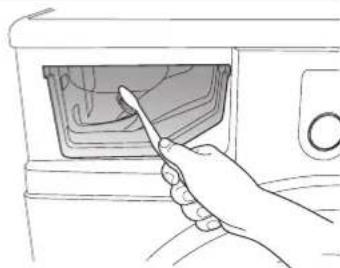
ПОЧECTBAHEHAФИЛТьРАЗAOCTATьL
IpenopbUbame da noHCTBaTe fnnTba 3a ocTaBcN 5 nN 6 nbTn rOduHNO, nN KOrato ce nokaee cboBseHne 3a rpeuKa "5E". (Bx. "N3toUbaHe Ha nepaHaTa MaunHa B cnuaH Ha 3lonoJyka" Ha npeduHata CTpaHnca.)

Ipei Da noHCTTE fuiTbpa 3a ocTaTbU, yBepTe ce, ye cTe n3Bauiu Ka6ena 3a 3axpaHbaHeTo OT KOHTAKTA.
- TbpoOTCTpaHETe OCTaTbHATA BODA (BZ. "N3TOUbaHe Ha nepaHATA MaunHa B CnyaHa 3IOnOlyka" Ha cTp. 29.)
Ako n3BaJnte fnnTbpa,6e3 da n3TOHTe OCTaTbHata BOda,OCTaTbHATA BDA MOKe Da nOTeHe HABbH. - OTbopete Kanaka Ha qnItbpa, KaTo n3nO13BaTe MoHeTa nn KJIOH.
3.PaBHTeKaHaKkTa 3a abapuHn H3TOBaHe CbC 3abbpTaHe HAnBO N3TOHe BCuHKata BOda.
4.PaBnTeKaanKaTaHaΦnTbpa3aocTaBt.
5.ИЗнСТЕТБУКIN3AMbPcRABaHIN NOCTaTbUO TФNTbpa.BHIMABAITE NEPKaTHa NOMnTaHa NOMnTa 3a IN3TOUBAHe 3aDΦNITbPa Da He e 6JOKupaHa. - NocTabete OTHOBO KanaaKaTa Ha qnnTbpa qnnTbpa.
- NocTaBete OTHOBO KanaKa Ha qnTbpa.
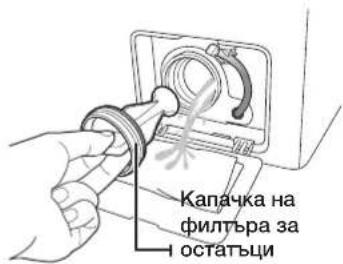

He oTbaprrte kanaqkata Ha qnntbpa 3a ocTaTbun DokaTo MaunHata pa6oTn, 3aOTo MOKe da n3Teue ropeua Boda.

- YBepete ce, ye cTe noCTabnn OTHOBo KanaYkata Ha fNITbpa, CneI KaTO rO NOHCTnTE. Ako fNITbpbT e N3BbH MaUNHaTa, nepaJHaTa MaUNHa MOKe Da ce IOBpeIN IIN Da CE NOJyH TeH Ha BOda.
-ΦHnTbPbT Tp8Ba Da 6bIe HnBJIHO Crlno6EH CJIeN ONUCTBAHETO My.
почистваши и подьржаны ваша тегална машина
ПОЧECTBAHE HA MPEXECTЯ ФИЛТьР HA MAPКУА 3A BODA
Tp6Ba Da noHCTBaTe MpeXecTna 0nIbTp Ha Mapkya 3a BODa NOHe BeHNbK rOIMUHO IIN npNOKa3BaHe Ha cbo6eHne 3a rpeuKa "4E":
- 3aTbOpTe KpaHa 3a IOnaBaHe Ha BOda KbM NepaHaTa MaunHa.
- Pa3BnHTe MapkyHa OT Tb6a Ha nepaHATA MaunHa. 3a Da n36erHete 6JNKBaHTo Ha BOda nopadn Bb3dyHOTO HAnraHe B MapkyHa, NOKPInTe MapkyHa C Kbpna.
3.CILOCKN KIEUIN BHIMATEJHO N3BaTe MpeXeCTnФJIITbP OT KpaH Ma Mapkya ITo H3IIaKHeT E BbB BOda, DOKaTO CTAHe YnCT. OCBeh TOBa, NOChCTe TE OTBbTpE IN OTBbH pe36OBAHn CbeHNHTeJ. - Hatnchete pntbpa obaTHo Ha MxCTO.
- 3aBnHTeTe Mapkya OTHOBKbM NepaHaTa MaunHa.
- YBepete Ce, He Bp3KITE HmAT TeOBe IN OTBopeTe KpaHa.
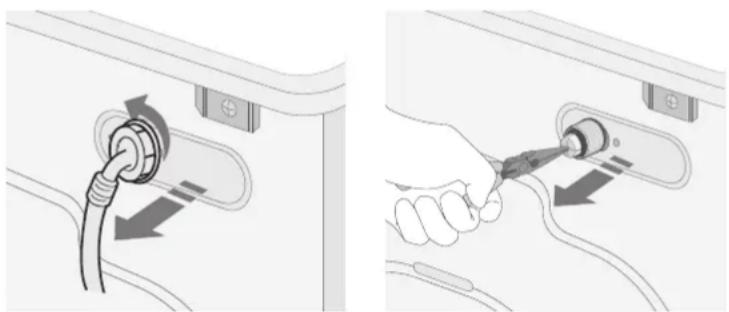
PEMOHTIPAHE HA 3AMPb3HAJIa IEPAJIHMAULINHA
Ako Tempepatpata cnahe noToukata Ha 3ampb3BaHe n Baaata nepaHa MaunHa e 3ampb3Hana:
- 13BaTeEeIeHa IepaHnTaMaHnHa OT KOHTaKaT。
- Hane Te tonna Boda Bbpxy BDOONPOBNOHnKpaH, 3a da ocBOOHTe MapkyHa 3a noDaBaHe Ha BOda.
- CbaneTe MapkyHa 3a noDaBaHe Ha BOba I rO HAToneTe B TOnla BOba.
- HaneTe TOnJa Boda B 6apabHa Ha nepaHata MaunHa n octabeTe da npecto10 MNHYTN.
- Cbpxte OTHOBo Mapkya 3a NpdaBaHe Ha BOa KbM BoOnpoBoHn KpaH n npOBepeTe daHn OepaunTE NO NpdaBaHe Ha BOa HN3TOBaHe Ca HopMaJIHN.
CbXPAHRAHE HA BAJATA INEPAJIHA MALUNHA
Ako Tpra6Ba Da CbxaPnHbATE BaUaTApepaHa MaunHa npOdbKHTeHbBpeMe 63 Da pa6oTn, no-Do6pe n3TOHeTe BODaTA OT HeN ppeKbcHeTe Bp3KIne. PepaHIne MaunHmORat Da ce NOBpeJr, aKO ppeDn CbXpaHEHHeTo B MapkyHte N BbTpEeHNTE KOMNoHEnTn OCTaHe BODa.
- N36epeTe Unkbl Quick Wash (Bbp30 npaHe) n doabete 6eHnBa OTeJeHneTo 3a 6eHnHa. PycheTe MaunHata da n3PbHn Uckkbla 6e3 npaHe.
- 3aTbOpTe KpaHOBeTe 3a BOnaTa N OTKaUeTe IOnaBaUuTE MapKyuN.
3.ИЗКИЧЕТЕЦENTEЯHAпералнATERMaUNHаOTKOHTaNIOCTaBeTeBpaTAtaHa nepalnHaTaMaUNHaOTBopeHa,3aДamOKeB6apabHaDaцnkylnpaBb3dYx.
Ako Baata NaepaHa MaunHa e 6nla CbXpaHbHa npi TempepaTpa nD Hynata, npdN da na 3nOJ3BaTe aocTabete n3BecTHo Bpeme, 3a da ce pa3mpa3n eBeHTyaIHO OCTaHaJATA BOda B He.
Блгарский-32
OTCTpaHЯBaHe Ha HeN3PpaBHOCTn I INHOPMaUNoHHN KOIOBE
ПОНБЕРЕ TE3N TOUKN, AKO BALIATA NEPAJIHA MALINHA...
TABJIULA HA LUKJIITE
(ONLNAHnOTpe6nteT)
| ПОНГРАМ | Марс. Терло (кг) | Ершелен ПЕПAPAT | Марсимал-на Temпера-тура (℃) | Сkopост цentro-фуг(a марс.) ob./min. | Delay end(Одожени Завва- нe) | ||||
| WF1702 WF1700 | WF1602 WF1600 | Пред- пpane | Прpane | Омe- ков- тел | WF1702 WF1602 | WF1700 WF1600 | |||
| Cotton (Памух)(♀) | 7,0 6,0 | ● | da | ● | 95 1200 | 1000 | ● | ||
| Synthetics (Сиntетика)(♂) | 2,5 2,5 | ● | da | ● | 60 1200 | 1000 | ● | ||
| Hand Wash For Wool (Pычно пане за вьлес)(♂) | 2,0 1,5 | -да | ● | 40 800 | 800 | ● | |||
| Baby Care (Гриха за детето)(♀) | 3,0 2,5 | ● | da | ● | 95 1200 | 1000 | ● | ||
| Daily Wash (Eжедnevно панe)(♂) | 2,0 2,0 | ● | da | ● | 60 1200 | 1000 | ● | ||
| 15' Quick Wash (15-Minutely бърто панe)(♂) | 2,0 2,0 | -да | ● | 40 800 | 800 | ● | |||
- LKbI c npdpnahe npobjkaBa np6n. 15 MHytn nobHe.
2.ДаHHHTe 3a BpeMeTpaHe Ha LkBla ca nI3MepEn npu ycIOBnraTa, nocOueHn B CtaHapr IEC 60456 / EN 60456. CtapTnpaTe pexIma Ha KaIbprpae CneJ INCTaJIpaHeto (Bx. cTp. 34). - NopTe6JIeHHeTO B OTdENHITe KINIIuMa MOKe Da Ce pa3NIuHbA O T CToHOCHTe, DaJIeHN B Ta6JIuCAta, npaI KoJIe6aHnraTb H aJrHaHTo N TempepaTypata Ha BoData, TerIto Ha 3apeJeHOTo npaHe n Bnda Ha npaHTo.
- Korato e n36paHa cyHKuIa 3a INHTeH3nBHO npaHe, BpeMeTo Ha cIKbJa ce yBeJIyAba npn BCEKU NKbl.
ПОНДЖЕНЕ
TÁBЛИЦА 3A ГПЖИ 3A ТьКAHИТЕ
CneHNTE CmBOJn DaBaT HAcOKN 3a rpnKn 3a TbKaHNTe. ETKeNTe 3a rpnKn3a TbKaHNTe BKIOyBaT YeTnpu CmBOJn B CneHnpe: npaHe, n36eJIbaHe, cyueHe n rnaJeHe, n XIMMHeCKO uCTeHe, KOrato e Heo6xOIMO.
N3no3BaHTo Ha CmB0Jn OcIpyBa NocJeIOBaTeHOCT npn pa3NJHNTe PpO3BOJTeHn Ha 6JIekNo, MeCTn HBOCHn apTNI. CJeBaHTe INHCTpyKuNTe OT eTIKeTa, 3a Da yNbJXHTe MaKcIMMaHNO XJBOTa Ha IpxaTa n da HAMInTE npo6JIemTe npn npaHTo.
| Устончва мaterия | Можеdoesceгади по 100°C макс. | ||
| Фина Тьkan Да He се Гади | |||
| 95 | Можеdoesceпешся рprn 95°C | A | Можеdoesceчstнхимоческі в БСяжakьв разборітел |
| 60 | Можеdoesceпешся рprn 60°C | P | химоч秧очпесу само с пегхлорд,бензи за залки, чіст спір't пій R113 |
| 40 | Можеdoesceпешся рprn 40°C | F | химоч秧очпесу само сьс самолетенбензи,чіст спір't пій R113 |
| 30 | Можеdoesceпешся рprn 30°C Дa He сe | Чістуххоч秧с | |
| Можеdoesceпешся на рыka | - | Да сe суши поставени хоризонтailing | |
| Самохимоч秧очпесу Можеdoesce suшнию | |||
| Можеdoesceпшелва в студа ВODA | Да сe суши на заразалка за драхи | ||
| Да He сeпшелва | Барабанно сухene,Hopmaлно Заграванne | ||
| Можеdoesceпшелпprn 200°C макс. | Барабанно сухene,покжени Заграванne | ||
| Можеdoesceпшелпprn 150°C макс. | Бezь барабанно сухene | ||
ОпАЗВАЕ HA OKОЛHATA CРЕДА
To3n ypei e npou3BeHEn OT MaTePmaJI, rOHN 3a peLkNlpaHe. Ako peIte Da n3xBpIraTe To3n ypei, cna3BaIe TeJeCTBaUaTAp HOpMaTINbHa ypeIb3a N3XbPJIHe Ha OTnAdbu. OTpeKTe 3axpaHbuaJia KaBc, Taka Ye ypeIbT da He MoKe Ja Ce BkIOUcb Ba 3axpaHbAe. CbaTe BpaTuKaTa, Taka Ye B ypeJa Da He MoKe Ja OCTaHaT 3aTBoPeHn JxNBOTH NII MAnKn DeJa.
He npebuabaKe kOnuectBaTa nepnneH npenapat, npenopbHaBn B nHctpyKunTe Ha npou3BOUNTeJIte.
- 13no3BaIe npenapatn 3a npemaxbaHe Ha nTHa Hn36eInTeJn npedn uKbJa Ha npaHe cmo KOrato e cTporo Heo6xOIMO.
- Nectete BOda n eIeKtpoeHeprna Ype3 npahe cAmO Ha IIbJIHO 3apeXkaHe (TOOHOT KOJIHecTBO 3abncn OT n3non3BaHaTa nporpama).
CNEUΦUKALNA
| ТП ПЕРАЛХ С ПРЕДно 3APEXДАНЕ | |||
| РАЗМЕРИ | WF1702 / WF1700 | ||
| LU600MM X Д550MM X B850MM | |||
| HAJIЯГАЕ HA BOДATA 50 кPa ~ 800 кPa | |||
| ОБЕМ HA BOДATA 56 n | |||
| HETO TEГЛо | WF1702 / WF1700 | ||
| 56 кг | |||
| КАПАЦТET HA ПРАЕ И ZEGHTPOФУTGИРАЕ 7,0 кг | |||
| ПOTРЕБЛECHЕ HAЕЛКТРОЕСТПЕ | MOДЕЛ WF1702 / WF1700 | ||
| ПРАНЕ | 220 V 150 W | ||
| 240 V 150 W | |||
| ПРАНЕ и HAFРЯВАНЕ | 220 V 2000 W | ||
| 240 V 2400 W | |||
| ZEHTROФУTGИРАЕ | MOДЕЛ WF1702 WF1700 | ||
| 230V 530 W 500 W | |||
| ИЗПOMПВАНЕ 34 W | |||
| ОБОРOTи HAUCEHTPOФУТATA | MOДЕЛ WF1702 WF1700 | ||
| OB./Min. 1200 1000 | |||
BbHnHrT Bn n CneuPkaunTe Ha ypea noNexKaT Ha npomHa 6e3 npedn3BecTne, c en YcBbBpueHCTBaHe.
ПрилaxesHne
CNEUINKALNA
| ТИП ПЕРАЛХ С ПЕДно 3АРЕДANHE | |||
| РАЗМЕРи | WF1602 / WF1600 | ||
| LII600MM X Φ450MM X B850MM | |||
| HAJIЯГАЕ HA BOДATA 50 кPa ~ 800 кPa | |||
| ОБЕМ HA BOДATA 48 II | |||
| NETO TEГЛо | WF1602 WF1600 | ||
| 54 кг | |||
| КАПАЦТET HA ПPAHЕ И LAЧТPOФУГИРАЕ 6,0 кг | |||
| ПOTРЕБЛECHЕ HAЕЛКТРОЕНПЯ | MOДЕЛ WF1602 / WF1600 | ||
| ПРАНЕ | 220 V 150 W | ||
| 240 V 150 W | |||
| ПРАНЕ и HAFРЯВАС | 220 V 2000 W | ||
| 240 V 2400 W | |||
| LEHTROФУПАРЕ | MOДЕЛ WF1602 WF1600 | ||
| 230V 530 W 500 W | |||
| ИЗПOMПВАЕ 34 W | |||
| ОБОРOTи HAUCENTPOФУТATA | MOДЕЛ WF1602 WF1600 | ||
| б.Мин. 1200 1000 | |||
BbHnHnT Bn n CneuKaunTe Ha ypeHa noJnxat Ha npomHa 6e3 npedn3BeCTne, c neI yCbBbPseHCTBaHe.
BbIrapckn-38
CEPNIAOMALHINIEPAJIHNMALIHNI (EU CAMO)
CnopeI Perynaia (EC) N 1061/2010
" ** 3Be3nUka O3HaHbBa BapnaHT Ha MoJe, KOITOMOKe Da Ce npOMeHr Ype3 3aMeCTBaHe C (0-9) nnn(A-Z).
KoN Dc68-02796Q-03_BG


WF1702AH(A/C/D/F/G/H/R/S/T/V/W/Z)(G) WF1702NH(A/C/D/F/G/H/R/S/T/V/W/Z)(G)
WF1700AH(A/C/D/F/G/H/R/S/T/V/W/Z)(G) WF1700NH(A/C/D/F/G/H/R/S/T/V/W/Z)(G)
WF1602AH(A/C/D/F/G/H/R/S/T/V/W/Z)(G) WF1602NH(A/C/D/F/G/H/R/S/T/V/W/Z)(G)
WF1600AH(A/C/D/F/G/H/R/S/T/V/W/Z)(G) WF1600NH(A/C/D/F/G/H/R/S/T/V/W/Z)(G)
WF1702AM(A/C/D/F/G/H/R/S/T/V/W/Z)(G) WF1702NM(A/C/D/F/G/H/R/S/T/V/W/Z)(G)
WF1700AM(A/C/D/F/G/H/R/S/T/V/W/Z)(G) WF1700NM(A/C/D/F/G/H/R/S/T/V/W/Z)(G)
WF1602AM(A/C/D/F/G/H/R/S/T/V/W/Z)(G) WF1602NM(A/C/D/F/G/H/R/S/T/V/W/Z)(G)
WF1600AM(A/C/D/F/G/H/R/S/T/V/W/Z)(G) WF1600NM(A/C/D/F/G/H/R/S/T/V/W/Z)(G)
Pračka
uživatská príručka
Planet
First
100%
Recycled Paper
JUHISED PESU PESEMISEKS
Nende lihtsate nouannete jargimine tagab tohusaima pesemise ja puhtaima pesu.

PESUVAHEND JA LISANDID
RiiTe HooLDuSMÄRGiSTe TABeL
Activation/Désactivation
QUESTIONS OU COMMENTAIRES?
| pays appeléZ | le ou rendeZ-vous sur le site | |
| BULGARIA | 800 111 31, Бразлattа Телегонна Линь | www.samsung.com/bg/support |
| CROATIA 072 | 726 786 www.samsung.com/hr/support | |
| CZECH 800 - SAMSUNG (800-726786) www.samsung.com/cz/support | ||
| GREECE | 80111-SAMSUNG (80111 726 7864) only from land line (+30) 210 6897691 from mobile and land line | www.samsung.com/gr/support |
| HUNGARY | 0680SAMSUNG (0680-726-786) 0680PREMIUM (0680-773-648) | www.samsung.com/hu/support |
| ROMANIA | 08008 726 78 64 (08008 SAMSUNG) Apel Gratisuit | www.samsung.com/ro/support |
| RUSSIA 8-800 | -555-55-55 www.samsung.com/ru/support | |
| SERBIA 011 321 | 6899 www.samsung.com/rs/support | |
| SLOVAKIA 0800 | - SAMSUNG(0800-726 786) www.samsung.com/sk/support | |
| LITHUANIA 8-800 | -77777 www.samsung.com/lt/support | |
| LATvia | 8000-7267 | www.samsung.com/lv/support |
| ESTONIA | 800-7267 | www.samsung.com/ee/support |
| SLOVENIA | 080 697 267 090 726 786 | www.samsung.com/si/support |
Code No. DC68-02796Q-03_EN


WF1702AH(A/C/D/F/G/H/R/S/T/V/W/Z)(G) WF1702NH(A/C/D/F/G/H/R/S/T/V/W/Z)(G)
WF1700AH(A/C/D/F/G/H/R/S/T/V/W/Z)(G) WF1700NH(A/C/D/F/G/H/R/S/T/V/W/Z)(G)
WF1602AH(A/C/D/F/G/H/R/S/T/V/W/Z)(G) WF1602NH(A/C/D/F/G/H/R/S/T/V/W/Z)(G)
WF1600AH(A/C/D/F/G/H/R/S/T/V/W/Z)(G) WF1600NH(A/C/D/F/G/H/R/S/T/V/W/Z)(G)
WF1702AM(A/C/D/F/G/H/R/S/T/V/W/Z)(G) WF1702NM(A/C/D/F/G/H/R/S/T/V/W/Z)(G)
WF1700AM(A/C/D/F/G/H/R/S/T/V/W/Z)(G) WF1700NM(A/C/D/F/G/H/R/S/T/V/W/Z)(G)
WF1602AM(A/C/D/F/G/H/R/S/T/V/W/Z)(G) WF1602NM(A/C/D/F/G/H/R/S/T/V/W/Z)(G)
WF1600AM(A/C/D/F/G/H/R/S/T/V/W/Z)(G) WF1600NM(A/C/D/F/G/H/R/S/T/V/W/Z)(G)
Πλυντήριο Poύχων
Evyειρίδio Xρήσεως
Planet
First
100%
Recycled Paper
AutoToEyXeiipioXpioncexiKaataaKeuaotiean0100avakukawhexaprti.
φavtaoTeiTE TIC δuvatóTnTEC
SacuxapioToou neaayopaoate auto to npoiov Tc Samsung.
CE
SAMSUNG
περιεχόμενα
A T A p O O X t A T N E R K A T A T A

Autn ouakeun tha npenei va tonotheetai etoi wote va unapxeipoaaon yia to kalwdio peuataoc.
- 2eavriθεπ πεπτωπμηρειν προληθει ηλεκτροληξία ἡπρκayía λόγω τής διαρρούσηλεκτρικόρεματος.
Eykataohtote Tn oukeun navw oE enine do kai oKAnpo dane do nou va uTopei va unootnpie to bapoc tou. - _i a_i avriotn nepittwn iowc npokknouv avwmaloi kpaadaooi, etakivnoeic, opubc n npo3nmuatae to npoiov.

105660010
ANOPIE H NAPATHPHSEI
| ХОРА KAΛΕΣΤΕ | HЕΠΙΣΚΕΦTEITE MAΣ ΣΤΟ ΔΙΑΔΙΚΤΥΟ ΣΤΟ |
| BULGARIA | 800 111 31, Бezплатна телегонna Линя |
| CROATIA 072 726 | 786 www.samsung.com/hr/support |
| CZECH 800 - SAMSUNG (800-726786) www.samsung.com/cz/support | |
| GREECE | 80111-SAMSUNG (80111 726 7864) only from land line (+30) 210 6897691 from mobile and land line |
| HUNGARY | 0680SAMSUNG (0680-726-786) 0680PREMIUM (0680-773-648) |
| ROMANIA | 08008 726 78 64 (08008 SAMSUNG) Apel GRATUIT |
| RUSSIA 8-800-55 | 5-55-55 www.samsung.com/ru/support |
| SERBIA 011 321 | 6899 www.samsung.com/rs/support |
| SLOVAKIA 0800 - SAMSUNG(0800-726 786) www.samsung.com/sk/support | |
| LITHUANIA 8-800 | 77777 www.samsung.com/lt/support |
| LATvia | 8000-7267 |
| ESTONIA | 800-7267 |
| SLOVENIA | 080 697 267 090 726 786 |
EGY ADAG SZENNYES MOSÁSA
21
A MOSOGEP TISZTITASA ES KARBANTARTASA
29
MALINHATA 3A INEPEHe

29 VcnyuTaHe Ha BOnaTa OJ MaUInHaTa npn BOHpeHN CITyauM
29 YnCTeHBe Ha HAdBopeuHOCTa
30 YnCTeHe HaΦnOKaTn OTBOpNTe 3a DeTepeHT
31 YnCTeHe Ha qntepoT 3a ocTaToU
32 HcTeHe Ha MPExeCTnOT dHnTep Ha UpeBOTo 3a B0da
32 PnnpaKa Ha 3amp3HaTa MaunHata 3a nepehe
32 CklaIpaHBe Ha MaunHaTa 3a nepeHe
33 PpOBepeTe nOBn TOOKN DOKOJIky MaunHaTa 3a nepehe...
34 INHOpMaTnBnKoDOBN
OTCTPAHYBAHbE HA IPOBJIEMN INHΦOPMATNBH KODOBN

34 Pekim 3a kaIIb6pnpahe
KAJIINBPUNPAHbE HA BAUATA MALUNHA 3A IPEHBe

35 Tabega Ha nporpamn
TABEJA HA IPOI PAMN
36 TaBena 3a OdpKyBaHe Ha TkaeHnHaTa
36 3aunTHa HxNBOThHaTa cpeHnHa
37 Cnueuufkaun
39 Jncta Ha MaunHn 3a nepehe aJIMHTa 3a DomakInhCTBa (EU camo)
43 Vopmaun 3a OCHOBHnTe nporpaMn 3a nepehe
MakeOnckn-2
6e36eHOCn INHOpMaun
Bn cheHtame Ha BaWata HOBa MaunHa Samsung ActivFreshTM. Oba ynatCTBO codpxk BaxKn HOpMaun 3a IHCTaInpaHbeto, KopncTeHbeto n prnxkaT a 3a Baunot ypei. Be MOJIMe BHIMATEJIHO da rO npOHtate OBA ynatCTBO 3a rN INCNOJ3yBaTe CNTe PnIOOBKN I MOXHOCTn Ha BaWata MaunHa 3a.
LTO TPEBA DA 3HAETE 3A YNATCTBATA 3A BE3BEOHO PABOTEHbE
IpoHnTajTe ro OBA yNATCTBO BHNMaTeJHo 3a da bNteTe CnryPhn IeKa 3HaTe 6e36eJHO n eFHKACHO da ynpabYbATE CO MHORYTe ONUIN NdyHKUIN Ha Baunot HOB ypeN uYBaJTe rHa CNyPFO MeCTO, BO HcROBa 6JIIm3HNa, 3a iNn Notpe6N. KopucTeTe ro ypeDOT cAmO 3a npedBnDEHaTa HameHa, kako wTO e OOnuHOByNA TCTBOTo pa6ota.
IpeynpeyBaHbata N Baxhnte yNaTCTBa 3a 6e36eHn paOteHe oD Oba yNATCTBO He n NOKPbBAat CHTe MoKHN yCIOBn i CNTyaun Do KOnuTo MOKe Da DooJe. Ba7a OndroBOPHOCT e da Kopncntte 3dpab pa3ym, I da bNDte BNIMATEJHn IprkKnBn Kora ja INHCTaJInpaTe, ODPKyBaTe N KOPNCNTte BA7aTaMAUNHa. Bnejkn CNEHnBE yNATCTBa 3a paOta Ce OndecyBaat Ha NOBeKe MOpEn, KapaKTepnCTKNITE Ha Ba7aTaMaUNHa Mone MaNKy Da ce pa3NIkyBaAT O ONHe ONIIaHn BO OBA yNA TCTBO, a HEKON 3Haun 3a pDeynpeyBaHbe Da He Ce OndecyBaat Ha Hea. Ako IMate npaaHbA nnrpnKn, ObpaTeTe CE BO Haj6mckNtO cepBnceH cHTap nn nobapajTe nomuH n HfopMaun Ha INHTepHET, Ha www.samsung.com.
BAKHN BEE3BEOHOCN CIMBOJN MEPKN
LTO 3Haayat NKOHHTe N 3HaunTe BO OBA yNaTCTBO:
Toa moKeJa npEiIN3BnKa cTpyeH yap nn noXkap.
Hemojte da ro bnehe Te kaebnoT kora ro ncknybATE ypeoT oD CTpyja.
- N3BneheTe ro wTekepot OJ dpKejkn rTo Teno To Ha wTekepot.
-Дokолу He noctanite Taka, ce n3noxybate Ha ctpyen yap nIn noxkap.
He noctabyaBajTe n KaBenot nnu CEBKITE OHamy KaJe wTO MOXeTe da ce cOnHete Od HNB.

3HAU 3A BHUMAHNE IPN IHCTAJAUJA

Oboj ypei Tpe6a da ce noctabn, Taka ITO WTekepot Ke 6nne cekojnat doctaneH.
-Дokолу He noctanite Taka, ce n3noxybaTe Ha cTpyeH yap uIn noxap npaDn npOyUtaHe Ha cTpyjata.
Ihctanipaje ro ypeoT ha pameH TBPn NOK KOJ MOKe da ja HOCN HEOBaTa TeKHa.
- Iokonky He noctanite TaKa, MoKe da Dojde Do HeHOpMaJIHN Bn6paUIM, DnIXKeHa nnnpo6JeMn co npou3BOIoT.

CEPN03Hn 3HAuN 3A PEPdUpyBAHe PN KOPNCTeHbE

Ako dojne do nonnaBvBaHbe Ha anapatoT, BeHaaw npeknHeTe ro cHa6dyBaHbeto co ctpya. n o6paTeTe ce BO Haj6ncknOT cepBuceH ueHTap.
-He donnpajte ro wTekepot co BoDenpaue
-Ako ro npabnTe Toa,ce n3IoxyBaTe Ha cTpyeH yap
Ako od ypeoT ce cnyaat uynn 3Byu, ce ocetn Mnpnc Ha 3aropeno nla, BeHaun 13BleheTe ro wTekepot n o6paTeCe BO Haj6ncknot cepbcen CEHTap.
-Дokолку He noctanite TaKa, ce n3NoxyBaTe Ha cTpyeH yap nIIN noxkap.
Ako dojne do npotekybahe Ha rac (Ha npimep nponaH, Teeh rac, nTH.), Behdaw npobetpe, 63 da ro donipate wtekepot. He donipajre n ypeot nn Kaebot.
- He KopnicTeBHeNTnlaTOp 3a npoBeTpyaHbe.
ToaMOKeJa npedn3BnKa eKcnno3nja nn nnokap.
He octabajte nI decaT a na ce irpaat BO IIN Ha MaunHata. Nokpaj Toa, kora ro OTCpaHyBaTe ypeoT, DEMOHnPajte ja paKaTa Ha BpaTata.
-Ako ce 3aIbAaBt BHaTpe, DaTaMa MoKe da Ce 3aDyWaT Do CMPT.
YBepeTe ce deKa cTe ja OTCpaHnne cTea amBaIaxa (cyHfepu, CTuponop) oD INHOTo Ha MaunHata, nped da noCHete da ja KOpNCHTte.
6e36eHocn nHopMaun
He nepete npedmetn n3BaIkaHn CO 6eH3nH, Kepo3nH, 6eH3OJ, paCTbOpyBaH, aIKoxon nn npyn 3anaNBn INE kCNIIO3NBHN cyNTaHnn.
- Toa moxe da npedn3Bnka ctpyeH ydap, noxkap nIeKcnnoJa.
He OTbopajTe ja BpaTaTa OJ MaunHaTa Ha Cnna DoNeKa paBoTn (nepe Ha BnCoka TempepaTypa/cuH/LeHTpnpyInpa).
- BODATA WTO Ke nCTeHe OJ MaunHaTa MoKe Da npEIN3BnKa IN3ropeHnI INI JIN3raHe Ha noDoT.
Toa 6n moKeNo Da npEiN3Bvika NOBpea.
- HacnHIO OTBopaHe Ha BpaTaTa MoKe Ja npedn3BnKa OwTeTyBaHe Ha BpaTaTa nnnoBpeDa.
He nikajte ja paKaTa nOД mAsHHaTа.
Toa 6n moKeNo da npEiN3BnKa noBpea.
He donpajte ro wtekepot co boeHN paue.
Toa 6n moKeNo da npEiN3Bvka cTpyeH yap.
HemojTe da ro nckJyHyBaTe ypeoT co BaJeHe Ha wTeKePOT dOeKa toj pa60tn.
- IOBTOHOTOBMETHyBaHeHaIITeKePOTMOKeJaIpeu3BnKaNCKpeHe,ODIHTOMOKe DaDoJNeDoCTpyEHyapNIINoXap.
He octabajTe rI deuata nn HEMOKHNTe Iua da ro KopncTat ypeoT 6e3 HaIgneybahe. He do3bonybajTe MM ha deuata da ce KauybaaT BO ypeoT.
-Дokonky He noctannte Taka, Moke da dojde do ctpyeu yap, nokap mnn nopeya.
He npykaje co pakaTaNIO mTaJIe NpeJMeT NOI MaUNHaT aOJeKa Taa pa6OTN.
Toa 6n MoKeNo da npEiN3BnKa noBpeA.
He n3Bnekybajre ro 1tekepot co Bnehe He Ka6eIOT, TyKcekorau cBpcTo paKaJTe ro n 3Bnekybajre ro dpeKTHO od npNKlyyOKOT od SIOOT.
- OwTeTyBaHbETo Ha Ka6eIOT MoKe Da npEdn3BnKa KyCa Bpcka, noXkap n/Inn cTpyeh yIap

He 6nDyBaJte ce camite da ro nonpaBate,packlonyBATE mIoMOnfkyBATE ypeDoT.
- He kopnctete nonHaKbN ocHrypBaH (6akapHa nIi neJIuHa Knua, nTH.) oCBeH CTaHdapdHnte.
-Kora e noTpe6Ha nonpaBka nIin peHCTaIIpaHe Ha ypeIoT, o6paTe ce Bo Haj5nckNt cepBuceH cHTap.
-Дokonky He noctanite TaKa, ce n3noxyBaTe Ha cTpyeH yAp, noxap, npo6nem co npov3BOJOT nIIN NOBpeHa.

Ako eIeKtpnHHTe DeIOBn DoJnat BO KOHTaKT CO BOJa, BeNHaU N3BaJeTe rO WTeKePOT Od CTpyja n Obpatete Ce BO Haj6JIncKnOT cepBuceH ueHTap.
-Дokолку He noctanite TaKa, ce ИлwxByaTe Ha cTpyeH yap uIu nOxkap.
Kora doBoHToO zupeBO 3a BOna Ke ce Ocbn O, cIaBnHaTn Ke ro nonnaBn ypeDoT, BeNaH uBHeTe Ro wTeKePOT.
-Дokonky He noctanite TaKa, ce nIoxyBaTe Ha cTpyeH yap uN noxkap.
I3BnekyBaJTe ro 0TEkePOT aKO noDJIro BpeMe He nlaHnPaTe da ro KOpNCITte ypeDoT IIN pRn HeBpeMe CO rPMOTeBNU/CBETKaHe.
-Дokonky He noctanite TaKa, ce nIoxyBaTe Ha cTpyeH yap nIIN noxkap.
MaKeDoHcN-8

Kora ypeoT e 3araen Co HekakBa cTpHa CynCTaHua, KaO Ha npMep DeTepeHT, HeNcTOnJa, OCTaToU OXpaHa, INTH., INBLeHeTe FO WTEKePOT IN NCHnCTeTe FO BlaXHa, MeKa Kpna.
- OOKNY He noCTaNTe Taka, MoXe Da DojDe Do npomeHa Ha 6oJaTa, DeOpMaUIn, OHTeTyBaHe INI 'pOcyBaHe.
IpeHnTo CtaKIO MOKeJa ce cKpUIn npu cnHe yap. BndTe BHMaTeHNn npu KOpNCteHe Ha MaunHata.
- CkpweHOTo CTaKNo 6M MoKeJIo Da npEiN3BnKa NOBpeJa.
IIO npeknH BO cna6dybaheTo CO BODa nn npn nobTOPO NOBp3yBaHe Ha UpeBOTo 3a DOBOH BA BODa, NOIEKA OTBopajTe ja cnabnHaTa.
Otbpajte ja cnaibnata noleka n ako nooiofo Bpeme He cte ja KopncTe me MaunHaTa.
- PnTNCOKOT HA BO3dyXOT BO LpeBOTO 3a DOBOH HA BOda INN BO BOOBOHaTa CEBKa MOKe Da IpeDn3BnKA OWTeYBaHe Ha HEKOJ DEI INN IpOTEyBaBe Ha BOdaTA.
Дokолу BO TEKOT Ha pa6oTaTа DoJde Do rpeWka BO nCnyWtAHeTo, .npOBepTe Da Hema npOJIEM Bn NcIyCTOT.
-Ako ja KopnCTnte MaunHaTa Kora e npenlaBeHa nopadn IpO6Jem BO nCnyTtBaTeO, Ce n3NoxyBaTe Ha cTpyeH ynap nnnoKap npaH npOnyTuHe Ha cTpyjata.
Y6abo Hanikajte rna aIuHTaTa BO MaunHaTa 3a da He ce cnuyn da ng notpataTe co BpaTata.
-AKOrnΦaTnte anuTuTaCoBpaTaToa MoKe Ia npEiN3BnKa OwTeTyBaHe UINHa anuTuTa Ta Hn Ha MaunHata Nn NaK Da DOBeNe Do IpOteKyBaHe Ha BOnaTa.
PpOBepe TaJn CnaBnHaTa e 3aTBopeHa KOr He ja KopNCHTte.
- YBepete ce deka upafoT ha cnojkaTHa UpeBOTo 3a DOBOH BA BOne UBCTO 3aTeRHaT.
-ДOKOKу He e, NOCTOn ONaCHOcT ON MaTepnjAnHa WTeTa NIN NOBpeJa.
PpOBepTe BO rymata Ha BpaTata Da He ce 3aRnabIne CtpaHn TeJa (OTnad, KOHm, nTH.)
- Ako Bpata Ta He e do6po 3aTbopeHa, Toa 6n MoKeJIo Da npEiN3BnKa IpoteKyBaHe Ha BODaTa.
Ipei npBOTO KOpncTeHe OTBopTe ja CJIaBnHaTn I npOBepTe daJN CNojKaTa Ha UpeBOTO 3a DOBoH H BOne e Do6po npuCBpCTeHO n daJN Teue O HeKaJe.
-AkoIpaΦOBHTe IIN CNOjKaTa Ha cpeBOTO 3a DOBoD Ha BOda Ce Ia6abN, Toa 6n MOKeNo Da npEiun3BvNa IpoTeKyBaHe Ha BOdaT.
Kako da ja haMaJIte onaCHOCTa EKcIIO3nJa:
-ПОД ИЕКОУСЛБИ, BO CYNCTeMITE CO TOnla BODA, KAKO HA npIMeP BaUHOT 6oJnep, aKO He CTe FO KOpIcTeNe DBe HedeNIN NII NOBKe, MOKe DA DoJIpe DO Co3JaBaHBe Ha BOIOPOJD EKCIJIIO3IBEH. AKO BaUHOT CNTeM 3a TOnla BODa HE e KOpIcTeH DBe HedeNIN NII NOBKe, OTBOpETr GnCITe CJIaBHN 3a TOnla BODa BO DOMOT I OCTaBte Ja BODaTaN TeHe HekONky MInHTN PpeD NaNoHTe Da ja KOpIcTlTe MaunHaT. Ha Toj HauHn Ke Ro OcNObIte eBEHTyAnHO Co3JaDEHOT BOPOd. BiDejKn BOPOpOd e 3aNaIINB, He NpuTe N He NaIeTe OTBOpEN ORaH DoJdeKa rnpaBte Toa.AKO DoJIe Do npoTEkYBaHBe Ha rACOT, BeDnaH npOBetpeT6e3 da ro DonnPpaTe WTEkePOT 3a CTpyja.
PpOIN3BOoT KOJ rO KynBte e HameHET cAmO 3a DomuHa ynoTpe6a.
KopncTeHbTo 3a DeIOBn HOTpe6n Ce CmTa 3a HeCOOdBETHa yNtpe6a Ha npOn3BOoT. Bo ToJ cIyaj, CTAnapdHata rapaHunja Koja ja oBe36eMyBa KOMNaHjata Samsung Hema da ro NOKPme npOn3BOoT n KOMNaHjata Samsung Hema da ppe3eme OndroBOPHOCT 3a deEkeTN nn OWTeYBaHa kON Ke HacTaHat nopadcoDBeHTa Ynotpe6a.
6e36eHocn nHopMaun
He KaHybajTe Ce Bp3 ypeDOT H He CTabajTe PpeDMETn Bp3 Hero (aIIuTu, 3anaeHn CBeKn, 3anaeHn Ungapn, caIOBn, xemikaJIIM, MetaJIH NpeDMETn, nTH.).
- Oba Moxe da npedn3Bnka cTpyeH yap, noxap, npo6Iemn co npon3BOJOT nnnnoBpeda.
He npckajte ncnapnBmATEpnn, kao HnCEKTHUINH, Na NOBpHnHaTa HaypeoT.
- POKpaT Toa uTo e uTeTHo 3a lyTeTo, Toa MoKe da npEiN3BnKa n cTpyeH yAp, NoXap nn npO6JIeMn co npOn3BOIoT.
Hemojte Bo 6Jn3Ha Ha MaunHaTa Da CTaBaTe npeMetu wTO co3daBaat eJeKTPomarHeTHO NOJE.
Toa 6n moKeNo da npedn3BnKa npeKn BO pa6oTeHeTo.
He donnpajte ja BOJATA wTO CE nCnyTA BO TEKOT Ha zHKlyc Ha nepehe nn cywehe noD BnCOKA Temnepatya e keuka, bndjekn e keuka.
Toa moKeJa npEdu3BnKa n3ropeHnI nn noBpeHa.
Hemojte da nepete, cHTpnuFytnape Tn cyuTte BODOTIOPN HIOJNOJK 3a ceHebe, npocTnpKn nn oBke (^*) OCBeH aKO ypeDTo NMa CNEUjAnHa nporpama 3a nepeHe Ha TaKBtE ppeMetTu.
- He nepete Tbe6en, Tbpnn npocntnpn, dypn n aKO maaT 03HaKa deKa MoKat da ce nepaT BO MaunHa.
Toa 6n MoKeNo da npEiN3BnKa NOBpeJa nn OJTeTyBaHBe Ha MaUHaTa, SuOBeNe, noD0T nn OSeKata, npEiN3BnKaHn OD HeHOpMaHnTe Bn6paun. - He nepete BOLHEH Né6Hb, BeTpOBKn, NOJHeTn eJIeU, NaHTOJaHn 3a cKjuaHe, BpeKn 3a CnneHbe, MyuAMn 3a NeHIn, ObJIeKa 3a NoTeHbe, KAKO NcIpaNn 3a BeJocnPeN, MOTOcIKN, ABTOM6HUN, NTH.
He pakybaije co MaunHaTa ako e n3BaJeH caIoT 3a deTeprHrT.
Toa moKeJa npEiIN3BnKa cTpyeH yIap IJIIN NOBpeHa nopAaI npOTeKyBaHe Ha BoTa.
He donpajte ja BhatpeuHocTa Ha 6apabahOT 3a Bpeme nn BeDnAou OKaKo Ke 3aBpuN cyueheTo, 6nJeKn e Kekok.
Toa 6n moKeNo da nped3BnKa n3ropeHn.
He nikajte ja pakata BO OTBOpEHNOt ca3 daTepeRHT.
Toa 6n MoKeNo Da IIOBeIe Do NOBpeA, 6nJeJkn paKaTa MoKe Da Bu ce fAtu Bo ypeoT 3a npIMaHe DeTePreH. HEmoJte BO MaUNHaT a CTaBaTe HNKaKBn dpyr
IpeMeTn (Ha np. YeBIn, OCTaTOuN OXpaHa, XINBOTHn)OCBeH aMHTa.
Toa 6n MoKeNo Da npEiN3BnKa OUITeYBaHBe Ha MaIINHaTa IIN NOBpeJa N CmPT Ha JXIBOTHTe, PpeiN3BnKaHN OJ HeHOpMaIIHNTe Bnbpauu.
He npntnckajTe nKoHnHaTa CO ocTpnpedMeTn, KaKO nIIM, HOKeBN, HOKTN, mTH.
Toa moXe da npEi3BnKa cTpyeH yDap nnnoBpea.
He nepete aaniuTa KOUTo Ce I3BaIaKHaN Co Macna, KpeM NII JIOcNOH KOn OBOuHcOe HAOtaat BO npOaBHNiTE 3a HeRa Ha KOXa NII BO CaIOHnTe 3a MacaKa.
Toa moKeJa npEiN3BnKa DeOpMnpaHe Ha rMaTa Ha BpaTata N nToa Dn IpoteKyBaHc HbDta.
He octabajte rMaMeaHInTe npedMeTn, KaKo 6e3oNacn nnu uHOn 3a KocA, nIi nak 6eJIoTO, noJOnro BpeMe BO 6apabahOT.
- Toa moxe da npedn3Bnka 'pocyahe Ha 6apabahOT
- Ako Ha noBpuHnHa Ha 6apabahOT ce nojABn 'pra, HaneceTe cpeCTBO 3a YnCTHe (HeytpalHO) Bp3 noBpuHnHa T nCnuCTeTe ja 'prata co cyHrep. HnkoraH He KopnCTeMeTAlHa YETka.
He yntpe6ybaje deTeprehT 3a cyBO YnCTeHbe DnpeKTHo HnepeTe, nIakHete nnu TcHTpndpynpajTe aMIta N3BaIkanH co deTepreht 3a cyBO YnCTeHbe.
Toa 6n moxeno da npedn3Bnka cnoHtacoROpyBaHe nIi naneHBe npadn OkndaunjHa MaNoto.
HekopucTeTe ja TOnlaTa BOna oJ ypeN 3a naeHe/rrpeHBe.
Toa moke da npedu3Bnka npo6nemkaj MaunHaTa.
HemojTe BO MaunHaTa Da KOpIcTHe npIpOeH canyH 3a nepeHe Ha paKa.
-AkoToJceCTBpDHeH3aENnBOBHTpeuHocTaHaMaunHata,MOKeJaDoJeDo npo6JIemKajnpou3BODT,IpomEHnHaBojata,'procyBaHeeNJN CMPdea.
Hemojte BO mpekata da nepete rolemn napuHa aaniuta, kako Ha npimep nocteHHHa.
- CtabajTe rH yopanITE n rpaHnCHTe BO MPexKaTa 3a nepehe n nepeTe rN 3aeHNO co npyTte aHNTa.
- OOKONky He noctannte Taka, MoKe da dojde Do nobpea, npedn3BnKaHa od HENOPMaJIHnTe Bn6paun.
He kopncTeTe CTbpDnat DeTepreHT. - Ako ce HataJIOxN BO BHaTpeHOCTa Ha MaunHata, Toa 6n MoKeIIO da npedn3BnKa npOTEyBaHe Ha BODaTa.
Kaj MaunHnte 3a nepehe Co OTBOpn 3a BEHTnlauJa BO OCHOBata, norgnxke Te cT BOpnte Da He 6nDat 3atBopeHN Co KINIM INI dpyn IpueKn.
Icnpa3Hete ngue6oBHTe Ha oBleKaTa WTO Ke ce nepe.
- Tbpni, octpn npedmetn, kako napuKn, 6e3onacn, wajkn, wpafoBn nn Kameha, MOKe da npedn3BnKaat rJolEMO OwTeTyBaHe Ha MaunHaTa.
He nepete o6neka co rolemn TOKN, konHnHa uIN dpyr TeXKo Metan.

CEPNO3HN 3HAUIN 3A INPEUYIPDEYBAHBe INPNYNCHEBETO

He nctete ro ypeot co dapekthno npckaHb Boda Bp3 Hero.
HemojTe da KopnCTNe jaKcpeTBO 3a YnCTbe co KncEJIHH.
He ynoTpe6yBaJte 6eH3oJ, pa3peDyBaU nn ankoXoJ 3a uHCTeHe Ha ypeDoT.
Toa moke da npedn3Bnka npomeha a 6ojaT, deopmaunja, oTeTyBahe, ctpyen yap nnnojkap.
I3BneheTe ro stKepot OJ npKJIyOkoT, nped Ja noCHe Co YnCTeHe NIN ODPxkyBaHe.
- DOKOLKY He noCTaNTe Taka, ce n3NoKyBaTe Ha cTpyen ydap nnnoxkap.
6e36eHocn nHopMaun
YIATCTBO BO BPCKA CO O3HAKATA "WEEE"
IpaBnHIO deNoHnpaHe Ha OBOJ npOn3BOd (OTnaHa eJeKtpuHa n eJeKtpoHcKa onpema)
(Приименліво BO Држави спосеби система спраувае co otnaDOT)
Obaa o3Haka Ha npoIN3BOJOT, npi6bOpT nnIJItepaTypTa O3HaCyBa DeKa npoi3BOJOT n HerOBnOT eNEKTPoHcKn npi6op (Ha np. nonHaOT, cIyuaKInTe, USB ka6enot) He tpeBa da ce OTCTpaHyBaat 3aeDHO co OCTaHnOT OTnAod OMaKinHCTBOTO Ha KpaJOT od HNBnOT pa6Toh BEk. 3a n36eRhyBaHe Ha MOxHa WTeTa Bp3 OKOIHNATA nn YOBeHKOTO 3dPaBje npedN3BnKaHa co HEKOHTPOIpaHO ffPnaHe OTnA, Be MoIIme Da rN ODBOnTE Obne npedMeTn OD pyrnte BVIOBn OTnA nOgROBOPHo Da rN peuKInpate 3apaDn yHaNPdeyBaHe Ha ekOLOwKn ONpaBdaHO IOBTOPHo KOpICTeHe Ha MaTepnJaHInTe pecypcn.
ФИЗИКITe IINa MoKAT da ce obpaT an Bo npOdaBnUcaTa Kae ITO FO KyIIne OBOJ npOn3BOd nIN BO cnyk6bTe Ha loKaIIHATA camOynpaba, 3a DeTaN KKe I KAKo Da I3BpHaT peLNIkpAHe Na npOn3BODoT Ha HauH N 6e6eDen NO OKOIINHata.
IeIOBHTe KOpUCHnU MoKAT Da Ce ObaPaTaT Do CBoJOT Cha6NyBaU n Da rI npOBepaT OpeDHTe N yCIOBHTe BO DOrOBOpOT 3a Ha6AbKa. OBoj Ipn3BOd N HerOBnOT eNeKTPOHcN Inp6Op He Tpe6a Da Ce MeuaaT co dpyr KomepuJaHe OTnAd.
NoctabvBaHbe Ha MaunHaTa 3a nephe
IInuTo 10Ke ja BpHn INHCTaHaJjata TpeBa DocJeHNo da rN CJIeN Obne HNCTpyKUn 3a NcnpabHo paBoTeHe Ha BaWata HOBa MaunHa n 3a Da He bNiTe H3IOXeHN Ha ONaCHOCT Od NOBpeDa Pn NpeHbETo.
ПОНБЕРКАHAДELIOВITE
BHHMaTeJIHO paCnakyBaJte ja MaunHata 3a nepeHe n npOBepe TaIb NcNOpaHaHn CTe DeIOBn npKacKaHn noJIoY. Ako MaunHata e oWTeTeHa npTpaHcnpToT JIn He BN cncopaaHn CTe JeIOBn, obpaTe ce Samsung cepBn 3a KopuChnU IN do Baunot Samsung npOdaBaU.

Nobp3yBaHé Ha BOdaTa n OdBOIoT
Nobp3yBaHe Ha UpeBTo 3a DOBOH HbOa
1.ДржачOTODUpeBOTO3aIOBOHалднвОдacoL-OBJNK NOBp3eTe ro CO npKnyOKOT 3aIOBOH HaJaHbOHa Ha 3aHHTa CTpaHa OMaunHata.CterHete co paka.
EHNOT Kpaj Ha UpeBOTO 3a DOBOH HbOa Tpe6a Da ce NOBp3e Ha MaUNHaT, a DpyNtO CO CJIABINHATA 3a BOJa. He 3aterHyBaJte ro UpeBOTO 3a DOBOH Ha BOJa. Ako UpeBOTO e IpeKpaTko, 3aMeHeTe rO co NDoIro UpeBO 3a BWCOK PnITNCOK.
- NOBp3eTo ro dpyrnoT kpaJ od upeBOTo 3a DOBn Ha BOda CO cnaBuHata nCTerHeTe CO paka. IIO notpe6a, MoXeTe da ja npomEnite NOLOK6aTa HA upeBOTo 3a DOBn Ha BOda CO OcIbOboYBaHe, BPTHe n IOBtOpHO CTERHyBaHe Ha denOT od upeBOTo KoJ e NOBp3AH Co MaunHaTa.
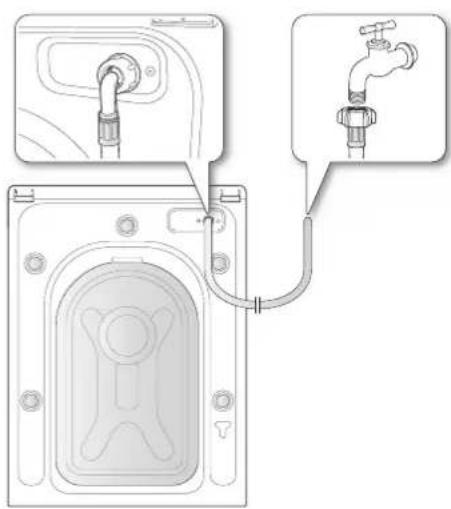
3a odpeHn moen co donoHnTeJeH doB0d 3a tonla Boga:
1.ДржанOTODUpeBOTO3aДOBнHaTOnlaBoDAcoL-OBJNKIOBp3eTe ro copnKJyOKOTa DOBOHAnTOJIbBOHaHa3aHHTaCTpaHaOmaHHata.CTeHETe co paka.
2.Поврете ro npугnot край od цьвото 3a ДOBOD Ha TOnla BODа co CnaBnHaTа 3a TOnla BOda nCTerHete co paka.
3. YIOTpe6yBaJte Y-ENI DOKONky CaKaTe Da KOpNCTnTe cMo JaHa BOna.
пocтabybaие Ha Maшин haTa 3a Nepehe
IobpyBaHbHe Ha UpeBOTo 3a DOBOD Ha BODa (OpeHn MoeIN)
- OTePAnHeTe ro aadTepoT od ueBTo 3a DoBOHa BOa.
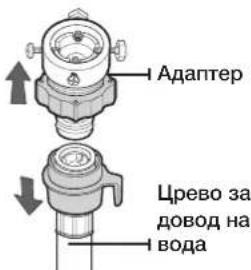
2.Прв,co nOMOHa‘+upaФИREp,ocnobOte rnyetnpit3aBPTKo od aanTepOT.Itoa,Ipxejkn roaantepOT 3aBPTeTe RoJeNt (2)BO Hacoka Ha cTppeIkatadokeKa npouenot He 6nDe 5mm.
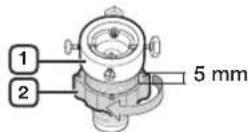
- Nop3eTn aanTePOT n CnaBnHaTc CO uBpCTO CTerHyBaHHe Ha 3aBPTKITE, Co ICTOBpeMeHO IOINHyBaHc Ha aanTePOT Harope. 3aBptete ro denot (2) BO HAcoka Ha cTpeIkata dokeKa He ce cnojat neobute (1) n (2).
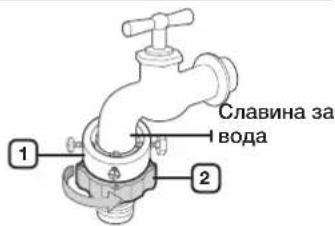
- NOBp3eTe ro UpeBoto 3a IOBOH Ha BOda co aanTepOT. Kora Ke ro ocno6oJte JeNt (3) UpeBOTO abTomatckn Ke ce NOBp3e CO aanTepOT n Ke ce CnyUHe 3ByK - 'KNIK'.
OtkaKo Ke ro NOBp3eTe UpeBOTo 3a IIOBOH A BOda CO aIaNTepOT, npoBepeTe DaJIu UpeBOTo 3a IOBOd Ha BOda e npabINHO NOBp3aHO NOBLeKyBajKn Ro HADONY.

- Nobp3eTe ro npynto KpaJ on UpeBTo 3a noBoH a Boga HA OTBOPOT Ha BEHTNiot 3a Boga Ha 3aHata cTpaHa oMaunHata. 3aBpTeTe ro UpeBTo Hanecho do KpaJ.

MaKeDoHcKn-18
- OTBOpTe Ro IOBOJOT Ha BOJa I npOBepeTe Ja He nCTeKYBa BOJa OJ BeHTNlOT, CJIaBNHaTaNn aDANTepOT. JOKoJky nCTeKYBa BOJa, NOBtOpTe rnpTeXoHnTe YekOpn.

Hemojte da ja kopncntte MaunHaTa 3a nepeHe doKoIky nCTeKyBa Bda. Moke da dojde do eNeKTpUyen ynap nn nobpeda.

- Ako cnabnHaTnMa npNKnyOc Co HABpTyBaHbe, NOBp3Te ro cpeBOTO 3a DOBOd Ha BOda Co cnabnHaTa KaKO uTo e npKkaHo.
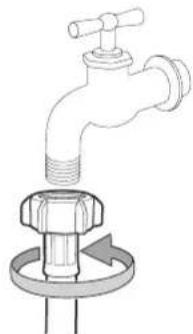

YnOtnpe6yBaJTe BOoHnaeH Tn H cnaBHa 3a DoBoH Ha B0da. DOKoNky cnaBHaTa e HeTnpnArOHa HIN IpemHory rOema,OTCTpaHete Ro npCTeHOT 3a npnlaRoDyBaHe nped Da ja BAeHTHeTe CNaBHaTA Bo aanTepoT.
пocтabybaие Ha Maшин haTa 3a Nepehe
Pobp3yBaHbHe Na UpeBOTo 3a ODbO
Kpaot Ha LpeBOTo 3a ODBMOXe da ce nocTaBn Ha TpN HauHHI:
- Ppeky pa60t ha naaba6oto: LpeBOTO 3a ObO MOPa Da 6nnde nocTaBeHO Ha BmcoHHa o60 do 90 cm. 3a da ro cBNTkate UpeBOTO ynotpe6eTe ro nCnopaHnOT nlaCTuHnDpKaau 3a UpeBO. PpiucPCTeTo ro dpXauoT 3a SIn CO Kyka nn 3a CnaBnHa co Xnua 3a da cnpeHTe NmecTyBaHe Ha UpeBOTO.

2.Bo pa3rpaHyBaHBe Ha OJBOOnHaTa cEbKa OJ Naba6OTo:Pa3rpaHyBaHbeto Ha cEbKaTAta 3a OJBOmOPaJa 6nJe HAd CnFOHOt Ha JABa6OTo Taka UTO KpajOT Ha UpeBOTO da e HajmaIky 60 cm HAd 3emjata.
3.Bo cEBA 3a OBOD: IpenopaHbAme ynoTpeBa Ha BepTKkAnHa cEBKa o6 65 cm; cEBKaTa He cMee da bIe nokpatao 60 cm n noJra o90 cm.

3a xnpaHTOT 3a oDBOe nOTope6HO;
MNHMmaJIeH nnJaMeTap oI 5 cm.
MNHIManeH KaIaIeT3a NcPpIaHe oD 60 nITpu BO MNHyTa.
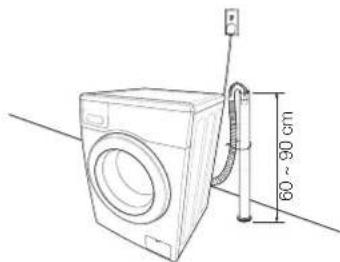
YEKOP5
PnKnyBaHe Ha MaunHaTa 3a nepeHe Ha HanojyBaHe
PnKJyTe Ro Ka6eIOT 3a HanojyBaHe BO SInHnO TteKepe 3a AC 220-240V / 50Hz, koj e 3aHTtEN CO OCNpyBaH NIN PpeKNHyBaH Na KOJO. (3a NOBeKe INHcOpMaUu OKoJy eNEKtpnHnTE I NOTpeBnTE 3a 3aEmjyBaHe, nOrJeHnTe Ha CTpaHnla 14.)

PpObHo TeCTnpaHe
PpOBepTe dann npaBnHcTe ja nHCTannpane BaWaaTa MaunHa 3a nepehe CO aKTNBnPaHe Ha uKnlyCOT NkHee+eHTpnpyra OTkako Ke 3aBpuInTE CO NHCTanaJjata.
пенихе на сизда
CoBaWata HOba Samsung MaunHa 3a nepHe, HajTeWKnot KeKe 6nDe OndyKata To Da CTaBte npn PBOTo nepHe.
PNI PBOTO NPEHBe

Ipei nepeheTo Ha a annuTa 3a npBnat, Mopa Da HappaBte KOMPnTeH npa3e H zuKlyc (T.e. 6e3 anuuta).
- PnTnCHeTe ro KonHeTo Power (HanojyBaHe).
- CTabeTe MaIKy DeTepReHT BO npeppaata Ha oKaTa 3a deTepreHT.
- OTbOpTe rO IOBOOT Ha BOJa BO MaunHaTa.
- Пптисе Г когнсTo Start/Pause (akTNbnpaHe/ nay3a).

ObaKe ja OTCpaHIMoXHaT3aOCTaHATA BOda BO MaHHaTc OD 3aBpUHOTeCTnPaHe Ha IPOUN3BOIDNTJOT.

Iperpa ①TepeHr3a npedpehe He nnu wnpak.
Iperpa ⅢTePreHT 3a rnaBHO nepeHbe, OMEKHyBaH Ha BOa, cpeCTBO 3a HAKNCHyBaHe, 6eINIO nOTcPaHyBaHn Ha dAMKn.
IperpaA 8AANTNB,Ha np. OMeKHyBaH (He IONHETe HAdIOJHHOT pa6 (MAX) oN "A")
OCHOBH INHCTPYKLIIN
- CTabete Tn aJINHTaTb BO MaJINHATA 3a nepehe.

Hemojte da ja npenonHyBaTe MaunHaTa 3a nepehe. 3a da ja opeiTe KOHNHaTa Ha
06nka 3a nepehe Bo 3aBnCHoCT od Hej3HHOT BID, norJeHHeTe ja TaBeJaTa HA cTpaHua
27.

BHHMabajte aJNTata Ta He Ce 3aJIaBAT Ha BpaTata, 6nJeKIMoKe Da Dojde IIOCTeKyBaHbHe Ha BOJa.
Bo npednnot rymen den od MaunHaT, no Lknycot 3a nepehe moke da ce 3aepkn detepreHT. OTrpaHete ro 3aepkaHnot deTeprHt 6ndejKn MoKe da npedn3bika nCTeKyaBaHe Ha B0da.
HemojTe da nepeTe BOoOtnOpHn anuTu.
- 3atbopete ja BpaTata do kpaJ.
- BknyteTo HanojyBaheTo.
4.Доадete DeTepeHTn aDNTINBn BO nperpaHte. - Ⅲ6epeTe ro cooDBeTHNtO uKlync n ONUNTe 3a aUHTata. Hukatopot 3a nepeHKe 3acBETn Ha ekpaHOT Ke ce npkaKe npoeCTaHaTOTO BpeMe Ha LkycOT.
6.ПиТиСнeTe ro konTuTo Start/Pause (akTnBnpaHne/nay3a)
пени.
KOPINCTEHE HA KOHTPOJHATA IIOUa
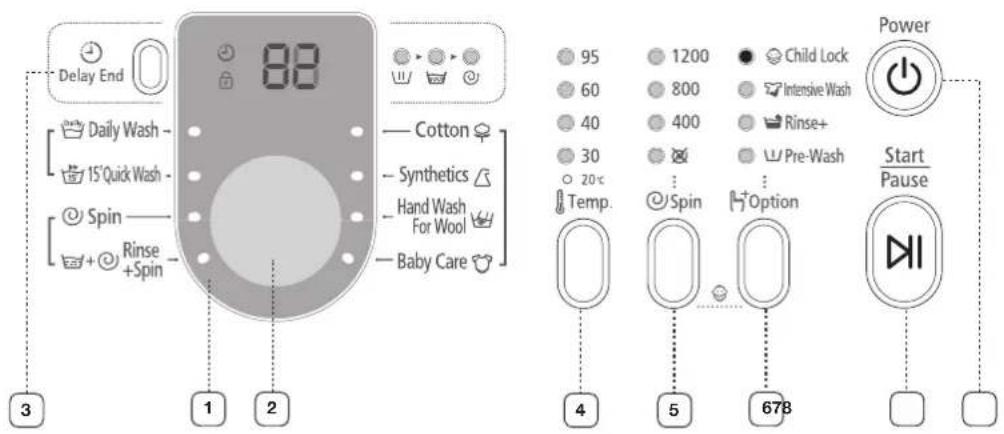
1 IINITANIEH PPAUKN EKPAH
To npikaKyaB npeocHaTOb Bpeme Ha Lklycot Ha nepeHe, CnTe HOpMaun Pn nepeHe n nopaknte 3a rpeka.
2 N3BnPAHACIKNCL
V360p Ha IeMaHa IpeBpTyBaHne 6p3uHa Ha BpTeHe 3a LKnyCOT.
3a DeTaNHn HnFopMaun, nOrIeHHe Bo "PepeHe Ha anuTa co KopncTeHe Ha n3bnpaOHT 3a LkNyc" (norIeHHe Ha cTpaHua 25).
Cotton (namyK) - 3a cpeHNO mnn Manky BaIkaH namyk, noCTeHHHa, yapwadn, doJIHa oJNeKa, KpN, KoWyIn n Cn.
Synthetics (cHrTeTnka)(3) - 3a cpeHNO mN MaNKy BaIKAHN 6Ny3N, KOUIN nCn. IN3pa6OteHn OJ NOJIeCTep (DIOJEN, TpeBIPA), NOnNAmN (nePLOH, HajNoH) INN CInuHn MaTePiJann.
Hand Wash for Wool (paHNo nepeHe 3a BOnHa) (V) - Camo 3a 6nneKa od BOJHa KoJa ce nepe Bo MaunHa. BkyHata TeKHa Tpe6a da
Lkncoc3aBolHaTnepeanuTaTaKOpNCtejKnHexHnDbNkeBa. 3a Bpeme Ha nepeheTo,HexHNte Hn HabNaXHyBaQn DnBxKeBa KOHTINHpAHO npOdoJKyBaAT 3a Da n 3aHTNTat BOIHeHtE BnakHa oDcoBpaHe /n3o6nHyBaBe nHexHo da nNCnCTaT. CtonnpaBeTo Ha Oba nporpama He npetCTaByBa npoblem.
3a LKnycOT 3a BOLHa ce npenopayBa HeytpanEn DeTepeHT, co Koj ce do6bHaat noo6pn pe3yIaTn npn nepeheTo n noo6pa rPika 3a BOHHeHITe BIAkHA.
Baby Care (rpnxka 3a 6e6nha)(Ipehe Ha BnCoka TemepaTypa nDOnOJIHHTeHNII PnaKHeHa 3a Da ce OcNpy NekA He Ce OCTaHaTn HnKaKBrOCTaTOU ON DeTePrecht HA TeHKata O6Neka.
Daily Wash (BOO6nuaeHO nepehe)(- Ce KopncTn 3a CEKOJHEBHTe aJIuTu KaKo DOJIHa OBJEka N KOUyIi. KpaTKa nporpama 3a BOBeNyBaHe Ha TcTeIpaHe.
15' Quick Wash (15' Bp30 nepehe)(15) - 3a MaIky N3BaJIkaHn aIIWTA KON BN CE NOTpe6HN 3a KpaTko BpeMe.
BpeHIOCTNE(15'MnHyTMOKeJaBaPpaaT Bo 3aBnCHOCT OI pINTUCOKOT N TBPOCTA Ha BOATA, TEMNepaTypa Ha BOATA KOja CE BHECyBa, CObHaTa TEMNepaTypa, BIDOT N KOJIuHNHaTa HA aIIITATA N CTeNEHOT Ha HNBHa IN3BaIKAHOCT, DETePREHTOT ITO CE KOpNCtN, BaPpAHeTo Ha eEeKTPnHaTa eHepRJa N BO 3aBnCHOCT OD DOJONIHHTENHTE ONUIN KOJ Ke CE IN36epat.
MaKeDoHcKn-22
| 3 | ФОПЕ 3A I3БОР HA OДLOЖЕНО 3ABPUYBAHБ | ФОПЕ 3A I3БОР HA OДLOЖЕELY 3ABPUYBAHБ | ФОПЕ 3A I3БОР HA OДLOЖЕELY 3ABPUYBAHБ |
| 4 | ФОПЕ 3A I3БОР HA TEMNEPATYPA | ФОПЕ 3A I3БОP HA TEMNEPATYPA | ФОПЕ 3A I3БОP HA TEMNEPATYPA |
| 5 | ФОПЕ 3A I3БОР HA LECTRIPNФΥΤΑ | ФОПЕ 3A I3БОP HA LECTRIPNФΥΤΑ | ФОПЕ 3A I3БОP HA LECTRIPNФΥΤΑ |
| 6 | ФОПЕ 3A I3БОР HA OПЦИJA | ФОПЕ 3A I3БОP HA OПЦИJA | ФОПЕ 3A I3БОP HA OПЦИJA |
| 7 | ФОПЕ 3A I3SBOP HA AKTINBIPAAHБ/ ПAY3A | ФОПЕ 3A I3SBOP HA AKTINBIPAAHБ/ ПAY3A | ФОПЕ 3A I3SBOP HA AKTINBIPAAHБ/ ПAY3A |
пени.
3aKnyuBaHbe 3a Deua
Функлajta 3a 3aknyBaHbe 3a Deua OBO3MOKBya 3aknyBaHbe Ha KONyHbTa Taka IITO n3bpAHOT nporpam 3a MHe He MoKe da 6npe npomeHet.
AKTNBnpaHbe/JeakTNBnpaHbe
Ako cakate da ja akTNBpuate nn DeakTNBpuate dyHKunjata 3a Be36eHnOceH MexaHN3am, nCTOBpeMeHO npNTncHEte rN KOHTnBaTa Spin (uENTpduyra)@) n Option (onuja)(3aDpxKeTe 3 cekyn. Pn aKTNBpuhe Ha OBaa dyHKunja Ke 3acBETn "Child Lock (Be36eHnOceH MexaHN3am)
Kora ja akTNBnpate dyHKunjata, pa60tn cmo eHOn KOHe Power (hanojyBahe)() . FyHKunjata Ke 6nJe BKnyHeHa Dpyn IN NO BKnyHyBaBeTo IN NCKnyyBaBeTo HA HanojyBaBeTo INN NO OTKahyBaBeTo IN NOBTOpHOTO NOBp3yBaHe Ha Ka6eIOT 3a HanojyBaBe.
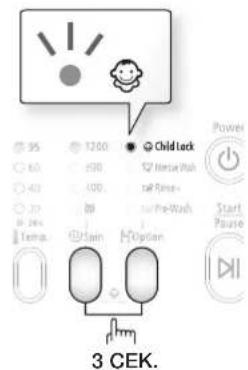
Delay end (oIIOxHe 3aBpUyBaHBe)
MoKeTe da ja noCTaBnTe MaunHaTa 3a nepeHBe aTOMaTCKn Da ro 3aBpUu nepeHbTo nOdoHa, co n36op Ha BpeMe Ha oJIoXyBaHe oD 3 do 19 yaca (co yekop oD 1 yac). PpiKaKaHInTe YacOBn rO O3HaCyBaAT BpeMeTO Ha 3aBpUyBaHe Ha nepeHbTo.
- PaHNO IIN ABOTOMATCKN NOCTABETe ja MaunHATA CnopeT NIO T HA aIHTaT KaON Tpe6a da ce nepat.
- CekbeHJnHNO npTnCHyBaJTe ro konHeTo Delay End (OdoXeHO 3aBpuYbaHe) (①) OdeKa He Ro NOCTaBITE CAKAHOTo BpeMe 3a OdoXeHO 3aBpuYbaHe.
3.ПиTNCHETe FOKHTeTO Start/Pause (akTbBnpaHne/nay3a)(N).ИнДИКaTOpOT"Delay End (OJNOxKeHO 3aBpUyBaHe) Ke 3acBETn HacOBHnKOT Ke 3anOHne Co OJbpojYBaHe ce JIOJIeKa He FO JOCTINHE NOCTABeHTo BOpeMe. - 3a da ja ncknynte dyHKnjuata Delay End (oJIOKeHO 3aBpuBahe), npTncHe ro konHeTO Power (hanojvbahe)(1)) nnoToa noBTOpHO BKnyte Ja MaunHata 3a nepeHe.
Ipehe Ha aIIMTa co KOpncTeHe Ha n36npaOTo 3a cKJIyc
IpeheTo CO BaUaTa HOBa MaUNHa e MHORY eNHOCTaBHO co yNtpe6aTa Ha Samsung "Fuzzy Control" cNCTeMOT 3a ABTomATcKa KOHTpOJa. Kora Ke n3epeTe nporpama 3a nepeHe, MaUNHata Ke ja NocTaN COoDBeTHa TEmnepaTypa, BpeMeTo u 6p3uHaTa Ha nepeHeTo.
- OTbOpTe ja cIaBnHaTa 3a BOJa Ha IaBa6To.
2.ПиТССЧЕTO KOнЧЕTO Power (HANOJyBaHbE)() - Otbopete ja Bpatata.
- HanonHete ja MaunHata co aJnWta, 6e3 da ja npenonHnte.
- 3atbopete ja BpaTata.
6.Доадete Детергent,ОмкHyBaHи Детергent 3a npednepehe (no notpe6a) BO COOДБETHTE nperpaN.

Pre-wash (npenephe) e moKHO cAmo Kora ce n36paHn nporpamnte Cotton (namyK)(Synthetics (CInHTeNka)(A Baby Care (rpNka 3a 6beHbA),(Daily Wash (BoobuHaeno nepeHe)).Ppe6Ha e eINHCTBeHO DOKOJIky TkaEHNHTE Ce MHORY BaJIKAHN.
- KopnCTeTo N36npaOTo 3a uKlyc 3a n36Op Ha COoBETNtO uKlyc Bo 3aBnCHoCT OJ TINOT HA MATEpjuAnOT: Cotton (namyk)(Synthetics (CInTeTnka))(Hand Wash for Wool (paHNo nepeHe 3a BOJHa)(), Baby Care (rpNka 3a 6eBna)D Daily Wash (BoobuHaeo nepeHe)(15'Quick Wash (15' Bp30 nepeHe)(). Ha KOHTponHata pnoHa Ke 3acBetat COoBBeTHnTE INdKaTopn.
- Bo OBOJ MOMENT, CO PINTNCHYBAHHe HA KONHTO 3a COODBETHaTOnuJa, Ke MOKe Da rN KOHTPOJIpaTe TEMNEpApTaHa NapeHBeTo, 6pojOT Ha NlaKHeHaTa, 6p3NuHaTa Ha LcHTPnDpyrata H BpEmeTO Ha OJIOKeHO 3aBpUyBaHe.
- ПиTuNCHeTe ro KonHcTeO Start/Pause (akTbBupaHe/nay3a) n nepeHcTe Ke 3anoHne. HnDnKaTopoT 3a npocot Ke 3acBETn Ha ekpaHOT Ke ce npkaKxe npoeocTaHaTO BpeMe Ha LInklycot.
Onuja 3a nay3a
Ipei nCTeKyBaHBe Ha 5 MmHyTn no 3anOHyBaHbETo Ha nepeHbETo, MoXHO e da oJaaneTe/ n3BaJITe O6NeKa.

- PnTnCHeTo ro KonHeTo Start/Pause (akTNbupahe/nay3a) (II) 3a OTKJIyUbaBe Ha BpaTata.
BpaTata He moKe da ce OTbOpN Kora BODaTa e npemHory XELUKA nn Kora HnBOTo Ha BOdaTa e npemHory BUCOKO. - ⅡI 3aTbopaHbeto Ha Bpata, npITNCHTe Ro KOnHeTo Start/Pause (akTNBpuhae/nay3a)(II) 3a NOBTOPOHO 3aNOUHyBaHe Ha NepeHbTo.
Kora zuknycot e 3aBpuH:
Kora LJIIOIOT LIIKNLYC Ke 3aBpUIM, MaLIINHaTa aBTOMaTcKn Ke CE NCKJyH.
- OTbopete ja BpaTaTa.
2.ИЗбдетг anuWtata.
пенихе на щишта
PaHNo npeHBe o6JIeKa
Mokete ja ja n36pepe foynkuijata 3a paHNo nepehe 6e3 ynoTpe6a Ha n36bpaHOT 3a LKlyc.
1. OTBOpTe ro IOBOoT Ha BOJa.
2.ПиТиСHTeTo ro konHTo Power (hanojyBaHe) (b)Ha MaunHaTa 3a NepeHBe.
3. Otbopete ja bpaata.
4. HanonHete ja MaunHata co aunTa, be3 da ja npenOnHInTe.
5. 3atbopete ja BpaTata.
6.Доадete Детергentи no notpe6a OMeKHyBaH nIN DeTepreHT 3a npednepehe BO COODBeTHITE nperepaI.
7.ПуNTИСHTE.To KONЧETo Temp.(TemnepaTypa)(3a DA n36epeTe COOДБЕТHa TemnepaTypa. (20^(ИсКУ�УВа), Ha cIte cnJANuK), 30^,40^,60^, 95°C)
8. PnTncheTe ro konHeTo Option (OnuJa) (H+ 3a da od6epete Rinse+(nakHebe+) n da doaTe BpeMe 3a nnakHebe. BpeMeTaebeto Ha nepeHbeto Ke ce npdoJHK peCNEKTINBHO.
9. PnntncheTe ro KonHeTo Spin (eHTpnpyra)3a da n36peTe 6p3Ha Ha eHTpnpyra. FyHKJjata 3a 3anpeHo pnaKHeBn OOBMOxyBa Da rN IN3BaIITe Ce yUITE MOKPNTe aIIuTa oMaaHnHaTa 3a nepeHbe. (Be3 eHTpnpyra (VckJIyYBaHe Ha CInTe cnJaIiNk): 3anpeHo nnakHeBe)
10. CekBHeHJIJaHO npTnCHyBaJte ro konHeTo Delay End (OndoxeHo 3aBpyBaHe) (O) 3a n36op Ha cooDBeTHata onuHa o ndoxeHo 3aBpyBaHe (O, 3 yaca do 19 yaca, co yekop od 1 yac). PpikaKaHHTe YacOBn r O3HaHyBaat BpeMeTo Ha 3aBpyBaHe Ha nepeHeTo.
11.ПиТиСHTe ro KOnHeTo 3a Start/Pause (akTbBpaHbe/nay3a)(II) n MaunHaTa Ke ro 3anoHne LInKlycOT Ha nepeHbe.
INHCTPYKUIM 3A INPEHEB
Cnepe Tn OBNE 6HNOCTaBn HanaTCTBnja 3a N3BOHO pHOn YNCtN aJIuTu HajeKaccho nepeHe.

Cekoraw npoBepe ja 03nakata 3a rpnka 3a oblekata nped nepeheTo.
CoptpajTe n nepete rB aunite aunuTa BO cornacHoc Co cneHNTE KpntepnyMn:
- O3naka 3a rpnka: Coptnpajte namyk, MeuHa TkaeHnHa, cHTeTnKa, CBnla, BOHa IN BeUtaHc Cbna.
- Boja: Ondene Te ro beIoto oI oOeHTo. HoBITE, oOeHN aIIuTa nepTe rN oDJIeNo.
- FonemHa: Npehe Ha oIeKa co pa3nHa rolemHa Ke ro noOpBn KBaIITeTOT Ha nepeHTo.
- UyBCTBtENHOC:ДeJNKaTHNte pa6oTN Kako YnCTa BOJIHa, 3aBeCu N CBnla nepTe rOndelHO, co yIOTpe6a Ha npOrpaMOT 3a nepeHe Ha dJNKaTHN pa6oTN. IpOBepTe rO3HaKNTe Ha eTNIkETiTE Ha aIIuHTata IIIN paKOBoDEte Ce CnopeD TaBeJaTa BOdoAToKOT.
Ppaa3Hehe Ha ue6oBnTe
Ipei cekoe nephe, ncpa3HeTe rnte uebOHa o6kekata. MaJIte n npemTne CO HnnpaBUNEN OblNK kao napuKN, HOxEBN, ININ CNOjyBaIKN 3a XapTNja, MOKAT da ja oWTeTaMaunHata 3a nepHe. HeMoJTe da nepete obNeKa co rolemn TOKN, KOHNb a nn DpyrT BpDm MeTANHn PpeMeTI.
Metanot Ha obnekata Moke da ja oWTeN BaWata ObKe KaKo N 6apabHOT. Ipei nepeheTo npEBpTeTe Hn Haonaky anuTata CO KOnHbA n Be3. DOKONy NaTeHTnte Ha naHTANOHTE i jakHTe Ce OTBOpEHn pni nepeHbeto, Moke da doJe Do OWTeYBaHe Ha 6apabHOT. NaTeHTnte Tpe6a Da ce 3aTBopat N da ce 6bOxKat co JeHTa nped nepeHbTo.
AnuTaCoDolnNeHTMOKe Da Ce 3aNneTkaaTcO DpyNTe aNtTa N da Dojde DO HNB OwTeYBaHe. Ppe nepeheTo Tpeba Da ro OrpaHnnte DnXKeHbeto Ha JeHTnte.
Ppeepenebe Ha namyK
Baata HOBa MaunHa, BO KOMbHauJia co COBpeMeHnte DeTePreHTn, Ke NoCTnHe n3BOHpeHN pe3yNTaTN npn nepeheTo, 3aWteDyBAjKIn eHeprJia, BpeMe, BODa n DeTepreHT.
Cenak,doKoNky BaWNTe naMyHn aIINuTa ce MHGY BaNKaHn, KopNCTe Te npednepehe co detepreHT Ha 63aHa npoteHH.
OdpyBaHe Ha KanaTetOT Ha noJIHeBe
He npenHbajte ja MaunHaTa 6nJejKn BaunTe ainnTu MoKeBn Hema da ce nCepat doBo. KopucTe ja Obaa Tabena 3a da ja odpeiTe KOnHHaTa Ha obNeKaTa 3a nepeHBe BO 3aBnCHoCT oJ HezHnOT BnD.
| Вид на Тkaэнна Кац捜ет | ||
| Моden | WF1702 WF1700 | WF1602 WF1600 |
| Cotton (namук) - среeding/mалку валко - многу валко | ||
| Synthetics (сиntética) 3,0 kg 2,5 kg | ||
| Hand Wash for Wool (разно поеде за волna) 2,0 kg 2,0 kg | ||

- Okolky obLekata He e n36aHcnpaHa ("UE" 3acBetyBa Ha ekpaHot), npepacnpedene Tn anuTata.
Ako aIiHtata He ce paMHoepHo pacnopeHn, eKacHOCTa Ha UeHTpNpynpaHe MOKe Da ce HAMJI.
- Pn nepehe Ha nocTeHnHa nn jopraHn, BpemTo 3a nepehe MoKe Da ce npdoJnxnn eKacHocTa Ha UeHTPnOpynpaHe MoKe Da ce HamaJI.
- 3a noctenHnHa nn jopraHn, npenopaHnOT kanaTet Ha noJIHe e 1,8(kg) nnn NOMaJIky.

CTabete rI rpaHnIte (OHne kon ce nepaT) BO MPexkata 3a nepehe (ce KnyBa donoJIHntelHO).
- MeTaNHnTE DeJIOBn OJ rpaHnUte MoKe Da ro npObnat MaTePnJANOT nJa ja oWtETeMaunHaTa. 3aToa OBOJ TIN Ha ObLeKa CTABETe Ro BO MPexKa 3a NepeIbe.
MaHn n lechn aHnWt KaKO qOpAn, paKaBnU, xynaxoNkn HAMMBHbMoKe Da ce 3aINaBAt OKOJy BpaTata. CTabete rN BO MAna MPexka 3a nepehe.
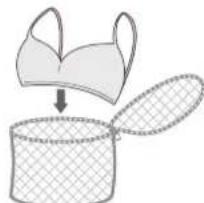

Hemojte da ja nepete camo MPekata 3a nepehe 6e3 pytn aunuTa. Oba moke da npedn3Bnka HeHopMaJIHN BIBpaUN KOn MOKAT da ja NOMEcTA MaUNHaT a 3a nepehe npin wTO MOKe da doJe Do HecpeKeH cnuyaj n Nobpea.
пени.
INHOPMAUIM 3A DETEPRTN I AINTUBN
KoJ dTepeRrTa ro KOpuncte
BnDOT Ha detepreHTOT 3aBcN OJ BnDOT Ha TkaEHHATA (namyK, CInTeTnKa, DeINKaTHN TkaEHHH, BOJHa), Bojata, TempepaTypaTa Ha nepeHe N BnDOT Ha BaJIKAHOCTa. Cekorau ynotpebyajte detepreHT 3a nepeHe KoJ "He NeH" npemHory I KOJ e HameHET 3a ABOMATCKITe MaunHn 3a nepeHe.
Cnepe Tn npenopaknte Ha npoun3BODHTN Ha TepeReHt 3a TeXHHata Ha aHHTATA 3a nepehe, cTepeHOT Ha BaKHaOcTa N TBpNOCTa HA BODA tAO BAWeTO MecTo. DOKONky He 3haete KOnky e TBpda BOdA, INΦOpMnpajte Ce kaj NOKAHNTe oprAHN 3a BoOCH6dyBaHe.
HemojTe Da KopnCTIne DeTepreHT KoJ ce CTbpHAn, 6nJeKn DeTepreHTOT MoKe Da CE 3aDpKn I No CkNlyHOT Ha NpAekHeBe. MoKe Da DoJNe Do HEnpaBnHO NpAakHeBe Ha MaunHaTa IIN 6NoKnpaHBe Ha NcTeKOT 3a NpeTeKyBaHe.
06phe TBHMaHHe Ha cIeHnTo Kora ce Kopnctu yHKunjata BoHa
KopncTe NCKnyuBO HeyTpaneH TeeH DeTepeHT 3a BOJHa
- AKO CE KOPINCTN DETEPREHT BO INPAUOK, INCTNOT MOKE Da OCTaHE BO MAUNHATA 3a nepehe N da ja OWTETN TKAeHNHaTAt (BOJHATA).
Φnoka 3a dTepeRHT
MaunHata 3a nepehe IMA oDdEHN nperpaI 3a dTepeHT N OMEKHyBa. DOnaTe rN cTte aINTBn 3a nepeHe BO COODBETHnTE npepaI nped BKnyBaHTo Ha MaunHata 3a nepeHe.
HEMOJTE da ja OTbopate qnokata 3a deTepreht doeka paBOTu MaunHaTa.
- N3Bneye te ja fnookaTa 3a deTepreH Ta neBaTa cTpaHa oJ KOHTPOONHaTa nIOHa.
2.Доадete ja npenopaHaHata KOJINHa Ha DeTepreHT DnpeKTHO BO nperpaTa 3a DeTepreHT II nped BKJyHyBaHbeto Ha MaunHATA 3a NepeHe.
3.Доадete ja npenopaHaHATA KOINHnHa Ha OMEKHyBaB BO nperpandaT3a OMEKHyBaH @DOKOJIky e NOTpe6Ho.
HEdoabajte HnkaBn TeuHn DeTepreHTN UIN BHIMAHIE TeTePREHTN BO npaB BO nperpaData 3a OMEKHyBaU
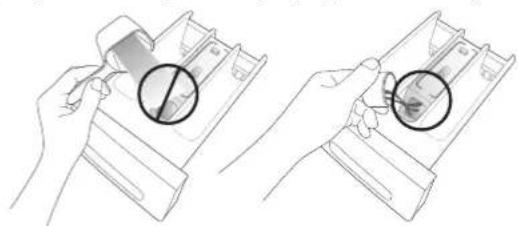
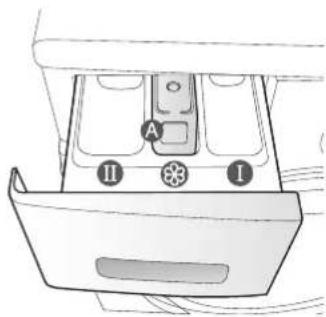
4.ПиКористпьHa onuJaTa Prewash (npednepeHb),doaTe ja npenopauHaTAt KOINHnHa Ha DeTepreHT Bo nperpaaTata 3a npednepeHbe ①.
Ipi nepehe Ha rolempa6oH,HEMOJTE da rn KopnCTe TcneHNHTuNOBn Ha DetepreHT.
- DeTepeHTn OJ TIN Ha Ta6Netn KancyIn
- DetepeHTN KON KOpNTaT TOnka mpeka
KoHcHTpnpaHNTe INI rYCTNTE OMEKHyBaHr Tpe6a da ce pa3peDat CO MAIKy BOda npeD Ja ce CTaBAt BO nperpapata (Ha OBOJ HauHH Ce OHEBO3MOkyBa 6nOKpahe Ha OBOOT.)
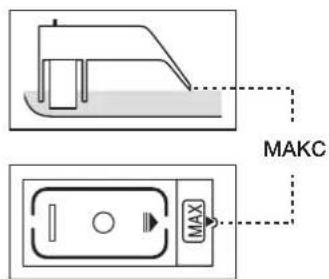
BHHMaBaJte OMeKHyBaHOT Da He Ce npEnIe, OTKaKO Ke ja 3aTbOpnte cNOKaTa 3a DeTePreHT N Ke DoJaTe OMeKHyBaH BO npErpaDATA 3a DeTePreHT 3a NnAKeHeBe.
CHCTEHE HA HADBOPEUHOCTA
- N36pnIeTe ja NOBpHnHaTa Ha MaunHaTa, BKJyHyBaJkn Ja I KOHTPOJIHaTa IIIOa, CO MEKa Kpna KopNCtejKn CpeCTBO 3a YNCTeHe BO DOMAKINCTBaTt KOE He e abpa3NBHO.
- Co MeKa Kpna NcyuIeTe ja nobpunHaTa.
3.He nctypajTe BOda Bp3 MaunHaTa.
MaKeDoHcKn-29
Чистенье и облесуваенье на Машината за пара
CHCTEHE HA ΦNOKATA N OTBOPNTE 3A DETEPREHT
- PnTCHTe ja paKaTa 3a ocNo6OyBaHBe OJ BHaTpeHHaCTpaHa Ha fNOKaTa 3a DeTePrecht N3BHeHeTe ja fNOKaTa.
2.ИЗваде te ja npperpaData 3a TeeyH DeTepeHT onФнokata 3a DeTepeHT.
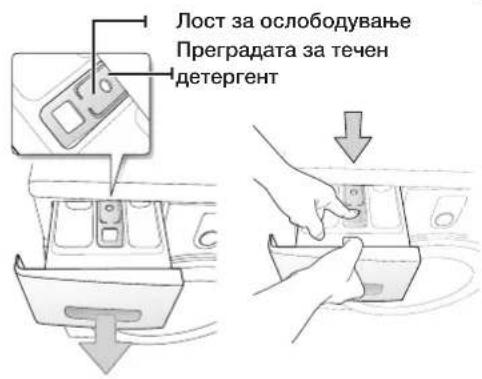
- NIMJTe Tn CNTe DENOBN NOI MNA BODa.
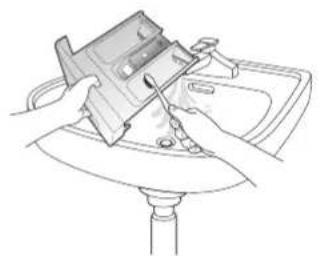
4.ИсистeteгOTBOPITEODФИOKATAcoCTapaYETKNUka 3a3abn.
5.Bpate ja npperpaata 3a tehen detepreHT co cnHIO pNTNCHyBaBe BO dNOkata.
6. Bpatete ja dnokata Ha mecto.
7. 3a otctpaHyBaHHe Ha npeocTaHaTnOT deTepreHT, BKnyte ja nporpamata 3a nlaKHebe 6e anuTa BO 6apabhot.
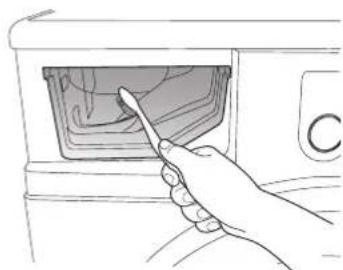
YINCTEHE HA ΦNJITEPOT 3A OCTATOU
Ipe npaCyBame nCTeHb Ha cHTepOT 3a octato5 nII 6 nTI rOuHNO, nII KORA Ha ekpaHot Ke ce npkaKe npakata 3a rpeWka "5E". (IorneHHe "VcnyUtahe Ha BODATA OD MaunHaTApn BOHpEni CITyaUHa Ha npTeXoHnTa CTpaHua.)

Ipei Da Ro YnCTUte fHNTepOT 3a OCTaTOU, npOBepTe daJI Ka6eIOT 3a HanojyBaHe e NCKnyHe.
- IpBO OTCTpaHete ja npeocTaHaTata BOda (nORJeDHeTe "IcnyuTaHbe Ha BOdAto OM MaunHata npu BOHpEnHn cHTyaUaNHa HcTpaHua 29.)
Iokonky ro n3BaJnte cHnTepot 63 da ja otCTpaHNTe npoeOtaHaTaB Oda, Taa MoKe da ce nCueN. - OToBopTe ro Kanakot Ha qInIePOT co napuHa nn KJny.
- OndBpTeTe ro kanakot 3a nCnyuTaHb He Ha BODaT npn BOHpeHN CNTyaun Co BPTeHe HaneBO N nCNYuTete ja ceJaT BODa
- OndpTeTe Ro kanakot Ha dntepo3a octatooun
- N3MnJTe r n Cnte HeHnCTOTm Od fnnTepo 3a octatoqn. BHHMaBajTe nepkata Ha oDboHaTa npmna 3ad fnnTepo 3a ocTaTOu Da He 6nde 6nokpapaHa.
6.BpateTe ro kanaKoT Ha dntepot 3a oCTaToU. - BpareTe ro kanakot Ha dntepoT.
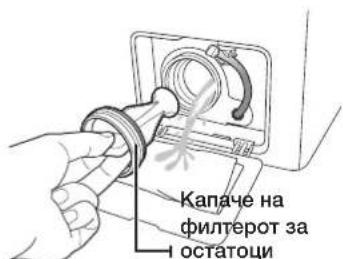

He oTbopajte ro kanaheTo ha cInntepoT 3a ocTaOu ndoKe MaunHata paBoTn, bNejKn TOnnata BODa MoKe da nCTeYe.

Iorpxkete ce da ro bpaTte kanaeTo Ha qntepoT oTKako Ke ro uCnCTnte qntepoT. Ako qntepoT He e BO MaunHaTa, MaunHaTa 3a nepeHbe MOKe HnpabuJHo da paobTu nn Da nCTeKyBa B0da od Hea.
ΦHITepoT Tpe6a Da cenocho Da ro CKJONITE OTKAKO Ke INCHCTNTe.
KoI 6p. DC68-02796Q-03_MK


WF1702AH(A/C/D/F/G/H/R/S/T/V/W/Z)(G) WF1702NH(A/C/D/F/G/H/R/S/T/V/W/Z)(G)
WF1700AH(A/C/D/F/G/H/R/S/T/V/W/Z)(G) WF1700NH(A/C/D/F/G/H/R/S/T/V/W/Z)(G)
WF1602AH(A/C/D/F/G/H/R/S/T/V/W/Z)(G) WF1602NH(A/C/D/F/G/H/R/S/T/V/W/Z)(G)
WF1600AH(A/C/D/F/G/H/R/S/T/V/W/Z)(G) WF1600NH(A/C/D/F/G/H/R/S/T/V/W/Z)(G)
WF1702AM(A/C/D/F/G/H/R/S/T/V/W/Z)(G) WF1702NM(A/C/D/F/G/H/R/S/T/V/W/Z)(G)
WF1700AM(A/C/D/F/G/H/R/S/T/V/W/Z)(G) WF1700NM(A/C/D/F/G/H/R/S/T/V/W/Z)(G)
WF1602AM(A/C/D/F/G/H/R/S/T/V/W/Z)(G) WF1602NM(A/C/D/F/G/H/R/S/T/V/W/Z)(G)
WF1600AM(A/C/D/F/G/H/R/S/T/V/W/Z)(G) WF1600NM(A/C/D/F/G/H/R/S/T/V/W/Z)(G)
Pralka automatyczna
instrukcja obstugi
Planet
First
100%
Recycled Paper
INFORMACJE DOTYCZACE DETERGENTów I DODATKÖW
Code No. DC68-02796Q-03_EN


WF1702AH(A/C/D/F/G/H/R/S/T/V/W/Z)(G) WF1702NH(A/C/D/F/G/H/R/S/T/V/W/Z)(G)
WF1700AH(A/C/D/F/G/H/R/S/T/V/W/Z)(G) WF1700NH(A/C/D/F/G/H/R/S/T/V/W/Z)(G)
WF1602AH(A/C/D/F/G/H/R/S/T/V/W/Z)(G) WF1602NH(A/C/D/F/G/H/R/S/T/V/W/Z)(G)
WF1600AH(A/C/D/F/G/H/R/S/T/V/W/Z)(G) WF1600NH(A/C/D/F/G/H/R/S/T/V/W/Z)(G)
WF1702AM(A/C/D/F/G/H/R/S/T/V/W/Z)(G) WF1702NM(A/C/D/F/G/H/R/S/T/V/W/Z)(G)
WF1700AM(A/C/D/F/G/H/R/S/T/V/W/Z)(G) WF1700NM(A/C/D/F/G/H/R/S/T/V/W/Z)(G)
WF1602AM(A/C/D/F/G/H/R/S/T/V/W/Z)(G) WF1602NM(A/C/D/F/G/H/R/S/T/V/W/Z)(G)
WF1600AM(A/C/D/F/G/H/R/S/T/V/W/Z)(G) WF1600NM(A/C/D/F/G/H/R/S/T/V/W/Z)(G)
Maşină de spălat
Manual de utiliser
Planet
First
100%
Recycled Paper
Scurgerea conductei fixe necessities:
- un diametru minim de 5 cm.
o capacitate minima de 60 litri pe minut.

PASUL 5
Alimentarea electrica a masinii de spalat
INDICATII PENTRU RUF
Urmaji aceste indicati simple pentru a obtine rufe CAT mai curate si o spalare CAT mai eficienta.

BAKHBIE METKN BE3ONACHOCTN IN MEPbl IPEDOCTOPOXHOCTN
3HaKn n CmBOLbl, NcNoJb3yEmble B DaHHOM pyKOBOdCTBe NOJb3OBaTeJIa, O3HaayIOT cNeDyIOUee:
| ПЕДУПЕЖDEHWE | |
| BHIMAHWE! | Heoctopoxhoe 此外能用 Hei Heo6jIoDeHne Mepe 6e3oNaChocTm Moxet PrnBeCTn K POnyueHIO cepbe3HOITPABMbI IIN JETaJIbHOMU NcXOyU. |
| BHIMAHWE! | Heoctopoxhoe 此外能用 Hei Heo6jIoDeHne Mepe 6e3oNaChocTm Moxet PrnBeCTn K POnyueHIO He3HaHTeJIbHOITPABMbI IIN NOBpeXeHIO IMUeCTBa. |
| YTo6bI CHN3ITb PnCK Bo3HKnHOBeHn PoXapA, B3pYIBa,napXeHn EJIeKTPnEeCKM TOKOM IIN POnyueHn TpaBMbl pInNCpONJ3OBaHn CTnpAIBHO MAsHHbI, COJIIOJaTe CJIeDyIOJImeMepbI PpeOCTOpOXHOCr. | |
| HE nbItaiTecb cdeIaTb 3TO. | |
| HE pa3bipaiTe. | |
| HE npKacaiTecb. | |
| CTporo cIeDyIte yKa3aHnAM. | |
| OTKIIOuHTe BnIKy Ka6eJIa PIitAHn O'TcTeBOI PO3ETKN. | |
| Bo n36eKaHne IopaxeHn 3JIeKTPnEeCKM TOKOM y6eDITeCb, YTOCTnPabHna MaSHHa 3a3eMJIeHa. | |
| O6paTIteCB B cepBnCHbI cIeHTp 3a NOMOJIbU. | |
| ПрIMeHAnHe | |
3Tn npdpnypeintbHbIe 3HaKn pa3MeueHbI 3dec b nra TOrO, YTO6bl He dOnyctNTb TpaBMnpOBAHnBac n dpyrnx IIOeJ.
PoxkanyuCTa, CneHNTe 3a HMM BHMMaTeNbHO.
Pocne npouteHHaTOrpa3eNa, depKnte HnctpyKuHIO no 3KcnIyataaB HnadeXHom MeCTe nnaONcKa INHOpMaun, KOtopar MoKET NOHaDoNBcBam B daJIbHeuem.

PpeKJeHemNoJIb3ObaTbCnAToMauHHoN, npOHTaIeBce HCTpykUIN.
3Ta MaunHa, KaN NIOOe Dpyoe obOpdyOBaHHe, B KOToPOM NcNOBb3yeTcra 3JeKTPnueCTBO IN DBNKUJIeCE DaTAM, ABJRETC NOTeHUMaJIbHO OAnCHO. TTObI Be3oNaCHO paOToTaC b 3ToI MauINHO, O3HAKOMbTEcB c TEM, KaO HAc DeNCTByET, IN BbINOJIHrYe YXoD 3a HeI, KOrDa EIO NOb3yEtECb.
He npocbbyBaIe cboi pykn nMmaHny.
- 3TO MOKET NpNBecTn K TpaBMe.
He npikacaiTecb K BNJIke NITaHnBlaJXhblm pyKaAM.
-TOMOKETIINKyIaPny3JIeKTPOTOKOM.
Bo Bpempa60bMaunHbHe BbIepnBaHTe BNJKy NITaHn, YTO6bOTKJIIOHTb MaunHy.
-IOBTOHAR BCTABKa BNJIKI NITaHnB CTEHHyIO PO3ETKy MOXET BbIBBaTb NCKpy INpNBECTN K yDAPy 3JIeKTPOTOKOM IIN BO3RopaHNO.
He no3BOJnTe DeTAM NIN HEMOuHbIM JIOJAM NOJIb3OBaTbC8 3TOI MaUNHO6e3 npUCMOTpa. He no3BOJnTe DeTAM B36NuPaTbC8 Ha MaUNHy.
- HecobnDene He 3Toro TpeboaHm MoKet npBecTu K ydpy aNektpOTOKOM, OXoRAM IJIN TpaBme.
He BCOBbIaIe CBOIO pyky nII KAKOJ-NIO Bo MetaJIINueckn npEIMET noD CTnpaJIbHyIO MaUNHy BO Bpemr e paBoTbl.
-TOMOKETPnBecTNKTpaBMe.
He OTKIIOUaIte MaunHy, HATrIMBaIuHyp NITaHnI, BcERda KpeNko 6epNTecb 3a BUNKy I HanpMyIO BbITACKINBaIte ee n3 po3ETKn NITaHnI.
-Повразденишура мokет пиьсгл К корOTКOMу 3amblKaHIO,BO3ropaHIO N/INIydpay 3JIeKTPOTOKOM
He nbItaTaeB pemOHtnpOBAtB, pa3bnpaTB nII nepeJeIbIbAeMbMaUNHy cAmOCToRTeJIbHO.
-
He nolb3yIeTcB HnKaKIMn PJIaBKMn IpeOxpaHITeJMyn (Haipmep, MeHOBCTaBKO, CTaJIbHbIM IPOBOOM N T. D.) KpOME cTaHdapTHORO PJIaBKOOrnpedoxpaHITeJRA.
-
Ecnn nontpe6yetcpeMOHT ININ NOBtopHnIHCTaIIIaIeMaIINHbI, CBXKNTecb C 6JIuKaIIMK Bam cepBNCbIM cHTpOM.
-
HecobnOHeHne 3TOro TpeBoBaHnRA MoKeT npBecTn K yApy 3JIeKTpOToKOM, BO3rOpAHIO, NOJOMKe MaUHHbI IIN K TpaBMe.
Ecn KaKoe-JNBO NOCTOPOHHee BeueCTBO,HaPnIMep,Boa,nonaTe B annapat, OKIIOHTe BNky NITaHn I CBXkntecb C 6JnxKaIIuM K Bam cepBnCHbIM UeHTpOM.
- HecobnJeHne 3Toro Tpe6oBaHnMoKeT npBecTu K yapy 3eKtpoTOkOM nIN BO3rOpaHIO.
EcnI WnHaHr IINI NOaHn BObI COCKOHt C KpaHa N HaHET 3aIMBaTb MaunHy, OTOeHNHTe BNJKy NITAHJ.
- HecobnOeHne 3Toro Tpe6oBaHnMoKet npnbctn K ydpy 3JekTpotoKOM nIN BO3ropaHIO.
OTcoeHNHTE BnIKy NITaHn,ecJIM MaUNHa He 6yETNcNOb3OBaTbcra IINTEJIbHOE Bpemr nn ECJIN CNYHTCRA p03a C rPOMOM / nIIN MOJIHNHe.
- HecobIOeHHe 3TOrTO Tpe6OBAHnMoKET PINBecT N yIaPy 3JIeKTpOTOKOM IIN BO3rOpAHIO.
Pycckn-8

Ecni TnpaJIbHa MaJInHa 3arp3HeHa TaKIMN IOCTOPOHHM BeuecTBAMn, KaCpeiCTBa IINCTnPKI, 3arp3HeHnOCTaTKI INIuINrT.OTCOeINHTe BUNKy NITAHn INIOHNTTE CTnpaJIbHyo MaJInHy, NOJIb3yrcB BlaxKHOn IN MfKOn TKaHbIO.
- HecobnOHeHne 3TOro Tpe6oBaHnRA MoKeT npNBecTu K oBeCuBHeuBaHnIO, DeOpMaUIn, PONOMKe IIN pKaBnHe.
IpeepHee cTeKIO MOKeT pa36ntbcra OT cInbHoro ydapa. BydbTe ocToPOXHbI, noB3yrcb CTnpaJIbHO MaINHOH.
- Pa36bntoe cTeKIO MOxET npINBeCTN K TpaBMe.
B clyaae npekpaueHnnaBbI nn npn nobTOpHOM noDCoeHn nnahra naaBbI, OTKpbBaIte KpaH MeJeHHO.
OTkpBiaIe KpaH MeIeHHO,ecN MaIHHo DaBHHe NOJIb3OBAJIncb.
- HaniuHne BO3dyxa B IJIaHRe NOaHn BObI INN B BOOpnpOBOHOI Tpy6e MoKet npINBecT N K NOJOMKe KaKoJ-JIbO DeTaJI N J K YTeUKe BObl.
EcIn BO Bpemra paobTo b 6ydt MeTb MeCTo npOn3Bolhbi CnVB, npOBepbTe, eCTb JIN npOJIema co CnIBOM.
- ECIN CTnpaIbHnMaMunHa NcIOJIb3yETcR, KOrJa OHa IMeet IpoteKy BObl, 3TO MOKeT PnIBecrN K yIapy 3JeKTPOTOKOM NII B03rOpAHem Pn HAIHN yTeKKn 3JKeKTPnueCTBa.
YKlaIbIbAte 6eIbB B CTnpaIbHyIO MaIINHy NOHOCbIO, YTObI OHO He 3aXkMaIocbDbepbIO.
- Ecn 6eJIbe 3axMETcra DBebpIO,TO OHO MOKeT NOBpeNTbcra NIM MOKeT NOIOMaTbCRA CTpaJIbHAR MaUNHa NIN NORBNTcRA YTeKa BObl.
CneIte 3a TEM, YTO6bI Kpan 6bl 3akpbIT, KOrda CTnpaJIbHO MaUNHO He NOJIb3yIOCTCA.
- Y6eINTEcB, YTO BnHT Ha CoeINHITene IJNaHra NOpaHn BObI 3aTAYr T OJXHBIM o6pa30M.
- HecobnDHeHne 3TOrTO Tpe6oBaHnMoKet nPnBcTn K nOpYe mMyuEcTbN nn TpaBMe.
PpOBepbTe,HTo6bHa pe3HOBOM yIIOTHEHn He 6bINO NOCTOPOHHX MATEpnaIOB (NCKyTOB TKAHN,HITOK N T.Ⅱ).
-He nnoTHo 3aKpbITa JDbep MoXeT npNBecTN K yTeUe BObl.
IpeepTe, KaK IOnb30BaTcB MaunHoi, OTKpoIe KpaH y6eHITecB, YTO CoeHNHTeB ⅢaHaTgnoaHn BOdbI 3aTMy T HaeXHO n YTo yTeKa BoDbI, KOtopa 6bIa npexKe, OTCyTCTByET.
- EcIIN BNTbI INI COeINHTeB IJIaHra IIOaH N BOdbI 3aTAYbI HENIOTHO, TO 3TO MOKET PnIBECTN K yTeYKe BOdbI.
YTo6bI CHN3NTb ONaCHOCTb BO3rOpaHn INB3pBa:
- Pn onpeJeHbix yCIOBnX B BOIOpOBOHO CNTeMe C rOpaeB OBOI, KOtopa He nCIOJIb3OBAJACb Ha npOTaKeHn DByx HeDeJIb NIIb 6Olee, MoKet oBpa3oBBiBaTbcB OBOPOD. BOIOPOD - 3TO B3PbIBOONACHbI I A3. EcIn BaIa cNCTema rOpaeB BObl He nCIOJIb3OBAJACb B TeUHeHne DByx HeDeJIb NIIb 6Olee, OTKpoITe BCE KpaHbI rOpaeB BObl B BaIeM DOME, INo3BOJIbTe BOIDE CTeKaTb B TeUHeHne HeCKOJIbKIN X MNHT pEeJde, HEM NoIb3OBAJBcR CTpaJIbHO MaIINHO. 3TO No3BOJNT BBIITN BCEMy O6pa3OBAWEMycr BOIOPOy. B 3TO BPemr He CIENyET KypITb N 3axIRaTb OTKpbITOro ORH, TAK KAK BOIOPOrOrHeONAcEH. ECIn IMeET MeCTo YTeYka Ra3a, HEmdJIeHNO IPOBETPe TONEUeHHe, HnpKacAraCB K BuJIke 3JIeKTPOnITAHn.
Pnio6peTeHHoe Bamu yCTpoiCTBO npeHa3HaueHO ToJIbKO IJa DomaHHeRo NCIOJIb3OBAHIA.
IcnoJb3OBAHHe yCTpoCTBa B KOMMepHecknx ZeJx KbJIuΦnUpyeTcKa KHeHaJNeXaUee IcNoJb3OBAHHe.
B Takom cnlyae Ha yctpoiCTBO He pacnpoCTpaHReTc CTaHapTna rapaHTn
Samsung, n Samsung He Hecet OTBeTCTBEHHOCTN 3a HeNCnPabHOCTN INI NOBpeXKeHnA,
IOJyHe B pe3yJIbTaTe IIO6HOrO INIOJIb3OBAHnA.
He BneseaIte Ha MaunHy n He KlaIInTe Ha Hee Beu (Takne Ka 6eIbe, 3axKehHbE CBeHn, HenoraueHHbIe CNapeTbI, Nocdy, XmNKaTbI, MeTaJIINHeCKNe npdMeTbI n T. d.).
- 3TO MOXET IpnBecTN K yDapy 3JIeKTPOTOKOM, BO3rOpaHIO, NOLOMKe MaLIINbI INI TpaBMe.
He paCbIyIe JERKONcnapaHOuueCe BueceCTBa, HApPIMep, INHCEKTNUdbI, NO NOBepxHOCTMaunHbI.
- IOMIMTOrO, YTO OHnBpeHbI JnJIIOeI, OHN MoYr TaKKe PpNBecT K ydApy 3JIeKTpOTOKOM, BO3ROpAHIO NII NOJOMKe MaUNHbI.
He nomeuante Bo3ne CTnpaBHO MaunHb Ip6opb, KOtOpb co3daIOT 3JIeKTpOMaHTNbIE NOJ.
-He CTnpaIte TOnCTbIX, XECTKIX LUNHOBOK.
-TO MOKET npBecTn K TpaBme IINIOBpeIITb CTnpaIbHyIO MaIHHy,CTeHbI,NOI INOJEXDy N3-3a Ype3MepHO B6paun.
* UepctTbIe nOteIbHbIe npHaIeXHocTn, HauKJKn OT DoxJa, pbIaCKe XInIeTbI, IbIXHbIe WtAhBi, CnAIBHbe MeUKN, JeTcKHe NOIgY3NtIK, CnOPTINBHe TpIKOTaXHbIE KOCTIOMbI, a TAKKE TeHTbI dIy YKpbITnBELOCNIEoB, MOTOUKNOB, aBTOMOUsne I T. I.
He BkIIOuHaTe MaunHy B pa6Otu, ecn paCnppeJnteIb Inra MOUx CpeCTB He BCTaBHeHa Ha CBOE MecTO.
- ΘTo MoXeT npVBecTu K yIaPy 3JIeKTpOToKOM uI N K TpaBMe I3-3a yTeKu BObl.
He npikacaiTecb K BHTpeHHne NOBepxHocTN 6aka BO Bpemn cpa3y nocJe cyuKn, TAK KA OHa Ropya.
- 3TO MOKET PnBecTN K OKoRan.
He knaIte cboIO pyky B Kopo6ky Iry MoOuix CpeCTB nocJe TOR, KaK OTkpoTe e.
-
3TO MOKET npBecTn K TpaBme. He KnaIITe B CTnpaJIbHyIO MaUNHy HNKaKINppeMToB (Taknx, KaK BoTHKn, OCTaTKN PIIuN, XNBOTHbIX), KPOME TEX, KOTOpbie NOJLEXKaT CTnPKe.
-
13-3a CnIbHOB Bn6paCIN 3TO MOKET PnIBeCTN K NOJOMKe CTnpaJIbHOH MaUNHbI INI K TpaBME I nI6eIN DOMaUHIX JINBOThIX .
He HaKIMaTe Ha KHONK TaKIMN OCTpbIM NpeMetAM, KaK UINbKN, HOXN, TBO3DN I T. D.
- ΘΟМоЖeТпрИВeСТиΚуДApу 3ЛeКТpoTOKOM ИЛNТpaВMe.
He CTnpaIte 6JIb, 3aRpa3HeHHOe MacnAMn, KpeMaMn IIN NOcBoHAMN, KOToPbIE O6bIHy npOdaIOCTB CNEUaJIbHbIX Mara3Hax, rDe npOdaIOCTC pEiCTBa No yXoY 3a KOKeI, INI B MaCCaKhbIX KInHkax.
- 3TO MOXET OTpa3ntbca Ha pe3INHOBOM yNIOTHeHm, KOtOpoe 6ydt DeopMnpoBaHO n HauHET nponyCKaTb BOdy.
He octabJnTe MeTaNnueckne npedMeTbI, HanpImep, aHrJIiCKyIO bynabKy nIN 3aKoNky IIN BOLOC, INI TIOBk C OT6eINBaTeEN B 6apabeHa Ha DOInroe BpeM.
-
3TO MOKET npBecTn K NOBHeHIO pKaBHyHbI Ha 6apabae
-
Ecni Ha NOBepxHocTn 6apabaa HauHnae TNOBJIbTcR pKaaYHa, HAnecTe Ha ero NOBepxHOCTb MOUSe e CpeDCTBO (HeITpAlbHoE) N BOCNoJIb3yITeCb r6Koi, YTO6bl ydaNTbe. Hn B KOem cnyae He NoJIb3yITeCb MeTaNJInueckO uTeKoi.
He nCnoB3yIte HEnocpeDCTBeHHO CpeDCTBa IaY CyXoXMMHecCKO uNCTKIN He CTnpaIte, He OOnJaCKNBAITE N He OTXIMaTe 6eJIbe, 3aRpy3HeHHoe KaKIMn-JIn6o CpeDCTBaMn CyXo XMMHecCKO uNCTKN.
-TO MOKETPnBecTN K CAMOBOCJIaMeHeHIO NIN BO3rOpAHIO N3-3a BbICOKOI Tempeatpybl, KOtopa Co3daeTcprn OKNCJehn Heftn.
He noIb3yIteCb ropeH BOIO n3 ycTPOiCTB InOxLnXeHn/HarpeBa BObl.
-TO MOKET PnBECTN K HENOLJAKAM B CTIPAJIbHOI MAJIHHe
He nCnoB3yIe TnA CtnpaBHO MaunHbHaTpyaBHOE MbIO DnMaBITb pyK.
- EcnOHO 3aTBePeT n HaKoNTcB CTIpAJIbHOI MAUINHe, 3TO MOKeT PnIBeCTN K HeNoJaKaM B Hei, ObecuBceHbAHIO, K NoRbLeHIO pXaBcHbI IIN HENpYTHbIX 3aJaxOB.
He cTnpaIe KpyHbIe Beu, HApPIMep, NocTeJIbHbIe npHaIeXHOCTN B cETKe dIa CTnPK.
- YknaIbIaIte Hockn I 6IOCTraIbTepbI B cETKy dJa CTnpKn n CTpaIte nx C dpYIM 6eJIbEM.
- HeBbINOJIHeHMe 3TOrO Tpe6oBaHnRA MoKET PpUBeCTN K TpaBMe N3-3a CUNJBbIX Bu6paui.
He noJIb3yIteCb 3aTBePdEeBwIMn CpeDCTBaMn IJNCTUPK.
- IVx CKONJIeHHe B CTnpaJIbHOm MaUNHe MOKeT PnIBecTn K yTeUke BOJbl.
Ecni y Baawe CnpaBHO MaunHb B ee OCHOBaHm IMeOTcBEHTNIAIOHHbE OTBepCTNA, pOBepebTe, YTO6bl 3TN OTBepCTNA He 6bl IN pepeKpbITbI KOBPOM IN KAKIM-TO dpYrMM pPeDMeTOM, ppeRrCTByIOUmm pPOXdy BO3dyxa.
YIOCTOBeBbTECb,TO KAPMaHbI OJekbl, KOTOPa 6yET CTnPaTbc B MaUHe, NCTbl.
TBePbIe,OctPbIE PpeMTeBtHApnMpE,MOHeTbH,ahrJInCKne 6yJabKN,ΓBO3N, UpyPiKAMHNMOYTPINBecTN KNOJOMKe CTnpaJIbHOMaIJINHbI.
He cTnpaIte B MaUInHe OeJy C KpyTHbIMN npraKkAmn, NpyROBUNAMn UIN dpYrMM TKeJIbIMM MetaJIInueckmN akceccyapamn.

TIPPLEDINE
BAKHAR INHΦOPMAU, KACAHOJACR YNCTKN CTIPALbHOJ MAUNHbl

He nCTte MaunHy, npocTo o6pb3nBa ee Bdoi.
He nCnoJIb3yIte YnCTraJUe CpeIcTBO Ha OCHOBE KpeIKnx KNCJOT.
He nCnoJIb3yIte 6eH3oJ, pactBOpTeJIN IIN CnIPT DJIY NCTK INTpaJIbHO MaIIINHbI.
- 3TO MOKET PnBBeCTN K OBeCzBeHbAHIO, DeOpMaUIN, NOlOMKe, ydApY 3JekTpOTOKOM INI B03rOpaHIO.
Ipejde, Yem uCTNTb CTnpaJIbHyO MaunHy NIN BbIOJHrTb eE TexHueCKoe 06cJIyKuBaHne, OTCoEHHTE MaunHy OT NTaHry, BbTAUHB BNkY PtTaHry IN3 HAcTeHHoP03eTKN.
- HecobJIOeHHe 3TOro Tpe6OBAHnRA MOKeT npNBecTN K yIapy 3JIeKTPOTOKOM NII B03rOpAHIO.
yCTaHOBka CTnpaJIbHOn MaSHINhbl
CneuaJIncT NO yCTaHOBKe DOJxKe H CToPO Co6IIOJaTb DaHHbE INHCTpyKUIN, UTObI OBeCeuHTb IpaBnJIbHyKO pa6O TY CTnpaJIbHO MaUNHbI N PpeODTbPaTITb ONaCHOCTb NOJyEHNr TpaBM BO BpEMr CTnPKI.
ПОВЕРKA KOMПЛЕKTALДИ
AkkypaTHo paacnakyIte CTnpaIbHyIO MaunHy I y6eIITcB, YTO B KOMPJIeKT BXOJrT BCE JeTaIIy, yka3aHHbe HIXKe. Ecln CTnpaIbHa MaunHa 6bIina NobpeXJeHa BO BpEmr TpaHCnOpTIpOBKn IIN B KOMNJIeKTe OTCyTCTByHOT HeKOTOpbIe DeTann, ObpaTITcB B ceHTp NO oBCJyXnBaHIO KJIeHTOB KOMNaHIM Samsung nn K dInepy KomnaHIM Samsung.

MHIMMaHbHn DnAmEtP 5cm.
MHHIMAlbHaCKOpOCTcINBa60JITpOB MHyTy.
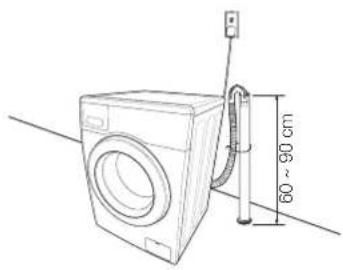
JAR5
POnKJIIOUeHHe CTnpaIbHO MaUNHbI K 3JeKTpONTaHnIO
IOnKIOHHTe HHP NITAHN K CTeBOH PO3EKe (pa3peUeHHo 3JNEKTpHHeCKo PO3ETke 220-240 B/50 TnepemehHOrO TOKa, 3aunuHcHoo C nMOUbIO ppeOxpaHTeJI INn ABTOMaTHueCKOr BOBikHOaTeJI. (DOnONHHTeJIbHyO INOpMaUIO O Tpe6OBaHNIX K 3JNEKTpHHeCTBy u 3a3eMJIeHHIO CM. Ha cTp. 14).
TecTOBb3anyck
Iocne yCTaHOBKn CTnpaJIbHOm MaUINHb IpnO3BeIte npOBepKy, 3aNyCTNb IpoPpAMMy IOnockaHHe+OTXkM
STINPKA 6eJIbIa
C HOBO CTnpaIbHO MaunHO Samsung npc Tnpke 6eJIb cMbIM TpyHbIM 6ydt npHHaTpeHne O TOM, KaKoe 6eJIbe CTnpaTb B nepByIO Ochepd.
NEPBARCTNPKBAEBJIb

IpeepnepboCtnpkOBeJbHeo6xOIMO3aynCTTbNoHbLcKKnCTnpkn6e36JIb.
- HaxMITE KONky Power (Bkn./BbIK).
2.ДобавьTe Heбовьоe KOnHecTBo CpeIcTBA nA CTnPKB OTOJIENHe ①OTCEKa DnRA MOIOUx CpeIcTBA.
3.BkIOHTe noaHy BObI B CTnpaJIbHy MoaHHy. - HaxmTe KONky Start/Pause (CTapT/Play3a).

PnTOM ydaIITcB Oda, KOTOPaMOrJa OCTaTBcB MaHInHe NocJe NcblTaHn, BbINOJIHeHHbIX Ha 3aBODeN3ROTOBtTe.
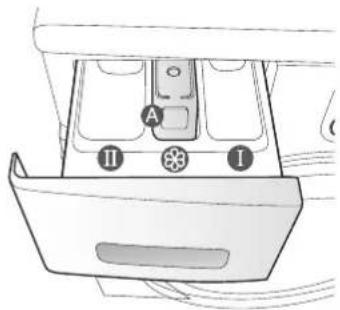
OTCEK ①MOUue CpeCTBO DnI PneBapntbHoi CTIPKN ININ KpaxMaN.
OTcck CpeDCTBO DnI OCHOBHON CTNpKN, CpeDCTBO DnI CMrHEnH BODbl, CpeDCTBO DnI PnpEBaPHTeJIbHO 3aMaYBaHnO, OT6JIbAteJIb NITTHOBbIOBNTeJIb.
OTcEK 8do6aBKn, HapnimeK KOHnIIOHOep nIe 6JIbI INBcNOMORAteNbHbe BcIecTBA [3anoJHnTB cIeNyET He BblIe HnKHeRo Kpaar nepeoropokn "A" (MAKC.)]
OBLIUEYKA3AHNA
- 3arpy3nTe 6eIbe B CTnpaIbHyIO MaunHy.

He neperpykaTe CTnpaIbHyIO MaunHy.ДЯ onpeJeHnna 6bema 3arpy3Kn dny KaKdo Tnna 6eJIb CM. Ta6nUy Ha cTp.27.

-
Y6eINTEcB TOM, YTO 6eJIbe He 3aUeMMIOCb DBepuei, NOCKOJIbky 3TO MOXET npINBEcT N K YTeHKe BObl.
-
PocJIe cIKJIa CTnPK CpeCTBO dIa CTnPK MOKeT OCTaBc B pe3HOBbIX yIIOHTHeJx nepeHHe Yactn CTnpAIBHO MaINHb. YdaJIte OCTabWeecr cpeCTBO dIa CTnPK, NocOJIbky 30 MoKET Bbl3BaT IpOTeHcy BObl.
He cTnpaTe BOOOTaJIKNBaHOUne MaTePnaJIbI.
2.3akpoTeDBepeDoUeHka.
3.BKIOHITe CTnpaIbHyIO MaUNHy.
4.ДобавытевOTсЕДЯМоюшиСрсдТВСрсдТВДЯ STИРКИДобавк.
5.Bb6epnte Heo6xOuMbI uKJI n npaMeTpbl Ira3ppyKeHHoro 6eJIb. 3aropITcN HnukatOp CTnPK, n Ha nCnnee oTo6paanTcnpdnoIaraemar npdoJXHTBHOCTb cKJa CTnPK.
6. HaxmTe KONky Start/Pause (CTapT/lay3a).
CTNpKa 6eJIbIa
NCSIOJIb3OBAHNE PAHEJIYUPABJEHNA


UHPOBOI TPAHNECKN INCJIEN
OTo6paKeHHe OCTaBWeRocBpeMeHN LcNKNa CTnPK, Bcei HOpMaUm O LKNe CTnPK N COo6uEHn O6 OUn6kax.

NEPEKJIIOYATEJIb LUKNIOB
BbIepeHTE IJLZUKJIa Heo6xOdmyIO npOrpamMy n CKOpocTb OTKIMMa.
Дя noJyHn6 BoJee noJpo6Ho nHfOpMaunm CM. pa3Je "CTnpka 6eJIb c nCnoJIb3OBAHHeM nepeKJIIOHaTeJIa YIKJIOB" (CM. cTp.25).
Cotton (Xlonok)(- cpeHne- nIcna6o3arpa3HeHHbIe n3dJIa IxONka, noCTeBHOe 6enbe, canfETKN u Ckateptn, HxKHee 6enbe, PNOTeHuca, copOuKn I T.I.
Synthetics (CnHTeTnka)(√) - cpeIHe- mI nCna6o3arpa3HeHbIe 6Jy3Kn, copOuKn I T.I., n3rTOBneHHbIe n3 noIIaΦnpa (mIoJIeH, TpeBnpa), noIIaMnJa (nepNoH, HeIIOH) nn aHaIOrnHoro COCTBa.
Hand Wash For Wool (PyuHra CTnPKa uepcTu) -TOIbKO n3dJIINn I3 WepCTN,ДЯ KOTOpBIX MOXHO INCNoJIb3OBA Tb MaUHHHyIO CTnPKy. O6bem 3arpy3kn DoJKeH 6blbMeHbue 2 Kr.
C Tnpka B pexnme cTnpka wepcttnocyueCTBnreTc nOKOHbIM NOKaHbAHmE 6apabaha. B pexnme nIOLOCKaHne cNOKOHOe NOKaHbAHme n3amauBaHne npoJOnkakOTc, YTObI PpeDToBpaNTb ycaKy /n3MeHeHne fOpMbI WepCTraHbIX BOLOKOH, a TaKke, YTObI OHUeHne OcyueeCTBnloCb HAnBoJe eAJaLIM CnOCOBom. OctahOBHTb 3Ty Opeaunio HeCLOXHo.
-Дяпolyени Лушinx pe3yЛьТаTOB CTnPKI IN Дял NyЧeI coxpaHOCtI WepCTaHbIX BOLOKOH B pexKIMe CTnPKA WePCTN peKOMeHnyETcR NOJIb3OBAbCS HeITpAlhBbIM CTnPaJIbHbIM NOpoukOM.
Baby Care (Teckne Bue) Cnpb Kcok TeMepaType n DOnJIHnTEbHbIe NIKbl NOIOCKAHN NCKIOHAT npCytCTBHe Ha BaWeJ DeNkAHTHO OeXKe CNEOB NIObIX CTpApNbHbIX NOPoIKOB. Daily Wash (ExedHeBna) -NCIOb3yeTcI TaKx ExedHeBHO NCIOb3yeMbIX Beuei, KaK HxKHe 6JIbe n pyBaAkn.
15'Quick Wash (Bbictpa 15')()-NcnoJb3yETcraIcnEka 3aqrpa3HeHHoOdExbl, KOTOpYKe HEO6XoIMMO NOCTnpaTb 6bICTpo.
| 3haeHnna IpoJolKInteJIbHOCTN CTIPKn (15'MHyt) MOryt OTLIHATbCS OT yka3aHHbIX 3HaeHnN I 3aBNCAT OT daJIbHeHn BObl, jckCTKoCTN BODbl, Tempeatypbl BODbl Ha BlyCke, Tempeatypbl POMeUeHn, TINa I BEca CTIpaembl BcEeN I CTeNEHn Hx 3aRpy3HeHNOCTN, pIMeHnEMO MOIOJeGcreDCTBA, OTKIoHeHn HapJXeHnIe 3JeKTPoNTAHn OR T HopMbI IN DOnOLHITeJIbHO BbIbPAHbX ΦyHKuI. ДоБавte LIIb H6OlJbOe KOJIueCTBO MOIOSeG creDCTBa dIg H6OlJbOro KOJIueCTBa IpeNdAHAChENHOrO I dIa CTIPKn 6beJa (BecOM He 60lee 2 Kr) dIg peXIma B6tPa 15-MHHTa CHa CTIPKa. Ecln Bbl do6abite cIeKUMOM MHOrO MOIOSeG creDCTBA, OHO MOKeT octaTbC nOcIe CTIPKN. Spin (OTXIM)(Φ)-doONHITeJIbHbI ΣIKL ΩTKIMma dIg 60lee TuaTeJIbHOrO OTXIMa. Rinse + Spin (ПОLOCKaHne + OTXIM)(Φ+Φ) -peXm IMcNoJIb3yETcR IprI CTIPKne 6beI, dIg KOTOPrO HeOBxOIMO BvIPOHNTB TOLko PONOCKaHne, iln dIg do6abHn EONIOUHEpA BO BpeM PONOCKaHn. | |
| 3 | KHONKA BbIBOPA OTILOXHITb CTIPKU |
| 4 | KHONKA BbIBOPA TEMPEPATYPbl |
| 5 | KHONKA BbIBOPA OTXIM |
| 6 | KHONKA BbIBOPA ONLl# |
STIPKA 6eJIbIa
Delay End (OTNoXnTb CTnpKy)
Moxho 3anporpammpoBaTb CTpaJIbHyIO MaunHy TaK, YTO6bl OHa aBOMaTHueCKn 3aOKHnla CTnpky n03Ke, Bbl6pab Bpemr OTCPOHKn Ha 3-19 cAcob (c Warom B 1 lac).OTobpaKaemoe Ha DnCIIeE Bpemr 063Haayet Bpemr OKOHHaHnCTnPKn.
- BpyHyIO nIaBOMaTnueckn yCTaHOBnTe npOrpamMy dIra CTnpaJIbHOJ MaUINHbIB COOTBeTCTBmC TINOM TkaHN 6JIbI, PpeHa3NaHeHHO rIa CTnPKN.
- Haxmte KhoNky Delay End (OTnoxntb cTupKy)() Heckonbo pa3, noka He 6ydt yCTaHOBNEHO BpeM 3aepKKn.
- Haxmte KhoNky Start/Pause (CTapr/Na3a)(II). 3aropntcHnDkaTOp "Delay End (OTIOXHTb CTnpKy) u hcbI HaHyT o6paTHb OTCET DO yka3aHHoro BpeMeHN.
- TTo6bI OTMeHnTb dyHKnIO Delay End (OTNoXnTb CTnPKy), HaxKMITE KHOINKy Power (BKn./ BbIK).(), 3aTEM CHOBA BKJIOHTe CTnpaJIbHYIO MaunHy.
CTnpka 6eJb c nCnoJIb3OBAHHe mpeKeIIOUyTeJIa UKIOB
BlaorapabTOMatuecko cnteMe ynpablenia Ctnpko Fuzzy Control", paaepaHno kOmnaHne Samsung, CTnPKa BbIOJHReTcOeHbJeRko. Ppi BbIbope nporpaMMbCTnPK MaunHa cama ycTaHaBnBaet npaBnHyTo TempeaTyP, BpemN CKOpocTb CTnPK, KOtOpble Bb TaKke MoKeTe N3MeHHTb NO CBOeMy YCMOTpeHIO.
- OtkpoIte BOIOIPOBOHbI KpaH.
- Haxmte KhoIky Power (Bkn./BbIK.) ()
- OTkpoTe DBepeu.
- 3aRpy3nte nooepedHO Beu, pa3MeuaIx CBO6OHO B 6apa6aHe MaunHbI N36erag neperpy3kn.
- 3akpoTe DBepy.
- 3a pynte B COOTBeTCTByouuue OTCeKn CpeIcTBo Ira CTnPK, KOHnnuHep Ira 6enbry cpeIcTBO Ira npedBapntelbHOI CTnPK (ecIn Tpe6yetca).
PexnmpaMa Cotton (Xionok)(Syntheticcs Cntetka) Baby Care (Teckne Benu)) Daily Wash (ExeHbHa) IpeBapntbHa CTnpKa Heo6xOma, ToIbKO eCnn 6enbe Oehb rpa3Hoe.
- NcnoIb3yIte nepeKIOUaTeB LKIOB Ira BbIbopa Heo6xOIMrO LKIA B COOTBeTCTBm C TINOM TKAH: Cotton (Xionok)(), Synthetics(CuHTeTnKa)Hand Wash For Wool (PyHna CTnPKa 1epCTn) Baby Care(ETCKne Beun)(), Daily Wash (ExeJeHbHa)15'Quick Wash (BbICtpa 15') (). Ha naHei ynpabEnia 6dyT ropeTb coOTBeTCTByIOJIne INHdkATOpbl.
- Tenepb c nOMOJIbIO COOTBeTCTByIOUx KHOJOK MOXHO Bbl6paTb TempeaTypy CTnPK, KOINHECTBO NOLOCKAHNI, KOINHECTBO OOBOPOTOB IJN OTKIMN INBPEM NTCPOOUKN CTnPKI.
- Haxmte KhoNky Start/Pause (CTapT/Play3a), n HaHHeTcSTnpKa. 3arOpNTc nHnKAtop CTpKn, n Ha DncJIeE OTo6pa3ntCtOCTabUWeecBpeMa LkJa.
Функця nay3bl

B TeueHne 5 MInHyT nOcIe NaHaJcA StnPK MoXHO Do6aBJIb Tnn N3BJeKaT bEJIbe.
1. TTo6bI pa36nOKIpOBaTb DBepu, HaxMMTe KHOKKy Start/Pause (CTapr/Play3a)(II).
Bbepuy HeJIb3a OTKpbITb, ecn BODa CInuKOM TOPArynn ypoBeHb BoDbI CInuKOM BblCOKNI.
2. Nocne TOro KaK DBePua 6bIa 3aKpbIta, HaxMITE KHOHKy Start/Pause (CTapr/Nay3a)(II).
UKNK cTnPKn 3aBepweH:
Iocne 3aBepueHnBaCero LKJIa CTnpKn CTnpaJIbHa MaUNHa BbIKIOHaETcA bTOMaTHeCKN.
- OTKpoIe TdBepu.
- 13BnKeKnte 6eJIbe.
STIPKa 6eJIbIa
YcTaHOBka pexkma cTnPK BpyHyIO
MOxHO BpyHyO yCTaHOBnTb peKIM CTnPKN.
1. Otkpoite BoDopnoBoHbI KpaH.
2. HaxmTe KONky Power (BkI./BbIKl.(H) Ha cTnpaJIbHOu MaUNHe.
3. OTKpoIte DBePcUy.
4. 3arpy3nte noohepeedHO Beu, pa3meuaIx CBO6OHO B 6apaaHe MaunHbI n36erai neperpy3kn.
5. 3akpoTe DBepu.
6.ДббБТСРЕДСТВОДПСТIPКИ,ECJIHHeO6XODMO,KOHДиФОHEPДЯбБЯИN CpeDCTBOДЛпрдВapNTeJbHOI CTIPKNB COOTBTCTBYIOUNEOTCEKN.
7. Haxmte KhoNky Temp.(TemnepaTypa)( )IyBbIbopa TemnepaTypb BoDbI npI CTnpke. (20 ^ C Bce INdkaTopb BiKIOueHb), 30 ^ C 40 ^ C 60 ^ C n 95 ^ C
8. Haxmnte Ha KhoNky Option (Onu) (_j^+) , TTo6bBb6paTb peXMM IOnoHHTelbHOe NOIOCKaHHe, KOtOpBiy yBeJIyHBAET npOIOJXHTeHBOCTb NOIOCKAHn. IpoOIOJXHTeHOCTh CTnPK 6yET COOTBETCTBEHHO yBeJIyHHe.
9. HaxmTe KhoNky Spin (OTXIM)(BnBbOpa ckopocTn OTXIMMa.
PnBbIbope cyHKm 3aepKKn IIOCKaHn 13 CTnpaJIbHO MauINHb MoXHO n3BJIeKaTb MOKpoe 6eJIbe. (6e3 OTKIMa (Bce HnDnkaTopbl BbIKJIOUHeHb): 3aepKkna NOLOCKaHn).
- Haxmnte KhoNky Delay End (OTnoxntb CTnpy)HECKoJIbKO pa3 npeKIOueHnI DOCTyINbIX BapnaHTOB OTNOXeHHoro BblIOJIHeHnI CTnPK (OT 3 do 19 cacoB C WaROM B OdnH lac). OTo6paxKaemoe Bpemr o6O3HaAet Bpemr OKOHuaHnI CTnPKI.
- HaxMMTe KhoNky Start/Pause (CTapT/NaY3a)(II) dIy 3ayncka uKna CTnPK.
HHTPYKUNI NO CTINPKE BELB
CneyuTe 3TMM npocTbIM INHCTpyKUJAM DnA NOyHuHHe HauNyUHxpe3yJbTaTOB CTNPKI.

Ipeed CTnPKoB Bcerda npOBepaTe Oco6eHHocTn yXoJa 3a TkaHbO B COOTBeTCTBn C CmBOnaMHa 3TNKETKe.
Paccopnpyte n noctpaaTe 6eIbe B COOTBETCTBNN CO CJIeDyUOUMM KpTepnMaN.
- RaJIbIK C INHCTpyKUmeI NO yOxy: paccOpTpyIte 6eJIbe Ha n3dJIeN I3 XJIOPIKa, CMeUaHHbIX TKAHe, CNHTeTIKN, UeJIka, UepCTn N BNUCKO3bl.
LBeT:OTdJIInTe LBeTHbIe BeuOn OT 6EnbIX.HOBIIe LBeTHbIe BeUc STnpaIte OTdJIbHO.
Pa3Mep: 3aRpy3ka pa3hix no pa3Mepy Beuei B Odn H uKn oecneHIT 60lee 3fpeKTNBHyO CTnpKy.
CyBCTBnTeNbHocTb: CTnpaIte N3dJIeNIA N3 dJIeNKaTHbIX TkaHeN OTdJIbHO, INcNoJIb3yur cIKN CTnPKN "DJIeNKaTHbIE" nIra HObIX N3dJIeN I3 WepCTN, UTOP n WJekOBbIX N3dJIeN. CM. CmboJIbHa 3TNIKeTKax Beuei, npedHa3HaueHHbIX DnIa CTnPKN, INI INHOpMaUIO NO yXOdy 3aTkAhhBO B npuioKeHN.
Поберка KapmaHOB
IpeepKaKdoCtnpKoOCB60kDaTe Bce KapMaHb.IHaunHe He60bux, TBepbix n octpIX npEMeTOB,HanPIMeMPOHeTOK,HoxKe,ByNAbO K cKpeNOKn 6ymar,MOxET npVBecTN K NOBpeXdEnm CTpaJIbHO MaUNHb.I He CtnpaiTe 6BeC BoNBuIMn npJCKAMn, NpyROBcAmN INI DpyrIMM MetaJIINHeCKIMN npEMeTaMn.
MeTALnueckne 3IeMeHTbHa OJExde MOryT NOBpeNTb OJExdy N6ak. Ipeep CTnPKoO OJExDb CnyROBuaAMN BbluBkoB BbIEbpHnte ee.Ecnn BO Bpemr CTnPK MoHNb6PIOK N KpyTOKpbITb, OHMOY TNOBpeNTb 6apabH, pe3HOBBI yNtOHNTen, cTeKIO DBePbI, a TaKke npryIoo OJExdy. Ipeep CTnPKo MOHN DoJIxHbI 6bITb 3aKpbITb N 3aKpeNJIeHbIC NOMOu bIO uHypka.
OdexJa C dINHHbIMN 3aBra3kAMM MOxET 3aNyTaTbC R cyrMM 3JeMeHTAMM OeXbl, YTO MOxET npIBecTN K IN NOBpeKJdeHIO. IpeEi HauJIOM CTnPKI y6eIITecb B TOM, YTO 3aBra3KN 3akpenHebl.
PpeBapntelbHa CTnPKa n3dennn 3xXlonka
CTnpaIbHna MaunHa npn IcNOJb3OBAHm COBpeMeHHbIX CpeCTB nla CTnPKn 06ecneHbaet TpeBOxCoHbtepeyIbTaTbI CTnPKn, AKOHOMA 3JeKtpO3HeprNIO, BpeM, BDOY n cpeCTBa nra CTnPKn. Ondako eCNI XNONKOBbIE BeUINOCO6eHHO CInbHO 3aRpa3HeHbI, IcNOJb3yIte nix CTnPKn pnpamMy PpeDbarNTbHOn CTnPKn CO CpeCTBOM nla CTnPKn Ha OCHOBe 6eIKOB.
Onpeelenene o6bema 3arpy3kn
He neperpykaTe CTnpaIbHyIO MaunHy. B npOTnBHom Cnyae pe3yIbTaTbCTnPK MOryt Okazatbcra HeyoBJIeTBOpITBeNbHbIMN. Ina onpeJeHnO obema 3aRpy3K IN COOTBeTCTBmC TINOM BeIbIrcNoJIb3yIte npuBeHeHHyo Hxke TaJIuCy..
IcnoJIb3OBAHHe MOIOxN CpeICTB IJIa CTnPKI
TINMOUUXCpeCTB DnA CTNPKDOLIXEHOOTBeTCTBOBaTB TNYTKaHN (XJONOK,CHTETKKA, DEJIKAthbIe TKAH, Wepctb), ee UBeTy, TEMpepaType CTNPKN CTeNEH 3arPra3HeHNA.
Bcerda nCnoJIb3yIte MOIOUne cpeIcTBA C Hn3KIM NeHoo6pa3ObaHMe, pa3pa6oTaHHbIe dIa ABTOMATHeCKNX CTnpAJIbHbIX MaIIINH.
CneNyTe peKOMHeIaIeM N3rTOBnTeIe MIOUx CpeCTB, OCHOBIBaRcBaHa 06bEme 6JIbA, CTENH 3arPra3HeHn I JecTKOCTN NCNOB3yEMo BObl. EcnI CTenH JecTKOCTN BObl HEn3BeCTHa, 6paTITcB B OprAHn3aIuIO, OecCeHbAIooIyIO BOOCha6KeHne.

He nCnoIb3yIte 3aTBePdEeBnne nn 3acTbIBuNe CpeCDtBa Inra CTnPK, NocKoJIbKy OHN MOrYT He pAcTBOpNTbcRA B PPOUecce CTnPK IN OCTaBaTbCS B MaUNHe BO BpEmr LkJIa NIOOCKAHNA. 3TO MOXET PnVBecTN K HeKaueCTBeHHOMY NIOOCKAHIO 6eJIbN INI INepeJINBaHnIO YpeE3 KpaBcJeCTBnE 3acopa OTBepCTNI.

Ioxaanycta, noIb3yrcb pexnMOM "Uepctb", o6paTne BHMHHe Ha cNeDyioee.
- ⅡTnKU WepCTHbIX N3dJIIN NOJb3yTEcB TOJIbKO HeHTpaJIbHbIMN XIKIMMOIOUIMCpeCTBaMn.
- PpIMeHHeHne NopOuKOBbIX MOUcX CpeCTB MOKeT PnBeCTN K OcaKy 3TNx CpeIcTB Ha 6eJIbe I npHe MaTePnaJa (Wepctn).
OTCEK JIJA MOUxCpeCTB
Hnna CTnpaBna Maunna Ochauhe NaTneBbIMN OTeKaMn IJRA MOUux CpeCTB IN KOHNIOHEpa nIeBJe. Ipeep 3anyckom CTnpaBHO MauHHbI DoabBe B COOTBETCTBYUue OTCEKN BCE HeoXoDmblc cpeCTBa IJRA CTNPK.

HEOTKpbBaIteOTcEKn CpeICTB IJIa CTIpKN BO BpEmpaBoMaUNHbI.
- BbDnHbTe OTEcK DnRA MOUx CpeCTB CJeBOI CTOPHOI OT NaHeN VnpaBNeHnA.
2.ПелдзлсКOMCTPаьнMmaHbIIO6aBbTeВOTCEK ⅢДЯMOUUXCpeCDTBpeKOMeHyEMOEKOJIHeCTBO CpeDCTBaДЯCTPKI. - Pn Heo6xOIMOCTN DoabBte peKOMeHdyEMOe KOINHECTBO KOHNIOHepa DnB 6bB B COOTBEcTBYIOU OTCK

HEdoabnIte HnKaNX NPOoKOBbIX/XnKnx MOOuNX,cpedTB BOTCEK DnKOHmIOHepa (8).

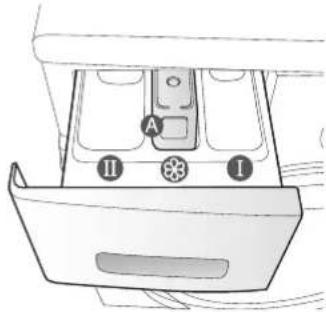
- PnncnoJb3OBAHm nKJa npEeBapntelHoCTNpKN peKOMeHdyemoe KOJIueCTBO cpeCDtBA dIg CTNpKN CNeDyET doabHTB BOTcEK①. DnI npEeBapntelHoCTNpKN.

PnCtnpke 6oBunx npemetOB oexkbl HE nCnoB3ynte cneDyUOuNE Tnbl cpeCTB nIa CTNPK.
CpeCTBaIy CTupKnB Ta5Netkax n Kancylax
CpeCTBaIy CTnPKI pN IcNOJb3OBAHm 7apa n ceTkn
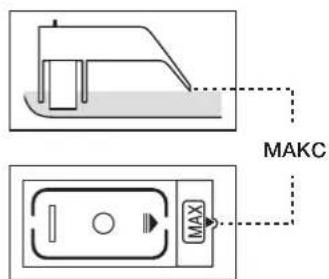

KoHcHTpnpOBaHHbIe IINrYCTbIE KOHNuHOpeblIg6EJIbpeep3arpy3KO BOTCEK CJIeDyET pa36abTbHe6OJIbUIM KOINHECTBOM BObl (IINPpeOITBpaueHnpePENBAHnuepe3 KpaBcNECTBne 6JOKNPOBKn OTBepCtn).

Bydte octopokhbl, He donyckaTe nepeJIbBa KOHdUIOHEpa np3aKpbIbAHn Iuika dmoiox cpeCTB nocJe doabJIeHn KoHdUIOHEpa B OTCEk Dn ppeBaPHTbHO CTnpKn.
BojmoKETOCTaTbC8oJbUe,ChEMBipacCHITbIaJI. PnroTOBBTe 60JbUyO EMKoCTb.
- BHOBb yCTaHOBtte 3aIyUky Ha Tpy6ky aBaPmHoro CInBa n 3aTe m npKpeNITE Tpy6ky aBaPmHoro CInBa K HnPaBnIOeMy KpOky.
7.YcTaHOBnTe KpbIuKy fuiIbTpHa MeCTO.
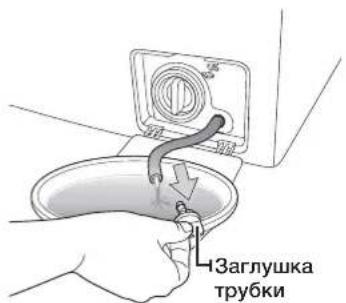
3aŋyuka Tpy6n abapuHoro CnBa
YNCTKA BHEUSHENIOBEPXHOCTN CTIPALbHOI MALINHbl
- PpOtpnTe NOBepxHocTn CTnpaJIbHOI MaUNHbI, BKJIIOUaI NaHEJ yINpaBHeHna, MmKoI TKAHbIO C NcNOJIb3OBaHNMe Hae6pa3NVBHbIX 6bITOBbIX YNCTAUXCpeDCTB.
- BbITPnTe NIOBepxHOCb HAcyXo MAnKoT KaHbIO.
3.ИЗбeraиTe noIaHnBaBObI Ha NOBepxHOCTb CTnpaIbHOM MaIHINHbI.
TEXHUNECKNE XAPAKTEPNUKNI
| ТП | СТИРАЛБЕМALSUHA CФОNTАЛБНОД3АГУЗКОД | ||
| ГАБAPИTNБIE PAЗMEРы | WF1702 / WF1700 | ||
| LU600MM X Γ550MM X B850MM | |||
| Давлиейные BOДы 50 кпа ~ 800 кпa | |||
| ОБъЕМ BOДы | 56и | ||
| ВEC БЕЗ УПАКOBКИ | WF1702 / WF1700 | ||
| 56 кt | |||
| ОБъЕМ 3АГУЗКИ ДЛЯ CTИРКИ И OTЖИМА 7,0 кt | |||
| ПOTРЕБЛЯЕМАМOLЦHOCTь | MOДELB WF1702 / WF1700 | ||
| СТИРКА | 220 B 150 Bt | ||
| 240 B 150 Bt | |||
| СТИРКА ИНАРЕBAHИЕ | 220 B 2000 Bt | ||
| 240 B 2400 Bt | |||
| OTЖИМ | MOДELB WF1702 WF1700 | ||
| 230 B 530 Bt 500 Bt | |||
| СЛПВ 34 Вt | |||
| ОБОРOTBI OTЖИМА | MOДELB WF1702 WF1700 | ||
| OB/MIN 1200 1000 | |||
BHeuHn BnI xapaKTeepntkN n3deJn MoryT n3MeHrbc8 6e3 npEaBPteJIbHO rYBeOMJeHnB CEJx yCOBepueHcTBoBaHn npOyKaTa.
TEXHUNECKNE XAPAKTEPNUCTUKN
| ТИП | СТИРАЛБЕМALSUHA C ФОНТАЛБНОД 3АГУЗКОД | ||
| ГАБAPITNBIE PA3MEРы | WF1602 / WF1600 | ||
| LU600MM X Γ450MM X B850MM | |||
| Давлие ВODы 50 кпа ~ 800 кпa | |||
| ОБъEM BOДы | 48n | ||
| ВEC БЕЗ УПAKOBКИ | WF1602 WF1600 | ||
| 54 кг | |||
| ОБъEM 3АГУЗКИ ДЛЯ CTИРКИ И OTЖИМА 6,0 кг | |||
| ПOTРЕБЛЯЕМА MOLCUHOCТь | MOДЕЛь WF1602 / WF1600 | ||
| СТИРКА | 220 B 150 Bt | ||
| 240 B 150 Bt | |||
| СТИРКА И HANТPEBAHИЕ | 220 B 2000 Bt | ||
| 240 B 2400 Bt | |||
| OTЖИМ | MOДЕЛь WF1602 WF1600 | ||
| 230 B 530 Bt 500 Bt | |||
| СЛПВ 34 Bt | |||
| ОБОРOTы OTЖИМА | MOДЕЛь WF1602 WF1600 | ||
| OB/MIN 1200 1000 | |||
BHeuHn Bn, n XapakTeepntKn 3dEJIa MOryT N3MeHrTaC 6e3 npEaBPteIbHoro yBeOMJeHnB CEJx yCOBepueHcCTBOBaHn npOdykTa.
TABJIUZA XAPAKTEPNCIK CTIPALBHOI MAUNHBI (EU TOJbKO)
Co0TBeTCTByeT CTaHdApTy (EC) N 1061/2010

3Bé3DouKn **MCNoJIb3yIOTcIINrO6o3HaueHnra pa3InuHbIX BapNaHTOB MoJeIN, BMeCTO Hx MOrTy 6bITb IOCTaBJIeHbCIMBOJIb (0-9) IN (A-Z).
| Samsung | ||||
| Названные мodyдз | WF1702NHWW F1702NHWG | WF1700** | ||
| Оьем к T 7 T | ||||
| 3нергозфektimbноctь | ||||
| A + + + (самая виска зфektimbноctь) - D (самая посяя зфektimbноctь) A+ A+ | ||||
| 3нергозг tradeипee | ||||
| Говобoe зероглорбени (AE_C)1) | KBt/H 220 220 | |||
| 3нергозг tradeи b pexime (E t.60) 'Cotton 60 °C(Xlonok 60 °C) pri n polnoi zarpyЗke | KBt 1,231,23 | |||
| 3нергозг tradeи b pexime (E t.60.1/2) 'Cotton 60 °C (Xlonok 60 °C) pri n heloioh zarpyЗke | KBt 0,89 0,89 | |||
| 3нергозг tradeи b pexime (E t.40.1/2) 'Cotton 40 °C (Xlonok 40 °C) pri n heloioh zarpyЗke | KBt 0,69 0,69 | |||
| Мошость pri n vyк nullуенham рintанham (P_0) Bt 0,45 0,45 | ||||
| Мошость посile zastveшения prorpammb (P_L) Bt 5 5 | ||||
| Говобoe погг tradeи bo'dy (AW_c)2) | Л/юd 10010 10010 | |||
| Кл assc зфektimbноctiy otxkimi a3) | ||||
| OT A (надоблесе зфektimbный) do G (надмение зфektimbный) | B | C | ||
| Мakсимальаг сокорstь вразшины | OB/MMH | 1200 | 1000 | |
| Остаточая ваджноctь | % | 53 | 62 | |
| Пограмы, k kOTOPbIM OTHOCITCS INHOFOPMAZIA Na STIKETKE i B Tablizne | Xlonok 60 °C u 40 °C + NHTEHONHBA4) | |||
| Дл'tельноctь.stan'daptnohoi prorpammbi | ||||
| 'С cotton 60 °C' (Xlonok 60 °C) pri n polnoi zarpyaze MMIL | 205 205 | |||
| 'Cotton 60 °C' (Xlonok 60 °C) pri n heloioh zarpyaze | MMIL | 162 | 162 | |
| 'Cotton 40 °C' (Xlonok 40 °C) pri n heloioh zarpyaze | MMIL | 157 | 157 | |
| Взвшиеная мошость BO BKIIQUENHOM pekimme | MMIL | 2 | 2 | |
| Уровень-boЗduшноfoшуma | ||||
| Стирka | ДБ(A)В OTHOCHIN 1 nBT | 59 | 59 | |
| ОТЖIM | ДБ(A)В OTHOCHIN 1 nBT | 78 | 74 | |
| Размеры | ||||
| Размеры устрийства | Быcodа | MM | 850 | |
| Ширiva | MM | 600 | ||
| Глобина 5) | MM | 550 | ||
| Вес 663 уразкови | КТ | 56 | ||
| Овsiш BEC | КТ | 58 | ||
| Вес уразкови | КТ | 2 | ||
| Давлиейь bo'dy | КПa | 50-800 | ||
| 3некtronessesе podkluchnéme | ||||
| Наррахениe | В | 220-240 | ||
| Пог�блене ол ektrpoэнергий | Вt | 2000-2400 | ||
| Частota | Фц | 50 | ||
| Наразиме komпайни | Samsung Electronics Co., Ltd. | |||
Прилloxkeнe
- TódoBoe 3HeproToTpe6IeHne OCHoBaHO Ha 220 cTaHapTHbIX UIKJax CTnPKx IOnKa (60 °C n 40^, noHa n uactuHna 3aRpy3ka) n ToPe6JeHHn B BBKIOUeHHOM n BKIOUeHHOM (npn IpocToe) coCTOHN. PaKTInHeCKoe 3HeproToTpe6IeHne 3aBnCt OT yCNOBn nCNOJB3OBaHHy yCTpoiCTBa.
- TOnOBoPacxOaBbIOcbHHa 220 cTaNapTHbIX UKJIax CTnPKX XIONKa (60 °C n 40 °C, noHaa n acTmHa3arpy3ka).ФakTNueckn pacxOaBbIObI 3aBucNT OYcNoBn NcNoNb3OBaHry YCTpOJCTBa.
- OTKIM OyeHb BaxKeH, ecn nI cyuKb BiI NOB3yETecb CuyuNKoJ dIg 6eJIb.Ha OTKIM TpaITTCr 3HaHTeJIbHO 6OJIbSe 3JeKtpO3Heprm, Yem Ha CTUpyk.CTUPKa Ha BBICOKNX 06OpOTax N03BOJRe TkoHOMITb 3JeKtpO3HeprIO, ecn CyuNTb ODEXyB CyuNlke IINI 6eJIb.
- Iporpambl 'standard cotton 60^ program' (CTaHdapTHbI peKIM CTnPKxionka npn 60°C) n 'standard cotton 40^ program' (CTaHdapTHbI peKIM CTnPKxionka npn 40°C), KOtOpbie MOXHO BbIpaTb Do6abHeHem fynKcun Intensive (HTeHCNBHa) C yCTaHOBKO nporpamM dJa XIONKa npn 60°C n 40°C, NOxOaT DnI cpeHne 3arP3HeHHoro xIONKOBoro 6eJIb; 3TN nporpamMbI RAJIOTCaMbIM 3oFKeTINHBiIMN (No paCXOy BObI n 3JeKTPoHEprn) npn DaHOM TIne CTnPK. IocJe yCTaHOBKn 3aYcTIne peKIM KaIIbPoBKn (CM. CTp. 34). Ipn INcIOb3OBAHm DaHHbIX peKIMOB fakTIueckra TempepaTypa BObl MoKET OTJNUAToBcROT3aRBHeHoi.
5.PacctoHnme MeKdy CTeHOH n yCTpoiCTBOM He yuHTbIaebTc npyka3AHn rly6nhbYcTPOICTBa.
TABJIUZA XAPAKTEPNCIK CTIPALBHOI MAUNHBI (EU TOJbKO)
Co0TBeTCTByeT CTaHdApTy (EC) N 1061/2010

3Bé3DouKn " * MCNoIb3yIOTc IIN O6O3HaueHnpa3NnUHbIX BapnaHTOB MoJeIN, BMeCTO HIX MOrYT 6bITb IOCTaBJIeHb CmBOJIb (0-9) IN (A-Z).
- Moze to viest'k problem s prackou.
Slovencina - 10