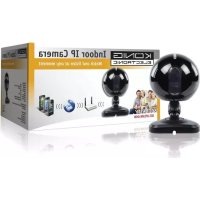
SECIPCAM100W - Surveillance Camera KONIG - Free user manual and instructions
Find the device manual for free SECIPCAM100W KONIG in PDF.
User questions about SECIPCAM100W KONIG
0 question about this device. Answer the ones you know or ask your own.
Ask a new question about this device
Download the instructions for your Surveillance Camera in PDF format for free! Find your manual SECIPCAM100W - KONIG and take your electronic device back in hand. On this page are published all the documents necessary for the use of your device. SECIPCAM100W by KONIG.
USER MANUAL SECIPCAM100W KONIG
MANUAL (p. 2)
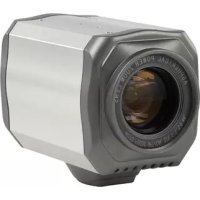
IP camera
MODE D'EMPLOI (p. 24)
Camera IP
MANUALE (p. 46) Telecamera IP
HASZNÁLATI UTMUTATO (o. 68.)
IP kamera
MANUAL DE USO (p. 57)
Cármara IP
- Watch over your properties with this genuine Plug & Play IP camera. Easy and simple to install, works without the need for any form of configuration. The free uCare Cam app allows you to watch and listen to live footage on your Smartphone or other mobile devices, anytime and anywhere. The free uCare Cam app is available on Google Play and the Apple App Store. Advanced features provide you e-mail or app notification when motion is detected. Photo and/or video footage can be played back at any moment. Also suitable for use as a baby monitor due to the 2-way audio function.
We recommend that you read this manual before installing/using this product. - Keep this manual in a safe place for future reference.
System requirements:
Device running Android 4.0 and up or iOS 5.0 and up.
- Router with Wi-Fi.
Installation of the App on your mobile device
1
Download the "uCare Cam" app from Google Play or the Apple app store
Android Device
Google Play Store "uCare Cam" Download Link
iOS Device
App Store "uCare Cam" Download Link

2
After the software installation is complete, click the icon to run the app.
Default "uCare Cam" password: 0000
Manager's Name: admin
Manager's Password: 0000


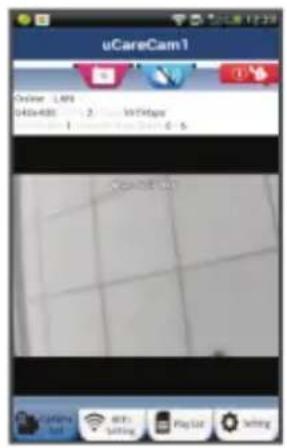
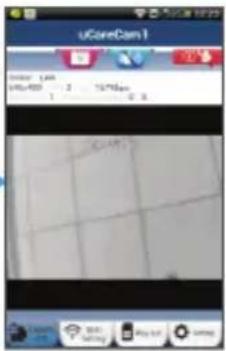
Figure 1
"Camera List Window"
There are two options to continue the easy set up of your IP camera.
Install your IP camera by ROUTER MODE
1
Power On
Plug the power adapter DC connector into the DC input port of the IP camera and then plug the power adapter into a wall outlet. The status LED on the IP camera will turn green for about 15 seconds.
2
Programme Loading
The status LED will flash red for about 15 seconds.
3
Router Link Mode
Wait until the status LED colour alternates between red and green.
Note:
If the LED does not turn red and green, then press the WPS/Reset button for more than 10 seconds to restart the IP camera.
When the green status LED lights up and holds, and then the red status LED flashes twice, after which it changes into green, the IP camera has entered the RESET state. At this moment you can release the button and then wait until the status LED alternates between red and green.
ANDROID (for Apple go to: Step 8)
Set the IP camera to connect to the Wi-Fi Router
4
Open the "uCare Cam" App and select:

Click here to install the new Wi-Fi Camera

In the screen of the Camera List Window (see figure 1).

In the following screen select the tab:


then select the tab: to enter the next step (see Figure 2).

Follow the instructions in the Camera List window step by step (see Figure 3 and Figure 4). Please enter a personal camera name and password (default 0000). You are encouraged to change the default password after setup for security purposes.

Click the tab

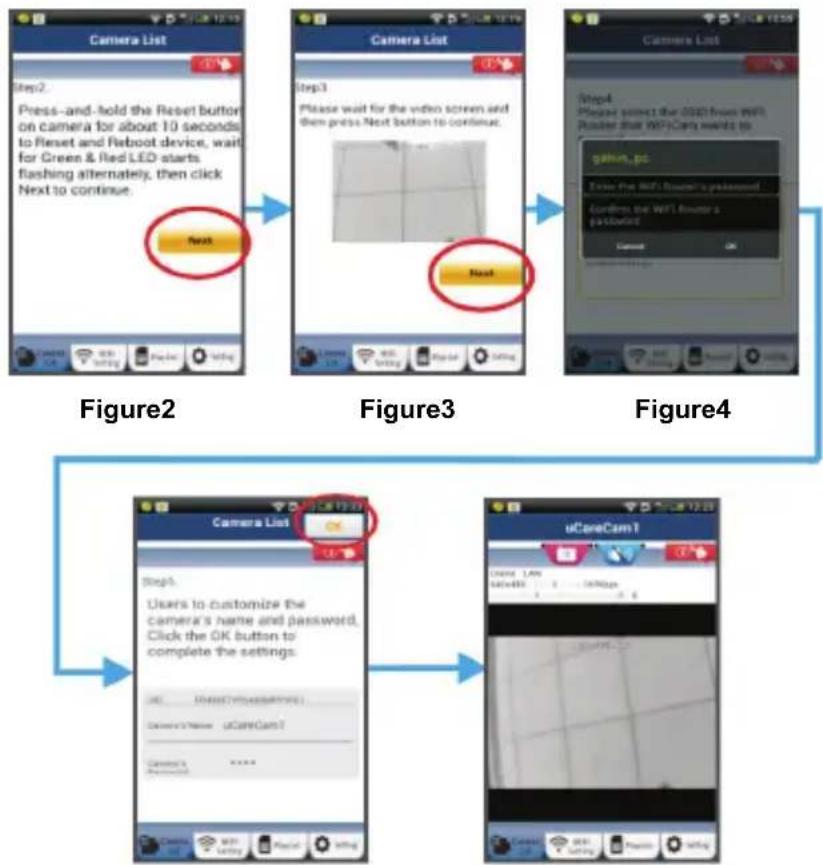
(see Figure 5). The uCare Cam will automatically enter the viewing window (see Figure 6) and the IP camera status LED will turn orange.
Figure5 Figure6
APPLE
Set the IP camera to connect to the Wi-Fi router
8
Open up "Settings" on your iOS device and select "Wi-Fi" and let it search for a network. The network will be "Wi-Fi-cam-p2p". Select "Wi-Fi-cam-p2p" to connect.
9
Now, open the "uCare Cam" app and select the tab at the bottom of the screen that says "Wi-Fi Connect".
10
Select "Router mode", then "Next". Enter the Wi-Fi router SSID and password for your home router.
11
After the IP camera receives this information, it will restart. Please wait for it to start up and connect to your Wi-Fi router. When it successfully connects, the status LED colour will turn orange. It may take up to 5 minutes.
12
Then select the camera name in the "uCare Cam" app to connect. Note: If the status LED colour does not turn orange, please check your Wi-Fi router and make sure the IP camera is within the signal area of your Wi-Fi router. Then try this setup again.
Install your IP camera by WPS connection mode
If your Wi-Fi router has a WPS (Wi-Fi Protected Setup) button, you can use it to set up the IP camera. (Must enable WPA/WPA2 encryption in Router). On the Wi-Fi router, you will see a button labelled "WPS". It may also be called "QSS" or "AOSS"
1
Setup Wi-Fi - WPS mode
Open the "uCare Cam" app

and select "Wi-Fi Setting" or "Wi-Fi Connect" at the bottom of the screen.
Select the tab:
then select the tab:
Next
WPS Setup mode
to enter Step 2 (see Figure 8).
2
Enter WPS mode
Power on your IP camera. The status LED on the IP camera will be green for about 15 seconds.
3
Programme Loading
The status LED will flash red for about 15 seconds.

Press the WPS button on your IP camera
Wait until the status LED flashes between red and green, then press and hold the WPS/RESET button on your IP camera for about 2 seconds to enter WPS mode. The status LED will be flashing green.

Enter WPS mode on the Wi-Fi router
Press the WPS button on the Wi-Fi router

Selecting the Wi-Fi router
Select the Wi-Fi router of your choice in the screen (see Figure 9).
Then select the tab:
Next
to enter next step (see Figure 10).
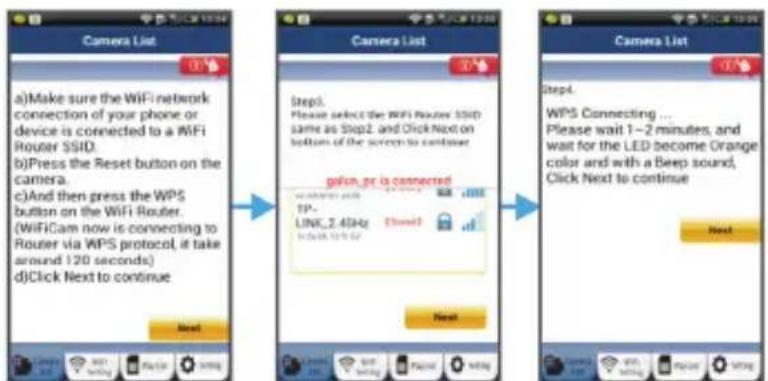
Figure9
Figure10 Figure8

IP camera connects with Wi-Fi router
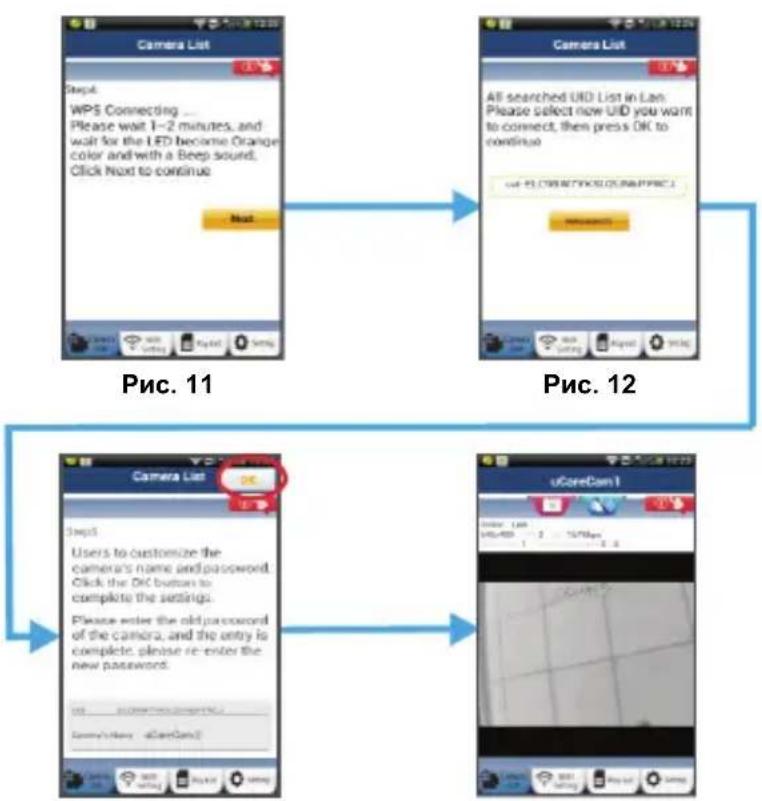
Wait about 1-2 minutes. If the IP camera is successfully connected to the Wi-Fi router, the status LED will become orange.
Otherwise the status LED will become a flashing red light. If the setup is not successful, please go back to Step 1 and try again.

If successful, select the tab:

(see Figure 11), and follow the instructions.
Please enter a camera name and password for security and

select the Tab: (see Figure 13).
The IP camera will automatically enter the viewing screen (see Figure 14).
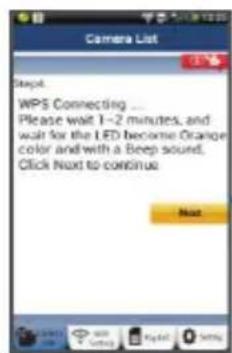
Figure11
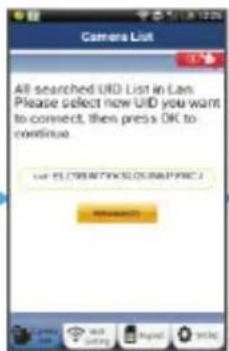
Figure12
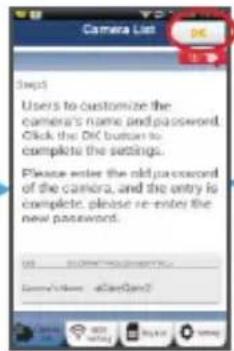
Figure13 Figure14
Start up the IP camera after the Wi-Fi connection has been completed
1
Power On
Plug the power adapter DC connector into the DC input port of the IP camera and then plug the power adapter into a wall outlet. The status LED on the IP camera will turn green for about 15 seconds.
2
Programme Loading
The status LED will flash red for about 15 seconds.
3
Searching Wi-Fi Router
The status LED will flash green until the Wi-Fi router is found (up to 5 minutes). Once the router is found, the status LED will become orange.
If the IP camera cannot connect to the Wi-Fi router, please check the Wi-Fi router status or re-install.
In the app, select the camera name that is shown in the Camera List, and the viewing window will open(see Figure 15).
Add already installed IP camera to the app
ANDROID (for Apple go to: Step 5)
1
Open the "uCare Cam" app and select:

Click here to import installed Wi-Fi Camera
In the Camera List Window screen (see figure 16) for adding an IP camera.
2
Select the tab:
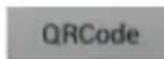
Your device will now enter the QR code mode.
Note: you need to have a QR code scanner installed on your device.
3
Locate the QR code on the backside of the IP camera and scan the QR code.
After scanning the QR code, the UID (Unique ID code) appears in the screen of your device (see Figure 17).

Enter a personal camera name and password and select the tab:
(see Figure 17).
The new camera will be added to the list
(see Figure 18).
Figure16 Figure 17 Figure 18
APPLE

Open the App "uCare Cam".


Select, in the camera list window, the "+" sign on the right top of the screen.

Select option "Scan camera QR code".
Note: you need to have a QR code scanner installed on your device.

Locate the QR code on the backside of the IP camera and scan the QR code.

The UID (Unique ID code) will show up after scanning the QR code.
Enter a personal camera name and select "DONE" on the top right side of the screen.

For further explanation of the app, the IP camera and the FAQ, please check the FULL manual (English only) on the CD supplied with this product.
Product description:
SEC-IPCAM100B (W)
- Wi-Fi antenna
- Light intensity sensor
- IR LED
- No function
- Microphone
- LED indicator
- WPS/Reset button
- Micro SD card slot
- Loudspeaker
- Connection for camera mount
11.5V DC input

SEC-IPCAM105B (W)
- LED indicator
- Light intensity sensor
- IR LED
- Microphone
- WPS/Reset button
- Micro SD card slot
- 5V DC input

Safety precautions:


To reduce risk of electric shock, this product should ONLY be opened by an authorised technician when service is required. Disconnect the product from mains and other equipment if a problem should occur. Do not expose the product to water or moisture.
Maintenance:
Clean only with a dry cloth. Do not use cleaning solvents or abrasives.
Warranty:
Any changes and/or modifications to the product will void the warranty. We cannot accept any liability for damage caused by incorrect use of this product.
Disclaimer:
Designs and specifications are subject to change without notice. All logos, brands and product names are trademarks or registered trademarks of their respective holders and are hereby recognized as such.
Disposal:
- This product is designated for separate collection at an appropriate collection point. Do not dispose of this product with household waste.
- For more information, contact the retailer or the local authority responsible for waste management.
This product has been manufactured and supplied in compliance with all relevant regulations and directives, valid for all member states of the European Union. It also complies with all applicable specifications and regulations in the country of sales.
Formal documentation is available upon request. This includes, but is not limited to: Declaration of Conformity (and product identity), Material Safety Data Sheet and product test report.
Please contact our customer service desk for support:
via website: http://www.nedis.com/en-us/contact/contact-form.htm#news
via e-mail: service@nedis.com
via telephone: +31 (0)73-5993965 (during office hours)
NEDIS B.V., De Tweeling 28, 5215 MC 's-Hertogenbosch, THE NETHERLANDS
DEUTSCH
Einführung:
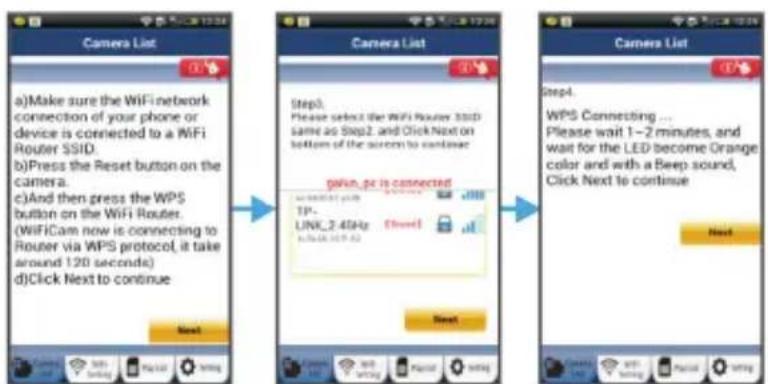
Image 9
Image 10 Image 8


Image 16 Image 17 Image 18
APPLE

A Anything's done.
A thing's done.
A thing's done.
A thing's done.
10
Selection are router Wi-Fi
Söka after Wi-Fi-router
Nume administrator: admin
Parola administrator: 0000


Figura 1
Instalati camera IP in modul de connectare WPS
Pntote to koupti WPS tnc kappaepaic IP
AvoicTe Tny eapouyn "uCare Cam".


AnoTo Tnapato AioTac Kaepaoc, EIIAEgTe To OuMoO +" Otnv Navw DExia yovia Tns oovns.

ETIIAEET "Scan camera QR code".
Administratorcode: 0000

Fig. 1
"Kameralistevindue"
Sog after Wi-Fi-routeren
Status LED-indikatoren blinker gront, indtil Wi-Fi-routeren er fundet (dette tager op til 5 minutter).
PexIM CBy3n C MapUpyTu3aTopoM
OxKdntecb, KOrda CBeToIOoHbI INHdkaTOp HauHET NooUpeepHO Mrratb KpaChbIM 3eJIeHbIM.
Приимейсане:
Ecnn HndkaTOp He Muraet KpaChbIM n 3eneHbIM, cIeNyET nepe3arpy3ntb IP-kamepy, Haxab Ha KhoNkY «WPS/c6poca» n ydepxNBaee He MeHee 10 cekyHd.
O haayane npouecca IPE3AΓPY3KN IP-kaempbI CBnTeBCTByET CneyuOooee: ropnt 3eJehb CBeTOIOHbI INDNKATOp, 3aTeM Dba pa3a MInHET KpaCHbI INDNKATOp N 3arOpNTc3eJehbIM. B 3TOT MOMENT CNeDyET OTNCTNb KHONKY IOXJaTbcra, KOJa CBeTOIOHbI INDNKATOp Haunet NoopeEHO MNrTaB KpaCHbIM 3eJehbIM.
TTO6bI nepeuTu K uary 2 (cm. puc. 8).
2
BknHueHne pexnMa WPS
BkIIOUHTe IP-kaMepy. CBeToIDnOHNb HINdNkATOp COCToHnHa Kopnyoe IP-kaMepb3aTropTc3eNeHbIM Ha 15 cekyHd.
3
3arpy3ka nporpapMMbI
CBETOIOHOHbI INDnKaTOp COCTOHN 3aTOpNTcKpaCHbIM Ha 15 ceKyHd.
4
Haxmnte KhoNky WPSHa Kopnyce IP-kaMepbl
Ioxntecb, KOrda CBeToOnOHy IHNikatop COCToHnHaUHT NoOuepeHNO MInaTb KpaHbIM n 3eHbIM. BKnouHte pexim WPS, Haxkab KhoNky «WPS/c6poca» n ydePknBaar ee 2 cekyHdbI. CBeToOnOHy IHNikatop COCToHn6 Byet MInaTb 3eHbIM.
5
BkHoueHne pexnMa WPS Ha MappyTu3aTope Wi-Fi
EcII IN IP-kaMepa He cMOKET NOKJIIOHTbcra K MapIpyTn3aTopy Wi-Fi, CBeToNDHbI INdIKaTOP COCTOHN 6yJeT MIRATb KpaChbIM. Ppi OTCyTCTBNI NOKJIIOUeHn IOBTOPTe npoueeC yCTaHOBKn eue pa3, HauHHa c 7ara 1.
8
EcnnoKnoeHne yctaHOBnHO,HaXmTe Ha BKnaKy
Next
(cm.pnc.11)nCneDynte HNCTpyKunm Ha 3kpaHe.
Ykaknte mMa Kamepbi npoJIb (B cIeJx 6e3onacHocTn) n
9
HaKMTe Ha BklaIky (cm.pnc.13).
B npnloxeHnn abTOMaTHueckn oTo6pa3ntcK oKHO npocMToPa (cm. pnc. 14).
Pnc.13 Pnc.14
3anyck IP-kamepbI npu yctaHOBHeHHOM coeHHeHH Wi-Fi
1
BkIoueHne
BcTaBbTe 6nKa nHa B pa3bEm nHa Ha IP-kaMepe N noKnUoyte 6nK nHa K 3JeKtpocetn. CBeToNDnHb INDnKaTOp COCTOaHn Ha Kopnyce IP-kaMepbI 3aRopntc 3eNeHbIM Ha 15 cekyHd.
2
3arpy3ka nporpammbi
CBeToIIOHbI INHdkaTOp COcTOHn 3aropntcKpaChbIM Ha 15 cekyHd.
3
Ponck MapspyTu3aTopa Wi-Fi
Bo Bpemn noncka Mapuyn3atopa Wi-Fi cBeToIOHbI INHdkaTOp COCTOHN6ydt Mrrab 3eJIeHbIM (He 60nee 5 MNHyT).
KordaMapuTyN3aTOp 6yTeO6hApUkeH, CBeToOnoHbI INnKaTOp COCTOHN3aRopuTCr opAHKeBbIM.
B cnyuae oTcYCTBnra coeHHeHnmaexdy IP-kamepo n MapuTy3aTopom Wi-Fi cneyet npOBepntb coToarHne 6ecnpoBOHO rMapuTy3aTopa nIN NOBtOpNTb npOcecc yCTaHOBKn.
Посл e Вьбopa kamepb i3 cncka B npinoxeHn uCare Cam noBntcR okno npocmoTpa (cM. pnc. 15).