X7.1 - Coffee machine ILLY - Free user manual and instructions
Find the device manual for free X7.1 ILLY in PDF.
User questions about X7.1 ILLY
0 question about this device. Answer the ones you know or ask your own.
Ask a new question about this device
Download the instructions for your Coffee machine in PDF format for free! Find your manual X7.1 - ILLY and take your electronic device back in hand. On this page are published all the documents necessary for the use of your device. X7.1 by ILLY.
USER MANUAL X7.1 ILLY
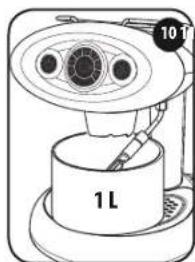
Serbatoio acqua: 1,0 litri
Pompa: 15 bar
Potenza consumata in power off: < 0.5W
IMPORTANT SAFETY MEASURES 25
USING THE MACHINE 25
INSTALLATION OF THE APPLIANCE 26
CLEANING THE APPLIANCE 26
IF THE APPLIANCE BREAKS DOWN 26
INCORRECT USE OF THE MACHINE 27
INSTALLING AND USING THE MACHINE 28
SWITCHING THE MACHINE ON AND OFF 29
STAND-BY 29
MAKING COFFEE 30
PROGRAMMING THE MACHINE TO DISPENSE A CERTAIN AMOUNT OF COFFEE. 31
TO MAKE CAPPUCCINO 32
TO HEAT WATER 33
MAKING COFFEE AFTER USING THE STEAM WAND. 33
DESCALING 34
CLEANING AND MAINTENANCE 36
SUGGESTIONS 37
WARRANTY LIMITATIONS 37
TROUBLESHOOTING 38
GENERAL NOTICE
Read the instruction manual and the warranty limitations carefully.
The machine must be connected to a properly grounded power outlet. The machine must be kept clean by frequently washing the drip plate, drip tray, capsule holder, water tank, and steam wand.
EXTREMELY IMPORTANT: never immerse the machine in water or put it in the dishwasher. The water in the tank must be replaced regularly.
Do not use the machine without water in the tank. After changing the water, return the tank to the machine, making sure it's correctly inserted.
We recommend descending the machine at least once every 2 months using a descaler specially designed for espresso machines, following the instructions in the DESCALING section.
The machine is equipped with a valve to maintain constant pressure, which may cause some water to drip from the capsule holder.
TECHNICAL DATA
Endlosure: PC+ABS (EU), PC (USA)
Thermoblock core: steel
Water tank: 1.0 litre
Pump: 15 bar
Coffee pressure during extraction: 15 bar
Dimensions: 200 × 340 × 350 ~mm
2 solenoid valves
Circuit board with the following functions:
- automatic coffee brew volume setting
- precision temperature control (coffee and steam)
- descending indicator
- thermoblock temperature indicator
- warning beep
- automatic descending program
- power save
Steam wand
Cup rack
Weight without packaging: 5kg
Voltage: 220-240V, 50/60Hz (EU); 120V, 60Hz (USA)
Power: 1200-1380W (EU), 1200W (USA)
Power consumption in power off mode: < 0.5W
Weighted sound level is below 70dB.
The manufacturer reserves the right to make changes or improvements without prior notice.
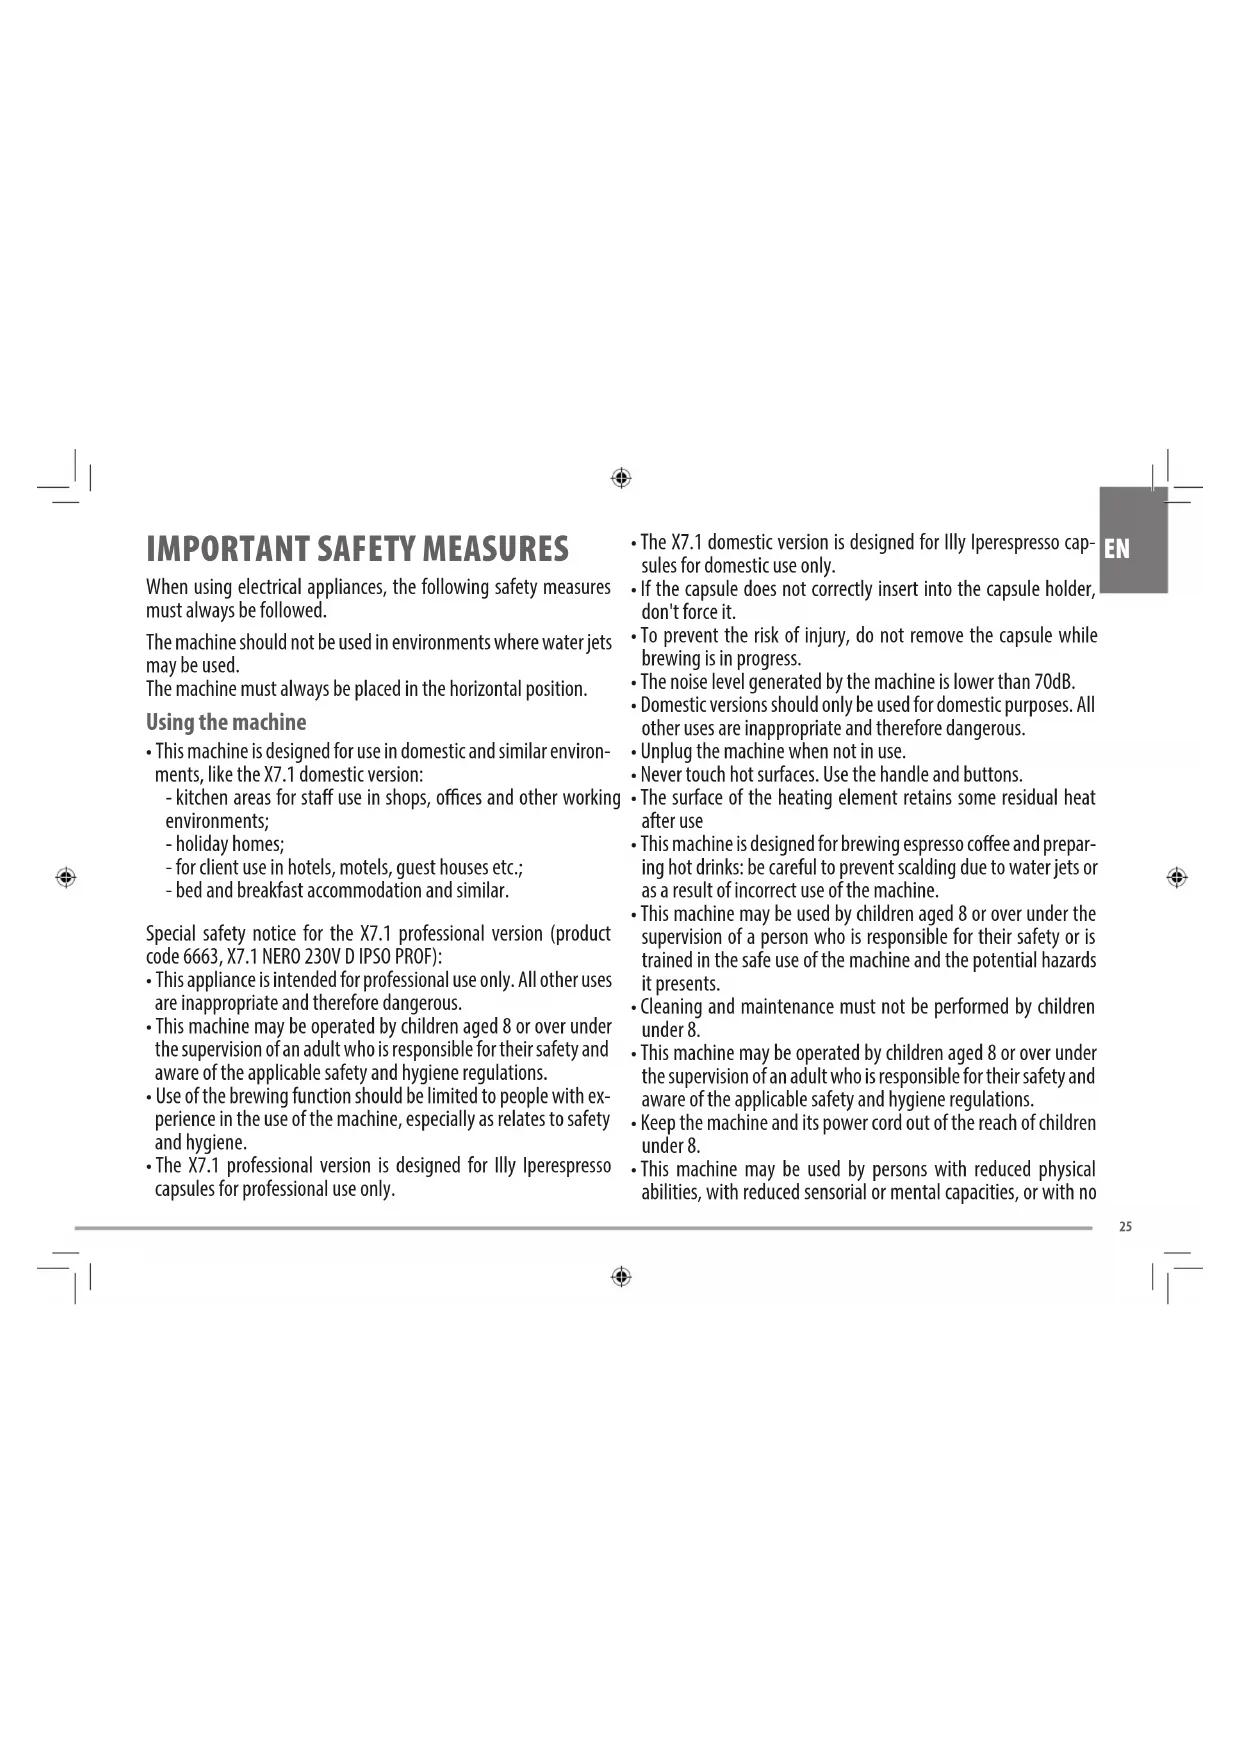
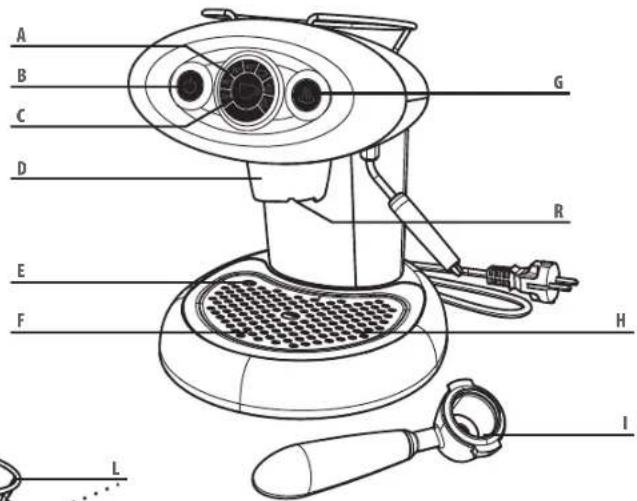
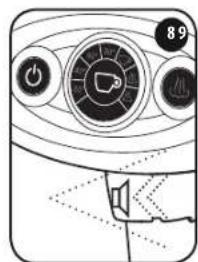
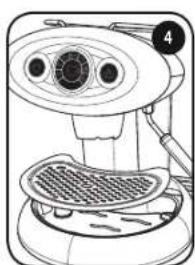
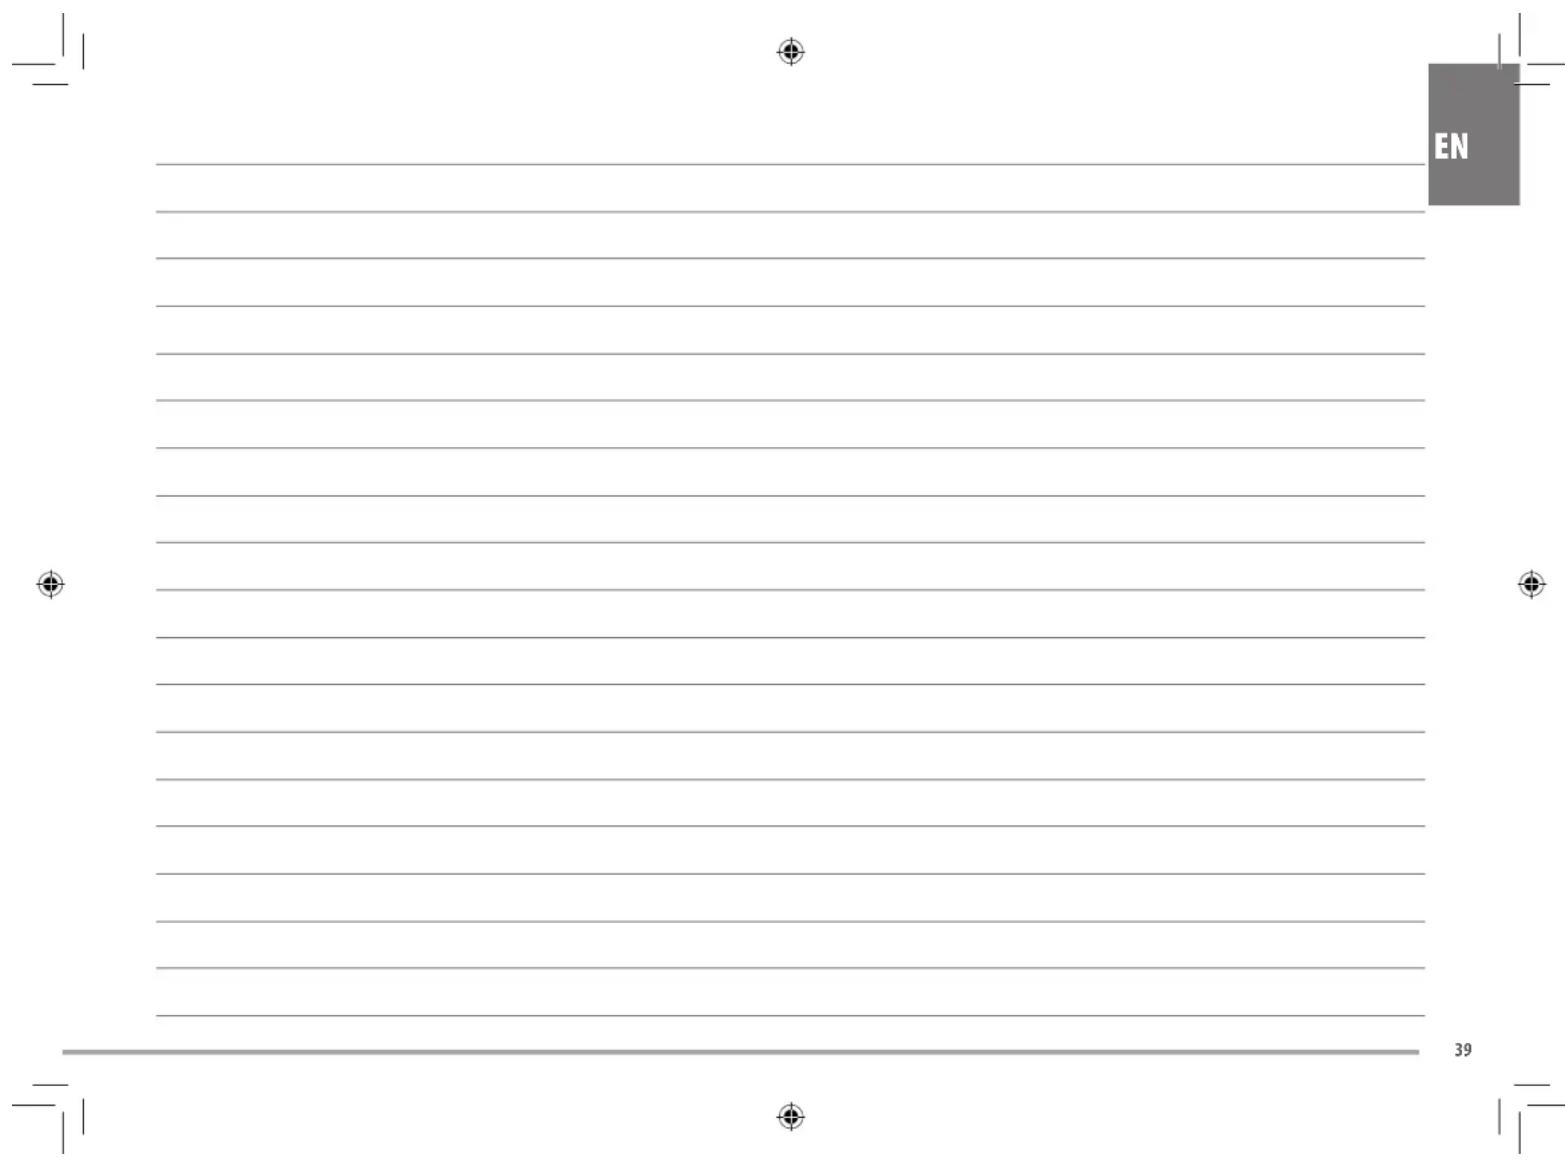
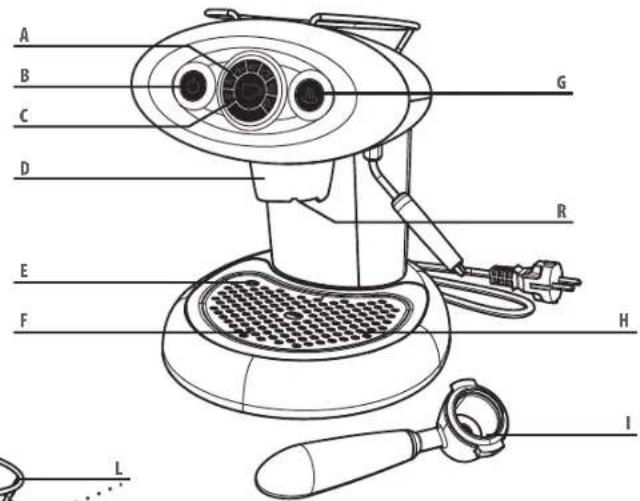
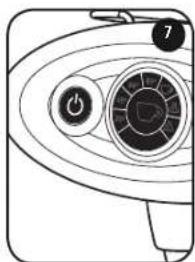
EN MACHINE PARTS
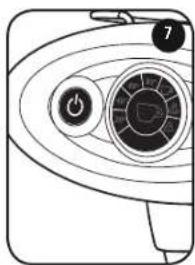
A LUMINOUS TEMPERATURE DIAL (indicates machine status)
B ON/OFF BUTTON
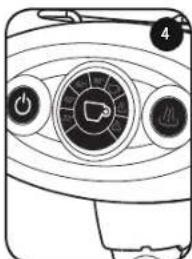
C BREW BUTTON(starts and stops brewing of coffee)
D COFFEE DISPENSER HEAD
E DRIP TRAY FULL INDICATOR
F CUP STAND/DRIP PLATE
G STEAM BUTTON
H DRIP COLLECTOR TRAY (under the cup stand)
CAPSULE HOLDER (Iperespresso)
L CUP RACK
M INTERNAL BEEPER (emits warning audio tone)
N POWER SUPPLY CORD
O STEAM WAND
P WATER TANK
Q DATA PLATE(under base)
R CAPSULE HOLDER ENGAGED POSITION
IMPORTANT SAFETY MEASURES
When using electrical appliances, the following safety measures must always be followed.
The machine should not be used in environments where water jets may be used.
The machine must always be placed in the horizontal position.
Using the machine
- This machine is designed for use in domestic and similar environments, like the X7.1 domestic version:
- kitchen areas for staff use in shops, offices and other working environments;
- holiday homes;
- for client use in hotels, motels, guest houses etc.;
- bed and breakfast accommodation and similar.
Special safety notice for the X7.1 professional version (product code 6663, X7.1 NERO 230V D IPSO PROF):
- This appliance is intended for professional use only. All other uses are inappropriate and therefore dangerous.
- This machine may be operated by children aged 8 or over under the supervision of an adult who is responsible for their safety and aware of the applicable safety and hygiene regulations.
- Use of the brewing function should be limited to people with experience in the use of the machine, especially as relates to safety and hygiene.
-
The X7.1 professional version is designed for Illy Iperespresso capsules for professional use only.
-
The X7.1 domestic version is designed for Illy Iperespresso capsules for domestic use only.
- If the capsule does not correctly insert into the capsule holder, don't force it.
- To prevent the risk of injury, do not remove the capsule while brewing is in progress.
The noise level generated by the machine is lower than 70dB. - Domestic versions should only be used for domestic purposes. All other uses are inappropriate and therefore dangerous.
- Unplug the machine when not in use.
- Never touch hot surfaces. Use the handle and buttons.
- The surface of the heating element retains some residual heat after use
- This machine is designed for brewing espresso coffee and preparing hot drinks: be careful to prevent scalding due to water jets or as a result of incorrect use of the machine.
- This machine may be used by children aged 8 or over under the supervision of a person who is responsible for their safety or is trained in the safe use of the machine and the potential hazards it presents.
- Cleaning and maintenance must not be performed by children under 8.
- This machine may be operated by children aged 8 or over under the supervision of an adult who is responsible for their safety and aware of the applicable safety and hygiene regulations.
- Keep the machine and its power cord out of the reach of children under 8.
- This machine may be used by persons with reduced physical abilities, with reduced sensorial or mental capacities, or with no
experience or knowledge of its use, only when under the supervision of a person who is responsible for their safety, or when instructed in the safe use of the machine and the potential hazards it presents.
Children should be kept under supervision to prevent them from playing with the machine.
- Only use the machine in closed areas where it is protected from the weather.
- To protect against fire, electric shock and injury, never immerse the power cord, plug or the machine itself in water or other fluids.
- Never use the appliance for any purpose other than that intended.
- Never rest the appliance on electrical or gas hobs, or place it in a hot oven.
- The machine should be switched on only when it is being used. After use, it should be switched off by pressing the power button and disconnecting the plug from the power socket.
- Before unplugging the machine, make sure it is switched off (ON/OFF button unlit).
- Using accessories not recommended by the manufacturer may result in fire, electric shock or personal injury.
Installation of the appliance
- Read the instructions carefully.
- Never install the machine in a place where the temperature may reach 0^ or lower (if the water in the machine freezes it may damage it) or 40^ or higher.
-
Check that the mains voltage corresponds to the requirements indicated on the machine data plate. The machine should only be connected to a 6A mains outlet when powered at 230VAC, or 12A when powered at 120VAC and correctly earthed.
-
If the plug and socket are not compatible, have the correct plug fitted by an authorized service centre.
- Place the machine on a counter top away from water taps and sinks.
- After removing the packaging, check that the appliance is in perfect condition before installation.
- Do not leave the packaging materials within the reach of children.
Cleaning the appliance
- Make sure the machine is switched off; the ON/OFF button should be unlit.
- Remove the plug from the power socket.
- Wait until the appliance is cool before cleaning.
- Clean the body and accessories with a damp cloth, then wipe with a non-abrasive dry cloth. Do not use detergents.
- Never train a water jet on the machine.
If the appliance breaks down
- Do not use the appliance if the power cord or plug are damaged, if the appliance shows signs of malfunctioning, or if it is damaged. Take the machine to the nearest authorised service centre for checks or repairs.
- If the power cord is damaged it must be replaced by the manufacturer or an authorized service centre.
- In case of damage or malfunction, turn off the appliance and do not tamper with it. For repairs, contact a service centre authorized by the manufacturer and demand the use of original spare parts only. Failure to comply with these instructions may compromise the safe operation of the appliance and will result in the forfeiture of warranty rights.
Incorrect use of the machine
- Domestic versions should only be used for domestic purposes. All other uses are inappropriate and therefore dangerous.
- The manufacturer shall not be held liable for any accidents caused by lack of earthing or earthing that is not compliant with applicable laws.
- The manufacturer shall not be held liable for possible damage caused by improper, incorrect or unreasonable use.
EN
INSTALLING AND USING THE MACHINE
Before connecting the coffee machine to the mains, carefully read the safety instructions in the section IMPORTANT SAFETY PRECAUTIONS.
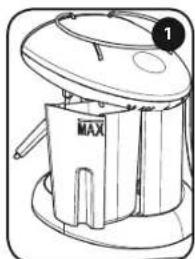
Make sure the machine is disconnected from the mains power supply.
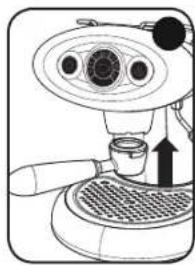
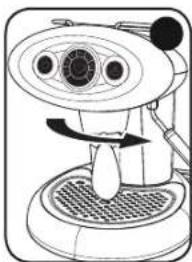
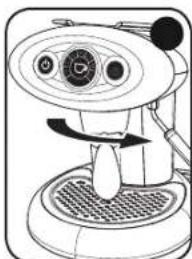
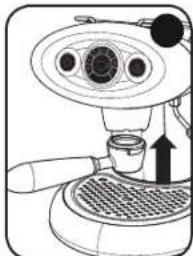
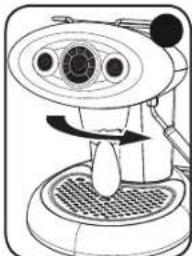
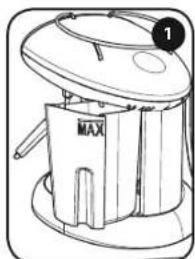
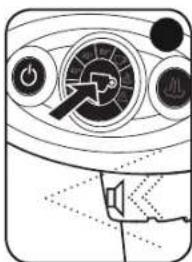
Insert the capsule holder from below and twist it to the right until it locks in position.
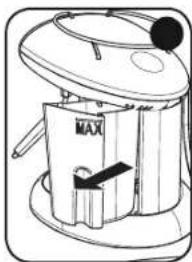
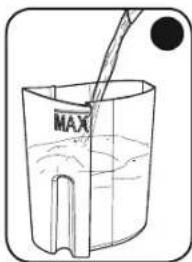
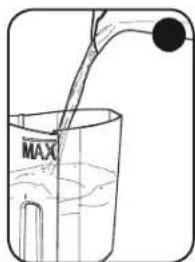
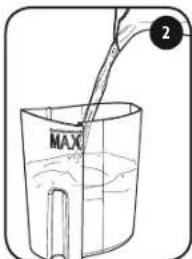
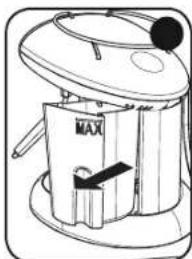
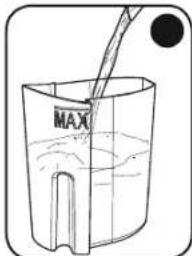
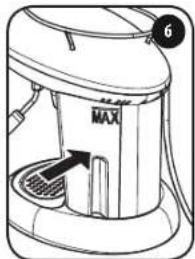
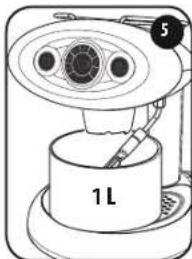
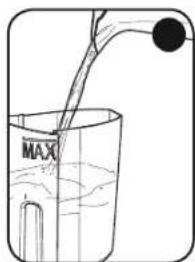
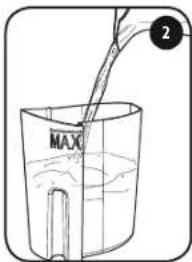
Pull out the water tank to remove it and fill with fresh drinking water up to the MAX mark.
CAUTION: only put fresh, uncarbonated drinking water in the water tank. Hot water and other liquids can damage the tank. Do not operate the machine without water in the tank.
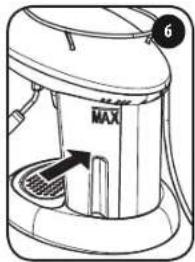
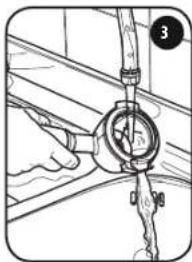
Fit the tank into the machine;
make sure it's correctly
inserted.
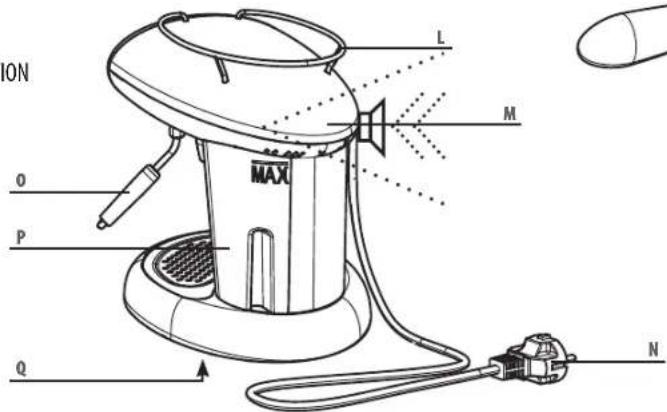
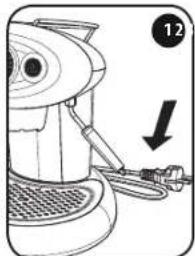
Insert the plug into the socket. See the next section for instructions on switching on and using the machine.
NOTE: we recommend saving the original packaging (at least during the warranty period) in the event the machine needs to be sent for repair to an authorized service centre.
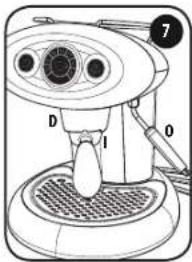
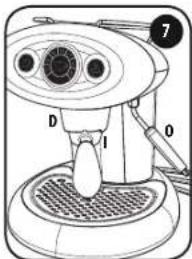
CAUTION: When the machine is working, the dispenser head (D), steam wand (O) and metal parts of the capsule holder (I) are hot and may cause burns if touched.
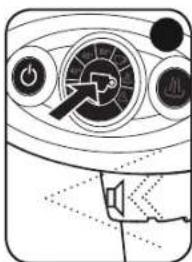
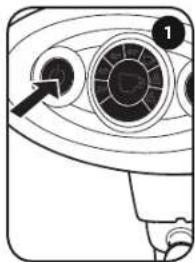
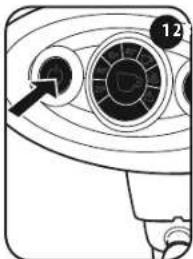
SWITCHING THE MACHINE ON AND OFF
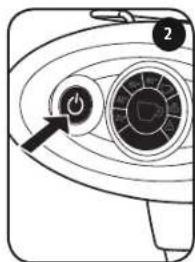
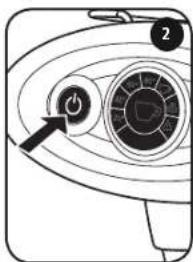
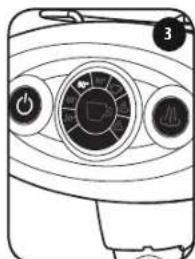
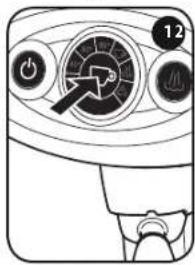
Before switching the machine on, check the level in the water tank; if necessary, add water as described. Remove and rinse the drip tray every time you fill the water tank. To switch the machine on, touch and hold the button until it lights up.
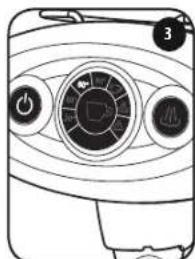
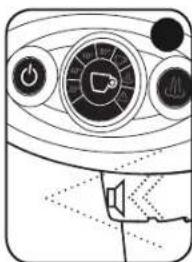
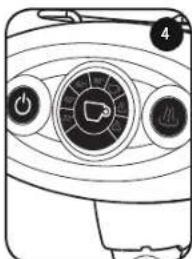
The luminous symbols on the dial light up in sequence as the temperature of the thermoblock rises. After a few minutes, the symbol on the brew button lights up and the machine emits a short beep to indicate that it has reached operating temperature.
NOTE: Run the machine for a few times without a capsule when using for the first time or after a long period of inactivity.
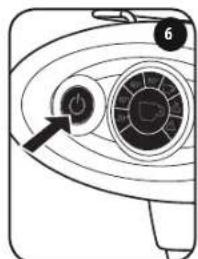
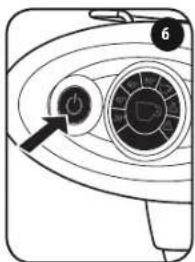
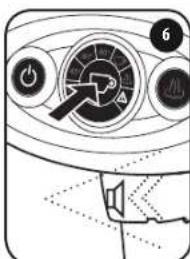
To switch off the machine, press and hold the button until all lights on the front panel go off; Do not remove the plug from the power socket when the machine is switched on.
Stand-by
This machine is designed to respect the environment and features an eco-power mode to reduce its energy consumption when not in use.
After 30 minutes of inactivity, the machine automatically shuts down.
5 minutes before automatic shutdown, the button flashes. Press the button to keep the machine switched on.
EN
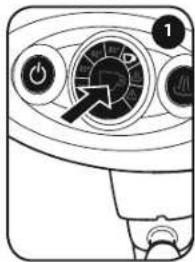
MAKING COFFEE
The X7.1 is designed for use with Illy Iperespresso capsules only.


To prepare a coffee, proceed as follows:
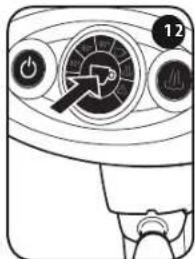
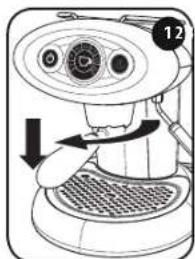
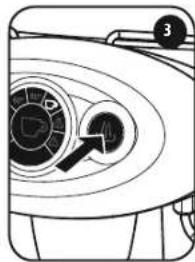
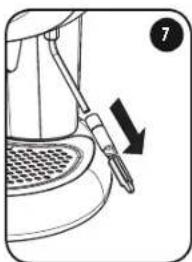
- Twist the capsule holder to the left and disengage it from the dispenser head.
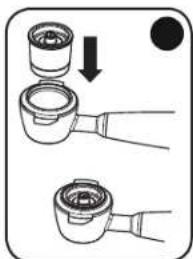
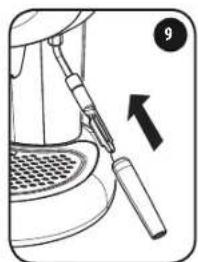
- Insert the capsule as shown in the figure.
NOTE: the capsule should fit snugly into the holder; if not, remove it and re-insert it properly.
NOTE: After the brew button is pressed, it takes the machine a couple of seconds to start dispensing coffee; this slight delay is perfectly normal.
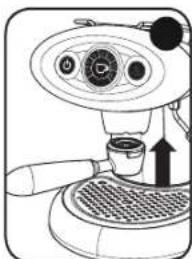
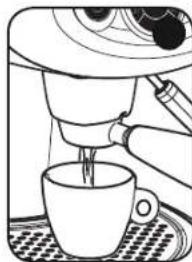
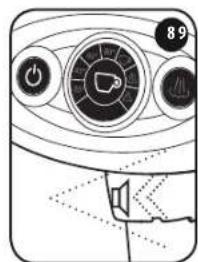
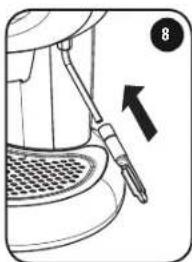
- Insert the capsule holder in the dispenser head; twist the capsule holder to the right until it locks in position.
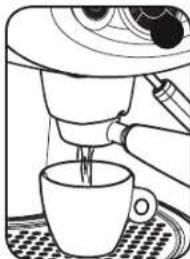
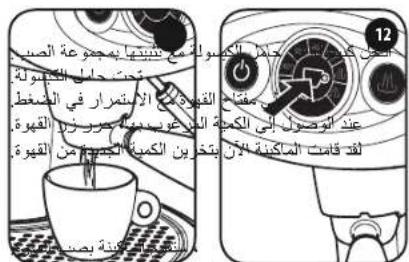
- Make sure the brew button is lit.
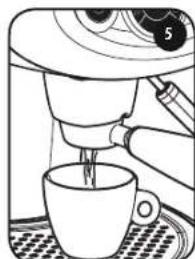
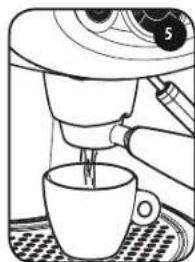
Press and release the brew button machine dispenses the desired amount of coffee. To stop dispensing early, press the button again.
To make another coffee, replace the used capsule and repeat the operation described above.
CAUTION:
- Each capsule contains a single dose of coffee. Capsules should not be re-used.
- For safety reasons, the machine automatically switches off the dispenser function after it has been running for about a minute.
- Don't forget to empty and clean the drip tray regularly.
PROGRAMMING THE MACHINE TO DISPENSE A CERTAIN AMOUNT OF COFFEE
You can programme the X7.1 to dispense exactly the amount of coffee you want: just press the brew button when the machine has dispensed the desired amount: the machine will memorize the amount and stop dispensing. You can also manually programme the amount of coffee you want the machine to dispense.
Programming a new fill level setting:
-
Insert a capsule in the capsule holder and click it into place in the dispenser head.
-
Place a coffee cup below the capsule holder.
- Press and hold the brew button.
- Once the machine has dispensed the right amount of coffee, release the button.
- The new setting has been stored in the machine's memory.
You can use the manual dispensing mode to adjust the amount of coffee dispensed for each new cup without changing the stored settings.
Manual dispensing:
- Press and hold the brew button for 3 seconds. The machine dispenses coffee.
- Once the machine has dispensed the amount of coffee you want, press the button again to stop dispensing.
The amount dispensed is not stored in the machine's memory.
EN
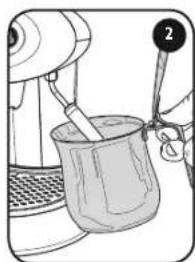
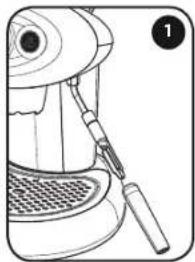
TO MAKE CAPPUCCINO
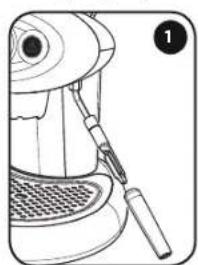
The steam wand which comes with the machine allows you to froth milk for cappuccino.
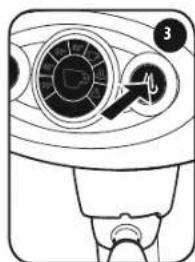
Make one or more cups of coffee, following the instructions above. To froth the milk:
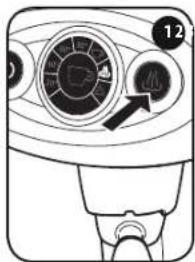
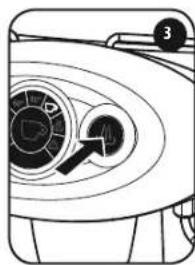
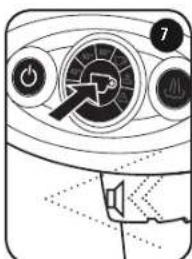
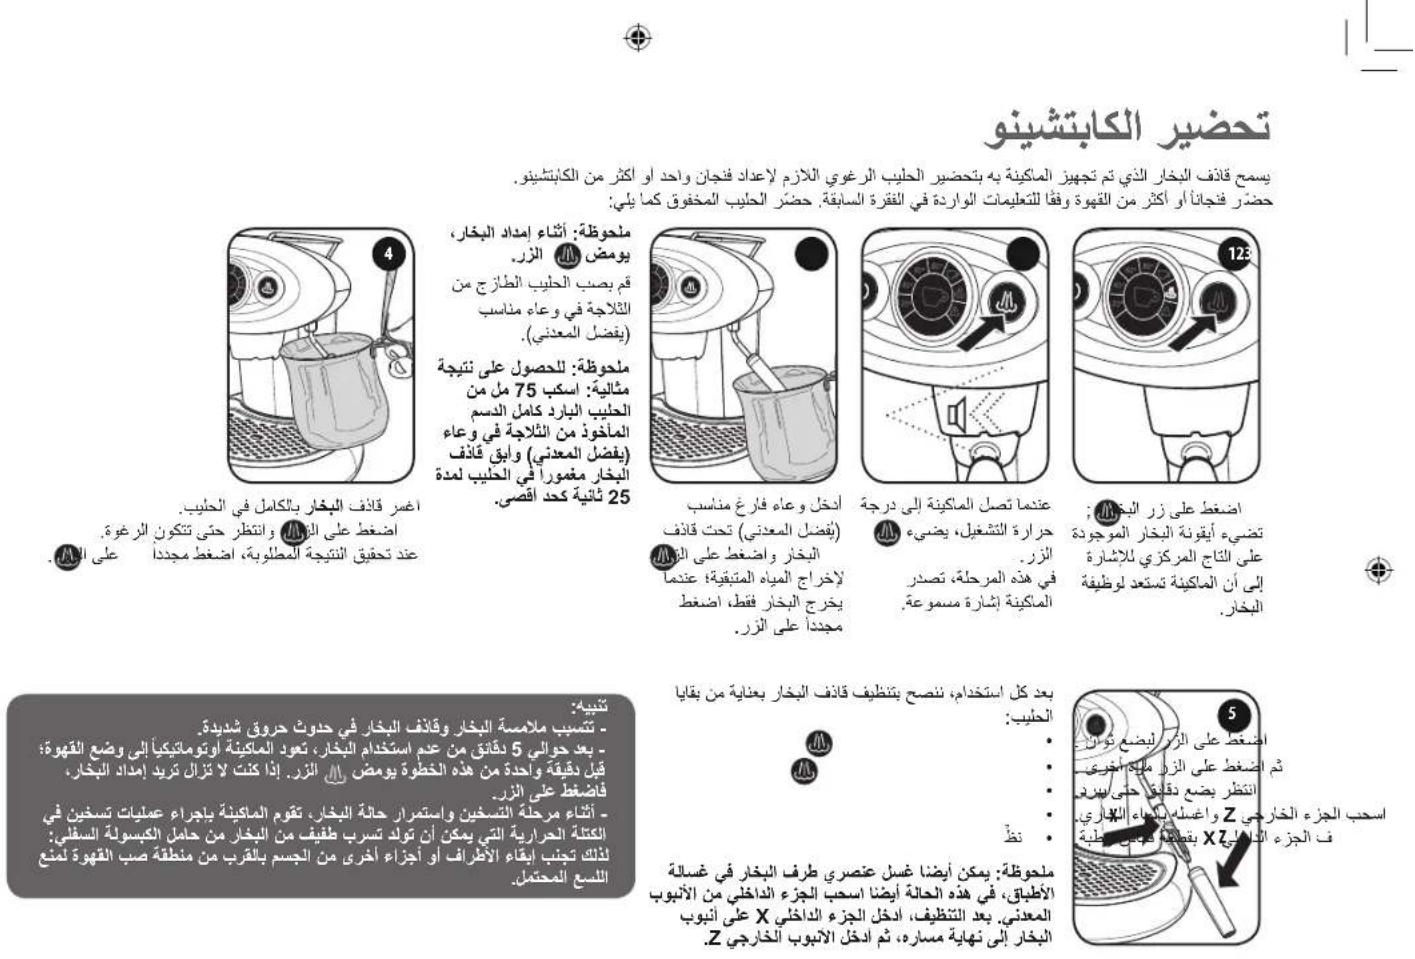
Press the steam button the steam symbol on the dial lights up to indicate that the machine is preparing to enter "steam" mode.
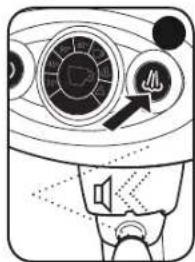
When the machine reaches the required temperature, the button lights up.
The machine emits a beep.
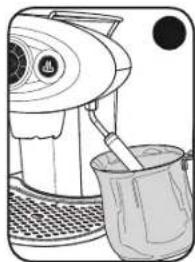
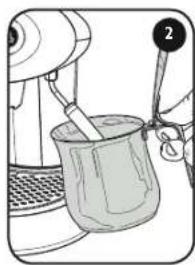
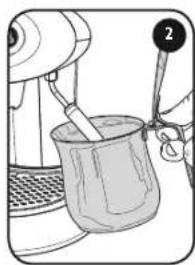
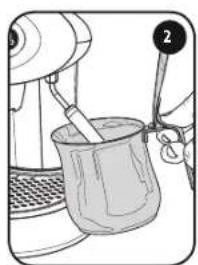
Insert the steam wand into a suitable (preferably metal) empty recipient and press the
button to drain off remaining water; once the wand is emitting only steam, press the button again to stop it.
NOTE: When the steam wand is dispensing steam, the button flashes. Pour some cold milk into a suitable recipient (preferably a metal jug).
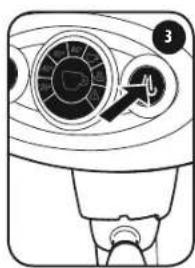
NOTE: For best results: pour 75 ml of whole cold milk, taken fresh from the fridge, into a suitable recipient (preferably a metal jug) and immerse the steam wand in the milk for no more than 25 seconds.

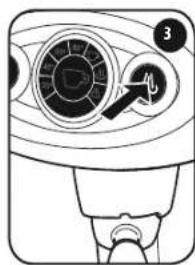
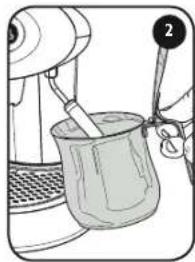
Fully immerse the steam wand in the milk. Press the button to froth the milk.
Once the milk is foamed to the right consistency, press the button again to stop frothing
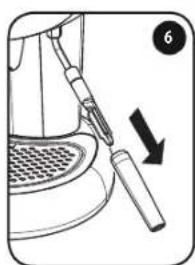
Carefully remove all residue of milk from the steam wand after each use:
- Press and hold the button on for a few seconds. Release.
- Press the button again.
- Allow the machine to cool down for a few minutes.
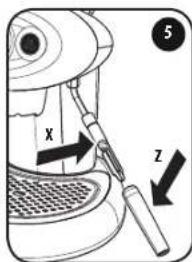
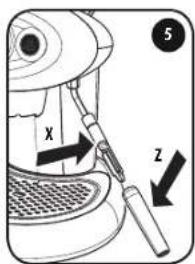
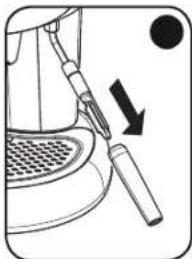
- Remove the tip Z and wash it under running water.
Clean the internal nozzle X with a damp cloth.
NOTE: Both parts of the steam wand are dishwasher-safe. Before placing them in a dishwasher, remove the inner part of the metal tube. After cleaning, slide the inner nozzle X onto the steam tube and push until it clicks into place. Then fit the outer tip Z back into place.
CAUTION:
- The steam wand and the steam it dispenses can cause serious burns.
- When the steam function has been inactive for about 5 minutes, the machine automatically returns to coffee-maker mode; one minute before switching mode, the button begins to flash. Press this button to remain in steam mode.
- During the heating phase and once it's in steam mode, the machine brings the thermoblock up to temperature. This may cause small amounts of steam to escape from the capsule holder: to avoid the risk of scalding, keep the hands and other parts of the body well away from the coffee dispensing head.
TO HEAT WATER
The steam wand which comes with the machine also dispenses hot water to make teas and infusions.
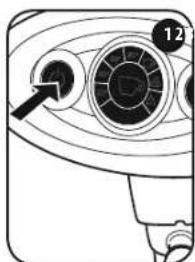
Make sure the brew button
Proceed as follows:
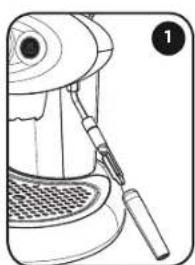
Clean any milk residue from the steam wand.
Place a metal jug under the steam wand.
Press and hold the steam button at least 3 seconds. The wand starts to dispense hot water and the steam button flashes rapidly. Press the steam button again to stop the wand from dispensing hot water.
Never make an espresso immediately after using the steam wand, as the water passing through the thermoblock is too hot for making coffee and will compromise its flavour.
The brew button is disabled when the temperature of the thermoblock is too high.
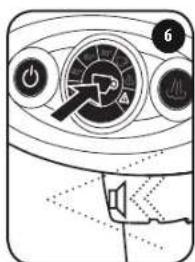
To return to coffee-maker mode, press the brew button and wait for the coffee cup symbol to light up bring the cooling phase (about 10 minutes), the large coffee cup symbol flashes.
To return the machine to coffee-maker mode more quickly (about 1 minute), proceed as follows:
- Place a metal jug under the steam wand.
Press and hold the steam button seconds.
The steam wand dispenses the programmed amount of hot water; the dispenser shuts off automatically.
EN
DESCALING
- If the warning symbol on the outer dial starts flashing (once every 2 seconds), you need to descale your machine. This is a two-step process: first, descending (approx. duration 14 minutes), followed by rinsing (approx. duration 3 minutes).
- Limescale accumulation is a normal result of machine use. The machine has an automatic program that helps optimize cleaning and removes scale deposits from the interior. Failure to descale your machine may result in malfunctions that are not covered by the warranty.
- For the descaling procedure, refer to that indicated in the corresponding chapter in this manual. Use only descaling products for coffee machines, dissolved according to the procedures indicated in the instructions for the product.
- In the event of a power outage during the descending procedure, the descending cycle resumes at the point it was interrupted.
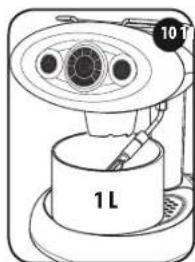
Switch the machine off. - Remove the water tank and fill it with 1 litre of water (up to the MAX line). Remove the capsule holder.
- Pour the descending solution into the tank and mix until fully dissolved.
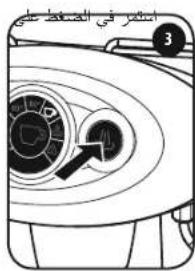
Switch the machine on: within 15 seconds of switching on, press and hold the button until the machine emits 4 beeps (3 short and 1 long). Release the button.
The button flashes: the machine is ready to start the descending cycle.
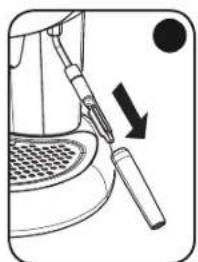
- Remove the tip from the steam wand to make the next operation easier.
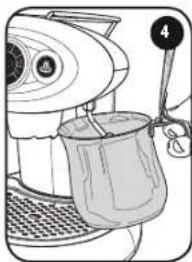
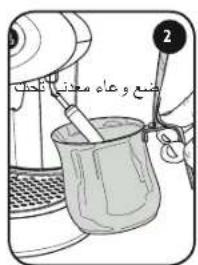
- Place a recipient of capacity of at least 1 litre under the dispenser head and steam wand.

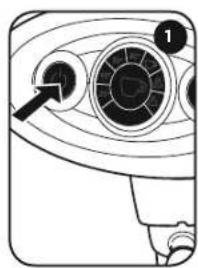
Press once and release the button to start the descending cycle. Buttons flax alternately. The machine's dispenser head and steam wand will intermittently emit water while the operation is in progress (duration: 14 minutes).
NOTE: the descending cycle can be put on hold by pressing the button. Press the button to resume the cycle.
A long beep indicates the descending phase is complete. The next step is to rinse the machine's water circuits to eliminate descending solution residue. The button keeps flashing.
- Remove the water tank and wash it thoroughly. Fill it with 1 litre of fresh water (up to the MAX line).
- Place the empty recipient of capacity of at least 1 litre back under the dispenser head and steam wand.
In it thoroughly. Fill it with 1 litre (pe).
Press once and release the button to start the rinsing cycle. Buttons
A beep indicates the rinsing phase is complete. The button lights up.
EN
CLEANING AND MAINTENANCE
The machine and its components should be cleaned at least once a week.
Do not use water which has been standing in the tank for a few days; pour it away and fill the tank with fresh drinking water.
Do not use ethyl alcohol, solvents, abrasive sponges and/or aggressive chemicals to clean the machine.
CAUTION: do not dry the machine or its components in a microwave or conventional oven.
To clean the machine, proceed as follows:
Switch off the machine and remove the plug from the power socket.
Remove the water tank and cover and wash them under running water.

Remove the capsule from the capsule holder if present and wash the capsule holder under running water.
- Remove the drip plate and wash with lukewarm water.
- Remove the drip tray and wash with lukewarm water.

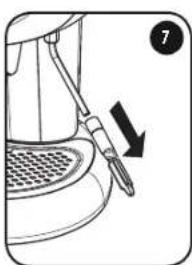
- Remove the outer tip of the steam wand.
- Remove the inner nozzle of the steam wand from the metal tube.
- After separating the two components, wash them separately with lukewarm water.


- After washing the components, fit the inner nozzle to the metal tube and then slide the outer tip into place.
NOTE: make sure the inner nozzle and outer tip are fitted tightly in place.
SUGGESTIONS
For optimum espresso flavour, don't forget to:
- change the water in the tank and empty the drip tray at least once a week;
- when possible, use soft (low calcium) water to prevent the buildup of limescale in the machine;
- serve the coffee in warm cups.
WARRANTY LIMITATIONS
The warranty does not cover failures caused by:
- lack of periodical descending
- operating the machine at voltages other than those indicated on the data plate (see MACHINE PARTS section);
- misuse or failure to follow instructions
changes made internally.
The warranty does not cover repair costs for machines that have been tampered with by unauthorized service centres.
Such costs will be entirely payable by the customer.
You are advised to:
not put the drip tray in the dishwasher;
- keep the inside of the water tank holder dry at all times.
Failure to follow these instructions may cause problems to the enclosure that are not covered by the warranty.
CAUTION:
Saving the original packaging (at least over the warranty period) is advisable in the event the machine needs to be sent to an authorized service centre.
Any damage caused due to transport without proper packaging is not covered by the warranty.
Disposal of used electric and electronic appliances, by private persons in the European Union.
The WEEE symbol used on this product means that it must not be disposed of together with other domestic waste but must be collected separately.
Consumers have the option of handing in used appliances to distributors, free-of-charge on a 1:1 basis, when they purchase a new product.
For further information about the collection of appliances to be scrapped, please contact the local authority in your town of residence, the local waste disposal service or the retailer where the product was purchased. Consumers are responsible for disposing of appliances in accordance with applicable law, and non-compliance may be subject to penalties.
The correct disposal of this product will contribute to protecting the environment, natural resources and human health.


ENTROUBLESHOOTING
| PROBLEM SOLUTION | |
| The proton does not light up when pressed. | Check the mains power connection; check the mains switch on your fuseboard. |
| The machine does not brew coffee. | Proceed as follows: - Fill the water tank; return it to its place, making sure it is properly inserted. - Remove the capsule holder from the dispenser head. - Wait for the button to light up (machine ready to brew). - Place a recipient under the dispenser head and press the coffee dispenser button. - Allow the machine to dispense water for a few seconds. - Interrupt the operation - Insert a new capsule in the capsule holder and click it into place in the dispenser head; dispense coffee as shown in the instructions. |
| The machine does not dispense steam when the button is pressed. Steam comes out but the milk is not foamy. | Scenario a) If the steam symbol on the outer dial is lit, wait for the steam button to light up. |
| Scenario b) If the steam symbol on the outer dial is not lit, press the steam button and wait for this button to light up (reheat). | |
| Scenario c) Possible obstruction of dispenser: switch the machine off, allow it to cool down (at least one hour); remove obstructions from the outlet holes in the steam wand. | |
| Water leaks from the dispenser head during use | Insert a new capsule in the capsule holder; twist the handle to click it into position and proceed to brew coffee as shown in the instructions. |
| Short, repeated beeps and flashing triangle symbol | Proceed as follows: - Switch the machine off. Fill the water tank. - Place a recipient under the steam wand and press the button. - Switch on the machine and wait about 10 seconds for the button to light up. |
| Triangle symbol flashing rapidly | Descale the machine |
| Water leaks from inside the machine Switch off the machine | machine and remove the plug from the power socket. |
| Water leaks from the water tank after filling | Empty the tank and apply pressure to the transparent rubber washer in the intake valve inside the tank. |
| Drops of coffee overflow from the capsule when the machine starts brewing | Minor dripping during the first couple of seconds of brewing is normal. |
If the problem persists, contact an authorized service centre.
FR
SOMMAIRE
RÉGLES GÉNÉRALES POUR L'UTILISATION DE LA MACHINE 41
CHARACTERISTIQUES TECHNIQUES 41
PARTIES DE LA MACHINE 42
MESURES IMPORTANTES DE SECURITE 43
UTILISATION DE L'APPAREIL 43
INSTALLATION DE LAPPAREIL 44
NETTOYAGE DE L'APPAREIL 44
EN CAS DE PANNE DE LAPPAREIL 45
UTILISATION IMPROPRE DE L'APPAREIL 45
INSTALLATION ET MISE EN SERVICE DE L'APPAREIL 46
LIMPEZA E MANUTENCAO 108
RECOMENDAÇÖS 109
LIMITAÇOES DA GARANTIA 109
SOLUÇOES DOS PROBLEMAS 110
REGRAS GERAIS PARA A UTILIZACAO DA MAQUINA
Waterreservoir: 1,0 liter
Pomp: 15 bar
INSTALLATION AF APPARATET 134
APPARATETS RENGØRING 134
I TILFELDE AF BESKADIGELSE AF APPARATET. 134
UKORREKT BRUG AF APPARATET 135
INSTALLATION OG IBRUGTAGNING AF APPARATET. 136
TENDINGOG SLUKNING 137
STANDBY 137
TILBEREDNING AF KAFFEN 138
JUSTERING AF MAENGDEN AF KAFFE I KOPPEN 139
TILBEREDNING AF CAPPUCCINO. 140
TILBEREDNING AF VARMT VAND 141
TILBEREDNING AF EN KOP KAFFE AFTER DAMPPRODUktion 141
AFKALKING 142
RENGORING OG VEDLIGEHOLDELSE 144
GODE RAD 145
GARANTIBEGRENNSINGER 145
PROBLEMLOSING 146
GENERELLE REGLER FOR BRUG AF MASKINEN
Installation of apparatus
NEPIOPIEMOI EETYHESH
H eyyunon 7ev kaluntie 1aabc nupokalouvtai ano:
μia nTaktikn anaooTomega,
λeitoupyia me taan diapopetikn ano ekivn nov kathetai otny nivakida ddoevwv (Bλ. kεφáalIO MEPH TOY MHXANHMATO)
akataaianxponn xponn nouv evial oupwn me tic odnytec,
aλλayες που ἀγιναν εωτερικά.
H eyyunon dev kaunstei ta e0da eniokeunc o nxavc otioie exouyivei napebaoeic ano n eouaoiodotnvea kvtpa oepbic. Auta ta e0da 0a baupuvov npwoc tov pAtn.
LuoTHouMe ta akOaouoA:
Mny tootheite to diako ouaoync oayovwv oTo nauvtnpio niatwy.
- AtnpTe To kAtw ePoc Tou eowTepiKou Tnc otnAnc Tnc dEea- evnic navta oEvvo.
H ntnpon autow twv onueiw nuopeiva dnuioupnyoei npoBn- mata stn uXavn nov dev kaluntovta anTv eyyunon.
IPOOXH:
UvIoTatai n diatnponn Tnc apxikc ouokevaoia c (toulambdaotov ia tv npio do eyyunoc) ia tvn
eVdoeoyne anoToaTou mXavmuoc oE eovaoiodo tneva kcvtra oepic. O1 tuxov nueie cou opeiaovta otn metapopac wopic enapkn ouokvaaia dey kaIu- mtovta ano tv eyyunon.
Aiaoon xpoiopoioueov nEeKtpikou kai nEeKtpovikou Eoani oou ano 1wec ony Evopwnaikri Evwn.
PnIroTOBJIeHHe KAnyuHHO 176
PPIROTOBNEHNE FOPYEN BObl 177
PPIROTOBULEHNE KOOE IIOCLIE IODAU NAPA 177
ydaJIeHHe HAKIN11 178
OuHCTKA H yXoI 180
PEKOMEHDAUH 181
OgPAnueynna TApAHTn 181
YCTPAHEHNE IPOBEM. 182
OBUHE INPABUNA NOICNOJIb30BAHNUKOΦEMAUNHbl
CneNyET BHIMATEIbHO 03HAKOMITbc C UHHCTpyKUeN NO EKCnnyataunn n OpaHnueHnraHTnn.
KoΦeMaùnHa dōnJxHa 6bɪt b nɒkIhʊeHa K COOTBETCTByUòeɪ pɔzE tke Toka, oobceηeHHo 3a3eMlneHm. KoΦeMaùnHa dōnJxHa cOePxAβcB yIcTOTE, dπr 3TOrHOe0xbOIMo peryLpHOrO Ouɪsət b peWetKy, Kaɪnec6bOpHk, KɑncynOepeXaTeIb, EMKoCTb n Tpy6kY BbIXOJa napa.
KPAIHE BAXHO: HIKoRda He nOporpykaJTe KofoemaunHy B Body N He CTaBbTe eE B NocCydomoEhyu MaunHy. CoepKaUaJaCra B EMcKcTn Boda NOpJeXHT peYIpaHoi 3aMeHe.
He cIeIyET nIb3ObaTbCRA KOeMaunHoi 6e3 HauuHra BObl B EMKoCTn. IocIe 3aMeHBI BObl BCTaBbTe EMKoCTb B KOeMaunHy, y6eINBUnCb B npaBnBHoYcTaHOBKe.
IIO MeHbWei Mepe,pa3 BДBa MeCraa peKOMeHnyetcnoB30BaTbCpECDTBOM Dnla ydaJIeHnHaKuIN,CneuaJIbHO npEDyCMOTpeHHbIM DnRA KoPeMaunH,B COOTBeTCTBm C yKa3aHnARMpa3deJaYDAJIeHHe HAKUIN.
KoΦeMaunHa OChauneHa KlaNaHOM, o6ecneuBaHouM NOCTOHHoe DaBHeHHe, N03TOMy B03MOKeH BbIXoJ KaIeJIb BoDbl N3 KaNCyIOnepXaTeJIa.
TEXHNUECKNEXAPAKTEPUCTUKN
MaTePnAn Koprnya: PC+ABS (EC), PC (CUSA)
MaTePnAJI BHyTpEHHe YacTn TepMo6Noka: StaJIb
HapjxHe:220-240B,50/60T(EC)120B,60T(CU)
Mouhoctb:1200-1380BT(EC),1200BT(CUJA)
Moohoctb, noTp6bnaemam np OTKIOueHn nITAHN: < 0.5 BT
B3BeWeHbI yPoBeHb 3ByKOBoRo daBHeHHa MeHbIe 70 db.
I3roTOBtEnb coxpaHReT 3a co6oB npaBO Ha BHeceHne I3MeHennnn ynyUweHn b6e npedBaPteNbHorO n3BeueHn.
KOMПLEKTYЮULE
A CBETOBARIIOOCA TEMNEPATYPbI (yka3bIeam ccmoHua KoFemaau-Hbl)
BITABHbBI BbIKIOHYATEINb
KHOIIKAIIOAQUKOΦE(zanyckaem u ocmahaenueaem noaoykoΦe)
D K0OΦEBJOK
E NOJIABKOBbI DATyIK YPOBHA
FPEWETKA DIA YAWEK
KHOHONKAIAPA
H KANNEC5OBPHIK (paonnojneh noD peewemkou dnaauek)
KANCYLODEPXATENB (Iperespresso)
LIOJCTABKA DIAYUWEK
M BHYTPEHHm 3yMMEP (noaem 3eykoou cuzhan dna u3eueenu nonb30aemen)
N CUNIOBOI KABEJIb
OTyBKAIIODAUHIIAPA
P BAKДЯВОДы
Q TAbIMUKA C DAHHbIMN (noD ochoahueM)
RIOJOXEHNE OPGAHNHTEJI XODAIOPTAONIBTPA
BAЖHbIEMePbI IПЕДОCTOPOЖHOCTN
PnncnoB3oBaHm 3JIeKtpueecknx np6bOpOB Heo6xoJMo co6IIOaT bJeDyUOuNe MebpI npEOCTOPOXHOCTN.
Pnp6op He npedymoTpeH yCTaHOBKe B MeCTax, rDe BO3MOX-HO NpndaHn CTpy BObl.
Pnp60yctaHaBnBaetcB rOpun3oHTaNbHOM noJooKeHH.
IcnoJb30BaHne np6opa
JaHHbI np6Op npEHa3HauEn IINcNoB3OBAHnB DOMaHnHX INoO6hIX yCIOBnX, KAc 6bITOBaBepCnMoDeJN X7.1:
-B Kyxohhblx yrolkax DnepcoHala B Mara3uHax, Ofncax INdpyrnx pa6oynx nomeuehenx;
-BCEIbCKNXDOMAX;
-ДЯ KЛиEHTOB B RocTHHuaX, MToTeJx N Dpyrnx NOMeUeHnIXKJIOTO Tnna;
BCTpykTpyax Tuna bed & break-fast.
Oc6oe npdynpekdeHne nI npoecchoHaBHO Bepmmoen X7.1, 0603aueHHo KODOM 6663, c onncaHem X7.1 YEPHA230BDIPSO PROF:
JaHbI np6Op npedHa3HaueH ToIbKO IIN npOphiCCnHOaHb-Horo nCNoB3OBaHna. HIO6oe ppyoe nCNOB3OBaHne cHTaETc HENpaBnBbHbIM NIOtOMy ONaCHbIM.
-TeN B Bo3paCTe OT 8 neT n CTapIe MOrY BbINONHtB DaHHble OepaUN TOnbKO NOD pNcMoTpOM Nua,OTBeTCTBeHHoro 3a IN6e30NaCHOCTb N O3HaKOMJIeHHORO C DeICTByUoUMM TnHneHHueCKMM HOpMaTUBaMn.
Ncnonb30BaHne np6opa He no Ha3HaYeHHIO
-5bIToBbIe BepCn IOnKhbl NcNpOb3oBaTcB TaNbKO DnMaHrero NcNpOb3oBaHn. JIO6oe dpyroe NcNpOb3oBaHne CunTaEc HENpaBUNbHbIM NNoTOMy ONaChbIM.
PONBODNTIbHEHecETOTBeTCTBHeHHOCTN3aBO3MOXHbIe aBaPnHbIe CNTyauu, Bbl3BaHHbe HecO6JIIODeHMeM DeiCTByIOUe-TO 3aKOHOdaTeJIbCTBa B OTHoUeHN CNTEmbl 3a3EmJeHn.
- U3rOToBnTeNb He Hecet OTBeTCTBeHHOCtB 3a BO3MOXHbIM yuepe6, o6yCIOBNeHHbIM HECOoTBeTCTByUOMM, OuIN60uHbIM IN Hepa3ymhblm NcNlB3OBaHMeM.
RU
BHIMAHNE: COXPAHJTE 3TN NHCTPYKUIN.
RU
YCTAHOBKA IN BBOD PNUBOPA B 3KcPnyATAUIO
Ipepe nnoknouenem Kocemaunhblk knektpcetbnBmameleho npounaite npabina 6e3oanacctn, cdoepkaaene B pa3dene BAXHbIE MPEbl 6301ACHOCTM.
YbEaHTeCb, YTO KOpeMaHIMAHOTKIOUeHAOTJIEKTPOeTIN.
BCTabTe CHM3y KANCyNOpEepKAtenb NOBePHTe Eero Bnpabo do nnonoKeHn 60KOp8Kn.
H3BNEKTE EMOKCTBOBdy,NOTAHYBE HAPyK,HNANONHTe ee CBEXEINITBEBOI BOOIO MAKC.ypOBH
BHIMAHME:
Bcerda3aHbAte
BEMK0CTbTOnlbXO
CBexyo Hera3Hypo
BaHHyIO NtBeByK
Body. Togrya Boda,
aTaKxpepyTne
XHDKOCTMA0FyT
noBpeNTbEMXoCTb.
He BknoaTe Kope
Maunny63BQbl.

YCTAHOBITE EMKOTB B KOFEMAIHHY;YbEIMTcB B TOM,TOOHA BCTABHNA NOHOTBIO.
BCTabTe BNIky Bpo3eKy. NpeE BKnIOUeHMeN pOuHTaI Te cneDuOn pa3en.
PIMMEAHVE: pekomehydtca coxpaanb opnunhblhyu yanokobky (no mehlemepe,Ha nepnojrapaHTN)Ha cnayo otnpaBkn KoepmaunHb BAbotn30BaHbIe cepBkchbcIte HtbpI.
BHIMAHHE
BoBpeMa pa60tb KoFemaunHb KONTAKC Koef6nokomD, Tpy6kno npaO H metaJIyuecko qactbKocynOpedepKaTeI MOKET npuHHHTb OKOrH.
BКЛIOUECHNE/BbIKJIIOUCHNE
NepenB KIOHueHem KOeMaHHb NOBepTe yOpeBb BObl B EKMOCTP;np Heo6xoDMWCOTd OJone BoY,KAK ONCAHO. KaKdi p4, KOrJa HAnOHnHEte EMcOCTB BOIO, CIneTE BOy M KanIEcBOPHnKa H POMOIteERO. YoBoB BKNIOHTb KOeMaAHnHY, HAKMNTe KKnONKY Ka OHa He 3arOpNTC.
3HaKnHa KpyrnoM DnCnnee 3aRaopTaTcNoCTeNEHNO, yKa3bIBaB
yBneuHHe TEmpePtyb TepMoDNoKe.
Yepe3 HeckonbKO MnyHT KoFemaMaHHa N3Beuaet O DoCTNKeHHN
paboHem TEmpePtyb, 3aRaopTaTc HAcu KHOnK NoDaHn I
3ByUT KPOTKIN 3ByKOBoi CnHAn.
PIMMEYAHHE: npn nepbOM HcnoNb3OBAHINHNNIOJI ENIHTBHOPOCTOPE KOMHeHyTeCBAIOHNHTb NOaDy HEKNOKNKuAaEK BOdBi 6e3 KanCybl.
TObb BYKIOHHTB KOeMaAHINHY, DEPKHTE HAKATOH KHONKY, NOKA HE NORAHTCHNIUEBAI NAHEJI;HKORDA He BBIHNMAITE WHPNITAHNAI3POETK, ECNI KOFeMAHINBAKHOVAEA.
PekmokndaHn
KoepmaHnHa 3anporgpaMmUPOBaHd nOcbNIOeHHn OkpyKaIOu
Ie CpcBn HcIXKCHNnOTpcEHNn 3NEKTOPEHRn BO BpEMn
HECNIOB3OBAHn.
Yeep30 MmHT HeCNIOb3OBAHn KoepmaHnBA BkNIouaETcA
ABOMATWcHKn.
3a5 MmHT Do ABOMATWcCKOTo OTKNIQUEHn HAHNAETMHrTaB
KHONKa mHeo6XoIMMo OCTaBtB MaINHb BKNIQUEHnOH,
HAKMNTE KONKy.
RU
ПИРOTOBЛЕНЕ KОФЕ
KofoemaunnaX7.1 pa3pa60taHnI yncnoBzOBaHnTobnko kancyn illy Iperespsso.

IINPnIPOTOBHeHHKOe BbINONHHe CNEyOuMe DeEChTBnA:
- NObepHmTE BnEBO KANCyNOepeKAtenb H3BneKeNTe erO H3 KO
Φe6noka.
BCTaBbTe kancyny kak nokaaHn ha pncyHke.
PIMMEAHHE: kancyna donkha BCTABnBcNerko; B npotnbHom cnyae, n3BneKeTee nBCTABbTe npabnbo.
PIMMEAHHE: noya Kofo ocyeCTBnTc TnpMepno BteHne npabi Cekynd Nocne HkaTHN KhoNK;3TO cHTaTcR HopMaNbHbIM fHyHKMOHPOBaHHem KofoMa. 1HNHb.
BCTABTE KANCyOePKeTaeNB KOe6nOK NOBepHtE pyKU BnPaBO DO NNOJKeHRA 6NOKPOBKN.
- y6eJntecb, tO KoHnIka nOaau Kofo 3aRopenacb.
HaxMMTE HOTNCTHE KONIKY NIOaJMy KOe MaJINHa BbI DaET 3aIporpammmPOBaHHeo KOnMueCTBO KoKe. YTo6bl npep
I npnoTobnHn CnyuOe HOn3b KoKe N3BnKeHTe HnONo- 30aHHyKANCyN NOBtOpTN eONCAHHe BbIe OpeauM.
PERUIMPOBKA KOJINUCTBA KOΦE YAùKE
KoepmaHuaX7.1n03BnAET BmTaB 3aDAAHHe KOJIeCTBO KoE:doCTaTOH HaxaTb KHONKY NDAuH Koe MaaHHa OCTAHOBITc H 3aDAAHOM KOJIueCTBe. OHaKo, cJIM Tpe6yEtC dpyroe KOJIueCTBO,MOKHHO BYPyHBOBCTN BAMHTb HOBOE KOJIueCTBO KoE.
CoxpaheneBnamrHOBOro o6bema npoun Kofe:
BCTabBeKANCyBNKANCyOepeKaTebNpHKPeHrEeroKofo6nOky.
- Nomctme Taauky noi kancynopekatae.
HaxMMte H depKmte HaKaToH KOnkny noaH Koae.
- PnDocTmKeHH HxHKHO KONHcEBAOTyCtME KHNKy NOaH KoFe.
BnamrmbmaHbBHeceHO HOBOE KOJNUeCTBO KoFe.
TaKKe MoXHO BPuyHyPOperyIMPOBaTb KOnHueCTBO KoOe pnp KaKaDoI npDae, He MeHa HAcToPoiKn, NocpeDeTBom pyHoi NpaH.
Punna nopa:
Hakmte KhoNkY npaM KoFe bTeueHne 3 cekyHnMaunHa BbAact KoFe.
- PnIOCTKHeHH HxHKO IONueCTBa CHOBa HxMITE KHOJIy NOaH Ky KoFe, YTObI OCTaHOBt NODaCy.
TakmMobpazomMaHnHaHe3anOMuHaetBbIaHHoeKoJIueCTBO,aNOLyueHHbO6bEMNOPunKACAeTcROTdEnbHOIOaH.
PnroBte OHy Hcckonbko hweek Koe B COOTBcTBH CHTpyKunM, npbeHNbIMN B npdebyuem npaparpae. PnroTOBBe B3btoe MONO, KaK yka3aHO dance:

HaxMITE KhoNky npa Hau cHTpAIBHM DcNnce 3aoropTcR 3aHcOK npa, yKa3bIba, YTO KoPeMaunHa HaxoITcR BpeKHe Npa napa.

PnDIOCTHXKHeHH KOpemaHn HOBaOeH TeMnEPaTyb 3aRopaeTc KHOnKa B30Jb4he MaHnHa U3aet 3ByKOB CMHnA

BctabBe ncyTny noxdxHuyo
EmKOBt (nyuhe metannu-
yeCKyO noT py6ky npa HaxMMTe KHNKy 0b6b
BbWen octatok B0dy, KOrda
HauHT bXdoTH TOnkO nap, CHOBA HAXMMTE KHNKY.
PYPMEUHHE:Bo spermia nodaunnapmaMraet KHONKA
Bnnei xoNOHoe MONO k3 xoIOINbHnka B COOTBE-CTBYIOUy EMKOCTb (Iyue MeTANIIuueckyo).
PIMMEAHME:Jnna
ONTMHbHOrO pe3ybnTata:
Bneite 75 Mn XoNOHOrO
CenbHOrO MOnOKa H3
XoIOINbHnKa B EMKcTb
(NyuHHe MeTaANHeeCKyU)
NHYCTTe Tya Tpy6Ky
napa Ha Bpem25 cekHyd
MAKCHYM.

Npyr3yneonnoHCTbTO ty6k npaB eKoCtB cMOIOKOM. HAKMITE KhoNkY OdoKnTe ObaOBAHNIeHb. Korga p3eybntb yDertocHTH,CHOBA HAKMNTc KhoNkY
IocneKaKIOHOICN0B3OBAHNPEKOMeHnyETCA TuaTeNbHO ONUCTHTB TPy6k npapaOTOCATKO B MONOKA:
Hakmtte Ha Heckonbko Cekyi KNHkONK
3aTeM CHOBA HAXMMTE KHOIKY
- NpOdoxHnTe HeckoBko MmHyT, YTOb6I Tpy6ka ocTbna.
CHMMHTeHApxHyIOaCTbZnnpOMoIte eoeNDcTpyBBObl.
0UHTNTBEHYTPEHHHIOOaCTbXBAJHXHOHKaHbIO.
PIMMEYAHNE:06a KOMMOHENTHaKHOEHNKA npaaNOxOHTAIN MOHKB NOCYDMOOeyH MaHInHE,B 3OTM CNYae CnEyET TaKBe BByHTb BHYTpEHNOOctb HMTaennnecko Tpy6Kn. Ncne OuCTKN BCTabTe BHYTpEHNOO cactb X Btp6kny napdoynopa 3atemBCTabTe HApKyHyo Tpy6ky Z.
BHIMAHVE:
-KoHTAKT c npamn Ipy6koI npapa moKet npnbECh n KOKOrAM.
-PrnmepeHoepe3 5 MmHTy HEMcOnb3BaOHnnpa mApMaHa ABToMaTHueckn
yctahAubnAe3eB pekmNmndaoy KoFe; 3a MMHyTO dTOrO nepekDa hauHaer
ETMnATb KHONKa L, Ecn Tp6eYerTc NDOa4u npapa, HAXMMte KHONy.
-B0 BpemaHarpeBa HnykuHm bbldAn npapa MaHNHa OcUeCTBnR THePBeB
TEpMo6IOke, KOtOpBm KMOket rHEepuOBat He6oBnWb BbxO npAPA n3 HxNKe
RoKANCyOdepXaTeen: NO3OTMy HE NOCTABnYe PPyHnn DpyTne TaTena B
pa6oOee npoctpanCTBO dIh nOa4u KoFe, Yto6bi 136eKahtb CuyAHnhix OKOroB.
ПИГOTOBLEHNE TOPAчЕВОдbl
Tpyka npa, kotoip oohcnae H KOeMaHnHa, no3B0nIeTakke noDaIb YoDy InpnoTOrOBeHHa Yau HtpBaRbHx HAcToEB.
y6eDHTecb, yTO KHNKNAIOaUHKOfoEopenaoc.
BbInonHnTe cneDyiooee:
OuHCTIte Tpy6ky npa ot BO3- MoKHHbIX OCTaTKOB MOnoka.
yctanohOBITE metaTnHmueckyo EMKoCTb TOp Tpy6k npa.
HaxMMte KhoNky npa A TeueHHe 3 cekyH.
KoepemaunhaHaHETBbdaBabaTbRnHyBOy,KNONKa npa TPO MMraT.
CHOBA HAKMMTE KHOKNKYapa
Kak TONbKO Byet JOCTHYO HJXHoe KOINHECTBO BOBJL.
ПИГOTOBЛЕHNE KOФЕ ПОСЛ ПОДАЧИ ПAPA
KpaHbBaxHO 366aTb nprrTOBnHn KOe 3cnpccO cpa3y Je noce nnoa npa, TaK KaC CmNOKom ropraa B0da, CrehePPOBaHHa TepMO6nOKOM, HertaMBO BmRET Ha Bkyc KoFe.
ToTMGY KhoNkA NOaH NooC 2KoHaet, KOrDa TeMnepaTpya TepMO6nOKa CmNOKom BblcokA.

4TobbepHybckfhyknnn nprotoBneHnKohe, HAKMHe KHOKNy NOaDH KOpE nKuHTe,KoJa 3aRopmCn KHONKa Bpemr3Tou 0xNakJen (npmepHo 10 MNHT)6ydt MrrtBt 3HaQOKaAkhN HA CEITPaHbHom Kpyrnom Dmcnee.
YTO6b6bCTpeBepHyTB KOeMAUHBYB PECIMNOADaO Koede (npMnEHPo 1 MHyTa), BbONNHOte CneDIOUeee:
- YCTAHOBITE MeTAMIIHueCKYIO EMMKoB TPOI TPy6k npa.
-ДержichteнхатоиВ teceHnC 3 cekyHKnONky nodaHn napa
Byedt BvduHa 0aaporpAMHH
bopanHoe KOINueCTBO ropauey
BObIy;IO OKOHVAHIMndaa
OCTAHOBITCR ABOTMATUeCKM.
RU YDAJIEHNE HAKUNI
- Ecnna Hkpyrnom dncnnnee mraet 3nok (1 MrraHne kackbde Ibe cekHybl) aTO heo6xmoMo bblonHtbydaneHne HAKNIu. uKnl npedycmatpnaet 2 a3b: a3a ydaene HAKMI (npodoknntelbhoct bpmpemho 14 MMHT) n 03a ononacKBHn (npodoknntelbhoct bpmpemho 3 MMHTb).
- 06pa3oBaHne HAKnnppeCTabIeR cobH HopMaIbHOe ABHeHne B peyIbte R McnoB3OBAHn KoFemaMHN. MaHIna OchaueHa ATOmatuYeckoi nporpammo ydaenHHaKnn, KOTOPaN O3BOJNeT ONMMN3HPOBAtb OUYCTKY H YAJIbTB OCTATKN HAKNN M3HyTpH. EcnH He BblonHrB npoeDpy ydaenHHaKnn, To HAKINb MoXET N KHeNCnPABHOCTM B pa6ote, HA KOTOpBe He pacnpocPbAReTcRAPANTH.
3.Динсгуклnoуделноннннннсm.Yka3aHncooTbETCTBHyоeI rnaBb daHoro pykoBDCTBa.NcnoIb3yTe TOnbKO cpeCTBa nlaYdaneHnHaKKnHn, npedha3NaueHHbe dNkoFemaHn,pa3BeDEHbE B COOTBETCBnCkya3aHnMn,mpBeDEHbIMn B HcTpykmaX Ha cpeCTBO. - EcnB BO Bpemn pnoeDpyb ydaenHn KaHn OTKnOaTc3 NkTpueCTBO, To npre BoCCTaHOBennuKKn BO3o6OBHTc CToro MOMENTA, B KOTOpBn OH 6bl npepaH.
BbkiIOHTe KofoemauHH. - N3BNEKHTe EMMoCTb BnEJIte B Hee 1 n BoIy (do MaKc. OTMeTKH ypoBH). N3BNEKTe KANCnyu NKANCNoepKaTeNb.
BnTe BEMKoCTb CBOJOp CpeCTBO DnAynaneHnHaKnHn INepeMeMaHTe Do nonHOro pactBopeHHa.
BKnHHTe KcfoemaunHy:Yepe3 15 cckyHn nocie BknHoueHH HaxMHTe HApKHTe HaxKaToH KNKHy Ka He npo3ByHT4 3ByKOBxhCnHana (3 KopoTkNx H 1DnnHbH).OTnyCTHe KNKHy.
KhoNka HauHET MHRatb 3 KofemaunHa rotoba dna3anycka uKna ydaeneHHaKaHn.
Yro6bI ynpocHTb onepaHIO, pekOMeHdyeTc CHATb HAKOHeH NK Tpy6Kn BbXoDa napa.
- NmecCTHe EMKoCTb 06bEMOM He MeHHe 1 n noJ KoFe6nok W Tpy6ky npa.
HaKMMTe 1 pa3 KhoNky 3aynycka uOcTkn O T HAKNI.
KhoNKn MnHn no OuepeM. KoeMaunHa HauHnet npebbIbCTyIO nOaay BOaBn 3K o6bnKa n Tpy6kn npaa (npdoJKNTeNbHOCTb 14 MMHT).
PIMMEAHHE:MOHBOBPEMeHO npeBaTbUKN, HAKABHKNY ChOBa HAKMITE KHNK 06bB BO3O6HOBNtBuNK.
HInTeIbHbM3ByKOBo CMnHan KaYBaIbAeT HAOKOHAnHe Za3bI ydaneHnHaKnH. TenePb Heo6OxIMn BbIOnHnHTb UcNk OonoanckmBaHnKOTypOB, YTObI ydaIbTcOATaN KJIOKCTIN DyaIeHNHaHKnH. KhoNka npOdoXaet MHRatb.
M3BNEKHTI N TUIATENBHO IPOMOIT EMKOCTb.3AENE1N.CBEJX BOBbIO MAKC.OTMEKNYPOBHA.
OnonopoknHne H nOmeCTte EMKoCTb 06bEMOM He MeHee 1. noN KOe6nOK N Tpy6ky npa.
IteEKMocb.3aeneTc1n.cBeOBHA.
OCTb 06bEMOM He MeHee 1 n.
Hakmte 1 p3 KhoNky DnA zanycka uKna onoNaCKBANH.
Khoonkn nn no ouhepi.
KoepMaHnHa HauHET npEBBcTyo NpOaHy BoDy M3 Koe6IOna H Tpy6Kn npa (npOdoJIeTeBHOCTb 3 MHHY).

38ykoBOn CnHAn Yka3bIaEe HAn OKOHNHeMfAbeOnOJaCNBAHm.
KHONKA 3aoroprrn Henpe- pbbHbIM CBETOM.
RU
OuNTKA uYXoI
Oumctky Koemaunhbln eekomnlketyuoxpekomehnyetc OcyueCTbAa KaK MMHmympa3B HcEJIIO.
He hcnonbmyte octaoyoc B EMKoCTN BOY B TeeyHne HccknoBkXn Dhe; npombaiTe N CKeDHeBHO 3anONHnTte CBexek nITBeBOI BOIO.
He noB3yIeTcB 3TNIOBbIM cHPTOM, pAcTBOpATenMn, a6pa3NHBbIMn r6kAMn n/nn arpeCCNBbIMn XHHMueCKMN CpeCTBaMn.
BHIMAHVE: He donyckaertca cyka kofemaunhbl n(H) ee KOMNekTyuux B dyXOBKe HnM NKPOBONHOHn (mH) cTaNdapTHOHneH.
YTO6bO OOHCTNtB KOfemaHHy, BbONHHTe CIEyHOoe:

BbKIOHHTe KofoMaunHy N BbHbTe BmNKy M3 cTeBOI pO3eTK.
H3BNEKITE EKKOCTb Kpblkky HnpOMOIte IX pTOOHOB DOIO.
Onyctouhnte kancynoepjkaTeJIbHbIMOHTe erOBoJoi.

I3BnEKeHTpepeKHy npomOte ee TenoBdoi.
ИЗьнгктЕ кannпсборнИ K И ВьимоТе erо ТетноБоги.


-ПОНБКOMTOHEHTbl,ВСТБТБВВHTYPENHIHOO qACTbB MetanIIMueckyIO Tpyb,3aTEM BCTSBTe BHEWNIHOO qACTb.
IPMMEVAHNE: npn yctahOBKe BHyTPenHeB H BheuHeN KOeHNOAaTH Tpy6Kn BbIXOa Napa BCTabNtEHXdoynopa.
PEKOMEHDAUIN
YtobHaacnAdTbCBAICOKOKaYeCTBeHHbIM Kofo 3cnpccO He 3abaiTe:
MeHbBdyB EMKoCTn ONoPoxKHTb KaJIe6OpHk XOTb 6bI pa3 B HeJeIO;
-ICN0Jb3OBA Tb NO B03MOXHOCT N BOy C Hn3KMM COePkaHneM N3BcTt, YTO6bl CHN3NTb OTNOXKeHn BHYTpKoΦemaunHbI;
-ПовьВаТбС ПОДогртБИМ YашКамN.
OTPAHnueHnraTAPAHTN
TapaHTnHe paCnpocTpaHReTcHa HeNCpapBHOCTn,06yCIOBHeHbIe CNeDyUOIM:
- He peryjraHoe BbInonHeHne zukla dJa ydaJeHnHaKuINi;
pa6oTa npHnpanpJxKeHH,OTnHCHOMOT3HaueHHy,yKa3aHHoro Ha Ta6nUke daHbIX (cm. pa3den YACTN KO0EMAUNHbl);
HECOOTBeTCTBouOe IcNoIb3OBaHne Hn B HApyuHeHnHCTpyKm; - HecaHKUHOHPOBaHHbIe BMeJAteJIbCTBa.
IapaHTnHe pacPiocpTaHaeTcHa peMOHT KofoMaunH, npOn3-BeDeHHbI CNJaMn He aBTopu3ObaHHbIX cepBCHbIX ueHTPOB.
TaknepacxoDbIOTHOcTcNIOHOCTBuHOHaCt3aKa3Uka.
PekomeHdyTe:
-HeCTaBnTbKaJInc6OpHNK B NocydomoEHyu MaunHy;
CneIHTb 3a Tem, YTO6bI DHO BHYTpN KOLOHKN IJIY EMKOCTN 6bIIO BCEJa CyXM.
HecobJIOeHHe BbIeYka3aHHOro MoKet npNBecT N pO6JIeMaM YHKUHOHPOBaHnN KOeMaUNHbI, Pn EToM rapaHTnB 3ToM cnyae He JeIcTByeT.
BHUMAHVE:
PeKOMeHdyETcOxpaHrTbOpuRnHaJIbHyIOn yNaKOBky (no MeHbWeMpe,Ha nepNoD rapaHTm) Ha cnyaH OTnpaBKN KoΦeMaunHb I aBTopn3oBaHHbIe cepBNCbIe ceHTpbI. Ha Bo3MoXhBIyep6, oByCIOLeHHbI TpAHCnOpTnPoBKOJ 6e3 COOTBEcTCTBYIOSe yNaKOBKn, rapaHTnHe pacNPOCTpaHReTc.
Ymunuzaun 3neKmpuueckzo u 3neKmpnHoo 6b1bueo 8ucnoB-3oBuH uObopyobua uacmhbmu nUaMu Eeponeickom Coo3e. Cumon RAE, npubedeHHu Ha mou npodykuu, yka3bHaem Ho mo, ymo oHa He noDnekum ymunzauu Bmecme cdpzumu 6bimoBbmu omxodamu, a noDnekum omdehHom c0py.
YacmHbI nonb30BameMb Moxem 6e38o3Me3dHo camb npu6op dupepy, b coomHOueHu oUn Ha oUn, npu nokynke Ho2o.
Дя nonyehua dononHumeNBou uHOpmauuu O cbOpOHyx ueHmpax nodexkauezo nepeabomke obopydoBaHua, peKoMeHyemcBobpaamcbB myuunanumem no MeCy npoxubauH, B MeCmhyo clyxbynepeabomku omxodob unu b Maazun, 2de sbina npuobepema npodykua. Nolb3obamenb Hecem oBemcmbenhocmb3a ymunzauu BO coombemcBau c deucmyouuMu HopMaU, a HecoBliodehue nonokhenu npceJeDyemc 3aKOHOM.
Jolkna ymuuaa daHou npdykuu codecmyem oxpae okpykaoue cpebl npupohbix pecypcou 3doopobn oed.


RUYCTPAHEHNE IPOBJEM
- 乘令樂樂樂樂樂樂樂樂樂樂樂樂樂樂樂樂樂樂樂樂樂樂樂樂樂樂樂樂樂樂樂樂樂樂樂樂樂樂樂樂樂樂樂樂樂樂樂樂樂樂樂樂樂樂樂樂樂樂樂樂樂樂樂樂樂樂樂樂樂樂樂樂樂樂樂樂樂樂樂樂
- 凶陝 贼藏用 电 雷 售 网
- 壁面的墙,墙的墙,墙的墙,墙的墙,墙的墙,墙的墙,墙的墙,墙的墙,墙的墙,墙的墙,墙的墙,墙的墙,墙的墙,墙的墙,墙的墙,墙的墙,墙的墙,墙的墙,墙的墙,墙的墙,墙的墙,
aljol jol jol jol jol jol jol jol jol jol
S OBC = S AOB + S_ BOC
1
1
70 Jd jial gai all cia gai all a
Lai jiaol plisuuiy uui jiuuiuuiuuiuuiuuiuuiuuiuuiuuiuuiuuiuuiuuiuuiuuiuuiuuiuuiuuiuuiuuiuuiuuiuuiuuiuuiuuiuuiuuiuuiuuiuuiuuiuuiuuiuuiuuiuuiuuiuuiuuiuuiuuiuuiuuiuuiuuiuuiuuiuuiuui uuuuuuuuuuuuuuuuuuuuuuuuuuuuuuuuuuuuuuuuuuuuuuuuuuuuuuuuuuuuuuuuuuuuuuuuuuuuuuuuuuuuuuuuuuuuuuuuuuuuuuuuuuuuuuuuuuuuuuuuuuuuuuuuuuuuuuuuuuuuuuuuuuuuuuuuuuuuuuuuuuuuuuuuu uu
- Bed and Breas
x7.1 gall
X7.1 NERO 230V 6663 D IPSO PROF:
J J
J
J
J
J
J
J
J
J
J
J
J
J
J
J
J
J
J
J
J
J
J
s
8
在 Rt ABD 中:
#
Jg21 1
Jglal 5y
clal 13) agio0 y gl a jn Jl al J
agio40 n 6 (jglal 1
Jglal 6 6 6
Jglal 12 230 230
Jglal 120 120
Jgs 6
Jglal 6
Jglal 12
Jglal 120
Jglal 120
Jglal 120
Jglal 120
Jglal 120
Jglal 120
Jglal 120
12 8 jai jai jai jai jai jai jai jai jai jai jai jai jai jai jai jai jai jai jai jai jai jai jai jai jai jai jai jai jai jai jai jai jai jai jai jai jai jai jai jai jai jai jai jai jai jai jai jai jai jai jali yjali yjali yjali yjali yjali yjali yjali yjali yjali yjali yjali yjali yjali yjali yjali yjali yjali yjali yjali yjali yjali yjali yjali yjali yjali yjali yjali yjali yjali yjali yjali yjali yjali yj
J
J
J
J
J
J
J

jgl jbc 1

S OBC = S ABC + S_ BOC
jgl 1
a 10000000000000000000000000000000000000000000000
·is
2g ② ( ab) ^ c
a a a a a a a a a a a a a a a a a a a a a a a a a a a
:8g
3 3
120 1
y
y
#
AR
y 1
山
3
aal
A
1
24
4.4.2.1
1
Jy 1
J 1
y 1
14 24
j3d j
e 1
a 1
y 10
3 3