Memory 2 Move - External hard drive INTENSO - Free user manual and instructions
Find the device manual for free Memory 2 Move INTENSO in PDF.
User questions about Memory 2 Move INTENSO
0 question about this device. Answer the ones you know or ask your own.
Ask a new question about this device
Download the instructions for your External hard drive in PDF format for free! Find your manual Memory 2 Move - INTENSO and take your electronic device back in hand. On this page are published all the documents necessary for the use of your device. Memory 2 Move by INTENSO.
USER MANUAL Memory 2 Move INTENSO
WPA-PSK,WPA2-PSK, Mixed WPA/WPA2-PSK.
11.6.1 ADMINISTRATOR
"Memory 2 Move" allows to wirelessly access your videos, music, photos, data and stream it to your iPad®, iPhone®, tablets, smartphones, and notebooks – no cords or cables to tangle. With the internal hard drive storage, there is no need to worry about running out of space on your mobile devices and the built-in USB 3.0 port makes the le transfer easier and much faster.
For maximum portability, the WiFi HDD device has a built-in rechargeable baery. Simply plug it into any available USB port on your computer to charge and copy your les. As simple as 1-2-3, you are ready to enjoy your device and no waing needed. "Memory 2 Move can be accessed while the baery is charging.
2. PRODUCT FEATURES
- Stream media over WiFi enabled devices up to 5 users simultaneously
- Access and stream your music, videos, photos and data using the free custom mobile app supporting iOS and Android operang systems
- Up to 5 Hours of connuous baery life*
- Search funcon to locate and access your le much faster.
- Internet access capability via the oponal RJ45 or wireless, supporng 802.11 b/g/n speeds
Supports NTFS, exFAT, FAT and FAT32
Supports LAN data-shares and cross-plaorms including Windows, Mac, Linux, iOS and Android. - Support mulple NSA, including samba/webdav
- Support mulple plaorm client tools, including Windows/Mac/Linux/iPad/iPhone/Android *Baery life subject to normal usage conditions and conguraons.
To funcon as an external HDD, simply connect "Memory 2 Move" into the computer's available USB port. "Memory 2 Move" will automatically mount on your desktop or inside the "My Computer". The "Memory 2 Move" works as an external hard drive and charges the internal baery.
Wired mode, connect the RJ45 cable into the available port on the back of your router, then enable the DHCP feature of "Memory 2 Move" to automatically assign an IP address.

Wireless mode; wirelessly connect "Memory 2 Move" to your existing wireless router to have internet access as illustrated below.

3. CONTENT OF PACKAGE
Memory 2 Move USB 2.0 cable
CD
- Manual
Power Supply (KTEC-KSAS0060500100VEU-5V/1A)
4. PRODUCT SPECIFICATION
- Dimensions: 127.3mm (L) X 80mm (B) X 25mm (H)
Wi-Fi:
Standard: 802.11 b/g/n,
Frequency: 2.4 GHZ - Speed: 72Mbps at 20MHz
150Mbps at 40MHz
Network Interface: 100Mbps Ethernet RJ45 - USB Interface: Micro USB 3.0, for data transfer and charging
Baery Capacity: 3000mAh - Operang temperature: The normal operang temperature of the device is between 5-35 Degrees Celsius.
5. MINIMUM HARDWARE REQUIREMENTS
- Internet Connec
PC Operang System Requirements - Windows: XP/Vista/Windows 7/8
Mac: OS X 10.6.0 and later - Others: Fedora 12 (Linux) and later
PC Web Browser - Windows: Supports Internet Explorer 7.0 and higher version
Mac: Supports Safari 3.0 and higher version - Others: Firefox 3.5 and higher version
- Router or Switch
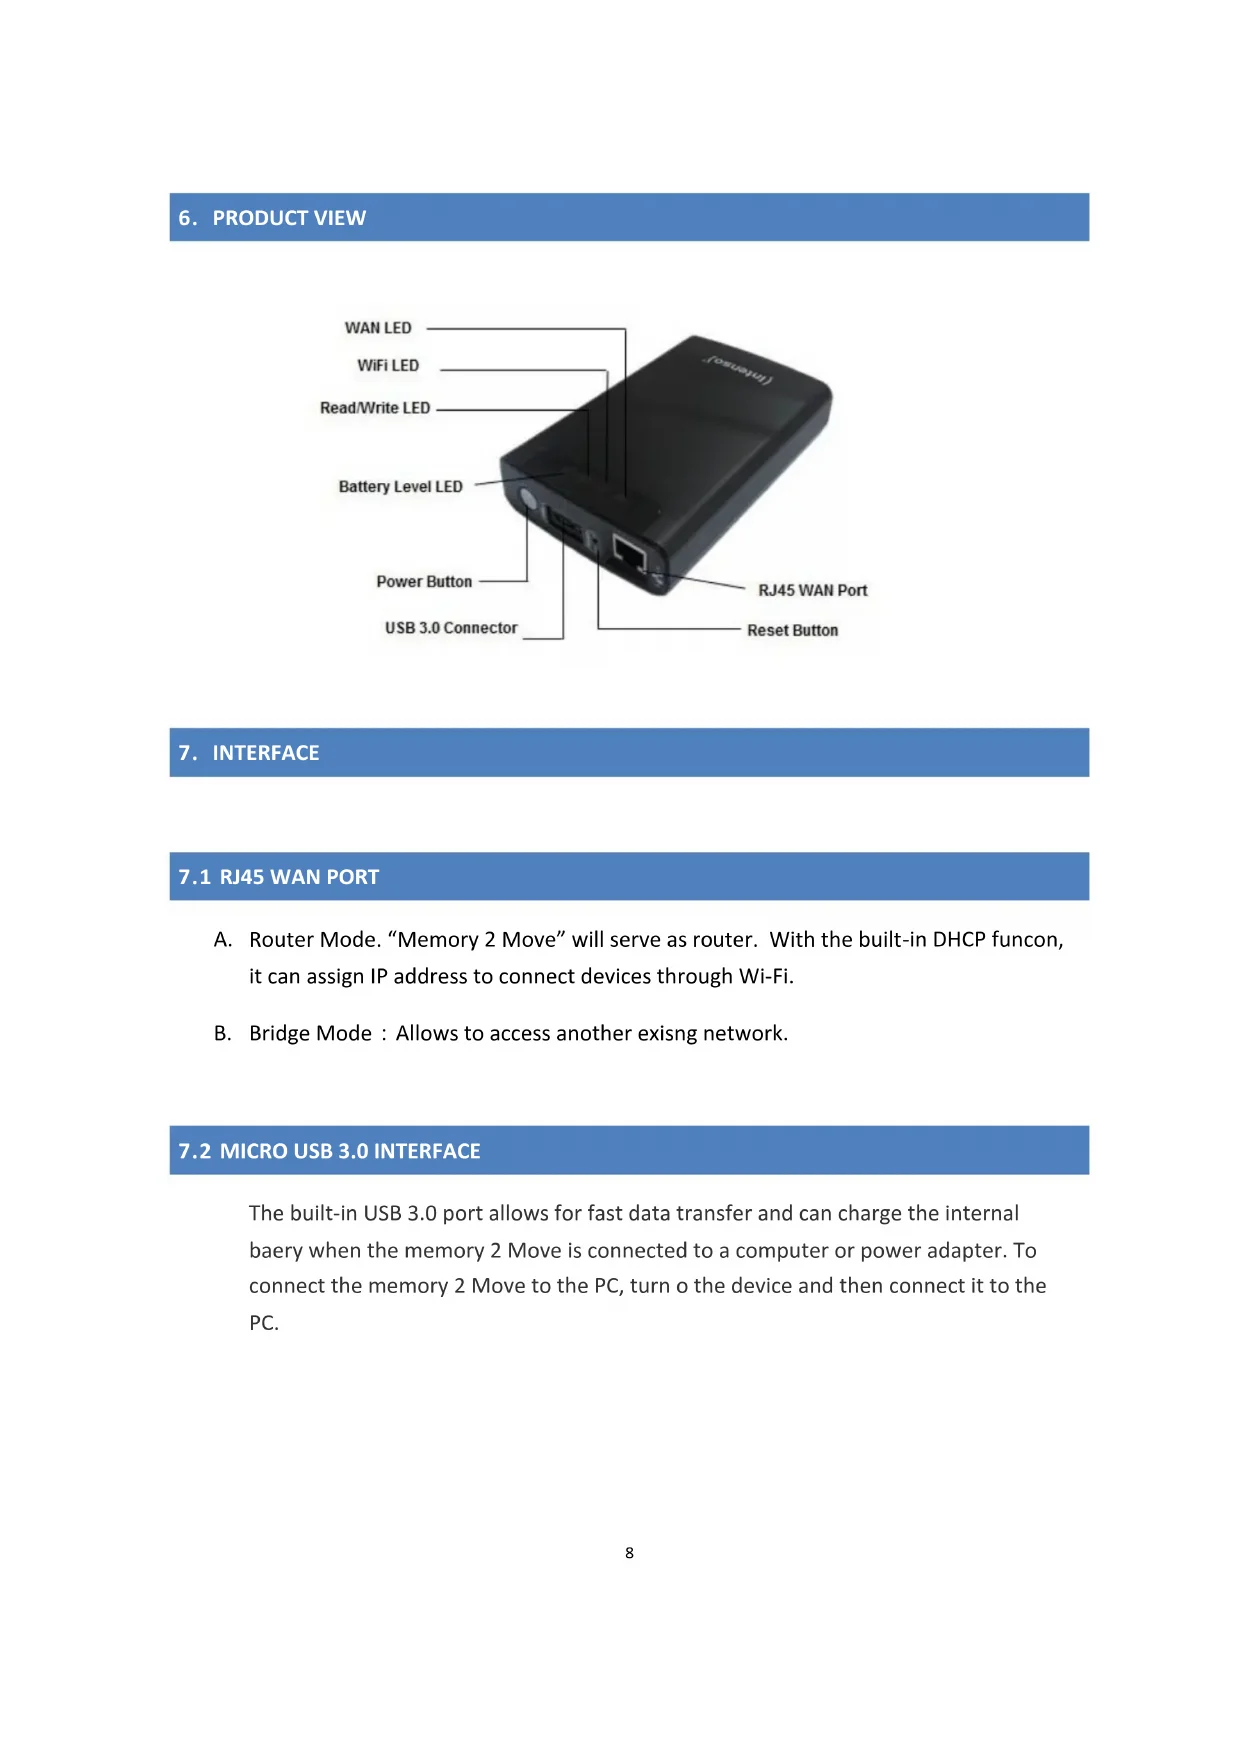
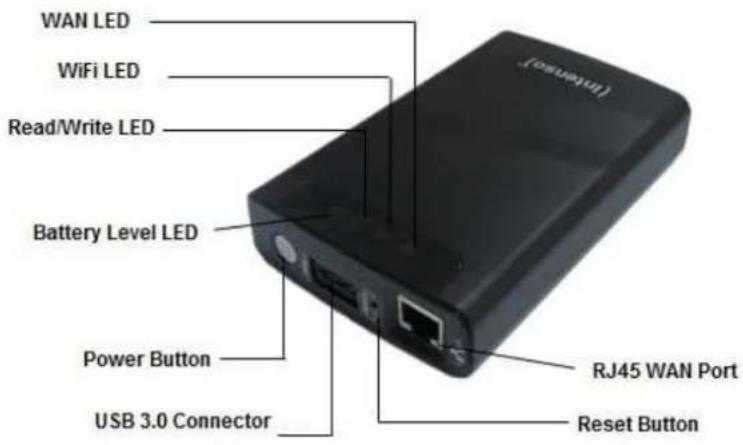
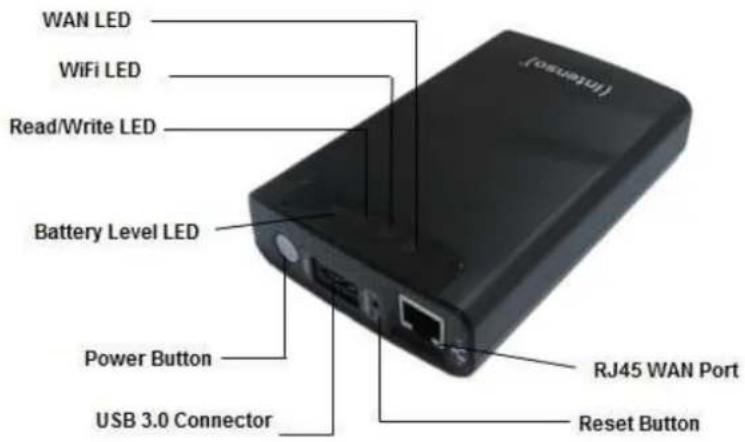
6.PRODUCT VIEW
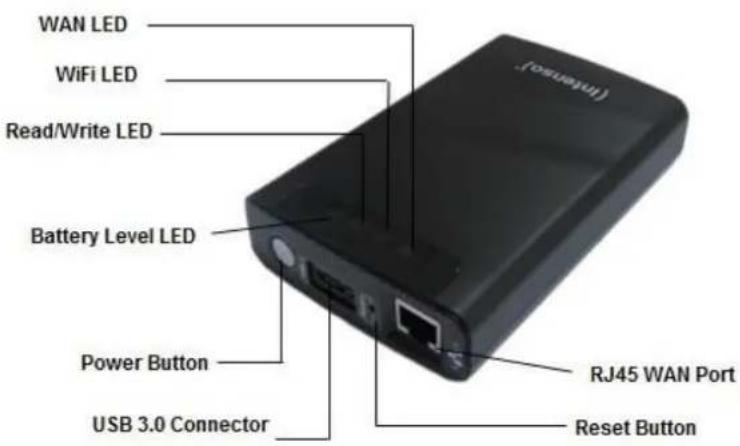
7. INTERFACE
7.1 RJ45 WAN PORT
A. Router Mode."Memory 2 Move" will serve as router. With the built-in DHCP funcon, it can assign IP address to connect devices through Wi-Fi.
B. Bridge Mode : Allows to access another exisng network.
7.2 MICROUSB3.0INTERFACE
The built-in USB 3.0 port allows for fast data transfer and can charge the internal baery when the memory 2 Move is connected to a computer or power adapter. To connect the memory 2 Move to the PC, turn o the device and then connect it to the PC.
7.3 LED PANEL
Power LED:
- LED O: The device is switched-o or no power
Green Color:
- O: Baery is fully charged
- Slowly Blinking: Baery charging
- Blinking Fast: Device Shung-Down
Red Color:
- Steady Light: Less than 30% available power
- Blinking Fast: Will soon shut-down, must be charged immediately
HDD LED:
- Blinking: Read/Write acvies
- Steady Light blue: Connected with USB 3.0
- Steady Light green: Connected with USB 2.0
Wi-Fi LED:
Blue Color:
- LED O: The device is switched-o or no power
- Blinking: Starts the Inializaon process
- Steady Light: Initializaon process completed
Ready to use, Wi-Fi signal is normal
Internet LED: Router Mode:
-Blue Color: Good signal
- Red/ blue in chage: Bad conneccon
- No LED: No connec established
Bridge Mode:
-Blue Color: Good signal
- No LED: No connec established
8. USING PC OR MAC
8.1 LIAISE A WIRELESS LAN CONNECTION WITH THE PC
Switch-on "Memory 2 Move" by pressing the power buon at the front panel.
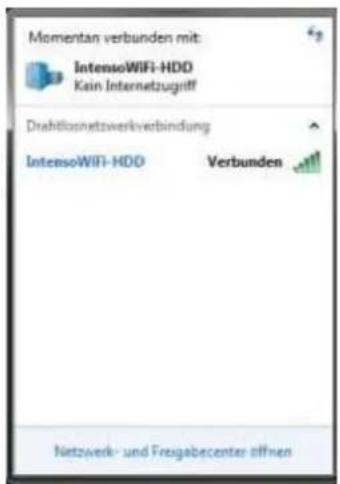
Wait for few minutes until the Wireless LED stops ashing. Enable the Wi-Fi feature on your PC and open the Wireless Network Connecn. Select the "Memory 2 Move" wireless connecn (default wireless SSID: Memory2Move-XXXX and password: intense01).
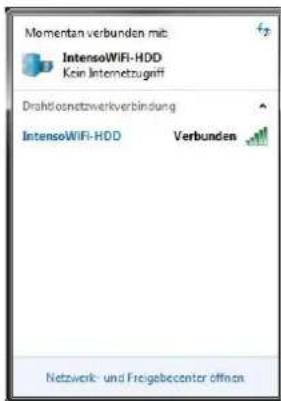
Note: For your own safety, please change your password aer successful connecn.
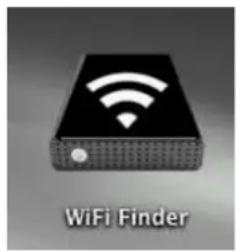
Once you have successfully connected to "Memory 2 Move", you may now run the "WiFi Finder" to search for your device and complete the conguraon process.
Our included "WiFi Finder" is the only soware that you will need to install on your computer. This soware utility allows you to easily search and look for your "Memory 2 Move" that is connected from your home network. The soware must not be installed.
Simply click on the WiFi Finder Icon which is part of CD content.
8.2 PC WIFI FINDER
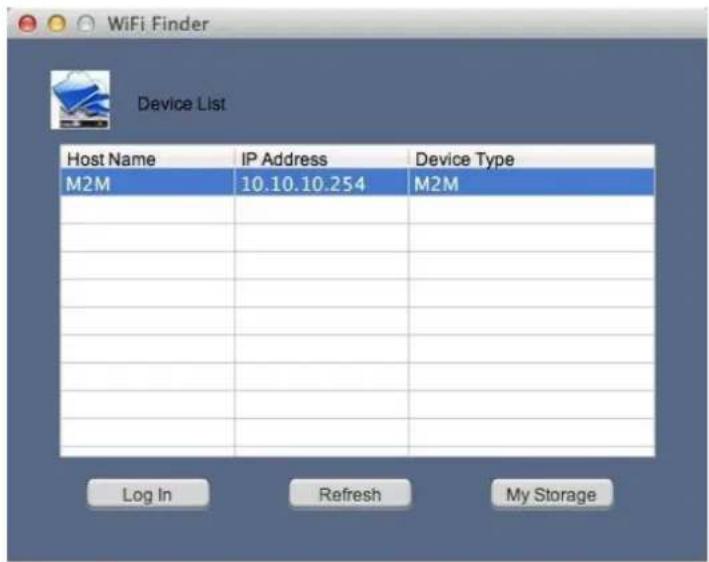
Double-click the "WiFi Finder" icon to start the sware. This utility will search for all the connected devices in your network as menoned on below screenshot.

If you do not nd the Memory 2 Move on the list of devices connected in your network, click on the "Refresh" buon to update the device list.
1.) Select the Memory 2 Move on the list, and then click on the "Log In" buon to enter the web interface.
Default user name: admin
Default password: 00000
Click on the "Log In" buon to access the Web Management Interface.
Note: For your own safety, please change the password aer successful connecn.
2.) You may transfer the data between PC and Memory 2 Move, such as upload the data from PC into the WiFi Disk, or download the data from the WiFi Disk into PC.
8.2.1 MY STORAGE
Click "My Storage" buon. The above shown window will appear.
Aer input the correctly user name (admin) and password (00000), you may access the Memory 2 Move.
For your own safety, please change the password aer successful connecn.
You may transfer the data between PC and Memory 2 Move, such as upload the data from PC into the WiFi Disk, or download the data from the WiFi Disk into PC.
8.3 LIAISE A WIRELESS LAN CONNECTION WITH MAC
Switch-on the "Memory 2 Move" by pressing the power buon at the front panel. Wait for few minutes until the Wireless LED stops ashing. Enable the Wi-Fi feature on your MAC and open the Wireless Network Connecn. Select the Memory 2 Move wireless connecn (default wireless SSID: Memory2Move-XXXX and password: intenso1). Once you have successfully connected to "Memory 2 Move", you may now run the "WiFi Finder" to search for your device and complete the conguraon process.
Our included "WiFi Finder" is the only soware that you will need to install on your computer. This soware utility allows you to easily search and look for your "Memory 2 Move" that is connected from your home network. The soware must not be installed.
Simply click on the WiFi Finder Icon which is part of CD content.
8.3.1. MAC WIFI FINDER
Double-click the "WiFi Finder" icon on your desktop. The soware utility will search all the connected devices in your network. If you do not nd the Memory 2 Move on the list of devices connected in your network, click on the "Refresh" buon to refresh the device list.
1.) Select the Memory 2 Move on the list, and then click on the "Log In" buon to enter the web interface.
Default user name: admin
Default password: 00000
Click on the "Log In" buon to access the Web Management Interface.
Note: For your own safety, please change the password aer successful connecn.
2.) You may transfer the data between PC and Memory 2 Move, such as upload the data from PC into the WiFi Disk, or download the data from the WiFi Disk into PC.
8.3.2. MY STORAGE
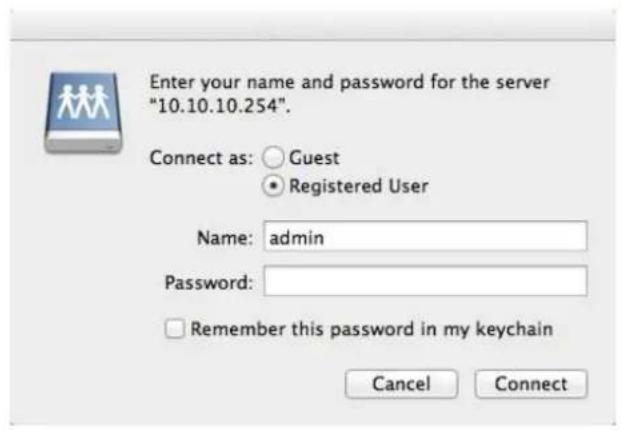
Select the Memory 2 Move and click "My Storage" buon. A pop-up window appears. Aer input the correctly user name (admin) and password (00000), you may access the Memory 2 Move by samba.
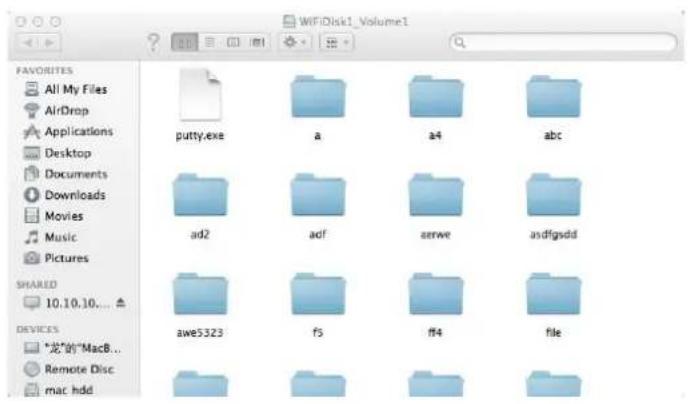
You may operate all les and directories on the Memory 2 Move by samba, such as: create, edit, delete, copy, move, rename. Furthermore you can transfer the data between MAC and the Memory 2 Move, such as upload the data from MAC into the WiFi Storage, or download the data from the WiFi Storage into MAC.
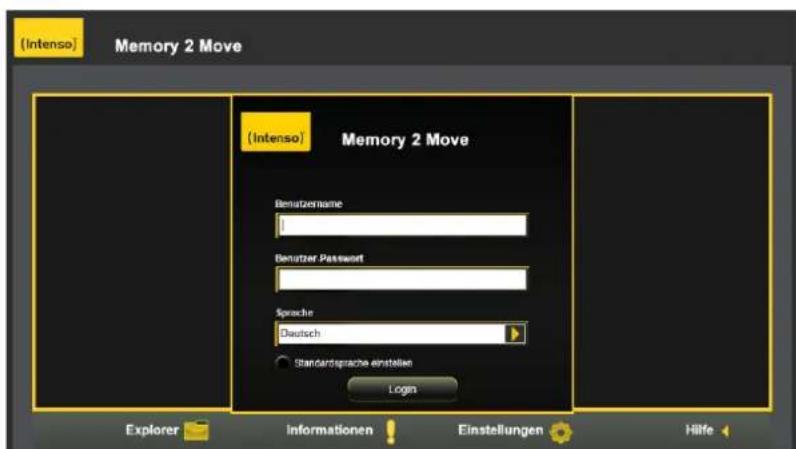
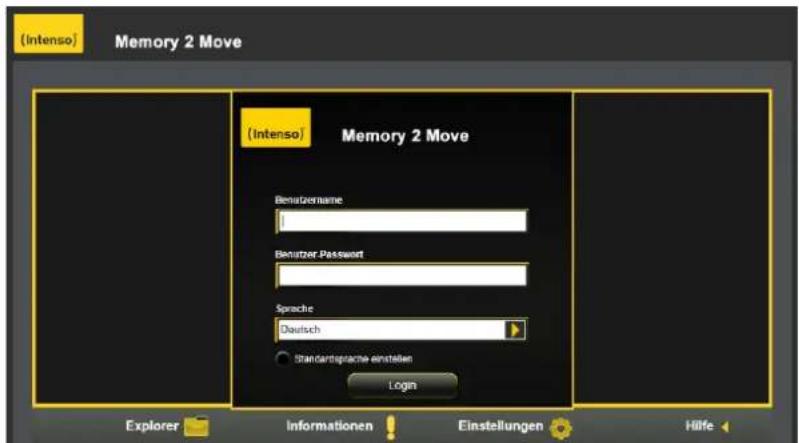
8.4 "MEMORY 2 MOVE" CONFIGURATION
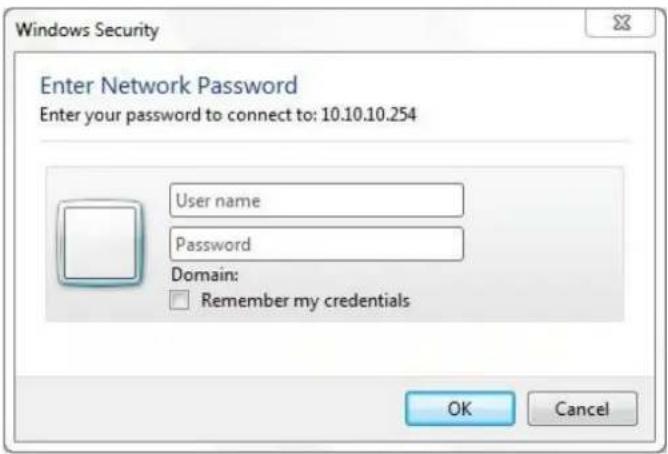
When you are connected successfully to the Memory 2 Move, your Web-Browser opens. You have to log in to the web interface.
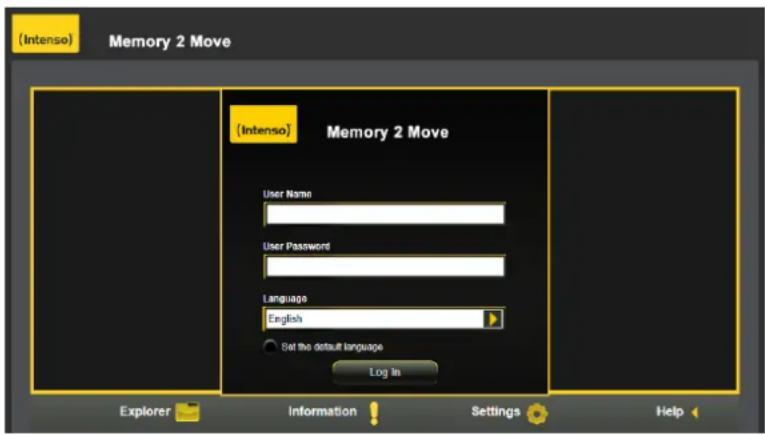
Default user name: admin
Default password: 00000
Click on the "Log In" buon to access the Web Management Interface.
Once your Wi-Fi enabled-PC is successfully connected to the "Memory 2 Move", using the "WiFi Finder" will allow you to access our built-in Web Management Interface and conjure your device.
Startup Wizard
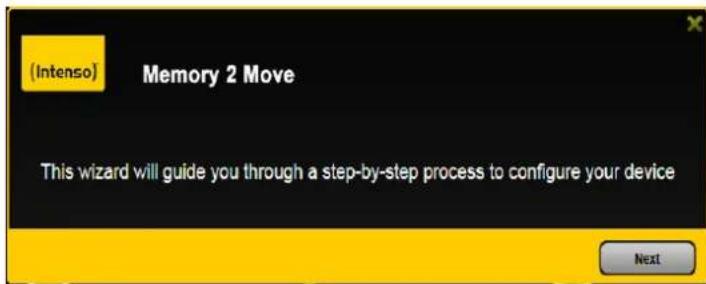
During the initial setup, our Wizard will automatically run and will guide you through the step-by-step process on conjuring the "Memory 2 Move" as seen on the screenshot above. You may cancel this process by clicking on the "X" at the top right corner of the window. If you cancel the Wizard, it will keep the factory default sengs of your "Memory 2 Move". Click on the "Next" buon to connue.
Internet Seng
... through another conneccon with an available network

You can choose between two available Internet Access opons - By default Wireless Access is selected (as you can see on the picture).
A. Wireless Access: Connecng the "M2M" device to another wireless network to have internet access.
B. Wired Access: Directly connecng the "M2M" to the available port on the back of the router to connect to another network.
- SSID: Type-in the SSID name or click on the "Rescan" buon to automatically search for the available wireless networks.
- Password: Type-in the correct password to join the selected wireless network conneccon.
-
IP Address: Select either DHCP or manually assign an IP address
-
By selecng DHCP, the host will provide an automac IP address to connect to the internet.
- By selecng Manual, you have to manually assign an IP address to connect to the internet.
Selecng Wired Access

Note: If you cannot connect with another network, ask your network administrator for the guidelines
By selecng Wired Access, the Dynamic IP is selected as the default seng. You can manually assign your own IP address by clicking on the green arrow and select the Stac IP opon.
Click on the "X" buon if you wish to cancel and exit this window.
Click on the "Next" buon to connue the process. The next step is to condure the WiFi and LAN sengs.
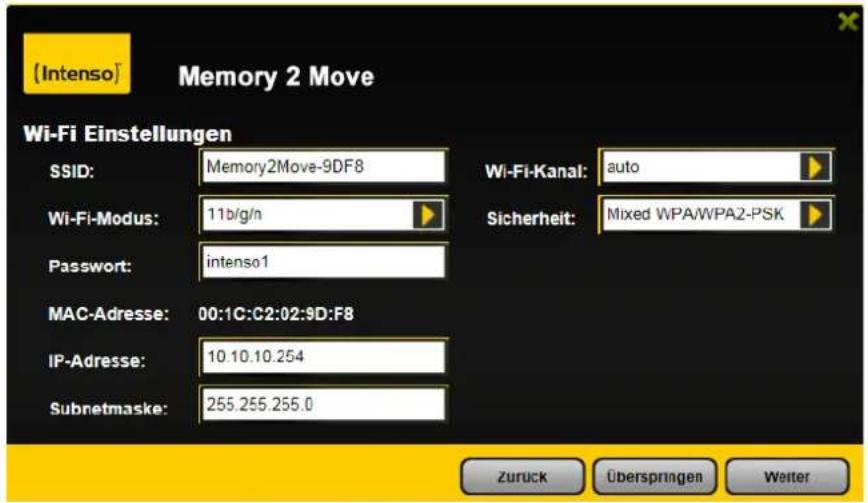
WiFi & LAN Seng

SSID: Type-in a combinaon of leers and numbers only. 32 characters is the maximum allowable SSD length.
- Channel: The default seng is set to Auto. There are 14 channels available to choose from.
- Modes: The default seng is 802.11b/g/n. You can also manually set the modes to 11Mbps (802.11b), 54MBPS (802.11G), and 150Mbps (802.11n).
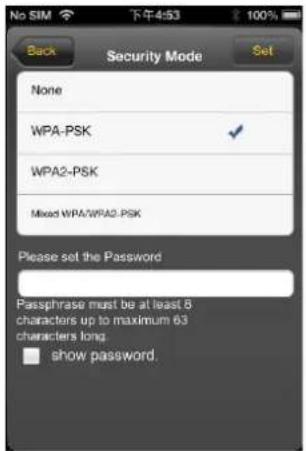
Security : The WPA-PSK, WPA2-PSK , Mixed WPA/WPA2-PSK (default) are available.
- Password : Minimum 8 (Maximum 63) characters.
- IP Address : The default IP address is set to 10.10.10.254 with subnet mask of 255.255.255.0. The IP address can be changed.
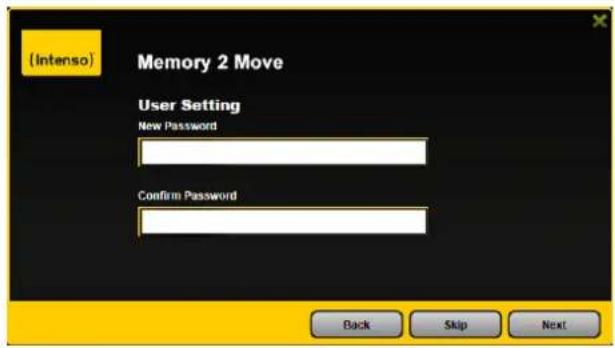
Click on the "Next" buon to change the admin default password. Click on the "Next" buon once the password has been modied. You may click on the "Skip" buon to keep the default password.
Aer nishing the startup wizard the system will start reboong.
This process will take 2 minutes (see picture below)

9. USING MOBILE DEVICES
9.1 IOS CLIENT APP INSTALLATION
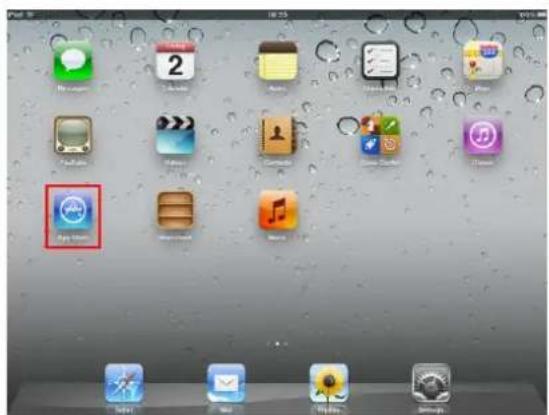
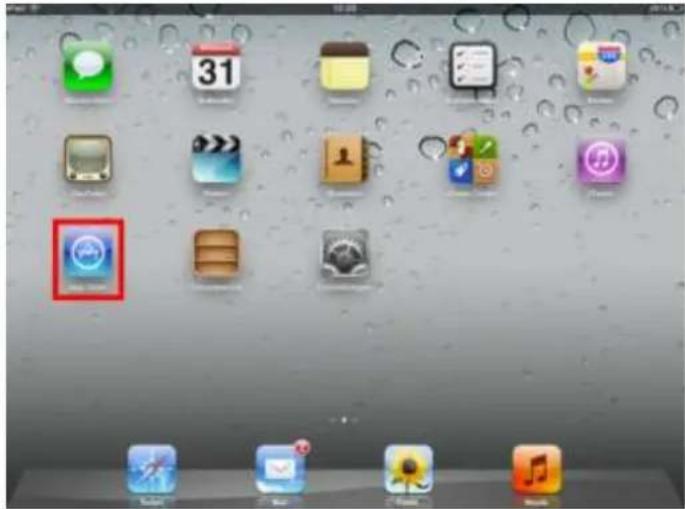
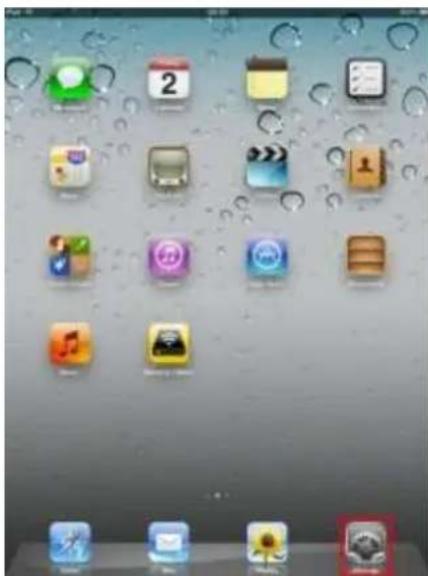
- Click on the "App Store" icon on the Home screen as seen on the following image. Search and locate the free "Memory 2 Move" app and follow the on-screen installaon instrucons.
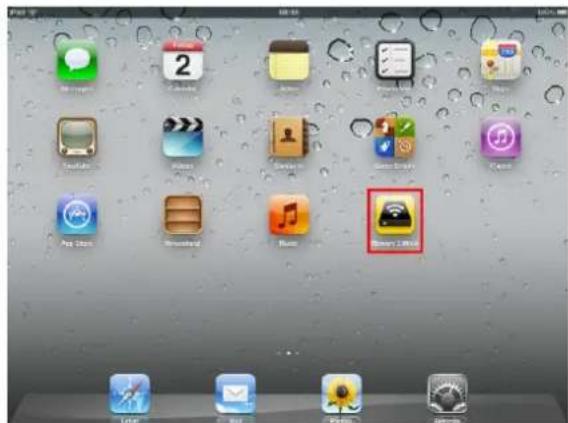
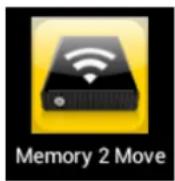
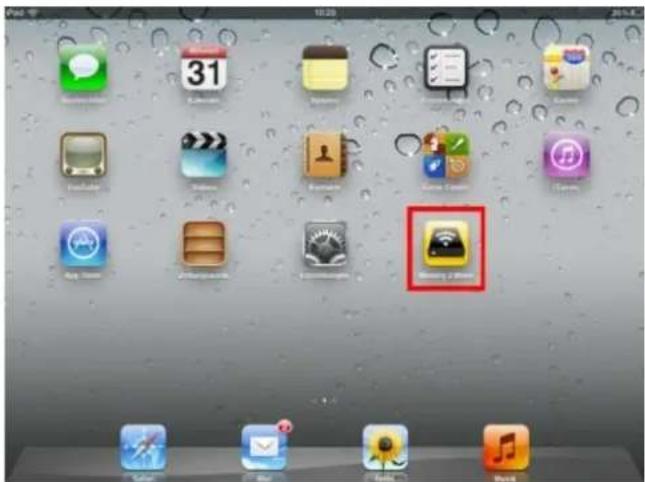
- Once the installaon process has been completed, the "Memory 2 Move" app can be found on the home screen as seen on the image.
9.2 WIRELESSLY CONNECTING YOUR IPHONE/IPAD
- Turn-on the "Memory 2 Move". Wait for a few minutes to complete the initialzaon process. The blue Wi-Fi LED on the device should remain solid indicang that the initialzaon process has been completed.
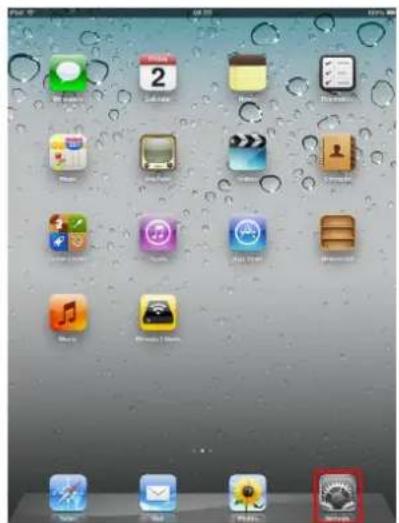
- Click on the "Sengs" icon on the desktop as seen on the screenshot.
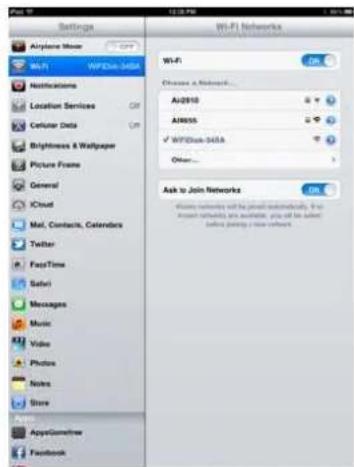
- Click on "Wi-Fi". Inside the Wi-Fi Networks, the "Memory2Move-XXXX" should appear on the list. Click on the "Memory2Move-XXXX". Enter the password (default: intenso1)
-
Once the "Memory2Move-XXXX" is selected, a check mark will appear before the SSID and the Wi-Fi logo will appear aer the device name on the top le of the display.
-
Click on the "Memory 2 Move" icon to launch the app as seen on the image.
- Enter the Admin password that you assigned during the conguraon process (00000). The password is only required during the rst login. The device remembers the password and there is no need to enter it again the second me you login.
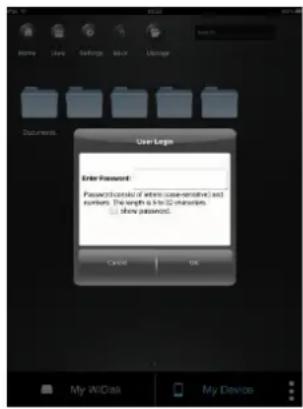
- Once the password has been entered correctly, you will be automatically connected into the "Memory 2 Move". This is your direct access to the connected data carriers that are connected to the device.
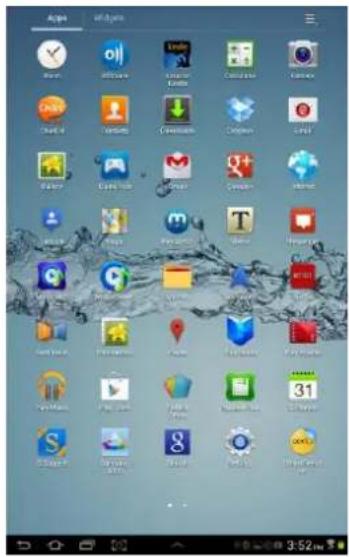
9.4AndroidCLIENTAPPINSTALLATION
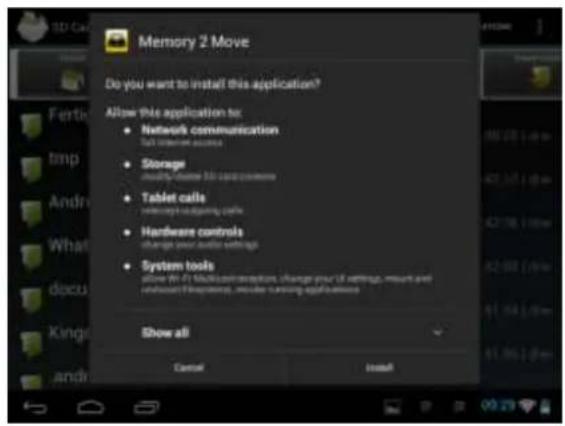
- Download the Client App called "Memory 2 Move" from the ocial website (Google Play Store, Android Market) as seen on the screenshot.
- Click on the "Install" buon and follow the on-screen instrucons.

- Once the Client App is successfully installed, the "Memory 2 Move" icon can be found on your desktop as seen on the image.

9.5 WIRELESSLY CONNECTING YOURAndroid DEVICES
-
Turn-on the "Memory 2 Move". Wait for a few minutes to complete the initializaon process. The blue Wi-Fi LED on the device should remain solid indicating that the initializaon process has been completed.
-
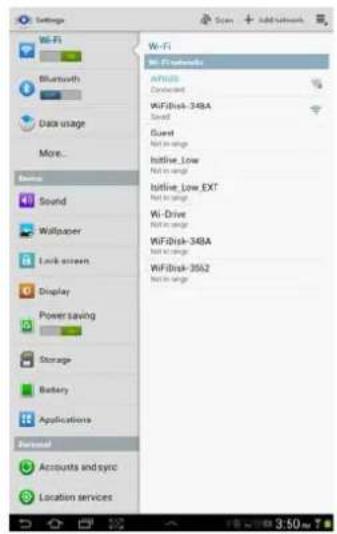
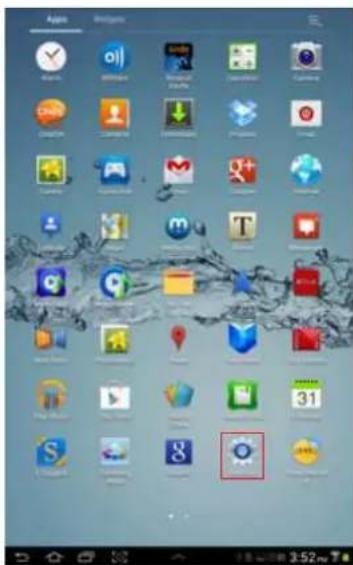
Click on the "Sengs" icon on your desktop as seen on the screenshot.
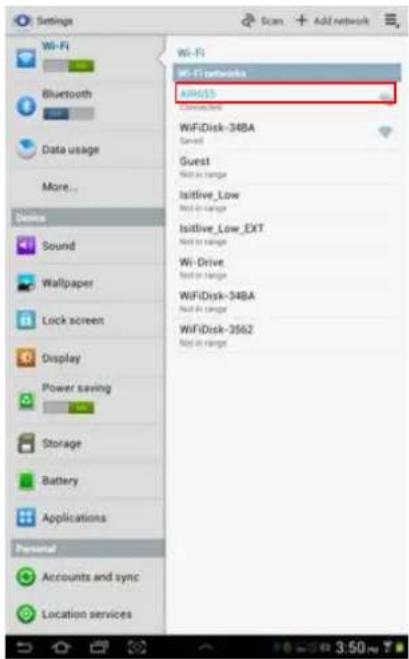
- Switch the Wi-Fi to ON posion. Inside the Wi-Fi networks, the "Memory2Move-XXXX" should appear on the list. Click on the "Memory2Move-XXXX" and enter your password (default: intenso1).
-
The word "Connected" will appear under the SSID name of which is an indicaon that the Android Device is connected to the "Memory 2 Move"
-
Click on the "Memory 2 Move" icon to launch the app as seen on the image below.

- Enter the Admin password that you assigned during the conguraon process (default: 00000). The password is only required during the rst login. The device remembers the password and there is no need to enter it again the second me you login.
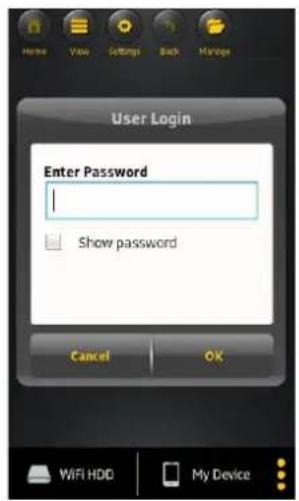
- Once the password has been entered correctly, you will be automatically connected into the "Memory 2 Move" menu. This is your direct access to the connected data carriers that are connected to the device.
10. BASIC FUNCTIONALITY
10.1 IOS DEVICE CLIENT
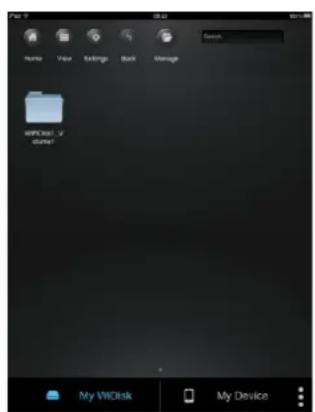
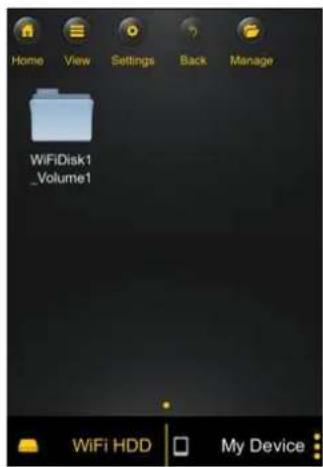
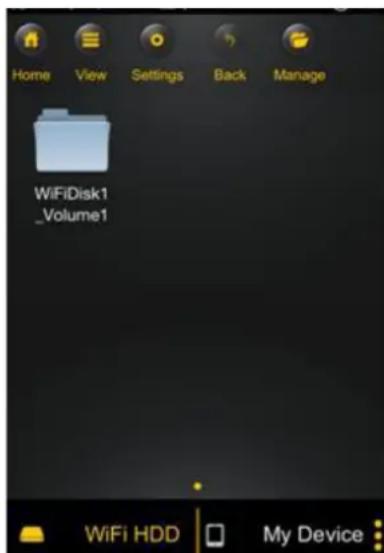
Once you have successfully connected to the "Memory 2 Move", by default, you will be inside the "Memory 2 Move" menu. This is your direct access to the connected data carriers. Via the menu "My Device" you can access the data carriers. Few buons that can be found inside the Main Screen as listed below.
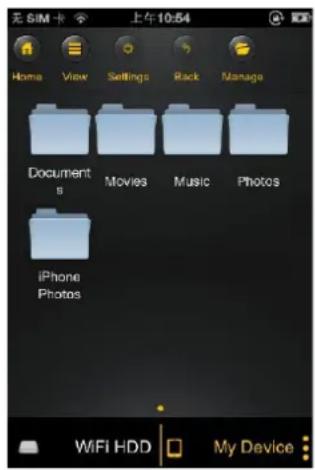
My Device Main Screen View - By default, the Documents folder, Music folder, Photos Folder, Videos folders and iPad (or iPhone) folder are available to easily organize your les inside the My Device.
"Memory 2 Move" Main Screen View
| Home | Home Buon – back to the main screen. |
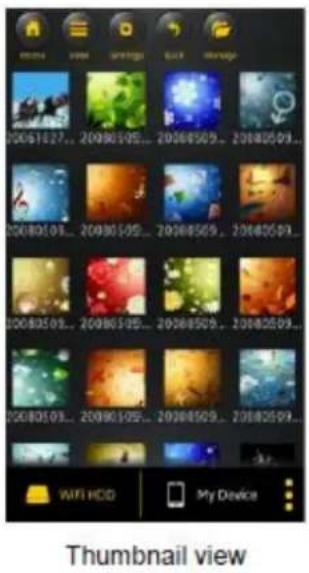
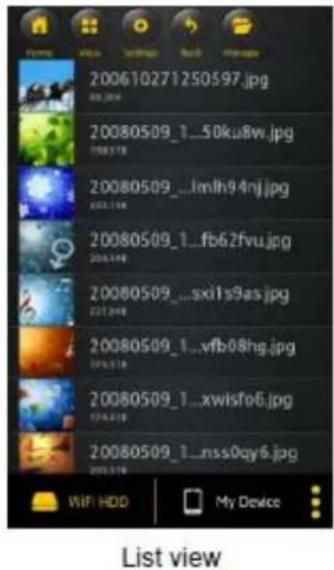
| View | View Buon - change to List or Thumbnail view. |
| Settings | Sengs Buon – change the “Memory 2 Move”conguraon. |
| Back | Back Buon – back to previous screen |
| Manage | Manage Buon – to choose one or more les |
| WiFi HDD | “Memory 2 Move” – the Remote Storage |
| My Device | My device –access to the device that you are presently usingfor connecng to the Memory 2 Move. |
| Status Buon – to view the download/upload status list. | |
10.2Android DEVICE CLIENT
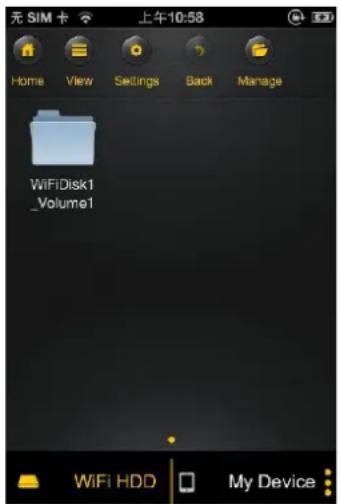
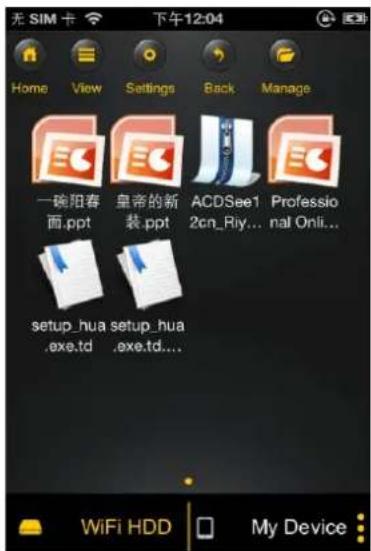
Once you have successfully connected to the "Memory 2 Move", by default, you will be inside the "Memory 2 Move" menu. This is your direct access to the connected data carriers. Via the menu "My Device" you can access the data carriers. Few buons that can be found inside the Main Screen as listed below.
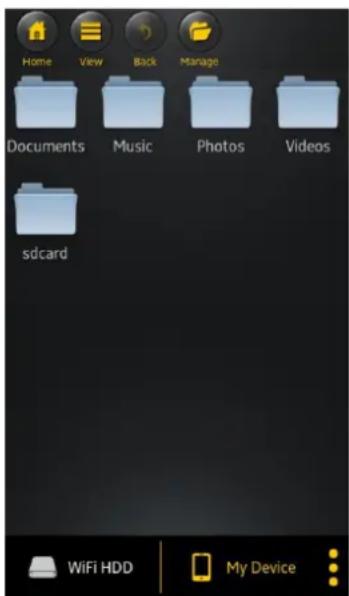
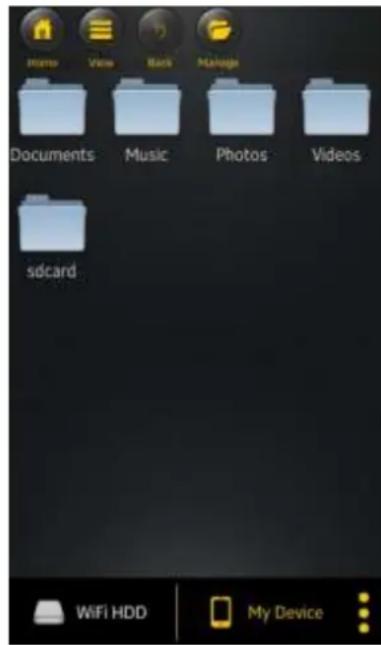
My Device Main Screen View - By default, the Documents folder, Music folder, Photos Folder, Videos folders and SDCard folder are available to easily organize your les inside the My Device.
"Memory 2 Move" Main Screen View
| Home | Home Buon – back to the main screen. |
| View | View Buon - change to List or Thumbnail view. |
| Settings | Sengs Buon – change the “Memory 2 Move”conguraon. |
| Back | Back Buon – back to previous screen |
| Manage | Manage Buon – to choose one or more les |
| WiFi HDD | “Memory 2 Move” – the Remote Storage |
| My Device | My device –access to the device that you are presently usingfor connecng to the Memory 2 Move. |
| Status Buon – to view the download/upload status list. | |
10.3 WI-FI SETTINGS (IOS ANDAndroid)
10.3.1 WI-FI SETTING INTERFACE
Click on to change the Wi-Fi Disk conguraon. This feature only appears when switched to My Wi-Fi Device.

10.3.2 MODIFY DEVICE NAME
Please press on icon to modify the device name. Aer input the new device name, the Set buon appears, click on the Set buon to save the new device name.

10.3.3 SECURITY
Under WiFi HDD Sengs the security opons appear. The Wi-Fi Disk supports the following security
Modes: None, WPA-PSK, WA2-PSK, Mixed WPA/WPA2-PSK. If you want to select a new security mode (except "Disabled"), you have to ask for pung the new wireless password in; click on set buon to save the new security mode and password.
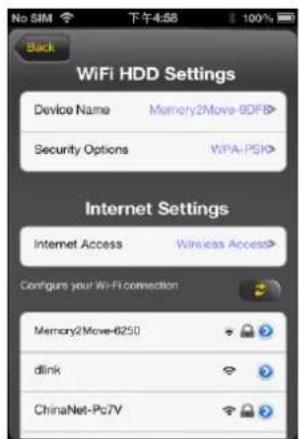
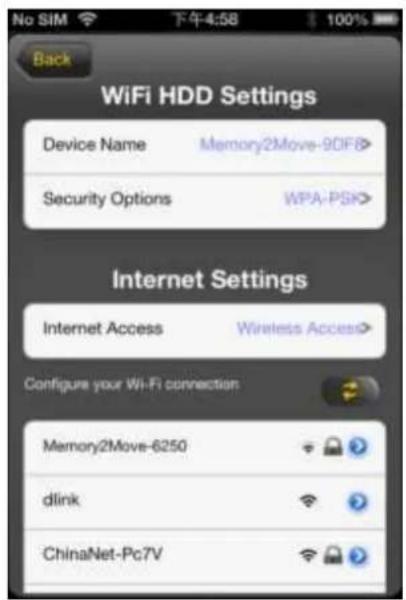
10.3.4 INTERNET MODE
Under Internet Sengs you will nd the internet access. The Wi-Fi Disk supports the following internet access:, Wireless Mode and Wired Mode. Wireless Mode is AP Client that access internet by wireless to connect wireless router, Wired Mode is WAN or LAN Router that access internet by Ethernet port to connect wired router. Aer select the internet mode, click on "Save" to save the new mode.
Below please nd the picture showing the wireless access:
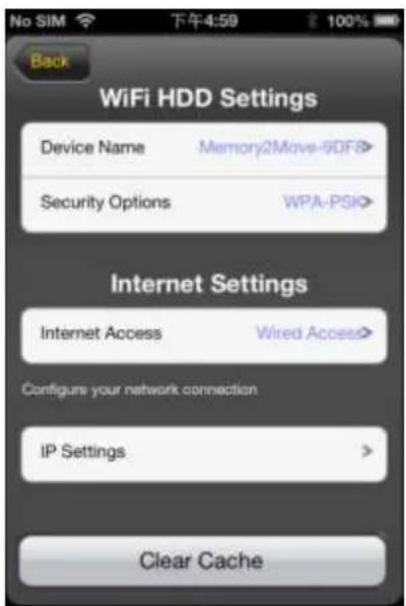
By selecng wired mode, you have to conjure the network rst as seen on the screenshot.
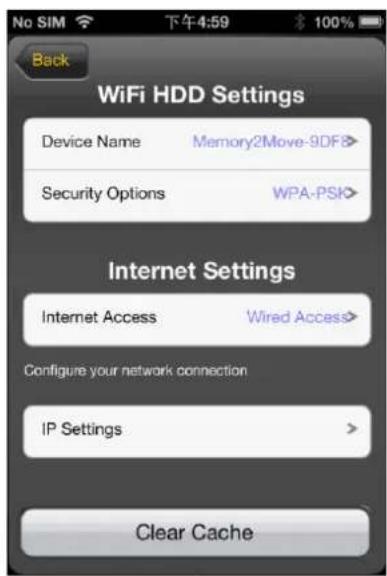
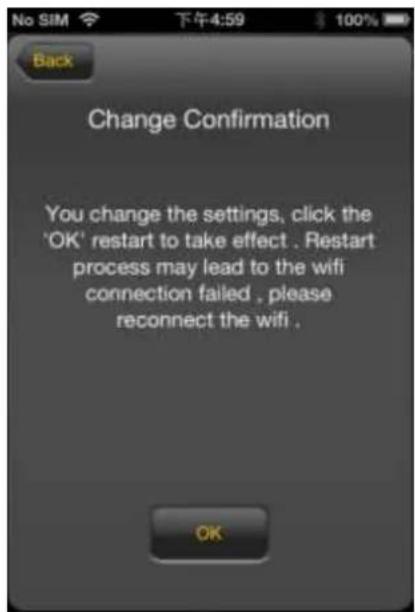
Aer selecng "Save" buon, below picture will appear, click on "OK" to reboot.
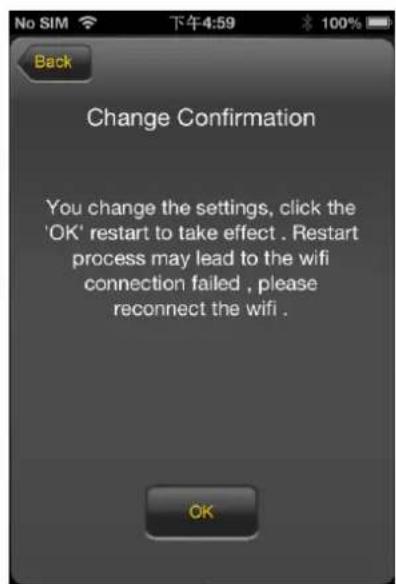
Click "Back" buon to return to Wi-Fi sengs interface.
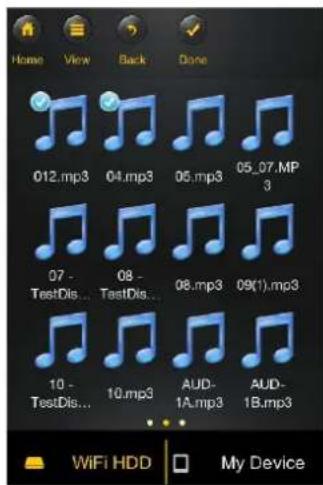
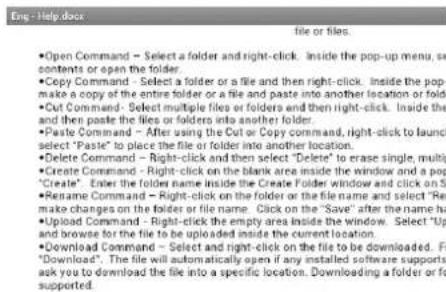
10.4 PLAYING MUSIC/AUDIO (IOS ANDAndroid)
Tip: It is highly recommended to create a folder or folders where to copy all your media les into the "Memory 2 Move" for ease of use and le organizaon. The Music or Audio les can be played regardless if you are inside the "Memory 2 Move" or "My Device. Simply locate the music or audio le that you would like to play. Click on the le and your music will automatically play.

Note: Please consult your device manual to check whether it will support the music/audio les that you would like to play.
-
When clicked it will play the previous music
-
When clicked, it will play the next song.
-
When clicked, it will start playing the music or audio le. Click again, the win pause/stop playing the music.
Five play modes:
a. Play current song: the music ends aer playing current song
b. - Repeat current song: the player will always play the current song, and it will only stop playing when the buon is clicked.
c. - Shue all songs: the music or the audio les will be played randomly.
d. - Play current folder: the music or the audio les will be played and not repeated.
e. - Repeat all songs: the music or the audio les will be played in sequence and repeated.
Note: You can click and hold, then slide the music progress buoy to fast-forward or rewind the music.
Tip: You can exit the Music Player Interface at any me and will connue to play the music or audio le in the background.
Tip: It is highly recommended to create a folder or folders where to copy all your movie les into the "Memory 2 Move" for ease of use and le organizaon.
The movie or video les can be played regardless if you are inside the "Memory 2 Move" or "My Device".
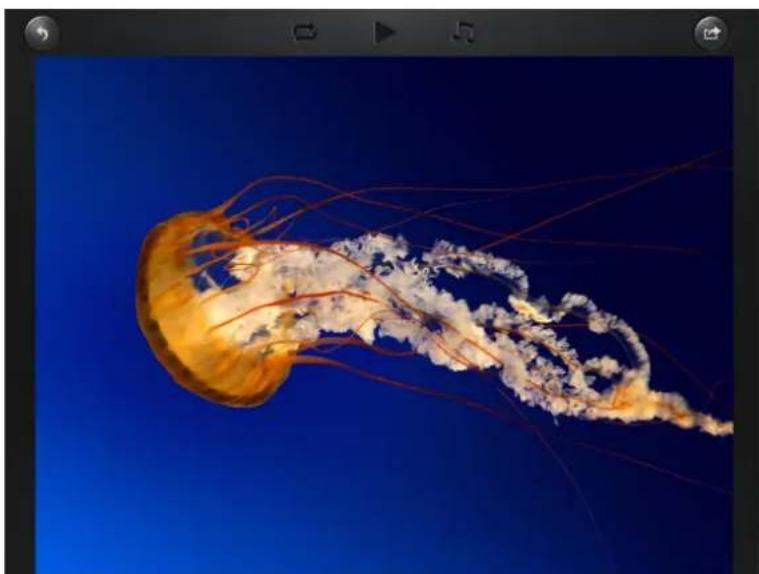
Simply locate the movie or video le that you would like to play. Click on the le and your movie will automatically play as seen on the screenshot below.

Note: Please consult your device manual to check whether it will support the movie or videos that you would like to play.
By default, the video playback is in the landscape mode. See the buon funconalies below.
- When clicked, the movie that is currently playing will stop and will exit the Movie Player Interface.
- n clicked, this will scale your movie according to the screen size.
- Click on and slide the progress buoyon to fast-forward or rewind the movie.
- 4.1.3.2.1.1.1.1.1.1.1.1.1.1.1.1.1.1.1.1.1.1.1.1.1.1.1.1.1.1.1.1.1.1.1.1.1.1.1.1.1.1.1.1.1.1.1.1.1.1.1.1.1.1.
- Press and hold to fast-rewind the movie while playing.
- Press and hold to fast-forward the movie while playing.
- When clicked, it will start playing or resume playing the movie.
- when clicked, it will pause the movie from playing.
10.5.2Android
Tip: It is highly recommended to create a folder or folders where to copy all your movie les into the "Memory 2 Move" for ease of use and le organizaon.
The movie or video les can be played regardless if you are inside the "Memory 2 Move" or "My Device.
Simply locate the movie or video le that you would like to play. Click on the le and the list of movie player will appear as seen on the screenshot below.
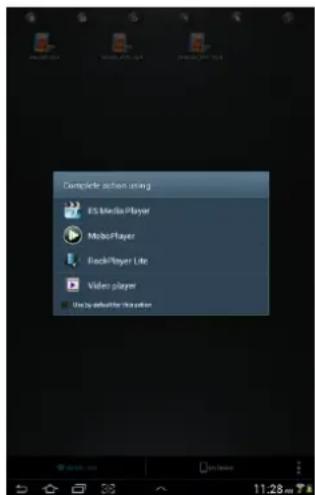
Note: The control panel will vary depending on the movie player installed on your Android devices. Please consult the movie player's user guide on how to control the movie.
10.6.1 IOS
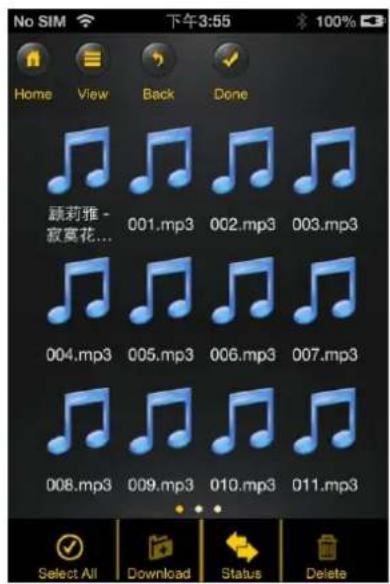
Tip: It is highly recommended to create a folder or folders where to copy all your pictures into the "Memory 2 Move" for simply use and le organizaon.
Note: The "Memory 2 Move" currently supports .jpg, ti, gif and .bmp images.
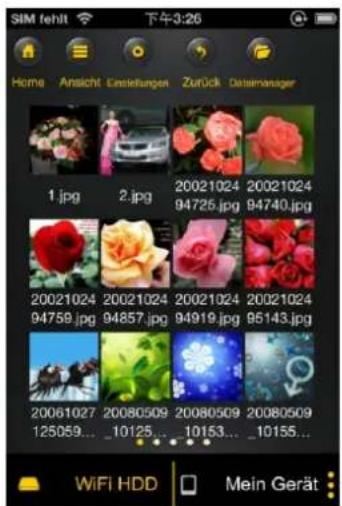
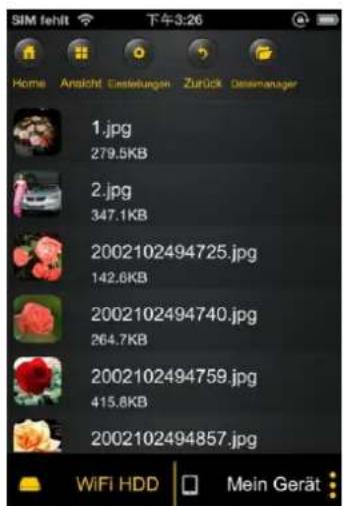
The supported images can be viewed as thumbnails or as a list as seen on the screenshot below. Any images that are not supported can be viewed as a generic thumbnail or icon.
Click on any pictures or images and it will automatically play. Aerwards the menu bar shall appear as shown on the picture below.
There are few funcons available to control the slideshow. You can swipe your nger across the screen to manually view the pictures or images or click the buon, to automatically play the slideshow.
- Click the Buon to stop the slideshow from playing and press again to connue playing.
- Click the button to restart or to replay the slideshow.
- Click the buon to play the slideshow once and it will stop at the last image or photo.
- Click the button to return from the previous screen.
Background music can be added while playing the slideshow. Click the button as seen on the screenshot below.

- Stop/Connue playing buon - to stop or connue playing the background music. Select buon - search and locate the le or les that you would like to play as the
background music. Click on the to return to the slideshow as seen on the screenshot below.
- Repeat buoyon – the background music will connue playing the same music when it is switched-on. By default, this opon is switched-o.
10.6.2. ANDROID
Tip: It is highly recommended to create a folder or folders where to copy all your pictures into the "Memory 2 Move" for simply use and le organizaon.
Note: Please consult your device manual to check whether it will support the photos that you would like to play. The supported images can be viewed as thumbnails or as a list as seen on the screenshot below. Any images that are not supported can be viewed as a generic thumbnail or icon.
Click on any pictures or images and it will automatically play. Aerwards the menu bar shall appear as shown on the picture below.

There are few funcons that are available to control the slideshow. You can swipe your index nger across the screen to manually view the pictures or images or click the
buon, to automacally play the slideshow.
- Click the Buon to stop the slideshow from playing and press again to connue playing.
- Click the button to restart or to replay the slideshow.
- Click the buon to play the slideshow once and it will stop at the last image or photo.
- Click the button to return from the previous screen.
- Background music can be added while playing the slideshow. Click the Buon as seen on the screenshot below.

- Stop/Connue playing buon - to stop or connue playing the background music.
- Select buon - search and locate the le or les that you would like to play as the
background music. Click on the to return to the slideshow as seen on the screenshot below.

- Repeat buoyon – the background music will connue playing the same music when it is switched-on. By default, this opon is switched-o.
10.7 SHARING PHOTOS/IMAGES
10.7.1 IOS
There are few opons to share photos/image to your friends and family; by email, saving to the device Photo Album and upload to Facebook.
Note: Internet connecion is required to share photos/images via email or accessing any social media network.

- Click on the buon located at the top right of the screen to show the three
opons available to share your photos/images. Click the the previous screen.

to return from
- E-Mail buon – this buon will launch the default e-Mail app to send the photo as an aachment.


- Add to photo - when selected, the selected photo/image will be saved into the Photo Album of the device.
- Upload to Facebook – when selected, you will be directed to the Facebook login screen. The Facebook app must be installed on your device. Facebook login and password is required.
10.7.2Android
Sharing photos/images using your Android device will vary depending on the apps installed on your device.
Note: Internet connecn is required to share photos/images via email or accessing any social media networks.


- Click thebuon to return from the previous screen or to exit. Click the

buon located at the top right of the screen to show the 2 opons available to share your photos/images.
- Share buon - when selected, a list of app installed on your Android will appear as seen on the screenshot below. You may select from the list which app to launch.
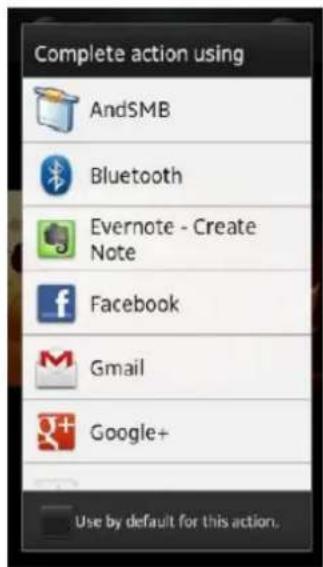
- Save Photo buoy - when selected, the selected photo/image will be saved into the device Photo Gallery.
10.8.1 IOS
The device client app supports keynote, numbers, page, Excel, Word, .pdf, .txt and ppt les.
To open or view any documents, simply click on the le. This will automatically open the
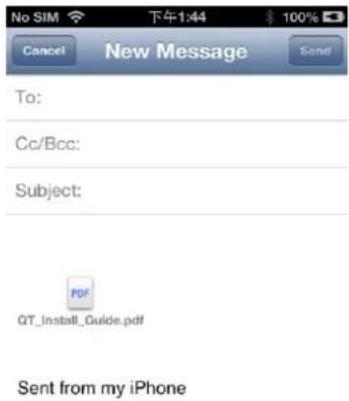
supported le. Click the buon to return from the previous screen or click the buon to send the le via email as seen on the screenshot below.
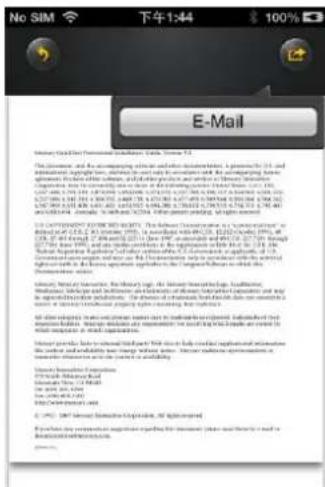
Note: Internet connecn is required to send emails.
Click the "E-Mail" buon, the default email app will launch automatically and the selected document will be sent as an aachment.
Once the email is sent, there will be a message "Mail Sent" located at the lower-le corner of the screen. This is an indication that the email was sent successfully.
10.8.2Android
3. Keyboard Shortcuts
Our built-in Web Management Interface supports keyboard commands and shi
Tab Key, Enter Key, Home Key, PGUP, PGON, End Key, Up Arrow, Down Arrow, I Delete Key
Windows-Ctrl+C=Copy.Ctrl+V=Paste
Mac-CMD+C=Copy; CMD+V=Past
4. Drag and Drop
A single file drag and drop is supported by our built-in Web Management Inter

To open/view a document using your Android device, simply click on the le that you wish to open/view. This will automatically open the le using the default viewer or the installed app on your Android device as seen on the screenshot.
Note: Internet connecn is required to send emails.
10.9 COPY, DELETE, DOWNLOAD, upload FUNCTIONS (IOS ANDAndroid)
You may click on the button at any me to share, delete, download, and upload les.
As seen on the screenshots below, the will appear at the top as part of the menu once
the

At the boom of the screen, there are new icons. See below for their funcons.
- Click once, all the les will be selected. The icon will turn into yellow color and a check mark will appear on every le.
Tick once again, all the les will be unselected. The check marks are invisible.
Tip: You may select a single or mulple les by clicking on the thumbnail. As well, you may
click and hold on the thumbnail for few seconds and drag it to the
the to upload, or to the ico delete a le or les.
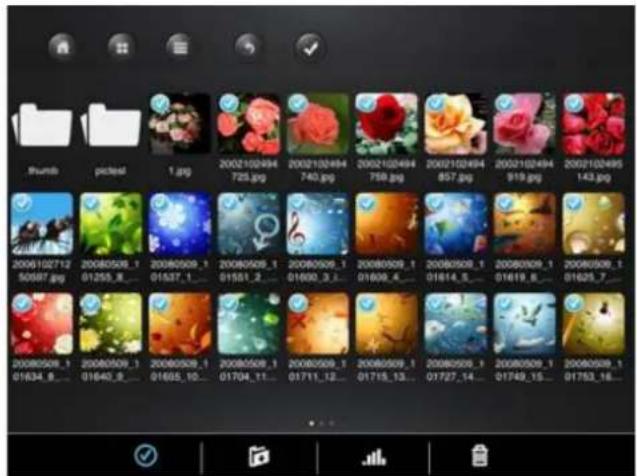

Download les from the Memory 2 Move

Upload les from "My Device"

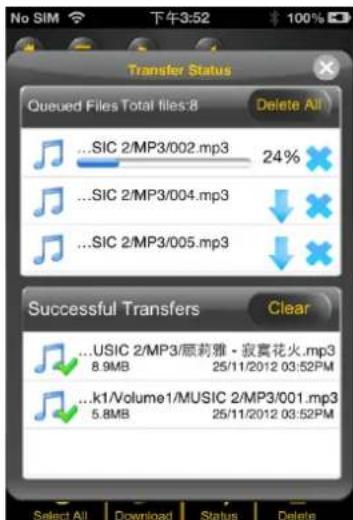
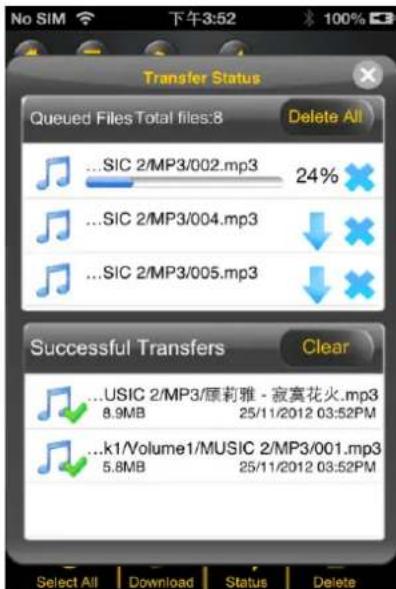
When clicked, the list of les that are in queue for uploads/downloads will be as well as the list of les that were copied/transferred successfully.

- When clicked, any selected les will be deleted.
10.10 DOWNLOADING FILES TO YOUR DEVICE (IOS ANDAndroid)
Once you get connected into the "Memory 2 Move", you can download a single or mulple les into the local storage (My Device).
- Click on

- Use your nger to tap and select one or more les. You may use the les to be download to your device.

select all
- Click on

- Select the folder where you want to download the les.
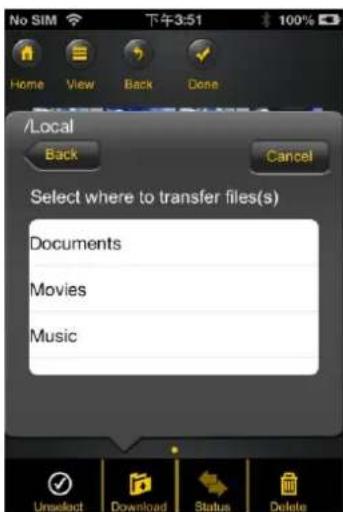
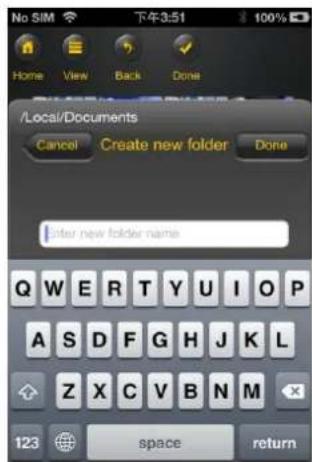
- A new folder may be created to download the selected le or les. To create a new folder, simply click on the "Create Folder" buon. Enter the new folder name inside the box and click the "Done" buon as seen on the screenshot below. The folder name can be minimum 1 characters in length and maximum of 26 characters. Click the "Cancel" buon to exit.
- Click on the "Conrm" buon to start downloading files as seen on the screenshot below.
Note: Successfully copied/transferred les will be listed below inside the "Successful Transfers" window as seen on the le screenshot. Click on the "Clear" buon to remove or clear the list
- Click anywhere on the screen or "x" buon, you will return to the previous screen.
Once done, click on the to exit.
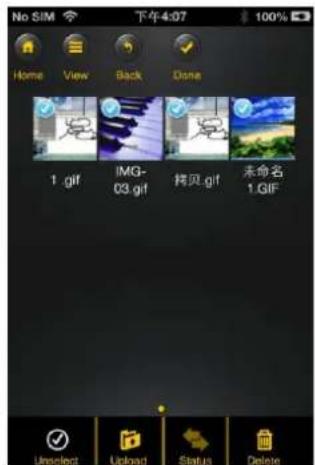
10.11 UPLOADING FILES TO YOUR "MEMORY2MOVE"(IOS ANDAndroid)
Once you get connected into the "Memory 2 Move", you can upload single or mulple les into the storage of the Memory 2 Move.
- Click on

- Use your index nger to select one or more les. You may use the les to be copied/transferred.

select all

- Click on

- Select the folder where you want the les to be copied or transferred.
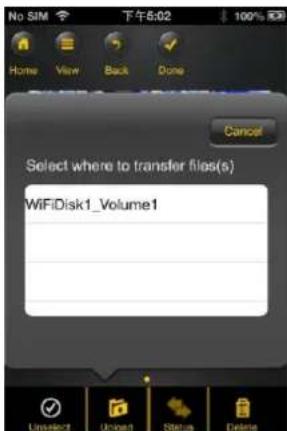
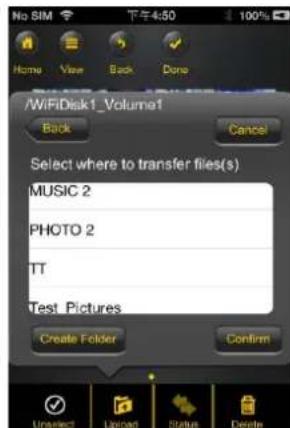
- A new folder may be created to copy/transfer the selected le or les. To create a new folder, simply click on the "New Folder" buon. Enter the new folder name inside the box and click the "Create" buon as seen on the screenshot below. The folder name can be minimum 1 character in length and maximum of 26 characters. Click the "Cancel" buon to exit.

- Click on the "Conrm" buon to start copying/transferring les as seen on the screenshot below into the "Memory 2 Move".
- Click anywhere on the screen or "x" buon, you will return to the previous screen.
Once done, click on the to exit.
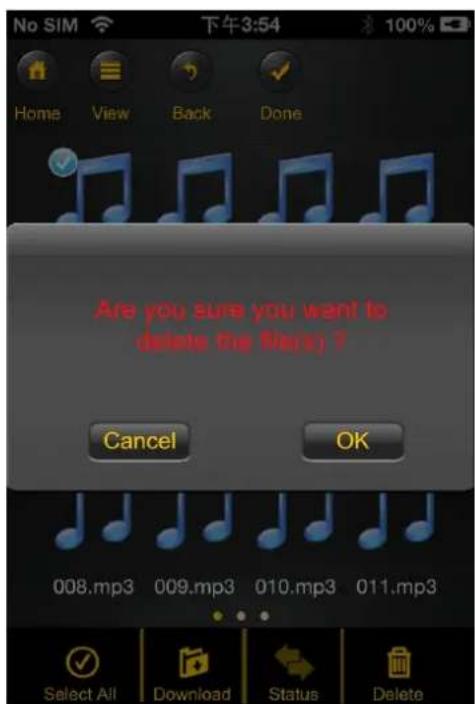
10.12. DELETE/ERASING A SINGLE OR MULTIPLE FILES (IOS ANDAndroid)
One or more les can be easy deleted/erased whether you are in "My Device" or in "Memory 2 Move".
To delete les, click on the.

- Use your index nger to select a single or mulple les. You may click on the select all les to delete/erase.

- Click on the Delete to delete or erase the selected le or les. A warning message will appear on the screen to confirm le deleon as seen on the screenshot below. Click OK to connue deleng les.
10.13 upload/DOWNLOAD HISTORY AND STATUS
If you have uploaded or download mulple les from/to the "Memory 2 Move" to your local
storage (My Device), simply click the stnstck the les on the queue or les that were
successfully copied/transferred. You may also click on the on the main screen to check on the status.
10.14 CLOSE "MEMORY 2 MOVE" APP
10.14.1 IOS
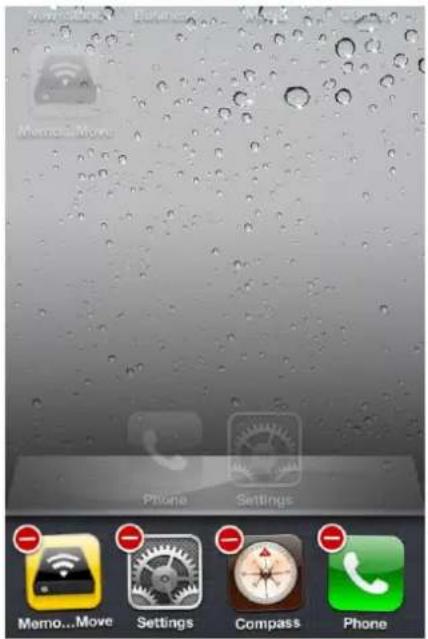
To exit from using the "Memory 2 Move" App on iPhone/ iPad devices, simply press the Home key on your Apple Device.
To close the app, click on the Home key twice and the list of app will appear at the boom of your device. Click and hold the applicaon icon unl the minus "- sign appears at the top corner of the app icon. Click on the minus "- sign to remove the app as seen on the screenshot below.
10.14.2Android
To exit from using the "Memory 2 Move" App Android mobile devices, simply click on the and select the "Exit" buon. A warning "Are you sure you want to exit this applet?" message will appear. Click "OK" to connue existing or click "Cancel".
10.15 UNINSTALL "MEMORY 2 MOVE" APP (IOS ANDAndroid)
10.15.1 IOS
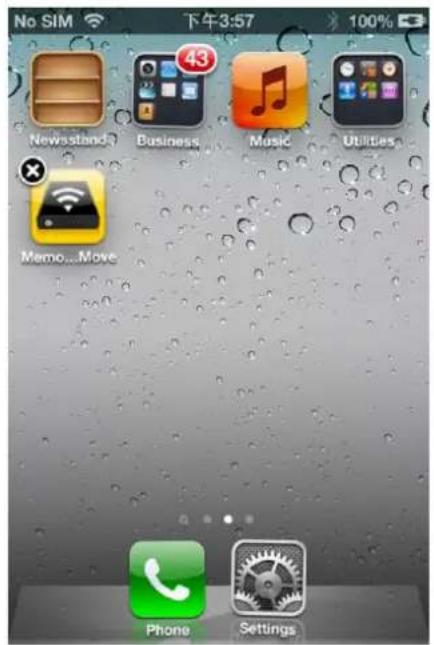
To uninstall the app from your Apple Mobile Devices, click and hold the "Memory 2 Move" app for few seconds. An "X" mark will appear on all the icons on your mobile device as seen on the screenshot. Simple click on the "X" located at the top-le corner of the "Memory 2 Move" icon and this will remove the app from your Apple device.
10.15.2Android
To uninstall the "Memory 2 Move" app from your Android mobile devices, see the instrucons below.
Note: Uninstalling app on the Android devices will vary. Please consult your mobile device manual prior to removing any applicaon.
- Click on the Sengs icon from your desktop.
- Go into the applicaon manager.
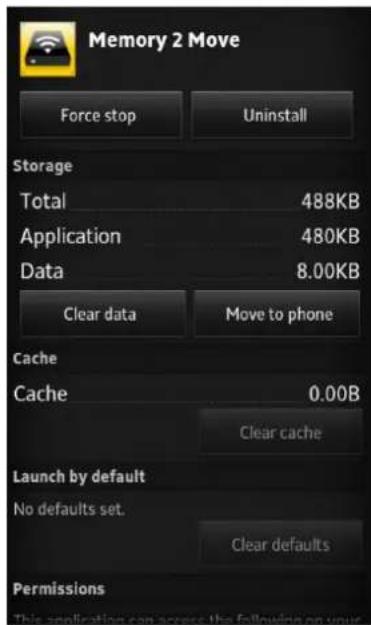
- Locate and select the "Memory 2 Move" app.
- Click on the "Uninstall" buon.
- A warning appears: "Memory 2 Move. This applicaon will be uninstalled." Click the "OK" buon to connue uninstalling the app or click on the "Cancel" buon.

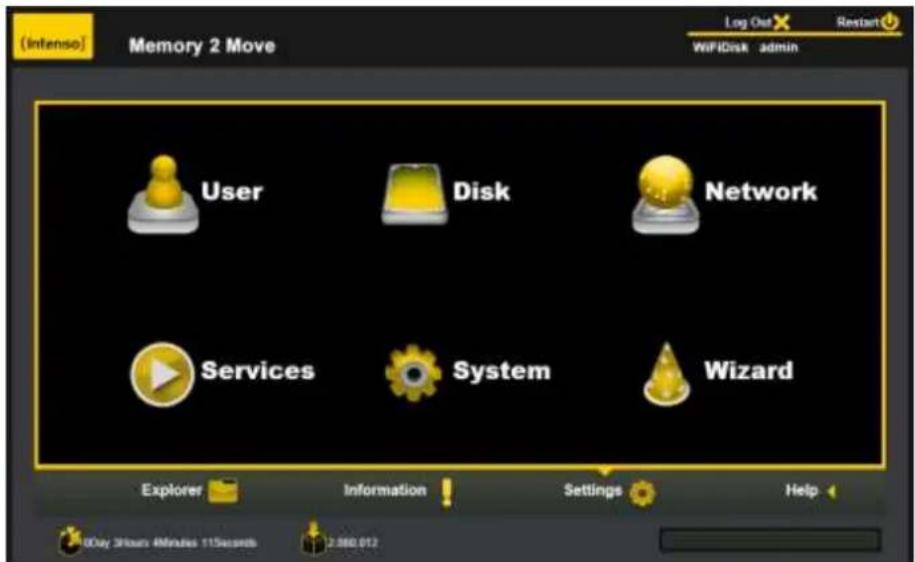
11. WEB MANAGEMENT FUNCTIONS
Our built-in Web Management sware is a unique web-based utility stored inside our "Memory 2 Move" product. No sware is needed to install on your Personal Computer to use this utility. Simply launch our "WiFi Finder" or open your web browser and enter the 10.10.10.254 IP address.
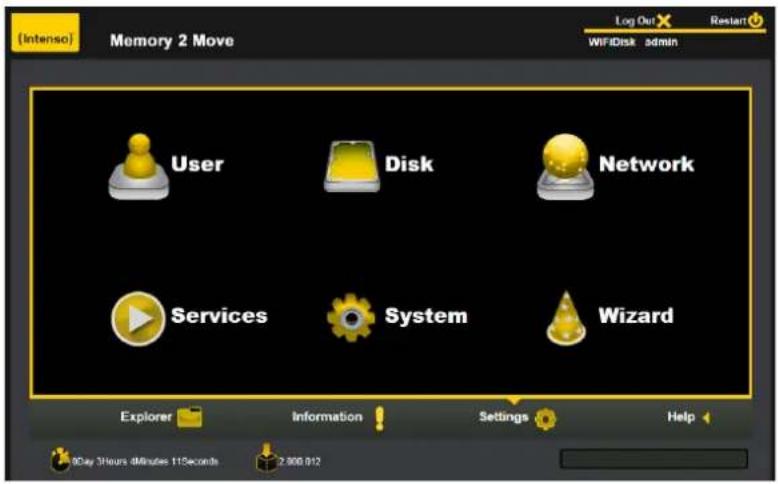
Available sub menus:
| User | Allows the user to change the admin password. |
| Disk | Provides informmaon of the internal hard disk drive. |
| Network | Networking Sengs allow the user to make modicaons and changes to Host Name, Wi-Fi and LAN, DHCP Server and Internet |
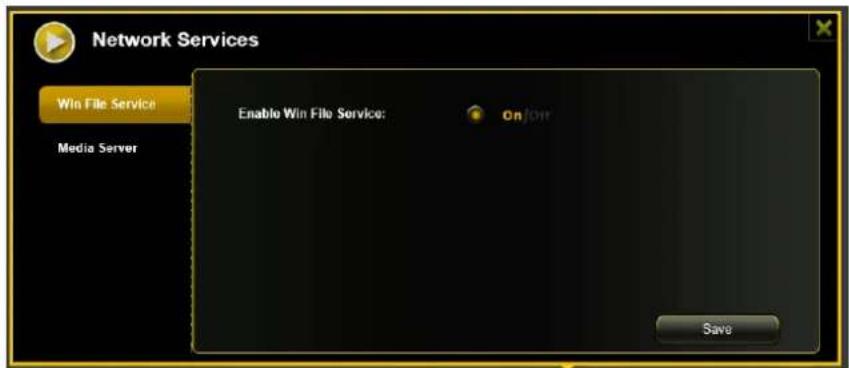
| Services | Allows the users to enable and disable the Win File Services. |
| System | Allows the user to make modicaons and changes to the Time Sengs, Create System Backup, Firmware Upgrade and Reseng to the factory default setup. |
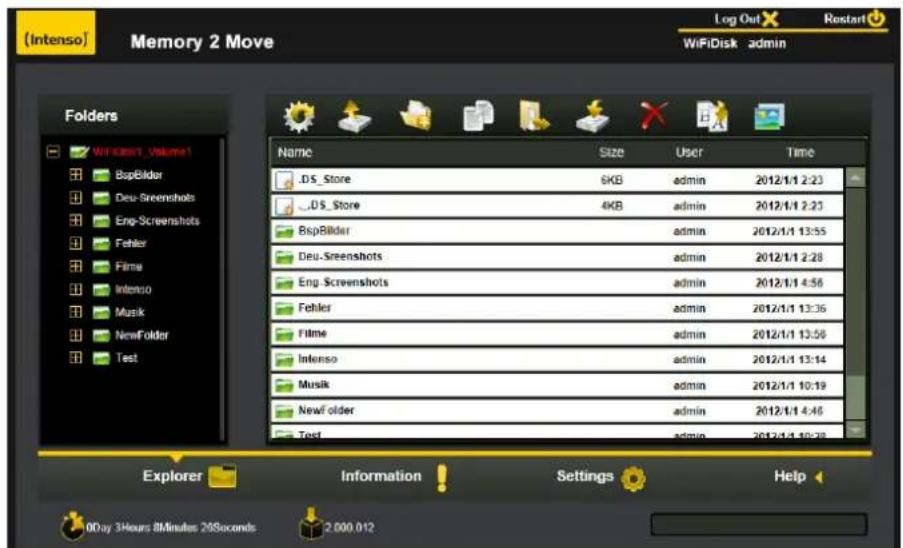
11.1 EXPLORER FUNCTION
Our user-friendly web based utility allows the user to upload les to the device, create folders, copy, cut, delete and rename folders and le names. We provide similar functionalities as the windows explorer of which makes our interface much easier to use.
| Refresh buon - to refresh the display |
| Upload buon - to upload le or les into a specic folder. |
| Create Folder - to create a new folder. Maximum folder name is 26 characters in length. |
| Copy buon - to copy le or les and paste them into another folder. |
| Move buon - to move a le or les from one locaon to another | |
| Open / Download buon - to open or download a le or les into a specic locaon. If the sware installed on your computer supports a specic le type, this le will automatically open. Otherwise, it will ask you to download the le into a specic locaon. Downloading a folder or folders is currently not supported. | |
| Delete buon - to delete a le or les. | |
| Renaming buon - to make name modicaon or changing the le name. | |
| Photo Viewer - to show pictures |
11.2 CONTEXT MENU (NOT FOR MAC)
On the le level, you can right-click using your mouse and a pop-menu will appear. You may Copy, Cut, Delete, Rename or Download as seen on the screenshot below.
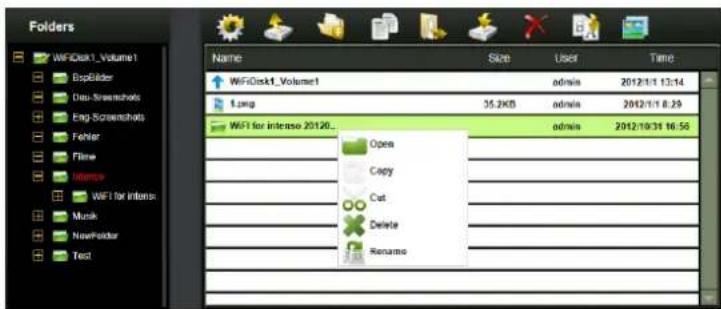
On the folder level, you can right-click using your mouse and a pop-up menu will appear. You may Open, Copy, Cut, Delete or Rename the folder as seen on the screenshot below.
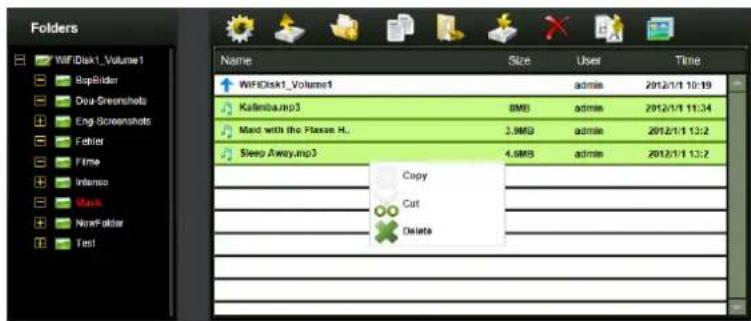
Selecng mulple les and right-click on the mouse will allow the user to either Copy, Cut or Delete the les as seen on the screenshot below.

Right-clicking at the boom of the window as seen below will allow the user to either Paste, Create or Upload le or les.
Funcon Overview:
- Open Command: Select a folder and right-click. Inside the pop-up menu, select "Open" to view the contents or open the folder.
- Copy Command: Select a folder or a le and then right-click. Inside the pop-up menu, select "Copy" to make a copy of the enre folder or a le and paste into another locaon or folder.
- Cut Command: Select mulple les or folders and then right-click. Inside the pop-up menu, select "Cut" and then paste the les or folders into another folder.
- Paste Command: Aer using the Cut or Copy command, right-click to launch the pop-up menu and then select "Paste" to place the le or folder into another locaon.
-
Delete Command: Right-click and then select "Delete" to erase single, mulple les on folders.
-
Create Command: Right-click on the blank area inside the window and a pop-up menu will appear. Select "Create". Enter the folder name inside the Create Folder window and click on Save.
- Rename Command: Right-click on the folder or the le name and select "Rename". This allows the user to make changes on the folder or le name. Click on the "Save" aer the name has been changed.
- Upload Command: Right-click the empty area inside the window. Select "Upload" inside the pop-up menu and browse for the le to be uploaded inside the current locaon.
- Download Command: Select and right-click on the le to be downloaded. From the pop-up menu, select "Download". The le will automatically open if any installed soware supports this le type otherwise, it will ask you to download the le into a specific locaon. Downloading a folder or folders is currently not supported.
11.3 KEYBOARD SHORTCUTS
Our built-in Web Management Interface supports keyboard commands and shortcuts such as the following:
Tab Key, Enter Key, Home Key, PGUP, PGDN,, End Key, Up Arrow, Down Arrow, Le, Arrow Right Arrow, and Delete Key
Windows - Ctrl+C = Copy; Ctrl+V = Paste
Mac-CMD+C = Copy; CMD+V = Past
11.4 DRAG AND DROP
A single le drag and drop is supported by our built-in Web Management Interface, simply click and hold on the le inside the main window and drag it to any folders available inside theFolders tree.
11.5 INFORMATION
Provides detail informaon regarding the hardware condion, network status and storage informaon.
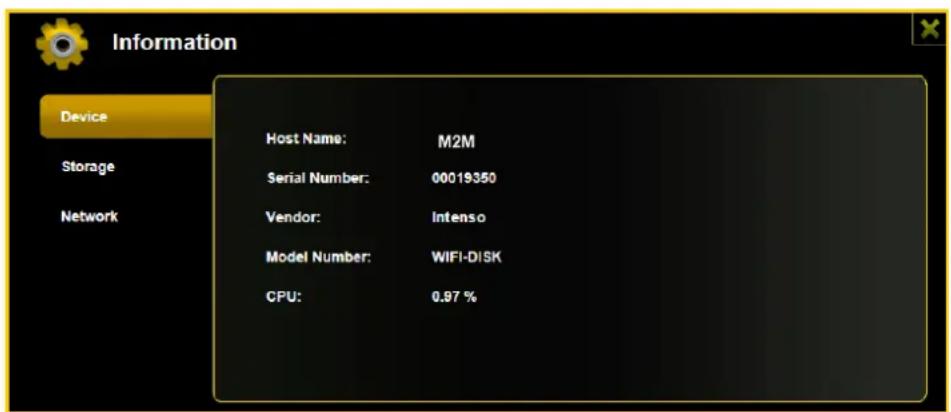
11.5.1 DEVICE INFORMATION
Informaon about CPU, Model and Hostname
11.5.2 STORAGE INFORMATION
Here you will receive informaon on the connected data carriers as well as about the WiFi device (overall capacity of hard disc, hard disc manufacturer, available memory space).

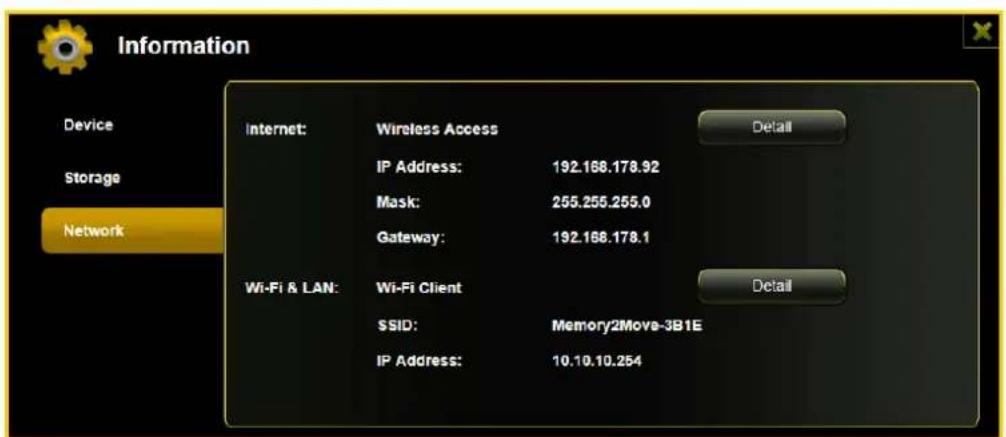
11.5.3 NETWORK INFORMATION
Informaon about IP address, gateway etc.
11.6 SETTINGS
11.6.1 USER SETTINGS
Click on the "User" thumbnail. This window will allow you to modify the admin password as seen on the screenshot below. The password should be at minimum of 5 characters to maximum 32 characters in length. Click on the "Save" buon the password has been changed.
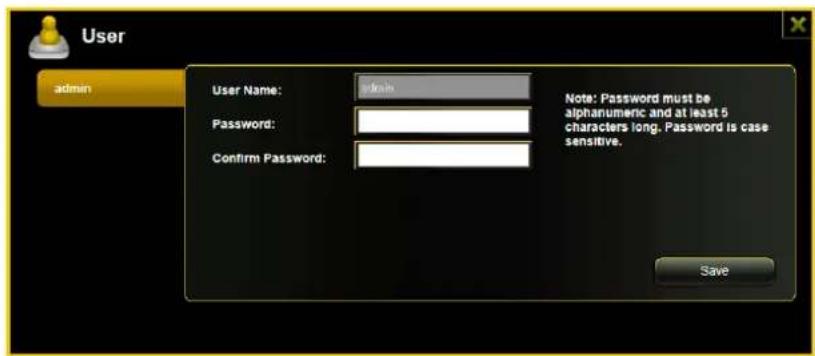
The default User Name is admin and the password is "00000". Click on the "X" to cancel and exit.
11.6.2 DISK SETTINGS
Click on the "Disk" thumbnail. This window provides informaon regarding the internal hard drive as seen on the screenshot below. It provides detailed informaon including rmware version, serial number, disk total capacity, temperature, and more.

As seen on the screenshot below, the Volume screen provides informaon regarding the File System used to format the internal hard disk drive, total and available capacity.
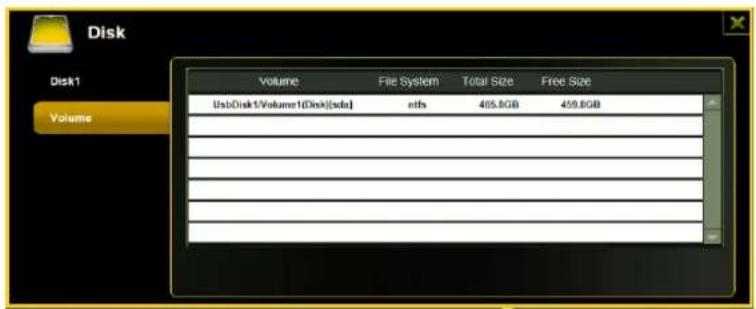
Click on the "X" to exit.
11.7 NETWORK SETTINGS
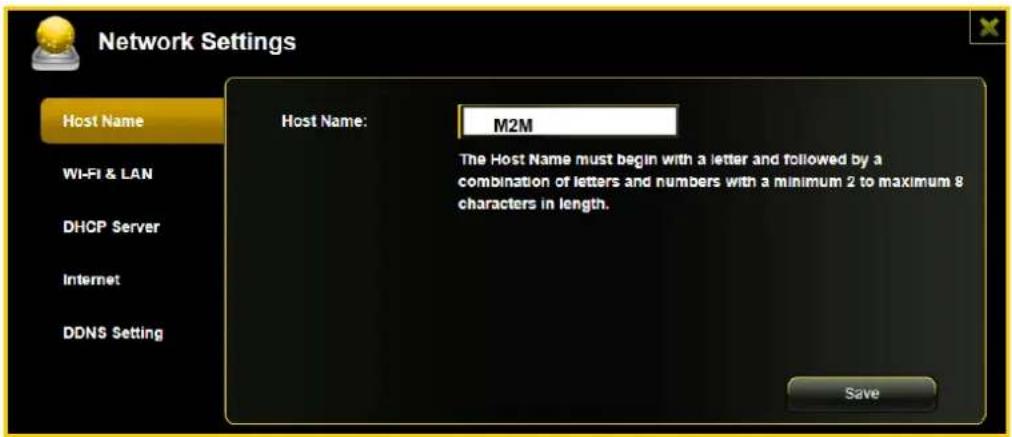
11.7.1 HOST NAME
The Hostname is a name that is assigned to a device connected to a computer network. It must begin with a leer and followed by a combinaon of leers and numbers. Length must be between 2 and 8 characters.
11.7.2 WI-FI & LAN
The sengs inside the WiFi & LAN can be modied based on your needs. See the screenshot below for the available opons.
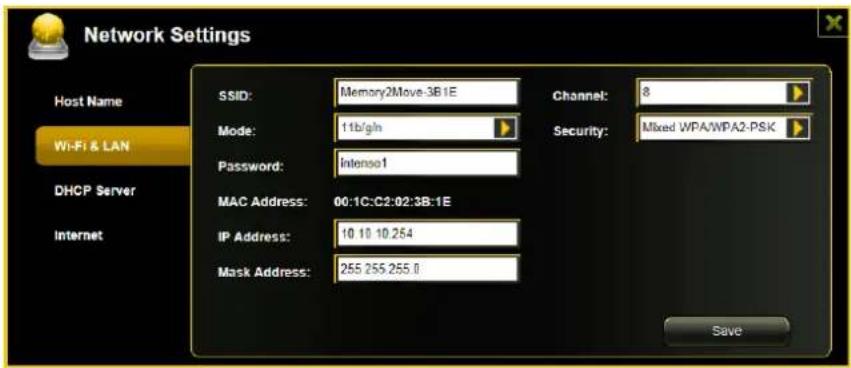
SSID: Type-in the combinaon of leers and numbers only. 32 characters is the maximum
-
allowable SSD length
-
Channel The default seng is set to Auto. There are 14 available channels to choose from.
- Modes: The default seng is 802.11b/g/n. You can also manually set the modes to 11Mbps
(802.11b), 54MBPS (802.11G), and 150Mbps (802.11n).
- Security: The WPA-PSK, WPA2-PSK, Mixed WPA/WPA2-PSK (default) are available.
- Password: WPA-PSK, WPA2-PSK, Mixed WPA-PSK/WPA2-PSK: Minimum 8 (Maximum 63)
characters. - IP Address: The default IP address is set to 10.10.10.254 with subnet mask of 255.255.255.0.
- The IP address can be changed.
- Click the "Save" buon to save changes. Click the "X" to exit and cancel.
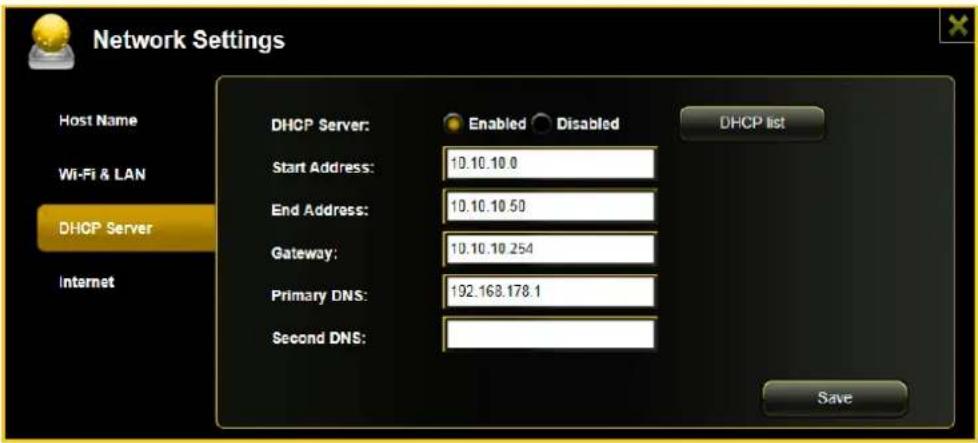
11.7.3 DHCPSERVER
The DHCP or Dynamic Host Conguraon Protocol is a network protocol that allows a server to automatically assign an IP address to a computer connected into a network. By default, the DHCP Server onpon is enabled. This onpon can be disabled if needed and the IP address can be manually assigned.
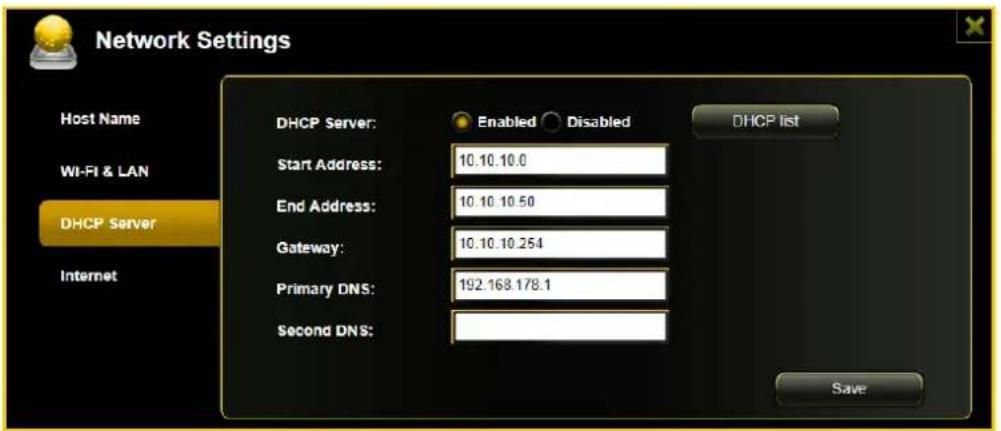
Click the "Save" buon aer making any changes. Click on the "X" to exit and cancel.
Click the "DHCP List" buon and it will provide a list of all the computers and devices connected to your "Memory 2 Move" Device. Please see the screenshot below.
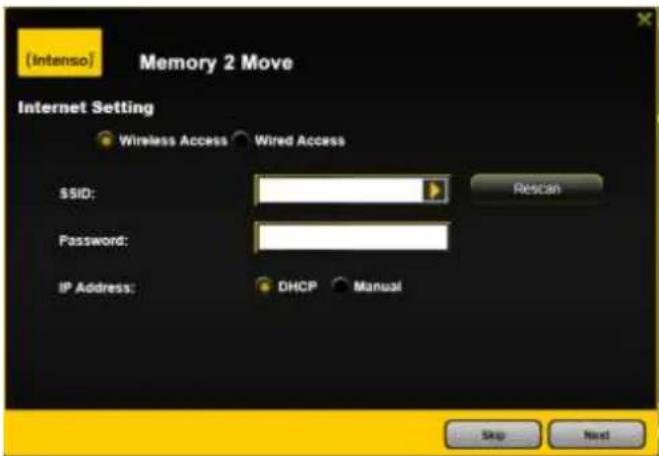
11.7.4 INTERNET SETTINGS
... through another conneccon with an available network
You can choose between two available Internet Access opons - By default Wireless Access is selected (as you can see on the picture).
A. Wireless Access: Connecng the "M2M" device to another wireless network to have internet access.
B. Wired Access: Directly connecng the "M2M" to the available port on the back of the router to connect to another network.
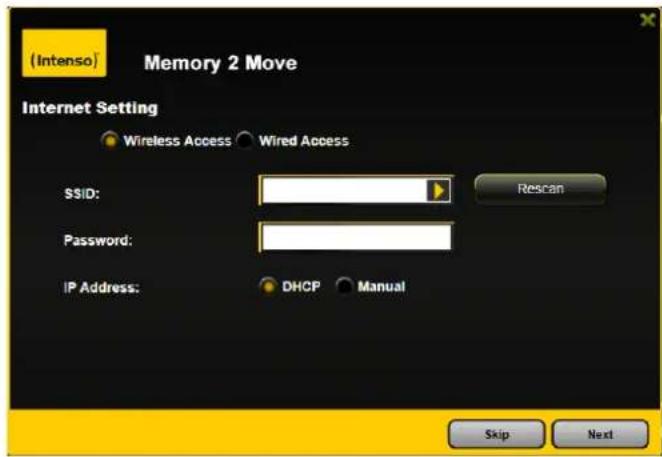
Selecng Wireless Access
-
SSID: Type-in the SSID name or click on the "Rescan" buon to automatically search for the available wireless networks.
-
Password: Type-in the correct password to join the selected wireless network conneccon.
-
IP Address: Select either DHCP or Manually assign an IP address
-
By selecng DHCP, the host will provide an automac IP address to connect to the internet.
- By selecng Manual, you have to manually assign an IP address to connect to the internet.
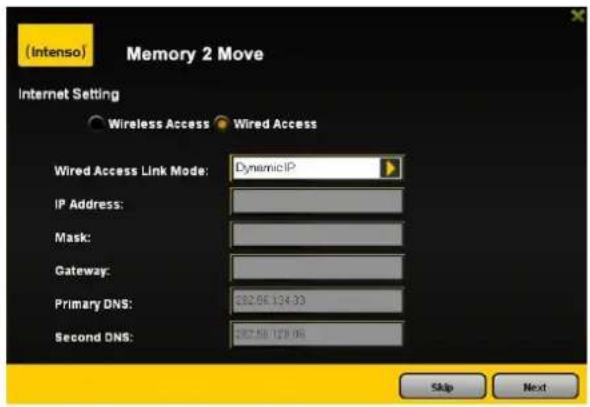
By selecng Wired Access, the Dynamic IP is selected as the default seng. You can manually assign your own IP address by clicking on the green arrow and select the Stac IP opon.
Click on the "X" buon if you wish to cancel and exit this window.
Note: If you cannot connect with another network, ask your network administrator for the guidelines applicable to you!
11.8 NETWORK SERVICES
11.8.1 WINDOWS SHARING SERVICES
Data sharing and accessing the "Memory 2 Move" product makes it simple by enabling the Samba Services. By default, this feature is already enabled as seen on the screenshot below.
11.8.2 MEDIASERVER
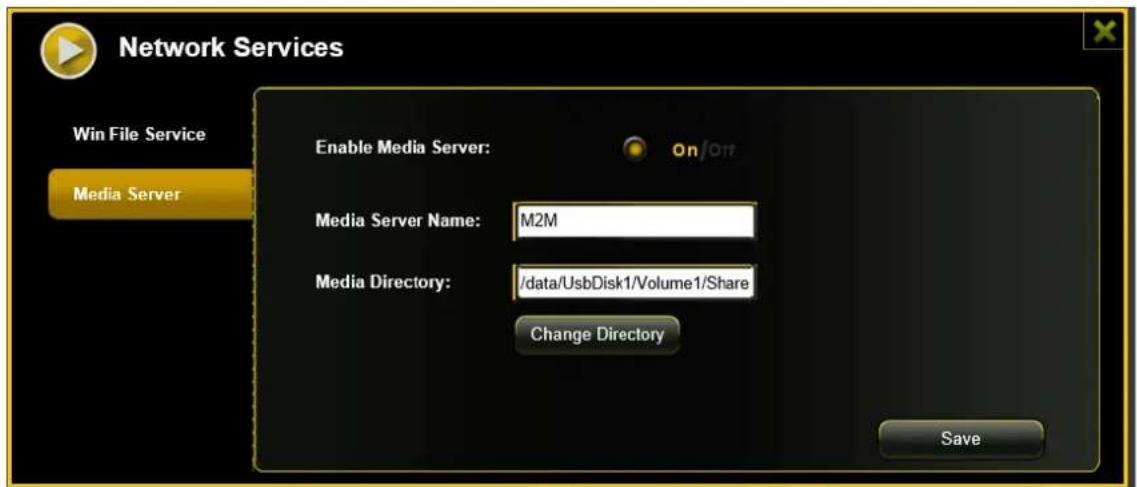
Funcons:

A Cvate or deacvate the Media Server.

Denes the name displayed in the network.

State the complete folder name that is to be provided via the Media Server.

Changes the sharing directory on the Memory 2 Move.

Here you can save the new sengs.
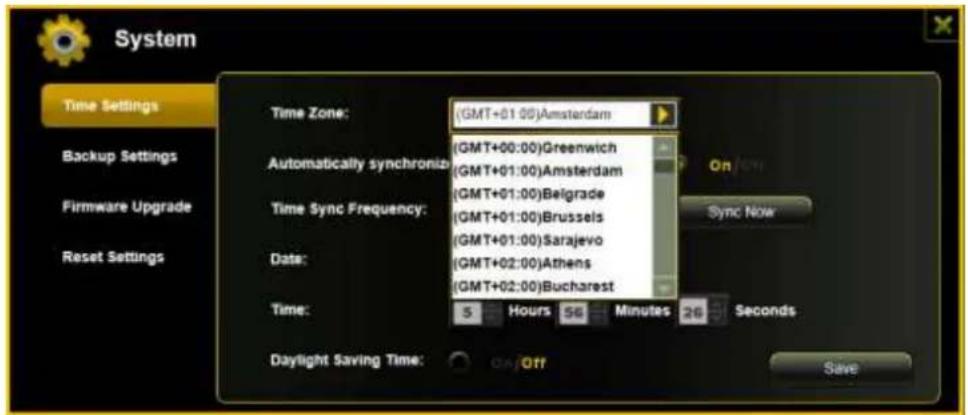
11.9 SYSTEM SETTINGS
11.9.1 TIME SETTINGS
The me sengs can be changed based on your current me-zone. You can choose to synchronize me with the Internet or the me on your PC.
Click on the drop-down list and select the region you are located and switch-on the "Automacally synchronize with an Internet Time Server". This will automatically update the me when the "Memory 2 Move" is connected to the internet.
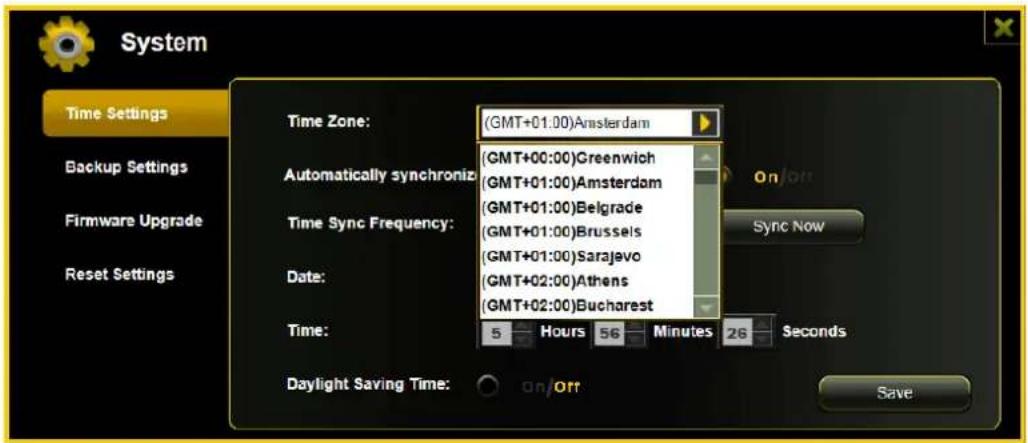
The "Time Sync Frequency" can be set to every day, every 2 days, every 3 days, up to every 7 days.
The automac me synchronizaon can be switched-o and apply the PC me instead.
Applying the PC me will automatically adjust the me and date based on the PC me. See the image below.
Click on the "X" buon to exit and cancel the Time Sengs.
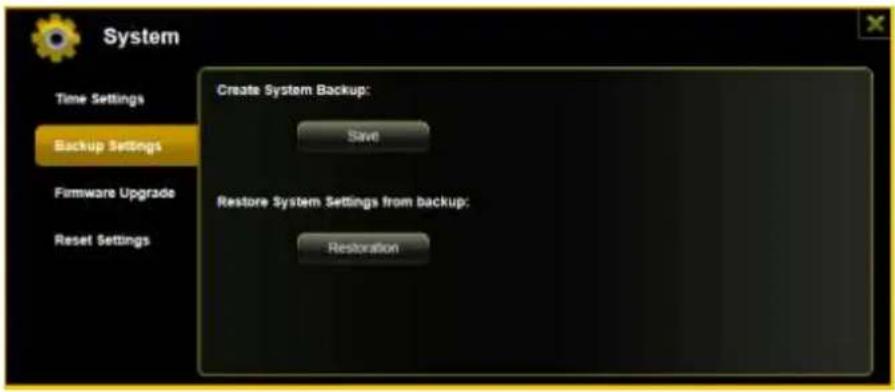
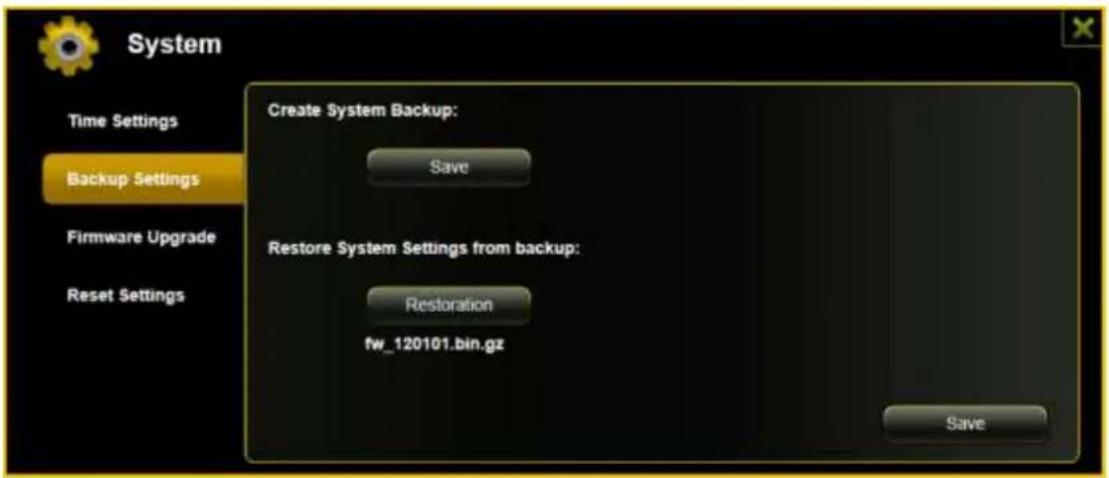
11.9.2 BACKUP SETTINGS
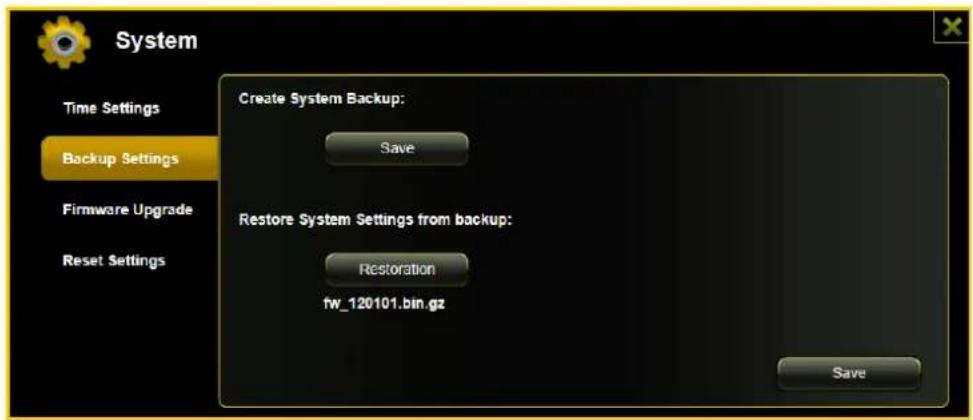
Creang a backup as seen on the screenshot below can save the "Memory 2 Move" system conguraon. Please note that this process will not create a backup of the "Memory 2 Move" contents.
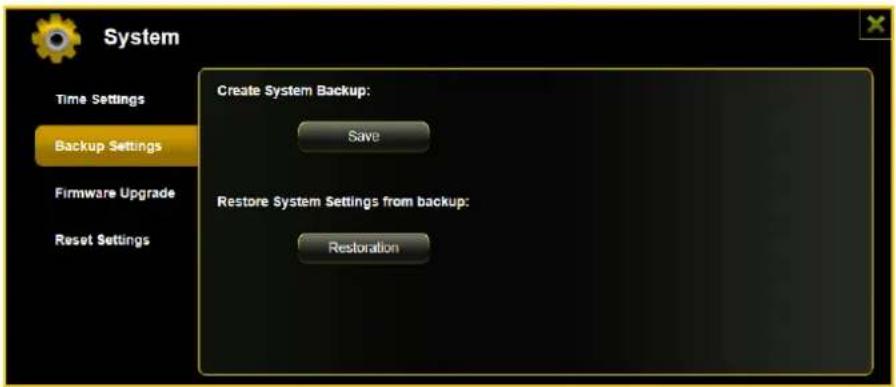
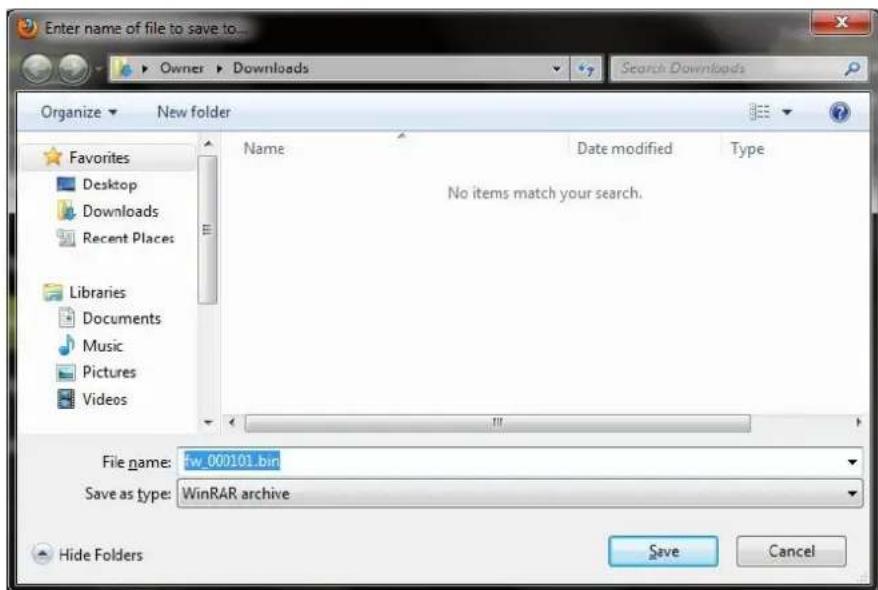
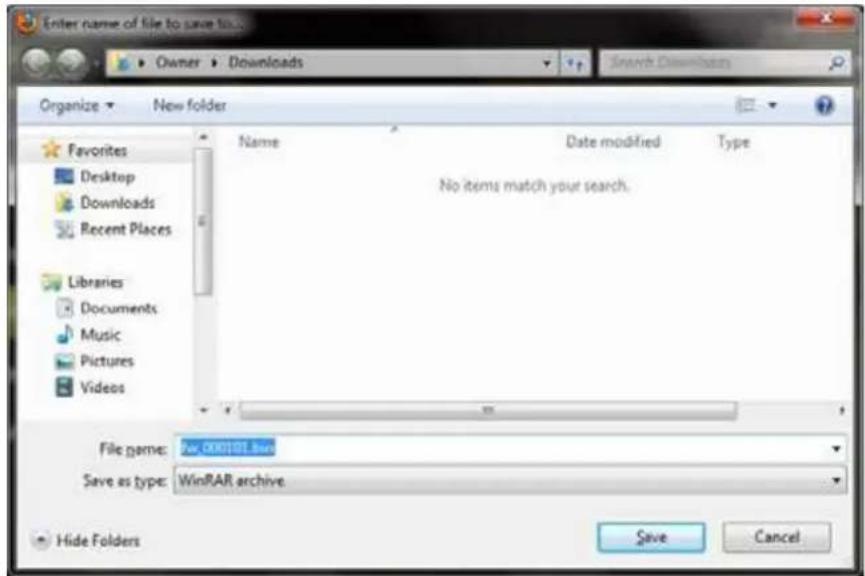
Simply click on the "Save" buon to create the backup. This process will create a .bin.gz or .bin le of which can be used to restore the current sengs of the "Memory 2 Move".
Click the "Save" buon to save the backup le on your computer as seen on the screenshot below.
To restore the backup, click the folder icon. Locate and select the .bin or .bin.gz le. The backup le will appear below the folder as seen on the screenshot below. Click default the "Save" buon to restore.
A warning message will appear as seen on the screenshot below.

The device will reboot automatically once the restore process has been completed and will return to login screen.
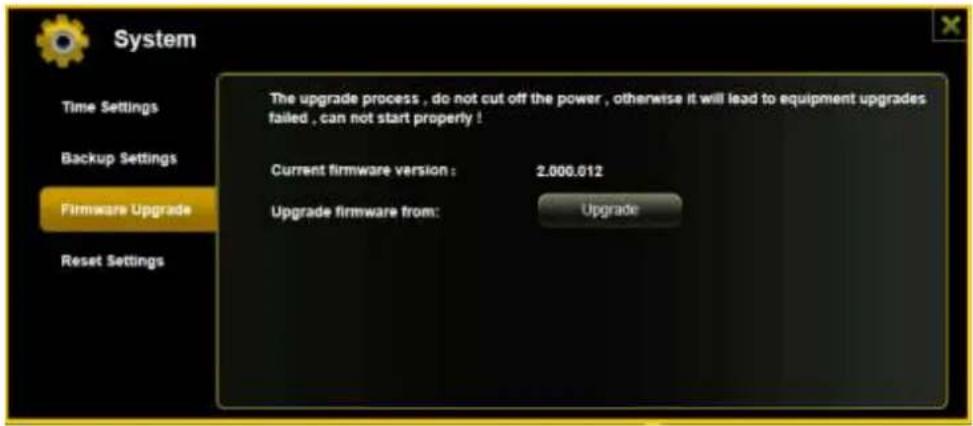
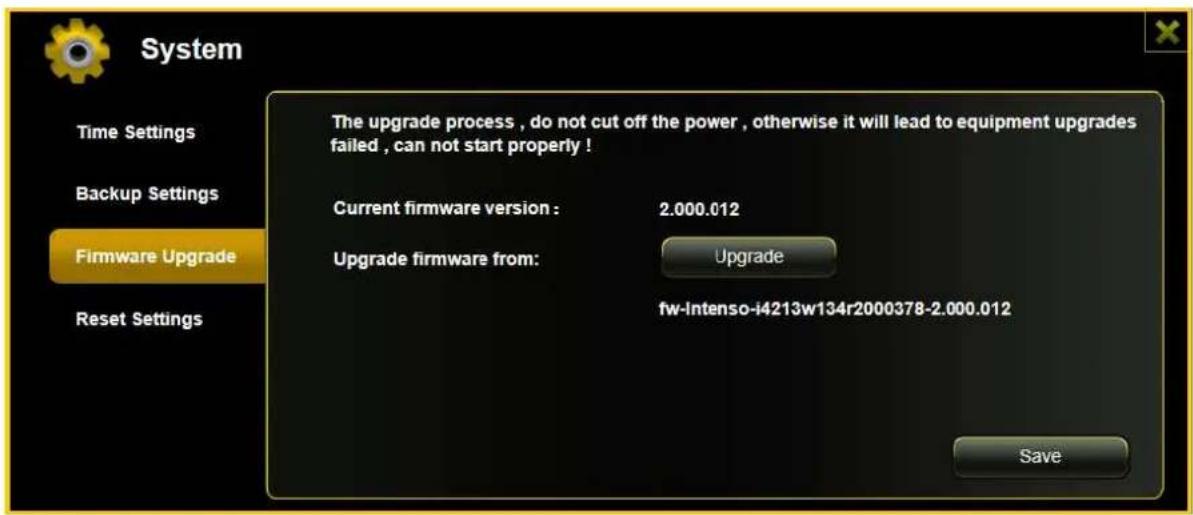
11.9.3 FIRMWARE UPGRADE
The device rmware can be upgraded by following the simple steps below.
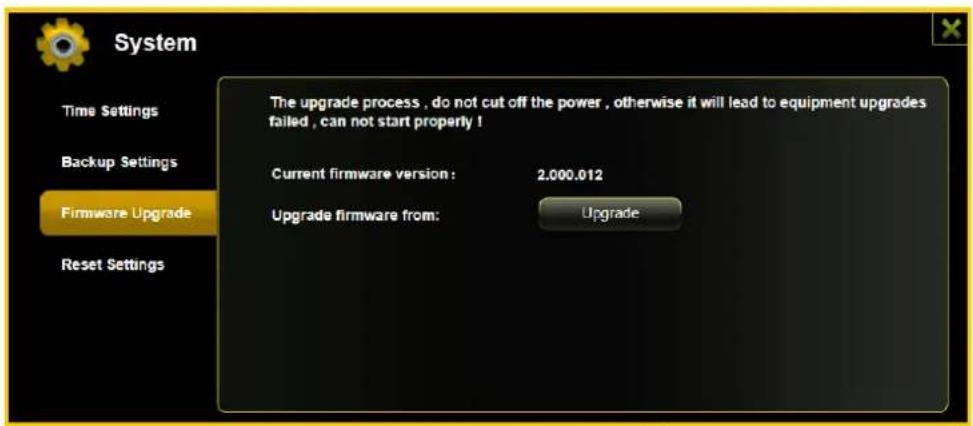
- Download and save the latest rmware version on your computer.
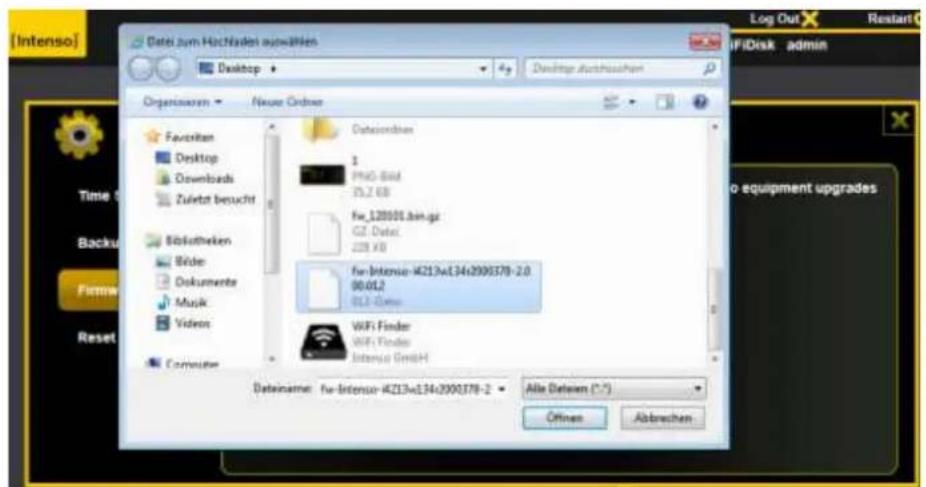
- Click on the folder icon, search and locate the rmware le on your computer and then click on the "Open" buon as seen on the screenshot below.
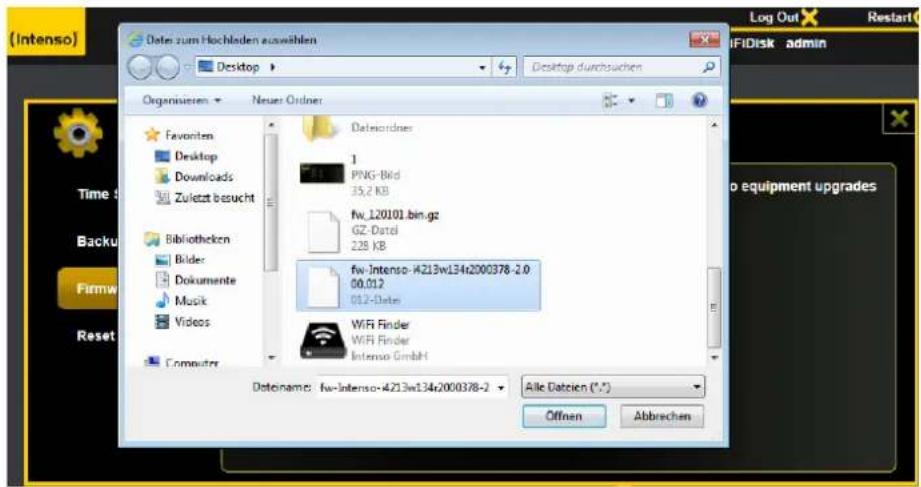
- The latest rmware update le will appear at the boom of the folder. Click on the "Save" buon to connue updang the rmware.
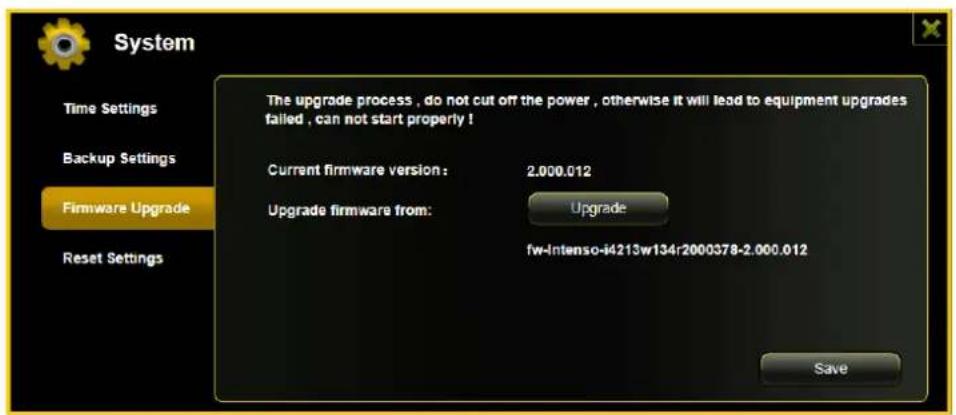
- Once the rmware has been installed, the warning message as seen on the screenshot below will appear and the device will automatically reboot and will go back into the login screen.

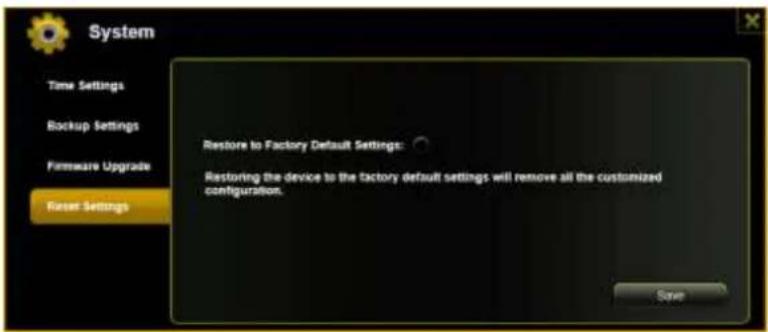
11.9.4 RESETTING TO FACTORY DEFAULTS
Reseng to factory defaults will reset all your customized sengs or whatever changes you made back to its original sengs.
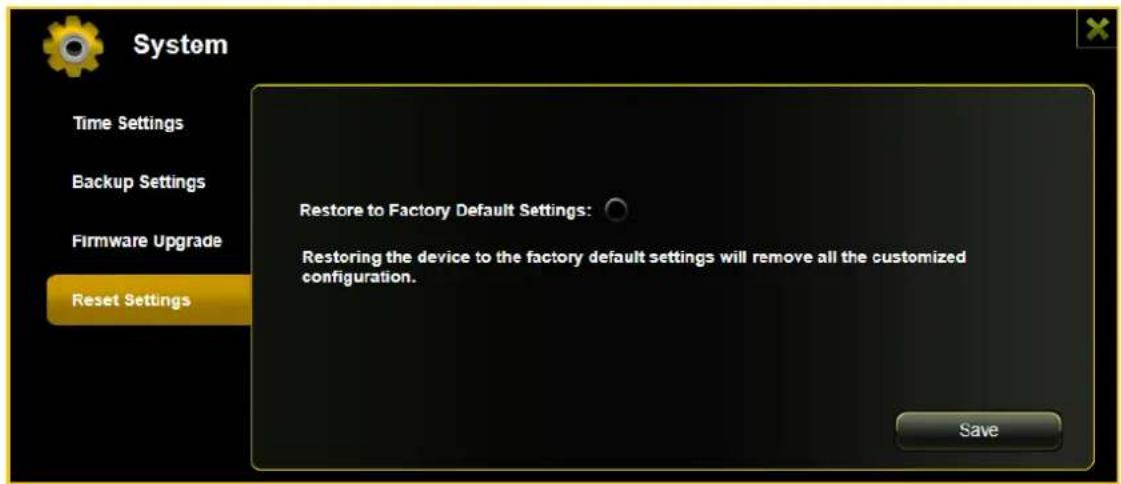
Simply click on the round buon aer the "Restore to Factory Default Sengs:" Click on the "Save" buon to connue.
The Warning Message window will appear. The "Memory 2 Move" will automatically reboot once the restoring to the factory default sengs have been completed. See the screenshot below.

Note: This process will reset the Wi-Fi SSID, and the password including the admin password.
SOMMAIRE
1. APERÇU DU PRODUIT
2. FONCTIONS DU PRODUIT
6.DESCRIPTION DU PRODUIT
7. RACCORDS EXISTANTS
7.1. PORT WAN RJ45
You have successfully configured your device and the system is rebooting. Please wait 2 minutes. Remaining 119 seconds... If you are unable to reconnect the device, please use the client tool to search.
9. UTILISATION D'APPAREILS MOBILES
9.1 INSTALLATION DE L'APP IOS MEMORY 2 MOVE
Dimensioni: 127.3mm (L) X 80mm (L) X 25mm (A)
Wi-Fi:
Standard: 802.11 b/g/n,
O Frequenza: 2.4 GHZ
O Velocità di trasmissione: 72Mbps (20MHz) / 150Mbps (40MHz)
You have successfully configured your device and the system is rebooting. Please wait 2 minutes. Remaining 119 seconds ... If you are unable to reconnect the device, please use the client tool to search.
9. UTILIZZO DI APPARECCHI MOBILI
9.1 INSTALLAZIONE DELLA APP MEMORY 2 MOVE PER IOS
10.3.4 ACCESSI INTERNET
Dimensoes: 127.3mm (C) X 80mm (L) X 25mm (A)
Wi-Fi:
O Padra: 802.11 b/g/n,
O Frequencia: 2.4 GHZ
Taxas de transferência: 72Mbps (20MHz) / 150Mbps (40MHz)
LED Wi-Fi - azimuth:
- Intermitte:
Basta能做到 these two times, but he was still able to do so.
8.3.1 MAC WIFI FINDER
Acvate or deacvate the Media Server.

Denes the name displayed in the network.

State the complete folder name that is to be provided via the Media Server.

Changes the sharing directory on the Memory 2 Move.

Here you can save the new sengs.
11.9 SISTEMA
11.9.1 CONFIGURACION DE LA HORA
Wymiary: 127.3mm (L) X 80mm (B) X 25mm (H)
Wi-Fi:
You have successfully configured your device and the system is rebooting. Please wait 2 minutes. Remaining 119 seconds ... If you are unable to reconnect the device, please use the client tool to search.
9. UZYWANIE URZADZEN PRZENOSNYCH
9.1 INSTALOWANIE APLIKACJI IOS MEMORY 2 MOVE
11.3 SKRÓTY KLAWIATUROWE
- PC INHTepHET 6pay3ep
o Windows: noDepKnBaET Internet Explorer 7.0 n BvIe
o Mac: noIepeKnBaet Safari 3.0 n BbIwe
O PpOue: Firefox 3.5 n BvIe
MapuTy3aTop n ceTeBOKOMMyTaTop
6. BHEUHIN BNDYCTPOICTBA
7. IMEIOUHNECRA NOPTbI
7.1 RJ45 WAN IIOPT
A. Pexim MappyTu3aTopa: Memory 2 Move pa6oTaet kaK obuHbIMappyTu3aTopu MoKeT 3aDaBaTb IP aDpeca Ha npoueccopax, KOTOpbIe coeDInHeBJI uee3 WLAN.
B. Pekim WAN (Wide-Area Network - Teppitopnabha KOMnbIOTepHa cetb): I03boJrT co3daTb HObIe KOMnbIOTepHbIe cETn Ha 6a3e yXe HMeIOUxCra.
7.2 HNHTEPΦEIC MICROUSB3.0
BcTpoeHbI USB 3.0-nopT no3Bolraet ocyuecTBlaTb 6bictpyo nepedauy HhOpMaunn 3apjKaTb 6aTaapeo, KOrDa Memory 2 Move coeDHH c KomnbIOTepom nIi CTeEBIM 6loKOM nITAHN. OH yHKUOHpye TToIbKO TOrda, KOrDa YCTPOJCTBO BIKJIQUeHO.
7.3 CBETOДNOДHAH INDKAUJIa
CbeToaNoI nHTaHn (Power LED):
- He CBETNTCA: yCTPOINCTBO BblIOUeHO;
- HenpepbIBHO CBeNTcra 3eIeHbIM ZBeTOM: 6aTape rnoHocTbIO 3apXKeHa;
- 6bICTPO MInraet3eIeHbIM CBeTOM: yCTPOINCTBO BbIKIOUaETc;
- MeДлЕнHо MИгаeТ 3eЛeHbI MцВeTOM: yCTpoIcTBО 3apЯKaeTc;
- NOCTOHHO CBeITTCaPacHbIM ΚBeTOM: 3apdka aKKymyIaTopa Hnke 30%;
- 6bICtpo MURaeKpaChbIM CBeTOM: aKKyMylrTop pa3pRKeH.
CbeToaNoA JxecTkoro DaNcKa (HDD LED):
- NOCTOHHOCBETTCA6eIbIMCBeTOM: peKHM FOTOBHOCTH;
- Miraet 6eJIbIM UBeTOM: aKTHBbI npOceC 3aNcH/TeHn;
-cBra3b uepe3 USB nopT:
O NOCTOARHNO CBETbCA CNHIM UBeTOM: CBa3b uepe3 USB 3.0-nopT;
O NOCTOARHHOCBETbCBAJIbIMUBeTOM: CBa3bYepe3USB2.0-nopT.
Cnnn cbTeoNoD Wi-Fi (Wi-Fi LED):
-
Mrau: npoecc HnuaaHaHaayalc;
CBeToIDNoI He CBeTHTCA: yCTPOINCTBO BbIKIOUeHO IIN OBeCTOueHO; -
NOCTOHHOCBETTC:
O npoecc HnHuaJn3aun 3aKOHnIcra;
peKIM IOTOBHOCTN-YCTPOINCTBa MOXHO COeHNHtB.
CbeToaNooNHTepHeta(InternetLED):
- pekIM MapuPyTu3aTopa:
CINHnIuBET: XopoOwee KaueCTBO CnHaJa;
O nepemehno cnHn/kpacHbI uBET: nIOXoe kaueCTBO cnHaJa;
CBeToIONoI He CBeTHTcR: HET CBA3N C NHTepHEtOM;
- peKIM MOCTa:
CINHnI cBET: XopoOwee KaueCTBO CnHnHa;
CBeToIIOHe CBeTHTCA: HET CBA3N C NHTepHEtOM.
8. INCINOL3OBAHNE KOMNBIOTEPA PC NIN MAC
8.1 CO3DAHNE BECNPOBOHO LAN CETN CODHM KOMNBIOTEPOM PC
BkIouHe Wi-Fi yctpoCtBO, Haxab KhoNky nItaHna Ha ero nepeDne naHei.
AknBpynte yHKnIO WLAN (Wireless Local Area Network - 6ecnpoBnHa loKaIbHnA ceTb) Ha PIK n ueknTe no cmboly Wlan B cnncke 3aau Bn3y cnpaba. OtkpbBaetc CJeDyUOaY HnNkau:
Bb6epeIokalbHyIOceTb IOIIMHeM«Memory2Move-XXXX»
Yka3aHue: npedabumelbno 3adahnbl napoB b ccmohuu nocmaeku: «intenso1'. Pokanyucma, nocne ycneuho bblonHeHHO2 coedunehu B cenax cobcmeHHou bezopacnco 3adaume HOBbl napoB.
Iocne TOrO KaK 6ydt YcneHNO BbInoJIHeHO CoeINHeHne c Wi-Fi ycTpoiCTBOM, HcTalnpyte, noXaIyIcTa, npIlaeMoe npI nocTabKe KIneHTCKoe IIO (nporpaMMHoe o6ecneHne) cJeDyUoIIM o6pa30m:
You have successfully configured your device and the system is rebooting. Please wait 2 minutes. Remaining 119 seconds ... If you are unable to reconnect the device, please use the client tool to search.
9. ИСПОЛБ3OBAHNE MOБИЛьНыX YCTPOДСТВ
9.1 HHCTAJIaIcIgI PnJIoXeHnI IOS MEMORY 2 MOVE
- Μεικητην έκουκγ App Store Ha ochOBHOM OKHe, κακ ποκa3aHo Ha cIeIyIoUeɪ KapTINHKe. HauIte 6ecπλaTHyU BepCnU npIloJxEHHa «Memory 2 Move» n cIeIyIte yKa3aHnM no IHCTaJIaζuN Ha 3KpaHe.
Kak Tolbko HCTaIIaIy ycneHNO 3aBepWeHa, npilooKeHne «Memory 2 Move» hyxHO NCKaTb Ha OCHOBHOM 3kpaHe yCTpOiCTBa (cM. cJeDyUoIuPnCyuHOK).
9.2 BECNPPOBODHOE COEINHEHNE C IPHONE/IPAD
- BkIIOuHTe Memory 2 Move. IopoJxIte napy MmHyT, noka HCTaJIaCnna 3aBepuNTc. 3TO BnDNo no CInHemy Wi-Fi cBeToAnOdy, KOTOpbI noCne 3aBepWeHn INCTaJIaCnN pnekpaaaet mRaTb.
- ⅢeIKNHte NOKHky «HaCtpoN», kak noka3aHo Ha cIeDyUoSe m pucyHke.
9.4 HHCTAJIaIaIaIaIaIaIaIaIaIaIaIaIaIaIaIaIaIaIaIaIaIaIaIaIaIaIaIaIaIaIaIaIaIaIaIaIaIaIaIaIaIaIaIaIaIaIaIaIaIaIaII
- OTKpoIe «Google Playstore» ИИ«App Center» И НайдTe 6ecnlaTHyIO BepCnIO npiloxeHЯ «Memory 2 Move».
- CnéduyIte yka3aHnMn no nHCTaJIaCm H a 3KpaHe, KaK noka3aHo Ha cIeDyUoSei KapTINHe.
- KaK ToIbKO nHCTaJIaIy yCneUHO 3aBepSeHa, npInIoXeHne «Memory 2Move» HxKHO nCKaTb Ha OCHOBHOM 3kpaHe yCTpoIcTBA (CM. cIeDyUoIu npCyHOK).

9.5 BECIPPOBOHOE COEINHEHNE C UCTPOICTBOM HA IITAPOPME ANDROID
-
BkIouHte Memory 2 Move. IopoJxIte napy MInHyT, noka HCTaJIaCnna 3aBepuNTc. 3To BnDNo no cHemy Wi-Fi cBeToAnOdy, KOTOpbI nocne 3aBepWeHn INCTaJIaCnnpekpaaet MInatb.
-
ⅢeIKNHTe NkOHky «HaCtpoNKn», KaK nOKa3aHo Ha cIeNyIoUe KapTNHKe.
- BkIIOHTe yHKUIO Wi-Fi, cDnHyB «BnptyalbHoe OKHO» BnpaBO.
B cnncke Imeouxsc Wi-Fi cetei doJxHa noaBtbc ceTb «Memory2Move-XXXX». ⅢeIKNHte nO tOi cTeN, kak noka3aHo Ha cIeDyUoSei KapTHHe. EcIn BO BpeM BbINOJIHeHn Iura 8 «HacTroKn Wi-Fi i Lan» 6bl yCTaHOBJe npOJIb, BBeIITe erO.
- EcIn yctpoiCTBO ycneHNO coeHNHeO C Wi-Fi JeeCTKIM DNCKOM, NOBJIaETc coo6ueHne «POndkIIOyeHO» POn IMeHem cetn (SSID).
9.6 BXOД NOЛьб3OBATEЯ (ANDROID)
B MeHIO MoXHo BbI6paTb cIeDyUOuNe NoIpyHKtbl:
Главhoe MeHIO «Moe yctpoIcTBO»-ДЯСИСТЕмATN3aUNIФайLOB 3dEcB HMeOTcR CTaHdApTHbIe NaKN «ДOKUMeHTbl»,«My3bIka»,«ФOTO»,«ВиdeO»«SD KapTa».
10.3.4 DoCTynbIK INHTEPHETY
Ipn HactpoKax INHTepHeTa NOBlaeTc COo6ueHne O HaJIuHn BapnaHTOB DoCTyNa K INHTepHeTy. MoXHO BbIbupaTb MeJdy npOBoDhbIM N 6ecnpoBOdHbIM DoCTynom.
HOpMaun O 6ecnpoBODHom HHTepHeTe npu yCTaHOBe HAcTpoE K HHTepHeTa NOABnEeTc B cepdInHe NOKa3aHHOrO HNKe 3KpaHa:
EcnBbIbpaTb 6ecnpoBOHO BapnAHT,TO HxKHO CO3daTb KOHfNpyaCIO cETn,Bbl6Op KToPOB 6bl CdeHaN.
Pocne BbIbopa cTe NcJIKNHTe NO «CoxpaHNTb», nocne yero noBntc coo6uHne «BbINONHeHne» O nepe3arpy3Ke, dJa BbInONHeHnKOTOpOHyXHo 9eIKHyTb «OK».
EcnHnHaKaTb《Ha3aD》,npoI3oIeTe npexoB MeHIO yCTaHOBOK Wi-Fi.
10.4 IPOONIPTbIBAHNE MY3bIKN IN AYDNHOFAIJIOB (IOS/ANDROID)
Cobem: Pekomehdyemcra c03damb odHy unu HeckoIbKO nanok dne BCex My3bIkaJIbHbIX u ayduofoaun. 3mo obne2um ux uCnoIb3ObaHue u cucmamuaquo Ha WiFi Jecmkom ducke.
BHeuHn BnI, IaBHO MeHIO:
ImeouneecnoMeHIO:
11.7.4 IOCTUKNHHTEPHETY
Hacpoika DocTyna K INTepHeTy
...C NOMOUIIO NOKJIIOUeHnK OJHOI 3 yKe IMeIOUXc CeTei.
IMeETc BO3MOxHOCtB BbIbopa MeJdy 2 IMeHOuMmCra OUzmaN DoCTyNa K INHTepHeTy.
Ipn cTaHdapTHo yCTaHOBKe npEynCMOTpeH npOBdHO JocTyn (KaK BnDHO Ha pncyHke BBepxy).
A. BeccnpoBDoHoi DoCTyn (WLAN):
YTo6bI OcyuEcTBnTb NOdkNIOUeHne K INHTepHeTy, CoeHNHTe M2M c dpyrnM WLAN MapwpyTu3aTopoM.
AknBpyTe nn DeakTbPyTe MeHa-cebp.
(2)
Media Server Name: M2M
YCTaHOBnTe Nm, yKa3aHHoe B cETn.
(3)

3aadaTe mMa KaTalora,doCTyn K KOtOpomy doJKeH oBecneuMb Medna-cepBep.
(4)
Change Directory
PomeHnTe DnpeKToPO Doctyna Ha Memory 2 Move.
(5)

3decb MoKHO coXpaHnTb BblNoJIHeHHbIe HAcTpOJKN.
11.9 CNTCTEMA
11.9.1 YCTAHOBKA BPEMEHN
ДлгэЗТOrO cyuecTByeT BO3MOxHOCtB BbI6paTb YacOBoi NOc KaK BpyHOM peKnme,ТakИ OcyuEcTBNTb CnHXPOHn3aunIO BpeMeHn ABTomatueckn.
Ecn npHnMaetcpeeHne Bb6paTb YacOBo NocB pyuHOM peKHe, npocTo 9eKnHTe no JeIto cTpeJIke Bo3Je 6JIOka «YacOBo Noc» n Bbl6epHTe n3 MeHIO, B 3aBnCmOCTN OT cTaHdApTa, XeJaembl YacOBo Noc.
EcnBbIbpaetcABTomatnuecka CnHxpoHn3aunBpeMeH,TO BpeMa KaJdbi pa3 06HOBnaeTcKorda npOxCoDNT COeHNHeHne cNHTepHeTOM.
Onu nn CnHxpon3aun BpeMeHH:
Yactota: exeIHeBHO, KaKdIe 2 dH, KaKdIe 3 dH,... MoXHo Bbl6paTb INTEpBaI cnHXPOHN3aun Do 7 dHei.
A B T O M A T N U C E C K A C H X P O H N 3 a c u n B p e m e h N M o x e t 6 b i T b O T M e H e H K o r d a y r o d h o, n B M e c t o 3 T O R O B b i b u p a e T C O I P U N H A T B B P E M A P K).B 3 T O M C l y u a e B o c p r i n H M a e T C R T E k y u s e e B p e m a o T P K, T a k q T O o b a y c t p o i c t b a n o k a 3 b i B a J O T O D H O I T O J e B p e m a.
11.9.2 COXPAHEHNE
YTo6bI co3dAtb pe3epBHOe KOHnpOBaHne (Backup) KOHfNpyauu Wi-Fi cnCTembl,
UeIKHNTE, noKaNyIcTa, no KnaBnIe «CoXpaHNTb». Co3daTcAaIc pacwnpeHEm .bin.gz, c nOMoCbIO KOtOporo 3aTeM, npn XeJALHH, MOxHObBOcCTaHOBHTb yCTaHOBKn
cnCTembl. 3TOf aaiL coXpaHNTe, noKaNyIcTa, B npouceccope.
YTo6bI BocCTaHOBnTb CnCTeMy, 9eJIKNHtE, NOJauNcTa, no KlaBnSe «BocCTaHOBJIeHne».
HaIInTe n OTKpoIte CoXpaHeHHbI pe3epBbI ΦaII n 3aTeM 9eJIKNHtE, NOJauNcTa, Ha
«CoXpaHnTb» BHN3y cnpaBA B OKHe.
B xode BocctaHOBJIeHn IONBJIeTc coo6JeHne, KOtOpoe HhΦopMnpyet O Tekyuem COCTOHHI npoucecca.

Iocne ycneuHoro BOCCTaHOBJeHnKoHfNpyaun CnCTeMbY yCTPOcTBO aBTOMaTHueckn nepe3anyckaTe, n noBJIeTcHaaybHbI ekpaH.
11.9.3 OSHOBJIEHNE BCTPOEHHHORO NO
EcnI dIy o6HOBHeHn BcTpoEHnO IO nCnoJIb3yETc caIT www.intenso.de, HxKHO BblONHnTb cIeDyIOUne Oepaun, N03BOJIAIOUne 3TO CdeLaTb.
1.) 3arpy3nte BcTpoEHnOe NO Ha PIK.
2.) IIOxKanyIcTa, IeJIKNHITe IIO KJIaBnIe «O6HOBnTb» I NaIInTe 3aRpyJKeHHoe BCTopeEHoe IIO Ha IIK. BbI6epNte faiI n IeJIKNHITe IIO «OTKpbITb», YTO6bl npoDOLXHTb DaJIbIe.
3.) Hnke KlaBnH «O6HOBHTb» TeNepb NOBJAEcH OMEp Bercn BCTpoEHHoro PO, no KOtopoI o6HOBJIeTcra yCTpoiCTBO. IooKanyIcTa, IeJIKNHe PO «CoXpaHITb» BHN3y cnpaba Ha 3KpaHe, YTObI 3aNyCTNb npOceCC o6HOBJIeHnR BCTpoEHHoro PO.
Yka3aHne: ecn 3arpyKeH HenpaBnIbHbI oOpMaT, nOBlaeTc cJeDyIOUeepdUnpeKdHne o6 Own6ke:

4.) B xode obnoBleHn noaBnaTeC coo6eHne, KOtOpoe HhOpMnpyEt o Tekyuem coCTOHN npouceca.

Iocne ycneHoro o6HOBHeHnYcTPOJCTBO ABTomaTnueckn nepe3anyckaetc, n NOBnEeTcctapTObblkpaH.
11.9.4 CNTCTEMHbI CBPOC (RESET)
Korda yctpoiCTBO BO3BpaaTcra K 3aBOdCKIM HAcTPOiKaM, BCE npednpnHrTbIe paHHee HAcTPOiKN YdaJIaHTcra, IN CHOBA aKTINBIPyHTcra HAcTPOiKN, DeiCTBOBaBUnne c camoro Hauana.
YTo6bI BbIbpaTb BO3BpaT K 3aBOODcKIM UCTaHOBkAM, ZeJIKNHTe, NoXaIyNCTa, no KpyrIoN KlaBnSe. ZeJIKNHTe, NoXaIyNCTa, NO KlaBnSe «CoXpaHtB», YTo6bI 3aNyCTNb npOcecc.ДЯ nCKIIOUeHnHaEDOpa3yMeHn, NoXaIyNCTa, NOrTBepdnte BbIbOp B npNBedeHHom dAlee npedynpeJdaIOuSem coo6uHn.
Cleyuouee coo6eHne noBnreTcBO BpeMa AKTHBHOrO npouceca n daet HOpMaun O Tekyem ero BbINOJIHeHH.

Yka3aHue: nocmeo, KaHa ycmpoucme npou3beeh cucmemhbi c6poc,napoB admuHucmpamopao mee cmupaemc. Choea deucmbyem napoi, komopbi 6bl e cocmouuu nocmau.