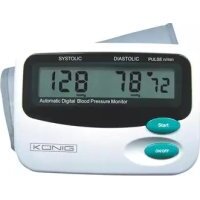
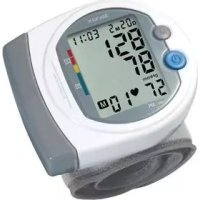
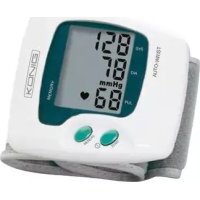
HCBLDPRESS21 - Blood pressure monitor KONIG - Free user manual and instructions
Find the device manual for free HCBLDPRESS21 KONIG in PDF.
| Product type | Automatic blood pressure monitor |
| Brand | KONIG |
| Model | HC-BLDPRESS21 |
| Measurement method | Oscillometric, automatic inflation and measurement |
| Power supply | 4 AA batteries (1.5 V) or 6 V DC mains adapter |
| Memory capacity | 60 readings with date and time |
| Pressure range | 0 – 300 mmHg |
| Pressure accuracy | ±3 mmHg |
| Pulse range | 40 – 180/min |
| Monitor dimensions | 150 × 108 × 60 mm |
| Cuff dimensions | 520 × 140 mm |
| Weight (without batteries) | Approximately 335 g |
| Classification | Class II, type B |
| Operating conditions | Temperature: 5 °C to 40 °C, humidity < 90 % |
| Storage conditions | Temperature: -20 °C to 55 °C, humidity < 95 % |
| Battery life | Approximately 2 months (3 min/day) |
| Maintenance and cleaning | Monitor: dry cloth; cuff: hand wash with mild detergent, air dry |
| Safety | Do not immerse, avoid shocks, disassembly prohibited, keep away from magnetic fields |
| Spare parts and repairability | Removable and replaceable cuff; repair by qualified technician only |
| General information | Compliant with MDD93/42/EEC; WEEE symbol; intended for adults |
Frequently Asked Questions - HCBLDPRESS21 KONIG
User questions about HCBLDPRESS21 KONIG
0 question about this device. Answer the ones you know or ask your own.
Ask a new question about this device
Download the instructions for your Blood pressure monitor in PDF format for free! Find your manual HCBLDPRESS21 - KONIG and take your electronic device back in hand. On this page are published all the documents necessary for the use of your device. HCBLDPRESS21 by KONIG.
USER MANUAL HCBLDPRESS21 KONIG
Blood pressure monitor
ANLEITUNG (s. 7)
Blutdruckmonitor
MODE D'EMPLOI (p. 12)
Tensiometre
MANUAL DE USO (p. 27)
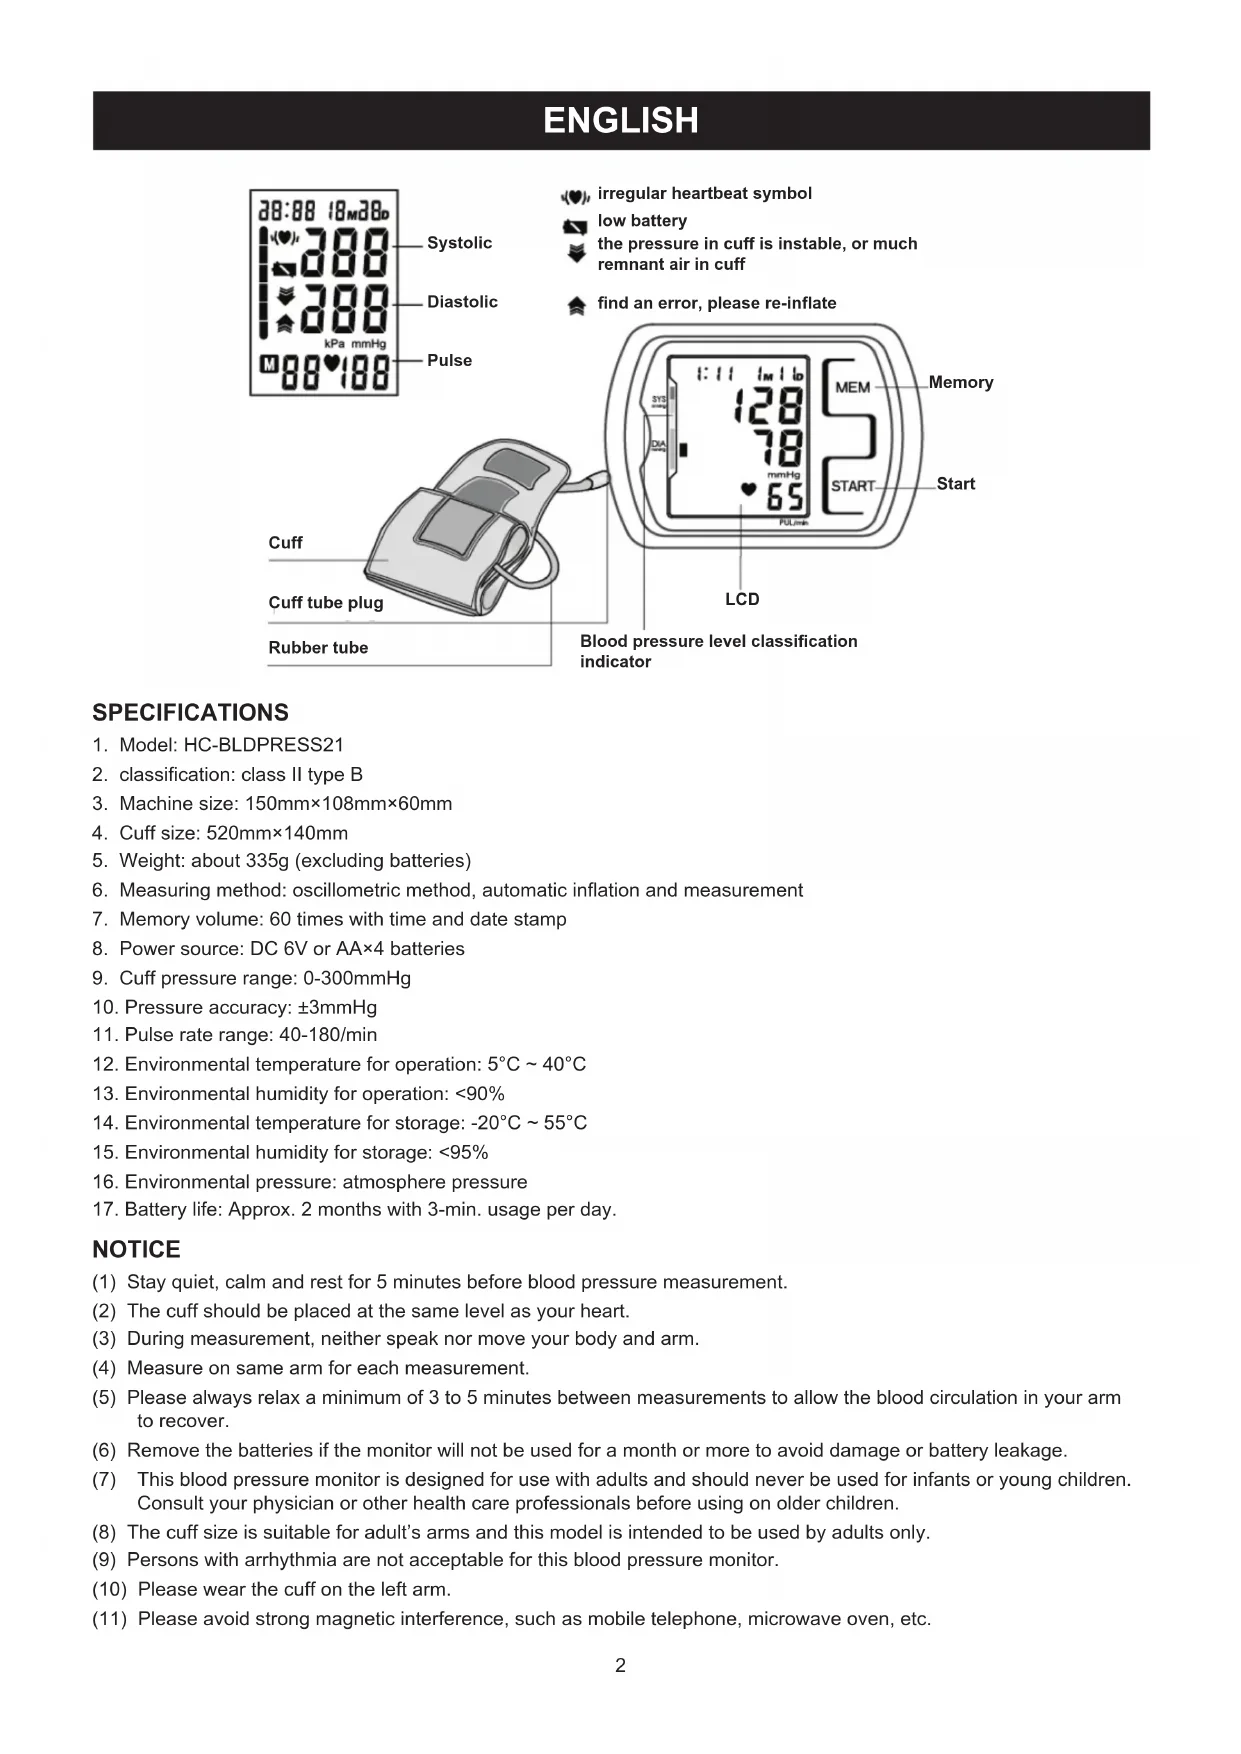
- Model: HC-BLDPRESS21
- classification: class II type B
- Machine size: 150mm × 108mm × 60mm
- Cuff size: 520mm × 140mm
- Weight: about 335g (excluding batteries)
- Measuring method: oscillometric method, automatic inflation and measurement
- Memory volume: 60 times with time and date stamp
- Power source: DC 6V or AA×4 batteries
- Cuff pressure range: 0-300mmHg
- Pressure accuracy: ± 3mmHg
- Pulse rate range: 40-180/min
- Environmental temperature for operation: 5^ 40^
- Environmental humidity for operation: <90%
- Environmental temperature for storage: -20^ 55^
- Environmental humidity for storage: <95%
- Environmental pressure: atmosphere pressure
- Battery life: Approx. 2 months with 3-min. usage per day.
NOTICE
(1) Stay quiet, calm and rest for 5 minutes before blood pressure measurement.
(2) The cuff should be placed at the same level as your heart.
(3) During measurement, neither speak nor move your body and arm.
(4) Measure on same arm for each measurement.
(5) Please always relax a minimum of 3 to 5 minutes between measurements to allow the blood circulation in your arm to recover.
(6) Remove the batteries if the monitor will not be used for a month or more to avoid damage or battery leakage.
(7) This blood pressure monitor is designed for use with adults and should never be used for infants or young children. Consult your physician or other health care professionals before using on older children.
(8) The cuff size is suitable for adult's arms and this model is intended to be used by adults only.
(9) Persons with arrhythmia are not acceptable for this blood pressure monitor.
(10) Please wear the cuff on the left arm.
(11) Please avoid strong magnetic interference, such as mobile telephone, microwave oven, etc.
SETUP AND OPERATING PROCEDURES
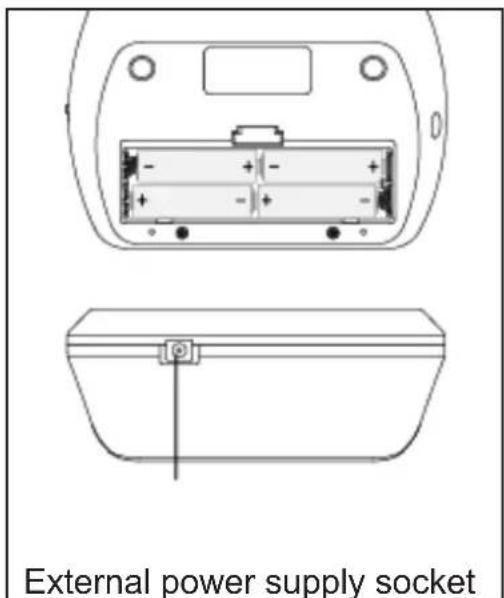
1. BATTERY LOADING
a. Open battery cover at the back of the monitor.
b. Load four "AA" size batteries. Please pay attention to polarity.
c. Close the battery cover.
When LCD shows battery symbol place all batteries with new ones.
Rechargeable batteries with a voltage of 1.2V are not suitable for this monitor.
Remove the batteries if the monitor will not be used for a month or more to avoid damage or battery leakage
2. ON/OFF SWITCH
Your device has a touch button as equipment. Be careful not to touch the button by mistake. Keep the ON/OFF switch in "OFF" position when the device is not in use to avoid unintentional adjustments.

3. CLOCK AND DATE ADJUSTMENT
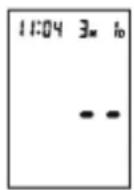
a. Once you install the battery or turn off the monitor, it will enter Clock Mode, and LCD will display time and date
b. While the monitor is in Clock Mode, press the "START" and "MEM" button simultaneously for two seconds (ON/OFF switch in ON position), the month flashes at first. Press the button "START" repeatedly, day, hour and minute will flash in turn. While the number is flashing, press the button "MEM" to increase the number. Keep on pressing the button "MEM", the number will increase fast.
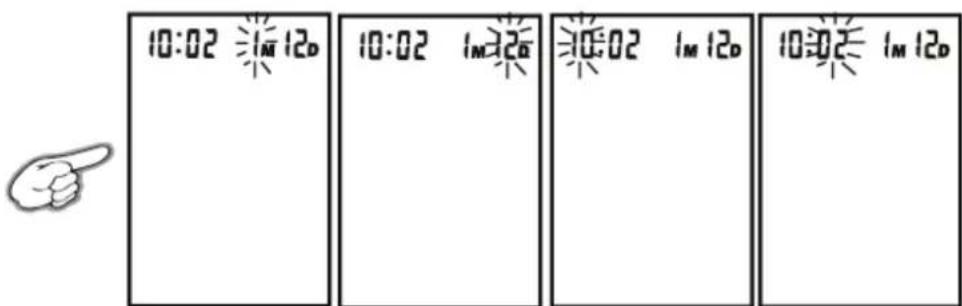
c. You can turn off the monitor by pressing "START" button when the minute is flashing, then time and date are confirmed.
d. The monitor will turn off automatically after 1 minute if no operation with the time and date unchanged.
e. Once you change the batteries, you should readjust the time and date.
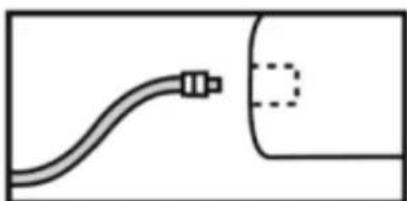
4. CONNECTING THE CUFF TO THE MONITOR
Insert the cuff tubing connector into the socket in the left side of the monitor. Make sure that the connector is completely inserted to avoid air leakage during blood pressure measurements.
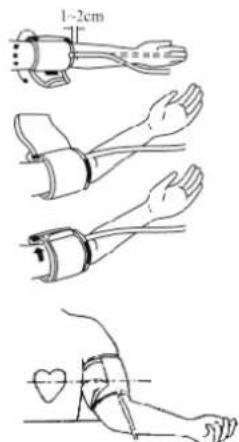
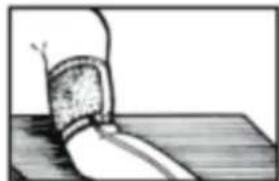
5. APPLYING THE CUFF
a. Place the cuff around a bare arm 1-2cm above the elbow joint.
b. While seated, place palm upside in front of you on a flat surface such as a desk or table. Position the air tube in the middle of your arm in line with your middle finger.
c. Pull the cuff end through the medal loop (the cuff is packaged like this already), turn it outward (away from your body) and tighten it and close the Velcro fastener.
d. The cuff should fit comfortably, yet snugly around your arm. You should be able to insert one finger between your arm and the cuff.
Note:
- Measure on same arm each time.
- Do not move your arm, body, or the monitor and do not move the rubber tube during measurement.
- Stay quiet, calm for 5 minutes before blood pressure measurement.
- If the cuff becomes dirty, remove it from the monitor and clean it by hand in a mild detergent, then rinse it thoroughly in cold water. Never dry the cuff in clothes dryer or iron it.
6. BODY POSTURE DURING MEASUREMENT
Sitting Measurement
a. Be seated with your feet flat on the floor.
b. Place palm upside in front of you on a flat surface such as a desk or table
c. The cuff should be at the same level as your heart.
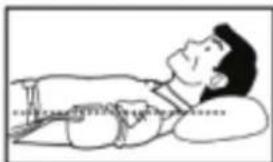
Lying Down Measurement
a. Lie on your back.
b. Place your arm straight along your side with your palm up.
c. The cuff should be placed at the same level as your heart.
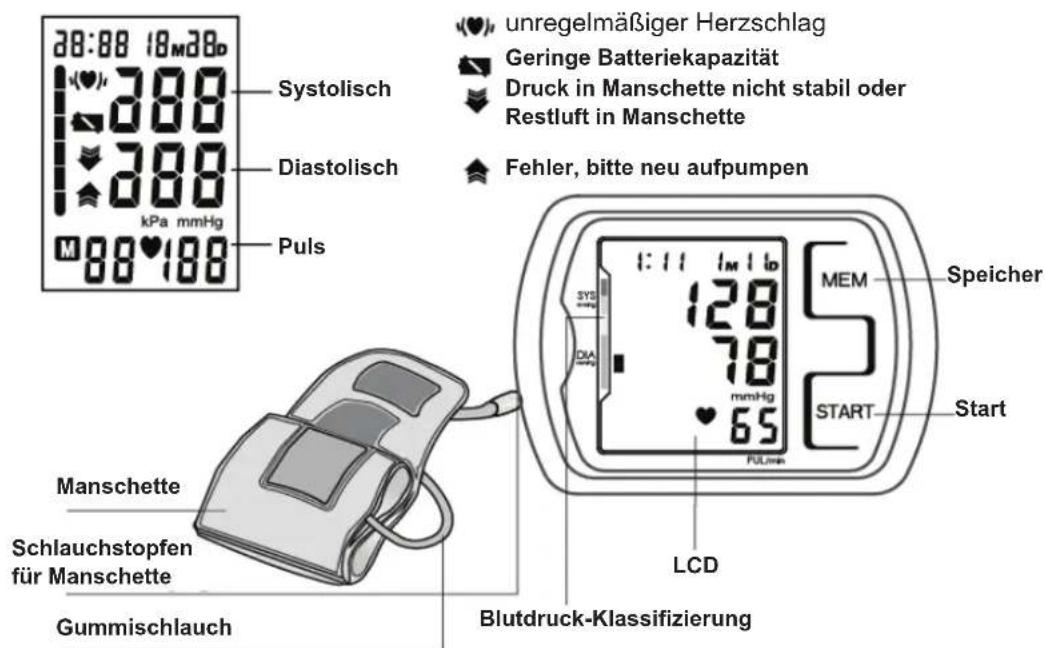
a. Switch the monitor on by using the ON/OFF switch (ON position).
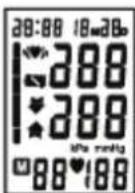
b. After applying the cuff and your body is in a comfortable position, press the "START" button. A beep is heard and all display characters are shown for self-test.
c. If the monitor has stored results, the LCD will momentarily display the most recent one.
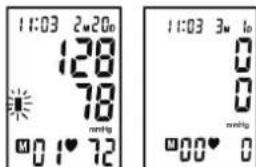
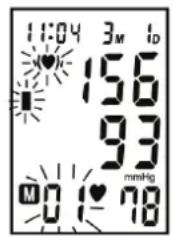
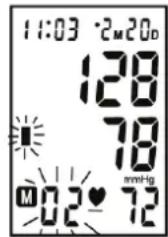
d. Then the monitor inflates the cuff until sufficient pressure has built up for a measurement. Then the monitor slowly releases the air from the cuff and carries out the measurement. Finally the blood pressure and pulse rate will be calculated and displayed on the LCD screen. The blood pressure classification indicator and Irregular heartbeat symbol (if any) will flash on the screen. The result will be automatically stored in the monitor.
e. After measurement, the monitor will turn off automatically after 1 minute of idling. Alternatively, press the "START" button to turn off the monitor manually.
f. During measurement, press the "START" button to turn off the monitor manually.


8. DISPLAYING STORED RESULTS
a. Switch the monitor on by using the ON/OFF switch (ON position).
b. In Clock Mode, press "MEM" button to display the stored results. The last result will be displayed with date and time. Irregular heartbeat symbol (if any) and the indicator of blood pressure classification will flash at the same time. Press "MEM" button repeatedly to review the results measured previously.
c. When displaying the stored results, the monitor will turn off automatically after 2 minutes of idling. You can also press the button "START" to turn off the monitor manually.

9. DELETING MEASUREMENTS FROM THE MEMORY
When results are displayed, keep on pressing button "MEM" for three seconds, all results will be deleted after three "beeps". Press the button "MEM" or "START", the monitor will turn off.


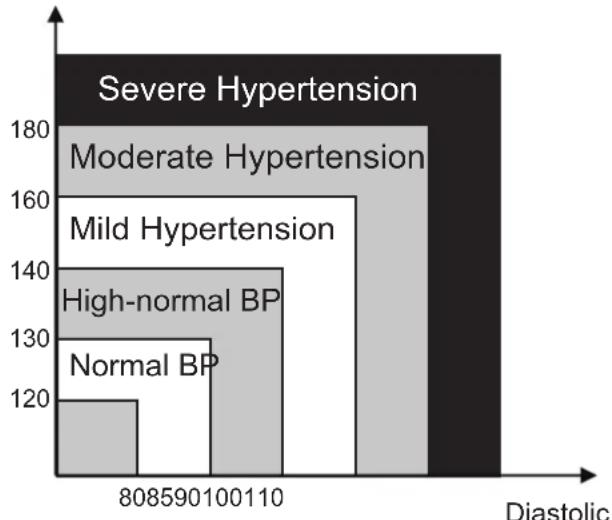
10. ASSESSING HIGH BLOOD PRESSURE FOR ADULTS
The following guidelines for assessing high blood pressure (without regard of age or gender) have been established by the World Health Organization (WHO). Please note that other factors (e.g. diabetes, obesity, smoking, etc.) need to be taken into consideration. Consult your physician for accurate assessment.
Classification of blood pressure for adults
Systolic
(mmHg)
(mmHg)
WHO/ISH Definitions and Classification of Blood Pressure Levels
| BLOOD PRESSURE CLASSIFICATION | SBP mmHg | DBP mmHg | COLOR INDICATOR |
| Optimal | <120<80 | GREEN | |
| Normal | 120-1298 | 0-84 | GREEN |
| High-Normal | 130-1398 | 5-89 | GREEN |
| Stage 1 Hypertension | 140-1599 | 0-99 | YELLOW |
| Stage 2 Hypertension | 160-1791 | 00-109 | ORANGE |
| Stage 3 Hypertension | ≥18011 | 0 ≥ | RED |
Note: It is not intended to provide a basis of any type of rush toward emergency conditions/diagnosis based on the color scheme and that the color scheme is meant only to differentiate between the different levels of blood pressure.
11. TROUBLESHOOTING
| PROBLEM POSSIBLE CAUSE SOLUTION | ||
| LCD Display shows battery symbol | Low Battery Change all batteries | |
| LCD Display shows "EE" | Arm or blood pressure monitor was moved during testing | Re-test taking care to not move your arm or the blood pressure monitor |
| The cuff does not inflate properly or pressure falls quickly during testing | Ensure that the rubber tube is fully inserted into the blood pressure monitor | |
| Irregular heartbeat (arrhythmia) | People with light arrhythmia may re-test.It is inappropriate for people with serious arrhythmia to use this blood pressure monitor. | |
| The blood pressure monitor did not inflate sufficiently.The cuff was not properly wrapped or the rubber tube was bent or pressed. | Review the cuff wrapping and testing sections of the instructions and re-test. | |
| LCD Display shows abnormal result | The cuff position was not correct or it was not properly tightened | Apply the cuff correctly and try again |
| Body posture was not correct during testing | Review the body posture and testing sections of the instructions and re-test. | |
| Speaking, arm or body movement, angry, excited or nervous during testing | Re-test when calm and without speaking or moving during the test | |
| No response when you press button or load battery | Incorrect operation, or strong electromagnetic interference | Take out batteries for five minutes, and then reinstall all batteries. |
Maintenance
- Do not drop this monitor or subject it to strong impact.
- Avoid high temperature and polarization. Do not immerse the monitor in water as this will result in damage to the monitor.
- If this monitor is stored near freezing, allow it to acclimate to room temperature before use.
- Do not attempt to disassemble this monitor.
- If you do not use the monitor for a long time, please remove the batteries.
When the cuff is dirty, detach it from the equipment, wash the cuff by hand with proper detergent and rinse in cold water. Dry in air. Never iron.
EXPLANATION OF SYMBOLS ON UNIT
Symbol for "Caution Consult Accompanying Documents"

Symbol for "Type B Applied Parts"

CE is a kind of marking of EU safe attestation. This product matches MDD93/42/EEC
Safety precautions:

CAUTION
RISK OF ELECTRIC SHOCK
DO NOT OPEN

To reduce risk of electric shock, this product should ONLY be opened by an authorized technician when service is required. Disconnect the product from mains and other equipment if a problem should occur. Do not expose the product to water or moisture.
Maintenance:
Clean only with a dry cloth. Do not use cleaning solvents or abrasives.
Warranty:
No guarantee or liability can be accepted for any changes and modifications of the product or damage caused due to incorrect use of this product.
General:
Designs and specifications are subject to change without notice.
All logos brands and product names are trademarks or registered trademarks of their respective holders and are hereby recognized as such.
Keep this manual and packaging for future reference.
Attention:
This product is marked with this symbol. It means that used electrical and electronic products should not be mixed with general household waste. There is a separate collections system for these products.
DEUTSCH
SPEZIFIKATIONEN
11.PROBLEEMOPLOSSING
6. POSTURA CORPORAL DURANTE LA MEDIDA
Posión de sentado
2. ON/OFF (BE/KI) KAPCSOLO
3.AJAN JA PAIVAMARAN SAA TO
9. RADERA MÄTRESULTAT FRÄN MINNET
Description: Blood pressure monitor