HCBLDPRESS10 - Blood pressure monitor KONIG - Free user manual and instructions
Find the device manual for free HCBLDPRESS10 KONIG in PDF.
| Product type | Electronic wrist blood pressure monitor |
| Brand | KONIG |
| Model | HCBLDPRESS10 |
| Dimensions (approx.) | 7 x 7 x 3 cm |
| Weight (approx.) | 100 g |
| Power supply | 2 non-rechargeable AAA batteries (1.5 V) |
| Measurement method | Oscillometric with integrated silicon pressure sensor |
| Display | LCD screen |
| Measurement range | 0 mmHg - 300 mmHg |
| Accuracy | ± 3 mmHg |
| Memory | 90 rewritable measurements |
| Auto power off | After 3 minutes of inactivity |
| Main functions | Automatic measurement of systolic/diastolic pressure and pulse, memory reading |
| Maintenance and cleaning | Clean with a dry cloth. Do not use solvents or abrasive products. The cuff can be hand washed with a mild detergent and rinsed with cold water. |
| Safety | Do not open the device (risk of electric shock). Do not expose to water or moisture. Do not use on infants or young children. |
| Spare parts and repairability | Repair only by a qualified authorized technician. No spare parts available to the general public. |
| General information | Compliant with EN1060, IEC60601, Directive 93/42/EEC. Warranty does not apply in case of modification or incorrect use. |
Frequently Asked Questions - HCBLDPRESS10 KONIG
User questions about HCBLDPRESS10 KONIG
0 question about this device. Answer the ones you know or ask your own.
Ask a new question about this device
Download the instructions for your Blood pressure monitor in PDF format for free! Find your manual HCBLDPRESS10 - KONIG and take your electronic device back in hand. On this page are published all the documents necessary for the use of your device. HCBLDPRESS10 by KONIG.
USER MANUAL HCBLDPRESS10 KONIG
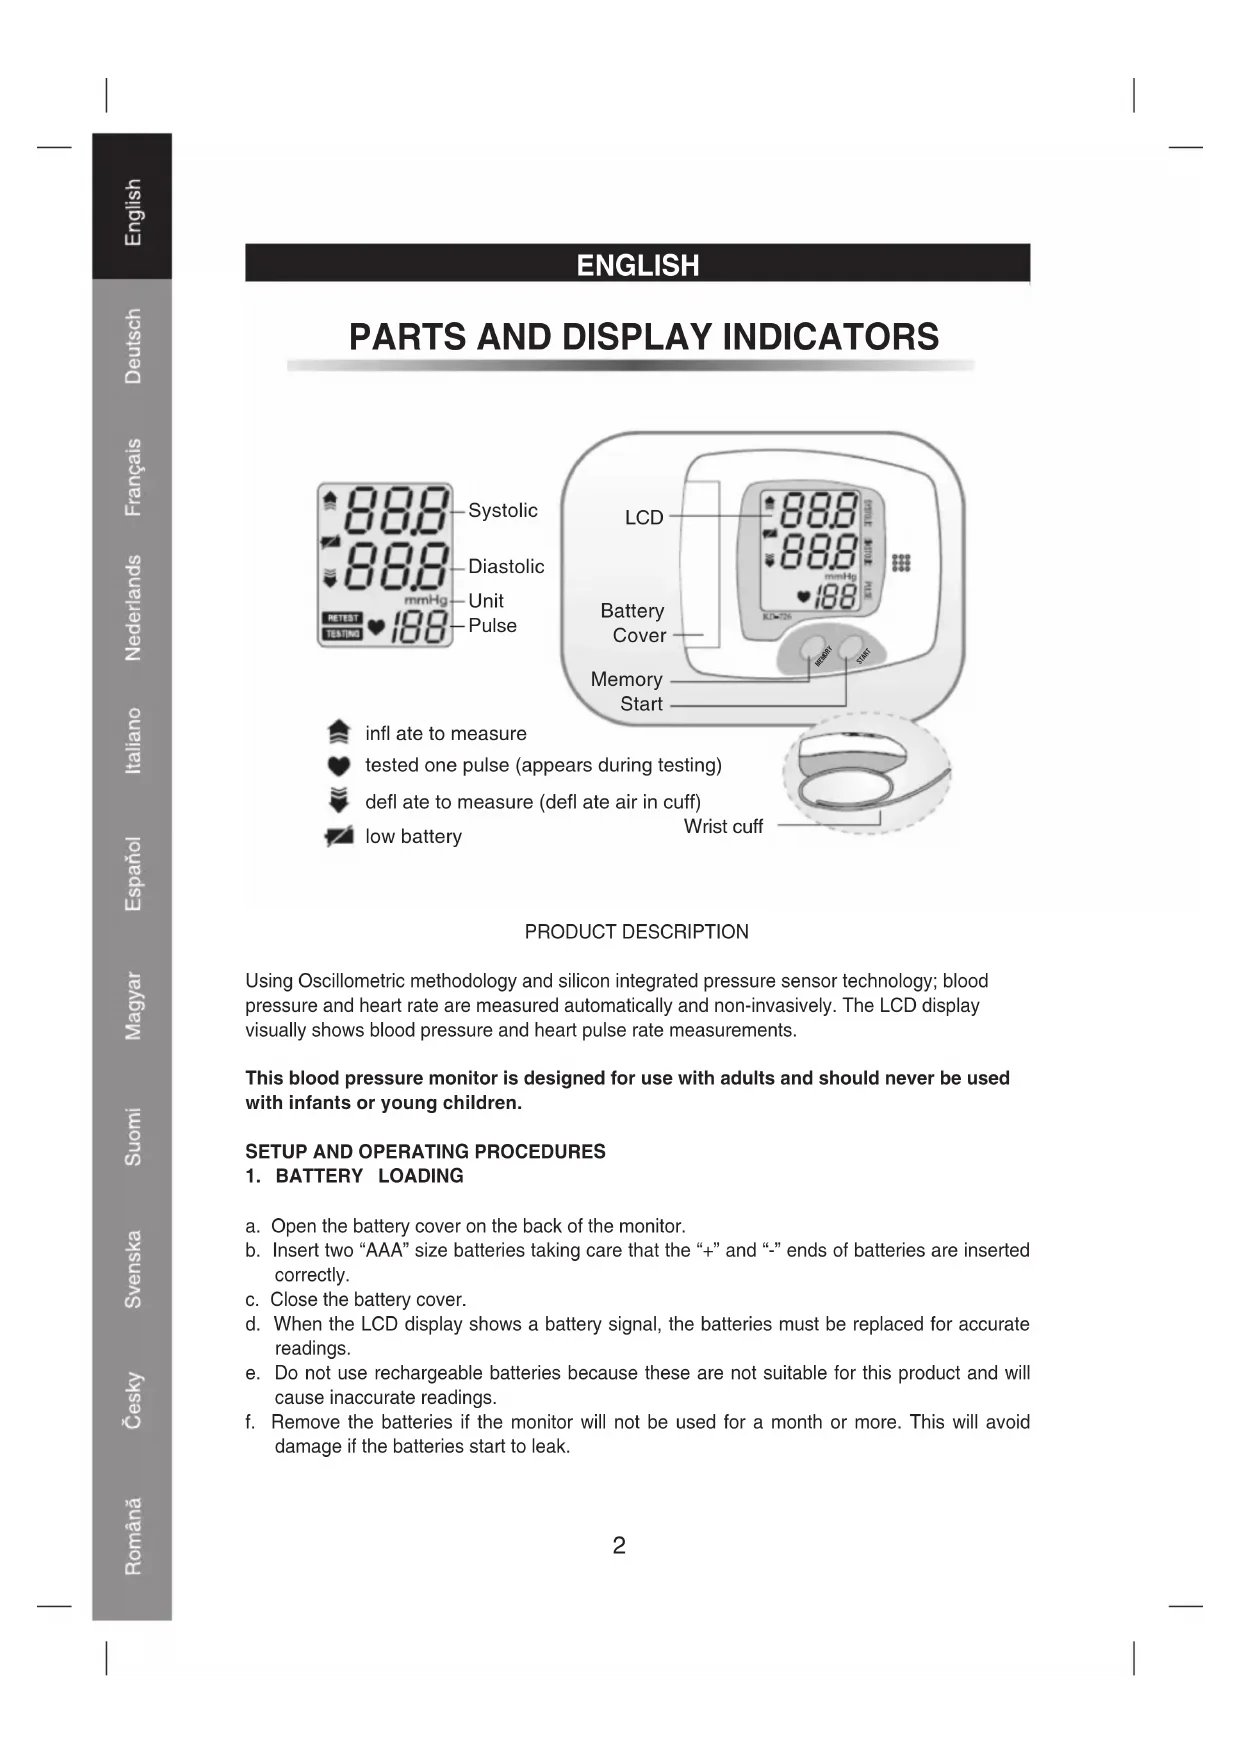
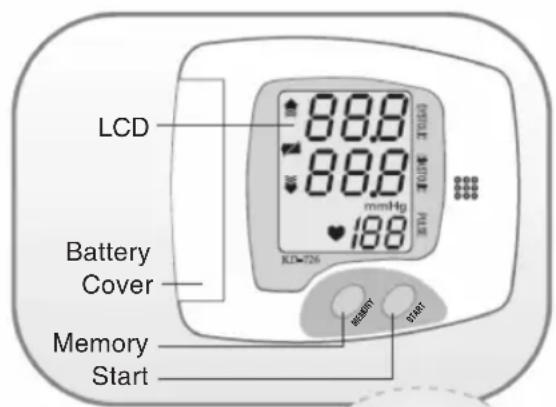
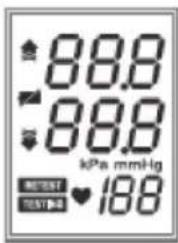
PARTS AND DISPLAY INDICATORS
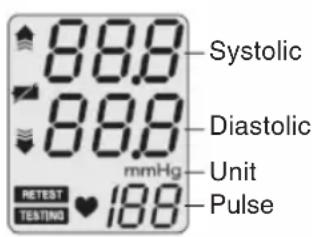
inlateto measure
- tested one pulse (appears during testing)
defl ate to measure (defl ate air in cuff)
low battery
Wrist cuff
PRODUCT DESCRIPTION
Using Oscillometric methodology and silicon integrated pressure sensor technology; blood pressure and heart rate are measured automatically and non-invasively. The LCD display visually shows blood pressure and heart pulse rate measurements.
This blood pressure monitor is designed for use with adults and should never be used with infants or young children.
SETUP AND OPERATING PROCEDURES
1. BATTERY LOADING
a. Open the battery cover on the back of the monitor.
b. Insert two "AAA" size batteries taking care that the "+" and "-" ends of batteries are inserted correctly.
c. Close the battery cover.
d. When the LCD display shows a battery signal, the batteries must be replaced for accurate readings.
e. Do not use rechargeable batteries because these are not suitable for this product and will cause inaccurate readings.
f. Remove the batteries if the monitor will not be used for a month or more. This will avoid damage if the batteries start to leak.
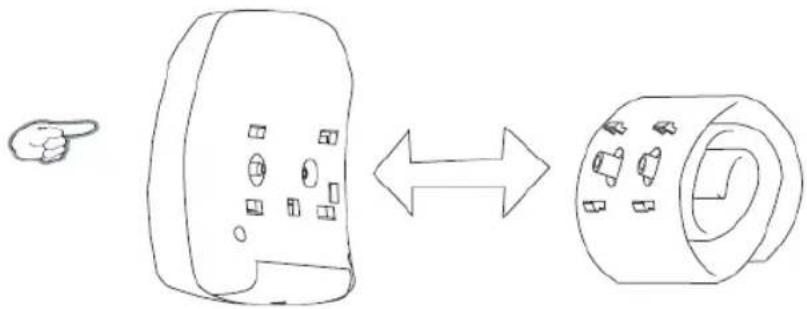
2. CUFF CONNECTION TO THE MONITOR
The cuff is attached to the monitor when it is packaged. Should the cuff become unattached, align the two plugs and four brackets of the cuff with the plug sockets and bracket sockets of the monitor and press the cuff to the monitor until the plugs and brackets are securely attached.
3. CUFF WRAPPING ON YOUR WRIST
a. Place the cuff around a bare wrist 1/2 to 3/4 of an inch above the wrist joint on the open-hand side of the wrist.
b. While seated, place the arm with the cuffed wrist in front of your body on a desk or table with the palm up. If the cuff is correctly placed, you can read the LCD display when your arm is held open-hand side-up in front of your body.
c. The cuff must be neither too tight nor too loose. You should be able to place one finger between the cuff and your wrist.
d. Measure using the same arm each time.
e. Do not move your arms, body, or the monitor during blood pressure measurements.
f. Stay quiet, calm and rest for 5 minutes before and during blood pressure measurement.
g. If the cuff becomes dirty, remove it from the monitor and wash it by hand in a mild detergent, then rinse it thoroughly in cold water. Allow the cuff to dry before using it for a blood pressure measurement. Never dry the cuff in a clothes dryer and never iron the cuff.

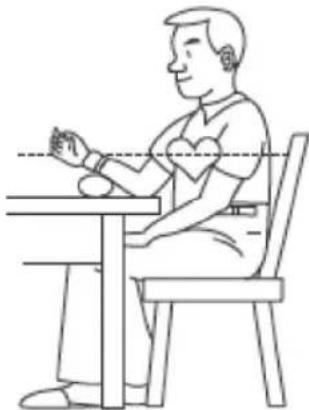
4. BODY POSTURE DURING MEASUREMENT
Sitting Measurement
a. Sit upright
b. Place the arm with the cuff in front of you with your elbow resting on a desk or table with the palm up.
c. The cuff should be at the same level as your heart.
d. Placing your arm on the monitor's plastic case as shown in the picture aids in maintaining a correct and still arm position.
5. TAKING A MEASUREMENT
a. With the cuff wrapped around your arm and your body in a comfortable position, press and hold the button "START" until the LCD display is activated. The display will first verify then it will set to read all zeros.
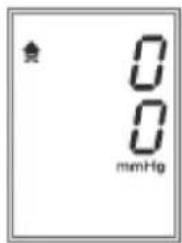
b. Once the LCD display reads all zeros, the monitor will then pump up the cuff, then release the air pressure from the cuff and then display the blood pressure and pulse rate measurements on the LCD display.

c. Re-measuring
If you want to measure again, just press the "START" button.
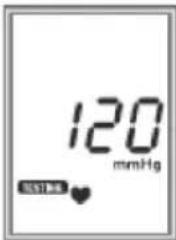
6. READING MEASUREMENT RESULTS
The LCD display will automatically show the systolic and diastolic blood pressure reading in mmHg units after each measurement. The heart rate is also displayed in pulse per minute next to the “ ♥ ” symbol.

7. TURNING THE MONITOR POWER OFF
The monitor power will turn-off automatically after 3 minutes of non-use after measurement displaying. Alternatively, you can press and release the button "START" to manually turn off the monitor.
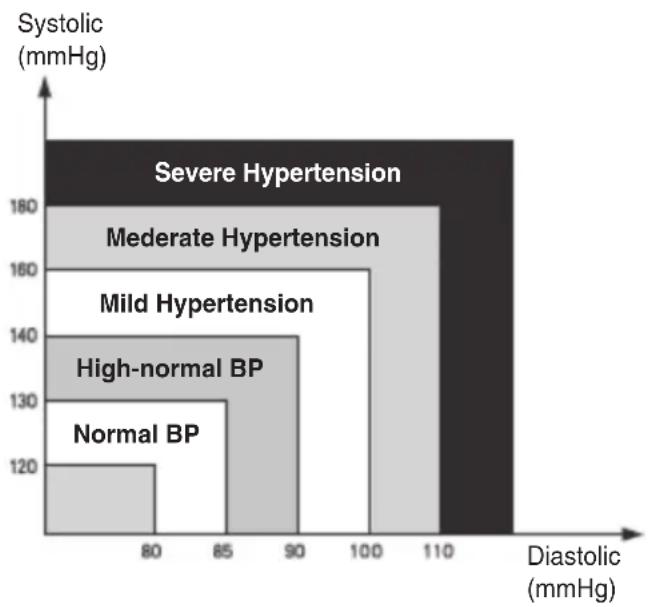
8. ASSESSING HIGH BLOOD PRESSURE FOR ADULTS
The following standards for assessing high blood pressure (without regard to age or gender) have been established as a guide by the World Health Organization (WHO). Please note that other risk factors (e.g. diabetes, obesity, smoking, etc) need to be taken into consideration and may affect these figures. Consult with your physician for accurate assessment.
9. READING THE MEASUREMENTS IN THE MEMORY
a. When the monitor is turned off, press and release the button „MEM“. The most recent measurement will be displayed. If more than one measurement is in the memory, press and release the button „MEM“ again and the second most recent measurement will be displayed. Repeat this process to view each measurement stored in the memory. When the BPM is turned on, and you have pressed the „MEMORY“ button then the LCD will display the last result. Press „MEMORY“ button continuously, previous measurement results will be displayed one by one.
b. After reading the measurements in the memory, press and release the button "START" and the monitor will power-off. When in the memory reading mode, the monitor will power-off automatically after ten seconds of non-use.
- Measuring range: 0mmHg - 300mmHg
Accuracy: within +/- 3mmHg - 2 x AAA batteries
90 Times memory
IMPORTANT INFORMATION
Physical activity excitement, stress, eating, drinking, smoking and many other activities and factors (including taking a blood pressure measurement) all influence blood pressure value. Because of this it is most unusual to obtain identical multiple blood pressure readings.
Blood pressure fluctuates continually during the day and night with the highest values usually in the daytime and lowest values usually in the evening.
Considering the above information, the way to collect day-to-day blood pressure measurements that can be meaningfully compared is to measure your blood pressure at approximately the same time or times each day.
When re-measuring blood pressure, always wait a minimum of 3 to 5 minutes between measurements to allow the blood circulation in your arm to recover. Remember, it is normal and it is expected that you will not obtain identical multiple blood pressure readings.
Declaration of conformity
We,
Nedis B.V.
De Tweeling 28
Declare that product:
Name: KONIG
Model: HC-BLDPRESS10
Description: Blood pressure monitor
Is in conformity with the following standards
The following standards have been applied:
EN1060-1:2002, EN1060-3:1997, IEC 60601-1:1998+A1:1991+A2:1995, EN1060-4:2004,
EN980:2003, EN1041:1998, EN60601-1-2:2006, EN ISO14971:2007, EN ISO10993-1:2003
EN ISO10993-5:1999, EN ISO10993-10:2002, BS EN60601-1-6:2007
Following the provisions of the 93/42/EEC directive.
s-Hertogenbosch, 2008, may 20

Mrs. J. Gilad
Purchase Director
Safety precautions:


To reduce risk of electric shock, this product should ONLY be opened by an authorized technician when service is required. Disconnect the product from mains and other
equipment if a problem should occur. Do not expose the product to water or moisture.
Maintenance:
Clean only with a dry cloth. Do not use cleaning solvents or abrasives.
Warranty:
No guarantee or liability can be accepted for any changes and modifi cations of the product or damage caused due to incorrect use of this product.
General:
Designs and specific cations are subject to change without notice.
All logos brands and product names are trademarks or registered trademarks of their respective holders and are hereby recognized as such.
Attention:
This product is marked with this symbol. It means that used electrical and electronic products should not be mixed with general household waste. There is a separate collections system for these products.
Copyright ©

DEUTSCH
Conform prederilor directivei 93/42/EEC.
s-Hertogenbosch, 2008. majus 20.

J. Gilad
Director achizitii