
SHE9503 - Headphones PHILIPS - Free user manual and instructions
Find the device manual for free SHE9503 PHILIPS in PDF.
| Product type | Stick vacuum and handheld vacuum |
| Runtime (handheld vacuum only) | 12 minutes |
| Runtime (stick vacuum, normal speed) | More than 20 minutes |
| Runtime (stick vacuum, maximum speed) | 11 minutes |
| Charging time | Approximately 7 hours |
| Power supply | Built-in rechargeable NiMH batteries |
| Brush type | Rotating brush for floors and carpets |
| Included accessories | Crevice tool, brush, charging base with storage compartment |
| Dust container capacity | Not specified |
| Filters | Washable inner and outer filters (replaceable, reference 4322 004 93471) |
| Maintenance and cleaning | Regular cleaning of the dust container, filters, and rotating brush |
| Safety instructions | Do not vacuum up water, liquids, flammable substances or hot ashes; do not immerse the appliance |
| Warranty and service | International warranty, contact Philips Consumer Service or local retailer |
Frequently Asked Questions - SHE9503 PHILIPS
User questions about SHE9503 PHILIPS
0 question about this device. Answer the ones you know or ask your own.
Ask a new question about this device
Download the instructions for your Headphones in PDF format for free! Find your manual SHE9503 - PHILIPS and take your electronic device back in hand. On this page are published all the documents necessary for the use of your device. SHE9503 by PHILIPS.
USER MANUAL SHE9503 PHILIPS
Congratulations on your purchase and welcome to Philips! To fully benefit from the support that Philips offers, register your product at www.philips.com/welcome.
General description (Fig. 1)
A Stick unit
1 On/off button
2 Maximum power (MAX) button
3 Upper stick
4 Screw to attach upper stick to lower stick
5 Lower stick
6 Floor nozzle joint
7 Floor nozzle release button
8 'Brush blocked' light
9 Floor nozzle
10 Retainer
11 Roller brush
12 Cutting groove
13 Wheels
B Handheld vacuum cleaner
1 On/off button
2 Dust compartment release button
3 Dust compartment
4 Small nozzle release button
5 Handheld vacuum cleaner release button
6 Exhaust air openings
7 Filter unit
8 Detachable small nozzle
9 Outer filter
10 Inner filter
11 Filter holder with rattle mechanism
C Accessories
1 Charging base
2 Charging light
3 Storage compartment
4 Adapter
5 Back support of charging base
6 Crevice tool
7 Brush tool
Important
Read this user manual carefully before you use the appliance and save it for future reference.
Danger
- Never suck up water or any other liquid. Never suck up flammable substances and do not suck up ashes until they are cold.
- Never immerse the appliance, the charging base or the adapter in water or any other liquid, nor rinse it under the tap.
Warning
- Check if the voltage indicated on the adapter corresponds to the local mains voltage before you connect the appliance.
- Do not use the vacuum cleaner, the charging base or the adapter if it is damaged.
- If the adapter or charging base is damaged, always have it replaced with one of the original type in order to avoid a hazard.
- The adapter contains a transformer. Do not cut off the adapter to replace it with another plug, as this causes a hazardous situation.
- This appliance is not intended for use by persons (including children) with reduced physical, sensory or mental capabilities, or lack of experience and knowledge, unless they have been given supervision or instruction concerning use of the appliance by a person responsible for their safety.
- Children should be supervised to ensure that they do not play with the appliance.
Caution
- Remove the adapter from the wall socket before you clean the charging base.
- Only charge the vacuum cleaner with the adapter and charging base supplied. During charging, the adapter feels warm to the touch. This is normal.
- Always switch off the vacuum cleaner after use.
- The voltage on the contact strips in the charging base is low and therefore not dangerous.
- Never block the exhaust air openings during vacuuming.
- Switch off the appliance when you charge it.
- Always use the vacuum cleaner with the filter unit assembled.
Electromagnetic fields (EMF)
This Philips appliance complies with all standards regarding electromagnetic fields (EMF). If handled properly and according to the instructions in this user manual, the appliance is safe to use based on scientific evidence available today.
Before first use
1 Remove any protective foil or plastic from the appliance.
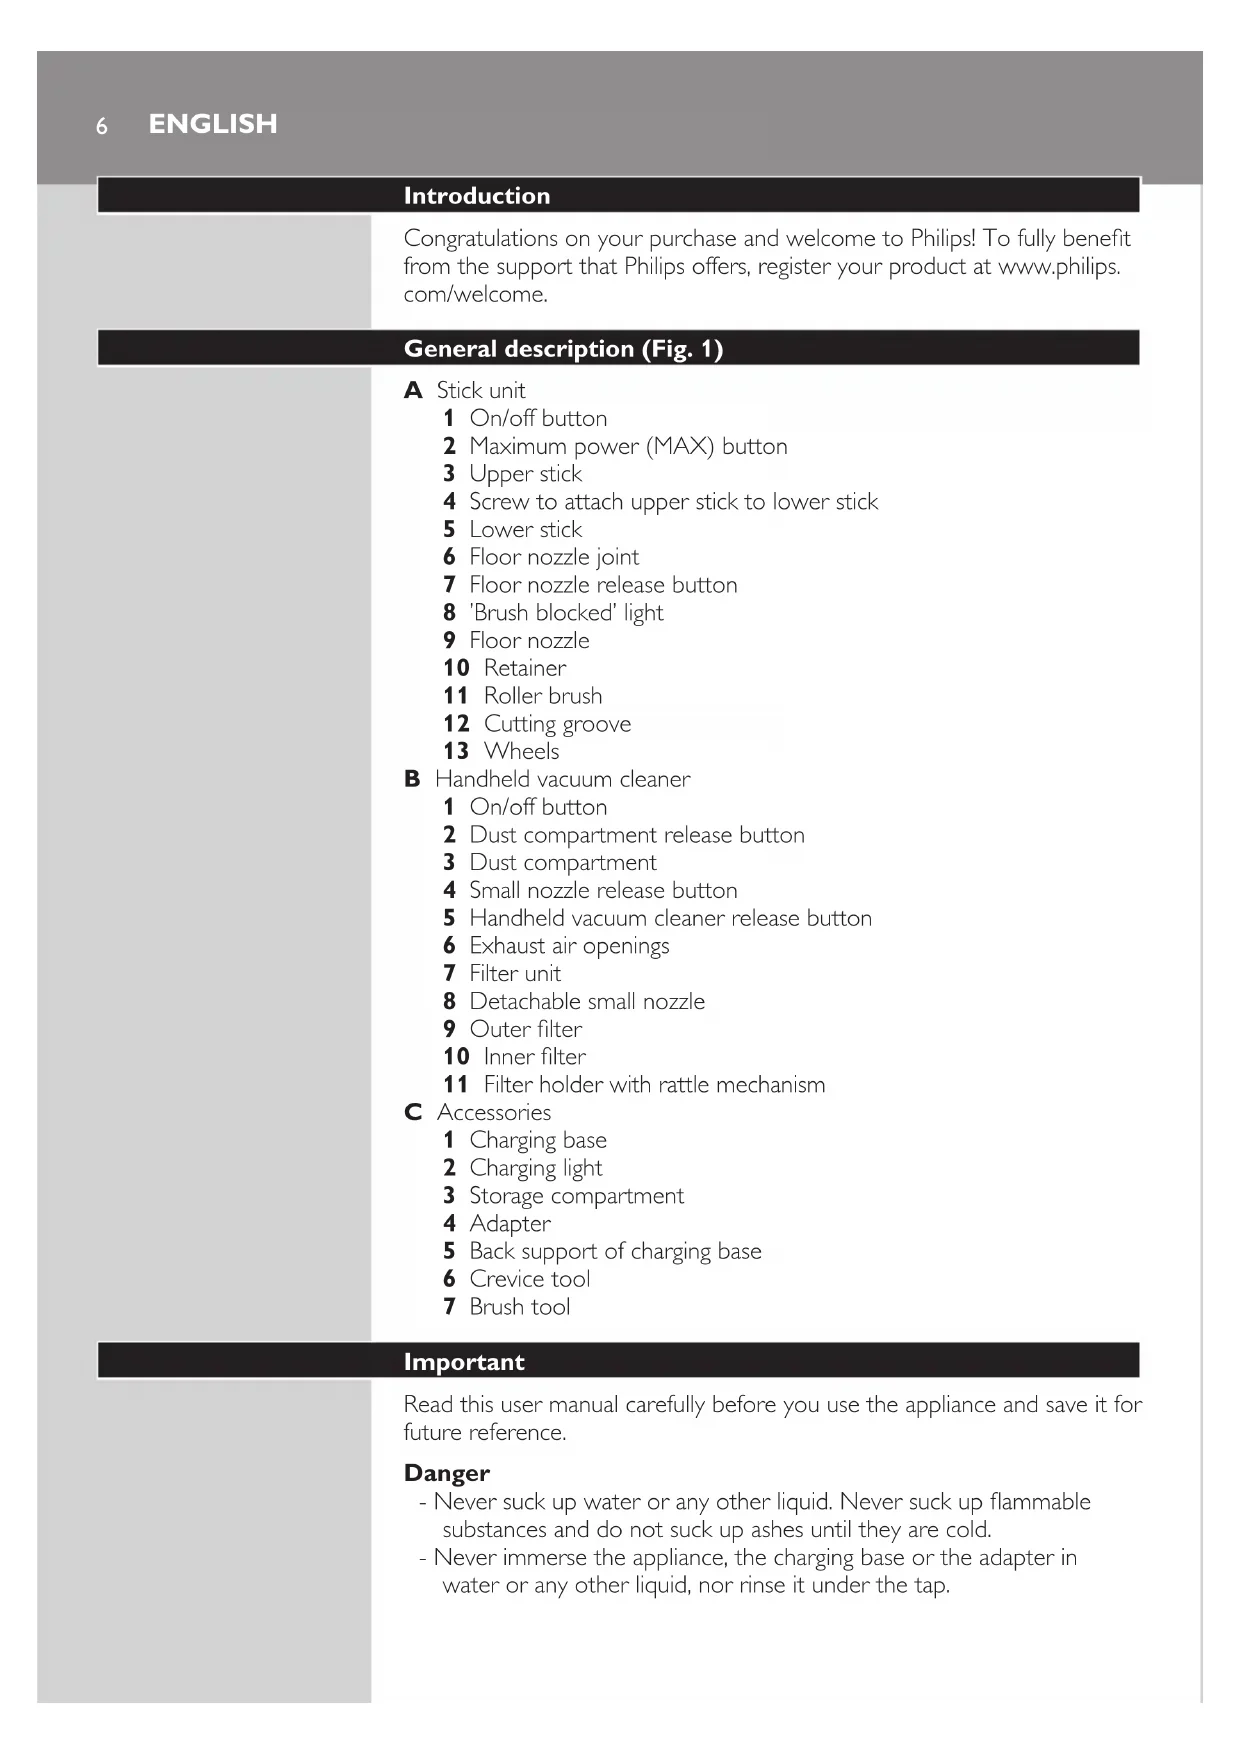
2 Attach the back support to the back of the charging base ('click').
Note: You only have to do this once. Never disassemble the back support from the charging base.
ENGLISH8

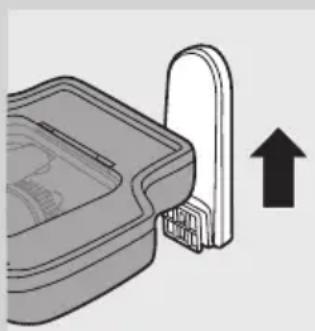
3 Place the upper stick on the lower stick ('click').
Note: Make sure that the recesses of the upper stick fit exactly on the projections of the lower stick.
Note: You only have to do this once. Never disassemble the upper stick from the lower stick.
4 Fasten the screw with a screwdriver or coin.
Place the stick on the floor nozzle ('click').
Preparing for use
Charging the appliance
Charge the appliance for at least 7 hours before you use it for the first time.
It takes approx. 7 hours to fully charge the appliance.
The operating time of the appliance varies. When the handheld vacuum cleaner is fully charged, it has an operating time of 12 minutes when it is used without the stick unit. When the fully charged handheld vacuum cleaner is placed in the stick unit, it has an operating time of 11 minutes at maximum speed and more than 20 minutes at normal speed.
1 Make sure the appliance is switched off.
2 Put the adapter of the charging base in the wall socket.
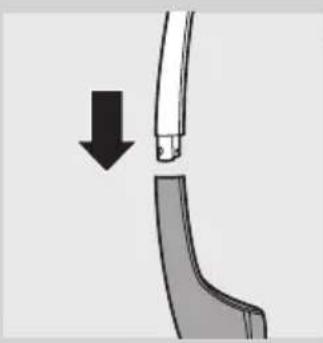
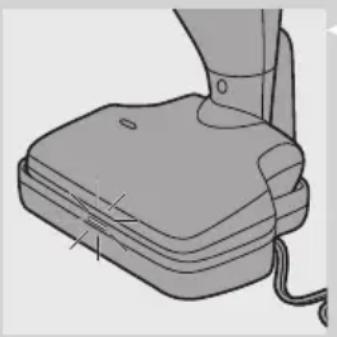
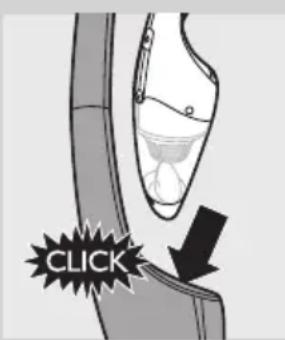
3 Place the handheld vacuum cleaner in the stick unit ('click').
4 Place the appliance on the charging base.
The charging light goes on to indicate that the appliance is charging.
Note: The charging light does not give any information about the battery charge level of the vacuum cleaner.
- When the appliance is fully charged, the charging light goes out.
Note: You can leave the appliance on the charging base, even when it is fully charged. Every 5 minutes, the charging light lights up for 3 seconds. This indicates that the appliance is checking if the batteries are still fully charged.
Note: If you put the appliance on the charging base while it is switched on, the appliance switches off automatically after 2 seconds.
Saving energy
If you are not going to use the appliance for a longer period of time, remove the adapter from the wall socket to save energy.
Using the appliance
Using the stick unit
You can use the stick unit to clean floors and carpets.
When you use the stick unit, always make sure the dust compartment is attached to the handheld vacuum cleaner, to prevent damage to the handheld vacuum cleaner.
1 Place the handheld vacuum cleaner properly in the stick unit ('click').
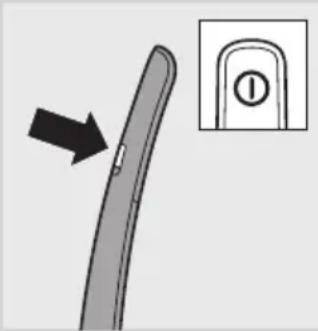
2 Press the on/off button to switch on the appliance.
The appliance starts to operate at normal speed. Use this speed for optimal operating time and minimal noise. The operating time at this speed is more than 20 minutes.
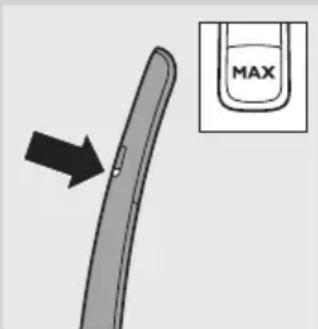
- Press the MAX button if you want to operate the appliance at maximum speed. Use this speed for optimal cleaning performance. The operating time at this speed is 11 minutes.
- If you want to switch back to normal speed, press the MAX button again.
Note: During use, the 'brush blocked' light may flash red to indicate that the roller brush is blocked. If this happens, you have to remove the item that is blocking the brush or clean the brush (see chapter 'Cleaning').
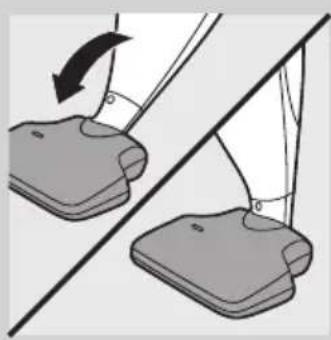
3 If you want to leave the appliance alone for a while or if you want to remove the handheld vacuum cleaner from the stick unit during use, you can use the parking position. Push the stick towards the floor nozzle into the parking position.
4 After use, press the on/off button to switch off the appliance.
Using the handheld vacuum cleaner
You can use the handheld vacuum cleaner without the stick unit to vacuum small and hard-to-reach areas, like tables, furniture, car seats etc. When the handheld vacuum cleaner is fully charged, it has an operating time of 12 minutes.
1 If the handheld vacuum cleaner is attached to the stick unit, switch off the handheld vacuum cleaner before you remove it from the stick unit.
Note: If you remove the handheld vacuum cleaner when the appliance is switched on at normal speed, the handheld vacuum cleaner operates at reduced power. To make sure the handheld vacuum cleaner operates at full power, switch it off and back on again.
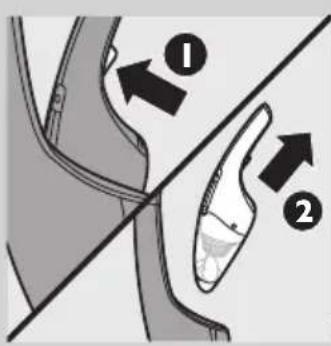
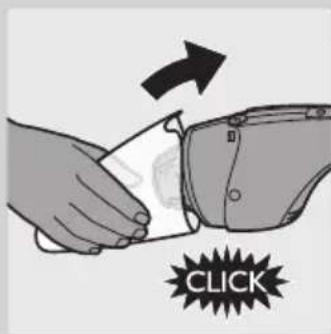
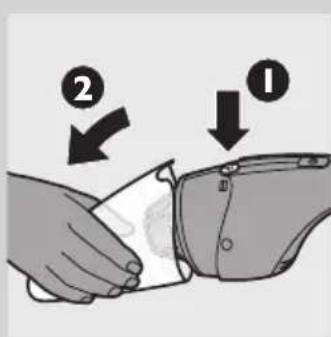
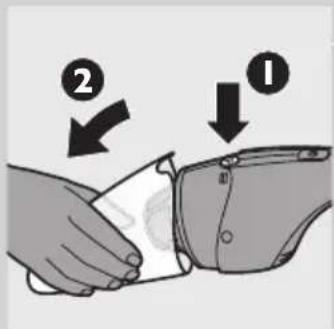
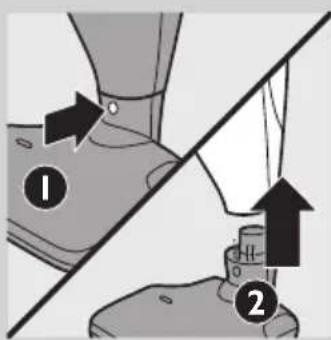
2 Press the handheld vacuum cleaner release button (1) and remove the handheld vacuum cleaner from the stick unit (2).
3 Press the on/off button to switch on the appliance.
4 After use, press the on/off button again to switch off the appliance. Make sure you switch off the handheld vacuum cleaner before you put it back into the stick unit
Note: If you put the handheld vacuum cleaner back into the stick unit when it is still switched on, the roller brush does not work and the cleaning performance is not optimal. To make the roller brush operate, switch off the appliance and switch it back on again.
Accessories
The appliance comes with the following accessories:
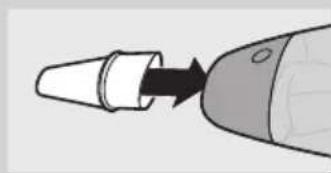
- a crevice tool to vacuum corners or narrow gaps.
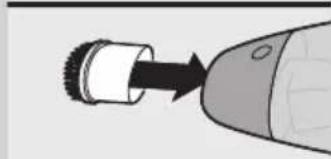
- a brush tool to clean delicate surfaces.
1 Take the accessory you want to use from the storage compartment of the charging base.
2 Attach the accessory to the small nozzle.

Cleaning
Always remove the adapter from the wall socket before you clean the charging base.
1 Clean the outside of the handheld vacuum cleaner, the outside of the stick unit and the outside of the charging base with a damp cloth.
2 For information on how to empty and clean the dust compartment and how to clean the filter unit, follow the instructions in sections 'Emptying and cleaning the dust compartment' and 'Cleaning the filter unit' below.
Emptying and cleaning the dust compartment
Make sure you empty and clean the dust compartment regularly.
Quick emptying
You can empty the dust compartment quickly in the following way:
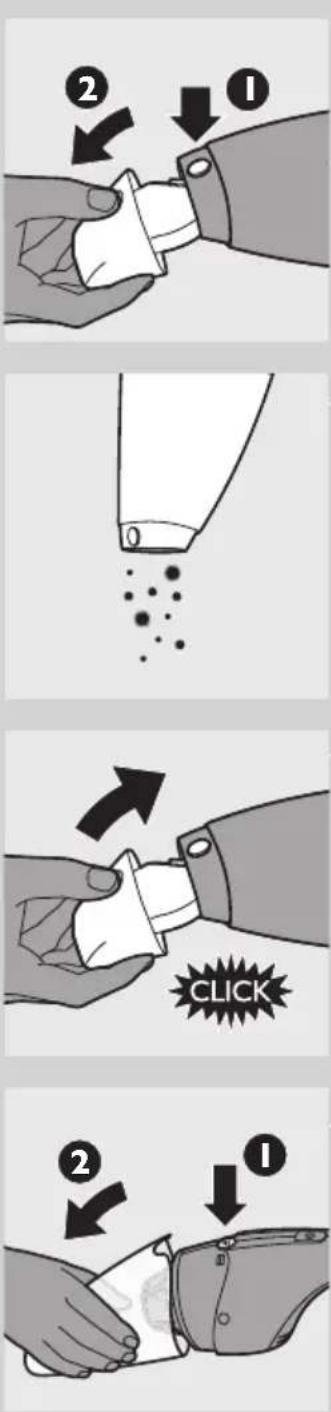
1 Press the nozzle release button (1) and take the detachable nozzle off the appliance (2).
2 Shake the contents of the dust compartment into a dustbin.
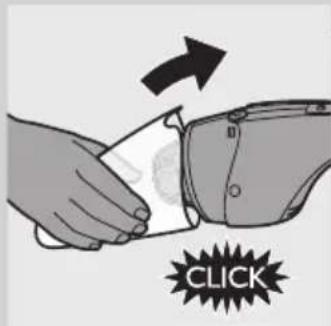
3 First attach the bottom of the dust compartment and then push the top of the dust compartment towards the appliance until it locks into place ('click').
Thorough cleaning
You can empty and clean the dust compartment thoroughly in the following way:
1 Hold the appliance over a dustbin, press the dust compartment release button (1) and remove the dust compartment (2).
ENGLISH12
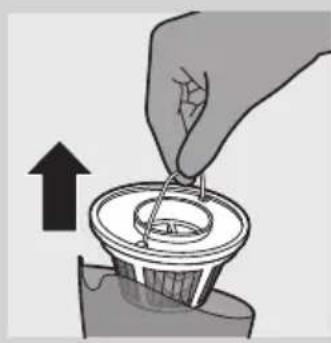
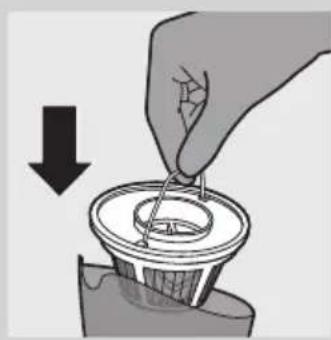
2 Remove the filter unit from the dust compartment.
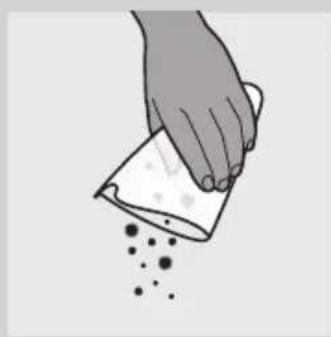
3 Shake the dust compartment with your free hand to empty the contents into a dustbin.
4 If necessary, clean the dust compartment with a damp cloth.
5 If necessary, clean the filter unit. See section 'Cleaning the filter unit' below.
6 Put the filter unit back into the dust compartment.
7 To reattach the dust compartment, align the slot on the dust compartment with the projection on the appliance. First attach the bottom of the dust compartment (1) and then push the top of the dust compartment towards the appliance (2) until it locks into place ('click').
Cleaning the filter unit
Make sure you clean the filter unit regularly.
Quick cleaning
You can clean the filter unit quickly in the following way:
1 Hold the appliance over a dustbin, press the dust compartment release button (1) and remove the dust compartment (2).
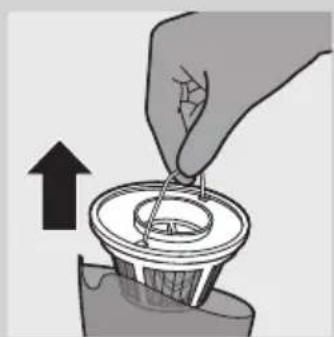
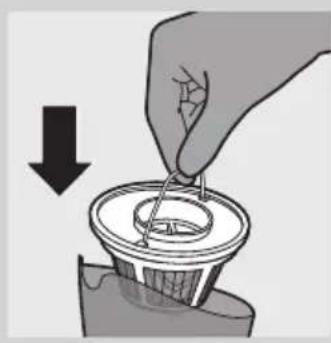
2 Turn the rattle inside the filter holder a few times.
The rattle loosens the dust from the inner filter.
3 To reattach the dust compartment, align the slot on the dust compartment with the projection on the appliance. First attach the bottom of the dust compartment (1) and then push the top of the dust compartment towards the appliance (2) until it locks into place ('click').
Thorough cleaning
You can clean the filter unit thoroughly in the following way:
1 Hold the appliance over a dustbin, press the dust compartment release button (1) and remove the dust compartment (2).
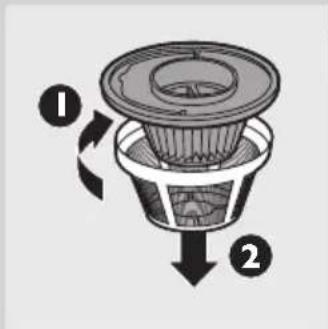
2 Remove the filter unit from the dust compartment.
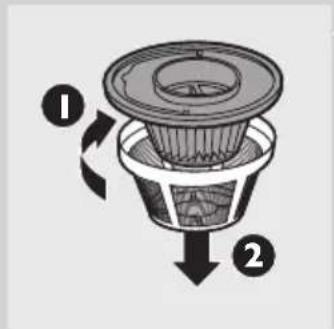
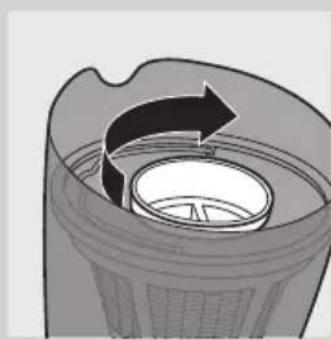
3 Turn the outer filter clockwise (1) and remove it from the filter holder (2).
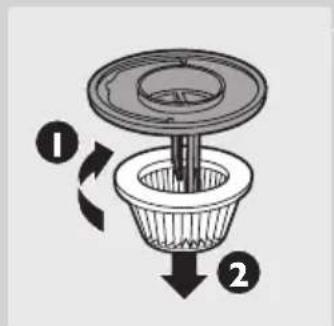
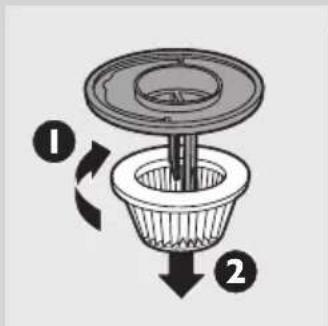
4 Turn the inner filter clockwise (1) and remove it from the filter holder (2).
Clean the inner filter and the outer filter with a brush or with a normal vacuum cleaner if they are very dirty.
Note: If necessary you can clean the inner filter and the outer filter in cold or lukewarm water. Dry the inner and outer filter thoroughly before you use the filter unit again.
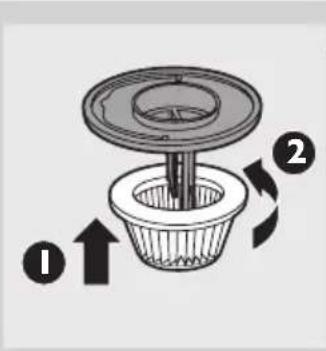
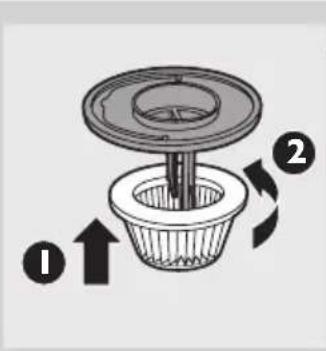
6 Place the inner filter back onto the filter holder (1) and turn it anticlockwise to attach it (2).

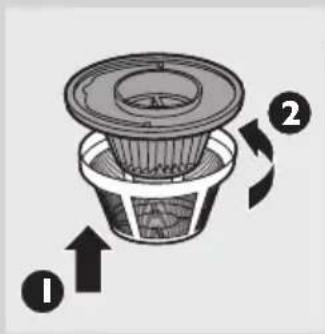
7 Place the outer filter back onto the filter holder (1) and turn it anticlockwise to attach it (2).
8 Put the filter unit back into the dust compartment. Note: Make sure you insert the filter unit in the correct way.
9 To reattach the dust compartment, align the slot on the dust compartment with the projection on the appliance. First attach the bottom of the dust compartment (1) and then push the top of the dust compartment towards the appliance (2) until it locks into place ('click').
Cleaning the floor nozzle joint
The joint of the floor nozzle may get blocked by large dirt particles. Follow the steps below to clean the joint.
Switch off the appliance.
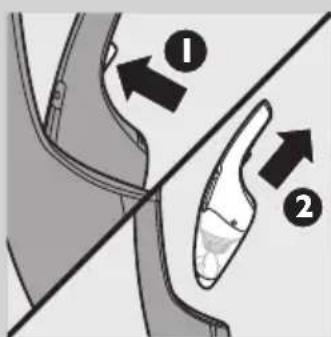
Press the floor nozzle release button (1) to detach the stick from the floor nozzle (2).
3 Remove the large dirt particles from the joint.
4 Place the stick back onto the floor nozzle ('click').
Cleaning the roller brush
When the 'brush blocked' light starts to flash red, the roller brush is blocked. If this happens, follow the steps below to clean the roller brush.
Switch off the appliance.
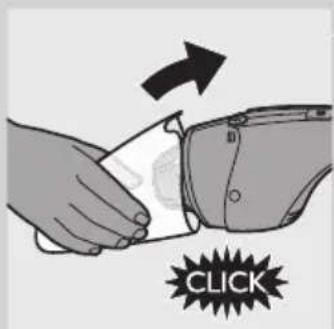
Tip: If the handheld vacuum cleaner is attached to the stick unit, press the handheld vacuum cleaner release button (1) and remove the handheld vacuum cleaner from the stick unit (2).
2 Turn the floor nozzle upside down.
3 Rotate the roller brush until the cutting groove faces you.

Use a pair of scissors to cut the hairs, threads etc. that have collected around the roller brush.
5 Remove fluff, hairs and other dirt from the roller brush.
Note: You can also remove the roller brush for easier cleaning.
Removing the roller brush
1 Switch off the appliance.
2 Turn the floor nozzle upside down and open the retainer.
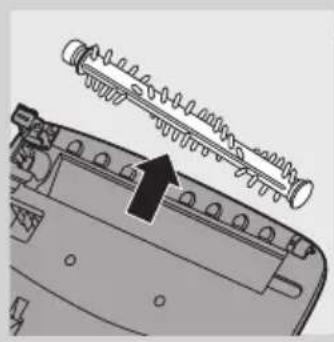
3 Lift the roller brush out of the floor nozzle.
4 Remove fluff, hairs and other dirt from the roller brush and the groove.
Reinserting the roller brush
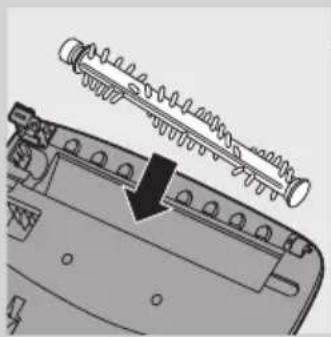
1 First insert the end of the roller brush furthest from the retainer into the nozzle, then insert the end of the roller brush closest to the retainer into the nozzle.

2 Close the retainer ('click').
Note: If the roller brush is not properly inserted, you cannot close the retainer.
Storage

1 Put the accessories in the storage compartment of the charging base.
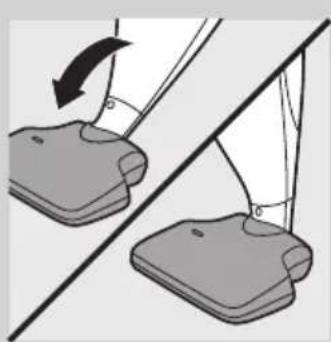
2 Push the stick towards the floor nozzle into the parking position.

3 You can store the appliance (handheld vacuum cleaner placed in the stick unit) on the charging base.
Replacement
We advise you to replace the inner filter and the outer filter after a prolonged period of use or if you can no longer clean them properly.
Replacing the inner and outer filter
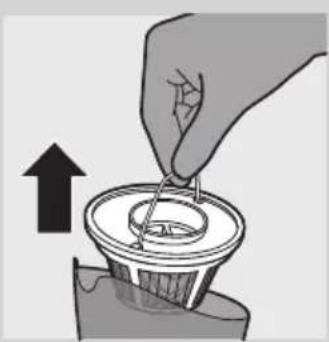
1 Remove the filter unit from the dust compartment.
2 Turn the outer filter clockwise (1) and remove it from the filter holder (2).
3 Turn the inner filter clockwise (1) and remove it from the filter holder (2).
4 Place a new inner filter on the filter holder (1) and turn it anticlockwise to attach it (2).
5 Place a new outer filter on the filter holder (1) and turn it anticlockwise to attach it (2).
6 Put the filter unit back into the dust compartment. Note: Make sure you insert the filter unit in the correct way.
Accessories
New inner filters are available under type number 4322 004 93471. Contact your Philips dealer.
Environment
- Do not throw away the appliance with the normal household waste at the end of its life, but hand it in at an official collection point for recycling. By doing this, you help to preserve the environment.
- The built-in rechargeable batteries contain substances that may pollute the environment. Remove the batteries when you discard the appliance. Do not throw away the batteries with the normal household waste, but hand them in at an official collection point. You can also take the appliance to a Philips service centre. The staff of this centre will remove the batteries for you and will dispose of them in an environmentally safe way.
Removing the rechargeable batteries
NiMH batteries may explode when exposed to high temperatures or fire.
Only remove the rechargeable batteries if they are completely empty. You can remove the rechargeable batteries in the following way.
1 Let the vacuum cleaner run until it stops.
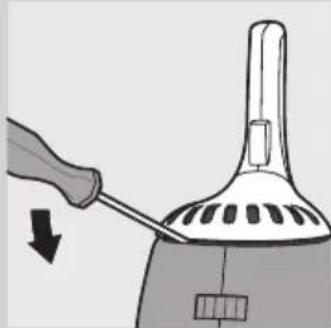
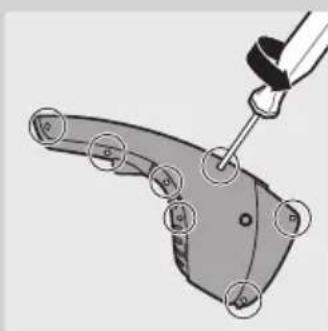
2 Remove the panel with the exhaust air openings from the vacuum cleaner with a screwdriver.
3 Undo the screws on the side of the vacuum cleaner.
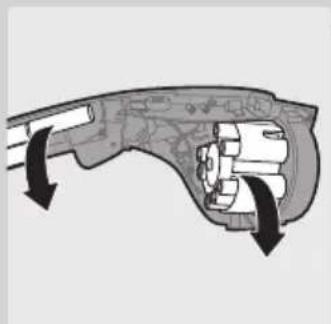
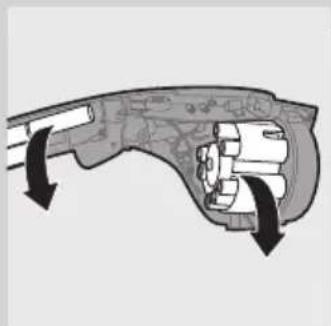
4 Press the dust compartment release button and separate the two housing parts.
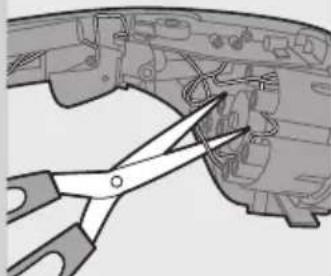
Cut the wires connected to the rechargeable batteries one by one.
6 Remove the rechargeable batteries.
Guarantee and service
| If you need service or information or if you have a problem, please visit the Philips website at www.philips.com or contact the Philips Consumer Care Centre in your country (you find its phone number in the worldwide guarantee leaflet). If there is no Consumer Care Centre in your country, go to your local Philips dealer. | |
| Troubleshooting | |
| This chapter summarises the most common problems you could encounter with your vacuum cleaner. Please read the different sections for more details. If you are unable to solve the problem, please contact the Philips Consumer Care Centre in your country. | |
| Problem Solution | |
| The appliance does not work. | The batteries may be low. Recharge the batteries. |
| You may not have placed the appliance on the charging base properly. Place the appliance on the charging base properly. The charging light goes on to indicate that the appliance is charging. | |
| You may not have put the adapter in the wall socket properly. Put the adapter in the wall socket properly. | |
| You have put the appliance on the charging base with the handheld vacuum cleaner switched on. In this case the appliance switches off automatically after two seconds. | |
| If you are using the stick unit, the contact points on the stick unit and/or on the handheld vacuum cleaner may be dirty or may not make proper contact. Wipe them clean with a dry cloth and then place the handheld vacuum cleaner in the stick unit. Move the handheld vacuum cleaner slightly to the left and right a few times until you hear a click. | |
| Take the appliance to your dealer or a service centre authorised by Philips for examination. | |
| The charging light does not go on. | Make sure that the adapter is inserted in the wall socket properly and that the appliance is placed on the charging base properly. |
| The vacuum cleaner does not vacuum properly. | The dust compartment may not be attached to the appliance properly. Attach the dust compartment to the appliance properly. |
| The dust compartment may be full. Empty the dust compartment. | |
| The filter unit may be clogged. Clean the inner filter and the outer filter (see chapter 'Cleaning'). | |
| If you are using the stick unit, the contact points on the stick unit and/or on the handheld vacuum cleaner may be dirty or may not make proper contact. Wipe them clean with a dry cloth and make sure you hear a click when you place the handheld vacuum cleaner in the stick unit. | |
| The floor nozzle joint may be blocked by large dirt particles. Clean the floor nozzle joint (see chapter 'Cleaning'). | |
| Problem Solution | |
| Dust escapes from the vacuum cleaner. | The dust compartment may be full. Empty the dust compartment. |
| The dust compartment may not be attached to the appliance properly. Attach the dust compartment to the appliance properly. | |
| Perhaps the filter unit is not placed in the dust compartment properly. Place the filter unit in the dust compartment properly. | |
| The vacuum cleaner does not work properly when one of the accessories is attached to the small nozzle. | The dust compartment may be full. Empty the dust compartment. |
| The accessory may be clogged. Remove the obstruction from the accessory. | |
| The filter unit may be clogged. Clean the inner filter and the outer filter (see chapter 'Cleaning'). | |
| The 'brush blocked' light flashes red. | The roller brush is blocked. Clean the roller brush (see chapter 'Cleaning'). |
| If you use the stick unit on soft, deep-pile carpet, the 'brush blocked' light may also start to flash red, even though the roller brush is not blocked. In this case, the suction power does not decrease and you can continue to use the stick unit. | |
| The appliance produces a lot of noise. | There are solid parts inside the dust compartment. Empty the dust compartment and clean the filter unit (see chapter 'Cleaning'). |
| The floor nozzle joint may be clogged. Clean the floor nozzle joint (see chapter 'Cleaning'). | |
| The appliance does not pick up dirt effectively. | The roller brush is clogged. Clean the roller brush (see chapter 'Cleaning'). |
Introduktion
2 Fermez la fixation (clic).
6 Retire as baterias recarregaveis.
Garantia e assistencia
- General description (Fig. 1)
- Important
- Danger
- Warning
- Caution
- Electromagnetic fields (EMF)
- Before first use
- ENGLISH8
- Preparing for use
- Charging the appliance
- Saving energy
- Using the appliance
- Using the stick unit
- Using the handheld vacuum cleaner
- Accessories
- Cleaning
- Emptying and cleaning the dust compartment
- Quick emptying
- Thorough cleaning
- ENGLISH12
- Cleaning the filter unit
- Quick cleaning
- Cleaning the floor nozzle joint
- Cleaning the roller brush
- Removing the roller brush
- Reinserting the roller brush
- Storage
- Replacement
- Replacing the inner and outer filter
- Environment
- Removing the rechargeable batteries
- Guarantee and service
- Introduktion
- Garantia e assistencia
Brand : PHILIPS
Model : SHE9503
Category : Headphones