
SHK3020 - Headphones PHILIPS - Free user manual and instructions
Find the device manual for free SHK3020 PHILIPS in PDF.
| Product type | Stick vacuum cleaner (cordless) |
| Brand | Philips |
| Model | SHK3020 |
| Power supply | Rechargeable NiCd/NiMH battery via mains adapter |
| Charging time | 16 to 18 hours |
| Running time | Approximately 10-15 minutes (not specified, estimate based on manual) |
| Dust compartment capacity | Approximately 0.5 L (not specified) |
| Weight | Approximately 3 kg (not specified) |
| Tube length | Adjustable (telescopic), approx. 60-100 cm |
| Rotating brush | Yes, motorized, removable for cleaning |
| Brush type | Cylindrical brush with belt |
| Storage options | Horizontal (on base), vertical (against wall), wall-mounted (hung by groove) |
| Special features | Adjustable telescopic tube, pivoting lower handle |
| Cleaning and maintenance | Damp cloth, emptying compartment, cleaning brush and wheels |
| Safety | Do not vacuum liquids, do not use on wet surfaces, keep out of reach of children |
| Available spare parts | Rotating brush, belt, front cover, wheels, dust compartment, adapter, charging base |
| Warranty and service | Philips authorized service center, website www.philips.com |
| General information | Keep the manual, adapter voltage corresponds to mains, adapter contains a transformer |
Frequently Asked Questions - SHK3020 PHILIPS
User questions about SHK3020 PHILIPS
0 question about this device. Answer the ones you know or ask your own.
Ask a new question about this device
Download the instructions for your Headphones in PDF format for free! Find your manual SHK3020 - PHILIPS and take your electronic device back in hand. On this page are published all the documents necessary for the use of your device. SHK3020 by PHILIPS.
USER MANUAL SHK3020 PHILIPS
natural_image
Black and white photo of a Philips cleaning brush (no text or symbols visible on the device body)PHILIPS
natural_image
Diagram of a folded paper or scroll with grid patterns and directional arrows, no text or symbols present.1
natural_image
Mechanical assembly diagram showing a component with an arrow and a vol, no text or symbols presentENGLISH 6
DANSK 15
DEUTSCH 24
ΕΛΛΗΝΙΚΑ 34
ESPAÑOL 45
SUOMI 55
FRANÇAIS 64
ITALIANO 74
NEDERLANDS 84
NORSK 94
PORTUGUÊS 103
SVENSKA 112
TÜRKÇE 121
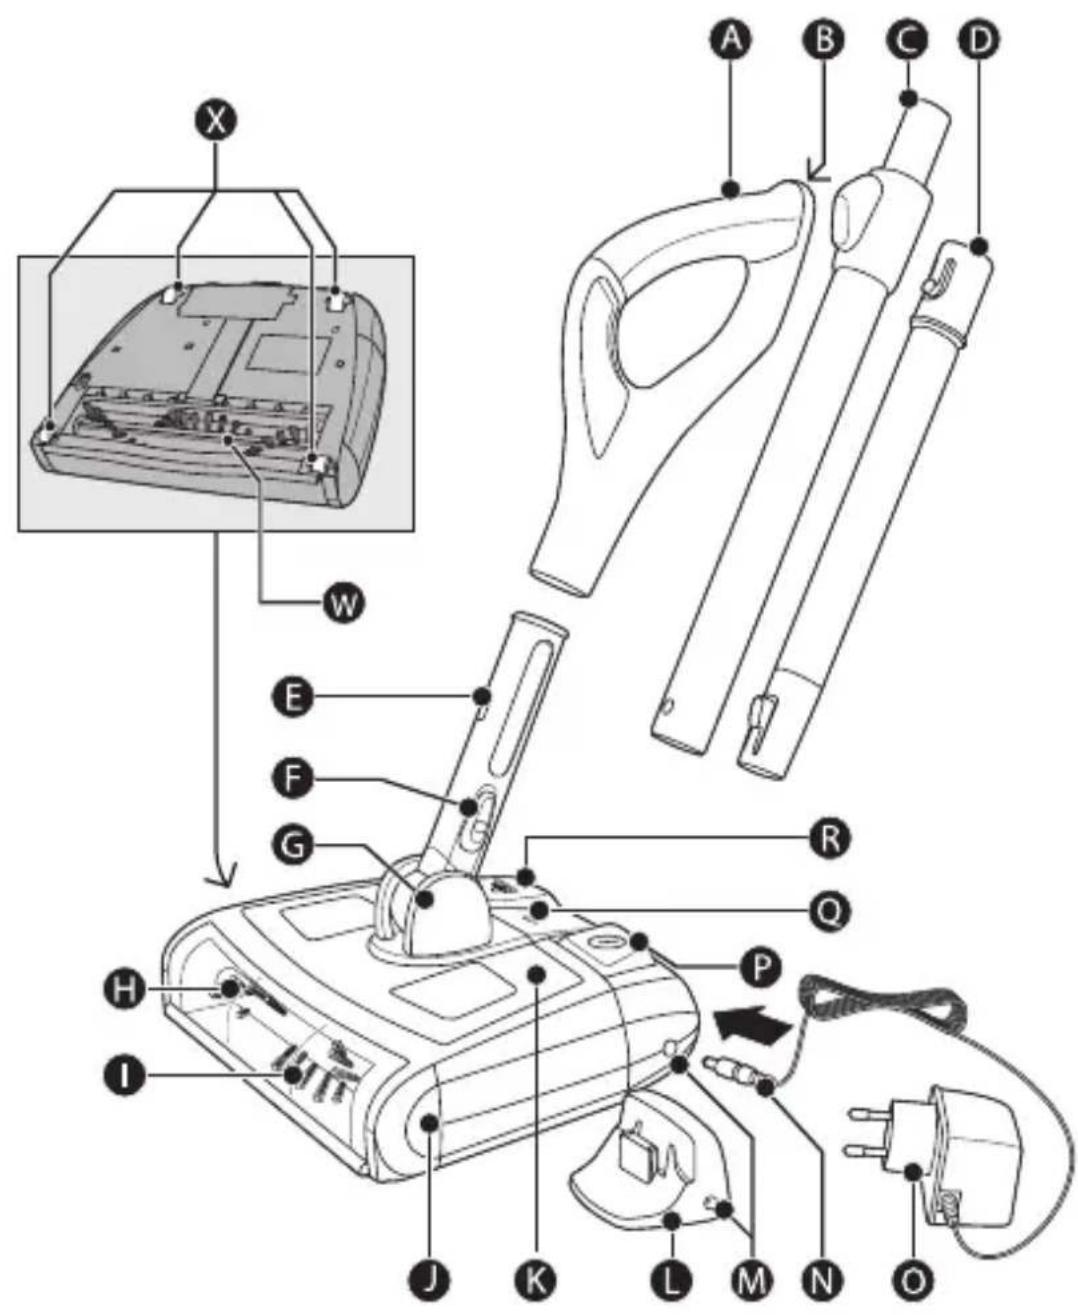
General description (Fig. 1)
A Upper handle
B Hanging slot
© Telescopic part of stick with length adjustment slide
D Bottom part of stick
E Lower handle
1 Transparent front cover
J Sweeper base
K Dirt tray
L Charging base
M Socket for small plug
N Small plug
Adapter
P On/off button
Charging light
R Dirt tray release button
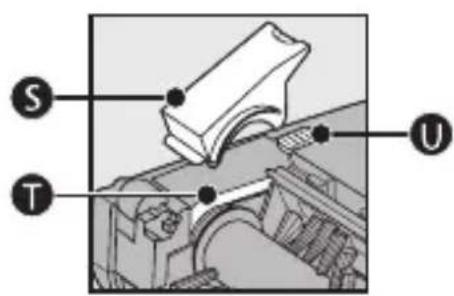
S Retainer
T Belt
Retainer release slide
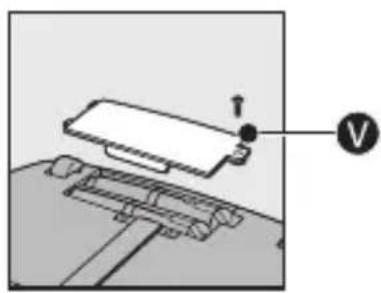
V Lid of battery pack compartment
Cutting groove
X Wheels
Important
Read this user manual carefully before you use the appliance and save it for future reference.
- Check if the voltage indicated on the adapter corresponds to the local mains voltage before you connect the appliance.
-
Do not use the appliance if the adapter, the cord, the charging base or the appliance itself is damaged. If the adapter or charging base is damaged, always have it replaced with one of the original type in order to avoid a hazard.
-
Keep the appliance out of the reach of children.
- Never use the appliance and the charging base outdoors. Never use the appliance on wet surfaces.
- Never pick up water, liquids or wet food substances. Never pick up flammable substances and do not pick up ashes until they are cold.
- Never immerse the appliance and the charging base in water or any other liquid, nor rinse them under the tap.
- Do not use the appliance without the dirt tray or roller brush.
- Always switch off the appliance after use, before you charge it and before you connect or disconnect parts.
- Unplug the appliance before you clean or maintain it.
- Only charge the appliance with the adapter and/or charging base supplied.
- The adapter contains a transformer. Do not cut off the adapter to replace it with another plug, as this causes a hazardous situation.
- The adapter feels warm during charging. This is normal.
- Always return the appliance to a service centre authorised by Philips for examination or repair.
- Do not stick your hands/fingers into the rotating roller brush to avoid injuries.
Electromagnetic fields (EMF)
This Philips appliance complies with all standards regarding electromagnetic fields (EMF). If handled properly and according to the instructions in this user manual, the appliance is safe to use based on scientific evidence available today.
Before first use
1 Rotate the lower handle 180^ to the left or right (1). Then pull the handle upwards until it is in upright position (2). (Fig. 2)
2 Charge the appliance for at least 16-18 hours before you use it for the first time (see chapter ‘Charging’).
Preparing for use
1 Connect the upper handle to the telescopic part of the stick.
ENGLISH8
2 Connect the telescopic part of the stick to the bottom part of the stick ('click'). (Fig. 3)
3 Connect the stick to the lower handle of the sweeper base ('click') (Fig. 4).
- To remove the stick, press the button on the lower handle (1) and pull the stick upwards (2). (Fig. 5)
Charging
You need to charge the appliance when the charging light flashes. Charge the appliance for 16-18 hours.
Only charge the appliance when the battery pack is low to avoid overcharging.
1 Switch off the appliance before you charge it.
2 Place the stick in upright position ('click') (Fig. 6).
3 Insert the small plug into the socket on the sweeper base (Fig. 7).
You can also use the charging base: insert the small plug into the charging base and put the appliance on the charging base.
4 Insert the adapter into a wall socket.
The charging light is on continuously during charging and after the battery is fully charged. The charging light goes out when you disconnect the appliance from the mains.
Using the appliance
1 To unlock the stick from its storage position, put your foot on top of the sweeper base to prevent it from tilting. Then pull the handle towards you ('click'). (Fig. 8)
Do not to put your foot on the on/off button or the dirt tray release button.
2 Press the on/off button to switch on the appliance. (Fig. 9)
To switch off the appliance, press the on/off button again.
3 To adjust the length of the stick during use, press the slide on the telescopic part (1). At the same time, move the top or bottom part of the stick upwards or downwards (2) (Fig. 10).
4 To use the sweeper as a handheld appliance, remove the stick and hold the sweeper by the lower handle. (Fig. 11)
For better grip, push the handle towards the front of the appliance until it is at a 45-degree angle to the base ('click').
Cleaning
Never clean the appliance or any of its parts in water or in the dishwasher.
Clean the appliance and its parts with a damp cloth.
1 Always pull the small plug out of the appliance or remove the appliance from the charging base before you clean the appliance.
2 Clean the appliance with a damp cloth.
Emptying the dirt tray
1 Always empty the dirt tray after use.
2 Place the stick in upright position ('click') (Fig. 6).
3 Press the length adjustment slide (1) and slide the telescopic part of the stick to the lowest position (2) (Fig. 12).
4 Press on the dirt tray release button (1) and lift the dirt tray out of the sweeper base (2) (Fig. 13).
5 Hold the dirt tray over a dustbin. Then press the slide on the lower handle downwards to open the dirt tray door and empty the dirt tray (Fig. 14).
6 Place the dirt tray back into the sweeper base and push it down into position. (Fig. 15)
The dirt tray door closes automatically when you put the dirt tray back into the sweeper base ('click').
Cleaning the roller brush
1 Switch off the appliance before you clean the roller brush.
2 Remove the transparent front cover from the sweeper base. Grab the bottom edge of the cover with both hands, pull it outwards (1) and upwards (2) firmly until it is released from the slots (Fig. 16).
3 Rotate the roller brush until the cutting groove faces you. Use a pair of scissors to cut the hairs, threads etc that have collected around the roller brush (Fig. 17).
4 Remove fluff, hairs and other dirt from the roller brush.
Removing the roller brush
1 To remove the stick, press the button on the lower handle (1) and pull the stick upwards (2) (Fig. 5).
2 Turn the sweeper base upside down, push the release slide in the direction of the arrow (1) and remove the retainer (2) (Fig. 18).
3 Slip the belt off the end of the roller brush (1) and lift the brush out of the base (2) (Fig. 19).
4 Remove fluff, hairs and other dirt from the roller brush and the groove.
Reinserting the roller brush
1 Slip the belt over the ribbed end of the roller brush. Insert the other end of the roller brush into the slot opposite the belt (Fig. 20).
2 Insert the end of the roller brush with the belt into the other slot. (Fig. 21)
Do not force the roller brush into the slot. Rotate the roller brush so that the ridge on the side with the belt points upwards.
3 Put the retainer back into the slot (1) and slide the release slide to the original position ('click') (2) (Fig. 22)
If the roller brush is not properly inserted, you cannot move the release slide to locked position.
4 Reattach the transparent front cover to the sweeper base. Grab the cover with both hands, push it downwards (1) and inwards (2) firmly until it snaps back into the slots ('click'). (Fig. 23)
Cleaning the wheels
1 Switch off the appliance.
2 Remove the transparent front cover from the sweeper base. Grab the bottom edge of the cover with both hands, pull it outwards (1) and upwards (2) firmly until it is released from the slots (Fig. 16).
3 Place the sweeper base upside down.
4 Insert a slotted screwdriver underneath one of the wheels. Rotate the screwdriver to loosen the wheel and axle from the groove (Fig. 24).
Do not place your hand on the wheel.
To prevent the wheel and axle from hitting you or others, do not put your face close to the sweeper base and do not point it at other persons.
5 Repeat steps 4 and 5 to remove the other wheels.
6 Remove fluff, hairs and other dirt from the wheels, axles and grooves.
7 Insert the axles into the wheels.
8 Put the wheels and the axles back into the grooves and press them firmly into position ('click'). (Fig. 25)
9 Reattach the transparent front cover into the sweeper base. Grab the cover with both hands, push it downwards (1) and inwards (2) firmly until it snaps back into the slots ('click'). (Fig. 23)
Storage
You can store the appliance in three ways:
1 To store the appliance in horizontal position, place it on the charging base (Fig. 26).
Do not connect the charging base to the mains if the battery of the appliance does not need to be recharged.
2 To store the appliance in vertical position, tilt the side of the sweeper base with the roller brush towards the stick ('click'). Then park the appliance against a wall (Fig. 27).
3 To hang the appliance from the wall, tilt the side of the sweeper base with the roller brush towards the stick ('click'). Then hang the appliance on a nail by the hanging slot in the back of the upper handle (Fig. 28).
Environment
- Do not throw away the appliance with the normal household waste at the end of its life, but hand it in at an official collection point for recycling. By doing this, you help to preserve the environment (Fig. 29).
- If you intend not to use the appliance for a longer period of time, remove the adapter from the wall socket to save energy.
Battery disposal
NiCd/NiMH batteries can be harmful to the environment and may explode if exposed to high temperatures or fire.
1 Remove the battery pack when you discard the appliance.
- Do not throw away the battery pack with the normal household waste, but hand it in at an official collection point.
- You can also take the appliance to a Philips service centre. The staff of this centre will remove the battery pack for you and will dispose of it in an environmentally safe way.
Make sure the appliance is switched off and disconnected from the mains before you remove the battery pack.
Only remove the battery pack if it is completely empty.
2 Let the appliance run until it stops.
3 Undo the screws and remove the lid of the battery compartment (Fig. 30).
4 Disconnect the terminals one by one and remove the battery pack (Fig. 31).
Guarantee & service
If you need information or if you have a problem, please visit the Philips website at www.philips.com or contact the Philips Customer Care Centre in your country (you find its phone number in the worldwide guarantee leaflet). If there is no Customer Care Centre in your country, go to your local Philips dealer or contact the Service Department of Philips Domestic Appliances and Personal Care BV.
Troubleshooting
Problem Possible cause Solution
| The appliance does not work. | You have not charged the appliance. | Charge the appliance (see chapter ‘Charging’). |
| You have not inserted the adapter properly into the wall socket. | Insert the adapter properly into the wall socket. |
| Problem | Possible cause Solution | |
| You have not inserted the small plug properly into the appliance or into the charging base. | Insert the small plug properly into the appliance or into the charging base. | |
| The appliance does not pick up dirt effectively. | The dirt tray is full. | Empty the dirt tray (see chapter ‘Cleaning’). |
| The roller brush is clogged. | Clean the roller brush (see chapter ‘Cleaning’). | |
| The appliance has a short operating time. | The battery pack has developed a memory effect. | Discharge the battery pack completely by letting the appliance run until it stops. Then recharge the battery pack for 16-19 hours. Repeat this discharge-charge cycle for 3-5 times. |
| Dirt escapes from the appliance. | The dirt tray is full. | Empty the dirt tray (see chapter ‘Cleaning’). |
| The dirt tray door is not locked properly. | Make sure the dirt tray door is locked before you place the dirt tray back into the appliance (see chapter ‘Cleaning’). |
- General description (Fig. 1)
- Important
- Electromagnetic fields (EMF)
- Before first use
- Preparing for use
- ENGLISH8
- Charging
- Using the appliance
- Cleaning
- Emptying the dirt tray
- Cleaning the roller brush
- Removing the roller brush
- Reinserting the roller brush
- Cleaning the wheels
- Storage
- Environment
- Battery disposal
- Guarantee & service
- Troubleshooting
Brand : PHILIPS
Model : SHK3020
Category : Headphones