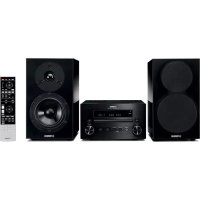
MCR-640 - Audio System YAMAHA - Free user manual and instructions
Find the device manual for free MCR-640 YAMAHA in PDF.

| Product Type | Micro-component audio system with tuner-amplifier and CD player |
| Brand | YAMAHA |
| Model | MCR-640 |
| Output Power | 65 W + 65 W (6 Ω, 1 kHz, 10% THD) |
| FM Receiver | 30 presets, range 87.50-108.00 MHz |
| CD Player | Audio CD, CD-R/RW, MP3/WMA (discs and USB devices) |
| USB Devices | Mass storage (FAT16/32), MP3/WMA files |
| iPod Dock | Built-in on the tuner-amplifier, charging and playback |
| Auxiliary Inputs | 1 x RCA audio (PLAYER) |
| Outputs | Speakers (6 Ω min), headphones (3.5 mm jack) |
| Dimensions (tuner-amplifier) | 215 x 110 x 348 mm (W x H x D) |
| Weight (tuner-amplifier) | 5.7 kg |
| Dimensions (CD player) | 215 x 108 x 318 mm |
| Weight (CD player) | 3.2 kg |
| Power Supply | 230 V~, 50 Hz |
| Power Consumption | 115 W (tuner-amplifier), 16 W (CD player) |
| Standby Consumption | Less than 0.3 W |
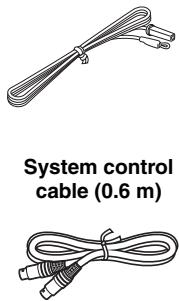
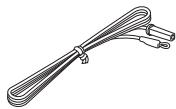
| Supplied Accessories | Remote control, RCA audio cable, control cable, FM antenna, USB cover, iPod cover |
| Special Functions | Pure Direct mode, auto standby, on/off timers, adjustable display brightness, equalizer (bass/treble/balance) |
| Safety | Short-circuit protection, overheat shutdown |
Frequently Asked Questions - MCR-640 YAMAHA
User questions about MCR-640 YAMAHA
0 question about this device. Answer the ones you know or ask your own.
Ask a new question about this device
Download the instructions for your Audio System in PDF format for free! Find your manual MCR-640 - YAMAHA and take your electronic device back in hand. On this page are published all the documents necessary for the use of your device. MCR-640 by YAMAHA.
USER MANUAL MCR-640 YAMAHA
micro component system
PIANOCRAFT
| CAUTION Use of controls or adjustments or performance of procedures other than those specified herein may result in hazardous radiation exposure. |
| AVENTISSEMENT L'utilisation de commandes et l'emploi de régles ou de méthodes autres que ceux décrits ci-dessous, peuvent entraîner une exposition à un rayonnement dangereux. |
| VORSICHT Die Verwendung von Bedienelementen oder die Einstellung bzw. die Ausführung von anderen als in dieser Anleitung beschreiben den Vorgängen kann zu Gefährung durch gefährliche Strahlung führen. |
| OBSERVERA Använding av reglage aller justeringar aller utförende av胆固醇 på annat sätt an sä som beskrivs här kan resultera i farlig strålning. |
| ATTENZIONE L'uso di controlli, regolazioni, operazioni o procedure non specificati in quello manuale posso sono risultare in esposizione a radiazioni pericolose. |
| PRECAUCión El uso de los controles, los ajustes o los procedimientos que no se specifiescan enste manual=Puede causar una exposión peligrosa a la radiación. |
| LET OP Gebruik van bedieningsorganen, installingen of procedures anders dan beschreiben in dit document kan leiden tot blootstelling aan gevaarlijke stralen. |
| ΠΡΕΝΟCTEPEXΕHENIE Испοлbethоваиме opταнов управлийся ил пюизveideни我没有 tradeькиме ил видаиони инструкими, можетот отравпься на видаиони опасно радиаими. |
VAROITUS
1 To assure the finest performance, please read this manual carefully. Keep it in a safe place for future reference.
2 Install this sound system in a well ventilated, cool, dry, clean place and away from direct sunlight, heat sources, vibration, dust, moisture and cold. For proper ventilation, allow the following minimum clearances.
Top: 30~cm (R-840 Only)
Rear: 10cm
Sides: 10cm
3 Locate this unit away from other electrical appliances, motors, or transformers to avoid humming sounds.
4 Do not expose this unit to sudden temperature changes from cold to hot, and do not locate this unit in an environment with high humidity (i.e. a room with a humidifier) to prevent condensation inside this unit, which may cause an electrical shock, fire, damage to this unit, and/or personal injury.
5 Avoid installing this unit where foreign object may fall onto this unit and/or this unit may be exposed to liquid dripping or splashing. On the top of this unit, do not place:
- Other components, as they may cause damage and/or discoloration on the surface of this unit.
- Burning objects (i.e. candles), as they may cause fire, damage to this unit, and/or personal injury.
- Containers with liquid in them, as they may fall and liquid may cause electrical shock to the user and/or damage to this unit.
6 Do not cover this unit with a newspaper, tablecloth, curtain, etc. in order not to obstruct heat radiation. If the temperature inside this unit rises, it may cause fire, damage to this unit, and/or personal injury.
7 Do not plug in this unit to a wall outlet until all connections are complete.
8 Do not operate this unit upside-down. It may overheat, possibly causing damage.
9 Do not use force on switches, knobs and/or cords.
10 When disconnecting the power cable from the wall outlet, grasp the plug; do not pull the cable.
11 Do not clean this unit with chemical solvents; this might damage the finish. Use a clean, dry cloth.
12 Only voltage specified on this unit must be used. Using this unit with a higher voltage than specified is dangerous and may cause fire, damage to this unit, and/or personal injury. Yamaha will not be held responsible for any damage resulting from use of this unit with a voltage other than specified.
13 To prevent damage by lightning, keep the power cable and outdoor antennas disconnected from a wall outlet or this unit during a lightning storm.
14 Do not attempt to modify or fix this unit. Contact qualified Yamaha service personnel when any service is needed. The cabinet should never be opened for any reasons.
15 When not planning to use this unit for long periods of time (i.e. vacation), disconnect the AC power plug from the wall outlet.
16 Be sure to read the "TROUBLESHOOTING" section on common operating errors before concluding that this unit is faulty.
17 Before moving this unit, press to set it to standby mode and disconnect the AC power plug from the wall outlet.
18 Condensation will form when the surrounding temperature changes suddenly. Disconnect the power cable from the outlet, then leave this unit alone.
19 When using this unit for a long time, this unit may become warm. Turn the power off, then leave this unit alone for cooling.
20 Install this unit near the AC outlet and where the AC power plug can be reached easily.
21 The batteries shall not be exposed to excessive heat such as sunshine, fire or the like.
22 Excessive sound pressure from earphones and headphones can cause hearing loss.
This unit is not disconnected from the AC power source as long as it is connected to the wall outlet, even if this unit itself is turned off by . This state is called standby mode. In this state, this unit is designed to consume a very small quantity of power.
WARNING
TO REDUCE THE RISK OF FIRE OR ELECTRIC SHOCK, DO NOT EXPOSE THIS UNIT TO RAIN OR MOISTURE.
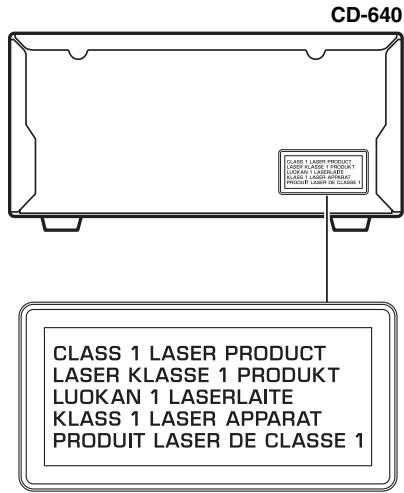
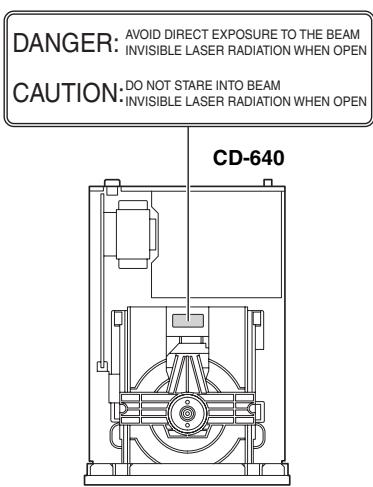
LASER SAFETY
This unit employs a laser. Due to possible eye injury, only a qualified service person should remove the cover or attempt to service this device.
DANGER
This unit emits visible laser radiation when open. Avoid direct eye exposure to beam. When this unit is plugged into the wall outlet, do not place your eyes close to the opening of the disc tray and other openings to look into inside.
The laser component in this product is capable of emitting radiation exceeding the limit for Class 1.
LASER
Type Semiconductor laser GaAs/GaAlAs
Wave length 780 nm
Output Power 10 mW
CONTENTS
INTRODUCTION
FEATURES 2
SUPPLIED ACCESSORIES 2
PLAYABLE DISC AND FILE FORMAT 3
CONTROLS AND FUNCTIONS. 4
Receiver (R-840). 4
CD player (CD-640) 5
Remote control. 6
PREPARATION
PREPARATIONS 8
Connecting speakers/external components/ antennas 8
Connecting power cables. 9
Connecting an iPodTM 10
Connecting USB devices 10
Installing the batteries in the remote control 11
Using the remote control 11
Adjusting the Clock 12
BASIC OPERATIONS
Basic system operations. 13
Changing the brightness of the front panel display 14
Using headphones. 14
DISC AND USB DEVICE OPERATIONS. 15
Playback operations 15
Switching the playback information display 16
Repeating playback (Repeat Play) 16
Repeating a specified section (Repeat A-B) 17
Playing back randomly (Random Play) 17
Customizing playback order (Program Play) 17
TUNER OPERATIONS
FM TUNING. 18
Automatic tuning 18
Manual tuning. 18
Automatic preset tuning. 18
Manual preset tuning 19
Selecting preset stations 19
Displaying the Radio Data System information.....20
Using the TP (traffic program) data service 21
CT (clock time) settings. 21
OTHER OPERATIONS
SETTING THE TIMER 22
Setting the clock timer 22
Setting the sleep timer 23
SETTING THE AUTO-STANDBY MODE.....24
CONTROLLING iPodTM 25
Using iPodTM 25
ADDITIONAL INFORMATION
TROUBLESHOOTING. 26
Receiver (R-840). 26
Remote control 28
CD player (CD-640) 28
NOTES ABOUT HANDLING COMPACT
DISCS. 30
GLOSSARY 30
Audio information 30
Copyright and logo marks 30
SPECIFICATIONS 31
FEATURES
Receiver (R-840)
Minimum RMS output power per channel 65W + 65W (6Ω, 1kHz, 10% THD)
30-station FM preset tuning
- iPod playability (with rechargeable function)
Pure Direct mode
Adjustable Display Brightness
CD player (CD-640)
- Plays Audio CDs, MP3/WMA discs
- CD-R, CD-RW Disc Playability
- Plays MP3/WMA files stored on a USB device
- Linked operation with the receiver such as Pure Direct mode, Adjustable Display Brightness and INPUT mode
About this manual
- In this manual, "R-840" is described as "receiver" and "CD-640" is described as "CD player".
- This manual describes how to operate the system using a remote control except when it is not available. Some of these operations are also available using the front panel buttons.
- indicates a tip for your operation.
- Notes contain important information about safety and operating instructions.
- This manual is printed prior to production. Design and specifications are subject to change in part as a result of improvements, etc. In case of differences between the manual and the product, the product has priority.
SUPPLIED ACCESSORIES
This product includes the following accessories. Before connecting this system, make sure you received all of the following parts.
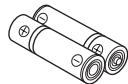
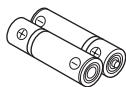
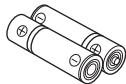
Batteries (x2) (AAA, R03, UM-4)
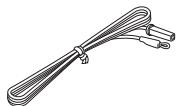
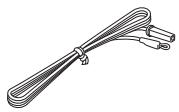
Indoor FM antenna
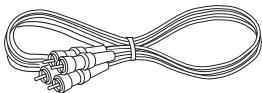
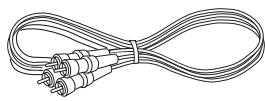
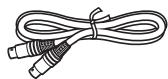
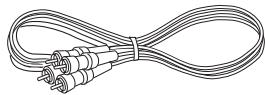
RCA stereo cable (1.0 m)
CAUTION
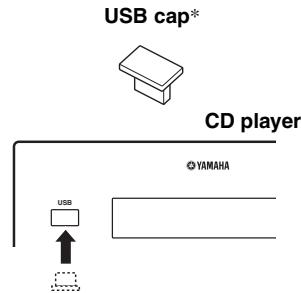
Keep the USB cap out of the reach of children, so that it is not mistakenly swallowed.
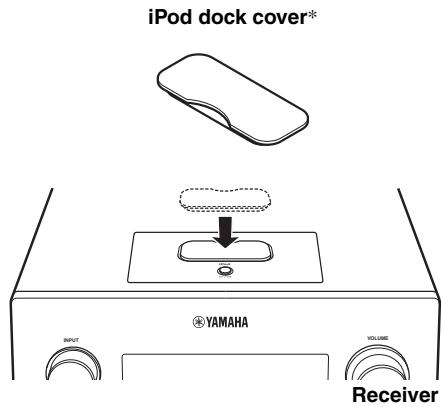
* The USB cap and the iPod dock cover are supplied with this product to cover the USB port and the iPod dock when not in use.
PLAYABLE DISC AND FILE FORMAT
■ Playable MP3 and WMA files (USB device and Data Disc)
MP3
| Format | Bitrate (kbps) | Sampling frequency (kHz) |
| MPEG 1 Audio Layer-3 | 32-320 * | 32/44.1/48 |
| MPEG 2 Audio Layer-3, 2 | 8-160 * | 16/22.05/24 |
| MPEG-2.5 Audio Layer-2 | 8-160 * | 8/11.025/12 |
- Variable bitrate is also supported.
WMA
Version 8
- Version 9 (Standard and variable bitrates are supported. Professional and Lossless are not supported.)
| Profile | Bitrate (kbps) | Sampling frequency (kHz) |
| High Profile | 32-320 * | 32/44.1/48 |
| Mid Profile | 16-32 | 16/22.05 |
- Variable bitrate is also supported.
Notes
- Playback for Data Disc starts in alphanumeric order.
- Playback for USB starts in order by date and time of creation.
Copyright-protected WMA (DRM) files cannot be played back by the CD player. - The disc must be ISO 9660 compatible.
- Elapsed time may not be displayed correctly while playing back variable bitrate contents.
| Data Disc | USB | |
| Maximum total number of file and folder* | 512 | 999 |
| Maximum folder number* | 255 | 255 |
| Maximum file number per folder | 511 | 255 |
- The root is counted as one of the folders.
Playable discs
Use compact discs bearing the marks below.

... Compact discs (digital audio)

CD-R, CD-RW digital audio discs
- CD-R or CD-RW discs bearing one of the following phrases.
FOR CONSUMER
FOR CONSUMER USE
FOR MUSIC USE ONLY - Finalized CD-R or CD-RW discs.

Note
The CD player may not be able to play some CD-R/CD-RW discs or discs on which recording was not made correctly.

To play back an 8-cm (3-inch) CD
Place it in the inner recessed area of the disc tray. Do not put a normal (12-cm) CD on top of an 8-cm (3-inch) CD.
To prevent a malfunction of this unit:

- Do not use any nonstandard shaped disc (heart, etc.) available on the market because it might damage the unit.
- Do not use a disc with tape, stickers, or paste on it. If you use such a disc, the disc may get stuck in the unit, or damage to the unit may result.
Note: Do not use any lens cleaners as they may be a cause of malfunction.
CONTROLS AND FUNCTIONS
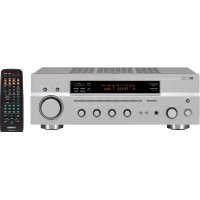
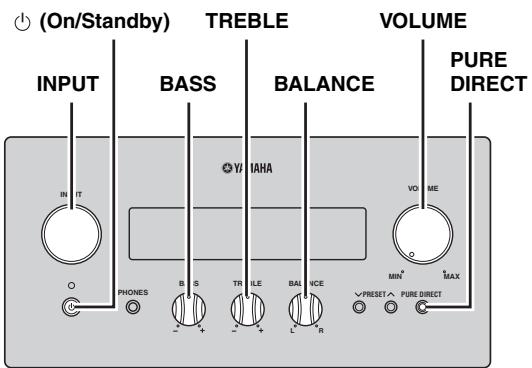
Receiver (R-840)
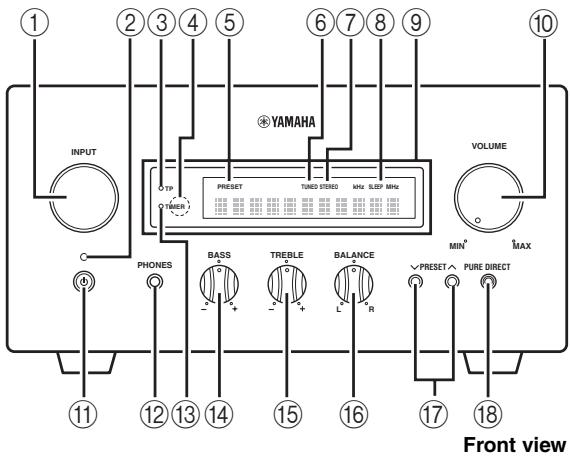
Front panel
① INPUT
Selects an input source.
② On/Standby indicator
Lights up in green when the receiver is turned on. Lights up in amber when the receiver is in standby mode.
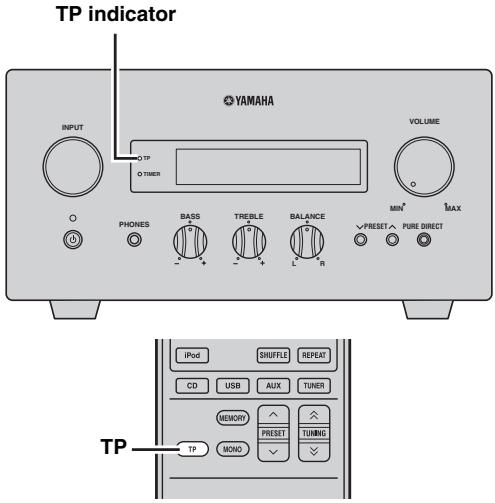
③ TP indicator
Lights up when the receiver is receiving a Radio Data System station which contains the TP (Traffic Program) data service (p.21).
④ Remote control sensor
Receives signals from the remote control.
(5) PRESET indicator
Lights up when you select preset radio stations (p.19).
(6) TUNED indicator
Lights up when the receiver is tuned into a station.
⑦ STEREO indicator
Lights up when the receiver is receiving a strong signal from an FM stereo broadcast.
⑧ SLEEP indicator
Lights up when the sleep timer is on (p.23).
⑨ Front panel display
Shows the various information such as the tuning frequency.
VOLUME
Adjusts the volume level.
(1) (On/Standby)
Turns the receiver on or sets it to standby mode.
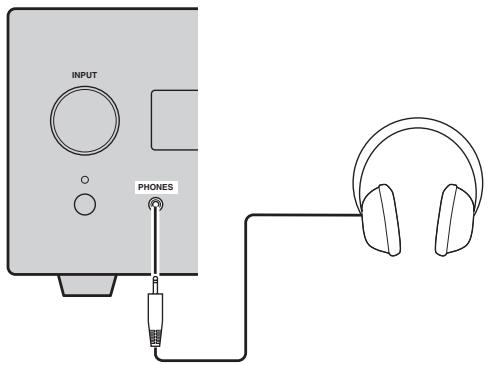
⑫ PHONES jack
Outputs audio signals for private listening with headphones.
⑬ TIMER indicator
Lights up when the timer is set (p.22).
14 BASS
Adjusts the low frequency response (p.13).
15 TREBLE
Adjusts the high frequency response (p.13).
16 BALANCE
Adjusts the audio output balance of the left to right speakers to compensate for imbalances caused by speaker locations or listening room conditions.
17 PRESETV/
Selects a preset station. The input source is changed to FM. Operable even when the receiver is in standby mode (p.19).
18 PURE DIRECT
Turns on or off Pure Direct mode (p.13).
When Pure Direct mode is on, the indicator lights up in blue.
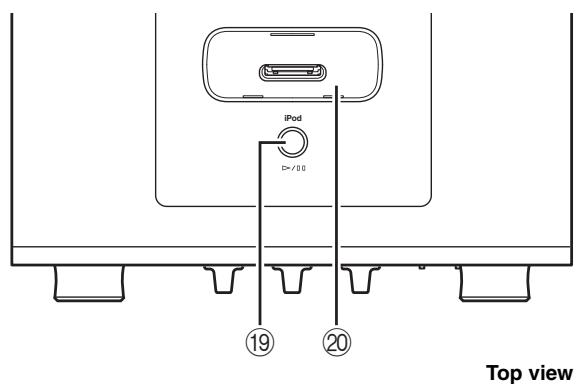
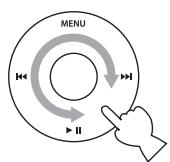
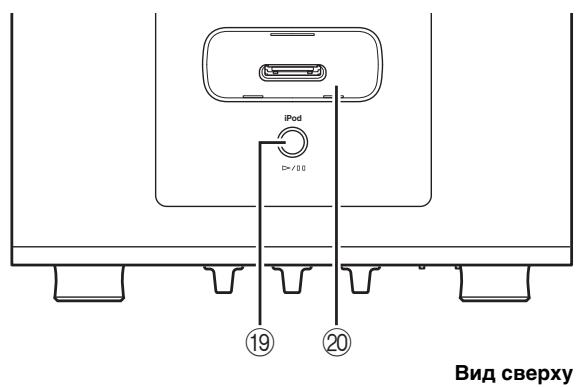
19>//
Starts and pauses the playback of iPod. The input source is changed to iPod. Operable even when the receiver is in standby mode.
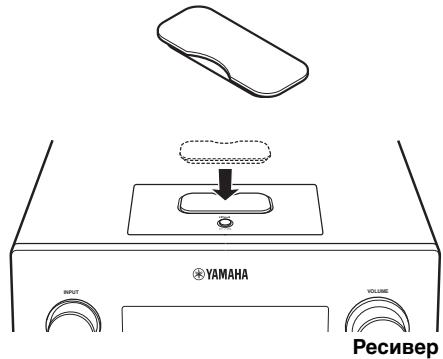
iPod dock
Connect your iPod (p.10).
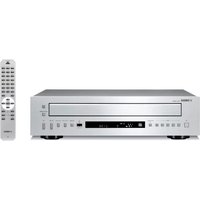
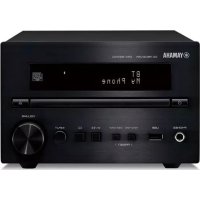
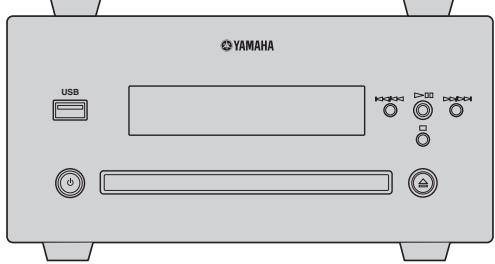
CD player (CD-640)
Front panel
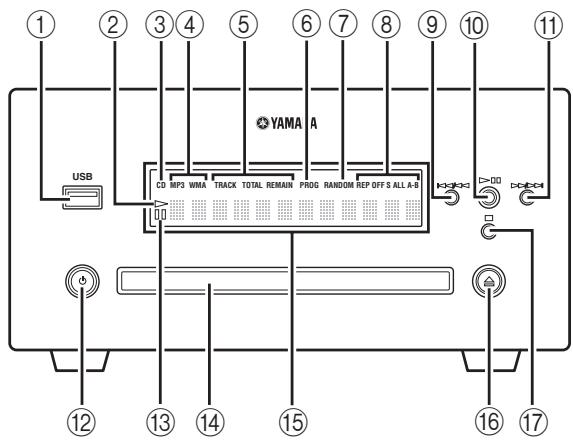
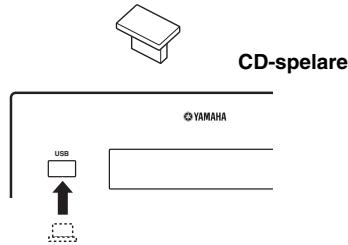
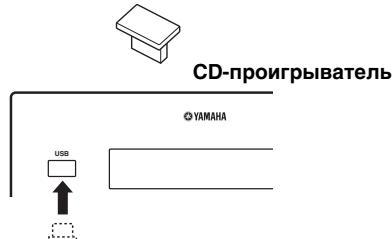
① USB port
Connect your USB device.
(2) (play) indicator
Appears during playback.
③ CD indicator
Appears when an audio CD is loaded.
④ Music data type indicator
Indicates the type of music data stored on the disc in the disc tray or on the USB device connected to the USB port.
⑤ Time display mode indicators
Indicate the kind of time information displayed on the front panel display (p.16).
⑥ PROG indicator
Lights up when Program play mode is selected.
⑦ RANDOM indicator
Lights up when Random play mode is selected.
⑧ REP OFF S ALL A-B indicator
Lights up when Repeat play mode is selected.
9
Returns to the beginning of the current track. Press and hold to fast reverse. Press twice to skip to the previous track (p.15).
10
Starts or pauses playback (p.15).
When this button is pressed during standby mode, the receiver automatically turns on and the input source changes to either CD or USB, whichever was last selected.
⑪ △>//△
Skipping to the next track. Press and hold to fast forward (p.15).
⑫ (On/Standby)
Turns on the CD player or sets it to standby mode. When this button is pressed during standby mode, the receiver automatically turns on and the input source changes to either CD or USB, whichever was selected last.
(pause) indicator
Lights up while the CD player is paused.
14 Disc tray
Holds a disc to be played back.
15 Front panel display
Shows the current status of the CD player.
16
Opens and closes the disc tray. When this button is pressed during standby mode, the receiver automatically turns on and the input source changes to CD.
⑦
Stops playback (p.15).
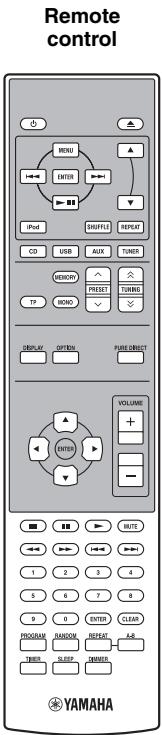
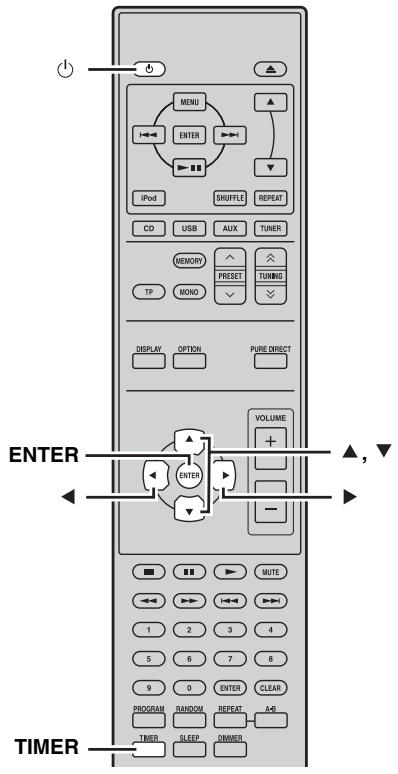
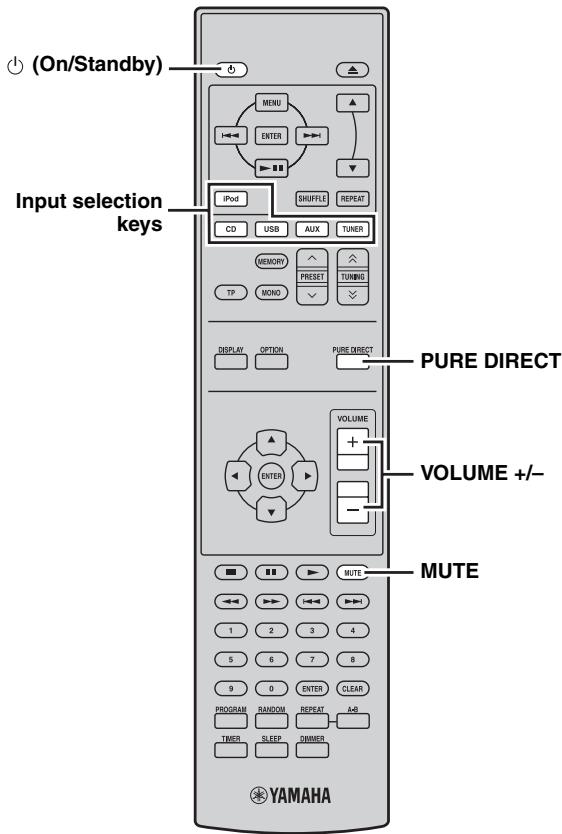
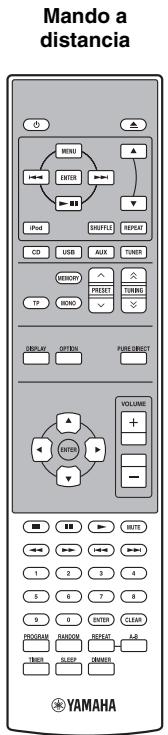
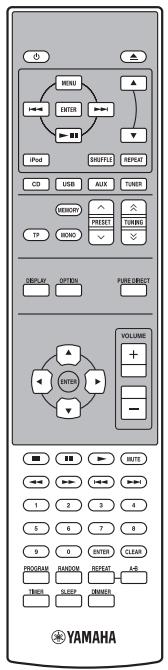
Remote control
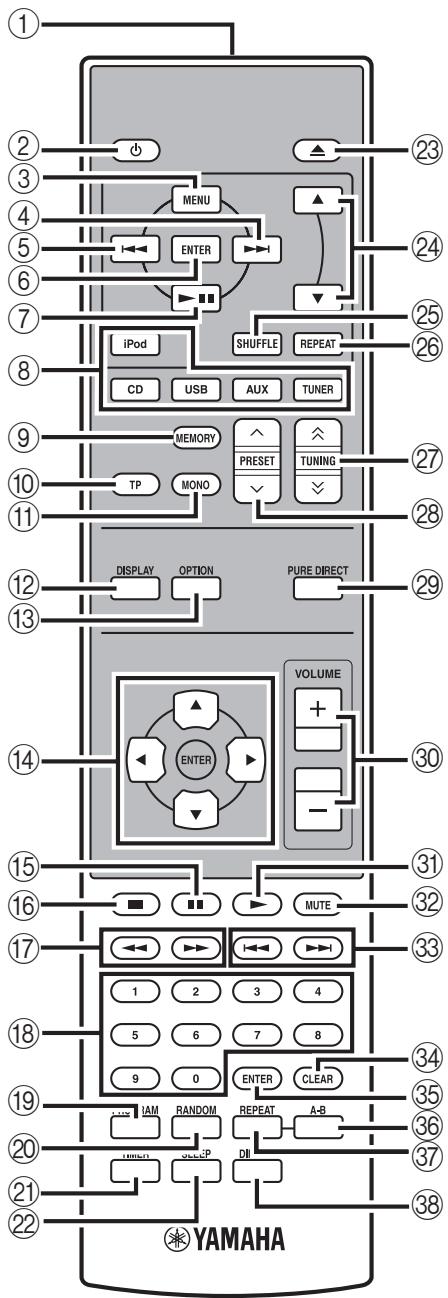
This remote control can operate the system components (including tuner functions) and an iPod stationed in the iPod dock on the top of the receiver.
To operate the CD player, tuner functions, or an iPod using the remote control, you need to set the receiver to corresponding input mode (13) (8) Input selection keys).
To operate your iPod
Press the corresponding iPod operation key on the remote control.
The iPod operation keys are indicated with iPod in the section below. See page 25 for more information on the operation of your iPod.
① Infrared signal transmitter
Sends signals to the system you want to control.
② (On/Standby)
Turns the system on or sets it to standby mode.
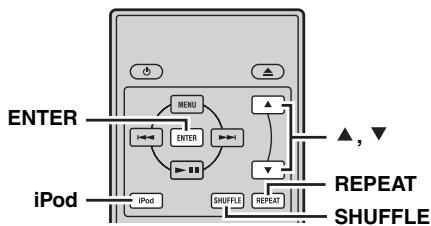
③ MENU iPod
Returns to the upper level in the iPod menu.
④ iPod
Skipping to the next song. Press and hold to fast forward.
⑤ iPod
Skipping to the beginning of the current track. Press twice to skip back to the previous track. Press and hold to fast reverse.
⑥ ENTER iPod
Press ENTER to enter the selected group. (Pressing ENTER starts playback when a song is selected.)
⑦ /I Pod
Starts or Pauses Playback.
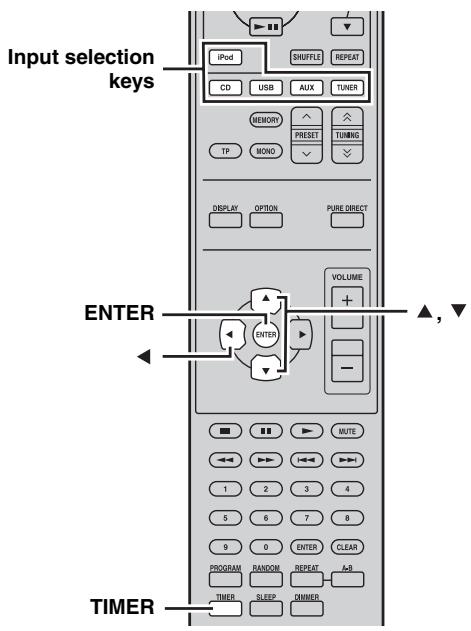
⑧ Input selection keys
Select the input source on the receiver.
When selecting an input source, press the corresponding input selection key (or turn INPUT on the front panel).
The name of the corresponding input source appears on the front panel display of the receiver.
When CD or USB is selected as an input source, the CD player turns on automatically and when other input source is selected, the CD player sets to standby mode.
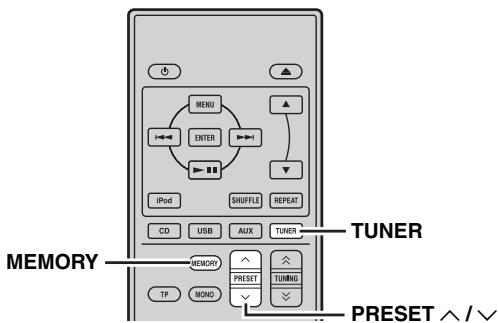
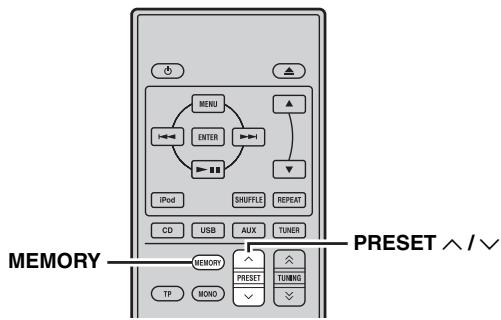
⑨ MEMORY
Stores a preset station in the memory (p.19). Starts
Automatic preset tuning (p.18).
10 TP
Enters TP (Traffic Program) data service receiving mode (p.21).
11 MONO
Sets FM broadcasting receiving mode to monaural mode.
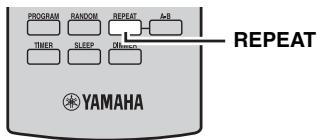
12 DISPLAY
Switches the information shown on the front panel display of the receiver and CD player (p.16, p.20).
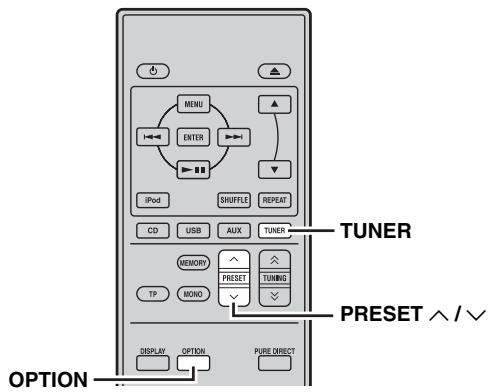
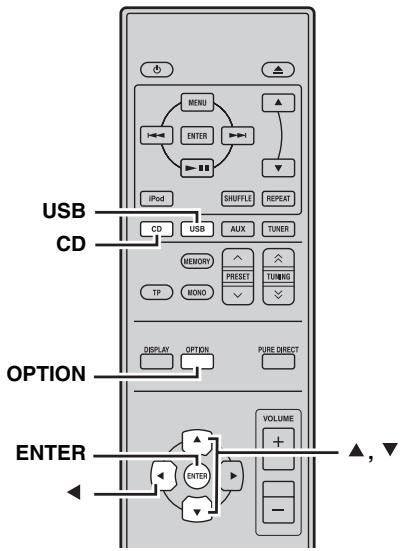
(13) OPTION
Enters option menu mode.
See pages 19, 21 and 24 for option menu items.
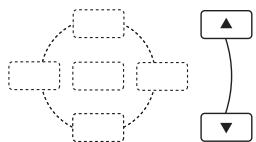
14 ▲,▼,▲,▶,ENTER
For selecting and confirming an item.
15
Pauses playback (p.15).
16
Stops playback (p.15).
⑦
Rewind and fast-forward music.
18 Numeric keys
Input numbers.
19 PROGRAM
Sets the CD player to the track program mode (p.17).
20 RANDOM
Turns on/off the Random Play (p.17).
② TIMER
Shows the current time on the front panel display of the receiver.
And sets the clock (p.12) or the timer (p.22).
SLEEP
Sets the sleep timer on the system (p.23).
23
Opens and closes the disc tray.
② ▲,IPod
Press or to switch an item in the selected group (p.25).
25 SHUFFLE iPod
Selects mode of Shuffle Play (p.25).
② REPEAT iPod
Selects mode of Repeat Play (p.25).
TUNING 公 / 公
Press TUNING / for manual tuning and press and hold TUNING / for automatic tuning (p.18).
28 PRESET /
Selects a preset station (p.19).
29 PURE DIRECT
Turns on or off Pure Direct mode (p.13).
30 VOLUME + / -
Adjusts the overall volume level on the receiver.
(3)
Starts playback (p.15).
32 MUTE
Turn off the volume (p.14).
33 1<,>
Skipping to the beginning of the current track or next track.
34 CLEAR
Clears an entry.
35 ENTER
Confirms an entry.
36 A-B
Sets start and end points of a section and plays back the specified section repeatedly (p.17).
37 REPEAT
Selects the Repeat Play mode (p.16).
DIMMER
Changes the brightness of the front panel display (p.14).
PREPARATIONS
Connecting speakers/external components/antennas
Make sure you read the following procedure and note carefully before connecting the system. The remote control and linked operation of the system only work when the receiver and the CD player are connected via the system control cable. For information on the speakers (NS-BP300), refer to the owner's manual supplied with it.
Connecting the system
Connect the AUDIO IN (A PLAYER L/R) jacks of the receiver to the AUDIO OUT (A L/R) jacks of the CD player using the supplied audio RCA stereo cable.
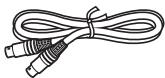
Connect the SYSTEM CONNECTOR (BTO:PLAYER) jack of the receiver to the SYSTEM CONNECTOR (BTO:RECEIVER) jack of the CD player using the supplied system control cable.
Connect the speaker terminals (L) of the receiver to the speaker terminals of the left speaker and the speaker terminals (R) of the receiver to the speaker terminals of the right speaker using the speaker cables supplied with the speaker set (NS-BP300).
4 Connect the supplied FM antenna to the ANTENNA jack.
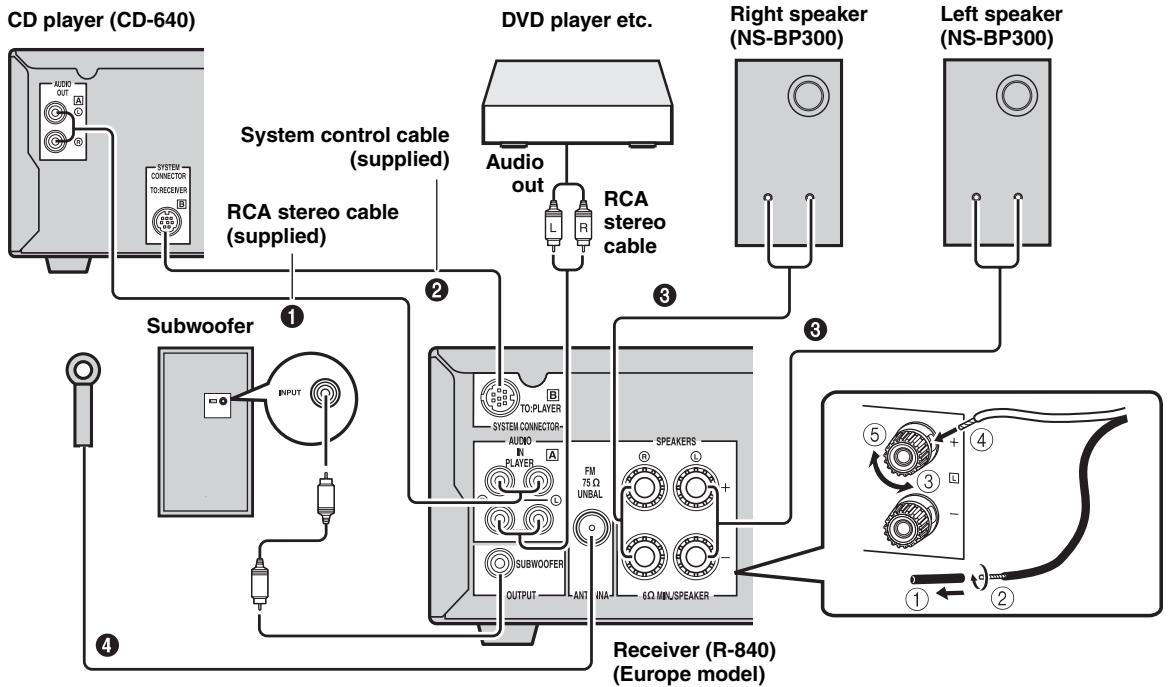
CAUTION
- Do not connect this unit or other components to the main power until all connections between components are complete.
- Do not let the bare speaker wires touch each other or any metal part of the receiver. This could damage the receiver and/or the speakers.
- All connections must be correct: L (left) to L, R (right) to R, “+” to “+” and “-” to “-”. If the connections are faulty, no sound will be heard from the speakers, and if the polarity of the speaker connections is incorrect, the sound will be unnatural and lack bass. Also, refer to the owner's manual for each of your components.
Notes
- The system control connection is used to transmit the remote control signals from the receiver to the CD player.
- When connecting speakers other than NS-BP300, use speakers having more than 6 impedance.
- If there is a problem of weak radio wave reception in your area or you want to improve radio reception, we recommend that you use commercially available outdoor antennas. For details, consult the nearest authorized Yamaha dealer or service center.
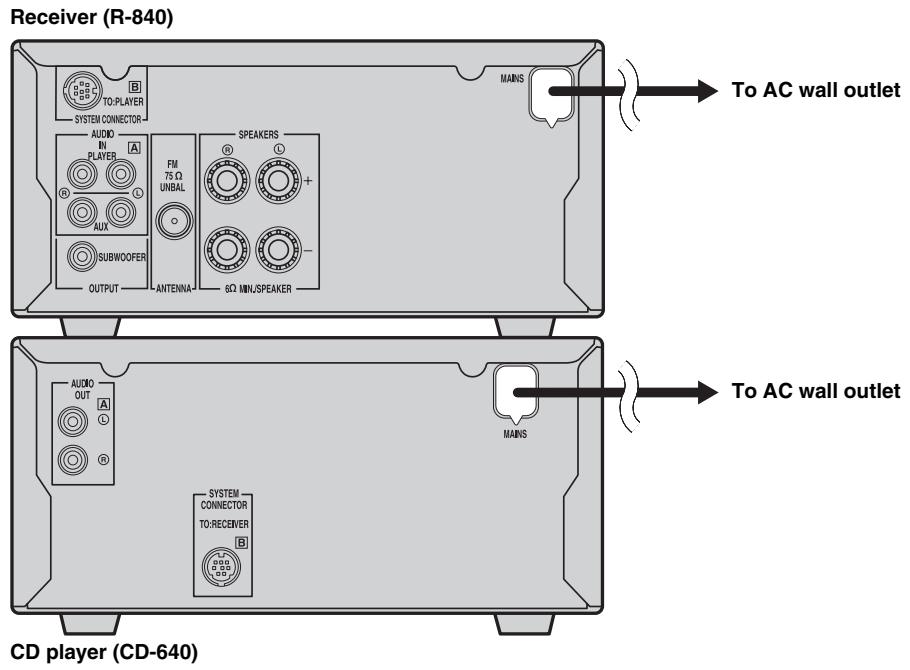
Connecting power cables
After you made all connections, connect the power cables of this system and other components to AC wall outlets.
Connecting an iPodTM
The receiver is equipped with the iPod dock on the top panel where you can station your iPod and control playback of your iPod using the supplied remote control. Use this receiver with iPod dock adapter (supplied with your iPod or commercially available) appropriate for your iPod. If you use this receiver without using an appropriate iPod dock adapter, loose connection may result.

When the receiver is turned on or in standby mode, connect the iPod during the playback. The receiver automatically starts playback of iPod (for the fifth or later generation of iPod, iPod touch, iPod Classic, or iPod nano).
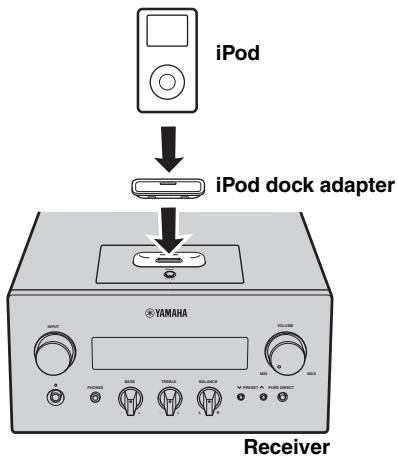
Notes
- Only iPod (Click and Wheel), iPod nano, iPod Classic, iPod mini and iPod touch are supported.
- Do not connect any iPod accessories (such as headphones, a wired remote control, or an FM transmitter) to your iPod when it is stationed in the iPod dock.
- Unless your iPod is firmly stationed in the iPod dock, audio signals may not be output properly.
- Once the connection between your iPod and the receiver is complete and the receiver is set to iPod mode (p.6), "CONNECTED" appears on the front panel display. If the connection between your iPod and the receiver fails, a status message appears on the front panel display. For a complete list of connection status message, see the iPod section in "TROUBLESHOOTING" (p.26).
- When your iPod is stationed in the iPod dock of the receiver, your iPod can be charged automatically even when the receiver is in standby mode.
- You can disconnect the iPod during the playback.
Connecting USB devices
This CD player has a USB port and can access MP3 or WMA files saved on your USB device. Connect your USB device to the USB port on the front panel of the CD player.
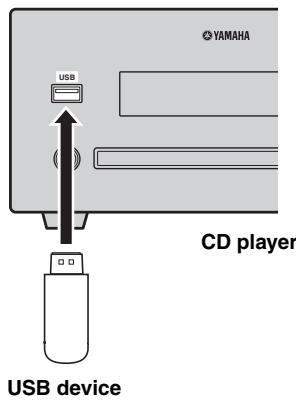
Supported USB devices
This CD player supports USB mass storage class devices (e.g., flash memories, card readers or portable audio players) using FAT16 or FAT32 format.
Notes
- Some devices may not work properly even if they meet the requirements.
- Do not connect devices other than the USB mass storage class devices.
- When you insert two or more memory cards at the same time using card readers, etc., only one of the memory cards is recognized.
- Yamaha and suppliers accept no liability for the loss of data saved on the USB devices connected to the receiver. As a precaution, it is recommended that the files are made backup copies.
- Playability of and power supply to all kind of USB devices are not guaranteed.
- When your USB device is connected to the USB port, your USB device can be charged automatically even when the CD player is in standby mode. Some USB devices cannot be charged in standby mode.
- You can disconnect the USB device during the playback.
Installing the batteries in the remote control
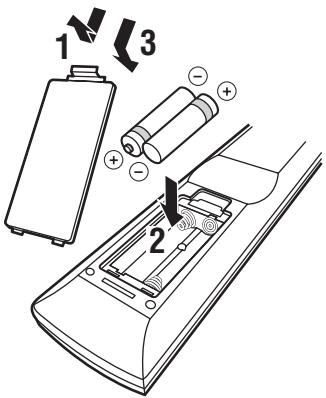
Notes on batteries
- Change both batteries when the operation range of the remote control decreases.
- Use AAA, R03, UM-4 batteries.
- Make sure that the polarities are correct. See the illustration inside the battery compartment.
- Remove the batteries if the remote control is not to be used for an extended period of time.
- Do not use old batteries together with new ones.
- Do not use different types of batteries (such as alkaline and manganese batteries) together. Read the packaging carefully as these different types of batteries may have the same shape and color.
- If the batteries have leaked, dispose of them immediately. Avoid touching the leaked material or letting it come into contact with clothing, etc. Clean the battery compartment thoroughly before installing new batteries.
- Do not throw away batteries with general house waste; dispose of them correctly in accordance with your local regulations.
Using the remote control
The remote control transmits a directional infrared beam. Be sure to aim the remote control directly at the remote control sensor on the front panel of the receiver during operation.
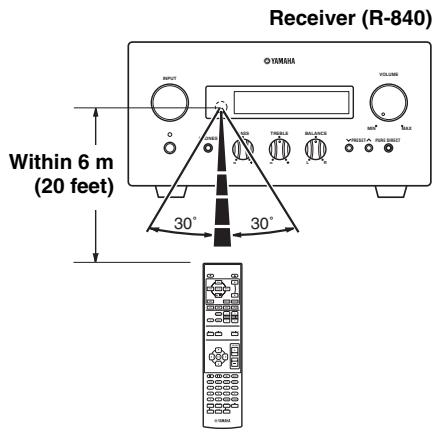
Notes
- The area between the remote control and the receiver must be clear of large obstacles.
- Do not spill water or other liquids on the remote control.
- Do not drop the remote control.
-
Do not leave or store the remote control in the following types of conditions:
-
high humidity, such as near a bath
-
high temperature, such as near a heater or a stove
extremely low temperatures
-dustyplaces. -
Do not expose the remote control sensor to strong lighting, in particular, an inverter type fluorescent lamp; otherwise, the remote control may not work properly. If necessary, position the system away from direct lighting.
Adjusting the Clock
Before starting playback operation, follow the procedure below to adjust the clock setting of the receiver.
Notes
- Use the remote control to set the clock. You cannot set the clock with the buttons on the receiver.
The receiver supports 24-hour clock display. - If you do not touch any key for 90 seconds, the receiver returns to normal mode.
1 Press to turn the receiver on.
The front panel display lights up.
2 Press TIMER to show the current time.
If the clock is not set, "SET TIME" flashes on the display.
Press ENTER to proceed to step 3.
3 Press / to select "TIME", and press ENTER.
The receiver enters clock setting mode. The hour digits start flashing.

4 Set the hour using / , and press .
The minute digits start flashing.

5 Set the minutes using / , and press ENTER.
The hour and minute digits start flashing.
To change the hour or minutes again, press or , do steps 4 and 5, and proceed to step 6.

6 Press ENTER.
The clock is set.
The hour and minute segments stop flashing and remain on. The receiver returns to the normal mode.


You can return to the previous screen by pressing .
SYSTEM OPERATIONS
Follow the procedure below to select an input source and adjust the sound settings on the system.
Basic system operations
1 Press (On/Standby) to turn on the receiver. Depending on the input mode of the receiver, the CD player also turns on by the system control connection (p.8). The front panel display lights up.
This system has an auto-standby function (p.24) which automatically sets it to standby mode if not operated for 30 minutes while the receiver is set to CD or USB input mode.
2 Press one of the input selection keys (or rotate INPUT on the front panel) to select the desired input source.
3 Start playback on the selected source component or select a radio station. For information on the disc/USB device playback, see page 15, and for information on tuning, see page 18.
4 Press VOLUME + / - (or turn VOLUME on the front panel) to adjust the volume to the desired output level.
5 Rotate BASS, TREBLE, or BALANCE on the front panel of the receiver to adjust the following settings.
BASS: Adjusts the low frequency response.
TREBLE: Adjusts the high frequency response.
BALANCE: Adjusts the volume level of each left and right speaker channel.
Pure Direct mode
Pure Direct mode bypasses the tone control circuit and turns off the front panel display, allowing you to enjoy pure high-fidelity sound.
Press PURE DIRECT (or PURE DIRECT on the front panel) to turn on Pure Direct mode.
The front panel display automatically turns off. PURE DIRECT on the front panel is backlit in blue.
Notes
- If you carry out operations while Pure Direct mode is turned on, the front panel display lights up briefly to acknowledge the command.
- While the Pure Direct mode is turned on, neither BASS, TREBLE, nor BALANCE is available.
To turn off Pure Direct mode
Press PURE DIRECT again. The PURE DIRE
backlight turns off and the front panel display turns on.
Muting the sound (MUTE)
Press MUTE to reduce the current volume level by approximately 20dB.
"MUTE ON" appears on the front panel display.
Press MUTE again to restore the audio output to the previous volume level.
Changing the brightness of the front panel display
You can dim the front panel display of the receiver. The front panel display of the CD player also dims by the system control connection (p.8). (The default setting is "DIMMER OFF".)
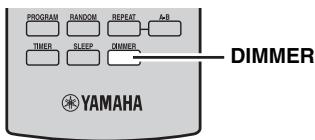
Press DIMMER.
You can choose your desired brightness of the front panel display between normal (bright), mid dim, and dim.
Using headphones
You can connect your headphones to the PHONES jack on the front panel of the receiver.
The sound from the speakers and the subwoofer stops.
DISC AND USB DEVICE OPERATIONS
You can enjoy playing back your audio CDs, and MP3 or WMA files recorded on a disc/USB device. Some operations may be different or restricted depending on the disc/USB device. Before playing back, check the compatibility of your disc/USB device with this system (p.3).
Playback operations
To start disc playback
1 Select CD as an input source (e3 p.13).
2 Press to open the disc tray and load a CD.
3 Press▶.
Playback starts automatically.
For an audio CD, playback starts from the first track, and for MP3 or WMA files, playback starts in alphanumeric order by the filename.
You can also close the disc tray by pressing on the front panel of the CD player.
To start USB device playback
1 Select USB as an input source (p.13).
2 Connect your USB device to the USB port on the CD player.
The total number of files are displayed.
The reading time may exceed 30 seconds depending on the number of files/folders..
3 Press to start playback.
The files are played back in the sequence of the date and time created.
Notes
- Total time does not appear for USB device playback.
- If the USB device is partitioned, only the first partition is displayed.
- Some files may not work properly depending on the USB device specification.
Copyright-protected files cannot be played back. - This system can play back files of 4 GB in size or less.
To stop playback
Press■.
For audio CD, the total track number and total time of the disc are displayed and for MP3/WMA disc or USB device, the total file number is displayed on the front panel.
To pause playback
Press.
To return to normal playback, press ■.
To skip tracks
To return to the start of the current track, press
To skip to the next track, press
To skip to the previous track, quickly press twice.
To fast reverse or fast forward
To fast reverse, press
To fast forward, press
To return to normal playback, press
Only a low sound is heard during fast-reverse or fast-forward.
Switching the playback information display
You can switch the disc playback information shown in the CD player's front panel display. Available information differs depending on the type of the disc/USB device.
Press DISPLAY repeatedly while playing back a disc/USB device.
Each time you press the key, the information display changes as described in "Playback information for audio CDs" and "Playback information for MP3 or WMA files recorded on discs/USB devices".
Notes
- Some information may not be available depending on a disc/USB device.
- Some special characters may not be shown properly.
■Playback information for audio CDs
The following information can be displayed during playback of an audio CD.

■Playback information for MP3 or WMA files recorded on discs/USB devices
The following information is available during playback of an MP3 or WMA disc/USB device.

Note
After a file name is displayed for a few seconds, the screen automatically returns to the elapsed time display.
Repeating playback (Repeat Play)
You can play back a single track or all tracks on a disc/ USB device repeatedly.
1 Play back the disc/USB device you want to repeat.
2 During the playback of the disc/USB device, press REPEAT to select the desired Repeat Play mode.
Each time you press the key, the Repeat Play mode indicator in the CD player's front panel display changes as follows.
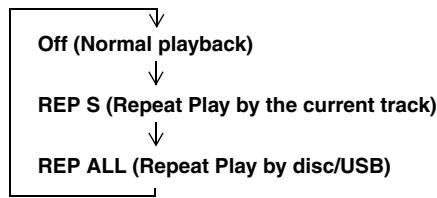
To cancel Repeat Play
Press REPEAT repeatedly so that the Repeat Play mode indicator disappears from the front panel display.
Note
The Repeat play mode is canceled when the disc/USB device is removed.
"REP OFF" appears when the system is set to Pure Direct mode.
Repeating a specified section (Repeat A-B)
You can repeat a specified section of a track.
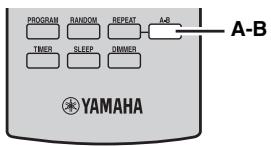
1 Press A-B to set the start point of repeat play.
"REP" and "A-" light up on the CD player's front panel display.
2 Press A-B to set the end point of repeat play.
"A-B" lights up on the display.
The selected section is played back repeatedly.
To cancel repeat A-B
Press A-B again to make "A-B" disappear from the front panel display.
Notes
- You cannot set repeat A-B to start in one track and end in another track.
- This operation is not available for MP3 or WMA files recorded on a disc/USB device.
- If you stop playback by pressing , repeat A-B is canceled.
- You cannot use repeat A-B when this unit is in Pure Direct mode.
Playing back randomly (Random Play)
You can play back tracks in the disc/USB device in random order.
Note
When playing back a disc/USB device with Random Play, the remaining time of the disc/USB device cannot be displayed.
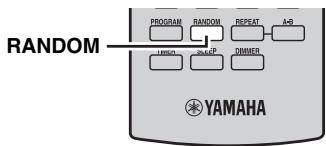
Press RANDOM while playback is stopped.
The RANDOM indicator lights up on the CD player's front panel display and Random Play starts.
To cancel Random Play
Press
Customizing playback order (Program Play)
You can customize the playback order of up to 50 tracks stored on an audio CD. This operation is not available for data discs and USB devices.

1 Press to stop playback.
2 Press PROGRAM.
The CD player enters program input mode and the PROG indicator lights up on the front panel display.
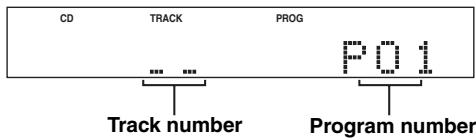
3 Use the numeric keys to enter the track number you want to program and press ENTER.
Example: To select the track number 8, press 8, and press ENTER to confirm the entry.
The front panel display shows the total number of tracks and then the program screen.
Repeat this step until you program all desired tracks.
4 Press to start Program Play.
To clear the last programmed track
Press CLEAR during program input mode.
The last programmed track is cleared.
To clear all programmed tracks
Press CLEAR after exiting program input mode.
All programmed tracks are cleared.
The display is turned off after 2 seconds.
Note
If you open the disc tray or set the CD player to standby mode, the program is automatically cleared.
FM TUNING
There are 2 tuning methods: automatic and manual. You can also use the automatic and manual preset tuning features to store up to 30 stations.
Automatic tuning
Automatic tuning is effective when station signals are strong and there is no interference.
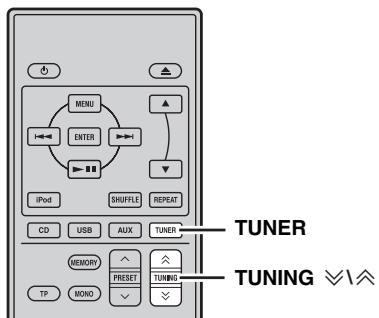
Automatic preset tuning
Follow the procedure below to preset radio stations automatically.
1 Press TUNER to set the receiver to FM mode.
2 Press and hold TUNING / for more than 2 seconds to begin automatic tuning.
When the receiver is tuned into a station, the TUNED indicator lights up and the frequency of the received station is shown on the front panel display.
- Press to tune into a lower frequency.
- Press to tune into a higher frequency.
Manual tuning
If the signal received from the station you want to select is weak, tune into it manually.
1 Press TUNER to set the receiver to FM mode.
2 Press TUNING / to tune into the desired station manually.
1 Press TUNER to set the receiver to FM mode.
2 Press and hold MEMORY for more than 2 seconds.
The PRESET indicator starts flashing on the front panel display and automatic station preset starts.
When all frequencies are searched, preset stops automatically.
- The search starts at the lowest frequency and goes toward the highest frequency.
- The receiver automatically applies a preset number to each detected station.
- To cancel the search, press MEMORY.
Notes
- You can preset up to 30 FM stations.
- Any stored station data existing under a preset station number is cleared when you store a new station under the same preset station number.
Manual preset tuning
You can store up to 30 stations.
1 Tune into a radio station you want to preset.
See page 18 for tuning instructions.
2 Press MEMORY.
The PRESET indicator flashes on the front panel display for about 5 seconds.
3 Press PRESET / repeatedly to select a preset station number while the PRESET indicator is flashing.
4 Press MEMORY to store while the PRESET indicator is flashing.
The PRESET indicator lights up on the front panel display.
5 Repeat steps 1 to 4 until all desired stations are preset.
Selecting preset stations
You can tune into any desired station simply by selecting the preset station under which it was stored (p.18).
Press PRESET / repeatedly to select a preset station.

- You can also use the front panel to select preset stations. Press PRESET / repeatedly to select a preset station.
- When you press PRESET / on the front panel of the receiver in standby mode, the receiver automatically activates the tuner and tunes in to the preset station that you selected previously.
To delete the preset station
1 Press TUNER to set the unit to FM mode.
2 Press OPTION to display the option menu. Press / to select "PRESET DEL" and press ENTER.
3 Press / to select the preset number you want to delete and press ENTER.
The preset station is now deleted.
You can continue to delete preset stations on this screen. Repeat steps 2 and 3 until all unnecessary stations are deleted.
To cancel deleting operation
Press OPTION.
RADIO DATA SYSTEM TUNING (EUROPE MODEL ONLY)
Radio Data System (Europe model only) is a data transmission system used by FM stations in many countries. The Radio Data System function is carried out among the network stations. This receiver can receive various Radio Data System information such as PS (program service), PTY (program type), RT (radio text), CT (clock time) and TP (traffic program) when receiving Radio Data System broadcasting stations.
Displaying the Radio Data System information
Use this feature to display the 4 types of the Radio Data System information: PS (program service), PTY (program type), RT (radio text) and CT (clock time).
Notes
- You can select only the available Radio Data System modes being offered by the station.
- If the signals being received are not strong enough, the receiver may not be able to utilize the Radio Data System data. In particular, "RT" mode requires a large amount of data and may not be available even when other Radio Data System modes are available.
- If the signal strength is weakened by external interference while the receiver is receiving the Radio Data System data, the reception may be cut off unexpectedly and "...WAIT" appears on the front panel display.
- When "RT" mode is selected, the receiver can display the program information by a maximum of 64 alphanumeric characters, including the umlaut symbol. Unavailable characters are displayed with the "_" (underscore).

While tuning into a Radio Data System station, press DISPLAY repeatedly to select desired Radio Data System display mode.
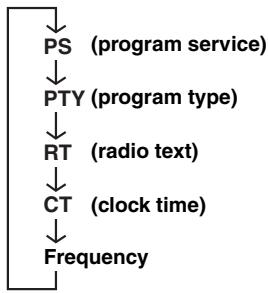
For descriptions of program types, see the table below.
| Program type | Descriptions |
| News | News |
| Affairs | Current Affairs |
| Info | Information |
| Sport | Sport |
| Educate | Education |
| Drama | Drama |
| Culture | Culture |
| Science | Science |
| Varied | Varied |
| Pop M | Pop Music |
| Rock M | Rock Music |
| Easy M | Easy Listening Music |
| Light M | Light Classical Music |
| Classics | Serious Classical Music |
| Other M | Other Music |
Using the TP (traffic program) data service
Use this feature to receive the TP (traffic program) data service of the Radio Data System station network.
1 Tune into the desired Radio Data System broadcasting station.
2 Press TP.
"TP SEARCH" flashes on the front panel display for about three seconds, and the search starts.
The TP indicator on the receiver flashes during search.
When the traffic program is received, the TP indicator stays on and the search stops.
If you press TP, the search starts again.
If the receiver fails to receive the traffic program, the TP indicator turns off and "NO TP" appears on the display. The receiver returns to its previous state.
To cancel the search
Press TP during search.
CT (clock time) settings
You can use the CT information received from the Radio Data System stations to adjust the built-in clock of the receiver.
1 Press OPTION.
An option menu item appears on the front panel display.
2 Press / to select "AUTO CLOCK", and press ENTER.
3 Press / to select "ON" or "OFF", and press ENTER.
The "AUTO CLOCK" status is displayed.
The default setting is "ON".
ON: Automatically adjusts the receiver clock using the CT information.
OFF: Does not adjust the receiver clock.
To exit the option menu
Press OPTION.
SETTING THE TIMER
The receiver is equipped with 2 types of timer functions. The CD player also turns on or sets to standby mode automatically by the system control connection (E8p.8).
Setting the clock timer
The clock timer automatically turns the receiver on or sets it to standby mode at the specified time. You can also specify an input which the receiver automatically selects when the clock timer turns it on.
Notes
- You cannot set the clock timer unless you adjust the clock (p.12).
- If you do not touch any key for more than 30 seconds after the previous key operation, the operations you made are cleared from the memory and the normal display reappears.

1 Press TIMER and / to select "TIMER", and then press ENTER.
The receiver enters timer setting mode. The TIMER indicator on the front panel flashes.
2 Press or to select "ON" (timer enabled) or "OFF" (timer disabled), and press ENTER.
ON: The timer clock setting screen appears. Proceed to step 3.
OFF: The TIMER indicator turns off and the receiver returns to normal mode.
Note
To disable the timer, select "OFF". Once the timer is enabled, the timer setting and the TIMER indicator remain on until "OFF" is selected.
3 Set the starting time of the timer.
For details on how to set the clock, see steps 4 through 6 of "Adjusting the Clock" (p.12).
4 Press / or an input selection key to select the input source to be used when the timer turns on the receiver, and press ENTER.
The receiver automatically selects the input source when it is turned on by the clock timer.
If FM is selected as the input source, the preset number (e.g. "P01") is shown on the front panel display. Press / to select the preset number of the station you want to hear when the timer is activated, and press ENTER.
If you select "---" (default), the receiver selects the station that you previously tuned in to.
If no station is registered as a preset station, "---" is shown. Press ENTER and proceed to step 5.
You can only select a preset station. Register a station that you want to hear when the timer is activated as a preset station in advance (p.19).
Note
You cannot select AUX as an input source.
5 Press / to set the operation time length of the receiver.
You can select a length of time from 30 to 90 minutes in 10-minute steps. Select "--" if you do not want the receiver to automatically go to standby mode.
6 Press ENTER to complete the timer setting.
The TIMER indicator lights up.
7 Press to set the receiver to standby mode.
The receiver will be turned on automatically at the specified time.
To cancel the timer setting operation
Press TIMER during the operation.

You can return to the previous screen by pressing .
Setting the sleep timer
The sleep timer sets the receiver to standby mode after the specified time elapses.
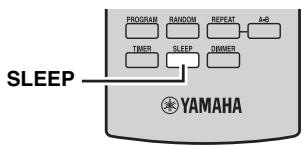
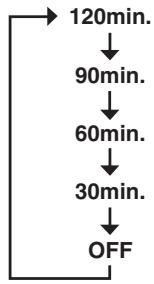
Press SLEEP repeatedly to select the desired duration.
Each time you press the key, the duration changes as follows.
The SLEEP indicator lights up on the front panel display.

- The sleep timer is canceled if you set the receiver to standby mode.
- If you press SLEEP once while the sleep timer is set, the ongoing duration appears on the front panel display.
To cancel the sleep timer
Press SLEEP repeatedly to select "OFF".
SETTING THE AUTO-STANDBY MODE
The auto-standby function automatically sets the system to standby mode when CD or USB is selected as input source and the system is not operated for 30 minutes.
Notes
- Unless you connect the receiver and the CD player with the supplied system control cable properly (p.8), this feature does not function for the system.
- This feature does not function for the system during playback.
1 Press CD or USB to select an input source, and press OPTION.
"AUTO STBY" appears on the front panel display of the receiver.
2 Press ENTER.
The current setting is displayed.
3 Press / to select "ON" or "OFF".
The default setting is "ON".
4 Press ENTER to confirm the setting.
"AUTO STBY" reappears on the display.
5 Press OPTION.
The receiver returns to normal mode.
To cancel the setting operation
Press OPTION during the operation.
You can return to the previous screen by pressing .
CONTROLLING iPod™
In addition to controlling the receiver (R-840) and CD player (CD-640), you can operate your iPod stationed in the iPod dock using the supplied remote control.
Using iPodTM
Once you have stationed your iPod to the iPod dock, you can enjoy playback of your iPod using the supplied remote control.
When connecting the iPod during the playback, this system automatically changes to iPod mode.
Notes
- Only iPod (Click and Wheel), iPod nano, iPod Classic, iPod mini and iPod touch are supported.
- Some features may not be compatible depending on the model or the software version of your iPod.

For a complete list of status messages that appear on the front panel display of the receiver, see the "iPod" section in "TROUBLESHOOTING" (p.27).

Remote control

The supplied remote control has the same function keys with your iPod. So, these keys are corresponding with each other.
1 Press iPod to select the iPod as the input source.
2 Station your iPod to the iPod dock.
3 Press / to operate the iPod menu, and then press ENTER to start playback of the selected song (or group).
View the screen of the iPod to control the menu.
- Operate the iPod using the iPod controls or the supplied remote control.
Repeating playback (Repeat Play)
You can play back a single track or a group of tracks on your iPod repeatedly.
Press REPEAT.
Each time you press the key, mode of Repeat Play changes. The following chart is an example of how mode changes as you press the key. Check currently selected mode on your iPod screen.

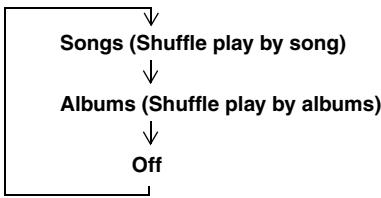
Playing back randomly (Shuffle Play)
You can play back songs or albums on your iPod randomly.
Press SHUFFLE.
Each time you press the key, mode of Shuffle Play changes. The following chart is an example of how mode changes as you press the key. Check currently selected mode on your iPod screen.
TROUBLESHOOTING
Refer to the table below when this system does not function properly. If the problem you are experiencing is not listed below or if the instruction below does not help, turn off this system, disconnect the power cable, and contact the nearest authorized Yamaha dealer or service center.
Receiver (R-840)
General
| Problem | Cause | Remedy | See page |
| The receiver fails to turn on or enters standby mode soon after the power is turned on. | The power cable is not connected or the plug is not completely inserted. | Connect the power cable firmly. | 8 |
| The receiver has been exposed to a strong external electric shock (such as lightning or strong static electricity). | Set the receiver to standby mode, disconnect the power cable, plug it back in after 30 seconds and then use it normally. | — | |
| The cable is short-circuited and the protection circuit has been activated. | Make sure that all speaker wire connections on the receiver and on all speakers are secure and that the wire for each connection does not touch anything other than its respective connection. | 8 | |
| The internal temperature is too high, the protection circuit has been activated. | Wait about 1 hour for the receiver to cool down and then turn it back on. | 8 | |
| No sound | Incorrect input or output cable connections. | Connect the cables properly. If the problem persists, the cables may be defective. | 8 |
| No appropriate input source has been selected. | Select an appropriate input source with the INPUT selector on the front panel (or the input selection keys on the remote control). | — | |
| Speaker connections are not secure. | Secure the connections. | 8 | |
| The volume is turned down. | Turn up the volume. | — | |
| The sound is muted. | Press MUTE or VOLUME +/- to resume audio output and then adjust the volume. | 7 | |
| Signals the receiver cannot reproduce are being input from a source component, such as a CD-ROM. | Play a source whose signals can be reproduced by the receiver. | — | |
| The sound suddenly goes off. | The timer has turned off the receiver. | Turn on the receiver, and play the source again. | — |
| Sound is heard from the speaker on one side only. | Cables are not connected properly. | Connect the cables properly. If the problem persists, the cables may be defective. | 8 |
| There is noise interference from digital or radio frequency equipment. | The receiver is too close to the digital or high-frequency equipment. | Move the receiver further away from such equipment. | — |
| The sound is distorted. | The volume level is too high. | Adjust the volume level. | 13 |
| “CHK SP WIRE” appears on the display. | Speaker cables are short-circuited. | Make sure speaker cables are connected correctly. | 8 |
FM
| Problem | Cause | Remedy | See page |
| FM stereo reception is noisy. | The characteristics of FM stereo broadcasts may cause this problem when the transmitter is too far away or the antenna input is poor. | Check the antenna connections. | 8 |
| Try using a high-quality directional FM antenna. | — | ||
| There is distortion, and clear reception cannot be obtained even with a good FM antenna. | There is multi-path interference. | Adjust the antenna position to eliminate multi-path interference. | — |
| The desired station cannot be tuned into with the automatic tuning method. | The signal is too weak. | Use a high-quality directional FM antenna. | — |
| Use the manual tuning method. | 18 | ||
| Previously preset stations can no longer be tuned into. | The receiver has been disconnected for a long period. | Set preset stations. | 18 |
iPod
Note
If a transmission error occurs but no status message is displayed on the front panel display of the receiver, check the connection between the receiver and your iPod (p.10).
| Status message | Cause | Remedy | See page |
| CONNECT ERR | There is a problem with the signal path from your iPod to the receiver. | Turn off the receiver and try resetting your iPod. | 10 |
| UNKNOWN TYP | The iPod being used is not supported by the receiver. | Only iPod (Click and Wheel), iPod nano, iPod Classic, iPod mini and iPod touch are supported. | — |
| CONNECTED | Your iPod is properly stationed in the iPod dock, and the connection between your iPod and the receiver is complete. | ||
| NOT CONNECT | Your iPod was removed from the iPod dock of the receiver. | Station your iPod back to the iPod dock of the receiver. | 10 |
| CAN'T PLAY | The receiver cannot play back the songs currently stored on your iPod. | Check that the songs currently stored on your iPod are playable. | — |
| Store some other playable music files on your iPod. | — |
Remote control
| Problem | Cause | Remedy | See page |
| The remote control does not work nor function properly. | The remote control may be operated outside its operation range. | For information on the remote control operation range, see “Using the remote control”. | 11 |
| The remote control sensor on this system may be exposed to direct sunlight or lightening (invented fluorescent lamps). | Change the lighting or orientation of this system. | 11 | |
| The battery may be worn out. | Replace the battery with new one. | 11 | |
| There are obstacles between the sensor of this system and the remote control. | Remove the obstacles. | 11 | |
| The system control cable is disconnected from the system connector jack of the receiver and/or the CD player. | Connect the receiver and the CD player securely with the system control cable. | 8 |
CD player (CD-640)
| Problem | Cause | Remedy | See page |
| Power does not turn on. | The plug is not completely inserted. | Connect the power cable firmly. | 8 |
| The receiver and the CD player are connected incorrectly. | Connect the system control cable properly between the receiver and the CD player. | 8 | |
| The receiver is set incorrectly. | Check the setting (INPUT/Volume/MUTE/ Headphone) of the receiver. | — | |
| Power suddenly shuts off during playback. | The auto-standby function of the receiver works when the receiver does not receive a playing signal transmitted from the CD player via the system control cable for 30 minutes. | Check the connection of the system control cable between the receiver and the CD player. | 8 |
| No sound or distorted sound | The sampling rate of a MP3 or WMA file may not be compatible with the CD player. | Check the sampling rate and bit rate of the MP3 or WMA file are compatible with the CD player. | 3 |
| Disc playback does not start. | You may use a CD-R/RW that is not finalized. | Finalize the CD-R/RW. | — |
| The disc label may not be facing up. | Place the disc in the disc tray with the label facing up. | — | |
| The disc may be defective. | Try to play back another disc. If the same problem does not occur, the disc you want to play back is defective. | — | |
| MP3/WMA disc may not contain sufficient music tracks to be played back. | Check that your MP3/WMA disc contains at least 5 MP3/WMA music files. | — | |
| The sampling rate of a MP3 or WMA file may not be compatible with the CD player. | Check the sampling rate and bit rate of an MP3 or WMA file are compatible with the CD player. | 3 | |
| The USB device cannot be recognized. | The USB device is not connected correctly. | Connect the USB device correctly. | 10 |
| The CD player is not linked with the receiver. | The system control cable is disconnected from the system connector jacks of the receiver and/or the CD player. | Connect the system control cable properly to the system connector jacks of the receiver and the CD player. | 8 |
USB
Note
If a transmission error occurs but no status message is displayed on the front panel display of the receiver, check the connection between the CD player and the USB device (p.10).
| Status message | Cause | Remedy | See page |
| NO USB | The USB device is not connected. | Connect a playable USB device. | 10 |
| OVER CURRENT | The USB device is either unplayable on this system or connected at an incorrect angle. | Disconnect the USB device. Change the input source to a device other than USB and back to USB. Then, correctly connect a playable USB device to the CD player. | — |
NOTES ABOUT HANDLING COMPACT DISCS
Handling compact discs
- Always handle with care so that the playing surface is not scratched. Do not warp discs.
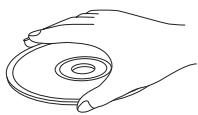
-
To keep clean the playing surface, wipe with a clean, dry cloth. Do not use any type of disc cleaner, spray, or any other chemical-based liquid.
-
Do not wipe with a circular motion; wipe straight outward from the center.
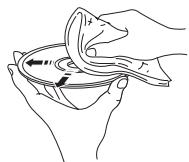
- Use a soft-tipped pen when writing on the label side of the disc.
- When a disc is not being used, remove it from this unit and store in an appropriate case.
- Do not expose discs to direct sunlight, high temperature or high humidity for a long time.
GLOSSARY
Audio information
MP3 (MPEG Audio Layer-3)
One of the audio compression methods used by MPEG. It employs the irreversible compression method, which achieves a high compression rate by thinning out the data of hardly audible part to the human ears. It is said to be capable of compressing the data quantity by about 1/11 (128 kbps) while maintaining a similar audio quality to music CD.
PCM (Pulse Code Modulation)
A signal that is changed to digital format without compression. A CD is recorded with 16-bit sound at 44.1kHz . This signal also has a type called Packed PCM (PPCM) that can be compressed without any loss of data.
Sampling frequency
The number of sampling (process for digitalizing analog signals) per second. In principle, the higher the sampling rate, the wider the frequency range that can be played back, and the higher the quantized bit rate, the finer the sound that can be reproduced.
Track
A CD can be divided into a number of segments (tracks). Each division is called a track number.
WMA (Windows Media Audio)
An audio compression method developed by Microsoft Corporation. It employs the irreversible compression method, which achieves a high compression rate by thinning out the data of hardly audible part to the human ears. It is said to be capable of compressing the data quantity by about 1/22 (64 kbps) while maintaining a similar audio quality to music CD.
Copyright and logo marks
MPEG Layer-3 audio decoding technology licensed from Fraunhofer IIS and Thomson Multimedia.
iPodTM
"iPod" is a trademark of Apple Inc., registered in the U.S. and other countries.
"Made for iPod" means that an electronic accessory has been designed to connect specifically to iPod and has been certified by the developer to meet Apple performance standards.
Apple is not responsible for the operation of this device or its compliance with safety and regulatory standards.
SPECIFICATIONS
R-840
AMPLIFIER SECTION
Minimum RMS output power per channel (6 Ω, 1 kHz, 10 % THD) .65 W + 65 W
- Input sensitivity/Impedance
PLAYER, etc. 200 mV/47 kΩ
Frequency Response PLAYER, etc. 20 Hz to 20kHz± 0.5 dB
- Total Harmonic Distortion
PLAYER, etc. (30 W/6 Ω) 0.04 % or less
- Signal to Noise ratio (IHF-A network)
- PLAYER (200 mV, Input shorted) 100 dB or more
TUNER SECTION
- Tuning Range. 87.50 to 108.00 MHz
GENERAL
- Power Supply. AC 230 V, 50 Hz
Power consumption. 115 W - Dimensions (W × H × D) 215 × 110 × 348 mm (8 1/2 × 4 3/8 × 13 3/4 in)
Weight 5.7 kg (12.6 lbs) - Standby power consumption............ less than 0.3 W
CD-640
PLAYBACK SYSTEM
CD, CD-R/RW
AUDIO PERFORMANCE
- Signal-Noise (1 kHz) 110 dB or more
- Dynamic range (1 kHz) 100 dB or more
Distortion and Noise (1 kHz) .0.003 % or less
GENERAL
Power supply AC 230 V, 50 Hz
Power consumption 16 W
- Dimensions (W × H × D) 215 × 108 × 318 mm (8 1/2 × 4 1/4 × 12 1/2 in)
Weight 3.2 kg (7.1 lbs)
- Standby power consumption............less than 0.3W
Specifications are subject to change without notice.
Limited Guarantee for European Economic Area (EEA) and Switzerland
Thank you for having chosen a Yamaha product. In the unlikely event that your Yamaha product needs guarantee service, please contact the dealer from whom it was purchased. If you experience any difficulty, please contact Yamaha representative office in your country. You can find full details on our website (http://www.yamaha-hifi.com/ or http://www.yamaha-uk.com/ for U.K. resident).
The product is guaranteed to be free from defects in workmanship or materials for a period of two years from the date of the original purchase. Yamaha undertakes, subject to the conditions listed below, to have the faulty product or any part(s) repaired, or replaced at Yamaha's discretion, without any charge for parts or labour. Yamaha reserves the right to replace a product with that of a similar kind and/or value and condition, where a model has been discontinued or is considered uneconomic to repair.
Conditions
1 The original invoice or sales receipt (showing date of purchase, product code and dealer's name) MUST accompany the defective product, along with a statement detailing the fault. In the absence of this clear proof of purchase, Yamaha reserves the right to refuse to provide free of charge service and the product may be returned at the customer's expense.
2 The product MUST have been purchased from an AUTHORISED Yamaha dealer within the European Economic Area (EEA) or Switzerland.
3 The product must not have been the subject of any modifications or alterations, unless authorised in writing by Yamaha.
4 The following are excluded from this guarantee:
a. Periodic maintenance and repair or replacement of parts due to normal wear and tear.
b. Damage resulting from:
(1) Repairs performed by the customer himself or by an unauthorised third party.
(2) Inadequate packaging or mishandling, when the product is in transit from the customer. Please note that it is the customer's responsibility to ensure the product is adequately packaged when returning the product for repair.
(3) Misuse, including but not limited to (a) failure to use the product for its normal purpose or in accordance with Yamaha's instructions on the proper use, maintenance and storage, and (b) installation or use of the product in a manner inconsistent with the technical or safety standards in force in the country where it is used.
(4) Accidents, lightning, water, fire, improper ventilation, battery leakage or any cause beyond Yamaha's control.
(5) Defects of the system into which this product is incorporated and/or incompatibility with third party products.
(6) Use of a product imported into the EEA and/or Switzerland, not by Yamaha, where that product does not conform to the technical or safety standards of the country of use and/or to the standard specification of a product sold by Yamaha in the EEA and/or Switzerland.
5 Where the guarantee differs between the country of purchase and the country of use of the product, the guarantee of the country of use shall apply.
6 Yamaha may not be held responsible for any losses or damages, whether direct, consequential or otherwise, save for the repair or replacement of the product.
7 Please backup any custom settings or data, as Yamaha may not be held responsible for any alteration or loss to such settings or data.
8 This guarantee does not affect the consumer's statutory rights under applicable national laws in force or the consumer's rights against the dealer arising from their sales/purchase contract.
Information for Users on Collection and Disposal of Old Equipment and Used Batteries

These symbols on the products, packaging, and/or accompanying documents mean that used electrical and electronic products and batteries should not be mixed with general household waste.
For proper treatment, recovery and recycling of old products and used batteries, please take them to applicable collection points, in accordance with your national legislation and the Directives 2002/96/EC and 2006/66/EC.

By disposing of these products and batteries correctly, you will help to save valuable resources and prevent any potential negative effects on human health and the environment which could otherwise arise from inappropriate waste handling.

For more information about collection and recycling of old products and batteries, please contact your local municipality, your waste disposal service or the point of sale where you purchased the items.
[Information on Disposal in other Countries outside the European Union]
These symbols are only valid in the European Union. If you wish to discard these items, please contact your local authorities or dealer and ask for the correct method of disposal.
Note for the battery symbol (bottom two symbol examples):
This symbol might be used in combination with a chemical symbol. In this case it complies with the requirement set by the Directive for the chemical involved.
ATTENTION : VEUILLEZ LIRE CE QUI SUIT AVANT D'UTILISER L'APPAREIL.
ACCESSIONES FOURNIS 2
DISQUES ET FORMATS DE FICHIERS COMPATIBLES 3
COMMANDES ET FUNCTIONS. 4
Ampli-tuner (R-840) 4
Piles (x2) (AAA, R03, UM-4)
Antenne FM interieure
Cable stereo RCA (1,0 m)

Cache USB*

DIGITAL AUDIO
RoWritable
ReWhritable

Recordable

ReWritable
Lecture aléatoire (Shuffle Play)
Receiver (R-840). 26
Fernbedienung 28
CD-Player (CD-640). 28
HINWEISE ZUR HANDHABUNG VON COMPACT DISCS. 30
GLOSSAR. 30

DIGITAL AUDIO
RoWritable
Rewritable

Recordable

ReWritable
CD-R-, CD-RW-Digital-Audio-Discs
③ 0 VOLUME + / -
RCA stereokabel (1,0 m)
USB-kapa*
WARNING
③ 0 VOLUME + / -
Manuell stationsinstalling

RCA cavo stereo (1,0 m)

USB tappo*

Lettore CD
ATTENZIONE
③ 0 VOLUME + / -
Pilas (x2) (AAA, R03, UM-4)
Antena de FM interior
Cable de control del problema (0,6 m)
Recordable
ReWritable
Nota
③ 0 VOLUME + / -
Pulse OPTION durante la operation.
Receiver (R-840). 26
Afstandsbediening 28
② Aan/Stand-byindicator
Licht groen op wanner de receiver ingeschakeld is. Licht amber op wanner de receiver in stand-bystand staat.
③ TP-indicator
En stelt de klok (b.12) of de timer (b.22) in.
SLEEP
BbIXOJIHaM MOIHHoCTb 10MBT
COДЕРЖAHINE
BVEDEHNE
OIIINCAHNE 2
IIPIJIATAEMBIE IIPIHAAJIEXKHOCTN.....2
BOCIPON3BODIMbI E NCKH
ΦOPMATbI ΦΑΗΙΟB. 3
CHCTEMbI YIPABJEHNA
ФУHKПИ.. 4
PecHBep (R-840) 4
CD-ⅡpoHrpBbBaTeJIb (CD-640) 5
IyIbT IY. 6
IOTIOTOBKA
IIIOIIGOBKA 8
ПОДКЛЮЧЕНС KOJOHOK/
BHEIIHHX KOMIOHEHTOB/aHTHeHH 8
PoiKJIIOUeHHe CNJIOBbIX Ka6eJIeI 9
Подлоченie iPodTM 10
UcTaHOBka 6aTapeek B IyIbT YU. 11
HcIOJIb3OBAHHe IIyJIbTa IY
PerylnpOBka yacob 12
OCHOBHBIE ONEPALIM
CHCTEMHBIE OIIEPAIIN 13
OchOBhIe OIepaIIH ChTeMbI 13
HacrpoKa npKocTn nCnIIeA
IpeDHe IaHeJIn pecHBepa. 14
HcIOJIb3OBaHHe HayIIHHKOB. 14
OIEPAIINC JNCKAMN
YCTPOICTBOM USB 15
Oepaunn Bocpon3BedeHna 15
IpekeJIIOUeHHe 3KpaHa HnOporMauIN
Bocippon3BeJeHn. 16
Bb6op IpeynctaHOBJIeHHbIX paIIOCTaHI..19
HACTPOINKA CNTEMbI PAJIOJAHHBIX
(TOJIbKO MOJEJIb JJIa EBPOIIbI)............20
OTo6paXeHHe HnΦopMaunn CnCTeMbI
PainoJaanHbix 20
HcnoJIb3OBAHHe CJIyX6bl IpepaHn
IaHHbIX TP (IpoPpMaMn IINHKeHH) 21
UcTaHOBKn CT (TeKyuIee BpeMa) 21
ДPyгпЕ ONEPALIN
YCTAHOBKA TAIIMEPA. 22
UcTaHOBKa TaMepa YacOB 22
UcTaHOBKa TaIMepa cHa. 23
YCTAHOBKA B ABTOMATUHECKH
PEXIM OXIIAHNIA.24
YIIIPABJIEHHI iPodTM. 25
IcnoJIb3OBAHne iPodTM 25
DONOJIHNTIELbHAR INHΦOPMALIa
YCTPAHEHNE HENCIIPABHOCTEI.....26
PecHBep (R-840) 26
IyJIbT IY 28
CD-ⅡpoHrpBIBaTeJIb (CD-640) 28
IIIPIMEYAHNIOOBPAIIEHHIO C
KOMIIAKT-ДИСКAMN.. 30
TJIOCCAPIN 30
AynonHΦopMaIIa 30
O6o3HaueHnna 06 aBTopCKnx IpaBax N JIoTOHTIIbI. 30
TEXHNUECKNE IAPAMETPbI. 31
Опиcaне
PecuBep (R-840)
- Мнимальhoe RMS Вьхонhoe Наразженье на Канал 65Вt + 65Вt (6Ω,1KΓι,10%THD)
Hactpoikau npedyctaHOBka 30M-paHocTAnu
iPod noDepKnBaetc (cФyHKne3apKn) - Pekim Pure Direct
- Perylmpyemar npkoctb dncnne
CD-npOunrpBbAteIb (CD-640)
Bocnpon3BeDHeHne aydno CD-DCKOB, DCKOB MP3/WMA
Bocnpo3BODIMOCtB DnscKa CD-R, CD-RW
Bocpnon3BeDHeNhe paHIOB MP3/WMA, xpaHauXcH Na yCtpoNCTBe USB
CBy3aHnA paObaT c pecnBepom, hApnPmep, pexM Pure Direct, perynpyeMaA npKoCTb dncIeN upekm INPUT
O hactoIeM pyKOBODCTBE
B IaHHO HNCTpyKuHn yctpoNCTBO “R-840” Ha3bIbaeTcra "pechHBepOM" a yctpoNCTBO “CD-640” Ha3bIbaeTcra “CD-IPOHrpBbATEJEM
B IaHIO IHCTpyKIIIN OIIcAHI bI OIIpaIIHN II IOIIPAJIeHHIO CnCTeMOI C IIOMOIbI IOIJIbTa IY, KpOme CJIyuaeB, KOrIa 3TO HeBO3MOJHO. HeKOTOpIe I3 IaHHbIX OIIpaIIHN TaKKe BbIIOJIHrAOTc C IIOMOIbIO KHOIIOK IIpeJIHeI NaHEJI.
-03NaHaetcoBETJIAO6JIeHcEHnYyIpaJIeHN.
B II pIIMeuaHnHex coIepxHtca BaxHa HnΦopMaun IIO 6e3OIIaChocTH IN HnCTpyKUn IIO yIpaJIeHNIO.
-Данhoe pykoobCTBO OTIeYataHO IO IIPOH3BOJCTBA.ДИЗаин ITEXHUNeCKHe XapaKTePcHcTHKN MOry TuaCtTHNO H3MeHЯTbSc C HeJIbO yIyIeHnKaueCTBa H.T.D.BcIyuae,ecIN HmeIOTc pa3IInHmMeJy pykoobCTBOM n aIIapaTOM,IIpHOpHTeT OITaeTcAIIpaAty.
ПРИЛАГЕМБIE ПИНадлжховп.
K daHHOMy aIIIpaTpy npHJIraIaOTc sJeIyIOIe IprHaJIeJXHOCTH. Ipeep IIoIKJIIOUeHHem DaHHOcHTeMbI, y6eIHNTecb, YTO HMeIOTc cJeIyIOIe IeTaJIH.
IyblT dy
Батарейки (x2) (AAA, R03, UM-4)
BHyTpHnHa YMaHTeHHa
Ka6eIb ynpaBleHnncntemO (0,6 m)
Ctepeoka6ebr RCA(1,0M)
Kpbioka npota USB*
IPEIOCTEPEXEHNE
BeperHTeOTIeTeKpblkkyUSB,To6bOnHHeB3HaayHeIporJIoTHJIN ee.
Kpbioka daoka iPod*
KpbIHKN USB nIOK-pa3bema iPod yTaHaBJIbBAIoTc Ha IIOPT USB nIOK iPod, KOrJa OOH He HcIIIOJIb3yIoTc.
BOCПОНЗВОДИМьIE ДИСКИ ΦОРМАТыI ΦAIЛOB
Bocnpon3BOIDmble faiJIbI MP3 u WMA (yctpoicTBO USB n Dnck c daHHbIMn)
MP3
| Формат | Сkopосстьпередачибintов(кбint/c) | Частotaдисcopeетизаши(кгц) |
| MPEG 1 Audio Layer-3 | 32-320* | 32/44,1/48 |
| MPEG 2 Audio Layer-3, 2 | 8-160* | 16/22,05/24 |
| MPEG-2.5 Audio Layer-2 | 8-160* | 8/11,025/12 |
- TaKxe IIOJIeRkHbAeTcI IepeMeHHaЯ ckOpocTb IepeJaHn 6HTOB.
WMA
Bercna 8
Bepn 9 (IIOJIepKKa cTaHApTHbIX I IepemEHbIX cKOpocTe Ipepaun6ntOB; He IIOJIepKHNbAeTcIpepauna63 IOTepb I npOececNoHaJIbHaIpepaa)
...AydnooNcKn CD-R, CD-RW
3aropaeTcIprN BbIbOpE IIpeYucTaHOBJIeHHbIX paIIOCTaHIIN (c.19).
⑥ INHdNKaTOp TUNED
3aropaeTcIpnHacrpoKepechBepaHa paAnocTaHnIO.
⑦ HndkaTop STEREO
3aropaetc npn npneMe pecnbepom cnIbHOro cnHaJa oT cTepeofoHNueckoYM-tpaHcJIaHH.
⑧ИнданkaTop SLEEP
3aropaeTcIpnBVKJIOUeHnTaIMepa cHa (c.23).
⑨ Duscnpei nepeDnei naHei
OTo6paJxHHe pa3JIuHNoI HhΦopMaIIHH,HaIPnMep, YacTObI HaCTPOIKN.
10 VOLUME
PeryJInpOBKa yPOBnR rPOMKocTH.
(1) (On/Standby)
BkJIOueHHepeCnBepaHIneroYcTaHOBKaBpeKHM OXHaHna.
12 THe3do PHONES
BbIOaaynOCHHaJIOBIIHINHBNyaJIbHOrI npocJyHHBaHHepe3 HayHHKN.
13 INHdkaTop TIMER
3aropaeTc npu ycTaHOBKe TaHMepa (c.22).
14 BASS
PereJInpOBKa Hn3KoUactOTHOJ XapaKTepnCTHKn (c.13).
15 TREBLE
PeryJIHPOBka BbICOKOuactOTHOXapaKTepnCTKN(c.13).
16 BALANCE
PerjInpOBKa 6aJaHca BbIBOIMIMO3Byka JIeBOI INIpaBOI KOJIOHKN C IeJIbIO KOMIIeHcAIIIN IINc6aJaHca, BbI3BaHHOro paCIOJOXKeHHem KOJIOHOK IIIN OCO6eHHOCCTMNIOMeIeHHN IJI pOcLJUINHBAHN.
17 PRESETV/
BbI6Op IIpeUcyTaHOBJIeHHo paIIOcTaHIIHH. B KaueCTBe HcTOUHNka IIpHema 6yIeT BbI6paH YM. Pa6OtaET JaKe ToTGJa, KOrJa pecHBep HaxOJNTcR B pexKHe OxNJaHn (c.19).
18 PURE DIRECT
BkJIOUeHHe IIN BbIKJIIOUeHHe pexHMa Pure Direct (c.13). EcJIN BkJIIOUeH peXHM Pure Direct, INIINKaTOp BBICBeuINBaEtCnHNM IBeTOM.
19 KhoNka / 1
HaJIO II IpiHocTaHOBka BOCIIPOIN3BeIeHnIc iPod.B KaueCTBe HCTOUYHnKa IIpHema 6yJeT BbI6paH iPod. Pa6oTaTeJaKe ToTgIa, KOrIa pecHBPHe HaxOJIHTcBpeXHMe OxHuaHnI.
② Dok iPod
ПоДКЛЮЧЕНИЕ устpoиства iPod (c.10).
CD-пponгьВаTeЛь (CD-640)
Ipeedna naHeJIb
① Nopr USB
ПоДКЛЮЧЕНИЕ yctpoиCTBA USB.
② INHdkaTop (BOcnpoun3BeDeneHne)
PoiBJIaETcBO BVPeM BoCIOIPOUN3BeJeHn.
③ HndnKaTOp CD
HaJIo HInI IIpHocTaHOBKa BOCIIpOH3BeEeHnA (c.15).B cIyuae HaJkaTHa DaHHo KHOIIKN BpeJHMoeHNJaHHpeCHBep aBTOMaTHUeCKN BKJIIOHTcN HCTOuHKn IpiHema N3MeHNTcN JIN6o Ha CD, JIN6o Ha USB,B 3aBNCIMOCTN OT TORO,KaKoN IN3 HNX 6blJI BbIpaH IOscJIeIHNM.
11
IepexoHa cJIeIyIOIIyO 3ByKOByIO IOpOxKy.
HaJKMnTe H yIepKINBaIte IIa 6bICTpoI IpOKpyTKn BInpeI (c.15).
(12) (On/Standby)
BkIIOueHHe CD-IIpOINrPbIBaTeJIa HJIn eRo ycTaHOBka BpeKIM OXKnJaHHa.
B cIyuae hJaKaTHna JaHHoN KHOIIKN BpeKHMe OxHJaHnpecHbep aBTOMaTHueCKN BKJIIOHTcN HCTOuHnK IIpHeMa H3MeHNTcra JIN6o Ha CD, JIN6o Ha USB,B 3aBnCHMoCTn OT TOR,KaKo N3 HNX 6blI BbIpaH IOcJIeHNM.
13 INHdNkaTop (nay3a)
3aropaetc npn npnoctaHOBke CD-ppoHrpblBaTeJIA.
14 JIOTOKdcka
YIepKaHne IINsKa IJIb BOCIpOn3BeJeHnI.
15 DnCpIeI nepedne napeHn
OTo6paKaaTeKyuIee coCToHnHe CD-ⅡpOnIrPbIbAteJIa.
16
OTkpblte H 3aKpbIte JIoTka IIncka.
B cIyuae haxaTna daHHo KHOIIKN bpeXHMe OxHJaHHpeCnBep aBTOMaTHuecKn BKJIIOHTcN HCTOuHnK IIpHeMa H3MeHnTcN ha CD.
⑦
OctaHOBka BOCIOPOIN3BeIeHn (c.15).
NyIbT dy

IaHHbI IyJIbT IY MoKeT yIpaBJIbTb CnCTeMHbIMN KOMIOHEHTAMN (BKJIIOUaJ yHKIIIN TIOHepa) H iPod, yCTaHOBJEHHORO B JOK IIJa iPod Ha BepxHei IOBepxHOCTH peCINBepa.
IyipabJIeHn CD-IPoHrPbIBaTeJIem, yHKIIHmTIOhepa, HIN iPod c NjIbTa IY, Tpe6yeTcYCTaHOBHTb peCNBep Ha COOTBeTCTBYIOIIH pEXHM IIpHEma (8)KHOIIKN BbIbOpa HcTOUHHKa).
Длгуypаьlenya iPod
HaKMMTe COOTBeTCTByIOIyIO iPod KHOIIKy yIpaJIeHnHa IyJIbTe IY.
KHOIIKN yIipaBJIeHnI iPod o6O3HaueHbI c IIOMOIbIO iPod B IIpNBBeIeHHOM HIXKe pa3JeJIe. CMOTpHTe cTp. 25 IJIyIpyEHHI IOIpo6Hoi IHΦopMaIIHn O pa6Ote c iPod.
① Перетатунк Инфрарсано сигнана
Iocbilaet cHraJIbHa yIpaBJIeMyIO cnCTeMy.
② (On/Standby)
BkJIIOUeHne peCnBepa IJIIN erO yCTaHOBka BpeKIM OJNUdAHn.
③ MENU iPod
Bo3bpaT ha BepxHn ypOBeH meHIO iPod.
④ iPod
Ipexoi K cJeIyIOuIeKoMIO3HUN. HaKMHTe HyeepKbAte IJIa 6bIcTpoI pOkpyTKn BIIpePeJ.
⑤ iPod
IepexoHa HaHaJaIO TeKyuIeN 3ByKOBoH IOpOxKn. HaxMHTe IBaXNbIb, YTO6bl IpoIyCTnTb IIpeBbIyUHyO 3ByKObyIO IOpOxKy. HaxMHTe N yIepXHBaIte IJIa 6bIcTpoI IpoKpyTKn Ha3aI.
⑥ ENTER iPod
HaKMHTe KHOIIky ENTER IIJI BBOJa BbI6paHHoI rpyIIIbI. (PiH NaKaTHN ENTER, NaHnHaetcra BOCIIPOIN3BeDeHHe, ecJIH BbI6paHa KOMIO3nIIy.)
⑦ / / iPod
HaJIo HJII IIpHocTaHOVBKa BOCIIPOH3BeJEHHIA.
⑧ KhoIkn BbIbopa nCTOuHnKa
Bb6op hctOuHnKa IIpHeMa Ha pecHBepe.
Bo BpemBa b6oopa hctOuyHnKa IIpHeMa HaJKMHTe COOTBeTCTByIOUyIO KHOIIky Bb6opa hctOuyHnKa (JIH IOBepHNTe INPUT Ha IpeEINHe IaHEJIn).
Ha IINCIJIee IpeEINHe IaHEJIn pecBnBepa IIOBHTcra HA3BaHne COOTBeTCTByIOUIEr O hctOUYHnKa IIpHeMa.
EcJIN B KaYeCTBe HcToUHnKa IpiHeMa BbIbpaHbI CD HJIN USB, CD-ⅡpOInrPbIbAteJIb BKJIIOHTcABTOMaTHueckN, aB cJIyuae BBIsOpa IpyrTO HcToUHnKa IIpiHeMa CD- IIpOInrPbIbAteJIb IIpeEJaTe BpeKHM OxNJdaHH.
⑨ MEMORY
CoxpaHHeHne IpeYcTaHOBJIeHHo paIIOCTaHIIN B IIAMrTH (c.19). 3aIyck aBTOMaTHueCKoI IIpeYcTaHOBKn (c.18).
10 TP
IpexoiBpeKHMipHeMa cIyJkbI IpepaHnDaHHbIX TP (PpOprpaMMA dBHXKeHn) (c.21).
11 MONO
YcTaHObKa peKIma IIpHema UM-tpaHcJIaIINB MOHOΦOHnueckn peKIM.
12 DISPLAY
IpekeJIIOUeHHe INHΦOpMaIIHH, OTO6paKaemn Ha IIINJIe IepeINeI NaHeJIH peChBepa n CD-I npOnIrpbIbAteJIa (c.16,c.20).
⑬ OPTION
IpeXoB B pexHm MeHIO OIIIN.
Cm. cTp. 19, 21 n 24 IIJI IIOJIyueHn HnΦOpMaIIH O IIyHKtax MeHIO ONIIH.
14 ▲,▼,▲,▶,ENTER
IIaBbIbOpaHIOITBepeKJHeHnIyHKTa.
15
PnnoctaHOBKa BocnpOn3BeJeHnna (c.15).
16
OcTaHOBkaBOCINpOn3BeJeHnra (c.15).
⑦
BkJIIOueHHe/BbIKJIIOueHHe cIyuaHHOBOcIIPOHN3BeEHHa (c.17).
② TIMER
OTo6paKaAeTKeUiEe BpEmHaIINPiIe
ΦρΟΤaJIbHoI ΠaHeJIη pecHBepa.
N yctaHOBka YacOB (c.12) IJI TaNMepa (c.22).
② SLEEP
YcTaHOBka TaHMepa Cha Ha cHcTeMe (c.23).
23
OTkpblteH3aKpbItheJIoTkaIncKa.
② ▲,IPv6
BocIOJIb3yIteCb KHOIIKaMn ▲ HJIN VДЛЯ IpeKJIIOUeHnI IapAmEtpa B BbI6paHHoI rpyIIne (18c.25).
25 SHUFFLE iPod
Bb6oppeKIMBaBocIpOn3BVeIeHnBcJIyuaHOM IopJKe (c.25).
REPEAT iPod
BbI6OppeKImaIOBTOpHOroBOcIIPOH3BeJeHnA (c.25).
TUNING 公 / 公
HajkMaHTe TUNING 公 / 公 npu pyHnoi HacTpoKe, HaxMMte H yIepKHBaHTe TUNING 公 / 公 npn aBTOMaTHueckoHacTpoKe (c.18).
28 PRESET /
Bb6op npeducTaHOBJeHHo paIIOCTaHUN (c.19).
29 PURE DIRECT
BkJIIOUeHHe HJIN BbIKJIIOUeHHepeKHMa Pure Direct (c.13).
③ 0 VOLUME + / -
HacpoKa o6IeRo ypOBnI rPOMKoCTn peCnBepa.
(31)
HaJao BoCpOnH3BeJeHnna (c.15).
32 MUTE
BbIKJIOueHne 3Byka (c.14).
33 1<,
IepexoHa hauaJIo TeKyuIeH JIn cJeIyUOIIe 3ByKOBoI DOpOJKN.
34 CLEAR
OuHCTKa 3aIIINCH.
35 ENTER
Hac troka yapkoctn nncnpei peepnei pecehbpca (c.14).
IopKJIoueHne KOJIOHOK/BHeuHHX KOMNoHEtOB/aHTeHH
IpeepiIOKJIIOUeHHeM CnCTeMbI BHNMaTeJIbHO I3yUHTe CJIeYIOUIOIpoIeIpyu II pINMeUHaHH. NylbT Dv nCBa3aHHa pa60Ta CnCTeMbI FyHKcIOHnpUToTobKO B TOM Clyuae, ecIn pecNBep u CD- npOnpRbIBateJb CoeINHeBIC NOMOChbIO Ka6eJIy UnpaBLeHnCnCTeMoN. BoJIee IOIpO6Ho O KOJIOpHKax (NS-BP300) cMOTpHte B pykoBOIDCTBE IIO INX EKCIpyaTIHN.
IopKJIbOHeHcNCTeMbI
IIOKJIIOUHTe rHe3Ja AUDIO IN (APLAYER L/R) pecHBepa K rHe3IaM AUDIO OUT (A L/R) CDIIPOHrpbIBaTeJc I NOMOUIIO IOCTaBJIeMORO cTrepeoOHueckoro ayINOKa6JI RA.CA.
IIoIckJIIOuHTe rHe3IO SYSTEM CONNECTOR (TO:PLAYER) pecHBepa K rHe3Iy SYSTEM CONNECTOR (TO:RECEIVER) CD-IPoONrpbIbAteJc I IOMOIIbIO IOCTabJIeMOrO Ka6JIa YIpaJIeHn CnCTeMoI.
IIOKJIIOHnTE pa3'beMbl KOJIOHKn (L) peCnBepa K pa3'beMam JIeBOI KOJIOHKn, a pa3'beMbl KOJIOHKn (R) pecnBepa Ka pa3'beMam IIpaBOI KOJIOHKn, HcIOJIb3yra Ka6eJIH KOJIOHOK, IOCTabJIeMbI c AkyCTHueckO chCTeMOI (NS-BP300).
IopKJIIOHTe IOCTaBJIeMyIO BHyTpEHHIO YMa-AHTeHHy K rHe3Iy ANTENNA.
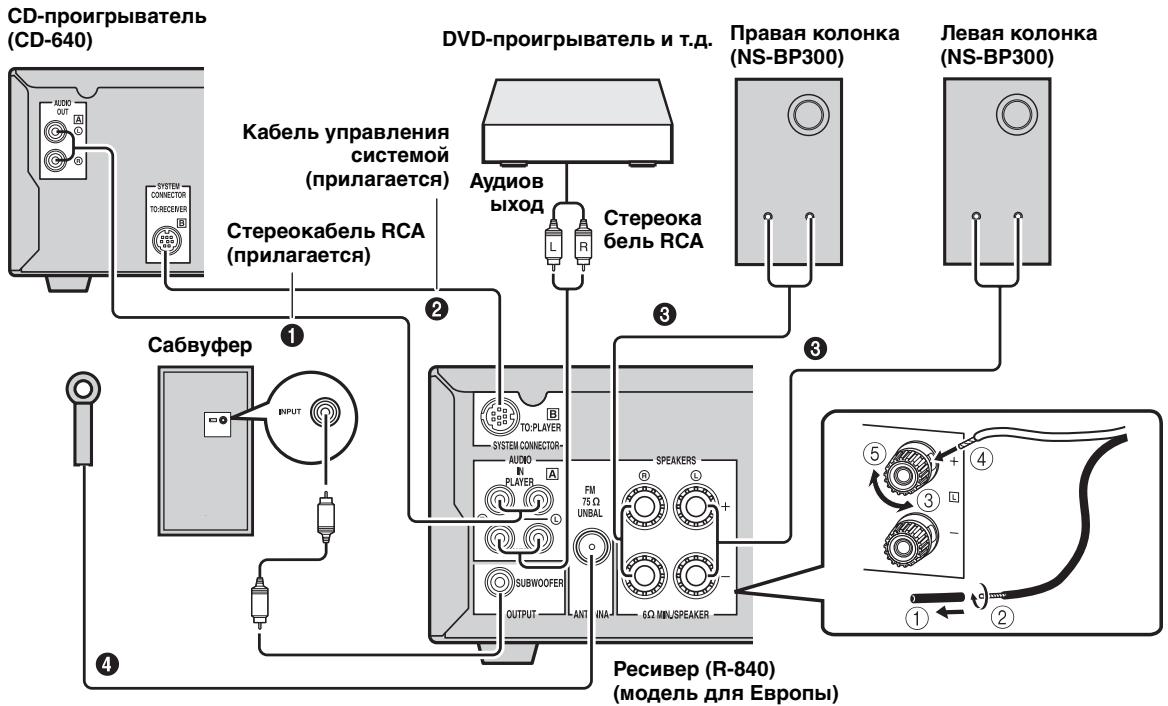
PPEIOCTEPEXEHNE
HeIOKJIIOuAHTeToYcTPOIcTBOINpyrHKeKOMIOHeHTbIKcETNIOTOROKaK6yUytCoEINHeHbBCEKOMIOHeHTbI.
- OTKpbIbIe IIOBOJa KOJIOHOK He IOJIIXHbI COINPKACAITcIpyr C pyrOM HJIn C JIO6oM MeTaJIINueCKoYacTbIO peCNBepa. 3TO MOKeT IIpNBeCTH K IIOLOMKe peCNBepa H/IIJ N KOJOHOK.
Bce coeHHeHHI JIOJIHbI 6bITb BbIIIOJIHeHbI BepHO: L (JIeBbI) K L, R (IIpaBbI) K R, “+” K “+” I “-” K “-” 3ByaHne ot KOJIOHOK 6yIET OTCYCTBOBaT II pR HeIIpABHbIbHom BblIOJIHeHH N IOKJIIOUeHHN, IV 3ByaHne 6yIET HeecTeCTBeHHbIM c OTCYCTBHeM Hn3KOJcAcTOTHORO CnHaJa II pR Heo6JIIOJeHHN IOJIpyHOCTN II pR IOKJIIOUeHHN KOJIOHOK. 3a IIOJIHNTEJBbHM INCBeEHNM 6pbIaIaIteCb K pyKOBoIDCTBaM IO 3KCIJyataaHH KaJIOrO KOMIOHEHTa.
PpIMeuaHn
- CoeHHHeHne ynpabIeHn HcTeMoH hIOJIb3yETcI IJIpeNaH cHrHaJIOB YO t peChBepa Ha CD-IpOnIrpbIbATEJIb.
-Пи ПОДКЛIOЧЕнHH KOJOHOK,OTJIINHbIX OT NS-BP300,HcIOJIb3yIte KOJOHOKN C cOIIpoTnBJIeHNm CBblIe 6Ω. - PnCJIa6OM IIpHMe paIIOBOJIN B BAIIepeIHOHe IIN ecIIN BbIXOTHTe yIyUHTB paIIOHIpHem, peKOMeHnyetcI HIOJIb3OBAtB HmEIOIIIEcB IIpoJaKe BHEIIHHe aHTeHHb. BoJIee IOIpo6Ho, o6paTHTeCb K 6JIHXaIIeMy ABTOPIHOBAHHomY INJIepy Yamaha IIN cepBNC-UEHtp.
EcJIH YacbI He yCTaHOBJIeHbI, Ha IINcIIJIe MmIgAET HnIkaIIra "SET TIME:
HaKmIe ENTER IIJIe IepexOJa K IyHKnTy 3.
3 BocnoJb3yIteCb KhoNkamn / nlaBb6opa onu "TIME"; a 3aTeM haxmnte ENTER.
PecnBeppeHJET BpeKHM yCTaHOBKn YacOB. NaHT MmraTb YacOBbI IINΦpbI.
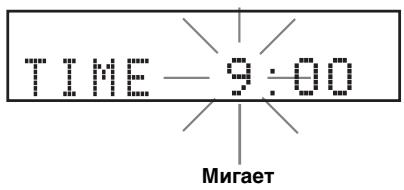
4 YctaHOBnte yac c NOMOu bIO KHONOK / , a 3aTEM HaxMITE KHONKY
HaHTMnraTbMNHyTHbIeIINΦpbl.
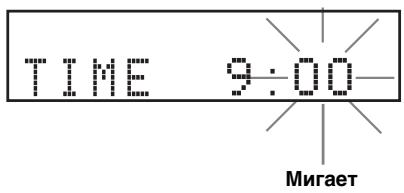
5 YctaHOBNTe MNHyTbIC NOMOuBIO KHONOK / , a 3aTeM HaxMnte KhONky ENTER.
HaHT MnraTb YacOBbI H MNHyTHbI IuΦpbl. ΦTo6bl N3MeHnTB Yac H MNHyTbI eIe pa3, HaxMNTe KHOIIky ▲ HJN▼, BbIOJIHnTe IIIaH 4 N 5, a 3aTeM IIpeEINTE K IIIary 6.

6 HaxmTe KhONKy ENTER.
YacbI yCTaHOBJEHeblI.
YacOBbIe H MmHyTHbIe cerMeHTbI IpepcTaHyT MmRaTb H NaHyT rOpTe b HeIpepbIBHO. PecHBep BepHeTcB H HopMaJIbHbI pexHM.


BepHytbcK I npébIyIeMу 3kpaHy MoKHO, hJaab KHOIIky
СИCTEMHBIE ONEPAÇΥN
CJIeIyHnKeYka3aHHoI IpoIeIype,BbI6epHTe HcToUHk IIpHeMa H NaCTpoIte 3ByKOBbIe IapaMeTpbl CnCTeMbI.
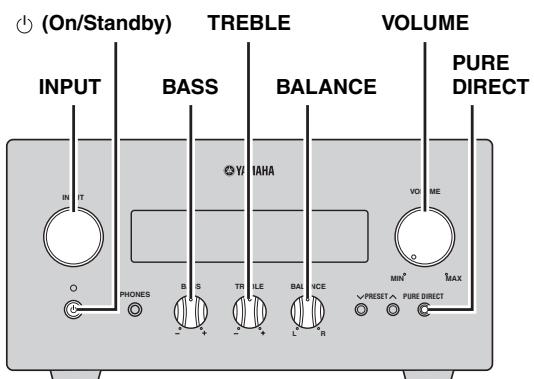
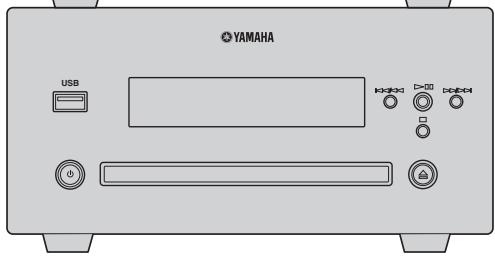
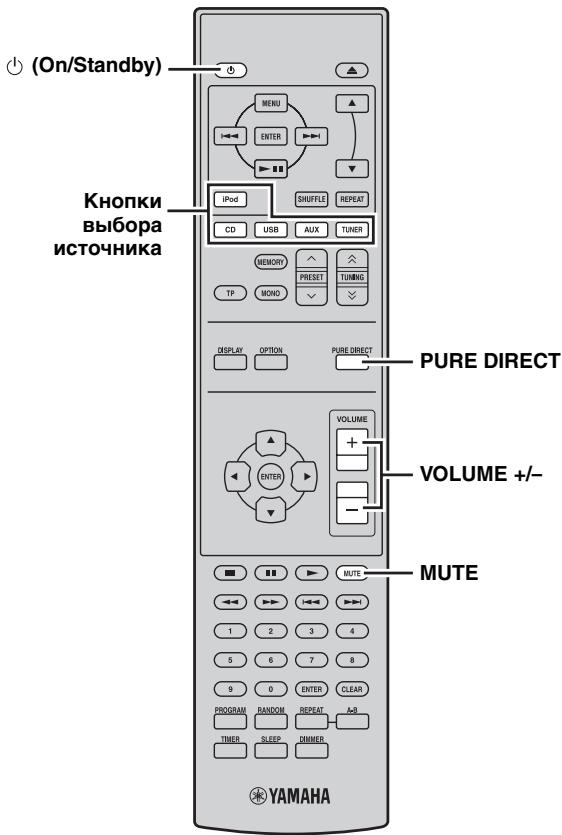
OchOBHbIe Opeaun CnCTembl
1 HaxmTe KhONky (On/Standby) nBkIIOUeHnpeCnBepa.
B 3aBnHmocTH OT peKHaMa IIpHema ycTpoNCTBa, CD-IIPOHrPbIBaTeJIb TaKKe BkJIIOuHaeTcyepe3 coeINHeHne yIpaBJIeHNcCTeMoH (c.c.8). BkJIIOUaYeTcIncJIeI IpePeHHe IaHeJIH.

Данная снстema осаншема Функима ABTOMATUeCKORO peЖима Oжидань (c.24),KOTOPЯ ABTOMATUeCKH IIpeBOIHT cHCTeMBy B peЖIM Oжидань, ecIIH OHa He HcIIIOJIb3OBAJIacb 30 MHHyT, IOKa peCHBep 6blI yctaHOBJeH Ha peЖIM IIpHema CD IIIN USB.
2 Haxmte OndHy n3 KhoNOK BbIbopa nCTOuHnka (nIn nobepHnte nepeKJIouaTeIb INPUT Ha nepeDnei naHei) dJa BbIbopa Tpe6yemoro nCTOuHnka npHeMa.
3 Haunthe Bocnpon3BeHne Ha Bb6paHHOM KMOHOENTe-NCToHNKe IINBb6epnte padnoctaHIO. IJI IOJUeyHnI DOJIOJIHNTeJIbHbIX CBeJEHnI IO BOCpOHN3BeJEHHo cDInckOB/ycTpoNCTB USB,cmOTPte cTp.15 NIOJUeyHnI DOJOJIHNTeJIbHbIX CBeJEHnI IO HAcTPOHe,CMOTPte cTp.18.
4 BocnoIb3yIeTcB KhoIkpamn VOLUME + / - (iIN noBepHnTe perynlTop rpoMkOCTn VOLUME napeDne naneN) dny yctahOBKn 3Byka Ha Tpe6yEmbl ypOBeHr pOMKoCTn.
CHOBA HAXMITE KHOIIKY MUTE IJIY BOCCTaHOBJEHHI
BbIBOda 3Byka K IIpeXHeMy yPoBHIO rPOMKoCTH.
Hac troponka npkoctn dincpnpepeidne paheInpceBepa
Mozhno ymehbHITb JpKoCTb IINcIIepepeHne IIaHeJI peCnBepa.
IeJIeIeIeIeJIeHHeIIaHeJIi CD-IpoINrpBbATEJIa TAKKe IeJIaETc8 6OJIee TycKJIbIM Uepe3 coeINHeHHe ynpabJIeHN CHCTeMOn (E C.8).
(HactpoIkoI IO yMOJIuaHIIIO YBJIaTeTc“DIMMER OFF")
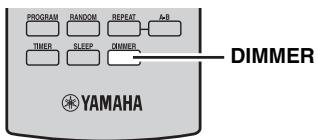
Haxmte KhONky DIMMER.
BbMOxKeTe BbI6HpaTb Tpe6yEmyIO npKocTb IINcIIeIpeepHeI pHaJIpeCBepa H3 Tpex 3HaueHH:
HOPMaJIbHaЯ npKOcTb, cpeINHЯ TycKJIOCTb H TycKJIOCTb.
HauaNo BocnpOn3BedeHn DaNcKa
1 BbI6epnte CD B KaueCTBe nCTOuHnKa npneMa (c.13).
2 HaxMMTe KhoNky ,YTO6bl OTKpbItb IOTOK dNcKa n 3aRpy3nTb dNcK CD.
3 Haxmnte KhoNky. BocpoH3BeJeHne HaunHeTcABTomaTHueckn. IJIay ayno CD-ncKa BocpoH3BeJeHne HaunHaetcIepBoi 3ByKOBoi IOpOxKn, a IIJI paJIIOB MP3 nIN WMA - b aJIpaBHTHom IopJKe IIO HMeHH paJIa.
JIOTOK IINCKa TaKKe MOxHO OTKpbIBaTB H3aKpbIBaTB NaKaTHeM KHOIIKN HaIpeJeHn IaHeJIi CD- IIPOHNpBIBaTeJIa.
Hauano BocnpoN3BedeHnC yctpoNCTBa USB
1 BbI6epnte USB b KaueCTBe nCTOHTHnKa npHema (c.13).
2 Поdkлочte yctpoicTBO USB K nopTy USB Ha CD-рponrpbiBaTeIe. OTo6pa3ntcЯ obiiee KOJIInyeCTBO φaIIIOB. BpeM cyHTbIaHnma MoKeT IIpeBbIaTb 30 ceKyI - 9TO 3aBnCt OT YHCJa φaIIIOB/IIaIOK.
3 HaxmTe KhoNky NaHaJaBocnpon3BeHeHna. ΦaJIbI 6yUyt BOCnpoN3BOJNTbcra B IOpjaKe JAtbI IN BpeMeHH IX CO3JaHHa.
PpmeaHn
-ПривOCПИОн3BVEeHINcycTpoIcTBaUSBO6IIeeВремьСбсхфайIOB He OTO6paJkaeTc.
- EcJIn ycTpoIcTBO USB pa36HTo Ha pa3JeJIbI, OTO6paKaaeTcra ToJIbKO coIepKHMoe IepBOrO pa3JeJa.
B3aBnHMOCTNOTcIeIINΦHKaIIHHyTPOINCTBaUSB HeKOTOpbIeΦaJIbI MOrYT cHTbIBaTbCHeBepHO.
ΦaJIbI,3aIIHIIeEHHbIE aBTOPCKHM IpaBOM,BOCINPOIN3BOJNTbcH He MOrYT.
Даннай сн�тума может ВОПОНЗВОДИТБайлб OБемо Ду 4ΓБ.
OctaHOBka BocnpOn3BedeHnA
HaKMMTe KHOIIKy
Pay3a BocnpOn3BedeHnA
HaKMMTe KHOIIky ■
JIЯ BO3O6HOBJIeHnIpeKHMa O6bIuHOrO BOCIIPOIN3BeJeHnHaXKMHTe KHOIIKy I.
PpOnyck 3ByKOBoI DOpOxKn
"REP OFF" IIOBJIeTcB CJIyae yCTaHOBKn cNCTeMbI B peKIM Pure Direct.
Повтор заданHorофразмени (Repeat A-B)
MozhoIOBTOPTb3aHaHHIΦpaarMeHT 3ByKOBoI DOpOxKN.
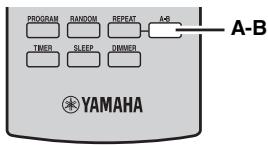
1 HaxMMTe KhoNkU A-B dIy yCTaHOBKn HaayalbHOn ToUKn NOBTOpHOrO BocPon3BeDeHn.
"REP" n "A-" 3aropntcna IIncIIee IpeepHei IIaHeJIi CD-ppOnIrpBbTaTeJI.
2 Haxmte KhoNky A-B dny yctahOBKn KOHeuHOn ToQKn NOBTOPHOrBOcPon3BeDeHn.
“A-B”3arotptcHaIinCIIJiee.
BbIbpaHHbI paRMent 6yIeT BOCIIPOH3BOJTHcI IOBTOHO.
OTmeHaФyHKcHm NOBTOPOBO BOCpON3BeDeHnA-B
HactpoIka nopAdka BocnpO3BVeDeHn (Program Play)
Mozho HactpoHTb IopJIOK Bocippon3BeJeHnI IO 50 3BykOBbIX IopOkeK, coXpaHeHHbIX Ha ayHNO CD-ⅡncKe. JAnHna OIIepaIIHa HeIOCTyINHa IJIA NcKOB C JaAHbIMN H yctpOHTB USB.
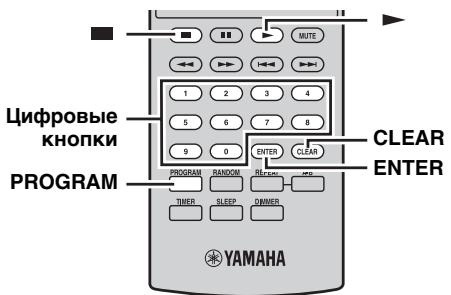
1 HaxMMTe KONky ⅡIaOCTaHOBKn BOCpOn3BeDeHnA.
2 HaxmTe KhoNky PROGRAM.
CD-ⅡpOINrPbIBaTeJIbIpeEJIeT B IIpOprAMMbIy peXHM IIpHemaHa Hn DaNcIIee IpeEJIeH NlaHeJIn 3aOpHTcH NHHkAToP PROG.

3 BocnoJIb3yIteCb IuΦpOBbIMn KhoNkAmn dIa BBoDa HOMepa 3BykoBoI DopoXKn, KOtOpYIO HxKHO 3anporpaMMIpOBA Tb, n HaxMnte KhoNky ENTER.
BbI6epNTe HOMep IpeDyCTaHOBJIeHHo paIIOCTaHcHn, NOKa MIRaET INHdNKaTOP PRESET.
4 HaxmTe KhoNky MEMORY dJa
coxpaHeHn, noka MmraeT nHdNkatop PRESET.
Ha IIncIIiee IpepeIHeI IaHeJIH 3aRopHTcI INIIkaTop PRESET.
5 NOBTOPaIte 1-4 Do npdeyctaHOBKn BCEX HxKhbIX paJnoCTaHcN.
BbI6op npedyctaHOBJeHHbIX paNocTaHcni
BbMOKeTe JIeKo HAcTpOHTbcHa JaHO6yIO JeJaemyo paHnOCTaHIIIO, BbI6paB rpyIIy H HOMep IIpeYcTaHOBJIeHHo paHnOCTaHIIHN, IIOJ KOTOpbIM Oha 6blia coXpaHeHa (c.18).
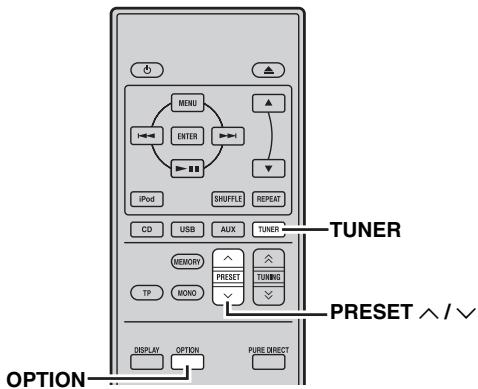
BocnoIb3yItecb KhoNkoI PRESET / dIa Bbl6opa npedyctaHOBJIeHHO paIIOCTaIcII.

-TaKKe MoKHO HcIOJIb3OBAt bIpeJIHIOI IaHeJIb IIJI BbI6Opa IIpeJyCtAHOBJIeHHbIX paJINOCtAHIIH.
BocnoIb3yItebc KHOIIKO PRESET / IIJIa BbI6opa IIpeYCTaHOBJIEHHo paHIOCTaHINH.
-Пин haжathn KhoIIOK PRESET / ha IIpeJHeIaHeJI pecHBepa BpeKHMe OxHuaHry, OH aBTOMaTHUeCKN BkIOuHT TIOhe H NaCTpOHT erO Ha IIpeJyuctaHOBJIeHHyIO CTaHIIIO, KOtOpAra 6bIIa BBbpaHa paHee.
Дя удалениnpedуctaHOBlenho paioctaHcun
1 HaxmTe KhoNky TUNER dIy ycTaHOBKn yctpoiCTBa B peXIM 4M.
2 Haxmnte KhoNky OPTION dans oTo6paXeHnmeHIO onu. BocnoIb3yItecb KhoNkAmn / dIa BbIbopa Hndkaun "PRESET DEL", a 3aTeM haxmnte KhoNky ENTER.
3 BocnoJb3yItec b KhONKaMn / JIy BbIbopa npeducTaHOBJIeHHO CTaHcIN, KOtOpYIO HxKHO ydaJIHTb, a 3aTeM HaXMMTe KhoNky ENTER.
PpeNyctaHOBJIeHHa cTaHnIg 6yIeT yJaJIeHa.
Mozho npoIOJXHTb ydaJIeHne
IpeyctaHOBJeHHbIX CTaHnHa 9TOM 3KpaHe.
YcTaHOBKa TaMepa YacOB
TaHmep aBTOMaTHUeCKn BKJIIOuayet peChBep HJIN yCTaHaBJINBaET eRO B peKHM OXHJaHHB yKa3aHHoe BpeM. TaKxe MOxHO yKa3aTb HcTOUYHK, aBTOMaTHUeCKn BBi6HpAembl peChBepom IIpH BKJIIOUeHHN TaHmepa.
Приимеанnia
- YCTaHOBKa TaHMepa HeBO3MOxHa, IIOKa He 6yIyT HAcTPOeHbI YaCbI (c.12).
- EcInB TeueHHe 6oJIe Yem 30 cekyHn He 6bIIa HkaTa HnKaKaJn KHOIIKa IocIe IIpeIbIyIeero HaKaTH, BbIOJIHeHHbIe OIepaHn ydaJIaIOTcH III NaMByTH, N OTO6paKaTecO bIyHbI INCIIJe.
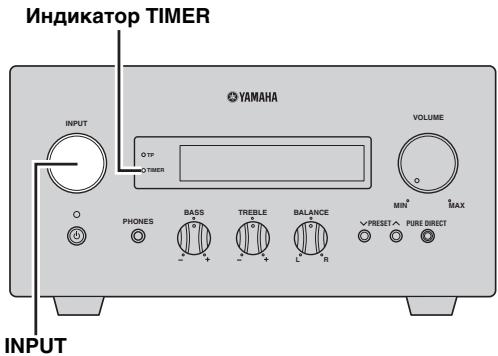
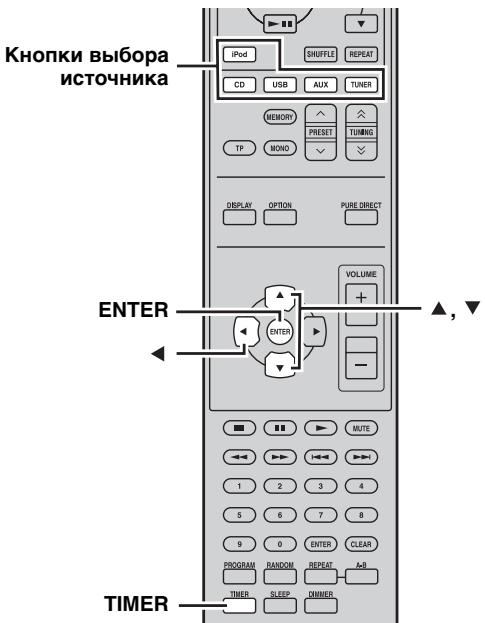
1 BocnoJIb3yItecB KhoIkaMn TIMER n ▲/▼ ДЯ ВьБОра onци "TIMER", a 3aTeM нажмTe KhoIky ENTER.
PecnBepepeT BpeKIM yCTaHOBKn TaHmepa. Ha IpeEneI NaHeJIIn 6yTeMnRaTb HnDnKaTOp TIMER.
2 BocnoJIb3yIteCb KHONKAMN ▲ HII NДЯ BbIbopa onци "ON" (TaIMep BKJIIOUeH) HII "OFF" (TaIMep BbIKJIIOUeH), a 3aTeM HaxmTe KHONKy ENTER.
ON:ПОЯВИТСАКранycтановьн Таймера.
Ipeennte K 3y 3.
OFF: INHINKaTOp TIMER BbIKJIOUHTcN peCnBepBepHeTcB O6bIuHbIpeXHM.
PpMueaHne
ДявьклоченТаМераВьберпгe“OFF"KaTOLьКО 6удЕВьклочenТаМер,установkaТаМераИнДИКаТOP TIMER NaЧHyт ropetь НелретьВи ДToTex ПОТЯБьбраHo“OFF”
3 YctaHOBNTe BpemHaayana pa6oTbI TaHmepa.
IIJIIOJIyUeHnIIOJPO6HOINHΦOpMaIHNo6 yCTaHOBKe YacOB,cm.IIaIgN 4-6 pa3JeJa "PeryJIInpOBoKa YacOB" (c.12).
4 BocnoJIb3yIteCb KhoNkAMn / nJH KhoNkoBbIbOpa NcTOUHnKa dJa BbIbopa NcTOUHnKa npHeMa, NcNoJIb3yeMOro BO BpeMa BkJIIOueHn TaIMepOM pecNBepa, HaxmTe KhoNky ENTER.
PecnBep aBTOMaTHueckN BbIbnpaET HcTOHnK IIpHema BO BpeM eEo BKJIIOUeHHra C IIMOIIbIO TaHmepa.
EcJI IN B KaueCTBe BXoJHOrO HcToUHnKa BbI6paH cnHraJI YM, Homep IIpeJyctaHOBKn (HaIIprHMeP, "P01") 6yJeT OTO6paXaTbc8 Ha IINCIJIeepoHTaJIbHOI IaHeJIi. HaxMMTe / IJIABbI6opa HOMepa IIpeJyctaHOBKn paIIOCTaHIHH, Heo6xoJIMoI IJII pOcIJyIINBaHH, IIpi BKJIOUeHHOM TaIMepe, a 3aTeM HaxMMTe ENTER.
Прии Вьборе ---"(IOумЛчанHо) pecиВер BьберET paIHOCtaHиIO,Ha KOTOPyO OH 6blI NaCTpoeH paHee.
EcHn HET coXpaHeHHo PAHIOCTaHINB KaueCTBe IpeJyctaHOBJIeHHo PAHIOCTaHIN, OTo6pa3HTcra --."HaXMHTe ENTER IN IpeepiNTe K Ⅲary 5.
MoXHO BbI6paTb TOJIbKO IpeJyctaHOBJIeHHyIO paJnOCTaHIIHIO. CoXpaHNTe paJnOCTaHIIHIO, KOtOpYIO XOTHTe IIpocJyIIaTb, IIpiB BKJIIOueHHOM TaImepe B KaueCTBe IIpeJyctaHOBJIeHHOH paJnOCTaHIIH3 3apaHee (c.19).
PpMeeaHne
HeIb3a BbI6paTb AUXB KaueCTbe hctOuHnKa npHema.
5 BocnoJIb3yItecB KHOJkAMN / dIyCTaHOBKn IpomexkyTKa BpeMeH pa6OtbipecuBepa.
YcTaHOBKa TaMepa cHa
TaHMeP cHa yctaHaBJIbAeT peCHBep BpeKHM OXHHaHHIIOcJIe OKOHuaHHYka3aHHOrO BpeMeHH.
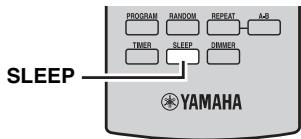
Функия abTOMaTHuecKOrO peKIMa OxHДaHnI IO3BOJIeT aBTOMaTHueckN yCTaHOBHTb cHCTeMy BpeKIM OxHДaHnI B cJIyae BbI6opa OIIHH CD IJIH USB B KaYeCTBe HCTOuHnKa IIpHeMa I B cJIyae, ecJIn C cHCTeMoI He BbIIOJIJIocb HnKaKHX DeIcTBn B TeYeHne 30 MmHyT.
PpmeaHn
- POKa peCnBepi CD-PpOINrPbIBaTeJIb He IIOJKNIOUeHb HAnJIeXaIIMM O6pa3OM Upe3 IIOCTabJIaEMbI Ka6JIb yIpaBJIeHHa cnCTemO (c.8), DaHHa 0yHKIIra He 6yIet cpa6aTbIBaTB IIIA CNCTeMbI.
-Даннайфункиг He cpa6aTaBbAeTДЯСHTeMbI BO BpeMЯ BOCIIPOIN3BeJeHn.

Длг OTmehblonepaunynyctaHOBkn
HaKMHTe KHOIIKy OPTION BO BpeMpa6oTbTaHMepa.

BepHytbcK IIpeIbIyIeMey 3KpaHy MoXHo, HaxaB KHOIIKy
1 BocnoIb3yITeScb KhoIkaMn CD nIu USB dJIy BbIbOpa NCTOCHNka npHema, n HaxMnte hKonky OPTION.
"AUTO STBY" IOBHTcHa IINCIIJee IpeeHne IIaHeJIIN pecHBepa.
2 HaxmTe KhoNky ENTER.
HacpoiKoI IO yMOJIuaHHIO JBJIaTeCra "ON"
4 HaxmTe KhoNky ENTER dIa NOdTBePxxDeHnHaCTpoiKn.
"AUTO STBY" BHOBb IIOBHTcHa IINCIJIiee.
5 HaxmTe KhONky OPTION.
PecHBepBepHeTcB HOpMaJIbHbI pExHM.
YINPABJIEHNE iPodTM
C I IOMOIIbIIO IOCTaBJIeMOrO IIyJIbTa IY KpOME yIpaBJIeHnpeCBepOM (R-840) IN CD-IpoHrpBIBaTeJIeM (CD640), TAKKe MoXHO yIpaBJIaTb ycTPOJcTBOM iPod, ycTaHOJIeHHbIM B JOK iPod.
Испобзовные iPod™
IocJIe IIOKJIIOUeHn iPod K JOKy iPod MoJHO BOCIIPOH3BOIDtB daHHbIe c iPod C IOMOIIbIO IOCTaBJIeMOrO IIyIbTa IY.
PiN IIOKJIIOUeHn iPod BO BpeMBAOCIIPOH3BeJeHn, daHHa CNCTema ABTOMaTHueCKN IIpeHJTe B peKHM iPod.
PpIMeuaHn
- Пдержваю стобк iPod (Click and Wheel), iPod nano, iPod Classic, iPod mini iPod touch.
- HeKOTOpbIe yHKiIN MOryT He IIOJIepJHbAteBcR, B 3aBnCHMOCTN OT MOJIeIN HJI IN BepCn IIporpAMMHorO o6ecIueHIn iPod.
#
IIJIIOJIyueHnIIOJHOcINCKaCOoBIIeHNOCOCTOHHNpa60TBI,IOJIYJIaIOUHxCgHaINcIIJIeIpeIeHIIpeHBePa, cm.pa3JIeJI“iPod”BΓJIabe“YCTPAHEHNEHENCIPABHOCTEI"(c.27).
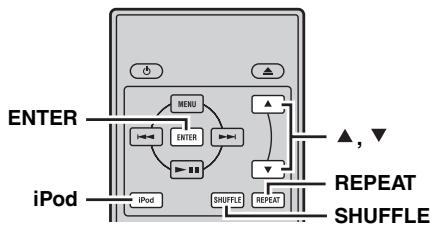


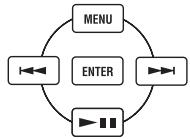
Nybld


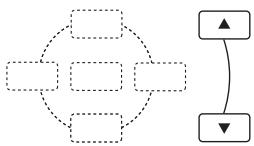
PnJIaeraMbI IyJIbT IY HMeET Te Jx e camblie yHKIIHOHaJIbHbIe KHOIIKN, YTO h iPod. TaKIM 06pa3OM, Ha3HaueHne 3THX KHOIIOK COBIIaJaET.
1 Haxmam iPod, BbI6epnte cyHKnIO iPod KAK NCTOCHNK NOCTyNAIOUcero CNHaja.
■ NOBtophoe Bocnpoun3BeDeHne (Repeat Play)
Mожно IIOBTOpHOb BOCIIPOH3BOIDHTb OIHy 3ByKOByIO IopOxKy HJIIN rpyI\PY IdoPoxKeHa iPod.
HaKmTe KhONKy REPEAT.
При Кадом Нжатин KhoIGNК IIpoHcxOДТ CMeHa peЖима IOBTOPOBOBIOHN3BeHn.В IIpNBeHNOH HIXe Ta6JIuH e IOKa3aH IIpHmep I3MeHeHnpeXnma IIpr NaJxKATN KhoIGN. IIpoBepbTe Ha əKpaH eI Pod peXHM, BbI6paHHbI B DAHHbMOMeHT.
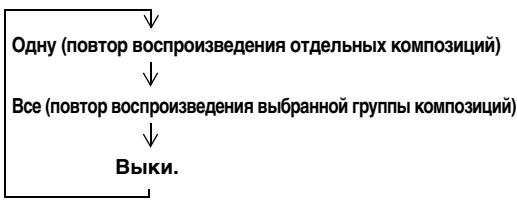
Bocnpoun3BeDeHne B cLyuHaHOM npopJKe (Shuffle Play)
KOMIO3HUNHJIaJIb6OMBHa iPod MoJxHO BOCIIPOH3BOIDHTB CJIyauHOM IopJKe.
Haxmnte KhoNky SHUFFLE.
IIpn KaJDOM HaKaTHN KHOIIKN IIpOncxOJNT CMeHa
peKHMa BOCIIPOH3BeJeHHN B CJIyuaHOM IOpJKe. B
IIpNBeJeHHo HNXe Ta6JIuIe IOKa3aN IIpIMep
H3MeHeHHN peKHMa IIpn HaKaTHN KHOIIKN. IIpOBepbTe
Ha 3KpaHe iPod peKHM, BbIbpaHHbB DAHHb MOMHT.
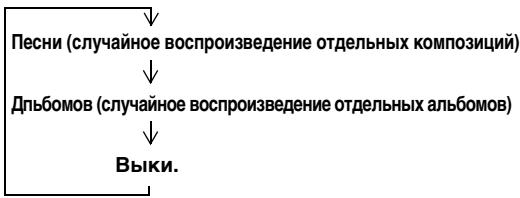
YCTPAHEHNE HENCIPABHOCTEIN
EcJH y Bac BO3HNKJIIN JIO6bIe H3 cJIeYIOUHX TpyHOCTeB BO BpeM 3KcIIyatauHHN JaHHoN CnCTEmbl, BOCIOJIb3yIITecb HIXKeIPnHBeDEHHO Ta6JIuIe IJIy UcTpaHEnH NHeCIIpaBHocTH. B cJIyuee ecJH HeHCIIpaBHOCTb He yKa3aHa B Ta6JIuIe HJIN B1 He cMOrJIH HcPiPaBHTte ee, cJIeYy HnCTpyKIIIM Ta6JIuIbI, OTKJIIOUHTe DaHHyIO CnCTeMy, OTCoeDHHTE Ka6eJIb IIHTaHHN I ObpaTHTeCB K 6JIINKaIIHMe My OΦHuaJIbHOMy IIJIepy HJIN B cepBnCHbI ΒeHTp Yamaha.
PecuBep (R-840)
067aJyacTb
Yactota DnCKpeTn3aun
KoiJueCTBO Bb60pOK (IPOIeCC IIIO OUIΦpOBaHHaHaIOrOBbIX CnHbAOB) BCekUHyD. B IprHIIHIE, Yem BblIe YaCTOTa aMIJIHTyINO-HMNIYbCHOH MOUYJIaHH, TEm IIIHe dHaIa3OH YaCTOT IIJIA BOCIIPOH3BeJEHHN, H Yem 6OJIbIe cKOpocTb KBAHTOBaHHbIX 6HTOB, TEM YHIe BOcIIPOH3BeJEHne yPobHe 3ByuAHH.
3BykoBaJdoPoxKa
CD-IMCKMOKHOpa3JeJIHTbHaHeCKOJIbKOceIeMeHToB (3ByKOBbIXIIOPOJKe).KaJIOMy pa3JeIy B KaueCTBe HMeHN IIpHCBaHbAEtC HOMep 3ByKOBoIIOPOJKN.
WMA (Windows Media Audio)
MeToI cKaTHa 3ByuHnA, pa3pa6oTaHHbI KOMIIaHHe Microsoft Corporation. Oh HcIOJIb3yEe MeToI 6e3BO3BpaTHOrO cKaTnA, KOTOpI aPxHBnpyET C BbICOKHM yPobHEm cKaTHa IIyTeM cOKpaIeHnHaCTn 3ByuHnA, TpyHNo yJIOBIMOn IJIa YeJIOBeYeCEKOrO cIJyXa. 3OT MeToI MoKeT cKImaTb DaHHbIe IIpHmepHO Ha 1/22 (64 KbHT/c) cOJHOBpeMeHHbIM COxpaHeHEm OJINHaKOBOrO KaYecTba 3ByuHnA, KaHa My3bIkaJIbHbIX CD-DnCKax.
Обоз nauseю abtopcknx npabaxилогotnbl
TexhoJIoTnayIIOJeKOJInpOBAHnMPEG Layer-3 JIeH3nPObaHa Fraunhofer IIS n Thomson Multimedia.
iPodTM
“iPod”ЯBJIeTcTTOBapHbIM 3HaKOM KOMIIaHH Apple Inc., 3apeHCTprhpoBaHHoB B CIIIA H npYrHx ctpaHax.
HaIIINc b"Made for iPod"O3Hauaet, YTO daHHa
JIeKTPoHHa IIpIHaNJIeXHocTb 6blIa pa3pa6OtaHa IJI
IOIKJIOUeHnI cIeIIaJIbHO K iPod n cepTHΦHnIPOBaHa
pa3pa6OTuHKOM B COOTBeTCTBHN co CTAHApTaMn KaueCTBa
KOMIIaHH Apple.
KomIIaHnAe Apple He Hecet OTBeTCTBeHHocTH 3a yHKUHOHNPOBaHne JaHHoro ycPoHcTBa HJIN erO COBMeCTHMOCt b Co tAHJaPtaMH 6e3OHaCHoCTH n PeryJIaTHBbIMH HopMaMn.
TEXHINUeCKNEIAPAMETPbI
R-840
PA3ДЕЛ YCИЛТЕЛЯ
- MHHMaJIbHoE cpeHneKBaIpaTHueckoe BbIXOJIHoe HauPjaKeHHe Ha KaHaJI RMS (6Ω,1KΓι,10% THD) 65BT+65BT
- UYBCTBHTeJIbHOCTb IIpHEMa/HMIIeJaHC PLAYER, np. 200 MB/47 KΩ
- Yactotnha XapaKTepeHCTnKa PLAYER, np. 20 T - 20 K T ± 0,5 nB
- O6IIe HeJIHHHeHoe HcKaJKeHHe PLAYER, np. (30 Bt/6 Ω) 0,04 % IIIN MeHHe
- CoOTHOIIeHHe cHTHaJI/IIyM (CeTb IHF-A)
PLAYER (200 MB, BXoJ 3aMKHyT) ..... 100 έБ έЛьоe