MCR-232 - Audio System YAMAHA - Free user manual and instructions
Find the device manual for free MCR-232 YAMAHA in PDF.
User questions about MCR-232 YAMAHA
0 question about this device. Answer the ones you know or ask your own.
Ask a new question about this device
Download the instructions for your Audio System in PDF format for free! Find your manual MCR-232 - YAMAHA and take your electronic device back in hand. On this page are published all the documents necessary for the use of your device. MCR-232 by YAMAHA.
USER MANUAL MCR-232 YAMAHA
1 To assure the finest performance, please read this manual carefully. Keep it in a safe place for future reference.
2 Install this sound system in a well ventilated, cool, dry, clean place - away from direct sunlight, heat sources, vibration, dust, moisture, and/or cold. For proper ventilation, allow the following minimum clearances around CRX-332.
Top: 20~cm (8 in)
Rear: 10cm (4 in)
Sides: 10cm (4 in)
3 Locate this unit away from other electrical appliances, motors, or transformers to avoid humming sounds.
4 Do not expose this unit to sudden temperature changes from cold to hot, and do not locate this unit in an environment with high humidity (i.e. a room with a humidifier) to prevent condensation inside this unit, which may cause an electrical shock, fire, damage to this unit, and/or personal injury.
5 Avoid installing this unit where foreign object may fall onto this unit and/or this unit may be exposed to liquid dripping or splashing. On the top of this unit, do not place:
- Other components, as they may cause damage and/or discoloration on the surface of this unit.
- Burning objects (i.e. candles), as they may cause fire, damage to this unit, and/or personal injury.
- Containers with liquid in them, as they may fall and liquid may cause electrical shock to the user and/or damage to this unit.
6 Do not cover this unit with a newspaper, tablecloth, curtain, etc. in order not to obstruct heat radiation. If the temperature inside this unit rises, it may cause fire, damage to this unit, and/or personal injury.
7 Do not plug in this unit to a wall outlet until all connections are complete.
8 Do not operate this unit upside-down. It may overheat, possibly causing damage.
9 Do not use force on switches, knobs and/or cords.
10 When disconnecting the power cable from the wall outlet, grasp the plug; do not pull the cable.
11 Do not clean this unit with chemical solvents; this might damage the finish. Use a clean, dry cloth.
12 Only voltage specified on this unit must be used. Using this unit with a higher voltage than specified is dangerous and may cause fire, damage to this unit, and/or personal injury. Yamaha will not be held responsible for any damage resulting from use of this unit with a voltage other than specified.
13 To prevent damage by lightning, keep the power cable and outdoor antennas disconnected from a wall outlet or this unit during a lightning storm.
14 Do not attempt to modify or fix this unit. Contact qualified Yamaha service personnel when any service is needed. The cabinet should never be opened for any reasons.
15 When not planning to use this unit for long periods of time (i.e. vacation), disconnect the AC power plug from the wall outlet.
16 Be sure to read the "TROUBLESHOOTING" section on common operating errors before concluding that this unit is faulty.
17 Before moving this unit, press to set this unit to the standby mode, and disconnect the AC power plug from the wall outlet.
18 Condensation will form when the surrounding temperature changes suddenly. Disconnect the power cable from the outlet, then leave this unit alone.
19 When using this unit for a long time, this unit may become warm. Turn the power off, then leave this unit alone for cooling.
20 Install this unit near the AC outlet and where the AC power plug can be reached easily.
21 The batteries shall not be exposed to excessive heat such as sunshine, fire or the like.
22 Excessive sound pressure from earphones and headphones can cause hearing loss.
This unit is not disconnected from the AC power source as long as it is connected to the wall outlet, even if this unit itself is turned off by . This state is called the standby mode. In this state, this unit is designed to consume a very small quantity of power.
WARNING
TO REDUCE THE RISK OF FIRE OR ELECTRIC SHOCK, DO NOT EXPOSE THIS UNIT TO RAIN OR MOISTURE.
LASER SAFETY
This unit employs a laser. Due to possible eye injury, only a qualified service person should remove the cover or attempt to service this device.
DANGER
This unit emits visible laser radiation when open. Avoid direct eye exposure to beam. When this unit is plugged into the wall outlet, do not place your eyes close to the opening of the disc tray and other openings to look into inside.
LASER
Type Semiconductor laser GaAs/GaAlAs
Wave length 790 nm
Output Power 7 mW
WARNING
DO NOT TOUCH THIS UNIT WHEN IT IS USED CONTINUOUSLY AT HIGH VOLUME BECAUSE THE BOTTOM OF THIS UNIT MAY BECOME HOT. IT MAY LEAD TO INJURIES SUCH AS BURNS, ETC.
CONTENTS
PREPARATION
SUPPLIED ACCESSORIES 2
PLAYABLE DISCS AND FILE FORMAT. 3
CONNECTION 4
Connecting speakers/antenna/subwoofer. 4
Connecting the power cable. 5
Other connection. 5
REMOTE CONTROL 6
FRONT PANEL DISPLAY 7
OPERATION
FRONT PANEL AND BASIC OPERATION ....8
LISTENING TO MUSIC. 9
Playback operation. 9
Other operation 10
LISTENING TO FM RADIO STATIONS 11
Tuning to radio stations 11
Presetting radio stations 11
Selecting preset radio stations (Preset tuning) 11
Displaying Radio Data System information. 11
USING USEFUL FUNCTIONS 12
Using option menu. 12
Using sleep timer 12
ADDITIONAL INFORMATION
TROUBLESHOOTING 13
General 13
iPod/iPad 14
USB/iPad 15
Radio reception. 15
Disc playback 16
Remote control 16
HANDLING COMPACT DISCS 17
SPECIFICATIONS. 17
■ About this manual
- "iPod" described in this manual may also refer to "iPhone".
- This manual describes how to operate this unit using a remote control except when it is not available. Some of these operations are also available using the front panel buttons.
- The symbol “ _ss ” with page number(s) indicates the corresponding reference page(s).
Notes contain important information about safety and operating instructions. indicates a tip for your operation. - This manual is printed prior to production. Design and specifications are subject to change in part as a result of improvements, etc. In case of differences between the manual and the product, the product has priority.
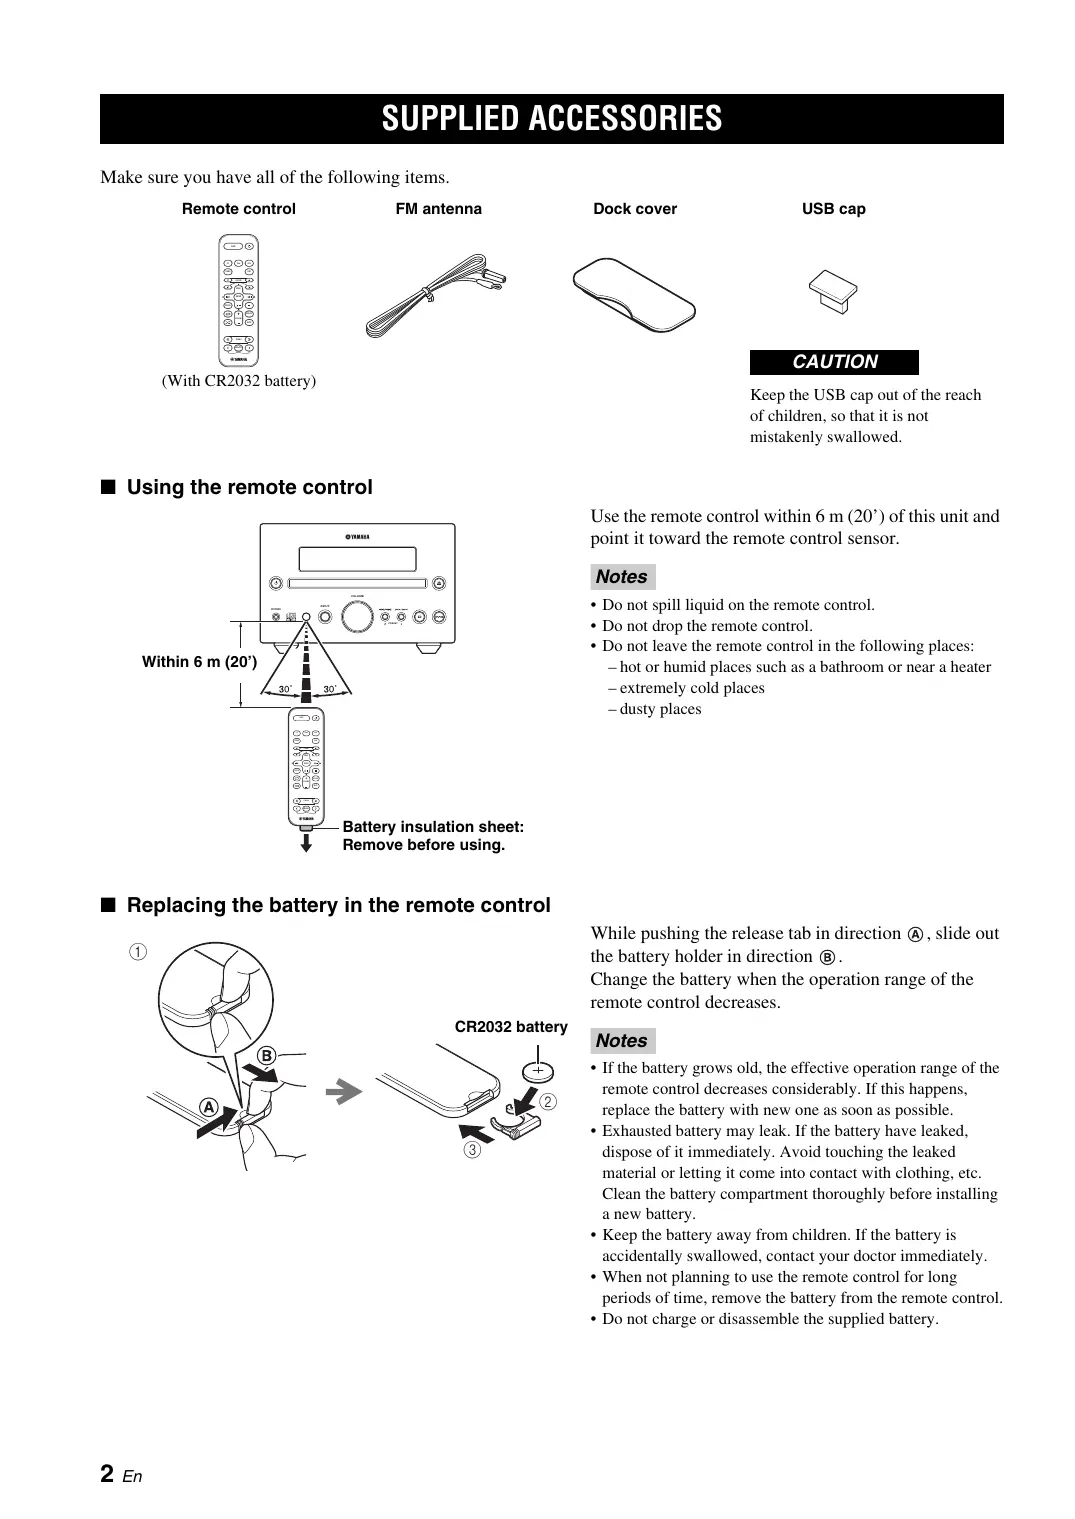
SUPPLIED ACCESSORIES
Make sure you have all of the following items.

Remote control
With CR2032 battery
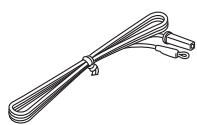
FM antenna
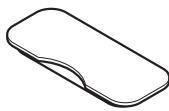
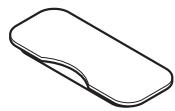
Dock cover

USB cap
CAUTION
Keep the USB cap out of the reach of children, so that it is not mistakenly swallowed.
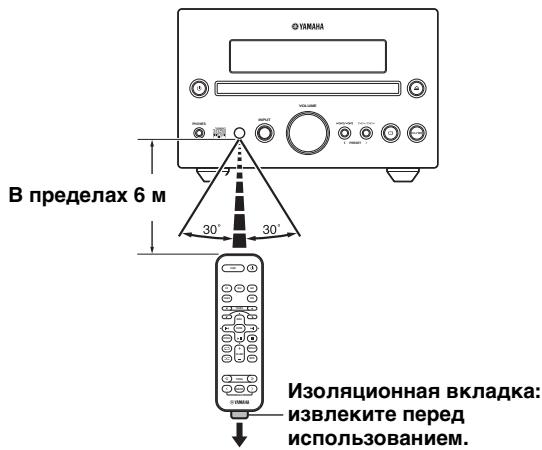
Using the remote control
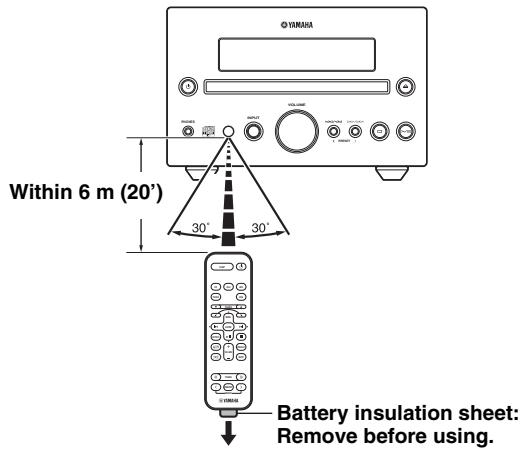
Use the remote control within 6m (20^) of this unit and point it toward the remote control sensor.
Notes
- Do not spill liquid on the remote control.
- Do not drop the remote control.
- Do not leave the remote control in the following places:
- hot or humid places such as a bathroom or near a heater
- extremely cold places
- dusty places
Replacing the battery in the remote control
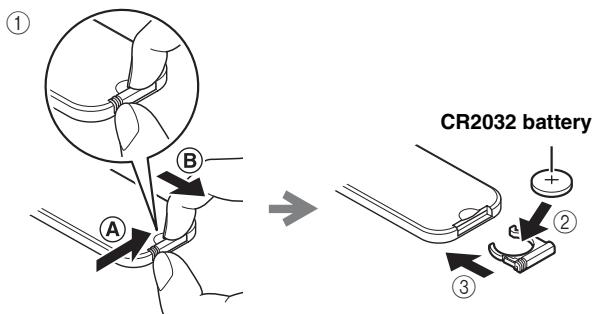
While pushing the release tab in direction A, slide out the battery holder in direction B.
Change the battery when the operation range of the remote control decreases.
Notes
- If the battery grows old, the effective operation range of the remote control decreases considerably. If this happens, replace the battery with new one as soon as possible.
- Exhausted battery may leak. If the battery have leaked, dispose of it immediately. Avoid touching the leaked material or letting it come into contact with clothing, etc. Clean the battery compartment thoroughly before installing a new battery.
- Keep the battery away from children. If the battery is accidentally swallowed, contact your doctor immediately.
- When not planning to use the remote control for long periods of time, remove the battery from the remote control.
- Do not charge or disassemble the supplied battery.
PLAYABLE DISCS AND FILE FORMAT
Playable discs
Use compact discs bearing the marks below.

... Compact discs (digital audio)

CD-R,CD-RW digital audio discs
- CD-R or CD-RW discs bearing one of the following phrases.
FOR CONSUMER
FOR CONSUMER USE
FOR MUSIC USE ONLY
- Finalized CD-R or CD-RW discs

Note
This compact disc player may not be able to play some CD-R/CD-RW discs or discs on which recording was not made correctly.

CD-TEXT discs

ck an 8-cm (3 in) CD
Place it in the inner recessed area of the disc tray. Do not put a normal (12-cm) CD on top of an 8-cm (3 in) CD.
To prevent a malfunction of this unit:
- Do not use any nonstandard shaped disc (heart, etc.) available on the market because it might damage the unit.

- Do not use a disc with tape, stickers, or paste on it. If you use such a disc, the disc may get stuck in the unit, or damage to the unit may result.
Note: Do not use any lens cleaners as they may be a cause of malfunction.
Playable MP3 and WMA files
MP3
| Format | Bitrate (kbps) | Sampling frequency (kHz) |
| MPEG 1 Audio Layer-3 | 32-320*1 | 32/44.1/48 |
| MPEG 2 Audio Layer-3, 2 | 8-160*1 | 16/22.05/24 |
*1 Variable bitrate is supported.
WMA
Version 8
- Version 9 (Standard and variable bitrates are supported. Professional and Lossless are not supported.)
| Profile | Bitrate (kbps) | Sampling frequency (kHz) |
| High Profile | 32-320*2 | 32/44.1/48 |
| Mid Profile | 16-32 | 22.05 |
*2 Both constant and variable bitrates are supported.
Notes
- Playback for Data Disc starts in alphanumeric order of files.
- Playback for USB starts in order by date and time of creation.
Copyright-protected WMA (DRM) files cannot be played back by this unit. - The disc must be ISO 9660 compatible.
- The maximum file and folder numbers are as follows.
| Data Disc | USB | |
| Maximum total number of file and folder*3 | 512 | 9,999 |
| Maximum folder number*3 | 255 | 999 |
| Maximum file number per folder | 511 | 255 |
*3 The root is counted as one of the folders.
CONNECTION
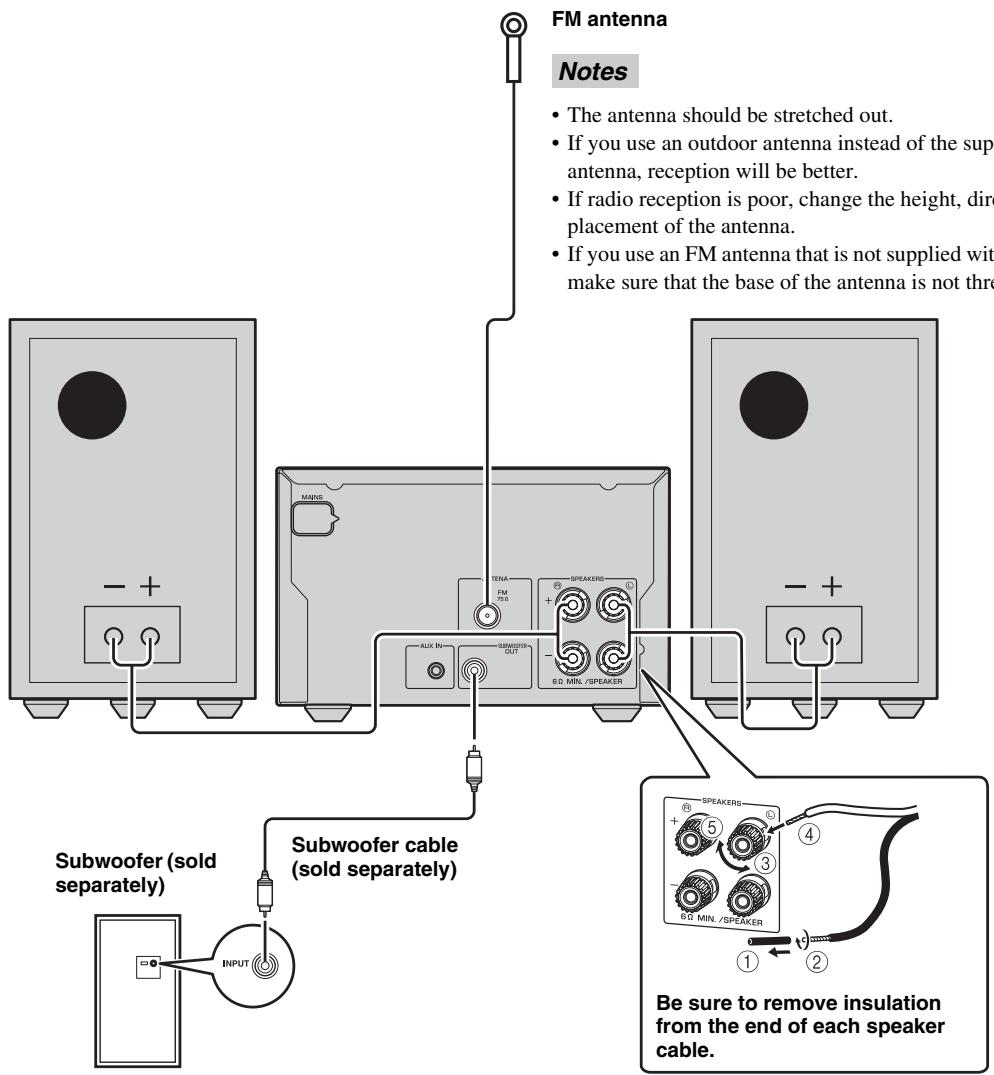
Connecting speakers/antenna/subwoofer
Follow the procedure below to connect the speakers and FM antenna to this unit. For information on your speakers, refer to the owner's manual supplied for the speakers.
If a subwoofer is connected, low-frequency audio signals are output through SUBWOOFER OUT.
CAUTION
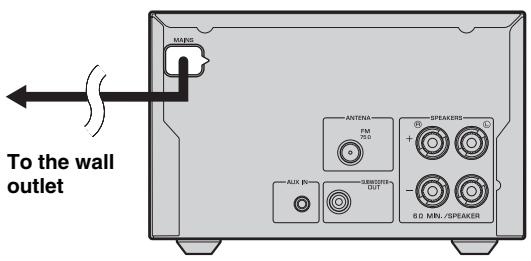
Do not connect the power cable of this unit until all cable connections are completed.
Notes
- If you connect a subwoofer, use a subwoofer that has a built-in amplifier.
- Be sure to connect the left channel (L), right channel (R), "+"(red) "-" (black) properly. If the connections are faulty, no sound will be heard from the speakers, and if the polarity of the speaker connections is incorrect, the sound will be unnatural and lacks bass.
- Do not let the bare speaker wires touch each other or do not let them touch any metal part of this unit. This could damage this unit and/or the speakers.
- Use speakers having more than 6 impedance.
- There is a chance that placing speakers too close to a CRT-based (Braun tube) TV set might impair picture color. Should this happen, move the speakers away from the TV set.
Connecting the power cable
After you made all connections, connect the power cables of this unit
Other connection
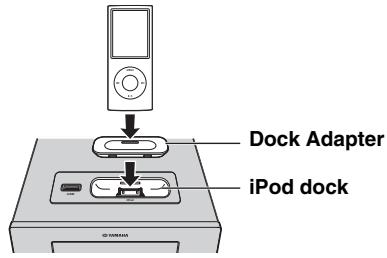
■ Stationing iPod
Station or remove your iPod whenever you want.
#
An iPod is charged when set in the iPod dock.
When the unit is turned on and the input source is set to USB, the iPod is not charged.
Note
This unit is compatible with iPod classic, iPod nano (2nd generation and later), iPod touch and iPhone.
Notes
- To secure the connection, attach a compatible Dock Adapter supplied with the iPod or an iPod Universal Dock Adapter (sold separately), and remove the protective case covering from your iPod.
- If you do not use an adapter or if the adapter is not compatible, the connection could be loose or poor, which could cause damage or malfunctions. For details on dock adaptor information, please visit official Apple's website.
- If an iPod in protective case is connected by force, the connector may be damaged. Remove the protective case before connection.
- Attach the dock cover to the iPod dock whenever you are not using it.
Connecting iPad
Connect or remove your iPad whenever you want.
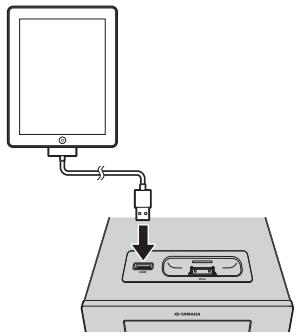
#
When the unit is turned on and the input source is set to USB, the connected iPad is charged.
Note
- Make sure to use a Dock Connector to USB Cable that is supplied with your iPad.
- When an iPad or USB device is not in use, set the USB cover to protect USB port.
Connecting a USB device
Connect or remove your USB device whenever you want.
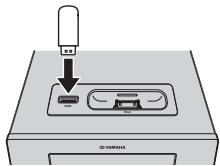
中
When the unit is turned on and the input source is set to USB, the connected USB device is charged.
Notes
- This unit supports USB mass storage class devices (e.g., flash memories or portable audio players) using FAT16 or FAT32 format.
- Do not connect devices other than USB mass storage class devices (such as USB chargers or USB hubs), PCs, card readers, an external HDD, etc.
- USB devices that use encryption cannot be used.
- When an iPad or USB device is not in use, set the USB cover to protect USB port.
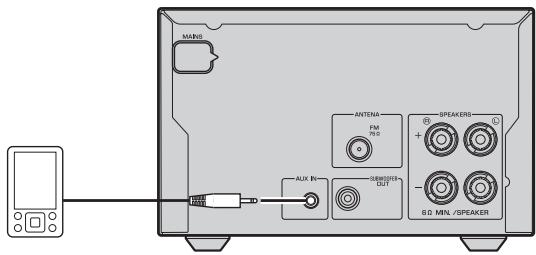
Connecting an external device
Connect your portable audio device using a commercially available 3.5mm (1/8 in) mini plug cable.
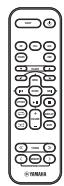
REMOTE CONTROL
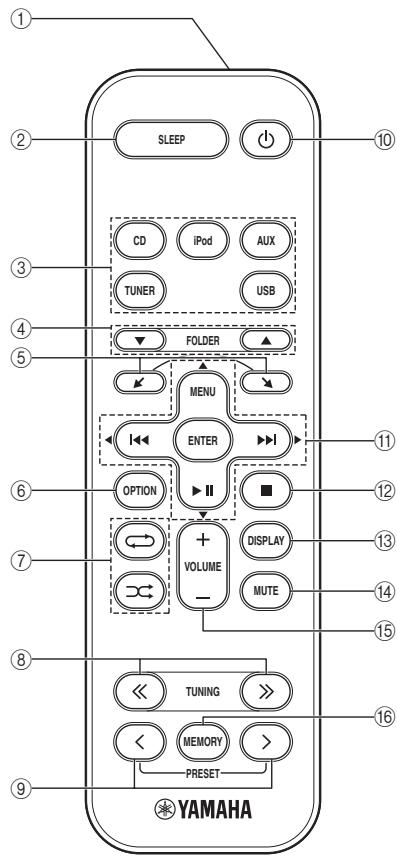
① Infrared signal transmitter
② SLEEP: Sleep setting (P. 12)
③ Source buttons: Change sources.
④ FOLDER (during data CD/USB playback): Change folder.
⑤ , : Scrol1s through items on the iPod's screen.
⑥ OPTION: Displays the option menu. (P. 12)
⑦ (Shuffle), (Repeat) (P. 10)
8 TUNING (during receiving radio): Tuning radio (P. 11)
(9) PRESET (during receiving radio): Select the preset radio station (P. 11)
10 D: Standby/on
(1) (during playback): Skip backward and forward/press and hold to rewind and fast-forward
MENU: Returns to the upper level in the iPod menu.
▶II: Play/pause
/ / / (During using the option menu): Changes the setting
ENTER
(During using the iPod): Select group/start playback
(During using the option menu): Confirms the setting
12 ■: Stop playback.
⑬ DISPLAY: Switches the information shown on the front panel. (P. 10)
14 MUTE: Mute/resume the sound.
15 VOLUME: Volume control
^16 MEMORY: Memories preset radio stations. (P. 11)
FRONT PANEL DISPLAY

① SLEEP indicator: Lights up when the sleep timer is on (P. 12).
② PRESET indicator: Lights up when you preset radio stations (P. 11).
③ STEREO indicator: Lights up when this unit is receiving a strong signal from an FM stereo broadcast.
④ AUTO indicator: Lights up when this unit is in the Automatic Tuning mode (P. 11).
⑤ SHUFFLE indicator: Lights up when you set your iPod/iPad/CD/USB to shuffle play (P. 10).
⑥ REPEAT indicator: Lights up when you set your iPod/iPad/CD/USB to repeat play (P. 10).
⑦ Radio Data System indicators: The name of the Radio Data System data offered by the currently received Radio Data System station lights up (P. 11).
MUTE indicator: Lights up when the sound is muted.
^9 Multi information display: Shows the various information.
TUNED indicator: Lights up when this unit is tuned into a station (P. 11).
⑪ MEMORY indicator: Flashes when searching for a radio station by automatic preset tuning. Lights up when you preset radio stations automatically or manually (P. 11).
12 Multi information indicators: Indicate the music information currently displayed on Multi information display (P. 10).
⑬ Operation indicators: Shows the available menu buttons for the currently selected OPTION menu item.
FRONT PANEL AND BASIC OPERATION

- Press to set the unit to standby mode. All the information on the front panel display is not displayed in standby mode. This can reduce power consumption. To turn on the unit, press , , or / on the front panel. If you press / , the input source is set to CD, iPod or USB depending on which input source is used last. Playback begins if the input source is set to CD or USB.
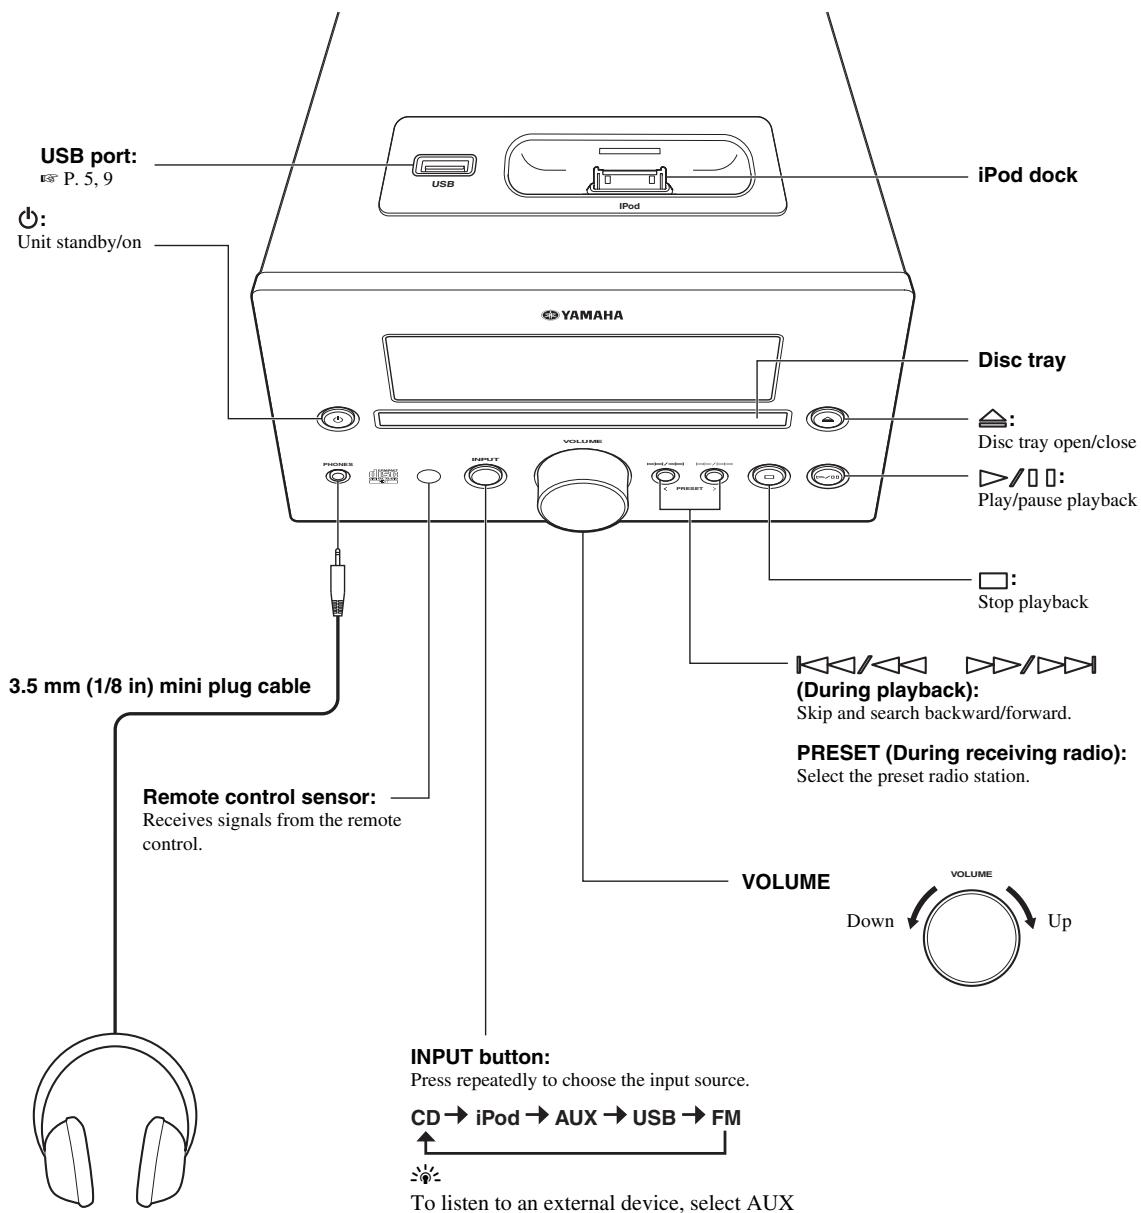
PHONES:
Connecting headphones
No sound is output from the speakers when headphones are connected.
and use the external device to begin playback.
LISTENING TO MUSIC
Playback operation
Follow the procedures below to play back music.
| 1 Set the source | 2 Switch the input | 3 Select music and start playback | |
| iPod*1 | Dock Adapter P.5 | iPod | Scroll the list Menu ENTER Control menu |
| iPad*1 | P.5 | USB | |
| USB*2 | P.5 | Skip to the first file in the previous/next folder for MP3 or WMA*3 FOLDER MENU ENTER OPTION | |
| CD | CD |
1 Some features may not be available depending on the model or the software version of your iPod/iPad.
2 - Some devices may not work properly even if they meet the requirements.
- Playability of and power supply to all kind of USB devices are not guaranteed.
- The reading time may exceed 30 seconds depending on the number of files/folders.
- Yamaha and suppliers accept no liability for the loss of data saved on the USB devices connected to this unit.
As a precaution, it is recommended that the files are made backup copies.
*3 · If you press these buttons, the folder name is displayed on the front panel display for a certain period.
- ROOT is displayed for the root folder when the directory contains playable files.
Other operation
Control playback
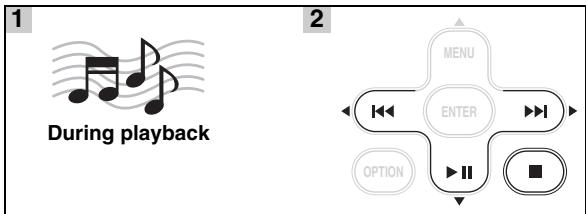
▶▶: Skip forward/Press and hold to Fast forward
: Skip backward/Press and hold to Rewind
▶II: Play/Pause
: Stop
Notes
- Playback for Data Disc starts in alphanumeric order of files.
- Playback for USB starts in order by date and time of creation.
- If is pressed during playback, next time playback starts from the beginning of the track you listened to last time. If is pressed again while playback is stopped, next time playback starts from the first track of the CD/USB device.
- This unit automatically switch the unit to standby mode if the unit is left turned on for 1 hour without playback or any other operation being performed (Automatic standby function).
Shuffle play
You can play back in random sequence.

Press repeatedly.
For iPod/iPad

*1 You cannot set SHUFFLE ALBUMS when you use an iPod touch, iPhone or iPad.
For CD/USB

*2 If the audio format of the selected music source is MP3/WMA, you can also select SHUFFLE FOLDER.
Repeat play
You can play back repeatedly.

Press repeatedly.
For iPod/iPad

For CD/USB

*3 If the audio format of the selected music source is MP3/ WMA, you can also select REPEAT FOLDER.
Switching the display
You can switch the playback information shown on the front panel display. Some special characters may not be shown properly.

For iPod/iPad
Song number and elapsed time (default setting)

Song number and remaining time

Song name

Artist name

Album name

Back to the default setting
Note
This function is available for iPod classic, iPod nano (2nd generation and later), iPod touch, iPhone and iPad. However, even with these models, this function may not be available depending on the software version of your iPod/iPad.
For CD/USB
Track/file number and elapsed time of the current song (default setting)
Track number and remaining time of the current song*4
↓
Total time of the disc*4
Remaining time of the disc*4
File name*5
Track name*6
Artist name*6
Album name*6
Back to the default setting
4 Only for Audio CDs
5 Only for MP3/WMA files
*6 Only when the selected track has information
LISTENING TO FM RADIO STATIONS
Tuning to radio stations
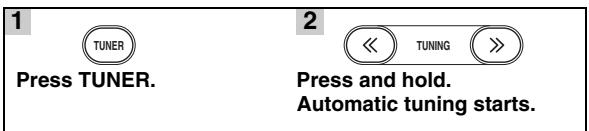
If the signal received from the station you want to select is weak, you can also tune into radio stations manually by pressing TUNING repeatedly.
Note
If you tune to a station manually, the sound is monaural.
Presetting radio stations
You can store your favorite FM stations with the preset function.
Automatic preset tuning
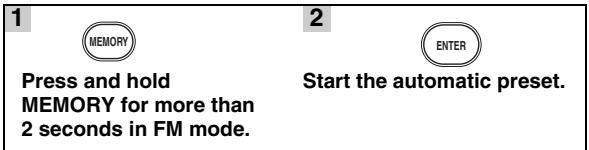
To cancel automatic presetting, press MEMORY again without pressing ENTER in step 2.
Note
When you perform the automatic preset, all stored stations are cleared and the new stations are stored.
Manual preset tuning
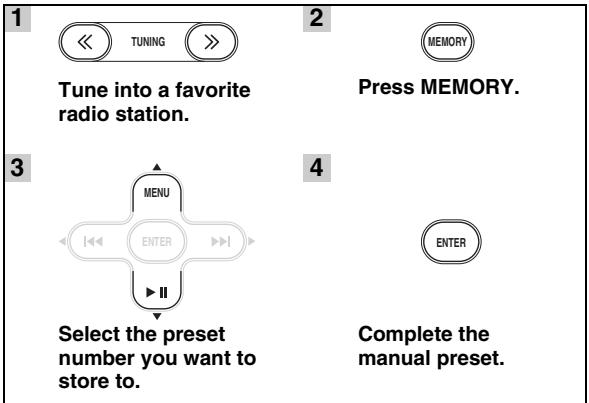
中
- You can preset up to 30 FM stations.
- To cancel the manual preset while choosing a preset number, press MEMORY again.
- You can delete a preset station by pressing OPTION Cursor / ENTER to select PRESET DELETE.
Selecting preset radio stations (Preset tuning)

Select the preset radio station in FM mode.
Displaying Radio Data System information

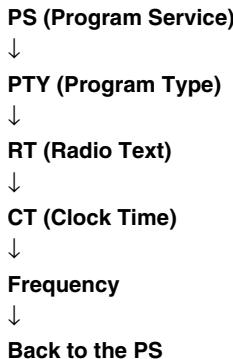
Note
If the signal transmission of the Radio Data System station is too weak, this unit may not be able to receive Radio Data System information completely. In particular, RT (Radio Text) information uses a lot of bandwidth, so it may be less available compared to other types of information.
USING USEFUL FUNCTIONS
Using option menu
The option menu appears on the front panel display by pressing OPTION. You can set various useful functions with option menu.
| Option menu | Parameter or control range | Reference page |
| PRESET DELETE | (Displays only when the input source is set to FM.) | 11 |
| DIMMER | DIMMER OFF (brightest)/DIMMER 1/DIMMER 2 (darkest) | This page |
| TREBLE | -10 to +10 | This page |
| BASS | -10 to +10 | This page |
| BALANCE | L+5 - CENTER - R+5 | This page |
| AUTO POWER OFF | TIME OFF/ TIME 8H/ TIME 4H AUTO POWER OFF sets the system to standby mode whenever no operation is performed for a preset amount of time. | This page |
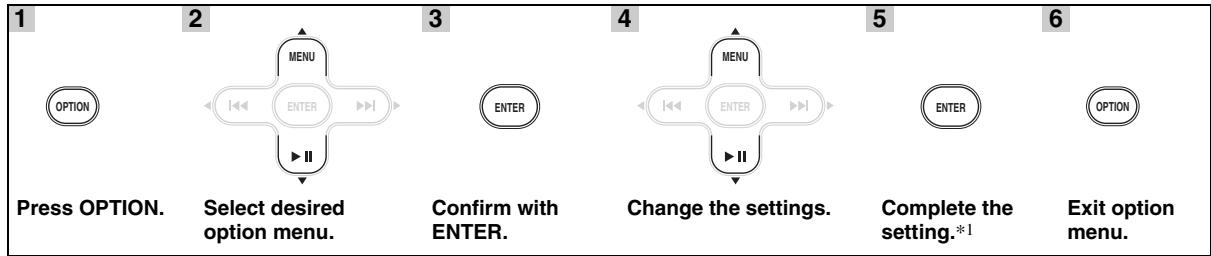
*1 To set additional items, repeat steps 2 to 5.
中
To cancel the setting during the operation, press OPTION.
Setting dimmer, tone/balance
DIMMER: Changes the brightness of the front panel display.
TREBLE ^*2 : Adjusts the high frequency response.
BASS*2: Adjusts the low frequency response.
BALANCE: Adjusts the volume level of each left and right speaker channel.
*2 Also effective when you are using headphones.
Using sleep timer
The sleep timer sets the unit to the standby mode after the specified time elapses.

The SLEEP indicator lights up on the front panel display (P. 7).
TROUBLESHOOTING
Refer to the table below when this unit does not function properly. If the problem you are experiencing is not listed below or if the instruction below does not help, turn off this unit, disconnect the power cable, and contact the nearest authorized Yamaha dealer or service center.
General
| Problem | Cause | Remedy | Page |
| This unit fails to turn on or enters the standby mode soon after the power is turned on. | The power cable is not connected or the plug is not completely inserted. | Connect the power cable firmly. | 5 |
| This unit has been exposed to a strong external electric shock (such as lightning or strong static electricity). | Press and hold Ⓞ for more than 5 seconds to reset the system. If this does not solve the problem, set this unit to the standby mode, disconnect the power cable, plug it back in after 30 seconds and then use it normally. | — | |
| The unit does not operate properly. | |||
| No sound. | No appropriate input source has been selected. | Select an appropriate input source with INPUT on the front panel (or the source buttons on the remote control). | — |
| Speaker connections are not secure. | Secure the connections. | 4 | |
| The mute function may be on. | Cancel the mute function. | 6 | |
| The volume is turned down. | Turn up the volume. | 8 | |
| Signals this unit cannot reproduce are being input from a source component, such as a CD-ROM. | Play a source whose signals can be reproduced by this unit. | 3 | |
| The power is suddenly turned off. | The sleep timer may be set. | This is not malfunction. Turn on the unit and play the source again. | — |
| The unit is left turned on for 1 hour without playback or any other operation being performed. | |||
| AUTO POWER OFF is triggered. | Setting AUTO POWER OFF to TIME OFF enables to play continuously. | 12 | |
| Sound is heard from the speaker on one side only. | Incorrect cable connections. | Connect the cables properly. If the problem persists, the cables may be defective. | 4 |
| There is noise interference from digital or radio frequency equipment. | This unit is too close to the digital or high-frequency equipment. | Move this unit farther away from such equipment. | — |
iPod/iPad
Note
In case of a transmission error without a status message appearing in the front panel of this unit, check the connection to your iPod/iPad (see page 5).
| Status message | Cause | Remedy | Page |
| iPod Connecting | This unit is in the middle of recognizing the connection with your iPod. | If the message continues to appear in the front panel display, disconnect and connect the iPod again. | 5 |
| iPod Charging | |||
| Unknown iPod | There is a problem with the signal path from your iPod to this unit. | Connect the iPod again. | 5 |
| The iPod being used is not supported by this unit. | Only iPod classic, iPod nano (2nd generation and later), iPod touch and iPhone are supported. | — | |
| iPod | This unit has recognized your iPod; however, it cannot obtain information such as elapsed time. | ||
| iPod Unplugged | Your iPod was removed. | Connect the iPod again. | 5 |
| Over Current | The iPod being used is not supported by this unit. | Disconnect the iPod and then turn the unit off and on again. Then connect supported iPod again. | 5 |
| The iPod is connected at an angle. |
- Messages shown above appear only when a device is connected to the iPod dock.
| Problem | Cause | Remedy | Page |
| No sound. | The power of the unit is off. | Connect the power cable correctly. | — |
| The iPod/iPad software version has not been updated. | Download the latest iTunes software to update the iPod/iPad software version to the latest. | — | |
| The iPod/iPad is in the process of connecting with the unit. | Please wait for a while. | — | |
| The iPod/iPad is not connected correctly. | Remove the iPod/iPad from the unit, then connect it again. | 5 | |
| The iPod/iPad sounds, but you cannot operate it with the unit or the remote control. | The iPod/iPad is not connected correctly. | Remove the iPod/iPad from the unit, then connect it again. | 5 |
| You cannot operate from the iPod/iPad. | The iPod/iPad is not connected correctly. | Remove the iPod/iPad from the unit, then connect it again. | 5 |
| The playback information is not displayed on the front panel display. | The iPod/iPad you set is not compatible with the playback information display. | Only iPod classic, iPod nano (2nd generation and later), iPod touch, iPhone and iPad are supported. | 5 |
| The iPod/iPad does not charge up. | The iPod/iPad is not connected correctly. | Remove the iPod/iPad from the unit, then connect it again. | 5 |
| Suddenly the music being played back is canceled and another track starts playing without performing any operation. | The iPod's Shake to Shuffle function is turned on. | Turn off the Shake to Shuffle function in the iPod's settings. | — |
USB/iPad
Note
In case of a transmission error without a status message appearing in the front panel of this unit, check the connection to the USB device (see page 5).
| Status message | Cause | Remedy | Page |
| USB Unplugged | The USB device is not connected firmly. | Connect the USB device again. | 5 |
| Unknown USB | The connected USB device is not playable on this unit. | Connect playable USB device. | 5 |
| The file name is too long. | The file name should be no more than 250 characters. | — | |
| Over Current | The USB device is connected at an angle. | Disconnect the USB device and then turn the unit off and on again. Then connect playable USB device again. | 5 |
| No Files | The USB device does not contain playable files. | Use a USB device contains playable files. | 3 |
| An incompatible USB device is connected to the unit. | Turn off the system and reconnect the USB device to the unit. If it does not resolve the problem, the USB device is not playable on the unit. | — | |
| USB Time Out | The number of files/folders exceeds the limit. | Reduce the number of files/folders; refer to the limitations noted in this manual. | 3 |
Radio reception
| Problem | Cause | Remedy | Page |
| MP3/WMA file in the USB device does not play. | The USB device is not recognized. | Connect the USB device again. | 5 |
| Connect an AC adapter if supplied with the device. | — | ||
| Format the USB device and copy the files again. | — | ||
| Improper USB device connections. | Connect the USB device again. | 5 | |
| The MP3 or WMA formats are not compatible with this unit. | Replace the file with a correctly recorded file playable with this unit. | 3 | |
| If the solutions above do not resolve the problem, the USB device is not playable on the unit. | Try another USB device. | — |
| Problem | Cause | Remedy | Page |
| FM stereo reception is noisy. | The antenna is connected improperly. | Check the antenna connections. | 4 |
| The characteristics of FM stereo broadcasts may cause this problem when the transmitter is too far away or the antenna input is poor. | Try using a high-quality directional FM antenna. | — | |
| Use the manual tuning method. | 11 | ||
| The desired station cannot be tuned into with the automatic tuning method. | The signal is too weak. | Use a high-quality directional FM antenna. | — |
| Use the manual tuning method. | 11 | ||
| The preset selecting function does not work. | The preset (memory) may have been erased. | Preset radio stations again. | 11 |
| There is distortion, and clear reception cannot be obtained even with a good FM antenna or an outdoor antenna. | Multipath reflection or other radio interference may have occurred. | Change the height, direction, or placement of the antenna. | — |
Disc playback
| Problem | Cause | Remedy | Page |
| No sound or distorted sound | The sampling rate of an MP3 or WMA file may not be compatible with this unit. | Check the sampling rate and bit rate of an MP3 or WMA file are compatible with this unit. | 3 |
| Disc playback does not start. | You may be using a CD-R/RW that is not finalized. | Finalize the CD-R/RW. | — |
| The disc label may be upside down. | Check that the disc label is facing up. | — | |
| The disc may be defective. | Try playing back another disc. If this cures the problem, the disc you want to play back is defective. | — | |
| MP3/WMA disc may not contain sufficient music files to be played back. | Check that your MP3/WMA disc contains at least 5 MP3/WMA music files. If the number of files is small, the disc may not be recognized. | — | |
| The sampling rate of an MP3 or WMA file may not be compatible with this unit. | Check the sampling rate and bit rate of an MP3 or WMA file are compatible with this unit. | 3 | |
| Some button operations do not work. | The disc loaded into the unit may not be compatible. | Remove the disc and then check whether the unit supports the disc or not. | 3 |
| Playback does not start immediately after pressing >/0 on the unit or ▷ on the remote control. | The disc may be dirty. | Wipe the disc clean. | — |
| The disc loaded into the unit may not be compatible. | Use a disc supported by the unit. | 3 | |
| If the unit was moved from a cold to warm place, condensation may have formed on the disc reading lens. | Wait for an hour or two until the unit adjusts to the room temperature, and try again. | — | |
| “No Disc” appears in the display even though a disc is in the disc tray. | The disc loaded into the unit may not be compatible. | Use a disc supported by the unit. | 3 |
| The disc may be dirty. | Remove the disc and then wipe the disc clean. | — | |
| Disc is loaded upside-down. | Remove the disc and then load the disc with the labeled side facing up. | — |
Remote control
| Problem | Cause | Remedy | Page |
| The remote control does not work nor function properly. | The remote control may be operated outside its operation range. | For information on the remote control operation range, refer to “Using the remote control”. | 2 |
| The remote control sensor on this unit may be exposed to direct sunlight or lighting. | Change the lighting or orientation of this unit. | — | |
| The battery may be worn out. | Replace the battery with new one. | 2 | |
| There are obstacles between the sensor of this unit and the remote control. | Remove the obstacles. | — |
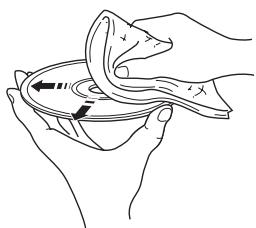
HANDLING COMPACT DISCS
- Always handle with care so that the playing surface is not scratched. Do not bend discs.
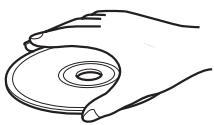
- To keep the playing surface clean, wipe with a clean, dry cloth. Do not use any type of disc cleaner, spray, or any other chemical-based liquid.
-
Do not expose discs to direct sunlight, high temperature or high humidity for a long time.
-
Do not wipe with a circular motion; wipe straight outward from the center.
- Use a soft-tipped pen when writing on the label side of a disc.
SPECIFICATIONS
PLAYER SECTION
iPod
Supported iPod..... .Pod classic, iPod nano (2nd generation and later), iPod touch, iPhone, iPad
CD
Media CD, CD-R/RW
Audio format. Audio CD, MP3, WMA
LASER
- Type. Semiconductor laser GaAs/GaAlAs
- Wave length. 780 nm
Output Power 10 mW
USB
Audio format.. MP3, WMA
AUX
- Input connector............ STEREO L/R: 3.5 mm STEREO mini Jack
AMPLIFIER SECTION
Maximum output power 20 W + 20 W (6 Ω 1 kHz, 10% THD)
- Input impedance (AUX) 73 kΩ
Maximum input signal (AUX). 2.2 V
Total harmonic distortion CD etc. 1kHz / 8 W. 0.04%
TUNER SECTION
Tuning range [U.S.A. and Canada models] 87.5 to 107.9 MHz [Other models] 87.50 to 108.00 MHz
GENERAL
-
Power Supply [Europe model]AC 230 V, 50 Hz [U.S.A. and Canada models]AC 120 V, 60 Hz [Asia model]AC 220-240 V, 50/60 Hz [Taiwan model]AC 110-120 V, 60 Hz [Australia model]AC 240 V, 50 Hz [U.K. model]AC 230 V, 50 Hz [China model]AC 220 V, 50 Hz [Korea model]AC 220 V, 60 Hz
Power consumption 32 W -
Standby Power consumption. 0.3 W or less
- Dimensions (W × H × D) 180 × 118 × 318.2 mm (7 1/8 × 4 5/8 × 12 1/2 in)
Weight 2.95 kg (6.5 lbs.)
Specifications are subject to change without notice.
iPod, iPhone, iPad
"Made for iPod," "Made for iPhone," and "Made for iPad" mean that an electronic accessory has been designed to connect specifically to iPod, iPhone, or iPad, respectively, and has been certified by the developer to meet Apple performance standards. Apple is not responsible for the operation of this device or its compliance with safety and regulatory standards. Please note that the use of this accessory with iPod, iPhone, or iPad may affect wireless performance.
iPad, iPhone, iPod, iPod classic, iPod nano, iPod shuffle, and iPod touch are trademarks of Apple Inc., registered in the U.S. and other countries.
ATTENTION : VEUILLEZ LIRE CE QUI SUIT AVANT D'UTILISER L'APPAREIL.
ACCESSIONS FOURNIS. 2
DISQUES ET FORMATS DE FICHIER PRIS EN CHARGE. 3
RACCORDEMENT 4
- Support. CD, CD-R/RW
- Format audio CD audio, MP3, WMA
LASER
- Format audio... MP3, WMA
AUX
MEDFOLJANDE TILLBEHOR 2
FORMAT PÅ SPELBARA SKIVOR
OCH FILER. 3
ANSLUTNING 4
Ansluta högtalare/antenn/subwoofer 4
Ansluta natkabeln 5
Stalla in dimmer, ton/balans
PS (Program Service - programmadenist)
↓
PTY (Program Type - programmatype)
↓
RT (Radio Text - radiotekt)
↓
OMGAAN MET COMPACT DISCS
Audio-indeling.. MP3, WMA
AUX
- Ingang.........STEREOL R: 3,5 mm STEREOL-miniaansluting
VERSTERKERSECTIE
Maximaal uitgangsvermogen. 20W + 20W (6Ω1kHz,10%THV)
- Ingangsimpedantie (AUX). 73 kΩ
Maximaal ingangssignaal (AUX) 2,2 V
- Totale harmonische verrorming
Cd enz. 1 kHz/8W. 0,04 %
TUNERSECTIE
IIPIJIAGAEMbIE IIPIHADJEKHOCTU....2
BOCIPPOH3BODIMbIE INCKN
ΦOPMATbI ΦΑΙΝΙΟB............ 3
ПОДКЛЮЧЕНЕ
ПОДКЛЮУЕнne ДИНHAМИКOB, aHTeHHbI N
ca6ByΦepa. 4
TEXHINUeCKNE XAPAKTEPHCTHKN....17
PABOTA
IIEPEDHRAIANAHEJBIOCHOBHOE
YIIPABJIEHNE 8
IIPOCJIYIHHBAHNE MY3bIKN 9
Oepaunn Bocpon3BedeHna 9
Дугные о等工作.................................... 10
IIPOCJIYIHHBAHNE FM
PAIIOCTAHIIH 11
Hacrpoika padnoctanu. 11
IpeBapHTeJIbHaJaHacTpoJa paAnocTaHn..11
Bb6op IpeyctaHOBJeHHbIX paIIOCTaHcII
(HaTpoKa Ha IpeDyctaHOBJIeHnyIO
paiaocTaHIOHO) 11
OTo6paXeHHe HhΦOpMaHH ChCTeMBI
paIIOJaHHbIX. 11
HcIOJIb3OBAHNE IOJE3HbIX
Функш.. 12
HcnoJIb3OBaHHe MeHIO HAcTPOIKN. 12
HcnoJIb3OBaHHe TaMepa cHa. 12
06 3tom pyKOBoDCTBe
-Описн_e“iPod”ВэтоинсгукшIMOжТаЖeOTHOCHTbсК“iPhone”.
B DAHHO IHCTpyKIIH ONIcaHBIO IIEpaIIN IO yInpaJIeHNIO aIIIapaTOM c IIMOIObIO IIyJBtA DY, KpOMEcIyuaEB, KOrJa 3TO HeBO3MOxHO. HeKOToPbIe I3 OIIHCaHHbIX JeIcTBNI MOxHO TaKKe BByIOJIHrTb C IIMOIObIO KHOIOK Ha IpeJHHeI IaHEJIH.
- CHMBOJI "E" pIOM c HOMePOM (HOMepaMH) cTpaHHI, o6O3Haayet COOTBeTCTByIOIIne cTpaHHIbI IIJIcIpaBKn.
- IIpHMeUaHH coIepKgAT BaJHyIO HhΦopMaIIHIO O 6e3OIIaChOCTH IN HHCTpyKIIHN IIO ΘKcIIyAtaIIHN. -06o3Haayet COBET IO IOBOy ONepaIIHN.
-Даннай Инструкшьг OTпчата на Ддюн STBOДСТВ.Конструкшьг И Тхнчесніх ХаразКерпсн MOryT 6ыт bу acsttuho H3meHeHb I pe3yJIbTaTe yCOBepIeHCTBOBaHH N T.I. B cIvyae pa3JInH MekJy INHcSTruKIIneH uYcTpoHCTBOM IIpHOpHTET HmeeT yCtpoHCTBO.
ПИЛАЕМьIE ПИнадлжноCTN
Y6eIHTecb B TOM, YTO K aIIIapaty IIpHJIaIaIOTcBce IIpeIcTaJIeHHbIe HNKe JeTaJIH.
Nybld
(C 6aTapeiKoN CR2032)

AHTeHHa FM
KpbIuKa DOK-CTaHcN

Kpbiika npota USB
BHIMAHHE
XpaHnTe KpbIHKy IopTa USB B HeIOCTUYHOM JJIeTeH MeCte, YTO6bI OHn HE MOJIN CIIyauHaHO IIporJIoTHtB ee.
IcnoJb3OBAHne npJbTa Dy
HcnoJIb3yIte IyJIbT Ha paCCTOaHHn 6 M OT aIIapapaHa HApBaJIaIe ero Ha JaTUnK
PpIMeuaHn
He IpoJINBaIte KKnKocTb Ha IIyIbT Ny.
- HepoHnTeIyJIbT IY.
He octabJIaIte IyJIbT NyB CJIeIyIOIIx MeCtax: -kapKIN HIN BJIaXHbIX, HAnpHMeP B BaHHoN IIIN BO3JIe O6OrpeBaTeJIa;
-OUeHbXOJIIOHbIX MecTaX;
- IIbIbHbIX MecTaX.
3aMeHa 6aTapeKn B nyIbTe Dy
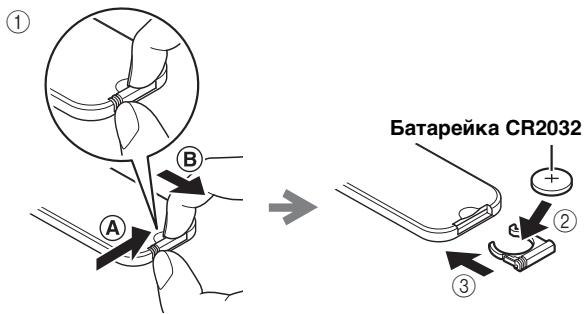
HaabHBHaΦHKcHpyIOUHЯ3bIyOKB HaIIpaBJIeHHN A, BbIIBHbTe IepKaTeJIb 6aTapeIKB H aIIpaBJIeHHN 8.
Pn cnHexeHH pa6oeryo nHaia3OHa IIyIbTa IY 3aMeHHTe 6aTapeKy.
PpimeyaHn
B KOHcpoKa 3KcIIyataaHH 6aTaapeKN 3aHHTNBbI pa6OuH NHaIIa3OH IIyIbTa IY 3NaHTeJIbHO yMeHbIIaetcR. B 3TOM cIyuae 3aMeHHTe 6aTaapeKy HOBo KAK MOJHO 6bICTpee.
- IcnoJIb3ObaHHa 6aTaapeKa MoXeT IpoteYb. EcJIn 6aTaapeKka IpoteKJa, HEmJeHNo yTHJIN3HpyTe ee. He IIpHKacaiTeCb K IpoteKIIeMy BeIeCTBy n He JOnyckaIte erO KOHTaKtA c OJeKDo n T.I. II. PpeD yCTaHOBko HOBO 6aTaapeKn TuaTeJbHo OvHCTHe OTceK dJa 6aTaapeek.
-XpaHnTe 6aTapeiKN B HeIOCTyIHHOM IJIa JeTee Mece. EcJIN BbI HJIn pe6eHOK CJIyauHaHIO IIPOrIOTJIN 6aTaapeKky,HeMeJIeHNO O6paTHTeCb K BpaYu.
- EcJIH NpJIbT JY He 6yIeT HcIIIOJIb3ObaTbcra B TeueHHe JInTeJIbHOrBpeMeHH, H3BJIeKHTe 6aTaapeiKy H3 NpJIbTa JY.
- He 3apjkaaIte Hnpepa3bnpaIte IIOCTabJIeMyIO c yctpoJIcTBOM 6aTaapeKy.
BOCIPON3BOIDIMbIE INCKN IN ΦOPMATbI ΦAINIOB
Bocnpon3BOIDMble DNCKN
HcIOJIb3yIte KOMIIaKT-ⅡHCKN c OTMeTKaMn, yKa3aHHbIMN JaJIee.

...KomnakT-dnCKn (uΦpOBoe aydno)

LiuΦpOBoBbIe ayDnOuNcKn CD-R,CD-RW
- IINCKN CD-R HJIN CD-RW, Ha yIIaKOBKe KOtOpbIX HJIN Ha caMOM IINCKe HMeetcR OJHa H3 CJJeDyIOIINX HAJIINCEH.
FOR CONSUMER FOR CONSUMER USE FOR MUSIC USE ONLY
- ΦИнlaJIиЗИрОваHHьIe ДИСКИ CD-R
- ИЛД CD-RW
PpMueaHne
HaДaHHOM IpOHHpBbAteJIe KOMIIaKTIINCKOB He yJaCTcB OBCIIPOH3BecTHHeKOTOpbIE INcKN CD-R/CD-RW IIININCKN C HEIIpaBHJIbHO BbIIIOJIHeHHo3aIIINCbIO.


...ДиСкN CD-TEXT
Bocnpon3BeJeHne 8-cm CD-Dncka
ПомecтHTe ДИСК BO BHYTpEHHIOU YacTb JLOTkaДИСКOBОДa. He yCTaHAbJINBaIte OБьИЧыIe (12-cM)CD-ДИСКН ПОВЕХ 8-cM CD-ДИСКOB.
ДлпрдOTВрашени Выхова n3 CTPOДанHoro annapata:
He HcIOJIb3yIte IINCKH HeCTaHJapTHoH φOpMbI (B BVIE cepIIa N T.II.), TaK KaK 3TO MoKeT IIpNBecTH K IOBpeKJdeHHIO yCTpoNCTBa.

He nCIOJIb3yIte IINCKN,Ha IOBepxHOCTH KOtOpbIX ecT IIeHka,HaKJIeIKN HIn KpacKa. EcJIN BCTaBHTb TaKOJ INCK B INCKOBO,I OH MOKeT IprNJINIIHyTB K HeMy IIN IOBpeINb CHTbIBaIOUee ycTroHCTBO.
PnmeaHne. He HcIOJIb3yIte KaKHe-JIN6O OuHCTHTeJIIN JIIJH3, TaK KaK 3TO MOKeT IIpHBecTH K HeNCIIpaBHO pa6Ote.
Bocnpon3BoDmblc paJbI MP3 n WMA MP3
EcIIIOKJIIOUeHb HAYIHHKN, 3ByK He 6yJeT BbIBOHTbCra H3 IHHAMIKOB.
HaKHMaIte IOBTOPOH OJIY BbIbOpa HcToUHnKa BXOJa.
Дллпрслушнвань снгнада c BHEIIHero yctpoNCTBa bIb6epHTe AUX, a 3aTeM 3aIyCtHTe BOCIIPOH3BeDeHne Ha BHEIIHem yctpoNCTBE.
ПОНСЛУШИBAHNE MY3ыКИ
HactpoIka n3MeHeHnApKocTn, ToHaJIbHoCTn/6aJaHca
DIMMER: I3MeHeHHe npKocTn IIcIIJIe IpeIeHne IaHeJIn.
TREBLE*2: HacTpOJaXapaKTepeHCTNKn BOCIpOn3BVeJeHnBbICOKHXaCTOT.
BASS*2: hactpoKa xaapaKTepeHCTnKn BocIpOn3BeJeHnHa Hn3KNx YacToT.
BALANCE: NaCTPOnKa yPoBnI rPOMKoCTH OTJeJIbHO JIEBOr I IpaBOr KaHaJa IIHaAMHkOB.
[MoJIbIJIBeJIHKo6pHTaHH] 230BIIepeMeHHoroTOka,50Tc [MoJIbIJIKNTaI] .220BIIepeMeHHoroTOka,50Tc [MoJIbIJIKNKopEn] .220BIIepeMeHHoroTOka,60Tc
- IopTe6JIaEma MoIIOHOCTb 32Bt
IOTpe6JIaEma MoIIOHocTb BpeKHeMe OxHJaHHa 0,3BT HIN MeHee
Pa3Mepb1 (III × B × Γ) 180 × 118 × 318,2 MM
Bec. 2,95 Kr
TexHHueckHe XapaKTePepHcTHKN MOryT 6bITb H3MeHeHbI 6e3 IIpeBapHTeJIbHO rYBeOMJIeHN.
iPod, iPhone, iPad
3HaKn "Made for iPod", "Made for iPhone" and "Made for iPad" yka3bIbaIOT, YTO 3JIeKTPoHhIbe IpiHnAIIJExKHOCTH, H a KOTopbIX IMeIoTc8 3THaKN, IIpeIHa3NaYeHbI IJIa IIOIcoEINHeHnK yctPoIcTBy iPod, iPhone nIi iPad COOTBeTCTBHeH0, a TaKKe YTO OHN cepTnΦHIIpOBAHbI pa3pa60TuHkOM B COOTBeTCTBnN C 3KcIIJIyaTaIIIOHbIMn CTaHApTaMn Apple.
Kopnpaunr Apple He Hecet OTBeTCTBHeHHoCTn 3a pa60Ty daHHoro yctpoHCTBa IIN erO COOTBeTCTBHe cTaHdApTaM 6e30IaHcHocTn H peryJIraTHBbIM HOpMaM.
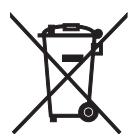
Information for Users on Collection and Disposal of Old Equipment and Used Batteries


Pb
These symbols on the products, packaging, and/or accompanying documents mean that used electrical and electronic products and batteries should not be mixed with general household waste.
For proper treatment, recovery and recycling of old products and used batteries, please take them to applicable collection points, in accordance with your national legislation and the Directives 2002/96/EC and 2006/66/EC.
By disposing of these products and batteries correctly, you will help to save valuable resources and prevent any potential negative effects on human health and the environment which could otherwise arise from inappropriate waste handling.
For more information about collection and recycling of old products and batteries, please contact your local municipality, your waste disposal service or the point of sale where you purchased the items.
[Information on Disposal in other Countries outside the European Union]
These symbols are only valid in the European Union. If you wish to discard these items, please contact your local authorities or dealer and ask for the correct method of disposal.
Note for the battery symbol (bottom two symbol examples):
This symbol might be used in combination with a chemical symbol. In this case it complies with the requirement set by the Directive for the chemical involved.
Français
CAUTION: DO NOT STARE INTO BEAM INVISIBLE LASER RADIATION WHEN OPEN
VAROITUS
If the socket outlets in the home are not suitable for the plug supplied with this appliance, it should be cut off and an appropriate 3 pin plug fitted. For details, refer to the instructions described below.
Note
The plug severed from the mains lead must be destroyed, as a plug with bared flexible cord is hazardous if engaged in a live socket outlet.
Special Instructions for U.K. Model
IMPORTANT
THE WIRES IN MAINS LEAD ARE COLOURED IN ACCORDANCE WITH THE FOLLOWING CODE:
Blue: NEUTRAL
Brown: LIVE
As the colours of the wires in the mains lead of this apparatus may not correspond with the coloured markings identifying the terminals in your plug, proceed as follows: The wire which is coloured BLUE must be connected to the terminal which is marked with the letter N or coloured BLACK. The wire which is coloured BROWN must be connected to the terminal which is marked with the letter L or coloured RED.
Make sure that neither core is connected to the earth terminal of the three pin plug.
| Important Notice: Guarantee Information for customers in EEA* and Switzerland | English |
| For detailed guarantee information about this Yamaha product, and Pan-EEA* and Switzerland warranty service, please either visit the website address below (Printable file is available at our website) or contact the Yamaha representative office for your country. * EEA: European Economic Area | |
| Remarque importante: informations de garantie pour les clients de l'EEE et la Suisse | Français |
| Pour des informations plus détaillées sur la garantie de ce produit Yamaha et sur le service de garantie applicable dans l'ensemble de l'EEE ainsi qu'en Suisse, consultez notre site Web à l'adresse ci-dessous (le fichier imprimable est disponible sur notre site Web) ou contactez directement Yamaha dans votre pays de résidence. * EEE : Espace Economique Européen | |
| Wichtiger Hinweis: Garantie-Information für Kunden in der EWR* und der Schweiz | Deutsch |
| Für{nahere Garantie-Information über ceses Produkt von Yamaha, sowie über den Pan-EWR*- und Schweizer Garantieservice, besuchen Sieitte entweder die folgend angegebene Internetadressee (eine druckfähige Version befindet sich auch auf unserer Website), oder wenden Sie sich an den für Ihr Land zuständigen Yamaha-Vertrieb. *EWR: Europäischer Wirtschaftsráum | |
| Viktigt: Garantiinformation für kunder i EES-området* och Schweiz | Svenska |
| Für detailjerad information omenna Yamahaproduktsam garantiservice i hela EES-området* och Schweiz kan du antingen besöka nedanstående webbaddress (en utskriftsvänlig fil finns på webbplatsen) erller kontakta Yamaha officiella représentiert i ditt land. * EES: Europeiska Ekonomiska Samarbetsområdet | |
| Avviso importante: informazioni sulla garanzia per i clienti residenti nell'EEA* e in Svizzera | Italiano |
| Per informazioni dettagliate sulla garanzia relativa a quello prodotto Yamaha e l'assistenza in garanzia nei paesi EEA* e in Svizzera, potete consultrare il site Web all'indirizzo riportato di seguito (è disponibile il file in formato stampabile) oppure contattare l'ufficio di rappresentanza locale della Yamaha. * EEA: Area Economica Europea | |
| Avviso importante: información sobre la garantía para los clienteles del EEE* y Suiza | Espanol |
| Para una información detallada sobre este produit Yamaha y sobre el soporte de garantía en la zona EEE* y Suiza, visite la direction web que se incluye más bajo (la version del archivo para imprintir esta disponible en是我国 sitio web) o pángase en contacto con el representante de Yamaha en su País. * EEE: Espacio Económico Europeo | |
| Belangrijke meededeling: Garantie-informatie voor klanten in de EER* en Zwitserland | Nederland |
| Voor gedetailleerde garantie-informatie over dit Yamaha-product en de garantieservice in heel de EER* en Zwitserland,.gaat u maar de onderstaande website (u vind een afdrukbaar bestand op unsere website) of neemt u contact op met de vertegenwoordiginc van Yamaha in uw land. * EER: Europese Economische Ruimte | |
http://europe.yamaha.com/warranty/