HSM 3441 NE - Hair clippers CLATRONIC - Free user manual and instructions
Find the device manual for free HSM 3441 NE CLATRONIC in PDF.
User questions about HSM 3441 NE CLATRONIC
0 question about this device. Answer the ones you know or ask your own.
Ask a new question about this device
Download the instructions for your Hair clippers in PDF format for free! Find your manual HSM 3441 NE - CLATRONIC and take your electronic device back in hand. On this page are published all the documents necessary for the use of your device. HSM 3441 NE by CLATRONIC.
USER MANUAL HSM 3441 NE CLATRONIC
Location of Controls 3
User manual. 46
Hair and beard clippers. 47
Nose and ear hair trimmer 50
Technical Specifications. 52
Disposal. 53
Spis tresci PC Strona
WARNING: EXPLOSIONSGEFAHR!
WAARSCHUWING: ONTPLOFFINGSGEVAAR!
WAARSCHUWING: GEVAAR VOOR LETSEL!
RISQUE D'LECTROCUTION!
Batterie rechargeable
Pile: 1x 1,5 V, Type : MIGNON LR6, AA, UM3
4 X Peines guías (longitudes: 3 mm, 6 mm, 9 mm, 12 mm)
Thank you for choosing our product. We hope you will enjoy using the appliance.
General Notes
Before using this device, carefully read this user manual and keep it together with the Warranty Certificate, cashier receipt and if possible, the original package inclusive its interior packing. If you hand on the device to any third person, include the user manual as well.
- Use the device for private and its intended purpose only. The device is not intended for commercial use.
- Do not use the device outdoors. Protect it from heat, direct sunlight, humidity (do not immerse into liquids under any circumstances) and sharp edges. Do not use the device with wet hands. If the device gets wet, unplug it immediately.
- Always switch off and unplug the device (pull the plug, not the cable) when you do not use the device, or when you attach accessories, during cleaning or malfunctioning.
- Do not leave the device unattended during operation. Always switch off the device when leaving the room. Unplug the device.
- Regularly check the device and cable for signs of damage. Do not continue to operate the device in case of damage.
- Do only use original parts.
- For the safety of your children, keep any packing parts (plastic bags, cartilage, Styrofoam etc.) out of their reach.
GB

WARNING:
Don't let small children play with foils for danger of suffocation!
Symbols in this user manual
Important notes for your safety are marked distinctively. Pay absolute attention to them to avoid accidents and damage to the device:

WARNING:
Wards of dangers for your health and indicates potential risks of injury.

CAUTION:
Indicates potential dangers for the device or other objects.

NOTE: Highlights tips and information for you.
Handling of batteries

WARNING: DANGER OF EXPLOSION!
Do not expose the batteries to high temperatures or direct sunlight. Never throw batteries into fire.
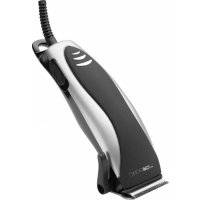
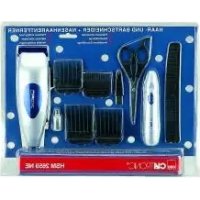
Hair and beard clippers
Special safety instructions for this appliance

RISK OF ELECTRIC SHOCK!
- Do not use the device near water (e.g. bath tub, wash basin or other containers filled with water.
-
Caution: Keep the appliance dry.
-
This appliance can be used by children aged from 8 years and above and persons with reduced physical, sensory or mental capabilities or lack of experience and knowledge if they have been given supervision or instruction concerning use of the appliance in a safe way and understand the hazards involved.
Children shall not play with the appliance. -
Cleaning and user maintenance shall not be made by children without supervision.
-
Do not repair the device by yourself. Please contact authorized personnel. In order to avoid hazards, a damaged mains cable must be replaced with an equivalent cable by the manufacturer, our customer service or any other qualified specialist.
- Do not operate the hair and beard clippers with wet hands.
- Only cut dry hair with this unit.
- Only use this unit to cut head hair and beard.
- Do not press the clipper head too firmly onto the skin. Danger of injury.
Location of Controls
1 Suspension eye
2 On/Off switch
3 Hair length adjuster
4 Moving blade
5 Fixed blade
Accessories (no illustration)
4 X Comb attachments (lengths: 3 mm, 6 mm, 9 mm, 12 mm)
1 X Protective cap for shaving head
1 X Cleaning brush
Adjust Cutting Length
- First remove the protective cap from the shaving head.
- Fit a comb attachment according to your desired hair length. The size of the hair length setting is displayed in the center of the comb attachment.
- In order to fit a comb attachment, hold it with the teeth pointing upwards. The labeling of the comb attachment should remain visible on the back. Slide the comb attachment onto the shaving head and press it in so that it clicks into place.
Cut Hair / Beard
- Select the cutting length.
- Connect the mains plug to a properly installed isolated ground receptacle 230V /50Hz
- Slide the On/Off switch (2) to position "1".
iNOTE:
- Start by using the biggest comb attachment and cut your hair/whisker step by step to the desired length.
- The hair length adjuster (3) allows you to set the exact cutting length and to use the comb attachments effectively.
Outlining and Shaving the Neck
- The clipper head allows outlining the shape of the beard, even in difficult to reach places as well as shaving the hairline at the neck.
- Turn the hair clipper off with the switch (2).
- Remove the comb attachment and turn the device on again.
Finish Operation
Slide the On/Off switch (2) after use to the position "0" and disconnect from the mains.
Cleaning and Maintenance
Regular cleaning and maintenance ensures optimum results and long lifetime.
WARNING:
- Turn the device off and disconnect the mains plug.
- Do not submerge the unit in water. This would cause electric shock or fire.
CAUTION:
- Do not use a wire brush or other abrasives.
-
Do not use sharp or abrasive cleaning agents.
-
Use the cleaning brush to remove remaining hair after use.
- Therefore, take off the comb attachment.
- Regularly apply 1 - 2 drops acid-free oil to the clipper head.
- Clean the casing with a slightly damp cloth, if necessary.
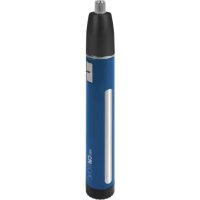
Nose and ear hair trimmer
Special instructions for this appliance

WARNING: RISK OF INJURIES!
- Do not use the appliance if the shaving head, blade holder or blade are deformed or damaged!
- Do not remove the shaving head during operation!
- Do not introduce the appliance further into the nostril / auricle than to the narrow tip of the shaving head.

CAUTION:
- The shaving head and blade are precision-machined and must not be exposed to heavy loading, impacts or similar.
- Do not put any sharp objects into the shaving head.
- Protect the appliance from moisture or liquids.
- This appliance is only meant for removing nose and ear hair. Do not use the appliance for any other purposes.
- Switch off the appliance before cleaning and removing the batteries.
Scope of delivery (without fig.)
1 Nose and ear hair trimmer
1 Protective cap for the shaving head
Inserting of the battery
(Battery is not included in the scope of delivery)
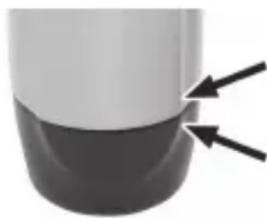
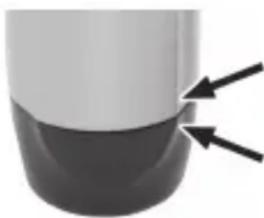
- Turn the bottom cover and pull it off.
- Insert a 1.5V battery of the type MIGNON AA into the battery compartment. The positive pole (+) has to show towards the shaving head.
- Close the battery compartment again: Turn the cover onto the device until it engages with a click. The flattened part of the cover must be positioned exactly under the flattened part of the device (see Fig.).
Usage
- Pull the protective cap off.
- Slide the switch towards "0" in order to turn on the appliance.
- Guide the tip of the shaving head into the nostril or auricle.

WARNING:
Only remove the prominent nose or ear hair. Do not forcefully push the appliance into the nostril / auricle. You can hurt yourself when it is inserted too deep!
- Slide the switch back towards "1" after usage in order to switch off the device.
- Clean the shaving head with the cleaning brush after usage.
- Set the protective cap onto the device.
Cleaning

WARNING:
- Do not submerge the unit in water.
The cutting blade is sharp. Do not touch it! There is the danger of injuries.

CAUTION:
- Do not use a wire brush or other abrasives.
-
Do not use sharp or abrasive cleaning agents.
-
Switch off the appliance before cleaning.
- Remove the battery from the battery compartment.
- Loosen the shaving head by turning it anticlockwise and remove it. Remove the cutting blade holder carefully.
- Remove remaining hair from the blade holder using the cleaning brush. You can also blow off the remaining hair from the holder.
- Replace the cutting blade holder into the cutting head.
- Set the cutting head onto the device. Turn it tight clockwise until it snaps audibly into place.
- Set the protective cap onto the device.
Noise emission
The workplace-related emission value is less than 70 dB(A).
Technical Specifications
Model: HSM 3441 NE
Net weight: approx. 0.435 kg
Hair and Beard trimmer
Power supply: 230 -240 V\~, 50 Hz
Power consumption: max. 10 W
Protection class: II
Nose and ear hair trimmer
Battery: 1x 1.5 V, Type: MIGNON LR6, AA, UM3
The right to make technical and design modifications in the course of continuous product development remains reserved.
This device complies with all current CE directives, such as electromagnetic compatibility and low voltage directive and is manufactured according to the latest safety regulations.
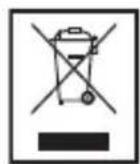
Disposal
Meaning of the "Wheelie Bin" Symbol
Take care of our environment, do not dispose of electrical applications via the household waste.
Dispose of obsolete or defective electrical appliances via municipal collection points.
Please help to avoid potential environmental and health impacts through improper waste disposal.
You contribute to recycling and other forms of utilization of old electric and electronic appliances.
Your municipality provides you with information about collecting points.
Dispose of Rechargeable Batteries
- Remove the batteries from the battery compartment of the nasal hair/ear hair remover.
- Dispose of the battery at an appropriate collection point or distributor. This product must not be disposed of in standard domestic refuse.
GB
UHHeHH Ta 06cIyROByBaHH
PeryIaRhe uHcHn i o6cnyroByBaHHra rapaHTy e ONTImaIbHi pe3yIbTaTn i TpNBaIIh TePMiN cLyXbN npNCtpoU.
PONEPEJXEHHA.
BIMKHTb npncptpi i BiD'edHaNeTe Kaebj XNBHeHHA.
He 3aHpyoIte npncptiy Body. Ce MoKe npn3BecTn Do ypaKeHHeJeKtpuHMM CTpyMOM nn noKeKi.
yBrama.
He BnKOpncToBvIe DpoTHy 10kY a6o IHwi npEaMeTu, 0 MoKytb NopPraNa T npNCTpii.
- He BnKOpncToByte roctpi a6o abpa3nBhi 3ac06n dny uHneHHa.
BnKOpNCToBvIe 1tky dny uHHeHH, yO6 yCyHyTN BOnocra nicra BnKOpNCTaHH npn- cTPOU.
Tomy, 3HIMITb HacaKg-rgpebiHeu.
- Perylaryho 3actocobyte 1 - 2 kpanni 3Ma3Kn 6e3 KNCLOTn DO rONOBKn MaunHKn.
- YnctbTe KOpNc 3JeRka BOnorOTo raHuyipKoHO, RkUo Ntpi6HO.
MaunHka IJI niIcTpuraHn BOLOcc Hoca i Byx Oco6JIbBi Bka3IBKn 1oO KOpncTyBaHHn nIM npnaJalom
IIOPEJXEHHA. IcHye He6e3neKa TpaBMyBaHHa!
He BnKOpncToBnyTe npNcTpi, kUo roJOBka 3 Je30M, TpMaU Je3a a6o Je30 DeΦopMOBaHo YI NOsKOJKeHO!
- He 3HimaiTe roNoBky 3 ne3om nIac po60Tu npucTpoHO!
He BCTaBnIte npncpti y Hi3dpO/ByuHy paKOBnHy daJI, HIX Ha DOBXnHy By3bKOTo KINcra TOnOBKn.
ybara.
-
TOnOBka i Ne3O BnroTOBJIeHI 3a DOnOMoROIO TEXHOJOrII BnCOKOI TOHOCTi, TOMy Ha HIX He cnId TnCHyT, BdaprTu ToIO.
He cTaBte 6yDb-riKIO roCTPi npEaMeTn B rOIOBky 3Je30M.
-ObepiraTe npicptiBid BOnorocTi Ta piH. -
LcH npncpti npn3naeHn BnKIOUHO dIy BnDAJIeHHB OLOCC 3 Hoca i Byx. He BVKOpNCTOByTe npncpti dIy6yDb-RAkX IHsIX cineN.
-Першнисту писрии abo вдадягь батае, ВIMКніть писри.
UA
KoMnJIeKT NOCTaBKn (6e3 MaJIOnHka)
1 Maunnka nla niDctpnaHn BOIOccn HocTa Byx
1 3axnchn KOBnaQOK dpa pixkyoI roJOBKn
BctabJHHaTaapei (6aTapeH He IdoaetbC B KOMnIeKT NOCTaBKN)
- NObepHiB HnXHNO KpnUky i 3HIMiTb ii.
- BCTaTe 6aTape1,5B Tnny MIGNON AA y BiDcik dIy 6aTapei. Plioc (+) noBHeH 6ytncpRMOBaHm y HapPmky rOIOBKn.
- 3HOBy 3aKpInTe BiDcIK dIy 6bTapei: NObepTaIte KpnUky Ha npNCTpoi, pOKn BOHa He KnaUHe Ha Micci. Pnacka YacTHHa KpnUkMae 6byu po3TaWOBaHa IpoocTo Ni d PnackoU Yo acTHHO Yo npNCTpoU (mB.MaI.).
BnKOpncTaHn
- 3Himits3axnchN KOBnaQK.
- Пocунытперемкач do позанчkn "0", zuob yBIMKHytn npictpi.
- CnpmyTe KineCb roNoBkn 3 ne30m y Hi3dpO a6o ByuHy paKOBnHy.

PonepeJxKeHHa.
Budajne liwe BOJOCHNKn Hoca Ta Byxa, 0o BVCTynaHOb. He TncHITb i3 cnloIO npictpiy Hizdpo/BuShny paKOBHy. RaKIO BCTaBNi npNcTpii 3aHaITo rInbOko, MoXHa ce6e TpaBMyBatn!
- 106 BmKHytn npucpii niCnI Ioro BnKOpncTaHHa, nocyHbTe nepemKau Do no3HaKn "1".
5.ПиЯВИКОРИСТАнгИ NOИСТБЕ ГOLOBКУ ЛЗа 3a ДОПOMORОЮ ZITКД YI NUIЧЕНЯ. - BctaHObitb 3axnCHm KOBnaQK Ha npncTpii.
UH

PonepeJxHnHa.
He BnKOpncToBvIe IpoTHy 10kTy a6o IHwi npEmdTe, 10 MoKByb noDpnaTnpicTpi.Ie3o Dyke roctpe.
He TopkaTecr Ioro! IcHye pN3NK TpaBMyBaHHa.
UA
ybara.
He BnKOpncToBvIe DpoTHy 10kTy a6o iHwi npEaMeTu, 10 MoKyTb noDpAaTu npNCTpii.
He BnKOpncToBynte roctpi a6o a6pa3nBhi 3ac06n dny uHneHHa.
- Ipeep TmM, AOK YNCTHTN npncTpiB BUMKHiTB Horo.
- BnMItb 6aTapeo 3 BiDciKy dIra 6aTapei.
- Послаб Te roLOBky 3 ne30M, NOBepHyBUn II npOTn rOdHHNKOBoi CTpiIKN, i 3HIMITb II. ByIbTe o6epeKHi, 3HimaUOn TpImaU HOka.
- BndaJitb 3aIIuKn BOLoC8 3 TpIMa7a Je3a 3a DOnOMoTO UITKn IINu YIeHHe. TaKoX cTpyCtB 3aIIuKn BOLOc8 3 TpIMa7a.
- 3amihitb trmaay nea y pixyuyi ronoBui.
- BctaHOBITb pIXyU rOIOBky Ha npicTpii. HadiNbTe 3axnchn npo3Opn yoxon.
- BcTaHOBb3axnCHN KOBnaOK Ha npncTpii.
Texhiuhi xapaKTepeNCTnKn
MoeB: HSM 3441 NE
Bara HeTTo: npn6I. 0,435 K
MaunHka nIpiCTpHaHHBolocc
KnBHeHHa: 230-240V\~,50Hz
CnoxmbaHn ehepi...Macc.10B
Klaac 3axncty:
+Maunnka nna pndtpnraHHBONocn HocTa Byx
Багар: 1x 1,5 B, Tyn: MIGNON LR6, AA, UM3
IpaBo Ha TexHiHi 3MiHi Ta 3MiHi y dN3aHi 36epiracBc npoDobK npoecy po3pObKn npOdykTy.
Cen npnctpi ceptiKOBaHO BiIOBIDHO Do IIOUHX HOpM P, HanpNKlaH Hopm enekTpomarHITHO cyMICHOCTI i H3bKOI Hanpyr, i cKOHCTpyNoBaHO BiIOBIDHO DO OCTaHHIX XapaKTepnCTIK i3 TexHik6e3neKn.
UA
PykoBoIcTBO nO 3KcnIyatauH
Cnacno 3a BbOp HaJero npOyKta. Haneemc, OH Bam noHpavTcR.
067ne 3ameuHn
Ipeed hauaIom 3Kcnnyatauun npnbopa BnHMaTeIbHo npoHTaIe npnilaraemyu HNCTpyKUIO NO 3KcNlyaTaUIN COxpaHIne ee B HaJeHHOM MeCTe, BMeCTe C rapaHTnHBIM TaHOHOM, KaccOBbIM YekOM N, NO BO3MOXHOCTN, KApTOHHO KoPO6KOc C yNaKOBOUHbIM MaTePnaIOM. EcNI DaTe KOMy-PlbO nonoB3OBAtbcr npnbOpom, O8raTeNbHO daIte BnpndauchHyIO NHCTpyKUIO IO 3KcnNyatauun.
- Повьи tecsb npobopom tolbko yacthbIM o6pa30m n no Ha3haueHIO. Pp6op He npedHa3haueH dIy KOMMepueeCKO rCNoB3OBAHIA.
He noIb3yIeTcB npnbopom noI otKpbItbIM He6OM. IpeoxpaHnTe npnbop ot Kapbl, npMbx COJIneHbIX LyueN, BnaJHoCTN (HN B KOem clyuae He norgyKaHTe erO B BoDy) n yIapOB o6 ocTpblE yIbI. He npkacaTecb K npnbOpy BlaJHbIMn pykamn. Ecn npnbop yBnaJHHncra Hn HAMOK, Tyt Jx e BbIHbTE BNkY n3 po3ETKn. - Послескпуataин, мотаяке пинадлжноcte, чstke nIN NOLOMKe npibopa Bcerda BbHIMaTe BnIKy n3 po3etkn (TAHNTe 3a BnIKy, a He 3a Ka6eIb).
He octabnIte BkHoueHHbIe 3neKtpnpnbopbl6e3 npncMoTpa.BbIXoJn3 nomeue HnBcerda BbIKHOaHTe np6Op.BbIHbTe WTEKepeN3 po3ETKn. - Прибори Кабелсeteвогипитанян Heo6xOДМо PeryЯрно 6cIeDoBaTb Ha HAIHne cIeIOB NOBpeKdEHN.ПрИОБаружЕнIN NOBpeKdEHN NOJIb3OBaTbCra Prn6Opom 3aIpeUReTcR.
- Icnoj3yIe TOnbKO OpiHnHaJIbHbIe 3aIuaCTn.
- I3 coo6paKeHn 6e30aChOCTn dIy DeTe He octabTne JexKaTb ynaKOBky (nlaCTN KOBbIe MeuKn, KapToH, neHONJaT n T.d.) 6e3 npncMoTpa.

PENEYNPEXDEHNE!
He no3B0JIte deTm nIpaTb c noJIaTnJIeHOBo nJIeHko. OnacNoctb yduBa!
CnMBOJI npHMeHReMbIe B DaHHOM pyKOBoDCTBe NIOb3OBaTeJI
Baxhble peKOMeHaaunn Ira oBeCneueHnBaWei 6e3oNaCHocTn 6o3HaueHbI NO OcO6EHomy.ObaTeJIbHO cIeMy Te 3TNM peKOMeHaaunm, YTObI ppeOTbpaNTb HecuaCTbIn CnyaH INI NIOOMky H3dEINr:

PENYPNPEXHEHNE:
IpeDynpexKaet o6 onaCHOCTn Ira 3doPOBbI N BO3MOXHOM pncKe nOlyueHn TpaBMbl.
RUS
BHIMAHNE:
Yka3bIbaeT Ha Bo3MOxHHyO ONaCHOCTb IJIa H3dEINrN IN DpyrNX OkpyKaIOuINX PpeDMeTOB.
I INPIMEYAHNA: Daet coBeTbI INHΦOpMaunHO.
06paueHHe c 3JeMeHTaMn NITaHn
I PENEYPENHEHNE: ONACHOCTb B3PbIBA!
He noDBepraTe 3neMeHTbI NITaHnB O3DeiCTBnHO BbICOKHX TeMnepaTyp INI INPmblx coJIHeuHbIX lyuei. HIKoRda He 6pocaTe 3neMeHTbI NITaHnB BOrOhB.
YdaIaIte TOnbKO BbICtUpaHoune H3 Hoca nn yxa BOJocbl. He BBoIte npH6op B HOCOBoe / yuHoe OTBepCTne C n3nunHM ycHnem. PnCnukom rJy6okOM BBeDeHHM MoKHO NopAHHTbc!
He norpykaTe yctpoNCTBO B Body.
- Ctpnryuee ne3Bne ocTpe. He npinkacaiTec b K hemy! MoXHo nopAHHTbCra.
RUS
BHIMAHNE:
- He nCnoB3yIte npoBOJIoUHyIO uTeKy IIN a6pa3nBhIe cpeIcTbA.
He nCnoB3yIte ocTpbie npEIMetbl nn a6pa3HBbIe yNCTaIue cpeIcTBa.
1.перд чстков Вьклочи пнбор.
2. BbHbTe 3JIeMeHTIITaHnIu3 6aTapeHOrO oTceKa.
3. OcnaBte cTpnyuToRnOBky, NOBepHyB ee npOTNB yacBOB CTpeKN, IN CHIMITE. AkkypaTHO CHIMNTE DePkaTeNb cTpnyuero ne3BnI.
4. YdaHte OCTaTKn BOLOC n3 DepeKaTeJIe3BnC NOMOuIO KNUCTOuKN DnA YnCTKn. MoHHo TaKKe BbIyTb OCTaTKn BOLOc n3 DepeKaTeJIa.
5. BCTaBbTe DepeKaTeNb CtpnIgUyIeero Ne3BnB B CtpnIgUyIeIO rOIOBky.
6. BCTaBbTe cTpHryuIyO rIoBky B yCtpoIcTBo. HadeHbTe npo3paHyIO 3aunTHyIO KpbIiKy.
7. Hadehhe Te 3aunTHyIO KpbIuKy Ha yCTpoiCTBO.
TexHHueckne xapaKTepeHCTnKn
MoeB: HSM 3441 NE
Bec HeTo: .npMepHo. 0,435 K
BOLOC MauHHKn Ira CtpnKKn 6opOdbI
3neKtpoHTaHHe: 230-240B\~,50T
Iotpe6JMaM MoHocTb: MaKc. 10 BaTT
Klacc 3aunr:
ycekeTeIb dIy BOnOC B Hocu I yux
3IeMeHT nHTaHn: 1x 1,5 B, Tuna: MIGNON LR6, AA, UM3
CoxpaheNo npaBO Ha TexHnueckne N KOHCTpyKUHOHHbIe I3MeHeHnB paMKax IpOdoJIka-kuSei cpa3pa6oTKn IpOdykTa.
3To n3deIeHne npoJIO BCE Heo6xOIMbIe n akTyalbHbIe npOBepK, npEaNcaHHbIe dIpeKTHBOI CE, K npM. Ha 3JeKTO-MaHHTHyO COBMeCTUMOCt b N COOTBeTCTBNE Tpe6oBaHNm K Hn3KOBoIbTHoI TexHKe, OHO 6blIO TaKHe CKOHCTpyuPoBaHO I NOCTPOEH C yUeTOM PocLeDHNX Tpe6oBaHNI IO TexHKe 6e30NaCHOCTn.
RUS
GARANTIEKARTE
warranty card - garantiekaart - carte de garantie - scheda di garanzia - tarjeta de garantia - cartao de garantia - garantikort - karta gwarancjna - zaručni list - kartica jamstva - carte de garantie - rapaunonha Kapta - zaručny list - garancijski list - garanciajegy - rapahtiinμφopmynp - rapaHTnHbI TaHO
HSM 3441 NE
24 Monate Garantie gemäß Garantieerklarung - 24 months warranty according to warranty declaration - 24征求意见 volgens garantieverklaring - 24 mois de garantie selon la déclaration de garantie - 24征求意见 secondo la dichiarazione de garanzia - 24征求意见 conform la déclaration de garantia - 24征求意见 on a déclaratio de garantia - 24 maneders garantié l'hénhold til garantietingelsene - 24 misise gwaranci na podstawie owidczcnia gwarancjynego - zaruks podle prohlasei o zuruce - 24 mesejne knamstvo u skladyu s jamstvenom deklaracion - 24 luni garantie conform déclaratje de garantie - 24 mecau rapaapanb cchotemctene c rapaapanpohnata deknapaun - 24 measa nzauka podle vhyasenia o zuruke - 24-mesechna ganci, skladno z garancijko izjavo - 24 honap garancia + garanciafeleteteleken leirtak szerint - rapaehn ha 24 micui biopinnio sanhi npraanip - rapaanr 24 mecnua cornacho sanenhim rapaannnnpaannn
Kaufdatum, Handlstertempel, Unterschrift - date of purchase, dealer stamp, signature - aankoc-datum, dalersttempel, handeckening, date dchat, tampon du coincefonaire, signature - data de acquistin, timbo del revendto, firma - fecha de compria, selle del distribuidor, fima - data de compria, calimbe do distribuidor, asinirabura - kipede, ferhandeltemspel, signatur - data zakupu, puezepi sproadency, pedis - datum zakoupel, nartles produje, podis - datum espeire, big trogova, potis - data de achidje, stampilis humoralis, remnata - [la] na morynaca, flerar na I'pogana, flugnac - datum nakupu, peatika ob chodnikia/edajuc, podis - datum nakupa, big trogova, potis - vistaris dituma, kereikedi belyegjne, alldis - para npapafanen, nevata npapauus, npagic - Data npapepetenen, uamr npapauus, Pngnco
CTC
CATRONICINTERNATIONAL GMBH
www.clatronic.com

CLATRONIC INTERNATIONAL GMBH
Internet: http://www.clatronic.de