StingBee - Toys BEEWI - Free user manual and instructions
Find the device manual for free StingBee BEEWI in PDF.
User questions about StingBee BEEWI
0 question about this device. Answer the ones you know or ask your own.
Ask a new question about this device
Download the instructions for your Toys in PDF format for free! Find your manual StingBee - BEEWI and take your electronic device back in hand. On this page are published all the documents necessary for the use of your device. StingBee by BEEWI.
USER MANUAL StingBee BEEWI
BLUETOOTH INTERACTIVE HELICOPTER
STING BEE BBZ302
STING BEE
natural_image
Line drawing of a helicopter in flight, showing propeller and rotor assembly (no text or symbols)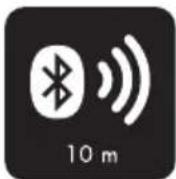


APPLICATION

natural_image
Illustration of a hand holding a smartphone with a blank screen (no text or symbols)
text_image
QR code image containing encoded data, no visible human-readable text
natural_image
Pink square icon with a white bird silhouette and the text 'BeeWi' beside it, no readable text or symbols in the main graphic area.User's guide
ENGLISH 4
FRANCAIS 12
DEUTSCH 20
ITALIANO 28
ESPAÑOL 36
PORTUGUES 44
NEDERLANDS 52
БЪЛГАРСКИ 60
ROMÂN 68
РУССКИЙ 76
日本語 84
中文 92
Thank you for purchasing the Bluetooth Interactive Helicopter from BEEWI. Please read the following instructions to learn how to configure and use more effectively your product.
INTRODUCTION
The Bluetooth Interactive Helicopter can be controlled directly from your Smartphone using the specific BeeWi HeliPad application available on Google play. The Bluetooth Interactive Helicopter works as a regular RC Helicopter with throttle, left/right and forward/backward directions. The application provided allows for both touch screen and motion control, offering a richer and more user friendly experience.
The Interactive Helicopter is Bluetooth 3.0 compliant and it is compatible with all Bluetooth compliant Android devices using the SPP Serial Profile.
1. PRODUCT DESCRIPTION
1.1. Package Content
- Bluetooth Interactive Helicopter
- USB Charging Cable
- Smart Target (requires 3 AAA batteries not included)
- Quick Start Guide
1.2. Main Features
- Use your SmartPhone to fly this helicopter and hit the Target!
- 3 Channels, dual rotor structure and gyroscope
- Maximum range 15 meters, Typical 10 meters
- Shooting range 3 meters typical
- Rechargeable battery, up to 8 minutes use time
- Standard USB charge
- BeeWi HeliPad 2.0 application compatible with Android devices, version 2.1 and above
- Intuitive motion control using mobile's motion sensor or touch-screen button interface
- 2 control modes: easy and expert
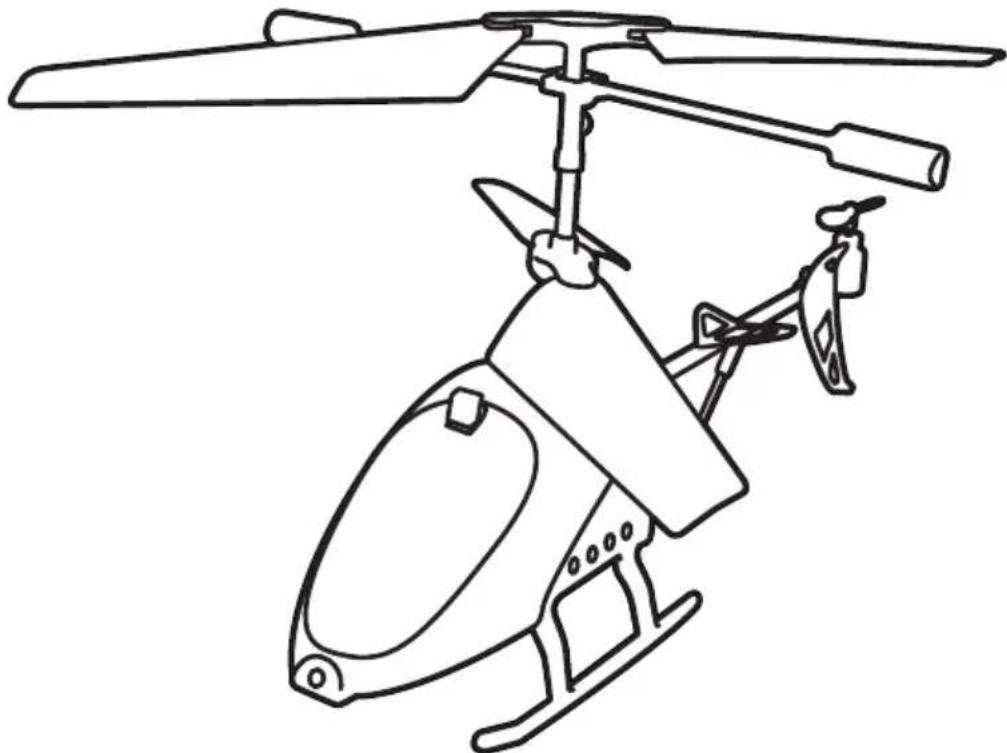
1.3. Product Outlook
Interactive Helicopter
- Main blades (2)
- Tail blade
- Stabilizer
- Fire/Transmission LED
- Reception LED
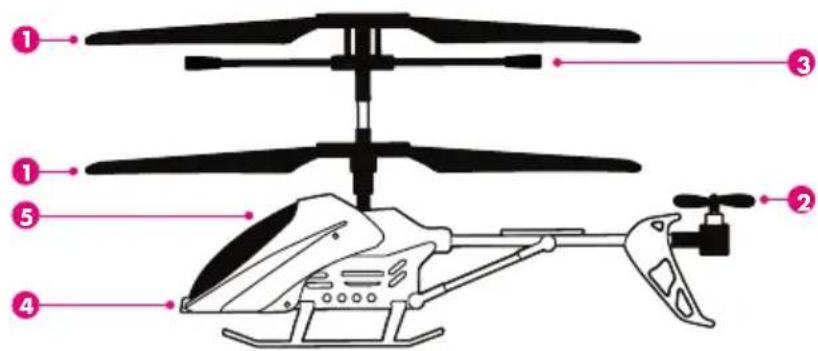
text_image
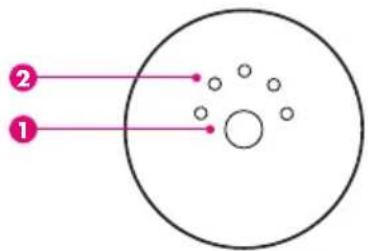
Diagram of a helicopter with numbered parts for identification and assembly reference.Smart Target
- Power On/Off button
- Lives indicator LEDs
- 3 x AAA batteries slot
text_image
② ①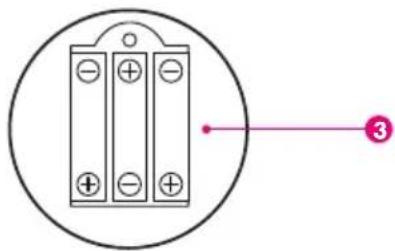
natural_image
Diagram of a three-pin battery terminal with pinout and connection point (no text or symbols)1.4. Product Specification
Helicopter Specifications
| BLUETOOTH CHIP Bluetooth 3.0 | |
| BLUETOOTH RANGE Class 2, up to 10 m | |
| PROTOCOL SPP Serial Profile | |
| BATTERY Lithium Polymer 180 mAH | |
| TYPICAL USE TIME Up to 8 minutes continuous | |
| CHARGE TIME Up to 40 minutes | |
| SERVO CONTROLS 3 channels + gyroscope | |
| IR SENSORS 1 TX (3 m range), 1 RX | |
| DIMENSIONS L 200 mm x H100 mm x W140 mm | |
| WEIGHT 45 g |
Target Specifications
| IR SENSORS 1 TX, 1 RX | |
| TX RANGE Minimum 3 m | |
| TX RADIUS +/- 30° | |
| BATTERY 3 X AAA cells (not included) | |
| DIMENSIONS D 76 mm x H 30 mm | |
| WEIGHT 40 g |
2. INITIAL SETTINGS
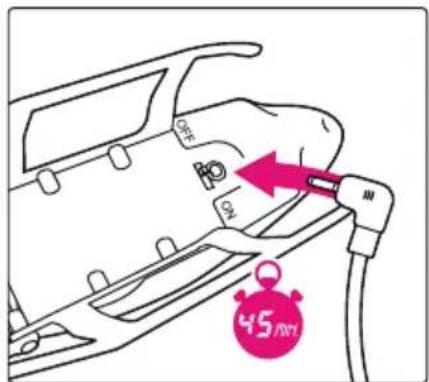
2.1. Battery Charge
- Make sure the Helicopter is switched OFF
- Plug the USB cable into the USB port on your PC: the light at the USB charger end is lightening.
- Connect the USB cable end to the charging socket located underneath the helicopter. Do not force, the cable end should connect smoothly.
- During the charging process, the USB charger light will turn off; if the light turns on again, it means the helicopter is fully charged.
text_image
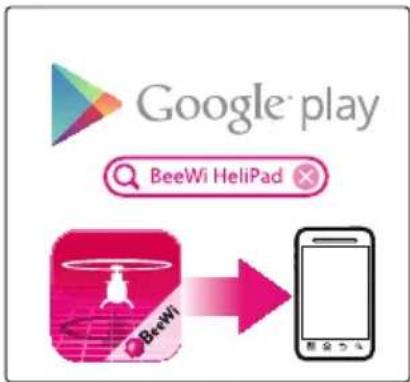
45 402.2. BeeWi HeliPad Installation
Go to Google play and look for "BeeWi HeliPad" app. Follow the on-screen indications to download and install the app. Once the application has been successfully installed, you can launch it directly. Insure the Helicopter has been paired and connected prior to start the application.
text_image
Google play BeeWi HeliPad2.3. Pairing
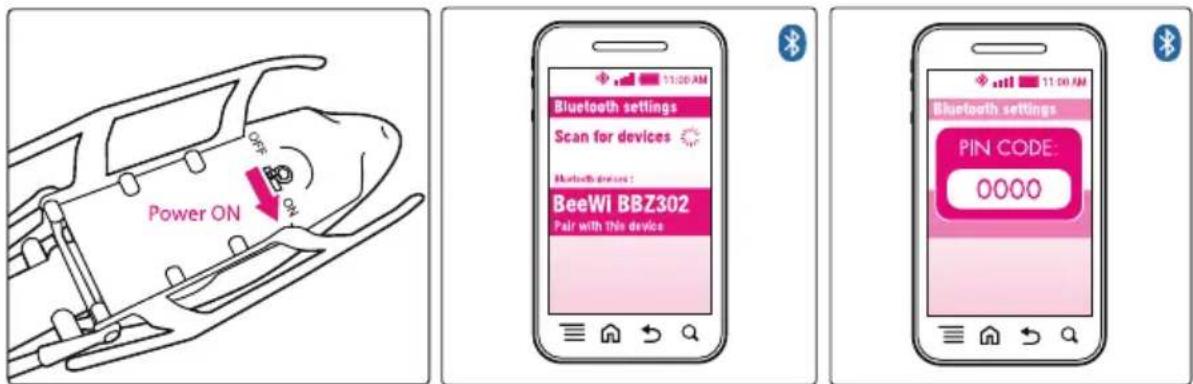
To pair the Helicopter with your device, refer to the pairing procedures in your mobile phone user manual and follow the instructions below:
- Power on the Helicopter to turn the unit in pairing mode (wait 30 seconds)
- In the Smartphone Bluetooth menu, search for devices, select the device named "BeeWi BBZ302" to pair it. When prompted, enter the pass key "0000".
text_image
Power ON Bluetooth settings Scan for devices BeeWi BBZ302 Pair with this device 11:00 AM 11:00 AM Bluetooth settings PIN CODE: 0000Note: you can also pair the Helicopter directly in the app by opening the "Select Helicopter" Menu and searching the Helicopter. In that case, select the device name "BeeWi BBZ302" on the screen and enter the pass key "0000" to add this device in your phone device list.
3. USING THE HELICOPTER
3.1. Connection
Open the BeeWi HeliPad application and display the application menu using the mobile Menu key then press "Select Helicopter" to see the list of paired devices.

text_image
11:00 AM SELECT DEVICE MODE CONTROLMake sure your Helicopter is turned on and select it in the list. The Helicopter will be connected automatically and the control screen below displayed.
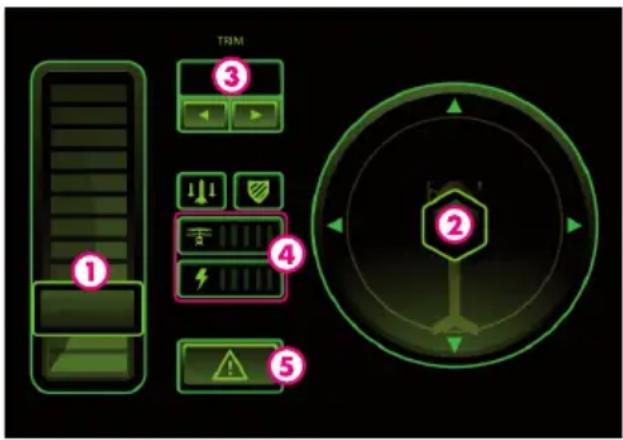
3.2. User Interface
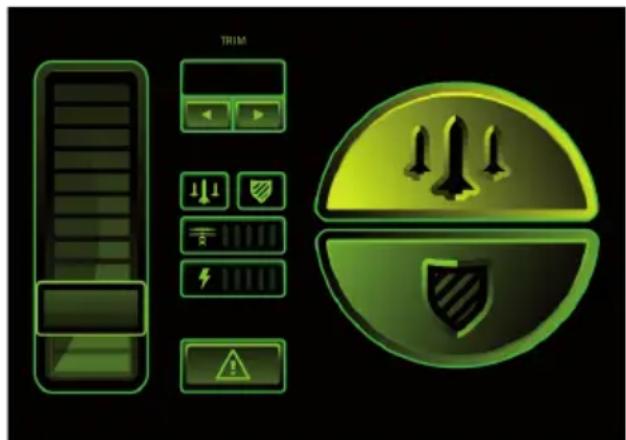
When the Helicopter is connected, you can access the control screen below. By default the control is motion and the trimmer is set to "0".
text_image
TRIM ① ③ ④ ② ⑤- Gas throttle
- Direction wheel (only touch mode)
- Trimmer
- Status control: lives bar and battery meter
- Emergency Stop
3.3. Operation
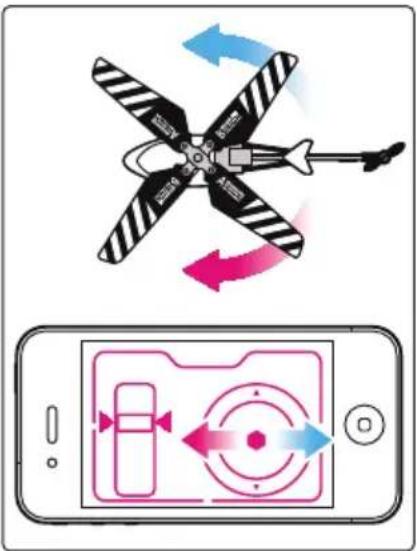
Gently push the throttle until the Helicopter engine turns on. Then keep the Helicopter on the ground and try the direction commands to learn how to fly:
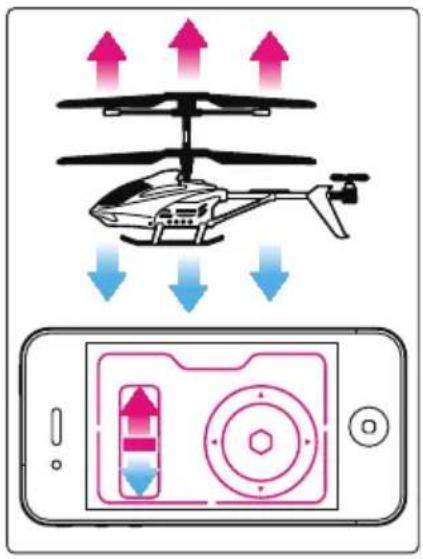
- To move forward, move the mobile device downwards
- To move backward, move the mobile device upwards
- To turn left, turn the mobile device leftwards
- To turn right, turn the mobile device rightwards
If the helicopter is drifting during the initial trial on the ground, it may be necessary to adjust the direction trimmer using the Trim > key if the helicopter is drifting on the left, or Trim < key if it is drifting on the right.
You can also simply use the buttons on the screen to control the Helicopter. To do so, open the Menu bar using the Menu key of the phone, and tap on Touch/Motion key. A confirmation message will appear on your screen. The controls are described next page:
text_image
Diagram illustrating helicopter navigation and targeting system with directional arrows and a smartphone screen showing target and control buttons.
text_image
Diagram showing a helicopter with directional arrows and a smartphone displaying a control interface with arrows and circular indicators.
text_image
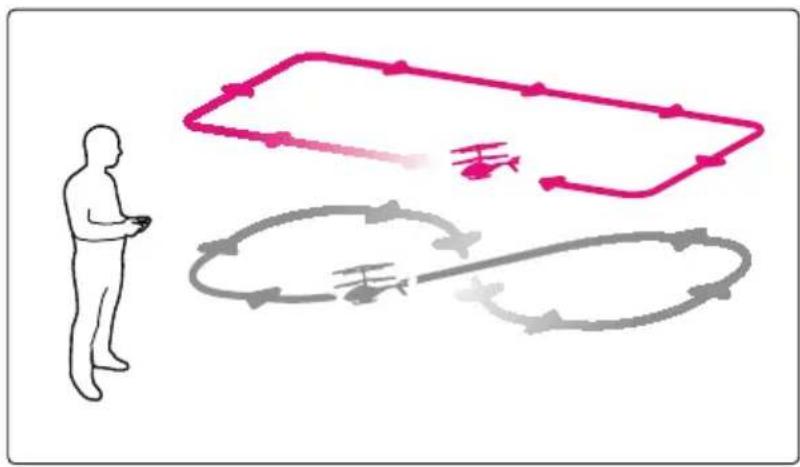
Diagram illustrating a helicopter with directional arrows and a smartphone displaying a target device interface.When you feel confident with the direction commands, you can start to fly your Helicopter. Softly push the throttle until your Helicopter is taking off. Try to maintain it at a steady height using the throttle before using the direction commands. Once you are confident with the throttle control, you can state to use all commands and train yourself with the following circuits.
flowchart
graph TD
    A["人形图"] --> B["粉色圆圈"]
    B --> C["灰色环"]
    C --> D["灰色环"]
    D --> E["毛"]
    style A fill:#fff,stroke:#000
    style B fill:#ff9999,stroke:#000
    style C fill:#ccf,stroke:#000
    style D fill:#cfc,stroke:#000
    style E fill:#fcc,stroke:#000

text_image
>3 m >2 m3.4. Configuration
The configuration menu can be accessed by opening the Menu bar using the phone Menu key. There are 4 different options listed in the Settings:
- SELECT: to select the Helicopter in the list of paired devices or search it to add it to the list
- CONTROLS: to select either MOTION or TOUCH control modes.
- MODE : to select either EASY (slower/smoother commands) or EXPERT
The default settings are MOTION, EASY, SOUND ON and VIBRATE ON but your preferred settings will be saved.
4. COMBAT FUNCTIONS
4.1. Interactive Helicopter Combat functions
text_image
TRIM 1 2 3 4 5 6 7 8 9 10 11 12 13 14 15 16 17 18 19 20 21 22 23 24 25 26 27 28 29 30 31 32 33 34 35 36 37 38 39 40 41 42 43 44 45 46 47 48 49 50 51 52 53 54 55 56 57 58 59 60 61 62 63 64 65 66 67 68 69 70 71 72 73 74 75 76 77 78 79 80You can use the combat functions in motion or touch control mode.
In motion control mode, the combat functions are accessible with large Fire and Shield buttons on the right side of the screen.
In touch control mode, the combat functions are emulated by flipping the mobile device forward to fire or backward to shield.
When hit the Helicopter will make a half turn on the left and the screen will display different screens and bomb sounds depending on the shield being raised or not.
The 5 bars 10 live counter will be decrement by one in case the shield was not raised.
4.2. Smart Target functions
Power on/off:
Just press the center button to power on or off the target.
The target will also automatically turn off in the following circumstances:
o Life count is "0"
o The target is not used for 8 minutes
o The batteries are low
Difficulty settings
The target comes with 5 preset difficulty levels. The default level is Level 3 (intermediate). You can select one of the difficulty levels when turning on the target with a long press. The actual level is then displayed on the 5 LED indicators. Just release the power button when you reach the required difficulty level.
Use the target
Like the Helicopter, the target is starting with 10 lives. It will randomly alternatively shoot and raise the shield. Shoots are shown with a beep and a red light. Shield mode is shown with the red light on.
Any time the target is hit, a double beep will be heard and one of the 5 lives LED will either blink or turn off depending on the previous state.
5. CAUTIONS & MAINTENANCE
WARNING!
- Please read carefully the complete manual before flying and strictly follow the instructions given.
• This product is not suitable for children under 14 years old. - This product is not suitable for children under 3 years old – risks of small parts breaking off and potential choking hazard.
- Stay away from the product when it is turned on. Do not come closer or touch the rotating parts.
- Do not disassemble or rework the product as this may cause damage and void the warranty.
USE AND MAINTENANCE
- During the first few flights, try to keep the helicopter very close to the ground to learn how to use it and land safely in case you lose control
- For better performance this model uses only one stabilizer hook – do not try to add another one.
- Use only the charging cable supplied with the helicopter, excluding any other USB cable.
- Do not operate the product with people or obstacles around.
- Do not operate the product outdoor in windy or bad weather conditions.
- Use the product with care and avoid throwing, crashing or twisting it.
- In case of a crash, the helicopter will automatically disconnect to avoid further damage
- Do not leave the product near sources of heat or in wet environment conditions for a long time.
DAMAGES NOT COVERED BY STANDARD WARRANTY
Damages not covered by the standard Warranty:
- Damages that are caused by a improper use of the toy (shocks, falls...)
- Damages resulting from any non-compliance with manufacturer instructions (power supply ...)
• Cosmetic damages (scratches, ...) - Components and parts which require regular renewal: batteries, power supply... Damages to the toy after an intervention by any person not authorized by BeeWi
European Union Directives Conformance Statement
Hereby, VOXLAND declares that this product is in compliance with:
CE • The essential requirements and other relevant provisions of Directive 1999/5/EC • All other relevant EU Directives
You can view your product's Declaration of Conformity (DoC) to Directive 1999/5/EC (to R&TTE Directive) at www.bee-wi.com.
Federal Communications Commission
FC This device complies with Part 15 of the FCC rules and with RSS-210 of Industry Canada.
Operation is subjected to the following two conditions:
1) This device may not cause harmful interference, and,
2) This device must accept any interference received, including interference that may cause undesired operation.
Caring for the environment by recycling
Do not dispose of electrical devices or accessories with your household waste. In some countries or regions, collection systems are set up to handle electrical and electronic waste items. Contact your regional authorities for more details.
Copyright and other legal information
BEEWI is a registered trademark. Other trademarks mentioned herewith are owned by their proprietors. All other product or service names are the property of their respective owners.
The use of wireless devices and their accessories may be prohibited or restricted in certain areas. Always obey the laws and regulations on the use of these products.
This product is covered by a 2-year product warranty which is valid from the date of purchase. Users are not permitted to make changes or modify the device in any way.
Changes or modifications not expressly approved by the party responsible for compliance will void the user's warranty. Please visit our website www.bee-wi.com for more information.
Technical support: support@bee-wi.com.
text_image
Diagram of a helicopter with numbered parts for identification and assembly referenceCible intelligente
natural_image
Diagram of a three-pin electrical connector with pinout and connection point (no text or symbols)1.4. Spécification
text_image
Power ON Bluetooth settings Scan for devices BeeWi BBZ302 Pair with this device 11:00 AM 11:00 AM Bluetooth settings PIN CODE: 0000text_image
Select device BssW1 BBZ302 XX:XX:XX:XX:XX:XX Search
text_image
Connectedtext_image
Diagram illustrating helicopter control system with directional arrows and a smartphone displaying a target device interface.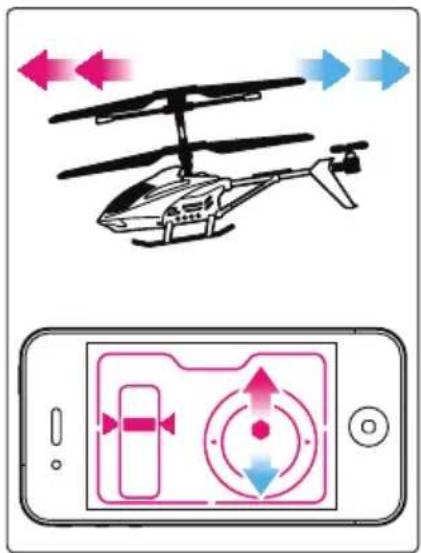
text_image
Diagram showing a helicopter with directional arrows and a smartphone displaying a control interface with arrows and circular indicators.
text_image
Diagram showing a helicopter with directional arrows and a smartphone displaying a target device with control buttons.text_image
>3 m >2 m3.4. Configuration
Allumage/Extinction:
Support technique: support@bee-wi.com.
text_image
Labeled diagram of a helicopter showing parts numbered 1 to 5 for identification.Intelligentes Ziel
text_image
Diagram showing two electrical components with labeled pins: one with dots and a circle, the other with three battery cells and pin numbering.1.4. Spezifikation
text_image
Power ON Bluetooth settings Scan for devices BeeWi BBZ302 Pair with this device 11:00 AM 11:00 AM PIN CODE: 0000text_image
Connectedtext_image
Diagram illustrating helicopter navigation and control system with directional arrows and a smartphone screen showing a target device.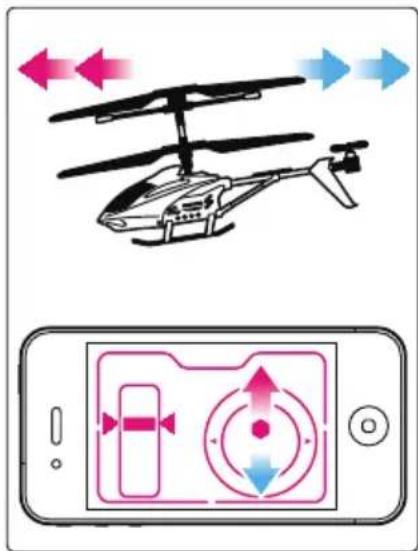
text_image
Diagram showing a helicopter with directional arrows and a smartphone displaying a control interface with arrows and circular indicators.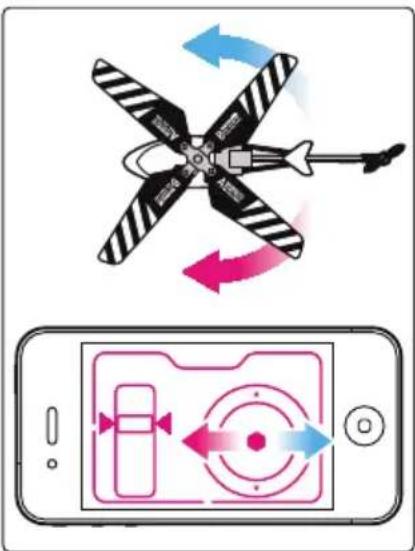
text_image
Diagram showing a helicopter with directional arrows and a smartphone displaying a target device with control buttons.text_image
>3 m >2 m3.4. Konfigurierung
text_image
Diagram of a helicopter with numbered parts for identification and assembly reference.natural_image
Diagram of a three-pin battery bank inside a circle, with a pin labeled '3' pointing to one terminal (no text or symbols beyond basic markings)1.4. Specifiche
text_image
Power ON Bluetooth settings Scan for devices BeeWi BBZ302 Pair with this device 11:00 AM 11:00 AM Bluetooth settings PIN CODE: 0000text_image
Select device BssW1 BBZ302 XX:XX:XX:XX:XX:XX Search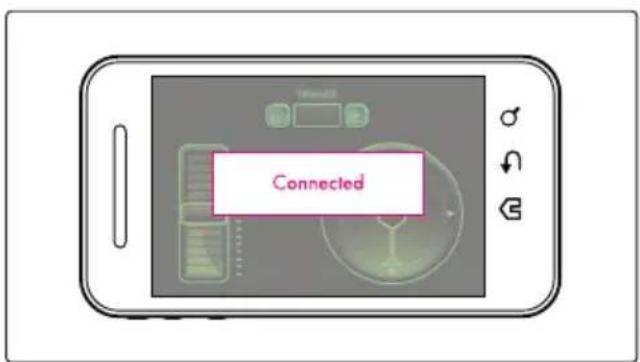
text_image
Connectedtext_image
Diagram illustrating helicopter navigation and targeting system with directional arrows and a smartphone screen showing target and control buttons.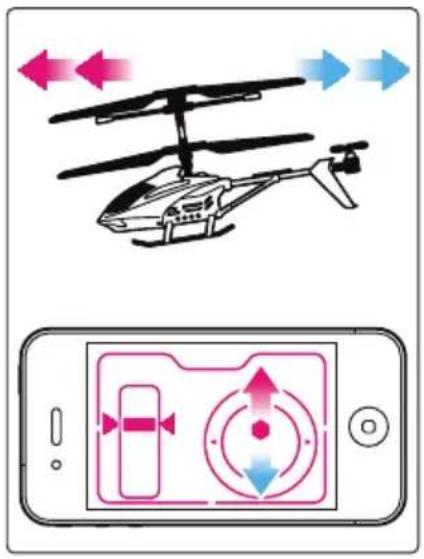
text_image
Diagram showing a helicopter with directional arrows and a smartphone displaying a control interface with arrows and circular indicators.
text_image
Diagram showing a helicopter with directional arrows and a smartphone displaying a target device with control buttons.text_image
>3 m >2 m3.4. Configurazione
text_image
Diagram of a helicopter with numbered parts for identification and assembly reference.Diana inteligente
natural_image
Diagram of a three-pin electrical connector with pinout and terminal symbols, no text or labels presenttext_image
Connectedtext_image
Diagram illustrating helicopter navigation and targeting system with directional arrows and a smartphone screen showing target and control buttons.
text_image
Diagram showing a helicopter with directional arrows and a smartphone displaying a control interface with arrows and circular indicators.
text_image
Diagram illustrating a helicopter with directional arrows and a smartphone displaying a target device interface.text_image
>3 m >2 m3.4. Configuración
text_image
Diagram of a helicopter with numbered parts for identificationAlvo inteligente
natural_image
Diagram of a three-pin electrical connector with pinout and connection point (no text or symbols)1.4. Especificação
text_image
Power ON OFF ON Bluetooth settings Scan for devices Bluetooth devices: BeeWi BBZ302 Pair with this device 11:00 AM 11:00 AM Bluetooth settings PIN CODE: 0000text_image
Select device BssW1 BBZ302 XX:XX:XX:XX:XX:XX Search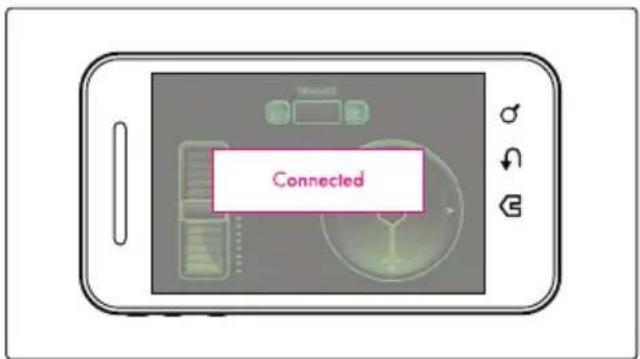
text_image
Connectedtext_image
Diagram illustrating helicopter navigation and control system with directional arrows and a smartphone screen showing flight status.
text_image
Diagram showing a helicopter with directional arrows and a smartphone displaying a control interface with arrows and circular indicators.
text_image
Diagram showing a helicopter with directional arrows and a smartphone displaying a target device interface.text_image
>3 m >2 m3.4. Configuração
text_image
Labeled diagram of a helicopter showing parts numbered 1 to 5 for identification.Intelligent doel
text_image
Diagram showing two electrical components with labeled pins: one with dots and one with a battery, both enclosed in a circle.1.4. Specificatie
text_image
Power ON Bluetooth settings Scan for devices BeeWi BBZ302 Pair with this device 11:00 AM 11:00 AM Bluetooth settings PIN CODE: 0000text_image
Select device BosWi BBZ302 XX:XX:XX:XX:XX Search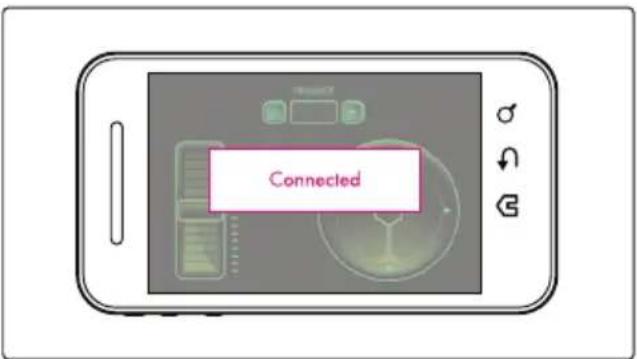
text_image
Connectedtext_image
Diagram illustrating helicopter navigation and flight control system with directional arrows and a smartphone screen showing flight direction and target.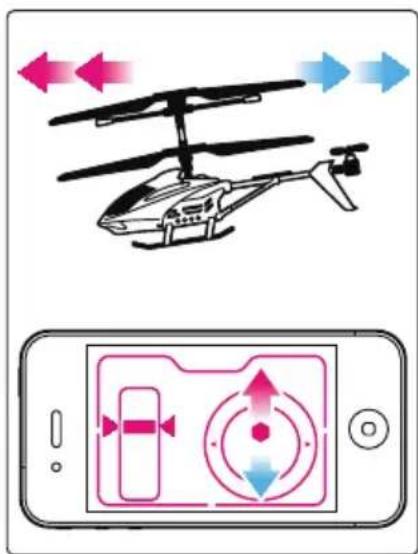
text_image
Diagram showing a helicopter with directional arrows and a smartphone displaying a control interface with arrows and circular indicators.
text_image
Diagram showing a helicopter with directional arrows and a smartphone displaying a target device with color-coded arrows.text_image
>3 m >2 m3.4. Configuratie
text_image
Diagram of a helicopter with numbered parts for identificationИнтелигентна мишена
text_image
Diagram showing two labeled circular components with internal dot patterns and a battery pack, marked with numbered annotations.1.4. Спецификация
text_image
Power ON Bluetooth settings Scan for devices BeeWi BBZ302 Pair with this device 11:00 AM 11:00 AM PIN CODE: 0000text_image
Select device BosWi BBZ302 XX:XX:XX:XX:XX Search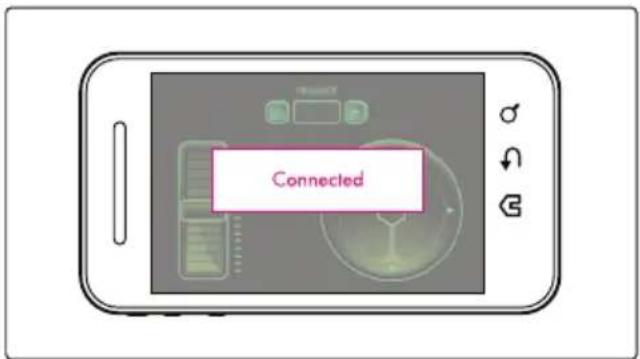
text_image
Connectedtext_image
Diagram illustrating helicopter navigation and control system with directional arrows and a smartphone screen showing flight direction and target.
text_image
Diagram showing a helicopter with directional arrows and a smartphone displaying a control interface with arrows and circular indicators.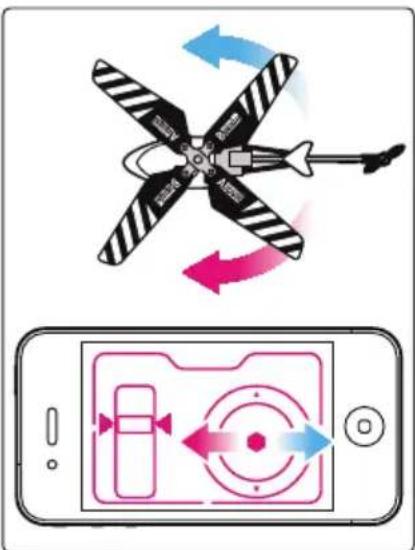
text_image
Diagram showing a helicopter with directional arrows and a smartphone displaying a target with bidirectional arrows, likely illustrating flight or navigation system.text_image
>3 m >2 m3.4. Конфигурация
text_image
Diagram of a helicopter with numbered parts labeled for identificationTintă inteligentă
natural_image
Diagram of a three-pin battery terminal with pinout and connection point (no text or symbols)1.4. Product Specification
Helicopter Specifications
| TEHNOLOGIE Bluetooth 3.0 | |
| DISTANȚĂ Clasa a 2-a, maximum 10 m | |
| PROTOCOL Profil seria SPP | |
| BATERIE Litiu polimer 180 mAh | |
| AUTONOMIE Până la 8 minute de utilizare continuă | |
| TIMP DE ÎNCĂRCARE Până la 40 de minute | |
| SERVOCONTROALE 3 canale + giroscop | |
| DIODE INFRAROȘU 1 de emisie (distanță 3 m), 1 de recepție | |
| DIMENSIUNI L 200mm x H 100 mm x I 140 mm | |
| GREUTATE 45 g |
Target Specifications
| SENZORI INFRAROŞU 1 TX, 1 RX | |
| DISTANȚĂ DE EMISIE Minimum 3 m | |
| UNGHI DE EMISIE ± 30° | |
| ALIMENTARE 3 x acumulatori AAA (care nu sunt incluși) | |
| DIMENSIUNI D 76 mm x H 30 mm | |
| GREUTATE 40 g |
2. CONFIGURARE INITIALĂ
text_image
Power ON Bluetooth settings Scan for devices BeeWi BBZ302 Pair with this device 11:00 AM 11:00 AM Bluetooth settings PIN CODE: 0000text_image
Connectedtext_image
Diagram illustrating helicopter navigation and targeting system with directional arrows and a smartphone screen showing target and control buttons.
text_image
Diagram showing a helicopter with directional arrows and a smartphone displaying a control interface with arrows and circular indicators.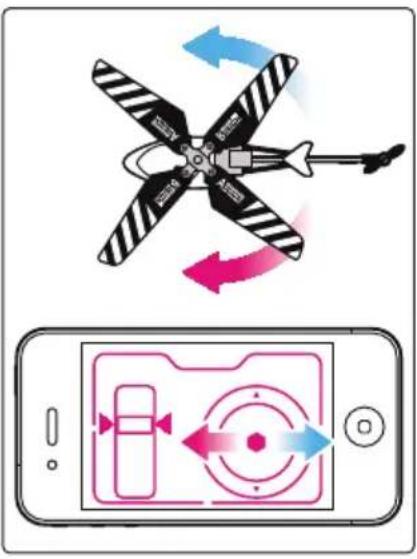
text_image
Diagram illustrating a helicopter with directional arrows and a smartphone displaying a target device interface.text_image
>3 m >2 m3.4. Configurare
text_image
Diagram of a helicopter with numbered parts for identificationПодвижная цель
text_image
Diagram showing two electrical components with labeled pins: one with dots and a circle, the other with three battery cells and pin labels 1, 2, and 3.1.4. Спецификация
text_image
Select device BosWi BBZ302 XX:XX:XX:XX:XX Search
text_image
Connectedtext_image
Diagram illustrating helicopter signal flow with arrows and a smartphone displaying control panel with directional arrows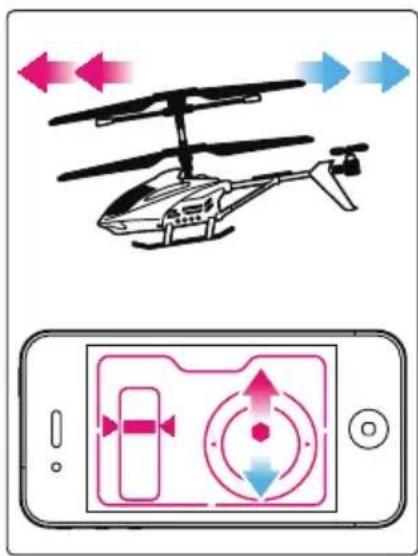
text_image
Diagram showing a helicopter with directional arrows and a smartphone displaying a control interface with arrows and circular indicators.
text_image
Diagram showing a helicopter with directional arrows and a smartphone displaying a target with bidirectional arrows, likely illustrating flight or navigation system.text_image
>3 m >2 m3.4. Конфигурация
text_image
Labeled diagram of a helicopter showing parts numbered 1 to 5 for identification.インテリジェント・ターゲット
natural_image
Diagram of a battery pack with three terminals and a pin labeled '3' (no text or symbols beyond basic labels)1.4. 特徵
ヘリコプターの仕様
text_image
Power ON Bluetooth settings Scan for devices BeeWi BBZ302 Pair with this device 11:00 AM 11:00 AM Bluetooth settings PIN CODE: 0000text_image
Connected3.2. 操作画面
text_image
Diagram illustrating helicopter control system with directional arrows and a smartphone displaying a target device interface.
text_image
Diagram showing a helicopter with directional arrows and a smartphone displaying a control interface with arrows and circular indicators.
text_image
Diagram showing a helicopter with directional arrows and a smartphone displaying a target device with control buttons.text_image
>3 m >2 m3.4. 設定
text_image
Diagram of a helicopter with numbered parts for identification智能目标
natural_image
Diagram of a three-pin electrical connector with pinout and terminal symbols, no text or labels present1.4. 规格
直升飞机的规格
text_image
Power ON OFF ON Bluetooth settings Scan for devices Bluetooth device: BeeWi BBZ302 Pair with this device 11:00 AM 11:00 AM Bluetooth settings PIN CODE: 0000text_image
Select device BssW1 BBZ302 XX:XX:XX:XX:XX:XX Search
text_image
Connected3.2. 用户界面
text_image
Diagram illustrating helicopter control system with directional arrows and a smartphone displaying a target device interface.
text_image
Diagram showing a helicopter with directional arrows and a smartphone displaying a control interface with arrows and circular indicators.