Magic Theatre SCD940 - Baby monitors PHILIPS - Free user manual and instructions
Find the device manual for free Magic Theatre SCD940 PHILIPS in PDF.

| Product Type | Baby room projector (Magic Theatre) |
| Brand | Philips |
| Model | Magic Theatre SCD940 |
| Power supply | 4 AA batteries (not included) or rechargeable AA batteries (reduced runtime) |
| Lamp | Krypton bulb 3.6 V, 0.3 A, base P13.5s |
| Cycle usage time | 5, 8 or 10 minutes (adjustable timer) |
| Main features | Image projection (included slides and blank slides), automatic rotation, sound selection (heartbeat, fountain, lullaby, silent), adjustable focus |
| Optimal projection distance | 1.5 to 5 m from wall or ceiling |
| Image rotation | Yes, switchable (MOTOR ON/OFF) |
| Customizable slides | Yes, with permanent markers on provided blank slides or overhead transparencies |
| Maintenance | Replacement of lamp and batteries (procedure described in the manual) |
| Safety | Use by adults or children over 3 years only; do not mix battery types; remove batteries if not used for a long time |
| Warranty | See www.philips.com or contact Philips customer support |
Frequently Asked Questions - Magic Theatre SCD940 PHILIPS
User questions about Magic Theatre SCD940 PHILIPS
0 question about this device. Answer the ones you know or ask your own.
Ask a new question about this device
Download the instructions for your Baby monitors in PDF format for free! Find your manual Magic Theatre SCD940 - PHILIPS and take your electronic device back in hand. On this page are published all the documents necessary for the use of your device. Magic Theatre SCD940 by PHILIPS.
USER MANUAL Magic Theatre SCD940 PHILIPS
Your Magic Theater Room projector
SCD940
Philips is dedicated to producing caring, reliable products that new moms and dads really need. Products whose reliability and operating quality bring reassurance. This Magic Theater Room Projector will help your baby fall asleep with reassuring sounds and appropriate images. By using shapes, colours and sounds that relate to various ages, you can stimulate your baby's aural and visual development. You can also make your own pictures to bring your daily bedtime story to life!
Having a regular bed-time ritual helps your baby to wind down after an energetic day, giving your baby the time to relax to fall asleep easily.
Please read this User Guide carefully before using the Magic Theater Room Projector. Keep this User Guide and packaging, as they contain important information.
Philips Baby Care, Taking care together
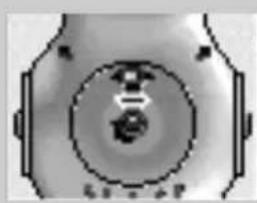
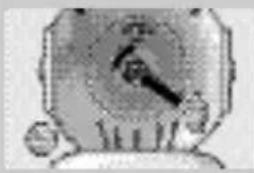
Legend of product. Illustrations on inside flap.
1 Slide wheel
Contains the slide
2 Lens
3 Focus ring
Adjusts the focus of the projected image.
4 MOTOR ON/OFF
Switches the rotation function on and off.
5 Slide holder
6 SOUND selector
- Switches the sound on and off.
- Selects sounds.
7 Battery compartment
8 Lamp compartment
9 ON/OFF timer control
- Switches the projector on and off.
- Selects the desired projection time.
10 Projector foot
Getting the Bedtime Magic Room projector ready
Inserting the batteries
The Bedtime Magic Room projector requires 4 AA type batteries (not included). You can also use rechargeable AA batteries but these batteries have a shorter operating time.

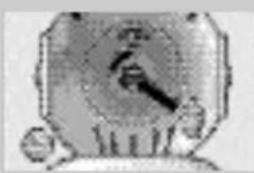
1 Open the battery compartment (7) by turning the coin slot counterclockwise.Approx. 1/4 turn. For this use a coin.
2 Insert four AA batteries, noting the + and - configuration inside the battery compartment
3 Put the battery compartment cover back in place.
4 Close the battery compartment (7) by turning the coin slot clockwise.Approx. 1/4 turn. For this use a coin.
Using your Bedtime Magic Room projector
Positioning the Bedtime Magic Room Projector
- The Bedtime Magic Room Projector is fit for both wall and ceiling projection and can be positioned under any angle.
- You will get the best image quality if you place the projector between 1.5 and 5m (1.6 and 5.5 yards). from the wall/ceiling.
- The best projection quality is achieved in a dark room.
Inserting slides
The supplied slides are designed for different ages of your baby. Your baby will enjoy the projected images most if you choose an image that fits your baby's age.
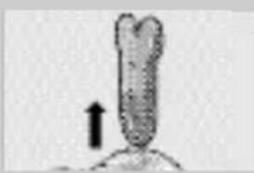
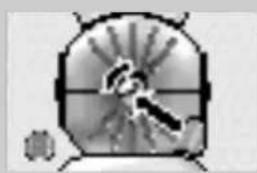
1 Take the slide holder (5) out of the projector.

2 Take the slide-wheel out of the slide holder and remove the printed disk (slide) from the slide-wheel (1).
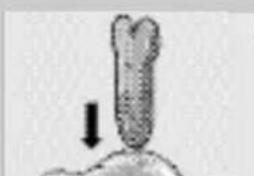
3 Insert the chosen slide into the slide-wheel. Make sure that the slide is positioned under the tabs at the edge of the slide-wheel.
4 Put the slide-wheel back into the slide-holder (5).
5 Put the slide-holder back into the projector with the little knob facing forward. Insert the holder unitil it clicks in position.
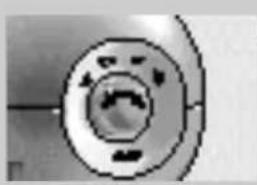

Selecting the sound
-
Set the SOUND selector (6) to the desired sound symbol:
-
no sound;
- soothing heartbeat;
- streaming water;
- gentle lullaby.
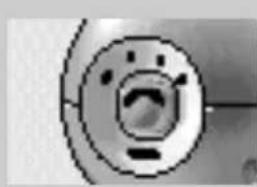
Setting the timer
- Set the ON/OFF timer control (9) to the desired playing time.
Soundstarts.
Focusing the image
- Turn the focus ring (3) to adjust the focus of the projected image.
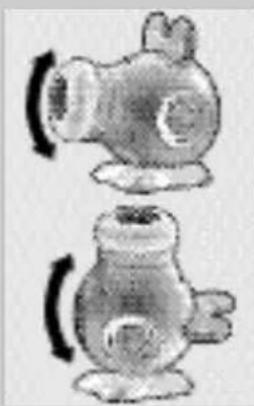
Rotating the projected image
You can project both still and rotating images. In general, babies are soothed by moving images, but if your child prefers a still image, you can use a still image.
- Set the MOTOR ON/OFF (4) switch to ON.
Once the projector is switched on, the image will rotate gently.
Making your own slides
You can bring even more magic into your bedtime story by drawing your own images and project them on to the baby room's wall or ceiling.
Use permanent markers to draw on the blank slides provided.
Insert your own slide as described under 'Inserting slides'.
If you have no more blank slides left, you can also use blank overhead sheets.
Maintenance
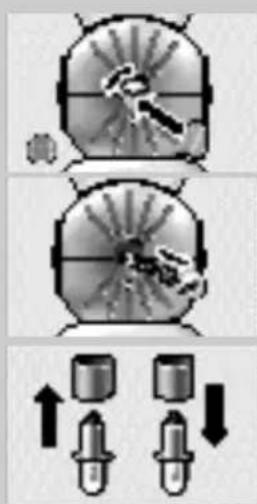
Replacing the lamp
1 Open the lamp compartment (8) by turning the coin slot counterclockwise.Approx. 1/4 turn. For this use a coin.
2 Take out the lamp.
3 Remove the isolating tube from the old lamp and place it on the new lamp.
4 Insert the new lamp into the lamp compartment.
5 Put the lamp compartment cover back in place.
6 Close the lamp compartment (8) by turning the coin slot clockwise.Approx. 1/4 turn. For this use a coin.
Replacing the batteries
1 Open the battery compartment (7) by turning the coin slot counterclockwise.Approx. 1/4 turn. For this use a coin.
2 Insert four AA batteries, noting the + and - configuration inside the battery compartment.
3 Put the battery compartment cover back in place.
4 Close the battery compartment (7) by turning the coin slot clockwise.Approx. 1/4 turn. For this use a coin.
Important information
- Only use batteries of the same type.
- Dispose of the batteries in an environmentally friendly way.
- Do not mix old and new batteries.
- Do not mix different types of batteries: alkaline, standard or rechargeable batteries.
- If the product is not used for a long period, remove the batteries. Leakage can cause damage of the product.
- Do not recharge non-rechargeable batteries.
- Empty batteries need to be removed from the product.
- Do not short-cut the battery connection points.
- Install all batteries correctly, + and - as marked on the unit.
- Do not mix old and new batteries or carbon and alkaline, etc.
- Remove batteries when the unit is not used for a long time.
- Batteries contain chemical substances, so they should be disposed of properly.
This product is meant for babies to enjoy images projected on the wall.
The product should be operated by parents or childme over 3 years only!
Technical specifications
Power supply: 4 × AA (or equivalents). We recommend to use Philips eXtreme Life or Philips Powerlife batteries.
Lamp: Krypton bulb, 3.6V, 0.3A, P13.5s base.
Playing time: 5, 8 or 10 minutes.
Guarantee & Service
If you need information or if you have a problem, please visit the Philips Web site at www.philips.com or contact the Philips Customer Care Center in your country (you will find its phone number in the worldwide guarantee leaflet). If there is no Customer Care Center in your country, turn to your local Philips dealer or contact the Service Department of Philips Domestic Appliances and Personal Care BV.
Philips Baby Care, Taking care together
7 Compartment des piles
8 Compartiment de la lampe
9 Commande ON/OFF de la minuterie
Specifications techniques
Alimentation
Philips Baby Care, Taking care together
Alternatively, you can use the following two methods to find the optimal solution.

Philips Baby Care, Taking care together
Philips Baby Care, Taking care together
Lamp: Krypton-lamp, 3.6V, 0.3A, P13.5s-fitting.
Philips Baby Care, Taking care together
Philips Baby Care, Taking care together
Descrição geral do
produto.
llustracoes na aba interior.
Philips Baby Care, Taking care together
Philips Baby Care, Taking care together
Produktoversikt. Illustrationer pa parmens insida.
Philips Baby Care, Taking care together
Philips Baby Care, Taking care together
Technical specifications
Philips Baby Care, Taking care together
EN Information to the Consumer
Disposal of your old product
Your product is designed and manufactured with high quality materials and components, which can be recycled and reused.
When this crossed-out wheeled bin symbol is attached to a product it means the product is covered by the European Directive 2002/96/EC.
Please inform yourself about the local separate collection system for electrical and electronic products.
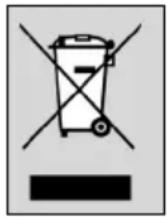
Please act according to your local rules and do not dispose of your old products with your normal household waste. The correct disposal of your old product will help prevent potential negative consequences for the environment and human health.
Specifications are subject to change without notice.
Trademarks are the property of Koninklijke Philips Electronics N.V. or their respective owners.
2005 © Koninklijke Philips Electronics N.V. All rights reserved.
www.philips.com