USER MANUAL SPF3473 PHILIPS
Philips and Philips Shield are used under license of Koninklijke Philips Electronics NV.
© 2014 GiiNii Tech Corporation
All rights reserved.
D.06.13.14
natural_image
Black-and-white framed picture of a person playing a dynamic game with purple and blue lighting (no text or symbols visible)
Digital PhotoFrame
User Manual
Manual del usuario
Mode d'emploi
www.philips.com/welcome
PHILIPS
Copyright
No part of this publication may be reproduced, transmitted, transcribed, stored in a retrieval system or translated into any language or computer language, in any form or by any means, electronic, mechanical, magnetic, optical, chemical, manual or otherwise, without the prior written permission of the company.
Disclaimer
The company makes no representations or warranties, either expressed or implied, with respect to the contents hereof and specifically disclaims any warranties,
merchantability or fitness for any particular purpose. Further, the company reserves the right to revise this publication and to make changes from time to time in the contents hereof without obligation to notify any person of such revision or changes.
Safety Instructions
Before operating the PhotoFrame, carefully read and follow the instructions below. Retain this User Manual for future reference.
- Read the safety and operating instructions carefully before using the product. All warnings on the product and in the operating instructions should be observed.
- Do not place this product under direct sunlight or near heat sources, such as in a closed car under sunlight or near a stove. The outer casing of this product may become deformed and the sophisticated sensors inside may become damaged due to excessive heat.
-
Do not use this product near water, in the rain or allow any liquid to get inside this product. Water and moisture may cause short-circuit to the electronic components and lead to malfunctions.
-
Do not use this product near strong electromagnetic sources, such as a microwave oven. The electromagnetic interference may cause this product to malfunction.
- Do not drop or apply shock/vibration to this product. Strong impacts may damage the components inside.
- Do not insert objects other than compatible memory cards into the memory card slots of this product. The metal contacts inside the slot can easily become damaged by foreign objects.
- Do not use an unknown power adapter other than the one supplied with the PhotoFrame. Connecting this product to an unknown power adapter is very dangerous and may lead to fire or explosion.
- Do not cut, bend, modify, place heavy objects, or step on the power adapter cord. Otherwise the external insulation may be damaged and result in short-circuit or fire.
- If there are strange odors or heat emitting from this product or any signs of malfunction, disconnect the PhotoFrame from the power immediately and contact your dealer for inspection or service.
- Use a smooth, soft cloth to clean the surface of the screen. Do not use liquid cleaners or glass cleaners.
- Do not attempt to disassemble or modify this product. There are no user serviceable parts inside this product, and any unauthorized modifications will void the warranty.
- Although the LCD panel is made with high-precision technology and has effective pixels of 99.99% or more, black dots or bright points of light (red, blue or green) may appear constantly on the LCD panel. This is a structural property of the LCD panel and is not a malfunction.
Table of contents
Copyright...... i
Safety Instructions ....ii
Table of contents.... 1
Key Features 2
What's in the Box 3
Overview 4
Right Rear View 4
Getting started....6
Step 1: Using the adjustable stand....6
Step 2: Connecting to power....7
Step 3 Starting Slideshows Automatically ....8
Operating the PhotoFrame 8
Using the Main Menu 9
Viewing Photos 10
Using Smart Energy Saver 11
Using the CLOCK (G-button) 11
Using Settings.... 12
Appendix 14
Specifications 14
Frequently asked questions.... 15
Regulation & Compliance 16
Philips ONE(1)YEAR LIMITED WARRANTY.... 17
Dear Customer:
Thank you for bringing our Philips Digital PhotoFrame into your home. Now you will be able to view your growing digital picture library in stunning clarity and share great memories with friends and family.
To get the most out of your new Philips product, please read through this entire User Manual before use.
Key Features
This PhotoFrame is equipped with the following features:
- Display clear and bright photos.
● Enables you to play back photo files that are stored in a memory card (SD/SDHC, MMC) or a USB flash drive.
- Smart Energy Saver software to personalize your frame, saving power when frame is not in use.
- Clock function
● Resolution: 800 x 480
● Supported photo format: JPEG
● Rating: DC5V 1A
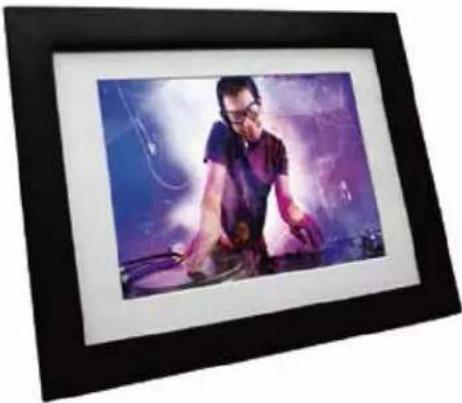
What's in the Box
Carefully open the packing box and ensure that you have the following items.
- Digital PhotoFrame
- AC power adapter
- User Manual
flowchart
graph LR
    A["Square Panel"] -->|1| B["Charger with Cable"]
    B -->|2| C["User Manual"]
● The appearance and accessories included may vary based on model number
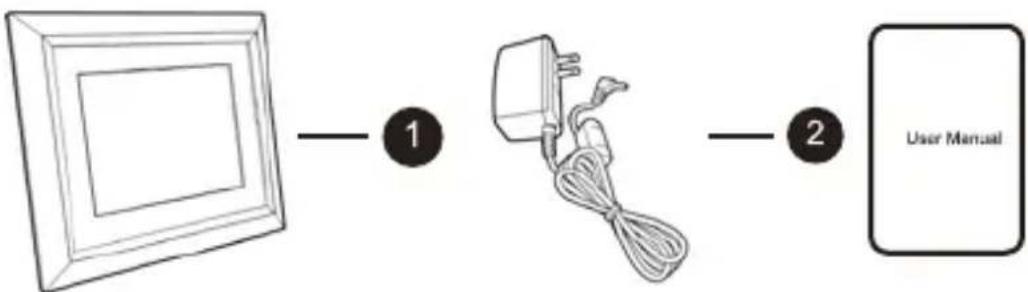
Overview
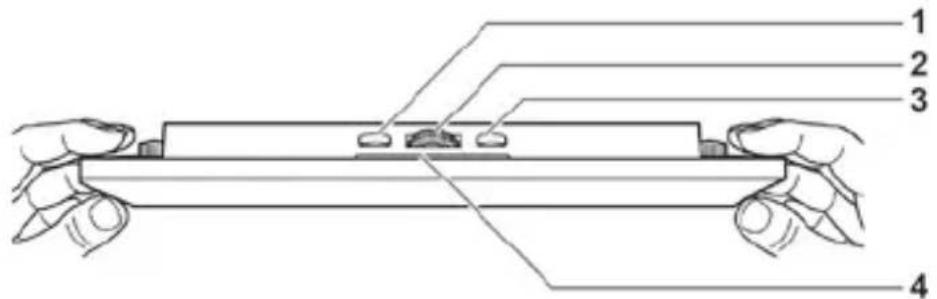
Right Rear View
| No. Description |
| 1 | Back stand |
| 2 | Power buttonTurn on/off the PhotoFrame |
| 3 | USB portAllows for a USB flash drive.Playback photos stored in the inserted drive. |
| 4 | Memory card slotAllows for an SD/SDHC, MMC.Playback photos stored in the inserted card. |
| 5 | Power jackConnect one end of the AC power adapter into the power jack and the other end into a power outlet. |
Rear view
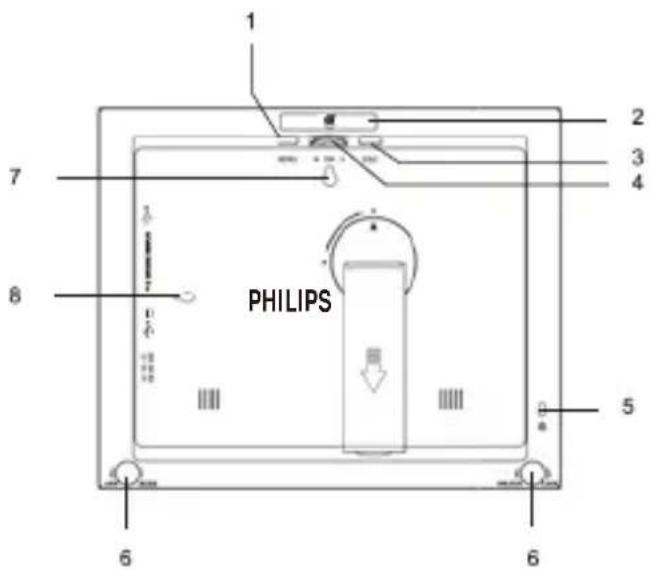
| # | Description |
| 1 | MENU buttonDisplays the pop-up menu. |
| 2 | EZ Access ButtonSwitches between Clock view and Slideshow view. |
| 3 | ESC button (ESCAPE button)Cancels current operation and/or returns to the previous page |
| 4 | Scroll Wheel/OK buttonScroll up/down to select the previous/next itemPress to enter or confirm your operation /selection |
| 5 | Kensington® security slotYou can attach an anti-theft Kensington® lock and cable to this slot to help prevent possible theft. |
| 6 | EZ Lock SystemYou can use the EZ Lock Screws to lock or unlock the wooden frame. |
| 7 | Wall mount hole (for landscape wall mounting)Allows you to hang the PhotoFrame horizontally on a wall. |
| 8 | Wall mount hole (for portrait wall mounting)Allows you to hang the PhotoFrame vertically on a wall. |
Getting started
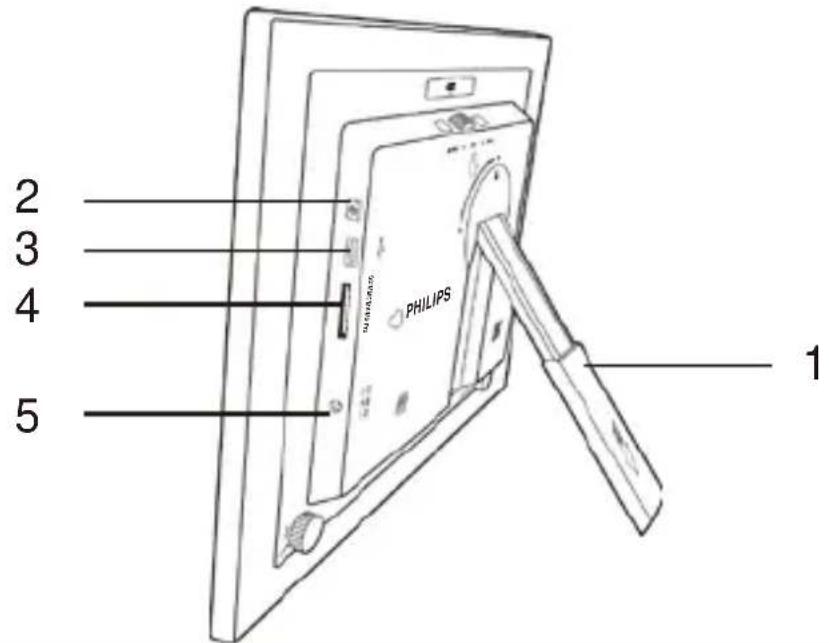
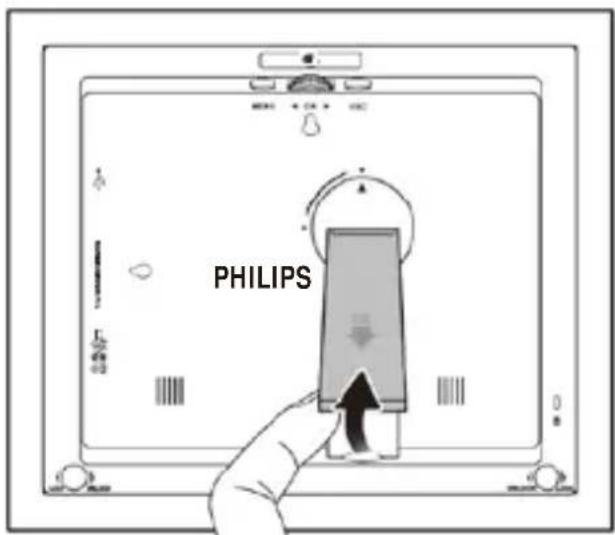
Step 1: Using the adjustable stand
- Gently pop out the back stand as shown below
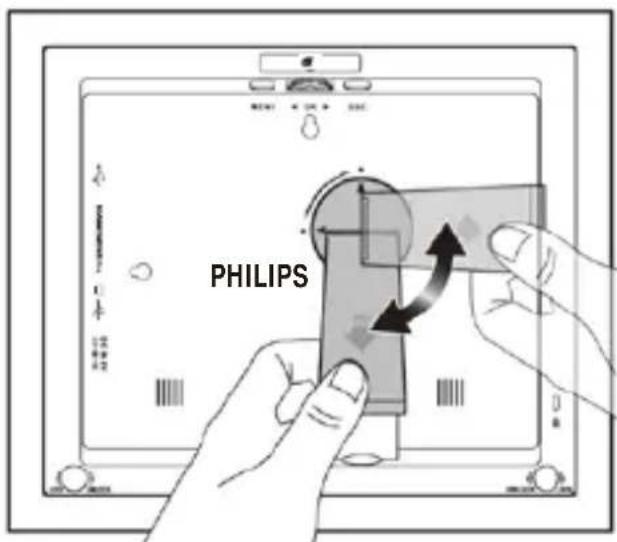
- To place the PhotoFrame horizontally or vertically, you can rotate the back stand by aligning the triangle mark with the rounded points (1 or 2).
- Pull out the back stand and adjust accordingly to the preferred viewing angle
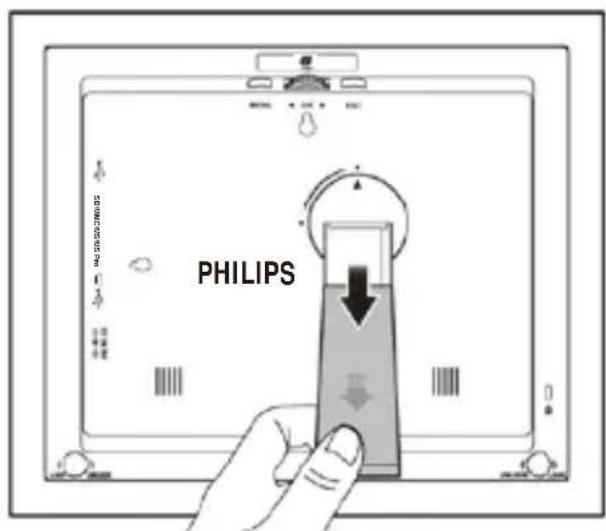
It is recommended to place the PhotoFrame horizontally, because this direction provides the best viewing and operating experience.
✿ By using the wall mount holes, you can hang the PhotoFrame horizontally or vertically on the wall.
Step 2: Connecting to power
- Place the PhotoFrame on a flat surface.
- Connect the power adapter as below (1), and press the Power button to turn on the PhotoFrame (2)
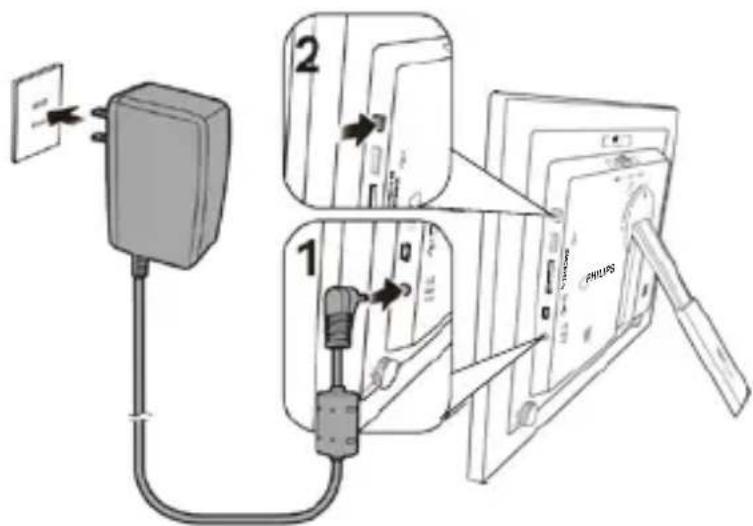
Power systems and plug types may vary depending on your country/region.
To turn off the PhotoFrame, press the PhotoFrame
Step 3 Starting Slideshows Automatically
Insert memory card or USB drive to start slideshow automatically. If there are no content, PhotoFrame will initiate slideshow playback from preinstalled images.
If there is no operation more than 1 minute during menu or setting mode, the PhotoFrame will resume previous slideshow automatically.
Operating the PhotoFrame
You can use the control buttons on the back to operate the Photo Frame.
| # Icon Description |
| 1 | ESESC | ESC button (ESCAPE button)Cancels current operation and/or returns to the previous page |
| 2 |  | Scroll wheel/ OK buttonPress this button to enter or confirm your operation /selection.Scroll this button to the left to select the previous item.Scroll this button to the right to select the next item. |
| 3 | MENENU | MENU buttonDisplays the pop-up menu. |
| 4 |  | EZ Access ButtonSwitches between Clock view and Slideshow view |
Using the Main Menu
To get into Main Menu, press MENU in slideshow mode. From the main menu as below, you can scroll to select the desired option, and then press OK to enter. In main menu, press ESC or MENU will resume previous slideshow.

| # Description |
| 1 SourceAllows you to select the media source among USB flash drive, Memory card and Pre-install. |
| 2 IntervalAllows you to select the slideshow interval between photos. |
| 3 Transition EffectAllows you to select the transition effect you wish to apply to the slideshow. |
| 4 Smart Energy SaverAllows you to select a power-saving option. |
| 5 SettingAllows you to configure the settings of the PhotoFrame. |
Viewing Photos
- In main menu, scroll to select SOURCE and then press OK to enter.
The USB and Memory Card albums can only be selected when a USB flash drive and a memory card have been inserted to the PhotoFrame.
- Scroll among the USB, Memory Card and Pre-install albums to select the source you wish to play slideshow, and then press OK. Photos in the source you selected will appear in the window in thumbnails. Press OK to enable the selection mark.

✿ Press MENU to display the pop-up menu, and then you can rotate or delete the photo selected.
3. Scroll among thumbnails and press OK to select one to start slideshow. If you wish to pause during slideshow, press OK; to resume slideshow, press OK again.
4. To configure slideshow settings, in main menu, scroll to select INTERVAL or TRANSITION EFFECT, and then press OK to enter.
- Interval: selects the slideshow interval between photos.
- Transition Effect: selects the transition effect you wish to apply to the slideshow.
Using Smart Energy Saver
The Smart Energy Saver mode provides various pre-defined power-saving options.
- In the main menu, scroll to select Smart Energy Saver and then press OK.
- Scroll to select a desired option, and then press OK.
For details about the power-saving options, refer to the table below.
| Options Description |
| OFF Turns off | Smart Energy Saver. |
| Save 20% | Always saves 20% on backlight power consumption. |
| Save 50% | Always saves 50% on backlight power consumption. |
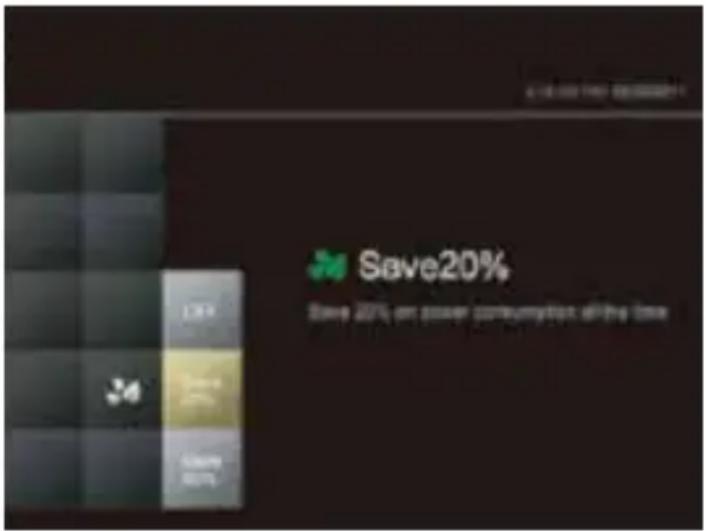
Using Smart Energy Sanver does not affect the photo quality.
You can press 📄 to toggle between Slideshow view and Clock view.
- When switching from Clock view to Slideshow view, the Photo Frame starts from the photo that was run last.
- If the last slideshow was from a Memory Card or USB and is no longer available, the PhotoFrame will start a slideshow from the Pre-install album.


Using Settings
Configure the settings of the PhotoFrame
- In the main menu, scroll to select SETTING and then press OK.
- Scroll to toggle among Date & Time, Brightness, Language, Information, Reset & Upgrade, and then press OK to enter a page.
- Press OK again. When the selection marks appear, scroll to adjust the settings, and then press OK to confirm.
- Press ESC to exit.
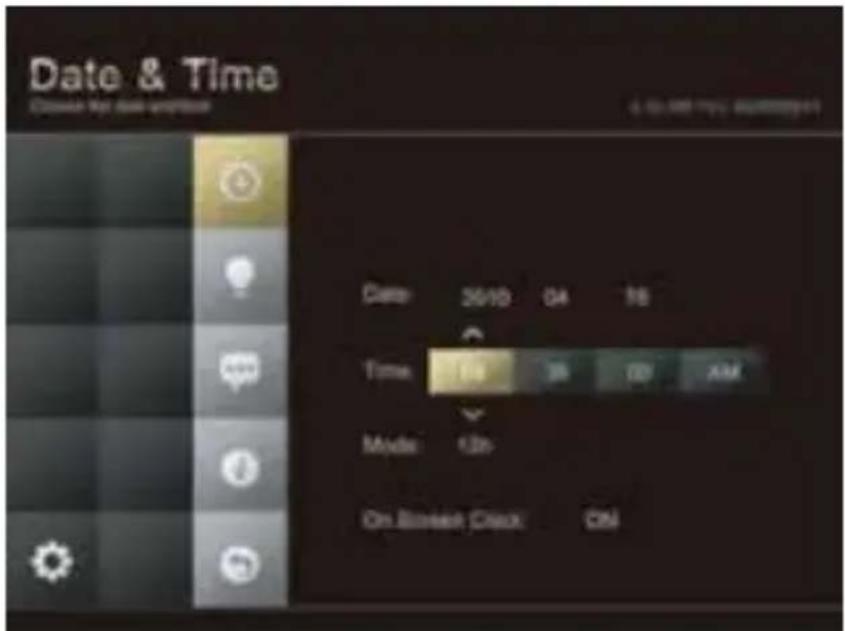
Date & Time page
| Item Option Description |
| Date - Set the date. | |
| Time - Set the time. | |
| Mode | - | Select a time format (12-hour clock or 24-hour clock). |
| On ScreenClock | On | On screen display of the digit clock during slideshow mode. |
| Off |
Brightness page
| Item | Option Description |
| Brightness | 20% | Select the level of screen brightness. |
| 40% |
| 60% |
| 80% |
| 100% |
Language page
| Item | Option Description |
| Language | English | Set On-Screen Display (OSD) language. |
| Spanish |
| French |
Information page
| Item Option Description |
| FW Version | - | Shows the current firmware version. |
Reset & Upgrade page
| Item Option Description |
| Reset | Yes | Revert settings back to system default. |
| No |
| Upgrade Yes | | Upgrades the firmware of the Photo Frame. |
Appendix
Specifications
Specifications are subject to change without prior notice
| Model | 7" |
| Screen Size | 7" |
| Backlight type | LED |
| Aspect ratio | 16:9 |
| Panel interface | Digital |
| Screen resolution | 800x480 |
| Supported image format | JPEG, BMP |
| USB port | USB |
| USB 1.1/2.0 compliant | Yes |
| Memory card slots | 2-in-1 card slot |
| Input power | AC100-240V |
| Output power | DC 5V, 1A |
| Automatic photo rotation (with built-in sensor) | No |
| Clock | Yes |
| Back stand | Foldable |
| Language support | English, French and Spanish |
| Plug & Play Compatibility | Windows7/XP/Vista/2000/MacOS X |
| Remote control | No |
| Paper Mat | Yes |
| Bonus Mat | No |
Frequently asked questions
⑦ What memory card formats are compatible with the PhotoFrame?
SD/SDHC, MMC, are compatible with the PhotoFrame.
⑦ Why do some photos load faster than others?
Higher resolution photos load slower. Using a lower resolution when taking photos will speed up loading time. Smart Copy™ can be used to resize selected images to decrease loading time.
⑦ Why are my photos appearing upside down?
The PhotoFrame is placed upside down. Please rotate the frame.
⑦ What types of image files can I view on my PhotoFrame?
The PhotoFrame supports playback of JPEG, BMP images.
⑦ The frame slows down significantly on certain photos. What can I do?
This is mainly due to extra processing time needed to decode very large size high resolution files. The DPF's Smart Copy (Resize by default) feature will automatically resize the file based on the unit's screen resolution and will significantly reduce the size of the photo and eliminate this issue. However, please always keep a copy of the original photos on the computer.
The frame froze and will not respond, what can I do?
If the frame freezes, it is easy to restart by unplugging from power, then press power button again.
Regulation and compliance
Federal Communication Commission (FCC) Notice
This equipment has been tested and found to comply with the limits for a Class B digital device, pursuant to Part 15 of the FCC Rules. These limits are designed to provide reasonable protection against harmful interference in a residential installation. This equipment generates, uses, and can radiate radio frequency energy and, if not installed and used in accor
dance with the instructions, may cause harmful interference to radio communications. However, there is no guarantee that interference will not occur in a particular installation. If this equipment does cause harmful interference to radio or television reception, which can be determined by turning the equipment off and on, the user is encouraged to try to correct the interference by one or more of the following measures:
- Reorient or relocate the receiving antenna.
- Increase the separation between the equipment and receiver.
- Connect the equipment into an outlet on a circuit different from that to which the receiver is connected.
- Consult the dealer or an experienced radio/TV technician for help.
Warning: Any changes or modification not expressly approved by the party responsible for compliance could void the user's authority to operate the equipment.
This device complies with Part 15 of the FCC Rules. Operation is subject to the following two conditions: (1) This device may not cause harmful interference, and (2) This device must accept any interference received, including interference that may cause undesired operation.
Recycling
- To minimize harm to the environment, the batteries supplied with the PhotoFrame do not contain mercury or nickelcadmium. If possible, when disposing of batteries, use recycling means available in your area.
- The PhotoFrame uses materials that can be recycled. To minimize the amount of waste in the environment, check your area for companies that will recover used televisions for dismantling and collection of reusable materials, or contact your dealer for recycling tips.
- Please dispose of the carton and packing material through the proper waste disposal management in your area.
* Visit www.recycle.philips.com for more information.
ONE (1) YEAR LIMITED WARRANTY
WARRANTY COVERAGE:
This warranty obligation is limited to the terms set forth below.
WHO IS COVERED:
This product is warranted to the original purchaser or the person receiving the product as a gift against defects in materials and workmanship as based on the date of original purchase ("Warranty Period") from an Authorized Dealer. The original sales receipt showing the product name and the purchase date from an authorized retailer is considered such proof.
WHAT IS COVERED:
This warranty covers new products if a defect in material or workmanship occurs and a valid claim is received within the Warranty Period. At its option, the company will either (1) repair the product at no charge, using new or refurbished replacement parts, or (2) exchange the product with a product that is new or which has been manufactured from new, or serviceable used parts and is at least functionally equivalent or most comparable to the original product in current inventory, or (3) refund the original purchase price of the product. The Company warrants replacement products or parts provided under this warranty against defects in materials and workmanship from the date of the replacement or repair for the remaining portion of the original product's warranty. When a product or part is exchanged, any replacement item becomes your property and the replaced item becomes the company's property. When a refund is given, your product becomes the company's property.
Replacement product can only be sent if all warranty requirements are met. Failure to follow all requirements can result in delay.
WHAT IS NOT COVERED -
EXCLUSIONS AND LIMITATIONS:
This Limited Warranty applies only to the new products that can be identified by the trademark, trade name, or logo affixed to it. This Limited Warranty does not apply to any non-Philips hardware product or any software, even if packaged or sold with the product. Non-Philips hardware manufacturers, suppliers, or publishers may provide a separate warranty for their own products packaged with the bundled product.
The Company is not liable for any damage to or loss of any programs, data, or other information stored on any media contained within the product, or any non-Philips product or part not covered by this warranty. Recovery or reinstallation of programs, data or other information is not covered under this Limited Warranty.
This warranty does not apply (a) to damage caused by accident, abuse, misuse, neglect, misapplication, or non-Philips product, (b) to damage caused by service
performed by anyone other than an Authorized Service Location, (c) to a product or a part that has been modified without written permission, or (d) if any serial number has been removed or defaced, or (e) to a product, accessories or consumables sold "AS IS" without warranty of any kind by including refurbished Philips products sold "As IS" by some retailers.
THIS LIMITED WARRANTY DOES NOT COVER:
• Shipping charges to return defective product.
• Labor charges for installation or setup of the product, adjustment of customer controls on the product, and installation or repair of any part outside of the product
- Product repair and/or part replacement because of improper installation or maintenance, connections to improper voltage supply, power line surge, lighting damage, retained images or screen markings resulting from viewing fixed stationary content for extended periods, product cosmetic appearance items due to normal wear and tear, unauthorized repair or other cause not within the control of the company.
- Damage or claims for products not being available for use, or for lost data or lost software.
- Damage from mishandled shipments or transit accidents when returning product.
- A product that requires modification or adaptation to enable it to operate in any country other than the country for which it was designed, manufactured, approved and/or authorized, or repair of products damaged by these modifications.
- A product used for commercial or institutional purposes (including but not limited to rental purposes).
- Product lost in shipment and no signature verification receipt can be provided.
- Failure to operate per Owner's Manual.
TO OBTAIN ASSISTANCE
For technical support go to www.Philips.com/support and select your product or call toll free: 1-877-784-0999
REPAIR OR REPLACEMENT AS PROVIDED UNDER THIS WARRANTY IS THE EXCLUSIVE REMEDY FOR THE CONSUMER. PHILIPS SHALL NOT BE LIABLE FOR ANY INCIDENTAL OR CONSEQUENTIAL DAMAGES FOR BREACH OF ANY EXPRESS OR IMPLIED WARRANTY ON THIS PRODUCT. EXCEPT TO THE EXTENT PROHIBITED BY APPLICABLE LAW, ANY IMPLIED WARRANTY OR MERCHANTABILITY OR FITNESS FOR A PARTICULAR PURPOSE ON THIS PRODUCT IS LIMITED IN DURATION TO THE DURATION OF THIS WARRANTY. Some states do not allow the exclusions or limitations of incidental or consequential damages, or allow limitations on how long an implied warranty lasts, so the above limitations or exclusions may not apply to you.
This warranty gives you specific legal rights. You may have other rights which may vary from state/province to state/province.
Copyright
flowchart
graph LR
    A["Square Panel"] -->|1| B["Charger Cable"]
    B -->|2| C["User Manual"]
* Visit www.recycle.philips.com for more information.
GARANTIA LIMITADA DE UN (1) AÑO
COBERTURA DE LA GARANTIA:
Page Date et Heure
Reset & Upgrade page