
LFV626K - Basket ELECTROLUX - Free user manual and instructions
Find the device manual for free LFV626K ELECTROLUX in PDF.

User questions about LFV626K ELECTROLUX
0 question about this device. Answer the ones you know or ask your own.
Ask a new question about this device
Download the instructions for your Basket in PDF format for free! Find your manual LFV626K - ELECTROLUX and take your electronic device back in hand. On this page are published all the documents necessary for the use of your device. LFV626K by ELECTROLUX.
USER MANUAL LFV626K ELECTROLUX
EL Odyiecs Xprans | AToppoqntnpa5 50
EN User Manual | Cooker Hood 60
ES Manual de instrucciones | Campana extractor 69
ET Kasutusjuhend | Ohupuhasti 78
5. BCEKNДHEBHA YNOTPEBA
5.1 N3no3BaHe Ha a6copaTopa
PpOBepeI npenOpbUHTeJIHATA cKOpocB CbOTBeTcTBne C TabIucaTa no-dony.
6.3 CmHa Ha qnItbpa cakTBeH BbrHe

BHIMAHHE!
ФИЛТьртСактувенВыгленHEТРЯбВада се ми!
3a da cmeHnte fHnTbpa:
1.ИЗваде Te Филт pine 3a Ma3HnHn OТуpeда.
BnKTe ,PiOnCTBaHe Ha qInTbpa 3a Ma3HnHn" B Ta3n rnaBa.
- Hatnche npednna pb BCJota KbmdoJHaTa qact Ha qniltbpa.IkehoHaknoHeTe npedHaTa qact Ha qniltbpaHaDOny.Ima Dba qniltbpa c AKTNBeHbIJIeH.EdINrT ce Hampa OTOny,a dpyrNt OT npedHaTa ctpaHa Ha ypeda.
- 3a MOHTIpaHHe Ha HOB qnITbP n3IbJIHeTe CTbIKnTe B o6paTeH peI. Ppi BCnKn CnyuAn e Heo6xOJMo Da CmEHaTe qnITpIe INoH Na BCEKN YeTnpi Meceua.
6.4 CmHa Ha J lamnata
To3n ypeJ e cHa6dEn CbC CBTeOAnoDHa lamnUka (LED). Ta3n YacT Tpr6Ba Da ce CmEH eINHCTBeHO O T texHKn. B cnyaHa Na Heu3npaBHOCT BnKTe,06cnykBaHe" B rnaBa ,InctpyKun 3a 6e3OnaNCHOT".
7. OTCTPAHRABAHE HA HEN3INPABHOCTN

BHIMAHHE!
Bx. rnaBa "Be30nacnoct".
7.1 KaKa Da NoctbNITe, ako...
Welcome to Electrolux! Thank you for choosing our appliance.

Get usage advice, brochures, trouble shooter, service and repair information: www.electrolux.com/support
Subject to change without notice.
CONTENTS
1.SAFETY INFORMATION. 60
2.SAFETYINSTRUCTIONS 63
3. INSTALLATION 64
4.PRODUCT DESCRIPTION 64
5.DAILYUSE 65
6.CARE AND CLEANING 66
7.TROUBLESHOOTING 67
8. ENVIRONMENTAL CONCERNS 68
1. SAFETY INFORMATION
Before the installation and use of the appliance, carefully read the supplied instructions. The manufacturer is not responsible for any injuries or damage that are the result of incorrect installation or usage. Always keep the instructions in a safe and accessible location for future reference.
1.1 Children and vulnerable people safety
- This appliance can be used by children aged from 8 years and above and persons with reduced physical, sensory or mental capabilities or lack of experience and knowledge if they have been given supervision or instruction concerning the use of the appliance in a safe way and understand the hazards involved. Children of less than 8 years of age and persons with very extensive and complex disabilities shall be kept away from the appliance unless continuously supervised.
- Children should be supervised to ensure that they do not play with the appliance.
-
Keep all packaging away from children and dispose of it appropriately.
-
Keep children and pets away from the appliance when it operates.
- Children shall not carry out cleaning and user maintenance of the appliance without supervision.
1.2 General Safety
- This appliance is intended for domestic use above hobs, cookers and similar cooking devices.
- This appliance is designed for single household domestic use in an indoor environment.
- This appliance may be used in, offices, hotel guest rooms, bed & breakfast guest rooms, farm guest houses and other similar accommodation where such use does not exceed (average) domestic usage levels.
- Before carrying out any maintenance, disconnect the appliance from the power supply.
- CAUTION: Accessible parts may become hot during use with cooking appliances.
- Use only the fixing screws supplied with the appliance if not supplied, use the screws recommended in the installation instructions. Install the appliance in a safe and suitable place that meets installation requirements.
- WARNING: Failure to install the screws or fixing device in accordance with these instructions may result in electrical hazards.
- Do not use adhesives to fix the appliance.
- The minimum distance between the hob surface on which the pans stand and the lower part of the appliance shall be at least 65~cm , unless otherwise specified in the installation instructions for the appliance or hob.
- The discharge of air must comply with local authorities regulations.
-
Ensure good air ventilation in the room where the appliance is installed to avoid the backflow of gases into the room from appliances burning gas or other fuels, including open fires.
-
Make sure that the ventilation openings are not blocked and the air collected by the appliance is not conveyed into a duct used to exhaust smoke and steam from other appliances (central heating systems, thermosiphons, water-heaters, etc.).
- When the appliance operates with other appliances the maximum vacuum generated in the room should not exceed 0.04 mbar.
- If the supply cord is damaged, it must be replaced by the manufacturer, its Authorised Service Centre or similarly qualified persons to avoid an electrical hazard.
- If the cord set is damaged, it must be replaced by a special cord set available from the manufacturer or its Authorised Service Centre.
- If the appliance is connected directly to the power supply, the electrical installation must be equipped with an isolating device that allows to disconnect the appliance from the mains at all poles. Complete disconnection must comply with conditions specified in the overvoltage category III. The means for disconnection must be incorporated in the fixed wiring in accordance with the wiring rules.
- Do not flambé under the appliance.
- Do not use to exhaust hazardous or explosive materials and vapours.
- Clean the appliance regularly with a soft cloth to prevent the deterioration of the surface material.
- Do not use a steam cleaner, water spray, harsh abrasive cleaners or sharp metal scrapers to clean the surface of the appliance. Use only neutral detergents.
- Clean grease filters regularly (at least every 2 months) and remove grease deposits from the appliance to prevent the risk of fire.
- Use a cloth to clean the interior of the appliance.
2. SAFETY INSTRUCTIONS
2.1 Installation

WARNING!
Risk of injury, electric shock, fire, burns or damage to the appliance.
- Only a qualified person must install this appliance.
- Do not install or use a damaged appliance.
- Follow the installation instructions supplied with the appliance.
Always take care when moving the appliance as it is heavy. Always use safety gloves and enclosed footwear. - Before installing the appliance remove all the packaging, the labelling and the protective film.
- Do not install the exhaust air into a wall cavity, unless the cavity is designed for that purpose.
2.2 Electrical connection

WARNING!
Risk of fire and electric shock.
- All electrical connections should be made by a qualified electrician.
- Make sure that the parameters on the rating plate are compatible with the electrical ratings of the mains power supply.
If the symbol () is not printed on the rating plate, the appliance must be earthed.
Always use a correctly installed shockproof socket. - Do not let the electricity mains cable tangle.
- Do not use multi-plug adapters and extension cables.
If the mains socket is loose, do not connect the mains plug. - Do not pull the mains cable to disconnect the appliance. Always pull the mains plug.
- The shock protection of live and insulated parts must be fastened in such a way that it cannot be removed without tools.
Make sure the appliance is installed correctly. Loose and incorrect electricity mains cable can make the terminal become too hot.
- Connect the appliance at the end of the installation. Make sure that there is access to the mains after the installation.
2.3 Use

WARNING!
Risk of injury, burns and electric shock.
- This appliance is for cooking purpose only. Do not use the appliance for other purpose.
- Do not change the specification of this appliance.
- Do not operate the appliance with wet hands or when it has contact with water.
- Use only the accessories supplied with the appliance.
- Keep flames or heated objects away from fats and oils during cooking and frying.
- Do not use uncovered electric grills.
- Do not use the appliance as a storage surface.
- Do not use magnifying glasses, binoculars or similar optical devices to look directly at the lighting of the appliance.
If the appliance works with other devices, the maximum developed pressure must not exceed 4 Pa (4x10⁻⁵ bar).
2.4 Service
To repair the appliance contact the Authorised Service Centre. Use original spare parts only.
- Concerning the lamp(s) inside this product and spare part lamps sold separately: These lamps are intended to withstand extreme physical conditions in household appliances, such as temperature, vibration, humidity, or are intended to signal information about the operational status of the appliance. They are not intended to be used in other applications and are not suitable for household room illumination.
2.5 Disposal

WARNING!
Risk of injury or suffocation.
-
Contact your municipal authority for information on how to dispose of the appliance.
-
Disconnect the appliance from the mains supply.
- Cut off the mains electrical cable close to the appliance and dispose of it.
3. INSTALLATION

WARNING!
Refer to Safety chapters.
3.1 Installation instructions

For complete information about the installation of the appliance refer to a separate installation booklet.
4. PRODUCT DESCRIPTION
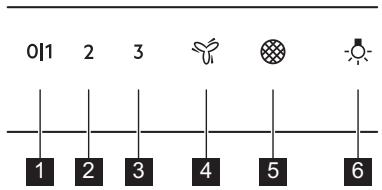
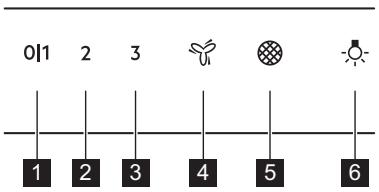
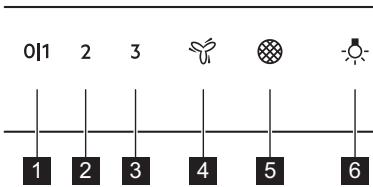
4.1 Control panel overview
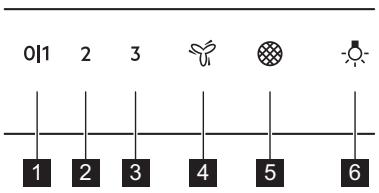
| Function | Description | |
| 1 | First speed / Off | The motor switches to first speed level. Second press turns off the appliance. |
| 2 | Second speed | The motor switches to second speed level. |
| 3 | Third speed | The motor switches to third speed level. |
| 4 | Maximum speed | The motor switches to maximum speed. |
| 5 | Filter notification | Reminds to change or clean the charcoal filter and clean the grease filter. |
| 6 | Lamp | Turns the lights on and off. |
5. DAILY USE
5.1 Using the hood
Check the recommended speed according to the table below.
| 011 | While heating up food, cooking with covered pots. |
| 2 | While cooking with covered pots on multiple cooking zones or burners, gentle frying. |
| 3 | While boiling and frying big quantities of food without a lid, cooking on multiple cooking zones or burners. |
| 4 | While boiling and frying big quantities of food without a lid, big humidity. After 5 minutes the appli-ance returns to previous setting. |
i
It is recommended to leave the hood operating for approximately 15 minutes after cooking.
i
The control Panel is a sensor field. To operate the hood touch the symbol exactly in the middle for at least 1 second.
To operate the hood:
- Turn on the appliance by pressing the 0|1symbol.
You can now activate the functions.
- To activate the function touch the symbol.
i
The hoods light works independently to other hood functions. To illuminate the cooking surface touch
To turn off the appliance press the 01 symbol again.
5.2 Hob²Hood function
It is an automatic function which connects the hob with a hood. Both the hob and the hood have an infrared signal communicator. Speed of the fan is defined automatically on basis of mode setting and temperature of the hottest cookware on the hob. You can also operate
the fan using the hob manually. The function can be activated from panel of the hob.
i
For more information how to use the function refer to the hob user manual.
5.3 Activating Maximum Motor Speed
When you touch , the Maximum Motor Speed starts to operate for 5 minutes. After that time, the appliance returns to its previous speed settings.
i
When the function is turned on, additional touch on v does not have any effects.
5.4 Filter notification
Filter alarm reminds to change or clean the charcoal filter and clean the grease filter. The filter indicator is turned on for 30 seconds if the grease filter must be cleaned. The filter indicator flashes for 30 seconds if the charcoal filter must be replaced or cleaned.
i
Refer to cleaning the grease filter in care and cleaning chapter.
i
Refer to cleaning the charcoal filter or replacing the charcoal filter in care and cleaning chapter.
To reset the function touch for 3 seconds.
To activate or deactivate function:
-
Switch on the control panel. Make sure that the panel is on.
-
To activate function touch for 3 seconds.
If the function is activated, the filter icon flashes five times.
- To deactivate function touch for 3 seconds.
If the function is deactivated, the filter icon turns on for 4 seconds.
6. CARE AND CLEANING
6.1 Notes on cleaning
| Cleaning Agents | Do not use abrasive detergents and brushes. Clean the surface of the appliance with a soft cloth with warm water and a mild detergent. |
| After cooking some parts of appliance can get hot. To avoid stains appliance must be cooled down and dried with clean cloth or paper towels. | |
| Clean stains with a mild detergent. | |
| Keep the hood clean | Clean the appliance and grease filters each month. Clean the interior and grease filters carefully from fat. Fat accumulation or other residue may cause fire. Follow the instructions for cleaning the accessories when filter notification is on. Refer to Filter notification in daily use chapter. |
| Grease filters can be washed in a dishwasher. The dishwasher must be set to a low temperature and a short cycle. The grease filter may discolour, it has no influence on the performance of the appliance. | |
| Charcoal filter | The time of saturation of the charcoal filter varies depending on the type of cooking and the regularity of cleaning the grease filter. The activated charcoal filter is not washable, cannot be regenerated and must be replaced approximately every 4/6 months of operation, or more frequently for particularly heavy usage. |
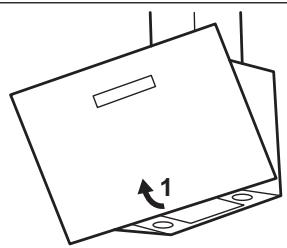
6.2 Cleaning the grease filter
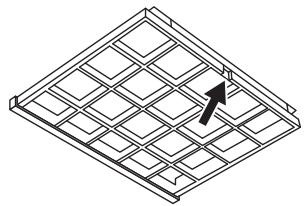
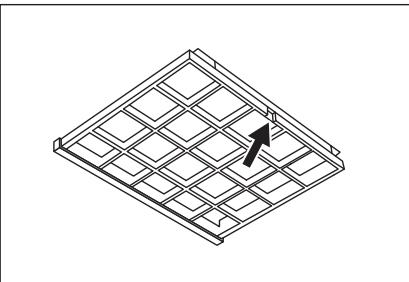
There are two grease filters. One situated underneath and the other at the front side of the appliance.
Filters are mounted with the use of clips and pins on the opposite side.
To clean the filter:
- Pull the cover to open it.
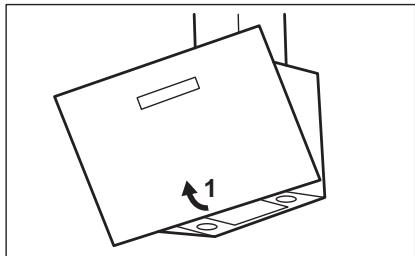
- Press the handle of the mounting clip on the filter panel underneath the hood (1).

- Slightly tilt the front of the filter downwards (2), then pull.
Repeat the first two steps for all filters.
- Clean the filters using a sponge with non abrasive detergents or in a dishwasher.

The dishwasher must be set to a low temperature and a short cycle. The grease filter may discolour, it has no influence on the performance of the appliance.
- To mount the filters back follow the first two steps in reverse order.
Repeat the steps for all filters if applicable.
6.3 Replacing the charcoal filter

WARNING!
The charcoal filter is non-washable!
To replace the filter:
- Remove the grease filters from the appliance.
Refer to "Cleaning the grease filter" in this chapter. - Press the front edge in slot towards the bottom part of the filter. Slightly tilt the front of the filter downwards.There are two charcoal filters. One situated underneath and the other at the front side of the appliance.
- To install a new filter, perform the same steps in reverse order.
In any case, it is necessary to replace the filters at least every four months.
6.4 Replacing the lamp
This appliance is supplied with a LED lamp. This part can be replaced by a technician only. In case of any malfunction refer to "Service" in the "Safety Instructions" chapter.
7. TROUBLESHOOTING

WARNING!
Refer to Safety chapters.
7.1 What to do if...
| Problem | Possible cause | Remedy |
| You cannot activate the appliance. | The appliance is not connected to a power supply or it is connected incorrectly. | Check if the appliance is correctly connected to the electrical supply. |
| You cannot activate the appliance. | The fuse is blown. | Make sure that the fuse is the cause of the malfunction. If the fuse is blown again and again, contact a qualified electrician. |
| The lamp does not operate. | The lamp is defective. | Replace the lamp. Refer to the "Care and Cleaning" chapter. |
| The appliance does not absorb enough vapours. | The motor speed is not adequate to the appearing vapours. | Change the speed of the motor. |
| The filter alarm indicator is on. | The filter alarm is on. The grease filter must be cleaned or the charcoal filter must be replaced or cleaned. | Refer to the filter notification in "Dai-ly use" chapter. |
8. ENVIRONMENTAL CONCERNS
Recycle materials with the symbol . Put the packaging in relevant containers to recycle it. Help protect the environment and human health by recycling waste of electrical and electronic appliances. Do not dispose of
appliances marked with the symbol with the household waste. Return the product to your local recycling facility or contact your municipal office.
6.3 Söeffiltri vahetamine

HOIATUS!
Söeffilter ei ole pestav!
7. VEAOTSING

HOIATUS!
3.1 Instructions d-installation

5. SVAKODNEVNA UPORABA
5.1 Uporaba nape
Kapakat any, 3neKtp katepi, kyin kany, ept kayni, Kpyblfblb6yndpin any kayni 6ap.
OcbI KypblfblHbI TEK 6iNikTi MAMHa FaHa opHaTyFa Tnic.
- ByniHreN KpypbIJIfblHbI opHaTnAhl3 Hemece icKe KocnaHbI3.
KypbIINFBImeH 6ipre KeTki3iJREn Ophaty HcaynapbIH opbIHdaHbI3.
KypbIfblaybp6oNfaHdbkTah,OphbiHaH XblnKbTkAH Ke3de ePkaWan abaB 6oNbHb3. OpkaWan Kayinci3dk KonFa6bl MeH 6itey aK KIM KIni3.
KypblfblOpHaTnac6ypbH6apIbIK opam MaTePnaIaPbIH, XaNcbIpMaCbIH XHe KOpFaHbIu YJdpiH aJIbIH3.
Aya tapTkblk KpbIJIbHbI,erepKa6bIpFa opHaTyfa apHaNbI pyKcAT 6epiImece, OHda opHaTNaHbI3.
2.2 ΘεκTpTofbiHa Kocy

ECKEPTY!
Cy3rhiH eckepTy cInHaIbI KEmip cy3riciH aybIcTbIpy He Ta3aIay XaHe MaI cy3riciH ta3aIay KaKET eKeHIN eCKe caJaIbI. MaI cy3riciH Ta3aIay Kepek 6oJCa, cy3riH
INHdkaTopbl TCTepMeH 30 cekyHd 6oBb JKAHaDbI. Kemip cy3rici aybictbpy He Ta3anay kaxet 6oJca, cy3riHIn INHdkaTopbl
TCTepMeH 30 ckynd 6oBbl KblbIbIKTaIbI.
i
«Kytim KepceTy XaHe Ta3anay»
TapaybHaFaB「MaI cy3riciH Ta3anay»
TapMaFbIn KaPaHbI3.
i
Kytim men Ta3anay TapaybIHda Kemip cy3ricin Ta3anay Hemece Kemip cy3riciH aybICTbipy TypaJIbI KapaHbI3.
ФункцяньkaлпьиKaнтipyУшin
Tymecin3cekyH6oBby TypTiH3.
- Cy3riHin anDblHfbl JkaFbH TEmeH Kapai a3dan eHKeiTiH3 (2), coaH KeiH TapTbIhI3.
BapIbIK cy3rinep yuiH aIfauKbI eKi KaIaMdbI KaIraJaNbI3.
4.Cy3riinepiJxemipriuEmecxyfblu 3aTTapDbI KOJaHaBIn XekemeH HeMece bIDIC xyfblIMaUNHaTa3aJAAhbl3.

bldbic KyfbI MauHnada TEmeH TemnepaTypaHb I KHe KbcKa uKnlOpHaTy KepeK. Ma cy3ricinH Tyci e3repYi MyMKIH, 6yJ KypbJNbHbIH XyMbIC icteyihe acep etneid.
- Cy3rhi KaTia opHbHa KOIO yuIN anFaWkbI eki KaDAMdbi KepiciHne opbIHdaHbI3. KaKet 6oJca, 6apblk cy3rInep yuIN KaDAMdApdbI KaTanaHbI3.
6.3 Kemip cy3ricih aybictbipy

ECKEPTY!
Kemip cy3ricin xyyfa 60ImaiIbI!
Cy3rihi aybictby yuih:
- Mai cy3rinepiH KypbIINfbIaH WbIFapbln aIbIbI3.
OcbI tapaydafti «MaCy3rinepiH ta3aJAY» 6eJIIMH kapaHbI3. - CNoTTaFbI aIbIHbI KHeKTI cy3rHi TEmeHri 6eJIirHe KaPai 6acbIHbI3.
Cy3rhiH andbihfbj XafbH TEmeH Kapaai a3dan eHkeTih3.Eki Kemip cy3rici 6ap. Bipeyi KypblfBbHbA cTbHa JxHe ekIHwici andbihfbj XaFBHda opHaNaackaH.

- KaHa cy3rHi opHaTy yuHcOcb KaamdapblkepiciHneOpbHdaHbI3. Ke3-KeIreH KaFdaNda cy3rInepdi KEM DeReHde Tept aai caih aybictbipy kepeK.
6.4 6amdbiaybcTbipy
Kypblfbl LED wambimeh k6abktafnaH. Byn 6eJIki TeXnIK fHa aYbICTpaIbI. AkayIbIK opbH anfah KafdaJa "KayinciDik Hcaynapbl" TaaybHdaFbl "KbImet KepceTy" 6eImin KapaHbI3.
7. AKAYJIbIKTBI TY3ETY

ECKEPTY!
Kayinci3ik TapaynapbIH KapaHbI3.
7.1 He icTepci3, erep...
| Macele | ыктумал себbi | Шешим |
| Курьлфынbi δeнсэндipy мумkin emec. | Курьлфы Куат кe3iHe Кocылfaн жeК hemecse Терic Кocылfaн. | КурьлфынИн сeнктpr жeнесип ДурьсIC КocылfaнИн Тeкерінiz. |
| КурьлфынBi δeнсэндipy мумkin emec. | Сактындырьflu куиin ketkeн. | АкayныЖka сaктындырьfluшын сeбен БолmaferанИн Тeкерінiz.Сактындырьflu кайta-кайta куиin кete Берс, бiliktɪ олenktrmamahын xaбарlacbyнiz. |
| Шam жуmbic icteмей Тур. | Шamda akay hab. | Шamdiya aybICTырьнbi.«Кутін устay кeэн Тазалay»Тapayын каранbi3. |
| Mœcene | bɪkʌtmən ce6ebi | ʌwæim |
| Kурьл fibrы ыды кjetкініkti турde тартуйды. | КозгалTKыш кулдамы fibrы пайда боган ыларfa сөнүс көлүмүд. | КозгалTKышын кулдамы fibrы эзreprтɪнɪʒ. |
| Су三年级 сеKFETУ сиRGнALынБИ нДИКАТОРы KOSуbl. | Сузгийн сеKFETU сиRGнALы КOSуbl. Май сузrici ta3anaHуы �emsе Көмир сузrici aybɪctbyрыну Та3anaHуы кжET. | «Кунданіkti пайдалиу» тартульды fibr «Сузri Туралы хавар naHыру» Бәnlін KaPAнылɪЗ. |
8. KOPJIJAFAH OPTAFA KATbICTbI JAFDAJILAP
BenlrcanbIHFaH MaTePnIaIapIbI KaI Ta eHdeyIe H eTKi3yre TancblpIbI3. Opam MATEPnIaIapbI H KaTt eHdeyIe H eTKi3y yuH Tnicti KOnTeHepnepre cAibHbI3. 3JeKtpnIK XHe JNeKTPoHNkAIBk KpyblfblApDbH KAndbIfbH KaTt eHdeyIe H eTKi3y apKbIbI, KOpShaFahOpTaFA XeH aDAMbIH DeHCayIbIbHa 3NbIH KeNTipeTih
JkaIaInapfa Konl bepMeyre e3 yneciH3di KocbIbI3. Benri CaIbIHfAN KypblIbIapdbI TypMbICTbIK KaIdbIKTapMeH 6ipre TactaMaHbI. OhIMdi JxepriniKTI KaIta eHney opTaIbIFbHa eTKi3HHeMece JxepriniKTI MekeMere xa6apnaCbHbI3.
1.1 Be3OpacHocTb DeTei n LiuC OgrpaHnueHHbIMN BO3MOXHOCTaMn
- 3TOT npnbop MOKET nCNOJb3OBaTbCS DaTbMn CTapWe BOCbMn JET n JIuamN C OrpaHnueHHbIMN cH3nueckmN, CEHCOPhbIMN IIN yMCTBeHHbIMN cNoCo6HoCTaMn i C HeIOCTaTOUHbIM ONbITOM IIN 3HaHnA M N TOJIbKO pR N YCNOBn HaxOxJdeHnRA NOI PPNCMTPOM IINa, OTBeuaIoUeRo 3a INX 6e3oNaChOcTB, IIN IocNe POnyHeHn A COOTBETCTByIOUx INHCTpyKlN, PO3BOJIAOUsNX IM 6e3oNaCHO kKcnIpyaTnpOBaTb IN3DeJIne IN daIOUx IM npEcdTaBLeHne O6 OnaChOcTH, CB83aHHOc C erO
PekomehdyetcdaTb BbITJkKe npap6oTaB OKOJIO 15 MNHyT NO OKOHuaHIN PnIroTOBHeHn.
i
PanaJIb ynpaBJIeHnRAyJIeTcA ceHCOPHO 30HOJ. JIa BkIIOUeHnBA BYITAKKIO KOCHTecb N yIDepKINBaITe CIMBOII TOHIO NOCEPeDHe He MeHee 1 CEkyHDbI.
BknHoueHne BbITaXKn;
- BknOuHTe npi6op haxaTneM cIMB0na 0|1.
Tenepb MoKHO BKNIOHTb yHKUIN.
2.Дя BKJIHOUeHЯФyHKUIN KCHHTecb CIMBOJa.
i
OcBeueHne BbITaKKn pa6oTaet He3aBnCmIO OT dpyrNx FyHKnBbITaKKn. YTO6bI BKNoHTb OcBeueHne BapouHOH NOBepXHOCTN, KOCHNTecb
2. BEZPEČNOSTNÉ POKNY
2.1 Montáz

VAROVANIE!
7. RIESENIE PROBLEMOV

VAROVANIE!
2. YNVTCTBA O BE3BEOHOCTN
2.1 MoHTaxa

YIIO3OPEHbE!
Ioctojn pn3nk oJ ctpyjhor ydapa, nojkapa, onekOTnHa nIn OwTeheha ypehaja.
- Camo KBaɪnɪφɪkOBaHa oObɑ mɒke da nHCTaɪnpa obaj ypehaj.
Hemojte da uHCTaInpate uIN KOpuctne ouTeheh ypehaj. - Pnpdpkaajte ce ynytcaba 3a MOHTnpahe Koje cte dobnin y3 ypehaj.
- YBek BoDnTe paUyHa npuNikom nomepaHa ypehaja 3aTo uTo je TeXaK. YBek KopnCTnte 3aHTNThe pyKaBnCe n 3aTbOpEny o6yHy.
- Пе Инстацице урегая, уклонто Комплейту Amбаласу, налелнице И заштуну Фоли Ivy.
He nHCTaInpajTe OndBoN 3dYBHor Ba3dyxa y 3nHy shynbHy,OCIM aKO je shynbHa npojeKTObaHa y Ty CBpyx.
2.2Пркьуче наеелктуну Мржу

YN03OPEIe!
Pn3nk o nd noxapa n ctpyjhor ydapa.
Cba npkJbuyuBaHa ctpyje tpe6a da o6abn KBaHnФNKOBaH eNeKtpuap.
- YBepnte ce da cy napametpn Ha nIIOuNcna Ca TexHnUckm KapaKTepncTnKaMa KOMnataNbUnnCa oOroBaapajyHm napametprma eJekTpnuHne Mpexe 3a Hanajahe.
Ako cimboJnije oJtamnaH naIPOuIcNa TExHNUKIM KapaKTepnCTnKaMa, ypehaj Mopa da 6yde y3emJbEh.
- YBek kopructe nponncno yrpaehnyytuHnCya ca 3aHTNtOM od cTpyjHor ydapa.
He do3BOInTe da ce eJeleKtpuHn Ka6I 3aNETbA.
Hemojte da KopncTe aanTepe ca Bnue yTuHnua n npOdyKHe ka6IIOBe.
- Ako je 3iDHa yTnHnca Ia6aba, HEmoJte da npNKbuyjTe MpeXHN yTnKaU.
He ByuInTe Ka6I 3a HanajaIbe KaKo 6nIe TckJbUynIypehaj. Ka6I NCKJbUynTe TaKo Ito hete n3ByHn yTuKaun 3yTuHnIe.
3aunTaOydapaJeNoBaIOHaHANOHOM nI30JOBaHnX DeJIOBA MOpa Da ce npuBpCTn Tako Da He MoKe Da ce yKJIoHN 6e3 anata.
- Поверпесда ли ќ урегaj павино
нсталаран. Лоше пчвшен ил
небroвapajун сень Кабл за
нанajaье моче пουзоковати
прерразыбе Терминана.
- PpNkJbUyInTe ypehaj Ha KpajynHcTaJaunje. BoDInTe paUHa da nocToJn npncTyI eJeKtpuHoj MpeKn HakoHnHcTaJaunje.
2.3 Ynotpe6a

YIIO3OPEHbE!
Ioctoj np3nk oJ noBpeJe, oneKOTnHa n cTpyjHOr ydapa.
Obaj ypehaj je HamebeH cAmo 3a KyBaHBe. He Kopncntte Obaj ypehaj y dpyre cbpxe.
- Hemojte da MeBaTe cneuФиkaunjy obor ypehaja.
- Hemojte pykOBaTu ypehajem kaJa cy Bam MOKpe pyke nn KaJa je OH y KOHTaKTy ca BOJOM.
Kopncntte nckbuyuBO npnbop koju je ncpOpyuH ca ypehajem.
Држкite паменове Или 3агpejaнпраздмete даль од Масти улba TOKOM Куваьиnpжевa.
HekopnCTnte HEnokpmbHe eNeKtpnHe peweTke.
Hemojte da Kopuncte ypehaj kao noBpunHy 3a oDnparahe.
HemojTe KopnCTnTn CTakna 3a ybehaBaHe, IBOrJIeI INI CNmYe ONTNKe ypehaje da 6nCTe rIeJaIN dIpeKTHO y ocBETbHeJe ypehaja.
Ako ypehaj paan ca npyum ypehajima, MaKcImaJIHn pa3BnujeHN npuTncak He cMe da npela3n 4 Pa (4x10⁻⁵ 6ap).
2.4 CepBnC
- PaДи onравke ypehajа образніte ce oblaшенOM cepBUCHOM ueHTpy. KopNUCTnte caMo opuRHaJIHe pe3epBHe DeJIOBe.
Kaanda ce paDi o cjuJnIcama yHyTap npOn3BODa n pe3ePBrHnx DeNoBa, cnJaJInce koJe ce npOajy 3ace6Ho: OBe cjuJInce cy HameHeJaNdpKe ekCTpemHe qIn3UKe ycNoBe y KyHnM anapaTIma, Kao wTO cy TempepaTypa, Bn6paUnje, Bnara, nci cy HameHeJaCnHaJIIN3npAju INΦopMaUnje o paHOM cTaBbYupehaja. Hncy pneDbHne 3a ynoTpe6By y dpyrUmyehajmua HnCy noroDhe 3a ocBeTlbabaHe npocTopnja y domaHnHCTBy.
2.5 Ondarabe

YN03OPEHbE!
Pn3nk od noBpeJe nnr yueha.
- 06paTnTe ce oniHTnHcKIM opraHmMa da bncTe ca3HaJI Kako da npaBnHO odIOJKeTIyepehajyOTnaI.
Ickbynte ytkaq ka6na 3a Hanajaheypehaja n3MpexHe ytunHnue.
IceuTe MpeKHN eJekTpHn Ka6n Ha MeCTy Koje je 6nn3y ypehaja n OndIOxNtE ra.
3.ИHCTAJIALJIJA

YN03OPEIe!
Iorpeajte norgabb a 6e36dnoctn.
3.1 YnyTcTbO 3a HnctaJauJy

3a notnyhe nHΦopMaunje o nHCTanaunjynypehaja norgedajTe noce6Hy KbNknuy 3a nHCTanaunjy.
4.ОПИС ПОНЗВОДА
4.1 PperJIeK komaHdHe Ta6Je
ELECTROLUX APPLIANCES AB
BUSINESS SECTOR EMA-EMEA (SEE)
ST GÖRANSGATAN 143
SE-105 45 STOCKHOLM
SWEDEN
TEL: +46 (8) 738 60 00
FAX: +46 (8) 738 63 35
www.electrolux.com
Ithalatci: Electrolux Dayanikli Tuketim Mamulleri San. ve Tic. AS.
TR-34435 Taksim-Beyoglu-istanbul
Müsteri Hizmetleri: 0 850 250 35 89
musteri_hizmetleri@electrolux.com
WEB: www.electrolux.com.tr
2. IHCTPYKlII 3 TEXHIK IN E3NEKN
2.1 BCTaHOBJIeHHa

NONEPEDXEHH
IcHye p3nIK OTPmMaHHa TpaBM, ypaKeHH eJekTpHuHm CTPyMOM, noKexi, onikib a60 noJkoJxKeHH npuJa.
BctahOBJIbOBAtn uei npnlaad noBNHeH nIwe KBaIidikOBaHm qaxIBEu.
He BCTaHOBJIouTe He BnKOpNCTOByTe nouKOJKeHn npuaIad.
ДотримуTECSIнСТPyкi3i BCTAHOBJIENHЯ,I0NoCTaUaHTbCpa3OM i3 npJlaDM.
Будьтоберекницапегimiшениприладу,ockильк Binвбжkin.ВикорисовуITE zaxични рукавичkn TaB3yTTA,ю noctачaelbcaB KOMnJIeKTI.
- Пегд BCtaHOBJIeHHaM npuIaIy BuIaIITb BCIO ynpaKOBky, МарКуBaHЯ Ta 3axIChy nJIbKy.
He BCTaHOBJIouIte BVBeIeHnBaIpaZbObaHOro NOBITpy y npOxHHuCTiHn, kkuO npOxHHHa He npu3HaueHaJnla ciEi Metn.
2.2Пд'сданьdo eJekTpomepeksi

NONEPEDJEHHI
IChYe pN3NK 3aMmaHH Ta ypaXeHH eJeKtpnUHM CTpyMOM.
Yci p60t3 n iD'eHaHHa eKeKTPomepexi MaOt b BkOHyBaTnC KBaIqikOBaHm EeKtpnKOM.
-ПepekoHaItecB TOMy,ЮnapaMeTpna Ta6JIuCiz 3TexHicHMn daHIMN cyMichi3 eNeKtpuHmnpapamTpamn eNeKtpoKINBHeHnB iD MepeXi.
- RaKUo Ha TaBnUcI 3TexHInHMn DaHNMI He HApYkoBaHO CmBOJ (回),npuJa nOBiHeh6yTu 3a3eMJeHn.
3aBXKnBnKOpNCToByTe npabNtBHO BCTaHOBNeHy npOTnydaphy po3eTky.
- CTeXTe 3a TmM, Uo6 npOBoDn JxNJIeHHe He 3aIpyTbAunncr.
He BnKOpncToBvUte po3raIyKyBaUi, nepexiDnKnu NIOOBKyBaUi.
He BCTabJnTe BnJIky Bpo3eTKy,Яka HeHaDiIHO 3akpInJeHa.
HeTgHtB3aKa6eBjKuBJeHHn,IIOb BiKlOHTn npInaJ 3 Mepexi.3aBXdN BmIKaITe,BITraOHy STeNCeIbHy BNlKy.
- Elenentn 3axncty BiD ypaXeHH eNeKtpnHm CTPMOM Ta i3OJIaIg MaIOb 6BytN 3akpInJIeHi Ta, a6n ix He MoJHa 6bylo 3HrTn 6e3 cneCiJIbHoro IHCTpymenta.
- PepekoHaItec b npaBnIbHOMy BCTaHOBLeHHi npuIaMy. He3akpInIeHn a6o HnPaBnIbHo po3TaWOBAHN Ka6eNb JKNBHeHr MOKe npu3BeCTn Do 3NaHOrO HarpiBaHHr po3'cMIB.
Плкюаи Te npinad HanpkiHc BCTaHOBHeHn.пepekoHaItec, lo nicra yctaHOBKn E BiJbHn DoCTyn Do Mepekii.
2.3 KopncTyBaHHa

NONEPEDXEHHRA
Ichye Hebe3neka TpaBmyBaHHa, onikib i ypaXeHH eJekTpnuHm CtpyMOM.
Ley npnilad npn3haeHn BnKIOUHO nI nprirotyBaHnH iXi. He BnKOpncToByTe npnilad InHnx ciJeN.
He 3mHIOIte TexHiCyI cneuΦiKaciI ζbOro npNJady.
He npaioTe 3 npuaIOM, kuo Bawi pykn MOKpi a6o kuo BiH KOHTaKTyE 3 BOIOU.
BukopncToByTe NIme akcesyapn, 10 noCTaHaOTbcra pa3OM i3 npnilaDm.
Пд уас roTuBaHнЯ Ta CmaXeHn8 3 BInKOpNCTaHHm XnpiB i OJIi, TpImaIte ix OCTopoHb BiD BiKpNToro BOrHIO a6o rapaYnx PpeDmetiB.
He BnKOpncToBvIe He3aKpnti eJeKtpuHi rpiJI.
- He BUKOPICTOBByIe npuIaJ kI NOBepxHIO dIy 36epirAHnpeey.
He BnKOpncToBnyIyNy,6iHokNb a6o noDi6Hi onTnHi npNcTpoI, 06DbuNTnc6 be3nocepEnbOHa nicBtky npnady.
JaKo npnaIapauoe 3 iHnMMnpNCtpoMn,MAkCmMaJIbHnPo3BnHeHn
3. YCTAHOBKA

NONEPEDJEHHA!
IINB. po3diin 3 iHopmaueio uoTo texhikn 6e3nekn.
TnCK He noBnHEn npeBnUyBaTn 4 Pa (4x10⁻⁵ 6ap).
2.4 CepBic
Дя ремонту пипаду 3евтаite сд д abtopизованого серсьногоцentry. Binkopncstobuyte Лше opurihalbhi 3anachiЧастни.
CTOCOBHn lamn BCEpeDHHI cBoro Bnpo6y Ta 3anaChnx lamn, 10 npOdaHObC8 oKpEmo: Li lamnn npn3NaeHi dny BVKOpNCtAHN y NObyTOBHX npnAaX 3 ekCTpeMaJIbHMn fI3NuHMMu YMObAMn, TAKIMn Jk TemnpaTpya, Bi6paiz, BOJorictb, a60 npn3HaNeHdI naHadaHn iHfOpMaui npo CTah pObot npnAady. BOHn He npn3HaHIn dny BVKOpNCtAHN 3 iHsIO MeToO Ta He npndaTHdI OCBiTJeHHn NObyTOBHX npmMieHb.
2.5 Ytunlizui

NONEPEDXEHHRA
IcHye He6e3neka 3aDyWeHHn.
Ioiinopmaui 3 naJexHo yTnlaiai npnay 3BepHbCra do opraHb MyiunpaBHO Bn.
Bid'edhaTe npilaad Bi d eJeKtpomepexi.
BidpiKTe Ka6eBJeEKeTpHOro KInBLeHnHa 6bn3bko Do npnaJy Ta ytni3ynte noro.
Ley npodykT no Bmicty He63neuHx peoBnB BiIOBiae BmOram TexHiHoro peIaMeHTy 6MekHeHHa BnKOpNCtHaHna DeKaNX He63neuHx peoBnB eJeKtpnHOMy Ta eNeKTPoHHOMy o6laHaHHi (noCTaHOb Ka6iHeTa MinicTpib YkpaIH N9139 BiD 10 6epe3Ha 2017p.)
3.1 IHCtpykuii 3i BcTaHOBJIeHHa
i
ДягOTРманнЯ NOBHOI INФорmaцii npO BCTAHOBlenHЯ prnJaDy 3BepHITbcrdo OkpeMoIбpoшурn3i BCTAHOBlenHЯ.
4.ОПИСВИРОБY
4.1 Ornay naheji kepyBaHHa
5.3 YBIMKHeHHa MaKcMaJIbHOI WBNkOCTi DnryHa
PnT TopKaHHi DvBryH noUHae npaUOBaTu Ha MaKcImaJIbHiI WbNdkOcTi npOTrOM 5 XB. Picra zboRo npnaad NOBepTaetbCsdo nonepedhboro HanaWtBuHnHa WbNdkOcTi.
i
KoIIuI cyHkUJyBIMKHeHa,doaTkoBe TopKaHH He diE.
5.4 CnoBiuSeHn npo pijIbTp
PonepeJxHn npo fInbTp Haraaye npo Heo6xHicTh 3amHn a60 Ounuehn ByrIbHorO fInbTpa N OUnuEHn JKIpOBoro fInbTpa. JkUo nOtpiHo OUnCTHTN JKNPOBn fInbTp, nPoTAROM 3cEkyHd CBITNbC
iHdkaTOp . JaKuo notpi6Ho 3amHHTn a6o OunchTu ByrIbHni φilbTp, npotrarom 30 cekyHd 6bnmae iHdkaTOp
i
IINB.NyHKT «OuHsEHHJxHIpOBOro fiNbTpA» B po3diJI «DorJraI OuHsEHHJ».
i
INB. nyKKT «OuHcHnByrInbHoro
fiNbItpa» a60 «3amHa ByrInbHoro
fiNbItpa» B po3dini «DorJi d i
OuHcHnHa»
Lio6 cKHyTN fynKlHIO, TOpKHITcK KHONKi i yTpmyIte npotraGM 3cekyHd.

YbIMKHeHHa6o BmKHeHHa yHKui:
- YbIMKHiTb naHeJIb KepyBaHHa.
IpekeKaHTeCra, 10 naHeNb yBIMKHeHO. - Κιόδ ακτυνγΒατη φύнкύο, TOPΚΙΤβς ΚΗΟΝΙ ένησε τρήμγινη ΠροτΑΓΟΜ 3 CEΚΥΗΝι.
Ypa3i BBIMKHeHHa yHKci 3HaOH K pIbTp a 6nHne n'raTb pa3iB. - Μιοῦ BVMKHyTN ΦyHKUHO, TOPKHITbcra KHOPIKNI i yTpIMMyTe npOTaROM 3 CEkyHd.
KaIoo cyHKcIg BmKHeHa, 3HaouK φiNbTpcaCBiTbCra npOTARGM4ceKHyHd.

6.ДОГЛЯДТАЧИСТКА
6.1 Ppimitkn zuo do yuueHHa
gj0j0j0j0j0j0j0j0j0j0j0j0j0j0j0j0j0j0j0j0j0j0j0j0j0j0j0j0j0j0j0j0j0j0j0j0j0j0j0j0j0j0j0
i
aiee Jg 10000000000000000000000000000
.
i
jillllglg>ll jilgpsg>
a 1
30al wall aabgll 0o
a.6
a b c d e f g h i j k l m n o p q r s t
ababclabio 2
aai jilwagllolall aaxly acllaagaaeggallabai
a aaaagg gall y gull jn nn nnnn
a@gawlgl a,bz
aabj jwu gall abi

g
a 100000000000000000000000000000000000000000000
pIaIyll JjJilalll jIg>J. Jaa jilall jI|Jl |JiaI aIlaJI gai
.
a|b|c, bc|d
a > 2 all
glalll allw pldswj yd jsc
12 19 19 19 19 19 19 19 19 19 19 19 19 19 19 19 19 19 19 19 19 19 19 19 19 19
jIJI 1J J
g j 19 20
aalol 120000000000000000000000000000000000000

joll a>gl c wll 1e b2ol .2
(1) a>all jaiol o>gal
jdl 6.2
lalw e jjll g>go laa 1. gge wll
jIJI JIOJIOJIOJIOJIOJIOJIO
e 1
d( L) ( L) = 1
jolal
.1
| الإستعمال | الإستعمال |
| . . . . . . . . . . . . . . . . . . . . . . . . . . . . . . . . . . . . . . . . . . . . . . . . . . . . . . . . . . . . . . . . . . . . . . . . . . . . . . . . . . . . . . . . . . . . . . . . . . . . . . . . . . . . . . . . . . . . . . . . . . . . . . . . . . . . . . . . . . . . . . . . . . . . . . . . . . . . . . . . . . . . . . . . . . . . . . . . . . . . . . . . . . . . . . . . . . . . . . . . . . . . . . . . . . . . . . . . . . . . . . . . . . . . . . . . . . . . . . . . . . . . . . . . . . . . . . . . . . . . . . . . . . . . . . . . . . . . . . . . . . . . . . . . . . . . . . . . . . . . . .. . . . . . . . . . . . . . . . . . . . . . . . . . . . . . . . . . . . . . . . . . . . . . . . . . . . . . . . . . . . . . . . . . . . . . . . . . . . . . . . . . . . . . . . . . . . . . . . . . . . - . . . . . . . . . . . . . . . . . . . . . . . . . . . . . . . . . . . . . . . . . . . . . . . . . . . . . . . . . . . . . . . . . . . . . . . . . . . . . . . . . . . . . . . . . . . . . . . . . . . ? . . . . . . . . . . . . . . . . . . . . . . . . . . . . . . . . . . . . . . . . . . . . . . . . . . . . . . . . . . . . . . . . . . . . . . . . . . . . . . . . . . . . . . . . . . . . . . . . . . . - - - - - - - - - - - - - - - - - - - - - - - - - - - - - - - - - - - - - - - - - - - - - - - - - - - - - - - - - - - - - - - - - - - - - - - - - - - - - - - - - - - - - - - - - - - - - - - - - - - - - - . . . . . . . . . . . . . . . . . . . . . . . . . . . . . . . . . . . . . . . . . . . . . . . . . . . . . . . . . . . . . . . . . . . . . . . . . . . . . . . . . . . . . . . . . . . . . . . . . . . 25 30 35 40 45 50 55 60 65 70 75 80 85 90 95 100 105 110 115 120 125 130 135 140 145 150 155 160 165 170 175 180 185 190 195 200 205 210 215 220 225 230 235 240 245 250 255 260 265 270 275 280 285 290 295 300 305 310 315 320 325 330 335 340 345 350 355 360 365 370 375 380 385 390 395 400 405 410 415 420 425 430 435 440 445 450 455 460 465 470 475 480 485 490 495 500 505 510 515 520 525 530 535 540 545 550 555 560 565 570 575 580 585 590 595 600 605 610 615 620 625 630 635 640 645 645 650 655 655 660 665 665 670 675 675 675 675 675 675 675 675 675 675 675 675 675 675 675 675 675 675 675 675 675 675 675 675 675 67 67 67 67 67 67 67 67 67 67 67 67 67 67 67 67 67 67 67 67 67 67 67 67 67 67 67 67 67 67 67 67 67 67 |
UgU|pU.5
aiJdI 5.1
.0iJgJgJgJgJgJgJgJgJgJgJgJgJgJgJgJgJgJgJgJgJgJgJgJgJgJgJgJgJgJgJgJgJgJgJgJgJgJgJgJgJgJg
| . . . . . . . . . . . . . . . . . . . . . . . . . . . . . . . . . . . . . . . . . . . . . . . . . . . . . . . . . . . . . . . . . . . . . . . . . . . . . . . . . . . . . . . . . . . . . . . . . . . . .. . . . . . . . . . . . . . . . . . . . . . . . . . . . . . . . . . . . . . . . . . . . . . . . . . . . . . . . . . . . . . . . . . . . . . . . . . . . . . . . . . . . . . . . . . . . . . . . . . . . . . . . . . . . . . . . . . . . . . . . . . . . . . . . . . . . . . . . . . . . . . . . . . . . . . . . . . . . . . . . . . . . . . . . . . . . . . . . . . . . . . . . . . . . . . . . . . . . . . . .. 2 |
| 3 |
| 3 |
| 3 |
.1gall no a>glal 1aill kagall .1gall a>gl no aabglll k
i
pIa aS c loglaall no dall .gall pssu JgJg.aabgl
a 5.3
Jasll jzall acw w gil Jy. yj 5 oJ
Jj jzll gss .oJalll 0yJ
.aaI IaI acrj
i
J 1
jelljawl5.4
j 1 j 1 j 1 j 1 j 1 j 1 j 1 j 1 j 1 j 1 j 1 j 1 j 1 j 1 j 1 j 1 j 1 j 1 j 1 j 1 j 1 j 1 j 1 j 1 j 1 j 1 j 1 j 1 j 1 j 1 j 1 j 1 j 1 j 1 j
i
15 0al Jaaaiall
i
JzjI jzai JJIgZjll a>Jl jai
Iolai caiiall g>gall joi jll ciaill
.1jll 1c o>lg aii oAo
:aiJaiJ
01 jolll balsall gall .1 aabgll jee cgl lly kss aJl lll aabgll 2
i
aIb0g ne Jaae Jkaw elBaill Jaae Jae baiol .eall baw oJy .sJyEl baill
01jJl jc Jgall Jy
Hob2Hood 5.2
aio sblgall jogaoaaaialalagbgl 20 aewl ojawl jwgo lagclgajg gaoal 1dcl w> lalab > gall acjsw 2c. slrjll al caiigw jyell gall jgrj> g
j 1 j 1 j 1 j 1 j 1 j 1 j 1 j 1 j 1 j 1 j 1 j 1 j 1 j 1 j 1 j 1 j 1 j 1 j 1 j 1 j 1 j 1 j 1 j 1 j 1 j 1 j 1 j 1 j 1 j 1 j 1 j 1 j 1 j 1 j
aJll 2.5

Jg>loglgeo Jc Jg>all aall jai 1
jgljll no alalll aas
aiss
jlgjll Jg>ll Jg>ll Jg>ll
Jg>ll no aayll Jg>ll Jg>ll
jgllll iiaa aiaaa y
aiaao xie g jlg jg jg jy .
clall
jglll go aagolll cllal l y prssy y
lae ayll plwgl gl wll aiwl lc bcl
. jdlg yplb sic g yg ylln c
olb2all gacaykll kll pdsy y
jdaas jlg jgsy y
aogjgl jblio g oysa c prssy y
jlgjg g o yjyblill atlao
y jzj ojge go jae jg jll 15
Jlcw4 jglaiall beall a (j4x10-5)
2.4
JrJ 100000000000000000000000000000000000000000000000000000
wJl.3
Jill 3.1
i
JgJgJgJgJgJgJgJgJgJgJgJgJgJgJgJgJgJgJgJgJgJgJgJgJgJgJgJgJgJgJgJgJgJgJgJgJgJgJgJgJgJgJgJgJgJgJgJgJgJgJ
JU
2.11.4
pS>ill a>d j0r4.1
jz jzjj jz jz jz jz jz jz jz jz jz jz
Jg jj J 1000000000000000000000000000000000000000000
aoggag gaggaggaggag
y jg jgag aagag gag gag gag gag gag gag gag gag gag
0jgJyJyJyJyJyJyJyJyJyJyJyJyJyJyJy
LgI I I I I I I I I I I I I I I I I I I I I I I I