
40VHT2-60.1 - Hedge trimmers STERWINS - Free user manual and instructions
Find the device manual for free 40VHT2-60.1 STERWINS in PDF.
| Product type | Cordless Li-ion battery hedge trimmer |
| Brand | STERWINS |
| Model | 40VHT2-60.1 |
| Rated voltage | 36 V DC |
| Weight (without battery) | 3.2 kg |
| Blade length | 658 mm |
| Cutting length | 605 mm |
| Maximum cutting capacity | 20 mm |
| Blade oscillation speed (no load) | 2800 min⁻¹ |
| Guaranteed sound power level | 92 dB(A) |
| Vibration level (K=1.5 m/s²) | < 2.5 m/s² |
| Battery type | Li-ion, model 40VBA2-50.1 (5 Ah) |
| Compatible charger | 40VCH1-3A.1 (3A) or 40VCH2-6A.1 (6A) |
| Safety switches | Double switch (safety + start/stop) |
| Blade protection | Removable blade sheath |
| Intended use | Outdoor only, trimming hedges, bushes and shrubs |
| Maintenance and cleaning | Clean with a soft, damp cloth; lubricate the blade regularly; remove the battery before any operation |
| Spare parts available | Blade, battery, charger, switches, springs, etc. (availability period: 6 years) |
| Warranty | 5 years, defects in material and workmanship, non-professional use |
| Recommended storage temperature | 4 °C to 24 °C |
| Countries of compliance | CE, EAC, Ukraine, Brazil |
Frequently Asked Questions - 40VHT2-60.1 STERWINS
User questions about 40VHT2-60.1 STERWINS
0 question about this device. Answer the ones you know or ask your own.
Ask a new question about this device
Download the instructions for your Hedge trimmers in PDF format for free! Find your manual 40VHT2-60.1 - STERWINS and take your electronic device back in hand. On this page are published all the documents necessary for the use of your device. 40VHT2-60.1 by STERWINS.
USER MANUAL 40VHT2-60.1 STERWINS
2.3 SYMBOLES FIGURANT DANS CE MANUEL
10.2 EXCLUSIONS DE LA GARANTIE
10.1 A NOSSA GARANTIA
2.7 USO E MANUTENZIONE DELLA MACCHINA
- NON FORZARE LA MACCHINA. UTILIZZARE LA MACCHINA PIU ADATTA AL LAVORO DA SVOLGERE. LA MACCHINA ADATT A EFFICACE E SICURA SE UTILIZZATA ALLA VECITÀ PER LA QUALE É STATA PROGETTATA.
- NON UTILIZZARE LA MACCHINA SE I'INTERRUPTORE DI AVVIO/ ARRESTO NON LA ACCENDE O NON LA SPEGNE. UNA MACCHINA CHE NON PUO ESSERE CONTROLLATA TRAMITE IL PULSANTE DI AVVIO/ARRESTO E PERICOLOSA E DEVE ESSERE RIPARATA.
- SCOLLEGARE LA SPINA DAL CAVO DI ALIMENTAZIONE E/O IL GRUPPO BATTERIA DELLA MACCHINA PRIMA DI REGULARLA, SOSTITURNE GLI ACCESSORI ORIPORA. TALIMISURE PREVENTIVE DI SICUREZZA RIDUCONO IL RISCHIO DI AVVIO ACCIDENTALE DELLA MACCHINA.
- RIPORRE LE MACCHINE FUORI DALLA PORTATA DEL BABBINI E NON PERMETTERNE L'uso A PERSONE CHE NON HANNO FAMILIARITA CON LA MACCHINA O CON LE PRESENTI ISTRUZIONI. LE MACCHINE SONO PERICOLSE SE UTILIZZE DA PERSONE NON COMPETENTI.
MANUTENZIONE DELLE MACCHINE. VERIFICARE CHE LE PARTI MOBILI NON SIANO DISALLINEATE O INCEPPATE, CHE I COMPONENTI NON SIANO DANNEGGIATI E CHE NON SIANO PRESENTI ALTRI PROBLEMI CHE POTREBBERO PREGUIDICARE IL CORRETTO FUNZIONAMENTO DELLA MACCHINA. SE LA MACCHINA è DANNEGGIATA, FARLA RIPARARE
PRIMADI UTILIZZARLA NUOVAMENTE. MOLTI INCIDENTI SONO CAUSATI DA MACCHINE IN CATTIVE CONDIZIONI.
- MANTENERE GLI ACCESSORI DA TAGLIO AFFILIATI E BEN PULITI. GLI ACCESSORI DA TAGLIO CON BORDI TAGLIENTI HANNNO MENO POSSIBILITA DI BLOCCARSI E SONI PIU FACILI DA CONTROLLARE SE CORRETTAMENTE SOTTOPOSTI A MANUTENZIONE.
- UTILIZZARE LA MACCHINA, GLI ACCESSORI E LE VARIE PARTI CONFORMEMENTE ALLE PRESENTI ISTRUZIONI, TENENDO CONTO DELLE CONDITIONSI DELL'AREA DI LAVORO E DEL LAVORO DA SVOLGERE. L'uso DELLA MACCHINA PER OPERAZIONI DIVERSE DA QUELLA PREVISTE PUO COMPORTARE SITUAZIONI DI PERICOLO.
- TENERE I MANICI E LE SUPERFICI DI PRESA ASCIUTTE, PULITE E PRIVE DI OLIO E GRASSO. I MANICI E LE SUPERFICI DI PRESA NON CONSENTONO UN UTILIZZO E UN CONTROLLO SICURI DELL'UTENSILE IN CASO SOPRAGGIUNGANO IMPREVISTI.
10.1 H E R F Y H S H M A S
Ta npoiovta STERWINS exouv oxdeltaotie ouuphiwva te uynlotepa npotuna noiotntac yia npoiovta nou npoopiciovtai yia tv ayopa katavaawtwv. Autn n eyyunon nwnannc kauunttepeiofo 5 etuw ano tnv nupeounvia ayopac tou npoiovtoc. Autn n eyyunon kauunttei ola ta elattmuata oia uikka kai tvkataokevn: eapntmuata kai otoxieia nou aeinouv, kai nueic unkavovikec auvgnekec xponcn. H eniaekuv kai n avikataotaon twv eapntmuatwv dev napateivounu tvn apxikn peiofo eyyunon. Ppenei va eiote oe deon va npoakouieTe tvn anoei eynayopac yia auto to npoiov kai tv nupeounvia ayopac. H kaluyn eyyunonnc ppiopiizetai otnv aia autou tou npoiovtoc.
10.2 EIAPESEI EETYHSH
Aut n eyyunon 6ev kauntei npoalmuata oue nepiotatika tou npokuntouv ano eoaaevn xpnon tou npoiovto. Ta napakatu otoxieia 6ev kaunntovta i ano tvnyeyyuon:
To epyaaleo exi xpnomuonoi dee ophi aeva, n
-Znuiéc nou npokuntouv kat a netaopapnynyekataoautoou npoiovtoc,
- Eπισκευες ἡ/και αλλαγή εξαρτημάτων πού πραγματοποίουνται οὐ τριθό μέρος, ἡ
-Znmuic nou npokalouvtai ano Ewstepiokc napayovtce n Eva avtkeiEvva, owncaumoc n Tepec, n
-ZnueC nou npokuntouv ano tn m un oumuopphiom e tic odnyec aaoaaleac kai xnoanc, n
To epyaIio exi anoouvapmoIoyn8ei n aoivTei, n
-To epyaaleio natae uypo npiaalov (p0sia, poxn, buuievo stvpe...),
-To epyaIeio exxipnouoio8ei yia enayyEaatkoocokonooc, n
-To epyaIeio exei kTe8ei oE depokpiaia kToC TnC Tepioxnc nou kaOpietai oTo Kefaiao «Ano8hKeuon
To npoiov npentie va xnpoiuonoieita uno kavovikc ouvhdkec xphong ka yia m enayyewaikouc okonoc. cek toutou, egaipovtai ano autnv tnv eyyunan ta npoiovta nou xpoiuonoivtai ano etaipiec knnoupiknc, tonikec apxec, kaadw cai etaipiec nou npoosepouv evoikia eni nlpwn hdeltaevdaveioeEgnonlaou.
2.2 SYMBOL NA PRODUKCIE
10.1 NASZA GWARANCJA
KIOKCTb, BbITEKAIOUJIaW3 AKKYMUTATOPA, MOXET BbI3BATb PAIDPAJXE HmOKOITN.
- HE NCIJIb3yIte IOBPEXDEHHbIe IIM60 N3MEHEHHbIE AKKVMJITOPbIe BIOKNuNHCTPymeHbI. IOBPEXDEHHbIe IMN N3MEHEHHbIe AKKVMJITOPbI MOYT PA5OTATb HENPEDCKA3YEMOI CTATb PIPNUHNOIPOXAPA, B3PbIBA ININ PMCKA NIOVUEHNEI TPABMbI.
HEIIOBEBPRAITEAKKUMYILATOPHBI BLOKIMINHCTPYMEHT BO3JENCTBMIOTHARIMYIMPE3MEPHOITEMPIEPATybl. BO3JENCTBMEOTHRIMYIMTEMPIEPATyblBBILIE130°CMOXET PIMBECTNIKB3PBBY.
CIEJUYTE BCEM YKA3AHNAMI 3APJKE IHE 3APJXAITEAKKUMYJATOPHbI bIOK mIN MHCTPYMENT BHE dNA1A3OHA TEMIEPATYP,IPMBEDEHHOTB MHCHTPYUIM.3APJKA, BbIPOIIHREMAY HETIPABINbHO mIN PIPN TEMPEPATYPE,BbIXOJIaIe 3A IPPEDELbYKA3AHHOTO dNA1A3OHA,MOXET PIPBECTM K IOBPEXDEHNIO AKKUMYJATOPA IN VBEINUEHNIO PIVCKA BO3GROPANIA.
2.9 OBCNJYKNUBAHNE
IOPUYAHTE O6CJYKBAHHE 3JEKTPONHCTPYMEHTA KBALIOUIMPOBAHHOMY CTIELIAHNTCY IIO PEMOHTY, NCTIOJIb3yOULCEMY TOJIbKO INDEHTNCHBE 3AIAPBHe YACTH.3TO O6ECNEVHT BE30IACHOCTb 3JEKTPONHCTPYMEHTA.
3AIPELIAECTC8O6CLYJMBATbIOBPEKDEHHBIE AKKYMJIaTOpHBIE bIOK.05cIyJXBAHME AKKYMJIaTOpHBIX bIOKOB DOLJXHO BbIIOJIHrTcBcTTOJIbKO IPON3BOJDATEIEM IIM ABTOPIN3OBAHbHbIM CEPBNCbIM LCEHTPAMI.
2.10 OBLIe IPEyIpyEHHIO TEXHnke B3OPIACHOCTN 3JIINJ:
BCE ACTM TEI JIOXHbI HAXOIMbCra HA B30IaCHOM PACCTOHNOT Ie3Bn. HE BbIHmAMTe PA3PE3AHbIMATEPHAMHE DEXPKTE PA3PE3AEMbIMATEPMAL BO BPEMJIBHXEHHIe3Bm.Ie3Bn PTOIOJXaOHOT DBIVATbCpIOcJIe BIKJIQUChEHHI DVBtAEPI. KPATKOBPEMeHHHaeHBNHmATEMbHOCTb PPINPABOT C M3DEJIEMMOKET PIPBECTM K TJAKeIy TPABME.
- PEHEHOCITE N3DEJIME 3A PYKOKTky COCTAHOBIEHHbIM
JIEM, CTAPAÇB HE BKNIOUATy UCTPOIcTB. IPIPABINbHAJ
PEHEHOCKA N3DEJIMA CHN3NT PMCK CNYAUHTO 3AUYCKA
YCTPOIcTBa IMIIONUYEHNA TPABM OT JLE3BV.
- PIPN TPAHCTIOPTMPOBKE NIM XPAHEHIM N3DEJIMBA BCEITDA YCTAHABINBAITE KpbILUKY JE3BNI. IPIPABINbHARI PEPEHOCKA N3DEJIM CHN3MT PICK IOTLYEHHN TPABM OT JE3BNI.
- PIM OUHCTKE 3AMATOTO MATEPNJIA NIN O6CJIYJXMBAHN UCTPOICTBA YbEIDNTECb, YTO BCE BbIKJIHOATENI NTAHMBAIKJIHOUYHeB, AAKKYMJIATOPHBI BLOK I3BLEUEH NIN OTCOEHNHE. HEOXNJADHHOE CPABATbIBAHNE I3DEJIWA PIM OUHCTKE
2.11 OCTATOUHbIE PNCKN
IPOUHTNE 3TV INCHPTYKLMIO, YTObI O3HAKOMMTbC R CIPABUNAMN ICTOJIb3OBAHIN DAHHOTIO PPODyKTA 3AIOMNHTE PABWIA TEXHNIKI B3OTIACHOCTM IN BTOHOCTN Xb BYIOHJNTE.3TO IOMOJET PIEOTBPATNTB PICKN IOIACHOCTN BCEITDA bYbTe BHIMATEJIbHbI PNI NCTOJIb3OBAHIN 3TOTO PPODyKTA, YTObI BOBPEMBAIBNTb IVCTPAHNTB PICKM. bICTPoe BMELLATEJIbCTBO MOKET PIEOTBPATNTB TRAKEJIbIE TPABMbI MATEPNAJIbHbI YLCEp. IPIB03HNIKHOBEHMI HENCIPABHOCTEN BIKJIHOHTE YCTPOJCTBO IM OTCOEDHNITE AKKYMYTAPOT.
DAJXECINBCEMHCTPYKLMCTPOFOOGBIOJDIAOTC,BCEPABHO HEKOTOPBIEQAKTOPYMOITYPNBECTNUKOIACHOCTU,HATPNIME: -JIETLILUEYACTNUOBAPBATIBAEMOTOIPEDIMETA.
-BM5PALMOHHbIe TPABMbI:MCIOJIb3yIte CTELIaJIbHbIE PYKOrTKM ICTAPAIETcB COKPATITb BPEMRAPOStbIb BC3JEYCTBVE.
3AKJIMHWBLLIEFO MATEPMAIAIIN O6CTIYXMBAHIW MOKET IIPVECTN KCEPbE3HbIMTPABMAM.
- DEPJKNTE HOXHNCbI DJIY IOIDPE3KN JXHBOI N3TPOODI TOJbKO 3A N3OJIIMPOBAHHbIE POBEPXHOCTN 3AXBATOB, TAK KAK JE3BME MOKET COPIKOKCHyTBcCCKpbITOn IOPOBOIKOM. KOHTAK IIE3BM C PTOBOIDOM IOI HATIPJKEHEM MOKET IPMBECTN K TOMY, YTOOTKpBTbIE METALINUeCKNE YACTN IN3DEINIA OKAKVTCaIOI HAPJPKEHEM, I OTEPATOPA MOKET YDAPITb TOKOM.
- DEPKNTE BCE LIIHYPbI IINTAHNIA KABEJIIN IOJANILBEOT 30HbI PE3KN. LIIHYPbI IINTAHNIA NIK KABEJIIN MOYT bblc CIPRAHAIB XIWBOI N3TOPODN INIIN KYCTAX IN MOYT bblc CNUYAHIHO PIEPEPE3AHBI NE3BnEM.
HEIIOJIb3YJTEcBHOKHNUAMIMINIOIPOPE3KNXMBO INTOPOINIPNHEbIaTOPIRMAHTbIXIOIOTNbIHYUCIOBNHX, OOCBJHNOKOTDA CUYIeCTBYET ONACHOCTbY UDAPA MOJIHN.3TO CHJXAET PNCK YDAPAMOLNIEM.
-TPABMbI, BbI3BAHhbIe LJJyMOM. NcTIOJIb3yJTE CPEICTBA 3ALIHTbIOpAHOB CJIYXA, CTAPAYTECb COKPATNTb BPEMA PABOTbI W BO3DEIcCTBVE.
- BdIbIXAHNE PbIbIIN YACTUI.
- BCEFIIA PTPMMEHJNTE CPECTBA 3ALIITbI OPTAHOB 3PEHMIAECJIW BO BPEMWCIOJIb3OBAHINY YCTPOMCTBA BO3HNKHYT KAKIEJIIM60 W3TVX OAKTOPOB,HEMEPIEHHO OCTAHOBNTYEYCTPOCTBOIPTPOKHCYNLTIPNYTECBPAAOM
TPABMbI MOYT BbITb Bb3BAHbI IMYCYUTyBIEHbI DINITEJIbHbIM NCIIOJIb3OBAHMe INHCTPYMEHTA. PIPINDINTEJIbHOJ PA60TE C JIObIM INHCTPYMEHTOM DEIAIATE PETYNAHPbIE TEPEPBbIBI.
IIMTEJIbHOE NCTIOJIb3OBAHME IPOJyKA TIOIBBEPTAETIOJIb3OBATEJIYBbPAUIM,KOTOPARMOKET Bb3BATpPd
3A5OBEBAHIM, M3BECTbIXIPOIDOBUHM HA3BAHEMM CmHDPOM B6PALWMYKIN (HATIPWMEPMOTGYTIOSEJIETbIAPILb), A TAKXE CTEUMOUWECKME 3A5OBEBAHIA, TAKVE KAK CmHDPOM 3A1PACTHO KAHAHA.
-
YTO6bI CHN3NTb 3OT PNC TPNV NCTIOB3OBAHIMTPODyKTA, BCEITDA HADBEAHTE 3ALUHTBIE PEPYATKM IN DEPXMTE PYKM B TEPIE.
-
TEXHnueCKne DAHHbIE
10.2 TAPAHNTHbIe NCKJIouEHn
2.5 3NEKTP KYI EPEIH NAI DAIANY KE3IHDEI KAYINCI3IK
JXABbIKTbIH ALJIAPbI PO3ETKAFCA GmKEC KELIVI KEPEK.
ALJAHbI ELUKALAH 03TEPTNIH3. JXEPE TVbIKTAJFAH
JXAbIK KOCbIJFAH ADANTEP ALJIAPbIH NAIADIANLAHbI3.
03TEPTINMEHE ALJIAP MEH CmKEC KEJIETIH PO3ETKANAP 3NEKTP
TObIHbIH COFY KAYTIH A3AJTAbI.
- DEHEHIN KYbIPNAP, PADIATOPNAP, APAJIKTAP MEH TOHA3bIKbIITAP CNAKTbI JXEPTE TIVbIKTAJFAH BETTEPE TMIOHE KOJI BEPMEH3.ETEP DEHEH3 XEPETE TIVbIKTAJCA, TOK COFY KAYTI APTAbI.
JXABbIKbI JXAHbIP JXAByIMYMKIH HEMECE bIFAJIDJI XEPDE YCTAMAH3. JXABbIKKA CydbIH TYCJ3NEKTP TOBih COFY KAYTIH APTbIPAdbI.
CbIMbl3HnHblTYPDE PAAIADAIHAHbHb13.CbIMblJXABdIKbIXbJIbKbITY, TAPTY HEMECA XbIPATY ULIH EILKAUHAN PAIADAIHAHbHb13.CbIMblXbIJyDAn, MAJIbI, OTKIP KMEKTEPHEH HEMECA KO3FAIIMJIbBQIIIEKTEPHEAIBIC KAUbIKbIKTA CAKTAHb13.3AKbIMDAIFAH HEMECA OPAJFAH CbIMdAP TOK COFY KAYTIH APTTBIPABbl.
JKA5bIKbIcBpTTA PAHDAHAFAH KE3DE, CbPTKbI KOJIADHYFA
JAPAMblY3APTKblcBIMblKOJIADHBHbI3. CbPTTA KOJIADHYFA
JAPAMblCbIMblPAHDAIAHY 3NEKTP TOTbIHCOFV KAYTIH
A3AIaTAbI.
- ETEP XABbIKbI DbIMKbI JXEPDE IaIaIaIaHy KAKET BONCA, INIOΦEPEHUMaIbI KOPFAhBc KBybIbIbIcBImE (DKK) KOPFAJIfAH XINAKTbI IaIaIaIaHbIHbI3. INIOΦEPEHUMaIbI bKOPFAhBc KBybIbIFcIBH IaIaIaHy TOK COFY KAYIIH TMeHDETJI.
2.6 KEKE KAYIIC13IK
A6AJIaHbI3,OPbIHJaJIbIINXATKAH OPEKETTEPDI 5AKbIJAAHbI3
K3HE JABbIKTbI IAMJANAHY KE3IHNE OPbIHbI WELLIIM DEPI
KA6bIJAAHbI3. UAPUJAAFAH KE3DE HEMECE ECPTKI, AJKOTOlB
HEMECE DAPI-DAPMEKTEP ACEP ETKEH KE3JE JXABJbIKtBJI PAIDALAHSAhB13. JXABJbIKTBJI PAIDALAHY KE3IHIDE3EHHCIG3 50JY AVbIP JXAPAKATTAPFA C6EJI B0JYbIMMKIH.
XKEKOPFAHbIC KYPANlAPbIH NAIJIANIAPbIHbI3.3PKALJAH K03 KOPFAHbICbIH KMIH3.TIWCTI JAF DAIJIAPDA KOPIAHbIHATbIH LIAHAH KOPFAHbTIbIMACKA, CbIPFAHAMAIbIH AIK KIMIM, KAKCAHEMECE ECTY KOPFAHbICbCIcNkTbI KOPFAHbIC KYPANlAPbI JAPAKATTAPbIH PIIaDlaBOTy KAYINH TMeHIDETII.
- KE3JEKOKICKEKOBILIbIbIbIbOLIBIPMAHbI3.KYAT K03IHE
X3HE/HEMECE BATAPEAJIAP XINHAFBIIHA KOCNIAC BYPbIH, KYPAJIbIbI
TACbIMAJIDAY AILBIDAA XkBPATbIIT-KOCKblITbIH 0JIPIIHTEHIE
K03JKT13H3.CAVCAbIbIbI3 AXbIPATbIIT-KOCKblITa BAOTIFAH KE3JE
XA5blIKbTIbTACbIMAJIDAY HEMECE AXbIPATbIIT-KOCKblLI KOCblIFAH
KE3JEXA5blIKbTIbKOcy Xa3ATAbIM OKVFALAPFA CEBETI BOIVbIMMYKIH.
JXA6JIbIKtBJKOCNAC 5yPbIH BAPNIk PETTEY KIITTEPIH HEMECE COMBIH KIITTEPIH AJIN TACTAHJ3.COMBH KIITI HEMECE JXA6JIbIKtBJH AINHAMIMAIb Ie9JIITHE SEKITINIEH KIIT ADAM JXAPAKATbHA CESEII BOLIVI MYMKIH.
- APTbIK KXYKTEMEXKACAMAhB13.AfBtHbI3Dbl DYpBcKoNbIn, 2PKAUAH TNE-TEHNIKTI CAKTAHb13.5YJ KYTNEIeH JXAFdJIaIAPDA JXA6bIKTbIKAKCbIPAK BACKAPVFA YMVKIHdk BEPEII.
TNICTIKMIMKINH3.KEHKMIMHEMECEOJIIEKEB 6yIMIDAPDbI KMIEMH3.LUAHTbI,KNIM MEK KOJFANTAPdbIO3fAJMAJIbI 60JIUEKTEPDEH AJbIC KAUBIKbTKAYTkTAYCTAHbI3.KEH KNIM, OJIUEKEN BvIMIDAP HEMECE Y3BHJUALLKO3FAJIMAJbI 60JIUEKTEPEIINIHYMYMKIH. - LAAHbI TAPtBIN, KHHAMTbIH KOHNbIPfBILAPbI KOCYFA
APHAJFAH KYPbIFbIAP bAP 0NCA, OJIAPbIH IyPbIC
KJALFAHbI, PAIDAJAHbIATbIHbHA KG3 JETKl3Hl3. LAAHbI
XHHAY KYPaTBIH PAIDJAIAHy LAAHMEH BAIJIABHcTbI KAVITTEPI
A3AHTAbI.
KYPALIADAPbI JMIJI PAJALAHYDAH AJIBIHFAH TQXIPMEHH CE6E6IHEK KYPALIbh KAYINCI3IK KAFMDAPbIH EJEEMYE XOI BEPMEH3.ABAICb3 OPEKET CKVHITbIH ILLIHDE AByBIP JAKAPATKA CE6ENI BOUYbIMYMKH.
2.7 KABdIbIKTbI PAIДАЛAHY JXHE KYTIM KOPCETY
XABJIKTbI UAMADAH TBIC PAIDALAH6AHbI3. XMYbIC YUHJXAPAMDbI XABDbKTbI PAIDALAHbI3.IYPbIC TAHDAIFAHXABdIK XMYbICTbIXOBAJIAHFAH XBIIMDAMbIKTA XAKCbIPAK OPIKAVITC10bIHDAyFAMMKHIDK BEPDI.
- ETEPAKbIPATbI-KCKbIIHKcBIMACA XGHE 0LLIPIMCE, KABIDKTBIAIADAIAHSAHbI3. AKBIPATbI-KCKbILINIEH BAKAPbIMAYtIH KE3 KEJIET XA5DbIK KAVITTI 60TbI TAbuIaI bI XGHE OHBJXOHJDEY KAXET.
- PETTEVIEPIJXACAMAC BSYbIH,AKCECCYAPIAPbIAYbICTbIPMAC HEMECE JXA6JIbIKTbICAKTAMAC BSYbIH,JXA6JIbIKTAH ALJAHbI AXbIPATbIH3XHE/HEMECE BATAPERIAP XHNAfABIH AJBII TACTAHbI3.OCbIHDAKAYITCISIKTIH AJIbIH ANLY LLIAPAIAPbI JXA6JIbIKTbIKE3JEIDCOK ICKE KcObJIy KAYIH INA3AJTAbI.
5OC TYPFAH JXABIbIKTbI bAJIANAPDbIH KOJIbJXETNIETIH JXEPDE CAKTAHbI3 XJHE JXABIbIKTbI PAnDAJAHY JXOBIH HEMECE OCBI HYCKAYNbIKTbI bIJMEMTHI ADAMDAPFA JXABDbIKTbI PAnDAJAHYFA PYKCAT BEPMEH3. JXABDbIK bUIKTIJIIT JOKI PAnDAJAHYUbIAPDbIH KOJIbIHDA KAVINTI 60JIbIT ABaIAbIbI.
JXABdbIKKA TEXHVKALbIK KbI3MET KOPCETY. JXABdbIKTbIH JXMybICbHA 3CEP ETYI MYMKIH K03FAJIMAIbI 6BIIWEKTEPdIH
5yPMALAHbH HEME6 bAIaHbICTbIPbIbIH, 60JIeKTEPdIH CbHybIH XGHE BACKA XAF dIAPbIH AIIbIH AIIbIHbI3. 3AKbIMdIaHfA BONCA, KOIaHAp AIIbIHDA JXABbIKTb I XOHTDEY KAXET. KOITTEH TOTEHILIE XAF dAIaIAP XABbIKKA DYPBC TEXHNKAbIK KbI3MET KOPCETIIMETEH YLIHIN PAIA BOLAdI.
KECETIH KPYAPJLAPBbI OTKIP XJHE TA3A KYJE CAKTAHbI. 0TKIP JXMEKTEPI BAP YPbIC TEXHNIJIbIK KbI3MET KOPCETIJIteH KECKIII KPYAPJLAPBbIH BAJIaHbICY MymKIHdITIGTomeH XJHE OJIAPDbI BAKbIAY OHAI.
JXABbIKbI,AKCECCYAPNIAP MEH AJIbIHbAJI KECKIIPEPI JXGE T.I. JXMYBIC UAPTTAPBIH XGE OPBINADAYBI KEPEK TANCBIPMAMAPBI ECKPEO bIPbI0CbHVCKAYAPFA CJMEKC PIAIDAIANY KAXET.MAKCATTBI OPEKETTEPHG3T E TANCBIPMAMAPBI OPBIHDAUYUHN JXABbIKbTI PAIDIANAH KYAITTI JAF DAIAPBIH IIMDA BOTyIBHA CEBETI BOTyIB MYKMH.
- TYTKAJAP MEH KANCbIPbllI GETETPDI KYPFAK XJHE TA3A KYIMDE, MAJ TCYNEIITIHDE ETIN CAKTAHb13. CbIPFAHAK TYTKAJAP MEH KANCbIPbllI BETET KYTIIETEH JXAF DAJIAPDA KPYALDb KAVITCI3 YCTAYFA XJHE BACKAPYFA YMKKIHJIK BEPMEINI.
2.8 BATAPERJAH JYMBIC ICTEITIH KYPALI IAIJAHAUY XOHE KYTIM KOPCETY
- TEK 0HIIpyUJI KQPCTKEH 3APJITafbIUINEH 3APJITAHbI3. BATAPERJAP XINHAfBIHbI BIP TYPIMEH TIAJDAIANHBJATbIH 3APJITAFbIITAPDbI BACKA BATAPERJAP XINHAfBIMEH KOJIDAHFAHDA, OPTTHI PAIDA BOUY KAYTI TVbIHDAJIbI.
KABIKbI TEK TMICTI BATAPERJAP XHNAKTAPBIMEH KANAHbIbI3. BATAPERJAP XHNAKTAPbIHbI BACKA TYPNEPIH ITAI DAIANY JAKAPATTAPFA XOHE OPTTIH ITAI DA 5OTY KAVITHE CEBIT BOYbI MYMKIH.
BATAPERJAP KINHAFbI KOJIADHbIJMAFAH KE3DE, OHbI BIP KJIEMMAJAH BACKA KJIEMMAFA KOCbI MYMKIH KAFA3 KbICTbIPbIbITAP, MOHETAJAP, KJITTEP, WIETELEP, BYPAHDAJAP HEMECE KE3 KEJITEH YCAK METAJAH JAKACJFAH 3ATTAP CYNKTbI BACKA METAJI 3ATTAPDAH AJIbIC XEPDE CAKTAHbI. BATAPER KJIEMMAJbIH KbICKA TIVbIKTAY TYTAHYFA HEMECE OPTKE CESEI BOJyblMYMKIH.
3MHNbIXYMBCI KAFDAJIAPBIHDA BATAPEDAH CYBkTBIK
LbIFyIMMKIH;OCbIHDM CYBkTBIKTEH KATBHACTbl
BONDbIPMAHbI3.KATbIHAC OPbIH ANFAH XAF DAIA,CymeH
LIAMbIHbI3.EFPCyBkTBIK KG3FE TNIKETCE,KOcBIMUJA
2.9 KbI3MET KOPCETY
JXABbIKKA TEK BIPDEI KOCAKKbI BOJIUIEKETPDI KOJIADHBII, BIIIKTI MAMAH KbI3MET KOPCETY TINIC. BYJXABbIKbIH KAYITC13DIIH KAMTAMACbI3 ETEJI.
MEIMIHANbIK KOMEKKE JXYTIHHI3.5ATAPE9DAH LlbyIFATbIH CbIKTBK TITIPKEHYE HEMCEK YIWIKTEPDH TIAJDA 5OlybHaC ESEPI BOLyblMYMKIH.
- 3AKbIMDAJFAH HEMECE MOJINPHKALIQAHAHFAH BATAPERAJAP XNHAfbIH HEMECE KXPALdbI KOJIADHAHB13.3AKbIMDAJFAH HEMECE MOJINPHKALIQAHAHFAH BATAPERAJAP OPTKE, JAKbJIbIbCKA HEMECE JAKAPAKAT AJY KAYTIH TVdbIPATbIH KYTTIEHEN JXAF DAJIAPFA CEBEN BOJyBMyMKIH.
BATAPERIAP XMHAFbIH HEMECE KYPALIBIOTKA
JAKBHIDATNAHb3 HEMECE TbIM XOFAPbI TEMIEPATYADA
CAKTAHAHb3.OTKA HEMECE 130°C-TAH XOFAPbI TEMIEPATYAPA
JAKBHIDATY JAPbJIbCKA C6EBI BOJyIbMYMKIH. - 5APJIbIK 3APJITAY HYCKAYIAPbIH OPbIHDAHbI3 JXGEHE BATAPEJIAP XINHAfblH HEMECE KYPANblHyCKAYIbIKTA KOPCETITIEHT TEMTEPATyPA UJEKTEVJIPEIHbIC 3APJITAMAHbI3. IyPbIC EMEC.HEMECE KOPCETUIIIEH AYKbIMHAH TBIC TEMTEPATyPAI3AJPITAY BATAPEHbI 3AKbIMdAyblJxGE OPT KAYTIH TYbIPbI MyMKIH.
3AkBIMDAJAFAH BATAPERAJAP XMHAKTAPbHa EILKALUH KaI3MET KOPCETTIEN3. BATAPERAJAP XMHAKTAPbHa KbI3MET KOPCETYII TEK OHJIPyLlHEMECE OKIJIETTI KbI3MET KOPCETYLIIIEP OPbIHDAByI KEPEK.
2.10 BYTAKTAPdbI KECyTE APHAJIFAH JABdbIK KAYINCI3dIIG XOHIHDEI ECKEPTUJIPE:
- DEHEH3I1 IIbIaK JXY3DEPIHEAJIbIC KALbIKbTKA YCTAHbI3. JXY3DEP KO3FAJIFAH KE3JEKECJETIH MATEPMAJIDI bAMAHbI3 HEMECE KECJIVI KEPEK MATEPMAJIDI VCTAMAHbI3. JXA5BJKTbIgUHTEH COH, JXY3DEP BIPA3YAKbT K03FAJADJIb.I 5YTAKTAPDb KECYTE APHAfAH JXA5BJKTbI pIAJDAJAHy KE3IHJDE 3EiHcI3 6OIV AByIP JXAPAKATTAPFA CEBEN 6OIVbMYKMHN.
- BYTAKTAPdbI KECYTE APHANFAH JXABDbIKTbI TYTKACbIHAH YCTAHb3 XGHE KY3DEPI TOKTATbIbII, KYAT KCKbIbIHbIH JYMBICICTEMEHTIHHE KG3JETK3IH3. BYTAKTAPdbI KECYTE
APAHJFAH JXABIDIKTBIDYPBICCAKTAUYX3DEPDIH BAMKAVCbI3DAICKE KOCBJNYKHE XJEKE JXAPAKAT ANKY KAYTIH A3AMTAbl.
- BYTAKTAPbI KECYTE APHAJIFAH XA5bIbIKTBtI TACbIMAJDAFAH HEMECE CAKTAFAH KE3IDE OPKAIUAH TbIIJAK XY3DEPIIH XA6bIHbIH CALbIHbI3. BYTAKTAPbI KECYTE APHAJIFAH XA5bIbIKTBtI DYPbIC YCTAY JXY3DEIPHEH HEKE JAPAKAT AYI KAYTIH A3AIJAeTbI.
- BITEJIINKAJFAH MATEPMAJIADAPDAH TAsALAY HEMECE XA5BbIKKA Kb3MET KOPCETY KE3IHDE BAPJIHK KYAT KCKbIITAPbIHbIH COHIIPIJTEHIHE XGEHE BATAPEJAP XHHAFbIHbIH LlIFAPbIJFAHbHA HEMECE AXbIPATbIJFAHbHA K83 JXETKI3IH3.
BITEJIIN KAIJIFAH MATEPNAIJDAH TA3AJIAY HEMECE XABdIKKA KbI3MET KOPCETY KE3IHJE BYTAKTAPbIK KECYE APHAJIFAH XABdIKbIH KYTTIETEK3JE ICKE KOCbIybl AByBP JXAPAKATTAPCA CEBTI BOIybl MYMKIH.
- 5YTAKTAPDbI KECYTE APHANFAH XABDbIKTbI TEK OKUAYNAHFAH
XAFbIHAH YCTAHbI3, CEBEbl PbIiAe KXY3I KPOIHbEHTIH
CBIMDAPFA TNII KETYIMYMKH. 3JIKTP CbIMbHa TNIIT KETETIH
PiBILJAK XY3DEPI 5YTAKTAPDbI KECYTE APHANFAH XABDbIKTbIH ALIbIK
2.11 KALybl MYMKIH TəYEKEJIDEP
- bYH N YCKAYbIbIKbIbOky APKbIbIbOHIMI dybIC KOnIaHy
KoJIbIMEH TAHbICbIHbI3.KAVINCI3IK H YCKAYIbAPbIH ECTE CAKTbIH 3
XGHE TOJIbIK OPbIHDAhB3. bYI T OVEKEIIEP MEH KAVITEPIN
AIIbIH ANyFA KOMEKTECEJI. bYI THIMDI KONlDAHFAH KE3IDE OPKALUH
A5AI B0JIbIH3,OCBJIAIJA C13 T OVEKEIIEPJI.EPTE AHbIKTAYbIH3
MymKH. XbIJdAM APALACY AByIP XAPAKATTAP MEH MYNIKTIH
BYLIHYNE XOJI BEPMeI. I.ETP AKAVITAP BOJICA, BATAPERHbIgLIIPII,
AByIPATbIH3.
BAPTIbIKHYCKAYNIAPKATAHCAKTAJCADA,KAVITTVDIPYBYIMYMKIH 0AKTOPIAPBAMMbICJIbI:
-JXMYBcMATEPMAIJIAPbIHbJIJAkTbIPbJIFAH 80JIILIEKTEPI
-ДИРПДЕН ПАДА 5ОЛATыH XAPAKATTAP: TIVCTI TYTKANAPIKOLДАныHbI3 XGHE XMYbIC YAkItb MEH 3KCTO3MUNAЯbl A3AHTyFATbPbCbHbI3.
-LLUYbIHJCEPIHEHIANDA BONATbIH JXAPAKATTAP:ECTY MYLIJIENEPIH KOPFAY KYPALDAPbIH KMIHI3, JXYMbIC YAKbITbMEH
50JIILIEKTEPIH《3IIEKTPNEHIDPYJ》XGHE ONEPATOPFA TOK COFYBI MYMKIH.
BAPJIbIK CbIMJAP MEH KABEJIbI DEPJI KECY AMAFbIHAH AJIbIC YCTAHbI3.KyAT CbIMJAPbI HEMECE KABEJIbI DEP BSYTAJIbI KOPILIAYIAPDA HEMECE TAJI-LLIIJKTEPH APACbIHDA KOPRIHSEBI BAIKAYCbI3dTlIbIAKXY3DEPIMEH KECIJYMYKMHI.
- BYTAKAPdbI KECYTE APAHIFAH JXABDbIKTbI KOJIAMCbI3 AYAPAMbl JXAFdAmbIHDA, 3CIPECE HAI3AFAM KAYTI BAP KE3JE, PAHDAJAH5AhB13. BYI HAI3AFaIMbIH COFY KAYTIH TOMEHDETJI.
3KCTO3NLMHbIa3AHTbIHbI3.
-LLAH MENG BOJILIEKTEPDIH XYTBINYBI.
-OPKALUAH KGE3JI KOPFAY KYPAJIAPbIH KNIH3.
XA5DbIKTbI KOJIADHFAH KE3JE OCSbI ΦAKTOPNIAPbIH BIPEVIH
BAIKACAHb3, XABDbIKXYMbcIH TOKTATbIN, DORPIEPTE DEPEY
XA5APNTAcbIHb3
- KYPALINY3AK YAKBIT KOIADHY JXAPAKATTAPIBIH PAIA 50NYbHA HEMECE YIFAIIObHA CEBET 50NYbMYMKIH. KE3 KEITEH KYPAIINY3AK YAKBIT KOIADAHFAHDA, Y3JIIC XACAHb3.
- OHIMДI Y3AK YAKBIT KOLДAHY ПИДАЛAHUSSHFA KOLДIH DIPIN CINHДPOMBI (HAVS) DEI ATAJIATbIH BIPKATAP XAF DAJIAPBbI TYDIPYbI MYMKIH DIPIN OCEPIH TIT3EДI, MbICALbI, CAVCAKTAPbIH AK TYCUY; COHDAI-AK, KOLДbIH bIJI3IK bByIH CINHДPOMBI CINKbI EPEKLJI EAPJLAP.
-
ΘHIMДI KОЛДАнFAH KE3DE BYЛ KAVITTI A3AHTY YLUJIH OPKALJAH KONIFAT KINIT, KOLbIbIbI3dIb JxblbYCTAHbI3.
-
TEXHnKAlbIK DEPEKTEP
| Модаль | 40VHT2-60.1 |
| Номиналды Керhey (Т.T.B) | 36 Т.T.B |
| Жабдык салмары (батараяр жинагын санамаганда) | 3,2 кг |
| Жузderдін узынданы | 658 мм |
| Кесу узынданы | 605 мm |
| Кеслjetін матерпалдінEnУнkenЕлшемi | 20 мm |
| Белгileнгren дыбіс КуатынданDEнг'renii (ДБ(A)) | 92 д(B(A) |
| Өлшенин дыбics Куатын Deнгей (ДБ(A)) | 88.72дБ(A) K=3ДБ(A) |
| ӨлбicsТык КьсбIM Deнгей (ДБ(A)) | 77дБ(A) K=3ДБ(A) |
| КолдаНыICTаftыЖуMbIC TOГы | 4,2 A |
| Мakсималды TOK | 12 A |
| Дирil Deнгей (K=1,5 M/c²) | <2,5 M/c² |
| Өлшактун Тербелic Кьлдамдыftы (Жуктемcis) (MHN-1) | 2800 |
| КозfaNTКыштун 60сЖуржындамдыftы | >19500±10%/MHN |
Mamidienre H dipinih kannbI mHi cTaHdapTb cbHay aicihe caikec eJlleHdi JhHe bip KypandbekihicimeH canbcItby yiwH KOJaHbIybl MymKiH. DipinIH mAmldenre H kannbI mHI 3Kcno3nuaHb anbH ana 6aFahay ke3iHde de KOJaHbIybl MymKIn. Ka6dbkTb HaKtB naDanahy KeiHderi dipin MeH wU DeHRei KypaIbH KOJaHbIy JokbHa, acipece, hndeneTI H daBHdaMaFA 6aNhaHbICTB, MAmidienre H kannbI mHdepdeH 3eRwe 60nybl MymKiH; NaKtB naDanaHy 7apTTapbl HerizHde (Tpnrrepik YaKaITka KocBIMpaTeHne KypaIdapdbH eWipiny KAn He COn Hany YaKaBTb CnAKTb Kymblc uNKlinH 6apblk 6bnsekepin eckepe otbpIn) onepatop Kayinc3dirH KamTaMaCb13 ety MaKcaTbHa dKayinc3dik enseMepein aHbIKtay kaxet 60nybl MymKiH.
| Баразецлар жинасы | |
| Баразец Турì | Li-lon |
| Модаль | 40VBA2-50.1 40VBA2-50.XXX |
| Номиналды Керhey [Т.T.B] | 36 T.T.B |
| Баразецнын Номиналды Куаты | 5Ah Li-lon |
| Баразец ушьikтарын саны | 20 |
| Салмafы [Кг] | 1,29 кг |
| Зараятаблихинаftы | ||
| Морень | 40VCH1-3A.1 | 40VCH2-6A.1 |
| 40VCH1-3A.XXX | 40VCH2-6A.XXX | |
| Номиналды Туtbильпын Куат | 100-240В~ | 220-240B~ |
| Номиналды Шьfic Куат | 42 T.T.B | 42 T.T.B |
| Жимбic Temпегатурасы [°C] | 4°C~24°C | 4°C~24°C |
| Салмаftы [Кг] | 0,605 кг | 1,06 кг |
4. K¥PACTbIPY

ECKEPTY! KOIДAHAP AIIbIHDA ΘHIMDI TOIbIK KYPACTbIPY KAKET! TEK JAKPTbIaN KYPACTbIPbIJFaH HEMECE BYJIINHEB OJI山EKTEPMEH XINHAJIFAH OHIMDI KOIДAHBAHbI3! KYPACTbIPy HYCKAYIAPbIH KAdAM BOIVIHUA OPbIHDAHbI3XHE OHIMDI OHAN XINHAY YLIH KOPHEKI HYCKAYIbIK PETIHDE YCbIHbIHFaH CYPETTEPDI KOIДAHbIHbI3!
4.1 KANTAMADAH LbIFAPY
- Kecy e3ekweci
2.Пышak
3.Kopfahbic KypaJIbl
4.ANaTbIK aXbIpaTbIN-KOCKblU
5.AnlblHfblyTtKa
6.ApTkbl TyTkα - AxbipaTbIN-KOCKblU
8.ПьшakЖузIHJ Ka6blHbI - Byfattah Wbifapy TyMeci
KANTAMADAHLLBIFAPFAHKE3DEKOJFANTAPbIKIHI3.
- KAPITAH LlbuIFAPV YLIJH KECKILUTI, TbllIAKTBi, APAHbI HEMECE BACKA YKCAC KYPANIDAPBtIKONDAHAHbI3.
KYPALJbI TEKAPTKbl TYTKAcbIHAHYCTAHb3(6).
- KEIMH KAIITA PAIADIANAHY (TACbIMJDAV XGHE CAKTAY) YLIJIH KOPAITbI CAKTAH3.
KOCbIMUJA KEHECAIY YLJIH HYCKAYIbIKTbIKYPFAK XEPEDE CAKTAHbI3.
4.2 OPHATY
ПьшakЖузIHижа6bHbIb:2.1-cypeT
Kymbictb6actamac 6ypbH 2-xy3deh nbIaak xy3iH 8-ka6bHbH anbIn TaCTaHb3. Bekity yuH 8-ka6bHdb 2-ky3re Typan, canbHb3.
ECKETy: OHIMdi naIdaIaN6aFah Ke3e caTay XaHe TaCbMaIday yuH nblwak Kyy3iHi8-kaibihnapKaawh calbHb13.
BaTapeJnap XINHaftbIn OPhaTy/aIbIn Tactay: 2.2-cypet
ECKEPTY: BaTapeJIap KINHaftbIHbIH TMeHrI KaftbIHdaftb IbcIpMaHbIH OphbHa TyckHeIHe
KAne KymbICbI 6aTamaI TybpI, 6aTapeJIap KINHaftbIHbIH eHIMH IH 6aTapeHbIKOHdbIpy
nopTBHa 6ekitInreHHe Ke3 JeTKi3iH3.
BaTapeernap XINHaftbIH TbIbI3dAn 6eKITney BaTapeernap XINHaftbIH Kytan KeTyiHe ce6en 60nybl XaHe aybp Jkapakattapra aKeyni MyMkiH.
OpHaTy yuH: BaTapeaIap XnHaftb KylbInTaIbIn opHaTbImaHaLHa, 6aTapeaHb KoHdbpy npTbHa cAblb3 JxHe TypaIan,6ekitiH3.
AInT tacay yin: BaTapeHbI 1bI rapy yin 9-TyMeHi 6acbl, 6tape KynbH aBbHb3 XaHe 6tapeNap XnHaftbH eHIMHe H bIfapbHb3.
4.3 BiPIHLLI PET KOJIДАНУ
BaTapeHbI TeKcepy:2.2-cypet

ECKEPTY! OHIMI II PAIJIAIAHBAC BYPbIH Ocbl HYCKAYJIbIKTbIH BACbIHJDAfbl BAPIIK TAKbIPbINJIAJIAPbl BAP 'KAYINCI3IIK HYCKAYJIAPbl' BOJIIMH OKblI IbIFblHbI3.

BATAPRA CATbI ANJY KE3IHNE TOJIbIK 3APRA TAIMAFAH. OHIMBI BIPIHNI PET KOLDAHAP AIIbIHDA BATAPRAHbI 3APRA TAFBIUKA CAJIbIN,TOJIbIK 3APRA TAHbI3.
KypblfblhbiipinahykeiHneepeKeIheHa3apayapblb3:6apblkHa3apblb3dbipinpiet KOndahyraayapblb3.0Himdi anfaKbI peT 6oc keHicTikTe eL KeedepriciXaHe aHaHaadaftbe 3nemehTepci3 cbHaHb3.
4.4 Kbl3MET
Thimdiicke kocy 4.1-cypet
BvTaKTapIbI Kecy Jaa6dbIbIbIH icke Kocnac 6ypbH, 7-ajbIpaTbIIN-KoCkbIbI neH 4-anaTbIK KockbIeepkIH KO3FaJIbIH, ABTOMaTTbI TypeJxHe JxblJaM opbHa opanaTbIHbI TEKcepHl3. CoHdaN-AK, caKbIHDaTkbI WKeJeTy caHbIayapbIHbIH 6itEnmereHIn XaHe aNbIHbI 5-TyTKa MeH apTkbl 6-TyTKa Ta3a XaHe Kpyfak eKeHH TeKcepHl3. BvTaKTapIbI Kecy Jaa6dbIbIHda 6y3blNy 6enrinepi JOK eKeHHe Ke3 JeTeKi3ReH coH, TOnbIK 3apraTalFaH 6ataperaHbI «WbIPeTKeH» Dbl6bcEctinreHwe Jaa6dbIbTIbIH 6atapeHbI KOHDbIp npTbHa cbIpBTbIN caMbHbIc. Ocblaan H KeiH, 6vTaKTapBI Kecyre 60anaBl.
Bip KOnbHb36eH eHIMHApTKbI 6-TyTKacbHaH, eKIHwI KOJIbHb36eH anDbHfbl 5-TyTkadah YCTaHb3. Ka6dbkTb I Kocy ywiH 4-Kayinci3dIK KockbIbMeH 7-akpaTbIn-KockbluTbI bip Me3rJlde 6acy KepeK. XMbIc Ke3iHne 6yTaTapDbI Kecy XabdbHn ApKaUHaEki KOJIbHb36eH YCTaHb3.
Thimdi icke kocy: 4.2-cypet

ABAHJIAHbI3! OPKALSHAH KAYINCI3IK KO3IJIIPIIHN KNIH3. KYMbIC AIAHbI UAHDbI BOJCA, CY3TICI BAP BET MACKACbIH KNIH3. TnICTI KOJFAN IEN AAK KNIMI I NAIJAHAHy YCbIHbIJaDbI.
ECKETY: KEIbIP EJIDEPIE XABdbIKbTb TcYNIKTH KAI ME3TUNHIDE KGEHE KAHDAI APAHBI KYIHDEPI KONDAHYFA PYKCAT ETINETIH INXHOKAHDAI LJEKTEVNEP KONDAHbIbATbIHbIH HOPMATIBTK PETTEVNEP AHBKTAAbl! KORLIJIPETE KEDEPI KEITIPMEY XOHE OKMULIIK
KYkbKTAPbIbY36AY YLIHH BACKAPY OPAHJDApIH AH TOJIbIK AKTIAPATbICYPAHbI3XHOHE EPEXEJIEPICI CAKTAHbI3!
ADAMDAPFA KEDEPTI KEJIITIPETIH XGHE AIAHATATbIH TBIM EPEHTHE TbIM KELLI YAKBITTAAHEMECE DEMALIBIC KYHDEPI/KOFAMbIK MEPEKE KYHDEPIIAMAIAHsAHbI3. XEPIJIKTI LIKTEYIIEP TYPAJI bI BIIH3
- OHIMDI JAKBILIY KAYIIL BAP OPTADA KOJIANDAHSAHbI3.
OHIMDI KOJIAMCbI3 AAY PAHbI JXAFDAJIbIHJa, OCIPECE HAI3AFAH KAYII 6AP KE3JE, PIAI DAJIAH5AbHbI3. OHIMDI JXAPbIK DEHTEI TGMEH JXAFDAJIAPIAKOLDAH5AbHbI3. BIKTIMAI KAYITTEPIA AHbIKTAY YLIHH OIEPATOPFA AHBk KOPIHTIH JXMYBC AIMAFbI TALTI ETJILEI.
- ECTY MYLILIEPIH KOPFAY KYPAIJIAPbIH KOILDAHY ECKEPTUYIEPII (AHKAIHEMECE IABbIJ) ECTY KABJETIH TGMEHETDI. OIEPATOP KYMBIC AIMAFbIHDA HE 50JIi JXATKAHbIH HA KOCBJMLUA H3AP AVdAPybi KEPEK.ATAHdAMAHbI3 XOHE OPKALJIAH KYMbICKA H3AP AVdAPbIHb3.
- YKCAC KYPANAPDJI XAKbIH XEPIE TIAIADAIHY ECTY KABIETIH 3AKIMDAY KAYTIH XGHE XYMBIC AIMAfBIHA BACKA ADAMAPDPB1H KIPY MYMKIIHIIH APTbIPADJI.
- EKI AOKTAMbIKTbI TYbIN, TENE-TEHdIKTICAKTAhB3.
- APTbIKJXYKTEMJEKACAMAHbI3.APTbIKJXYKTEMETETIE-TEHJIKTIH JXOFALyIBHACEBENBOLyIBMYMKIH.KOJIbEYEJKEPIEDEOPKALLIAH MbIKTbI TYPAHbIHbIFACA K83XETKl3IH3.
KXYPIH3,ELIKAALLAH KYYIPMEH3.DHEEHIN BAPTBIK BOIIKTPEIH KO3FAJIMATbIb8TIJIeKTEPDEAHBIC KAALbIKTbIKTAYCTAHbI3.
TNTICTJXA5dbIKTAPcB3OHHIMELUKKUAHIAICKEKOCNAHb3. - ΘHIM KPYbIbMbIe HELbIP XAF DAIAA 03TEPTIEH3 HEMCE OHJIPYLJI YCbIHbFAH 60JIUEKTEP MEH AKCECCYAPJAPDbI KOJIaHbSAHbI3.

ETEP OHIM KYJANI KETCE, KATTbI COKKbl AJCA HEMECE BIPKEJIKI EMEC DIPINI NANDA BOJICA, OHIMDI BIPDEH TOKTATbIN, 3AKbIMdAIFAHbIH TEKCEPIH3 HEMECE DIPIJINIH CEBEIH AHBIKTAHbI3. KE3 KEJIrEH 3AKbIM TlICTI TYPDE JOHIIJEVIHEMECEOKIINETIKbI3METKOPCETYOPTAJbIFbIMEH AByICTbIPblIyblI KEPEK.
AHAHJIMAIbI 60JIUJEKTEPMEH BAIJIAHBIC KE3IHJDE JXAPAKAT ANY KAVTIH A3AI TY ULLIH, XABIDbIKTbI OPKALJAH TOKTAtbIH3, BATAPEJIAP XINHAFbIH AITbI TACTAHbI3 XGHE BAPILIK KO3FAJIMAIbI bLIUEKTEPIH TOKTAFAHbIH KA3JETKlIH3:
BITEJUYI T3AJIAYHEMECE T3APY AINbIHDA
OHIMDI KAPAYCb3KJALDbIPFAH KE3JE
-KOHDbIPMAJIAPbI OPHATNIACHEMECEAJIITACTAMACBpHII
- OHIMDI TEKCEPMEC, TEXHINKAJIJK KBJ3MET KOPCETTIEC HEMECE XMYBIC JXACAMAC5YPbIH
-JXABDbIKTBH OETTEH TBIC DIPJI BAHKANFAH KE3DE (DEPEV INCTEKLMAIAY KAKET)
Kecy:3.1 KHe 4.2 apaIbIbIbIaIbIcypeTtep
ECKEPTY: Kecy Kypblfbcih Kecy 6eTIHe IaMaMeH 15^ 6ypblTa YcTay Ta TbIpbCbHb3.
- 5yI ΘHIMHIN eH yNKeH Kecy oIuWeMHeH aCaTbIH 6yTaKTapDbI JxMbICTbl 6actamac 6ypbH 6yTAk KbIPKaTbIH KaIUsbIme H Kecin TaCtahbl3.
- KeceTih KpybIbnHb6TaJIb KOpWaydbH HeMece TaI-iiNikTepeiH niUHHe caiKec cbipfby KnmbblImeH kecy 6eTI 6oBImeH xeiJ Nkblb1h3.
- OHTaJIbI Tpyde Kecy yUH IN Kecy Kypblfbcih KO3faJIbIC 6afblHda TEmHe Kapai eHKeiTy YcblHaIbI.
-
Kecy kypbIfbcimHe bip pet ety apkblbl jKymblctbl kblnam opbIHdayfa TbipbcnHaB13
JKeH acbIKnHaB13. -
AaIbIme h eki KaftbH TMeHHHe H Kofapbl Kapa KeciH3. ByI KecinreH KaIdbIKTapdbH aI I KeciImereh aMakKa KyIaybHa Jok 6epMeNdi.
- LJIeTki JkaKapbIH KeckEHHe KeiH Kofapfbl JkaFbHa eTIi3. Kecy Kypblfbcih Kecy 6eTihe IaMameH 15^ 6ypblTa yCTayfa Tlbplcblh3.
- KecineiH aMak y3bH 60nca, JkaKcb HAtnXkere KeTy yuH 6ipHeWe Ke3eHMeH KeciH3; uafBH aMakTapdbI Kecy KymbCTbI OHa aKdTayfMyMkiHik 6pepi.

ECKEPTY: NIIUIHDEY KE3IHNE TPANEURA NIIUIHHE KECY YCbIHbIaIbI. TPANEURA NIIUIHHE KECY OcIMIKTEPdIH TABNFN OCYIHE CAnKEC KEJIeI JXoHE ByTAJIbI KOPLAYdbIH OHTANbI OcyIHE CE6EN BoJaIbI, CE6EBI TPANEURA NIIUIHDEI ByTAJIbI KOPLAYAPdbIH TOMEHI XAFbIHKAOBIPEK KApbIK TYCEDI.
- Erep Kecy KypbIfbcI Xymbcic Ke3iHde Kbl3bIn KeTce, nbIwaK Jy3epiHi iWiKi 6eTepiH MaJnaHbI3.

ECKEPTY: TETICTEN KECY KE3IHNE KECY KYPbIJIfIbICbl BYFATTJALdbI.OCbIJANLIA, TOK KYUJIHE BAMJIAHbICTbl OHIM ABTOMATTbI TYPDE OIIJEII. COHdIbIKTAH AXbIPATbINKOCKbIUtBIs BOCATbIN, TETICTEN KECydi JXAJFACTbIPbIHbI3.
- Bytanapdbkcey k6abfbH Kaibn TaI-wniikTepdi Kecy ywiin 1wMaanda TbIC naaHaHaB3. IIwaK Jy3dePiHne KaNbIKTap 6iteiIN KaIca, aKbpaTbn-KockblWtBi Depey 6ocatbn, 6TaapeJnap XnHaftbH anbln TaCTaHb3.

ECKEPTY: Пышak КУ3DEPI ΚЛI K03FAJIbICTA BOLFAHДA HEMECE TPNITTEP bAcblbT TYPCA, bATAPEJAP XMHAFbIH LbIFAPMAHbI3.
10.Жуmbic Ke3iHne epKaIuaH JKH-JaKaKa yIaTbH KaIbIKTapdHa 6aH 6OJIbIbI3. TikeHeKTI JanaIpaKaTapdbI Kecy Ke3iHne Konfan KniHiz.
PaiJaIaHuaH KeiH: 5.4-cypTe
Ka6bIKbTa3aIan (TexHnKaJIbK bI3MeT KepcTe 6oNiIMiH KapaHb3), nbIuak Jy3epiHi8-ka6bIHbOpHaTbHb3.
BaTapeHbI bIbIapy KHe 3apIaTay:6.1-cpeT KHe 6BaTapeHbI paIaHaHy cKaayIbIbI
- BaTape KyIbH aUydbH 9-TyImeCih 6acbl, 6BaTapeHbI eHIMHeH UbIrapbIb3.
- Lbipt eTkeH dIb6bc ecTImEreHwe, 6aTapeepnap XHaftbH 3aprTay KypblfbcHa KyIbIITay KynHe opHaTbHb3.
- JacbI Tyc JbcIbIbIKtafah Ke3Je, 6yI bTapeRbHbI 3aprIaTalbI XaTKaHbIH KepcTei. JacbI Tyc JbcIbIbIKtaMaJ, TypaKbI JxHaRfAH Ke3Je, 6yI bTapeRbHbI ToIbIK TaIaNFaHbIH KepcTei.

ECKEPTY! BATAPEHbI TPNITEP BAcbIJFAHDA HEMECE IIbILIAK KO3FAJIbICTA BOJFAH KE3DE CAJIMAHbI3 HEMECE LbIFAPMAHbI3.
5. TACbIMAJIAY
Ja6bikhtHemece 6aTapeHb TaCbImaIay eniH3re TAnBc9nI TaIaTapca CKeKec 6nybl TaIan etyi MyMkn. JKeprilkTI epexeJIepdi caKtay ywiH eniH3deri 6nIK opraHaapbHa xa6apLacbHb3. TaCbImaIay Ke3Inderi TempepaTypa caKtay WapTTapb6enIMHe KepctinReH TempepaTypa ayKbMbIHah eUkaWah TbIC 60MaNTbHbHa Ke3XeTKi3iH3.
5.1KABDbIKTbITACbIMAnJAY
5.1-cypet
Ka6bIKbI 0uipin, 6aTapeJnap XHaBH 1bIfapBih3. Ka6bIKbTI TacbImaIamac 6ybpH OHbCbPTTa 2cafTaCybIHb3. OhIMDiApKaWah TYKacbIHah YCTaHb3. OhIMdiABTOKeJIkTepDe TacbImaIIay Ke3HnDE naJa 60NaTBiH Ke3 KeIReH KaTTbI COKbIapDaH Hemece KaTTbI TepBenicTepeH KopFaHb3. OhIMHi CbIPbIn Hemece Kynan KeTneyIH KaMTaMaCb3 etiH3. OhIMDi KYN Ke3i aUbIK TycetIH Jepde caKaTaMaHb3.
5.2 JIHTN BATAPEJIAPbIH TACbIMaJdA
Mamimetepdi any ywiH 6aTapeHb KOnlaHy HycKayIbIbIH KapaHbI3.
6. KbICKAДaIbIHdAY
6.1-cypet
BaTapeHbI JxabDItaH aXbIpaTbIHbI3.
¥3ak yaKbIT caKTay anDbHnda 6aTapeRbHn naDanaHy JxHiDi eri HcckaybIka 6epilreH Ncaynapfa CneKC 3aprTaHaBHa K93 KeTki3iH3. TMeHderi cKaTay 6oBbHwa 6epilreH 6apblk HcckaynapdbOpbHdaH3. OhIMdi IwAHn KoprFay yUHn TYNHYckaBlk KaNTaMaHbI KOJdAHyfA HeMece Tnicti WSybepeKeHn Hemece KaNTaMaMeH Xa6yFa KeHeC 6epem3.
7. CAKTAY
Kabik neh 6aTapeHb Ta3, Kpfak, JeJeTeJitEn Hjepde 4C XHe 24C TemnepaTpyanap aapanbfbHda Jxhe 6aIaIap MeH 6iIKtiniri JOK aIamap Ja6dbkkA OHa J kon KeTki3e aImaHTbH Jepde caKaTbH. KocbIMwa KopfahbcItb KaTamaCb3 ety UwIH Xa6dbkTbJ xa6bHb3. Ohimdi IuaHHaN Kopfay YIiH TynHcKaNbIK KaNTamaHb KonJaHyFa HeMece TnicTi WByepeKnH HeMece KaNTaMaMeH Xa6yFA KeHec 6epem3. TacbImaJday Ke3IH De KypblHbMInDeTT Type6ektiH3.
7.1JXABdblKTblCAKTAY
6.1-cypet
BaTapeHbI Xa6DbIKTaH aXbIpaTbIH3. CaKtMaC 6ypbH Xa6DbIKTb CbIpTTa 2 cafA cybTbH3. BaIanap Hemece ocbI ΘHIMMeH TaHbIC eMec aIaAMap ETKip nbIaak Kx3depiHe KOJ KeTki36eyi YsiH nIbIaK Jx3depiH iN Xa6bIHbH OPhaTbIH3. KypblfBiHbH To3FaH, 60c Hemece 3aKbIMdaIaNFAH 6eJIkTePiH MyKnIaT TeKcepH13. CaKtMaC 6ypbH Xa6DbIKTb Ta3AnaHbI3. ΘHIMDi KYH Ke3i aIbIK TycetIH JepDe caKaTamaHbI3. ΘHIM YHE Mi cybIKTaH XaHE bINFaHaN KopfAnfRaHbHa Ke3 KeTki3iHi3.
7.2 JI NT N BATAPERJIAPbIH CAKTAY
6.1-cypTe
BaTapey KyaTbI 6BaTapeyHbIH naJaIaHaHy HcyKaYbIbHnda KePceTIJreH deHReIe CaiKeec eKeHHe K3 JekTeK3iHi3. MAnimEtTepdi any yuHb 6BaTapeyHbKOJaHaHy cyKaYbIbH KaPaHb3.
8. TEXHNIKAJIbIK Kbl3MET KOPCETY

KAYIIT! 3JIeKTP TOrbIHbIH COFybl CAJIdAPbIHAH JAKAPKAT AJY KAYII.
OHIMDI PETTEY,ИHCNEKUNIAJAY,TA3AJAY HEMECE CAKTAY AINdbIHDA,BATAPERJAP XMHAFbIH LdbIFAPbIHbI3.
8.1 T3AJIAY
(5.1) XeHe (5.4) apaIbIbIHaIaIbI cypeTTeP
ДыIMкьл,ЖмсakшубepkeннКорпспнПлacTKTeнЖацлfан КурмдастдуСутTiH3. Пл actKTeHжacalfah KopnycTa HeMece Kypamdactapda KywTi epitkiTepdi HeMece Jybl 3aTAPbI KOnlaHa6bH3. Keibip Ta3anaftbI 3aTATp 3aKbIM KeNTipy JxHe eceHripey KayinH TydbpybIMYMKIN.
8.2 KY3ДЕРДI TАЗЛАY
5.2XaHe 5.4 apanbifbfHdafbIypeTTeP

ECKEPTY! KECY KYPbIINfbcIMEH XyMbIC ICTETEH KE3DE
XHE OFAH XAKbIH XEPDE KOPFAHbIC KOJFAITAPbIH KNIH3!
KALIBKTAPdbI XOIO YUINH UETKA HEMECE AFAU TARKUA
CMAKTBI TNICTI KYPaJIdAPdbI KOJIANbIHbI3! TEK
KOLbIHbI3BEH XyMbIC ICTEMEH3! KECY KYPbIINfbcIH
AYbICTbIPY bIIIKTI MAMAHMEH OPbIHDAJybl KEPEK! PbILJAK
Xy3DEPI TEK XOHNEY KbI3METIMEH HEMECE TMICTI bIIIKTI
MAMAHAPMEH XOHIDJIY I HEMECE KAIPAJIybl KEPEK!
Пьшakтbing 2-ж3IH Ta3a api KaIdbikTapbl KaImafah Kynde caKaTahb3. KecilreH KaIdbikTapbl Ta3anaHb3. Kecy eHIMdiiriji Xofapbl 60nybl ywiH nbIwaKaTbH 2-ky3iHe a3 MJIwepde MaJnaFbUWbTI (MaIbp Ta3apTkblTbI) XaFBHb3. Пьшaktbing 2-ЖY3iH etKip Kynde caKaTaHb3. To3bI KetKeH Hemece 6yniHReh Kecy KypblfcbH 6ipDej KaHa TpyiHe 6iIKti MAmAH aybcTbpybl Kepek.

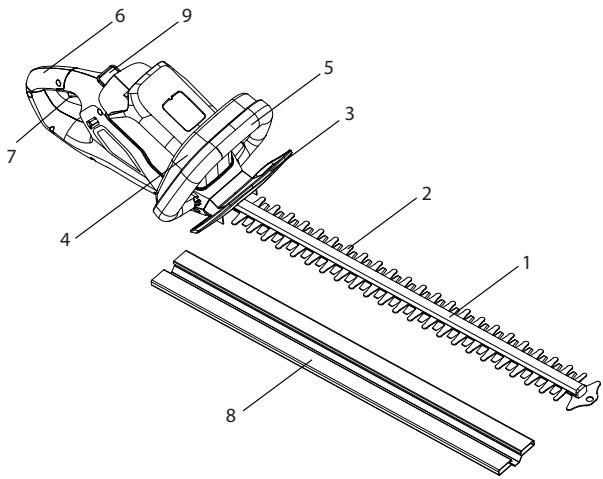
8.3 BÖNJLJEKTEJIΓEH KÖPIHICI
| Поз. | СИПATTAMACы | Косалкы бенисторди Жарамдальк Мерзимi | CAHы |
| 1 | Декоратовский XXабын | 1 | |
| 2 | Ахсыранын-коскиш | 6XXыл | 1 |
| 3 | Тригэнддсрппс epinпe | 2 | |
| 4 | Байланыстырфыш сым | 1 | |
| 5 | Ахсыранын-коскиш Тригэнрì | 1 | |
| 6 | Калпьина келтіру сэрп neci | 1 | |
| 7 | Сол жak корпuc | 1 | |
| 8 | Злескоюндану Кчрмдастap | 6XXыл | 1 |
| Поз. | СИПATTAMACы | Косалкы бөлшөгтөрдін Жарам'dылік мерзімi | CAHы |
| 9 | Тутka кураздасары | 1 | |
| 9.1 | Өздіrinен Тeckіш 6уразнда | 4 | |
| 9.2 | Сол жак 6bacna Тaктасы | 1 | |
| 9.3 | Он жак 6bacna Tɑктасы | 1 | |
| 9.4 | Ал'dынfvы Tутka | 1 | |
| 9.5 | Ту'me сэрп neci | 1 | |
| 9.6 | Ал'dынfvы Tутka куразы | 1 | |
| 9.7 | Корfasныс куразы | 1 | |
| 9.8 | Өздіrinen Тeckіш 6уразнда | 2 | |
| 10 | Буfasтын Шьогу Ту'mechi | 1 | |
| 11 | КозfaNTьш дірілін тәmen'detetiH Жа'tькшa | 2 | |
| 12 | Алattык TOKТау ожырарын-КOCKьшы | 6 жыл | 1 |
| 13 | Басна Тɑктасы | 1 | |
| 14 | Өздіrinen Тeckіш 6уразнда | 1 | |
| 15 | КозfaNTьшТын 6эсeн'deТкіш Корабын кураздасары | 1 | |
| 15.1 | Шаftын 6эсeн'deТу КозfaNTьшын Кураздасары | 1 | |
| 15.1.1 | КозfaNTьш кураздасары | 6 жыл | 1 |
| 15.1.2 | Tic'tdoнfasлak | 6 жыл | 1 |
| 15.2 | 1-Tиптіmetалдан жасалmafah салынбалы aI'llkbyрны 6уразнда | 2 | |
| 15.3 | Бэсэн'deТкіш корп | 1 | |
| 15.4 | Куразмны Tergic bactneektін уш тасілді Жинak 6ураздамасы | 2 | |
| 15.5 | Моь'tintipek | 1 | |
| 15.6 | Өс куб'tyтiri | 1 | |
| 15.7 | Tic'tdoнfasлak | 6 жыл | 1 |
| 15.8 | Шыfcbic 6ilik | 1 | |
| 15.9 | Моь'tintipek | 2 | |
| 15.10 | Улken жetektін Шьfcbic кураздасары | 1 | |
| 15.10.1 | Шыfcbic 6ilik | 1 | |
| 15.10.2 | Tic'tdoнfasлak | 6 жыл | 1 |
| 15.10.3 | Зкcentprпк Берлис | 2 | |
| Поз. | СИПATTAMACы | Косалкы бөлшөрдін жарамдылік мерзім | CAHы |
| 15.10.4 | Пышak жузінін күрамдасары | 6Жын | 1 |
| 15.10.5 | Жузіді такta | 1 | |
| 15.10.6 | Тысыздіры | 1 | |
| 15.10.7 | Бекітіш | 2 | |
| 15.11 | Уйkeлісбась материал | 1 | |
| 15.12 | Моьыntіpek | 1 | |
| 15.13 | Жавын | 1 | |
| 15.14 | КіPEC тәрізді тERCіstін кіланецінін эздігінен ТECіш 6ураздасы | 4 | |
| 16 | Пышak жузінін жавыны | 1 | |
| 17 | КіPEC тәрізді тERCіstін кіланецінін эздігінен ТECіш 6ураздасы | 2 | |
| 18 | Өздігінен ТECіш 6уразда | 15 | |
| 19 | Он жак корпунс | 1 |
8.4 AKAUYAPDbI XOIO

KAYIIT! 3JIeKTP TOrbIHbIH COfybl CAJIdApbIHAH JAKAPAT AJY KAYTI.
ECKEPTY!AKAYAPbI KOIMAC bYPbIH,0HIMDi OLLIPIH3.
| Масellenер | Болжалы сбенитepi | Шебим demр | Каскеттби 6иikтініk |
| Фенім іcke Косьлмайды | Батеря кayіnciiz emec Куіnde | Батерялар жинаftынін KayinciizdɪgɪnTekсeper Ушін 6атерянін Жоогары каflындafbl bICырмалapdlnH opнын бекітілгehініе кe3 Жeteкізінiz | - |
| Батерялар жинаftын КуаТы JжOK | Батерялар жинаftын Улгідігін HUCKaynlkKa сэйес зapідтаныз | - | |
| КуаТ/Жылдам'dык Косьлмайы ΘLlIPyЛ Куіндe | Кocу/эшіру щьыртін- Косьлмайы 6acblыз | - | |
| Батерялар жинаftы Дурьссбекітілmerгін | Дурьссбекітінiz | - | |
| Маселенер | Болжалды сбенитepi | Шебим dem | Кожевп 6010000000000000000000000000000000000000000000000000000000000000000000000000000000000000000000000000000 |
| Фаним icke Косьлмайды | Косу/оширу косьлшы Косулы Кшие ophaылмафан | «Онимdi icode Косу» Тарын Караныз | - |
| Еki щьратын- Косьлшын bideу fана Косулы Кшие ophaылады | «Онимdi icode Косу» Тарын Караныз | - | |
| Iшк iбелшекер 6улиген | КозfantКышту eширin, батарейни Stыл�огарынбз Жэно жабдыкты Tekсеріи3.Жабдыкты Жэндан | Бекитлген Жэндан optaныылфы | |
| Жадьк жогары Жылдамыкpen дipиндii | Пышak Тete-Тechдirig сakталмafан Немес ТоЗган | ПышakТы aуыстbing�ыз | Бекитлген Жэндан optaныылфы |
| КозfantКыш 6iliri 6уралган | КозfantКышту eширin, ЖабдыктыTekсеріи3. ЖабдыктыЖэндан | Бекитлген Жэндан optaныылфы | |
| КозfantКыш ЖуMbIC keziнde ТOKтайды | Бутakтардин Калындыfc сынbIMынблктан acbln Tucei | Тек сын IMынлбдыfc сaykec kejetih 6утakтардиь kecihi3 | - |
| Батaperя зарды Тayсылфан | Батaperяны Каят Зардынbl3 | - | |
| КозfantКыш Косулы, пышak жузdepi Козfantмайды | Жабдык 3akыдалган | ЖабдыкТы пайдаларбдыз Жэно Кызmet Корсету optaнызы хабарпасныз | Бекитлген Жэндан optaныылфы |
| Пышakтap 6itelген | Батaperялар_Jжинагын алын Тастаньз, сда Көйн пьшakтарды 6iteлүдөн taizaanbly3 | - | |
| Буталы Коршayларды кся Ксяндужбды ЖуMbIC kehenтeh ТOKтайды | КозfantКышшamada Тыс чуктелуі Mymkін | Жабдык_Jжинагын ТOKтayын, каяда iccke Косу ушін 3 мінут КУтінiz | - |
| КозfantKыш Кызвп KeTyi Mymkін | Жабдык_Jжинагын ТOKтayын, Каядалары Салкындаырп, Каяда Косынbl3 | - | |
| Батaperя Кызвп KeTyi Mymkін | Жабдык_Jжинагын ТOKтayын, Батaperяны Салкындаырп, Каяда Косынbl3 | - | |
| Mбeеленер | Болжалды сеBERTepi | Шебимер | Кашитiti 6iniktinik |
| Өнім Куаты Толык пайданылмайды | Баразецар кинанынс сыныIMдылбы Тым Төмэн | Баразецар кинанынс заярдтүлүз | - |
| Желдety санылayлары 6iTeлген | Желдety санылayларын Тазаллүз | - | |
| Шamадан Тыс дірін нemecе shу | Буразданар/COMындap 6ocan keTTi | Буразданар/COMындарды Тыfыз 6ekitini3 | - |
| Жавдык 3akbIMdallfaH | Жавдык 3akbIMdallfaH Пайданарбынд3 Жене кызmet КерсETY орталылbingа хабарласынд3 | Бекитіrelен Жендey optalibfy | |
| Өніm куmbicbl Кeнетten TOKтды | Баразецар кинанынс Зapяды Тayсылды | Баразецар кинанынс шыларынд3 кэне Зapядтүлүз | - |
| Бaразец Тым bICTbIK | Баразецар кинанынс шыларынд3 кэнe Салкындтүлүз | - | |
| Кесу кажетіншe орынданмäды | Пышak куztderi Тозган/ ЗakымдаллfaH | Пышak куztderiH aybICTbIPbIb3 | - |
| Пышak куztderiNe Tot 6ackaH | Баразецар кинанынс шыларын, apнайы Майmen Майлар, ЖуztderiH Тазаллүз | - | |
| Бутakтардын Калындыfы сыныIMдылбытAN acbIN Tucezi | ТЕK СыныIMдылбИККa сәйkec KeletіH 6утakтарды Keceɪiz3 | - |
8.5 ΘЛIMME ΘKEJIETIH KAFДАИAP
| Масellenер | Шебимдер |
| ЖуMbIC KeziHdeжабыктан ТУТИн ShыIfaы | ЖабыкЖуMbICbIH Depey TOKTaTbIHbI3, 6ataperaJapЖиHaftbIH ShbIFapbIHbI3, с overdан КeiInн Кыl3MeT KерсETY opTaIbIFbIHa xabapnaCbIHbI3 |
9. Kbl3MET MEP3IMIHICHOHbl

3Jektp 0HIMdepdi TpyMbicbIK eHIMdpeMeH bipre KOkblcKa naKTbipyfa 6OImaHbI.
KoJaHaBnFaH 3JekTp 0HIMdepdi 6OJIeK KINHa, apHaNb KaIdbIcTapDb JxHAY opbHapbHa TaTcBpy KepeK. KaTt aEhDey 60bHwa KeHeC any yUwH xepriikTi 6NIk opraHdapbHa Hemece dInepre xaabpIacbHbI3.
10. KENIIIK
10.1 bI3dIN KENIIIK
STERWINS əHimdepi TyTbIHybIJaP ahpIbHa apHaIaH eHIMdpeiH JxofapbI cana cTaHdapTTapbHa caikec xacanfAH. ByI caty keiindi IeHIMdi catbn anfah KynHeh 6actan 5KbIb6oBbJ kapaMdb6oIaDb. ByI keiinik aykbIMbHa MaTePnAaDapdbH XeHe eHdpicTiH 6apbIK akaynapbi Kipei: 6onwekter MeH 3JeMeHTepiH 60maybl XeHe KaIbITbI naIdaanhy kaiaibHda naiDa 6oNtBn 3akmbdAp. Boiwekterdj KeHney XeHe aybcItby 6actankbI keiinik MEPiMH 3aptnaDb. ByI eHIMdi catbn any XeHe catbn any KyHi 6oBbIHpa pactay KxKaTTapbH YcbHybIb3 KaXeT. Keiinik Mep3imi ByI eHIMHI KyHbIme HweKeTenei.
10.2 KENJIJIIKKE KIPMEI TH XAFDAIAP
Byn Keninik eHIMHIN dypbic naHdaanbImaybHaH TybHdaFaH mecenelep Meh KaTaNapdbKaMTbMaMiaBc.KeNeci 3neMeHTep KeiNdiKke KaTnaDbI:
-KypanDypbicKoJdaHbImMaHaH;HeMece
-БулэндiTаьмалдay HeMece opHaTy Ke3iHne 3aKbIMap paIda 6oJIbI; HeMece
- YsHInSi TapaTapMeH opbHdAilfah 6oIuKeKTePdi XeHdey XaHe/Hemece e3repty; Hemece
- CbIPTkbl ΦaKTopnapdbIH acepHHeH HeMece KYM HeMece Tac cnKaTbI 60rDe 3aTTapDbIH TycyIHeH 3aKbIMapdbIK naJa 60Nybl; HeMece
- Kayinci3ik TexHnKacbI MeH naiDanaHy XeHInDeri HvCKayIbIKtBi caKTamay caIapBHaH 6oIaTbH 3aKbIMdAp; HeMece
-Kypan 6eIeKTeIReH HeMeCe aIbIraH; HeMece
- Kypan nbimkbin opTada 6oJIbI (LbIK, JKHbIp, cyfa 6aTkHaH...); Hemece
- KyaJn KaicBn MaKcaTTa KoIJaHbJIHaH; Hemece
- Kypan «caK'Tay» TapaybIHa KepcetiIreH ayKbIMHaH Tbc TeMnepaTypaFa YbipaDbI
HIM KaIbINTbI naIdaIaHy KaTaNbIHDa JHe Kc6iBmEec MaKCaTTapDa KOJIaHbIyIkepeK. CoNdbIKTaH, 6yI KeiJIikke 6ak KomNaHnIapbI, JepriIKti 6NIk OprHaIapbl, coHdaiak, aKbIbI bJxanlay HeMece Jia6DbIKbI aKbICbI3 JkaIIFa 6epydi YcbHaTbH KomNaHnIap naJaIaNaHaTbIH eHIMdep KIpMeiDi.
Mace He Mece akay naJa 60fHaN XaFdaIa, Ke3 KeIReH yaKbItTa Sterwins dInepiHeh KeHec anyfa 60ana.KeTereH KaFdaInapda, Sterwins KOMnAHHcbHbH eKildepi MaceHe IeWe aanaBHe Mece akaydbTy3e Ta anaDb. LIoT fakTypaHbHe Mece Ty6ipTeKti caKaTahB3: 6yI KxKaTAP Ke3 KeIReH 7aFbIMapdbI Kapactby Ke3IHte Tana erinei.

Bctyn
Дякуема 3a Te, со ообалп си псстри. Haа Ka'mpania розрбгЯ ta BurotoBЯnpodukciю ta doklaada BCix 3ucnlb Дяloro, sO6 3a6e3neuHTI II BiIMHny kicTB BiINOBiHDo BmOR KOpNCtvyBaivB. BkOpncTObyTe daHI iHcTpyKciII, cO6 npOdoBxHTn Tepmin ekCpIyataaII npCtpoIO
BAJKINBO!ДЛЯTOGO,単OB HANALIHTYBAHH, EKCJINYATAUJA TA OBCLYTOBYAHN YIBOYO INPCTPOIO HE BKNIKKAIJ XOJDHIX NPOBJEM, PEKOMEHDOBAHO YBAXHO INPOUYTATNI CEIN POCIBHK DO NOYATKY POBOTNI 13 INPCTPOEM. 3BEPTAITE YBARY HA OCHOBHI 3ACTEPEXJEHHI ZOIO TEXHIKIN B3IEKN B CbOMY I NOCIBHKY I 3BEPIAITE NOCIBHKДЛЯ NOДJIbILOTO BUKOPUCTAHN.

BAЖЛИВО! 3БЕРΙΑΥTE ПОСΙБΝΚ ДДАПОДАльшOTO ВИКОΡИCTAHΝΗ.
PEKOMEHIOBAHO YBAJKHIO PPOUYTATN
1. BKNKOPNCTAHHЯ AKUMYJIaTOpHIX HOXNUcIb IJIaPiDPI3AHHЯ KINBOJLOTy 60 CM
Ley npncptpi npn3haeHH nI BVKOpncTaHH BKNIOHHO HaB0pi; 3a 6ydb-kynx 06ctabHH 3a6ofoHeBOVKnOpncTOByBatn Ioro y npmiueHHx. AkymnyTopHi HOKNUI dJI Npdi3aHHN JKBONlOTy npn3HaeeH IINe DJI BVKOpncTaHH y cyNX i do6pe npobITpOBaHNY yMObax. BOH npn3HaeeH IINe DJI NpDi3AHH JKBONlOTy, KUcIB i vaarapHKnIB Y domaunix caJax. He BVKOpncTOByTe npncptpi DJI INHX uInx uIne, OKpIM 3a3HaueHNX. Heo6XiHo DToPmByTnC8 o6mExeHH UOdo MaKcImaJIbHOi piaJIbHOI 3dAthocTI. He CnIIIOte rIkn, DJIra kNx nOtpi6Ha piaJIbHa 3daTHicTB, BUNa 3a Bka3aHy. He BVKOpncTOByTe npncptpi DJI INHX uIne, OKpIM 3a3HaueHNX. UIM npncptpoem He MoxHa KOpncTyBaTnC dITam a60 OC6am 3 o6mExeHHM fIChuHMn, PO3yMoBUMn Ta ceHCOPHHM moKlnBOCTaMn. Ley npncptpi npn3HaeeHH nI BVKOpncTaHH BpyHy. 3a 6ydb-kynx 06ctabHH 3a6oPoHaeTbcBCTAHOBLOBATn Ioro Ha BepCTat qH InSy onOpy.
Poc3kpTTy ynaKyaBHHnpekeHaTecra, 10 npncTpii yKomnIeKToBaHO BcIM Heo6xHnM npilaam (kUO take nepeD6aueHo). KUO npucTpi nouKOJxHe a60 Bi Mae 6bI-aki defeKTn, nobepHiTB Ioro nocTaaybHNky, He BnKOpNCTOByOuN. kUO BN pepeaTe uei hCTpyMeHT dJa BnKOpNCtAHn iHsIm Oocabam, TAKX nepeaTe im uei noci6HnK 3 ekCnPyataii.
3BepHt b ybary, 0o HaWe 6bHaHn HHe npn3Nauehe dIg KomepuHoro, npopeciHoro Ta npomncIbOBO BnKOpncTaHH. JaIoo Ioro 6yde BnKOpncTaHO dIra BnpIeHHN 3aBdaHb KomepuHnx, npopeciHnx Ta npomncIObx NiIpncMCTB a6o 3 Ihuoi NpOio NpOio MeTOIO, rapaTIO HA 6bHaHnH 6yde cKaocBaHO. Cei npucptpi Po3po6neho dIra EKcnnyataii npotarOM 6 pokIB (oukybaHm CTpOK cnYk6n).
2. IHCTPYKlii 3 TEXHIKNBe3NEKN

OBEPEXHO! IPOUHTAITE BCI 3ACTEPEXEHH NIOIO BE3NEUHO BMKOPNCTAHNA T A BCI IHCTPYKLI. HEJOTPUMAHN 3ACTEPEXHEb TA IHCTPYKLI MOXE IPN3BECTIN DO YPAXEHH EJEKTPNUHM CTPYMOM, IOXEXKI TA (ABO)CEPH03HIX TPABM.
YCI 3ACTEPEXEHH RA IHCTPYKU HEOBXIINHO 3BEPITN IJIPOJALbIIO BVKOPNCAHNIA.
2.13AΓΑJBHI 3ACTEPEXΕΗ ΚΕΧΙΚΟ ΒΕΜΙ
3A50POHAcTbCAIPIALOBATIN13AKYMUYIATOPHMMHOXMILMIMIIITPII3AHJXJNBOPTNOYIOBIM3YCKJIHNKOOHCTPYKLI,ABOTMOBILIB,BAHTAXJBOK,BIKOHHXIPRMAKIB,VBXOJDIT.H.,HEPEBIPMBLIMHAPPMOKTAIDHH.
HE DOKIADAIHTE HADMIPHY CNLY TA IPEPBAAHTAXUYTE IX.AKVMYIATOPHI HOXILI DIIAIIPI3AHN JXMBOIPOTY IPAUHOBATIMYb KPALLIE TA BE3TIE4HILIE 3I LIUBINKICTIO, HA RKY BOHPO3PAXOBAHI.
- AKLUO IPIPCTPIY UYE 3IBPAHO, IPEEJI NOTO BHKOPNCTAHHAMIPEEBIPTE, YHI HADJINHO 3ATAYHTO BCI FBNHTN. AKLUO IPIPCTPIHEOXJDHO 3BUPATN, TICLIA BIDKPNTTU YIAYKBAHNNI PEKOHAITECE, LIO B KOMTIKETI MICTA TBCI HEOSXIDNI DIAN HAIALLUTYBAHHKOMTNOHETN. AKLUO IPIPCTPII NOLIKODXEHO ABOBH MAC DEQKTNIPOBEPHITb ITO DO HAIBJNXOTO MATAINHY, HE BOKPNCOTBYOHU.
- TEPMIH (EJIKTKPOHCTPYMEHT) y IOTIEPEJXEHHX O3HAUAG IHCTPYMEHTI3 XWIBJEHHAM BID MEPEXI (DPTOTOBIW) ABO BID AKUMYITOPA (BE3DPTOTOBIW).
2.2 CUMBOJN HA IPIPNCPTOJI
4.3 IEPLIIE BKNOPNUCTAHN
Ipebipka akymyrtopa: iinoctpaia 2.2

OBEPEXHO! IEPUHIX KOPNUCTYBATNCA ZMM PNPCTPOCM, O3HANOMTECJ 3 PO3IIIOM «IHCTPYKUII 3 TEXHIKN B6E3NEKNI HA IOYATKY UBOFO ITOCIBHNAKA, A TAKOX IPOUYTAANTE BECb TEKCT IIID BIINIOBIDHM IIN3AOTOLOBKOM.

HA MOMENT ПИДБАнг АКУМЛЯТОР 3APДЖЕНМ HE NOBHICTIO.
ПЕРД ПЕЛSMВИКОPGИСТАHHЯМ ИСТРУМЕHTA YCTAHOBITБ AKUMYЛТOP Y 3APДHМ ПИСТПИ I NOBHICTU 3APДITb MTO.
IpeIe BnKOpncTaNH npictpoIO nOtpe6ye oO6JIbOoi yBaHn: npaIouOu 3 Hm ynpse, nobHicTo 30cepeBtecra Ha nocTabJeHOMy 3aDbAHHi. IJRA nepLooi cnpobn Bn6epiTB bInbHe MicSe 6e3 nepeXko i ppeMeTIB OTOeHH.
4.4 EKCIJIYATAUJIA
3anyck npictpoio: iInoctpaizia 4.1
Ipeep 3anyckom akymyJIaTOpHi HOxNci IJn iJpi3aHnn JxuBOJIoTy nepekoHaTeCey, 0o BmNKau7 I3anobixKnBmNKau4 BInbHO pyxAHOcBcA, IBNDKO iABTOMaTHO NOBepTaIObCn iJicac BiDnyckAHn. TaKox nepekoHaTeCey, 0o BeHTNJLJIcHI OTBOpH He 3akpNTi, a peepdHny pkyoRTKa 5 i 3aHnpykOaTKa 6 uCTi Ta cyXi. PepekoHaBUnCb, 0o akymyJIaTOpHi HOxNci IJn iJpi3aHH N KIBONlOTy He demOHCTpyHO JxODHnx O3HAK POJKOJKeHb, BCTaBTE NOBHICTHO 3apJxKeHn akymyJIaTOp y CTNUBaJIbHn NOPt PnCtpoD Do KnaCaHHe. NotIM MoKHa nepexoDHTNo iJpi3aHH N KIBONlOTy.
TpmaTe npncTpi OndHIO pykoTo 3a 3aHIO pykOaTKy 6, a iHIOIO - 3a nepeHIO pykOaTKy 5. Lio6 yBIMKHyTN npncTpi, noTpi6HO oNDohUacHO HaTNCHTN 3aNo6iJHKn BUMNKa4 4 i BUMNKa7. Iic qac pObTo 3abXdi TpmaTe akymylTopHi HOxuI dIra IIdpiaHH JKBONOTy 60ma pykAmn.
BukopncTaNnH npncTpOIOJIIOCTpaiz 4.2

YBATA! O6OB'3KOBO HADRAIte 3AXUCHI OKUYIAPN. HADRAIte
ΦIJIbTPYBAJIbHy MACKY, KOJI N PPAUHOCTE B 3AINIEHOMY
CEPEIOBNIUI. TAKOX PEKOMEHNIOBAHO BNUKOPUCTOBYBATNIIXOJIAI PYKABUNI TA 3AKPNTE B3YTTR.
OBEPEXHO!Y DEKIXX KPAIHA ICHYOTb TPABIMIA POBOTN 3I CTELIJIbHIMM INPOUYKTAMN, A TAKOXINOTb OSMEXEHRA LIOIO IX BVKOPMCCTAHNA 3A CTELIJIaBbHMIM INJRMN ABO TOIMHAMN HA IOBSY.CNIUYITE TPABIMIAM, LIO5 3EBEPITATN TILUY I CTOKIV, A TAKOX YHKHTN ADMIHICTPATIBHNX TPABOIPONYLIEHB.3EBPHCTCA 3A DETALBHOI HOFOPMAICIGDIO MlCUEBXN OPAHIB BIAIDN.
P06OuI FOIMHIN - PIIAUOBATN 3 PIPACTPOCM CIIIDIILIEY IPIINHHTI FOIMHNIOBn: HE BIKOPNCOTOBVITE NOTO PAHO BPAHLI, PI3HO BBEUEPI A6O IIYAC BIXIDINX ICBRTKOBNX DHB, KOJIU CE MOJE TIOTYP5BYATN IIODEI, LIO OTOUYOKTB BAC. OSHAOMTEc3 M1CLEBMIM 3AKOHODABHMN OBMEKEHAMN
HEKCNPIYATYITE PIPCTPII Y BIVSYHOE63NEUHITAMOCΦEPI.
HAMATAITECEAHEIIPAUOBATIN13TPNCTPOCMNTUACITIOAHOTOIDMOBBOKOLIMMOE CNTAIAXVBATIN BIMCKABKA.HEKCIYATYITE PIPNCTPI3AHENOCTATHBOOOCBITIEHHN.OTEPATOPIOBUNEH YITKO BAHTINPOBOUY 3OH,LI05BHACHO BMABNTIPTEHJHNY HEBE3NEKY.
BVKOPNCTAHH3AC0BIBIIN3AIXECTVOPAHIBCTYXY3HHXYG 3DATHICTbUHTN3ACTEPXHEHH(KPKNTA CNTHANTPBOTN) OTEPATOPIOBINEH BYTN HAD3BNUAYHOYBAHXHMDOBCBOFO, LIO BIDBYACTbCSBPOOCH3OH.IHE BIDBOPIKAITECnTA 3ABXIM 3OCEPEDJXUYTEcH AIOCTABTIEHOMY3ABDAHHI.
- KLIUO XTOCb IPIAUIOC 3 TAKIM CAMM IHCTPYMEHTOM IOPRJ13 BAMN, LIE 3BJIbLIYc PIM3IK YPAXEHH CNYX; KPIM TOTO, IHLJIIIOI IOTPAJIITb Y BALUY PO5OUY 3OHV.
CNIIDTBEPOCTOARTNHAHOHAFXIITPIMYBATNBAIANCA
HEHAMATAMTECEIOTARHTYNTCSIOUJI. TAKIM YINHOM BN MOXETEBPATWITBALAH.C.BUYDE TE DYYKE OBEPEXHMNI, KOJN CTOITE HA CXMIIAX.
- YKODHOMY PA3I HE CNTI BITN. HE HABNIKKYITE BYD-JAKI YACTMH BALIOTO TIIA DO PYXOMX YACTMH IPICTPOIO.
HE BIVKOPNCTOBVITE PIPACTPIJ,AKLIO DO HbOT HE IINEOHAHO BIDIOBIDHE PIPNAIDIA.
3A50POHOYACTBCAYb-RAKIM YHOM 3MIHIOBATN IPIPNCPIA ABO BVKOPNCTOBYBATN DETALI YI PPMIAIDRA, BIDMIHHI BID PEKOMEHNDBAHNX BIVO6HNIKOM.

KLIIO IINCTPII YIAB,IOCTPAXIAB BID CNJIbHOY UAPY ABO IOUAB HENPIPOJHO BIBPYBATN,HETAIHO BIMKHITB MOTO TA NEPEBIPE HA HARBHICTb NOLIKOJXEHB ABO 3HAUNDITb PPNHUY BIBPAUI. Y.PA3I BYIb-RAKNXIOLIKOJXEHB HEOBXIDHO 3DIINCHNTI HAIEXHM PEMOH ABO 3AMIHNTI DETAJI B ABTOPN3OBAHOMY CEPBICHOMY CEHTPI.
ДлгЗИКЕНHApy3NKUTPABMYBAHNAYePE3 KOHTAKT 13PYXOMMIMU YACTINHAMC CIIID O5OB'3KOBO BIMKHYTN INPCTPII3HRTN AKYUMYJTOP I IPEKOHATNC, LTO BCI PYXOMI YACTINH3YUNHEHO.TAKI DII BYKOHYOTcB HACTYNHXBNTADKAX:
- IPEDEOUYLIJIEHHMAOIPOUWLIJIEHHymyPA3I3ACMIUEHHHa
-KOINIOTPIBHO3AINIULHTNIPTNCTPII6E3HAGJYD
Piipri3aHH: iIIOCTpaiaB iD 3.1 do 4.2
ПРМITKA. HabarayTecra TpMaTu pIXyUH iHcTpymeH TiД KytOM npu6Jn3Ho 15°do nobepxHi 3pi3aHHa.
- Пелег поатkom роботи 3разпгіеі видаліті гілкі, до пелевшиуюті різальну 3даTHICTь. цbero пистою з дочиморю відnobідно сека_TOPа.
- Nobilbno nepemiuye pejyuhi nhtpymEnT no pijyuien nobepxhi po3MaunCTMn pyxamn, noBTOHQUH opmy KINBOONIoTy a60 Kyuib.
- PeKOMeHnyETbcra pObHTn HeBEniKn Haxn pIXyUro iHCTpyMeHaT a OHN3y B HaprMky pyx yI ONTmAlNbHOI npOdyKTNBHocTi pi3aHHJ.
- He nocniuaiTe i He HamaraTecra 3pi3aTu 3aHaTo 6arato 3a OOnn npoxiD pixyuro iHCTpymeHTa.
- CnoaTky 3pi3aIte BiD HnKhbOro 3pi3y Do BepxHbOro 3 06ox 6oKIB. Lc 3anobiratme notpapnnHHIO o6pi3kIB Ha dIinHKy, kky lu e notpi6HO niip3ATN.
6.ПicIЯ NiIpi3aHnH 6iUHnx CTOpI IN pIncTynaiTe Do Bepxib'Ha. HAmaraItec TaPIMaTI pIXyuH iNCTpyMeHT NiI KytOM npIbIa3Ho 15"do nOBepxHi 3pIaHH.
7.Дяdo柴rHeHHKpaUTope3yIbTaTy po3diIiTB niDipi3yBaHHa Ha deKeIbKa eTanIB.ЯкutoДiInHka,якnoTiPioHo NiDiPi3aTu,OCo6nBO DoBra,Дpi6HiWi O6p3kn Do3BoJrTb IerKOBnTOBnTu KOMNCT.

IPNMITKA. HAMAGAITECA HADABATN PPN IIPPI3YBAHHI OFOPMY TPAPEUII. PIIPI3YBAHHY FOPMI TPAPEUII BIDIOBIAE PPNPOHOMY POCTY POCINH I PPN3BOINTb IO ONTUMALHOPOCTY XNBONLOTY, TAK YK PPN CbOMY BILBE OCBITIEHHI NOTPANIE HA HNXHIO YACTNUHY XNBONLOTY.
- 3mauyeBHyTpiriHn NobepxHi pi3aIbHoro nolToHa, kKuo pIXkyuH iHctpymeHT neperpiraebTcR niD uac po60Tu.

ПРИМITKA. ПИД.YAC ПИДП3AHня PIЖучи INCHTPYMEHT MOKE BLOKYBATNcA.TAKIM YHOM,ПРИСТПIN ABTOMATNUHO BIDKJIIOHTbCЯ YEPE3 HADMIPHm CTPUM.TOMY BIDNYCTITb BIMNKaU,ANOTIM HATNCHTbNoO3HOBy,LIObПROIOBxNTI ПИДП3AHня.
- He npoIToBxuIte akymyIaTOpHi HOXnIe IJr NpIpi3aHnJg KINBOIpOly Tepe3 1iJIbHnI yarapHnK. JkIo pIaIbHe IIOIoTHo 3aklinHnIo, HeaIHO BiDpyCTITb BmNkaU i BnMIb aKymyIaTOp.

ПРИМITKA. HIKOLIN HE BIMMAITE AKUMYJIATOP ПID YAC PYXY PI3AJIbHOrO PIOJIoTHA A60 JKUo HATNCHYTo TIVCKOBn BIMNKaU.
- 3aBxJn 6yIbTe o6epeKHi 3 uactHkamcMTT, 1o JeTb nJ vac po6Otn. OJaTaTe pyKaBnKi nJ vac nipriHaHH KoJIIOHOrO qarapNky.
Picra BnKopncTahna: iIOCTpaia (5.4)
OuHCTiB npncpti (nVB. p03diI «TexHicHe 06cnyroByBaHHa») i BCTaHOBiTB KpUShky pi3aJIbHOro nIoTHa 8.
BnMaHH Ta n 3apJdxKeHHa kymyIaTopa: IInocTpaiz 6.1 Ta noci6Hnk 3 ekcnlyaTauii aKymyIaTopa
- HataHcHt b KhoNk y po36IokyBaHHa 9 i BnMiTb akyMylrTop i3 npicTpOIO.
2.Пикночьakymулгорdo3aprdHoro npnctroho.BcTaBte noro,3aФikcyBaBshndo Klaцання.
3.Якшо 6лmae 3eeleni iHДиkaTOp,akymyIaTOp 3apJxJaetbca.Якшо 3eeleni iHДиkaTOp nepectab 6lmaTu,akymyIaTOp nobHicTTO 3apJxKeHn.

OBEPEXKHO! HE BCTAHOBJIHOTe I HE 3HIMAITE AKUMYJTOP, KOJIH HATNCHYTO PYNCKOBUN BNMKAU A60 PYXAETbCRA PI3AJIbHE NOLIOTHO.
5. TPAHCIOPTYBAHH
Пд ус транспортуваши пистоюacoakymларopa може 6утн Heo6xidnoToptmyBaTnca певиньи Вимог, сц дюгу в buшй краини.Обовязково отрмайт coнсуltацio 3 zufo питань в micuceви ураздови oppaHAx, suob dobiatncя рpo bci taki ВIMORn. Temпepатура пд ус транспортуваши He nobinha bnxOДИТN 3a Mexki, 3a3naueHb p03diJI «36epiraHHA».
5.1 TPAHCIOPTYBAHHI PNPCTPOI
IInoctpaia 5.1
BmKHiTb npncTpi i BnMItb akymyIaTOp. Ipeep TpaHcnpOpTyBaHHm npncTpi MAc oxoNoHyTu HaBopi npToTGM 2 roDIn. CnID 3aBxJnpepeHocTN npncTpi 3a pyKoRTky. 3axuatae npncTpi BiD moKJIbNx cInbHnx ydApib a60 Bi6paui nIq cac TpaHcnpOpTyBaHHB A bTOMobixJx. NaIiHo 3aΦikCyIte npncTpi, uO6 BiN He nepeKeuIabcI H KOB3aB. PnncTpi Heo6XiIdHO xAnuatau BiD npMIX coHauHx npomeHIB.
5.2 TPAHCIOPTYBAHHJIITIEBHX AKUMYJATOPIB
Inoctpaia (5.2) i (5.4)

OBEPEXKHO! OJRAIATE 3AXNCHI PYKABNUKN IPN POBOTI 3 PIJKYUMIHCTPYMEHTOMIOBUN3YHbOTo.BNKOPNCTOBYNTE BIDNOBIHI IHCTPMEHTN DIA BNDALEHHRCMTT, HAPINKLAD IITKY ABO DEPEB'AH Y PAJIIMIO. B KODHOMY PA3I HE IPAUONTE BE3 3AXNCHNX PYKABNUOK! 3AMIHA PIJKYUO IHCTPMEHTA CIIIN BHKOHYBATNCRA NLIUIE KBALIΦIKOBAHM FAXIBUEM. 3AMHY ABO 3ATOUYBAHHRA PI3AJbHORO PONOTHA PEKOMEHNyCTbcra BHKOHBYATN NLIUIPE MOHTHOI CNYKBOIO ABO KBALIΦIKOBAHM FAXIBUEM.
TpmaTe piaIbHe noIoTHo 2 uNCTm, 6e3 qactnHOK cmITT. BuaJIiTB o6Pi3Kn. HaheciTb HeBeInky kIbKicTb MaCTnla (Ha ochoi OunuSyBaayc CMOnn) Ha pi3aIbHe noIoTHo 2, 106 36epertn Ioro pixyuy 3daTHicTb. TpmaTe piaIbHe noIoTHo 2 roctpum. 3HOWeHn a60 PooKOJKeHn pIXyHn IHCTpyMeHT cIId 3amHHTn Ha HOBn TaKOrO JTKTuNy KBaIiΦIKOBaHm faxibem.
8.3 306PAXEHH BPO3IBPAHOMYBnJIa

8.4 YCYHEHHH HECNPABHOCTE

HE6E3NEUHO! PN3NK YPAJXEHH EJEKTPNCHM CTPYMOM. OBEPEXHO! IEPEN YCYHENHm Byd-b-AKNX HECIPABHOCTeB BMKHITb PIPNCPTI.
Thank you for choosing this product. Upon designing and manufacturing our products, we place all of our efforts into ensuring an excellent quality that meets the needs of the users. Following these instructions allow to optimize the lifetime
IMPORTANT! IN ORDER TO OBTAIN THE UTMOST SATISFACTION FROM THIS PRODUCT UPON SETTING IT UP, USING IT, AND MAINTAINING IT, WE RECOMMEND THAT YOU CAREFULLY READ THIS USER MANUAL BEFORE USING THE PRODUCT. PLEASE PAY ATTENTION TO BASIC WARNINGS RELATING TO SAFETY WITHIN THIS MANUAL, AND KEEP THE MANUAL FOR LATER REFERENCE.

IMPORTANT, KEEP THE MANUAL FOR LATER REFERENCE : READ CAREFULLY
1. INTENDED USE OF BATTERY HEDGE TRIMMER 60CM
This product is intended for outdoor use only, and must not be used inside a building under any circumstances. The cordless hedge trimmer is only intended for use in dry and well-illuminated conditions. This hedge trimmer is only intended to be used for cutting hedges, bushes and shrubs in domestic gardens. Do not use it for others purposes. The maximum cutting capacity must be observed. Do not cut branches exceeding the stated maximum capacity. Do not use it for others purposes. The product is not intended to be used by children or persons with reduced physical, mental or sensory capabilities. This product is designed for hand use. This product should never be installed on a workbench or any other support.
After unwrapping the packing, make sure that the product is complete with its accessories (if any). If the product is damaged or has any defect, please do not use it and bring back it to your dealer. If you give this tool to another people, please give him also this instruction manual.
Please note that our equipment has not been designed for use in commercial, trade or industrial applications. Our warranty will be voided if the machine is used in commercial, trade or industrial businesses or for equivalent purposes. This product has been designed to be used over a period of 5 years (Expected lifetime).
2. SAFETY INSTRUCTIONS

WARNING: READ ALL SAFETY WARNINGS AND ALL INSTRUCTIONS. FAILURE TO FOLLOW THE WARNINGS AND INSTRUCTIONS MAY RESULT IN ELECTRIC SHOCK, FIRE AND/OR SERIOUS INJURY.
SAVE ALL WARNING AND INSTRUCTIONS FOR FUTURE REFERENCE.
2.1 GENERAL SAFETY WARNINGS
-
DO NOT OPERATE THE HEDGE TRIMMER NEAR GLASS ENCLOSURES, AUTOMOBILES, TRUCKS, WINDOW WELLS, DROP-OFFS, ETC. WITHOUT PROPERLY ADJUSTING THE AIM OF THE DISCHARGE.
-
DO NOT FORCE OR OVERLOAD THE HEDGE TRIMMER. THE HEDGE TRIMMER WILL PERFORM BETTER AND SAFER WHEN IT IS USED AT THE RATE THAT IT WAS DESIGNED TO WORK AT.
2.2 SYMBOLS ON THE PRODUCT
| CE | Complies with European standards: This symbol means that this appliance is compliant with the applicable European directives, and a test of compliance with these directives has been performed. | ||
| EAC | Single mark of circulation of products on the market of the Member States of the Customs Union. | Ukrainian conformity marking | |
| UNIVERSAL POWER | Universal: compatible only with Sterwins UP40, Lexman UP40 and Dexter UP40 products. | Read and understand all instructions before operating the product, follow all warning and safety instructions. | |
| Electrical products should not be discarded with household products. Used electrical products must be collected separately and disposed of at collection points provided for this purpose. Talk with your local authorities or dealer for advice on recycling. | |||
| Wear ear protection. | Wear eye protection | ||
| Wear head protection. | Wear protective gloves. | ||
| DANGER – Keep hands away from blade | Switch off: Remove the Battery before cleaning or maintenance. | ||
| Do not expose the product to rain or wet conditions. | Keep bystanders away. | ||
| 92dB | Guaranteed sound power level (tested according to Directive 2000/14/EC as amended by 2005/88/EC). | 605 mm | Cutting length: 605mm |

Remove battery pack before carrying out maintenance or cleaning work
2.3 SYMBOLS IN THIS MANUAL
| !! | Type and source of the danger: Failure to observe this warning may result in physical injury or death. | ! | Type and source of the danger: This symbol indicates that damage to the appliance, the environment or other property may occur as a result of non-observance of this warning. |
| i | Note: This symbol indicates important information for better understanding of the product. | Read the manual: This symbol indicates that you need to read the user manual carefully. | |
| Read the instruction manual. | Green point: Packaging recycling. | ||
| Brazilian environmental label: Recycle the packaging of the product. | Remove battery during transportation, storage, repair work and cleaning. | ||
| This product is recyclable. If it cannot be used anymore, please take it to waste recycling centre. | DESCARTE SELETIVO | Brazilian environmental label: Recycle this product. | |
| X.XX | Please refer to the corresponding illustration at the end of the booklet. | ||
- General Machine SafetyWarnings -

WARNING: READ ALL SAFETY WARNINGS, INSTRUCTIONS, ILLUSTRATIONS AND SPECIFICATIONS PROVIDED WITH THIS PRODUCT. FAILURE TO FOLLOW ALL INSTRUCTIONS LISTED BELOW MAY RESULT IN ELECTRIC SHOCK, FIRE AND/OR SERIOUS INJURY. SAVE ALL WARNINGS AND INSTRUCTIONS FOR FUTURE REFERENCE. THE TERM "MACHINE" IN THE WARNINGS REFERS TO YOUR MAINS-OPERATED (CORDED) MACHINE OR BATTERY-OPERATED (CORDLESS) MACHINE.
2.4 WORK AREA SAFETY
- KEEP WORK AREA CLEAN AND WELL LIT. CLUTTERED OR DARK AREAS INVITE ACCIDENTS.
- DO NOT OPERATE MACHINES IN EXPLOSIVE ATMOSPHERES, SUCH AS IN THE PRESENCE OF FLAMMABLE LIQUIDS, GASES OR DUST. MACHINES CREATE SPARKS WHICH MAY IGNITE THE DUST OR FUMES.
2.5 ELECTRICAL SAFETY
- MACHINE PLUGS MUST MATCH THE OUTLET. NEVER MODIFY THE PLUG IN ANY WAY. DO NOT USE ANY ADAPTER PLUGS WITH EARTHED (GROUNDED) MACHINES. UNMODIFIED PLUGS AND MATCHING OUTLETS WILL REDUCE RISK OF ELECTRIC SHOCK.
- AVOID BODY CONTACT WITH EARTHED OR GROUNDED SURFACES, SUCH AS PIPES, RADIATORS, RANGES AND REFRIGERATORS. THERE IS AN INCREASED RISK OF ELECTRIC SHOCK IF YOUR BODY IS EARTHED OR GROUNDED.
DO NOT EXPOSE MACHINES TO RAIN OR WET CONDITIONS. WATER ENTERING A MACHINE WILL INCREASE THE RISK OF ELECTRIC SHOCK.
2.6 PERSONAL SAFETY
- STAY ALERT, WATCH WHAT YOU ARE DOING AND USE COMMON SENSE WHEN OPERATING A MACHINE. DO NOT USE A MACHINE WHILE YOU ARE TIED OR UNDER THE INFLUENCE OF DRUGS, ALCOHOL OR MEDICATION. AMOUNT OF INATTENTION WHILE OPERATING MACHINES MAY RESULT IN SERIOUS PERSONAL INJURY.
- USE PERSONAL PROTECTIVE EQUIPMENT. ALWAYS WEAR EYE PROTECTION. PROTECTIVE EQUIPMENT SUCH AS DUST MASK, NON-SKID SAFETY SHOES, HARD HAT, OR HEARING PROTECTION USED FOR APPROPRIATE CONDITIONS WILL REDUCE PERSONAL INJURIES.
- PREVENT UNINTENTIONAL STARTING. ENSURE THE SWITCH IS IN THE OFF-POSITION BEFORE CONNECTING TO POWER SOURCE AND/OR BATTERY PACK, PICKING UP OR CARRYING THE TOOL. CARRYING MACHINES WITH YOUR FINGER ON THE SWITCH OR ENERGISING MACHINES THAT HAVE THE SWITCH ON INVITES ACCIDENTS.
-
REMOVE ANY ADJUSTING KEY OR WRENCH BEFORE TURNING THE MACHINE ON. A WRENCH OR A KEY LEFT ATTACHED TO A ROTATING PART OF THE MACHINE MAY RESULT IN PERSONAL INJURY.
-
KEEP CHILDREN AND BYSTANDERS AWAY WHILE OPERATING A MACHINE. DISTRACTIONS CAN CAUSE YOU TO LOSE CONTROL.
DO NOT ABUSE THE CORD. NEVER USE THE CORD FOR CARRYING, PULLING OR UNPLUGGING THE MACHINE. KEEP CORD AWAY FROM HEAT, OIL, SHARP EDGES OR MOVING PARTS. DAMAGED OR ENTANGLED CORDS INCREASE THE RISK OF ELECTRIC SHOCK.
- WHEN OPERATING A MACHINE OUTDOORS, USE AN EXTENSION CORD SUITABLE FOR OUTDOOR USE. USE OF A CORD SUITABLE FOR OUTDOOR USE REDUCES THE RISK OF ELECTRIC SHOCK.
- IF OPERATING A MACHINE IN ADAMP LOCATION IS UNAVOIDABLE, USE A RESIDUAL CURRENT DEVICE (RCD) PROTECTED SUPPLY. USE OF AN RCD REDUCES THE RISK OF ELECTRIC SHOCK.
- DO NOT OVERREACH. KEEP PROPER FOOTING AND BALANCE AT ALL TIMES. THIS ENABLES BETTER CONTROL OF THE MACHINE IN UNEXPECTED SITUATIONS.
- DRESS PROPERLY. DO NOT WEAR LOOSE CLOTHING OR JEWELLERY. KEEP YOUR HAIR, CLOTHING AND GLOVES AWAY FROM MOVING PARTS. LOOSE CLOTHES, JEWELLERY OR LONG HAIR CAN BE CAUGHT IN MOVING PARTS.
- IF DEVICES ARE PROVIDED FOR THE CONNECTION OF DUST EXTRACTION AND COLLECTION FACILITIES, ENSURE THESE ARE CONNECTED AND PROPERLY USED. USE OF DUST COLLECTION CAN REDUCE DUSTRELATED HAZARDS.
DO NOT LET FAMILIARITY GAINED FROM FREQUENT USE OF TOOLS ALLOW YOU TO BECOME COMPLACENT AND IGNORE TOOL SAFETY PRINCIPLES. A CARELESS ACTION CAN CAUSE SEVERE INJURY WITHIN A FRACTION OF A SECOND.
2.7 MACHINE USE AND CARE
- DO NOT FORCE THE MACHINE. USE THE CORRECT MACHINE FOR YOUR APPLICATION. THE CORRECT MACHINE WILL DO THE JOB BETTER AND SAFER AT THE RATE FOR WHICH IT WAS DESIGNED.
- DO NOT USE THE MACHINE IF THE SWITCH DOES NOT TURN IT ON AND OFF. ANY MACHINE THAT CANNOT BE CONTROLLED WITH THE SWITCH IS DANGEROUS AND MUST BE REPAIRED.
- DISCONNECT THE PLUG FROM THE POWER SOURCE AND/OR THE BATTERY PACK FROM THE MACHINE BEFORE MAKING ANY ADJUSTMENTS, CHANGING ACCESSORIES, OR STORING MACHINES. SUCH PREVENTIVE SAFETY MEASURES REDUCE THE RISK OF STARTING THE MACHINE ACCIDENTALLY.
- STORE IDLE MACHINES OUT OF THE REACH OF CHILDREN AND DO NOT ALLOW PERSONS UNFAMILIAR WITH THE MACHINE OR THESE INSTRUCTIONS TO OPERATE THE MACHINE. MACHINES ARE DANGEROUS IN THE HANDS OF UNTRAINED USERS.
2.8 BATTERY TOOL USE AND CARE
- RECHARGE ONLY WITH THE CHARGER SPECIFIED BY THE MANUFACTURER. A CHARGER THAT IS SUITABLE FOR ONE TYPE OF BATTERY PACK MAY CREATE A RISK OF FIRE WHEN USED WITH ANOTHER BATTERY PACK.
- USE MACHINES ONLY WITH SPECIFICALLY DESIGNATED BATTERY PACKS. USE OF ANY OTHER BATTERY PACKS MAY CREATE A RISK OF INJURY AND FIRE.
- WHEN BATTERY PACK IS NOT IN USE, KEEP IT AWAY FROM OTHER METAL OBJECTS, LIKE PAPER CLIPS, COINS, KEYS, NAILS, SCREWS OR OTHER SMALL METAL OBJECTS, THAT CAN MAKE A CONNECTION FROM ONE TERMINAL TO ANOTHER. SHORTING THE BATTERY TERMINALS TOGETHER MAY CAUSE BURNS OR A FIRE.
- UNDER ABUSIVE CONDITIONS, LIQUID MAY BE EJECTED FROM THE BATTERY;AVOID CONTACT. IF CONTACT ACCIDENTALLY OCCURS,FLUSH
2.9 SERVICE
-
HAVE YOUR MACHINE SERVICES BY A QUALIFIED REPAIR PERSON USING ONLY IDENTICAL REPLACEMENT PARTS. THIS WILL ENSURE THAT THE SAFETY OF THE MACHINE IS MAINTAINED.
-
MAINTAIN MACHINES. CHECK FOR MISALIGNMENT OR BINDING OF MOVING PARTS, BREAKAGEOF PARTS AND ANY OTHER CONDITION THAT MAY AFFECT THE MACHINES OPERATION. IF DAMAGED, HAVE THE MACHINE REPAIRED BEFORE USE. MANY ACCIDENTS ARE CAUSED BY POORLY MAINTAINED POWERTOOLS.
- KEEP CUTTING TOOLS SHARP AND CLEAN. PROPERLY MAINTAINED
- CUTTING TOOLS WITH SHARP CUTTING EDGES ARE LESS LIKELY TO BIND AND ARE EASIER TO CONTROL.
- USE THE MACHINE, ACCESSORIES AND TOOL BITS ETC. IN ACCORDANCE WITH THESE INSTRUCTIONS, TAKING INTO ACCOUNT THE WORKING CONDITIONS AND THE WORK TO BE PERFORMED. USE OF THE MACHINE FOR OPERATIONS DIFFERENT FROM THOSE INTENDED COULD RESULT IN A HAZARDOUS SITUATION.
- KEEP HANDLES AND GRASPING SURFACES DRY, CLEAN AND FREE FROM OIL AND GREASE. SLIPPERY HANDLES AND GRASPING SURFACES DO NOT ALLOW FOR SAFE HANDLING AND CONTROL OF THE TOOL IN UNEXPECTED SITUATIONS.
WITH WATER. IF LIQUID CONTACTS EYES, ADDitionally SEEK MEDICAL HELP. LIQUID EJECTED FROM THE BATTERY MAY CAUSE IRRITATION OR BURNS.
- DO NOT USE A BATTERY PACK OR TOOL THAT IS DAMAGED OR MODIFIED. DAMAGED OR MODIFIED BATTERIES MAY EXHIBIT UNPREDICTABLE BEHAVIOUR RESULTING IN FIRE, EXPLOSION OR RISK OF INJURY.
DO NOT EXPOSE A BATTERY PACK OR TOOL TO FIRE OR EXCESSIVE TEMPERATURE. EXPOSURE TO FIRE OR TEMPERATURE ABOVE 130^ MAY CAUSE EXPLOSION.
FOLLOW ALL CHARGING INSTRUCTIONS AND DO NOT CHARGE THE BATTERY PACK OR TOOL OUTSIDE THE TEMPERATURE RANGE SPECIFIED IN THE INSTRUCTIONS. CHARGING IMPROPERLY OR AT TEMPERATURES OUTSIDE THE SPECIFIED RANGE MAY DAMAGE THE BATTERY AND INCREASE THE RISK OFFIRE. - NEVER SERVICE DAMAGED BATTERY PACKS. SERVICE OF BATTERY PACKS SHOULD ONLY BE PERFORMED BY THE MANUFACTURER OR AUTHORIZED SERVICE PROVIDERS.
2.10 HEDGE TRIMMER SAFETY WARNINGS:
- KEEP ALL PARTS OF THE BODY AWAY FROM THE BLADE. DO NOT REMOVE CUT MATERIAL OR HOLD MATERIAL TO BE CUT WHEN BLADES ARE MOVING. BLADES CONTINUE TO MOVE AFTER THE SWITCH IS TURNED OFF. A MOMENT OF INATTENTION WHILE OPERATING THE HEDGE TRIMMER MAY RESULT IN-serIOUS PERSONAL INJURY.
- CARRY THE HEDGE TRIMMER BY THE HANDLE WITH THE BLADE STOPPED AND TAKING CARE NOT TO OPERATE ANY POWER SWITCH. PROPER CARRYING OF THE HEDGE TRIMMER WILL DECREASE THE RISK OF INADVERTENT STARTING AND RESULTANT PERSONAL INJURY FROM THE BLADES.
- WHEN TRANSPORTING OR STORING THE HEDGE TRIMMER, ALWAYS FIT THE BLADE COVER. PROPER HANDLING OF THE HEDGE TRIMMER WILL DECREASE THE RISK OF PERSONAL INJURY FROM THE BLADES.
- WHEN CLEARING JAMMED MATERIAL OR SERVICING THE UNIT, MAKE SURE ALL POWER SWITCHES ARE OFF AND THE BATTERY PACK IS
2.11 RESIDUAL RISKS
FAMILIARISE YOURSELF WITH THE USE OF THIS PRODUCT BY MEANS OF THIS INSTRUCTION MANUAL. MEMORISE THE SAFETY DIRECTIONS AND FOLLOW THEM TO THE LETTER. THIS WILL HELP TO PREVENT RISKS AND HAZARDS. ALWAYS BE ALERT WHEN USING THIS PRODUCT, SO THAT YOU CAN RECOGNISE AND HANDLE RISKS EARLY. FAST INTERVENTION CAN PREVENT SERIOUS INJURY AND DAMAGE TO PROPERTY. SWITCH OFF AND DISCONNECT FROM THE BATTERY IF THERE ARE MAL FUNCTIONS.
- EVEN IF ALL INSTRUCTIONS ARE STRICTLY FOLLOWED, THERE ARE STILL SOME FACTORS THAT COULD LEAD TO HAZARDS, SUCH AS:
- THROW OUT PIECES OF THE WORK PIECE.
VIBRATION INJURIES: USE DESIGNATED HANDLES AND TRY TO REDUCE WORKING TIME AND EXPOSURE.
- INJURIES CAUSED BY NOISE: WEAR EAR PROTECTION AND REDUCE WORKING TIME AND EXPOSURE.
REMOVED OR DISCONNECTED. UNEXPECTED ACTUATION OF THE HEDGE TRIMMER WHILE CLEARING JAMMED MATERIAL OR SERVICING MAY RESULT IN SERIOUS PERSONAL INJURY.
HOLD THE HEDGE TRIMMER BY INSULATED GRIPPING SURFACES ONLY, BECAUSE THE BLADE MAY CONTACT HIDDEN WIRING. BLADES CONTACTING A "LIVE" WIRE MAY MAKE EXPOSED METAL PARTS OF THE HEDGE TRIMMER "LIVE" AND COULD GIVE THE OPERATOR AN ELECTRIC SHOCK.
- KEEP ALL POWER CORDS AND CABLES AWAY FROM CUTTING AREA. POWER CORDS OR CABLES MAY BE HIDDEN IN HEDGES OR BUSHES AND CAN BE ACCIDENTALLY CUT BY THE BLADE.
- DO NOT USE THE HEDGE TRIMMER IN BAD WEATHER CONDITIONS, ESPECIALLY WHEN THERE IS A RISK OF LIGHTNING. THIS DECREASES THE RISK OF BEING STRUCK BY LIGHTNING.
- INHALATION OF DUST AND PARTICLES.
- WEAREYEPROTECTIONATALLTIMES.
IF YOU EXPERIENCE ANY OF THESE FACTORS WHILE USING THE MACHINE, STOP THE MACHINE CONSULT YOUR DOCTOR IMMEDIATELY
- INJURIES MAY BE CAUSED OR AGGRAVATED BY PROLONGED USE OF A TOOL. WHEN USING ANY TOOL FOR PROLONGED PERIODS, ENSURE YOU TAKE REGULAR BREAKS.
- PROLONGED USE OF THE PRODUCT EXPOSES THE USER TO VIBRATIONS THAT CAN CAUSE A RANGE OF CONDITIONS COLLECTIVELY KNOWN AS HAND-ARM VIBRATION SYNDROME (HAVS) E.G. Fingers GOING WHITE; AS WELL AS SPECIFIC DISEASES SUCH AS CARPAL TUNNEL SYNDROME.
- TO REDUCE THIS RISK WHEN USING THE PRODUCT, ALWAYS WEAR PROTECTIVE GLOVES AND KEEP YOUR HANDS WARM.
3. TECHNICAL DATA
| Model | 40VHT2-60.1 |
| Rated voltage (V d.c.) | 36 V d.c. |
| Machine weigh (without battery pack) | 3.2 kg |
| Blade length | 658 mm |
| Cutting Length | 605 mm |
| Cutting capacity | 20 mm |
| Guaranteed sound power level (dB(A)) | 92 dB(A) |
| Measured sound power level (dB(A)) | 88.72dB(A) K=3dB(A) |
| Sound pressure level (dB (A)) | 77dB(A) K=3dB(A) |
| Working current | 4.2 A |
| Maximum current | 12 A |
| Vibration level (K=1.5m/s2) | < 2.5 m/s2 |
| Blade oscillation speed (no load) (min-1) | 2800 |
| Motor no-load speed | >19500±10%/min |
The declared vibration total value has been measured in accordance with a standard test method and may be used for comparing one tool with another. The declared vibration total value may also be used in a preliminary exposure assessment. The vibration and noise emission during actual use of the machine can differ from the declared total value depending on the ways in which the tool is used; and it may be necessary to identify safety measures to protect the operator that are based on an estimation of exposure in the actual conditions of use (taking into account all parts of the operating cycle such as the times when the tool is switched off and when it is running idle in addition to the trigger time).
| Battery pack | |
| Type of battery | Li-Ion |
| Model | 40VBA2-50.1 40VBA2-50.XXX |
| Rated voltage [V d.c.] | 36V d.c. |
| Battery rated capacity | 5Ah Li-Ion |
| Number of battery cells | 20 |
| Weight [kg] | 1.29 kg |
| Charger pack | ||
| Model | 40VCH1-3A.1 40VCH1-3A.XXX | 40VCH2-6A.1 40VCH2-6A.XXX |
| Rated input | 100-240V~ | 220-240V~ |
| Rated output | 42V d.c. | 42V d.c. |
| Working temperature [°C] | 4°C~24°C | 4°C~24°C |
| Weight [kg] | 0.605 kg | 1.06 kg |
4. ASSEMBLY

WARNING! THE PRODUCT MUST BE FULY ASSEMBLED BEFORE OPERATION! DO NOT USE A PRODUCT THAT IS ONLY PARTLY ASSEMBLED OR ASSEMBLED WITH DAMAGED PARTS! FOLLOW THE ASSEMBLY INSTRUCTIONS STEP-BY-STEP AND USE THE PICTURES PROVIDED AS A VISUAL GUIDE TO EASILY ASSEMBLE THE PRODUCT!
4.1 UNBOXING
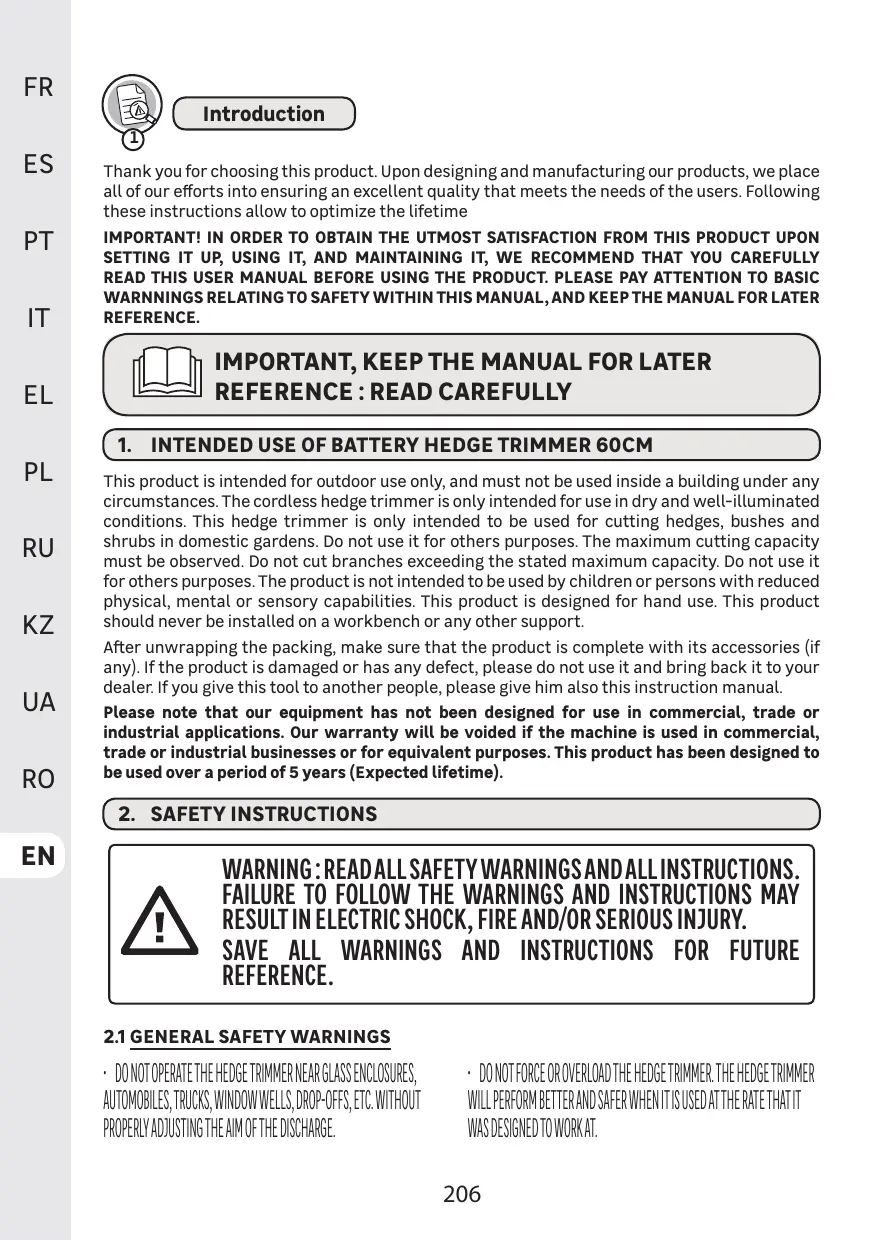
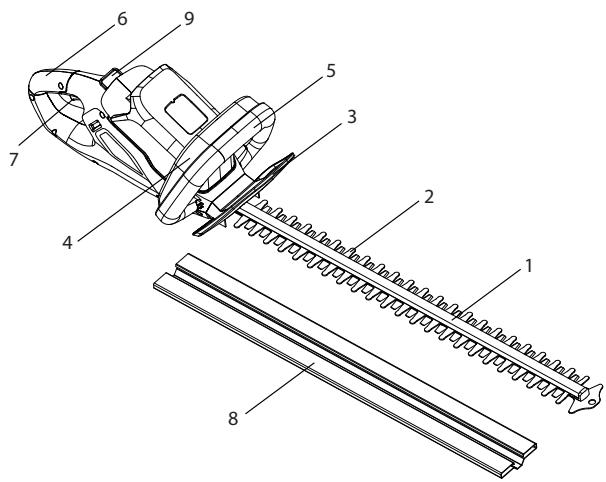
- Cutting bar
2.Blade - Protection guard
- Safety switch
- Front handle
6.Rear handle - On/off switch
8.Blade cover -
Unlock button
-
WEAR GLOVES WHEN UNBOXING.
- DO NOT USE CUTTER, KNIFE, SAW OR ANY OTHER SIMILAR TOOL FOR UNBOXING.
CARRY THE TOOL ONLY BY THE REAR HANDLE (6).
- KEEP THE BOX FOR FURTHER REUSE (TRANSPORT AND STORAGE).
- KEEP INSTRUCTION MANUAL IN A DRY AREA FOR FURTHER CONSULTATION.
4.2 INSTALLATION
Blade cover : illustration 2.1
Remove the blade cover 8 from the blade 2 before operation. Align and push the blade cover 8 onto the blade 2 to attach it.
NOTE: Always attach the blade cover 8 when the product is not in use, for storage and transportation.
Installing/Removing the battery pack : illustration 2.2
WARNING : Make sure the latch on the bottom of the battery pack snaps in place and the battery pack is fully seated and secure in the product's battery docking port before beginning operation.
Failure to securely seat the battery pack could cause the battery pack to fall out, resulting in serious personal injury.
To install : To attach, align and slide the battery pack onto the slots of the battery docking port until it locks in place.
To remove : To release, press the battery unlock button 9 and remove the battery pack from the product.
4.3 FIRST USE
Check the battery : illustration 2.2

WARNING! READ THE « SAFETY INSTRUCTION » SECTION AT THE BEGINNING OF THIS MANUAL INCLUDING ALL TEXT UNDER SUBHEADING THEREIN BEFORE USING THIS PRODUCT.

THE BATTERY IS NOT FULLY CHARGED AT THE TIME OF PURCHASE. BEFORE USING THE PRODUCT FOR THE FIRST TIME, PLACE THE BATTERY IN THE CHARGER AND CHARGE IT FULLY.
Pay particular attention using the machine for the first time : focus and dedicate all your attention to this first use. Make the first trial on a free space with no obstacle and no surrounding element.
4.4 OPERATION
Start the product: illustration 4.1
Before starting the hedge trimmer, check that the on/off switch 7 and safety switch 4 are moving freely, returning automatically and quickly upon release. Also check that the cooling air vents are not obstructed and that both the front handle 5 and rear handle 6 are clean and dry. After making sure that the hedge trimmer isn't demonstrating any symptoms of damage, slide the fully charged battery into the docking port of the hedge trimmer until a "click" is heard. Then you can begin to trim hedges.
Hold the product with one hand at the rear handle 6 and with another at the front handle 5. In order to power the machine on, you must press both the safety switch 4 and the on/off switch 7 simultaneously. Always hold the hedge trimmer with both hands during operation.
Operate the product:illustration 4.2

CAUTION! ALWAYS WEAR SAFETY GLASSES. WEAR A FILTER MASK IF THE OPERATION IS DUSTY. USE OF PROPER GLOVES AND SUBSTANTIAL FOOTWEAR IS ALSO RECOMMENDED.
- WARNING: IN SOME COUNTRIES REGULATIONS DEFINE AT WHAT TIME OF THE DAY AND ON WHAT SPECIAL DAYS PRODUCTS ARE ALLOWED TO BE USED AND WHAT RESTRICTIONS APPLY! ASK YOUR COMMUNITY FOR DETAILED INFORMATION AND OBSERVE THE REGULATIONS IN ORDER TO PRESERVE A PEACEFUL NEIGHBOURHOOD AND AVOID COMMITTING ADMINISTRATIVE OFFENCES!
OPERATING HOURS-ONLY OPERATE THE PRODUCT AT REASONABLE HOURS - NOT EARLY IN THE MORNING, LATE AT NIGHT OR ON WEEKENDS/PUBLIC
HOLIDAYS WHEN PEOPLE MIGHT BE DISTURBED. INFORM YOURSELF ABOUT LOCAL RESTRICTIONS
- DO NOT OPERATE THE PRODUCT IN AN EXPLOSIVE ATMOSPHERE.
-
AVOID USING THE PRODUCT IN BAD WEATHER CONDITIONS, ESPECIALLY WHEN THERE IS A RISK OF LIGHTNING. DO NOT OPERATE THE PRODUCT IN POOR LIGHTING. THE OPERATOR REQUIRESC A CLEAR VIEW OF THE WORK AREA TO IDENTIFY POTENTIAL HAZARDS.
-
USE OF HEARING PROTECTION REDUCES THE ABILITY TO HEAR WARNINGS (SHOUTS OR ALARMS). THE OPERATOR MUST PAY EXTRA ATTENTION TO WHAT IS GOING ON IN THE WORK AREA. DO NOT GET DISTRACTED, AND ALWAYS CONCENTRATE ON THE TASK.
- OPERATING SIMILAR TOOLS NEARBY INCREASES BOTH THE RISK OF HEARING INJURY AND THE POTENTIAL FOR OTHER PERSONS TO ENTER YOUR WORK AREA.
- KEEP FIRM FOOTING AND BALANCE.
DO NOT OVERREACH. OVERREACHING CAN RESULT IN LOSS OF BALANCE. ALWAYS BE SURE OF THE FOOTING ON SLOPEs.
- WALK, NEVER RUN. KEEP ALL PARTS OF YOUR BODY AWAY FROM ANY MOVING PART.
- NEVER RUN THE PRODUCT WITHOUT THE PROPER EQUIPMENT ATTACHED.
- DO NOT MODIFY THE PRODUCT IN ANY WAY OR USE PARTS AND ACCESSORIES THAT ARE NOT RECOMMENDED BY THE MANUFACTURER.

IF THE PRODUCT IS DROPPED, SUFFERS HEAVY IMPACT OR BEGINS TO VIBRATE ABNORMALLY, IMMEDIATELY STOP THE PRODUCT AND INSPECT FOR DAMAGE OR IDENTIFY THE CAUSE OF THE VIBRATION. ANY DAMAGE SHOULD BE PROPERLY REPAIRED OR REPLACE BY AN AUTHORIZED SERVICE CENTRE.
- TO REDUCE THE RISK OF INJURY ASSOCIATED WITH CONTACTING ROTATING PARTS, ALWAYS STOP THE MACHINE, REMOVE THE BATTERY PACK, AND MAKE SURE ALL MOVING PARTS HAVE STOPPED:
-BEFORE CLEANING OR CLEARING A BLOCKAGE
- WHEN LEAVING THE PRODUCT UNATTENDED
-BEFORE INSTALLING OR REMOVING ATTACHMENTS
-BEFORE CHECKING, MAINTAINING OR WORKING ON THE PRODUCT
- IF THE MACHINE STARTS TO VIBRATE ABNORMALLY (INSPECT IMMEDIATELY)
Trimming: Illustration 3.1 to 4.2
NOTE: Try to keep the cutting device angled at approximately 15^ to the cutting surface.
- Cut and remove branches exceeding the cutting capacity of this product using a proper pruner before operation.
- Move the cutting device lightly through the cutting surface in a sweeping motion following the shape of the hedge or shrub.
- A slight tilt downwards of the cutting device in the direction of motion is recommended for optimum cutting performance.
- Do not to rush and do not attempt to cut too much with one stroke of the cutting device.
- First cut both sides from the bottom cutting upwards to the top. This will prevent any of the trimmings falling into the path of the area still to be cut.
- After cutting the sides proceed to the top. Try to keep the cutting device angled at approximately 15^ to the cutting surface.
- Cut in a number of stages if the area being cut is particularly long to achieve a better result; smaller trimmings will allow for easy composting.

NOTE : WHEN SHAPING IT IS ADVISIBLE TO ACHIEVE A TRAPEZOIDAL SHAPE. A TRAPEZOIDAL CUT CORRESPONDS TO THE NATURAL GROWTH OF PLANTS AND RESULTS IN OPTIMAL HEDGE GROWTH, AS IT WILL EXPOSE MORE LIGHT TO THE LOWER END OF THE HEDGE.
- Lubricate the internal surfaces of the blade if the cutting device overheats during operation.

NOTE : WHILE TRIMMING, THE CUTTING DEVICE MAY BE BLOCKED. SO THE PRODUCT WILL TURN OFF AUTOMATICALLY DUE TO OVER CURRENT. THEREFORE RELEASE THE ON/OFF SWITCH AND THEN START AGAIN TO GO ON WITH TRIMMING.
- Do not force the hedge trimmer through heavy shrubbery. If the blades become jammed, immediately release the on/off switch and remove the battery pack.

NOTE : NEVER UNINSTALL THE BATTERY PACK WHILE THE BLADE IS STILL IN MOTION OR WHILE THE TRIGGER IS PRESSED.
- Always be careful of flying debris during operation. Wear gloves when trimming thorny or prickly foliage.
After use: Illustration (5.4)
Clean the machine (refer to chapter maintenance) and attach the blade cover 8.
Removing and charging the battery : Illustration 6.1 and battery instruction manual
- Press the unlock button 9 and slide the battery out of the product.
- Place the battery pack into the charger by sliding it into a locked position until it clicks.
- When the green light is flashing, the battery is charging. If the green light is no longer flashing, the battery is fully charged.

WARNING! DO NOT INSERT OR REMOVE THE BATTERY WHILE THE TRIGGER IS PRESSED OR WHILE THE BLADE IS IN MOTION.
5. TRANSPORTATION
Transporting the machine or battery may require that you meet certain requirements specific to your country. Please make sure to respect them by contacting the authorities of your country, in order to respect them all. Ensure temperature during transportation will never be out of temperature range given on chapter storage.
5.1 TRANSPORT THE MACHINE
Illustration 5.1
Switch the product off and remove the battery pack. Let the machine cool for 2 hours outside before transport it. Always carry the product by its handle. Protect the product from any heavy impact or strong vibrations which may occur during transportation in vehicles. Secure the product to prevent it from slipping or falling over. Do not expose the product to sunlight.
5.2 TRANSPORT THE LITHIUM BATTERIES
Please refer to the battery instruction manual for further details.
6. WINTERING
Illustration 6.1
Plug out the battery from the machine.
Before long storage please ensure the battery charged in accordance with the instructions provided on battery instruction manual. Follow all instructions given on chapter storage below. We recommend using the original package for storage or covering the product with a suitable cloth or enclosure to protect it against dust.
7. STORAGE
Only store the machine and the battery in a clean, dry, ventilated place with a temperature range of 4^ to 24^ and where the trimmer cannot be easily accessed by children or untrustworthy foes. Cover it in order to provide added protection. We recommend using the original package for storage or covering the product with a suitable cloth or enclosure to protect it against dust. Be sure to secure the unit while transporting.
7.1 STORE THE MACHINE
Illustration 6.1
Disconnect the battery from the machine. Let the machine cool for 2 hours outside before storing it. Install the blade cover to avoid the sharp blade being touched by children or persons unfamiliar with this product. Examine the unit thoroughly for worn, loose or damaged parts. Clean the unit before storing. Do not expose the product to sunlight. Make sure the product is always protected from cold and humidity.
7.2 STORE THE LITHIUM BATTERIES
Illustration 6.1
Please make sure that the battery power level is as recommended in the battery instruction manual. Please refer to the battery instruction manual for further details.
8. MAINTENANCE

DANGER! RISK OF INJURY DUE TO ELECTRIC SHOCK.
REMOVE THE BATTERY PACK BEFORE ADJUSTING, INSPECTING, CLEANING OR STORING THE PRODUCT.
8.1 CLEANING
Illustration 5.1 to 5.4
Wipe off the housing and the plastic components using a moist, soft cloth. Do not use strong solvents or detergents on the plastic housing or plastic components. Certain household cleaners may cause damage, and may cause a shock hazard.

WARNING! WEAR SAFETY GLOVES WHEN WORKING ON THE CUTTING DEVICE AND CLOSE TO IT! USE APPROPRIATE TOOLS TO REMOVE DEBRIS, E.G. A BRUSH OR WOODEN STICK! NEVER USE YOUR BARE HANDS! THE REPLACEMENT OF THE CUTTING DEVICE SHOULD BE DONE BY A QUALIFIED SPECIALIST! REWORK OR SHARPENING BLADES IS NOT RECOMMENDED UNLESS IT IS DONE BY A REPAIR SERVICE OR A SIMILARLY QUALIFIED SPECIALIST!
Keep the blade 2 clean and free of debris. Remove trimmings. Apply a small amount of lubricant (resin cleaner) on the blade 2 to retain a good cutting performance. Keep the blade 2 sharp. Have a worn or damaged cutting device replaced with a new one of the same type by a qualified specialist.
8.3 EXPLODED VIEW
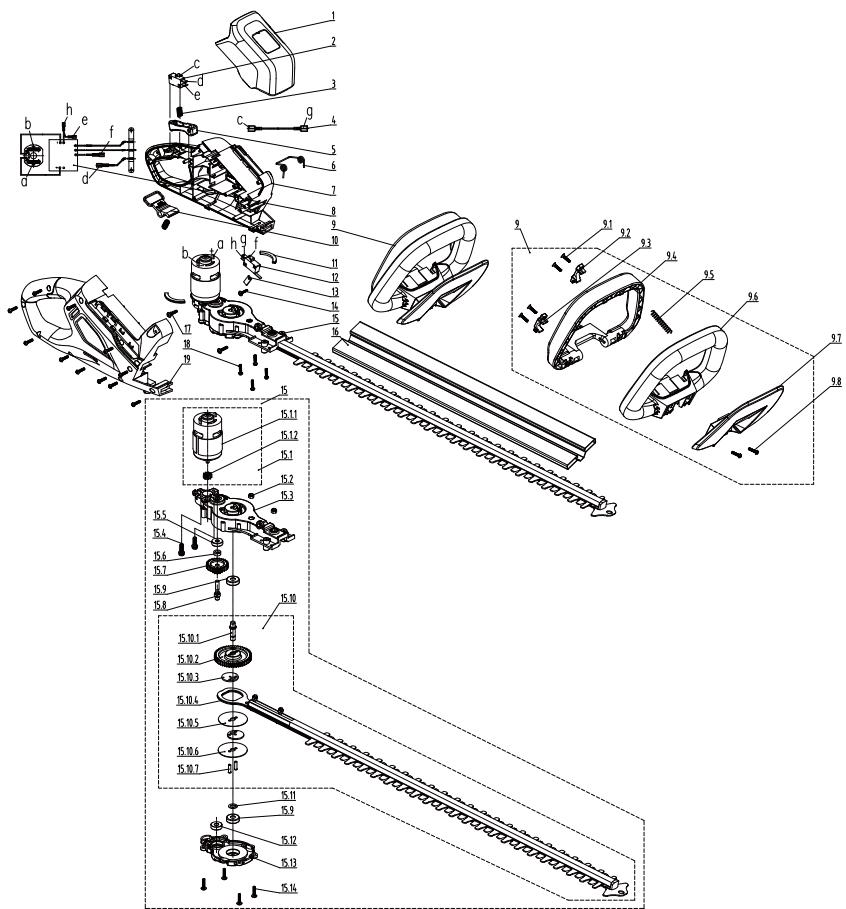
| POS | DESCRIPTION | Availability period of spare part | QTY |
| 1 | Decorative cover | 1 | |
| 2 | On/off switch | 6 years | 1 |
| 3 | Trigger spring | 2 | |
| 4 | Connector wire | 1 | |
| 5 | On/off switch trigger | 1 | |
| 6 | Reset spring | 1 | |
| 7 | Left housing | 1 | |
| 8 | Electronic components | 6 years | 1 |
| 9 | Handle components | 1 | |
| 9.1 | Self tapping screw | 4 | |
| 9.2 | Left pressure plate | 1 | |
| 9.3 | Right pressure plate | 1 | |
| 9.4 | Front handle | 1 | |
| 9.5 | Button spring | 1 | |
| 9.6 | Front handle frame | 1 | |
| 9.7 | Protection guard | 1 | |
| 9.8 | Self tapping screw | 2 | |
| 10 | Unlock button | 1 | |
| 11 | Motor vibration reduction pad | 2 | |
| 12 | On/off switch for safety switch | 6 years | 1 |
| 13 | Pressure plate | 1 | |
| 14 | Self tapping screw | 1 | |
| 15 | Motor gear box components | 1 | |
| 15.1 | Small gear motor components | 1 | |
| 15.1.1 | Motor components | 6 years | 1 |
| 15.1.2 | Gear | 6 years | 1 |
| 15.2 | Type 1 non-metallic insert hex lock nut | 2 | |
| 15.3 | Gear box | 1 | |
| 15.4 | Composite Groove Pan Head Three Combination Set Screw | 2 | |
| 15.5 | Bearing | 1 | |
| 15.6 | Axle sleeve | 1 | |
| 15.7 | Gear | 6 years | 1 |
| 15.8 | Output shaft | 1 | |
| 15.9 | Bearing | 2 | |
| 15.10 | Big gear output components | 1 | |
| 15.10.1 | Output shaft | 1 | |
| 15.10.2 | Gear | 6 years | 1 |
| 15.10.3 | Eccentric gear | 2 | |
| 15.10.4 | Blade components | 6 years | 1 |
| 15.10.5 | Blade plate | 1 | |
| 15.10.6 | Gasket | 1 | |
| 15.10.7 | Pin | 2 | |
| 15.11 | Antifriction mat | 1 | |
| 15.12 | Bearing | 1 | |
| 15.13 | Cover | 1 | |
| 15.14 | Cross recessed pan head flange self tapping screw | 4 | |
| 16 | Blade cover | 1 | |
| 17 | Cross recessed pan head flange self tapping screw | 2 | |
| 18 | Self tapping screw | 15 | |
| 19 | Right housing | 1 |
8.4 TROUBLESHOOTING

DANGER! RISK OF INJURY DUE TO ELECTRIC SHOCK.
WARNING! BEFORE ANY TROUBLE SHOOTING, SWITCH OFF THE PRODUCT.
| Problems | Probable causes | Solutions | Qualification required |
| Product does not start | Battery is not secure | To secure the battery pack, make sure the latches on the top of the battery pack snap into place | - |
| The battery pack is out of power | Charge the battery pack according to the instructions included with your model | - | |
| Power/speed switch is in the OFF position | Press the on/off switch | - | |
| Battery pack not properly attached | Attach properly | - | |
| Product does not start | On/off switch not set on ON position | Refer to chapter “Start the product” | - |
| Only one of the two switch is set on ON position | Refer to chapter “Start the product” | - | |
| Internal parts damaged | Turn off the motor, remove the battery, inspect the machine. Get the machine repaired | Approved repair centre | |
| The machine vibrates at high speed | The blade is out of balance or worn | Change the blade | Approved repair centre |
| The motor shaft is twisted | Turn off the motor and inspect the machine. Get the machine repaired | Approved repair centre | |
| The motor stops while operating | Thickness of branches exceeds capacity | Only cut branches complying with the capacity | - |
| The battery is discharged | Recharge the battery | - | |
| The Motor is ON, blades do not move | The machine has damage | Do not use the machine and speack to service center | Approved repair centre |
| The blades are blocked | Remove battery pack then clear blockage from the blades | - | |
| Machine suddenly stopped while cutting hedge | The Motor maybe occur overload | Stop the machine and wait for 3 minutes to restart | - |
| The Motor maybe occur overheat | Stop the machine and wait for the engine to cool before switching it on again | - | |
| The Battery maybe occur overheat | Stop the machine and wait for the battery to cool before switching it on again | - | |
| Product does not reach full power | Battery pack capacity too low | Charge battery pack | - |
| Air vents are blocked | Clean the air vents | - | |
| Vibration or noise is excessive | Bolts/nuts are loose | Tighten bolts/nuts | - |
| The machine has damage | Do not use the machine and speack to service center | Approved repair centre | |
| Product suddenly stops | Battery pack discharged | Remove and charge battery pack | - |
| Battery too hot | Remove battery pack and let it cool down | - | |
| Unsatisfactory cutting performance | Blade is worn / damaged | Replace the blade with a new one | - |
| Blade is rusted | Remove battery pack then add specific oil then clean the blade | - | |
| Thickness of branches exceeds capacity | Only cut branches complying with the capacity | - |
8.5Fatal Circumstances
| Problems | Solutions |
| Machine smokes during operation | Immediately stop the machine, Remove the battery pack then speack to service center |
9. END OF LIFE

Electrical products should not be discarded with household products. Used electrical products must be collected separately and disposed of at collection points provided for this purpose. Talk with your local authorities or dealer for advice on recycling.
10. WARRANTY
10.1 OUR WARRANTY
STERWINS products are designed according to the highest quality standards for products intended for the consumer market. This sale warranty covers a period of 5 years as of the date of purchase of the product. This warranty covers all defects in materials and workmanship: missing parts and elements, and damage occurring under normal use circumstances. Repair and replacement of parts do not lead to an extension of the initial warranty period. You must be able to provide proof of the purchase for this product and the date of purchase. Warranty coverage is limited to the value of this product.
10.2 WARRANTY EXCLUSIONS
This warranty does not cover problems nor incidents resulting from incorrect use of the product. The following items are not covered by warranty:
- The tool have been used incorrectly; or
- Damage occurring upon transporting or setting up this product; or
- Repairs and/or change of parts carried out by a third party; or
- Damage caused by external factors or foreign objects such as sand or stones; or
- Damage resulting from non-compliance with the safety and usage instructions; or
- The tool have been disassembled or opened; or
- The tool have been in a wet environment (dew, rain, submerged in water...); or
- The tool has been used for professional purpose; or
- The tool has been exposed to a temperature out of the range specified in chapter "storage"
The product must be used under normal usage circumstances, and for non-professional purposes. Therefore, excluded from this warranty are products used by gardening companies, local authorities, as well as companies offering paid rentals or free loaning of equipment.
In the event of a problem or defect, you should first always consult your Sterwins dealer. In most cases, the Sterwins dealer will be able to solve the problem or correct the defect. Keep your invoice or your receipt: these documents will be requested upon processing any claims.
820281 - EAN Code: 3276007275216
Industrial Type Design Reference: 40VHT2-60.1
Product Brand|Marque Produkt|Produto de marca|Marca do produits
STERWINS
Serial number coding or batch number(Codificacion du numero de series ou de lot) Codificacion del numero de series/Codificacion do numero de series
SSSSSS XX DDMMYN nn PPPPPP ( SSSSSS : Supplier code, XX : Factory ID, DDMMY: Production date, nn: number of version of product, PPPPPP : Incremental number)
Directive 2000/14/EC Annex V amended by 2005/88/EC EN ISO 11094:1991 EN ISO 3744:1995 EN ISO 3744:2010
Measured sound power level: 88.72dB(A)
Guaranteed Sound power level: 923dB(A)
Signed for and on behalf of (Signe par et nom de)Firmado por y en nombre de [Assinado por e am nome de:]
820281 - EAN Code: 3276007275216 Industrial Type Design Reference: 40VHT2-60.1
Marca del prodotto|Marka Produktu|Mapka Tpoiovroc|Marcà a produsului
STERWINS
Directive 2000/14/EC Annex V amended by 2005/88/EC
EN ISO 11094:1991
EN ISO 3744:1995
EN ISO 3744:2010
Measured Sound power level: 88.72dB(A)
Guaranteed Sound power level: 92dB(A)
Firme in vece e peronto idPodosipw imienuiTroy@pia yia kai ef ovjatoc Semmat nuli numelei
Luogo e data del rilasio [Data wydania i mièsoce]Tórc και περούνινα δδδόπης]
Eric LEMOINE
International Project Quality Leader
Ronchin
21/09/2021


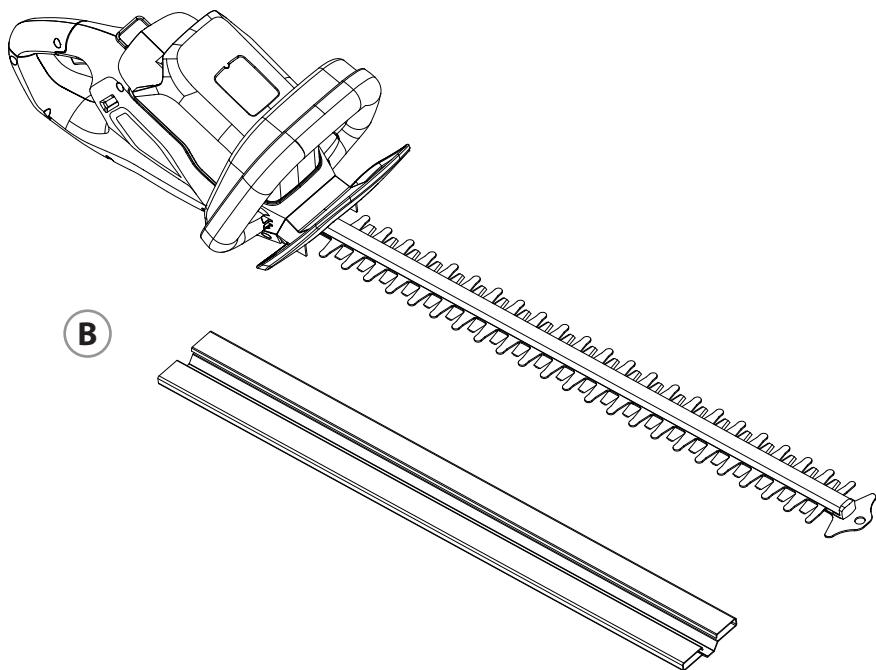
A


UNIVERSAL* POWER

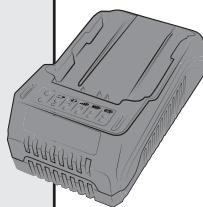

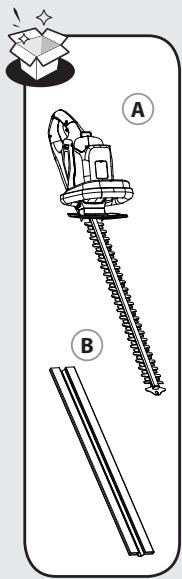

2.1
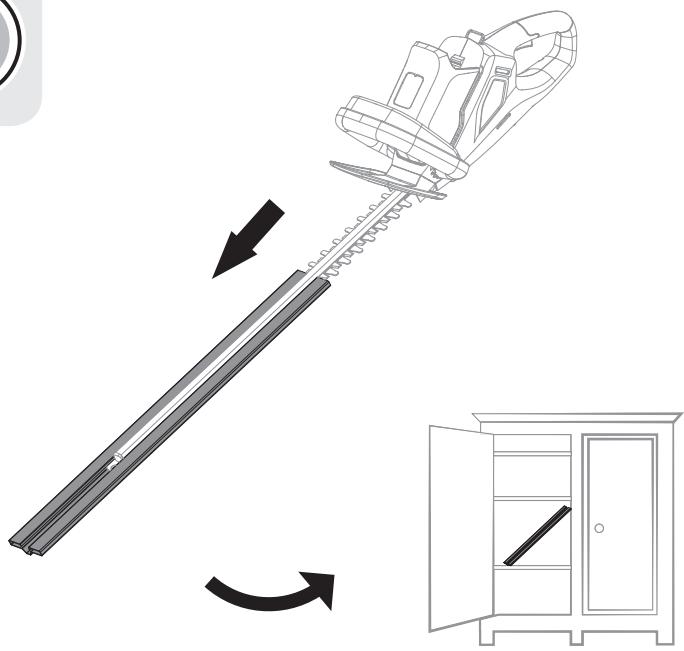
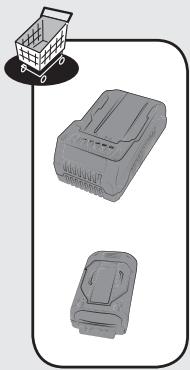
2.2
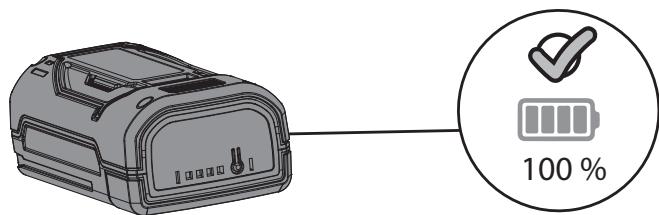
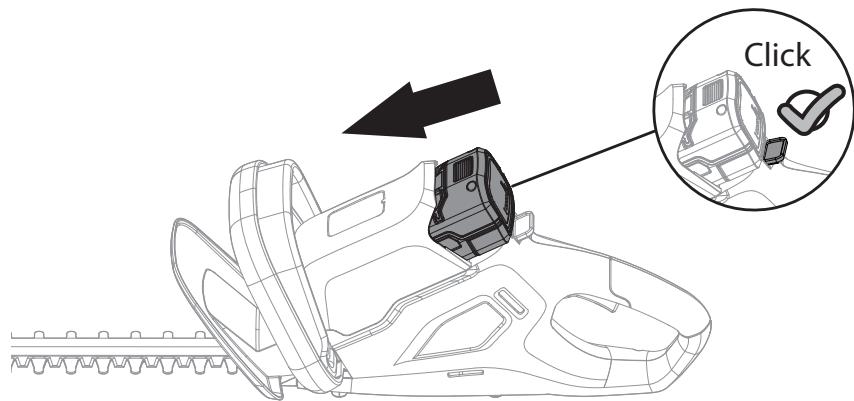

3.1
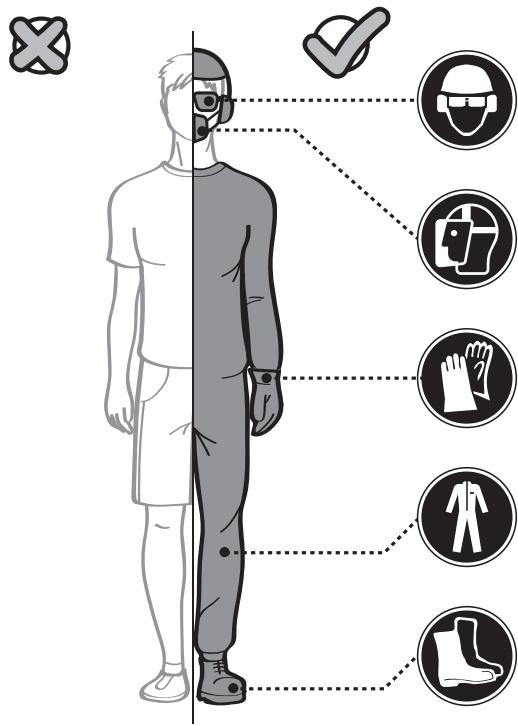
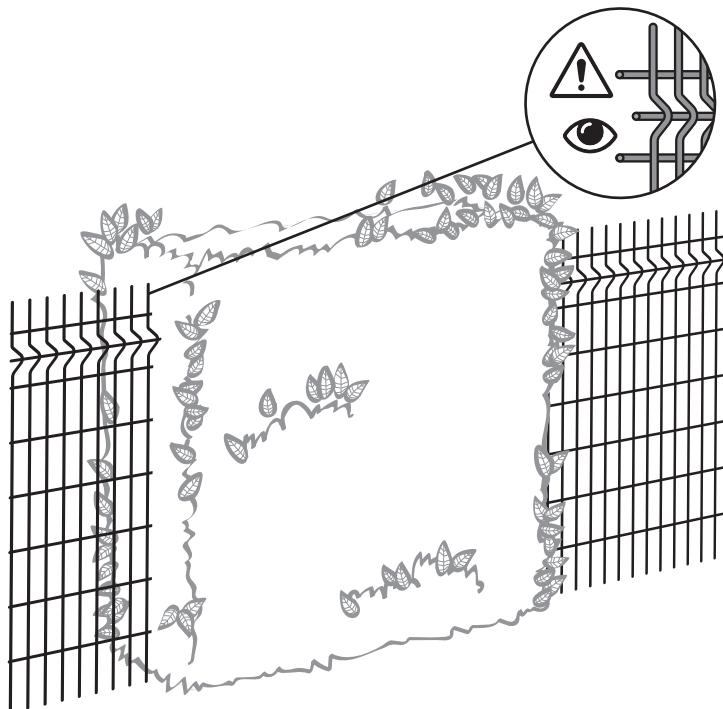
3.2

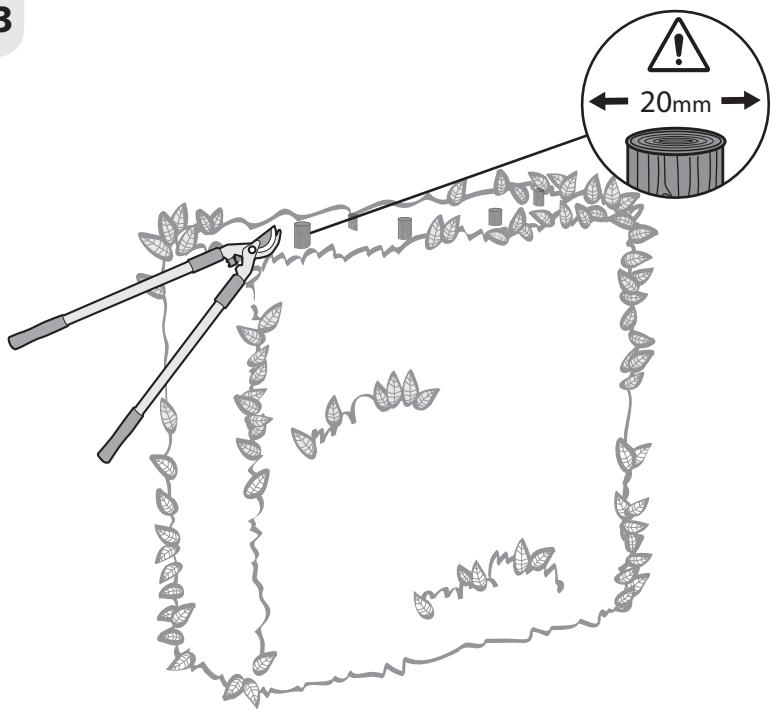
3.3
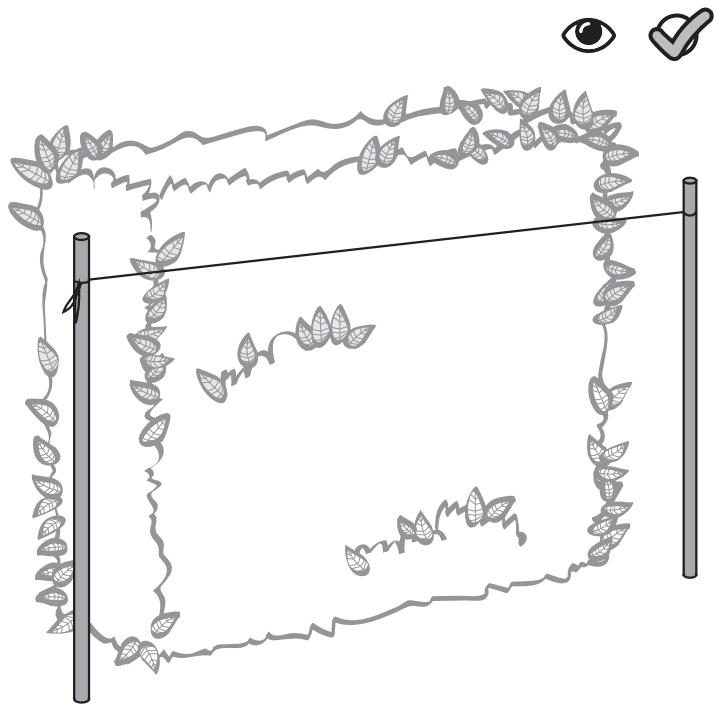
3.4

4.1
1
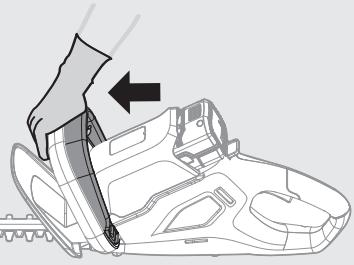
②
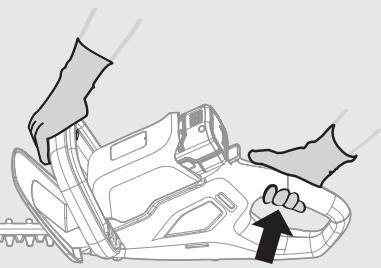
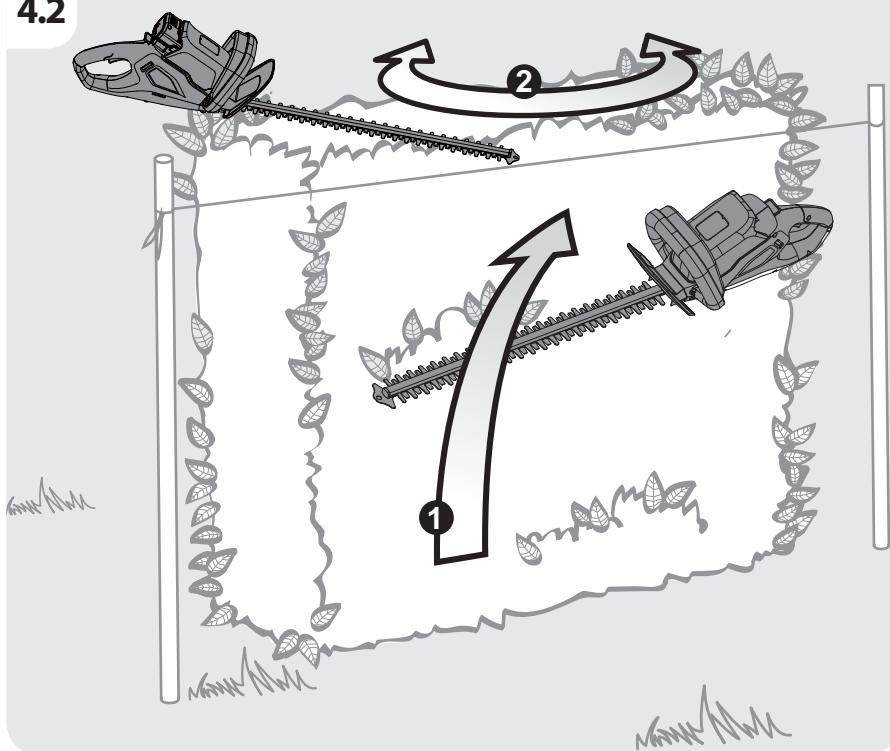
4.2
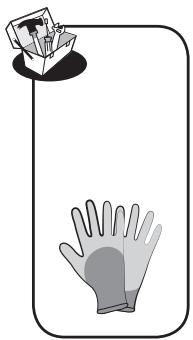
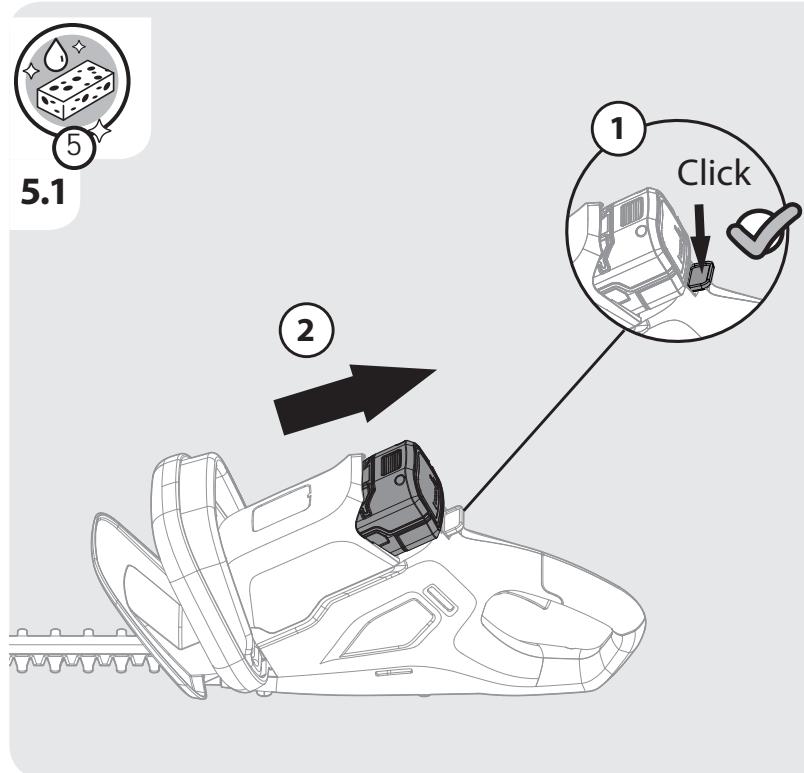
5.1

5.2


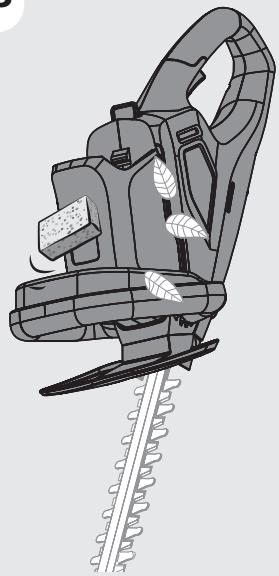
5.3
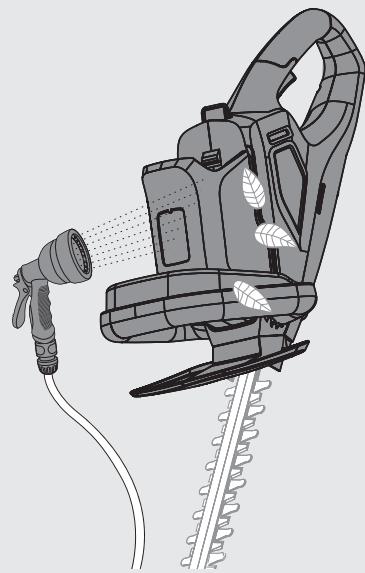
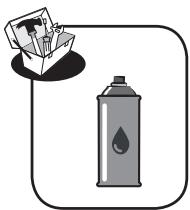
5.4


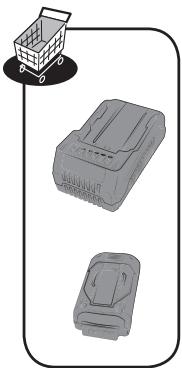

6.1
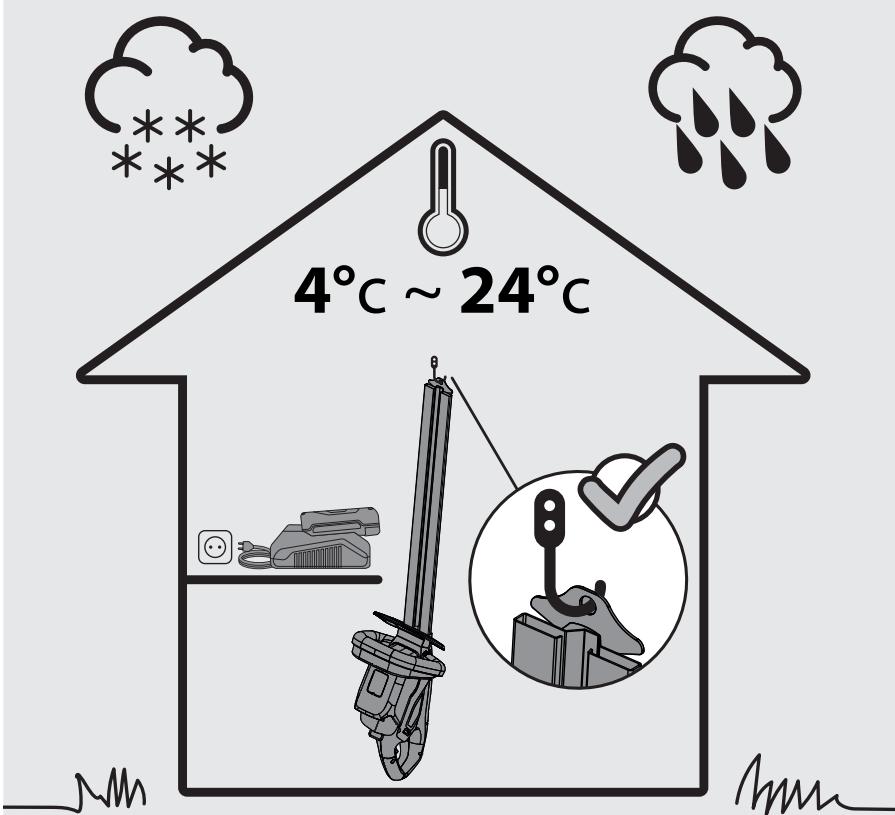
Ce produit est recyclable. S'il ne peut plus etre utilise, veuillez l'apporter dans un centre de recyclage de déchets.
Este producto es recicable. Si ya no se可以选择 usar, Ilevelo a un centro de reciclaje de residuos.
P Este produits e recicl的身体. Se deixar de o'utilizar, entrega-o num centro de reciclagem de resíduos.
13 Questo prodotto può essere riciclato. Se deve essere smaltito, portalo presso un centro de reciclaggio.
Auto to npoiov elvai avakukwioipo. Eav mtopei nIevov va xpnoiopoin8ei, etaepete tnv oe kantoio Kevtro avakukwonc anoppmuatuw.
PL Ten produit PODdawany jest recyklingowy, kiedy przystasteby uzyteczny nalez y dostarczyc go do punktu zbiórki odpadów.
NTIpojKTMOKTepepa6aTbBaTbc. Ecnn OH 60nbJe He npiroeH IJI POJIb3OBAHn, cJaTe ero B yTuJIN3aUIOHHB JcHTp.
bIyIeHIMKaIaTeHJeYeReKeJIeI. OHJI api KOnJaHyfA 6OImaTbIH KaFdaNJa, OHJI KaI Ta EHNeiTIH opTaIbIKKa TaNCbpyBuHb3DbI eTIHeMl3.
U A Κeɪ npódykT Mɔke nepeρo6IaTnCS. JAKUO BOHO 6IJIbIe He c npndaTHe dIa BVKOpncTyBaHHA, 3daiTe NOrO ByTuNlIaIciHmI ΣeHTp.
Aceast produs este reciclabil. Dacă nu mai poate ti folosit, va rugămăi aduceți intr-un centru de reciclare a deșeurilor.
EN This product is recyclable. If it cannot be used anymore, please take it to waste recycling centre.

ADEO Services
135 Rue Sadi Carnot - CS00001 59790 RONCHIN - FRANCE
TOB J'Epya Mepnem YuKpaHa,Byn. POnpa 17a,M.KiIB 04201, YuKpaHa
HmnpotepIprodabueuVnUOYHOUMOHcEHNOE pinnIMATb npTeHNsNo KAcETBTOBaT
Ha terepntopn Poccncko Fedeepaunoo OEPYAMEPNEH BOCTOK》,141031,MO,r.MbTuu,OctaUkoBcKe ooce,d1, PΦ
HaMeHOBaHHe n aDpeoPn3B0dntTena: XeKsHaNr Yt 3NeKTpkAnIpnnaAeKo, Tp.1No15O BcHbNy PoAa, IOnCnHb TaYh, HaNxy DnctPnk, U3aN, YkCz3aY, KItTa/ KbTaan
C E E A C


Made in China /3po6neho B Kntai /CdenaHO B Kntae /KbtaJa JxacanfahManufacture date /Data npo3B0vctBa /DaibHdaFah Kyhi:
SERIAL NUMBER
Cpok cnjx6bl 5 neT / Kb3MeT Mep3iM: 5 xbln
Imported by Adeo South Africa (PTY) LTD T/A Leroy Merlin Hosted in Leroy Merlin Fourways Store 35 Roos Street Witkoppen Ext 97, Sandton, 2191 Johannesburg, Gauteng, South Africa
IMNTOPep/ Iprodabueo/ Opragna3aun, PnHmHaOuLdA
IptepEnnnno KaoceBtu npdoKUyn B Pecny6bnke Kaaxctan:
TOO /Jfpeya Meplen Keazacth>0.050000, Pecny6bnke Kaazacth, r.Almatb,yn.Kyhaebaa, n77,BLc/PARK VIEW), 6
zTakn, oPhi N' 07.
UHMnopTAYlBb/CTaYbIb/Ka3aKCTAH Pecn6y6NkncsHnDa 9HIM Capanch60bHHLHa Hapa3bJIbKTAPDH Ka6blJdAHTBH yHbM: I'Lepya MePnEh Ka3aKCTAH KLLJIC. 050000, Ka3akctah Pecn6y6NkncsHb,AmTaMbK, Kaohae BkUeeci,77y,«PARK VIEW» BO,6-Ka6at,07-KeHcE.
HmnpotepIpIpoBADeUIIuOyIOnHOUMoCHHeO npHnIMabT pIteHnIIO KcAeCTbYBaTOPA: OooI'Lepa MpehEnBeB, 220020, Pecy6NbiKa BenaPcyb, ropod MMnck, npocNeKT Pio6eJiteneN, 100, ophi503
- SYMBOLES FIGURANT DANS CE MANUEL
- EXCLUSIONS DE LA GARANTIE
- A NOSSA GARANTIA
- USO E MANUTENZIONE DELLA MACCHINA
- H E R F Y H S H M A S
- EIAPESEI EETYHSH
- SYMBOL NA PRODUKCIE
- NASZA GWARANCJA
- OBCNJYKNUBAHNE
- OBLIe IPEyIpyEHHIO TEXHnke B3OPIACHOCTN 3JIINJ:
- OCTATOUHbIE PNCKN
- TAPAHNTHbIe NCKJIouEHn
- 3NEKTP KYI EPEIH NAI DAIANY KE3IHDEI KAYINCI3IK
- KEKE KAYIIC13IK
- KABdIbIKTbI PAIДАЛAHY JXHE KYTIM KOPCETY
- BATAPERJAH JYMBIC ICTEITIH KYPALI IAIJAHAUY XOHE KYTIM KOPCETY
- KbI3MET KOPCETY
- BYTAKTAPdbI KECyTE APHAJIFAH JABdbIK KAYINCI3dIIG XOHIHDEI ECKEPTUJIPE:
- KALybl MYMKIH TəYEKEJIDEP
- K¥PACTbIPY
- KANTAMADAH LbIFAPY
- OPHATY
- ПьшakЖузIHижа6bHbIb:2.1-cypeT
- BaTapeJnap XINHaftbIn OPhaTy/aIbIn Tactay: 2.2-cypet
- BiPIHLLI PET KOJIДАНУ
- Kbl3MET
- Thimdiicke kocy 4.1-cypet
- ETEP OHIM KYJANI KETCE, KATTbI COKKbl AJCA HEMECE BIPKEJIKI EMEC DIPINI NANDA BOJICA, OHIMDI BIPDEH TOKTATbIN, 3AKbIMdAIFAHbIH TEKCEPIH3 HEMECE DIPIJINIH CEBEIH AHBIKTAHbI3. KE3 KEJIrEH 3AKbIM TlICTI TYPDE JOHIIJEVIHEMECEOKIINETIKbI3METKOPCETYOPTAJbIFbIMEH AByICTbIPblIyblI KEPEK.
- Kecy:3.1 KHe 4.2 apaIbIbIbIaIbIcypeTtep
- TACbIMAJIAY
- 5.1KABDbIKTbITACbIMAnJAY
- 5.1-cypet
- JIHTN BATAPEJIAPbIH TACbIMaJdA
- KbICKAДaIbIHdAY
- 6.1-cypet
- CAKTAY
- 7.1JXABdblKTblCAKTAY
- JI NT N BATAPERJIAPbIH CAKTAY
- 6.1-cypTe
- TEXHNIKAJIbIK Kbl3MET KOPCETY
- T3AJIAY
- KY3ДЕРДI TАЗЛАY
- AKAUYAPDbI XOIO
- ΘЛIMME ΘKEJIETIH KAFДАИAP
- Kbl3MET MEP3IMIHICHOHbl
- KENIIIK
- bI3dIN KENIIIK
- KENJIJIIKKE KIPMEI TH XAFDAIAP
- Bctyn
- BAЖЛИВО! 3БЕРΙΑΥTE ПОСΙБΝΚ ДДАПОДАльшOTO ВИКОΡИCTAHΝΗ.
- PEKOMEHIOBAHO YBAJKHIO PPOUYTATN
- BKNKOPNCTAHHЯ AKUMYJIaTOpHIX HOXNUcIb IJIaPiDPI3AHHЯ KINBOJLOTy 60 CM
- IHCTPYKlii 3 TEXHIKNBe3NEKN
- 2.13AΓΑJBHI 3ACTEPEXΕΗ ΚΕΧΙΚΟ ΒΕΜΙ
- CUMBOJN HA IPIPNCPTOJI
- IEPLIIE BKNOPNUCTAHN
- EKCIJIYATAUJIA
- 3anyck npictpoio: iInoctpaizia 4.1
- BukopncTaNnH npncTpOIOJIIOCTpaiz 4.2
- KLIIO IINCTPII YIAB,IOCTPAXIAB BID CNJIbHOY UAPY ABO IOUAB HENPIPOJHO BIBPYBATN,HETAIHO BIMKHITB MOTO TA NEPEBIPE HA HARBHICTb NOLIKOJXEHB ABO 3HAUNDITb PPNHUY BIBPAUI. Y.PA3I BYIb-RAKNXIOLIKOJXEHB HEOBXIDHO 3DIINCHNTI HAIEXHM PEMOH ABO 3AMIHNTI DETAJI B ABTOPN3OBAHOMY CEPBICHOMY CEHTPI.
- Piipri3aHH: iIIOCTpaiaB iD 3.1 do 4.2
- TPAHCIOPTYBAHH
- TPAHCIOPTYBAHHI PNPCTPOI
- IInoctpaia 5.1
- TPAHCIOPTYBAHHJIITIEBHX AKUMYJATOPIB
- 306PAXEHH BPO3IBPAHOMYBnJIa
- YCYHEHHH HECNPABHOCTE
- HE6E3NEUHO! PN3NK YPAJXEHH EJEKTPNCHM CTPYMOM. OBEPEXHO! IEPEN YCYHENHm Byd-b-AKNX HECIPABHOCTeB BMKHITb PIPNCPTI.
- IMPORTANT, KEEP THE MANUAL FOR LATER REFERENCE : READ CAREFULLY
- INTENDED USE OF BATTERY HEDGE TRIMMER 60CM
- SAFETY INSTRUCTIONS
- GENERAL SAFETY WARNINGS
- - General Machine SafetyWarnings -
- WORK AREA SAFETY
- ELECTRICAL SAFETY
- PERSONAL SAFETY
- MACHINE USE AND CARE
- BATTERY TOOL USE AND CARE
- SERVICE
- HEDGE TRIMMER SAFETY WARNINGS:
- RESIDUAL RISKS
- TECHNICAL DATA
- ASSEMBLY
- UNBOXING
- INSTALLATION
- Blade cover : illustration 2.1
- Installing/Removing the battery pack : illustration 2.2
- FIRST USE
- OPERATION
- Start the product: illustration 4.1
- IF THE PRODUCT IS DROPPED, SUFFERS HEAVY IMPACT OR BEGINS TO VIBRATE ABNORMALLY, IMMEDIATELY STOP THE PRODUCT AND INSPECT FOR DAMAGE OR IDENTIFY THE CAUSE OF THE VIBRATION. ANY DAMAGE SHOULD BE PROPERLY REPAIRED OR REPLACE BY AN AUTHORIZED SERVICE CENTRE.
- Trimming: Illustration 3.1 to 4.2
- NOTE : WHEN SHAPING IT IS ADVISIBLE TO ACHIEVE A TRAPEZOIDAL SHAPE. A TRAPEZOIDAL CUT CORRESPONDS TO THE NATURAL GROWTH OF PLANTS AND RESULTS IN OPTIMAL HEDGE GROWTH, AS IT WILL EXPOSE MORE LIGHT TO THE LOWER END OF THE HEDGE.
- TRANSPORTATION
- TRANSPORT THE MACHINE
- TRANSPORT THE LITHIUM BATTERIES
- WINTERING
- Illustration 6.1
- STORAGE
- STORE THE MACHINE
- STORE THE LITHIUM BATTERIES
- MAINTENANCE
- CLEANING
- Illustration 5.1 to 5.4
- EXPLODED VIEW
- TROUBLESHOOTING
- 8.5Fatal Circumstances
- END OF LIFE
- WARRANTY
- OUR WARRANTY
- WARRANTY EXCLUSIONS
- STERWINS
- Directive 2000/14/EC Annex V amended by 2005/88/EC
- Eric LEMOINE
- Rue Sadi Carnot - CS00001 59790 RONCHIN - FRANCE
- C E E A C
Brand : STERWINS
Model : 40VHT2-60.1
Category : Hedge trimmers