USER MANUAL TH50DP6RF EQUATION
FR THERMOSTAT DAMBIANE DIGITAL PROGRAMMABLE SANS FIL POUR CHAUDIERE. INSTALLATION MURALE OU APOSER.
ES TERMOSTATO DE AMBIENTE DIGITAL PROGRAMABLE. INALAMBRICO. PARA CALDERA, INSTALACION DE PARED O PARA DEPOSITAR.
PTERMOSTATO DE AMBIENTE DIGITAL PROGRAMAMVEL,SEM FIO. PAR CALDEIRA,MONTAGEM MURAL OU NO SOLO
1 TERMOSTATO D'AMBIENTE DIGITALE PROGRAMMABULE, SENZA FILLO PER CALDAIE. INSTALLATION A PARETE O A INCASSO
ELIPOHAIKOSI PIPORPAMMATTZOMENO GEGMOSTATHX XPOPO, AZYPMATO. IIAEBHHTA2, ETKAIZTAZAH H TOIIOETHZH STO TOXHO
PL CYFROWY TERMOSTAT POKOJOWY PROGRAMOWALNY, BEZPRZEWOODYOW. DO PIECOW, INSTALACIA NAsciENNA LUB WOLNSTOJOAÇA.
RUMPOBIMIPTOPRAMOBAHIMKIMHATHMTEPMOCCTAT, E3P1POBJDHMJN.ДЛТКOTNIIBMOHTAK.HA CTHI AEO KQPDM.
U TERMINOSTAM AMBIENTAL DIGITAL PROGRAMAMABIL, FARI FAR. INSTALPE ARE PERETE SAU MONTARE.
EN DIGITAL PROGRAMMABLE ROOM-TEMPERATURE WIIRELESS THERMOSTAT FOR BOILERS. WALL-MOUNTED OR FREE-STANDING FITTING.
| REF | EAN |
| TH50DP6RF | 82823694 | 3276007196177 |

FR Manuel d'instructions
IT Manuale di Istruzioni
RO Manual de Instrucibili
ES Manual de Instrucciones
EL Eyyepiio 06nyiwv
UJ KepiBnHtBO Tio 36ipui EKcnPnyatauji
PT Manual de Instruções
PL Instrukcja Obstugi
EN Instruction Manual
FR : Introduction - Installation 6
ES : Introduccion - Instalacion 15
PT:Introducao-Instalacao 24
IT : Introduzione - Installazione 33
EL:Eioaywn-Eykaataaon 42
PL:Wpwadzenie-Instalacja 51
UK:BVeJeHn-ycTaHOBKa 60
RO : Introducere - Instalare 69
EN:Introduction-Installation. 78
FR : Utilisation 7
ES : Utilación 16
PT:Utilização 25
IT : Uso 34
EL : Xpnon. 43
PL:Uzytkowanie 52
UA:BukopncTaHHa 61
RO : Utilizare. 70
EN:Use 79
FR:Dépannage 13
ES : Reparación de averías 22
PT :Solucao de problemas 31
IT :Risoluzione problemi 40
EL:Avtietwion npoBλnátw. 49
PL: Rozwiawyanie problemow 58
UA: ycyhenn HecnpabHocTei .67
RO : Depanare. 76
EN:Troubleshooting. 85


x2

x2


Recepteur
Receptor
Receptor
Ricevitore
E Koutl 8ekm
PL Odbiornik
RO Receptor
Ua PnIMaY
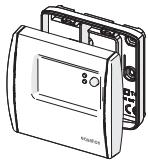
EN Receiver box
FR Chaudière
Caldera
PT Caldeira
Caldaie
EL AeBntao
Piecow
RO Kotnib
UA Boiler
EN Boiler


B1
B2
INTRODUCTION
19^ xnoiopoowvac to nAkpO kai 8a aaaaEiautouatao2 21^ otic 12

Parjote AUTO (kevpiok nklkpo) yia vaaykaotee mia eipoepn otyn npoypaatouevn 8epuokpaoia xupic vnepeve t e enouevo diadotma.

PntjATEe +1 wpa ( E[ ] ] ) vya va nepiopiaTe nV npieo do npakqpsiC ot mla wpa.
Aetoupyia biakonow
Aut n leitoupyia oac etupente i va npoypaumatiae me ia sta8epn 8epkoopaia yia evan eileyveo apiigmo npeuiv, npokieevou va ieiwote to evpeyeiak kostoc.
1- PlaTte MNOE (Apriatoepo nIaKtopo) yia va mezabeite stoe mevov nooyapauatuw, to oujbo kai nEvbei(ENPRC) avoabdbrivouw
2- Patae doo paoec to aivaBooBryei to ouboLo kai n evieicn FIFY
3- Patajate via eniBaeBaiwou, eauavicTeaui n evEeNkai avaooobhveo aopoiucuow npuepiv
4-Pu8muotovapio8o twv npewv xnoqoiowvtac ta nkiKaai
5- Patajate yia embebaowon, eayawicetan n evdeicn Tcai avaoboebjvne 8eepkaoda
6-PuBtiote nTn EtnBunnt depuokpaia xonoiouoovtac ta nktca kai
7- Patajote yia embebaiolon, o unolomoc apiohuc nepuivb aalacie kade mepa ta eovuxta
8-Γακύρωη, πατήσε ΜΕΝΟγ (αρισερό πλήκορ) και σηουνεξι απατήσε γι εἰμεβαίωη


m = 311 ;
Autur n EIOU OIOEIKVUIO iou auto npoiov Sev npei e va anopiprrtae aokai oikiaox amopipmuataou 6ev
Evou unoei baioyu, Eyj tebe oie ouvo enu ovoeutk uotoo yua tvn aoeppki tvn eibcky epeia
Xyogonotniueuvw Nekxpiuiv kai Nekxpioviuov oukeouei, to omoi npoiabvei to biokiuwa taw
KatavaLauiv v zntov avo tou tauiTe, v avakouv duapeiv tic xnpovtoimouevc oukeueic me ynv apoy
veuv oukeuvu, kabiuc kai tvn Eijkui olayov tetoavm oabTAVOTnv ovkyekpuovv opoviauoc.
Ira pereaoepse, nnaopoopec, mpoepie va eioouovneote me to katoaunac oae n ag thnoaegio tnc
oac H noatopopov wynogonotniueuvw Nekxpiuiv kai Nekxpioviuov oukeouei eoafalkei tvn
KataaAanr tneepyaeia kai aauokuaon toic, oate va anopoeuyetai nguidia yia to npepiabaaov ka t nydmoia ueia, ka via staipnuo i ooiyoi niok opioi.
BCTYI
Kimhathni Tepmoctat BMKae i BMKae CNTEMP OANENHn, 106 oTPMaTHN nOPIbHy TEMEPATpy (3aadhy TEMPATpy). BIn BHNAHae TEMEPATpy NOBtI r I npoiBHeC II 3 aadHO TEmEPATpyIO. Kluo TMEPATpy HABKOINHbBOO ceredobou NHXe ZAADHO TEMEPATpy, TEPMOCT AT BKNIOHTs KOETI i BMKKhe IHO, KOJIa 3aadHa TEMPATpyo Byde DoocarHY, tak dani.
EneoeepKTHHCTb3a63eNeUcTbca aonrpoTMMpeyIIOBAAHH TPI, kAnm cAmOHABVAETcRa ta aadTpyCTcdo HABKOINHb0o cepeOBDuia 3 a63eNeUcpeTbeNHN KOnPbI TMEPATpy 3MiHMaN HCM cNOXBAHNNM EHPeTI. IaONtHMnAHO HanaTuYBaHNA bCTAOHbITbNbKy TMEPATpy (HaNPKNaD, 18^ ) i KxKHOg DnA 36InbUyTe rpaDC, uO6 DCaTGN TMEPATpy, kA BAM NIOXDbUT (KOMpO7 TMEPATpy).
TEMPOCHTeB ENIINBAE HA NOTyKHCbTc KOTNa, TOMY HEMAc ENo6xIHDoHCTc BCTAHOBNtBAMn 6Bilu BnCKO TYMNEPATpyD nnpIKNOPCEHnARHAPBIIaHn
Kyu laipodotopr Ochuahenei Knaahanamu (pyuHMMa a6o TepMOCTATyHHMn), nepekoHaTIEc, 00 biKDpNTI Kaanana H aRaipatodopax P3tAloTHaOHNbX bT i Sami KMIHATU oTo TEPMOCTAT.
TeMpOCTAT CUMICHNI M OMDYIOHQUKMM KOTLAMM, ANE 3HJXKYE IX pNDQYKTNBICTB. B1I CUMICHNI 3CITTEMOO NIDIPIBYI nIIpONRnA KJILOO BHKIOVAe IIOBOH CYCTMEY (yInpabINHHRApaHO BOIO NOBHNO 3dIHNCHOBATNC INHIOO CTHEMO).
TeMOPoT 38'AYETbToI NO 6E3DpOTOBI MEPEKI 3 PrIMaMbNHPMNCTPOEM, AIKI NIIdKIOHHeHHI DO KOTNa. JAKTO EeMOPoTAT BTPAe 3E6DpOTOBI 38'3E0K ABO HecnpabHHN, KOEt MOKHa AKTNByBaTHn ABO dAEKTHBByNTBpyUHy 3a DonomOgHO KHONKn HA prImaMbHOMN pIcPtoI.
BCTAHOBJIENHJ
Tepmoctat NOBENHE 6yTN BCTANOBHn HcTAI 60nepeperopDIO, nOndai bID 6yBN-8KHX JDEpen I Tenna (paiaTatopa KAMHIA, COHJI) nPOTIRB (BIKOH, DEpeRI), H BAOTCI B1 N 1,2 M 0,1 M 0
BctahOBJIeHHaTnTaYacy
1-Hamuchimb MEHIO (niey KhoNy), cumoI 3HouHeHH PR[]6nMaOmb.
2-Hamuchim▲(KhONa HanaumyuehaHnmepepympy),uobyeiun8meho HanaumyueHHn,cumeon313eueHHSEETnuaum.
3- Hamucimh (npaoy kHONky), zuo ni meepdumu, eioobpaKaemcpi k i6nmae 3naueHHAR.
4 - Hamuchimb, u6nb ndmeepum, pik 6bnmuae.
5-BcmaHOeimb pik 3a donom02o1 KOHNOK i▼.
6- Hamuchimb, uip6 ni3meepdumu, 0606paxacmbc3nMIC8b1bnmuE3HaoeHHA MNTH.
7-Hamuchimb,u6o niOmeepdumi,micu6bnmuae.
8-BcmaHOBimmbicray3a donom02oKhONok ▲ma▼.
9-Hamucihmb,uo6 niomeepdumu, biodopaxaemcbsa deh b 6nmae3Huehen HJ4Y.
10-Hamuchimb(),uo6 niadeepoumi,deh6bnmuae.
11-BcmaHOBimbdeh3a donom02oKhoNOK maV
12 -HamaChmb,uo6nmeepduu 8ie06paXaeCTc2oDuaH 617mUOE3HHeHH HDLJR
13-Hamuchimb,u6o niomeepdumu,200nda6bnmuae.
14-BcmaHObimbac3a donomozoKhONOK ma▼.
15 - Hamuchimb (2), uo6 niMeepdumu, e06paQohjOBcXaBUNU H1NIMae 3HauHHA MING.
16 - Hamuchimb, uo6 niomepeodmu, xunuHbunmaomb.
17- BcmaHOeimb X8uJIuHua 3a donomO2oIO KHONOK a
18 - Hamuchimi, uop6 niomepoumu,


BixnHHe 3NaueHb TempepaTpy
B pekmni ABTO moKHa koperByaTH 3a4aHy TempeAtpy 3a donomoro KhoNOK Ta V. Lc TIMcObe
HanaTuBaHaNha Bye CkAcobAoH NiD Yac BnKoHaHH NaCTyHOrO 3aNoPramoBaHO rCaOBorO dian30Hy.
PnKla:Maemocy60Tu,10roHna paHky,TempepaTya 3anpoTpaMoBaHa Ha 18^ ,II MoKHa 3bIbHTn Do 19^ 3a
DONOMOROIO KHOKNK ▲,TODI BOHA ABTOMATUHIO NIDHIMETbCDO 21^ 012roDNHI DHA.

Hamauchim ABTO (JeHmPbALy HKONky), uO6 npumyco8 noepymuc do aznoepamBoHO memnepampy, He 4ekauu buokouHHaHcmyTHIO dian3OHy.

Hamuchimb ^ 十 2 0 日 npaBkyKnKny, uo6 ozmekumu yac bixunenHra do oohie ooduH.
Pekim Biptyctkn
LZyHnKzIqdoZbOBoJrE3aIporpamByTuNoCTiHyTeMpeAtpyHa o6paHy KInbKiCtB dHIB, 0o6 3Hn3HTN BNTpaTn Ha eNeKTpoeHepriQ.
1-Hamuchimb MEHIO (niye KhoNky),cumeon i
3nueHHPRG6nuaomb.
2-ДишamuchimkhONKNY ▲6numamume cumbeon
13HueHHH
3-Hamuchim(),u6nidmepdum,ei06paKaemcba
3aHHeHHI 61nmae KInbKmcb dHie.
4-BcmaHOeimkbInbKicmbdHie3aDonomO2oKNOHOK
i
5-Hamuchimb 0u6 niombepuumiu,biooepaekemcb3auhenyTEM i6nmae memnepamypa.
6-Bcmaohoeimb Heo6xiohymemnepamypy 3a donomooKhonok a
7 - Hamuchimb (), no6 niidmeepdum, kibkicmb thie 0e 3auiuunacr, 3mHoeamumembc 0oohn oniouhi.
8- LlO6 cKacybamu Hamucimb MEHIO (niye KhoNy), a nomim hamucimb 7nra nIiMoepeJxHnn.
BLOKYBaHHa KHOIIOK
1- LlO6 3a6noky8amu KhONku, oDHOACHo Hamuchimb i
ympumyume MEHIO (niay KhoNky) i O (npaoy KhoNky)
npomra20m5ckyhD. Biodo6pa3umbcya cumeon
2-LL06po36nkyamu noemopimb mi cami Kpoku.
ONTIMaJIbHn CTAP
Ley terpoctat 6nlaHann HynkuiioNTmiaui,ra
CnpmaObHa Ha ekOHOMIO eHeprii np36epKeHHI HanEHHoro
pIBH KOMΦoPTy.
Tepemctory biOOM, ckiKbNcVHAC pOITBOI nAor, 0oB 6DyHKy 6bny DCsRHY 3aadaHO tEmnepatypm, TOM bIH BIMKAe OAnenHnE TPOX pAHiye, 0oB DCsRTI eI ITepeNTAPYy 3yIapORAMoHauhN.
3a 3amOBuyBaHHm ONTtMI3aIi BIXkIIOHeA. LioB i3HATnCRA II AKTNByBaTu nIM.b.IHCtpyKII pexkMy
BCTAHOBNeHHA
KoHnOTmM3aizuo kAHTMB0aHO bIDOpaKaCTbC mCBNO1
PexkIM BCTaHOBJIeHHA
TepmoctaHanauTobAHnHa3abOdiIyynpaBInHHra3OBIMKOTlOM.
Pexim BCTAHOBHeHn 03BOIe 3mIHNTn 3aOdbcki HanaUyBaHH, DToPmMyOuChb Hnue3a3Haehnx 3Haehb.
UCYHEHHRA HECIPABHOCTE
Hecnpaehocmi o pobmi yacmo buuknukhi He3zHauHUMu npuHAMU. O3aoumme 3 m6nueho Huxche, nepuHX zepemumuc do cpeicHOi cyk6bu. Lle zaoadumb amcvac i no36abumb iB dn Henomp6hux eumpam.
The room thermostat turns the heating system on and off to obtain the desired temperature (set temperature). It detects the air temperature and compares it with the set temperature. If the room temperature is lower than the set temperature, the thermostat turns on the boiler, and turns it off when the set temperature is reached, and so on.
Energy efficiency is ensured by a self-learning TPI control algorithm, which adapts to the environment and provides tight temperature regulation with minimal energy consumption.
To obtain an optimum setting, set a low temperature (18^ for example) and increase degree by degree each day to reach the temperature that suits you (comfort temperature).
The thermostat does not affect the power of the boiler, so there is no need to set a higher temperature to heat faster.
If the radiators have valves (manual or thermostatic) make sure that the radiators located in the same room as the thermostat are open.
The thermostat is compatible with modulating boilers, but with a reduction in performance. It is compatible with floor heating system if included in a full system by a specialist (hot water control should be managed by another system)
The Thermostat communicates wirelessly to the Receiver Box which is wired to the boiler. If the Thermostat loses wireless communication or becomes faulty, the boiler can be switched on or off manually using the button on the Receiver Box.
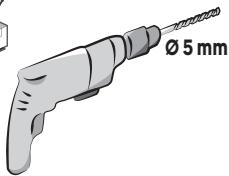
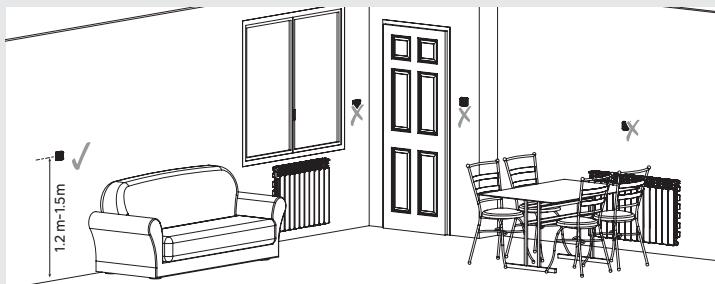
INSTALLATION
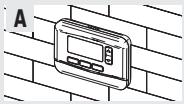
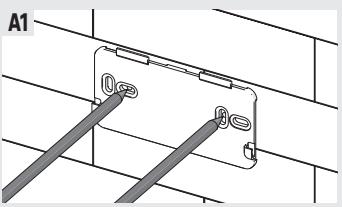
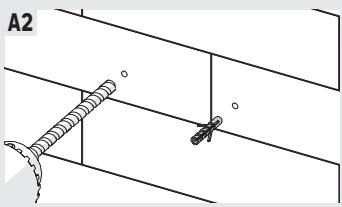
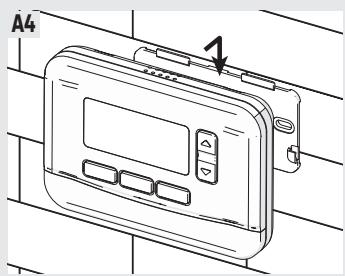
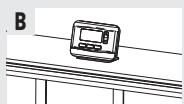
The thermostat must be placed, or fixed on a wall, away from any source of heat (fireplace, radiator, sun) and drafts (window, door), at a height of 1.2m to 1.5m .
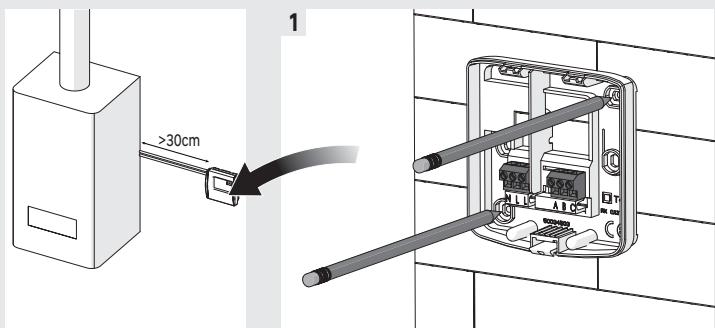
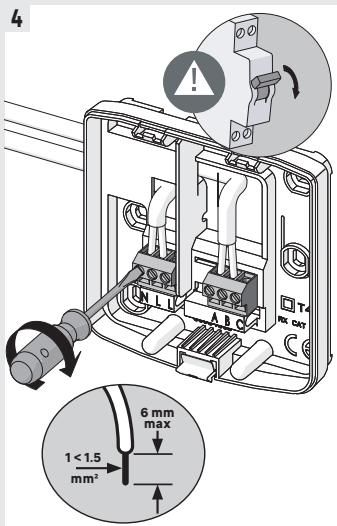
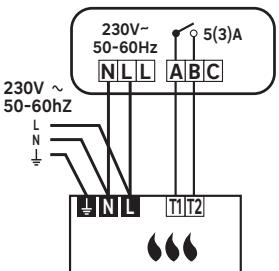
The receiver box must be connected to the inputs for a "ON/OFF" remote thermostat (T1 and T2) of a boiler, regardless of the polarity, and on a 230V - 50 - 60Hz power supply. It is important to connect phase (L) to terminal L of the receiver.
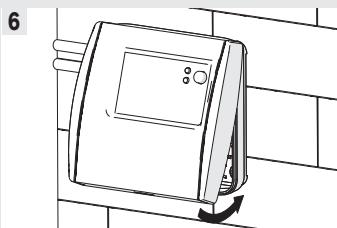
The Thermostat and Receiver Box in this pack are pre-bound.
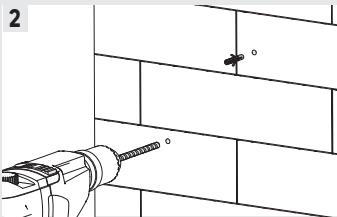
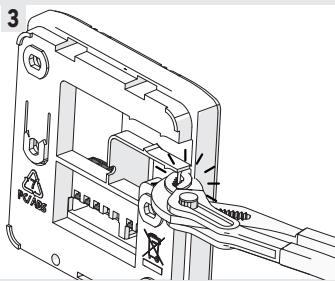
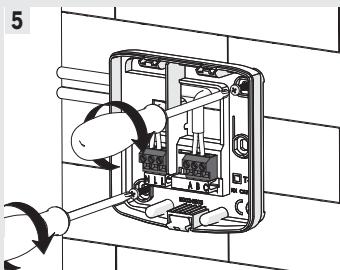
The installation must be carried out by a person possessing the required qualifications while respecting the national wiring standards in force.
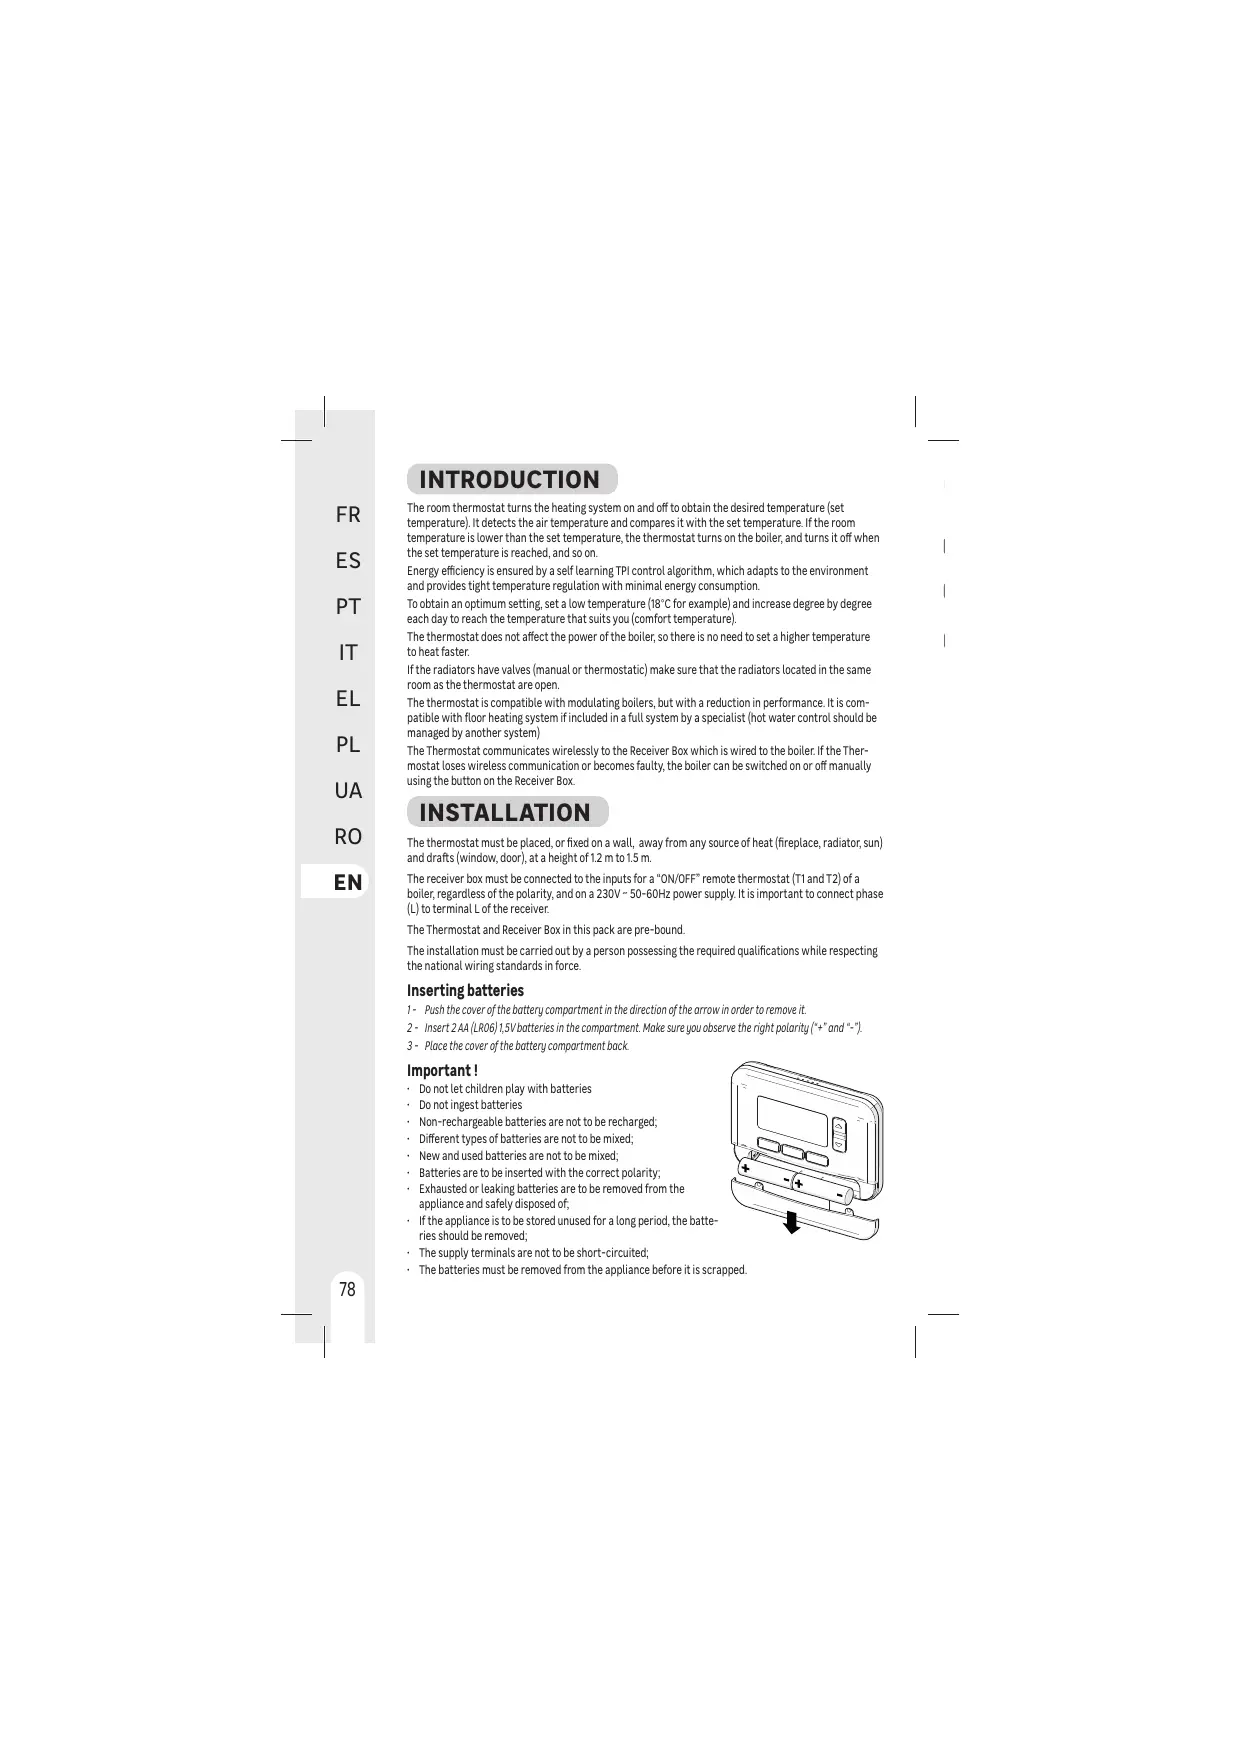
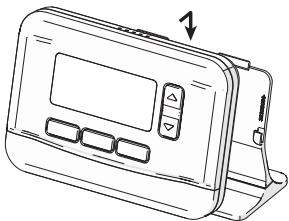
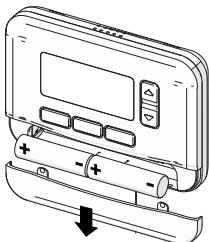
Inserting batteries
1- Push the cover of the battery compartment in the direction of the arrow in order to remove it.
2- Insert 2 AA (LR06) 1,5V batteries in the compartment. Make sure you observe the right polarity (^+ + " and -
3 - Place the cover of the battery compartment back.
Important!
- Do not let children play with batteries
- Do not ingest batteries
Non-rechargeable batteries are not to be recharged;
- Different types of batteries are not to be mixed;
- New and used batteries are not to be mixed;
- Batteries are to be inserted with the correct polarity;
- Exhausted or leaking batteries are to be removed from the appliance and safely disposed of;
- If the appliance is to be stored unused for a long period, the batteries should be removed;
- The supply terminals are not to be short-circuited;
- The batteries must be removed from the appliance before it is scrapped.
USE
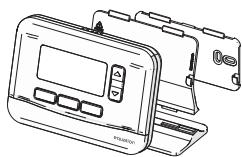
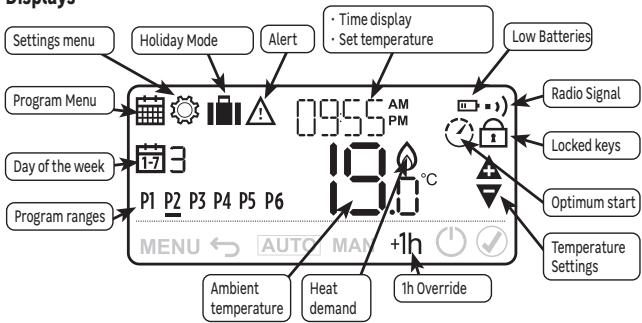
Displays
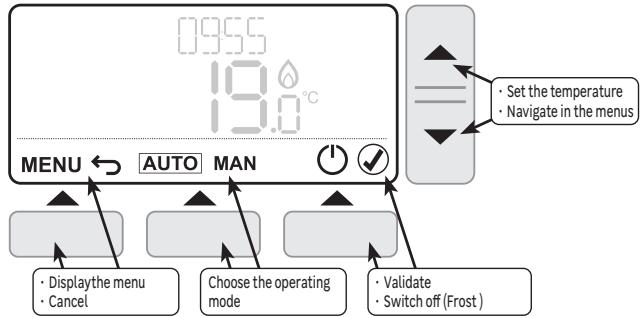
Controls and navigation
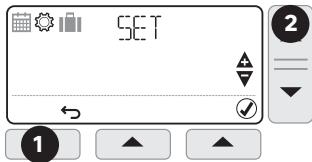
First start-up
When inserting the batteries for the first time, it is necessary to set the user's language, the date and time, and the type of programming.
1- Choose the language using the and keys
2-Press (Right key) to validate.
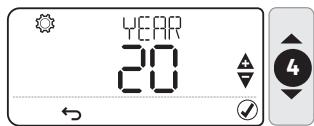
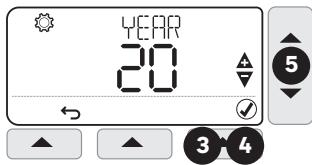
3- the indication YEAR is displayed and the year is flashing
4- Set the year using and keys
5-Press to validate.

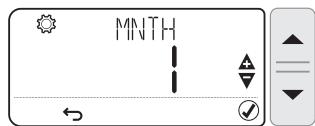
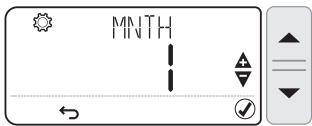
6 - Set the month using and keys
7- Press to validate.
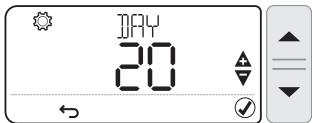
8- Set the day using and keys
9-Press to validate.
10-Set the hour using and keys
11-Press to validate.
12 - Set the minutes using and keys
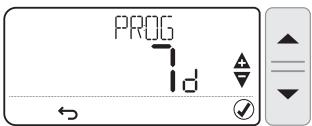
13- Press to validate, the indication PROG is displayed and the type of programming is flashing. Set the programming type using and keys

The programming type "7d" allows to set different time ranges for each day of the week.
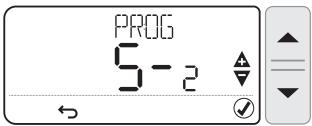
The programming type "5-2" propose a setting from week days (from Monday to Friday) and another one for week-end (Saturday and Sunday).
14 - Press to validate.
Operating modes
Several operating modes are available:
- AUTO: The thermostat follows the pre-recorded internal programs for each day of the week. These programs define which temperature to set for each of the 6 time ranges of the day. It is possible to customize these programs.
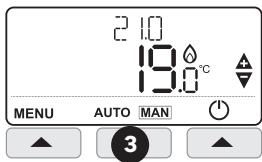
- MAN (Manual): The thermostat constantly monitors the set temperature using the and keys.
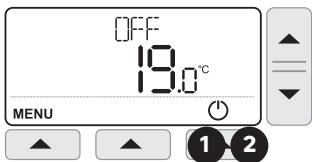
- OFF (Frost Protection Mode). The thermostat maintains a temperature above 5^ to protect against freezing.
Change Operating mode
1- Press (right key) to put the thermostat in Frost Protection Mode, FFF is displayed
2- Press again to activate the thermostat, CFF disappears
3-Press AUTO MAN (central key) to switch between AUTO and MANUAL modes

It is not possible to activate AUTO or MANUAL mode when the thermostat is in OFF Mode.

A long press on ▲ and▼ keys scrolls the values quickly.
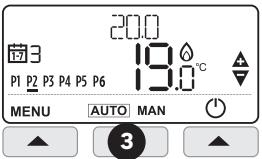
AUTO mode programs
The AUTO mode allows 6 temperature level changes that can be programmed for each day between 12:00 am and 11:50 p.m. Each temperature level can be set between 5^ and 35^ by steps of 0.5^ . The default programs are:
Monday to Friday (days 1 to 5)
| Range | P1 | P2 | P3 | P4 | P5 | P6 |
| Time | 6:30 | 8:00 | 12:00 | 14:00 | 18:00 | 22:30 |
| Temp. | 21°C | 16°C | 21°C | 16°C | 21°C | 16°C |
Saturday and Sunday (days 6 and 7)
| Range | P1 | P2 | P3 | P4 | P5 | P6 |
| Time | 6:30 | 9:00 | 12:00 | 14:00 | 18:00 | 23:00 |
| Temp. | 21°C | 18°C | 21°C | 18°C | 21°C | 16°C |
| MOFRI | 16°C | P2-21°C | P2-16°C | P4-16°C | P5-21°C |
| P2-21°C | P2-16°C | P4-16°C | P5-21°C |
| SAT SUN | 16°C | P2-21°C | P2-18°C | P4-18°C | P5-21°C |
| 3.00 | 6.00 | 8.00 | 12.00 | 14.00 | 18.00 | 23.00 | |
Customize programs
1- Press MENU(left key) to enter programmation menu, symbol and PROG indication are flashing
2 - Press (right key) to validate, the first day is displayed and its number is flashing.
-3 - Choose the day to change using and keys

: If the "5-2" programming type has been chosen when first start up, only "MO:FR" and "SA:SU" options can be changed.
4 - Press to validate, the first time range is flashing, the trigger time and the set temperature are displayed.
- 5 - Choose the first time range to change using the and keys
6 - Press to validate, the trigger time is flashing
7- Set the time using the and keys
8- Press to validate, the temperature is flashing
9 - Set the temperature using the and keys
10-Press to validate.
11 - Go back to point 5 for each of the other time ranges
- 12 - Go back to point 3 for each of the other days or copy the day (see below)
At each time, it is possible to go back to previous step by pressing (Left key)
Copying time ranges from one day to another
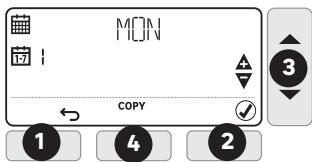
1- Press MENU (left key) to enter programmation menu, symbol and PROG indication are flashing
2 - Press (right key) to validate, the first day is displayed and its number is flashing.
3 - Choose the day to copy using and keys
4 - Press COPY (central key)
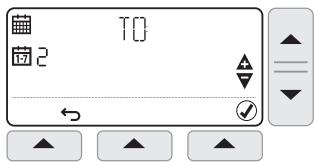
5 - The name of the day to copy (source) is replaced by T[· ] indication, and the day on which to copy (target) is flashing.
6 - Choose the target day using and keys
7-Press to validate,
8- Go back to point 6 for each of the other days to copy on.
Setting Date and Time
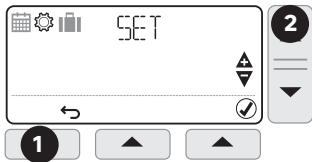
1- Press MENU (left key) to enter programmation menu, symbol and PROG indication are flashing
2- Press (setting temperature key) to enter settings menu symbol and T indication are flashing
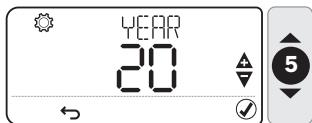
3- Press to validate, the year is displayed and YEAR indication is flashing
4-Press to validate, the year is flashing
5- Set the year using and keys
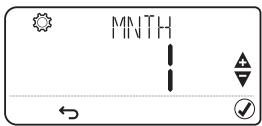
6- Press to validate, the month is displayed and the MNTH indication is flashing
7- Press to validate, the month is flashing
8 - Set the month using and keys
9- Press to validate, the day is displayed and the indication is flashing
10 - Press to validate, the day is flashing
11- Set the day using et keys
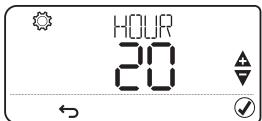
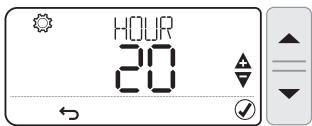
12 - Press to validate, the hour is displayed and the HOUR indication is flashing
13- Press to validate, the hour is flashing
14 - Set the hour using and keys
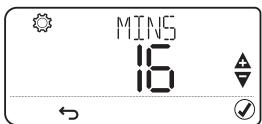
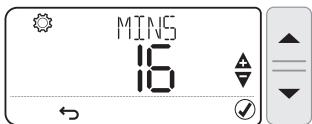
15- Press to validate, the minutes are displayed and the MINI indication is flashing
16 - Press to validate, the minutes are flasing
17 - Set the minutes using and keys
18 - Press to validate
Temperature override
In AUTO mode, it is possible to correct the setpoint temperature using the and keys.
This temporary setting will be canceled at the next scheduled time range.
Example: It is Saturday at 10 am, the set temperature is 18^ , I can rise to 19^ using the key, and it will automatically switch to 21^ at 12 pm.

Press AUTO (central key) to force a return to the programmed temperature without waiting for the next range.

Press "+1h" (right key) to limit the override period to one hour.
Vacation mode
This function allows you to program a constant temperature for a chosen number of days, in order to reduce energy costs.
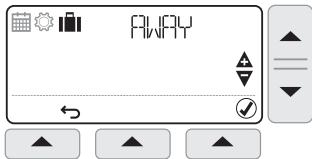
1- Press MENU (left key) to enter programmation menu, symbol and PROG indication are flashing
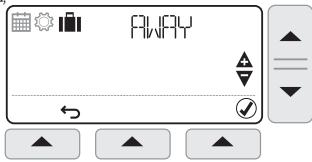
2- Press twice, symbol and FIyY indication are flashing
3- Press to validate, indication is displayed and the number of days is flashing
4 - Set the number of days using and keys
5- Press to validate, TEM indication is displayed and the temperature is flashing
6 - Set the desired temperature using et keys
7 - Press to validate, the remaining number of days will change every day at midnight
8- To cancel, press MENU (left key), then press to validate
Keypad lock
1- Keep pressing MENU (left key) and (right key) simultaneously for 5 seconds to lock the keyboard. The symbol is displayed.
2 - Proceed in the same way to unlock.
Optimum start
This Thermostat has optimisation functions that aim to save energy while maintaining suitable comfort levels.
The thermostat learns how long it takes your home to reach a set temperature and then turns the heating on a bit earlier to achieve that temperature at the programmed time.
By default optimisation is disabled, see instructions in installer mode on how to activate it.
The Thermostat displays during the optimisation period if set.
Installer Mode
The thermostat is factory set to control a gas boiler.
Installer Mode allows you to modify these factory settings respecting the below values.

| Applications | Cycles / hour | mini ON time | Settings to change |
| Gas boiler (<30 kW) | 6 | 1 min | No change |
| Oil boiler - Heat pump Pellet stove | 3 | 4 min | Parameter 30T on 4
Parameter 2CR on 3 |
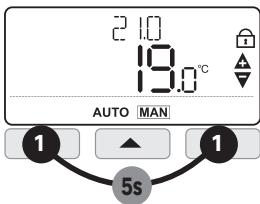
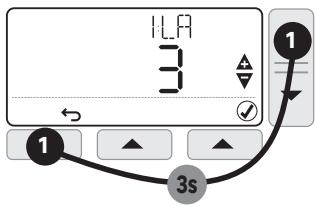
1- Keep pressing MENU (left key) and (temperature setting) simultaneously for 3 seconds to access installer mode.
2- Choose parameter to change using and keys
3- Press to change a parameter,
4 - Set the parameter using and keys
5-Press to validate
6-Press to exit installer mode
| Param. | Description | Values range | Default value |
| 1LA | Display language | 1=EN, 2=NL, 3=FR, 4=DE, 5=IT, 6=ES, 7=PT,8=CZ, 9=HU, 10=PL, 11=RO, 12=SK, 13=HR | 1=EN |
| 2CR | Cycle Rate | 3, 6, 9, 12 | 6 |
| 30T | Minimum boiler ON time | 1....5 min | 1 min |
| 4LL | Lower temperature limit | 5...21°C | 5°C |
| 5UL | Upper temperature limit | 21....35°C | 35°C |
| 6SO | Type of programmation | 1=7 days, 2=5+2 days | 1=7 days |
| 9LC | Fail Safe | 0=Disabled, 1=Enabled | 0=Disabled |
| 10BL | Backlight | 0=Disabled, 1=Enabled | 1=Enabled |
| 11CL | Clock format | 0=24h, 1=12h | 0=24h |
| 12DS | Daylight saving | 0=Disabled, 1=Enabled | 1=Enabled |
| 13TO | Temperature offset | -3....+3°C | 0 |
| 15SD | Reset schedule | 0, 1 (Reset) | 0 |
| 16FS | Factory reset | 0, 1 (Reset) | 0 |
| 17OP | Optimum start | 0=Disabled, 1= Enabled | 0=Disabled |
| 19LK | Lock options | 1=Partial, 2=Total | 1=Partial |
| Technical data |
| Type of Control | Independently mounted battery powered digital room thermostat for surface mounting |
| Electrical protection | IP30 No protection against water ingress |
| CLASS II Product that does not incorporate protective earthing provision, but a double insulation as provision against electric shock |
| Type of Batteries | 2 batteries AA (LR06) 1,5 V (not supplied) |
| Temperature range | 5-35°C |
| Action | Micro-interrupt, Type 1.C |
| Rated current | Rated voltage : 24-230V-, 50-60Hz - Max rated current for Resistive load : 5AMax rated current for Inductive load : 3A |
| Environment | Pollution degree = 2 (standard household conditions without conductive dust) |
| Regulation class(according 811/2013) | Class IV | Rated impulse voltage | 2500 V |
| Energy efficiency gain (contribution to seasonal space heating energy efficiency) | 2% |
| Class of Software | Class A | Overvoltage Category according IEC/EN 60730-1 | II |
| Radio frequency | 868.0-868.6 MHz, 1% Duty Cycle |
| Maximum power of radio emission | 25mW |
| Supplier | ADEO Services - 135 Rue Sadi Carnot, CS 00001, 59790 - RONCHIN - FRANCE |
Hereby, Adeo Services, declares that the radio equipment 82823694/TH50DP6RF is in compliance with Directive 2014/53/UE. The full text of the EU declaration of conformity is available at the following internet address: http://www.erp-equation.com/Regulation/
TROUBLESHOOTING
Operation issues are often due to minor causes; please go over the table below before contacting the After-Sales Service. This could save you time and spare you unnecessary expenses.
| Problem | Causes, solutions |
| No Display | Check batteries by opening cover.
Check that batteries are placed in the correct position.
Replace the batteries. |
| The ☑ symbol is displayed | The batteries are getting weak.. (less than 10% capacity) |
| The symbols ▲ and □ are flashing | Replace batteries immediately |
| The symbols △ and — are displayed | The sensor is faulty, contact your installer to repair or replace the thermostat. |
| The symbols △ and □) are flashing | Wireless signal is lost
Move the Thermostat to another location
Perform a rebinding |
In case of persistent problem, please contact the after-sales service of your store.
Warranty
The warranty does not cover problems related to improper installation, incorrect wiring or improper use.
Binding/Rebinding
The binding operation described below is required if:
- Any of the system components (Wireless Thermostat or Receiver Box) are replaced.
- The Receiver Box has incorrect or no binding data stored (e.g. when pre-bound system pack components have been mismatched).

During the binding procedure keep approximately 1m distance between the Wireless Thermostat and the Receiver Box.
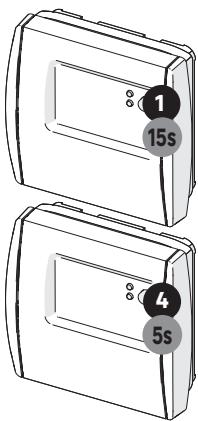
1- Press and hold the Receiver Box push button for 15 seconds to reset any previously stored data.
2 - After 5 seconds the red LED will start to flash quickly, but continue to hold the button.
3 - After 15 seconds the red LED will change to flash slowly. Release the push button.
4 - Press and hold the Receiver Box push button for 5 seconds to enter the binding mode. The Red LED will start flashing quickly to confirm the binding mode has been entered.
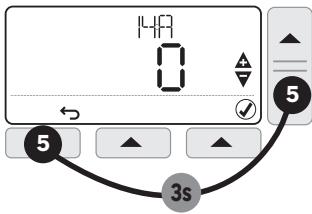
5 - On the Wireless Thermostat press and hold MENU (left key) and▼ (temperature setting) for 3 seconds to enter the binding screen with parameter 14A flashing. If 1 is shown then it is already bound to a Receiver Box. If 0 is shown then there are no Receiver Box bounded
6- To bind to a new Receiver Box, Press to enter the binding sub menu.
7- Press or to scroll to 1 and press again. After few seconds the binding result will be displayed on the screen with 1 representing successful bind, 0 representing failure.
If successful the red LED on the Receiver Box is switched off to confirm successful binding operation.
Processing waste of electronic and electric devices at life-cycle end.

This image indicates that this product must not be disposed of with unsorted home trash. A system for disposal and special processing of used electric and electronic devices, mandatory to follow, has been implemented including the right to have vendors retrieve free-of-charge used appliances upon purchase of new appliances, as well as special collection of such waste by approved organisations. For more information on this, you can contact your store or your town hall. Proper disposal of used electric and electronic appliances ensures their adequate processing and recycling in order to avoid damage to the environment and public health as well as to preserve natural resources.


C E

*Garantie 3 ans/3anos de garantía/Garantiade 3anos/ Garanzia 3 Ani / Evyunon 3 tuvw Gwarancja 3-letnia/ / TapaTria 3 pokiv/Garantie 3 ani / 3-year guarantee
Made in United Kingdom - 3робноу Великобртуанii
ADEO Services - 135 Rue Sadi Carnot CS 00001 - 59790 RONCHIN - France

TOB "Ipeya Mepneh YkpaHa", 04201 YkpaHa, M.KnIB, ByN. PIoIpaHa 17A, +380 44 498 46 00.Дане пдпрмство рпимакпгетенii BiD CpoKINBaivBцоTo TOBAPy, a TakoX pOboiNb TyropeMOHT, TeXHicHe i rapaNTiNe o6cnyrObyBaHnTepMin cnyxbN ToBAPy:5pokIB