USER MANUAL TH30DP4 EQUATION
Eoaywyn twv npataipw
BctahOBHTnaciJeHbTtXKHHa
1- Kibka pazieh Hamucimb DATE/ DAY, yoob ecmaohoumu deh mujckn.
| 1 | 2 | 3 | 4 | 5 | 6 | 7 |
| mnoheɪnlo | bɪrtopək | cèpèda | чětēpè | πfátniú | cúðtə | neɪdɪnla |
2-Плдмeeримь,Hamuchуш (OK) (3eNeHa KhOnka).
3-Bukopacmoyume khoonku 10 ma dnae bcmohneHnnoomoozaoyac.
4-PiMoepedimb,Hamuchyuewu (oc) (seenaKHonka).

Pexmmpo60Tu
IpoonohyIObca deKINbKa peKIMB po60n:
AITO: TepMOCTAT BIKOHYE NOEPENDEHbI ZANICAHI BHYTIPUHNI IORPMAH DIA KOKHOHO DHA TUKHRAI POMPAH BM3 HAOHTA, KY TEMNPTAPHYE Heo6xIDHO CTABAOHOTN DIA KOKHOHO 3-4-XaocOBHXI dianao3HO BoDy. BOH MOKHYBt ByTH AnhauTOBARI.
MAN (PyuHn)TeMoCTat noctiHO KOHTponIOe 3aHaHy TEmnepatpy 3a DonomOroIO KhoNOK
- OFF(PEKMM 3xHCTy BID 3amep3aHHN): Tepmoctat nIITPmYE Tmemepatpy BnIe 5°C dans 3axctmy BID 3amep3AHN.
UCYHEHHH HECNPABHOCTE
Hecnpoehcmioepofoi ocho buknukhoi h3eHauHmu npuHnuHAmO.03aoumme 3 m6nueo Huxwe, nepuHX 3eepmucocdo cepicbooi cyk6bu.Lle 3aoaaubm bam cac i no3aeumb bI dn hemomp6hux eumppm
The room thermostat turns the heating system on and off to obtain the desired temperature (set temperature). It detects the air temperature and compares it with the set temperature. If the room temperature is lower than the set temperature, the thermostat turns on the boiler, and turns it off when the set temperature is reached, and so on.
Energy efficiency is ensured by a TPI control algorithm, which adapts to the environment and provides tight temperature regulation with minimal energy consumption.
To obtain an optimum setting, set a low temperature (18°C for example) and increase degree by degree each day to reach the temperature that suits you (comfort temperature).
The thermostat does not affect the power of the boiler, so there is no need to set a higher temperature to heat faster.
if the radiators have valves (manual or thermostatic) make sure that the radiators located in the same room as the thermostat are open.
The thermostat is compatible with modulating boilers, but with a reduction in performance. It is compatible with floor heating system if included in a full system by a specialist (hot water control should be managed by another system)
INSTALLATION
The thermostat must be installed on a wall away from any source of heat (fireplace, radiator, sun) and drafts (window, door), at a height of 1.2m to 1.5m .
It must be connected to the inputs for a "ON/OFF" remote thermostat (T1 and T2) of a boiler, regardless of the polarity. The diagram on the label stuck in the box corresponds to the particular case of a series connection to the boiler supply. In this case, it is important to connect phase (L) to terminal A of the thermostat.
The installation must be carried out by a person possessing the required qualifications while respecting the national wiring standards in force.
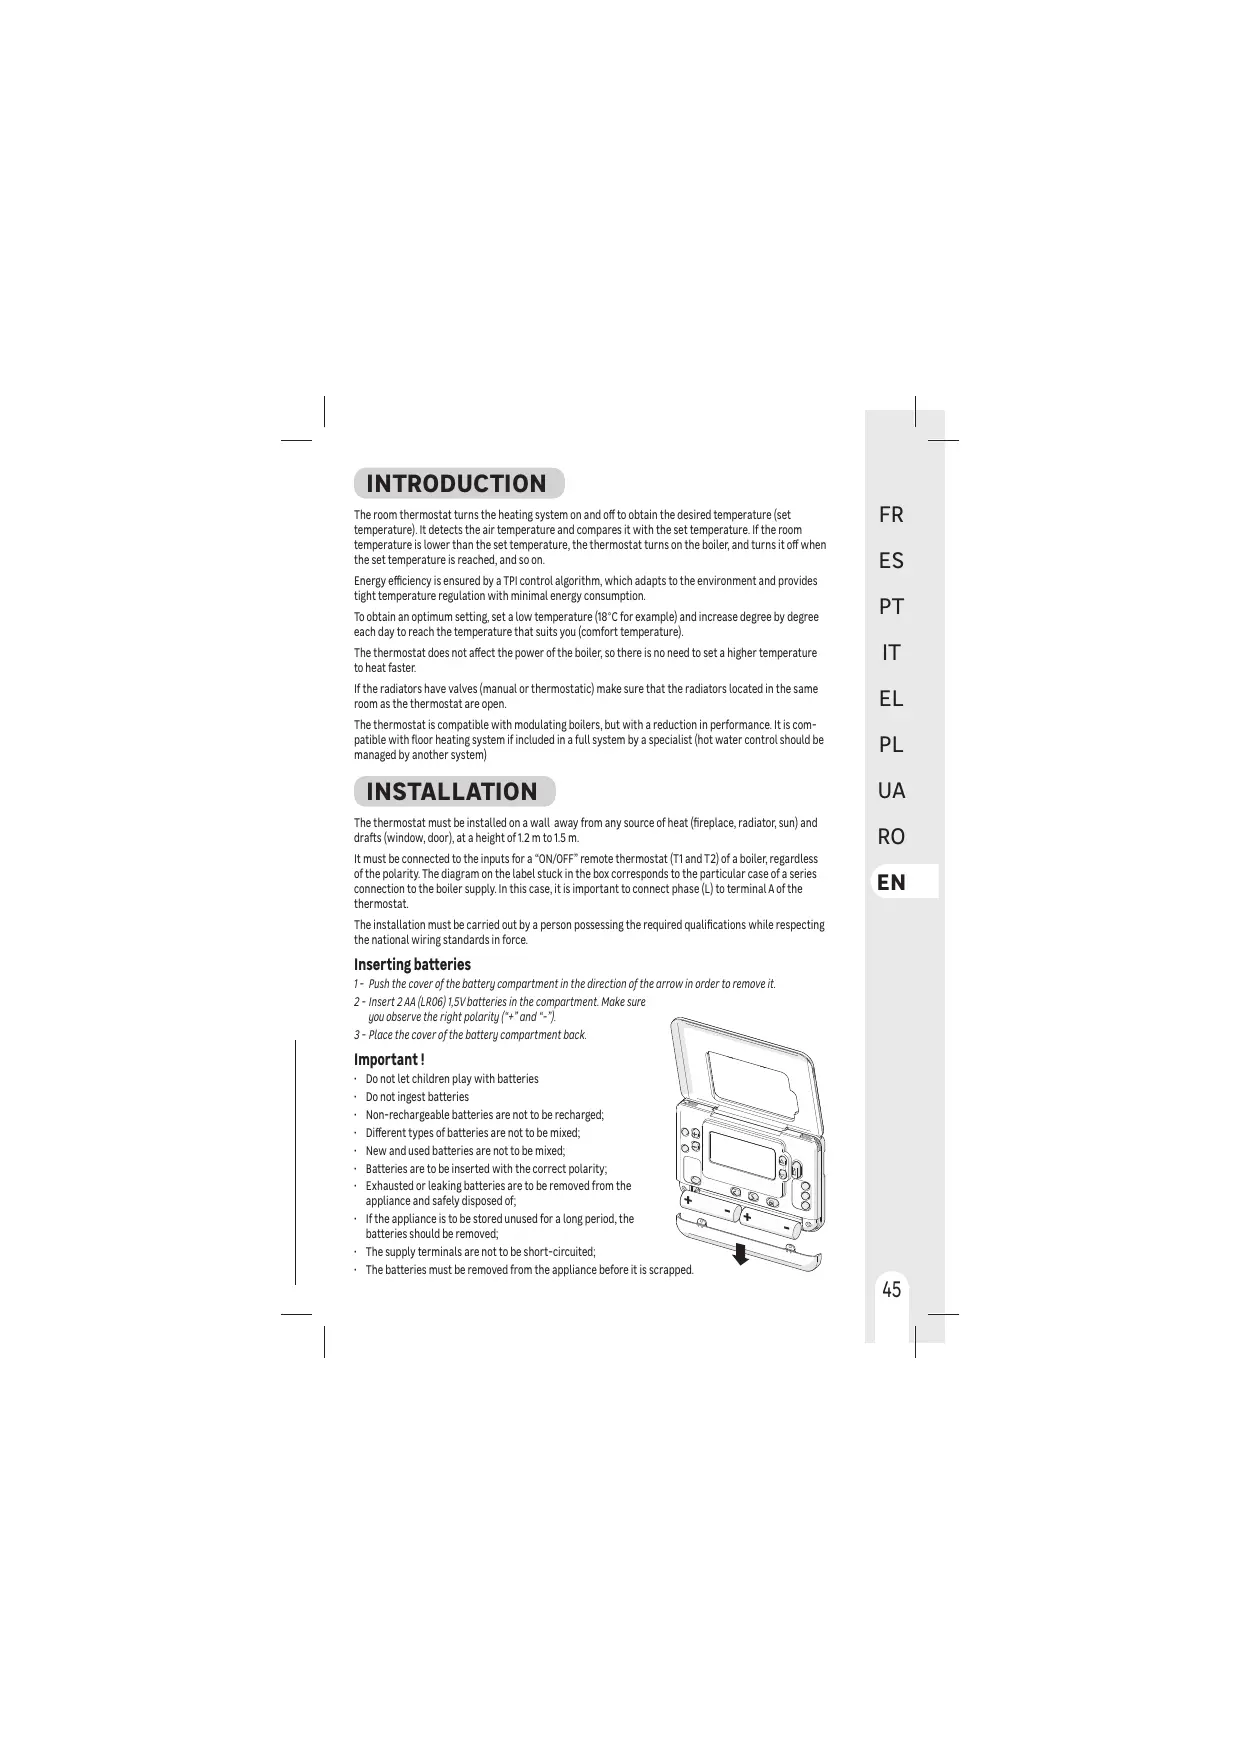
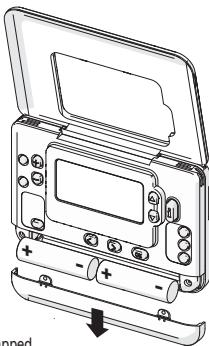
Inserting batteries
1 - Push the cover of the battery compartment in the direction of the arrow in order to remove it.
2 - Insert 2 AA (LRO6)1,5V batteries in the compartment. Make sure you observe the right polarity (+ and *-).
3 - Place the cover of the battery compartment back.
Important!
- Do not let children play with batteries
- Do not ingest batteries
Non-rechargeable batteries are not to be recharged;
Different types of batteries are not to be mixed;
- New and used batteries are not to be mixed;
- Batteries are to be inserted with the correct polarity;
- Exhausted or leaking batteries are to be removed from the appliance and safely disposed of;
- If the appliance is to be stored unused for a long period, the batteries should be removed;
- The supply terminals are not to be short-circuited;
- The batteries must be removed from the appliance before it is scrapped.
USE
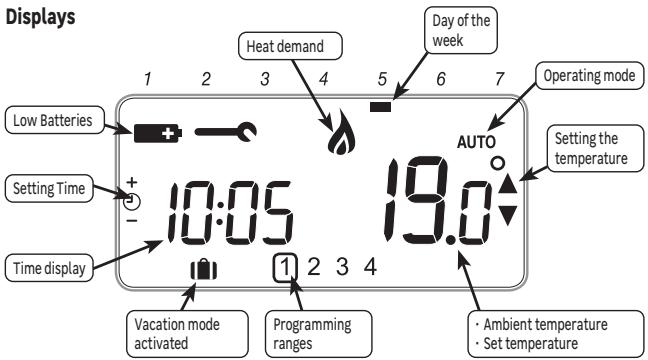

Setting Time and day of the week
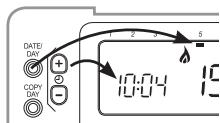
1- Press several times DATE/ DAY to set the day of the week
| 1 | 2 | 3 | 4 | 5 | 6 | 7 |
| Monday | Tuesday | Wednesday | Thursday | Friday | Saturday | Sunday |
2 - Confirm by pressing OK (green button)
3-Use the 日 and keys to set the current time
4- Confirm by pressing (oc) (green button)
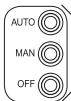
Operating modes
Several operating modes are available:
- AUTO: The thermostat follows the pre-recorded internal programs for each day of the week. These programs define which temperature to set for each of the 4 time ranges of the day. It is possible to customize these programs.
- MAN [Manual]: The thermostat constantly monitors the set temperature using the keys and .
- OFF (Frost Protection Mode): The thermostat maintains a temperature above 5^ to protect against freezing.

AUTO mode programs
The AUTO mode allows 4 temperature level changes that can be programmed for each day between 3 a.m. and 2:50 a.m. the next morning. Each temperature level can be set between 5^ and 35^ by steps of 0.5^ . The default programs are:
Monday to Friday (days 1 to 5)
| Range | 1 | 2 | 3 | 4 |
| Time | 6:30 | 8:00 | 18:00 | 22:30 |
| Temp. | 21°C | 18°C | 21°C | 16°C |
Saturday and Sunday (days 6 and 7)
| Range | 1 | 2 | 3 | 4 |
| Time | 8:00 | 10:00 | 18:00 | 23:00 |
| Temp. | 21°C | 21°C | 21°C | 16°C |

Customize programs
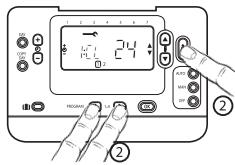
1-Press PROGRAM to enter programming mode, the day and hour indicator are flashing, and the track number is framed.
2- Press DATE/ several times to choose the day of the week to change
3-Press PROGRAM or several times to choose the time range to change
4-Set the time of the first range using the and keys
5 - Confirm by pressing OK (green button)
6-Set the temperature using the and keys.
7- Confirm by pressing OK
8-Go back to point 3 for each of the other time ranges
9 - Return to point 2 for each of the other days or copy the day (see below)

A long press on the keys scrolls the numbers quickly.
If a parameter does not need to be changed, go to the next one by pressing
Press AUTO to exit programming mode and use personalized parameters.

Copying time ranges from one day to another
1- Press PROGRAM < to enter programming mode, the day and hour indicator are flashing, and the track number is framed.
2- Press DATE/ several times to choose the day of the week to copy
3 - Press COPY DAY, the day to copy (source) is no longer flashing, and the day to copy on (target) is flashing.
4-Press DATE/ DAY several times to choose the target day
5 - Confirm by pressing OK (the target day becomes the source day)
6 - Go back to point 2 for each of the other days to copy
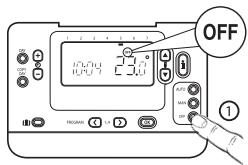
Temperature Override
In AUTO mode, it is possible to correct the setpoint temperature using the and keys.
This temporary setting will be canceled at the next scheduled time range.
Example: It is Saturday at 7 am, the set temperature is 16^ , I can rise to 19^ using the key, and it will automatically switch to 21^ at 8 am.

Press AUTO to force a return to the programmed temperature without waiting for the next range.
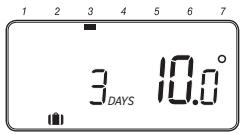
Vacation mode
This function allows you to program a constant temperature (10^ by default) for a chosen number of days, in order to reduce energy costs.
1- From MAN or AUTO mode, press , the number of days is flashing
2 - Set the desired number of days using the and keys
3 - Confirm by pressing OK , the temperature is flashing
4- Set the temperature using and keys.
5 - Confirm by pressing OK, the remaining number of days will change every day at midnight.

Press again to deactivate vacation mode.
TROUBLESHOOTING
Operation issues are often due to minor causes; please go over the table below before contacting the After-Sales Service. This could save you time and spare you unnecessary expenses.
| Problem | Causes, solutions |
| No Display | Check batteries by opening cover.
Check that batteries are placed in the correct position.
Replace the batteries. |
| The → symbol is flashing | The batteries are getting weak.
Replace the batteries. |
| The → symbol is displayed | A defect has appeared in your installation.
Remove and replace the batteries.
If the symbol does not come off after a few minutes, contact your installer. |
In case of persistent problem, please contact the after-sales service of your store.
Warranty
The warranty does not cover problems related to improper installation, incorrect wiring or improper use.

Processing waste of electronic and electric devices at life-cycle end.
This image indicates that this product must not be disposed of with unsorted home trash. A system for disposal and special processing of used electric and electronic devices, mandatory to follow, has been implemented including the right to have vendors retrieve free-of-charge used appliances upon purchase of new appliances, as well as special collection of such waste by approved organisations.
For more information on this, you can contact your store or your town hall. Proper disposal of used electric and electronic appliances ensures their adequate processing and recycling in order to avoid damage to the environment and public health as well as to preserve natural resources.
Installer Mode
The thermostat is factory set to control a gas boiler.
Installer Mode allows you to modify these factory settings respecting the below values.
| Applications | Cycles / hour | mini ON time | Settings to change |
| Gas boiler (<30 kW) | 6 | 1 min | No change |
| Oil boiler - Heat pump Pellet stove | 3 | 4 min | Parameter 1:0t on 4
Parameter 2:Cr on 3 |
1- Press the OFF Key.
2 - Maintain pressure simultaneously on and PROGRAM and _i = 1^n . The screen then displays the first parameter of level 1 of the installer parameters (from parameter 1 to parameter 19).
3- Press or to change the factory setting. The display is flashing to indicate that this change has been taken into account.
4 - Press the green key OK to confirm the change. The display stops flashing.
5-Press 念 to go to the next parameter.
6- Press PROGRAM . to go to level 2 of the installer parameters (parameter 1 to parameter 5).
7-Press AUTO, MAN or OFF to exit installer mode.
| Parameter | Description | Values range | Default value |
| Level1 | 1:CL | AM-PM / 24hr Display | 12, 24 h | 24h |
| 2:rP | Reset Time/ Temp Programs | 0, 1 | 1 |
| 6:UL | Upper temperature limit | 21 ... 35°C | 35°C |
| 7:LL | Lower temperature limit | 5 ... 21°C | 5°C |
| 12:t0 | Temperature offset | -3 ... +3°C | 0 |
| 13:Pb | Proportional Band Width | 1.5 ... 3°C | 1.5°C |
| 19:FS | Reset Parameters to Factory Defaults | 0, 1 | 1 |
| Level 2 | 1:Ot | Minimum boiler ON time | 1 ... 5 min | 1min |
| 2:Cr | Cycle Rate | 3, 6, 9, 12 | 6 |
| 5:PE | Pump Exercise | 0,1 | 0 |
| Technical data |
| Type of Control | Independently mounted control for Surface mounting |
| Electrical protection | IP30 No protection against water ingress |
| CLASS II Product that does not incorporate protective earthing provision, but a double insulation as provision against electric shock |
| Type of Batteries | 2 batteries AA (LR06) 1,5 V (not supplied) |
| Temperature range | 5-35°C |
| Action | Micro-interrupt, Type 1.C |
| Rated current | Rated voltage : 24-230V-, 50-60Hz - Max rated current for Resistive load : 5AMax rated current for Inductive load : 2A |
| Environment | Pollution degree = 2 (standard household conditions without conductive dust) |
| Regulation class(according 811/2013) | Class IV | Rated impulse voltage | 2500 V |
| Energy efficiency gain (contribution to seasonal space heating energy efficiency) | 2% |
| Class of Software | Class A | Overvoltage Category according IEC/EN 60730-1 | II |
| Supplier | ADEO Services - 135 Rue Sadi Carnot, CS 00001, 59790 - RONCHIN - FRANCE |


*Garantie 2 ans/2 años de garantía/Garantiade 2anos/ Garanzia 2 Ani / Evyunon 2 etuw/Gwarancja 2-letnia / Tapahtia 2 pokiv/Garantie 2 ani/2-year guarantee
Made in United Kingdom - 3робноу Великобрпати!
ADEO Services - 135 Rue Sadi Carnot CS 00001 - 59790 RONCHIN - France

TOB "Iepya MeprHeu YkpaHia", 04201 YkpaHia, M.KnIB, ByN. PIoJIpaH a 17A, +380 44 498 46 00.Дане пдпрмство рийmae пгетенii BiD CNoKINBaivB cIoOToTobApy, a TAKoK npBoOdntb IyoTopeMOHT, TeXHiNe i rapaTInHe O6cLyTobyBaHnA TepMin cIvy6n TobApY:5pokIB