USER MANUAL TH40DP6 EQUATION
TEpOcTAt E he NbIINBa H a TOnyKHeHt B KOTNa, TOMy Hemae Oo6xIiDHOCTI BCTAOHOBaTHa 6BILu BnCOKY TEMNEPATpy DnI pNcKOpEHAR HAPBIHHAe.
Kuaipai dopotop Ochuahenei Knaahanam (pyuHMMa a6o TepMOCTATHHMn), NpekoHaItee, 00 BiKDpNTI KaHANAM HA dpaIatopao p3tAloTHaOHNbX bT cI amai KMIHTU aIto TepMOCTat.
TePmocTAT CUMHIMI M MOyDIOHOUKM KOTAMM, Ane 3HJXKYE IX pNOOYKTNBHCTB. B1H CUMHIN I3 CNTTEMIO NIDIRpIBYI nIiNORI KIAIOEUB BKHOKAe IBOHBY CTMEY (YnpabJIHHRA PAPHO BOIO NOBHMO 3dJI CHOBATNC INHIOK CTHEMO).
BCTAHOBJIENHJ
TeMpOCTAT nobHEn 6byu BcTahOBLeHn Ha cTIi a60 nepeoropdu, noaani bI dyb-aynx Djepen Tennla (paiaTopa KamaHa, coua) i npotaarib (biKoh, dBepe), ha bocti Iid 1,2 M do 1,5 M.
BIn noBnHn 6by npiEduHn Dno BxOqD iB dctAunuHoro TepMoCTaTcKoTaN, kMn npauo3 a
PnHnHmON CBE a60 hNoro (T1iT2), HezaneJXHO bIN nnpHrOCTi. Cxema Ha npknneHn do Kopo6Kn
ETeKNTci BiNDoJIAe KOHNpTeHOMy BwnAdNy NOcIIIOBHOg NIKLNouHHeNn DO XKNBHeHNeKOTaN YbOmy
BnADKy BaxKnlo NIDKnOHUHTI qaSy (L) Do kNmE A TeMPoCTa.
BCTaHOBENH NIOVHHNO BIKOHYBaTNCb KBaniΦIKOBAHm CnIBPoBtIHMKOM BiINOBiHO Do DiOIOHNX HauioHaJIbHNx CTAnDaptIB eNEKTPonpOBOJKN.
UctaHOBkaBaTapeNOK
1- LlO6 3nmu Kpuuky iDciky dna 6amapeuk nocynbme ii y Hanpmy cmpinku.
2- Bcmaoe 2 oamaepkeu muny AA (LR06)1.5 B y iioch. 06o3xoo oompyumyimecs npraubhoi noanpnocmii ( +)ma _*^-
3-Bcmaeme Haazd kpuwky eicikny dna 6amapeuok.
Σουδαοις
-ДiTЯМЗбОрноЕграТСЕЗБаТApEиКAMN
3a60pOHeNo KOBtAn 6aTapeKn
- He cnii3aayjkaTn He3aayiHi 6TaapeKn;
He cnid 3milybata p13n tiu n6aTapeK;
- He cnid 3miubyaTu HOi Ta BxNbAhi 6TaapeKn;
BaTapeKn nOtro6HOBCTABnTn 3 npabunbHOIO NOIpaHicTcO;
P03prdXekhi a6bBtIaQoi b4atapeKki Nooti6HbNnHTA 3 npnauy Ta 6eanecho ytniu3ybaty;
JAKLO PnipnaI, HE BOKIPONCTOBYAHMTHEcIPOPTARF TPNBANORO NEPIDy CauY, TOJI 3 HbOro cIIN BNIHAYT6ATepaKeN,
KoHTaKTn 6aTapeHOK He NOBHHi 6yTN KopoTko3AmKHeHIMM;
- Batapei noTpi6HOBnHrTn 3 npinlaNy, nepu Hix NIO p03ipBaTn.
BVKOPNCAHH
ElenemEn KepyBaHHa Ta Habiraqii
Iepn3zanyck
y6b-yakuiacMOJHaNoeepHymucdo nonepdHbOzoKpOky,Hamuchyu (niey KhoNky).
KonioBaHnHa yacobnx diaa3oHIB 3 OndHOHa iHnI DeHb.
1- Hamuchimb MEHO (niey Khonky), yobyeimu B MeHIO npo2pamyohn, 6nmuHomb cumBoi i3hauehn PROG.
2-NaHmucimh (npaay hKnoy),u06 2-niOmeepoumi,iiO6pokacmaebcnpe npuui oenb i zoO homeb6nuae.
3-Bu6epimbdeh,akuHneobxioHOckionoeam3a 0doNMO2HO KhoNOK △i
4 - Hamuchimb KONIIHOBATN (ueHmptalny Khonky).

5—Haeta dHa, kui Heo6bXIO chKOJIaBAMU (nOAmKooi) amHmIbchBa hA MaOHyEeT T [ ], a HOpE dHa, 8 kui nopmiHO chKOJIaBAMU (jIoBooi) bIaUMMaTe.
6-Bubeipmbu jinbobu deh3a donomooKhoNOK aV
7-Hamuchim6,uo6niedaeepoum.
8-Bukhoalmei,ndouhoiaou 3-6-nyhKMY,dianKoKHO2O HacmynHO20IipooBO20 dH

BctahOBJIeHnJaTnTaYacy
1-Hamuchimmb MEHIO (niyy KhoNky), cumBoi 3HOUHNNPRGJ6nUMOHmB.
2- Hamuchim ▲(Honka HanuymayhnaHm mepepanpyu),uo6yui8aMeHIO Hanuymayehncaumoe 13Houhen H SET hunomokt.
3- Hamuchimb (npaey KhoNy), u6o niMeepaum, eio6paxaemcbpik i 6muac 3naueHHY FAR.
4-Hamuchimb 已 uo6 niomeepdumpi,ki6bnmuoe.
5-BcmaHoeimb pik 3a donom02o KNhONK △i▼.

6- Hamucimh 1,uo6 niadmeepduum, eio0bdoxpaemcbmicraibf 1 bIUMOC3HAeHHAR MNTH.
7-Hamuchimh(),u06nioaepdumiu,micra6bnmuae.
8-BcmaHOeimmbmicra3a0donom2oHKNOH ▲ma▼
9-Hamuchimb,upo ndmeepdumu, biodopaxacmbc4eBb 6muac3HaeHHa
10-Hamuchim6,uo6niiMeepouM,deHb6nmuae.
11-BcmaHObimdeh3a donoMo2HO KHONOK ma
12-Homuchim 1,uo6 ni3maepduu, bi0doopaekemc2o0duHa i 1bUMO 3HNOHH HCLJR.
13-Hamuchimb uo6 niomeepduu, zoudua 6nmuac.
14-BcmaHOBimbac3a donomozOKhONOK ▲ma▼.
15- Hamuchimb, uo6 niomeepdumu, iio6paoznohmbc xR 8UHUNI HUMae 3HueHHA MING.
16 - Hamuchimb, uo6 niadmaepdumu, xueunhu 6nmuomh.
17 - BcmaHOeimbXbUHn3a donom2oH konok ▲ ma▼.
18 - Hamuchimb, uop6 niomeepoumu,
BixnHeHn3NaueHbTeMnepaTpy
B pekkmi ABTO MOKHA KOPERYBAH 3a4aHy Tnepepatpy 3a donomorokho KHONOK ▲ Ta▼.Lje TMHacobe HanaTAYBaHb 6yde CkAeBOcAHIO nIq cac BHKHOHn AACTYnHO rANpORpaMOBaHOrO hAcBOcoBOr iAnao3OHy. PmKlKnad: Maemoc cy60ty, 10 roNaHpaHky, NcKTHApRApaMOBaHa Ha 18°C, II MOKHa 36bluHTn Do 19°C a3 Donomorokho KNOHK ▲ , Todi BOA bHTOMATHHo nIDHimETb8 Co 21°C o 12 roDHHn DnH.

Hamuchim ABTO (eHmptpBHy KOnky), uO6 npumyco0 noephyumcdo aznpzpaMoaeHO memnepamyp, He 4ekkuu buKoHaHH HacmyTHO zo diana3OHy.

Hamuchimb ^+ 120d" (npay ky Honky), u6o6 mekumu cac bixdun Hdo od hiiei zo du.
PexmmBIDnyctkn
LZyHKnZIOZOBONJ3aIporpamByTu NocTHy Tempepatpy Ha o6paHy KInbKicTb dHIB, 0o6 3nH3NTN BHTPaN Ha eNeKTpoEhepiK.
1-Hamuchimb MEHIO (niey KhoNkY), cumboi 3hauheny PROG 6muaohtb.
2-ДучИHAMUCHIMbKHOKNy▲,6nUMATUME CUMBON 1 i3HcHHeHrFVH.
3-Hamuchimu,up6nidemaepumu,eioebopaacmberc 3HoueHHI DHTY i6nmuoc klnbkmtb thia
4- BcmaHoeimb KInbKicmb db 3a donomoo KOHONK i
5-Hamuchimb uo6 niombepuu, iioobpaokaemcb3aHcHnH TTEM 1i6Iumae memnepmaypa.
6-BcmaHOeimb Heo6xiaHy mmepeamypy 3a donomozok HONOK
7 - Hamuchimb (√), πος πίδησερθυμι, κίλκείς έῦ ὄν Αζαλιωύπας, εἰπινόβαμιμεmbες συθήσου ποῦ ὄν Αγίου.
8- Lllo6 ckacybamu Hamucimb MEHIO (niay KhoNky), a nomim hamucimb 4n di niomepeoJxHHN.
BIoKoYBaHHa KHOHOK
1- 1Ioo63o6knyoamu KhoKu, oOHOaHcO HAMuchimib 5 yummuyme MEHO (niye KhoNy) (npaby KhoNy) npomaym 5CekyH. D0b6paumcbz cumon 1
2- LlO6 po36nokyeamu noemopimb mi cami kpoku.
Оптимальбнистар
Jei TeMpOCTa6bnaHAni FyHnJIeOe OTHmIa3JI,ja KcnpMaOBaHa H ekOHMOie Heepri nnp 3bepegeHHi naHexKHOr oPiBH KompOpTy
Tepemctayj bIOMO, cikbnk hucy nortp6HIOI TNOA, zuoB 6DyHKNU 6bny DCsRHTO 3daHOI TMepaTPyM, TOMY BII BMKAe OAnenHnE TPOX pahi IuH, zuoDCsRTI eJI TEPaTPNcy yI sPAPORAMBOHcN.
3a 3aMBOyBaHn HON OTNIIMiA2I BIDKIOHHe. IIO6 DIIHATNCRA K II AKTNBYAtn DIn. IHCTpyKJI pEXKMYBCTAOHOBHEHA.
KoHnOTTMi3aizio kAHTM0B0aHO bID6pKaazTcBc cIMBOI
PexkIM BCTaHOBJIeHHJ
MEOCTAH NALUTOBAHN HAI 3ABQDJI yIyIyIyIYIINR HAI BANBOM KITONH.
PEKMHCTA BACTHEOBHN D03BIOJI 3MIHNIH LI 3ABQDcKI HAI NALUTYBAHN, DOTPMYIOYCIM HUIE33AAHYEHN 3HAENHB.
| 3açtcocuBAHn | Lizhknl/roJ. | Mihimalha TpRbAJIcIb tpo60TH | PapametPrj, kaj moKHO n3mHHTN |
| Газовский котел (<30 KВt) | 6 | 1 min | Bej 3MHN |
| Масларный котел -Терлобий
насOC -Тelenетн a nii | 3 | 4 min | 3OT napametBvICSTabLeHo Na 4
2CR napametBrVbCTABNeHo Na 3 |
1- Lio6 nepeumu b pekzum ycmtaohoku, oohochao Harnuchim i ymuymye MEHIO (n iy khoxy) i A (KhoNY hanaawybaanHa mmepeampyu) npomraom 3 cekyhd.
2-Bubepimbnapamemp,kuu nompi6h03mhumu 3a donom020 KhoNOK ▲i▼.
3- Hamuchimb, uo6 3mHumu napamemp.
4-Hanaumyume napamemp 3a donomozoo KHONOK
5-Hamuchimb,uo6nmeepoumu.
6-Hamuchimb 一 ,uobeuimuzepekumyecmaHOeHnH.
UCYHEHHH HECNPABHOCTE
Hecnpaehocmi 6pobmi nacto bukukohni He3nauhmu npnuuhamu. O3aoummec 3 mabuJe Huxue, nepu Hix 3eepmucn cdo cepichoi cnyjku. Ie 3aoaaubm bam cac i no36aeumb iB henompibx uempm.
The room thermostat turns the heating system on and off to obtain the desired temperature (set temperature). It detects the air temperature and compares it with the set temperature. If the room temperature is lower than the set temperature, the thermostat turns on the boiler, and turns it off when the set temperature is reached, and so on.
Energy efficiency is ensured by a self learning TPI control algorithm, which adapts to the environment and provides tight temperature regulation with minimal energy consumption.
To obtain an optimum setting, set a low temperature (18^ for example) and increase degree by degree each day to reach the temperature that suits you (comfort temperature).
The thermostat does not affect the power of the boiler, so there is no need to set a higher temperature to heat faster.
If the radiators have valves (manual or thermostatic) make sure that the radiators located in the same room as the thermostat are open.
The thermostat is compatible with modulating boilers, but with a reduction in performance. It is compatible with floor heating system if included in a full system by a specialist (hot water control should be managed by another system)
INSTALLATION
The thermostat must be installed on a wall away from any source of heat (fireplace, radiator, sun) and drafts (window, door), at a height of 1.2m to 1.5m .
It must be connected to the inputs for a "ON/OFF" remote thermostat (T1 and T2) of a boiler, regardless of the polarity. The diagram on the label stuck in the box corresponds to the particular case of a series connection to the boiler supply. In this case, it is important to connect phase (L) to terminal A of the thermostat.
The installation must be carried out by a person possessing the required qualifications while respecting the national wiring standards in force.
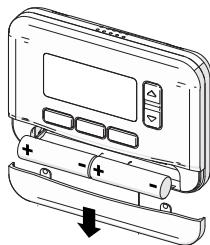
Inserting batteries
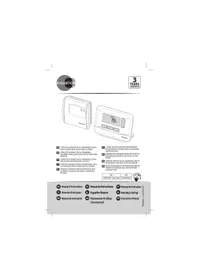
1 - Push the cover of the battery compartment in the direction of the arrow in order to remove it.
2 - Insert 2 AA (LR06)1.5V batteries in the compartment. Make sure you observe the right polarity (^+^ and ^-
3 - Place the cover of the battery compartment back.
Important!
- Do not let children play with batteries
- Do not ingest batteries
Non-rechargeable batteries are not to be recharged;
- Different types of batteries are not to be mixed;
- New and used batteries are not to be mixed;
- Batteries are to be inserted with the correct polarity;
- Exhausted or leaking batteries are to be removed from the appliance and safely disposed of;
- If the appliance is to be stored unused for a long period, the batteries should be removed;
- The supply terminals are not to be short-circuited;
- The batteries must be removed from the appliance before it is scrapped.

USE
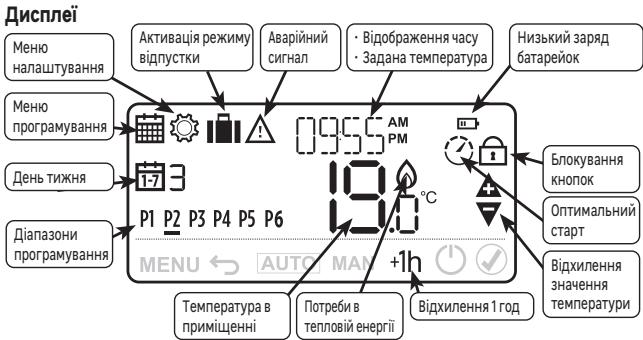
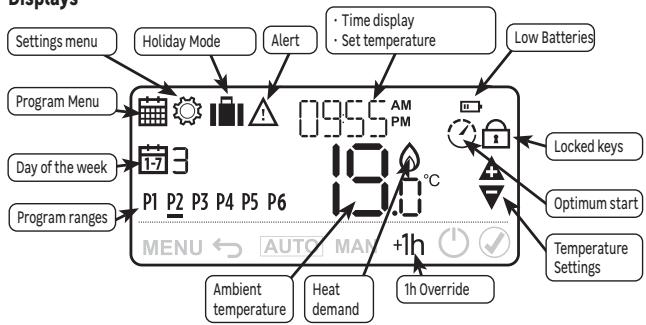
Displays
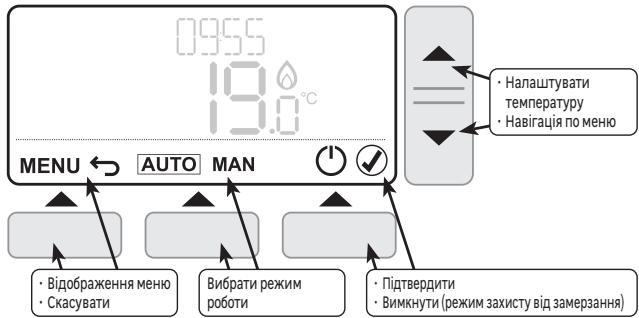
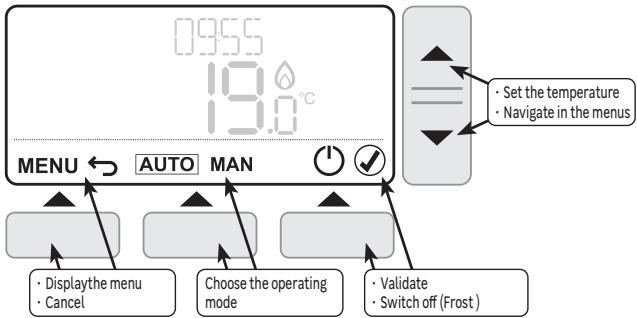
Controls and navigation
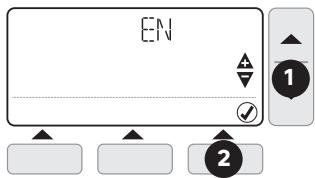
First start-up
When inserting the batteries for the first time, it is necessary to set the user's language, the date and time, and the type of programming.
1- Choose the language using the and keys
2-Press (Right key) to validate.
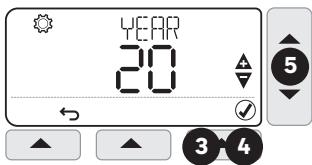
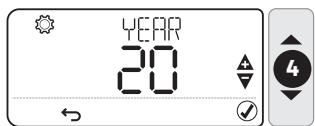
3- the indication YEAR is displayed and the year is flashing
4- Set the year using and keys
5-Press to validate.

6- Set the month using and keys
7- Press to validate.
8- Set the day using and keys
9-Press to validate.
10-Set the hour using and keys
11-Press to validate.
12 - Set the minutes using and keys
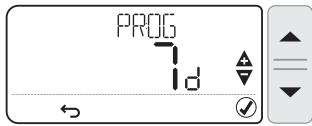
13 - Press to validate, the indication PROG is displayed and the type of programming is flashing. Set the programming type using and keys
The programming type "7d" allows to set different time ranges for each day of the week. The programming type "5-2" propose a setting from week days (from Monday to Friday) and another one for week-end (Saturday and Sunday).
14-Press to validate.

A long press on and keys scrolls the values quickly s

Operating modes
Several operating modes are available:
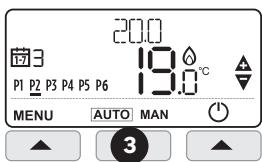
- AUTO: The thermostat follows the pre-recorded internal programs for each day of the week. These programs define which temperature to set for each of the 6 time ranges of the day. It is possible to customize these programs.
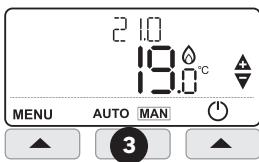
- MAN (Manual): The thermostat constantly monitors the set temperature using the and keys.
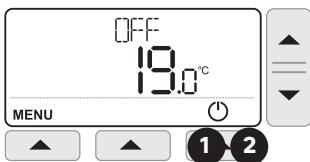
- OFF (Frost Protection Mode): The thermostat maintains a temperature above 5^ to protect against freezing.
Change Operating mode
1- Press (right key) to put the thermostat in Frost Protection Mode, F-F is displayed
2- Press again to activate the thermostat, CFF disappears
3-Press AUTO MAN (central key) to switch between AUTO and MANUAL modes

it is not possible to activate AUTO or MANUAL mode when the thermostat is in OFF Mode
AUTO mode programs
The AUTO mode allows 6 temperature level changes that can be programmed for each day between 12:00 am and 11:50 p.m. Each temperature level can be set between 5^ and 35^ by steps of 0.5^ . The default programs are:
Monday to Friday (days 1 to 5)
| Range | P1 | P2 | P3 | P4 | P5 | P6 |
| Time | 6:30 | 8:00 | 12:00 | 14:00 | 18:00 | 22:30 |
| Temp. | 21°C | 16°C | 21°C | 16°C | 21°C | 16°C |
Saturday and Sunday (days 6 and 7)
| Range | P1 | P2 | P3 | P4 | P5 | P6 |
| Time | 6:30 | 9:00 | 12:00 | 14:00 | 18:00 | 23:00 |
| Temp. | 21°C | 18°C | 21°C | 18°C | 21°C | 16°C |
| MOFRI | 16°C | P2-21°C | P2-16°C | P4-16°C | P5-21°C |
| P2-21°C | P2-16°C | P4-16°C | P5-21°C |
| SAT SUN | 16°C | P2-21°C | P2-16°C | P3-21°C | P3-21°C |
| P2-18°C | P4-18°C | P4-16°C | P5-21°C |
| | 3.00 | 6.00 | 8.00 | 12.00 | 14.00 | 18.00 | 23.00 | | | |
Customize programs
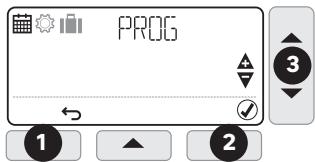
1- Press MENU (left key) to enter programmation menu, symbol and PROG indication are flashing
2- Press (right key) to validate, the first day is displayed and its number is flashing.
3 - Choose the day to change using and keys

If the "5-2" programming type has been chosen when first start up, only "MO:FR" and "SA:SU" options can be changed.
4 - Press to validate, the first time range is flashing, the trigger time and the set temperature are displayed.
-5 - Choose the first time range to change using the and keys
6 - Press to validate, the trigger time is flashing
7- Set the time using the and keys
8- Press to validate, the temperature is flashing
9 - Set the temperature using the and keys
10-Press to validate.
11 - Go back to point 5 for each of the other time ranges
12 - Go back to point 3 for each of the other days or copy the day (see below)

At each time, it is possible to go back to previous step by pressing (Left key)
Copying time ranges from one day to another
1- Press MENU (left key) to enter programmation menu, symbol and PROG indication are flashing
2 - Press (right key) to validate, the first day is displayed and its number is flashing.
3 - Choose the day to copy using and keys
4 - Press COPY (central key)
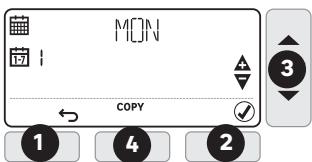
5- The name of the day to copy (source) is replaced by T[I] indication, and the day on which to copy (target) is flashing.
6 - Choose the target day using and keys
7- Press to validate,
8 - Go back to point 6 for each of the other days to copy on.

Setting Date and Time
1- Press MENU (left key) to enter programmation menu, symbol and PROG indication are flashing
2- Press setting temperature key to enter settings menu symbol and SET indication are flashing
3- Press to validate, the year is displayed and YEAR indication is flashing
4- Press to validate, the year is flashing
5- Set the year using and keys


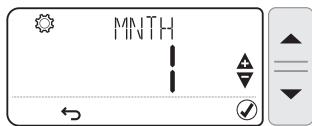
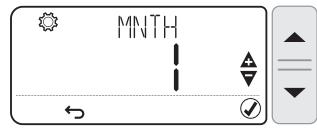
6- Press to validate, the month is displayed and the MNTH indication is flashing
7- Press to validate, the month is flashing
8 - Set the month using and keys

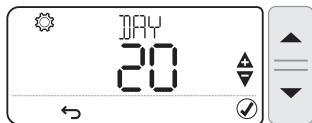
9- Press to validate, the day is displayed and the indication is flashing
10 - Press to validate, the day is flashing
11- Set the day using et keys
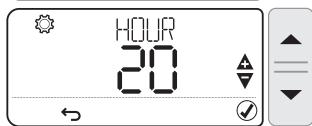
12 - Press to validate, the hour is displayed and the HOUR indication is flashing
13- Press to validate, the hour is flashing
14 - Set the hour using and keys

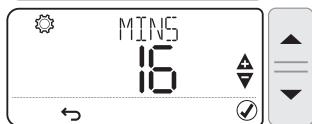
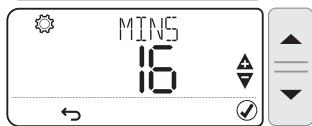
15 - Press to validate, the minutes are displayed and the MINIS indication is flashing
16 - Press to validate, the minutes are flasing
17 - Set the minutes using and keys
18-Press to validate

Temperature override
In AUTO mode, it is possible to correct the setpoint temperature using the and keys.
This temporary setting will be canceled at the next scheduled time range.
Example: It is Saturday at 10 am, the set temperature is 18^ , I can rise to 19^ using the key, and it will automatically switch to 21^ at 12 pm.

Press AUTO (central key) to force a return to the programmed temperature without waiting for the next range.

Press "+1h" (right key) to limit the override period to one hour.
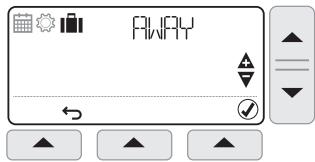
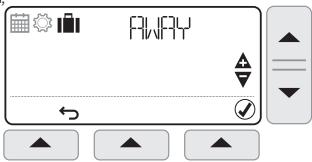
Vacation mode
This function allows you to program a constant temperature for a chosen number of days, in order to reduce energy costs.
1- Press MENU (left key) to enter programmation menu, symbol and PROG indication are flashing
2- Press twice, symbol and indication are flashing
3- Press to validate, indicating is displayed and the number of days is flashing
4 - Set the number of days using and keys
5- Press to validate, TEM indication is displayed and the temperature is flashing
6 - Set the desired temperature using et keys
7 - Press to validate, the remaining number of days will change every day at midnight
8 - To cancel, press MENU (left key), then press to validate
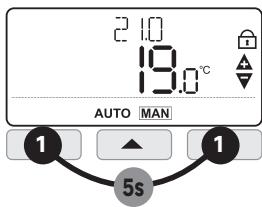
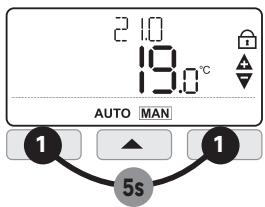
Keypad lock
1- Keep pressing MENU (left key) and (right key) simultaneously for 5 seconds to lock the keypad. The symbol is displayed.
2 - Proceed in the same way to unlock.
Optimum start
This Thermostat has optimisation functions that aim to save energy while maintaining suitable comfort levels. The thermostat learns how long it takes your home to reach a set temperature and then turns the heating on a bit earlier to achieve that temperature at the programmed time.
By default optimisation is disabled, see instructions in installer mode on how to activate it.
The Thermostat displays during the optimisation period if set.
Installer Mode
The thermostat is factory set to control a gas boiler.
Installer Mode allows you to modify these factory settings respecting the below values.
| Applications | Cycles / hour | mini ON time | Settings to change |
| Gas boiler (<30 kW) | 6 | 1 min | No change |
| Oil boiler - Heat pump | 3 | 4 min | Parameter 3OT on 4 |
| Pellet stove | Parameter 2CR on 3 |
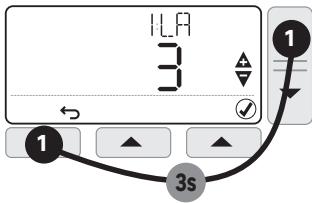
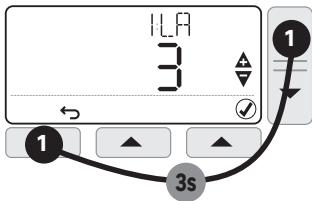
1- Keep pressing MENU (left key) and (temperature setting) simultaneously for 3 seconds to access installer mode.
2- Choose parameter to change using and keys
3-Press to change a parameter,
4 - Set the parameter using and keys
5-Press to validate
6- Press to exit installer mode
| Param. | Description | Values range | Default value |
| 1LA | Display language | 1=EN, 2=NL, 3=FR, 4=DE, 5=IT, 6=ES, 7=PT,8=CZ, 9=HU, 10=PL, 11=RO, 12=SK, 13=HR | 1=EN |
| 2CR | Cycle Rate | 3, 6, 9, 12 | 6 |
| 3OT | Minimum boiler ON time | 1......5 min | 1 min |
| 4LL | Lower temperature limit | 5......21°C | 5°C |
| 5UL | Upper temperature limit | 21......35°C | 35°C |
| 6SO | Type of programmation | 1=7 days, 2=5+2 days | 1=7 days |
| 9LC | Fail Safe | 0=Disabled, 1=Enabled | 0=Disabled |
| 10BL | Backlight | 0=Disabled, 1=Enabled | 1=Enabled |
| 11CL | Clock format | 0=24h, 1=12h | 0=24h |
| 12DS | Daylight saving | 0=Disabled, 1=Enabled | 1= Enabled |
| 13TO | Temperature offset | -3......+3°C | 0 |
| 15SD | Reset schedule | 0, 1 (Reset) | 0 |
| 16FS | Factory reset | 0, 1 (Reset) | 0 |
| 17OP | Optimum start | 0=Disabled, 1= Enabled | 0=Disabled |
| 19LK | Lock options | 1=Partial, 2=Total | 1=Partial |
| Technical data |
| Type of Control | Independently mounted control for Surface mounting |
| Electrical protection | IP30 No protection against water ingress |
| CLASS II Product that does not incorporate protective earthing provision, but a double insulation as provision against electric shock |
| Type of Batteries | 2 batteries AA (LR06) 1,5 V (not supplied) |
| Temperature range | 5-35°C |
| Action | Micro-interrupt, Type 1.C |
| Rated current | Rated voltage : 24-230V-, 50-60Hz - Max rated current for Resistive load : 3AMax rated current for Inductive load : 1A |
| Environment | Pollution degree = 2 (standard household conditions without conductive dust) |
| Regulation class(according 811/2013) | Class IV | Rated impulse voltage | 2500 V |
| Energy efficiency gain | (contribution to seasonal space heating energy efficiency) | 2% |
| Class of Software | Class A | Overvoltage Category according IEC/EN 60730-1 | II |
| Supplier | ADEO Services - 135 Rue Sadi Carnot, CS 00001, 59790 - RONCHIN - FRANCE |
TROUBLESHOOTING
Operation issues are often due to minor causes; please go over the table below before contacting the After-Sales Service. This could save you time and spare you unnecessary expenses.
| Problem | Causes, solutions |
| No Display | Check batteries by opening cover.
Check that batteries are placed in the correct position.
Replace the batteries. |
| The ➔ symbol is displayed | The batteries are getting weak.(less than 10% capacity) |
| The symbols ▲ and □ are flashing | Replace batteries immediately |
| The symbols △ and - - are displayed | The sensor is faulty, contact your installer to repair or replace the thermostat. |
In case of persistent problem, please contact the after-sales service of your store.
Warranty
The warranty does not cover problems related to improper installation, incorrect wiring or improper use.
Processing waste of electronic and electric devices at life-cycle end.

This image indicates that this product must not be disposed of with unsorted home trash. A system for disposal and special processing of used electric and electronic devices, mandatory to follow, has been implemented including the right to have vendors retrieve free-of-charge used appliances upon purchase of new appliances, as well as special collection of such waste by approved organisations.
For more information on this, you can contact your store or your town hall. Proper disposal of used electric and electronic appliances ensures their adequate processing and recycling
in order to avoid damage to the environment and public health as well as to preserve natural resources.


CE

*Garantie 3 ans/3 años de garantía/Garantiá de 3anos/Garanzia 3 Ani / Eyuúnon 3 ετών / Gwarancja 3-letnia/ / Γαραπία 3 ρούβει / Garantie 3 ani/ 3-year guarantee
Made in United Kingdom - 3робноу Великобританii
ADEO Services - 135 Rue Sadi Carnot CS 00001 - 59790 RONCHIN - France

TOB "Ipeya Meplen YuKpaHa", 04201 YuKpaHa, M.KnIB, ByN. PIoJrPaHa 17A, +380 44 498 46 00. Дане пдпрмство рпиmaс epTeH3i BiD croKnBaivB zuOTo TOBAPy, a ToKx npBoIDntb Iyo ropeMOHT, texHicHe i rapaHIne o6cnyrObyBaHnTepMin cnyk6n TOBAPy:5 pokIB