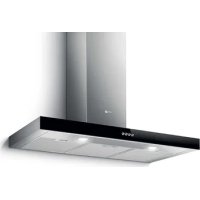
GIOIA WH/F/50 - Island hood TURBOAIR - Free user manual and instructions
Find the device manual for free GIOIA WH/F/50 TURBOAIR in PDF.
User questions about GIOIA WH/F/50 TURBOAIR
0 question about this device. Answer the ones you know or ask your own.
Ask a new question about this device
Download the instructions for your Island hood in PDF format for free! Find your manual GIOIA WH/F/50 - TURBOAIR and take your electronic device back in hand. On this page are published all the documents necessary for the use of your device. GIOIA WH/F/50 by TURBOAIR.
USER MANUAL GIOIA WH/F/50 TURBOAIR
EN - Instruction on mounting and use
Closely follow the instructions set out in this manual. All responsibility, for any eventual inconveniences, damages or fires caused by not complying with the instructions in this manual, is declined. The extractor hood has been designed exclusively for domestic use.
Note: the elements marked with the symbol (^*) are optional accessories supplied only with some models or elements to purchase, not supplied.

Caution
WARNING! Do not connect the appliance to the mains until the installation is fully complete.
Before any cleaning or maintenance operation, disconnect hood from the mains by removing the plug or disconnecting the mains electrical supply.
Always wear work gloves for all installation and maintenance operations.
The appliance is not intended for use by children or persons with impaired physical, sensorial or mental faculties, or if lacking in experience or knowledge, unless they are under supervision or have been trained in the use of the appliance by a person responsible for their safety.
This appliance is designed to be operated by adults, children should be monitored to ensure that they do not play with the appliance.
This appliance is designed to be operated by adults. Children should not be allowed to tamper with the controls or play with the appliance.
Never use the hood without effectively mounted grating!
The hood must NEVER be used as a support surface unless specifically indicated.
The premises where the appliance is installed must be sufficiently ventilated, when the kitchen hood is used together with other gas combustion devices or other fuels.
The ducting system for this appliance must not be connected to any existing ventilation system which is being used for any other purpose such as discharging exhaust fumes from appliances burning gas or other fuels.
The flaming of foods beneath the hood itself is severely prohibited.
The use of exposed flames is detrimental to the filters and may cause a fire risk, and must therefore be avoided in all circumstances.
Any frying must be done with care in order to make sure that the oil does not overheat and ignite.
Accessible parts of the hood may become hot when used with cooking appliance.
With regards to the technical and safety measures to be adopted for fume discharging it is important to closely follow the regulations provided by the local authorities.
The hood must be regularly cleaned on both the inside and outside (AT LEAST ONCE A MONTH).
This must be completed in accordance with the maintenance instructions provided in this manual). Failure to follow the instructions provided in this user guide regarding the cleaning of the hood and filters will lead to the risk of fires.
Do not use or leave the hood without the lamp correctly mounted due to the possible risk of electric shocks.
We will not accept any responsibility for any faults, damage or fires caused to the appliance as a result of the non-observation of the instructions included in this manual.
This appliance is marked according to the European directive 2002/96/EC on Waste Electrical and Electronic Equipment (WEEE). By ensuring this product is disposed of correctly, you will help prevent potential negative consequences for the environment and human health, which could otherwise be caused by inappropriate waste handling of this product.

The symbol on the product, or on the documents accompanying the product, indicates that this appliance may not be treated as household waste. Instead it should be taken to the appropriate collection point for the recycling of electrical and electronic equipment. Disposal must be carried out in accordance with local environmental regulations for waste disposal.
For further detailed information regarding the process, collection and recycling of this product, please contact the appropriate department of your local authorities or the local department for household waste or the shop where you purchased this product.
Use
The hood is supplied in the FILTERING version and is used without an extracted fumes discharger conduit.
Fumes and steam are recycled through the X deflector.
If you intend using the product in the SUCTION version, it is necessary to have an evacuation conduit going from the upper Y exit to the extraction hole towards the exterior.
In this case a connection ring has to be installed on the Y extraction hole and the carbon filter removed.
Specialised personnel must carry out both the electrical and the mechanical installation.
The minimum distance between the supporting surface for the cooking equipment on the hob and the lowest part of the range hood must be not less than 50cm from electric cookers and 65cm from gas or mixed cookers.
If the instructions for installation for the gas hob specify a greater distance, this must be adhered to.

Electrical connection
The mains tension must correspond to the tension shown on the characteristic label situated inside the hood.
The product is meant for connecting directly to the mains supply, therefore apply a regulation bipolar switch that ensures complete disconnection from the mains in the conditions of category III over-tension, conforming to the installation rules.
Warning! Detail B (fixing bracket to the ceiling - Fig. 1) is equipped with a conductor (yellow-green) that must be connected to the earth of the domestic electrical plant. Fig. 4
ATTENTION! Be particularly careful about positioning the excess cable. Failure to observe this indication could cause grave damage to the apparatus and/or an electric shock to the user or the installer. For further details see Fig. 8-15
Warining! Changing the interconnection cable must be carried out by the authorised technical assistance service.
Mounting
Expansion wall plugs are provided to secure the hood to most types of walls/ceilings. However, a qualified technician must verify suitability of the materials in accordance with the type of wall/ceiling. The wall/ceiling must be strong enough to take the weight of the hood. Do not tile, grout or silicone this appliance to the wall. Surface mounting only.
Additional Installation Specifications:
Use only the fixing screws supplied with the product for installation.
Use the correct length screws which are identified in the Installation Guide
WARNING! Failure to install the screws or fixing device in accordance with these instructions may result in electrical hazards.
Description of the hood
Fig. 1
A. Cover
B. Support to the ceiling bracket
C. Regulators of the tie-rods of the hood
D. Decorative cover
E. Box for connecting to the domestic power network
F. Interconnection cable
G. Halogen bulb
H. Active carbon filter
I. Metal anti-fat filter
Operation
Use the high suction speed in cases of concentrated kitchen vapours. It is recommended that the cooker hood suction is switched on for 5 minutes prior to cooking and to leave in operation during cooking and for another 15 minutes approximately after terminating cooking.

A. on/off light switch
B. on/off aspiration switch and minimum power selection
B+C. medium power selection aspiration switch
B+D. maximum power selection aspiration switch
Maintenance
ATTENTION! Before performing any maintenance operation, isolate the hood from the electrical supply by switching off at the connector and removing the connector fuse.
Or if the appliance has been connected through a plug and socket, then the plug must be removed from the socket.
Cleaning
The cooker hood should be cleaned regularly (at least with the same frequency with which you carry out maintenance of the fat filters) internally and externally. Clean using the cloth dampened with neutral liquid detergent. Do not use abrasive products. DO NOT USE ALCOHOL!
WARNING: Failure to carry out the basic cleaning recommendations of the cooker hood and replacement of the filters may cause fire risks.
Therefore, we recommend observing these instructions.
The manufacturer declines all responsibility for any damage to the motor or any fire damage linked to inappropriate maintenance or failure to observe the above safety recommendations.
Grease filter
Traps cooking grease particles.
This must be cleaned once a month (or when the filter saturation indication system - if envisaged on the model in possession - indicates this necessity) using non aggressive detergents, either by hand or in the dishwasher, which must be set to a low temperature and a short cycle.
When washed in a dishwasher, the grease filter may discolour slightly, but this does not affect its filtering capacity.

Charcoal filter (filter version only)
It absorbs unpleasant odours caused by cooking.
The charcoal filter can be washed once every two months (or when the filter saturation indication system - if envisaged on the model in possession - indicates this necessity) using hot water and a suitable detergent, or in a dishwasher at 65^ (if the dishwasher is used, select the full cycle function and leave dishes out).
Eliminate excess water without damaging the filter, then put it in the oven for 10 minutes at 100^ to dry completely. Replace the mattress every 3 years and when the cloth is damaged.
Montage
Install the carbon filter on the back of the grease filter and fix with two rods.
Attention! The rods are included in the carbon filter packing and not on the hood.
To dismantle the filter act in the reverse manner.

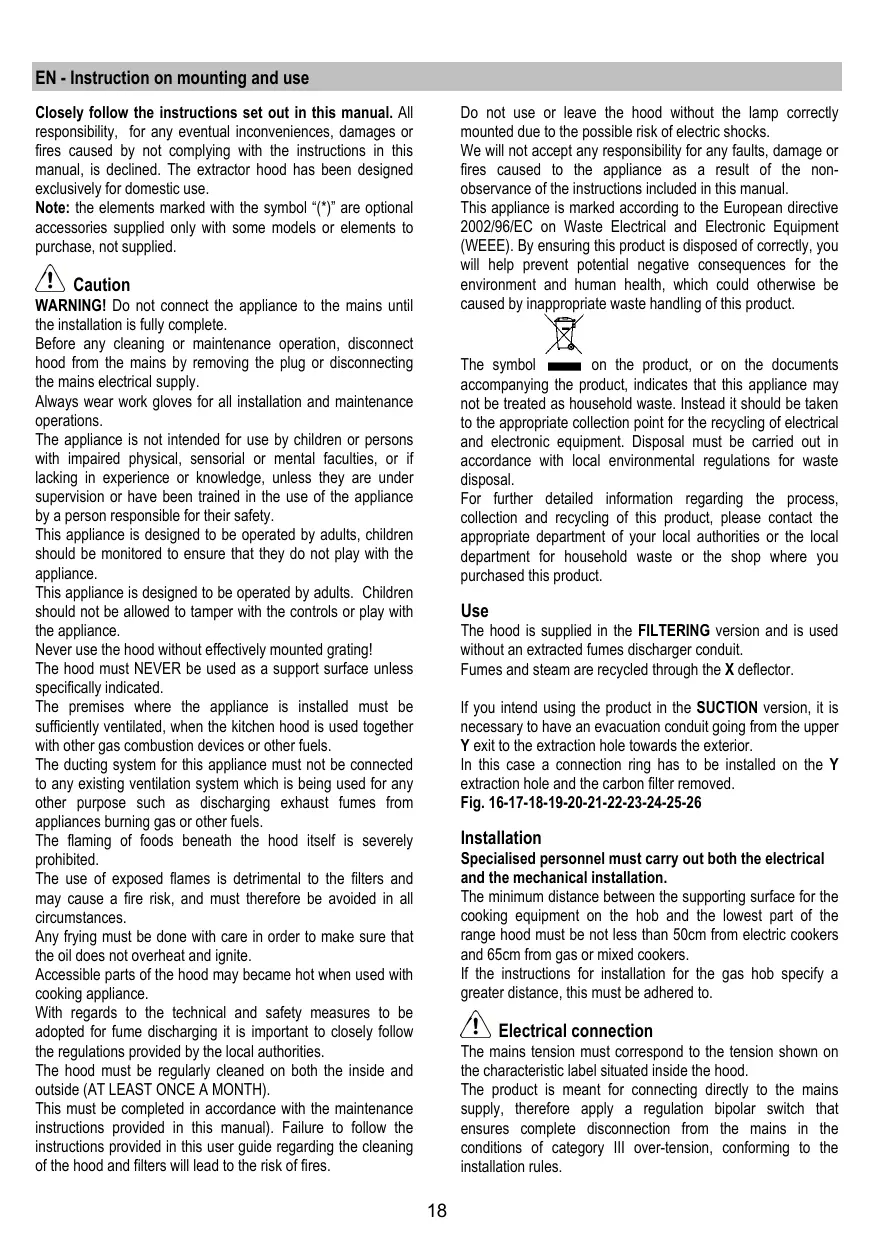
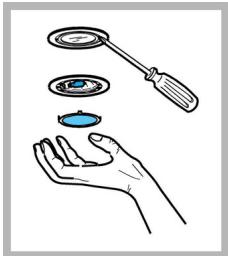
Replacing lamps
Disconnect the hood from the electricity.
Warning! Prior to touching the light bulbs ensure they are cooled down.
- Using a flat head screwdriver or equivalent tool, carefully pry loose the light cover.
- Remove the damaged light and replace with a new 12 Volt, 20 Watt (Maximum) halogen light made for a G-4 base SuITABLE FOR USE IN OPEN LUMINAires. Follow package directions and do not touch new light with bare hands.
- Reinstall the light cover. (it will snap shut).
Some models envisage lateral lamps:
Replace them with identical forms of 40W (E14) max).
Remove cover A to access the lamp housing A.
If the lights do not work, make sure that the lamps are fitted properly into their housings before you call for technical assistance.
He octabnIte detei 6e3 npncMOtra, YTO6bI OHI He nrgapJIc c np6obopom.
He nCOnIb3yIe BbITaKky, ecn peWetka HnpaBnIbHO yctahOBnela!
Kateropnueckn 3anpeuetaeTcNpOJIb3OBaTb BItTJkUy KaueCTBe OONPHIPOCKoTm,ecnI 3TO CneuaJIbHO He OROBOpEO.
Oecehe HaIeKaun Bo3DyXoo6MeH NomeJeHn, KOrDa BbI cNoJIb3yeTe BbITaKky B KyXHe OJHOBpeMeHc C DpyrMn np6obamHa ra3y HIn Ha dpyrom rOpUem.
BbITrIbAeMbI Bo3DyH He DoJxHe BbIbpaCbIbTaCn HApKyU yepe3 Bo3DyXOBOD, INcONlb3yEmbl DnB bIbPoCa DblMOB OT np6oBOP C r30BbIM CxNraHnEM mIn C pNTaHnEM dpYmIMT roPouMn.
Kateropnueckn 3anpeaetcra roTOBn6bnoa "noi nIamehem, noCKoNkBy CBO6OdHoe IAmA MoKeT NOBpeINb fNbTpbl n CTaT npuHNOI noXapa; no3tOMy, BO3depKJBauTeCb ot 3TOB B LIO6om Cnyae.
KapeHBe B 60JbWOM KOJNUeCTBe MacJa DOJIKHO npOn3BODNTCBaIOI NOCTOARHHbIM KOHTPOJIEM,IMER B BVND, YTO NepePeTeOE MACNO MOKET BOcPiMaHErTcR.
PnncnoIb3oBaHmBmeTe C npOuMm annapatamn DnB BApK,OTKpbItBe yactn np60pa MOrT CnIbHO HArpeBaTbcra.
YTO kacaetc TExnuecknx Mep u YcIOBn ITO texHnke 630nacnoctn npn OTBOe DbIMOB, TO npnEepKINBaITecb cTporo npaBnI, npdeymOTpeHHbIX peIamENTOM MeCThIx KOMNETHTbIX Bnactei.
PpOIN3BOIDIte NepNOUHeCKyIO OcNCTky BbITJxKn KaK BHyTpi, TAK IN ChapyKn (PO KPAIMHEI MEPE, PA3 B MECRlC coBJIOnDeHnEM ycNoBni, KOtOpBle CneuJaNbHO npEduCMOTpeHb B INHCTpyKunXn NO 06cnykBaHnIO DaHHoro npi6opa).
HecobnoHeHne HnCTpyKmI No YCTKe BbITaKm I No 3aMeHe nYCTKe PJIbTPOB MOxET CTaB pNCHoN IOxapa.
He nCnoJb3yIe H He octabJIe Te BItIaKBy 6e3 npAunIbHO yCTAHOBJIeHHbIX JAMIOueK B CBA3N C BO3MOXHbIM PNCKOM yDapa 3NeKTpUneCKM TOKOM.
Mblchimaem C c6eBcKky OTOBTBCTBEHOCt 3a HeNoIaIKn, yuepe nnCropaHne pnpbopa BCNECTBne Heco6JIIODeHn HNCTpykU, pnpBeDEHHbIX B DAHNOM pyKOBOJCTBE.
Данhoe ИделпnpoMapКИрOBaHO B COOTBETCTBnC Еврелсков ДиpeKTиВо 2002/96/EC NO yTININ3aUN ЗлктчecкOrи иЗлктpoHOrO obopуdoBaHЯ (WEEE).
OeceueH npabnblHy ytnlna3auNo daHHoro n3denn, BbI NOMOXETe PneoTbpaTb NoteHuaNbHbe HeraTNBbIe NOcNECTBn DnOKpykaIOUe CpeDbN 3DopOBbYeJIOBeKa, KOTOpBE MOIN bI IMETb MecTo B npotNBOM cnyae.

CnB01 Ha cAmOM n3dEnm nIn cOpBoDntelbHOn DOKyMeHTaun yka3bIAeT, YTO pRn yTNlN3aUN daHHORO n3dEnm C HMM HeN53 o6paatbca KAK C obHybIMn 6bIbOMn OTXdAMu Bmecto 3ToR,ero cIeJyET cDaBaTB COOTBeTcByUoMn NyHK TnpEIMNK 3NeKTPnuEcKOrO n 3NeKTPoHrO O6opyDobAHn DJIPOcIeDyIOSeY tINlN3aUN.
CdaHa HcNOM DoJXHa IPOIN3BOIDHTCB8 C COOTBETCTBnC MECTbIMN PpABINAMN NO YTIN3aUN OTXoOB.
3a 6oJIe e noIpOboHOn mHfOpMaJne o npabInax oxbpaJeHHc TAKIMN I3dJIeJMAH, IN yTNIIN3aJn INpepeaBoTKn ObaaauTeCB B MeCTHbE opraHb Ibactn, B CnyKbY no yTNIIN3aJm OTXODOB INB MgaraINH, B KOTOPOM Bb npno6peJI daHnOE n3deJIne.
Пользоване
BbIyKka NoCTaBnTcR B INCNOJIHeHm C PELYNPKYJLcNEI BO3dYxa NdoJIXHa NCNOJIb3ObaTbcra 6e3 TpybI dIra OTbOJa HApKy BbITrIMBaEMbIX DlbMOB.OTpMbTPOBaHHbI BO3dYx BO3BpaAaTcR B NOMUeHne Uepe3 DePfKeTOp X.
Ecnn BbITJxka 6ydt pa6oTaB bpeKmE C OTBODOM Bo3Dyxa, CMOnTHpyTe BbIBOHyIO Tpy6 y nIOBaEDnTe ee C BBIOHOro OTBepCTnR BbITJXKn K OTBepCTnO dIra OTOBoa Bo3Dyxa Hapky.
B daHOM cnuyae yctaHOBnTe Ha BbIOJHOe OTBepCTne Y nepexoDny BO TByNKy N BbIbTe yToIbHbI qINbTp.
HE IIPIMEHJTE CnHPT!
BhImaHne: He co6nIOeHne npabIN nIcTkn np6Opa n 3aMeHbI pInIbTPOB MOKET npIBeCTN K PnCKy BO3HNKHOBeHn IOkapa. IooTomy peKOMeHdyem co6nIOdaT npBbeHnble INCHTpKUIN.
CHHMaTeCJIIO6aOTBETCTBeHHOCTb B CBA3N C BO3MOXHbIMN NOBpeXDeHnAIMn DVBraTeJn I C NOKapAMn, BO3NHKUIMM BCIEeCTBHe HnPabINbHOrO peMOHTa INI HeCO6JIIODeHnRA BIWeOpINcAHhBIXnpEDynpExdHnI.
ANVAND INTE ALKOHOL!
He BnKOpNCTOByTe 3ac06n Ioo MaKToB abpa3nBHi MATEPIAII.
HE BUKOPUCTOBYNTE CINPT!
Ybara: He BnKoHaHn npaBn YIeHnH i 3amHn φinbTpiB MoKe npiBeCTn Do pN3NKy BnHKnHeHn NokEkei. Tomy peKoMeHnyeMo DToPmByBaTncB npiBeDeHnx IHcTpkyiJ.
3HimaTbCBAKABiDIOBdAaBbHcTbB3r3Ky3MOXJIINBMIMU yHKoJKeHHnMmDbIgHa i NOKeJAMN,ZO BUNHKnBhAcNiOk HeBipHOrOpemOnTy a60 He BUNKOHn BnSeONMCahNX nonepedKeHb.
ФильтрзатурмкхириВ
3atpmyec xnpobicnojyuehn, 0o BnHnkaHb nid yac npirotoybaHH iKi.
Повинен Уститя садд раз в міць (аоб колс Стетм индацilп полбенгь Флггь, якшу e у в buшй мосял, вka3ye Ha daHy HeobxidiHICTb), 3 BnKOpNCTAHNM hearpecnbHnx MnOchx 3ac06iB bpyHy a60 b nocydomnoчiy maunhi pri n H3bki Tempepatyi i kopoTOMy uKnii.
Pn MNTI B NocyDmNIOH MaunH MoKe MaTn Mice DeKe 3He6apBLeHHa PInbTpY,npTe Ioro PInbtpyOHi XapaKTEpNCtNI 3AluHaOTbcr He3MiHNHMn.
ByrilbHn pfIbTp (tiIbKn B pexnmi peunpkylauii)
B6npaε HenpncmHi 3aapanx Kyxhi.
ByirblnHn FInbTp MoXHa MmT N KoxHn Dba Micaui (a6o KOni CnCTema IHdNkaqii NpePobHeHHn FInbTpB, kAoo E y Baun MoDeni, BkAye Ha daHy Heo6xIdHcTB) B Tepni B0di 3 BiDnOBiDHNM MmOChm 3acObamn A6o B NocydomuOHi MaunHn npn Tempepatyi 65^ (B octaHbomy Bnuadky, BvOKHaiTe NobHn Uckn MmTTra 6e3 nocydu BCEpeDNIH nocydomuOoi MaunHn).
3nTn HndnnkOBy Bny 6e3 noNkoJxHn Hn pIbtpy, nicn yoro 3HOy noCTaBnTu NOro y dYXOBky Ha 10 xB. npn 100° nna NOBHOrO OcyuBaHnR.
IpyuKy MInrTa pa3 Ha Tpu pOKn, a6o J KcKHO rpo 4a3y, KOIN TKAHnBa BnBnEeTbCn POnKoJKeHOIO.
MoHTax
BCTABTN ByrIbHm fIpIbTp no3ady fIpIbtpy 3aTpMkn Jxpy i 3aΦikCyBatn DbOMa nlaHkamn.
Ybara! PnAnKn BKnOueHb Habip Do ByrInbHoro pInbtpy, a He KObnaka.
-Дя demontaxy fiinbtpy BnKoHaTn diB o6epHeHomy npraKy.
3amHaJAmn
Biiklouchnt npnlaad Bi eelktpomepexi.
Ybara! Iepi HIX TopkATn lamnn Heo6xIDHO BneBHTncs IO BOHNOXONNI.
- BnMItb 3axncn enemt 3a donomoro HeBeNkoi BnKpyTkn abo nOj6HOro IHcPymeHTy.
- 3aminiB neperopiny lamny. Binkopinctoboyte nra yto rane raonreHnI lamnn Ha 12V-20W maKc-G4, He doTopkyuocnbdo Hx pykamn.
- 3aKpIte pIafoh (kpIInHeHH 3acyBkoHO).
IeRki moDeni maOtB lamNooyKn 6okOBoro oCbitnHeHr:
3amHHTn TaKIMN J lamnochAm MaKc 40 BT (E14).
ДяdoctуныдлamнocbttlenнязгткшkyA.
Kkio cntema niccbitkn He npaioe, nepebiTe BipHy yctahOBky lamn B rH3da, neped TmR 3BeptaTcra Do ceHTpy TexhiHOI donOMOrn.
J 1 J 1 J 1 J 1 J 1 J 1 J 1 J 1 J 1 J 1 J 1 J 1 J 1 J 1 J 1
aI j y 100
a
26-25-24-23-22-21-20-19-18-17-16
#
a s 1s 1s 1s 1s
aaiiaaii
yall wll gwhl gie aoc uol lwl jw wjw all slal
50 n J 12 12
65 65
alilisall jieell
i 1
1
a 100000000000000000000000000000000000000
Jdallggyjckal jdlcl
aill llll lll l l
Ss
aIglll 1
jill jil jil g oolg 111 a
aannl 10000000000000000000000000000000000000000000000000
()()
4 15
1
15-8
j 1
aill aill aai
y
C
i
Jia jia jia jia jia jia jia jia jia jia jia jia jia jia jia jia jia jia jia jia jia jia jia jia jia jia jia jia jia jia jia jia jia jia jia jia jia jia jia jia jia jia jia jia
j j 1
Sall
i 1
Jauill
j 1 j 1 j 1 j 1 j 1 j 1 j 1 j 1 j 1 j 1 j 1 j 1 j 1 j 1 j 1 j 1 j 1 j 1 j 1 j 1 j 1 j 1 j 1 j 1 j 1 j 1 j 1 j 1 j 1 j 1 j 1 j 1 j 1 j 1 j
15 1
J 15
1 1
psia JxJcUgssall
y
jL
i
1 1111111111111111
Jai jai jai jai baill jai jai laic
1 1
A. 1 A. 1
j 1 j 1 j 1 j 1 j 1 j 1 j 1 j 1 j 1 j 1 j 1 j 1 j
.2g jll 1j00j jll
jlll ciil lcl aably jub liyia gian
Jg
i j j j j j j j j j j j j j j j j j j j j j j j j j j j j j j j j j j j j j j j j j j
K: 1234567890
Gj0g
y
aaiy jie yjie jie jie jie jie jie jie jie jie jie jie jie jie jie jie jie jie jie jie jie jie jie jie jie
- x. x^2 - 1
Jg
e 1
(jidall gai jali liuolai lioual liuicii jiu isy
a
a 1
JyS Juaa Juaai jui
a
Cll bok all oel yopoe (1)w! jol jol ai w
-
-
-
-
-
-
-
- 1.
-
-
-
-
-
-
2002/96/EC, Waste 2002/96/EC, Waste
Electrical and Electronic Equipment (WEEE).