USER MANUAL WT344 - WX333 WORX
*Not all the accessories illustrated or described are included in standard delivery.
TECHNICAL DATA
Type WX333 (330~359-designation of machinery, representative of Rotary hammer)
| Voltage | 220-240V~50/60Hz |
| Power input | 1250W |
| No load speed | 0-750/min |
| Impact rate | 0-3700/min |
| Impact energy | 5.0J |
| Chuck type | SDS-plus |
| Max drilling capacity | Steel 13mm |
| Masonry 32mm |
| Wood 40mm |
| Protection class | ☐/II |
| Machine weight | 6.1kg |
| A weighted sound pressure | LpA: 90dB(A) |
| A weighted sound power | LwA: 101dB(A) |
| KpA & KwA | 3.0dB(A) |
| Wear ear protection when sound pressure is over | 80dB(A) |
Vibration total values (triax vector sum) determined according to EN 60745:
| Hammer drilling into concrete | Vibration emission value ah,HD=17.4m/s2 |
| Uncertainty K=1.5m/s2 |
| Chiselling | Vibration emission value ah,Cheq=14.3m/s2 |
| Uncertainty K=1.5m/s2 |
The declared vibration total value may be used for comparing one tool with another, and may also be used in a preliminary assessment of exposure.

WARNING: The vibration emission value during actual use of the power tool can differ from the declared value depending on the ways in which the tool is used dependant on
the following examples and other variations on how the tool is used:
How the tool is used and the materials being cut or drilled.
The tool being in good condition and well maintained.
The use the correct accessory for the tool and ensuring it is sharp and in good condition.
The tightness of the grip on the handles and if any anti vibration accessories are used.
And the tool is being used as intended by its design and these instructions.

WARNING: To be accurate, an estimation of exposure level in the actual conditions of use should also take account of all parts of the operating cycle such as the times when
the tool is switched off and when it is running idle but not actually doing the job. This may significantly reduce the exposure level over the total working period.
Helping to minimise your vibration exposure risk.
ALWAYS use sharp chisels, drills and blades.
Maintain this tool in accordance with these instructions and keep well lubricated (where appropriate).
If the tool is to be used regularly then invest in anti vibration accessories.
Avoid using tools in temperatures of 10^ or less.
Plan your work schedule to spread any high vibration tool use across a number of days.
ACCESSIONS
Auxiliary handle 1
Depth gauge 1
SDS drill bits (8 10 12x150mm) 3
SDS chisel (point & flat 250mm) 2
Dust cover 1
Spanner 1
keyed chuck with key and adaptor 1
Plastic container grease 1
We recommend that you purchase your accessories listed in the above list from the same store that sold you the tool. Refer to the accessory packaging for further details. Store personnel can assist you and offer advice.
HAMMER SAFETYWARNINGS
- Wear ear protectors. Exposure to noise can cause hearing loss.
- Use auxiliary handle(s), if supplied with the tool. Loss of control can cause personal injury.
- Hold power tool by insulated gripping surfaces, when performing an operation where the cutting accessory may contact hidden wiring or its own cord. Cutting accessory contacting a "live" wire may make exposed metal parts of the power tool "live" and could give the operator an electric shock.
ADDITIONAL SAFETY RULES FOR HAMMER
1. Always wear a dust mask.
SYMBOLS

To reduce the risk of injury, user must read instruction manual

Double insulation

Warning

Wear ear protection

Wear eye protection

Wear dust mask

Waste electrical products must not be disposed of with household waste. Please recycle where facilities exist. Check with your local authorities or retailer for recycling advice.
OPERATING INSTRUCTIONS

NOTE: Before using the tool, read the instruction book carefully.
INTENDED USE
The machine is intended for hammer drilling in concrete, brick and stone as well as for light chiseling work. It is also suitable for drilling without impact in wood, metal, ceramic and plastic.
1. ADJUSTING THE AUXILIARY HANDLE (See Fig. A)
For your personal safety we recommend using the auxiliary handle at all times.
To adjust the handle, rotate the bottom of the handle anti-clockwise and rotate the handle around the hammer collar until the handle is in the desired position. Tighten fully.
2. USING THE DEPTH GAUGE (See Fig. A)
The depth gauge can be used to set a constant depth to the drill.
Rotate the locking screw on the top of the handle anti-clockwise to loosen, insert the depth stop into the handle. Adjust it to the desired depth. Rotate the locking screw clockwise to tighten.
3. FITTING BITS OR CHUCK (See Fig. B1)
Clean the bit shank and apply grease before installing the bit. Hold the rotary grip, pull back the lock sleeve and insert the bits or chuck into the bit holder. Turn the bit and push it in until a resistance is felt. The shaft drops completely into the bit holder. Once you are satisfied that it has been seated, release the black lock sleeve. This would lock the bits or chuck into position.
After installing, always make sure that the tool or chuck is securely held in the bit holder by trying to pull it out.
If the bits or chuck is not located well, repeat the operation again.
4. REMOVE BITS OR KEY CHUCK (See Fig.B1)
To remove the tool or chuck, pull back the lock sleeve, hold and pull the tool or chuck out.
NOTE: The bits or chuck are gripped firmly by the shank and can not be removed once locked in position.
5. USING THE CHUCK
For added convenience, your rotary hammer drill now comes with a 3-jaw chuck. It enables you to work with non-SDS drill bits/tools.

WARNING! The 3-jaw chuck is designed for wood and metal
DRILLING work only. NEVER use this chuck with rotary hammer or chisel. THIS CHUCK CAN BE DAMAGED IF YOU DO SO.
Inserting a drill bit into chuck. (See Fig. B2)
Before installing drill bit, remove mains plug from mains supply.
Place chuck key into chuck, turn key anticlockwise to undo/loosen chuck, insert drill/ tool and firmly tighten chuck by turning key clockwise. Remove key and replace in Blow Mould Case.
6. OPERATING THE ON/OFF SWITCH (See Fig. C)
Depress the switch to start the tool and release it to stop your tool.
7. USING THE VARIABLE SPEED CONTROL (See Fig. D)
The speed increases as you turn the switch towards the higher number and decreases on the lower number.
8. HAMMER DRILL FUNCTION (See Fig. E, F)
1)For drilling concrete, masonry etc, press the lock button (A) and rotate the selector switch to make sign "T" point to the triangle. (See Fig. E)
NOTE: You must press the selector switch lock button before adjusting the selector switch. If the selector switch cannot go into the required position, switch on your hammer a little, then adjust the selector switch again.
2)Turn the hammer or drilling action selector switch pointing to the hammer action "T" position. (See Fig. F)
3) You are now set up for hammer drilling into masonry.
9. DRILLING FUNCTION (See Fig. G, H)
1)Press the lock button (A) and rotate the selector switch to make sign "T" point to the triangle. (See Fig. G)
2)Turn the hammer or drilling action selector switch pointing to the drilling action " position. (See Fig. H)
3) You are now set up for drilling function.
10. CHISEL FUNCTION (See I, J)
1)For chipping, grooving or demolition operation, press the lock button (A) and then rotate the selector switch make sign "T" pointing to the triangle. (See Fig. I)
2)Turn the hammer or drilling action selector switch pointing to the hammer action "T" position. (See Fig. J)
3)You are now set up for chisel work using Chisel action.

WARNING: You must make
sure that the selector switch
is positively locked in chisel mode position. If not, it could cause a hazard.
11. DUST COVER (See Fig. K)
Use the dust cover to prevent dust from falling over the tool and on your self when performing overhead drilling operations. Attach the dust cover to the bit as shown in the K.
12. LUBRICATION MACHINE (See Fig. L)
The machine is grease-lubricated. A grease refill is only required during hammer work efficiency is low. Open the grease box lid at the top of the hammer using the pin spanner provided. Then refill approx 30g grease provided with your tool. The grease specification is general purpose lithium based. Use only Worx genuine hammer grease (optional accessory).
CAUTION: Keep the container of grease away from children.
13. TO REPLACE THE BRUSHES
(See Fig. M, N)
Disconnect the plug from the power supply. Unscrew the carbon brush cap with screwdriver.
Remove the carbon brush. Check the length
of the brush and replace if under 6mm. When brushes need replacement always renew both brushes, even if one is still more than 6mm long.
Completely screw down the carbon brush cap. Check that the tool is working. Before use, allow it run for a few minutes to enable the brushes to settle.
- Reduce the pressure on the drill bit when it is about to break through. This will prevent the drill from jamming.
- When drilling a large hole, first drill a pilot hole using a smaller drill bit.
- Always apply pressure to your drill bit in a straight line, and if possible at right angles to the workpiece.
- Never change the operating mode whilst the drill is running.
- Do not apply excessive pressure to the tool when chiseling. Expressive force does not speed up the work.
MAINTENANCE
Remove the plug from the socket before carrying out any adjustment, servicing or maintenance.
There are no user serviceable parts in your power tool. Never use water or chemical cleaners to clean your power tool. Wipe clean with a dry cloth. Always store your power tool in a dry place. Keep the motor ventilation slots clean. Keep all working controls free of dust. Occasionally you may see sparks through the ventilation slots. This is normal and will not damage your power tool. If the supply cord is damaged, it must be replaced by the manufacturer, its service agent or similarly qualified persons in order to avoid a hazard.
TROUBLESHOOTING
- If your power tool does not start, check the plug on the power supply first.
- If your hammer becomes too hot in use, set the hammer switch to the drill mode and allow your drill to operate at maximum speed without load for 2 minutes.
- If your hammer work efficiency is too low, please add sufficient grease in the grease box.
- If your hammer use in low efficiency, please check whether the tool is blunt.
- If a fault can not be rectified, return the tool to an authorized dealer for repair.
ENVIRONMENTAL PROTECTION

Waste electrical products should not be disposed of with household waste.

Please recycle where facilities exist.
Check with your Local Authority or retailer for recycling advice.
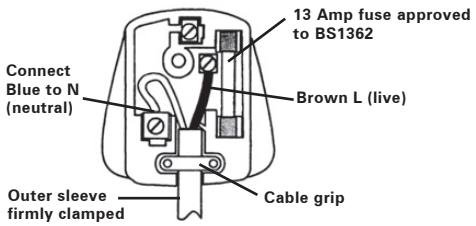
PLUG REPLACEMENT (UK & IRELAND ONLY)
If you need to replace the fitted plug then follow the instructions below.
IMPORTANT
The wires in the mains lead are colored in accordance with the following code:
BLUE = NEUTRAL
Brown = Live
As the colors of the wires in the mains lead of this appliance may not correspond with the colored markings identifying the terminals in your plug, proceed as follows. The wire which is colored blue must be connected to the terminal which is marked with N. The wire which is colored brown must be connected to the terminal which is marked with L.

WARNING: Never connect live or neutral wires to the earth terminal of the Only fit an approved 13ABS1363/A plug he correct rated fuse.
NOTE: If a moulded plug is fitted and has to be removed take great care in disposing of the plug and severed cable, it must be destroyed to prevent engaging into a socket.
Declare that the product, Description WORX Rotary Hammer Type WX333 (330~359-designation of machinery, representative of Rotary hammer) Function Hammering various materials
Complies with the following Directives, 2006/42/EC, 2011/65/EU, 2014/30/EU
Standards conform to
EN 60745-1,
EN 60745-2-6,
EN 55014-1,
EN 55014-2,
EN 61000-3-2,
EN 61000-3-3
The person authorized to compile the technical file,
Name Russell Nicholson
Address Positec Power Tools (Europe)
Ltd, PO Box 6242 Newbury RG14 9LT UK

Suzhou 2016/03/17
Allen Ding
Deputy Chief Engineer, Testing & Certification
- ARRETIERHÜLSE
- BOHRTIEFENANSCHLAG
- SCHMIERMITTELBEHÄLTERDECKEL
- EIN/AUS-SCHALTER
- HÄMMERN/BOHREN-UMSCHALTER
- HAMMER /MEISSEL-UMSCHALTER
- VARIABLEER GESCHWINDIGKEITSREGLER
- SDS BOHRER*
- SCHRAUBENSCHLUSSEL
- ZAHNKRANZBOHRFUTTERSATZ MIT ADAPTER, BOHRFUTTERSCHLUSSEL*
- SCHMIERFETTPLASTIKBEHÄLTER*
- STAUBSCHUTZHAUBE*
- SPITZMEISSEL & FLACHMEISSEL*
- ZUSATZHANDGRIFF
Schraubenschlüssel 1
TIPS VOOR HET WERKEN MET UW APPARAAT
Vrtaky sds (8, 10, 12x150mm) 3
Aperte completeness.
2. USAR O MEDIDOR DE PROFUNDIDADE (Ver Fig. A)
Cumpre as següntes Directivas:
2006/42/EC, 2011/65/EU, 2014/30/EU
you've got the power
www.worx.com
Copyright © 2016, Positec. All Rights Reserved.
AR01150001