OSKAR M OSKAR L - Smoker BARBECOOK - Free user manual and instructions
Find the device manual for free OSKAR M OSKAR L BARBECOOK in PDF.
| Product type | Wood or charcoal smoker |
| Brand | BARBECOOK |
| Models | OSKAR M, OSKAR L |
| Fuel | Charcoal or wood (except pine) |
| Usage | Outdoor only |
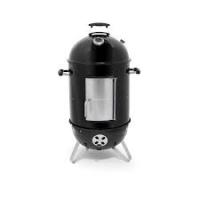
| Cooking capacity | OSKAR L: 2 cooking grates, OSKAR M: 1 grate |
| Smoking types | Hot smoking (50-80 °C), cold smoking (≤25 °C with accessory) |
| Grill function | Yes (without water pan) |
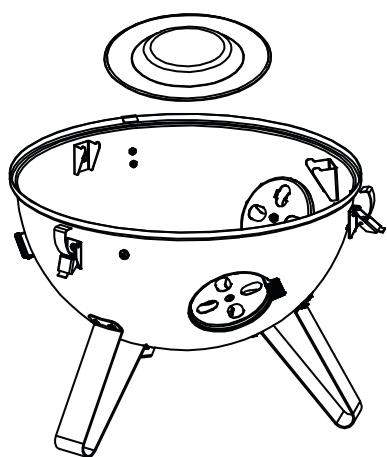
| Thermometer | Integrated in lid |
| Materials | Enameled steel, stainless steel, chrome steel, powder coating |
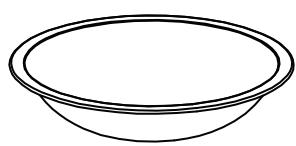
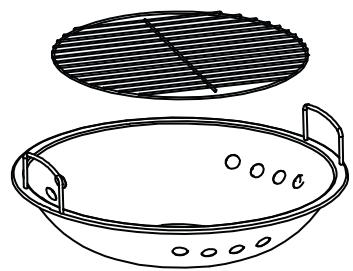
| Included accessories | Charcoal grate, cooking grates, water pan, ash container |
| Cold smoking accessory | Barbecook cold smoker (ref. 223.9840.160) - sold separately |
| Temperature control | Air inlets on lid and ash container |
| Maintenance and cleaning | Clean after each use; use Barbecook cleaner or mild detergent |
| Ash removal | Via removable ash container |
| Spare parts | Available at www.barbecook.com or at retail outlets |
| Warranty | 2 years from purchase date (subject to conditions) |
| Safety | Do not use indoors; keep away from children/pets; do not move while hot |
| Product registration | Recommended at www.barbecook.com for after-sales service |
Frequently Asked Questions - OSKAR M OSKAR L BARBECOOK
User questions about OSKAR M OSKAR L BARBECOOK
0 question about this device. Answer the ones you know or ask your own.
Ask a new question about this device
Download the instructions for your Smoker in PDF format for free! Find your manual OSKAR M OSKAR L - BARBECOOK and take your electronic device back in hand. On this page are published all the documents necessary for the use of your device. OSKAR M OSKAR L by BARBECOOK.
USER MANUAL OSKAR M OSKAR L BARBECOOK
1 REGISTER YOUR APPLIANCE 6
2 ABOUT THIS MANUAL 6
3 IMPORTANT SAFETY INSTRUCTIONS. 6
Read and follow the instructions 6
Use your common sense. 6
- Select an appropriate location. 6
4 RECURRENT CONCEPTS 6
Smoking 6
Enamel 6
5 ASSEMBLING THE APPLIANCE 6
- Safety instructions 6
To assemble the appliance 6
6 SMOKING FOOD 7
- Which wood or charcoal should I use? 7
- Step 1: Lighting the appliance 7
- Step 2: Starting to smoke. 7
- Step 3: Keeping a steady temperature
7 USEFUL TIPS AND TRICKS 7
- Adding flavour with wood chips 7
- Keeping your food moist 8
Lifting the lid 8
Using the appliance as a grill 8
8 MAINTAINING THE APPLIANCE 8
- Removing the ashes 8
- Cleaning the basket, grills and grid 8
Cleaning the broth pan and body. 8
Cleaning the lid 8 - Storing the appliance 8
- Maintaining enamel, stainless steel, chrome and powder coated parts 8
- Ordering spare parts 9
9 WARRANTY. 9
Covered 9
Not covered 9
1 REGISTER YOUR APPLIANCE
Thank you for purchasing a Barbecook appliance! We are sure it will bring you lots of happy barbecue moments.
To optimize your experience, register your appliance at
www.barbecook.com. It takes only a few minutes and yields some major benefits:
- You get access to our personalized after sales service. This allows you, for example, to quickly find spare parts for your appliance or to profit from an optimal warranty service.
We can inform you about interesting product updates and direct you to the product information and specifications that are relevant for your appliance.

For more information about registering your appliance, refer to www.barbecook.com.

Barbecook respects your privacy. Your data will not be sold, distributed or shared with third parties.
2 ABOUT THIS MANUAL
This manual is composed of two parts:
- The first part is the part that you are reading now. It includes instructions for the assembly, use and maintenance of your appliance.
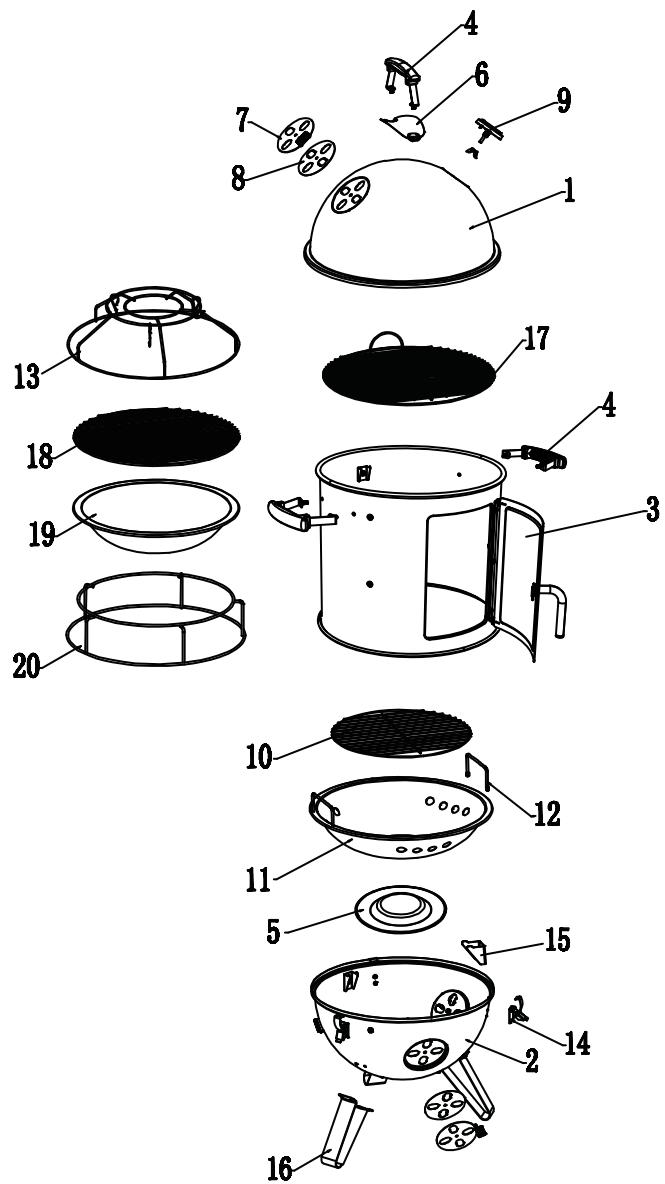
The second part starts on page 129. It includes all kinds of illustrations (exploded views, assembly drawings...) of the appliances that are described in this manual.
3 IMPORTANT SAFETY INSTRUCTIONS
3.1 Read and follow the instructions
Read the instructions before using the appliance. Always follow the instructions carefully. Assembling or using the appliance differently can cause fires and material damage.

Damages caused by not following the instructions (improper assembly, misuse, inadequate maintenance...) are not covered by the warranty.
3.2 Use your common sense
Use your common sense when working with the appliance:
- Do not leave the appliance unattended when in use.
- Warning! The appliance will become very hot, do not move it during operation.
Use appropriate protection when handling hot parts. - Keep flammable materials, flammable liquids and dissoluble objects away from an appliance in use.
- Warning! Keep children and pets away from an appliance in use.
- Keep a bucket of water or sand at hand when using the appliance, especially on very hot days and in dry areas.
- Warning! Do not use indoors.
3.3 Select an appropriate location
Use the appliance outdoors only. Using it indoors, even in a garage or shed, can cause carbon monoxide poisoning.
When selecting an outdoor location, always:
-
Make sure the appliance is not under an overhanging structure (a porch, a shelter...) or under foliage.
-
Put the appliance on a firm and stable surface. Never put it on a moving vehicle (a boat, a trailer...).
4 RECURRENT CONCEPTS
This part includes definitions of some less familiar concepts. These concepts are used in several topics of the manual.
4.1 Smoking
Smoking food is preparing food by exposing it to smoke from smouldering wood or charcoal. Meat and fish are the most commonly smoked foods, but you can also smoke crustaceans, vegetables and even cheeses.
There exist two types of smoking, hot and cold smoking:
- Hot smoking is smoking food and cooking it at the same time. The food is not exposed directly to the heat source and is cooked slowly, at a fairly low temperature (50 - 80^) .
Cold smoking is smoking food at a very low temperature - (max. 25^ ), so the food is not cooked in the process. Cold smoking is used to flavour and preserve food.

If you want to use your appliance for cold smoking, you need the Barbecook cold smoker (223.9840.160). This accessory allows you to cold smoke all types of food in the Oskar.
4.2 Enamel
Some parts of the appliance are covered in a layer of melted glass, called enamel. This enamel protects the underlying metal from corrosion. Enamel is a high-quality material: it is resistant to rust, does not fade under the influence of high temperatures and is very easy to maintain.

Because the enamel is less flexible than the metal which it covers, pieces of enamel can chip off when you handle the appliance incorrectly. To avoid problems, be careful when assembling enamelled parts and always maintain the enamel as described further in this manual.
5 ASSEMBLING THE APPLIANCE
5.1 Safety instructions
- Do not modify the appliance when assembling it. It is very dangerous and not allowed to alter parts of the appliance.
Always follow the assembly instructions carefully. - The user is responsible for the correct assembly of the appliance. Damages caused by improper assembly are not covered by the warranty.
5.2 To assemble the appliance
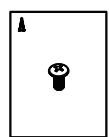
You need a cross-slotted screwdriver.
- Put the appliance on a flat and clean surface.
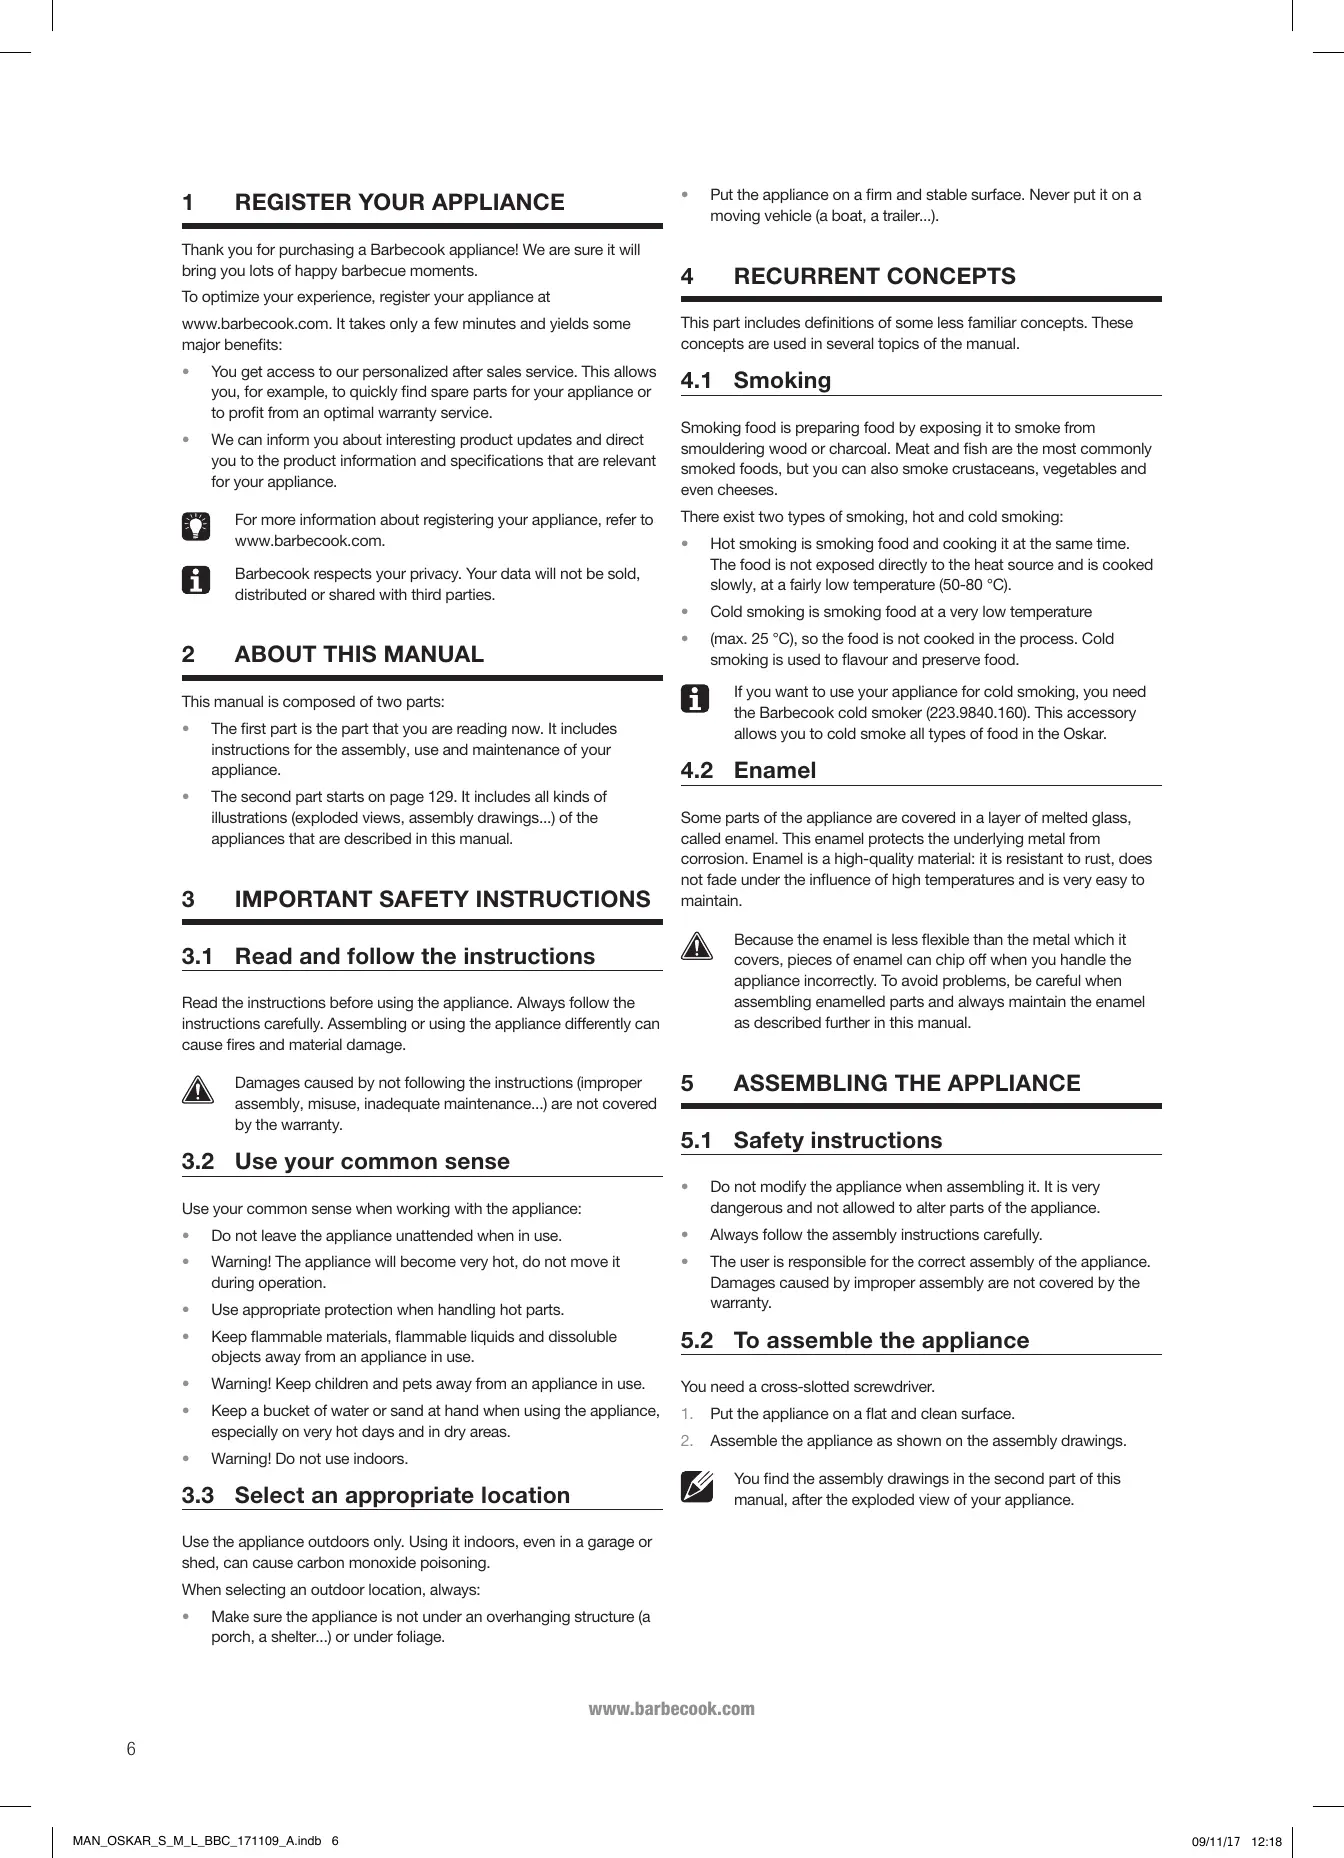
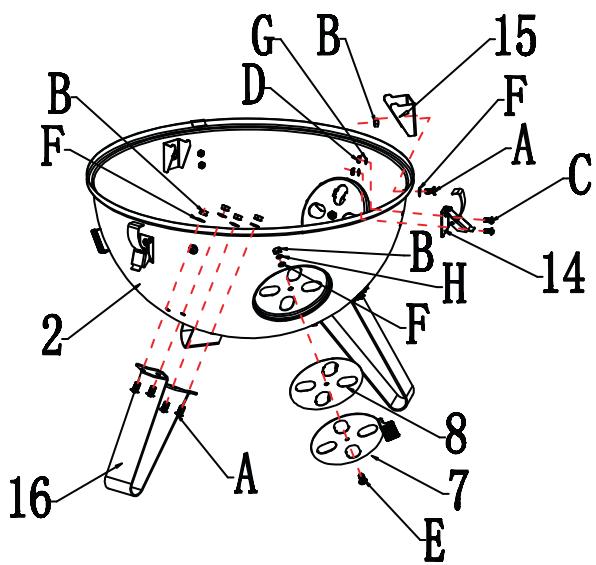
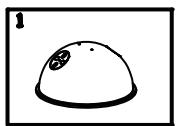
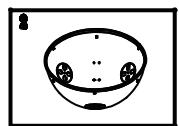
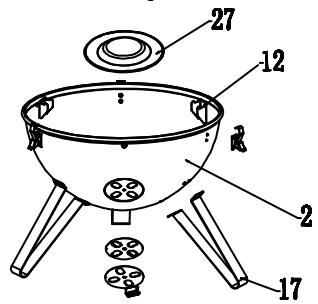
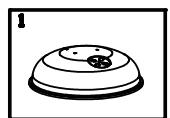
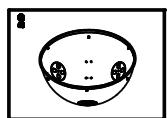
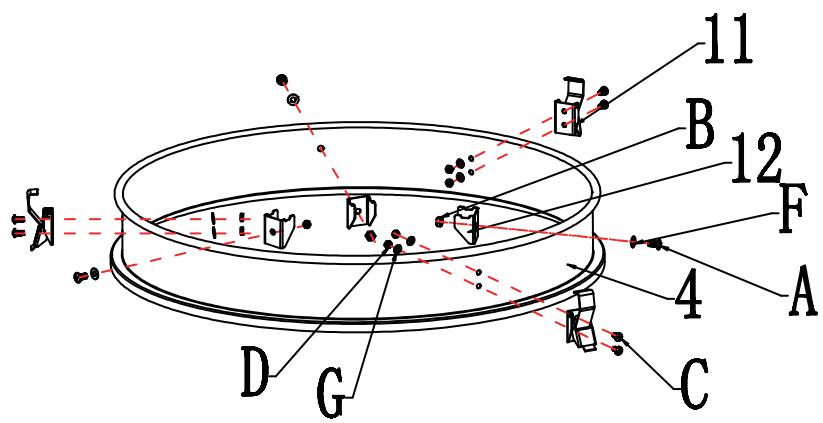
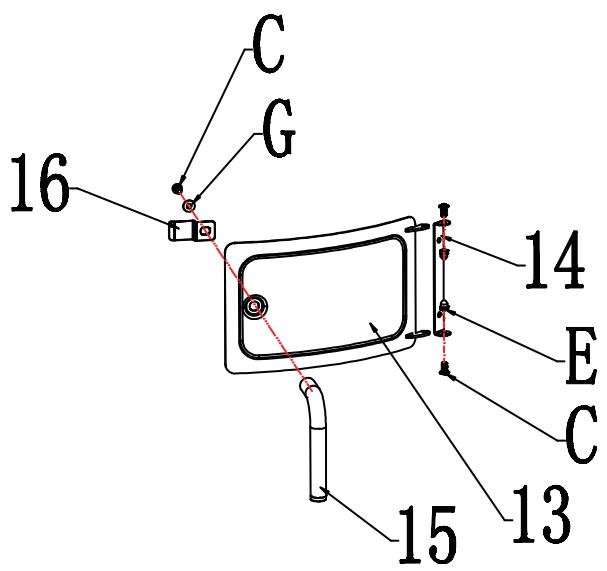
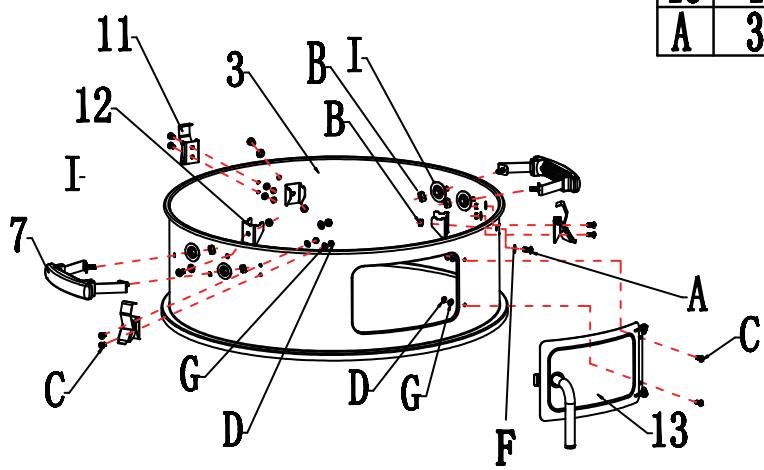
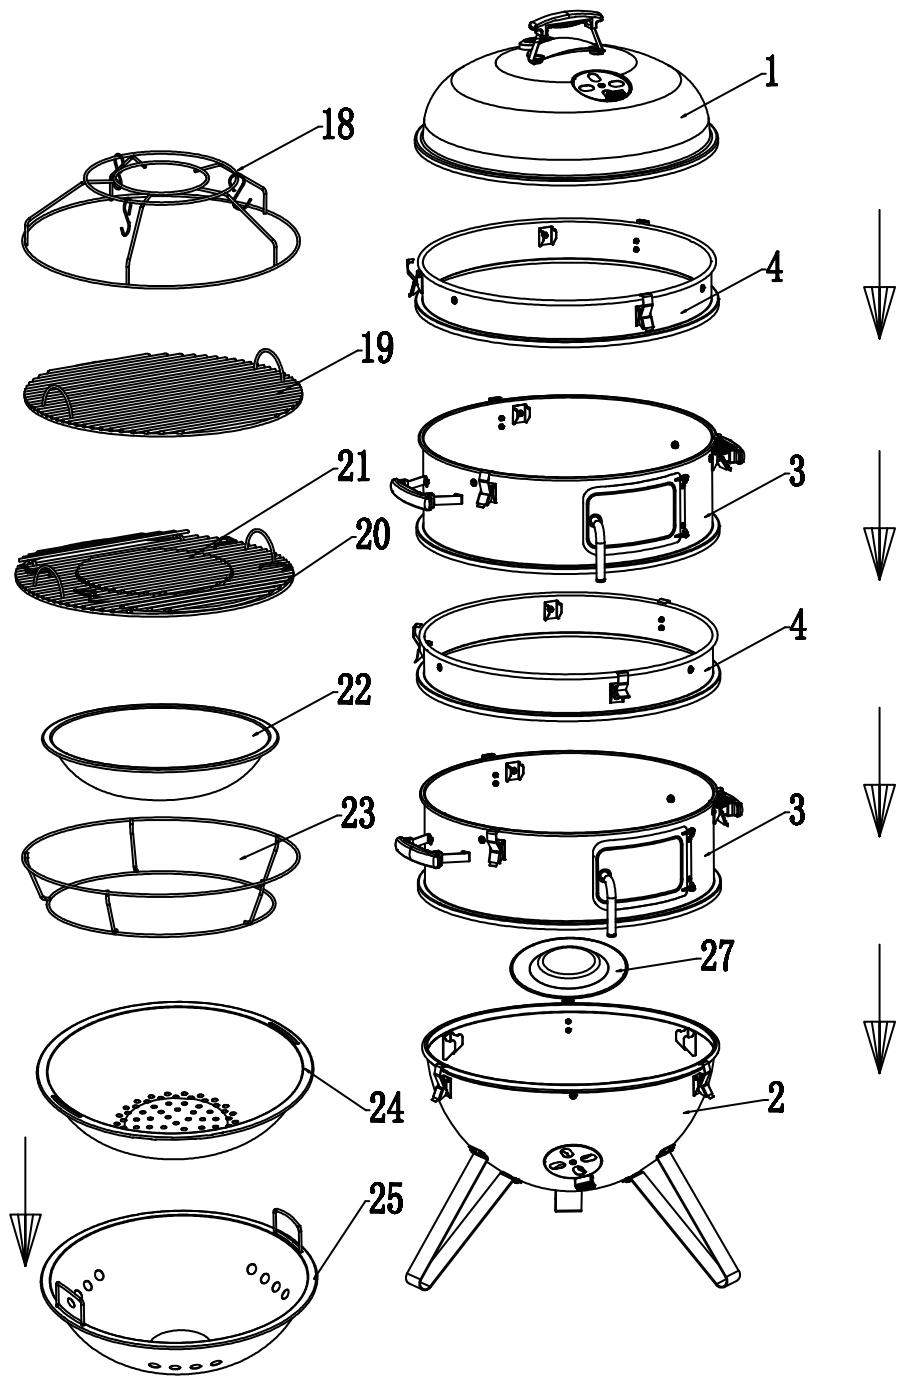
- Assemble the appliance as shown on the assembly drawings.

You find the assembly drawings in the second part of this manual, after the exploded view of your appliance.
6 SMOKING FOOD
You need wood or charcoal, firelighters (complying with EN 1860-3), a long match and some liquid (water, broth, wine...).
6.1 Which wood or charcoal should I use?
To light the appliance, you can use wood or charcoal:
| Material | What to use |
| Wood | You can use any type of wood, except pine wood. Use twigs and small branches to light the appliance. You can add larger branches and logs afterwards. |
| Charcoal | Always light your appliance with traditional charcoal, never with briquettes. Once the appliance is lit, you can add briquettes. Use good quality charcoal to light the appliance, preferably complying with EN 1860-2. Good quality charcoal is composed of large, shiny bricks and does not give off much dust. Use small pieces of charcoal to light the appliance. You can add larger bricks afterwards. |

Close your bag of charcoal properly before storing it. Always store it in a dry place, do not store it in a cellar.
6.2 Step 1: Lighting the appliance
Before you can smoke any food, you have to light a fire at the bottom of the appliance. Proceed as follows:
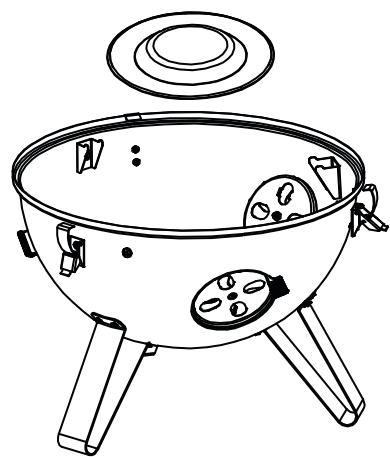
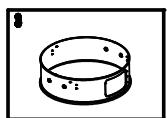
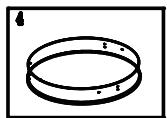
- Remove the lid, the upper rings of the body, the cooking grill(s) and the broth pan from the appliance.
- Put the charcoal grid in the charcoal bowl.
- Open the air supply holes in the ash container. You find the ash container below the charcoal bowl.
- Put some firefighters on the charcoal grid. Always use firefighters that comply with EN 1860-3.
-
Cover the firefighters with charcoal or wood. Tips:
-
Pile the charcoal or wood in a pyramid shape.
-
Do not use too much charcoal or wood to light the fire.
Make sure you can still reach the firelighters. -
Take a long match and light the firefighters.

When using the appliance for the first time, let it burn for 30 minutes. This removes any remaining manufacturing greases from the appliance.

Do not put the grill on the appliance yet. An empty grill can deform when held in the heat for too long.

Warning! Do not use spirit or petrol to light or re-light the appliance.
- Wait until the charcoal or wood is covered with a thin layer of white ashes. Normally, this takes about 25 minutes.
- Spread the coals or the wood evenly over the charcoal grid and close the door in the bottom ring of the body.

If you use charcoal, you can also light it in the Barbecook charcoal starter. When the charcoal is ready, just pour it from the charcoal starter onto the charcoal grid.
6.3 Step 2: Starting to smoke
Once the charcoal or wood is covered with a thin layer of white ashes, you can start smoking. Proceed as follows:
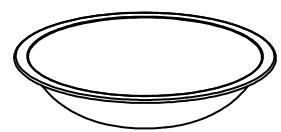
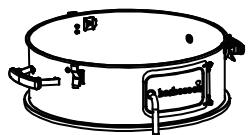
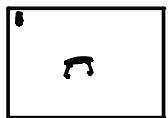
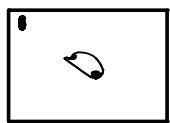
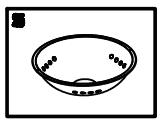
- Put the broth pan in the bottom ring of the body, on the three support brackets.
- Pour some liquid (water, broth, wine...) in the broth pan. You can also add herbs to the liquid for extra flavour.
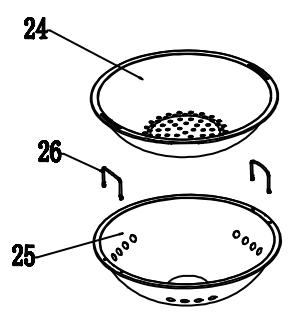
- Put the first cooking grill on the broth pan and put your food on the grill.

Only put a single layer of food on the grill and leave enough space between the pieces of food. This allows the smoke and heat to circulate evenly around the food.
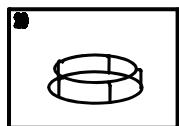
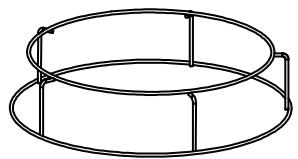
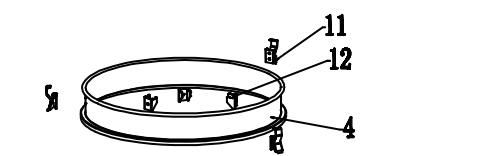
- Oskar L: Put the upper ring of the body on the bottom ring and close the doors in both rings.
- Oskar L: Put the second cooking grill on the support brackets of the upper ring of the body. Make sure the rim of the grill rests firmly on the brackets.
- Put your food on the grill and put the lid on the appliance.

Oskar L: This procedure describes how to smoke food using two grills. Obviously, you can also leave one of the grills out, replace one grill by the smoking basket or hang your food from the smoking hooks in the lid.
6.4 Step 3: Keeping a steady temperature
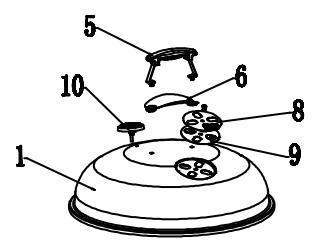
Once you started smoking, you have to keep the temperature steady around 70^ . Thanks to the thermometer in the lid, you can watch the temperature closely.
6.4.1 TEMPERATURE太O HIGH
- Put the lid on the appliance. Close the air supply holes in the lid and in the ash container.
- If the temperature remains too high, put some soaked wood chips on the fire. This also enhances the flavour of your food.
6.4.2 TEMPERATURE TOO LOW
- Fan the fire by opening the air supply holes in the lid and the ash container.
- If fanning the fire does not raise the temperature enough, add some charcoal or wood to the fire. Proceed as follows:
a. Put gloves on. Keep them on during the entire procedure.
b. Carefully remove the lid from the appliance and open the door in the bottom ring of the body.
c. Put some extra charcoal or wood in the charcoal pan. Use long-handled tongs and try not to stir up the ashes or cause any sparks.
d. Close the door in the bottom ring of the body.
e. Wait until the fire burns strongly and put the lid back on the appliance.
7 USEFUL TIPS AND TRICKS
7.1 Adding flavour with wood chips
To infuse your food with extra flavour, you can add flavoured wood chips to the fire. You can use the chips in two ways:
Soak the chips in water for 10 minutes, drain them and sprinkle them over the charcoal or wood.
- Put the chips in a tinfoil pouch, perforate the pouch with a fork and put the pouch on the charcoal or wood.
No matter which method you use, never add the chips before the charcoal or wood is covered with a thin layer of white ashes. Barbecook provides three types of flavoured wood chips:
| Flavour | Intensity | Ideal for |
| Apple | Mild | Venison, fish, fowl |
| Oak | Medium | Pork, fowl |
| Hickory | Robust | Pork chops, ribs, roasts |
7.2 Keeping your food moist
To keep your food moist, put some liquid (water, broth, wine...) in the broth pan when you start smoking. Check the pan regularly during smoking and add some extra liquid to the pan when necessary.
Proceed as follows:
- Open the door in the bottom ring of the body.
- Carefully pour the liquid in the broth pan, using a funnel or a pot with a spout.
- Close the door in the bottom ring of the body.
7.3 Lifting the lid
Once you started smoking, avoid lifting the lid as much as possible. A considerable amount of heat and smoke escapes each time you lift the lid, which extends the cooking time of your food.
If you have to lift the lid anyway, always lift it to the side instead of straight up. Lifting the lid straight up creates an air flow in the appliance, which can suck ashes onto your food.
7.4 Using the appliance as a grill
If you do not shield the food from the charcoal or wood with the broth pan, you can use the appliance as a regular grill. Proceed as follows:
- Light the appliance as described under "6 Smoking food".
- Put the cooking grill on the support brackets of the bottom ring of the body. Make sure the rim of the grill rests firmly on the brackets.
- Put your food on the grill.
8 MAINTAINING THE APPLIANCE
8.1 Removing the ashes
We recommend removing the ashes after each use. With the ash container, this is done in no time. Proceed as follows:
- Let the appliance cool down completely.
- Remove the lid, the upper ring of the body, the cooking grills and the broth pan.
- Remove the charcoal grid and brush the ashes into the ash container.
- Lift the ash container from the charcoal bowl and pour the ashes into a bucket.
8.2 Cleaning the basket, grills and grid
We recommend cleaning the smoking basket, the cooking grills and the charcoal grid after each use, with the Barbecook cleaner. Proceed as follows:
- Spray the foam on the part to be cleaned and let it act for a while. The foam discolours, as it soaks off the dirt and greases.
- Remove the foam with a soft sponge and water.
- Rinse the part thoroughly and dry it well before storing. This
prevents formation of rust.

You can also clean the basket, the grills and the grid with a soft detergent or with sodium bicarbonate. Never use over cleaners on these parts.

To prevent formation of rust, oil the cooking grills and the smoking basket lightly with vegetable oil before you store them. Never oil the charcoal grid.
8.3 Cleaning the broth pan and body
We recommend cleaning the broth pan and the body of the appliance (interior and exterior) after each use:
- Use water with a soft detergent and a soft sponge or cloth to clean the parts.
Rinse the parts thoroughly and dry them well before storing.

To prevent formation of rust, oil the broth pan and the exterior of the body with vegetable oil before you store the appliance. Never oil the interior of the body.
8.4 Cleaning the lid
The lid can become a bit greasy during smoking. To prevent the grease from building up, we recommend cleaning the inside of the lid after each use. Proceed as follows:
- Wait until the lid has cooled down a little. It should still be warm, but not too hot to handle.
- Wipe the inside of the lid with paper towels or clean it with water and a soft detergent.

If grease has built up in the lid anyway, brush off the flakes with a brass brush or crumpled aluminium foil.
8.5 Storing the appliance
Store the appliance in a dry place (indoors, under a shelter...) after each use.

Make sure the appliance is completely dry before you store it. This prevents formation of rust.
8.6 Maintaining enamel, stainless steel, chrome and powder coated parts
The appliance is composed of enamelled, stainless steel, chromed and powder coated parts. Each material has to be maintained differently:
| Material | How to maintain this material |
| Enamel | Do not use sharp objects and do not knock against a hard surface. Avoid contact with cold liquids while still hot. You can use metal sponges and abrasive detergents. |
| Stainless steel and chrome | Do not use aggressive, abrasive or metal detergents. Use soft detergents and let them act on the steel. Use a soft sponge or cloth. Rinse thoroughly after cleaning and dry well before storing. |
| Powder coated | Do not use sharp objects. Use soft detergents and a soft sponge or cloth. Rinse thoroughly after cleaning and dry well before storing. |

Damages caused by not following these instructions are regarded as inadequate maintenance and are not covered by the warranty.
Below the exploded view of your appliance (second part of the manual), you find a list with all parts of which the appliance is composed. This list includes a symbol that specifies the material of each part, so you can use it to check how you have to maintain a particular part. The parts list uses the following symbols:
| Symbol | Material |
| ● | Enamel |
| ▲ | Chrome |
| ■ | Stainless steel |
| ★ | Powder coated |
8.7 Ordering spare parts
Parts that are directly exposed to fire or intense heat have to be replaced from time to time. To order a spare part:
- Look up the reference number of the part you need. You find a list of all reference numbers below the exploded views in the second part of this manual and on www.barbecook.com.

If you registered your appliance online, you will automatically be guided to the correct list.
- Order the spare part at your point of sale. You can order parts both under and outside warranty.
9 WARRANTY
9.1 Covered
Your appliance comes with a warranty of two years, starting from the date of purchase. This warranty covers all manufacturing defects, provided that:
- You used, assembled and maintained your appliance according to the instructions in this manual. Damages caused by misuse, incorrect assembly or inadequate maintenance are not regarded as manufacturing defects.
- You can present the receipt and the unique serial number of your appliance. This serial number starts with a C, followed by 15 digits. You can find it:
On this manual.
- On the packaging of the appliance.
- On the inside of the foot of the appliance.
- The Barbecook quality department confirms that the parts are defective and that they proved defective under normal use, correct assembly and adequate maintenance.
If one of the above conditions is not met, you cannot claim any form of contribution. In all cases, the warranty is limited to the repair or replacement of the defective part(s).
9.2 Not covered
The following damages and defects are not covered by the warranty:
- Normal wear and tear (rusting, distortion, discolouration...) of parts that are directly exposed to fire or intense heat. It is normal to replace these parts from time to time.
- Visual irregularities that are inherent to the manufacturing process. These irregularities are not regarded as manufacturing defects.
- All damages caused by inadequate maintenance, incorrect storage, improper assembly or modifications made to pre-assembled parts.
- All consequential damages caused by careless or non-compliant use of the appliance.
- Rust or discoluration caused by external influences, the use of aggressive detergents, exposure to chlorine... These damages are not regarded as manufacturing defects.
8.1 Remover as cinzas
8 VEDLIKEHOLD AV APPARATET 61
8 VEDLIKEHOLD AV APPARATET
6 KAFINIIMMA DAHTO'Y 80
Ti éiouc Eua n kapbouva npée va xnpaonoi; 80
Brna 1:Avaama tnc aoukeuic 80
Brjua 2:Evap6n kantviogatoc 80
Brjua 3: Diatrnpnnt otaeepnc eepuokpaiaac 80
7 XPHZIMEZ SYMBOYEA KAI YIPOAEEEI 81
Ipo08nKn apuatoC uE pokvidia 81
- Diattnponn tnc uypaoiaoc tou qayntou 81
Avvwoon kantakiou 81
XprnTnc ouokewicwc oxapac 81
8 SYNT'HPHZH THS YSEKEYH
Aphiepoan otaxtnc 81
Kaθαριαός καλαθιού, σχαρών και πλέγματος 81
KaBapiaooc Toudeltaou uypwKai Tou oawatoc 82
Kaepiaooc Tou kattakioou 82
Aioohtkevouon tnc ouokcuuc 82
- Suvtipnontunmuatuv eayie,avoEeiodtou xalauba ka iE eioiopwn xpwiou kai noδpac 82
- Papayekia avtaalaktkov 82
9 EITYHszH 82
3 OLULISED OHUTUSJUHISED
ToBa pbKOBOCTBO Ce cBcTOn OT DBe yactn:
Пьрва час т e ча ст,TкгочучeteВМОмeHTa.TяВКИЧУВ
Инстукши 3a CTлобаяBaHETO,ИЗПОЛЗВaHETO И NOДпрьжКаТаHa
Ваши Урд.
Btopata yact 3anoHbHa cTpaHnIa 129. TRe BkIOuBa BCNUKINBDObe NIOCTpauIN (pa3TbPHTN HeTeJN, MOHTaJHNeTeJXn...) Ha ypeDa, KOINTCa OINCAHN B TOBa pkbOBOdCTBO.
3 BAXHIN NHCTPYKUN 3A BE3OПАСНСТ
6.3 Cтbnka 2: 3anoybaHe Ha Ctbnka 2: 3anoybaHe Ha
CneI kato BbIIMnIaTa IINI DpbBaTa Ce nOKpIaT C TbHbK cNoI 6yIa IeIeI, MoKTe Da 3anOuBaTe OnyUbaHeTo. HanpaBeTe cNeHoto:
-
NocTabeTe TaBata 3a 6yIbOH BdoJIHnI npbCTeH Ha Kopnyca, BbyPxTy PrTE ONOpHn CkObn.
-
HaneTe TeuHocT (BOda, 6yIbOH, BnHO... ) B TabaTa 3a 6yIbOH. MoxeTe CbIo Da Iobabite 6NJIK KbM TeuHocTTa 3a DOnblHInTeJeH apomat.
-
NocTabeTe nbpBata Ckapa 3a neueHe Bbpxy Tabata 3a 6yIboH nocTabeTe xpaHaT a Bbpyx ckapata.

IocTabraIte cmo eINH CNOXpaHa Bbpxy ckapata n octabraIte DOCTaBcHIO MRCTO MEKdy OTdEHNITe napYeTa xpaHa. Toba yneChraBa paBHOMepHaTa ZnPKynaqnaHa Na DmHa N TOpInHATA OKONO XpaHaTA.
-
Oskar L: Пocstabete rophnna npbcteh Na kopnyca Bbypxdolnna npbcteh n 3aTbopete BpaTne Ha Dbata npbcteha.
-
Oskar L: Пoctabete Btopata ckapa 3a nehebpyx onopnite ckoи Ha rohpnia npbcteh Ha kopnyca. Ybepete ce,Ye pb6bt Ha ckapata e 3dpaBO noCTabeh Bbpyx ckoBnte.
-
ПoctabeteханataВьрхсkapaТипoctabeteКалakaHaуpeda.

Oskar L: Ta3n ppozdupa onncBa haunHa 3a onyubane Ha xpaHa c n3no3BaHe Ha DBe ckapi. OueBnHoe, Ye MOxKeTe da MaxHete edHaTcCKapa, Da 3aMeHNTE eHata cKapa C KOuHnIcTa 3a onyubae NIn Da 3akauHte XpaHaTa Ha Kyknte 3a onyubae Ha kanaka.
Barbecook npednara trp Bua apomatn Ha nbpBeH nCTbprotnH:
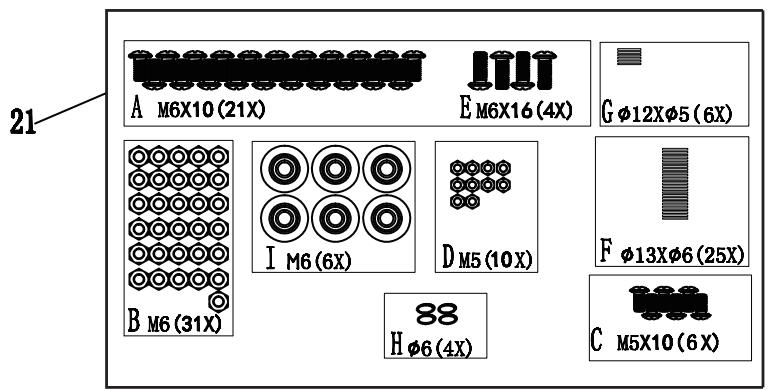
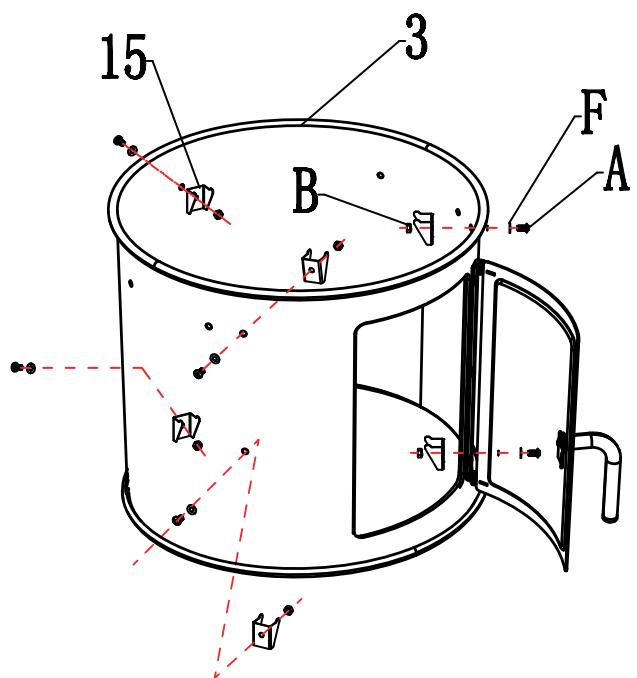
| 3 | 1 X |
| 15 | 6 X |
| A | 6 X |
| F | 6 X |
| B | 6 X |

2
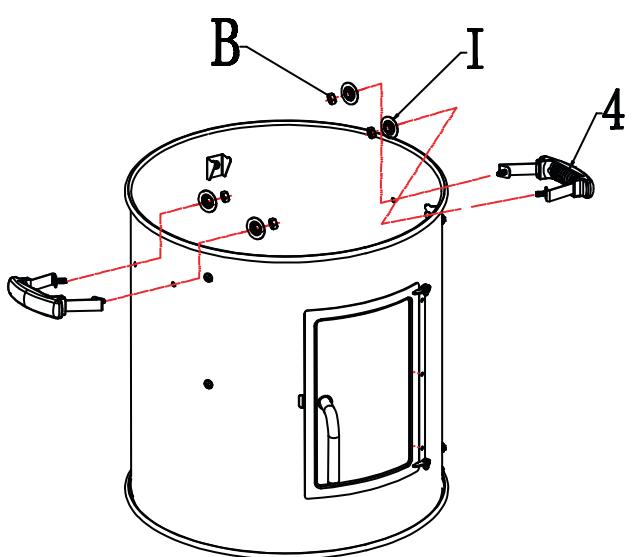
| 4 | 2 X | I | 4 X |
| B | 4 X |
3
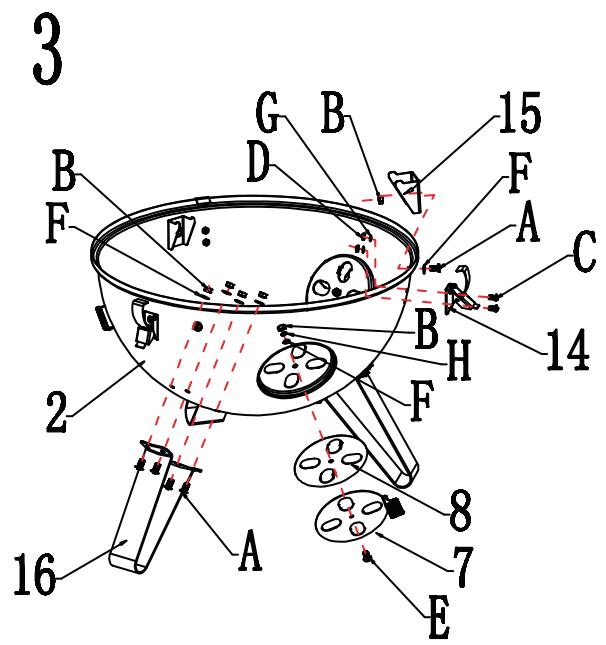
| 2 | 1 X | B | 18 X |
| 7 | 3 X | C | 6 X |
| 8 | 3 X | D | 6 X |
| 14 | 3 X | F | 18 X |
| 15 | 3 X | G | 6 X |
| 16 | 3 X | H | 3 X |
| A | 15 X | E | 3 X |
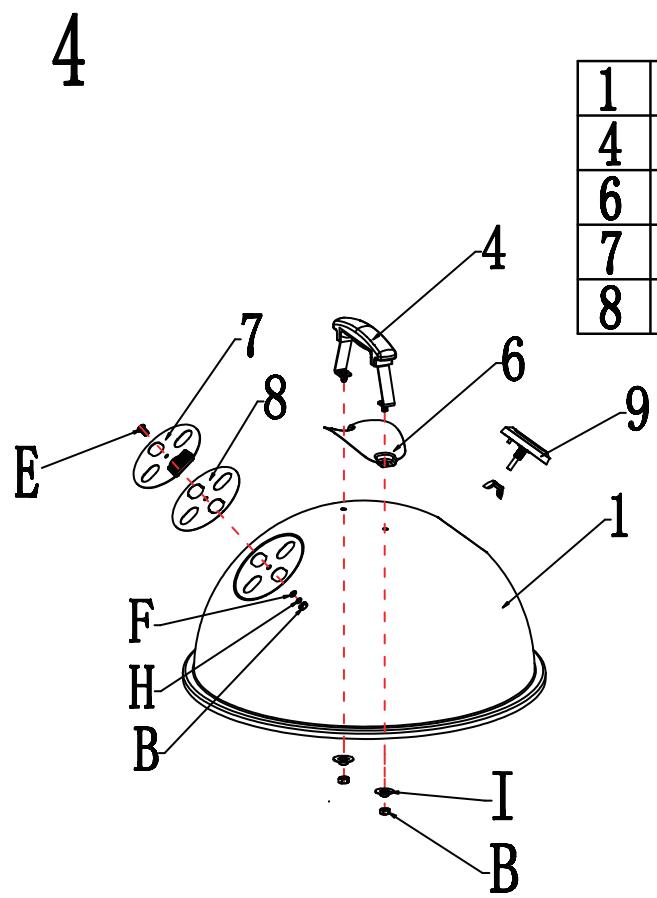
4
| 1 | 1 X | 9 | 1 X |
| 4 | 1 X | E | 1 X |
| 6 | 1 X | B | 3 X |
| 7 | 1 X | F | 1 X |
| 8 | 1 X | H | 1 X |
| I | 2 X | ||
5
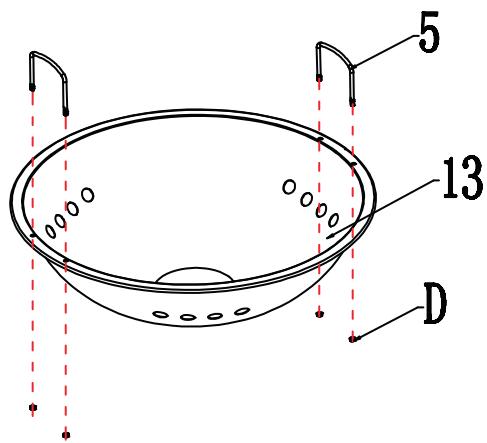
| 13 | 1 X | D | 4 X |
| 5 | 2 X |
6


Oskar M
www.barbecook.com
| OSKAR M 223.9839.000 | ||
| 1 | 227.9839.000 | ● |
| 2 | 227.9839.005 | ● |
| 3 | 227.9839.010 | ● |
| 4 | 227.9870.030 | |
| 5 | 227.9870.130 | |
| 6 | 227.9870.025 | |
| 7 | 227.9870.035 | |
| 8 | 227.9870.040 | |
| 9 | 227.9870.045 | |
| 10 | 227.9839.055 | ● |
| 11 | 227.9839.060 | ● |
| 12 | 227.9870.125 | |
| 13 | 227.9839.050 | ▲ |
| 14 | 227.9870.050 | |
| 15 | 227.9870.055 | |
| 16 | 227.9839.025 | ■ |
| 17 | 227.9839.030 | ▲ |
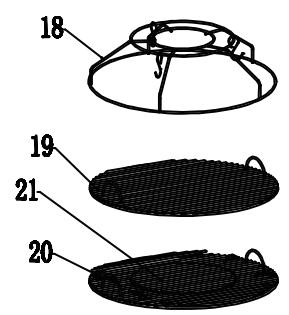
| 18 | 227.9839.035 | ▲ |
| 19 | 227.9839.040 | ● |
| 20 | 227.9839.045 | ▲ |
| 21 | 227.9839.065 | |
1X
1X
1X
3X
1X
1X
4X
4X
1X
1X
1X
2X
1X
3X
9X
3X
1X
1X
1X
1X
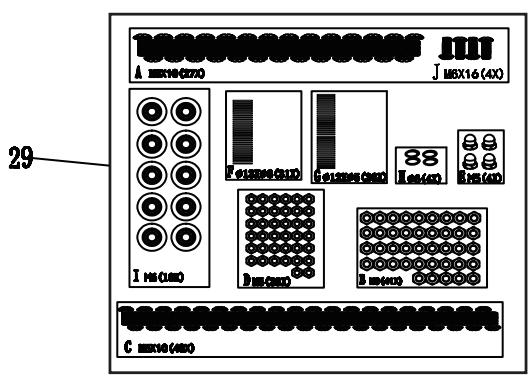
M6X10 (21X)
M6(31X)
M5X10(6X)
M5(10X)
M6X16(4X)
Φ13XΦ6(25X)

Φ12XΦ5(6X)
6 (4X)
M6 (6X)
1
| 3 | 1 X |
| 15 | 6 X |
| A | 6 X |
| F | 6 X |
| B | 6 X |
2
| 4 | 2 X | I | 4 X |
| B | 4 X |
| 2 | 1 X | B | 18 X |
| 7 | 3 X | C | 6 X |
| 8 | 3 X | D | 6 X |
| 14 | 3 X | F | 18 X |
| 15 | 3 X | G | 6 X |
| 16 | 3 X | H | 3 X |
| A | 15 X | E | 3 X |
| 1 | 1 X | 9 | 1 X |
| 4 | 1 X | E | 1 X |
| 6 | 1 X | B | 3 X |
| 7 | 1 X | F | 1 X |
| 8 | 1 X | H | 1 X |
| I | 2 X | ||
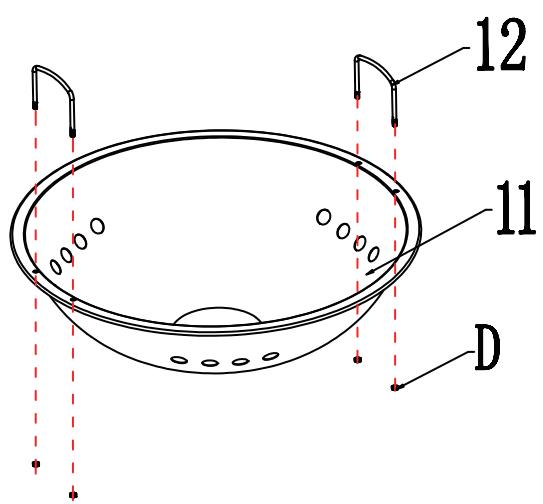
| 11 | 1 X | D | 4 X |
| 12 | 2 X | ||
5
6
Oskar L


223.9875.000
OSKAR L
| 1 | 227.9870.000 | ● |
| 2 | 227.9870.005 | ● |
| 3 | 227.9870.010 | ● |
| 4 | 227.9870.015 | ● |
| 5 | 227.9870.020 | |
| 6 | 227.9870.025 | |
| 7 | 227.9870.030 | |
| 8 | 227.9870.035 | |
| 9 | 227.9870.040 | |
| 10 | 227.9870.045 | |
| 11 | 227.9870.050 | |
| 12 | 227.9870.055 | |
| 13 | 227.9870.060 | ■ |
| 14 | 227.9870.065 | |
| 15 | 227.9870.070 | |
| 16 | 227.9870.075 | |
| 17 | 227.9870.080 | ■ |
| 18 | 227.9870.085 | ▲ |
| 19 | 227.9870.090 | ▲ |
| 20 | 227.9870.095 | ▲ |
| 21 | 227.9870.100 | ▲ |
| 22 | 227.9870.105 | ● |
| 23 | 227.9870.110 | ▲ |
| 24 | 227.9870.115 | ● |
| 25 | 227.9870.120 | ● |
| 26 | 227.9870.125 | |
| 27 | 227.9870.130 | |
| 29 | 227.9870.140 |
1X
1X
2X
2X
1X
1X
4X

4X
4X
1X
15X
15X
2X
2X
2x
2X
3X
1X
1X
1X
1X
1X
1X

1X
1X
2X
1X
16X10 (27X)
16(41X)
X1040X
M5(38X)
15 (4x)
Φ13XΦ6(31X)
Φ12XΦ5(36X)
Φ6(4X)
M6(10x)
16X16(4X)
1
| 4 | 1 X | B | 3 X |
| 11 | 3 X | C | 6 X |
| 12 | 3 X | D | 6 X |
| A | 3 X | F | 3 X |
| G | 6 X |
2
| 13 | 1 X | C | 3 X |
| 14 | 1 X | G | 1 X |
| 15 | 1 X | E | 2 X |
| 16 | 1 X |
3
| 3 | 1 X | B | 7 X |
| 7 | 2 X | C | 8 X |
| 11 | 3 X | D | 8 X |
| 12 | 3 X | F | 3 X |
| 13 | 1 X | G | 8 X |
| A | 3 X | I | 4 X |
4
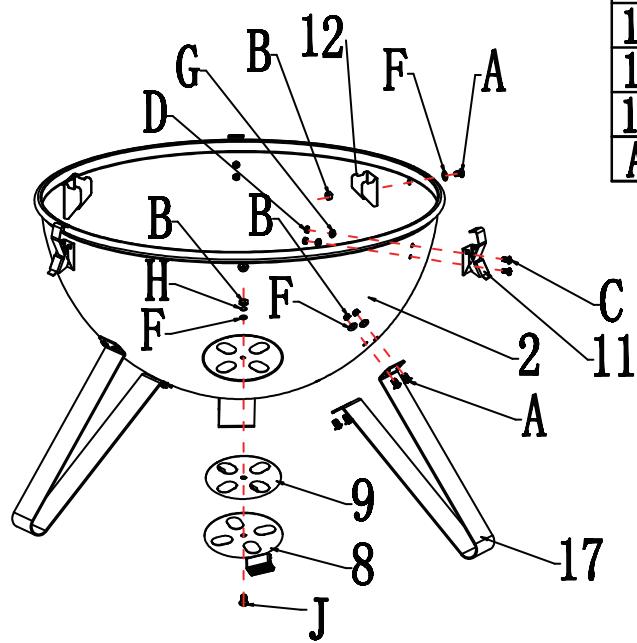
| 2 | 1 X | B | 18 X |
| 8 | 3 X | C | 6 X |
| 9 | 3 X | D | 6 X |
| 11 | 3 X | F | 18 X |
| 12 | 3 X | G | 6 X |
| 17 | 3 X | H | 3 X |
| A | 15 X | J | 3 X |
5
6
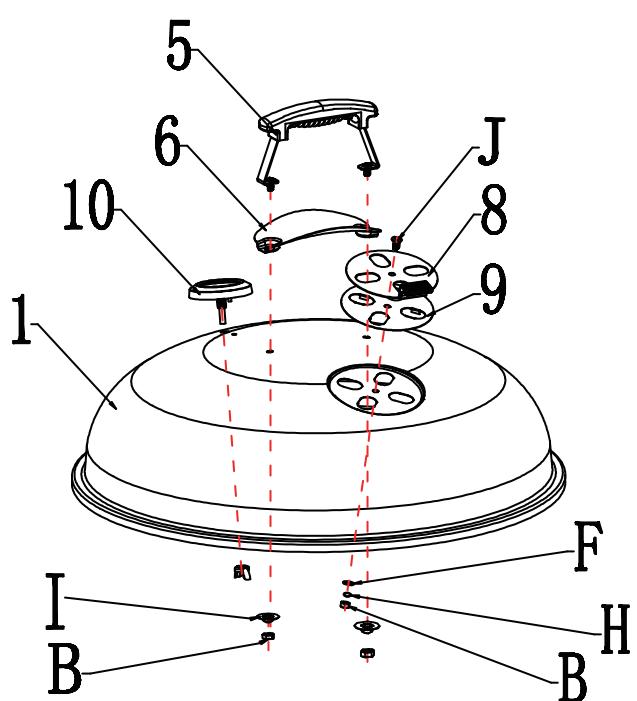
| 1 | 1 X | J | 1 X |
| 5 | 1 X | B | 3 X |
| 6 | 1 X | F | 1 X |
| 8 | 1 X | H | 1 X |
| 9 | 1 X | I | 2 X |
| 10 | 1 X |
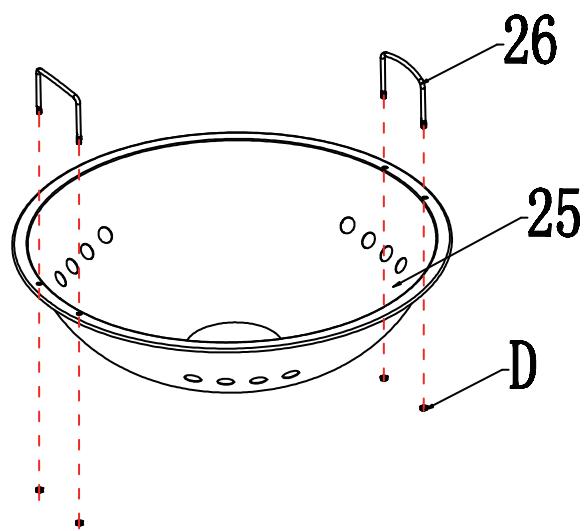
| 25 | 1 X | D | 4 X |
| 26 | 2 X |
7
Barbecook® is a registered trade mark of SAÉY Home & Garden N.V. Industrielaan 4, B-8501, Heule (Kortrijk) Belgium