SIESTA 612 - Barbecue BARBECOOK - Free user manual and instructions
Find the device manual for free SIESTA 612 BARBECOOK in PDF.
| Product type | Gas barbecue |
| Brand | BARBECOOK |
| Model | SIESTA 612 |
| Fuel | Butane or propane gas (depending on country, 28-30 mbar butane, 37 mbar propane) |
| Number of main burners | 3 |
| Side burner | Yes (max container support 9 kg, diameter 120-220 mm) |
| Rotisserie burner | Yes (motor on D batteries not included) |
| Ignition | Electric (AA battery not included) and manual (match) |
| Thermometer | Yes, on the lid |
| Materials | Enameled steel, stainless steel, chrome steel, powder coating |
| Warranty | 2 years |
| Usage | Outdoor only |
| Leak check | Mandatory before first use and after changing the bottle |
| Burner maintenance | Regular cleaning to avoid blockage (insects, webs) |
| Cleaning the grills | After each use with Barbecook cleaner or mild detergent |
| Storage | In a dry place, bottle disconnected, cover recommended |
| Spare parts | Available at www.barbecook.com or at point of sale |
| Gas bottle type | Refillable butane or propane 4.5 to 15 kg, max height 58 cm |
| Maximum hose length | 1.50 m |
Frequently Asked Questions - SIESTA 612 BARBECOOK
User questions about SIESTA 612 BARBECOOK
0 question about this device. Answer the ones you know or ask your own.
Ask a new question about this device
Download the instructions for your Barbecue in PDF format for free! Find your manual SIESTA 612 - BARBECOOK and take your electronic device back in hand. On this page are published all the documents necessary for the use of your device. SIESTA 612 by BARBECOOK.
USER MANUAL SIESTA 612 BARBECOOK
1 Register your appliance. 6
2 About this manual. 6
3 Important safety instructions.. 6
- Read and follow the instructions. 6
- Be cautious with gas 6
- Select an appropriate location. 6
Safety warnings 6
4 Recurrent concepts 6
- Venturis 6
- Burner hoods 7
Enamel 7
Flare-ups. 7
5 Assembling the appliance. 7
- Safety instructions 7
To assemble the appliance 7
6 Connecting gas to the appliance. 7
- Which cylinder, hose and regulator? 7
- Safety instructions 7
- Connecting the hose to the appliance. 7
- Connecting the hose and cylinder to the regulator. 8
- Replacing the cylinder 9
7 Checking for gas leaks 9
Why check for gas leaks? 9
- When check for gas leaks? 9
- Safety instructions 9
- Which materials do I need? 9
To check for gas leaks. 9
In case of a gas leak 9
8 Getting the appliance ready for use. 10
Before each use. 10
Before first use (in a long time) 10
- Burning in the appliance. 10
9 Lighting the burners. 10
- Safety instructions 10
- Lighting the main burners 10
- Lighting the side burner. 11
- Lighting the spit burner 11
- Switching the burners off. 12
Relighting the burners. 12 - Checking the flames 12
10 Useful tips and tricks 12
Preheating the appliance 12
Preventing food from sticking. 12
- Direct and indirect grilling 12
Grilling with closed lid. 12
- Watching the temperature 12
Taking advantage of the heat zones 13
Roasting food on the spit 13
Avoiding flare-ups 13
11 Maintaining the appliance. 13
- Cleaning the grill 13
- Cleaning the bowl 13
- Cleaning the burners and venturis. 13
- Maintaining enamel, stainless steel, chrome and powder coated parts 14
- Storing the appliance. 14
- Storing gas cylinders 14
- Ordering spare parts 14
12 Warranty. 14
Covered 14
Not covered 14
13 Technical specifications. 15
Type label. 15
- Injector diameters 15
14 TROUBLESHOOTING 15
1 REGISTER YOUR APPLIANCE
Thank you for purchasing a Barbecook appliance! A whole new world is waiting for you to explore, whether it be in the peace and quiet of nature or amidst the hustle and bustle of the city. Become a grill master in our #barbecook community and let us put your grill skills in the spotlight.
Register your Barbecook appliance online and get some major benefits:
- You get access to the full user manual and get to know every bit of your appliance.
- You benefit from a personalized after sales service, allowing you to quickly find spare parts and to profit from an optimal warranty service.
We inform you about product updates and give you tips, tricks and grillspiration to bring out the grill master in you.
Ready for an adventure? Register your product and join the #barbecook community!

For more information about registering your appliance, refer to www.barbecook.com.

Barbecook respects your privacy. Your data will not be sold, distributed or shared with third parties.
2 ABOUT THIS MANUAL
This manual is composed of two parts:
- The first part is what you are reading now. It includes instructions for the assembly, use and maintenance of your appliance.
- The second part starts on page 295. It includes all kinds of illustrations (exploded views, assembly drawings... of the appliances that are described in this manual.
3 IMPORTANT SAFETY INSTRUCTIONS
3.1 Read and follow the instructions
Read the instructions before using the appliance. Always follow the instructions carefully. Assembling or using the appliance differently can cause fires and material damage.

Damages caused by not following the instructions (improper assembly, misuse, inadequate maintenance...) are not covered by the warranty.
3.2 Be cautious with gas
Working with gas is perfectly safe, but requires some extra caution:
Always store gas cylinders outdoors, in a well-ventilated area. Make sure they are not exposed to excessive heat or direct sunlight.
- Never store your gas cylinder or spare gas cylinder in the cabinet of your appliance.
- Never store your spare gas cylinder near a gas appliance in use.
- Turn off the gas supply at the gas cylinder after use.
- Never smoke near a gas appliance in use of near a gas cylinder (full/empty).

If you smell gas, immediately close the gas supply, extinguish all flames and open the lid of the appliance. If the smell lasts, call your gas supplier or the fire department.
3.3 Select an appropriate location
Use the appliance outdoors only. Using it indoors, even in a garage or shed, can cause carbon monoxide poisoning.
When selecting an outdoor location, always:
- Place the appliance at least three meters away from any building, in an open and well-ventilated area.
- Make sure there is a free air flow to the burners and the vent holes in the cabinet at all times.
- Make sure the appliance is not under an overhanging structure (a porch, a shelter ...) or under foliage.
- Put the appliance on a firm and stable surface. Never put it on a moving vehicle (a boat, a trailer ...).
3.4 Safety warnings
Use outdoors only.
- Read the instructions before using the appliance.
- Do not move the appliance during use.
- Do not leave the appliance unattended during use, especially in the presence of children and animals.
WARNING: accessible parts may be very hot. Keep young children away.
- Use appropriate protection when handling hot parts (lid, grill ...).
- This appliance must be kept away from flammable materials during use.
- Do not use wood, charcoal, lava rocks or ceramic briquettes on a gas appliance.
- Do not use the appliance when you have consumed alcohol or taken drugs.
- Turn off the gas supply at the gas cylinder after use.
- Do not modify the appliance.
4 RECURRENT CONCEPTS
This part includes definitions of some less familiar concepts. These concepts are used in several topics of the manual.
4.1 Venturis
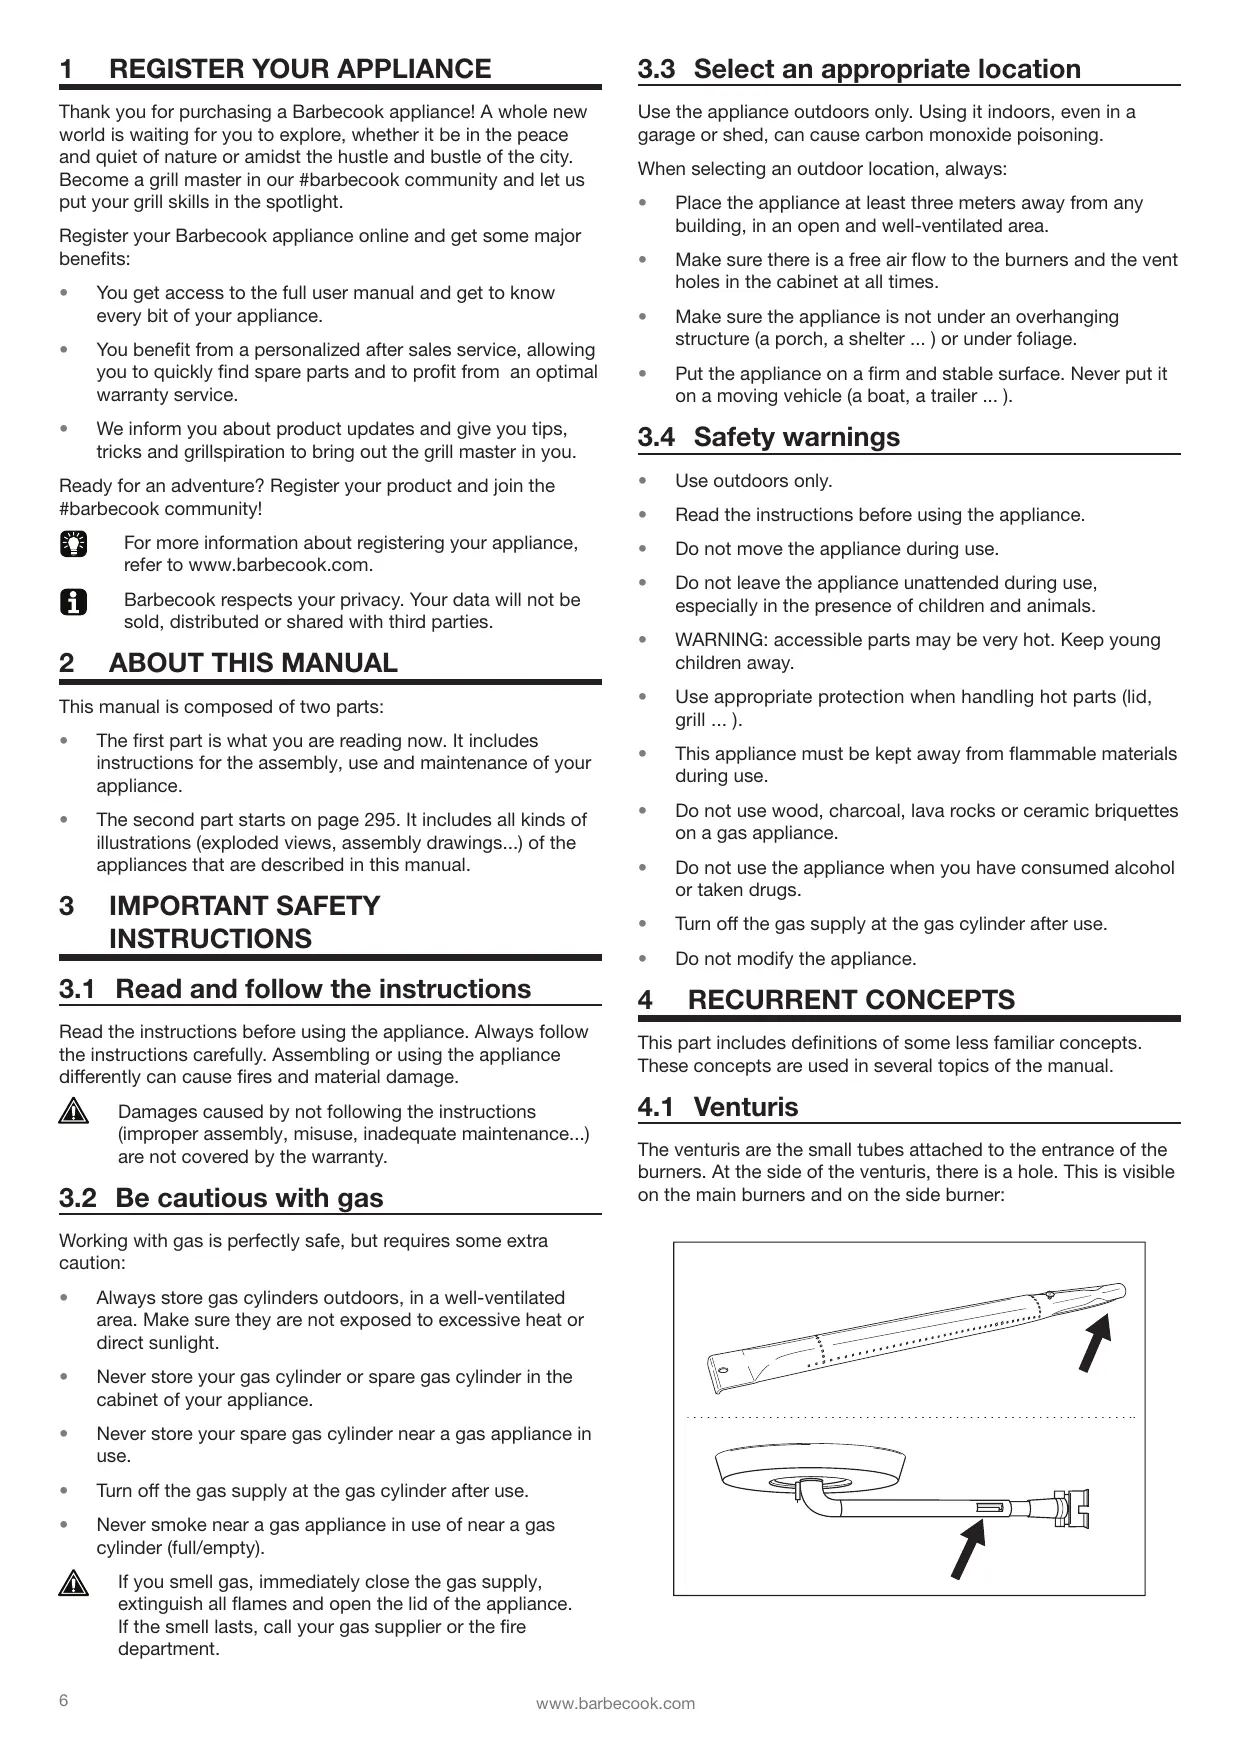
The venturis are the small tubes attached to the entrance of the burners. At the side of the venturis, there is a hole. This is visible on the main burners and on the side burner:

When the gas is on its way to the burners, it passes through the venturis. Thanks to the holes at the sides, the gas is then mixed with air and - as a result - with oxygen. This is necessary for a good ignition in the burners: only the correct mixture of gas and oxygen will ignite properly and will result in nice flames.
4.2 Burner hoods
The burner hoods are the hoods that you mount above the burners of your appliance. They protect the burners from dripping fat. The holes at the sides of the hoods also distribute the heat over the grill, so it is heated much taster and more evenly.
4.3 Enamel
Some parts of the appliance are covered in a layer of melted glass, called enamel. This enamel protects the underlying metal from corrosion. Enamel is a high-quality material: it is resistant to rust, does not fade under the influence of high temperatures and is very easy to maintain.

Because the enamel is less flexible than the metal which the appliance incorrectly. To avoid problems, be careful when assembling enamelled parts and always maintain the enamel as described further in this manual.
4.4 Flare-ups
Flare-ups are sudden flames that spark from the bowl when you are grilling. They are usually caused by dripping fat or marinade.
5 ASSEMBLING THE APPLIANCE
5.1 Safety instructions
- Do not modify the appliance when assembling it. It is very dangerous and not allowed to alter parts that are pre-assembled and/or sealed by the manufacturer.
Always follow the assembly instructions carefully. - The user is responsible for the correct assembly of the appliance. Damages caused by improper assembly are not covered by the warranty.
5.2 To assemble the appliance
You need a cross-slotted screwdriver, a flat-slotted screwdriver and an AA battery (electrical igniter). There are no batteries supplied with the appliance.
- Put the appliance on a flat and clean surface.
- Assemble the appliance as shown on the assembly drawings. You find them in the second part of this manual, after the exploded view of your appliance.

Be careful when assembling enamelled parts. The tools and screws may damage the enamel. Use the provided fiber washers to protect the enamel around the screws.

The blister packs can contain more screws than necessary. Screws can be left over after the assembly.

The package includes an emergency kit with spare assembly parts (screws, beits, fiber washers ...) You can use them in case you lost or broke some parts.
6 CONNECTING GAS TO THE APPLIANCE
6.1 Which cylinder, hose and regulator?
Before you can connect gas to the appliance, you have to buy a gas cylinder, hose and pressure regulator. The table below shows you which cylinder, hose and regulator you have to use. In Belgium (BE), for example, you have to use a propane cylinder with a hose and regulator for 37 mbar or a butane cylinder with a hose and regulator for 28-30 mbar.
| Country | Cylinder, hose and regulator |
| DK, GR, NO, SE, EE, LT, LV, CZ, PL, MT, HU, SI, SK, NL | Propane, 30 mbar / Butane, 30 mbar |
| ES, GB, IE, PT, BE, FR, LU, IT, CY | Propane, 37 mbar / Butane, 28-30 mbar |
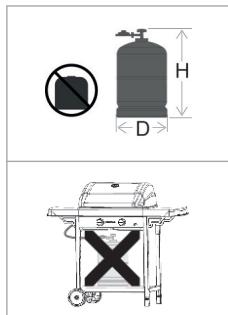

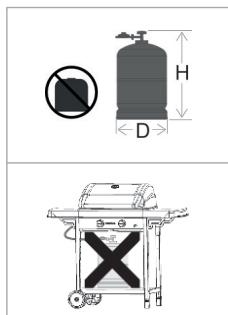
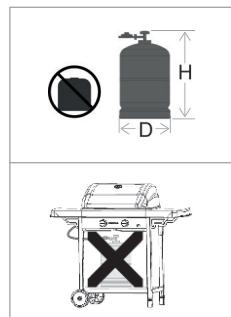
This barbecue has been adjusted to be operate with 4,5 to 15kg butane/propane cylinders with an appropriate low pressure regulator. We recommend connecting the appliance to propane. Propane offers a high-quality combustion and is less sensitive to frost. The height H of the cylinder must be less than 58~cm , regardless of the cylinder's width or diameter D.

Buy your pressure regulator and gas cylinder together. Not all regulators fit all cylinders.

Use only a gas hose and regulator that is homologated for the country of use.
6.2 Safety instructions
- Never connect the cylinder directly to the appliance. Always mount a pressure regulator on the cylinder first.
- Never modify pre-assembled or sealed parts of the cylinder, the hose or the pressure regulator.
-
Keep the hose as short as possible (1,5 m maximum) to prevent it from dragging on the ground.
-
Never distort or twist the hose. Do not pull or pierce the hose. Keep the hose away from any parts of the barbecue that get hot. Check that the flexible hose stretches out normally, without twisting or pulling.
-
It should be replaced if it is damaged or cracked, when required by national regulations or at the end of the part lifecycle (f.ex France)
-
Never open the gas supply.
Always keep the cylinder in an upright position. - Check for leaks each time you make changes to the gas connection. See "7 Checking for gas leaks".
6.3 Connecting the hose to the appliance
France:
The equipment may be used with two types of flexible hose:
- Flexible hose designed to be joined onto ringed tailpieces on both the barbecue and regulator sides, held firm with collars (in accordance with standard XP D 36-110). recommended length 1.25m
- Flexible hose (according to standard XP D 36-112) fitted with a G 1/2 threaded nut for fixing to the barbecue and a M 20 x1.5 threaded nut for fixing to the regulator, recommended length 1.25m .
Other countries:
It should be used with flexible hose that is suitable for use with butane and propane gas. Hose length should not exceed 1.50m .
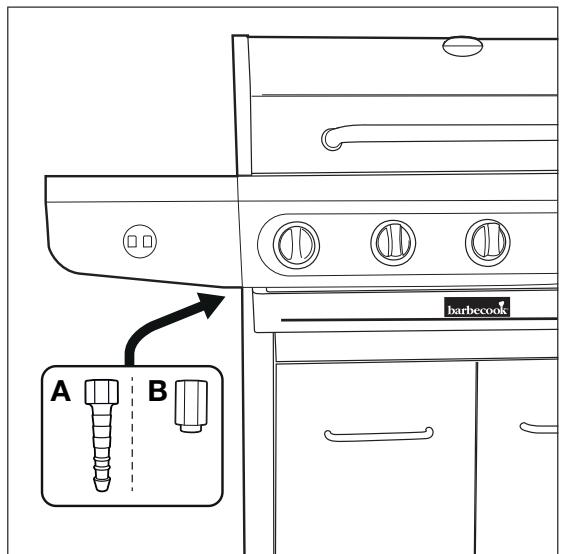
To connect the gas hose to the appliance, you have to mount a coupling on the gas tube of the appliance. The appliance comes with two couplings, both intended for particular countries:
| Country | Coupling |
| BE, CH, CZ, DK, ES, FI, GB, IE, IT, PT, SI | Coupling A |
| FR | Coupling B |

If your country is not in the table, use the coupling that complies with your national standards.
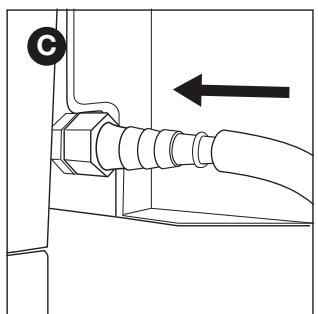
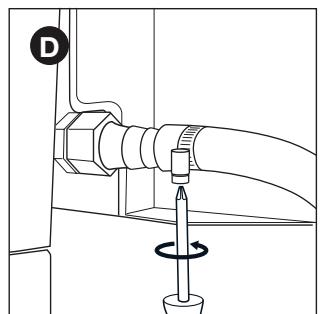
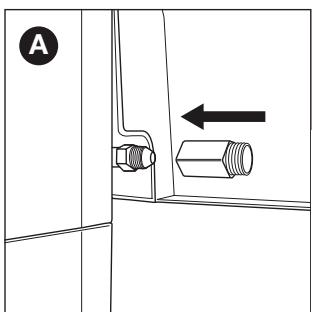
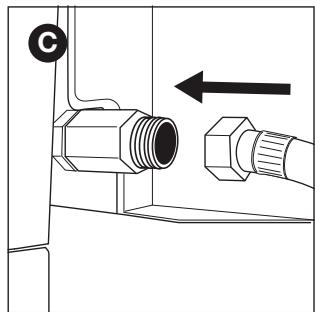
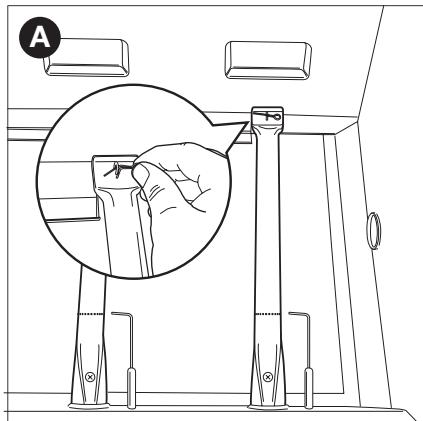
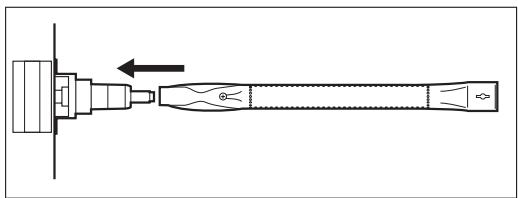
6.3.1 COUPLING A
You need a 19 mm spanner and a cross-slotted screwdriver.
- Screw the coupling on the gas tube of the appliance (A) and tighten it with a 19mm spanner (B).
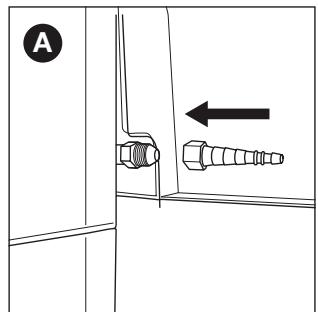
- Slide the hose over the coupling (C) and tighten the clamping ring with a cross-slotted screwdriver (D).
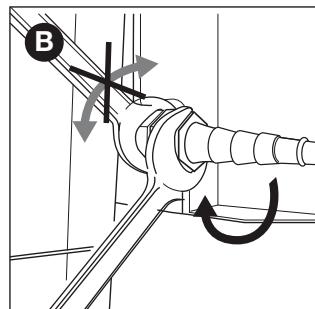
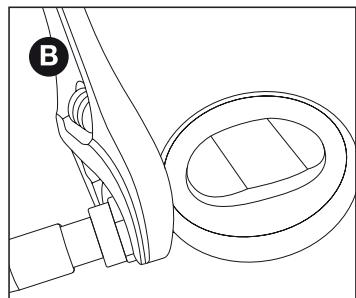
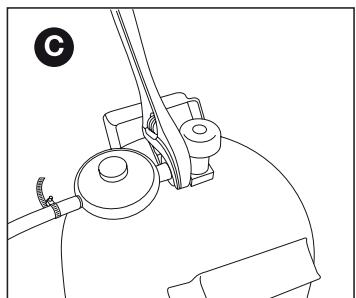
6.3.2 COUPLING B
You need a 22 mm spanner and an adjustable spanner.
- Screw the coupling on the gas tube of the appliance (A) and tighten it with a 22mm spanner (B).
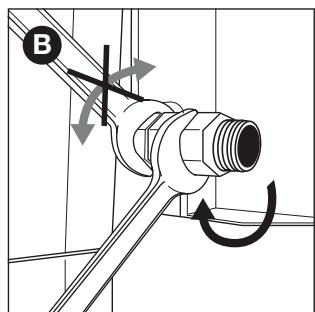
- Screw the gas hose on the coupling (C) and tighten it with two spanners. Hold the coupling with a 22 mm spanner, while tuming the hose with an adjustable spanner (D).
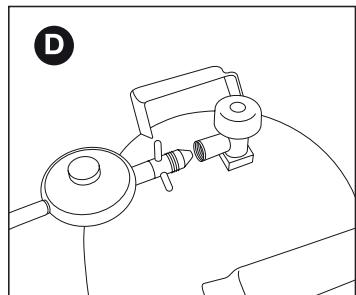
6.4 Connecting the hose and cylinder to the regulator
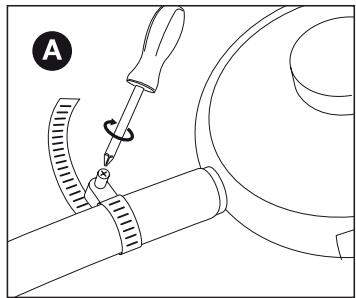
Depending on the type of pressure regulator you use, you need a cross-slotted screwdriver and/ or an adjustable spanner.
-
Connect the hose to the pressure regulator. Do one of the following:
-
If the hose has a clamping ring, slide the hose over the regulator and tighten the clamping ring with a cross-slotted screwdriver (A).
- If the hose has a nut, screw the hose on the regulator and tighten the nut with an adjustable spanner (B).
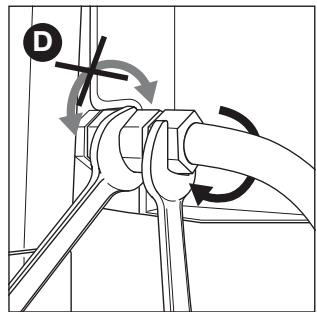
-
Connect the pressure regulator to the gas cylinder. Do one of the following:
-
If the regulator has a nut, screw the regulator clockwise on the cylinder and tighten the nut with an adjustable spanner (C).
- If the regulator has a screw thread, screw the regulator counter-clockwise on the cylinder (D).

Use only regulators complying with EN 16129.
6.5 Replacing the cylinder
- Close the gas supply and set all control knobs to OFF.
- Disconnect the empty cylinder and connect the full cylinder.
- Check the cylinder, the hose and all gas connections for leaks. See "7 Checking for gas leaks".

Attention, when changing the gas cylinder, this should always be carried out away from any source of ignition.
7 CHECKING FOR GAS LEAKS
7.1 Why check for gas leaks?
Propane and butane are heavier than air. As a result, they do not float away when leaking from the appliance. Especially on windless days, a leak can cause the gas to collect in and around the appliance. That accumulated gas can then ignite and explode.
7.2 When check for gas leaks?
- Before the first use or before the first use after a long period of non-use.

Also check for gas leaks if your appliance was assembled by your dealer.
Each time you replace a gas component.
- At least once a year, preferably at the beginning of the season.
7.3 Safety instructions
- Put the appliance outdoors, in a well-ventilated area. Make sure there are no flames or heat sources near the appliance.
- Never use a lighter or match to check for gas leaks.
- Do not smoke and do not light the burners when checking for gas leaks.
7.4 Which materials do I need?
To check for gas leaks, you need:
- A testing liquid. You can use a ready-made leak spray or a mixture of water (50%) and dish-washing soap (50%).
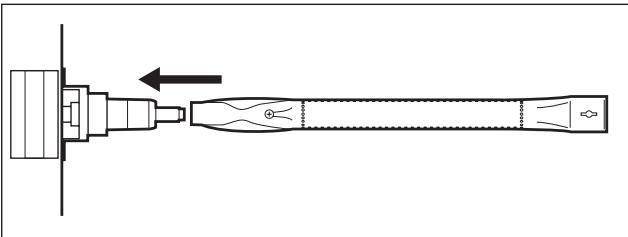
- The leak test tool that came with your appliance. You use it to suck up the testing liquid and apply it to the gas component or connection that you want to check.

7.5 To check for gas leaks
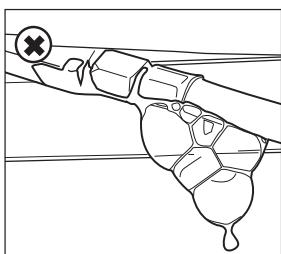
You check for gas leaks by applying a testing liquid to all gas components and connections. If the bubbles on a particular component or connection grow, there is gas leak:
To check for gas leaks, proceed as follows:
- Put the appliance outside.
- Get your leak test tool and testing liquid (leak spray or water/soap mixture).
- Open the lid and set all control knobs to OFF.
- Open the gas supply slightly. Turn the valve of the gas cylinder only once.
- Suck up some testing liquid with the leak test tool and apply it to the area that you want to check. You have to check:
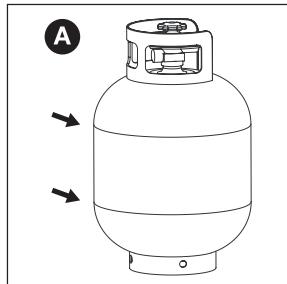
The welds of the gas cylinder (A)
The hose (B)
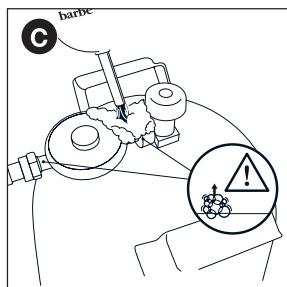
- The connections between the cylinder and the pressure regulator and between the pressure regulator and the hose (C)
The connection between the hose and the appliance (D)

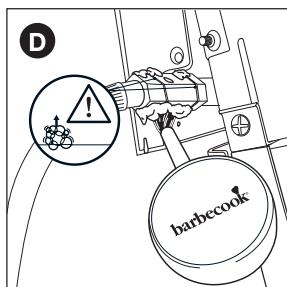

Your pressure regulator and coupling may be different from the ones in the illustrations.
-
Do one of the following:
-
If you detect a leak, continue as described in "In case of a gas leak".
- If there are no leaks, close the gas supply, rinse all components thoroughly with water and dry them well.
7.6 In case of a gas leak
-
Close the gas supply and do one of the following:
-
If you detected a leak on one of the connections, tighten that connection.
If you detected a leak on the cylinder or hose, replace the cylinder or hose. -
Recheck the connection or component on which you detected the leak.
- If the leak is not repaired, contact a Barbecook dealer. Do not use the appliance until the leak is repaired.

For a list of nearby Barbecook dealers, refer to www.barbecook.com.
8 GETTING THE APPLIANCE READY FOR USE
8.1 Before each use
Each time you use the appliance, make sure that:
- The appliance is in an appropriate location. See "3.3 Select an appropriate location".
- The gas hose does not drag on the ground and cannot come into contact with a hot surface or with dripping fat.
- The bowl is clean. We recommend cleaning the bowl after each use. See "11.2 Cleaning the bowl".
- The burners and venturis are not blocked by insect nests or spider webs. See “11.3 Cleaning the burners and venturis”.
- The burners are assembled correctly. The venturis have to be placed over the openings of the gas valves.

If you want to be absolutely sure that your gas connection is okay, you can check your appliance on gas leaks before each use. See "7 Checking for gas leaks".
8.2 Before first use (in a long time)
If you use the appliance for the first time or for the first time after a long period of non-use, you have to execute some extra checks:
- Make sure that you have read, understood and checked all the instructions in this manual (only before first use).
- Check the appliance for gas leaks. See "7 Checking for gas leaks".

Also check for gas leaks if your appliance was assembled by your dealer.
- Clean the burners and venturis (only before first use in a long time). See "11.3 Cleaning the burners and venturis".
- Burn in the appliance before you put any food on it (only before first use). See "8.3 Burning in the appliance".
8.3 Burning in the appliance
By burning in the appliance before the first use, you remove remaining manufacturing greases from the appliance. Proceed as follows:
- Light the main burners and set their control knobs to HIGH. See "9.2 Lighting the main burners".
- Close the lid and let the appliance burn for 15 minutes. Do not put any food on the grill yet.
- After 15 minutes, open the lid and let the appliance burn for another 5 minutes (control knobs still set to HIGH).
- After 5 minutes, the appliance is ready for use. You can now put food on the grill.
To light the burners with the electrical igniter, you have to install an AA battery in the igniter. That battery is not supplied with the appliance. You can find the battery case of the igniter at the inside of the front panel of the right side table.
9.1 Safety instructions
Before you light the appliance, execute all checks listed in "8 Getting the appliance ready for use".
Make sure the lid is always open when you light a burner.
- Never bend directly over a burner when lighting it.
9.2 Lighting the main burners
9.2.1 USING THE IGNITER
- Open the lid and set the control knobs of the main burners to OFF.
- If no other burner is lit yet, open the gas supply and wait ten seconds. This allows the gas to stabilize.
- Push in the control knob of one burner, set it to HIGH and hold it for a moment. The build-in igniter will cause sparks, which will light the burner.

Always light one main burner to start with. Never light all main burners at the same time.
- If the burner does not light after three attempts, set its control knob to OFF, close the gas supply and wait 5 minutes. This allows any accumulated gas to escape.
- Retry lighting the burner. If it still does not light, try lighting it with a match or refer to "14 Troubleshooting" to determine the cause of the problem.
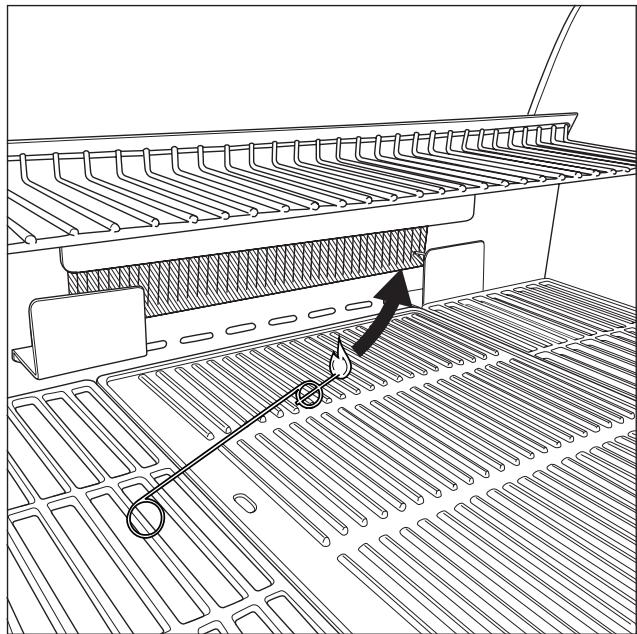
9.2.2 USING A MATCH
- Place a match in the match holder.
- Open the lid and set the control knobs of the main burners to OFF.
- If no other burner is lit yet, open the gas supply and wait ten seconds. This allows the gas to stabilize.
- Light the match and hold it about 13mm from the burner.
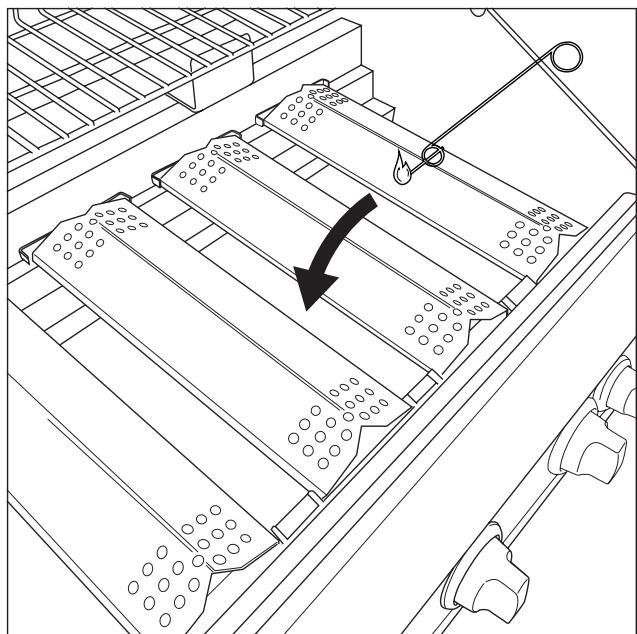
- Set the control knob of one burner to HIGH.

Always light one main burner to start with. Never light all main burners at the same time.
6. If the burner does not light within 5 seconds, set its control knob to OFF, close the gas supply and wait 5 minutes. This allows any accumulated gas to escape.
7. Retry lighting the burner. If it still does not light, refer to "14 Troubleshooting" to determine the cause of the problem.
8. Once one burner is lit, light the other burners by setting their control knobs to HIGH.
9.3 Lighting the side burner

The side burner can only carry pots with a maximum weight of 9kg , maximum diameter of 220mm and minimum diameter of 120mm .
9.3.1 USING THE IGNITER
- Open the lid and set the control knob of the side burner to OFF.
- If no other burner is lit yet, open the gas supply and wait ten seconds. This allows the gas to stabilize.
- Push in the control knob of the side burner, set it to HIGH and hold it for a moment. The build-in igniter will cause sparks, which will light the side burner.
- If the burner does not light after three attempts, set its control knob to OFF, close the gas supply and wait 5 minutes. This allows any accumulated gas to escape.
- Retry lighting the side burner. If it still does not light, try lighting it with a match or refer to "14 Troubleshooting" to determine the cause of the problem.
9.3.2 USING A MATCH
- Place a match in the match holder.
- Open the lid and set the control knob of the side burner to OFF.
- If no other burner is lit yet, open the gas supply and wait ten seconds. This allows the gas to stabilize.
- Light the match and hold it about 13mm from the side burner.
- Set the control knob of the side burner to HIGH.
- If the side burner does not light within 5 seconds, set its control knob to OFF, close the gas supply and wait 5 minutes. This allows any accumulated gas to escape.
- Retry lighting the side burner. If it still does not light, refer to "14 Troubleshooting" to determine the cause of the problem.
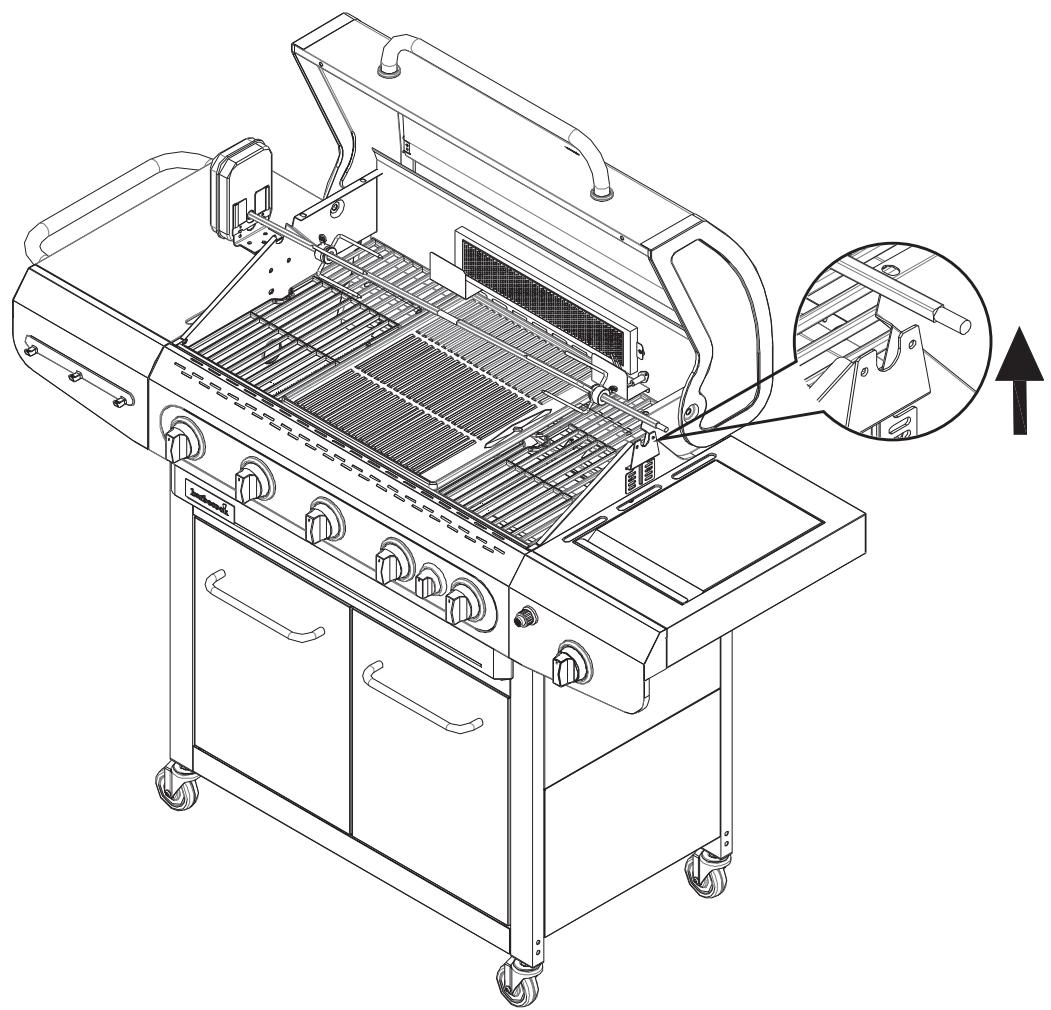
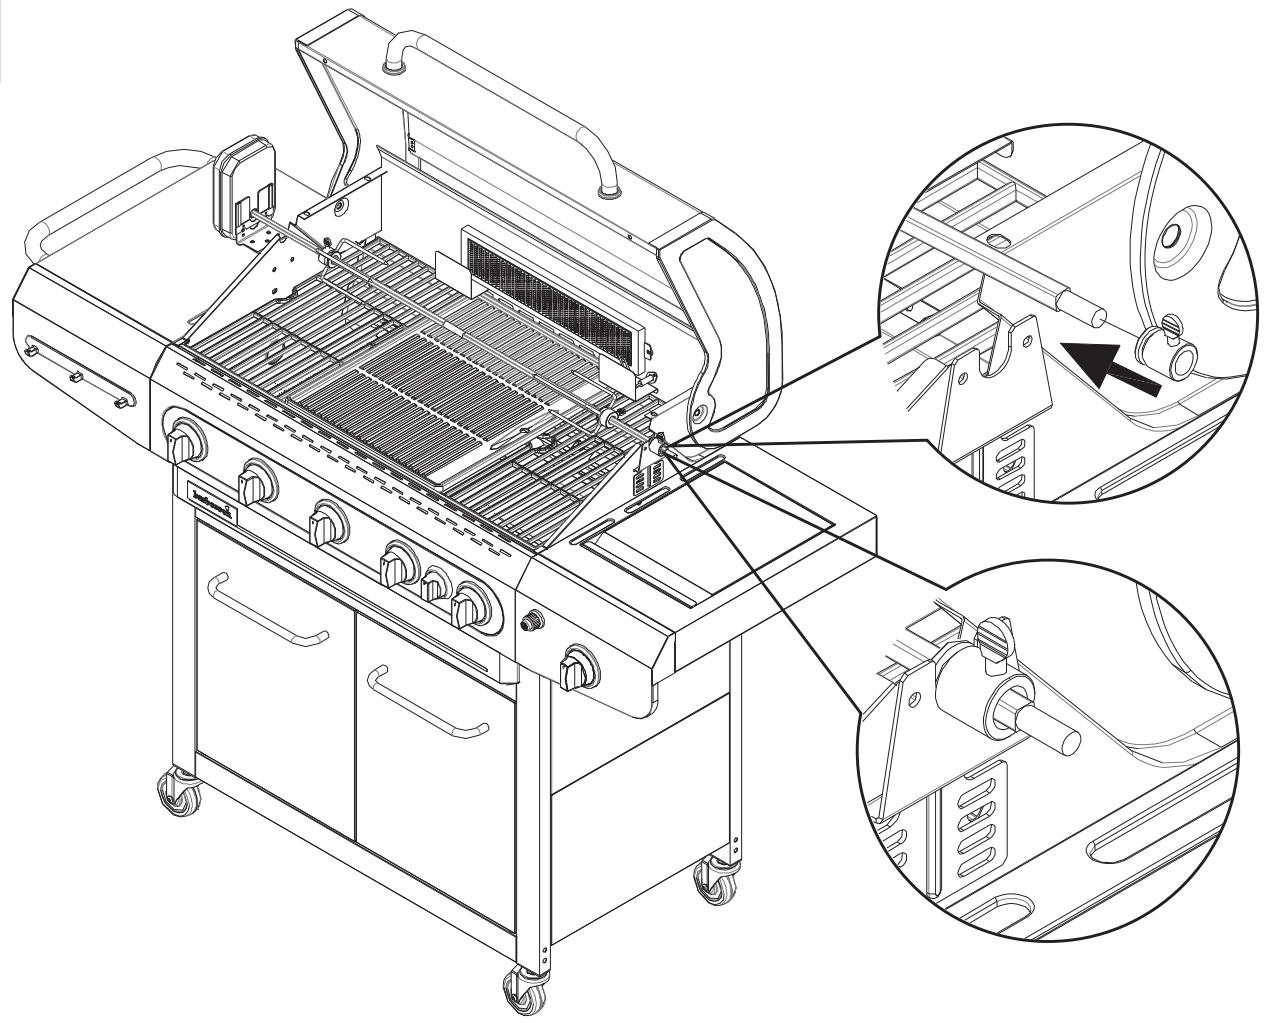
9.4 Lighting the spit burner

Before you can use the spit burner, you have to install two D batteries in the spit burner engine. These batteries are not supplied with the appliance.
9.4.1 USING THE IGNITER
- Open the lid and set the control knob of the spit burner to OFF.
- Remove the grills and warming rack from the appliance and put them aside.
- If no other burner is lit yet, open the gas supply and wait ten seconds. This allows the gas to stabilize.
- Push in the control knob of the spit burner, set it to HIGH and hold it for a moment. The build-in igniter will cause sparks, which will light the spit burner.
- If the burner does not light after three attempts, set its control knob to OFF, close the gas supply and wait 5 minutes. This allows any accumulated gas to escape.
- Retry lighting the spit burner. If it still does not light, try lighting it with a match or refer to "14 Troubleshooting" to determine the cause of the problem.
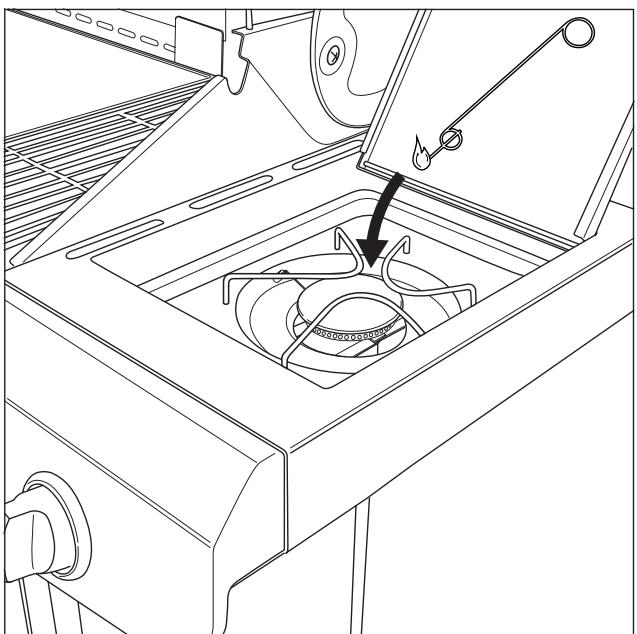
9.4.2 USING A MATCH
- Place a match in the match holder.
- Open the lid and set the control knob of the spit burner to OFF.
- If no other burner is lit yet, open the gas supply and wait ten seconds. This allows the gas to stabilize.
- Light the match and hold it to the right of the spit burner.
- Set the control knob of the spit burner to HIGH.
- If the burner does not light within 5 seconds, set its control knob to OFF, close the gas supply and wait 5 minutes. This allows any accumulated gas to escape.
- Retry lighting the spit burner. If it still does not light, refer to "14 Troubleshooting" to determine the cause of the problem.
9.5 Switching the burners off
If you no longer use the burners, you have to switch them off. Proceed as follows:
- Close the gas supply.
- Set the control knobs of the burners to OFF.

By closing the gas supply first, you make sure there is no gas left in the appliance.
9.6 Relighting the burners
If a burner goes out while in use, proceed as follows:
- Open the lid and close the gas supply.
- Set all control knobs to OFF and wait 5 minutes. This allows any accumulated gas to escape.
- Relight the burner(s).
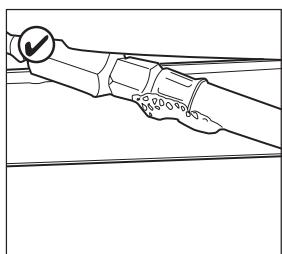
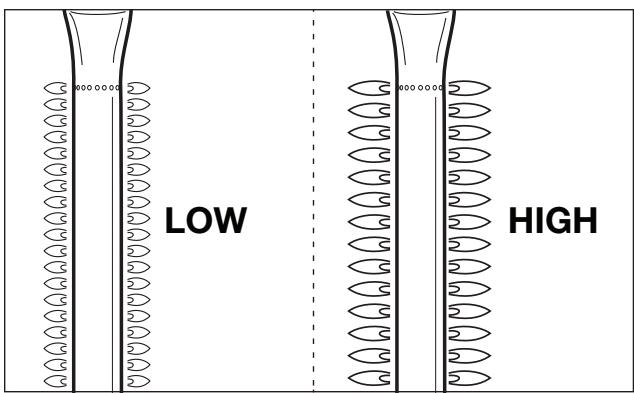
9.7 Checking the flames
Each time you light a burner, you have to check its flames. A perfect flame is almost completely blue, with some yellow at the top. Sporadic yellow flames are normal and not harmful.
If there is something wrong with the flames, do one of the following to solve the problem:
| If the flames are... | Do the following... |
| Low and entirely yellow | 1. Immediately close the gas supply and set all control knobs to OFF. 2. Refer to “Troubleshooting” to determine the cause of the problem. Most likely, the venturis are blocked. |
| Higher than the bowl | 1. Immediately close the gas supply and set all control knobs to OFF. 2. Wait 5 minutes to allow any accumulated gas to escape. 3. Relight the burner(s). 4. If the problem persists, refer to “Troubleshooting” to determine the cause of the problem. |
10 USEFUL TIPS AND TRICKS
10.1 Preheating the appliance
By preheating your appliance, you make sure the grill is hot enough by the time you put food on it. Proceed as follows:
- Light the burner(s) and set their control knob(s) to HIGH.
- Close the lid and leave the appliance for ten minutes.
- After ten minutes, open the lid and put your food on the grill.
- If you need less heat now, set the control knob(s) to a lower position.
10.2 Preventing food from sticking
To prevent your food from sticking to the grill:
- Oil the food lightly with a brush before you put it on the grill. You can also oil the grill itself.
- Preheat the appliance. The warmer the grill when you put food on it, the less the food will stick.
- Do not turn the food too quickly. Let it catch some heat first.
10.3 Direct and indirect grilling
Depending on the type of food you are preparing and on how you want to prepare it, you can grill directly or indirectly:
| Method | Description | Use |
| Direct | Put your food directly above a lit burner, set that burner to a high position and keep the lid open. | To sear meat and vegetables |
| Indirect | Put your food next to a lit burner, set that burner to a medium/low position and close the lid. | To further cook seared meat |

When grilling under a closed lid, always keep an eye on the lid thermometer to make sure the appliance does not get too hot. See "10.5 Watching the temperature".
10.4 Grilling with closed lid
Closing the lid while grilling has some important advantages:
- The temperature of the grill is higher and remains more constant.
- You reduce the cooking time of your food and keep your food more moist.
You reduce flare-ups and save gas.

When grilling under a closed lid, always keep an eye on the lid thermometer to make sure the appliance does not get too hot. See "10.5 Watching the temperature".
10.5Watching the temperature
Your appliance is equipped with powerful burners, so it heats up rapidly and you can keep the temperature steady. When grilling under a closed lid, however, you have to make sure that the appliance does not get too hot. Keep an eye on the lid thermometer and take into account the following guidelines:
A normal cooking temperature is about 210^ . At higher temperatures, dripping and accumulated fat can ignite.
- The temperature should never be over 300^ for more than five minutes. This can damage and deform the appliance.

If the appliance gets too hot, cool it down by opening the lid and setting the burners to a lower position.
10.6 Taking advantage of the heat zones
When all burners are lit, the burner hoods distribute the heat as evenly as possible over the grill. Despite this even heating, some zones are still hotter than others. You can take advantage of these heat zones to grill your food to perfection:
| Zone | Hot | Use to… |
| Front | Hot | Grill delicate food (prawns, fish…). |
| Center | Hotter | Prepare food that needs some time to cook (e.g. sausages, chicken ties…). |
| Back | Hottest | Sear meat and vegetables |

You can also create heat zones by playing with the power of the burners. You can, for example, set a burner to a lower position and use the zone above that burner for delicate food or food that needs some time to cook.
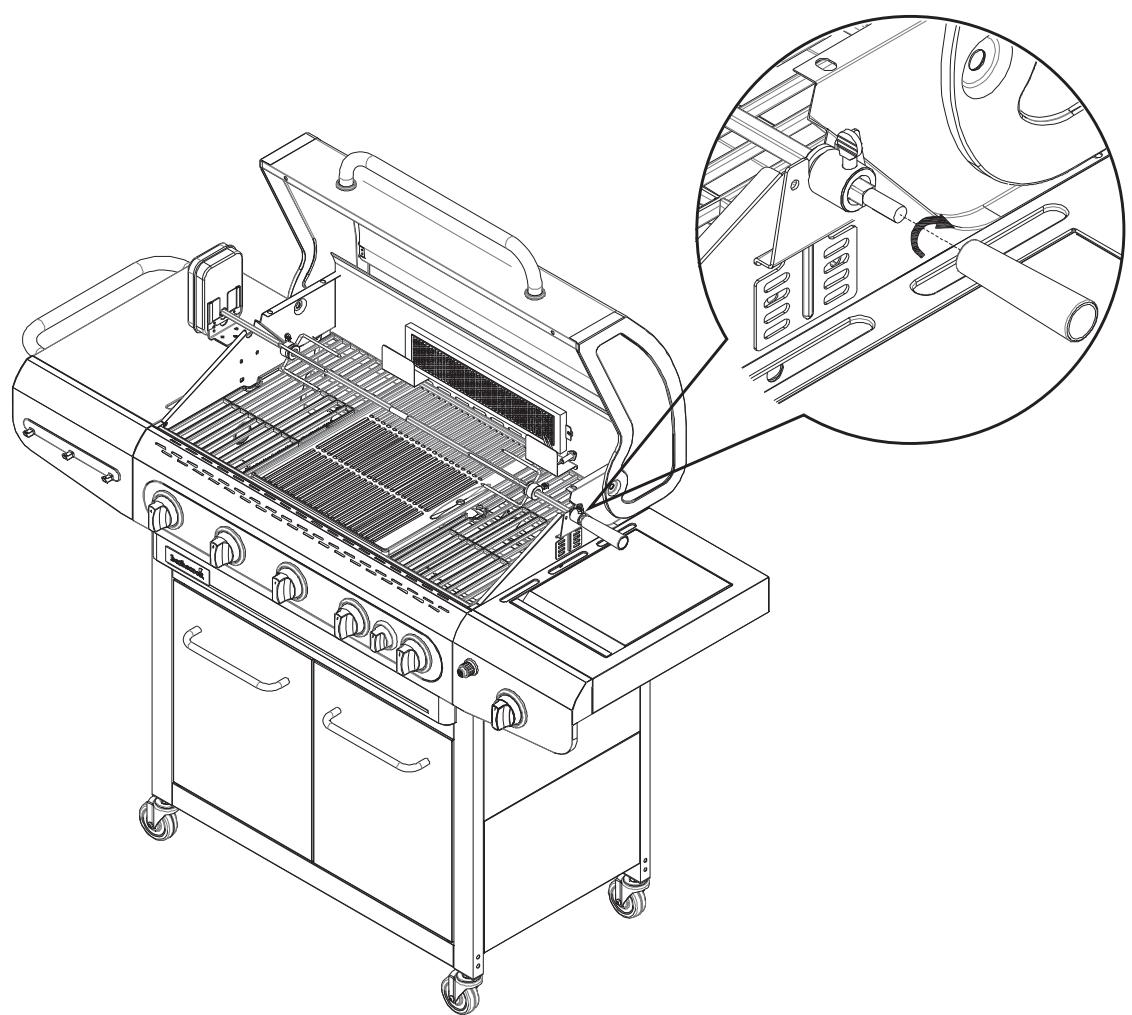
10.7 Roasting food on the spit
To roast food on the spit, you have to make the main burners and spit burner act together. To prepare a spit-roasted chicken, for example, proceed as follows:
- Remove the grills and warming rack from the appliance and put them aside.
- Light the main burners and close the lid to preheat the appliance. In the meantime, put the chicken on the spit.
- After ten minutes, open the lid, switch off the middle burner and set the side burners to LOW. You can put a dish on the middle burner to catch dripping fat.
- Put the spit above the burners and close the lid. The hot air will now cook the chicken, just like in a traditional oven.
- When the chicken is partially cooked, light the spit burner to crisp the chicken skin. Open the lid when lighting the burner and close it afterwards.
- Keep an eye on the chicken to make sure the skin does not burn. Switch the spit burner off once the skin is crisp enough.

When grilling under a closed lid, always keep an eye on the lid thermometer to make sure the appliance does not get too hot. See "10.5 Watching the temperature".
10.8 Avoiding flare-ups
During grilling, some flare-ups are normal. Too many flare-ups, however, increase the temperature in the appliance and can ignite accumulated fat. To avoid flare-ups:
- Make sure the bowl is clean when you start grilling. We recommend cleaning the bowl after each use. See "11.2 Cleaning the bowl".
- Regularly check if the fat drain hole is not blocked and if the fat drip tray or cup is not full yet.
- When grilling fatty meat, trim excess fat, close the lid and set the burners to a medium or low position.
11 MAINTAINING THE APPLIANCE
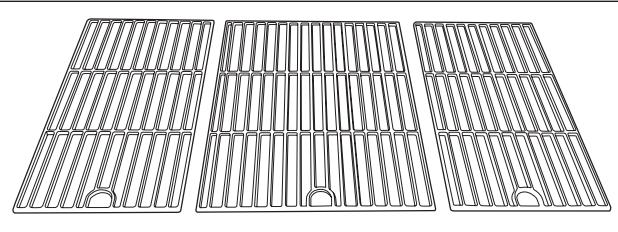
11.1 Cleaning the grill
We recommend cleaning the grill after each use, with a Barbecook cleaner.

You can also clean the grill with a soft detergent or with sodium bicarbonate. Never use oven cleaners on the grill.
11.2 Cleaning the bowl
We recommend cleaning the bowl after each use, with a Barbecook cleaner. Use it the same way you do on the grill.
11.3 Cleaning the burners and venturis
11.3.1 WHY CLEAN THE BURNERS AND VENTURIS?
Spiders and insects can make webs and nests in the burners and venturis. This may block the gas supply to the burners. As a result:
- You cannot light the burners. If you manage to light them anyway, they will only produce smoky and yellow flames.
- The gas can start burning outside the venturis, at the control knobs. These fires are called flash-backs and can result in serious injuries and material damage.


Damages caused by blocked burners and venturis are regarded as inadequate maintenance and are not covered by the warranty.
11.3.2 WHEN CLEAN THE BURNERS AND VENTURIS?
You have to clean the burners and venturis of your appliance:
Before the first use after a long period of non-use.
- At least twice a year, of which once at the beginning of the season.
11.3.3 TO CLEAN THE BURNERS AND VENTURIS
- Remove the burners from the appliance as shown on the illustrations. If you notice that a burner is damaged, you have to replace it.
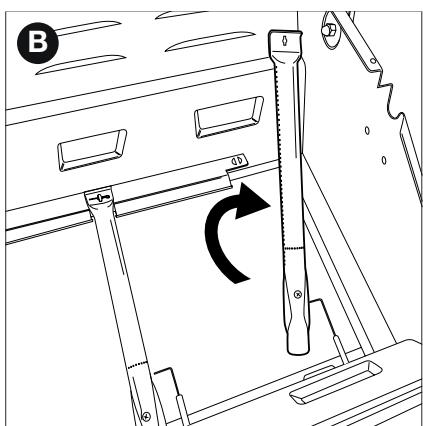
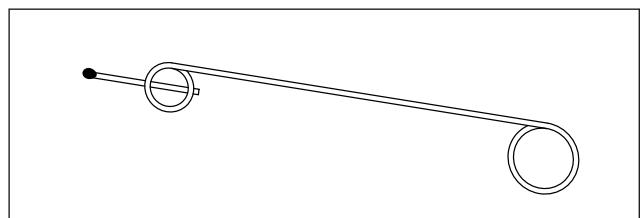
- Clean the burners and venturis with a small brush or a homemade pipe cleaner (an unfolded paperclip, a pipe brush ...).
- Put the burners back. Make sure to place the venturis over the openings of the gas valves.
11.4 Maintaining enamel, stainless steel, chrome and powder coated parts
The appliance is composed of enamelled, stainless steel, chromed and powder coated parts. Each material has to be maintained differently:
| Material | How to maintain this material |
| Enamel | Do not use sharp objects and do not knock against a hard surface. Avoid contact with cold liquids while still hot. You can use metal sponges and abrasive detergents. |
| Stainless steel and chrome | Do not use aggressive, abrasive or metal detergents. Use soft detergents and let them act on the steel. Use a soft sponge or cloth. Rinse thoroughly after cleaning and dry well before storing. |
| Powder coated | Do not use sharp objects. Use soft detergents and a soft sponge or cloth. Rinse thoroughly after cleaning and dry well before storing. |

To prevent formation of rust on stainless steel, avoid contact with chlorine, salt and iron. We recommend not using the appliance near the coast, near railways or near swimming pools.

Damages caused by not following these instructions are regarded as inadequate maintenance and are not covered by the warranty.
Below the exploded view of your appliance (second part of the manual), you find a list with all parts of which the appliance is composed. This list includes a symbol that specifies the material of each part, so you can use it to check how you have to maintain a particular part. The parts list uses the following symbols:
| Symbol | Material |
| ● | Enamel |
| ▲ | Chrome |
| ■ | Stainless steel |
| ★ | Powder coated |
11.5 Storing the appliance
If you do not use your appliance for a longer period of time, store it in a dry place. Before you store the appliance:
- Disconnect the gas cylinder. Never store your appliance indoors (not even in a garage or shed) as long as it is connected to the gas cylinder.
- Clean the burners and the grills, rub them with oil and wrap them in paper.
- Cover your appliance with a Barbecook cover. Register your appliance at www.barbecook.com to find out which cover you need.
11.6 Storing gas cylinders
These instructions apply to both empty and full gas cylinders.
Always store gas cylinders outdoors, in a well-ventilated area. Make sure they are not exposed to excessive heat or direct sunlight.
- Never store a gas cylinder in an area that can become very hot (in a car, on a boat...).
- Never store your gas cylinder or spare gas cylinder in the cabinet of your appliance.
- Never store your spare gas cylinder near a gas appliance in use.
Always store gas cylinders outside the reach of children.
Always store and transport gas cylinders in upright position.
11.7 Ordering spare parts
Parts that are directly exposed to fire or intense heat have to be replaced from time to time. To order a spare part:
- Look up the reference number of the part you need. You find a list of all reference numbers below the exploded views in the second part of this manual and on www.barbecook.com.

If you registered your appliance online, you will automatically be guided to the correct list in your MyBarbecook account. There you have the possibility to order your parts online.
2. Order the spare part via www.barbecook.com or at your point of sale. Parts under warranty can only be ordered at your point of sale.
12 WARRANTY
12.1 Covered
Your appliance comes with a warranty of two years, starting from the date of purchase. This warranty covers all manufacturing defects, provided that:
- You used, assembled and maintained your appliance according to the instructions in this manual. Damages caused by misuse, incorrect assembly or inadequate maintenance are not regarded as manufacturing defects.
-
You can present the receipt and the unique serial number of your appliance. This serial number starts with a G, followed by 15 digits. You can find it:
-
On this manual.
- On the packaging of the appliance.
-
On the inside of the cabinet door.
-
The Barbecook quality department confirms that the parts are defective and that they proved defective under normal use, correct assembly and adequate maintenance.
If one of the above conditions is not met, you cannot claim any form of contribution. In all cases, the warranty is limited to the repair or replacement of the defective part(s).
12.2 Not covered
The following damages and defects are not covered by the warranty:
- Normal wear and tear (rusting, distortion, discolouration...) of parts that are directly exposed to fire or intense heat. It is normal to replace these parts from time to time.
- Visual irregularities that are inherent to the manufacturing process. These irregularities are not regarded as manufacturing defects.
- All damages caused by inadequate maintenance, incorrect storage, improper assembly or modifications made to pre-assembled parts.
- All damages caused by misuse and abuse of the appliance (not using it according to the instructions in this manual, using it for commercial purposes, using it as a fire basket...).
- All consequential damages caused by careless or non-compliant use of the appliance.
- Rust or discolouration caused by external influences, the use of aggressive detergents, exposure to chlorine... These damages are not regarded as manufacturing defects.
13.1 Type label
The type label lists all the technical specifications of your appliance. You can find it:
In the second part of this manual.
On the inside of the cabinet door.
13.2 Injector diameters
Main burner: 0.85
Side burner: 0.85
- Spit burner: 0.98
14 TROUBLESHOOTING
| Problem | Probable cause(s) | Solution(s) |
| Not enough heat | ·Gas supply not open ·Venturis not placed over openings of gas valves ·Burner openings blocked ·Gas cylinder (almost) empty ·Pressure regulator not connected correctly to cylinder and/or hose | ·Open gas supply ·Place venturis over openings of gas valves ·Clean burner openings or replace burners ·Replace gas cylinder ·Reconnect pressure regulator to cylinder and/or hose |
| Excessive heat and/or flare-ups | ·Food too fatty ·Fat drain hole blocked, fat in bowl and/or fat on burners ·Temperature too high | ·Trim excess fat or set burners to a low position ·Clean fat drain hole, bowl and burners ·Set burners to a lower temperature and/or grill food indirectly |
| Heat not distributed evenly over grill surface | Some heat differences are normal, see “10.6 Taking advantage of the heat zones”. Probable cause(s) for big heat differences: ·Appliance not preheated | ·Preheat appliance |
| Yellow flames | ·Burners or venturis blocked ·Salt on burners ·Appliance connected to butane | ·Clean burners and venturis ·Clean burners ·Connect appliance to propane, using an appropriate pressure regulator |
| Incomplete flame | ·Burner blocked, pierced or rusted | ·Clean or replace burner |
| Flash-backs (flames outside venturis/at control knobs) | ·Burners or venturis blocked | ·Close gas supply and set burners to OFF. ·Let appliance cool down. ·Clean burners and venturis. |
| Flames higher than edge of bowl | ·Lots of wind ·Gas cylinder (almost) empty ·Fat in bowl or on burners | ·Put appliance with rear side towards wind ·Replace gas cylinder ·Clean bowl or burners |
| Pressure regulator hums | ·Hot weather ·New (full) gas cylinder | ·Not a hazard or defect. Should stop automatically after a while. |
| Burner whistles when set to LOW | ·Gas injector, venturi and/or burner dirty | ·Clean gas injector, venturi and burner |
| Impossible to light burner (using either igniter or match) | ·Burner or venturi blocked ·No gas supply | ·Clean burner and venturi ·Open gas supply and press safety knob on pressure regulator (not present on all regulators) |
| Impossible to light burner with igniter | ·No battery installed or battery not installed correctly ·Middle burner not lit first ·Igniter wiring not mounted correctly ·Electrode damaged ·Faulty ground ·Faulty igniter | ·(Re)install battery, with terminals positioned correctly ·Light the middle burner first ·Check and re-assemble all igniter connections ·Replace electrode ·Check and re-assemble electrodes, burners and igniter ·Replace igniter |
| No sparks nor sound when pressing igniter | • No battery installed or battery not installed correctly • Empty battery • Igniter button not assembled correctly • Faulty spark generator | • (Re)install battery, with terminals positioned correctly • Replace battery • Re-assemble igniter button • Replace spark generator |
| Only sound (no sparks) when pressing igniter | • Faulty ground • Burner and electrode too far apart | • Reconnect spark generator and electrodes • Slightly bend electrode to bring it closer to the burner |
| Sparks present that do not originate from burners | • Faulty wiring | • Replace wiring |
| Sparks present, but not on all electrodes and/or not powerful enough | • Faulty ground • Low battery • Wet or broken electrodes | • Reconnect spark generator and electrodes • Replace battery • Dry electrodes with paper towels or replace electrodes |
9 ACCENSIONE DEI FORNELLI

9.2.1 USO DELL'ACCENSIONE ELETTRICA
9.2.2 USO DEI FIAMMIFERI
9.7 Verificar as chamas
| Land | Sammenkobling |
| BE, CH, CZ, DK, ES, FI, GB, IE, IT, PT, SI | Sammenkobling A |
| FR | Sammenkobling B |

6 TILKOBLING AV GASS TIL APPARATET
6.1 Hvilken flaske, slange, regulator
11 VEDLIKEHOLD AV APPARATET
3 DÔLEŽITÉ BEZPEČNOSTNÉ POKNY
3.1 Precitajte si a dorziavajte pokyny
14 RIESENIE PROBLEMOV
3 OLULISED OHUTUSJUHISED
Iobpeinte, npuHHeHn OT HeCnA3BaHe Ha nHCTpyKuNTe (He npabInHo CToNo6BaHe, HnpabInHa yNtpe6a, HeoctTaTbUHa noDpBxKa N dp.) He ce NOKpNBat OT rapaHcraTa.
3.2БьдeTe BHNMaTeJIHn c ra3Ta
Pa6oTaTcra3e cBcsem 6e3OpacHa, Ho n3nCKBa n3BeCTHa CTenHn IOBnIeHO BnIMaHHe:
BunharncbxaPnBaIte ra3OBnTe 6yTnIKn Ha oTKpnto npOBeTpIBo MxCTo. YBepeTe ce, ye He ca n3JIOKeHN Ha npEkaJeHa ropeuHa n DnpeKTHa CtBnHeBa CBeJIHa.
Hnkora He cxbxaHbAaTe ra3oBaTa 6yTuNka nn pe3epBHaT a ra3Oba 6yTuNka B uKaΦa Ha Baunya ype.i.
Hnkora He cxbxaHbAaTe BaIaTa pe3epBHa ra3OBA 6ytnka 6bn3o Do ra3OB ypeD, KOITc Ce n3nol3Ba.
BnHaIuN3KJIIOUyBaIte ra3OIOJaBaHeTo npri ra3OBaTa 6ytunka cIeJ ynoTpe6a.
Hnkora He npuete 6n3o do ra3OB ypei, KoTo ce n3noJ3Ba, nn 6n3o do ra3Oba 6yTnIka (nbJHa/npa3Ha).

Ako yceTnte ra3, He3a6abHNo n3KlHouTe Ra3oNODaBaHeTo, KaTO yracnte BCNUCKn PJIaMbUcN, N OTbOpTe KanaKa Ha ypeJa. Ako MmPn3MaTa Ha ra3 npOJbLJaBA, Ce CBpXeTe C IOCTaBUnKa cN Ha ra3 IJIc C npOTNBONOxapHaTa cIyX6a.
4.1 Tpb6n Ha BeHTypn
Tp6nte Ha BeHTypn ca MaJIkn Tp6NkN, 3aKpeEnHa 3a BxOda Ha ropeIKeIte. OtCTpaHn Ha Tp6nte IMa OTBop. ToBa e BuDImo Ha rnaBHnTe ropeIKN n CTpaHnUHaTa ropeIka:

Korato ra3Ta npotTu KaBm ropeJIKNTe, TЯ npemHaBa npe3 Tpb6nTe. BlaRoIapenHe Ha OTbOpHTe OTCpaHn, ra3Ta ce CmecBa c Bb3dUx I B pe3yIITaT Ha TOBa - C KncLOpoJ. ToBa e Heo6XoIMO 3a Do6pOTo 3aJaIbAbe B ropeJIKNTe: camo npabINHaTa CmEc OT ra3 N KncLOpoJ. Ie Ce 3aapanI npabINHO I ue Ce NOlyuAT xy6abN pIamMbU.
4.2 Ko3nprkn Ha ropeIkaTa
Ko3npknte Ha ropeIkata ca Ko3npknte, KOIOte moHTnpaHad ropeIknite Ha Bauny ypeI. Te npedna3Bat ropeIknite OTKaNEsMa3nHa. OTBOPnte OTCTpaHn Ha Ko3nPKnte CbIo Taka pa3npedeJIaT ToJIInHaTa IIO ckapaTa, KOeTO IO3BOJRA MHOrO NO-6bp3O IN PO-paBHomepHo HArpaBaHe.
4.3 EmaiJ
HЯко часи на урета с поорпси с пл act pa3toneho CTbKJIO, hapeуенo emaui. To3n emaui npedna3Ba MeTana noД Hero ot Kopo3nia. EmaiIbTe BvcoKOKaueCTBeH MaTePuaJI: toi e yctOuivB Ha pbXka, He n36JIeNHa BA noD BInraHneTo Ha BvCoKIn TempepaTyPi n e leceH 3a noDpBXka.

TbI KaTo eMaJIbT He e ToJIKOBA TbBkAB, KOJIKOTO MeTana, KOITo NOKPnBa, NapYeTa OT eMaJla MoRat Da ce OTKbCnat PnH eNpabuHIO bOpaBeHe C ypeJa. 3a Da n36eHrTe Ipo6IeMn, BdTe BHNMaTeJHi npi CrNo6BaHa He eMaJInpaHnTe qACTn IN BnHaTn PoDlbPjKaAte eMaJla, KaKTo e ONIsCAHO B TOBa pBkoBOIDTO.
4.4 Пламьци
NCKPnTe Ca BHe3aHn PnAmbU, KOnTO n3JIn3aT OT Kynata, KOrato NeyeTe Ha cKapa. Te O6nKHOBeHo Ca npuHHeH ot KaeneMa3HnHa nn MapnHaTa.
5 CГЛОБЯBAHE HA UPEДA
5.1 Инструкци 3a 6e30napocT
He moiΦuIpaIte ypea np crJIo6BaHTo My. MHoro onaCHO e n He e no3BOJeHO da ce npomehrT qactnte, KOITO ca npedBapITeJIHO crJIo6eHN u/Inn 3aNeHaTaHn OT npOn3BOIDTeJIa.
BnHaI cIeIbaiTe BnHMaTeJIHO INCTpyKcIInTe 3a crIIO6BaHe.
- Потpeбителг НOCN OTROBOPHOC 3a npabuHOTO cIIO6BaHe Ha ypea. ПOBpeiTe,пчИнEHn OT He npabuHNo CrIo6BaHe, He ce NOKpNBaT O rapaHcIyTa.
5.2 3a da crlnoiTe ypeDa
Heo6xOIMa Bn e Kpbctata OTBepTKa, npaba OTBepTKa n AA 6batepy (eIekTpnueeckn 3anaNTen). C ypeJa He ce doCTaBrt 6batepyn.
- NocTaBete ypeHa Ha paBaHa u YnCtA NOBbpxHocT.
- CrIIO6eTe ypeDa, KaKTo e NOKa3aHo HaYeptExKeTc 3a crIIO6BaHe. MoKeTe Da rH HamePte BbB BTopaTa YacT Ha TOBa pBkoBOdCTBO cIeD pa3rIo6eHnT n3rIeN Ha ypeDa.

BHMaBaIte npn crIIO6BaHe Ha eMaJInpaHITe YacTn.
INCTpyMeHTnte IN BINTOBTe MORat da NOBpeJr T eMaIIa.
N3non3BaIte npedocTaBeHITe BIAkHeCTu Shaibn, 3a da
npedna3nte eMaIIa OKOLO BINTOBTe.

PaketchyTo C BVHTOBe MOxE Da CbIbpxa NOBuey E BHTOBe,OTKoNkOTO Ca Heo6xOuIMn.CJeD crJIO6BaHe MOxE Da OCTaHaT BVHTOBe.

PaketbT cbDbpka KOMnIeK T 3a CneuHn Cnyau n ce3epBHN uactn (BnHTOBe, BoTObe, fno6poBn Iua6n np.. MoKeTe da rN u3noJ3BaTe B cnyau, Ye u3rHy6nte nn CuyNTe HAKON UACTn.
6 CBbP3BAHE HA ΓA3TA C UPEДA
6.1 KaKBa 6yTnIka, MapKyu n peryIaTOp?
IpeNi CBp3BaHe Na ra3Ta KbM ypeJa, Tpr6Ba Da 3aKynite ra3Oba 6yTnJka, MapKyu n peryJNaTOp Ha NaJraHTo. TaBnCaTa IIO-DoJy NOKa3Ba KaKBn Ra3Oba 6yTnJka, MapKyu n peryJNaTOp da N3PON3BaTe.
B BeIgna (BE), HapnIeMep, TpI6Ba Da n3IOnI3BaTe 6yTnIka C npOpaH c MapKyu n perynatop 3a 37 mbar nn 6yTnIka c 6yToH c MapKyu n perynatop 3a 28-30 mbar.
| Държава | БътUILka, Маркуни р发电机хор |
| DK, GR, NO, SE, EE, LT, LV, CZ, PL, MT, HU, SI, SK, NL | Пробан, 30 mbar/Бутан, 30 mbar |
| ES, GB., IE, PT, BE, FR, LU, IT, CY | Пробан, 37 mbar/Бутан, 28 - 30 mbar |

ToBa 6ap6ekIO e NaCTpoEHO da pa6oTn C 6byTnKINpOAn/6yTaN OT 4.5do 15 kg c npDxOJaP perJnatop 3aHnCKo HnIraHe. PpeOpBvBaMe Bn Da CbpxKeTe ypeKaKbM pOAnH. PpOAnbT npeJaRa BnCOKokaeCTBeHO ropeHe n e NO-MaIKo YCbCTBnTeHn HnCKInTemnepaTpyn. BnCounHaT H na 6byTnKata Tpr6Ba dae no-MaIKo ot 58 cm, He3aBnCmO ot UnpHaTa nnIiDnAmEtbpA D Ha 6byTnKata.

3akynete peryanaTopa Ha haJraHaTe n 6ytjlkata 3aeNo. He BCnukn peyanaTopu ca noxDxOJaU 3a BCnukn 6ytjlkka.

Ia ce n3noJ3Ba cAmo ra3OB mapkyu nperylaTOp, npDxOJa7n 3a cTpaHaTa Ha yNoTpe6a.
3a cnncbK ha TbproBun Ha Barbecook nocetete www. barbecook.com.
8.1 Празд Всякуnotpe6a
PnBcKa ynoTpe6a Ha ypea, npoBepraBaiTe 3a cneHTo:
- YpeIbTe Ha IpoXoJrO MraCTo. BuxTe "3.3 N36epeTe IpoXoJrO MraCTo".
MapkybT 3a ra3 He ce Blaunno 3emra n He Bnna B KOHTaKT C ropeu a nobbpxHoc Tnn Kaeneua Ma3HnHa.
Kynatae uncTa. IpeopbUBaMe BN da nouchTbaTe Kynatacnei Bcko n3noJ3BaHe. Buxte "11.2 POnucTbaHe Ha Kynata". - TorpelenkeиТрбиTe Ha BeHTypи He ca 3anyuSeHn OT
- Гешип Ha Hacekomи Илп пяжини. ВижтЕ
- "11.3 Почиствае Ha ropelikneTe и ТрбиTe Ha BeHTypи".
- Topelknite ca npabnilho cTIO6EH. Tpb6nTe Ha BeHtpyn Tp6Ba da ca noCTaBeHN HAD OTBOpNTe Ha KJanaHnTE 3a ra3.

Ako nckaTe da cTe a6cIoHToH cnIpyHn, ye ra3Ta e npaBUNHO CBbP3aHa, MoKTe Da npoBepBaTe ypeDa 3a TeOBe Ha ra3 ppeDu BcKa ynoTpe6a. BuxTe "7 PpOBepka 3a TeOBe Ha ra3".
8.2 Прази пьвату уnotpe6a (след дьлгперiod на сбхра themselves)
Ako n3no3BaTe ypea 3a npBb nbT nIi 3a npBb nbT cIeI bIbIg nepIOd Ha HeynOTpe6a, Tpr6Ba da HappaNTe HAKoKo DOnbHInTeJIH NPOBepKn:
3aIbJIxNITeHNO pOoTeTe, BHNKHeT e I npOBepTe BCnUKN HCTpyKcIM N TOBa pBKOBOcTBO (cAmO npEi nPpBaTa ynoTpe6a).
- Поберете урEDA за точobe на га3. Вжт "7 Поберка за точobe на га3".

PpOBepe Te CbIoo 3a TeOBe Ha ra3 aKO ypeIbT e 6nI crIIObe ON TbproBVeua.
- Почистуся сюгелкей и Трьбшип на BeHTypи (само прудппьрвату уnotpe6а след дылг поюн на сухра themselves). Вжто "11.3 Почистваши на Рорелкей и Трьбшип на BeHTypи".
- HarpeTe ypeDa, npeDn Da cIaRaTe xpaHa Bbpxy Hero (cAmo npeDn PbBaTa ynoTpe6a). BuxkTe "8.3 ObrapRHe Ha ypeDa".
8.3 06rapЯнe ha ypeda
Upe3 obrapaHe Na ypeDa npdei NpBbTa My ynoTpe6a ue OTCpaHtE ocTaHaJIte npOn3BOJcTBeHN Ma3HmHn OT ypeDa. HanpaBeTe cIeHOTO:
- 3anaIeTe rnaBHTe ropeIKN u NaCTpoIte KOHTPOJHITe Nm KOnyeta Ha HIGH (BucOko). BuxTe "9.2 3anaIbaHe Ha rnaBHTe ropeIKN".
- 3aTbOpTe KaNaka n octaBeTe ypeDa da rOpu 15 MmHyTu. Bce oUe He noctabYnTe xpaHa Bbpxy ckapata.
- CJIeI 15 MmHyTn OTBopeTe KanaKa I ocTaBeTe ypeDa da roPi OoSe 5 MmHyTn (C KOHTPOJHOTO KONYe BCE OoSe B IO3NlUry HIGH).
- CJIeI 5 MInHyTn UpeBt e roTOB 3a yNToPe6a. Cera moKete Da nOCTaBNTe XpaHa BbPxy ckapata.
9 3APNAJBAHE HA TOPEJIKNTE

3a da 3anaJnte ropeIknite c eIeKtpnueckn 3anaJInteJ, TpI6Ba da noCTabInTe M 6aTePnB 3anaJInteJ. Ta3n 6aTePnHe ce doCTabnC ypeJa. MoXeTe Da oTKpnTe OTJeHHeTo 3a 6aTePnHa 3anaJbAHeTO BbTpe B npEnnnaHn Ha Ta6JaTa OTJaCHO.
HamaJIaBaTe BHe3aHHTe PJIaMbUc N CTeCTraBe rA3.

Korato nehe Ta Kaapa nO 3aTBopeh Kaap, BnHa n CneTe TepMometbpa Ha Kaapa, 3a Da cTe cnTyprH, Ye ypeBt Hma Da nperee. BnxTe "10.5 CJeDeHe Ha TemnepaTypata".
IobpeiTe, npuHHeH O T HeCnTa3BaHe Ha Te3n IHCTpyKUIM, Ce CHTaT 3a HeIOCTaTbUHa IOnpBxKa IN He CE NOKPUBaT OT rapaHcIyTa.
Iod pa3rno6eHn Bn Ha Baun ypei (BtopaTa Yact Na pkoBDCTBOTo) ige HamePnte CnncbK C BCNUK Nactu, cbTaeBraun ypeHa. To3n CnncbK BKIOUyBa CmBOJ, KOITOnocOyBa MaTePnAHa HA BCRA KaCT, TaKa Ye MoXKeTe Da rO n3NOJ3BaTe, 3a Da npOBepNTe KAK Da NpDJIbPxkATE ONpeJeHeHa qact. CnncbKbT C qactN n3NoJ3Ba CneHNTE CmBOJn:
6.1 Katero jeklenko, gibko cev in regulator?
Preden priklopite plin na napravo, morate kupiti plinsko jaklenko, cev in regulator tlaka. Spodnja tabela prikazuje, katero jaklenko, cev in regulator morate uporabiti.
V Belgiji (BE) morate na primer uporabiti propansko jeklenko s cevjo in regulatorjem za 37 mbar ali butansko jeklenko s cevjo in regulatorjem za 28-30 mbar.
| Država | Jeklenka, gibka cev in regulator |
| DK, GR, NO, SE, EE, LT, LV, CZ, PL, MT, HU, SI, SK, NL | Propan, 30 mbar/ Butan, 30 mbar |
| ES, GB., IE, PT, BE, FR, LU, IT, CY | Propan, 37 mbar/ Butan, 28 - 30 mbar |

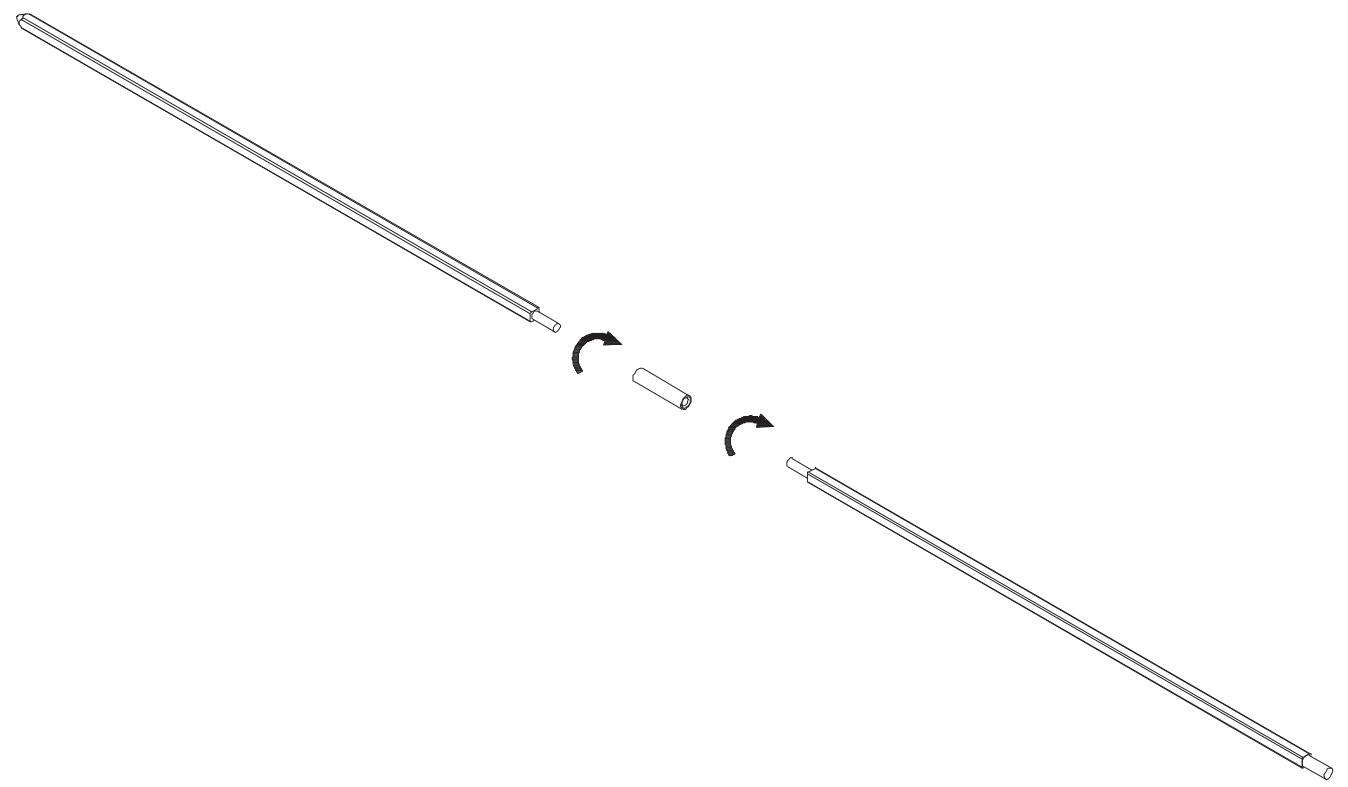
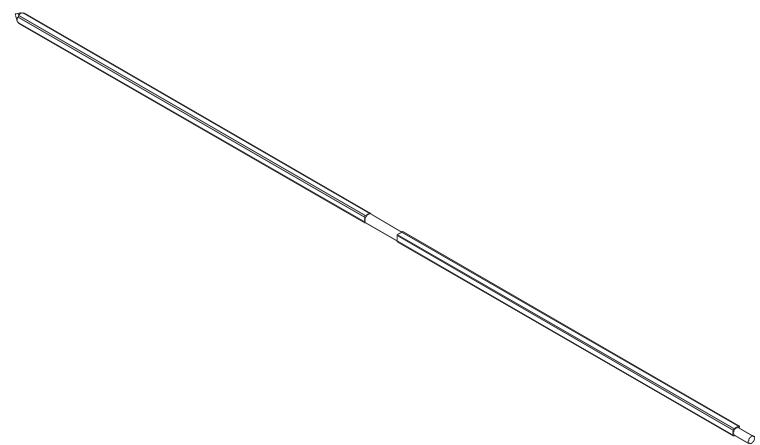
ADDITIONAL MONTAGE SPIT SET
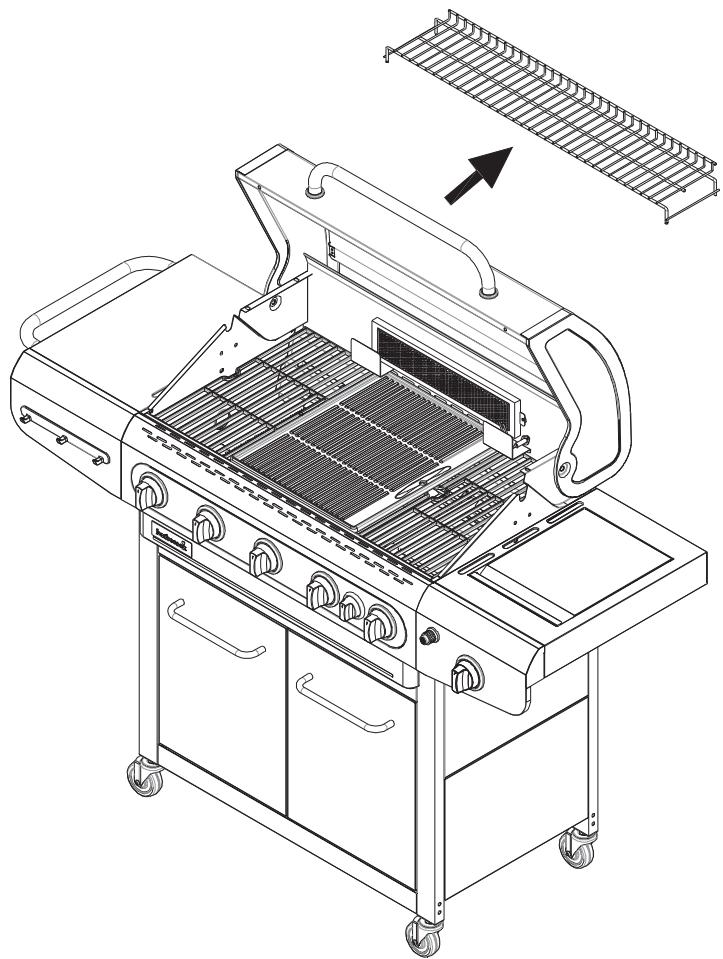
1
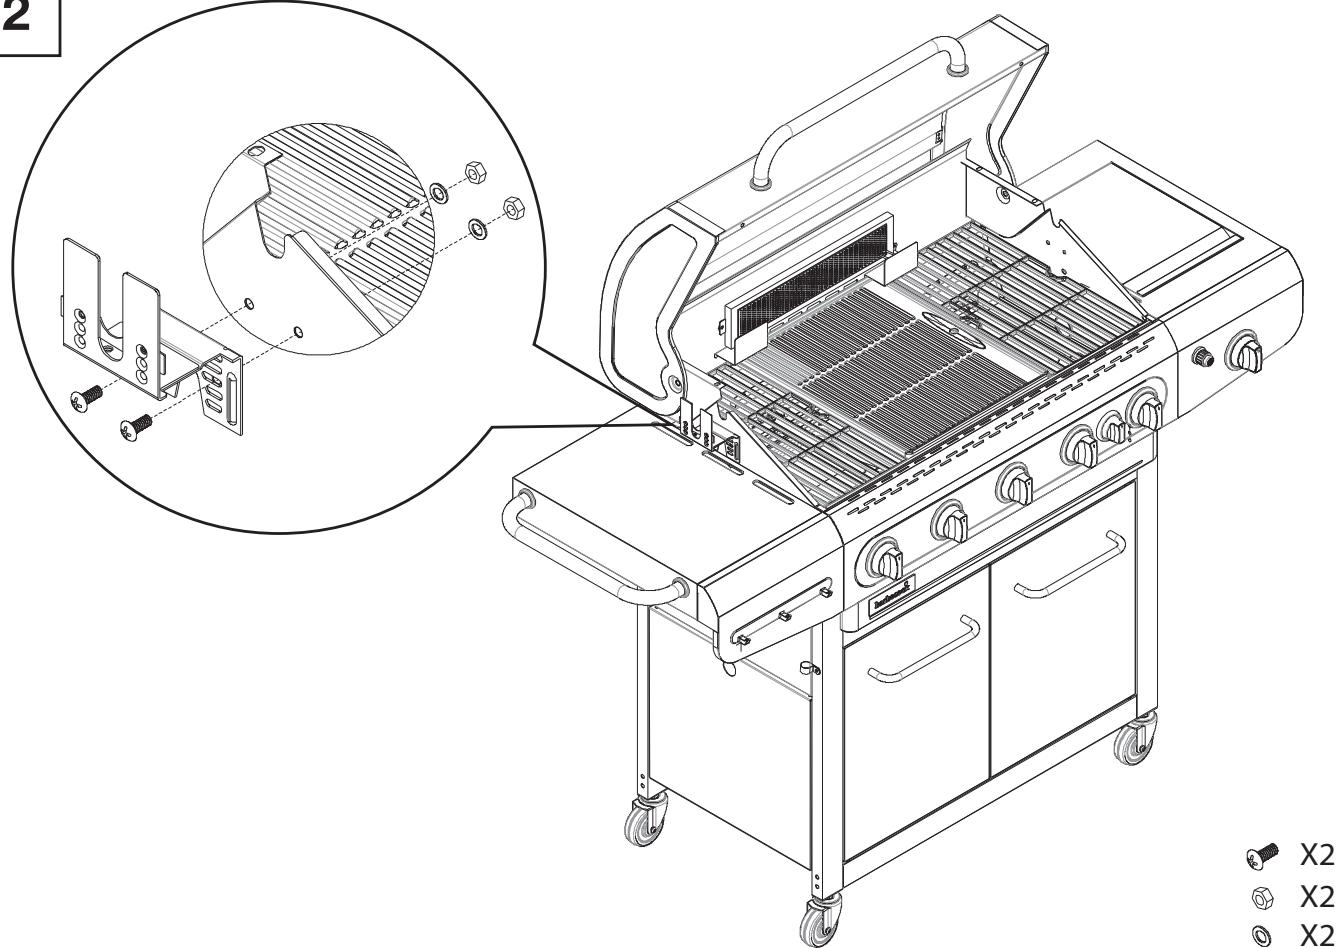
2
X2
X2
X2
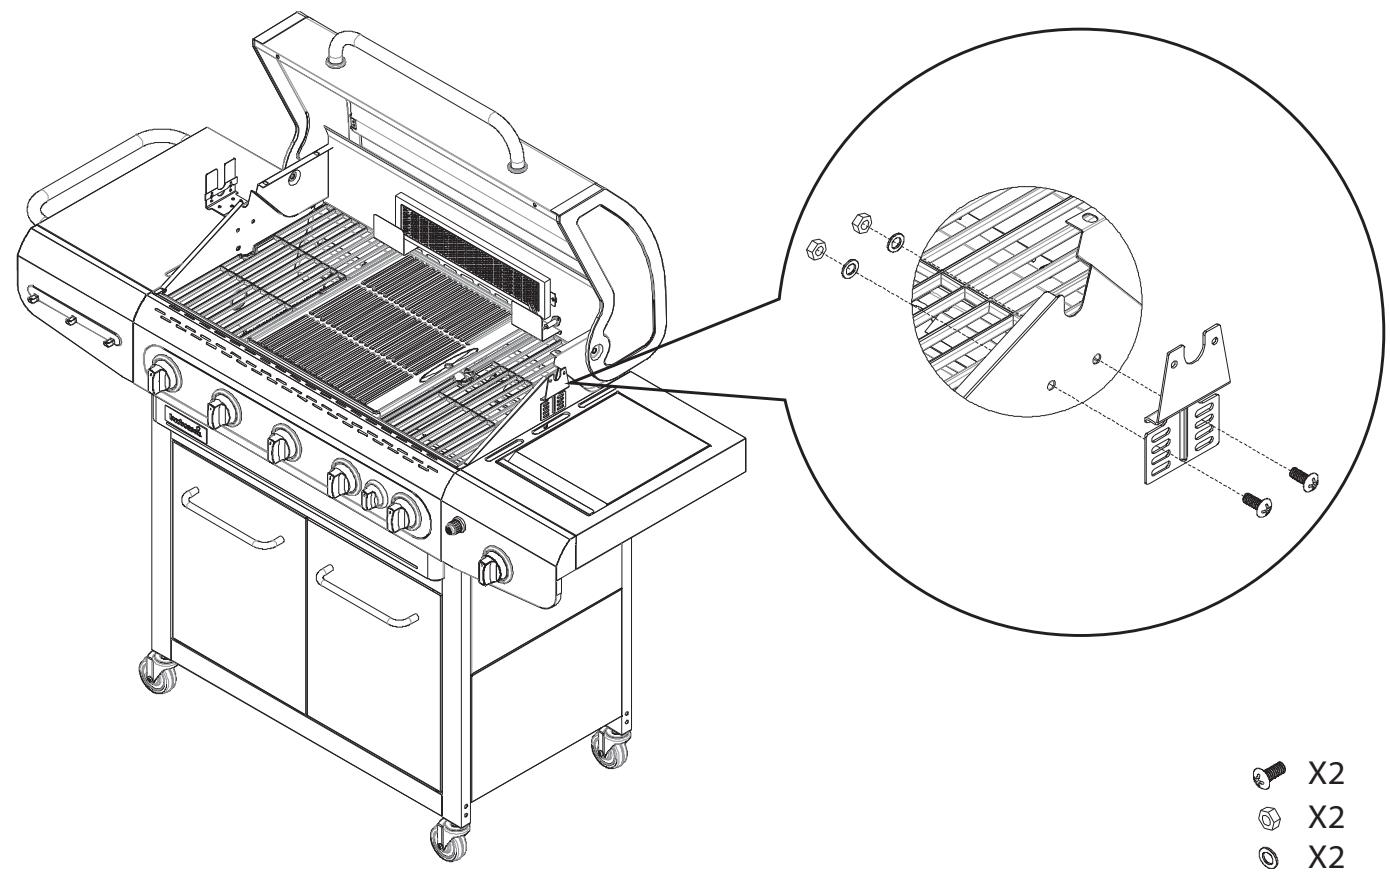
3
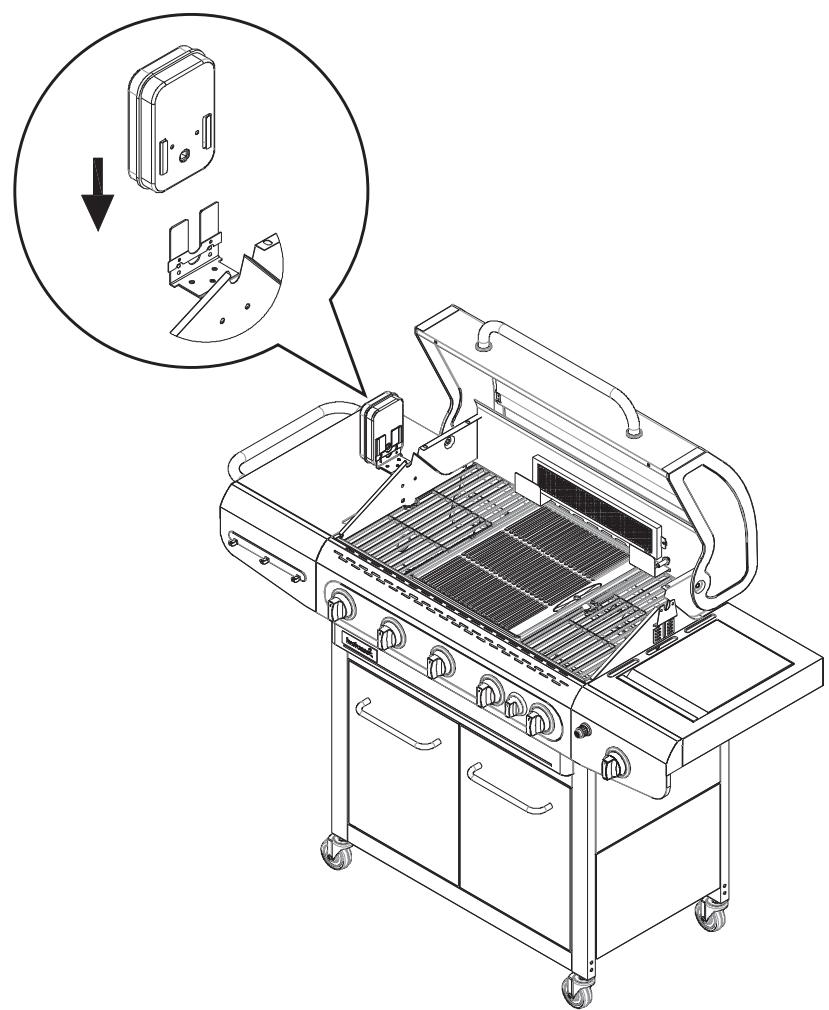
4
5
6
7
8
9
10
| A | B | C | D | E | F | G | H | I | J | K | ||||||||
| G30 | G31 | G30 | G31 | G30 | G31 | G30 | G31 | |||||||||||
| barbecook® | Siesta 612 (720-0876) Gas barbecue | BE, CH, CY, CZ, ES, FR, GB, GR, IE, IT, LT, LU, LV, PT, SI, SK, TR | 28 - 30 mbar | Butane | \( I_3+(28-30/37) \) | 1,5 V battery (not included) | 21.2 kW | 1543g/h | / | 14.5 kW | 1055g/h | / | 2.9 kW | 211g/h | / | 3.8 kW | 277g/h | / |
| 37 mbar | Propane | |||||||||||||||||
| BE, BG, CY, CZ, DK, EE, FI, FR, GB, GR, HR, HU, IT, LT, LU, LV, MT, NL, NO, RO, SE, SI, SK, TR | 28 - 30 mbar | Propane, butane or their mixtures | \( I_3B/P (30) \) | 21.2 kW | 1543g/h | 1515g/h | 14.5 kW | 1055g/h | 1036g/h | 2.9 kW | 211g/h | 207g/h | 3.8 kW | 277g/h | 272g/h | |||
| PL | 37 mbar | Propane, butane or their mixtures | \( I_3B/P (37) \) | |||||||||||||||
Inspiuter hoofobrander - Injecteur bruleur principale - Injector main burner - Injaktor Hauptbrenner - Iniettore bruciatore capo - Inyector para hornilla principale - Injector queimador principal - Inspruntningspumpen head gasbrännaren - Den store bränders dysetype - Suutin paapoltitmen - Tryska hlavnich hofäku - Tryska bočných horakov
Type - Typ - Tipo - Typpi: 0.85
Inspirer zijbrander - Injecteur brûleur latérale - Injector side burner - Inj达标ier Seitenkocher - Inlettore bruciatore latente - Injctor para hornilla lateral - Injctor queimador laterale - Inspruntingspumpen side gasbrännaren - Side braenders dysetype - Suutin sivupolttimen - Tryska bočniho hóráku - Tryska bočných hóákov - Type - Typ - Typpi: 0.85
Inspirer brandier achterkont - Injecteur brûleur arräre - Injillator rearburner - Inj达标ier Hintern Brenner - Inlettore bruciatore postiore - Injctor para hornilla trasaera - Injctor queimador retaguarda - Inspruntingspumpen bakhe gasbrännaren - Bageste braenders dysetype - Suutin takapoliti
men - Jmenovitá kapacita - Menovitá kapacita
A: Merk - Marque - Marke - Brand - Mapka - Značka - Mørke - Móρka - Marca - Kaubamärk - Tuotemerkki - robna marka - Márka - Zenklas -
Prezime - Merke - Marka - Marca - Marca - Značka - Znamka - MarkeB : Model - Appliance model - Modell des Gräte - Appliance model - Monan va upena - Model zažanje - Maskinops model - Montàto gauvurišć -
. Modele de aparato - Seadme model - Laitteen malii - model uredaja - A keszülék tipasa - Modele apareccchio - Prietaiso models - Icerics
modelis - Modell - Model stosowania - Modelo do aparelho - Modelul aparatului - Model zariadenia - Model naprave - Anordningsmodell
C: Land van bestemming - Pays de destination - Landsbezeichnung - Country Identification - Identifikation za Hcnpatra - Identifikace zemé - Identifikationsland - Xingou truoropongn - Identificador de pays - Binitihas - Maan tupinistus - drzava za identifikatiozi - Szamazási
Zrnnnnae - Iaennnnnnae - Aepaa 1000000000000000000000000000000000000000000000000000000000000000000000000000000000000

Home & Garden
Industrielaan 4
without side- and without rearburner - Nominae Kapazität ohne Seitenkochener und ohne Hintenbrenner - Capacita nominale senze brütsierten lateralis a posteriori . Consedido nominal sin herilla lateralis u trames . Consedido nominal com sueimodar laterali a retas guardes
- ciatore lare e postenire - Capacidone nominal sin Nomina lary y trasa - Capacidone nominal sem quimulaton e retaguarda
- Nominell Kapacitet utan den side och bakge gbrannaren - Nominel yderse udden side og baggeste brenderes - Mitoitett kapasiteet i lam
C€ 0063/18
0000
H: Nominaal vermog brander achterkant - Capacite nominale bruleur arriere - Nominal capacity rearburner Nomine Kapazitat Hinterbnren
Barbecook® is a registered trade mark of SAEY Home & Garden N.V. Industrielaan 4, B-8501, Heule (Kortrijk) Belgium