
D-BOOST650 3000 L/H - Booster pump TALLAS - Free user manual and instructions
Find the device manual for free D-BOOST650 3000 L/H TALLAS in PDF.
| Product Type | Automatic pressure booster |
| Brand | TALLAS |
| Model | D-BOOST650 3000 L/H |
| Applications | Domestic water supply, gardening, small agriculture, emergency |
| Absorbed power (P1) | 650 W |
| Useful power (P2) | 400 W |
| Supply voltage | 220-240 V ~ 50 Hz |
| Rated current | 3.11 A |
| Max. flow rate | 3000 l/h |
| Max. head | 39 m (3.9 bar) |
| Max. operating pressure | 6 bar |
| Max. suction depth | 8 m (priming < 3 min) |
| Diaphragm pressure tank | 18 liters |
| Connection | 1" M (suction and discharge) |
| Liquid type | Clean water, filtered rainwater, drinking water |
| Liquid temperature | 0 to +35 °C |
| Max. ambient temperature | +40 °C |
| Thermal protection | Yes, automatic restart after cooling (~15-20 min) |
| Protection rating | IP X4 |
| Insulation class | F |
| Net weight | 8.64 kg |
| Gross weight | 10.84 kg |
| Cable length | 1.5 m (type H07 RN-F) |
| Maintenance | Cleaning of suction filter and check valve |
| Warranty | 24 months (manufacturing defects) |
| Included accessories | Filter disassembly key, pressure gauge (integrated) |
Frequently Asked Questions - D-BOOST650 3000 L/H TALLAS
User questions about D-BOOST650 3000 L/H TALLAS
0 question about this device. Answer the ones you know or ask your own.
Ask a new question about this device
Download the instructions for your Booster pump in PDF format for free! Find your manual D-BOOST650 3000 L/H - TALLAS and take your electronic device back in hand. On this page are published all the documents necessary for the use of your device. D-BOOST650 3000 L/H by TALLAS.
USER MANUAL D-BOOST650 3000 L/H TALLAS
INSTRUCTIONS FOR INSTALLATION AND MAINTENANCE (GB)
4.1 Storage 2
4.2 Transport 2
4.3 Weight and dimensions 2
-
WARNINGS 2
-
INSTALLATION 3
- ELECTRICAL CONNECTION 3
- START-UP 3
-
PRECAUTIONS 4
-
MAINTENANCE AND CLEANING 4
10.1 Cleaning the suction filter 4
10.2 Cleaning the NRV 4
- TROUBLESHOOTING 4
FILLING THE EXPANSION VESSEL WITH AIR 5 - GUARANTEE 5
WARNING

Read all this documentation carefully before installation:
Take out the plug before any intervention. Absolutely avoid dry operation: the pump must be activated exclusively when it is immersed in water. If the water is finished, the pump must be deactivated immediately, taking the plug out of the socket.
Protect the electropump against inclement weather.
The pump is equipped with a thermal overload safety device. In the event of any overheating of the motor, this device automatically switches off the pump. The cooling time is roughly 15 to 20 minutes, then the pump automatically comes on again. If the overload cutout is tripped, it is essential to identify and deal with the cause of the overheating. See Troubleshooting.
1. APPLICATIONS
Self-priming centrifugal jet pumps with excellent suction capacity, even when gas is present in the water. Particularly indicated for water supply and pressure boosting in farmhouses. Suitable for small farming and gardening applications and for general hobby activity. Thanks to their compact and handy shape, they are also used for particular applications as portable pumps for emergency situations such as for drawing water from tanks or rivers.

These pumps cannot be used in swimming pools, ponds or basins where people are present, or for pumping hydrocarbons (petrol, diesel fuel, combustible oils, solvents, etc.) in accordance with the accident-prevention regulations in force. They should be cleaned before putting them away. See the chapter "Maintenance and Cleaning".
2. PUMPABLE LIQUIDS
Clean, free from solid bodies or abrasive substances, non-aggressive.
Table1
| Fresh water | ● |
| Rainwater (filtered) | ● |
| Clear waste water | ○ |
| Dirty water | ○ |
| Fountain water (filtered) | ● |
| River or lake water (filtered) | ● |
| Drinking water | ● |
Suitable
Not suitable
3. TECHNICAL DATA AND LIMITATIONS OF USE
Supply voltage: 220-240V, see electrical data plate
- Delayed line fuses (220-240V version): indicative values (Ampere)
Storage temperature: -10^ + 40^
Table2
| Model | Line fuses 220-240V 50Hz |
| P1= 650 | 4 |
Table 3
| Model | P1=650 | |
| Electrical data | P1 Rated absorbed power [W] | 650 |
| P2 [W] | 400 | |
| Mains voltage [V] | 1 ~ 220-240 AC | |
| Mains frequency [Hz] | 50 | |
| Current [A] | 3.11 | |
| Capacitor [μF] | 12.5 | |
| Capacitor [Vc] | 450 | |
| Hydraulic data | Max. flow rate [l/h] | 3000 |
| Max. head [m] | 39 | |
| Max. head [bar] | 3.9 | |
| Max. pressure [bar] | 6 | |
| Max suction depth [m/min] | 8 m / < 3min | |
| Range of use | Length of power cable [m] | 1.5 |
| Type of cable | H07 RNF | |
| Grade of motor protection | IP X4 | |
| Insulation class | F | |
| Liquid temperature range [°C] according to EN 60335-2-41 for domestic use | 0 °C / +35 °C | |
| Max. particle dimension [mm] | Clean water | |
| Max. ambient temperature [°C] | +40 °C | |
| Weight | DNM GAS | 1" M |
| Net/Gross weight approx. [kg] | 8.64/10.84 |

The pump cannot support the weight of the pipes, which must be supported in some other way.
4. MANAGEMENT
4.1 Storage
All the pumps must be stored in a dry covered place, with possible constant air humidity, free from vibrations and dust. They are supplied in their original pack in which they must remain until the time of installation.
4.2 Transport
Avoid subjecting the products to needless impacts and collisions.
4.3 Weight and dimensions
The adhesive plate on the packaging indicates the total weight of the pump and its dimensions.
5. WARNINGS

The pumps must never be carried, lifted or allowed to operate suspended from the power cable; use the handle provided.
The pump must never be allowed to run when dry
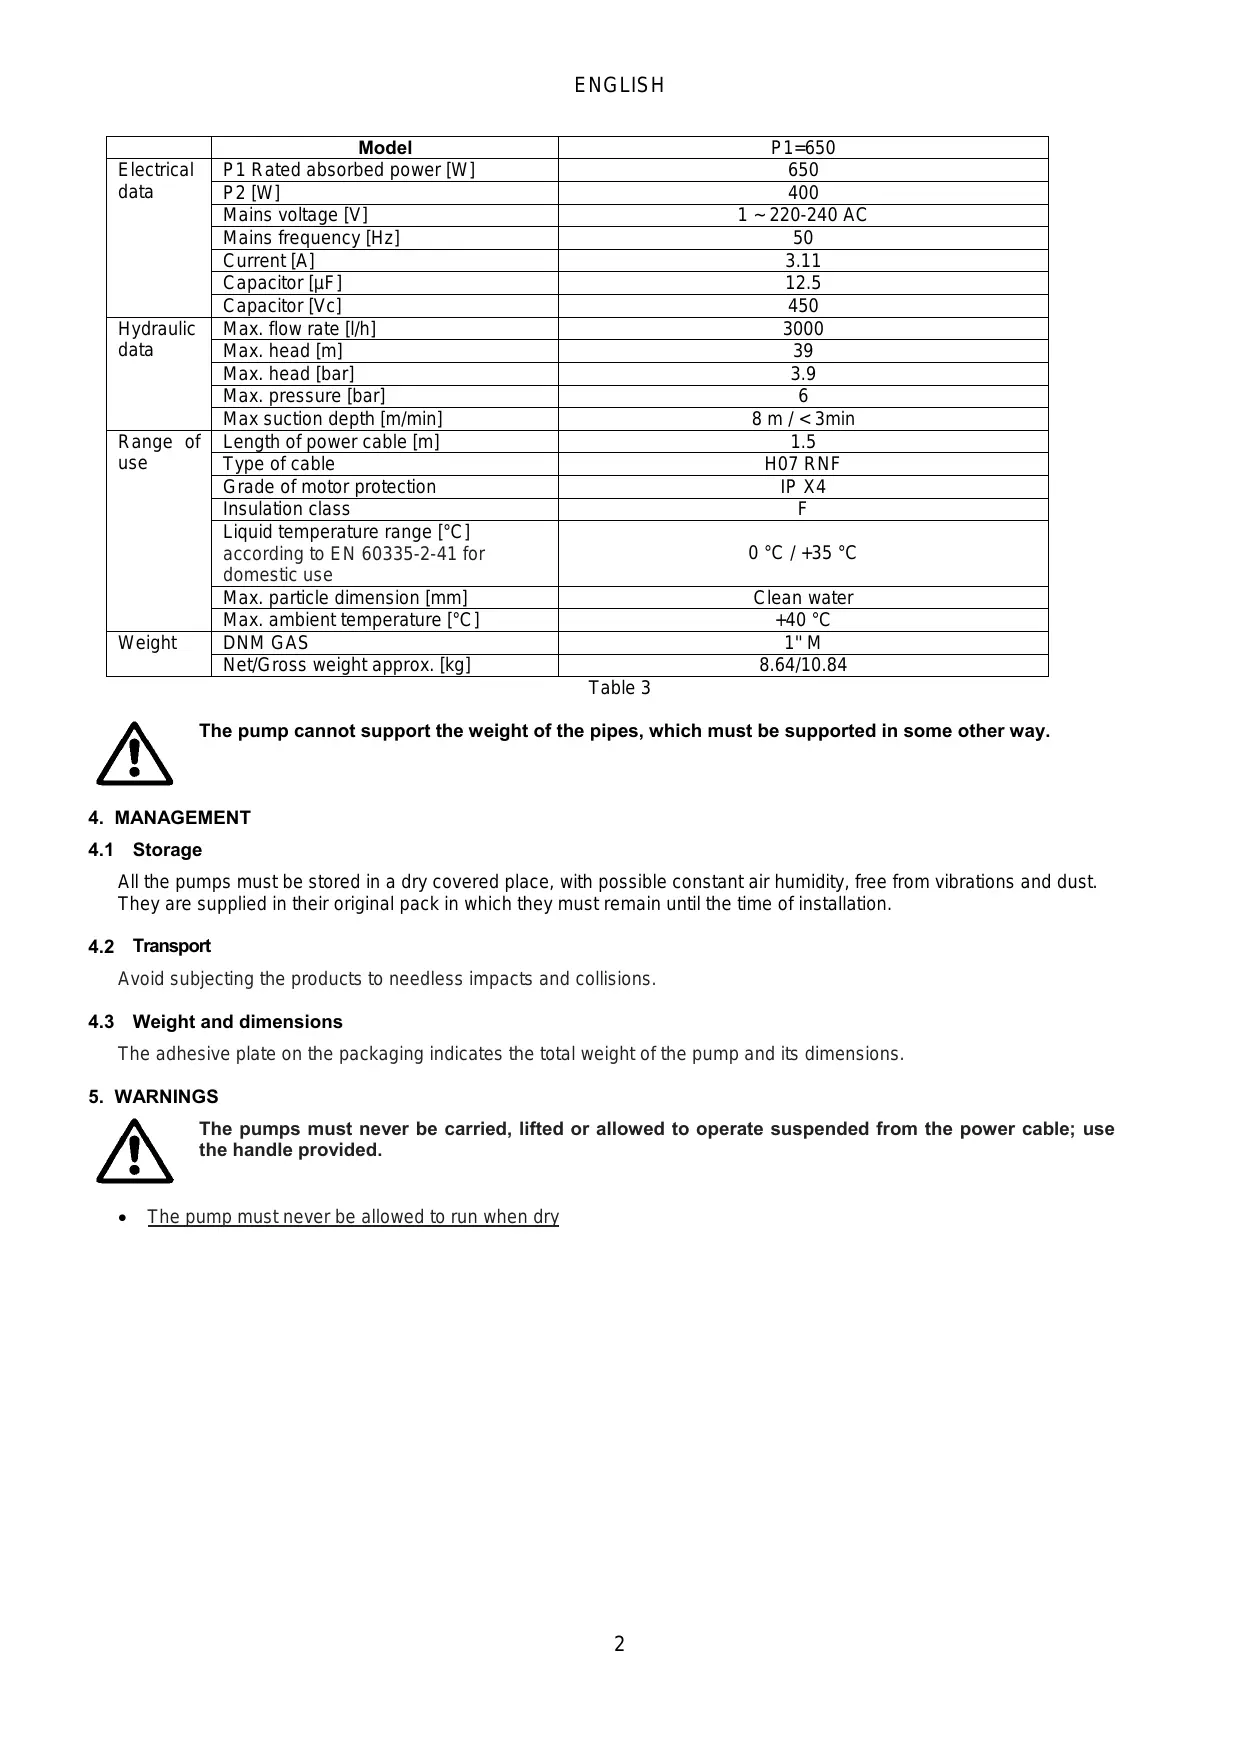
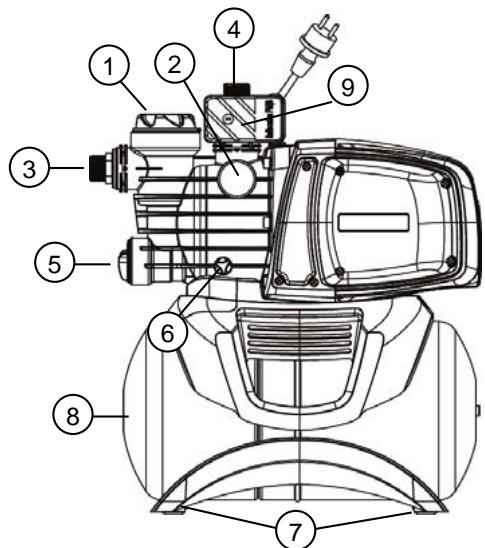
6. INSTALLATION
1 Pre-filter
2 Gauge
3 Swivel suction connection
4 Delivery connection
5 Integrated non-return valve
6 Drainage cap
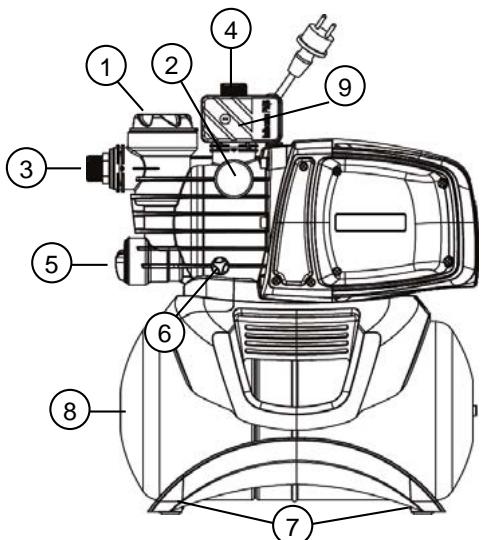
7 Vibration-damping rubber feet
8 Tank 18 I
9 Flow switch
The pump must be installed in a place protected from unfavourable weather conditions, and with an environment temperature not higher than 40^ .
The pump is provided with vibration-damping rubber feet, but in the case of fixed installations it is possible to remove them and provide anchorage to the base (7).
Do not allow the pipes to transmit excessive forces to the pump inlets (3) and (4), to avoid creating deformations or breakages.
It is always good practice to place the pump as close as possible to the liquid to be pumped. The pump must be installed only in horizontal position.
The pipes must never have an internal diameter smaller than that of the pump inlets; on intake, the pump is provided with a filter (1) and a non-return valve (NRV) (5).
For suction depths of over four metres or with long horizontal stretches it is advisable to use an intake hose with a diameter larger than that of the intake aperture of the pump. To prevent the formation of air pockets, the intake hose must slope slightly upwards towards the pump. Fig.2
If the suction pipe is made of rubber or flexible material, always check that it is of the reinforced vacuum-resistant type to avoid shrinkage due to suction.
In case of a fixed installation, it is recommended to fit a closing valve on both the suction side and the delivery side. This allows closure of the line upstream and/or downstream from the pump, useful for service and cleaning operations or for periods in which the pump is not in use.
The pump has a rotating inlet to facilitate installation (3) and (4).
In the case of flexible pipes, if necessary, use a bend fig. 1 and the gardening kit composed of a PE pipe and a kit of couplings with lance. These are not supplied, but can be bought separately.
In the case of very small dirt, as well as the integrated filter (1), it is recommended to use a pump inlet filter fitted on the suction pipe.
- Do not subject the motor to excessive starts/hour; it is strongly recommended not to exceed 20 starts/hour.

The diameter of the suction pipe must be greater than or the same as the diameter of the pump inlet, see Table 3.
7. ELECTRICAL CONNECTION

Ensure that the mains voltage is the same as the value shown on the motor plate and that there is the possibility of making a good earth connection. Follow the indications on the technical data plate and in this manual, table 3. The length of the power cable on the pump limits the installation distance, if an extension is required, make sure that it is of the same type (e.g. H05 RN-F or H07 RN-F depending on the installation) see tab.
8. START-UP

Do not start the pump without having completely filled it with liquid, about 4 litres.
If the water supply is finished, take the plug out of the socket immediately and switch off the pump. Avoid dry running.
- Before starting, check that the pump is properly primed, filling it completely, with clean water, through the filling hole, after having removed the filling cap of the transparent filter (1), with your hands or with the appropriate tool provided. This ensures that the mechanical seal is well lubricated and that the pump immediately starts to work regularly. Dry operation causes irreparable damage to the mechanical seal.
- The filling cap must be screwed on accurately until it stops (1).
- Insert the plug of the power cable in a 220-240 V power socket. Attention! The pump motor will start immediately, the water will start to come out after a maximum time of 3 minutes, depending on the depth of the water level, in the well or cistern.
- The pump is automatically deactivated when the maximum pressure is reached. If, when using water, the pressure falls below the minimum value, the pump is activated automatically. See Tab.3.
- To switch off the pump completely, take the plug out of the power socket.
In case of problems with the priming, repeat the handling until all air in the suction is disappeared.
9. PRECAUTIONS
RISK OF FROST: when the pump remains inactive at a temperature lower than 0^ , it is necessary to ensure that there is no water residue which could freeze, causing cracks in the plastic parts. If the pump has been used with substances that tend to form a deposit, or with water containing chlorine, rinse it after use with a powerful jet of water in order to avoid the formation of deposits or encrustations which would reduce the characteristics of the pump.
10. MAINTENANCE AND CLEANING
In normal operation the pump does not require any type of maintenance. In any case, all repair and maintenance work must be carried out only after having disconnected the pump from the supply mains. When restarting the pump, ensure that it has been correctly reassembled, so as not to create a risk for persons and property.
10.1 Cleaning the suction filter
Fig.3
- Switch off the electric power supply to the pump.
- Drain the pump, opening the drainage cap (6), after having first closed the gate valves upstream (if present).
- Unscrew the cover of the filter chamber, with your hands or with the appropriate tool provided
- Extract the filter unit from the top
- Rinse the cup under running water and clean the filter with a soft brush.
- Reassemble the filter, performing the operations in inverse order.
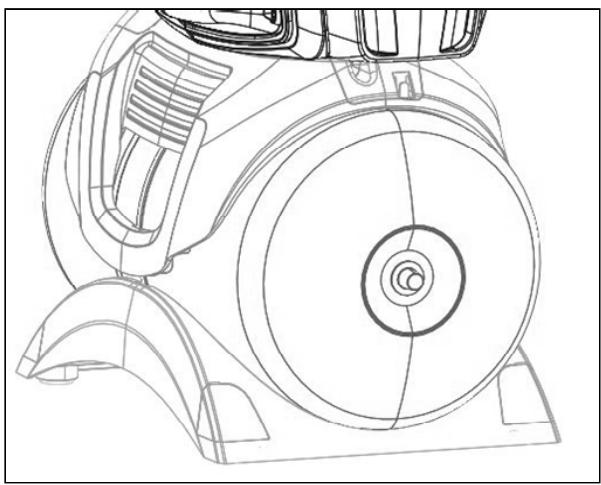
10.2 Cleaning the NRV
(Fig.4)
- Switch off the electric power supply to the pump.
- Remove the cap of the NRV (5) with the accessory provided.
- Remove the NRV check valve and clean it to remove any dirt.
- Assemble the parts, proceeding in inverse order to disassembly.
11. TROUBLESHOOTING

Before taking any troubleshooting action, disconnect the pump from the power supply (i.e. remove the plug from the socket). If there is any damage to the power cable or pump, any necessary repairs or replacements must be performed by the manufacturer or his authorized customer support service, or by an equally-qualified party, in order to prevent all risks.
| FAULT | CHECKS (possible cause) | REMEDY |
| 1. The motor does not start and makes no noise. | A. Check the electric connections. B. Check that the motor is live. C. Check the protection fuses. D. Possible intervention of thermal protection | C. If they are burnt-out, change them. D. Wait about 20 min until the motor cools. Check and eliminate the cause. N.B.: If the fault is repeated immediately this means that the motor is short circuiting. |
| 1. The motor does not start but makes noise. | A. Ensure that the mains voltage is the same as the value on the plate. B. Look for possible blockages in the pump or motor. C. Check that the shaft is not blocked. D. Check the condition of the capacitor. | B. Remove the blockage C. Use the tool provided to release the shaft. D. Replace the capacitor |
| 3. The motor turns with difficulty. | A. Check the voltage which may be insufficient. B. Check whether any moving parts are scraping against fixed parts. | B. Eliminate the cause of the scraping. |
| 4. The pump does not deliver. | A. The pump has not been primed correctly. B. The diameter of the intake pipe is insufficient. C. NRV non-return valve or filter clogged. | A. Fill the pump with water and prime it, taking care to let air out by unscrewing the vent cap. B. Replace the pipe with one with a larger diameter. C. Clean the filter and, if this is not sufficient, the NRV. |
| 5. The pump does not prime. | A. Suction pipe is taking in air.. B. The downward slope of the intake pipe favours the formation of air pockets. | A. Eliminate the phenomenon, checking that the connections and the suction pipe are airtight, and repeat the priming operation. B. Correct the inclination of the intake pipe. |
| 6. The pump supplies insufficient flow. | A. The suction pipe is clogged. B. The impeller is worn or blocked. C. The diameter of the intake pipe is insufficient. | A. Clean the suction pipe.. B. Remove the obstructions or replace the worn parts. C. Replace the pipe with one with a larger diameter. |
| 7. The pump is activated and deactivated too frequently | A. Damaged diaphragm of the expansion vessel B. The expansion vessel pressure is too low | A. Have the diaphragm replaced by an authorised service technician. B. Load the expansion vessel to 1.6 +-0.2 bar. |
| 8. The pump vibrates and operates noisily. | A. Check that the pump and the pipes are firmly anchored. B. There is cavitation in the pump, that is the demand for water is higher than it is able to pump. C. The pump is running above its plate characteristics. | A. Fix the loose parts more carefully. B. Reduce the intake height or check for load losses. C. It may be useful to limit the flow at delivery. |
FILLING THE EXPANSION VESSEL WITH AIR
The pressure in the expansion vessel must be approx. 1.6 + -0.2 bar. It is preloaded in the factory, so at the first start-up no operation is required.
To fill it with air you need an air pump or a device for inflating tyres with a pressure gauge (manometer).
- Unscrew the protective cover.
- Apply the air pump or the tyre inflating device to the valve of the boiler, pump air until the pressure gauge indicates about 1.6 + 0.2 bar.
- Screw the protective cover back on.
12. GUARANTEE

Any modification made without prior authorisation relieves the manufacturer of all responsibility. All the spare parts used in repairs must be authentic and all accessories must be authorised by the manufacturer, in order to ensure maximum safety of the machines and of the systems in which they may be installed.
This product is covered by a legal guarantee (in the European Community for 24 months from date of purchase) against all defects that can be assigned to manufacturing faults or to the material used.
The product under guarantee may, at discretion, either be replaced with one in perfect working order or replaced free of charge if the following conditions are observed:
- the product has been used correctly in compliance with the instructions and not attempt has been made to repair it by the buyer or by third parties.
- the product has been consigned to the outlet where it was purchased, attaching a document as proof of purchase (invoice or cash register receipt) and a brief description of the problem found.
The impeller and parts subject to wear are not covered by the guarantee. Intervention under guarantee does not extend the initial guarantee period in any way.
INDICE
- APPLICATIONI 6
- LIQUIDI POMPABILI 6
- DATI TECHNICI E LIMITAZIONI D'USO 6
- GESTIONE 7
3. TEXHNUECKN DAHHN I OPGAHNUEHEN 3A YIOTPEBA
3axpaHbAso HnpeXeHne: 220-240V, BIX KndeHT. Ta6ena C eJekTpuecknTe daHHI
- Празиелю Линяс c OTLOXeHo DeiCTBne (Верся 220-240V):празирн CTоHOCt (Amпери)
- TempepaTypa Ha cklaInpaHe: -10^ + 40^
Tábniça 2
FYLDNING AF EKSPANSIONSBEHOLDEREN MED LUFT
2. SIURBIMUI TINKAMI VANDENYS
Svarus, be kietu ir abrazyvini daleliu, chemiskai neutralus.
9. VOORZORGSGMAATREGELEN
Adequado
Nao adequado
3. DADOS TECNICOS E LIMITAÇÖES DE USO
- CΦEPbI PnIMHeHnI 107
- IPEKAYIBAEMbIE KNDKOCTN 107
- TEXHnueCKNE DAHHbIe I OPGAHUeHnB 3KcPJIyATAUIN 108
- 3KcJIyATAUJRA 108
4.1 CknaIropoBaHne 108
4.2 TpansopTnpOBka 108
4.3 Bec npa3mepbl 108
- IPEyIpeXeHn 108
6.MOHtAX 109
7. 3JIeKTPnueCKOE NOJKnIOUeyHne 109
8. 3Anyck 109
9. IPEIOCTOPOXHOCTN 110
- TEXHnueCKOE OBCJIyXKBAHNE I YNCTKA 110
10.1 Ouchstka fIbTa BcAsBaHna 110
10.2 Ynctka NRV 110
- ПОИСК ИССРABHOCТЕ … 110
HANOJIHNTE BO3dYXOM PACUINPTEJbHbI BAK 111
12.「APAHTIN 112
PPEyPPEKDEHNA

Ipeed MOHTaxkom yctpoiCTBa BHIMaTeIbHo npouHtaiTe daHHyIO DOKymeHTaunIO.
Ipeed IIO6oI onepauee OTKNHOHTe Bnky. KaTeOpHueckn n36eAaTe pa60TbI Hacoca 6e3 BOdbl.
PpeOxpaHbHaCocOTBnHnnaNoOrDhbxycNoBn.
3aunTa ot neperpy3ok. Hacoc obopydoBaH temnepaTypHbIM 3aunTHbIM yctpoCTBOM. Pnp neperpeBe DbrarTeJI 3aunTHoe yctpoIcTBo aBTOMaTneCKn BblKnHouaET HACOC. BpeM OXnaKdEHH coCTabJrEe OKO10 15-20 MHN., NO nCTeueHnn KOtOpbIX HACOC aBTOMaTneCKn BKNoUaETc. IocNe cpa6aTbIBaHnN 3aunTHoro yctpoIcTBa Heo6xOJMo HaHTn npuHy, npNBEdyU K cpa6aTbIBaHnU, n ycTpaHnt b ee. CmToPr «Ponck HencnpabHocteN».
1. CΦEpblПРИМЕHENHЯ
LcHtpo6eKhIe cTpyHbIe camO3aINBaIOUmeCn HAcOsbl CxopoSeB BCAsbIbAOUeC nOCO6bHOCTbTO TaKKe pIn HaJIuHr Ra3a B BOe. Oco6eHNO XopoIo NOxODHT Ia N IOaUn B0dbI N HAHeTaHn DABNeHn B 6bITOBbIe yCTaHOBKn. POnXoHNT dN He6oJbWo fepMbI IN CaIOBODCTBA, 6bITOBbIX ABAPINbIX CNTyaUmN I 6bITOBORO pPIMHeHn B CEJOM. BlaorDaap KOMnakTHOH KOHcTpyKUIN MAnHeBpeHHocTn 3TN HAcOsbl HaxOJAT CBOE pPIMHeHne B KaueCTBe nepeHoCHbIX HACOCOB dIra ABAPINbIX CNTyaUmN, OTKaUINBaHn BOdbI IN3 pe3epByapOB INI peK.

3TN HAcocbI HeIb3r IcNoIb3OBaTb B 6acceHax, npydx, BOoEmax B npncytCTBn JIOe NIN dIg
obpa60TK yIeBOOpOOB (6eH3nH, dI3eJIb, rOpUChne Macna, pactBOpNTeN i T.n.) corIaCHO
HopMaTHbAM npOTNB HeCuaCTNbIX CnyaEB, DeIcTByUOuM B 3ToI obNaCTN. Peped nomeueHem Ha
xpaHeHne cIeDyET Ounchntb Hacoc. Cm. rIaby "Texo6cnjXnbAHne n OunchTk"
2. ПЕPEKAчИBAЕMbIЕЖИДКОТN
UcTaa,63 TbePbIX NJIa 6pa3NBbIX YactnIe,HearpeccBnaJ.
Hacoc HNKoIa He IOnKeH pa60TaB BCxyH.
6. MOHTAX
1PpeBapnteHbIyΦnIbTp
2 MaHOMeTp
3 OpneHTiPyemoe CoeHHeHne BCaCbBaHn
4 CoeHHHeHne noJaun
5 BCTpoEHnBn HeBO3BpaTHbN KJanaH
6Пробka сиИВа
7 Pe3nHOBbIe Bn6poracIzne HOxKn
8 Pe3epByap 18 n.
9 PacxoDomep
3NeKtpoHaocOdoJKeH yCTaHaBJIbBaTcB MeCTe, 3aUHHeHHOM OT HEnOrOdbI n Tempepatyoi OkpykaioSei cpebl He bIwe 40^
Hacoc obopydoban BnBporaczIMM ONopamN, HO B cIyue HepepeHOChOYcTaHOKMOJHO CHaTb Ix N IpeDyCMOTpeTB KpenJIeHne K OOnOpHOMy OCHOBAHIO (7).
I36eai Tepeaun 136bItoHoro yCUNIA O Tpy6 K yCTbAM HAcoca (3) n (4), YTO6bI He CO3daBaTb DeΦopMauN IIN NOJOMOK.
HeN3MeHNO XopoIIM npaBnIOM YBJIeTcYCTaHaBJIbBaTb Haoc KaKdKOCTH.
Hacoc DoJxhen 6bItb yctAHOBnEIN NCKJIIOHTeJIbHO B TOpN3OHTaJIbHOM NOJIOXKeHm.
Tpy6bI HNKoIgda He doJIxHbI IMeTb BHyTpEHnI dJaMeTp MehIe, Yem yctbI 3JIeKtpOHacOca I BCaCbIBaHnI HaOcO, HAcoc obOpyIDoBaH qJIbTpOM (1) n HeBO3BpaTHbIM KJIanaHOM (NRV) (5).
Дяглбны BCasibAHn, npeblyaIOSeYteIpe MeTpA, nIN npH NaJIHyN DInHHbIX TOpN3OHTaJIbHbIX OTpe3KOB peKOMeHdyETcN cNoJIb3OBAtB Tpy6y BCasIBAHn C dNaMeTpOM, bJbIM dNaMeTpA BCacbIAUoIero OTBepCTNЯ 3JIeKtpOHACoca. Bo n36exKaHne O6pa3OBAHn BO3dUshbIX MeKOB BO BCacbIAUoIeM Tpy6oPpOBoDE npedymOTpeT he6OJIbIoN noDbem BCaslbAIOSeY Tpy6b B CTOpOHy HAcoca. Pnc.2
Ecni Tpyba BcabBaHn BblIOJIHeHa n3 pezHHb IIN rI6KOro MaTePnAna, Bcerda npOBepaTe, UTO OHa yKpeJIeHoro Tnna, BbldepXIBaIOUeBO BakyyM, UTO6bl N36EkaTb cyKeHn ppi BCacBbAHnn.
B cnyuae HepehochOn yctaHOBN peKomeHdyETcM OHTnPOBaT Klaanah 3aKpbITnKa Ka H CTOpOe BCacbBAHn, TaK n Ha HapnoH CTOpOHe. 3TO N03BOJnE T3aKpbIbTa IINHIO nepeh HAcOCOM IINI NOcNe Hero, YTO Tpe6yETc npi npoBeHn Texo6cNoKBaHn I OCHTkn IIN B cNYuae HeNCNOJIb3OBaHn HAcoca B TeueHne OnpeJeHnHO nepoJa. Hacoc Ochauen BpaauoUmCM BxODom IIN oBJeHn yCTaHOBN. (3) n (4).
B cnyuae 7nnaHROB, ecnn Heo6xOdIMo, nCnoIb30BaTb KOJIeHO pnc.1 IN KOMPJIeKT caIOBOJcTB coCTOHT n3 IJNAHROB IIN KOMPJIeKT C HAKOHeuHnikOM He NocTabJraETcR, IN HYKHO NOKyNaTb OTDeJIbHO.
B npncytcbnn 3aqr3HeHn He60nbux pa3MepOB, peKOMeHyeTcN cNoIb3OBAtB, NOMMO nHTerprpOBaHHoro fNbtpa (1), BxOdHn OfNbTp HacOca, MOHTnpOBaHHbH Na IaHr BCacbBaHna.
He noDBepraTe DnBraTeIb N36bIToHOMy KOJIuYeCTBy 3aNyCKOB/YacOB, peKOMeHNdyETcR He npEByIaTb 20 3aNyCKOB B yac.

DnAmEtTp Tpy6bI BCacbIBaHn IdoJxeh 6bItb 6oJbWe nn paBhIM, Yem DnAmEtTp yCTbY 3NeKtpoHaocca, cm. Ta6JInuy 3.
7. 3ЛЕКТРИСЕСКOE NOДКЛЮЧЕНЕ

Поберпь, утоны habръся сети элктуponитыня COOTBECTBOBaNo Hanръсяю, уka3aHHOMу Ha 3aBoDCKоТаБЛчКe DBnIgATEJЯ, И утоныsecutiveи BO3MOxHNo ПОИЗВECTN HADJIEXKAUEE COEДИHEHIE 3A3EMJIЕНЯ. Былольг Te yka3aHЯ, пивебе"Hьile Na texhnuecko Ta6JIuKe n B pykoBoDcTBe B ta6JInce 3.
He BkIIOuayaTe Haoc He 3aONHnB ero nonHOctbO xNIOKcOCTbO, OKONo 4 NITPOB.
Ecnn nctouuntc rnpablnueckn pecypc, HemeJeHNO OTCoeHNHTe BnIky, BbIKNIOuH Nacoc. IpeDoTbpaaTe paobTo 6e3 Bobl.
I3dJIe IIO rapaHTnMoKet 6bITb 3aMeHeHO Ha dpyroE bpaOoHc COCTOHHN
IINI 6ecnIaTHO OTpeMOHTnpoBaHO npi coBIOJeHm CneJeUOnx ycIobN:
INNEHÄLLSFÖRTECKNING
- ANVÄNDNINGSOMRÄDEN 133
- VÄTSKOR SOM KAN PUMPAS 133
- TEKNISKA DATA OCH ANVÄNDNINGSBEGRÄNSNINGAR 133
- HANTERING 134


- WARNING
- APPLICATIONS
- PUMPABLE LIQUIDS
- TECHNICAL DATA AND LIMITATIONS OF USE
- MANAGEMENT
- Storage
- Transport
- Weight and dimensions
- WARNINGS
- INSTALLATION
- ELECTRICAL CONNECTION
- START-UP
- PRECAUTIONS
- MAINTENANCE AND CLEANING
- Cleaning the suction filter
- Fig.3
- Cleaning the NRV
- (Fig.4)
- TROUBLESHOOTING
- FILLING THE EXPANSION VESSEL WITH AIR
- GUARANTEE
- INDICE
- TEXHNUECKN DAHHN I OPGAHNUEHEN 3A YIOTPEBA
- FYLDNING AF EKSPANSIONSBEHOLDEREN MED LUFT
- SIURBIMUI TINKAMI VANDENYS
- VOORZORGSGMAATREGELEN
- DADOS TECNICOS E LIMITAÇÖES DE USO
- PPEyPPEKDEHNA
- CΦEpblПРИМЕHENHЯ
- ПЕPEKAчИBAЕMbIЕЖИДКОТN
- MOHTAX
- 3ЛЕКТРИСЕСКOE NOДКЛЮЧЕНЕ
- INNEHÄLLSFÖRTECKNING
Brand : TALLAS
Model : D-BOOST650 3000 L/H
Category : Booster pump