USER MANUAL Powerline HAYWARD
SAVE THIS OWNER'S MANUAL

WARNING - Read and follow all instructions in this owner's manual and on the equipment. Failure to follow instructions can cause injury.
WARNING - This document should be given to the owner of the swimming pool and must be kept by the owner in a safe place.
WARNING - This appliance is not intended for use by persons (including children) with reduced physical, sensory or mental capabilities, or lack of experience and knowledge, unless they have been given supervision or instruction concerning use of the appliance by a person responsible for their safety.
WARNING - Children should be supervised to ensure that they do not play with the appliance.
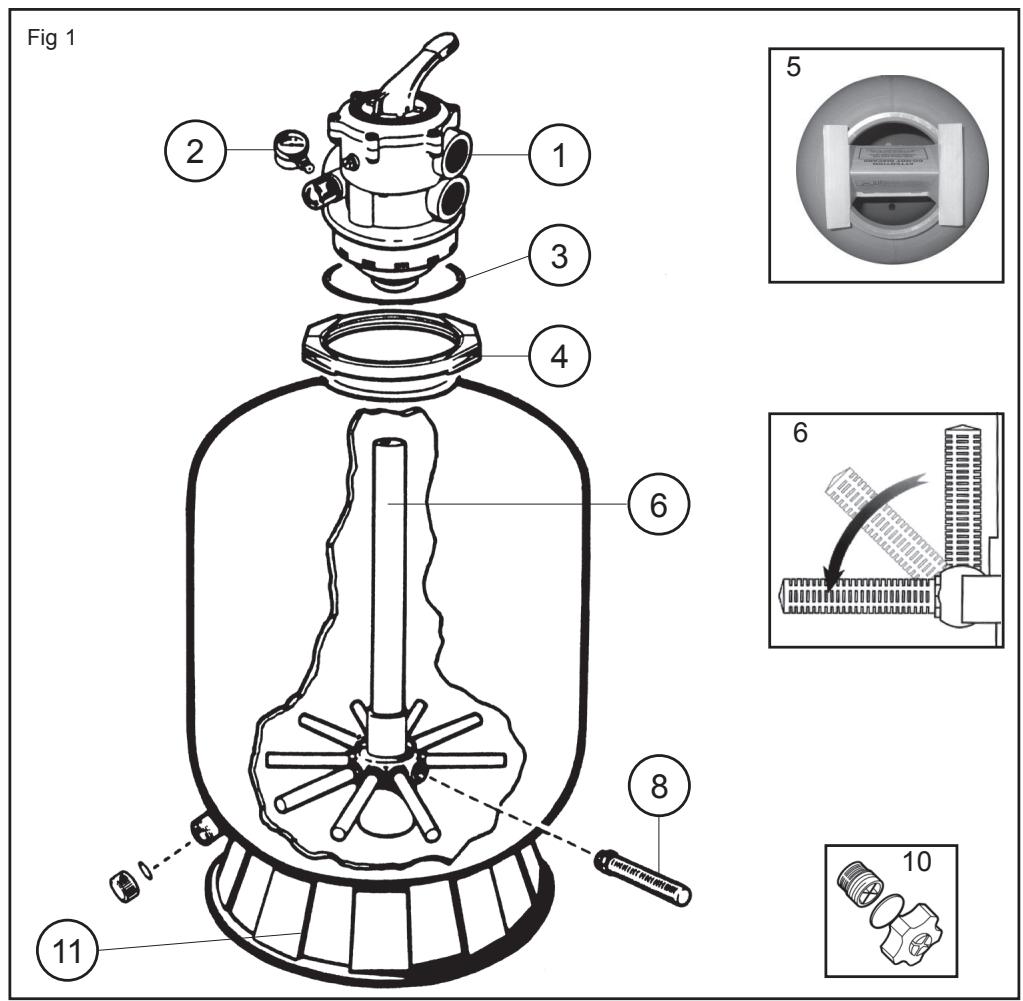

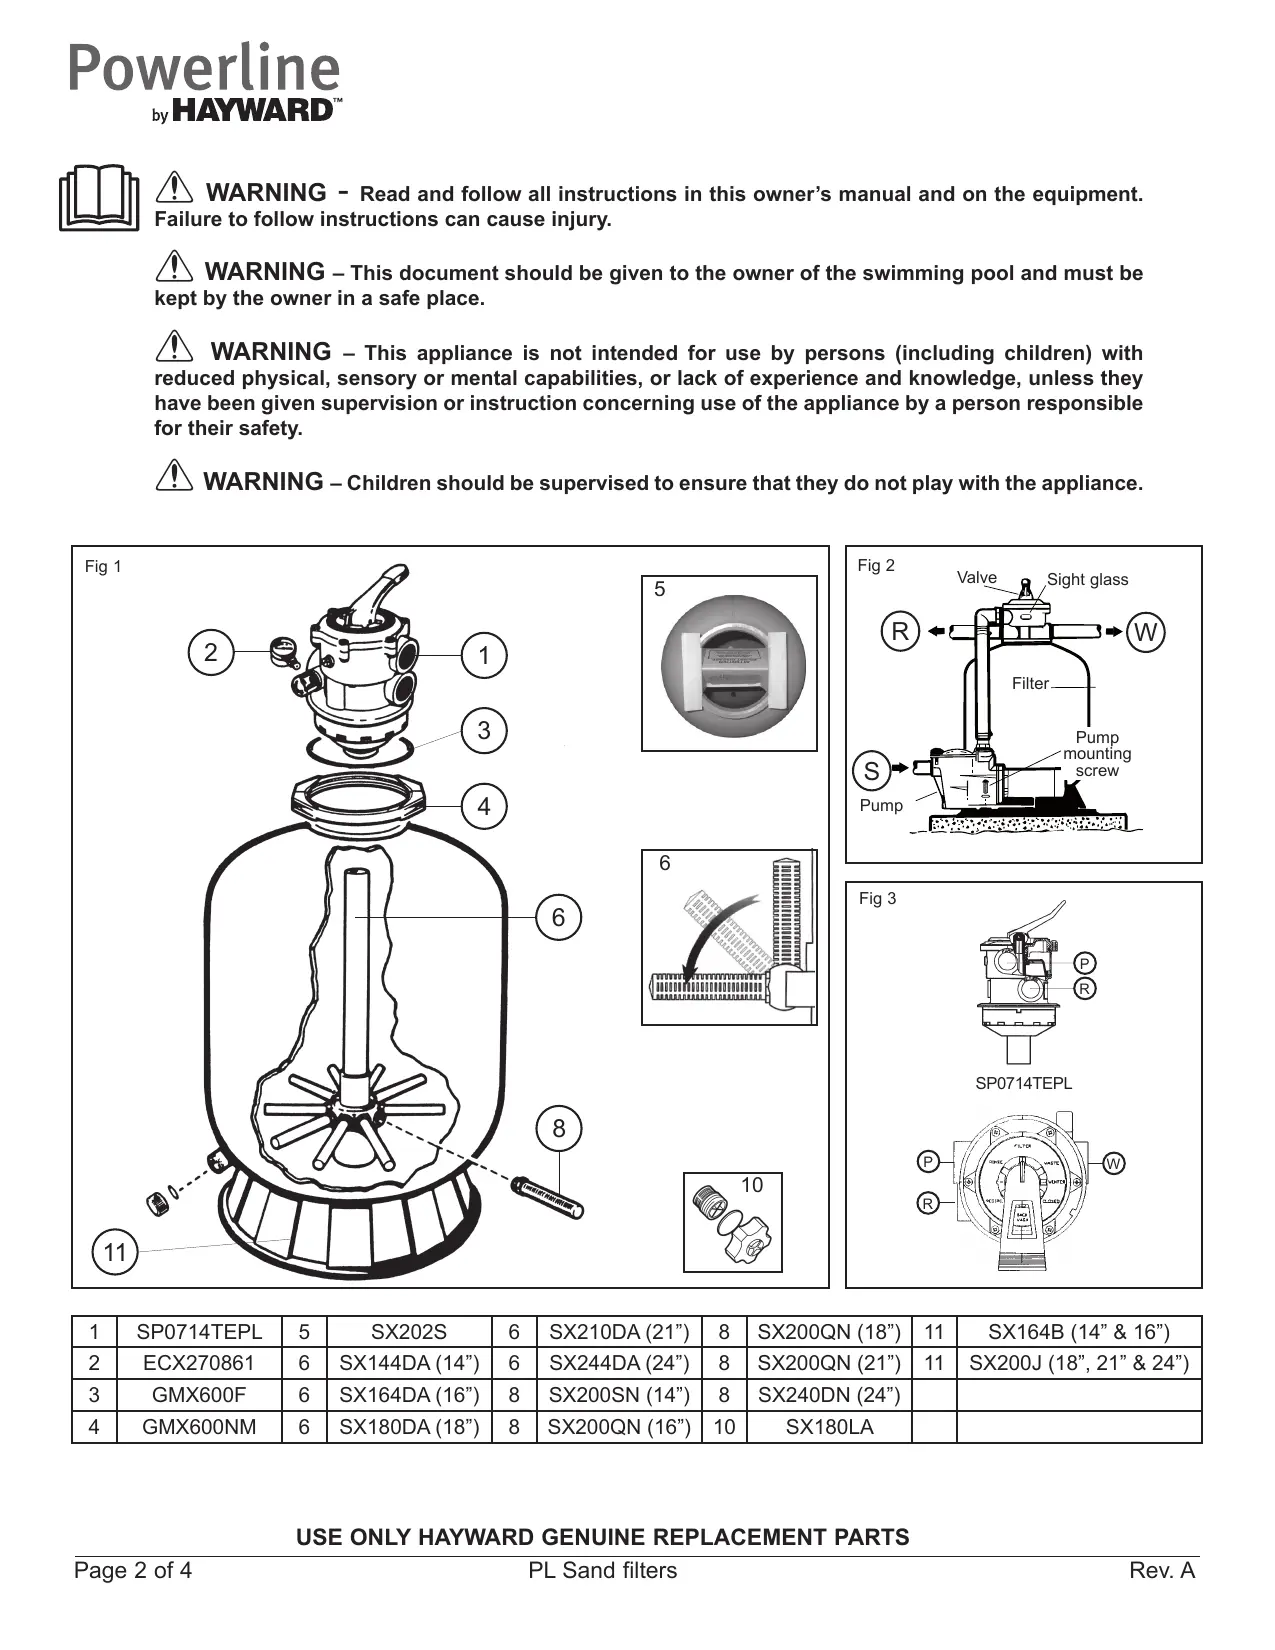
| 1 | SP0714TEPL | 5 | SX202S | 6 | SX210DA (21") | 8 | SX200QN (18") | 11 | SX164B (14" & 16") |
| 2 | ECX270861 | 6 | SX144DA (14") | 6 | SX244DA (24") | 8 | SX200QN (21") | 11 | SX200J (18", 21" & 24") |
| 3 | GMX600F | 6 | SX164DA (16") | 8 | SX200SN (14") | 8 | SX240DN (24") | | |
| 4 | GMX600NM | 6 | SX180DA (18") | 8 | SX200QN (16") | 10 | SX180LA | | |
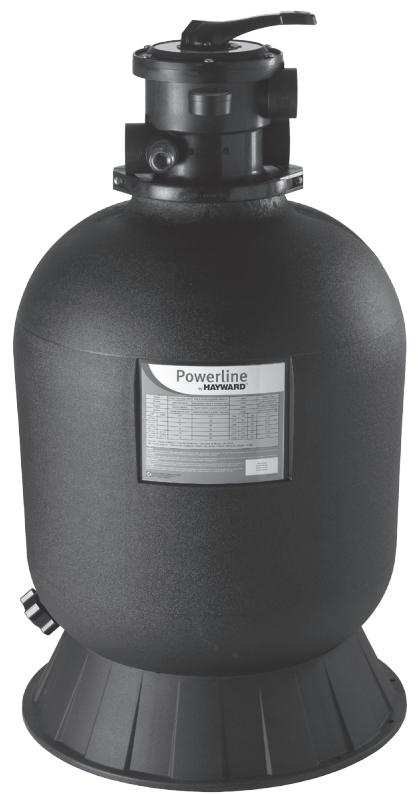
You have just become the owner of a sand filter, sand filter base and multiport valve (see figure 1).
OPERATION
Your filtration system uses special sand designed to trap impurities in the pool water. The sand is poured into the tank and acts as a permanent filtration system. The pump draws in the unfiltered pool water, which contains impurities in suspension and feeds it to the multiport control valve. When the water flows through the sand, the impurities are trapped there and the water that returns to your pool is filtered.
INSTALLATION
- Locating the filter
Find a clean, level spot. The top of the filter must be at least 1.5m distant from the water level. Place the filter so that the piping, the valve (1), and the drain plug (10) are easy to reach. This will make servicing and winterizing easier.
- Assembling the pump
Assemble the pump and its mount with the filter as indicated by the manufacturer's instructions.
- Filling the filter
The sand is put in through the opening in the top of the filter.
a. Place the centre tube (6) on the bottom of the tank and cover the opening in the top of the tube with funnel (5) provided for the purpose, to prevent any sand getting in it during filling. Make sure that the drain plug (10) is in place. All laterals (8) must be in the down position.
b. Half-fill the filter with water, then pour in the required quantity of sand (Cf. table on label).
Check that the centre tube (6) remains straight. The surface of the sand should be leveled and reach the middle of the filter.
c. Remove the funnel (5).
4. Assembling the valve
Place the valve (1), with its gasket (3), on the top of the filter.
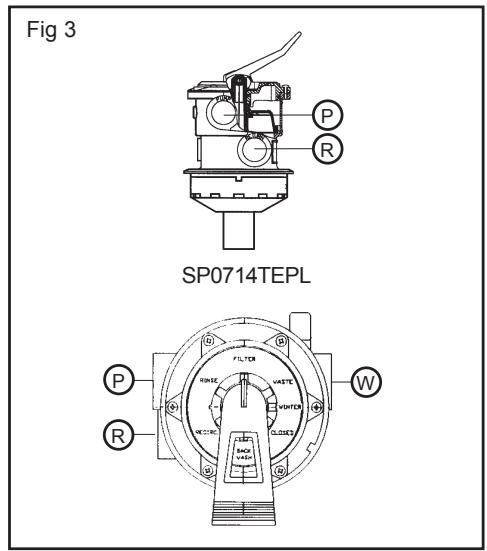
a. Make sure that the "PUMP" outlet of the valve its towards the pump. Then attach with the clamp (4).
b. Remove the black plastic screw on the side of the valve and replace it with the pressure gauge (2). Screw in by hand without forcing.
c. Connect the "PUMP" outlet (P) of the valve to the top outlet of the pump as indicated by the manufacturer's instructions
5. Connecting the valve
Then simply connect the pipes from the pool (cf. fig. 2) and from the skimmers (S) to the bottom port of the pump, on the strainer side, the discharge pipes to the valve port marked “RETURN” (R), and the drain connection to the valve port marked “WASTE” (W)
- Make the electrical connections of the pump as indicated by the manufacturer's instructions.
- To avoid leaks, make sure that the drain plug (10) in place and that all connections are tight.
Note 1: Do not force when screwing the connection end fittings into the valve unions.
Note 2: Coat the male threads with Teflon.
STARTING UP
IMPORTANT: ALWAYS STOP THE PUMP BEFORE OPERATING THE MULTIPORT VALVE.
- Check that all connections are tight and that the filter contains just the right amount of sand.
- Set the valve to "BACKWASH". Always lower the handle before turning.
- Start the pump as indicated by the manufacturer's instructions. Check that water flows normally in the circuit.
WARNING: All suction and discharge valves must be open when the pump is started. Otherwise, there is a risk of property damage, grave injury, or death.
Once the water flows smoothly, let the pump run for at least another 2 minutes. This backwash is recommended to eliminate any impurities or fine particles from the filtering sand.
- Stop the pump and set the valve to "RINSE". Restart the pump and let run until the water becomes clear in the sight glass (about a minute).
- Stop the pump and set the valve to "FILTER". Restart the pump and filtering starts. Adjust the inlet and outlet valves for the desired water flow.
- Carefully note the pressure reading at that time and the position of the needle on the pressure gauge. As the filter operates, impurities are retained and the pressure increases in the tank. When it exceeds the initial pressure (clean filter) by 10 PSI (0.7 bars or kg/cm^2 ), the filter must be backwashed.
Note 1: When your pool's water is cleaned for the first time, it may be necessary to backwash the filter frequently: the quantity of impurities is likely to be large.
Note 2 : Clean the pre-filters of the pump and skimmers regularly to ensure trouble-free operation of your filtration system Note 3 : Installations including heaters or cleaning systems with nozzles or tentacles protruding from the walls are highly sensitive to hydraulic rams because they operate at high pressure. The installer must do everything necessary to prevent hydraulic rams in the installation.
FUNCTIONS OF VALVE AND FILTER
FILTER
Set the valve to "Filter" for normal filtration (10 to 14 hours a day).
BACKWASH
For cleaning filter. When filter pressure gauge rises 10 PSI (0.7 bars or kg/cm^2 ) above start-up (clean pressure) Run the pump until the water in the sight glass is clear. Stop the pump about 2 minutes later and set the valve to "Rinse", when this position exists.
RINSE
With the valve set to "Rinse", run the pump for about one minute. This evacuates the dirty backwash water to a drain, not the pool. Stop the pump, set back to "Filter", and restart.
WASTE
The water is discharged directly to the sewer without going through the filter: to lower the pool water level and directly eliminate very dirty water when using the vacuum.
RECIRCULATE
The water bypasses the filter, for rapid dispersion of chemicals or for massive chlorination.
CLOSED
Cuts off circulation between the filter and the pump.
NEVER USE THIS POSITION WITH THE PUMP RUNNING.
WINTERIZING
- Completely drain tank by unscrewing drain cap at base of filter tank. Leave cap off during winter.
- Rotate and leave the valve handle between any position or on "WINTER" position if existing.
- Drain and winterize pump according to pump instructions.
SERVICE AND REPAIRS
Consult your local dealer. No return may be made directly to the factory without the express written authorization of Hayward Pool Europe.
Powerline
by HAYWARD


FILTROS DE ARENA PL
MANUAL DEL USUARIO
KLEP- EN FILTERFUNCTIES
FILTER (FILTER)
PecokdoJKeH6bITbBbIPOBHeHHa2/33aONHrTbФJIbTp.
C. CHaTb BOpOHky (5).
- C6opka KJanaHa
UctaHOBuTb Klaanah (1), He 3a6bIB O npoknaKe (3), B BePxHeJ yactn fInlbTpa.
a. Y6eIITbcra, yTO BbIXoHoe OTBepCTne "PUMP"/"HACOC" KlaIaHa HnPaBHeHO B CTOpOHy HAcoca. 3aTeM 3aKpeIITb 6JOK C NOMOu bIO XOMyTa (4).
b. OtkpyTntb YepHbI pJIactIKOBbI BnHT, paCNoJIOKeHHbI c6Oky KlaNaHa, I BMeCTo Hero npKpyTntb MaHometp (2). 3akpyuBaTb BpyHyU, He npJlraa Ype3MepHbIX ycInn.
c. CoeHnHTb BixOJHoe OTBepCTne "PUMP"/HACOC (P) KIanaHa C BepXHM BixOJHbIM OTBepCTnEM HAcoca, cJeDy INCTpyKUm IPOUN3BOIDTeJI.
5.Подсоевенец Клanaha
Bam octaetc TolbKO coeHNHT b TpybI, Ndyuine OT baccseHa (cm. pnc. 2), a IMeHNO, Tpy6y, nyuOy O T cKMMepOB (S), coeHNHTb C HxHnM OTBepCTneM Hacoca Co CTOpOHbI PpePnJIbTpa, HArHeTaTeJIbHyIO Tpy6y CoeHNITb C OTBepCTneM Klaanaha C nometkO "RETURN"/BO3BPAT (R), a TaKKe coeHNHTb CInBHyIO Tpy6y C OTBepCTneM Klaanaha C nometkO "WASTE"/CINB/(W).
- BbINOJIHNb 3JIeKtpUyeCKoe IOdKJIIOUeHne HAcOcA B COOTBETCTBnC INHCTpyKzmaM nPOnI3BOJntTeJIa.
- Bo n36eXaHHe yTeueK y6eInTbcra, YTO cINbHa npo6ka (10) haxoDnTcHa CBOe MeCTe N BCE COeHNHeHna HAnEHXO 3akpenJIeHbI.
PpmeHne 1: He npnlarabTb Upe3MeRbIX ycInn dIa 3aTgKKn CoeINHTeNbHbIX StTycepoB Ha qntnhrax KnaHaHa.
Pnmueyane 2: YnloTHaTb TeqJIOHOM HApyKHyU pe3b6y.
BBOДВЭКСПЛУATAЦИО
BAJHO BCErda OCTAHABJIINBATb HACOC, INPEXJE YEM INPNUCTyIATb K PABOTE C MHOROXOIOBbIM KJIAPAHOM.
- YbEHTbcra, YTO BCE qntnHn HaJeXHO 3aTarytI N B qnlbTp 3acbInaHO Tpe6yeMoE KOINueCTBO necka.
- YcTaHOBnTB KJIaHb B noLoXeHne "BACKWASH"/OBPATHA rPOMbIBKA. Bcerda onyckaTb pykoTky, npexJe cem NOBepHyTb ee.
- 3aynctntb hacoc, cney iHCTpykunm npo3BOiTeJy. y6eHTbcY, YTO BOa HOpMaJIbHO cIpyET B KOHType. BHIMAHNE Pn 3ayncke hacoca BCE BCaCtBAOuJne HArHeTaTeJbHbIe KJanaHbI DOJIxHbI OByTb OTKpbITb. B npotNBHom clyuae, Bbl nOdBepraete ce6paNcy TeJeCHbIX NOBpeXdHn, cepBe3HbIX paHEn mIn Cmeptn. Korda noDaua BoDbl cTahet paBHomepHoi, OCTaBtB hACOC npaOtaTb, no MehSeMpe, B TeueHne 2 MInHyT. BbINOJIHHeHne daHHoOBpaTHoIN pOMbIKn peKOMeHdyETcIg ydaJIeHn 3aqr3HEn nI IN MeJKNx qactnU, coDEPkauxxCB aNlbTpuyoJem necke.
NcNoJIb3yIte TOnIbKO HEnOДeJIbHbIE 3APACHbIE YACTH HAYWARD
- OctaHOBnTB HACOC n yCTaHOBnTB KnaanB B NOLOXeHne npombIKn "RINSE". ChOba 3anyCTnTB HACOC n OCTaBnTB erop aboTaTb Do Tex, nop Noka BOda He CtaHeT YIncToB B CMOTpOBOM CTeKJIe Knaana (npimepHO 1 MNHyTu).
- OctaHOBtB HACOC u yCTaHOBtB KnaanB nOJIOKeHne "FILTER"/ΦIJIbTP. ChOBa 3aNyCTtB HAcoc, NaHaeTcA nnTpauia. OtperynipoBaTB BnyCKHO N BblyckHO KnaanHb I nI pOnyuHn Jxema oBoMa nOdaN BoBl.
- 3a\PucaTb DaBHeHne, yKa3bIbAemoe B 3TOT MOMENT, n NOJooHe NcpeKn MaHOMeTp a. IIO Mepe paBoTbI qNlbTp a 3aRpa3HeHna 3aJePknBaIoTcN i DaBJIeHne B 6ake yBeJIuNbAeTcN. KaK TOnbKO OHO npEbbIwaet nepBOHaayabHoe 3NaueHne Ha 10 PCN (0.7 6ap uIN Kr/cm², NaUJIbHoe daBJeHne (NuCTbI qNlbTp)), Heo6xOJIMo OUnCTnTB qNlbTp, BblONHbOB o6paTHyIO npOMbIKy.
PpmeHne 1: Pn npB0oucTke BObI B BaWem baccseHe, BO3MOxHO, NOHaIObITc qaCTo npOn3BOuHTb opaTHyo npOMbIKy fNtbpTa. DeiCTBnteJIbHO, BNaUane 3aqr43HeHm cyueCTBeHNO 6OJIbWe.
PpimmeaHne 2: PeryIpaHNo npOn3BODnTb YnCTkU ppeΦnIbTpO B HacOca N cKIMMepOB dJIra obecneueHna 6ecpepeboHoi paobTo b CnCTeMb IuIbTpauNi.
PnmeHne 3: BbIcTynaIOUe I3 cTeH yCTaHOBKn, BkIIouaIOUe HArpeBaTeJIb IIIN CnCTeMy OChCTK n CΦOpcyHKamn IIN UyNaJIbCuAMN, OueHb YCbTBeNTbHbI K CNJbHbIM yDapAm, NocKoJIbKy paBoTaIOT pRn BBICOKOM daBHeHN. MoHTaxHnky CNeDuET npHHMaTb BCE HeO6xoIDMbIe MEPbl IЯ npeDoTbPaUeHnra CInlbHbIX yDapOB NO yCTaHOBKe.
HNKoIaHENCIOJIb3OBATb DAHHyO ΦYNKcIIO IPN PABOTAOUeM HACOCE.
KOHCEPBAÇNA HA 3NMHN IEPNO
- Полhoeью onopokHntb Фильтр, оТкpyтВ спвHyю побky, расpoJIOxeHHyU B HIXKHeч actn 6aka. He yctaHaBJIbBaTb npobky ha MeCTO B 3IMHnI nepiOД.
- YcTaHOBnTb n octaBnTb pyKoTky KlaPanaHa MeJdy DByMa NOLOXeHnA Mn IIn B NoIooXeHn "WINTER"/3IMA , npn HApNUn.
- Onopokhntb n 3aOKHcepBnpoBaTb Ha 3mMn nepnoHaoc, cJeDy HNCTpyKqIam pOn3BOndTeJIa.
PEMOHTI TEXHnueCKOE OBCJIyXINBAHNE
All HAYWARD products are covered for manufacturing defects or material defects for a warranty period of 2 years as of date of purchases. Any warranty claim should be accompanied by evidence of purchase, indicating date of purchase. We would therefore advise you to keep your invoice.
The HAYWARD warranty is limited to repair or replacement, as chosen by HAYWARD, of the faulty products, provided that they have been subjected to normal use, in compliance with the guidelines given in their user guides, provided that the products have not been altered in any way, and provided that they have been used exclusively with HAYWARD parts and components. The warranty does not cover damage due to frost and to chemicals. Any other costs (transport, labour, etc.) are excluded from the warranty.
HAYWARD may not be held liable for any direct or indirect damage resulting from incorrect installation, incorrect connection, or incorrect operation of a product.
In order to claim on a warranty and in order to request repair or replacement of an article, please ask your dealer.
No equipment returned to our factory will be accepted without our prior written approval.
Wearing parts are not covered by the warranty.
GARANTÍA LIMITADA
BESCHRÄNKTE GARANTIE