
BMG2115B - Microwaves BRANDT - Free user manual and instructions
Find the device manual for free BMG2115B BRANDT in PDF.
| Product Type | Built-in Microwave |
| Brand | Brandt |
| Model | BMG2115B |
| Dimensions (W x H x D) | 595 x 388 x 400 mm |
| Net Weight | 18.5 kg |
| Capacity | 25 L |
| Turntable Diameter | 315 mm |
| Rated Voltage | 230 V ~ 50 Hz |
| Input Power (Microwave) | 1450 W |
| Output Power (Microwave) | 900 W |
| Input Power (Grill) | 1000 W |
| Cooking Functions | Microwave, Grill, Combi (2 modes) |
| Automatic Programs | 8 menus (pizza, meat, vegetables, pasta, potatoes, fish, drink, popcorn) |
| Defrost | By weight (100-2000 g) or by time |
| Multi-Stage Cooking | Up to 2 stages (defrost then cook) |
| Timer | Yes, up to 95 min |
| Clock | 24h display |
| Child Lock | Yes, long press on Stop |
| Cleaning | Damp cloth, no steam cleaner or abrasives |
| Safety | Door lock, automatic stop, grounding |
| Spare Parts | Use only certified original parts |
| Repairability | Service by a qualified approved professional |
Frequently Asked Questions - BMG2115B BRANDT
User questions about BMG2115B BRANDT
0 question about this device. Answer the ones you know or ask your own.
Ask a new question about this device
Download the instructions for your Microwaves in PDF format for free! Find your manual BMG2115B - BRANDT and take your electronic device back in hand. On this page are published all the documents necessary for the use of your device. BMG2115B by BRANDT.
USER MANUAL BMG2115B BRANDT
1- RELATIONS CONSOMMATEURS FRANCE
7. Kuchynsky Časovač
6. Afrimning after tid
- Tryk på "Weight/Time Defrost" to gange, og ovenn vil vise "dEF2".
- Drej " Ⓞ" for at vœlge afrimningstiden. MAX-tiden er 95 minutter.
- Tryk på "Start/+30Sec./Bekræft" for at starte afrimningen. Afrimningseffekten er P30, og den kan ikkeændres.
7. Køkken timer
LES NØYE OG BEHOLD FOR FREMTIDIG REFERANSE
.P80"nnn,ynn 30+nnn" by ynb
.7:00" ynnnnyy nynnnn nn nn nnnn nn nnnn nn nnnn nn nnnn
nnx yynn nnnn 30+/nnn" by yn
ynnn nn nnnnnnnnnnnnn
.
nynp10
n nn nnnn nn nnnn, "nnnn" by ynn, bnnn nn nn nn nn nn nn.
.0ipn 3 3
yynnnnynnnynnnn nn nnnnnnnnnnnnnnnnnnnnnnnnnnnnnnnnnnnnnnnnnnnnnnnnnnnnnnnnnnnnnnnnnnnnnnnnnnnnnnnnnnnnnnnnnnnnnnnnnnnnnnnnnnnnnnnnn
J3
nynyynsip.11
ynnn nn nynn nn nnnn 3 nn "nnp/ny" by ynb,nnnn nn nn:
nynnynnn nn nnnn nn nnnn pnnn no
.【=】ynnn,nnx
y 3 y "y" by y
.
:DyDy
.ynnnn nn n"nnn/nn 30+/nnnn" by ynb
nivn.6
."DEF2" ynnn,yny "ny/ypyn 55 nyn" byyn
.95 9n n npnn .n nn nn nn nn nn " " nn
P30 n nn nn nn .nnn 30+/nnnn" by ynb
.
nun nn.7
.00:00 ynn ,nun /nn" by nn yyn
.99 95 nnnn nn nnnn nn nnnnnnnnnnnnnnnnnnnnnnnnnnnnnnnnnnnnnnnnnnnnnnnnnnnnnnnnnnnnnnnnnnnnnnnnnnnnnnnnnnnnnnnnn
.77nnn nn n 30+/nnnn" by ynb
,24nyn) nynnyn o.nyn 5 ynnn nnynn
JINONN NNNX
.24nynnnn nn nyn
unuiX u79n .8
"A-8" "A-1"-1, nnnn nn nnnn nn nnnn
. 30+/nnn" by ynb
.0nnn nn nnnnnnnnnnnnnnnnnnnnnnnnnnnnnnnnnnnnnnnnnnnnnnnnnnnnnnnnnnnnnnnnnnnnnnnnnnnnnnnnnnnnnnnnnnnnnnnnnnnnnnnnnnnnn
.1111111111111111111111111111111
350 3 1111111111111111
"A-6" nynyynnynnnn " 9
"130+/nnn" by ynb
.350" nynn nn nnnn nn nnnn nn nnnn nn nnnn nn nnnn nn nnnn nn nnnn nn nnnn nn nnnn nn nnnn nn nnnn nn nnnn nn nnnn nn nnnn nn nnnn nn nnnn nn nnnn nn nnnn nn nnnn nn nnnn nn nnnn nn nnnn nn nnnn nn nnnn nn nnnn nn nannn nn nnnn nn nnnn nn nnnn nn nnnn nn nnnn nn nnnn nn
"nnn" 30+/nn" by ynb
3
. "G" ynn nn nyn yy . by ynb
"Q" 11111111111111111111111111
Jn nn nnnnnnnnnnnnnnnnnnnnnnnnnnnnnnnnnnnnnnnnnnnnnnnnnnnnnnnnnnnnnnnnnnnnnnnnnnnnnnnnnnnnnnnnnnnnnnnnnnnnnnnnnnnnnnnnnnnnnnnnnnnnnnnnn
"nnn" 30+/nnn" by
.95:00 7y 0:05-n ywn
"nnn" "nnn/30+/nn" by yyn
C-1) 45-55
.10 1
30"nnn" 30+/nnn" by yn,nnn
.95-30-nn nnnn nn nnnn nn nnnn nn nnnn nn nnnn nn nnnn nn nnnn nn nnnn nn nnnn nn nnnn nn nnnn nn nnnn nn nnnn nn nnnn nn nnnn nn nnnn nn nnnn nn nnnn nn nnnn nn nnnn nn nnnn nn nnnn nn nnnn nn nnnn nn nnnn nn nnnn
n nn nnn ,"nna/nyy" by ynn on,ynnn nn nn (2
1.11111111
2
.P100"JN Jy JOnn, "JyJy"by yNb
" 1000000000000000000000000000000000000000000000
.99999999999999999999999999999999999999999999999999999999999
"nnn" 30+bnnn" by
.95:00 7y 0:05-n ywn
y 30+ynn"
nnn nn nnnn nn nnnn nnnn nnnn nnnn nnnn nnnn nnnn nnnn nnnn nnnn nnnn nnnn nnnn nnnn nnnn nnnn nnnn nnnn nnnn nnnn nnnn nnnn nnnn nnnn nnnn nnnn nnnn nnnn nnnn nnnn nnnn nnnn nnnn nnnn nn
.
.P100"nnynnnn nnny "yniin" by yni
. 80
.P80"nnn nn nnnn 30+nnnn" by ynb
.20:00" 1nnn nn nnnnnnnnnnnnnnnnnnnnnnnnnnnnnnnnnnnnnnnnnnnnnnnnnnnnnnnnnnnnnnnnnnnnnnnnnnnnnnnnnnnnn
. 30+ /n nn" by y n
:
:nnn nn nnnnnnnnnnnnnnnnn
5: npt 1--0
10: 5---1
niv 30: niv 10---5
npt1: npt30---10
npt5: npt95---30
1


nwnnnn
nun nnu/nnu
n7n7y
y/30+/nnn


nnn nn npnn .C
nynnnn npn .4
.ynnnn nn yynnn nnnn nn (1
. 2
yipn nn .npnnn n9, B y nn nn np , nnn nn .5 npnnn nnnn nn nynn nn
JINXJN JON.B
yinnnnn nn nnnn nn nn nn nn nn nn nn nn nn nn nn nn .1
.

"aa" 00000000000000000000000000000000000000000000
A 3

A 1
B
nannnn
O
n nn nn nn nn nn nn nn nn nn nn nn nn nn nn nn nn nn nn nn nn nn nn nn nn nn nn nn nn nn nn nn nn nn nn nn nn nn nn nn nn nn nn nn nn nn nn nn nn nn nn nn nn nn nn nn nn nn nn nn nn nn nn nn nn nn nn nn nn nn nn nn nn nn nn nn nn nn nn nn nn nn nn nn nn nn nn nn nn nn nn nn nn nn nn nn nn nn nn nn nn
nunA

nappnn
nnpnnnnnnnnnnnnnnnnnnnnnnnnnn

ywnn
nix nnnynynnynn
pn.pnxnnn noyn npnn ypsy pn
ypn nn npnnn nn noon nn
nnnnnnnnnnnnnnnnnnnnnnnnnnnnn
.
x
nn npnnn nn npnnn nnpnn
n 3 nnn nn nn nn
nXn nn nnnn nn nn
.
y
nnpnn Dax by nysoh on nx nns
npxn

yni yin yin no no
n nn nnn
n nn nnnn nn nn
X p7n 2X .nnn 1X
.
n

y
y
X.
y
.
.
,
JIOJN NNNN NPN
nng by nnaennnn
T
by npnn nn by
yyn npyn ypn
pnnyn ywn nn n
.
y 10 y n,nu n
y
ynnn nn nnnn - .nnnnn nnnnnnnnn nn.
:

YTo6bI CHN3NTb ONaCHOCTb
noxapa, nopaxheny TOKOM,
TpaBM N Upe3MepHoro
BO3dEInCTBnA 3HePnN
MINKPOBOJHOBOI Neu npN
IcnoJIb3OBaHNn Iprn60pa
Heo6xoDnMo co6IoudaTb
6a30BbIe Mepbl
PpeOCTOpOXHOCTN, B TOM
YncIe cIeDyUoIue:
IcnoJb3ObaHnIO np6opa n
HIMaOT COnyTCTBvIoUe OAnCHOCTN. DeTN He DoJXhBi INrpaTb C yCTPOICTBOM.
3aippeuaetcpa3peuatab
BbINOJIHЯrOuNCTKU
06cnykBaHne yctpoiCTBa
TeTm, eCNI OHI He CTapWe
8 letn He haoTcno
Ha3Opom. DeTm MnaIaIwe
8 JeT He pa3peWaaetcA
HaxoDntbCBA6n3N
yCTpoIcTba,ecnOHN He
HaxoJrTcI NOd Hau3OpOM.
— YcTpoIcTBO n eTo Ihyp
YTo6bI n36exaTb ONaCHOCTN
napxehn TOKOM,
peed 3aMeHoi lambli Heo6xOdmo y6eINTbcry TO yCTpoIcTBO BbIKJIouyeHO.

BHIMAHNE!
BbIOpJIHeHHe cepBnCHbIX nIIpeMOHTbIX pa6OT co CHaTneMkpIshK,ObecpeuBaHOUe3aUHTy OT BO3dEICTBmIMKPOBOJHOBOJ 3HEprN,ONaCHO DlRA BCEx,KpOME KOMPeTeHTbIX CpeZnaJIncTOB.

BHIMAHHE!
3aIpeuaeTcHarpeBaTb
KnDKoCTN N DpyrHe
PPOyKTbIB 3aKpbITbIX
KOHTeHepax, POTOMY OTO OHN MOrYT B3OpBaTbCSR.
- Ppi HArpeBaHnN PPOdyKTOB
B PIACTNKOBbIX NII IN 6ymaxKhbIX KOHTeHepax Heo6XODIMO
Ha6JIIOdaTb 3a NeCyBIO B CB83N
C ONaCHOCTbIO BO3rOpAHnY.
- IcNoJIb3OBaTb MoxHO
ToJIbKO NOCyDy,
PpeiHa3NaueHHyU DJIa
MnKpOBOJHObIX Neyei.
-B Clyuae NOABJeHnA DbIMa
Heo6XODIMO BblIQLIOCHITb
yCTPoIcTB0 NII IN OTKJIIOUHTb
ero OT 3JIeKTPocETn i
OCTaBVtB DBepCu 3aKpbITOn,
yTO6bl PllAmr NOracSLO.
—HaRpeBaHne HaNTKOB BMNKPOBOJHOBOI Neu MoXeT PrnBeCTN K OTLOXeHHOMY B3pbIBHOMy KNPeHIO, I N03Tomy PnI nepeHOce KOHTeHepa C TaKIMn HApNTKaMn CJIeDyET CO6JIoDaTb OCTOpOXHocTb. —CoadxHmoe 6BytBIOUcek DIA KOPMJIeHnI Y 6aHOK C DeTCKIM NITaHHeM HeoBXODIMo pa3MeMaTb IINI NOTpAeTn, a Npeed erO yNoTpe6JIeHnEM HeoBXODIMo nPoBepNTb TempepaTy BO n36ExKaHne OXoROB. —3aPpeuaetc HrpeBaTb B MInKPOBOJHObIX NeayxЯIca B CkOpLype I cIeIbIe RaIca, CBapeHNbIe BKpyTuO, NOCKOJBky OHI MOrUT B3OpBaTbcI dAxe IocIe OKOHuaHry HrpeBaHry. —Heo6XoDIMO peryIarpHo npOBODITb OChCTKY Neuy C ydaJIeHnEM IIObIX OTLOXeHn I NIISeBbIX nPoDyKTOB. —HeCnoc6HOcTB oEecneuHTb UcHToTу Neu MoXeT pRnBeCTN K NOBpeJeHIO IOBepxHOCTN, UTO MoXeT OTPuCaTeJIbHO IOBIIraTb Ha cPOK cLnyKbI yCTpoiCTBa I MoXeT pRnBeCTN K ONaCHO cnTyaIaIIN.
—ДоуckaetcaИСпОЛьЗOBaТ bToЛьКо ДaТчИКи TemпepaТурbl,peKOMeHДоваHHbIe ДЯ ДaHHOJI peuN.(ДЯ ПeчЕ,OBOPyДоваHHbIXДЯИСПОЛьЗOBaHHЯДaTчИКOB TemпepaТурbl).
—MnKpOBoJHOByI O neYb CJIeDyeT IcNoJIb3OBAtB PnO TkPbIToN DeKOpaTINBHOI DBepue.(IJIpeuC DeKOpaTINBHOI DBepue).
—ДанhoeустpoиCTBO npedHa3NaueHoДЯ ИСПОЛьЗOBaHиВ ДOMaшнИ ИНьIx ПОДБыx YCLOBnIAX:
- Ha Kuxhax Дляперсональ в магаших, офиси и дугinx pa6ochnxnomeшених;
- KJIneHTaMn B OTeJx, MOTeJx I INbIX POnO6HbIX 3aBeDeHnX;
Haepmax;
B MeCTax, rDe npEIOCTaBIAOTcHouJIeN 3aBTPaK.
MnKpOBoJHOBa neyb
npEHa3NaYeHa dJa nOdoRpeBa
npOdyKTOB nITaHnI
HaNTKOv. CyuKa npOdyKTOB
nITaHnI nn OdeJkbl,
nOdoRpeB rpeLoK, TaNOK,
BlaJXHO TKAHN, rY60K n INhBX
IpeMeTOB BJIeUeT ONaCHOCTb TpaBMbl IIN BO3ROpaHnI.
3aPpeaaeTcNcNoIb30BaTb B MmKpOBOJHOBOI Neu MeTaJIInueCKNe KOHTeHepbl Dlra PPOyKTOB HAnNTKOB.
3aπpeucaetc oynuatb yctpoiCTBa C NOMOuI npaOBOrO OunchTeJI.
—ИЗВЛЕКА KOHTeHepbl n3 np6bpa, cIeDyET cIeDITb 3a TEM,чTO6bl He CMECTnTb NOBOPOTbI CTOL.(3TO KacaETcraCTaCIOHOAPbIX N BCTPoeHHbIX np6bOpOB, KOTOpbIe IcNoJIb3YIOTCa Ha BBICOTE He MeHee 900 MM OT POJa I IMeHOT CbeMHbIE NOBOPOTbIe CTOLbl.ODnako 3TO HE OTHOCNTcK pnp6bopam C TROP3OHTaJIbHOJ OTKnDbIbAIOUSeiCBHn3 DBepuei.)
— Mнкроволноья的新ьявяетсьстразиваим прибором.
-3anpeuaeTcNcNoIb30BaTb napOBoOyNCNTeJIb.
—ПоверхноctьяшикадлхраненmaожетharpeBaTbca.

BHIMAHNE!
Bo BpemnncnoIb3OBAHnnpnbop n ero doctynhpieactn HarpBaIOTCn. HeKacaiTeCb HarpBaTeJIbHbIXJLEmeHTOB.DetamMlaIaIe8 let He pa3peaaetcnaXoNTbcraB6n3uYCTPOIcTBa,ecn OHN HeHaxoJaTcpoNHaD3OpOM.-Bo BpemnncnoIb3OBAHnnpnbop HarpBaETc. HeKacaiTeCb HarpBaTeJIbHbIXJLEmeHTOB BHyTpNI peuN.

BHIMAHHE!
Bo BpemnIOJIb3OBaHnna DOCTUINbIe qaCTn MOrYT HArpeBaTbCn. MaJIeHbKnx DeTeH He CLeDyET NOdNcKaTb K pIn6Opy. — Bo n36exKaHnne nepeRpeBa 3aIpeuAeTcY UCTaHaBJIuBaTb Pn6Op 3a DeKopatNBHOJ DBepuei. (3TO HE OTHOCITcK K UCTPOJCTBaM, ObOpyIDoBAHHbIM DeKopatNBHOJ DBepuei)

BHIMAHNE!
Korda np60p pa6oTaet B KOM6HnHPOBaHHOM pexIme, DeTAM pa3pe7aetc INCNoIb3OBaTb NeYb TOnbKO IOD Na6JIIODeHNEm B3PocNbIX B CBa3N C BbICOKO TempepaTpyo.
3aPpeuaeTcNcNoIb3OBaTb
JxecTkne a6pa3nBhble
UHCTaUne CpeDCTBa NIN
MeTaJIInueCKne Ckpe6Kn DJIa
OuHCTKn CTekJa DBepCuI Neu,
NOTOMy YTO OHN MOYT
IOuapaNaTb NOBepXHOCTb,
B pe3yIbTaTe Yero CTekIo
MOxET pa3pyuHTbcra.
1/UBEOMJIeHnIyIJIa IIOJIb3OBATEJIa
1) HOMHaJIbHbIe 3JIeKTpNueCKNe npaMeTpbl 5Hypa IIN yDInHnTeIa 0JXHbI 6bITb He HIXe 3JIeKTpNueCKNX npaMeTPOB yCTpO'CTBa.
2)Дя удлнHTeЯ
ДОпУСКаETСИСПОЛБ3OBaТь
TOЛьКо 3-пpoВODНошHyр
С 3aЗЕмЛеHNeM.
3)ДиHHbIshHypdoJIxHe6bITb paCNoLoXeH TaK,HTo6bI OH He BnCeI HaCDToJIeShnUeI nI npabOoyeI NOBepxHOCTbIO, rDe eROMOxHO cIyuaHNO 3auePNTbIINrDe eRO MOrYTNOTAHyTb DeTI.
OuHCTKA
Heo6xoJIMO OTKJIIOHTb yCTpoIcTBO OT NCTOCHNka PNTAHIA.
- BnHTpeHHIO IOBepxHocTb Neu CJeUyeT OUnIaTb NocLe IcNoJIb3OBAHnC NOMoIbIO BLnJXHO TKAHN.
-
Akceccyapbl cIeDyOuNtB ObUHbIMCnOC6OMC INTOJb3OBaHNEMMbIbHO BODbl.
-
Pama Дверцы, улочене и пилегаюше Deтали небхODIMо AkКураТно Очидаь Влжно ТkaНьЮ В сLYчae ИX 3aГРЗненя.
- 3aπpeuεaetcη nCNoJIb3OBaTb
JxecTkne a6pa3nBhIe
UHCTaIηne cpeICTBa IJIi
MeTaJIInueckne cKpe6Kn
ДЯ OChIcTKn CTeKla
DBePcbl Neu, NOTOMy UTO
OHN MOrYT NOpaPaNaTb
NObepXHOCTb,
B pe3yIbTaTe Yero CTeKIO
MOxKeT pa3pyuINtbcra. - COBET NO OUHCTKe---Для УДОБСТВА OЧИСТКИ ВНУТРЕнHX CTEHOK ПECHИ, С KOTOPБIM MOГЛИ СОПРИКаСТьСЯ ПИШЕВbie ПЮДУКТы: ПОМЕСТИTe ПОЛOBИНКУ ЛIMMOHA B ГLYБOKУTO TapeILKY, HALEYTE 300 MЛ (1/2 ПИNTы) BOДы И HARPEBAйTe Ha MOЦHOCTN 100 % В ТЕЧЕп 10 МИНТ. ПЮТРИТЕ ПECHь НACHСТО MЯrkоь ВлжнOHТ TXaHBIO.
IOCYDA
OCTOPOXKHO
MaTePnaJIbI, 3aIpeUeHHbIe IJIЯ NcNoJIb3OBaHnRA B MmKpOBoJHOBOI Neu
Ipeed yctaHOBKOBHMaTeBHO 03HaKOMbTeCb C pyKOBoDCTBOM
O6paTnte BHHMaHHe
3JIeKTPnueckne coeDInHeHn
Peeb nMeet uTekep. Ee cIeDyET
IOdkJIOUaTb TOnbKO K HADJeXaUIM
O6pa3OM UCTaHOBJIeHHoN 3a3EmJIeHHoN
PO3eTKe. YCTaHaBJIuBaTb PO3eTKU N
3aMeHrTa COeINHTeJIbHbIK Ka6eJIb
DOJKeH ToJIbKO KBaIIuΦHcIPOBaHHbIK
3JIeKTPNK B COOTBeTCTBn C
DeICTBYIOUIMM HOpMaMI.
EcIn IocLe yCTaHOBKn uTekep
CTaHOBNTcR HeEOCraEaMbIM, Ha JINHN
PiTuHnRA Prn6Opa Heo6xOdmo
YCTaHOBNTb BCEONIOCHBI
pa3BeENHTeJIb C pacCTOraHnEM
pa3MbIkaHnRA KOHTaKTOB He MeHee 3 MM.
B UkaQy, B KOTOpBI yCTaHaBJIuBAeTCR
peh, He DOJXHO 6bITb 3aJHeJ CTehKN
No3aDi Prn6Opa.
Mexdy CTEHKO IN BepxHeJ qACTbIO
np6Opa Heo6XoDIMO OCTaBtB 3a3Op.
KOHKePTHbI pa3Mep 3a3Opa MoKeT 6bITb
yKa3AH Ha CXemax.
MinHMalbHna BblCOTA yCTaHOBKn: 85 CM
He 3akpbIbAaTe BeHTNJLlOHHbIe
IN BO3dYX03a6OpHnKi.
PpImeuaHne.
He 3aSeMJaTe n He nepern6aTe
ShHyp nITaHnI.
BnHT A
BnHT B
MOHTaXHa IpaCTnHa
OПл actNKOBанaklaДka
A. BctpoeHHaMe6eIb
B. Побrotовkaшкафа
- O3HaKOMbTeCb c nHCTpykUnei K LJIABLOHOY dJIa HIXKHeJ YACTN LJKAΦA. IomeCTnTE 7a6LoH Ha HIXKHOIO CTeKNy 7kaΦa.
- Cénaïte OTMeTKn Ha NixkHei CTeHKe ⅢkaΦa corJaCHO OTMeTKam «a» Ⅲa6JIoHa.
LcHTpaIbHaJ IINHIA
- Y6epnte 7a6bIoh HnXHero 7kaΦa n 3aΦnKcnpyTe MOHTaXHyIO pnaCTnHy C nOMOuBnTa A.
C. UctaHOBka neyn
- YctaHOBInTe neyb B wkaΦ
1) y6eintecb, yTo 3aHnra YacTb neu 3aΦnKcnpoBaHa MOnTaXHoN pIaCTnHOH.
2) He 3aueemIe n He nepern6aIte shyp nItaHna.
- OTKpoIte DBepy, 3aФИКСИPyIe peYb WIIkaФy C nOMOuBbVHrTa B B MOHTaXHOM OTBepCTnN. 3aTeM 3aФИKCSIpyIe PIIaCTIKOBYIO HAKlaIDKy BVHTOM B MOHTaXHOM OTBepCTnN.
HCTpykunno3KcnlyaTaun
1. YctaHOBka yacob
5---10 mH :30 cekyHd
10---30 MmH : 1 MmHyTa
30---95 MmH : 5 MmHyT
Ppimep. EcnB bbl XOTHe NcNoIb3ObaTb «aBTo MeHIO» IJn pnproTOBneHn 350 r pb6bl.
9. MhoroctynehcuTae roTOBka
Moxho 3aadaTb He 60lee 2 cTyneHn roTOBKn. EcIn Onda n3 cTypeHeMHOROCTyHnHaToI rTOBKn ppeDyCMatPnBaET pa3MopaxnBaHne, 3Ta cTyneHbYCTaHaBnBAeTcK KaN nepBaJ.
Примет.Есп ВыхOTITE pa3MOPaЖиВаТь пОДУКТВ TeчEHNE 5 MнHT,ЗАtem rOTOBNTb HaMOUHOCTHN80%ВTeчEHNE7 MnHT,BblONJIHNTe CLEdYUOUIne DeICTBnI.
-
Haxmnte KhoIky «Bec/BpeMa pa3MopaxuBaHnry» Dba pa3a, И на диспjee поВNTcЯ NaДПИСь «dEF2».
-
ПоворачиBaIte «» ДЯ Вьбopa ВpeMeHn pa3MopaxiBaHn, NOka He NOYBNTcHaDnCb «5:00».
- Haxmite KhoIky «MinkpoBolHOBa neyb» oDNH pa3, Ha DnCpIee nOyBNTcHaDnCb «P100».
- Haxmte KhoNky «MnKpOBoHOBa neyb» eue pa3 iIi nOBepHnte « », yTo6bl Bb6paTb 80% moUHOCTn neu.
- Haxmte KhoNky «CtapT/+30c/ПоТВерДиТь» ДЯ ПОДТВерЖдЕня, И На ДИСплес NOBITcH NaDnCb «P80».
- Поворачивайтse «» Ддя ретуларовки Врemeи ratobkn, пoka на диспjee He nocrTcR «7:00».
Haxmte KhoNkY Ctap/+30c/NoTBePntb》,UTo6bHaauTaB roTOBky.B hauaIe nepBoi cTynEHn IpOzByuHT OINH CnHaJI 3yMMepa, IN HaunHeTcOCTe BpEmHn pa3MopaxKbAHn.3aTeM IpOzByuHT eue OINH CnHaJI 3yMMepa,KOTOpBI 6yJeT O3haaTb HauJIO BTOPOI CTynEHn rTOBKn.Pocne 3abepseHn rTOBKn 3yMMep npOzBEHNT PAnTb pa3.
10.Функцязпрoca
- Пи рабоTe МИКРОВЛНовoi Neуи, Грия, KM6инроваHHоу roTOBKe HaXmITE KHONKY «МИKРОВЛНова Neuch», уTOбы Na ДиСплee Ha 3 cekyнды OTO6pa3nIacb TeKyuzaЯ MOUHOCtB.
Ipo npoeCTBn 3 cekynd neyb BepHeTcB npebdyuee coToHne.
B COCTOHNI rOToBKN HAXMnTE KHONKY «TaNMeP KxHn/uaCbI», YTObI y3HaTb BpeMa, IN BpeMa 6yJeT OTo6paKeHo Ha 3 CekyHdbI.
11.ФункцяблokировкOTdTei
Блokровka:В соctони Oжданьня Нжмte KhoNky «СтО/NOCHNTb»И ydepxnBaIte ee 3ceKHyIbI,пoka He npO3ByuHtДПINHHbI 3BYKOBOcCnHaI, OЗнayaIoшпіпорхOD bpexIM bloknpOBKn OT DeTee.03aROpNTcN,ecnYCTaHOBJIeHbI Yacbl,Ha dinCpIee NOARNTcR TeKyuSue Bpem. B npOTNBOM clyuae Ha dinCpIee NOARNTcR [..].
BbIXoI n3 pexkIMa 6JOKnPOBKn: B pexKIme 6JOKnPOBKn HaxMnTe KHOnKy «CTOn/ OuHCTnTb» yUdepXKNBaIte ee 3ceKHyDbl, POKa He npO3ByuHT dINHHbI 3ByKOBoi CnHraJI, O3HaauHouSi ChrTne 6JOKnPOBKn.
You have just acquired a BRANDT product and we would like to thank you.
We have designed and made this product with you, your lifestyle and your requirements in mind so that it meets your expectations. We have devoted our know-how, our innovative spirit and the passion that has been guiding us for over 60 years.
In an effort to ensure that our products meet your requirements in the best possible way, our Customer Relations department is at your disposal, to answer all your questions and to listen to all your suggestions.
Visit our website www.brandt.com where you will find our latest innovations, as well as useful and complementary information.
BRANDT is delighted to assist you every day and hopes you get the most out of your purchase.
https://brandt.com/


Important: Before using your appliance, read this user guide carefully. miliarise yourself more quickly with its operation.
1/NOTICES TO THE USER 4
IMPORTANT SAFETY INSTRUCTIONS 5
CLEANING 10
UTENSILS 10
Materials you can use in microwave oven 12
Materials to be avoided in microwave oven 13
2 / INSTALLATION 14
SETTING UP YOUR OVEN 14
Installation and connection 15
3/ USING THE APPLIANCE 19
- Clock Setting 20
- Microwave Cooking 20
- Grill or Combi. Cooking 21
- Quick Start 21
5.Defrost By Weight 22
6.Defrost By Time 22
7.Kitchen Timer 22
8.Auto Menu 22 - Multi-section cooking 23
- Inquiring Function 24
- Lock-out Function for Children 24
4/ Trouble shooting 25
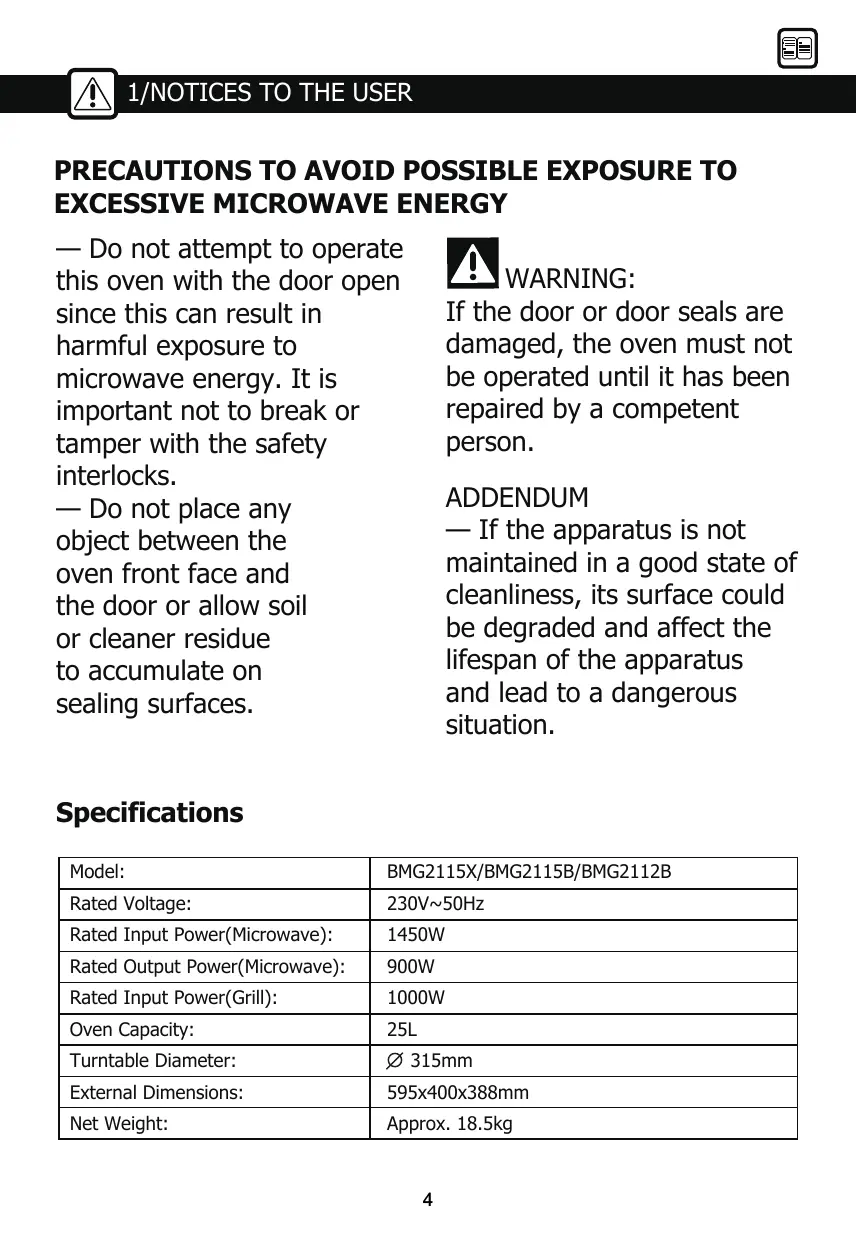
PRECAUTIONS TO AVOID POSSIBLE EXPOSURE TO EXCESSIVE MICROWAVE ENERGY
-
Do not attempt to operate this oven with the door open since this can result in harmful exposure to microwave energy. It is important not to break or tamper with the safety interlocks.
-
Do not place any object between the oven front face and the door or allow soil or cleaner residue to accumulate on sealing surfaces.

WARNING:
If the door or door seals are damaged, the oven must not be operated until it has been repaired by a competent person.
ADDENDUM
- If the apparatus is not maintained in a good state of cleanliness, its surface could be degraded and affect the lifespan of the apparatus and lead to a dangerous situation.
Specifications
| Model: | BMG2115X/BMG2115B/BMG2112B |
| Rated Voltage: | 230V~50Hz |
| Rated Input Power(Microwave): | 1450W |
| Rated Output Power(Microwave): | 900W |
| Rated Input Power(Grill): | 1000W |
| Oven Capacity: | 25L |
| Turntable Diameter: | Ø 315mm |
| External Dimensions: | 595x400x388mm |
| Net Weight: | Approx. 18.5kg |
IMPORTANT SAFETY INSTRUCTIONS

WARNING
To reduce the risk of fire, electric shock, injury to persons or exposure to excessive microwave oven energy when using your appliance, follow basic precautions, including the following:
-
Read and follow the specific: "PRECAUTIONS TO AVOID POSSIBLE EXPOSURE TO EXCESSIVE MICROWAVE ENERGY".
-
This appliance can be used by children aged from 8 years and above and persons with reduced physical, sensory or mental capabilities or lack of experience and knowledge if they have been given supervision or instruction concerning use of the appliance in a safe way and understand the hazards involved. Children shall not play with the appliance.
Cleaning and user maintenance shall not be made by children unless they are older than 8 and supervised. Children less than 8 years of age shall be kept away unless continuously supervised.
-
Keep the appliance and its cord out of reach of children less than 8 years.
-
If the supply cord is damaged, it must be replaced by the manufacturer, its service agent or similarly qualified persons in order to avoid a hazard. (For appliance with type Y attachment)

WARNING:
Ensure that the appliance is switched off before replacing the lamp to avoid the possibility of electric shock.

WARNING:
It is hazardous for anyone
other than a competent person to carry out any service or repair operation that involves the removal of a cover which gives protection against exposure to microwave energy.

WARNING: Liquids and other foods must not be used in sealed containers. If they are liable to code.
- When heating food in plastic or paper containers, keep an eye on the oven due to the possibility of ignition. - Only use utensils that are suitable for use in microwave ovens.
— If smoke is emitted, switch off or unplug the appliance and keep the door closed in order to stifle any flames. -
Microwave heating of beverages can result in delayed eruptive boiling, therefore care must be taken when handling the container.
-
The contents of feeding bottles and baby food jars shall be stirred or shaken and the temperature checked before consumption, in order to avoid burns.
— Eggs in their shell and whole hard-boiled eggs should not be heated in microwave ovens since they may explode, even after microwave heating has ended. - The oven should be cleaned regularly and any food deposits removed.
- Failure to maintain the oven in a clean condition could lead to deterioration of the surface that could adversely affect the life of the appliance and possibly result in a hazardous situation.
- Only use the temperature probe recommended for this oven.(for ovens provided with a facility to use a temperaturesensing probe.)
The microwave oven
must be operated with the decorative door open. (for ovens with a decorative door.)
-
This appliance is intended to be used in household and similar applications such as:
-
staff kitchen areas in shops, offices and other working environments;
- by clients in hotels, motels and other residential type environments;
- farm houses;
- bed and breakfast type environments.
The microwave oven is intended for heating food and beverages. Drying of food or clothing and heating of warming pads, slippers, sponges, damp cloth and similar may lead to risk of injury, ignition or fire.
Metallic containers for food and beverages are not allowed during microwave cooking.
The appliance shall not be cleaned with a steam
cleaner.
- Care should be taken not to displace the turntable when removing containers from the appliance. (For fixed appliances and built-in appliances being used equal or higher than 900mm above the floor and having detachable turntables. But this is not applicable for appliances with horizontal bottom hinged door.)
The microwave oven is intended to be used built-in.
— Steam cleaner is not to be used.
Surface of a storage drawer can get hot.

WARNING:
The appliance and its accessible parts become hot during use. Care should be taken to avoid touching heating elements. Children less than 8 years of age shall be kept away unless continuously supervised.
During use the appliance becomes hot. Care should be taken to avoid touching heating elements inside the oven.

WARNING:
Accessible parts may become hot during use. Young children should be kept away.
- The appliance must not be installed behind a decorative door in order to avoid overheating. (This is not applicable for appliances with decorative door.)

WARNING:
When the appliance is operated in the combination mode, children should only use the oven under adult supervision due to the temperatures generated.
- Do not use harsh abrasive cleaners or sharp metal scrapers to clean the oven doorglass since they can scratch the surface,
which may result in shattering of the glass.
READ CAREFULLY AND KEEP FOR FUTURE REFERENCE
To Reduce the Risk of Injury to Persons Grounding Installation

DANGER
Electric Shock Hazard Touching some of the internal components can cause serious personal injury or death. Do not disassemble this appliance.

WARNING
Electric Shock Hazard Improper use of the grounding can result in electric shock. Do not plug into an outlet until appliance is properly installed and grounded. This appliance must be grounded. In the event of an electrical short circuit, grounding reduces the risk of electric shock by providing an escape wire for the electric current. This appliance is equipped with a cord having a grounding wire with a grounding plug. The plug must be plugged into an outlet that is properly installed and grounded.
Consult a qualified electrician or serviceman if the grounding instructions are not completely understood or if doubt exists as to whether the appliance is properly grounded.
If it is necessary to use an extension cord, use only a 3-wire extension cord.
- A short power-supply cord is provided to reduce the risks resulting from becoming entangled in or tripping over a longer cord.
- If a long cord set or extension cord is used:
1) The marked electrical rating of the cord set or extension cord should be at least as great as the electrical rating of the appliance.
2) The extension cord must be a grounding-type 3-wire cord.
3) The long cord should be arranged so that it will not
drape over the counter top or tabletop where it can be pulled on by children or tripped over unintentionally.
CLEANING
Be sure to unplug the appliance from the power supply.
- Clean the cavity of the oven after using with a slightly damp cloth.
- Clean the accessories in the usual way in soapy water.
- The door frame and seal and neighbouring parts must be cleaned carefully with a damp cloth when they are dirty.
- Do not use harsh abrasive cleaners or sharp metal scrapers to clean the oven door glass since they can scratch the surface, which may result in shattering of the glass.
- Cleaning Tip---For easier cleaning of the cavity walls
that the food cooked can touch: Place half a lemon in a bowl, add 300ml (1/2 pint) water and heat on 100 % microwave power for 10 minutes. Wipe the oven clean using a soft, dry cloth.
UTENSILS
CAUTION
Personal Injury Hazard It is hazardous for anyone other than a competent person to carry out any service or repair operation that involves the removal of a cover which gives protection against exposure to microwave energy.
See the instructions on "Materials you can use in microwave oven or to be avoided in microwave oven." There may be certain non-metallic utensils that are not safe to use for microwaving. If in doubt, you can test the utensil in
question following the procedure below.
Utensil Test:
- Fill a microwave-safe container with 1 cup of cold water (250ml) along with the utensil in question.
- Cook on maximum power for 1 minute.
- Carefully feel the utensil. If the empty utensil is warm, do not use it for microwave cooking.
- Do not exceed 1 minute cooking time.
Materials you can use in microwave oven
| Utensils | Remarks |
| Browning dish | Follow manufacturer's instructions. The bottom of browning dish must be at least 3/16 inch (5mm) above the turntable. Incorrect usage may cause the turntable to break. |
| Dinnerware | Microwave-safe only. Follow manufacturer's instructions. Do not use cracked or chipped dishes. |
| Glass jars | Always remove lid. Use only to heat food until just warm. Most glass jars are not heat resistant and may break. |
| Glassware | Heat-resistant oven glassware only. Make sure there is no metallic trim. Do not use cracked or chipped dishes. |
| Oven cooking bags | Follow manufacturer's instructions. Do not close with metal tie. Make slits to allow steam to escape. |
| Paper plates and cups | Use for short-term cooking/warming only. Do not leave oven unattended while cooking. |
| Paper towels | Use to cover food for reheating and absorbing fat. Use with supervision for a short-term cooking only. |
| Parchment paper | Use as a cover to prevent splattering or a wrap for steaming. |
| Plastic | Microwave-safe only. Follow the manufacturer's instructions. Should be labeled "Microwave Safe". Some plastic containers soften, as the food inside gets hot. "Boiling bags" and tightly closed plastic bags should be slit, pierced or vented as directed by package. |
| Plastic wrap | Microwave-safe only. Use to cover food during cooking to retain moisture. Do not allow plastic wrap to touch food. |
| Thermometers | Microwave-safe only (meat and candy thermometers). |
| Wax paper | Use as a cover to prevent splattering and retain moisture. |
Materials to be avoided in microwave oven
| Utensils | Remarks |
| Aluminum tray | May cause arcing. Transfer food into microwave-safe dish. |
| Food carton with metal handle | May cause arcing. Transfer food into microwave-safe dish. |
| Metal or metaltrimmed utensils | Metal shields the food from microwave energy. Metal trim may cause arcing. |
| Metal twist ties | May cause arcing and could cause a fire in the oven. |
| Paper bags | May cause a fire in the oven. |
| Plastic foam | Plastic foam may melt or contaminate the liquid inside when exposed to high temperature. |
| Wood | Wood will dry out when used in the microwave oven and may split or crack. |
SETTING UP YOUR OVEN
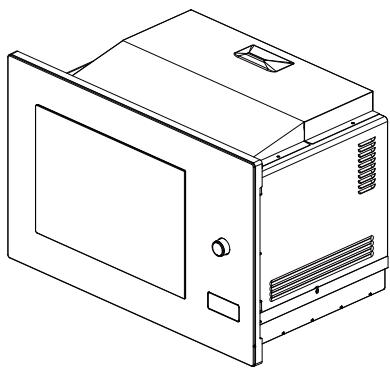
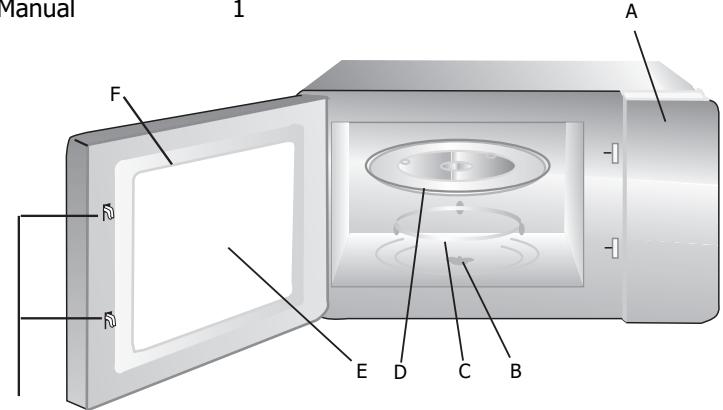
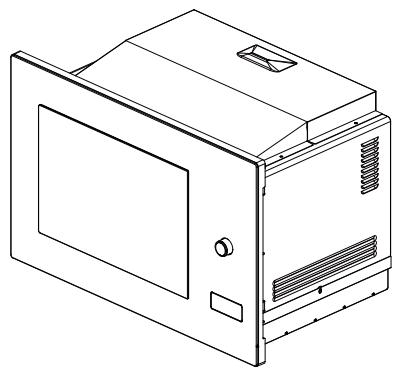
Names of Oven Parts and Accessories
Remove the oven and all materials from the carton and oven cavity. Your oven comes with the following accessories:
Glass tray 1
Turntable ring assembly 1
Instruction Manual 1
G
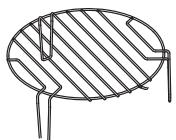
Grill Rack( Can not be used in microwave function and must be placed on the glass tray )
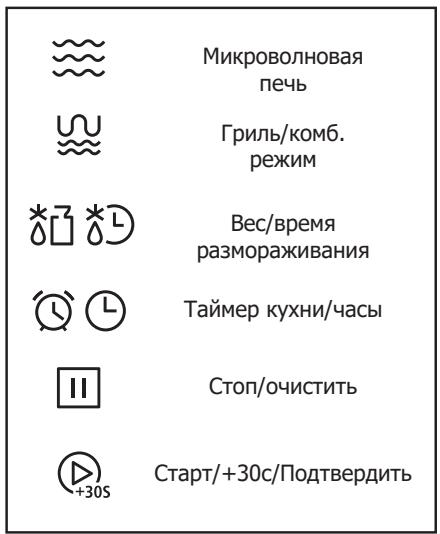
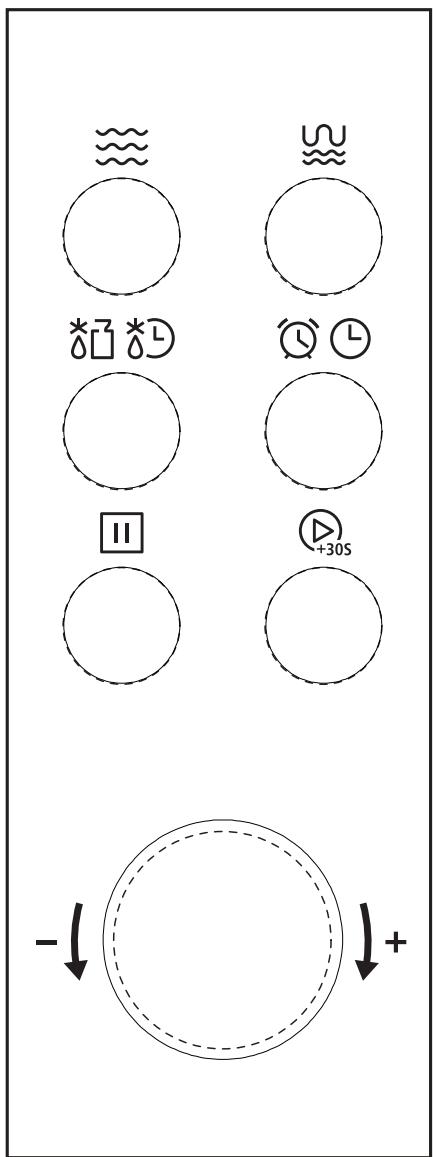
A) Control panel
B) Turntable shaft
C) Turntable ring assembly
D) Glass tray
E) Observation window
F) Door assembly
G) Safety interlock system
Turntable Installation
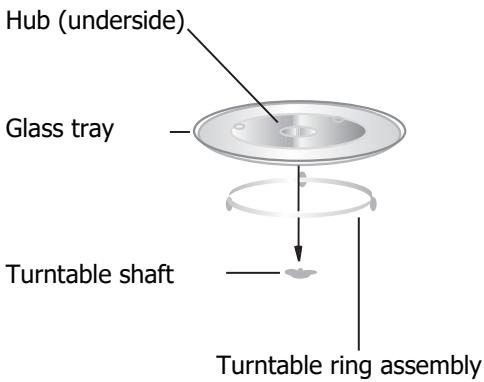
a. Never place the glass tray upside down. The glass tray should never be restricted.
b. Both glass tray and turntable ring assembly must always be used during cooking.
c. All food and containers of food are always placed on the glass tray for cooking.
d. If glass tray or turntable ring assembly cracks or breaks, contact your nearest authorized service center.
Installation and connection
- This appliance is only intended for domestic use.
- This oven is intended for built-in use only. It is not intended for countertop use or for use inside a cupboard.
- Please observe the special installation instructions.
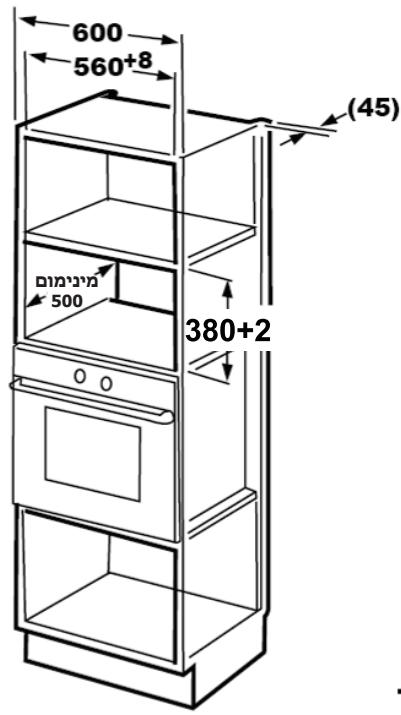
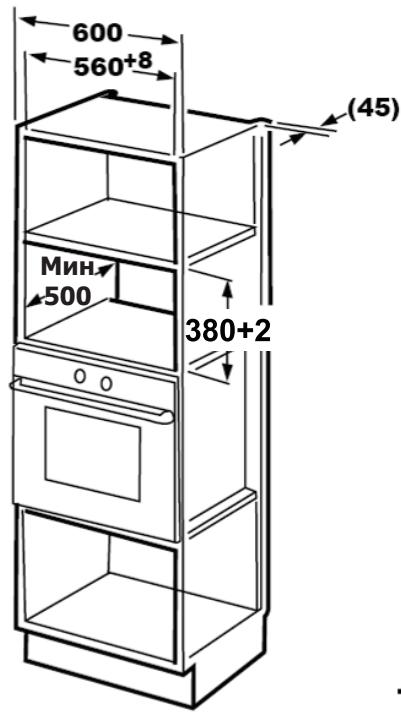
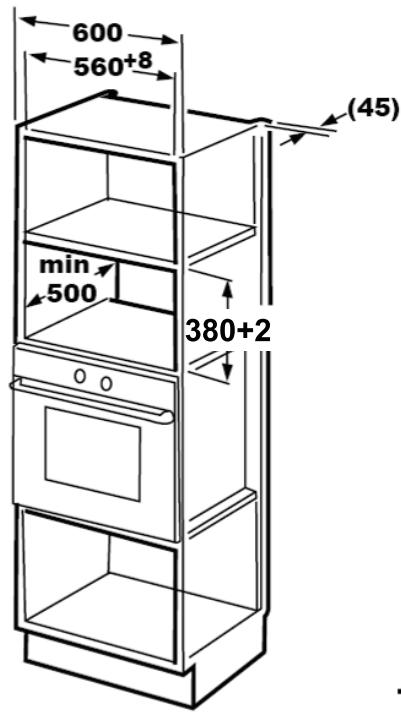
- The appliance can be installed in a 60cm wide wall-mounted cupboard.
- The appliance is fitted with a plug and must only be connected to a properly installed earthed socket.
- The mains voltage must correspond to the voltage specified on the rating plate.
- The socket must be installed and connecting cable must only be replaced by a qualified electrician. If the plug is no longer to accessible following installation, an all-pole disconnecting device must be present on the installation side with a contact gap of at least 3mm.
- Adapters, multi-way strips and extension leads must not be used. Overloading can result in a risk of fire.
The accessible surface may be hot during operation.
Installation Instructions
Please Read the Manual Carefully Before Installation
Please note
Electrical connection
The oven is fitted with a plug and must only be connected to a properly installed earthed socket. The socket must only be installed and the connecting cable must only be replaced by a qualified electrician, and in accordance with the appropriate regulations.
If the plug is no longer accessible following installation, an all-pole isolating switch must be present on the installation side with a contact gap of at least 3 mm.
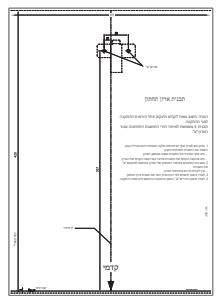
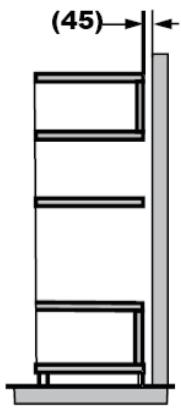
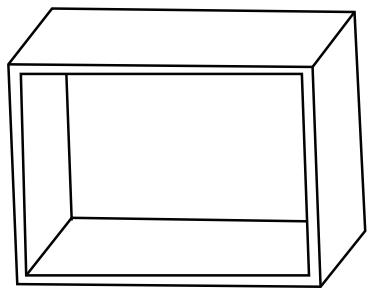
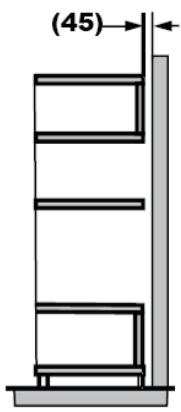
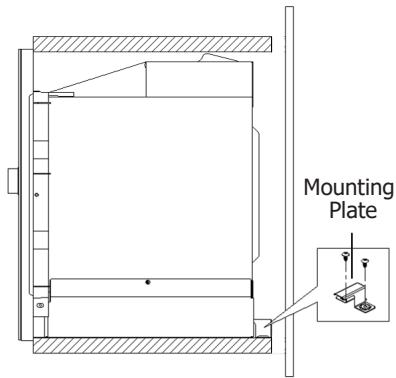
The fitted cabinet must not have a back wall behind the appliance.
A gap must be maintained between the wall and the base of the unit above.
Specific gap size could be referenced by the diagrams.
Minimum installation height: 85~cm Do not cover ventilation slots and suction holes.
Note:
Do not trap or bend the power cable.
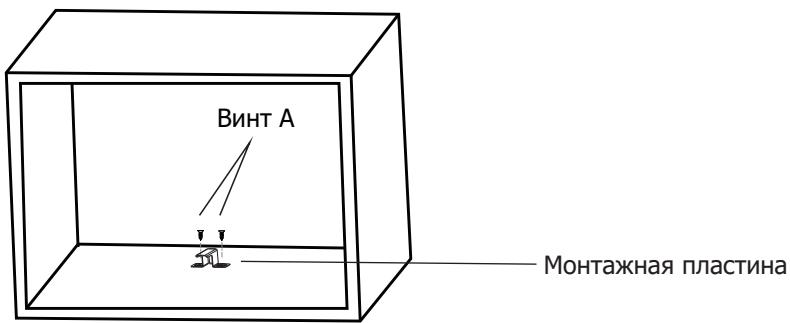
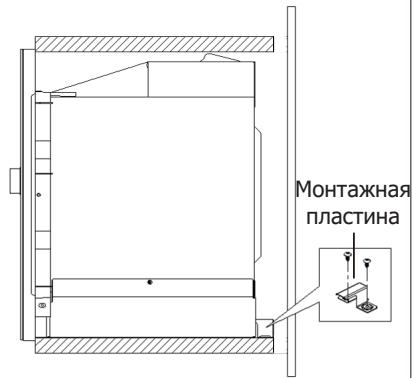
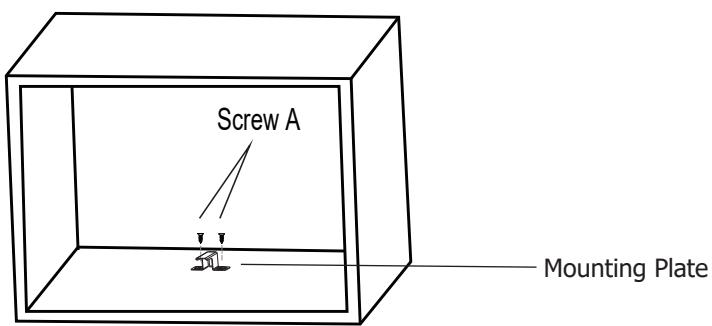
Screw A
Screw B
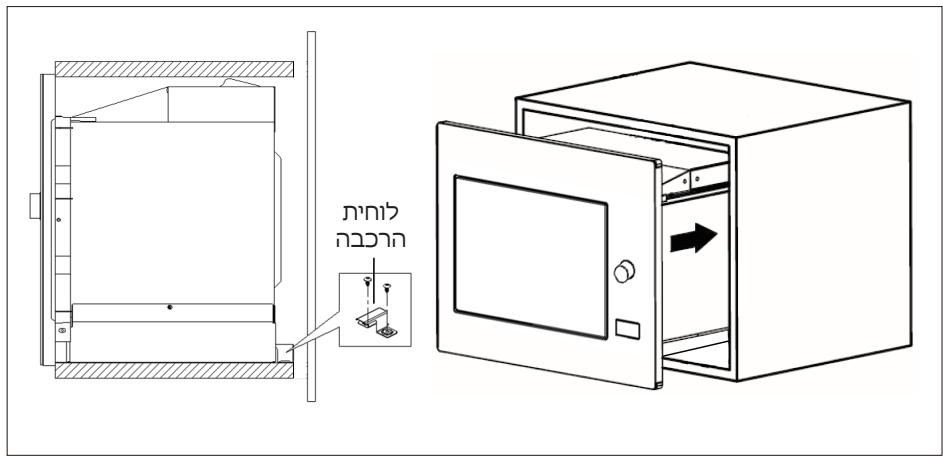
Mounting Plate
Trim-kit plastic cover
A. Built-in furniture
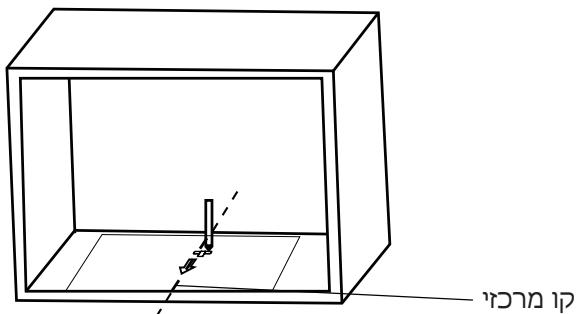
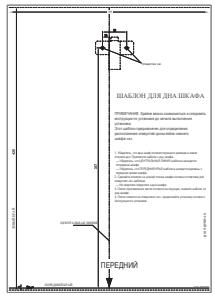
B.Prepare the cabinet
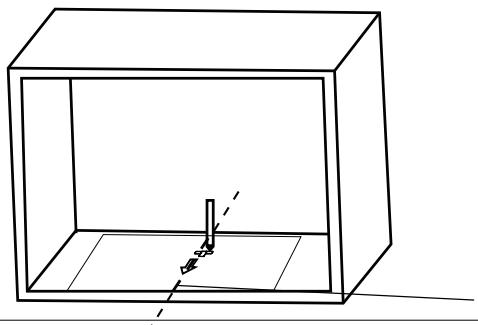
- Read the instruction on the BOTTOM CABINET TEMPLATE, put the template on the bottom plane of cabinet.

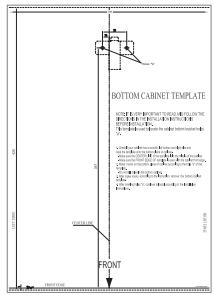
- Make the marks on the bottom plane of cabinet according to marks" a " of the template
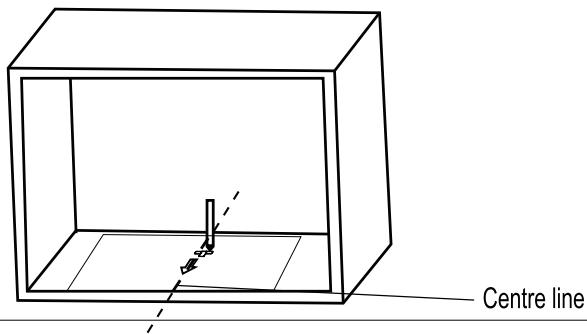
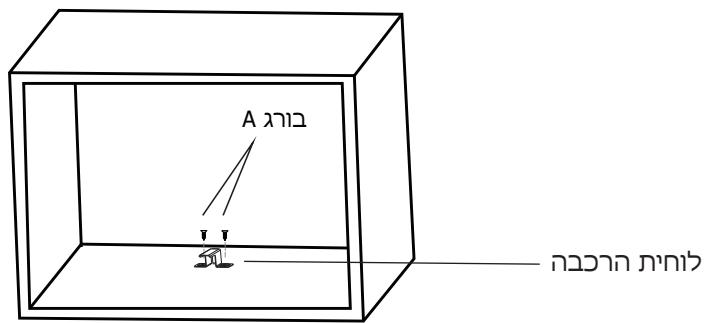
- Remove the bottom cabinet template and fix the mounting plate with screw A.
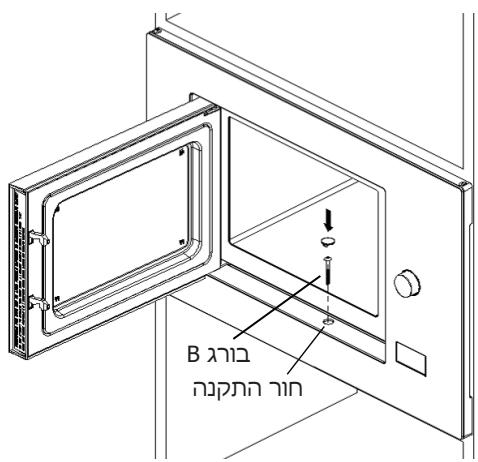
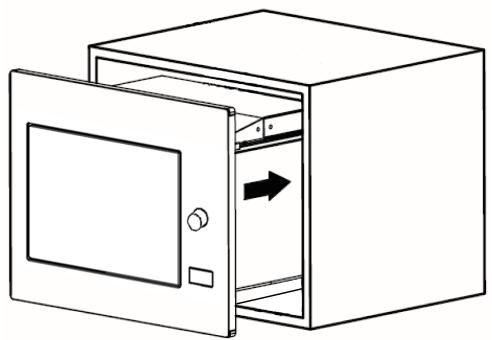
C.Install the oven
- Install the oven to the cabinet
1) Make sure the back of the oven is locked by mounting plate.
2) Do not trap or kink the power cord.
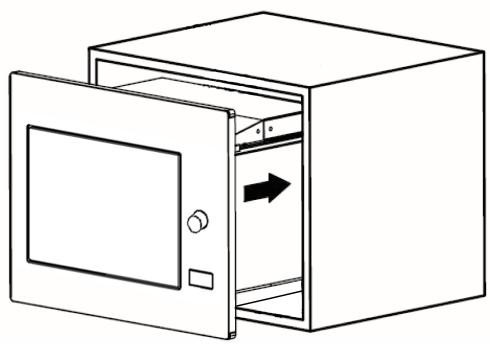
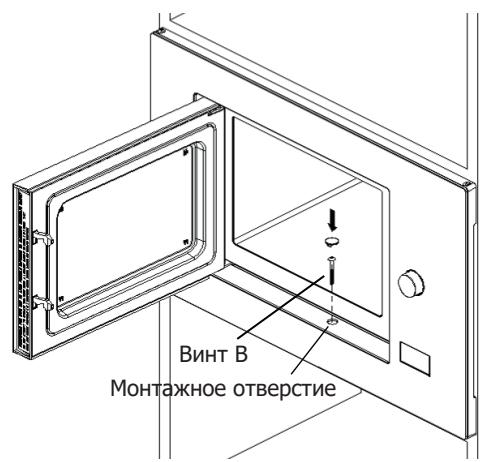
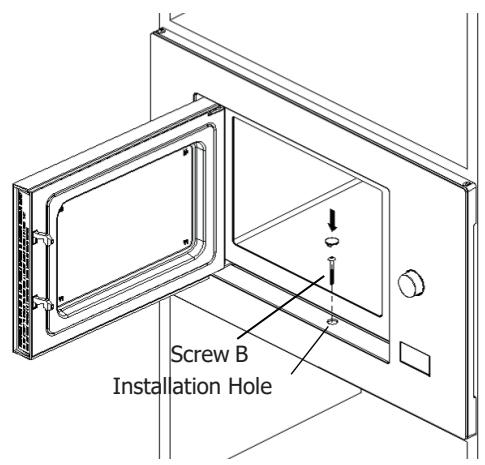
- Open the door, fix the oven to the cabinet with Screw B, at the installation hole. Then fix the Trim-kit plastic cover to the installation hole.
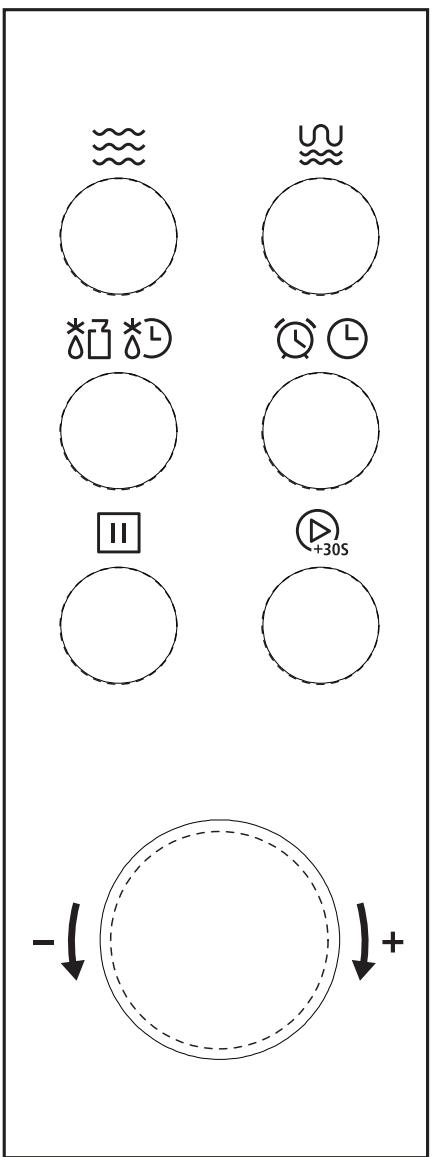
Operation Instructions
1. Clock Setting
When the microwave oven is electrified, the screen will display "0:00", buzzer will ring once.
- Press " Kitchen Timer/Clock " twice to select clock function, the hour figures will flash.
- Turn " 品 " to adjust the hour figures, the input time should be within 0--23.
- Press "Kitchen Timer/Clock", the minute figures will flash.
- Turn " 品 " to adjust the minute figures, the input time should be within 0--59.
- Press " Kitchen Timer/Clock " to finish clock setting.":" will flash, and the time will light.
Note:
1) If the clock is not set, it would not function when powered.
2) During the process of clock setting, if you press "Stop/Clear", the oven will go back to the previous status automatically.
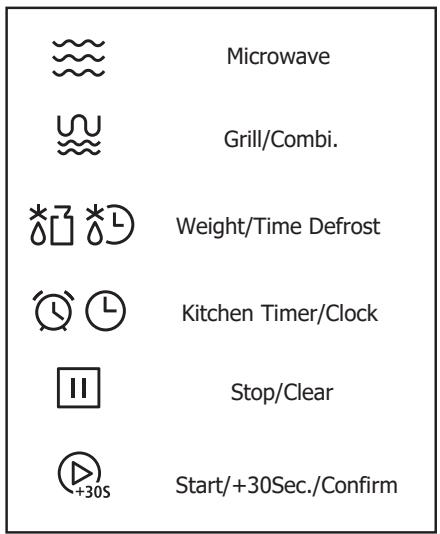
2. Microwave Cooking
- Press "Microwave", the screen will display "P100".
- Press " Microwave "repeatedly or turn " " to choose the power you want, and "P100", "P80", "P50", "P30 ", "P10" will display for each added press.
- Then press " Start/+30Sec./Confirm" to confirm, and turn " " to set cooking time from 0:05 to 95:00.
- Press " Start/+30Sec./Confirm" again to start cooking. Example: If you want to use 80% microwave power to cook for 20 minutes, you can operate the oven as the following steps.
- Press "Microwave" once, the screen displays "P100".
- Press "Microwave" once again or turn "Q", "t to choose 80% microwave power.
- Press " Start/+30Sec./Confirm " to confirm, and the screen displays "P80".
- Turn " ⌒ " to adjust the cooking time until the oven displays "20:00".
Press " Start/+30Sec./Confirm " to start cooking .
Note:
The step quantities for the adjustment time of the coding switch are as follow:
- Press " Grill/Combi. " once, the screen will display "G".
- Press " Grill/Combi. " repeatedly or turn " " to choose the power you want, and " G ", " C-1 " or " C-2 " will display for each added press.
- Then press " Start/+30Sec./Confirm " to confirm, and turn " " to set cooking time from 0:05 to 95:00.
- Press " Start/+30Sec./Confirm " again to start cooking.
Example: If you want to use 55% microwave power and 45% grill power(C-1) to cook for 10 minutes, you can operate the oven as the following steps.
- Press "Grill/Combi." once, the screen displays "G".
- Press " Grill/Combi. " repeatedly or turn " " to choose combi. 1 mode.
- Press " Start/+30Sec./Confirm " to confirm, and the screen displays "C-1".
- Turn " " to adjust the cooking time until the oven displays "10:00".
- Press " Start/+30Sec./Confirm " to start cooking.
Note:
If half the grill time passes, the oven sounds twice, and this is normal. In order to have a better effect of grilling food, you should turn the food over, close the door, and then press " Start/+30Sec./Confirm " to continue cooking. If no operation, the oven will continue working.
| "Grill/Combi." Order | Pad instructions Display | Microwave Power | Grill Power |
| 1 | G | 0% | 100% |
| 2 | C-1 | 55% | 45% |
| 3 | C-2 | 36% | 64% |
4. Quick Start
- In waiting state, Press " Start/+30Sec./Confirm " to start 30 seconds cooking with 100% power, each added press will increase 30 seconds cooking time up to 95 minutes.
- In microwave, grill, combination cooking or time defrost state, each press of " Start/+30Sec./Confirm " can increase 30 seconds of cooking time.
- In waiting state, turn " " left to set cooking time with 100% microwave power, then press " Start/+30Sec./Confirm " to start cooking.
5. Defrost By Weight
- Press "Weight/Time Defrost" once, and the oven will display "dEF1".
- Turn " Q " to select the weight of food from 100 to 2000 g.
- Press " Start/+30Sec./Confirm " to start defrosting.
6. Defrost By Time
- Press "Weight/Time Defrost" twice, and the oven will display "dEF2".
- Turn " to select the defrost time. The MAX time is 95 minutes.
- Press " Start/+30Sec./Confirm " to start defrosting. The defrost power is P30, and it cannot be changed.
7. Kitchen Timer
Press " Kitchen Timer/Clock " once, the screen will display 00:00.
- Turn " " to enter the correct time. (The maximum cooking time is 95 minutes.)
- Press " Start/+30Sec./Confirm " to confirm setting.
- When the kitchen time is reached, the buzzer will ring 5 times. If the clock has been set (24-hour system), the screen will display the current time.
Note: The kitchen Timer is different from 24-hour system. Kitchen Timer is a timer.
8.Auto Menu
- Turn " " right to choose the menu, and "A-1" to "A-8" will display.
- Press " Start/+30Sec./Confirm " to confirm.
- Turn " 品 " to choose the default weight as the menu chart.
Press " Start/+30Sec./Confirm " to start cooking.
Example: If you want to use "Auto Menu" to cook fish for 350g. - Turn " 品 " clockwise till "A-6" displays.
- Press " Start/+30Sec./Confirm " to confirm.
- Turn " ⌒ " to select the weight of fish till "350" displays.
- Press " Start/+30Sec./Confirm " to start cooking.
The menu chart:
| Menu | Weight | Display |
| A-1 Pizza | 200 g | 200 |
| 400 g | 400 | |
| A-2 Meat | 250 g | 250 |
| 350 g | 350 | |
| 450 g | 450 | |
| A-3 Vegetable | 200 g | 200 |
| 300 g | 300 | |
| 400 g | 400 | |
| A-4 Pasta | 50g(with 450 ml cold water) | 50 |
| 100g(with 800 ml cold water) | 100 | |
| A-5 Potato | 200 g | 200 |
| 400 g | 400 | |
| 600 g | 600 | |
| A-6 Fish | 250 g | 250 |
| 350 g | 350 | |
| 450 g | 450 | |
| A-7 Beverage | 1 cup(120 ml) | 1 |
| 2 cups(240 ml) | 2 | |
| 3 cups(360ml) | 3 | |
| A-8 Popcorn | 50 g | 50 |
| 100 g | 100 |
9. Multi-section cooking
At most 2 sections can be set for cooking. In multi-section cooking, if one section is defrosting, then defrosting shall be placed in the first section.
Example: If you want to defrost food for 5 minutes and then cook with 80% microwave power for 7 minutes, operate it as the following:
-
Press "Weight/Time Defrost " twice, and the oven will display "dEF2".
-
Turn " " to select the defrost time till "5:00" displays.
- Press " Microwave " once, the screen displays "P100".
- Press " Microwave " once again or turn " 🏻 " to choose 80% microwave power.
- Press " Start/+30Sec./Confirm " to confirm, and the screen displays "P80".
- Turn " " to adjust the cooking time till the oven displays "7:00".
- Press " Start/+30Sec./Confirm " to start cooking, and buzzer will sound once for the first section, defrosting time counts down. Buzzer will sound once again entering the second cooking. When cooking finishes, buzzer sounds five times.
10. Inquiring Function
- In states of microwave, grill and combination cooking, press "Microwave", the current power will be displayed for 3 seconds. After 3 seconds, the oven will turn back to the former state.
- In cooking state, press "Kitchen Timer/Clock" to inquire the time and the time will display for 3 seconds.
11. Lock-out Function for Children
Lock: In waiting state, press "Stop/Clear" for 3 seconds, there will be a long beep denoting entering the children-lock state. 0 will light and current time will display if the time has been set. Otherwise, the screen will display [---].
Lock quitting: In locked state, press "Stop/Clear" for 3 seconds, there will be a long "beep" denoting that the lock is released.
| Normal | |
| Microwave oven interfering TV reception | Radio and TV reception may be interfered when microwave oven operating. It is similar to the interference of small electrical appliance, like mixer, vacuum cleaner, and electric fan. It is normal. |
| Dim oven light | In low power microwave cooking, oven light may become dim. It is normal. |
| Steam accumulating on door, hot air out of vents | In cooking, steam may come out of food. Most will get out from vents. But some may accumulate on cool place like oven door. It is normal. |
| Oven started accidentally with no food in. | It is forbidden to run the until without any food inside. It is very dangerous. |
| Trouble | Possible cause | Remedy |
| Oven can not be started. | 1. Power cord not plugged in tightly. | Unplug. Then plug again after 10 seconds. |
| 2. Fuse blowing or circuit breaker works. | Replace fuse or reset circuit breaker (repaired by professional personnel of our company) | |
| 3. Trouble with outlet. | Test outlet with other electrical appliances. | |
| Oven does not heat. | 4. Door not closed well. | Close door well. |

According to Waste of Electrical and Electronic Equipment (WEEE) directive, WEEE should be separately collected and treated. If at any time in future you need to dispose of this product please do NOT dispose of this product with household waste. Please send this product to WEEE collecting points where available.
Brandt
CÓMOCONFIGURAR SU HORNO

- 1- RELATIONS CONSOMMATEURS FRANCE
- Kuchynsky Časovač
- Afrimning after tid
- Køkken timer
- nivn.6
- nun nn.7
- unuiX u79n .8
- 3
- 2
- nnn nn npnn .C
- JINXJN JON.B
- nappnn
- nnpnn Dax by nysoh on nx nns
- npxn
- BHIMAHNE!
- BHIMAHHE!
- 1/UBEOMJIeHnIyIJIa IIOJIb3OBATEJIa
- OuHCTKA
- IOCYDA
- OCTOPOXKHO
- MaTePnaJIbI, 3aIpeUeHHbIe IJIЯ NcNoJIb3OBaHnRA B MmKpOBoJHOBOI Neu
- O6paTnte BHHMaHHe
- BctpoeHHaMe6eIb
- Побrotовkaшкафа
- UctaHOBka neyn
- HCTpykunno3KcnlyaTaun
- YctaHOBka yacob
- MhoroctynehcuTae roTOBka
- 10.Функцязпрoca
- 11.ФункцяблokировкOTdTei
- 1/NOTICES TO THE USER 4
- / INSTALLATION 14
- 3/ USING THE APPLIANCE 19
- 4/ Trouble shooting 25
- PRECAUTIONS TO AVOID POSSIBLE EXPOSURE TO EXCESSIVE MICROWAVE ENERGY
- WARNING:
- ADDENDUM
- IMPORTANT SAFETY INSTRUCTIONS
- WARNING
- READ CAREFULLY AND KEEP FOR FUTURE REFERENCE
- To Reduce the Risk of Injury to Persons Grounding Installation
- DANGER
- CLEANING
- UTENSILS
- CAUTION
- Utensil Test:
- Materials you can use in microwave oven
- Materials to be avoided in microwave oven
- SETTING UP YOUR OVEN
- Turntable Installation
- Installation and connection
- The accessible surface may be hot during operation.
- Installation Instructions
- Please note
- Built-in furniture
- B.Prepare the cabinet
- C.Install the oven
- Operation Instructions
- Clock Setting
- Microwave Cooking
- Note:
- Quick Start
- Defrost By Weight
- Defrost By Time
- Kitchen Timer
- 8.Auto Menu
- Multi-section cooking
- Inquiring Function
- Lock-out Function for Children
- Brandt
- CÓMOCONFIGURAR SU HORNO
Brand : BRANDT
Model : BMG2115B
Category : Microwaves