USER MANUAL EM49 BEURER
Instructions for use 20
- Delivery scope and accessories 20
- Getting to know your device 20
- Signs and symbols 22
- Important notes 23
- Device description 25
- Initial use 25
7.Use 26
- Program overview 26
8.1 TENS program table 27
8.2 EMS program table 27
8.3 Information regarding the positioning of electrodes 29
9.Customisable programs 30
10.Doctor's function 32
11.Current parameters 33
11.1 Impulse shape 33
11.2 Impulse frequency 33
11.3 Impulse width 33
11.4 Impulse intensity 33
11.5 Cycled impulse parameter variation 33
- Cleaning and storage 34
- Disposal 34
14.Problems/solutions. 34
- Replacement parts and wearing parts 35
- Technical specifications 35
- Notes on electromagnetic compatibility 36
18.Warranty/service 36

Read these instructions for use carefully and keep them for later use, be sure to make them accessible to other users and observe the information
they contain.
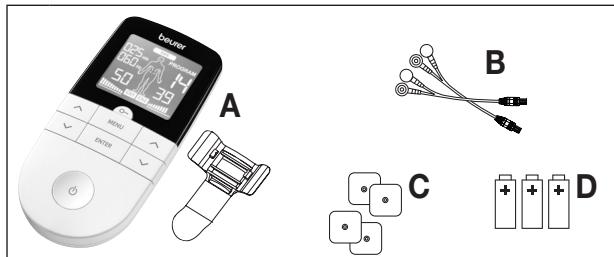
1. DELIVERY SCOPE AND ACCESSORIES
Check that the set packaging has not been tampered with and make sure that all components are present. Before use, ensure that there is no visible damage to the device or accessories and that all packaging material has been removed. If you have any doubts, do not use the device and contact your retailer or the specified Customer Services address.

2. GETTING TO KNOW YOUR DEVICE
What is a digital EMS/TENS unit and what can it do?
Digital EMS/TENS units fall into the electrostimulation device category.
They provide three basic functions suitable for combined operation:
- Electrical stimulation of nerve tracts (TENS)
- Electrical stimulation of muscle tissue (EMS)
- A massage effect triggered by electrical signals
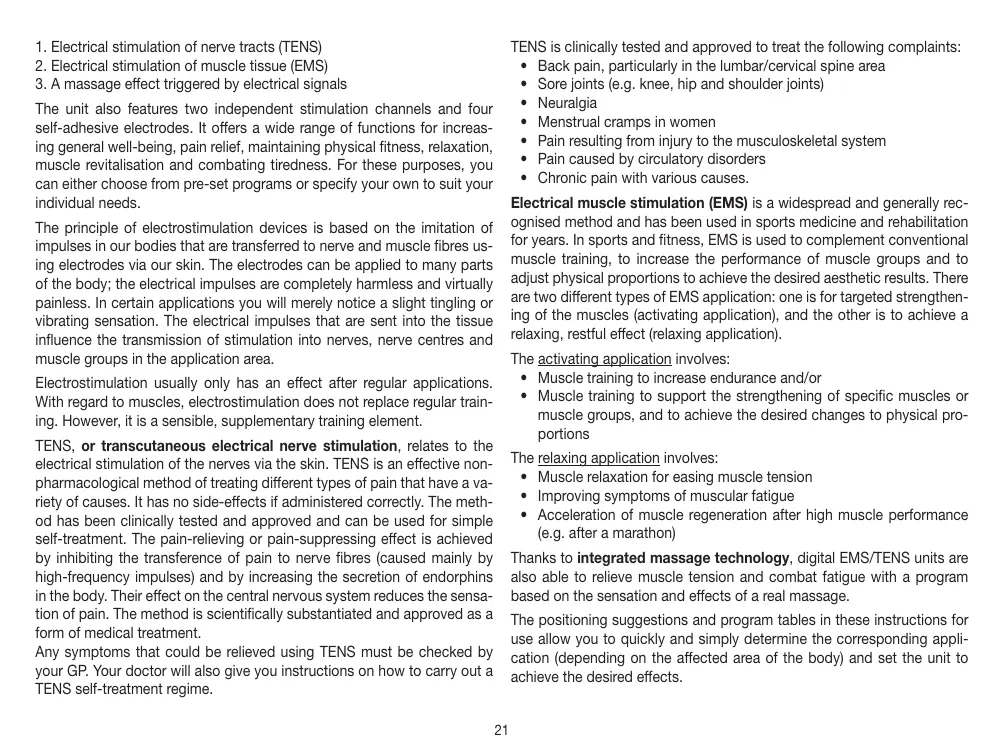
The unit also features two independent stimulation channels and four self-adhesive electrodes. It offers a wide range of functions for increasing general well-being, pain relief, maintaining physical fitness, relaxation, muscle revitalisation and combating tiredness. For these purposes, you can either choose from pre-set programs or specify your own to suit your individual needs.
The principle of electrostimulation devices is based on the imitation of impulses in our bodies that are transferred to nerve and muscle fibres using electrodes via our skin. The electrodes can be applied to many parts of the body; the electrical impulses are completely harmless and virtually painless. In certain applications you will merely notice a slight tingling or vibrating sensation. The electrical impulses that are sent into the tissue influence the transmission of stimulation into nerves, nerve centres and muscle groups in the application area.
Electrostimulation usually only has an effect after regular applications. With regard to muscles, electrostimulation does not replace regular training. However, it is a sensible, supplementary training element.
TENS, or transcutaneous electrical nerve stimulation, relates to the electrical stimulation of the nerves via the skin. TENS is an effective non-pharmacological method of treating different types of pain that have a variety of causes. It has no side-effects if administered correctly. The method has been clinically tested and approved and can be used for simple self-treatment. The pain-relieving or pain-suppressing effect is achieved by inhibiting the transference of pain to nerve fibres (caused mainly by high-frequency impulses) and by increasing the secretion of endorphins in the body. Their effect on the central nervous system reduces the sensation of pain. The method is scientifically substantiated and approved as a form of medical treatment.
Any symptoms that could be relieved using TENS must be checked by your GP. Your doctor will also give you instructions on how to carry out a TENS self-treatment regime.
TENS is clinically tested and approved to treat the following complaints:
- Back pain, particularly in the lumbar/cervical spine area
- Sore joints (e.g. knee, hip and shoulder joints)
Neuralgia
- Menstrual cramps in women
- Pain resulting from injury to the musculoskeletal system
- Pain caused by circulatory disorders
- Chronic pain with various causes.
Electrical muscle stimulation (EMS) is a widespread and generally recognised method and has been used in sports medicine and rehabilitation for years. In sports and fitness, EMS is used to complement conventional muscle training, to increase the performance of muscle groups and to adjust physical proportions to achieve the desired aesthetic results. There are two different types of EMS application: one is for targeted strengthening of the muscles (activating application), and the other is to achieve a relaxing, restful effect (relaxing application).
The activating application involves:
- Muscle training to increase endurance and/or
- Muscle training to support the strengthening of specific muscles or muscle groups, and to achieve the desired changes to physical proportions
The relaxing application involves:
- Muscle relaxation for easing muscle tension
- Improving symptoms of muscular fatigue
- Acceleration of muscle regeneration after high muscle performance (e.g. after a marathon)
Thanks to integrated massage technology, digital EMS/TENS units are also able to relieve muscle tension and combat fatigue with a program based on the sensation and effects of a real massage.
The positioning suggestions and program tables in these instructions for use allow you to quickly and simply determine the corresponding application (depending on the affected area of the body) and set the unit to achieve the desired effects.
Thanks to the two separately adjustable channels, the digital EMS/TENS unit offers you the advantage of being able to set the intensity of the impulses independently from each other for two treatment areas on the body, for example to cover both sides of your body or to evenly stimulate larger areas of tissue. The option to individually set the intensity of each channel also enables you to treat two separate areas of the body simultaneously instead of having to treat the individual areas in turn, which saves you time.
3. SIGNS AND SYMBOLS
The following symbols are used on the device, in these instructions for use, on the packaging and on the type plate for the device:
| WARNING
Warning instruction indicating a risk of injury or damage to health |
| IMPORTANT
Safety note indicating possible damage to the device/ accessory |
| Note
Note on important information |
| Observe the instructions for use |
| IP22 | Protected against ingress of solid foreign objects greater than 12.5 mm in diameter.
Protected against drops of water falling at up to 15° from vertical. |
| SN | Serial number |
| Application part, type BF |
| CE0483 | CE labelling
This product satisfies the requirements of the applicable European and national directives. |
| Manufacturer |
| The device can emit effective output values above 10 mA, averaged over every five-second interval |
| Separate the product and packaging elements and dispose of them in accordance with local regulations. |
| REF | Item number |
| Importer symbol |
| Storage / Transport | Permissible storage and transport temperature and humidity |
| Operating | Permissible operating temperature and humidity. |
| Separate the packaging elements and dispose of them in accordance with local regulations. |
| A | Marking to identify the packaging material.
A = Material code, B = Material number:
1-7 = Plastics, 20-22 = Paper and cardboard |
| The device must not be used by persons with medical implants (e.g. heart pacemakers). Otherwise their function could be impaired. |
4. IMPORTANT NOTES
The device is not a substitute for medical consultation and treatment. Consult your doctor first if you are experiencing any pain or are suffering from an illness.

WARNING!
To avoid damage to health, we strongly advise against using the digital EMS/TENS unit in the following situations:
- With implanted electrical devices (such as a pacemaker)
In the case of metal implants
If you use an insulin pump
If you have a high temperature (e.g. >39^ )
- If you have a known or acute cardiac arrhythmia, or disorders of the heart's impulse and conduction system
If you suffer from a seizure disorder (e.g. epilepsy)
If you are pregnant
If you have cancer
-
After an operation, if strong muscle contractions could affect the healing process
-
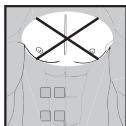
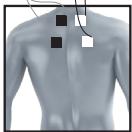
The device must never be used near to the heart. The stimulation electrodes must not be placed on any part of the front ribcage (where the ribs and breastbone are located), especially not on the two large pectorals. this can increase the risk of ventricular fibrillation and induce cardiac arrest.
Before using the device, consult your doctor if any of the following applies to you:
- Serious illnesses, in particular if you suspect or have been diagnosed with high blood pressure, a blood coagulation disorder, propensity to thrombo-embolic conditions or recurrent malignant growths
- Any skin conditions
- Unexplained chronic pain in any part of the body
Diabetes
- Any sensory impairment that reduces the feeling of pain (e.g. metabolic disorders)
If you are receiving medical treatment
- In the event of complaints linked to stimulation treatment
- If you suffer from persistently irritated skin due to long-term stimulation at the same electrode site

IMPORTANT!
Only use digital EMS/TENS units:
- On adults
- For the intended purpose and as specified in these instructions for use. Improper use can be dangerous.
- For external use
- With the original accessories supplied, which can be re-ordered. Failure to do so invalidates the warranty.
PRECAUTIONS:
- Always pull firmly on electrodes to remove them from the skin to prevent injuries in the unusual case of highly sensitive skin.
- Keep the device away from sources of heat and do not use it in close proximity (approx. 1 m) to shortwave or microwave devices (e.g. mobile phones), as doing so can result in unpleasant current peaks.
-
Do not expose the device to direct sunlight or high temperatures.
-
Protect the device from dust, dirt and humidity.
- Never immerse the device in water or other liquids.
The device is suitable for self-treatment.
- For hygiene reasons, the electrodes may only be used on one person.
- If the device does not work properly, or you feel unwell or experience pain, stop using it immediately.
- Switch off the unit or the respective channel first before removing or relocating electrodes to prevent unintentional stimulation.
- Do not modify electrodes (e.g. by cutting them). This increases the current intensity, which is potentially hazardous (max. recommended output value for the electrodes is 9mA / cm^2 , an effective current intensity beyond 2mA / cm^2 requires increased awareness).
- Do not use the device whilst asleep, driving a vehicle or operating machinery.
- Do not use whilst undertaking any activity where an unexpected reaction (e.g. strong muscle contractions even at low intensity) could be dangerous.
- Ensure that no metallic objects (e.g. belt buckles or necklaces) come into contact with the electrodes during stimulation. If you are wearing jewellery or have piercings in the area to be treated (e.g. a navel piercing), these must be removed before using the device. Failure to do so could result in spot burns.
- Keep the device away from children.
- Make sure not to confuse the electrode cables including contacts with your headphones or other devices and do not connect the electrodes to other devices.
- Do not use the device whilst using other devices that transmit electrical impulses into your body.
- Do not use in the vicinity of highly flammable substances, gases or explosives.
- Do not use rechargeable batteries and always use the same battery types.
- During the initial few minutes, use the device while sitting or lying down to minimise the risk of injuries as a consequence of isolated cases of vagal responses (feeling of faintness). If you feel faint, im
mediately switch off the device, lie down and support the legs in an elevated position (approx. 5-10 min).
- Treatment of the skin with moisturising lotions or ointments beforehand is not recommended as this considerably increases the electrode wear and may cause unpleasant current peaks.
- This device is not intended for use by children or people with restricted physical, sensory (e.g. reduced sensitivity to pain) or mental skills or a lack of experience and/or lack of knowledge, unless they are supervised by a person who is responsible for their safety or are instructed by such a person in how to use the device.
- If the adhesive capability of the adhesive electrodes decreases, please replace them immediately. Only use the device again with new adhesive electrodes. Otherwise the unequal adhesion of the adhesive electrodes may lead to skin injuries. Replace the electrodes with new ones after having used them 20 times at the latest.
Damage
- If the device is damaged, do not use it and contact your retailer or the specified Customer Services address.
- In order to perform the effectiveness of function by the device, do not drop the device or disassemble the device.
- Check the device for signs of wear and tear or damage. If there are such signs of wear and tear or damage or if the device was used improperly, it must be returned to the manufacturer or retailer before further use.
- Switch the device off immediately if it is faulty or not working properly.
- Do not attempt to open and/or repair the device yourself. Repairs may only be carried out by Customer Services or authorised retailers. Failure to comply will result in voiding of the warranty.
- The manufacturer is not liable for damage resulting from improper or careless use.
Notes on handling batteries
If your skin or eyes come into contact with battery fluid, rinse the affected areas with water and seek medical assistance.
- Choking hazard! Small children may swallow and choke on batteries. Store the batteries out of the reach of small children.
- Observe the plus (+) and minus (-) polarity signs.
- If a battery has leaked, put on protective gloves and clean the battery compartment with a dry cloth.
- Protect batteries from excessive heat.
- Risk of explosion! Never throw batteries into a fire.
- Do not charge or short-circuit batteries.
- If the device is not to be used for a relatively long period, take the batteries out of the battery compartment.
- Use identical or equivalent battery types only.
Always replace all batteries at the same time.
- Do not use rechargeable batteries.
- Do not disassemble, open or crush the batteries.
5. DEVICE DESCRIPTION
- ON/OFF button
- ENTER button
- Setting buttons
(Ch1 ∧V left, Ch2 ∧V right)
- MENU button
5.Keylock
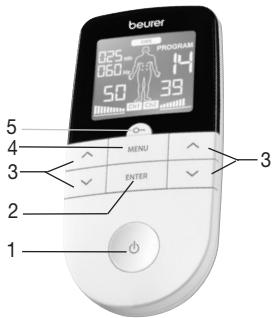
Display (full screen):
-
Menu TENS / EMS / MASSAGE
-
Program number
- Impulse intensity channel 2 (Ch2)
- Electrode positioning indicator
- Impulse intensity channel 1 (Ch1)
- Low battery
- Keylock
- Display for frequency (Hz) and pulse width ( s)
- Timer function (remaining time display) or working time
6. INITIAL USE
- Remove the belt clip from the unit (if attached).
- Press the battery compartment cover on the rear of the device and slide it downwards.
- Insert the three alkaline AAA 1.5V batteries. Make sure that the batteries are inserted the correct way round.
- Close the battery compartment lid again carefully (Fig. 1).
- Reattach the belt clip, if required.
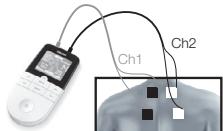
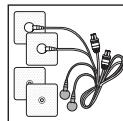
- Connect the connection cables with the electrodes (Fig. 2).
The electrodes feature clip closures to make connection particularly easy.
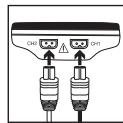
- Guide the connection cable plugs into the socket on the top of the device (Fig. 3).
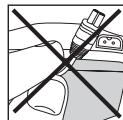
- Do not pull, twist or make sharp bends in the cables (Fig. 4).
Please note that when the battery is replaced or removed, all settings are restored to the factory default settings.

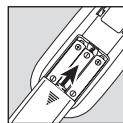
Fig. 1
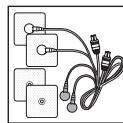
Fig. 2
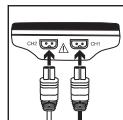
Fig. 3
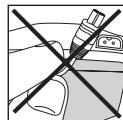
Fig. 4
7. USE
Notes on use
- The device switches itself off automatically if it is not used for one minute (automatic switch-off). When the unit is switched on again, the LCD screen displays the menu selection and the most recently used menu flashes.
- A brief acoustic signal is output when a valid button is pressed. Two brief acoustic signals are output when an invalid button is pressed.
- You can pause the stimulation at any time by briefly pressing the ON/OFF button. To continue the stimulation, briefly press the ON/OFF button again and set the desired impulse intensity again.
Starting application
Step 1: Look for a suitable program from the program tables (see section "6. Program overview").
Step 2: Place the electrodes on the desired area for treatment (for positioning suggestions see section _6.4 Information regarding the positioning of electrodes") and connect them to the device.
Step 3: Press the ON/OFF button to switch on the device.
Step 4: Press the MENU button to navigate through the TENS/EMS/MASSAGE menus and press the ENTER button to confirm your selection.
Step 5: Use the V setting buttons to select the program number you want and press the ENTER button to confirm your selection. At the start of the stimulation treatment, the impulse intensity of Ch1 and Ch2 is set to by default. No impulses are sent to the electrodes yet.
Step 6: Use the left and right setting buttons for Ch1 and Ch2 to select the impulse intensity you want. The indicator for impulse intensity in the display changes accordingly. If the program is in a pause phase, the intensity cannot be increased.
If you wish to return to the previous selection menu, press the MENU button. By holding down the ENTER button, you can skip individual setting steps and start directly with the stimulation treatment.
Keylock O
Locks the buttons to avoid them being pressed unintentionally.
- To activate the keylock, hold down the button until the symbol is visible in the display (approx. 3 seconds).
- To deactivate the keylock, hold down the button until the symbol disappears from the display (approx. 3 seconds).
Pausing application
You can pause the stimulation at any time by briefly pressing the ON/OFF button. To continue the stimulation, briefly press the ON/OFF button again and set the desired impulse intensity again.
8.PROGRAM OVERVIEW
The digital EMS/TENS unit features a total of over 70 programs:
15 TENS programs
35 EMS programs
20 MASSAGE programs
In all programs you can set the impulse intensity of both channels individually.
You can also set various parameters in the TENS programs 13 - 15 and the EMS programs 33 - 35 to adjust the stimulating effect to the application area.
8.1 TENS program table
| Progr. no. | Area of application, indications | Running time (min) | Possible electrode positions |
| 1 | Pain in upper limbs 1 | 30 | 12-17 |
| 2 | Pain in upper limbs 2 | 30 | 12-17 |
| 3 | Pain in lower limbs | 30 | 23-27 |
| 4 | Ankle pain | 30 | 28 |
| 5 | Shoulder pain | 30 | 1-4 |
| 6 | Pain in the back | 30 | 4-11 |
| 7 | Pain in bottom and back of thighs | 30 | 22, 23 |
| 8 | Pain relief 1 | 30 | 1-28 |
| 9 | Pain relief 2 | 30 | 1-28 |
| 10 | Endorphin effect (burst) | 30 | 1-28 |
| 11 | Pain relief 3 | 30 | 1-28 |
| 12 | Pain relief - chronic pain | 30 | 1-28 |

TENS programs 13-15 can be set individually (see section „Customisable programs“)
Note: See section 6.4 for the correct electrode position.
8.2 EMS program table
| Progr. no. | Area of application, indications | Running time (min) | Possible electrode positions |
| 1 | Warming up | 30 | 1-27 |
| 2 | Capillarisation | 30 | 1-27 |
| 3 | Strengthening the upper arm muscles | 30 | 12-15 |
| 4 | Maximising the strength of the upper arm muscles | 30 | 12-15 |
| Progr. no. | Area of application, indications | Running time (min) | Possible electrode positions |
| 5 | Explosive force of the upper arm muscles | 30 | 12-15 |
| 6 | Tightening the upper arm muscles | 30 | 12-15 |
| 7 | Shaping the upper arm muscles | 30 | 12-15 |
| 8 | Tightening the lower arm muscles | 30 | 16-17 |
| 9 | Maximising the strength of the lower arm muscles | 30 | 16-17 |
| 10 | Shaping the lower arm muscles | 30 | 16-17 |
| 11 | Tightening the abdominal muscles | 30 | 18-20 |
| 12 | Maximising the strength of the abdominal muscles | 30 | 18-20 |
| 13 | Shaping the abdominal muscles | 30 | 18-20 |
| 14 | Toning the abdominal muscles | 30 | 18-20 |
| 15 | Strengthening the thigh muscles | 30 | 23, 24 |
| 16 | Maximising the strength of the thigh muscles | 30 | 23, 24 |
| 17 | Explosive force of the thigh muscles | 30 | 23, 24 |
| 18 | Shaping the thigh muscles | 30 | 23, 24 |
| 19 | Toning the thigh muscles | 30 | 23, 24 |
| 20 | Strengthening the lower leg muscles | 30 | 26, 27 |
| 21 | Maximising the strength of the lower leg muscles | 30 | 26, 27 |
| 22 | Explosive force of the lower leg muscles | 30 | 26, 27 |
| 23 | Shaping the lower leg muscles | 30 | 26, 27 |
| 24 | Toning the lower leg muscles | 30 | 26, 27 |
| 25 | Strengthening the shoulder muscles | 30 | 1-4 |
| 26 | Maximising the strength of the shoul- der muscles | 30 | 1-4 |
| 27 | Tightening the shoulder muscles | 30 | 1-4 |
| 28 | Strengthening the lower back muscles | 30 | 4-11 |
| 29 | Maximising the strength of the lower back muscles | 30 | 4-11 |
| 30 | Tightening the gluteal muscles | 30 | 22 |
| 31 | Strengthening the gluteal muscles | 30 | 22 |
| 32 | Maximising the strength of the gluteal muscles | 30 | 22 |

EMS programs 33 - 35 can be set individually (see section „Customisable programs").
Note: See section 6.4 for the correct electrode position.
MASSAGE program table
| Progr. no. | Area of application, indications | Running time (min) | Possible electrode positions |
| 1 | Tapping massage 1 | 20 | 1-28 |
| 2 | Tapping massage 2 |
| 3 | Tapping massage 3 |
| 4 | Kneading massage 1 |
| 5 | Kneading massage 2 |
| 6 | Pressure massage |
| 7 | Relaxing massage 1 |
| 8 | Relaxing massage 2 |
| 9 | Relaxing massage 3 |
| 10 | Relaxing massage 4 |
| 11 | Spa massage 1 |
| 12 | Spa massage 2 |
| 13 | Spa massage 3 |
| 14 | Spa massage 4 |
| 15 | Spa massage 5 |
| 16 | Spa massage 6 |
| 17 | Spa massage 7 |
| 18 | Relaxing massage 1 |
| 19 | Relaxing massage 2 |
| 20 | Relaxing massage 3 |
Note: See section 6.4 for the correct electrode position.

WARNING!
Do not apply the electrodes to the front wall of the chest, i.e. do not massage the large left and right pectoral muscles.
1
2
3
4
5
6
7
8
9
10
11
12
13
14
15
16
17
18
19
20
21
22
23

24
25
26
27

28
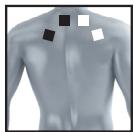
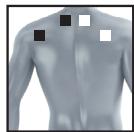
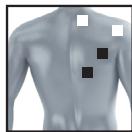
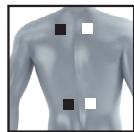
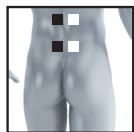
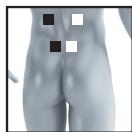
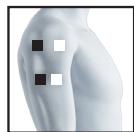
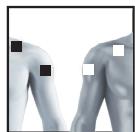
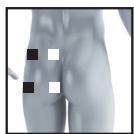
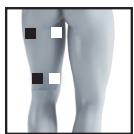
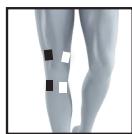
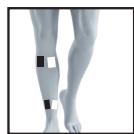
It is fundamental to the intended success of electrostimulation applications that electrodes are positioned sensibly.
We recommend that you consult your doctor to establish the ideal electrode positions for your intended application area.
The following applies to the selection of electrode positions:
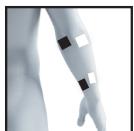
Electrode distance
The larger the distance between electrodes, the larger the stimulated tissue volume. This applies to the area and depth of the tissue volume. At the same time, however, the stimulation intensity of the tissue falls the further the electrodes are apart. As a result, greater distances between electrodes mean a larger tissue volume is stimulated, but less intensively. Consequently, you must increase the impulse intensity to boost stimulation.
The following guideline applies to selection of the electrode distance:
- Sensible distance: approx. 5-15 cm
- At distances below 5cm , the unit primarily stimulates surface structures intensively
- At distances in excess of 15cm , large areas and deep structures are stimulated very weakly
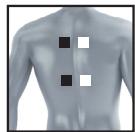
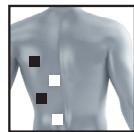
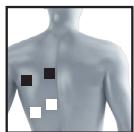
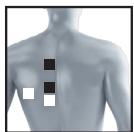
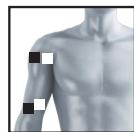
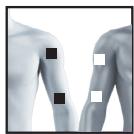
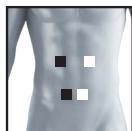
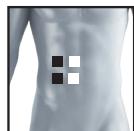
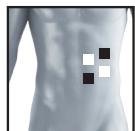
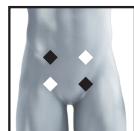
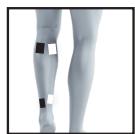
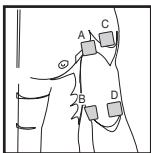
Relationship between electrodes and muscle fibre structures
Adapt the current flow direction to the fibre structure of the muscle according to the muscle layer you would like to treat. If you are targeting superficial muscles, position the electrodes in parallel to the fibre structure (A-B / C-D) and if you are targeting deeper layers of tissue, position the electrodes across the fibre structure. You can do this by positioning electrodes as crosses (i.e. diagonally), such as A-D / B-C.
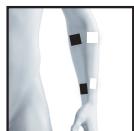
As part of pain relief treatment (TENS) using the digital EMS/TENS unit and its 2 separately adjustable channels and 2 adhesive electrodes each, it is advisable either to position the electrodes of a channel so that the area affected by the pain is between the electrodes or to position one electrode directly on the area affected by the pain and the other electrode at a minimum distance of 2 - 3cm . You may use the electrodes of the second channel to simultaneously treat additional areas affected by pain or use them in conjunction with the electrodes of the first channel to restrict the area affected by pain (position electrodes opposite). In this case, we once again recommend positioning electrodes as crosses.
Tip for the massage function: always use all four electrodes for optimum treatment.
Use the electrodes on skin that is clean and preferably free from hair and grease in order to prolong the life of the electrodes. If required, clean the skin with water and remove hair prior to treatment.
If an electrode should come loose during use, the impulse intensity of both channels is reduced to the lowest level. Apply the electrode again and reset the desired impulse intensity.
9. CUSTOMISABLE PROGRAMS
(Appplies for TENS 13-15, EMS 33-35)
The programs TENS 13-15 and EMS 33-35 can be customised according to your needs.
TENS 13 program
TENS 13 is a program that you can also customise. In this program, you can set the impulse frequency to between 1 and 150Hz and the impulse width to between 80 and 250~ s .
-
Place the electrodes on the desired area for treatment (for positioning suggestions see section "6.4 Information regarding the positioning of electrodes") and connect them to the device.
-
Select the TENS 13 program as described in section "5.2 Starting application" (step 3 to step 5).
- Use the / V setting buttons to select the impulse frequency you want and use the ENTER button to confirm.
- Use the / V setting buttons to select the impulse width you want and use the ENTER button to confirm.
- Use the setting buttons to select the treatment time you want and use the ENTER button to confirm.
- Use the left and right / V setting buttons for Ch1 and Ch2 to select the impulse intensity you want.
TENS 14 program
The TENS 14 program is a burst program that you can also customise. Various impulse sequences run in this program. Burst programs are suitable for all areas of application to be treated with changing signal patterns (to minimise the level of accustomed to the treatment). In this program you can set an impulse width of between 80 and 250~ s
- Place the electrodes on the desired area for treatment (for positioning suggestions see electrode positions in section 6.4) and connect them to the device.
- Select the TENS 14 program as described in section "5.2 Starting application" (step 3 to step 5).
- Use the V setting buttons to select the impulse width you want and use the ENTER button to confirm.
- Use the setting buttons to select the treatment time you want and use the ENTER button to confirm.
- Use the left and right / V setting buttons for Ch1 and Ch2 to select the impulse intensity you want.
TENS 15 program
TENS 15 is a program that you can also customise. In this program, you can set the impulse frequency to between 1 and 150Hz . The impulse width changes automatically during the stimulation treatment.
- Place the electrodes on the desired area for treatment (for positioning suggestions see electrode positions in section 6.4) and connect them to the device.
- Select the TENS 15 program as described in section "5.2 Starting application" (step 3 to step 5).
- Use the setting buttons to select the impulse frequency you want and use the ENTER button to confirm.
- Use the / V setting buttons to select the treatment time you want and use the ENTER button to confirm.
- Use the left and right / V setting buttons for Ch1 and Ch2 to select the impulse intensity you want.
EMS 33 program
EMS 33 is a program that you can also customise. In this program, you can set the impulse frequency to between 1 and 150Hz and the impulse width to between 80 and 320~ s .
- Place the electrodes on the desired area for treatment (for positioning suggestions see electrode positions in section 6.4) and connect them to the device.
- Select the EMS 33 program as described in section "5.2 Starting application" (step 3 to step 5).
- Use the V setting buttons to select the impulse frequency you want and use the ENTER button to confirm.
- Use the A / V setting buttons to select the impulse width you want and use the ENTER button to confirm.
- Use the setting buttons to select the treatment time you want and use the ENTER button to confirm.
- Use the left and right / V setting buttons for Ch1 and Ch2 to select the impulse intensity you want.
EMS 34 program
EMS 34 is a program that you can also customise. In this program, you can set the impulse frequency to between 1 and 150Hz and the impulse width to between 80 and 450~ s . You can also set the working time and pause time for this program to between 1 and 30 seconds each.
- Place the electrodes on the desired area for treatment (for positioning suggestions see electrode positions in section 6.4) and connect them to the device.
- Select the EMS 34 program as described in section "5.2 Starting application" (step 3 to step 5).
- Use the / V setting buttons to select the working time ("on time") you want and use the ENTER button to confirm.
- Use the setting buttons to select the pause time ("off time") you want and use the ENTER button to confirm.
- Use the / V setting buttons to select the impulse frequency you want and use the ENTER button to confirm.
- Use the / V setting buttons to select the impulse width you want and use the ENTER button to confirm.
- Use the setting buttons to select the treatment time you want and use the ENTER button to confirm.
- Use the left and right / V setting buttons for Ch1 and Ch2 to select the impulse intensity you want.
EMS 35 program
EMS 35 is a burst program that you can also customise. Various impulse sequences run in this program. Burst programs are suitable for all areas of application to be treated with changing signal patterns (to minimise the level of customising to the treatment). In this program, you can set the impulse frequency to between 1 and 150Hz and the impulse width to between 80 and 450~ s . You can also set the working time and pause time for this program to between 1 and 30 seconds each.
- Place the electrodes on the desired area for treatment (for positioning suggestions see electrode positions in section 6.4) and connect them to the device.
- Select the EMS 35 program as described in section "5.2 Starting application" (step 3 to step 5).
- Use the / V setting buttons to select the working time ("on time") you want and use the ENTER button to confirm.
-
Use the A / V setting buttons to select the pause time ("off time") you want and use the ENTER button to confirm.
-
Use the setting buttons to select the impulse frequency you want and use the ENTER button to confirm.
- Use the setting buttons to select the impulse width you want and use the ENTER button to confirm.
- Use the / V setting buttons to select the treatment time you want and use the ENTER button to confirm.
- Use the left and right setting buttons for Ch1 and Ch2 to select the impulse intensity you want.
10. DOCTOR'S FUNCTION
The Doctor's function is a special setting to allow you to access your personal program even more easily and directly.
Your individual program settings are instantly recalled and activated when the device is switched on.
You may wish to adjust this individual program following advice from your doctor.
Setting the Doctor's function
- Select your program and the corresponding settings as described in section "5.2 Starting application".
- At the start of the stimulation treatment, the impulse intensity of Ch1 and Ch2 is set to 00 by default. No impulses are sent to the electrodes yet. Before setting the desired impulse intensity using the intensity setting buttons, press and hold the Ch2 -button for 5 seconds. Storage in the Doctor's function is confirmed with a long acoustic signal. If you switch on the device again, the program you saved using the Doctor's function is automatically opened directly.
Deleting the Doctor's function
To clear the device again and to re-allow access to other programs, press and hold the Ch2 V -button again for approx. 5 seconds. To do this, the impulse intensity of Ch1 and Ch2 must be set to 0. Deletion of the Doctor's function is confirmed with a long acoustic signal.
Therapy memory
The EM49 records the treatment time. To reach the therapy memory, switch the device on using the ON/OFF button and press and hold the button Ch2 for 5 seconds. The treatment time lapsed appears in the display. The top two numbers stand for minutes; the hours are shown below. To reset the treatment time, press and hold the button Ch2 v for 5 seconds. When replacing the battery, the therapy memory is automatically reset. Press the „Menu“ button to return to selecting a program, or switch the device off. Info: Therapy memory cannot be accessed if the Doctor's function is activated.
11. CURRENT PARAMETERS
Electrostimulation units operate with the following current settings, which may affect stimulation effects differently, depending on the setting:
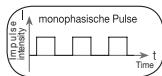
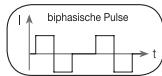
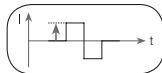
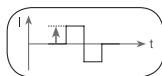
11.1 Impulse shape
This describes the time function of the electrical impulse.
It distinguishes between monophasic and biphasic pulse currents. In monophasic pulse currents, the current flows in one direction and in biphasic pulse currents the electrical impulse alternates its direction.
The digital EMS/TENS unit only provides biphasic pulse currents as these relieve muscles, cause little muscle fatigue and provide safer application.
11.2 Impulse frequency
The frequency indicates the number of individual impulses each second and is given in Hz (Hertz). It can be calculated by determining the cyclic value for the
time period. The relevant frequency determines which types of muscle fibres react favourably. Slow-reacting fibres react more easily to lower impulse frequencies up to 15Hz , whereas fast-reacting fibres only respond from approximately 35Hz onwards.
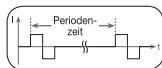
Impulses of approx. 45 - 70Hz are linked with constant tension in the muscles and quicker fatigue. Higher impulse frequencies are therefore favourable in strength and maximum power training.
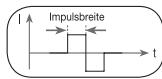
11.3 Impulse width
This indicates the duration of an individual impulse in microseconds. The impulse width therefore determines, among other things, the penetration of the electricity, where usually: larger muscle masses require larger impulse widths.
11.4 Impulse intensity
Setting the intensity levels depends on the individual sensitivity of each user and is determined by a variety of variables, such as site of application, blood circula
tion to the skin, skin thickness and the quality of the electrode contact. The setting used should be effective but should never cause an unpleasant sensation, such as pain, at the site of application. While a gentle tingling indicates sufficient stimulation energy levels, any setting that causes pain should be avoided.
During longer applications it may be necessary to make readjustments due to the adjustment processes over time at the site of application.
11.5 Cycled impulse parameter variation
In many cases it is necessary to cover the overall tissue structure at the site of application by applying several impulse parameters. In the digital EMS/TENS unit, this is achieved by the provided programs, which automatically make a cyclical impulse parameter change. This also prevents individual muscle groups at the site of application being affected by fatigue.
The digital EMS/TENS unit provides sensible default current parameter settings. With this, you can change the impulse intensity at any time during use. For 6 programs you can also set various parameters for stimulation yourself.
12. CLEANING AND STORAGE
Adhesive electrodes
- To ensure that the adhesive electrodes remain adhesive for as long as possible, clean them carefully with a damp, lint-free cloth or clean the underside of the electrodes under lukewarm, running water and pat dry with a lint-free cloth.

Before cleaning with water, remove the connection cables from the electrodes.
- Reapply the electrodes to the carrier foil following treatment.
Cleaning the device
- Remove the batteries from the device before cleaning.
- Clean the device after use with a soft, slightly damp cloth. If it is very dirty, you can also moisten the cloth with a mild soapy solution.
- Do not use any chemical or abrasive cleaning agents.

Ensure that no water enters the device.
Reuse of the device
Once it has been properly prepared, the device can be used again. Preparation includes replacement of the treatment electrodes as well as cleaning of the surface of the device using a cloth moistened with a mild soapy solution.
Storage
- Remove the batteries from the device if you will not be using it for a prolonged period of time. Leaking batteries may damage the device.
- Do not make sharp bends in the connection cables and electrodes.
- Disconnect the connection cables from the electrodes.
- Reapply the electrodes to the carrier foil after use.
- Store the device and accessories in a cool, well-ventilated space.
- Never place any heavy objects on the device.
13. DISPOSAL
The empty, completely flat batteries should be disposed of through specially designated collection boxes, recycling points or electronics retailers. You are legally required to dispose of the batteries.
Note: The codes below are printed on
batteries containing harmful substances: Pb = Battery contains lead, Cd = Battery contains cadmium, Hg = Battery contains mercury.
For environmental reasons, do not dispose of the device in the household waste at the end of its useful life. Dispose of the unit at a suitable local collection or recycling point. Dispose of the device in accordance with EC Directive - WEEE (Waste Electrical and Electronic Equipment). If you have any questions, please contact the local authorities responsible for waste dispo


14. PROBLEMS/SOLUTIONS
The device does not switch when the ON/OFF button is pressed. How to proceed:
(1) Ensure batteries have been inserted correctly and are in contact with the terminals.
(2) Replace batteries, if applicable.
(3) Contact Customer Services.
Electrodes do not adhere to the body. How to proceed:
(1) Clean the adhesive surface of the electrodes using a damp, lint-free cloth. Replace the electrodes if they still do not adhere securely.
(2) Clean the skin prior to any application; do not use skincare lotions or oils prior to treatment. Shaving may increase the life of electrodes.
There is no noticeable stimulation. How to proceed:
(1) Press the ON/OFF button to interrupt the program. Check the connection cables are correctly connected to the electrodes. Ensure the electrodes are in firm contact with the treatment area.
(2) Ensure the connection plug is firmly connected to the device.
(3) Press the ON/OFF button to restart the program.
(4) Check electrode positions and ensure that adhesive electrodes do not overlap.
(5) Gradually increase the impulse intensity.
(6) The batteries are almost empty. Replace the batteries.
The battery symbol is shown. How to proceed:
Replace all batteries.
You have an unpleasant sensation at the electrodes. How to proceed:
(1) The electrodes are not positioned correctly. Check their positions and re-position, if necessary.
(2) The electrodes are worn. This may cause irritated skin as even distribution of the current across the entire area is no longer guaranteed. For this reason, replace the electrodes.
Skin in the treatment area turns red. How to proceed:
Immediately stop treatment and wait until your skin has returned to its normal condition. If the redness is under the electrode and disappears quickly, there is no risk – this is caused by the locally stimulated, increased blood flow.
However, consult your doctor before you continue treatment if the skin irritation persists and this is accompanied by an itchy sensation or inflammation. This may be caused by an allergic reaction to the adhesive surface.
15. REPLACEMENT PARTS AND WEARING PARTS
You can obtain the following replacement parts directly from Customer Services:
| Designation | Item number and/or order number |
| 8 x adhesive electrodes (45 x 45 mm) | Item 661.02 |
| 4 x adhesive electrodes (50 x 100 mm) | Item 661.01 |
16. TECHNICAL SPECIFICATIONS
| Name and model | EM 49 |
| Type | EM 49 |
| Output waveform | Biphasic rectangular pulse |
| Pulse length | 50–450 μs |
| Pulse frequency | 1 – 150 Hz |
| Output voltage | max. 100 Vpp (500 ohm) |
| Output current | max. 200 mApp (500 ohm) |
| Voltage supply | 3 x AAA batteries |
| Treatment time | Adjustable from 5 to 100 minutes |
| Intensity | Adjustable from 0 to 50 |
| Operating conditions | 5°C–40°C (41°F–104°F) at a relative humidity of 40–70% |
| Storage conditions | 0°C - 40°C (32°F - 104°F) at a relative humidity of 0–90% |
| Transport conditions | -25°C- 70°C (-13°F-158°F) at a relative humidity of 0–90% |
| Dimensions | 132 x 63 x 29.5 mm (including belt clip) |
| Weight | 83 g (including belt clip, without batteries), 117 g (including belt clip and batteries) |
| Use Altitude Limit | 3000 m |
| Use Range Atmospheric Pressure | 700 - 1060 hPa |
The serial number is located on the device or in the battery compartment.
Note: If the device is not used according to the instructions specified, perfect functionality cannot be guaranteed!
We reserve the right to make technical changes to improve and develop the product.
This device complies with European standards EN60601-1 and EN60601-1-2 (In accordance with IEC 61000-4-2, IEC 61000-4-3, IEC 61000-4-4,
IEC 61000-4-5, IEC 61000-4-6, IEC 610004-8 and IEC 610004-11) and is subject to special precautionary measures with regard to electromagnetic compatibility. Please note that portable and mobile HF communication systems may interfere with this unit.
More details can be requested from the stated Customer Services address or found at the end of the instructions for use.
This device meets the requirements of European Directive 93/42/EEC for medical products, as well as those of the Medizinproduktegesetz (German Medical Devices Act).
17. NOTES ON ELECTROMAGNETIC COMPATIBILITY
WARNING!
- The device is suitable for use in all environments listed in these instructions for use, including domestic environments.
- The use of the device may be limited in the presence of electromagnetic disturbances. This could result in issues such as error messages or the failure of the display/device.
- Avoid using this device directly next to other devices or stacked on top of other devices, as this could lead to faulty operation. If, however, it is necessary to use the device in the manner stated, this device as well as the other devices must be monitored to ensure they are working properly.
- The use of accessories other than those specified or provided by the manufacturer of this device can lead to an increase in electromagnetic emissions or a decrease in the device's electromagnetic immunity; this can result in faulty operation.
-
Keep portable RF communication devices (including peripheral equipment, such as antenna cables or external antennas) at least 30 cm away from all device parts, including all cables included in delivery. Failure to comply with the above can impair the performance of the device.
-
Failure to comply with the above can impair the performance of the device.
18. WARRANTY/SERVICE
Further information on the guarantee and guarantee conditions can be found in the guarantee leaflet supplied.
FRANÇAIS
Table des matieres
15 programmes TENS
35 programmes EMS
20 programmes MASSAGE
|  | UYARI Yaralanma tehlikelerine veya-SAğlıkınlizla ilgili tehlikere yönelik uyanlar |
|  | DİKKAT Cihazla/aksesuarlyinga ilgili olası hasarlara yönelik güvenlik uyanlar |
|  | Not Önmli bilgilere yönelik not |
|  | Kullanım kılıvuzunu dikkate alın |
| IP22 | 12,5 mm'den��kçaplaki katmaddelerin iceri girmesineXXXXXXXXXXXXXXXXXXXXXXXXXXXXXXXXXXXXXXXXXXXXXXXXXXXXXXXXXXXXXXXXXXXXXXXXXXXXXXXXXXXXXXXXXXXXXXXXXXXXXXXXXXXXXXXXXXXXXXXXXXXXXXXXXXXXXXXXXXXXXXXXXXXXXXXXXXXXXXXXXXXXXXXXXXXXXXXXXXXXXXXXXXXXXXXXXXXXXXXXXXXXXXXXXXXXXXXXXXXXXXXXXXXXXXXXXXXXXXXXXXXXXXXXXXXXXXXXXXXXXXXXXXXXXXXXXXXXXXXXXXXXXXXXXXXXXXXXXXXXXXXXXXXXXXXXXXXXXXXXXXXXXXXXXXXXXXXXXXXXXXXXXXXXXXXXXXXXXXXXXXXXXXXXXXXXXXXXXXXXXXXXXXXXXXXXXXXXXXXXXXXXXXXXXXXXXXXXXXXXXXXXXXXXXXXXXXXXXXXXXXXXXXXXXXXXXXXXXXXXXXXXXXXXXXXXXXXXXXXXXXXXXXXXXXXXXXXXXXXXXXXXXXXXXXXXXXXXXXXXXXXXXXXXXXXXXXXXXXXXXXXXXXXXXXXXXXXXXXXXXXXXXXXXXXXXXXXXXXXXXXXXXXXXXXXXXXXXXXXXXXXXXXXXXXXXXXXXXXXXXXXXXXXXXXXXXXXXXXXXXXXXXXXXXXXXXXXXXXXXXXXXXXXXXXXXXXXXXXXXXXXXXXXXXXXXXXXXXXXXXXXXXXXXXXXXXXXXXXXXXXXXXXXXXXXXXXXXXXXXXXXXXXXXXXXXXXXXXXXXXXXXXXXXXXXXXXXXXXXXXXXXXXXXXXXXXXXXXXXXXXXXY |
15 TENS programi
35 EMS program
20 MASAJ program
BnHMaTeIbHo npOHTaIe daHHyIO uHCTpyKcIIO no npImHeHIO, coXpaHraIte ee IJRA NOcLeyIOU 1oero NcNoJIb3OBAHnI INpeIoCTabJIte dpyrIMOBaTeJIbM BO3MOxHOCTb C Hei O3HaKOMITbcR, e BcERda cLeyIte ee yKa3AHnIe.
1. KOMПЛЕKT NOCTABКИ AKCECCYAPbl
ПоверпгКOMПLEKTHOCTь NOCTaBKNI y6eДNTecb,чTO Ha KapToHNoYynakOBKe HET BHeUHnIX NOBpeXJdHm. Перд ИсПОЛБЗОВАнEM y6eДNTecbВ TOM,чTO npIbOPи erо pIrinaLdEJKHOCTN He IMeIOT BUNIMbIX NOBpeXJdHm.YdaJIaNTe BCE yaNAPKObUHte MaTePnAbl.ПиHaJIuHm COMMEHn He IcPONb3yIte npIbOPи O6paTnTEcB KnpOdaBuN uNn B cepBcHHy cIyXbO no Yka3aHHomy aDpecy.
3ΦΦeKt OT 3JIeKTPoCTMUYIaIIN, KAK npaBnIO, npOraBlaTeTcNocIpePeyIaRPHOrO pIpIMHeHInE. 3JIeKTPoCTMUYIaIINMbIuIe He 3aMeHReT peryIaRPhbI TpeHHrA, a DOnOpIHReT erO.
IOD TENS NOHIMaETcMeTOn 3eKtpuecko CTmUyIuHn HepBoB, OUCyECTBIAEMO uepe3 Koxy.TENS -3TO KINHueCKn Doka3AHnbl, 3f@KeKTHBnH, HEmekIKAmeHTo3Hb, npi npAanBbOM pImHeHIn 6eONaChbM ToD 6op6b6c 6obJIO, Bb3BaHNo PAaJIHyMbI KaftOpamn, NpOxDnIT darn CamOTepaann. BoneTyJHOooie Ne BoJeNODaBnHO
IeJe IeCTBHe IOCTIrAeTcR, KpOME Bcero IpOcero, NyTeM IOnaBLeHnI nepeDaHb 60nIO HEBPAM (Pnp 3OM, npExd EBCero, 6bnAoRaDapr BblCOKoHaCTOTbHIM IMNpylbCaM) INPOCTA BbIeJIeHnA ayTOReHHORO 3HOpDPHnA, KOtOpBly UMeHbJaET YCbTBcHTBeHbHOCTb K 60nI 6bnAoRaDapr CBOeMy JeiCTBnIO HA ZceHtpaBHyIO HEBNHyIO cIeTMy. MeToD hayHo NpOITBePxJDeH nOdyuH e K MeNiunHCKOM yPiMeHeHIO.
Kaknyo klnnueckyo kaptnHy, npi KOTOPoi CEneco06pa3HNo pImmeHHe MeToDa TENS, Heo6xOIMo 0bCsyuMb C IeuaIIMB BpaHOM. Oh daCT Bam TaKke yka3aHnIO nO cAmOTepaINc pImmeHHeM TENS.
TENS Klnnneckn nCnblan n donnyuene nIra cneyuounx oblacte npimHeHna:
- 60JI IN B CnIHe, OCO6eHNO JkaIIObI B O6NaCTN IONcHNUHO N IeHNO OTDeJIOB N03BOHOUHNIKA;
- 60JI B C cytTabax (HaIpIMep, KOJIeHbIX, Ta3O6eIpeHHbIX, IJIeYeBbIX);
HeBpaIrn;
- 601n npm MeHcTpyaunx y XKeHsIN;
- 60JI NOCNE TpaBM ONOPHO-ДВIraTeNbHOro annapaTa;
601n npn HapuueHnX KpoBOO6paueHn;
- prn xpoHnuecknx 6oJIe3HeHHbIX COCTOHRnX pa3HO r poJa.
3NeKtpnuecka CTmmylaqma Mblu (EMS) npedctabnaet coboi shpoko paacnpoctpaehHHy u obuenpn3haHHy MeTOHky, KOtpora Bot Yxhe MHO let nprimeHaeTcB CnoptbHOBn I peaBunltaOHNOH MeDNIHNE. PnI 3aHTnAeCnOPTOM u FNTHecOM EMS TAKKE nCnOJIbEyETC B KaHeCTBe DOnONHENIG K ObUHNO TpeHNPOBKe MYCkynaTpybI, ToO N03BOJAE TPOBICINb pa6oTOcIOcObHocTb ONpeDEHbIX rpynn Mblu, u DoobITbc COOTBeTcBN PrOpONpU INe Ta JEAeMaEBM cTeTcHeckIM napamETpAM. EMS nPrimeHaeTcCB yDMy CEYMa. C ONDH CTOPoHb, 3TA MetOduKa oEcecneuBaet CEeHApBaRHeHoe YKpePLeHne MyCkynaTpybI (TOHNIPUYOee pInmHeHne), a C dpyroT CTOPoHb, c ee NOMOJIbTO Takke MoXHo DOCTNuB paCClaBIAHOero 3fFekTa n ChIXeHnHa naprJXeHnra (PnIMHeHne C celbIO peNaKcaUN).
TOnH3npyUoIIM npImHeHHeM NOHImaETcA:
- TpeHnObKa MyCKyIaTpby IJIЯ NOBBIeHnI BByIOHCINBOCTN W/II
- TpeHnPobKa MycKyaTpybI Dny YkpeJIeHnO npPeJeHbIX MblUc
- ngpII NMbUc C cIeJIbIO DOCTNXeHn XeJaEMbIX pONOpCNI TeLa.
IopnpimHeHnemc celbpo pelaKcaunn IOnHmaeTc:
- peNaKcaZna MblIz dIy ocIa6JIeHn Ix HapJKeHnI;
- yIyUHHeHne COCTOHNrMbIuP npn pnpoRbIeHNrX MbIueHOn yCTaIOCTN;
- yckopene perehepaun MbIu nocne BbICOKnx HaPpy3OK (HaPnMep, nocne Mapafoha).
Blaorapb BCTpoeHHo TexHONm Maccxa, DeiCTBnKOTopo anaIolunHO DeiCTBnHoc HactoJrero Maccxa, TpeHaKeP IraMbIuK JNBO-ta EMS/TENS ChImaet MbIeHoe HanpXeHne n NOMoraet 60pOToBcC MbIeHoo yctanoctbIO.
Pekomehdaunno n0nouohopobAHIO nceuaibbte Tabu, npBBeDenHbte B hactouep ykoBOOCTBE, nomoryt Bam bIbpaT npabInbHoe npimEnHeNE (BCoOTBeTCTBm C 6pbabTaIBaEBIM uactKOM TeJa) n 6blcTPO doCTNhy Heo6xOdMOrO 3ΦΦeKaTa.
Blaoradapn DBym perynipyEmbim KaHanaam TpeHaKepr InyMbUx KINBOTA EMS/TENS no3Bolaret HAcTPOINb INTEHCNBHOCT bIMTNbCOB Ha DBYX o6pa6aTBaEBmBX yAcTKAte Tena, HApPMEp, YTO6blOndOBpeMeHHo CTMMyIPOBaTb 6be CTOPONb NIN 6BJWne yAcTKaTeNA. INNDNduAIBNaH aCtpoKa INTEHCNBHOCTn KaJdORO KAHANA nO3BOLaET Bam OndOBpeMeHHo 6pa6aTBaBbDba pa3JIuNbHX yAcTKaTeNA, YTO no3BOLaET EKO-HOMITB BPEM.
MEPblI PEPDOCTOPOXHOCTN
B nePBbIe MNHyTbI BblIOJIHnIte npOeDpycNJa IINI JEA, TTObI b PekKIX CnyAIX HAcTyIINHeN IBaraJIbHOI peAKUIM (OuSyIeHne cIaBOCTn) He NOIbEprTaBc 6cbI onaChOCTn NOLyUeHnI TRaBM. EcnIOIaBNTc OUsyUeHne CnaBOCTn, HeMeDAJIHoO tKIOUHTe pnp6Op nNoLOXkITe HOrn NOBbIe (npImepHO ha 5-10 MmH).
- He pekomehnyetcnpedbapntelhna o6pa6oTKa koxn jnpnbim Kpemom mnn Ma3bH, 3TO CINbHO yBeJIuHT N3HOC 3JIeKTPoDOb N MoJxET npBecTn K cKaUkam TOKa.
HactoI npnbop He npedHa3Haen DnI nCnoB3OBAHnA DeTbMn IINIOBmC ORaPunHeHHbIMn FIn3NuecknMn, CehOpHbIMn (HaNPnMEp, C OTCyTCTBnEM 60NEBOw YCbCTBnTEJIbHOCTn) INI yMCtBEHbIMn CnOCoBHOCTMa, C HeOCTaTOHbIMn 3HaHnMn INI ONbITOM. NcklIOUHeHne CoCTABnIOT cnyan, KOrDa 3a HmIMn OcUYeCTBnEETcRn HndLekaJnn Hnd3Op INI eCNl OOnyUnn OT BAc hNCTpyKuNN NO nCNOJ3OBAHnIO npNbopa.
- Ecln KJIeIaJc CnOcO6HocTb CAMOKJIeIaIXxCr 3JIeKTPoOB CHINITC, HEmEJIeHHO 3aMeHInTe IN. IcNoJIb3yIte npIbOp TOnJIbKO C HOBIMn CAMOKJIeIaMIMcR 3JIeKTPoAMn. B IpOTINBOM Clyuae HepaBHOMepHOe PnIKJIeNBAHHe CAMOKJIeIaIXxCr 3JIeKTPoOB MoKet NopBeHtB KoKy. 3aMeHInTe 3JIeKTPoDbI He pexke, Yem Upe3 kaxkDbe 20 npImHenHn.
TobpeKdHne
- Pn nauu nn noBpeKdHne HcnoIb3yTe np6op n o6paTntecb K npodabuy nu nO yka3aHHomy aDpcy cepBncHOn cnyk6bl.
- Дя обсесенья зф点点头 наразы пибoga не роняп и не разбраite erо.
- PnpoepeIe npi6Op Ha hauHmE npn3HakOB n3HOca nIO npOBpexDeHNI. Pn HauHmN TAKIN pni3HakOB, a TAKKE ecNI npi6Op icPONb3OBAcN e No Ho nHaNaHeHIO, Heo6XoIMo nepeD oOpePeHbIM erO npimHeHMe O6pATITbcr K npOn3BOJNTeIO nIO npOpaBuY.
Bcnyae depekTOB INI HnOlaIOK B paOte HeMeJIeHNO OTKIO- nIte npI6Op.
HnB KOem Cnyae He nbTaiTeCb CAMoCTOaTeNbHO OTKpbIb N/NIOTpEMOHINPOBaT PnIbOp.PeMOHThIbe paObTb IOnJXHb IpnON3BO-DITbCA TOJIbKO CnyKbO TexNHueCKO NIOpePKN Nl ABTOP30-
BaHbIMTTOPROBIMOprAHIN3aJYMaM.HecobIIOJeHne 3tOro Tpe6oBaHnBEeT Knotepe rapaHTNI.
- I3r0TOBnTeIb He HeceT OTBeTCTBeHHOCTN 3a yUeep6, BbI3BaHnBbI HeKBaINΦnCnPObaHHbIM NII HHeAДJIeKaUIM NcIOnIb3OBAHnEM npu6opa.
- BveDnTe 1teKepe coeHInHeIbHO Ka6eBpa3bEm Ha BerxHne CTOpOHe npi6oPa (Pnc.3).
- He TaHnTe, He nepeKpyuBaIte n He nepeRn6aIte npoBoda (pnc. 4).
i
Pn3aMeHe nIIN 1N3BVeHEni 6bTaapeek Bce Ha-CTpOKn 6bYdT c6pOWeHbl.
7. ПУМЕHEHNE
Yka3aHnK pIpMHeHnIO
- Ecn np6op He nCnOJb3yETcB TeUeHne 1 MNHy-Tbl,TOH aBTOMaTHueCKN OTKIOUaTcR (aBTOMaTNKa OTKIOUeHn).Pn NOBtOPHom BKNIOUeHn Ha KK-3KpaHe NOBITcR bIbOp MeHIO,POsJeHn BB6pAHn PnyHK T MeHIO 6yTe MTgA Tb.
- Ecnn haxaTb Ha donyctmmyo KhoNky, To pa3daCTcK KopOTkn CnHaN, npn HaxaTm Ha HeDOnyctmmyo KhoNky IpO3Byat Dba KopOTKNx CnHana.

Pnc.1
Pnc.2
Pnc.3
Pnc.4
Bbl moxete npepbTa BImyJnH BO HIO MOeHT KpATKm HA JxHaem KhoNkBkBbIK. (nay3a).IJa npOdoJnxHcTmJnEe pa3 hXnMte KhoNk BYkJI. nYcTaHOBnTe jenaemyo INTEHCINBHOCTb IMNpyBa 3aHOBO.
HauaJIO uCNoJIb3OBAHnA
War 1. Bb6epnTe n3 TaBnCBy (cM. pa3dEn «6. O630p npOrpaMM») npO- rpaMMy, coOTBeTCTBHyUOy BaAMm ZeJAM.
War 2. Pa3MeCTIte 3JIeKTPoDbI B HeO6xOJIMMo O6bIaTn (peKOMeHdaCIN no pa3MeUeHIno Cm. pa3JeN «6.4 Yka3aHnno pa3MeUeHIno 3JIeKTPoDob») I nIOkJIIOuHTe IN K YcTPOIcTBY.
Uar 3. Haxmnte KhoNky BkI./BblKl. , Uto6bl BkLIOuNTb npu6op.
Uar 4. HaxaTnem Ha KhoNky MENU nepeiDte B MeHIO TENS / EMS /MASSAGE I NOdTBepDte CBOI BbIOp HaxaTnem KhoNkI ENTER.
War 5.C NOMOZbIO KHOJOK HAcTPOKNI A/V BbIepeNT Heo6xOaIMbIbHOMep IpOgPAMMbI N IOdTBePdITHe HaxATmE HA KhoNkY ENTER. PnI3aNyCke CTImyInpIyUioSe IJeHEnI INTeHCINBHOCTb IMNtIbCa Ch1 nCh2 noMOnAHaHIOvctaHOBLeHa Ha. ImNpyCbI hAnekTPObI noka HeOTnpABIAOTcR.
Uar 6.C NOMOJIbIOJIeBOI INpABOI KHOJOK HAcTPOIKN A/V BbIbEepNTe Heo6XoIMyIO INTEHCUBHOCBt IMNylbCa JIN CH1 INCH2 COOTBETCTBEHNO.HINdkaIg NHTeHCUBHOCTN MmnyIbCa HA INCnPIee I3MeHNTCa COOTBETCYUIMM O6paOM. EcnIpnpramMAHXoITcB Pexime nay3bl, TO INTEHCUBHOCTB He 6yEDet yBeJIuueHa.
① Ośbaṇa nHφopmaζη
Ecnm Bb xotnte BepHybcra BnpdeIyUee MeHIO, HAKMITE KHOJIKY MENU. UdepXnBaA hAnatoi KHONKY ENTER, Bbl MoKTe npOyCTMb OTdJIbHbIe 3tAnbl NaCtpoKn i cpa3y HaaAtb CTImyInpUoOee leHeHne.
Блokировka Khoнok O-
BLOKIOPOBKA KHOJOKI NO3BOJAE TnpEDOTBpaTITb HnpeHamepeHHoe HAKATNE KHOJOK.
1.ДяakTBAuCn6IokPOBKn KHONOK ydepkBaJTe KHOKNy O HaxkatoB TeceHeNe 3 cekHyD, nokaHa dncptnee He noBbTcCIMBOJ.
2.ДядakntBaun6boknpoBkn KhoNOK yapedxNBaTe KhoNkOу HaxaToB TeHeHne 3cekyH, noka Ha dinCnIee He IcYe3HET CIMBOI.
PpnoctaHObKa nCNoJb3ObaHnA
BbIMoKTeIpeBaTbCTMmLyAIOB BJIIO6OIMMeHT KpaTKMMAHkaTMeM KHOKNBKL./BbIKL. (nay3a).ДЯпpoJIoJKeHЯCTMmYLIeNNe eue pa3 haxMInTe KHOKNy BKL./BbIKL. U yctaHOBInTe JekaeMyIO INTHECMBHOCTb IMnyIbca 3aHOBO.
8. OB3OP PPOPTPAMM
Втенихердя мьшц кивota EMS/TENS BC tropoeho 70 nporpaMM:
15 nporpamm TENS,
35 nporpaMM EMS,
20 nporpaMM maccka.
ДяВСЕХпграмМоЖнHЯСТРОЛБИNTEHCSBHOCTbIMNPyJIbCaO6Ox KaHaJIOB.
Kpome toro, B nporpaammax TENS 13-15 n B nporpaammax EMS 33-35 MoxHo HAcTpoNTb pa3nHbIe npaMeTpbl, UTo6bl OTpepyuNpuBaT bΦΦeKTmbHOCTb CTmUyIaMn B 3aBcIMOCtN OT MeCTa PpImHeHn PnIb6opa.
8.1 Ta6JIuca nporpaMM TENS
YdaJIeHneФyHKcIMN Doctor's Function
Дяразблорови пьбора и дя поуменя doctура К дугим порогамм Удрхьай Teнжато кноку Ch2 VВ teченige 5 cekynd, INTEHCBHOCt b Nmynbca Ch1 n Ch2 npn 3tOM yctahOBHTcRa Ha qU. YdaneHne phukun Doctor's Function noTBePckdaetcK opotkM cnHanom.
PamrB npoceyp
B EM49 0to6paxaetcA DInTeNbHocTb npOeDpybl. TTo6bl nepeiTu B naMByt npOeDpy, BKIOuHTe npI6bp HaxaTIEM KHOKN «BKn./BbIK.」 UyepXnBaIte np6bl.5ceKYNd KHOKNy Ch2 A5Ha dncNlee NoarBITcR npDeIduyaa DInTeNbHocTb npOeDpybl. BexXnE 2 uΦppb o63NaHOT MInHybl, HIXNHe - cAsbl. YTo6bl cbopCtB DInTeNbHocTb npOeDpybl, UyepXnBaIte KHOKN Ch2 V HaxaTOB TEChE 5 ceKYNd. Ppi 3aMeHe 6ataapeek NaMByt npOeDpyc b6OpCtCAB abOMATUeCKn. HaxmNTe KHOKN «MeHNO», TTo6bl nepeTI K BbIOpny pOrpAMM, INN BkJIIOHUTe np6Op. INHΦopMaZI: INΦopMaZI: naMByt npOeDpy HeBO3MOxHO Bb3BaTb, ecIN akTbIPOBaHaФyHKUma Doctor's Function.
11. NAPAMETPBI TOKAK
11.4 INHTeHCNBHOCTb MMnylbca
CTeHb HHTeHCNBHOCTn HAcTpaNBAETc INHINBUNaJIbHO B COOTBeTCTBm C Cy6BeKTHBbIMN OUyUHeHINM NOLb3ObaTeI NOppeJeTcraPAnuHbIMN BeINuHNAM, TAKMn KAK 30Ha npImeHEnr, Kpo
BOCHA6XHE KOKNI, TOJIUNHAKOKNI KAACTBOKHOKTAKTOB 3NEKTPDOB. IpaKTtuecknA HACTPOJKA MOKeT 6bITb 3ΦeKNTBHOIN, ODAKH OAn HE DoJNkHA B3bBAbTaH NEPNJrTHbIe OUySeHHa, NaHPMep 60NHa yuCACTKe pImMeHeHH. JERKoe nokalbBaHne rOBOpHT OdoCTaTOHNO3EPRn
CTMMyIaI, HO cIeNyET I36eRaTb HAcTpoE,K, BblBaIOxix 60JIeBbIE OUyueHn.
Пи рюдолжпельном пименени пибopa можетnotpeбоваьсяпегон actpoika BClendTBne поцеса adanTaци на учадке пимен。
11.5 BapnaHTbI npaMeTPOB mnylba, ynpaBnaeMbIe zKNaMn
B HekeToPbIx cnyaX Heo6xOJIMMo 3a Cuet NcOnIb3ObaHnna HeckOJIbKn npametpoB ImIyIbCa 06cneNHTbc 9eIOCTHOCTb CTpyKtyp TKAHn Ha yUactKe pImmeHEnHa. B TpeNaHepe EMS/TENS 3TO npOcxOJNT 3a CHTo, YTO mEIOUeCe IPOpramMbI abTOMaTneCKn BblONHIAOT UIKINuCeoe KImeHEnHe npametpoB ImIyIbCa. 3TO nO3BoAET peDjOTBaPTNb yctanoCTb OTdJIbIXrpynn MbIuC B MecTe npImMeHEnH.
B Tpehaxepe IЯ Mblu Jxmbota EMS/TENS cyuectbyot npedbapnteHbIhne HAcTPOKI npaAMETPOB ToKa. BbI bIIObe Bpem MoKTe I3MeHITb INTEHCINBHOCTb IMNpyIbCa BO Bpem pIIMHeHn. Kpome TOrO, B 6 nporpaamMMAoMOXHO caMOCTOReIbHO onPepeJIHTb paJIInHbIe npaMeTpbI dy CTmMyJznn.
12. YXODI XPAHEHNE
CamokJIeJIeNecs3JIeKtpoDbl
- YTo6bI o6eNeHTb a4re3HIO 3JNEKTPOoB Ha MaKcMmAbHo DInTEnbHbI cPoK, octopoXHO OOnuAte 3JNEKTPOdb INaJxHO CAnfETKO B63 BOPCa INI npOMbIAuTE HnKHNIO uactb 3JNEKTPOoB IOd TENIOI npTOUHO BOOIN PocCyUInTe IN, PpOMOKHyB CaNfETKO 6e3 BOpca.

Ipeed ouichtkoB BOe OTCoeDInHte KaebnOt 3neKtpoDB.
B 6atapekax TOKCHHbIX BEUcETB: Pb = 6atapeiKa coepjKT CBNHeC, Cd = 6atapeiKa coepjNT KaDMn, Hg = 6atapeiKa coepjNT pTyTb.
B INTEpecax oxpaHbI OkpykaIoUeI cpebl KaTEROpuYeCKn 3aNpeuaTeC BbIbpcabIBaTb npi6bp NO 3aBePeHm Cpoka erO cnyKbI BMeCTc 6 bITobBIM OTXoJam. YTNIN3aJna DOnkHa PPOIN3BOIDTBCa YEpe3 COOTBETCTByIOUme nyHKtB


6bopa B Baawei cTpaHe. PnB6op cIeJy TynIm3nOpaBt coNlacHO DnepKTHBE EC no OTOxOAM anEKNPTpuNcEsKOro n3NeKTPoHOrO o6OpYDoBAHn - WEEE (Waste Electrical and Electronic Equipment). B cnUyae BoNPocOB o6paaiTeB B MeCTHyO KOMMHyAaBHyO cnLyXbO, OTBETCBEHHyO 3a yTynIm3aLHIO OTxOob.
14. HENOJIADKN/PELISEHNE
Пибор He BKJIIOuaeTcHЯKaTnem KHOKNBKJ./BblKJI. .То DeIaTb?
(1) Y6eIntecb, yTo 6aTaapeKn yctaHOBJIeHb I npaBnJIbHO.
(2)Прин Heo6xOДIMOCtN 3aMeHnte 6aTapeKn.
(3) 06paTnteCb B cepBnchNo cnjxk6y.
3NeKtpoDbI OTOeINHIAOTc8 OTena. 7To deNaTb?
15. 3APACHbIE YACTN IN DETAJIN, NOdBEPXHEHHbIE BbICTPOMY N3HOCY
B cepBnCHoI cnyk6e Bbl moKTe 3aKa3aTb cIeNyUcHne 3aIacHbI eTaln.
3TOT npn60op COOTBeTCTByet EbponeNckIM cTaHdaptam EN60601-1 n EN60601-1-2 (CooTBeTCTBME cTaHdaptam IEC 61000-4-2, IEC 61000-4-3, IEC 61000-4-4, IEC 61000-4-5, IEC 61000-4-6, IEC 61000-4-8, IEC 61000-4-9, IEC 61000-4-10, IEC 61000-4-11, IEC 61000-4-12, IEC 61000-4-13, IEC 61000-4-14, IEC 61000-4-15, IEC 61000-4-16, IEC 61000-4-17, IEC 61000-4-18, IEC 61000-4-19, IEC 61000-4-20, IEC 61000-4-21, IEC 61000-4-22, IEC 61000-4-23, IEC 61000-4-24, IEC 61000-4-25, IEC 61000-4-26, IEC 61000-4-27, IEC 61000-4-28, IEC 61000-4-29, IEC 61000-4-30, IEC 61000-4-31, IEC 61000-4-32, IEC 61000-4-33, IEC 61000-4-34, IEC 61000-4-35, IEC 61000-4-36, IEC 61000-4-37, IEC 61000-4-38, IEC 61000-4-39, IEC 61000-4-40, IEC 61000-4-41, IEC 61000-4-42, IEC 61000-4-43, IEC 61000-4-44, IEC 61000-4-45, IEC 61000-4-46, IEC 61000-4-47, IEC 61000-4-48, IEC 61000-4-49, IEC 61
Bollee TochIbe daHbIe MoKHO 3aPocnTb no yKa3aHHOMy aDpeCy cepBnCHOn Cnyk6bl Nn HaHTN B KOHc Ne HCTpyKcMn No pImMeHEnIO.
18. GWARANCJA/SERWIS