USER MANUAL Destructeur de documents HAMA
Operating Instructions
Bedienungsanleitung
Mode d'emploi
PykoBoCTBO nO kcnIyataun
PbKOBOIcTBo 3aO6cJyKBaHe
O8nyieXpnonc
Kullanma kilavuzu
Käytööhje
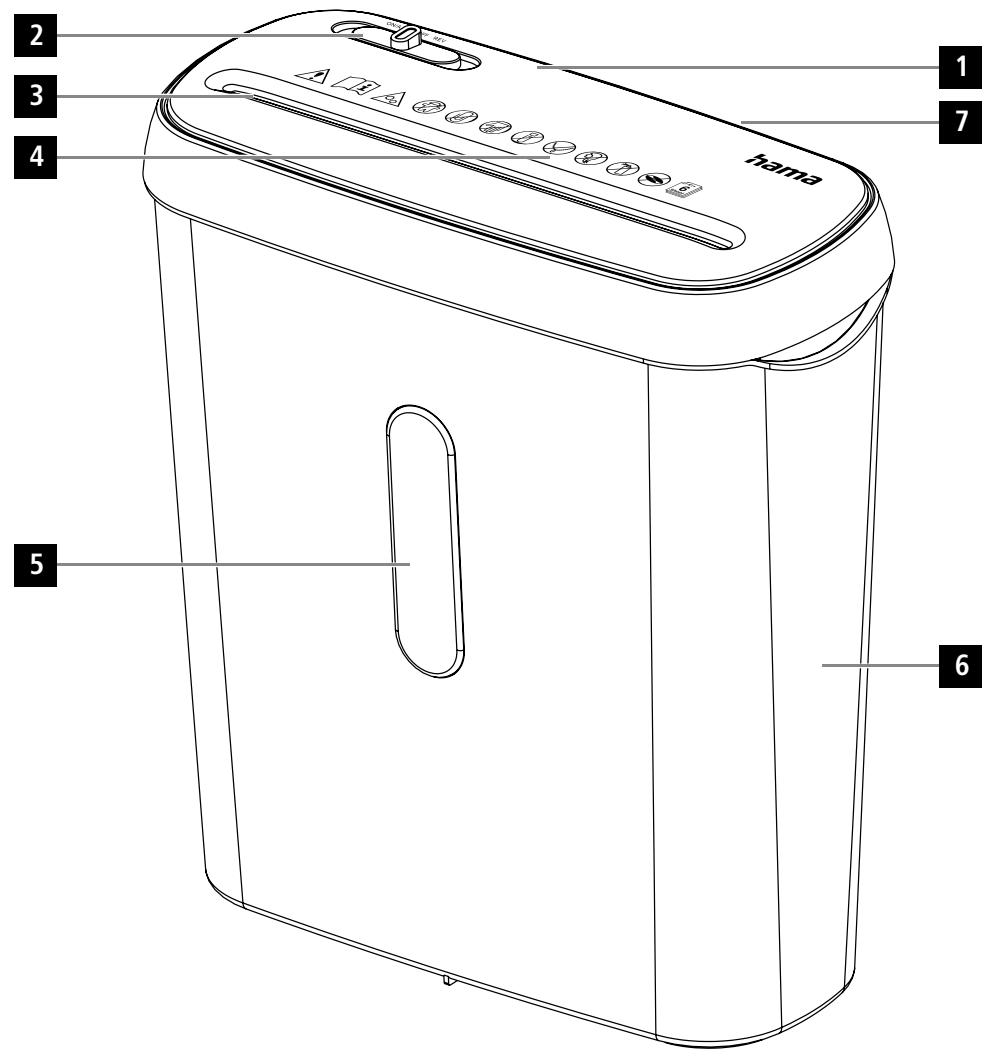
Machine setup
- Device head
- Slider switch
- Paper intake shaft
- Warning symbols
- Viewing window
- Waste container
- Connecting cable (back of the device)
1. Introduction
1.1 Foreword
Thank you for choosing a Hama product.
Take your time and read the following instructions and information completely. Please keep these instructions in a safe place for future reference. If you sell the device, please pass these operating instructions on to the new owner.
Note - Importance of the operating instructions

Failure to observe the operating instructions when using the product constitutes incorrect use or wilful misuse and is not permitted.
Note

This device is a new, unused product.
Any cutting residue present may have been left over from quality assurance tests during production.
1.2 Explanation of warning symbols and notes
Risk of electric shock

This symbol indicates a risk of electric shock from touching product parts carrying hazardous voltage.
Warning

This symbol is used to indicate safety instructions or to draw your attention to specific hazards and risks.
Note

This symbol is used to indicate additional information or important notes.
1.3 Package contents
"Basic S6" Shredder
These operating instructions
2. Safety
2.1 Correct use
- The product is intended for private, non-commercial use only.
- Use the product only for the intended purpose.
- The product is intended only for use inside buildings.
- Protect the product from dirt, moisture and overheating and use it in dry rooms only.
- Do not use the product in the immediate vicinity of heaters, other heat sources or in direct sunlight.
- Do not use the product in a damp environment and avoid splashing water.
- Do not operate the product outside the power limits specified in the technical data.
- Do not operate the product continuously, as it is not designed for this.
- Do not use the product in areas in which electronic products are not permitted.
- Do not drop the product and do not expose it to any major shocks.
- This product is not intended for use by persons, including children, with limited physical, sensory or mental abilities or lacking in experience or knowledge, unless they are supervised by a person responsible for their safety or have been instructed on how to use the product.
- As with all electrical products, this device should be kept out of the reach of children.
- Keep the packaging material out of the reach of children due to the risk of suffocation.
- Dispose of packaging material immediately in accordance with the locally applicable regulations.
- Do not modify the product in any way. Doing so voids the warranty.
Only use the article under moderate climatic conditions.
Always pull directly on the plug when disconnecting the cable, never on the cable itself.

Note
The product is only intended for volumes generated by households.
Warning
Any use is permitted only with the paper container provided.

The following materials may and may NOT be shredded:
| Paper | ✓ |
| Paper with staples | ✓ |
| Magnetic strip and ID chip cards | × |
| CDs, DVDs, Blu-Rays | × |
| Continuous paper, sticky labels, slides, newspaper, cardboard, paper clips, laminate, plastic (with the exception of the objects stated earlier) | × |
2.2 Basic safety instructions
Please note the following safety instructions in order to use the device safely.
- Check the device before use for any visible external damage. Do not put a damaged device into operation.
- People who, as a result of their physical, mental or motor capacities, are unable to operate the device safely must only use the device under supervision or after instruction by a responsible person.
- Faulty components must only be replaced with original spare parts. Only these parts are guaranteed to meet the required safety standards.
- Protect the device against moisture and the penetration of liquids or objects. In the event of contact with liquid, disconnect the device from the power supply immediately.

Warning - risk of cutting on the cutting rollers
Do not touch the cutting rollers.

Risk of electric shock
- Do not open the device or continue to operate it if it becomes damaged.
- Do not use the product if the AC adapter, adapter cable or power cable is damaged.
- Do not attempt to service or repair the product yourself. Leave any and all service work to qualified experts.
2.3 Explanation of symbols used on the product label
Warning - risk of injury

Note the warning symbols in order to avoid injuries or damage to the device.
| General warning symbol |
| Before commissioning, read the enclosed operating instructions.
You must comply with the safety instructions at all times. |
| ·This device is not intended for use by children.
·Avoid touching the intake opening with hands, clothing or hair.
·Unplug the device if it is not going to be used for a prolonged period. |
| Children must be supervised when using the device. |
| Do not insert paper clips into the intake shaft. |
| Do not reach into the intake shaft. |
| Keep clothing away from the intake shaft. |
| Keep jewellery, e.g. necklaces, away from the intake shaft. |
| Keep hair away from the intake shaft. |
| Do not use any aerosol products on or near the device. |
| Do not feed CDs/DVDs into the feed shaft. |
| Insert no more than 6 sheets of paper at any one time into the intake shaft (see 7. Technical Data). |
3. Installation / Setup
Warning
- Only operate the product from a socket that has been approved for the device. The socket must be installed close to the product and must be easily accessible.
- Disconnect the product from the power supply using the On/Off switch - if this is not available, unplug the power cord from the socket.
- If using a multi-socket power strip, make sure that the total power consumption of all connected devices does not exceed the power strip's maximum throughput rating.
- If you will not be using the product for a prolonged period, disconnect it from mains power.

Note

4. Operation

Note
- Be aware that the thickness of paper increases when it is folded, leading to the device's maximum page capacity being exceeded.
Always wait until one cutting operation is finished before starting the next one.
- Do not use the device continuously for more than 2 minutes at a time.
- Empty the container regularly in order to avoid damaging the device.
4.1 Switching the device on
- Move the operating switch (2) to the "On/Auto" position.
The device is now ready for use.
4.2 Switching the device off
- Move the operating switch (2) to the "Off" position.
4.3 Shredding paper
- Insert the paper into the centre of the intake shaft (3). The cutting rollers switch on automatically.
- Let go of the paper. Once the cutting process is complete, the device switches itself off again.
4.4 Forwards / backwards mode

Note
These modes are designed to release any blockages of the cutting mechanism.
- Move the slider switch (2) to the "REV" position. The rollers on the cutting mechanism now rotate in the reverse direction.
- Move the slider switch (2) alternately to the "ON/AUTO" position and the "REV" position. Repeat this process around three times.
- Then switch the device off - as described in 4.2 Switching the device off - and disconnect the mains plug.
- Remove the blocked cut material carefully from the intake shaft (3).
- Reconnect the device - as described in 3. Installation/Setup - to the power supply.
5. Care and Maintenance
Danger - risk of death from electric shock

Disconnect the mains plug from the socket before starting any cleaning work.
Warning - risk of cutting on the cutting rollers
Do not touch the cutting rollers.

Warning - damage to the device from moisture
Ensure, when cleaning, that no moisture penetrates the device in order to avoid irreparable damage to it.

5.1 Emptying the container
- Switch the device off - as described in 4.2 Switching the device off - and disconnect the mains plug.
- Lift the device head (1) off the waste container (6).
Empty the container.
- Place the device head (1) back on the waste container (6).
- Reconnect the device - as described in 3. Installation/Setup - to the power supply.
5.2 Cleaning the device
- Switch the device off - as described in 4.2 Switching the device off - and disconnect the mains plug.
- Clean the device with a dry cloth. In cases of heavy soiling, the cloth can be dampened a little.
- Allow the device to dry completely afterwards.
- Reconnect the device - as described in 3. Installation/Setup - to the power supply.
5.3 Cleaning / oiling the cutting rollers

Note
- Oil the cutting rollers after each emptying of the waste paper basket in order to prolong the shredder's service life.
- You can find an appropriate selection of cleaning products at www.hama.com.
- Switch the device on - as described in 4.1 Switching the device on.
5.3.1 Cleaning with Hama cleaners for shredders (item number: 113820)
- Apply the Hama cleaner for shredders (item number: 113820) in several strips onto a piece of DIN A4-size paper.
- Insert the paper into the centre of the intake shaft (3). The cutting rollers switch on automatically.
- Once the cutting process is complete, the device is ready for operation again.
5.3.2 Cleaning with cleaning paper
- Insert the cleaning paper into the centre of the intake shaft (3). The cutting rollers switch on automatically.
- Once the cutting process is complete, the device is ready for operation again.
6. Troubleshooting
| Error | Possible cause | Remedy |
| The cutting rollers do not switch on automatically when material to be shredded is inserted. | The operating switch (2) is in the “OFF” position. | Move the slider switch (2) to the “ON/AUTO” position. |
| The connecting cable (7) is not connected correctly. | Ensure that the mains plug is in the mains socket. |
| The socket is not live. | Check the domestic fuses. |
| The device is faulty. | Notify Customer Services. |
| The device switches itself off after a prolonged period of use and cannot be switched back on. | The device has become too hot. | Switch the device off and allow it to cool down for at least 25 minutes. |
7. Technical data
| Input voltage | 220-240 V~ |
| Mains Frequency | 50 Hz |
| Max. power consumption | 150 W |
| Dimensions (W x H x D) | \( {28.5} \times {32.2} \times {13.5}\mathrm{\;{cm}} \) |
| Weight (net) | 1580 g |
| Weight (gross) | 1880 g |
| Basket capacity for paper | 8 litres |
| Max. noise level | 70 dB |
| Max. cutting performance - paper (70 gsm) | 7 sheets (DIN A4 paper)* |
| Max. cutting performance - paper (80 gsm) | 6 sheets (DIN A4 paper)* |
| Max. cutting speed | 2.8 m/minute |
| Max. Feed Width (Paper) | 220 mm |
| Cutting Size (Paper) | 6 mm |
| Max. constant operation time | 2 minutes |
| Nominal idle period | min. 25 minutes |
| Protection class (as per DIN 66399) | 1 |
| Safety levels (as per DIN 66399) | P-2 |
- Thicker paper, moisture or any voltage other than that permitted may reduce the performance.
8. Warranty Disclaimer
All of the technical information, data and instructions regarding operation contained in these operating instructions was up to date at the time of printing and is provided based on previous experience and to the best of our knowledge.
Hama GmbH & Co KG assumes no liability and provides no warranty for damage resulting from improper installation/mounting, improper use of the product or from failure to observe the operating instructions and/or safety notes.
Maschinenaufbau
4.4 Peximblpa60tbi"Bnpeid/na3ad"

Yka3aHne
3Tn pekmbl pa60bI heo6xOaMbI Ira pa36loKpOBK pe3aJbHOrO yctpoCTBA.
- PiepeBedeatne NaohyckbuknepeKnochayte (2) b noNoxekeneve. RAVKnE pe3aHbNHO rycptOHaHnAHTN BPaaatcLbR a BOphATM HaupanBaHneJee
- Пелевские поларноюковский посяковскан (2) поочередно в полесенке BKJI/ABTO и полесенке REV. Посторпг поочесу паза.
3ATEM BlyKnoHHTe pRbO, KAKONCAHO BpaZdEe 4.2 BkKnOChENHe pN6bOpa, HnBKNBeKTE UTeKep HpOETKn.
- Octopoxho ydaJIte 3aCtprBIme o6pe3kn n3 aIgpy3OuHOro OTbepctn (3).
- Choba noKaJnOHTe pRbOp, KaK OTHcAHO B YNKe 3. UCTaHOBa/KOHCTpyKUHa —O
- 3NeKTPOPTAHINEM.
5. Texnueckoe o6cnyxnbAHne uyOd
Onacno-onacnoctbIyJxu3HnBcIeCTBHe npaKeHnA 3NeKTPnueCekm TOKOM
IpeJn HauJIOM ONUCTKN I3BVeKNTe WTeKeP n3 po3eTKN.
Ipeynpexkdenne - onaocnctb nopera o peraalbhe balcn
He kacaiTecb pe3aIbHbIX BAJIKOB.
Pnpnepnckdne Hnnpbopa BcndctBnB
Bou 63e6zhe HamebopatMORO nobpezheny y6edntecb, TTO pno OHCTke B npibop He noIpaada BoJa.
5.1 Pa3rpy3ka konTeHepa
- BbKIOHIOITE npri6Op, kak oniCaHO Bpa3aIe 4.2 BbKIOHIOEne npri6Opa, nB3JIeKIOITE sUteKep 3poETKn.
- CHIMMTE TOLOBHYOACTb np60pa (1) cKo3HbI dIy Mycopa (6).
Pa3rpy3nte KOnTeHep.
BHObYcTahOBnTe rOJIOBHyIO qAChI npi6opa (1) Ha KOp3mHy dIy Mycopa (6).
- Choba no3kno3hve pnp6b, KaOKOniKaH BOYKHe 3. YcTahOBka/KOHCTpyKUa - cIeKpOtniAHTNEM.
5.2 Ouicstka npn6opa
- BbKIOHIOITE pRi6Op, Ka onioCaHO Bpa3aIe 4.2 BbKIOHIOEne pRi6Opa, INB3JIeKOEITE sUHTeKp INP3OeTK.
• OHNCTREπp60cb ycuδn CAFETKo.Πρι ΣινΙΟΜ 3aŋργαΗΝι Σcβκτη KMy ΜΟχHo cIeKra yBλακxHbT.
JaTe npi60py noHIOCTbO BbICOXHyTb.
- Choba no3, kno3oHpe pno6p, KaO oniKaHO B yNkHe 3. YctaONbKa/OKhCTpyKUa - cIeKpnTnAHTNIEM.
5.3 OuCTKa/cm3ka pe3aJIbHbIX BaIKOB
Yka3aHne
T0b6 npDnIbCpO cnKb6BpeEepa, C3Ma3BaJyPe 3ePaJIbHbA BAnhN oceKaJdO p3aRyPcKoKoTHepeApE for OTOO.
BbOpoIPOIOXIOAUXIXNCHTIAUXIXCpeCTBMOKHOHNIHcAITE www.hama.com.
- Bклочиприбор, кak onicanHO pa3dene 4.1 Bклоченe np6opa
5.3.1 Ouicstka ouicnttelem Hama dIy wpeepob (Homep apTikyna: 113820)
- Hanaeche Tchnttienb Hama nuipepepob (Homep aptkynka: 113820) Heckoibkmn nooncama B haymayd oopmat DIN A4.
BCTaMbte BcMBy no cHTpy B aTgpyoHoe O bTePctne (3). Pe3aMbte Bnank A botamATmeccky KbIIOhCATO.
- Поссе завершени поцесca pe3kn пибор сюва ratobк pa6oTe.
5.3.2 OuNTKa c 6yMaor dIa OUcTkn
Bactbte BGYMAYO OHNCKNO CEHTPBY R3aqrpyoHoe OTBEPCHE (3).Pe3aJIbHe bANIK AOTAMOTHECNI BKHOATAC.
- Посе заразшени поцесca peЗк ппбор сюва ротов к рабote.
6. Uctpaehne Oun6ok
6. OCTpaHbAhe Ha Heu3npaBHOCTM
| Héniэравноct | Bbможин prсчина | Остраване |
| Рекшпite валяп и ce Bклочат AVOTMЛТИСод поставлие на Материма за рядан. | Ураллвашиитпөвклочатe(2)е hy poшни "OFF". | Пос abstete рөвклочатe(2)Вpoшни "ON/AUTO". |
| Сврлбашиит пrosовдник (7)Ne e сврлзанправлио. | Уberете ce, Yeцencьт e noctabenв контакta. |
| Контакт bte Н ecгигура нарlexенile. | Порobерete рениasticsпеспе hyжлишето. |
| Урдь t e Deфekten. | Свржete ce сcentыраза за облухвае на Клиенти. |
| Урдь tc NeЗклоча в сад по-дыга улоготба и поsedе не моче да се Bклочи. | Урдь tc ce h agrоpecилтБврде Mного. | Изκлочete ур dedи и go оставета за охлadiи за най-малко 25 минутii. |
7. TexHHueckn daHHN
| ВхODно наразмен�es | 220 - 240 V~ |
| Мразкова чебота | 50 Hz |
| маск. консумашия | 150 W |
| Разmersи (Ш × В × Д) | 28,5 x 32,2 x 13,5 cm |
| Тergло (нето) | 1580 g |
| Тergло (бportо) | 1880 g |
| Овем на кочнице за:xар'tия | 8 литра |
| маск. НИВО на Шу'm | 70 dB |
| маск. КалачтET на рязANE на:xар'tия (70 g/m²) | 7 ліста (хар'tия DIN A4)* |
| маск. КалачтET на рязANE на:xар'tия (80 g/m²) | 6 ліста (хар'tия DIN A4)* |
| маск. СКорOST на рязANE | 2,8 m/MinHytsa |
| маск. Шірінă за поставе на:xар'tия | 220 mm |
| разmersи на рязANEхар'tия | 6 mm |
| маск. Вера'm на раobota в 퍼pezьсат раoboten рezим | 2 Мініту |
| Номинално Вера'm за постуka | пініе 25 Мініту |
| Клас на зашита (сыласno DIN 66399) | 1 |
| Нова на бezoplachnot (сыласno DIN 66399) | P-2 |
*Plo-Debena Xaptrn, Bnara IIN PAna PaniHNO OT OONYCTMOTHO HANPEXHENMOrAT Da HAMJRT MOUHOCHTA.
8.ИЗкlioуbaheHaOTROBOPHOCT
BcNtHbCbDpXaJIeCEBTOBAyIyTbAbe3aObCnJyBaBeaTeXuHcEckmDetaJIIN,daHNHmYkaa3Ha 3aObCnJyBaHeToCBOTcTBaHTaNaOpNCeIHaTaBepcPnOtOEHATBaHEToHCaBa3aataHbAoDCeTaAHn HOnITnIOH3aHnH.
Hama GmbH & Co KG He noema OTOBOPBONCTN ha ranaparma 3 na Obepeidn, KOOTCA pezytntat ot Hneparilna Hmctaianla, MoTaNk h nyotpeba Ha npOyka tNt o HneBaahane yh nTbtaehto 3 aobcnykBaene w/nniHa yka3aaHnita 3a beOnenacHoct.
86652 Monheim/Germany
Service & Support

www.hama.com

+49 9091 502-0


C E